
Thanks for your feedback.
Collaboration restrictions for Webex Meetings in Control Hub
 Feedback?
Overview
You can restrict all users from joining meetings outside your organization, or restrict access to certain in-meeting features to make sure that users follow your organization's policies. When users try to use a disabled feature, an indicator appears to let them know about the restriction set by the organization.
To ensure security, we recommend applying restrictions to your browsers and all your devices.
Collaboration restrictions only support Webex Meetings and Webex Webinars. These restrictions don't apply to Webex Events (classic), Webex Training, and Webex Support.
These settings apply only to users who are on the Webex Meetings client version 42.3 or higher and Webex App client version 43.6 or higher.
Users can bypass these restrictions by joining internal and external meetings with their personal email addresses, or as guests. To avoid users bypassing these restrictions, follow the steps in Restrict Collaboration Features for Windows, Mac, Android, and iOS devices, and Chrome and Edge web browsers to add a token to company devices to make sure that accounts used with the devices follow the restrictions set by your organization.
When applying collaboration restrictions:
- If the user logs in with a different organization ID from the registry, Control Hub follows the most restrictive policy. Both the user policy and the organization policy are checked.
- If the user logs in with the same organization ID in the registry, Control Hub follows the logged-in user’s policy.
Collaboration restrictions at a group or user level
To set up policies for specific groups or on a per-user basis instead of the whole organization, create a meetings settings templates.
Allow or block external users from joining meetings in your organization
You can allow or block users outside of your organization from joining meetings hosted by users in your organization.
| 1 |
Sign in to Control Hub. |
| 2 |
Go to . |
| 3 |
Under Meetings, select one of the following next to Internal:
|
| 4 |
If you selected Allow external users with approved email domains, enter an approved email domain and click Add. You can also toggle Apply these settings to Personal Room Meetings only on. |
| 5 |
If you selected Block external users with selected email domains, enter an email domain to block external users and click Add. You can also toggle Apply this configuration to Personal Room Meetings only on. |
When you block users from joining external meetings, they can't join meetings that are hosted from Webex sites outside of your organization. But you can allow users to join meetings on certain Webex sites, by adding those Webex sites to an approved list setting.
| 1 |
Sign in to Control Hub. |
| 2 |
Go to . |
| 3 |
Under Meetings, select one of the following next to External:
|
| 4 |
If you selected Allow approved external sites, enter a Webex sitename and click Add. |
| 5 |
If you selected Block selected external sites, enter the Webex sites you wish to block and click Add to enforce the restriction. |
What to do next
Restrict collaboration features in Webex Meetings
These settings apply to users joining internal and external meetings. If you want to restrict your in-meeting features, then you can create and use a custom session type or a meeting settings template.
Session types support only internal meeting policies. Session types are applicable only when the user is the meeting host.
Meeting settings templates support internal and external meeting policies. Meeting settings templates are applicable when the user is the meeting host or participant.
When a host schedules a meeting, the host’s meeting settings template controls the availability of features during that meeting. If the host has a feature turned off, that feature is disabled for all participants in the meeting. If the host has a feature turned on, the feature is enabled for the meeting, but individual participants’ ability to use the feature depends on their own meeting settings.
| 1 |
Sign in to Control Hub. | |||||||||||||||||||||||||||||||||||||||||||||||||||||||||||||||||||||||||||||||||||||||
| 2 |
Go to . | |||||||||||||||||||||||||||||||||||||||||||||||||||||||||||||||||||||||||||||||||||||||
| 3 |
Turn features on or off for users during internal or external meetings: Persistent space meetings—Allows you to turn on Allow persistent meetings for spaces. Breakout sessions
Collaboration tools
In meeting
Recording
Remote control
Sharing
Telephony
Video
Recording downloads
Recording links
Recording link expiration
Settings override
Webex Meeting lobbies
|
Restrict collaboration features for Windows, Mac, Linux, Android, and iOS devices, and Chrome and Edge web browsers
If you want to restrict these collaboration settings devices in your organization, you can edit the system files so that those settings apply to anyone who uses the device to join a meeting outside your organization.
To do this, you have to first find and copy your organization ID in Control Hub. After getting the organization ID, follow the steps that apply to the devices that you want to edit.
Make sure to lock the organization ID in the registry so users can't change it themselves. If users change the organization ID, then the collaboration restrictions won't apply to their devices.
To ensure security, we recommend applying restrictions to your browsers and all your devices.
| 1 |
Sign in to Control Hub, and go to . |
| 2 |
Click the Copy icon in the Organization ID field. |
You can choose from three options to set up collaboration feature restrictions for Windows devices:
-
Configure manually using a registry value—You can manually edit specific devices by adding the organization ID to the registry:
-
Open the registry and browse to the context where you want to apply this policy. One of:
-
HKEY_CURRENT_USER\SOFTWARE\Policies\CiscoWebex\ -
HKEY_LOCAL_MACHINE\SOFTWARE\Policies\CiscoWebex\
-
- Create a new string value called
OrganizationID. - Right-click the new value and then Modify...
- Paste the organization ID in the Value data of the new string.
-
-
Configure using a Group Policy template—You can import a Group Policy administrative template (.adm) to apply the organization ID to the same registry values as above.
-
Configure using an MSI Installation—You can run a command to install webexapp.msi using the organization ID to edit this registry value:
HKEY_LOCAL_MACHINE\SOFTWARE\WOW6432Node\Webex\Policies\OrganizationID.
Configure using registry keys
-
Open the Registry Editor.
-
Add the organization ID to one of the following registry values:
-
HKEY_CURRENT_USER\SOFTWARE\Policies\CiscoWebex\OrganizationID -
HKEY_LOCAL_MACHINE\SOFTWARE\Policies\CiscoWebex\OrganizationID
-
Configure using a Group Policy template
-
Import an
.admfile. -
In a group policy management tool, click either:
-
Computer Configuration to apply the organization ID to
HKEY_CURRENT_USER\SOFTWARE\Policies\CiscoWebex\OrganizationID -
User Configuration to apply the organization to
HKEY_LOCAL_MACHINE\SOFTWARE\Policies\CiscoWebex\OrganizationID
-
-
In the navigation panel, click .
-
Double-click Configure Organization ID in Cisco Webex.
-
Click Enabled, add your organization ID in the Options box, and then click Apply.
Configure using a MSI installation
-
Run the following command to install
webexapp.msiwith theORGANIZATIONIDparameter to configureHKEY_LOCAL_MACHINE\SOFTWARE\WOW6432Node\Webex\Policies\OrganizationID:msiexec /i webexapp.msi /log webexapp.log ORGANIZATIONID="xxxxxxxx-xxxx-xxxx-xxxx-xxxxxxxxxxxx"
To set up collaboration restrictions on Mac devices, create a .plist file named com.cisco.webexmeetings.config.plist under /Library/Preferences/, and add the following key to the file:
|
Key name |
Value |
Description |
|---|---|---|
|
OrganizationID |
%OrganizationID% |
Specify the organization ID that you copied from Control Hub for the collaboration restrictions. |
To set up collaboration restrictions on Android and iOS mobile devices, you have to configure the organization ID using the Mobile Device Management AppConfig service.
This feature works only for mobile devices that use the Webex Meetings app on version 41.7 and later.
|
Configuration key |
Value type |
Description |
|---|---|---|
|
OrganizationID |
String |
Specify the organization ID that you copied from Control Hub for the collaboration restrictions. |
To have your organization's policies apply to users who join from Google Chrome, you must add the Webex Meetings Policy plugin downloaded from the Chrome Web Store and then add a rule for your organization to the policy.
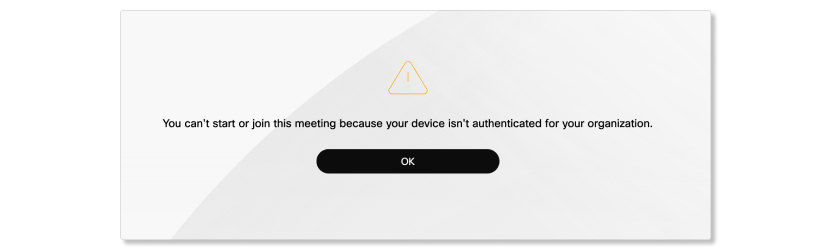
Users who are restricted from joining certain meetings see the following message when they try to join a restricted meeting through Google Chrome.
-
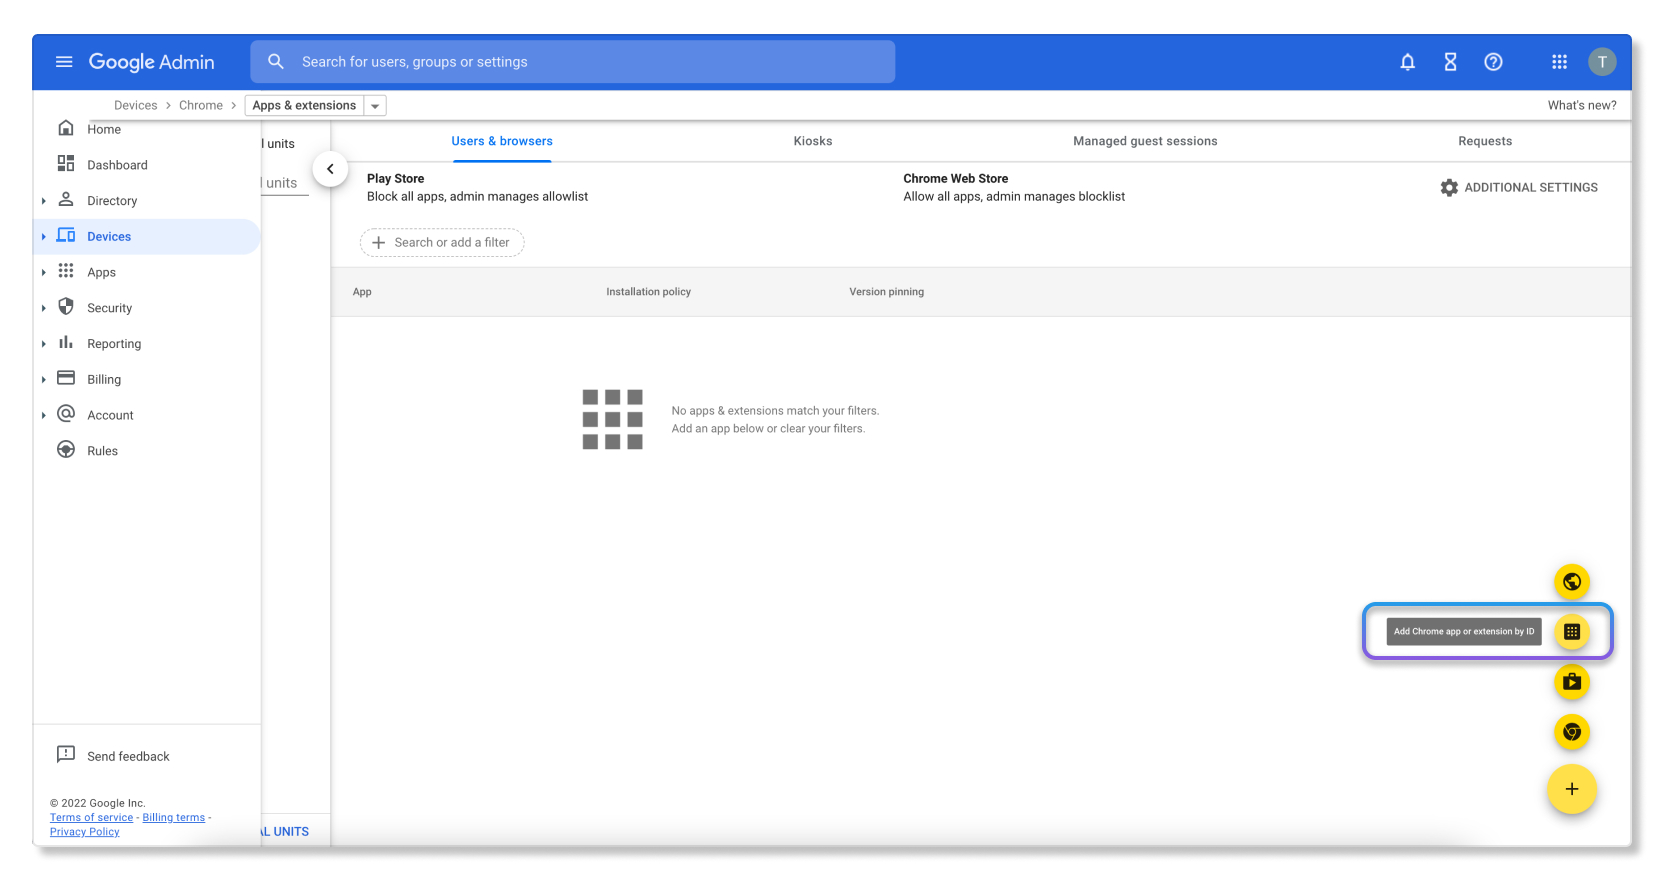
Open Google Chrome's IT admin page at https://admin.google.com.
-
Add the Webex Meetings Policy plugin extension by going to .
-
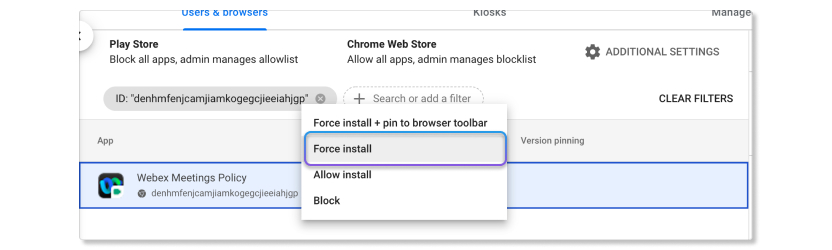
Add the following extension by ID:
denhmfenjcamjiamkogegcjieeiahjgp.
-
Add the following rule to the policy (using your own organization ID):
{"orgID": {"Value": "xxxxxxxx-xxxx-xxxx-xxxx-xxxxxxxxxxxx"}}
-
Right-click the tab and select Force install.
Configure using a group policy template
You can use group policies to install the Webex Meetings policy extension.
Before you begin ensure that you’ve imported the ADM or ADMX templates for Google Chrome.
-
In the Group Policy Editor, go to .
Select 'Configure the list of force-installed app and extensions'.
Right-click, and select Edit.
Select Enabled.
Click Show.
Enter the following ID under 'Extension/App IDs and update URLs to be silently installed'.
denhmfenjcamjiamkogegcjieeiahjgp;https://clients2.google.com/service/update2/crxClick Apply.
It may take time for Chrome to load the configuration. You can restart Google Chrome or
reload the policies by entering chrome://policy/ in the address bar.

Configure the organization ID with the registry key using a group policy
You can use Microsoft Group Policy to install the Webex Meetings Policy extension on to Google Chrome and configure the organization ID.
-
In the Group Policy Management Editor, create a new Group Policy Object (GPO).
You can also edit an existing GPO.
Link the GPO to the organization containing your users or devices, and switch to GPO Edit mode.
Go to .
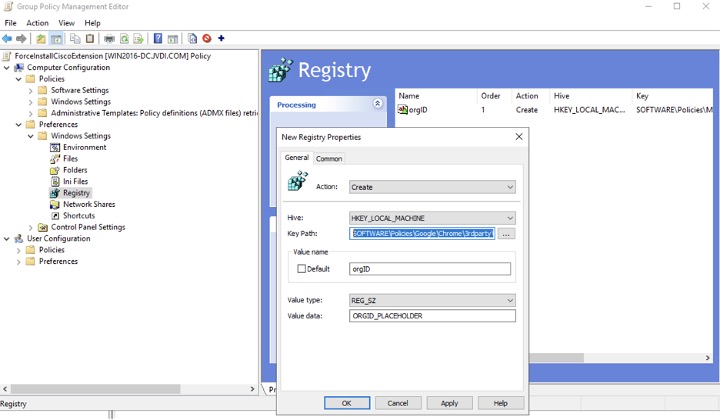
Right-click on Registry and select .
In the New Registry Properties window, select the General tab.
- Under Action, select Create.
-
Enter the following details:
-
Hive—
HKEY_LOCAL_MACHINE -
Key Path—
SOFTWARE\Policies\Google\Chrome\3rdparty\extensions\denhmfenjcamjiamkogegcjieeiahjgp\policy -
Value name—
orgID -
Value type—
REG_SZ -
Value data—The organization ID provided by Cisco.
-
Click Apply.
You must install and configure the Webex Meetings policy extension on Chrome browsers. This configuration applies your organization's meeting restrictions policy to users who join meetings using Chrome on MacOS computers. The details you need are:
- Extension ID: This is the same for everybody:
denhmfenjcamjiamkogegcjieeiahjgp - Your organization ID: Unique to your Webex organization. You can copy this ID from Control Hub, on the page.
Using Google Admin console
Describes how to force install the Webex Meetings extension with Google Admin console and configure it with your organization ID.
-
Sign in to your Google Admin console at https://admin.google.com.
-
Go to .
-
Add the following extension by ID:
denhmfenjcamjiamkogegcjieeiahjgp. -
Add the following rule to the policy (using your own organization ID):
{"orgID": {"Value": "xxxxxxxx-xxxx-xxxx-xxxx-xxxxxxxxxxxx"}} -
Right-click the tab and select Force install.
Setting MacOS preference
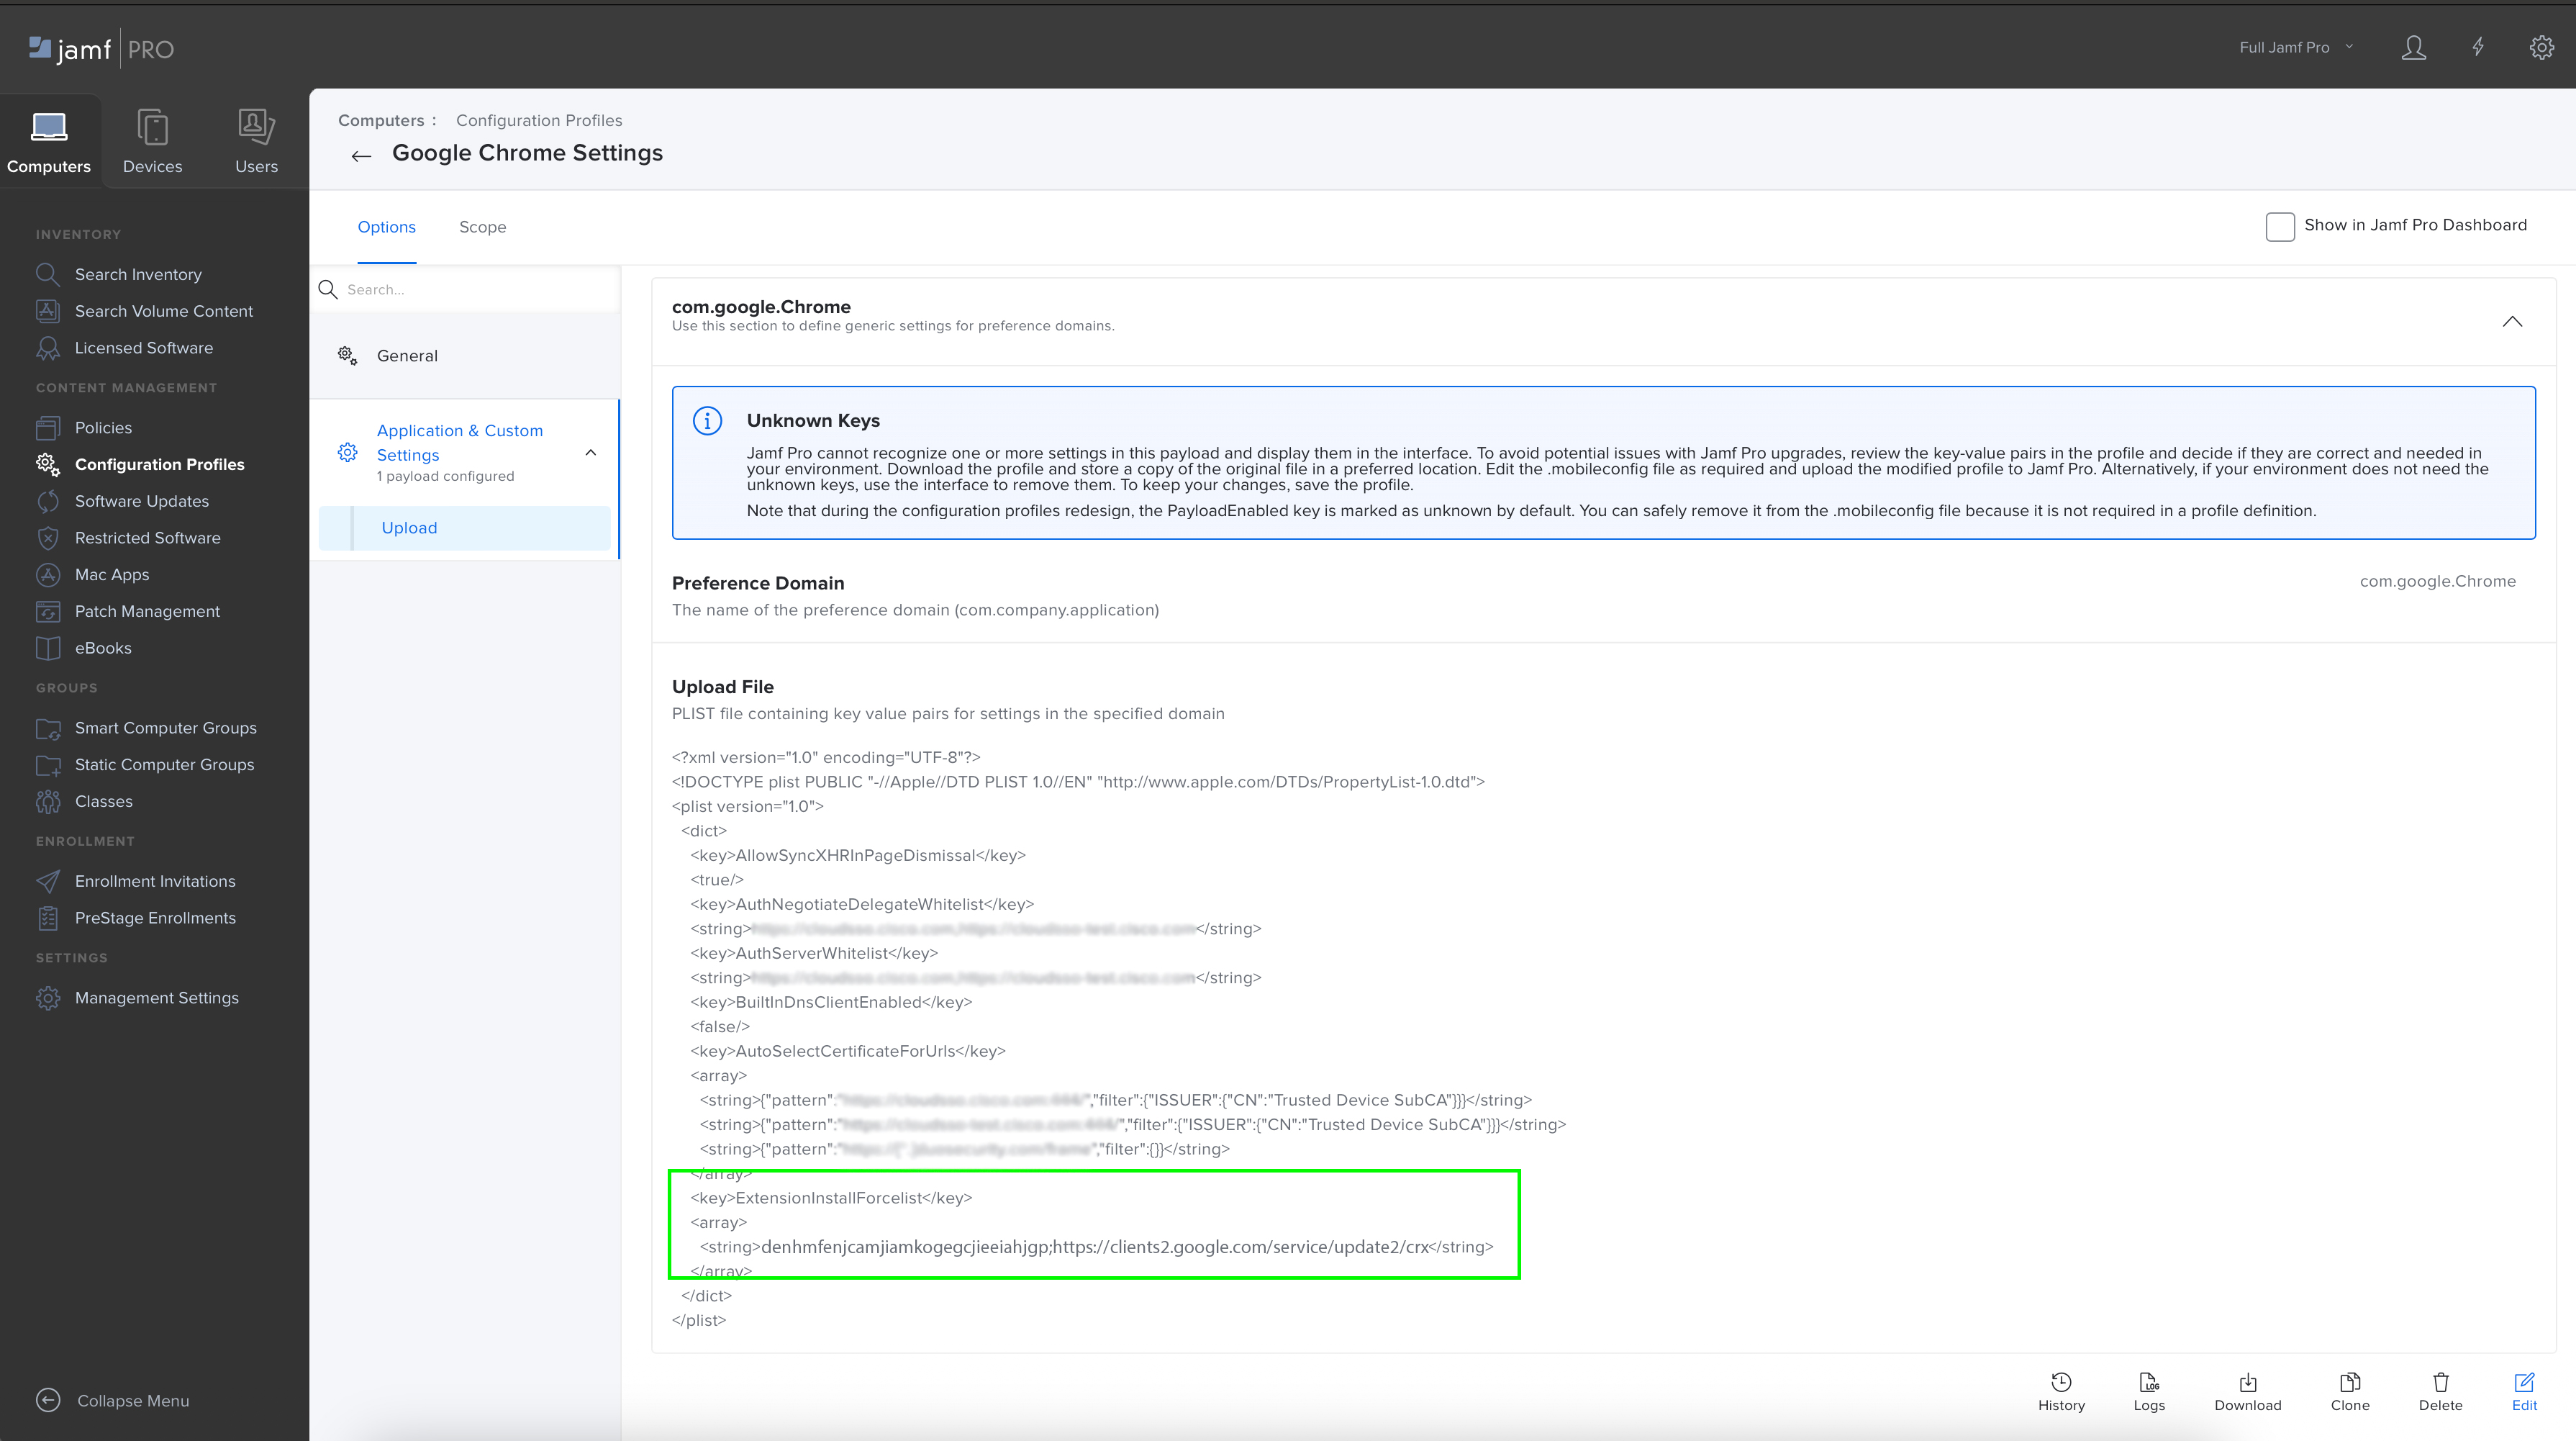
Describes how to force install the Webex Meetings extension using Chrome's
ExtensionInstallForcelistpreference on MacOS, and then configure the extension with your organization ID.
- Read the topic ExtensionInstallForcelist at Google's Chrome Enterprise policy documentation.
-
Use your Mobile Device Management software to update the
ExtensionInstallForcelist
preference.-
Add the following extension ID:
denhmfenjcamjiamkogegcjieeiahjgpand -
Add the update URL for the extension:
https://clients2.google.com/service/update2/crx
You should end up with a new string in the array that defines the extension force install list:
<array> <string>denhmfenjcamjiamkogegcjieeiahjgp;https://clients2.google.com/service/update2/crx</string> <string>other-extension-id;other-extension-update-URL</string> <string>another-extension-id;another-extension-update-URL</string> </array> -
- Deploy the modified configuration profile to your MacOS computers.
- Verify that the extension is installed on the Mac.
Create a configuration profile
Describes how to configure your organization ID for the Webex policy extension.
-
Create a property list file
com.google.Chrome.extensions.denhmfenjcamjiamkogegcjieeiahjgp.plistwith your organization ID using the following value:<?xml version="1.0" encoding="UTF-8"?> <!DOCTYPE plist PUBLIC "-//Apple//DTD PLIST 1.0//EN" "http://www.apple.com/DTDs/PropertyList-1.0.dtd"> <plist version="1.0"> <dict> <key>orgID</key> <string>xxxxxxxx-xxxx-xxxx-xxxx-xxxxxxxxxxxx</string> </dict> </plist> -
Deploy the modified configuration profile to your MacOS computers.
-
Verify that your Meetings policy applies when a user on a managed MacOS computer uses Chrome to join a meeting.

You can apply collaboration restrictions to your organization for users who join from Microsoft Edge. You can use the Google Chrome browser extension on Microsoft Edge as well.
Before you begin ensure that your device is enrolled for mobile device management (MDM).
Create a new configuration profile
-
Sign in to the Microsoft admin page, and go to .
-
Select the following properties:
-
Platform—Windows 10 or later.
-
Profile type—Templates.
-
-
Click Create.
-
Under Basics, select a name and description for your organization's policy.
-
Click Next.
-
Under , search for ‘Control which extensions are installed silently’ and select it.
-
Select Enabled and enter the following ID under 'Extension/App IDs and update URLs to be silently installed':
denhmfenjcamjiamkogegcjieeiahjgp;https://clients2.google.com/service/update2/crx?response=updatecheck&x=id%3Ddenhmfenjcamjiamkogegcjieeiahjgp%26uc -
Click Next.
(Optional) Under Scope tags, you can assign scope tags to the profile.
Under Assignments, select 'Add all users' and 'Add all devices'.
-
Click Next.
-
Under Review + create, review your settings and click Create.
Sync your managed device
-
On your managed device, go to .
Under 'Connected to MSFT MDM', click Info.
Scroll to 'Device sync status' and click Sync.
The Google Chrome extension is installed once the sync is complete. You can verify the sync by checking the Registry Editor in the following location:
HKEY_LOCAL_MACHINE\SOFTWARE\Policies\Microsoft\Edge\ExtensionInstallForcelistThe extension is also available in Microsoft Edge at edge://extensions.
Configure using registry key
To configure the policy for a specific organization ID, the Chrome extension reads a policy
that is set in the registry. You can manually import a registry key by creating a .reg
file.
-
Open the Registry Editor.
- Create a
.regfile with the following value:Windows Registry Editor Version 5.00 [HKEY_LOCAL_MACHINE\SOFTWARE\Policies\Microsoft\Edge\3rdparty\extensions\denhmfenjcamjiamkogegcjieeiahjgp\policy] "orgID"="xxxxxxxx-xxxx-xxxx-xxxx-xxxxxxxxxx" - Double-click the file to install the registry key.
You can also use PowerShell to install the registry key. Use the following value:
reg import
            .\edge_policy.reg
Verify your organization ID
-
Restart Microsoft Edge and go to web.webex.com.
Open the developer console and enter
webex.config.meetings.installedOrgID.The organization ID from the
.regfile is shown.
Configure using a group policy template
You can use group policies to install the Webex Meetings policy extension.
Before you begin ensure that you’ve imported the Microsoft Edge administrative templates.
-
In the Group Policy Editor, go to .
- Select 'Control which extensions are installed silently'.
Select Enabled.
Click Show.
Enter the following ID under 'Extension/App IDs and update URLs to be silently installed'.
denhmfenjcamjiamkogegcjieeiahjgp;https://clients2.google.com/service/update2/crxClick Apply.
Configure organization ID with registry key using group policy
You can use Microsoft Group Policy to install the Webex Meetings Policy extension on to Microsoft Edge and configure the organization ID.
-
In the Group Policy Management Editor, create a new Group Policy Object (GPO).
You can also edit an existing GPO.
Link the GPO to the organization containing your users or devices, and switch to GPO Edit mode.
Go to .
Right-click on Registry and select .
In the New Registry Properties window, select the General tab.
- Under Action, select Create.
-
Enter the following details:
-
Hive—
HKEY_LOCAL_MACHINE -
Key Path—
SOFTWARE\Policies\Microsoft\Edge\3rdparty\extensions\denhmfenjcamjiamkogegcjieeiahjgp\policy -
Value name—
orgID -
Value type—
REG_SZ -
Value data—The organization ID provided by Cisco.
-
Click Apply.
You can apply collaboration restrictions to your organization for users who join from Mozilla Firefox. You can deploy the Webex organization ID policy and Webex extension for Firefox to all your users through Microsoft Intune.
Configure using policy templates
Before you begin ensure that you have downloaded the Mozilla policy templates.
The ADMX files include:
mozilla.admxfirefox.admx
The ADML files include:
mozilla.admlfirefox.adml
- Open the
firefox.admxfile and locate the<policies>tag.Insert the following value within the
<policies>tag and save the file:<policy name="OrganizationPolicy" class="Both" displayName="$(string.OrganizationPolicy)" explainText="$(string.OrganizationPolicy_Explain)" key="Software\Policies\Mozilla\Firefox\3rdparty\Extensions\ciscowebexfirefoxpolicy1@cisco.com" presentation="$(presentation.OrganizationPolicy)" > <parentCategory ref="firefox"/> <supportedOn ref="SUPPORTED_FF62"/> <elements> <text id="OrganizationPolicy" valueName="orgID" required="true"/> </elements> </policy> - Click
en_US, open thefirefox.admlfile.Locate the
<tag and add the following value:stringTable><string id="OrganizationPolicy">orgID</string> <string id="OrganizationPolicy_Explain">Webex Meeting Policy Setting</string>Locate the
<tag and add the following value:presentationTable><presentation id="OrganizationPolicy"> <textBox refId="OrganizationPolicy"> <label>orgID</label> </textBox> </presentation> -
Sign in to the Microsoft admin page, and go to .
- Go to the Import ADMX tab and click Import.
- Follow the prompts to upload the ADMX and ADML files.
Import the
mozilla.admxandmozilla.admlfiles first. Make sure the status shows Available. Then, import thefirefox.admxandfirefox.admlfiles.
Create a new configuration profile
-
Sign in to the Microsoft admin page, and go to .
- Go to the Policies tab and click .
-
Select the following properties:
-
Platform—Windows 10 or later.
-
Profile type—Templates > Imported Administrative templates (Preview).
-
- Click Create.
- Under Basics, select a name and description for your organization's policy.
- Click Next.
- Under Configuration settings, select
orgIDand configure the settings you want in your policy. - Select Enabled and enter your organization ID.
- Click Next.
- (Optional) Under Scope tags, you can assign scope tags to the profile.
- Under Assignments, click Add Groups and
select a group to receive your profile.
If the profile is assigned to user groups, the configured ADMX settings apply to any device the user enrolls in and signs in to. If the profile is assigned to device groups, the settings apply to any user who signs in to the device. This applies to both computer configurations (
HKEY_LOCAL_MACHINE) and user configurations (HKEY_CURRENT_USER). Some user-assigned settings may also impact other users on the same device. - Click Next.
-
Under Review + create, review your settings and click Create.
Configure the policy for installing Firefox extensions
Before you begin make sure to download the Firefox ADMX template. You can download the policy_templates_v6.3.zip file,
extract the file and find windows > firefox.admx.
-
Sign in to the Microsoft admin page, and go to .
- Go to the Policies tab and click .
-
Select the following properties:
-
Platform—Windows 10 or later.
-
Profile type—Templates > Custom.
-
- Click Create.
- Under Basics, select a name and optional description for your organization's policy.
- Click Next.
-
Under Configuration settings, click Add:
- Enter a name and optional description.
-
OMA-URI—Enter:
./Device/Vendor/MSFT/Policy/ConfigOperations/ADMXInstall/Firefox/Policy/FirefoxAdmx -
Data type—Select String.
- Value—Copy all of the text from the
firefox.admxfile.
- Click Save, then click Next.
- Under Assignments, click Add Groups and select a group to receive your profile.
- Click Next.
- Under Review + create, review your settings and click Create.
Add individual policies
-
Sign in to the Microsoft admin page, and go to .
- Click the policy you created.
- Under Properties, scroll to Configuration settings, and click Edit.
-
Click Add.
- Enter a name and optional description.
-
OMA-URI—Enter:
./Device/Vendor/MSFT/Policy/Config/Firefox~Policy~firefox~Extensions/ExtensionSettings -
Data type—Select String.
- Value—Enter the value for the policy you want to
change.
<enabled/>
<data id="ExtensionSettings" value='
  {
    "*": {
      "install_sources": ["https://addons.mozilla.org/*"],
      "allowed_types": ["extension"]
     },
      "ciscowebexfirefoxpolicy1@cisco.com": {
        "installation_mode": "force_installed",
        "install_url": "https://addons.mozilla.org/firefox/downloads/latest/webex-meetings-policy/latest.xpi"
     }
  }'/>
Click Save.
- Under Review + save, review your changes and click Save.
Known issues
Known issues for Webex Assistant for Meetings
If a meeting has Closed Captioning and Webex Assistant enabled, users with those two features disabled can't turn both of them off during the meeting if they're given the host role.
Known issues for Webex devices
- Users on Mac devices can grab the presenter role from users on Webex devices even if the Take presenter feature have been disabled.
- Users with the Annotation feature disabled will still see annotations when they use Webex devices to join meetings.
- Collaboration restrictions are not applicable for Webex Devices (personal and shared) on Webex Meetings. This means, if the admin disables certain features, the user can still use those features on Webex Devices. For example, if sharing is disabled, the user (host or participant) can still share regardless of the meeting policy or Webex Device used.
Known issues with older client versions
We recommend that you upgrade the Webex Meetings client to the last version (WBS 42.7 or above) or at least to the latest lockdown version (WBS42.6) so users get the best experience with collaboration features. If users are on an older client version (such as WBS 42.3 or lower), some collaboration features may not be available or may work incorrectly.
Known issues with restricting Annotation and File and whiteboarding sharing features
When Annotation is restricted, but File and whiteboarding sharing isn't, users can still see annotations if the presenter shares a whiteboard and starts annotating.
Restrict collaboration features for Windows, Mac, Linux, Android, and iOS devices, and Chrome and Edge web browsers
If you want to restrict these collaboration settings devices in your organization, you can edit the system files so that those settings apply to anyone who uses the device to join a meeting outside your organization.
To do this, you have to first find and copy your organization ID in Control Hub. After getting the organization ID, follow the steps to the devices you want to edit.
Make sure to lock the organization ID in the registry so users can't change it themselves. If users change the organization ID, then the collaboration restrictions won't apply to their devices.
To ensure security, we recommend applying restrictions to your browsers and all your devices.
| 1 |
Sign in to Control Hub, and go to . |
| 2 |
Click the Copy icon in the Organization ID field. |
You can restrict collaboration features in Webex App for Windows devices by specifying which organization's users can sign in. When you set the
OrganizationID in the Windows registry, you ensure that only users from
your organization can sign in to Webex App on that device.
If a user tries to sign in with an account from a different organization, Webex App denies access and displays an error. If you remove the OrganizationID
value from the registry, then this restriction no longer applies, and users from any
organization can sign in.
You can choose from these options to set up collaboration feature restrictions for Windows devices:
Configure using registry keys
You can manually edit specific devices by adding the OrganizationID to one
of these registry values:
-
Open the Registry Editor.
-
Add the organization ID to one of the following registry values:
-
HKEY_LOCAL_MACHINE\SOFTWARE\Policies\CiscoWebex\OrganizationID -
HKEY_LOCAL_MACHINE\SOFTWARE\Cisco Spark Native\OrganizationID
-
For meetings on the Webex Suite meeting platform, you can set the registry key
HKEY_LOCAL_MACHINE\SOFTWARE\Policies\CiscoWebex\AllowOrganizationIDInHKCU
with Value as 1 and Type as DWORD32, and apply the
organization ID to one of these registry values:
-
HKEY_CURRENT_USER\SOFTWARE\Policies\CiscoWebex\OrganizationID -
HKEY_ CURRENT_USER\SOFTWARE\Cisco Spark Native\OrganizationID
Configure using a Group Policy template
You can import a Group Policy administrative template .adm or
.admx file to apply the organization ID to the same registry values as
above.
Import an .adm file:
- Download the group policy administrative template and add it to the group policy management tool.
-
In the group policy management tool, click either:
-
Computer Configuration to apply the organization ID to
HKEY_LOCAL_MACHINE\SOFTWARE\Policies\CiscoWebex\OrganizationID -
User Configuration to apply the organization to
HKEY_ CURRENT_USER\SOFTWARE\Policies\CiscoWebex\OrganizationID
-
-
In the navigation panel, click .
-
Double-click Configure Organization ID in Cisco Webex.
-
Click Enabled, add your organization ID in the Options box, and then click Apply.
Import an .admx file:
- Download the group policy administrative template and add it to the PolicyDefinitions folder.
-
In the group policy management tool, click either:
-
Computer Configuration to apply the organization ID to
HKEY_LOCAL_MACHINE\SOFTWARE\Policies\CiscoWebex\OrganizationID -
User Configuration to apply the organization to
HKEY_ CURRENT_USER\SOFTWARE\Policies\CiscoWebex\OrganizationID
-
-
In the navigation panel, click .
-
Double-click Configure Organization ID in Cisco Webex.
-
Click Enabled, add your organization ID in the Options box, and then click Apply.
Configure using an MSI installation
You can run the following command to install webexapp.msi with the
ORGID parameter to configure the organization ID to this registry value:
HKEY_LOCAL_MACHINE\SOFTWARE\Cisco Spark Native\OrganizationID.
For example:
msiexec /i c:\work\Webex.msi ACCEPT_EULA=TRUE EMAIL=xxxx@example.com ORGID=xxxxxxxx-xxxx-xxxx-xxxx-xxxxxxxxxxxxConfigure using a priority order
You can set the priority order from high to low.
You can set the registry key HKEY_LOCAL_MACHINE\SOFTWARE\Policies\CiscoWebex\AllowOrganizationIDInHKCU with Value as 1 and Type as DWORD32.
The organization ID is retrieved with the following sequence with high to low priority:
-
HKEY_CURRENT_USER\SOFTWARE\Policies\CiscoWebex\OrganizationID(configured manually or through group policy template) -
HKEY_CURRENT_USER\SOFTWARE\Cisco Spark Native\OrganizationID -
HKEY_LOCAL_MACHINE\SOFTWARE\Policies\CiscoWebex\OrganizationID(configured manually or through group policy template) -
HKEY_LOCAL_MACHIN\SOFTWARE\Cisco Spark Native\OrganizationID(configured through MSI installation)
Configure using mobile device management (MDM)
We recommend following the Webex App MDM Deployment procedure to add the
organization ID to the preference domain Cisco-Systems.Spark.
To set up collaboration restrictions for the Webex Suite meeting platform on Linux devices, create a .json file named
managedConfig.json and add the following key to the file:
|
Key name |
Location |
File content |
|---|---|---|
|
OrganizationID |
/etc/cisco-webex/managedConfig.json |
|
To set up collaboration restrictions on Android and iOS mobile devices, we recommend following the instructions in Enable security settings for mobile versions of Webex App.
To have your organization's policies apply to users who join from Google Chrome, you must add the Webex Meetings Policy plugin downloaded from the Chrome Web Store and then add a rule for your organization to the policy.
Users who are restricted from joining certain meetings see the following message when they try to join a restricted meeting through Google Chrome.
-
Open Google Chrome's IT admin page at https://admin.google.com.
-
Add the Webex Meetings Policy plugin extension by going to .
-
Add the following extension by ID:
denhmfenjcamjiamkogegcjieeiahjgp. -
Add the following rule to the policy (using your own organization ID):
{"orgID": {"Value": "xxxxxxxx-xxxx-xxxx-xxxx-xxxxxxxxxxxx"}} -
Right-click the tab and select Force install.
Configure using a group policy template
You can use group policies to install the Webex Meetings policy extension.
Before you begin ensure that you’ve imported the ADM or ADMX templates for Google Chrome.
-
In the Group Policy Editor, go to .
Select 'Configure the list of force-installed app and extensions'.
Right-click, and select Edit.
Select Enabled.
Click Show.
Enter the following ID under 'Extension/App IDs and update URLs to be silently installed'.
denhmfenjcamjiamkogegcjieeiahjgp;https://clients2.google.com/service/update2/crxClick Apply.
It may take time for Chrome to load the configuration. You can restart Google Chrome or
reload the policies by entering chrome://policy/ in the address bar.
Configure the organization ID with the registry key using a group policy
You can use Microsoft Group Policy to install the Webex Meetings Policy extension on to Google Chrome and configure the organization ID.
-
In the Group Policy Management Editor, create a new Group Policy Object (GPO).
You can also edit an existing GPO.
Link the GPO to the organization containing your users or devices, and switch to GPO Edit mode.
Go to .
Right-click on Registry and select .
In the New Registry Properties window, select the General tab.
- Under Action, select Create.
-
Enter the following details:
-
Hive—
HKEY_LOCAL_MACHINE -
Key Path—
SOFTWARE\Policies\Google\Chrome\3rdparty\extensions\denhmfenjcamjiamkogegcjieeiahjgp\policy -
Value name—
orgID -
Value type—
REG_SZ -
Value data—The organization ID provided by Cisco.
-
Click Apply.
You must install and configure the Webex Meetings policy extension on Chrome browsers. This configuration applies your organization's meeting restrictions policy to users who join meetings using Chrome on MacOS computers. The details you need are:
- Extension ID: This is the same for everybody:
denhmfenjcamjiamkogegcjieeiahjgp - Your organization ID: Unique to your Webex organization. You can copy this ID from Control Hub, on the page.
Using Google Admin console
Describes how to force install the Webex Meetings extension with Google Admin console and configure it with your organization ID.
-
Sign in to your Google Admin console at https://admin.google.com.
-
Go to .
-
Add the following extension by ID:
denhmfenjcamjiamkogegcjieeiahjgp. -
Add the following rule to the policy (using your own organization ID):
{"orgID": {"Value": "xxxxxxxx-xxxx-xxxx-xxxx-xxxxxxxxxxxx"}} -
Right-click the tab and select Force install.
Setting MacOS preference
Describes how to force install the Webex Meetings extension using Chrome's
ExtensionInstallForcelistpreference on MacOS, and then configure the extension with your organization ID.
- Read the topic ExtensionInstallForcelist at Google's Chrome Enterprise policy documentation.
-
Use your Mobile Device Management software to update the
ExtensionInstallForcelist
preference.-
Add the following extension ID:
denhmfenjcamjiamkogegcjieeiahjgpand -
Add the update URL for the extension:
https://clients2.google.com/service/update2/crx
You should end up with a new string in the array that defines the extension force install list:
<array> <string>denhmfenjcamjiamkogegcjieeiahjgp;https://clients2.google.com/service/update2/crx</string> <string>other-extension-id;other-extension-update-URL</string> <string>another-extension-id;another-extension-update-URL</string> </array> -
- Deploy the modified configuration profile to your MacOS computers.
- Verify that the extension is installed on the Mac.
Create a configuration profile
Describes how to configure your organization ID for the Webex policy extension.
-
Create a property list file
com.google.Chrome.extensions.denhmfenjcamjiamkogegcjieeiahjgp.plistwith your organization ID using the following value:<?xml version="1.0" encoding="UTF-8"?> <!DOCTYPE plist PUBLIC "-//Apple//DTD PLIST 1.0//EN" "http://www.apple.com/DTDs/PropertyList-1.0.dtd"> <plist version="1.0"> <dict> <key>orgID</key> <string>xxxxxxxx-xxxx-xxxx-xxxx-xxxxxxxxxxxx</string> </dict> </plist> -
Deploy the modified configuration profile to your MacOS computers.
-
Verify that your Meetings policy applies when a user on a managed MacOS computer uses Chrome to join a meeting.
You can apply collaboration restrictions to your organization for users who join from Microsoft Edge. You can use the Google Chrome browser extension on Microsoft Edge as well.
Before you begin ensure that your device is enrolled for mobile device management (MDM).
Create a new configuration profile
-
Sign in to the Microsoft admin page, and go to .
-
Select the following properties:
-
Platform—Windows 10 or later.
-
Profile type—Templates.
-
-
Click Create.
-
Under Basics, select a name and description for your organization's policy.
-
Click Next.
-
Under , search for ‘Control which extensions are installed silently’ and select it.
-
Select Enabled and enter the following ID under 'Extension/App IDs and update URLs to be silently installed':
denhmfenjcamjiamkogegcjieeiahjgp;https://clients2.google.com/service/update2/crx?response=updatecheck&x=id%3Ddenhmfenjcamjiamkogegcjieeiahjgp%26uc -
Click Next.
(Optional) Under Scope tags, you can assign scope tags to the profile.
Under Assignments, select 'Add all users' and 'Add all devices'.
-
Click Next.
-
Under Review + create, review your settings and click Create.
Sync your managed device
-
On your managed device, go to .
Under 'Connected to MSFT MDM', click Info.
Scroll to 'Device sync status' and click Sync.
The Google Chrome extension is installed once the sync is complete. You can verify the sync by checking the Registry Editor in the following location:
HKEY_LOCAL_MACHINE\SOFTWARE\Policies\Microsoft\Edge\ExtensionInstallForcelistThe extension is also available in Microsoft Edge at edge://extensions.
Configure using registry key
To configure the policy for a specific organization ID, the Chrome extension reads a policy
that is set in the registry. You can manually import a registry key by creating a .reg
file.
-
Open the Registry Editor.
- Create a
.regfile with the following value:Windows Registry Editor Version 5.00 [HKEY_LOCAL_MACHINE\SOFTWARE\Policies\Microsoft\Edge\3rdparty\extensions\denhmfenjcamjiamkogegcjieeiahjgp\policy] "orgID"="xxxxxxxx-xxxx-xxxx-xxxx-xxxxxxxxxx" - Double-click the file to install the registry key.
You can also use PowerShell to install the registry key. Use the following value:
reg import
            .\edge_policy.reg
Verify your organization ID
-
Restart Microsoft Edge and go to web.webex.com.
Open the developer console and enter
webex.config.meetings.installedOrgID.The organization ID from the
.regfile is shown.
Configure using a group policy template
You can use group policies to install the Webex Meetings policy extension.
Before you begin ensure that you’ve imported the Microsoft Edge administrative templates.
-
In the Group Policy Editor, go to .
- Select 'Control which extensions are installed silently'.
Select Enabled.
Click Show.
Enter the following ID under 'Extension/App IDs and update URLs to be silently installed'.
denhmfenjcamjiamkogegcjieeiahjgp;https://clients2.google.com/service/update2/crxClick Apply.
Configure organization ID with registry key using group policy
You can use Microsoft Group Policy to install the Webex Meetings Policy extension on to Microsoft Edge and configure the organization ID.
-
In the Group Policy Management Editor, create a new Group Policy Object (GPO).
You can also edit an existing GPO.
Link the GPO to the organization containing your users or devices, and switch to GPO Edit mode.
Go to .
Right-click on Registry and select .
In the New Registry Properties window, select the General tab.
- Under Action, select Create.
-
Enter the following details:
-
Hive—
HKEY_LOCAL_MACHINE -
Key Path—
SOFTWARE\Policies\Microsoft\Edge\3rdparty\extensions\denhmfenjcamjiamkogegcjieeiahjgp\policy -
Value name—
orgID -
Value type—
REG_SZ -
Value data—The organization ID provided by Cisco.
-
Click Apply.
Known issues
Known issues for Webex App
- When applying collaboration restrictions, it may take up to 30 minutes for new policies to be applied for meetings on the Webex Suite meeting platform.
- When a user pairs with a personal mode device, cloud recording policies for the user are applied to their personal device. But when a user is paired with a shared room device, cloud recording policies are determined by the meeting policy, and not the user policy. This is applicable for meetings on the Webex Suite meeting platform.
- When using the Webex Suite meeting platform, if a Windows, Mac, or iOS user isn’t allowed to join a meeting, the user is asked to switch their account. By clicking Switch Account, the Webex App restarts and the user is taken back to the sign-in page. But, for Android users, clicking Switch Account doesn’t restart the Webex App instead, it closes the application.
- When using meetings on the Webex Suite meeting platform, the meeting policy for Grab Presenter only applies if the user is the host.
- When launching the Webex App through Safari or Firefox, if Video or VoIP is disabled, the user can still send or receive Video and VoIP.
Known issues for Webex devices
When administrators disable Whiteboards, Closed Captioning, or Recordings, these features are blocked on devices, but the error message doesn’t show the reason for the block for Webex App meetings on the Webex Suite meeting platform.
- Features are blocked based on the user policy for personal mode devices.
- Features are blocked based on the meeting policy for shared mode devices.
Known issues with older client versions
We recommend that you upgrade the Webex App for the Webex Suite meeting platform to the client version WBS 43.6 or above, so users get the best experience with collaboration features. If users are on an older client version, then some collaboration features may not be available or may work incorrectly.


