- Home
- /
- Article

Thanks for your feedback.

Add your customer managed device
 In this article
 Feedback?
Enterprise administrators can add third-party SIP devices like door phones, overhead pagers and ATAs, and digital fax solutions.
Get started with customer-managed devices
The customer must provision the devices manually and owns the SIP Authentication credential. The customer is responsible for any fraud created due to failure to secure these credentials.
When adding devices in bulk, customer-managed devices are not supported.
The following specifications apply when adding third-party SIP devices:
-
Assign customer-managed devices to user or workspaces. Also you can assign each device to multiple users or workspaces.
-
All third-party device must support the Webex Calling Security requirements. See Security requirements for Webex Calling.
-
There are minimum firmware requirements in place. Check the third-party documentation for details.
-
Customer-managed devices now offers two generic SIP profiles, which are Generic SIP Phone and Generic SIP Gateway. These profiles allow SIP-TLS 1.2 compliant devices to connect to Webex Calling, without adding the specific device name in the Control Hub. Similar to the other customer-managed devices, Cisco Technical Support doesn’t investigate issues with devices connecting through this provisioning option.
Add customer-managed device to user
| 1 |
Sign in to Control Hub. |
| 2 |
Go to . You can also add a device to the user from the Users section by navigating to . |
| 3 |
Choose Personal usage to assign a device to a user and then click Next. |
| 4 |
Enter either the username or the actual name of the phone's owner, choose the user from the results, and then click Next. |
| 5 |
Choose Cisco phone, ATA, or third-party device. |
| 6 |
Choose Customer Managed Devices from the Select device drop-down list. |
| 7 |
Choose a Device Vendor from the Device Vendor drop-down list, and enter the MAC address. The line ID information can be found under Device Management.
|
| 8 |
Read the disclaimer and click the confirmation box. Then, click Save.
Provision the device to use DNS SRV, which resolves the domain provisioned for Outbound proxy. |
| 9 |
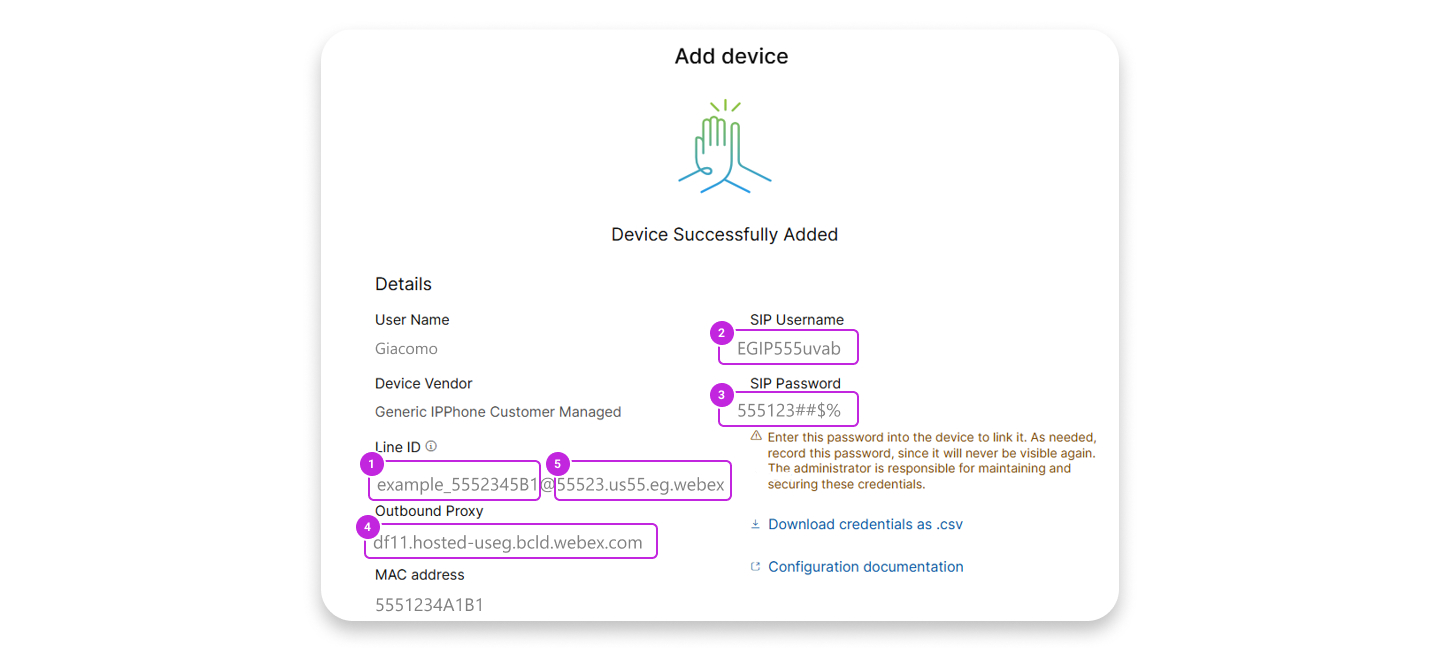
The confirmation screen shows important information that you need to finish the provisioning process of your customer-managed Device. Note your SIP Username and Password as you need this information to finish setting up your customer-managed device. You can also download this information in a CSV file for your records. This is the last time that you can see the password in full. |
Add a generic IP phone customer-managed device
You can now add a generic IP phone and register the third-party managed devices with Webex Calling.
| 1 |
Sign in to Control Hub. | ||||||||||||||||||||||||
| 2 |
Go to . You can also add a device to the user from the Users section by navigating to . | ||||||||||||||||||||||||
| 3 |
Choose Personal usage to assign a device to the user, and then click Next. | ||||||||||||||||||||||||
| 4 |
Enter either the username or the actual name of the phone's owner, choose the user from the results, and then click Next. | ||||||||||||||||||||||||
| 5 |
Choose Cisco MPP, wireless, ATA, or third-party device. | ||||||||||||||||||||||||
| 6 |
Choose Customer Managed Devices from the Select device drop-down list. | ||||||||||||||||||||||||
| 7 |
Choose Generic IPPhone Customer Managed from the Device Vendor drop-down list, and enter the MAC address. | ||||||||||||||||||||||||
| 8 |
Read the disclaimer and select the confirmation box. Click Save. | ||||||||||||||||||||||||
| 9 |
The confirmation screen displays important information that you need to complete for the provisioning process of your customer-managed device. Note your SIP Username and Password as you need this information to complete setting up your customer-managed device. You can also download this information in a CSV file for your reference. This is the last time that you can see the password in full. | ||||||||||||||||||||||||
| 10 |
The following image and the table lists examples of the device field mapping for devices, such as Poly and Yealink.
For both Outbound Proxy and Server 1, set Port to |
Add customer-managed device to new workspace
Before you begin
- You can add up to five customer-managed devices to a workspace with professional
workspace license.
You can add multiple devices to a professional workspace only from the new workspace page. You need to toggle on Try new Workspaces from the upper right corner of the workspace page to use the new workspace page.
- You can add only one device to a workspace with common area workspace license.
| 1 |
Sign in to Control Hub. |
| 2 |
Go to . You can also add a device to a new workspace from the Workspaces section by
navigation to .
|
| 3 |
Choose . |
| 4 |
Enter a name for the workspace (such as the name of the physical room), select room type and add capacity, and then click Next. A workspace name can't be longer than 30 characters and it can't have %, #, <, >, /, \, and " characters. |
| 5 |
Click Cisco phone, ATA, or third-party device. |
| 6 |
Choose Customer Managed Devices from the Select device drop-down list. |
| 7 |
Choose a Device Vendor from the Device Vendor drop-down list and enter the MAC address. If you've selected a fax service, then the MAC address field is automatically populated with a fake MAC address and it's read-only. |
| 8 |
Read the disclaimer and click the confirmation box. Then, click Next.
Provision the device to use DNS SRV, which resolves the domain provisioned for Outbound Proxy. |
| 9 |
Click the Calling service, and choose the subscription and license type that you want to assign to the workspace.
To find out more about the features that are available with the licenses, see Features available by license type for Webex Calling. |
| 10 |
Assign a Location and Phone Number (determined by the location that you choose), and then click Save. You also have the option of assigning an extension. |
| 11 |
The confirmation screen displays important information that you need to complete the provisioning process of your customer-managed device. Note your SIP Username and Password as you need this information to finish setting up your customer- managed device. You can also download this information in a CSV file for your records. This is the last time that you can see the password in full. If you want to add additional devices to a professional workspace, you can do
it in any one of the following ways:
|

 under the
 Add additional users or workspaces to a customer-managed device
| 1 |
Sign in to Control Hub. |
| 2 |
Go to . |
| 3 |
Select an existing device. |
| 4 |
From the Device Management tile, click Configure Lines. |
| 5 |
Click the + sign to add shared a port configuration. |
| 6 |
From the drop-down list, select Customer Managed Device. |
| 7 |
Click Save. |
| 8 |
The device is added and is listed under Device Management. The SIP username or password and Outbound Proxy values saved from the first line is used for this line when provisioning the physical device. |
Reset the SIP username or password for customer-managed device
Before you begin
-
Copy Button is only shown after going through the reset dialog—this reverts to reset the password which is hidden when revisiting the side panel.
| 1 |
Sign in to Control Hub. |
| 2 |
Go to . |
| 3 |
Select the customer-managed device. 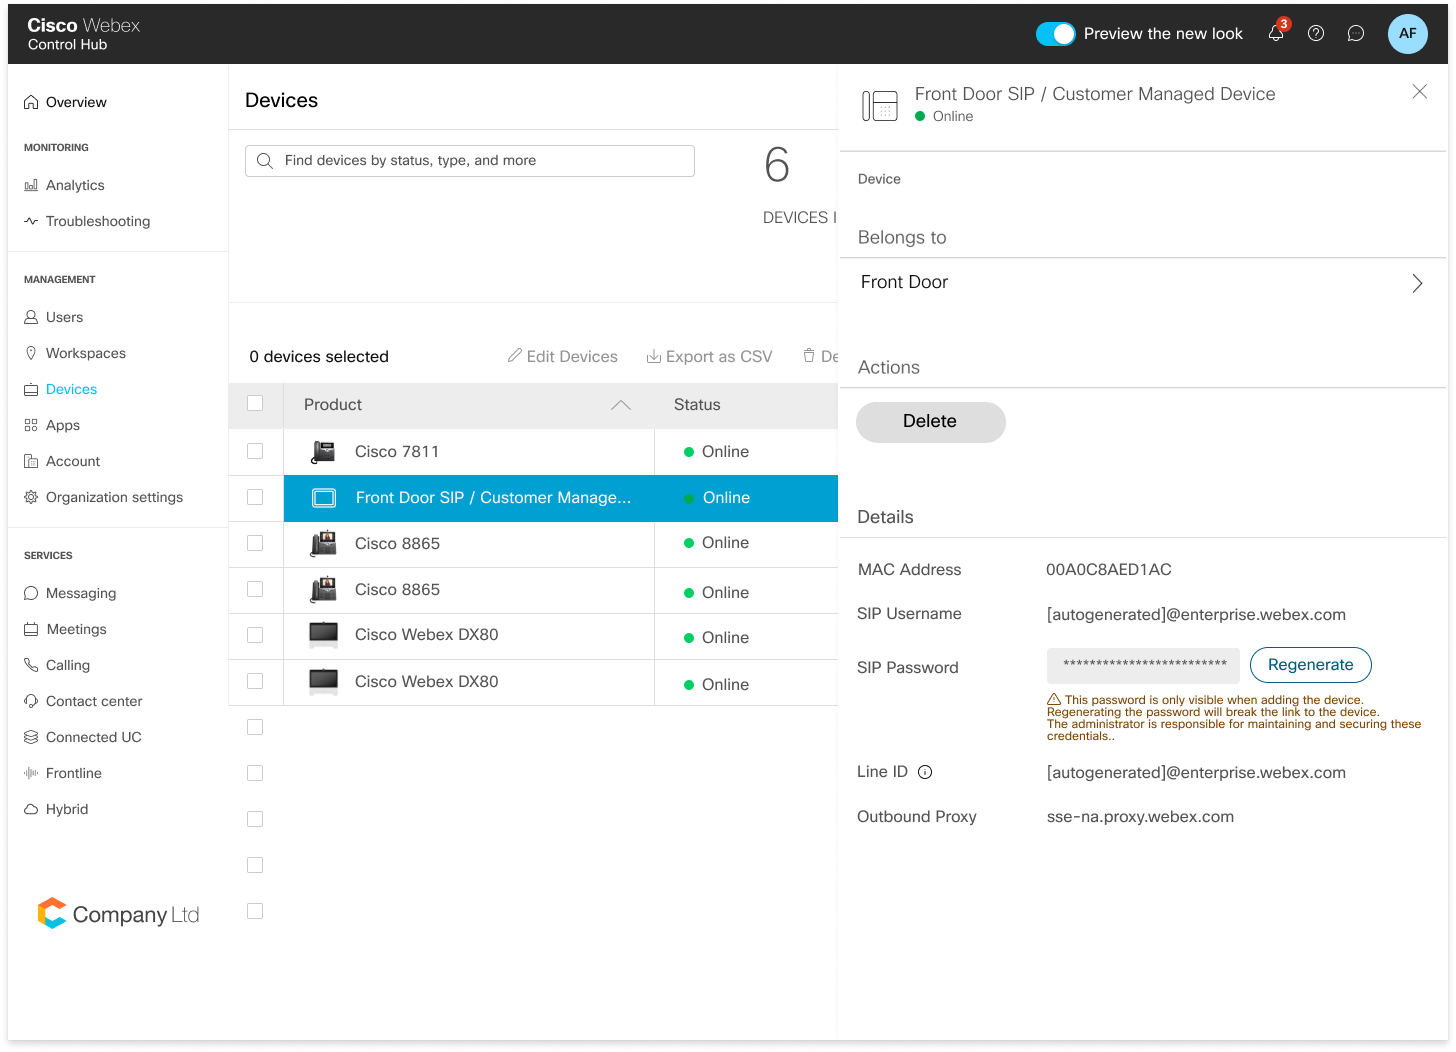
|
| 4 |
Under Details, click Reset Password. |
| 5 |
Click Reset to confirm your password. |
| 6 |
Your newly generated password is displayed in the field. The administrator for this device is responsible for maintaining these credentials. This is the last time that you can view the password in full. Copy and keep this information for your records and future use. |
Delete your customer-managed devices
You can now delete your customer-managed devices or delete a shared line from the customer-managed devices using the Configured Lines page.
| 1 |
Sign in to Control Hub. |
| 2 |
Go to . |
| 3 |
Select a user and click Devices to view the list of devices that is associated with the user. |
| 4 |
Select the device to view the details. |
| 5 |
To remove devices or shared lines for a user, click Configure Lines from the Device Management. |
| 6 |
From the Configured Lines page, click the Delete icon of the respective shared line. You can click the Remove all to remove the all the
lines.
The administrator must remove all SIP line data from the physical device for all SIP lines that are removed. |
| 7 |
Select the device to delete and click the Delete action. Once the delete action is selected, a pop-up displays to inform the administrator to remove the SIP registering data from the physical device. |
Search for devices
| 1 |
Sign in to Control Hub. |
| 2 |
Go to . |
| 3 |
Type your device name. Results will auto-populate in the table below the search field.
|
| 4 |
Locate and select the customer-managed device to make changes. |


