
Thanks for your feedback.
 Feedback?
Previously, installers had to convert Room Navigators to standalone mode before starting MAC address–based registration. Control Hub did not automatically configure the mode or placement.
For more information, see Zero Touch Provisioning for Board, Desk, and Room Series devices and Room Navigator as a standalone device.
What changed
Control Hub now collects the Room Navigator mode and placement during the device setup process. The Room Navigator receives these settings through zero-touch provisioning (ZTP).
The device CSV file also includes the Touch Panel Mode and Touch Panel Placement fields. Administrators can configure these fields before assigning devices in bulk.
The initial Room Navigator setup wizard now includes the Try automatic onboarding option. This option starts ZTP without requiring an activation code. Installers no longer need to manually switch the Room Navigator to standalone mode before MAC address–based registration.
Overview
- In Control Hub, add a device to a workspace.
- Add the Room Navigator by entering its MAC address or uploading a device CSV file.
- Configure the touch panel mode and placement.
- Submit the assignment. Control Hub creates a pending device.
- On a new or factory-reset Room Navigator, select Try automatic onboarding.
- The Room Navigator registers to the workspace and applies the pending configuration.
What’s included
- Add a Room Navigator to a workspace by using its wired MAC address.
- Add multiple Room Navigators by uploading a device CSV file.
- Configure the touch panel mode and placement before onboarding.
- Configure the mode and placement for each Room Navigator by using the Touch Panel Mode and Touch Panel Placement columns in the CSV file.
- Select Try automatic onboarding in the initial setup wizard to start zero-touch provisioning (ZTP). You don’t need to manually switch the Room Navigator to standalone mode.
- Complete a pre-onboarding software upgrade when required.
- Register the Room Navigator without entering an activation code.
- Apply the pending configuration after registration.
The following modes are supported:
- Room Booking
- Desk Booking
- Microsoft Teams Panel
- Persistent Web App (PWA)
What's not included
Automatic pairing between a Room Navigator and a codec.
Requirements
Control Hub
- A Webex organization that is enabled for the feature.
- Control Hub administrator access to configure workspaces and devices.
- A workspace for the Room Navigator.
- The wired MAC address of the Room Navigator.
- The current device CSV template for bulk assignments.
Room Navigator
- RoomOS 26.10.0 or later.
- A new or factory-reset Room Navigator.
- Network access to Webex services.
Service configuration
- For Room Booking, configure the calendar service, if required.
- For Desk Booking, use a workspace with hot desking enabled.
- For Microsoft Teams Panel, use a Microsoft Teams workspace.
- For Persistent Web App (PWA) mode, configure the web app URL and ensure that the required network access is available.
Add a Pending Navigator in Control Hub
- Sign in to Control Hub.
- Go to Management > Workspaces, and open the workspace.
- Select Add device.
- Select Cisco Room and Desk device, and then select Next.
- Select MAC address, and enter the wired MAC address of the device.
- Select Room Navigator, and then select Next.
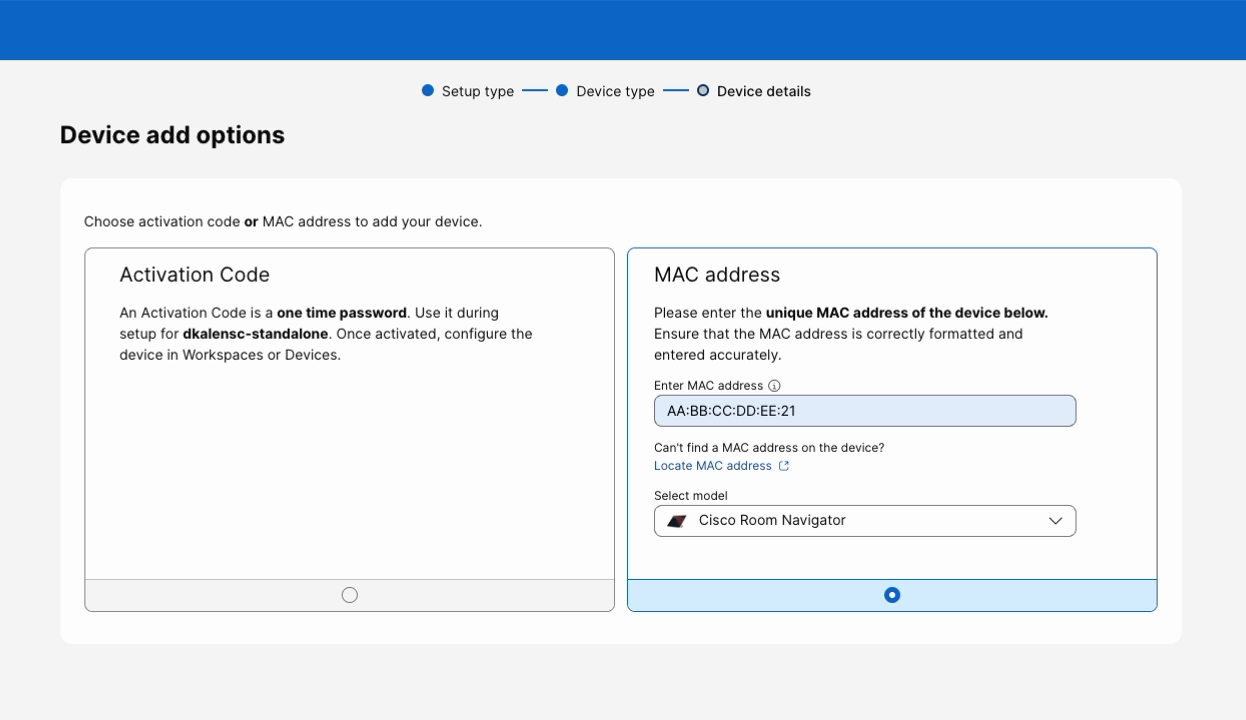 Enter the wired MAC address, then select Room
Navigator as the device model.
- On
Add Standalone Navigator, select the mode and placement.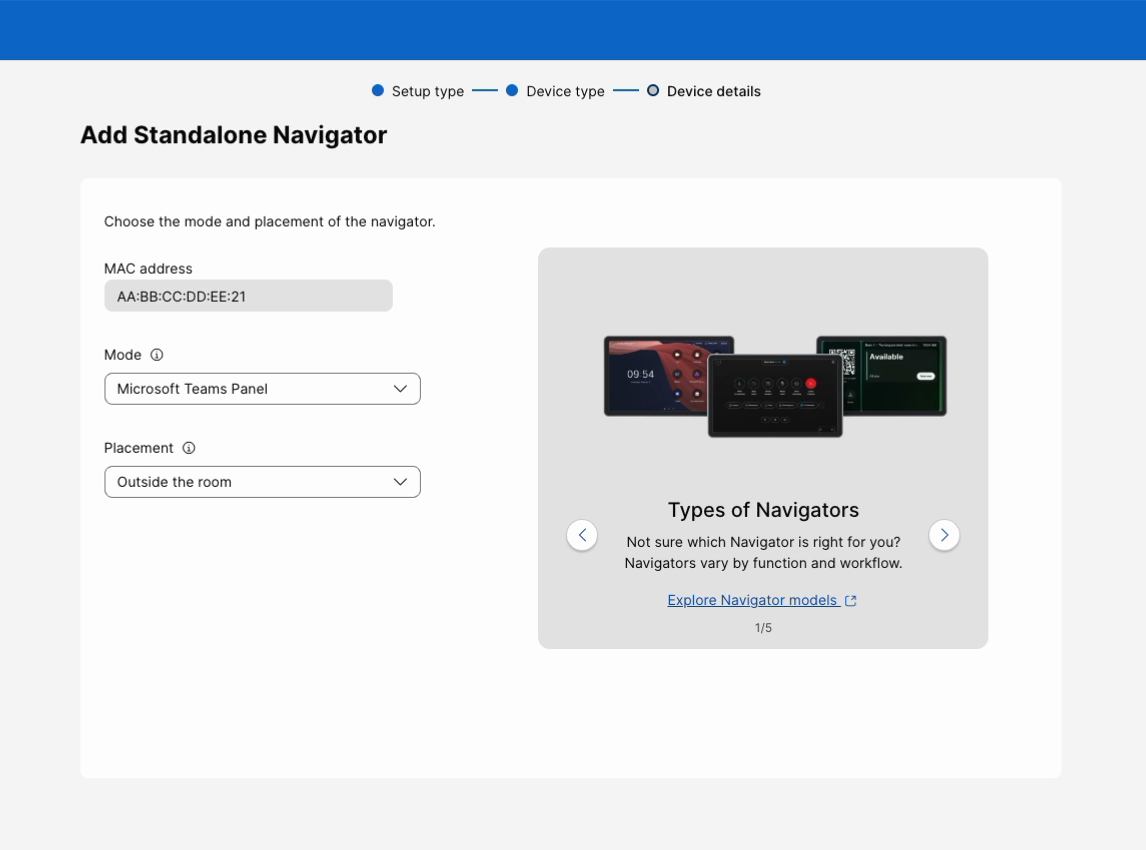 Select the standalone mode and the placement
before you add the Navigator.
- Submit the device assignment.
- On the summary page, make sure that the device model, MAC address, mode, placement,
and workspace are correct.
Device successfully addedconfirms that the pending device was added correctly.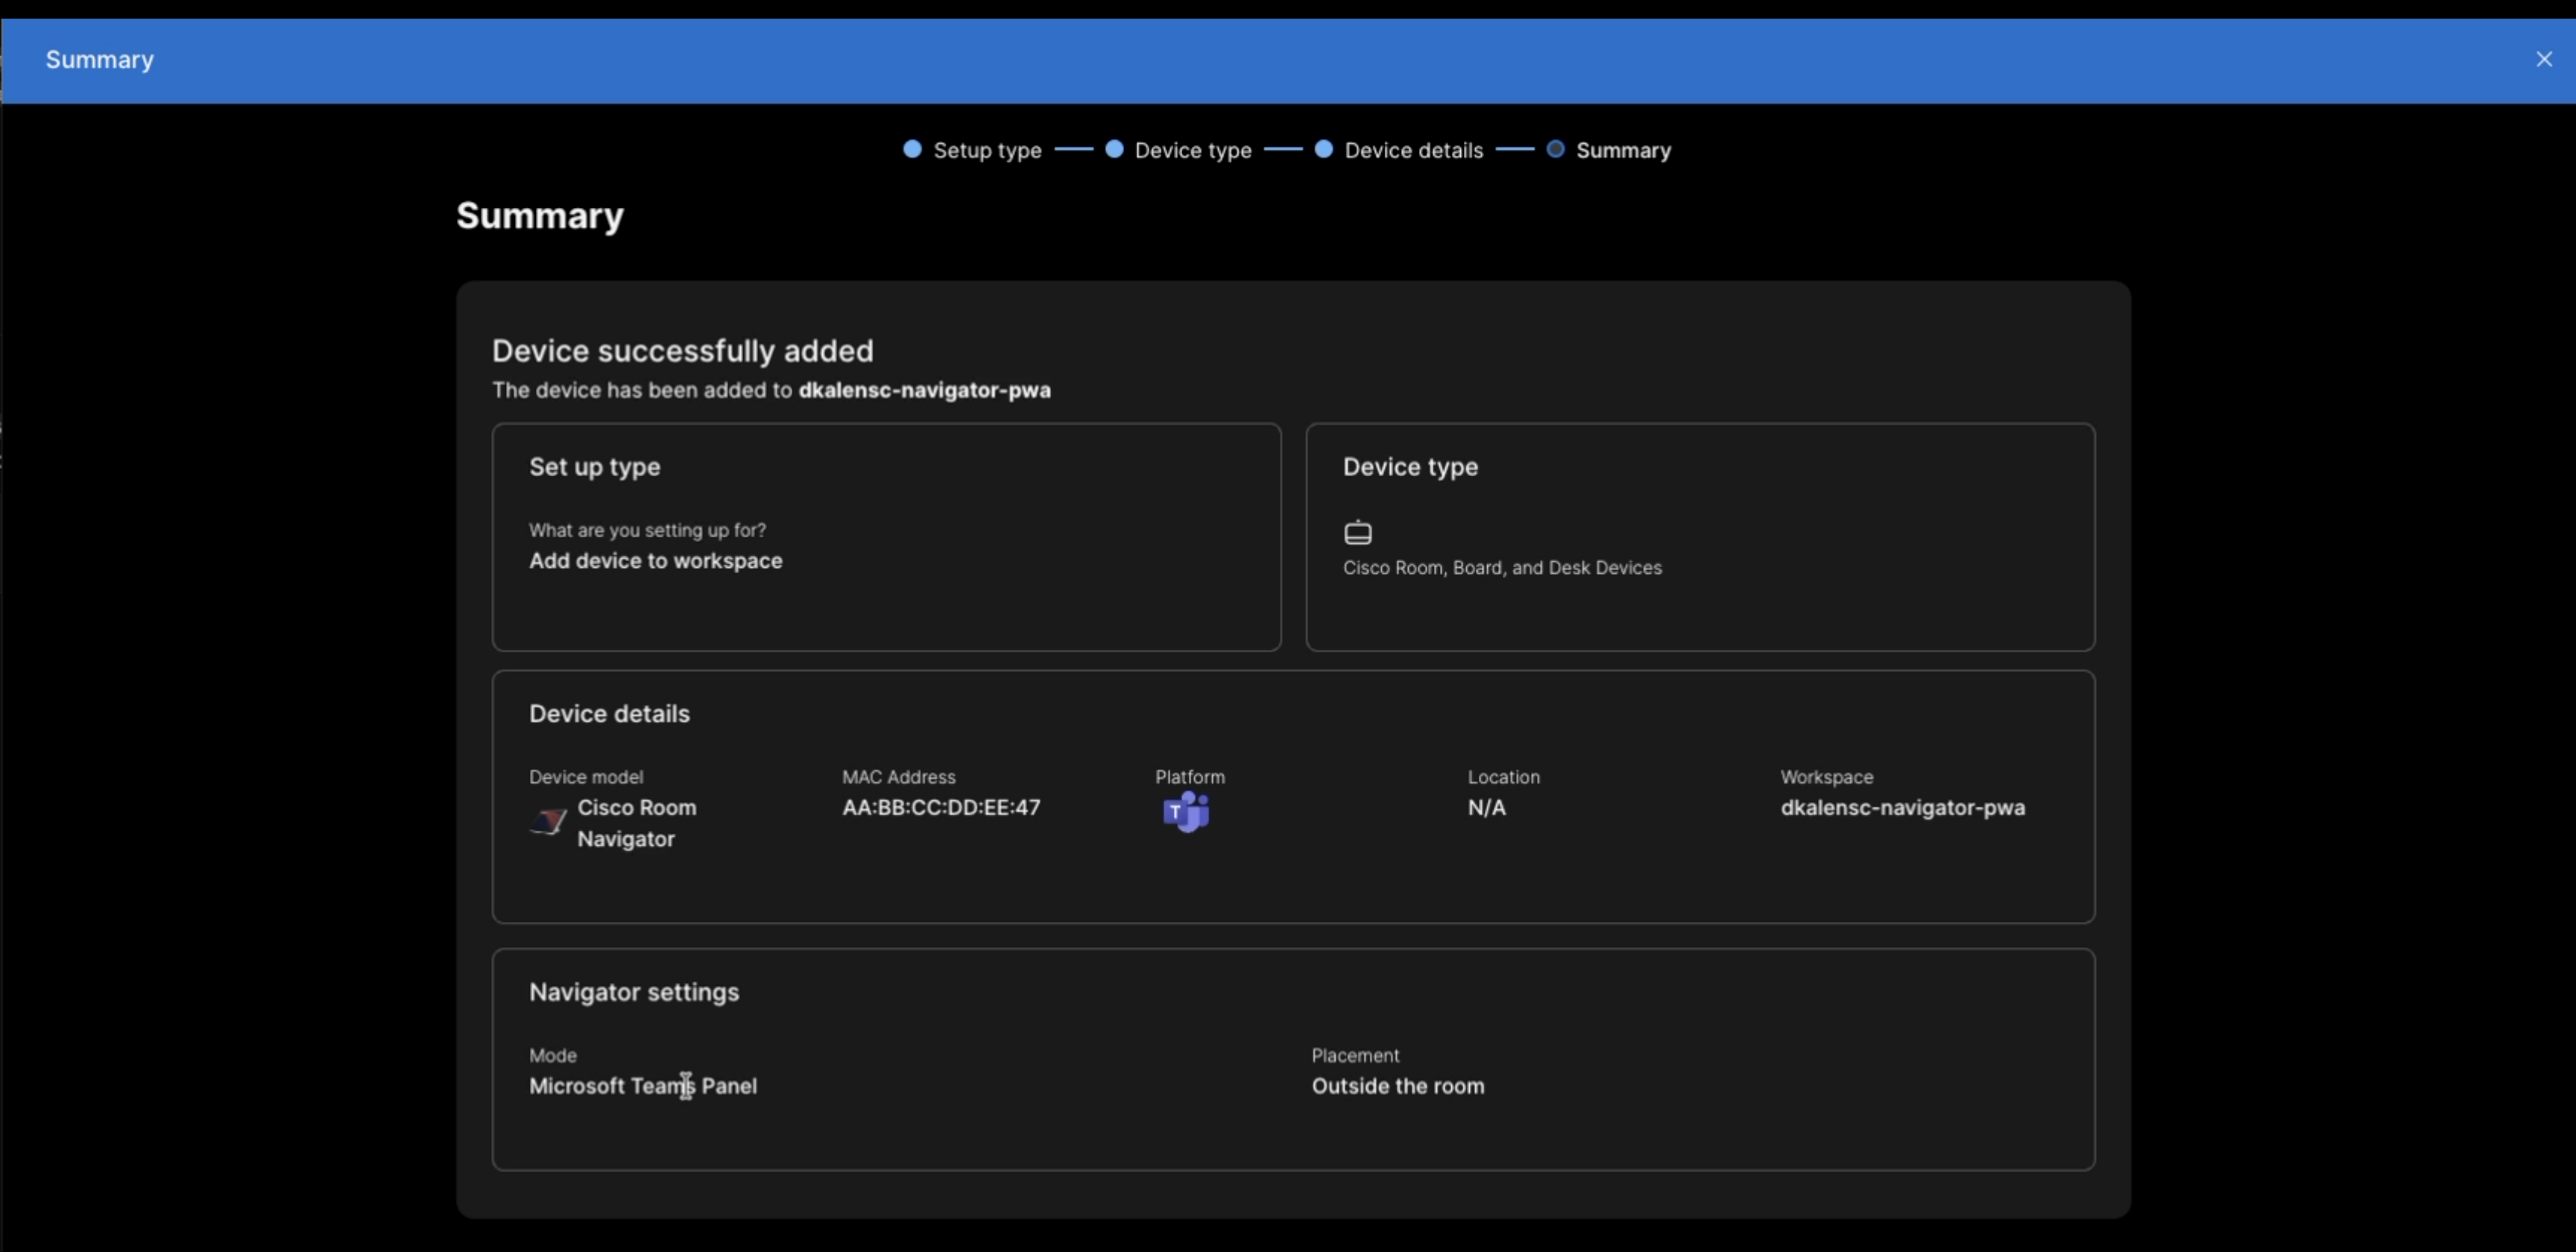 The summary page confirms the pending Room
Navigator and its selected settings.
Add pending Room Navigators by using a device CSV file
- In Control Hub, start the bulk device assignment process and download the current CSV template.
- Add each Room Navigator on a separate row.
- Complete the required device and workspace fields.
- Specify the Touch Panel Mode and Touch Panel Placement values for each Room Navigator.
- Upload the CSV file, review the device assignments, and submit them.
- Verify that each pending Room Navigator appears in the correct workspace.
Use the following values in the Touch Panel Mode column:
| Mode | CSV value |
|---|---|
| Room Booking |
roomScheduler
|
| Desk Booking |
deskScheduler
|
| Microsoft Teams Panel |
microsoftTeamsPanel
|
| Persistent Web App |
persistentWebApp
|
Use the following values in the Touch Panel Placement column:
| Placement | CSV value |
|---|---|
| Inside the room |
insideRoom
|
| Outside the room |
outsideRoom
|

The CSV template includes Touch Panel Mode and
Touch Panel Placement. This example uses roomScheduler and
insideRoom with sample data.
Onboard the Room Navigator
- Connect the Room Navigator, and turn it on. The device must be new or factory reset.
- Complete the language and network setup screens, if they appear.
- Select Try automatic onboarding.
- If prompted, install the pre-onboarding software upgrade and wait for the Room Navigator to restart.
- Wait for the registration and configuration processes to complete.
The Room Navigator is ready when it appears online in Control Hub and displays the configured mode and placement.
Recovery scenarios
The network is unavailable
If the Room Navigator can’t connect to the network, it displays the network setup screen. Configure the network connection, and then retry automatic onboarding.
The device is unclaimed or unassigned
If the Room Navigator displays an unclaimed-device or assignment error, add or correct the device assignment in Control Hub. Then, retry automatic onboarding.
Pair the Room Navigator or use an activation code
To pair the Room Navigator or enter an activation code, restart the setup wizard and select Manual onboarding instead of Try automatic onboarding.
Troubleshooting
| Symptom | Action |
|---|---|
| Try automatic onboarding isn’t available. | Upgrade the Room Navigator to RoomOS 26.10.0 or later. |
| The Room Navigator has no touch panel mode after onboarding. | The device might have been claimed through the previous zero-touch provisioning flow without mode settings. Create a new pending assignment with the correct mode and placement, factory-reset the Room Navigator, and try again. |
| The Room Navigator isn’t found. | Verify that Control Hub contains the correct wired MAC address and that the pending device is assigned to the correct workspace. |
| The mode or placement is incorrect. | Remove the pending device, and create a new assignment with the correct mode and placement. Then, retry automatic onboarding. |
| The Room Navigator can’t connect to Webex. | Restore network connectivity to Webex, and then retry automatic onboarding. |


