- Home
- /
- Article

Thanks for your feedback.

Configure trunks, route groups, and dial plans for Webex Calling
 In this article
 Feedback?
Webex Calling Plans, Trunks, and Route Groups help configure Webex Calling to manage calls between Webex Calling hosted users and premises PBX(s) users. This solution lets you configure hosted users to use Cloud PSTN (CCP or Cisco PSTN) or Premises-based PSTN.
A Trunk is a connection between Webex Calling and the premises, which terminates on the premises with a local gateway or other supported device. After you create a trunk, you can assign it to a route group.
A Route Group is a group of trunks that allow Webex Calling to distribute calls over multiple trunks or to provide redundancy.
A Local Gateway is an on-premises device that interconnects the trunk, on-premises PSTN, and/or PBX.
Trunks, route groups, and dial plans provide the following benefits:
-
Load-balancing and fail over across trunks to Webex Calling and the premises.
-
Ability for Webex Calling users to use cloud PSTN (Cloud Connected PSTN (CCP) or Cisco PSTN) and reach PBX users in the enterprise.
-
Routing of calls to different premises PBXs.
-
Tandem functionality to route calls between premises PBXs.
-
Broader range of migration and coexistence scenarios with premises PBXs, including mixed sites with premises users and Webex Calling users.
-
In-depth visibility of call routing decisions.
PSTN options for your location
Once your location is enabled, you must set up PSTN connectivity for Webex Calling users within that location. The following PSTN options are available:
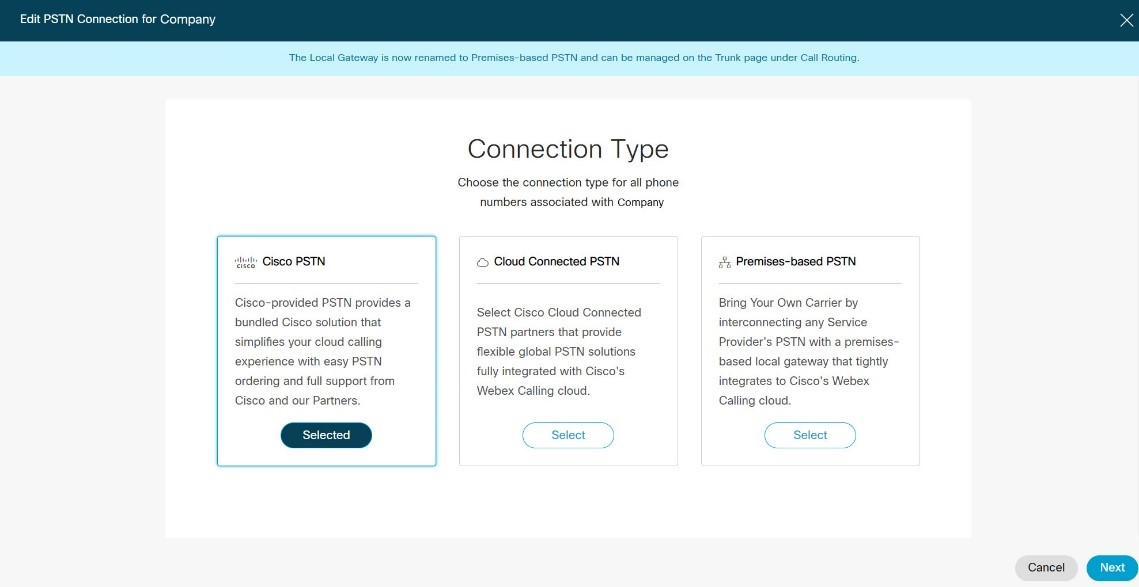
-
Cisco PSTN—Choose this option if you’d like a bundled solution that allows you to order new PSTN numbers and port existing numbers to Cisco. The Cisco PSTN option is only available under the following conditions:
-
You have purchased and enabled the Cisco Calling Plan.
-
The location is in a country where Cisco Calling Plan is supported.
-
-
Cloud Connected PSTN—Choose this option if you’re looking for a cloud solution that doesn’t require deployment of local hardware, and then select a CCP provider of choice. Cloud PSTN (Cisco PSTN or Cloud Connected PSTN) can only be used to provide PSTN access for Webex Calling users. Calls originating from premises users can’t access cloud PSTN.
-
Premises-based PSTN (Local Gateway)—Choose this option if you want to keep your current PSTN provider. Trunks for premises-based PSTN through local gateway can also be used to connect to premises PBXs. You can retain existing local gateway functionality is retained without making any configuration changes. Locations using local gateway are set to Premises-based PSTN and local gateways become trunks.
Configure your selected PSTN connection within Control Hub by selecting , select the location you want to modify, then select Assign or Manage and select the PSTN connection of choice.
Trunk
A trunk is a connection between Webex Calling and the premises, terminated on the premises with a supported session border controller acting as a Local Gateway. See Get started with Local Gateway to understand the various trunking models and requirements for devices and configuration.
For a registration trunk model, Session Border Controller (SBC) performs SIP registration. Registration-based trunk requires the local gateway to maintain the SIP registration is active. The connection is implicit to registration.
Before you begin
All trunks must be assigned to a location in Control Hub.
| 1 |
Select Add Trunk. |
| 2 |
Select a Location from the drop-down list. |
| 3 |
Enter a Name for the trunk. |
| 4 |
Select Registering from the Trunk Type drop-down list. |
| 5 |
Dual Identity Support setting impacts the handling of the From header and P-Asserted-Identity (PAI) header when sending an initial SIP INVITE to the trunk for an outbound call. With Dual Identity enabled, Webex Calling populates From and PAI (and both identity headers can be different). With Dual Identity disabled, PAI and From are identical and are set to what the From header was set to with Dual Identiity enabled. Below are some example scenarios to better understand the usage of this setting:
|
| 6 |
Click Save. |
What to do next
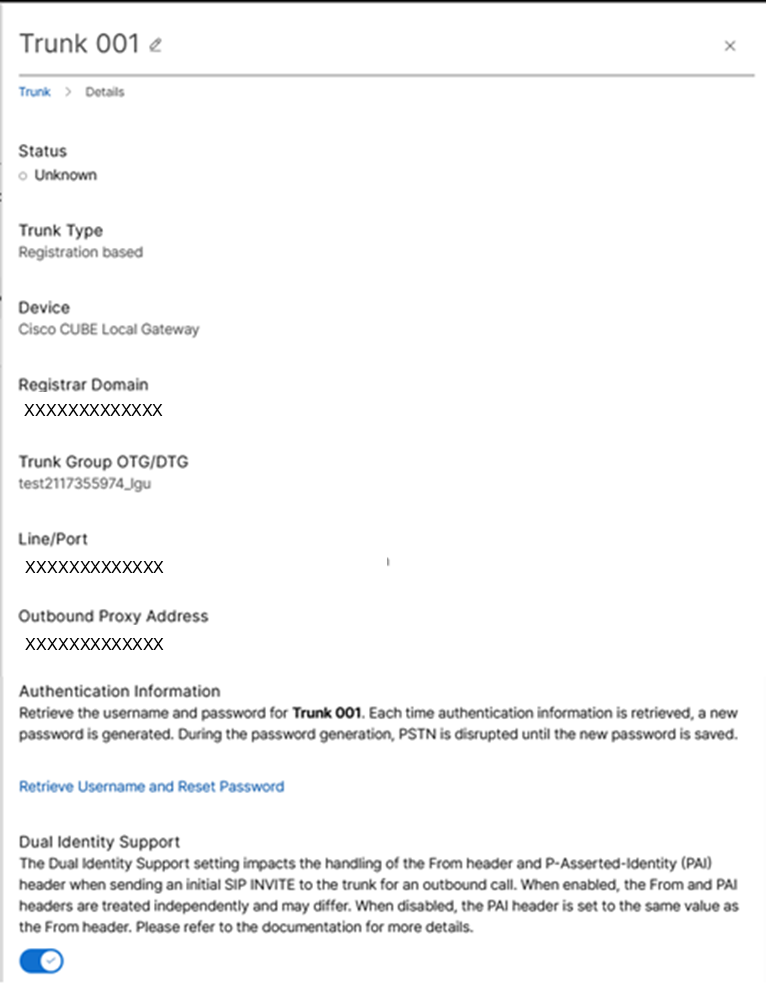
The trunk information appears on the screen Register Domain, Trunk Group OTG/DTG, Line/Port, Outbound Proxy Address. We recommend that you copy this information from Control Hub and paste it into a local text file or document so you can refer to it when you’re ready to configure the local gateway. If you lose the credentials, you must regenerate them from the trunk information screen in Control Hub. Click Retrieve Username and Reset Password to generate a new set of authentication credentials to use on the trunk.
This action impacts service, so it's recommended to be done during nonbusiness hours.
If you are configuring a trunk to connect your local gateway to Webex Calling, see: Configure Local Gateway on IOS-XE for Webex Calling.
A trunk is the connection between Webex Calling and the premises, terminating on the premises with a local gateway or other supported device.
Before you begin
All trunks must be assigned to a location within Control Hub.
| 1 |
Sign in to Control Hub. |
| 2 |
Go to . |
| 3 |
Select Add Trunk. |
| 4 |
Select a location and name of the trunk. The name of the trunk can't be more than 24 characters long. |
| 5 |
Dual Identity Support setting impacts the handling of the From header and P-Asserted-Identity (PAI) header when sending an initial SIP INVITE to the trunk for an outbound call. With Dual Identity enabled, Webex Calling populates From and PAI (and both identity headers can be different). With Dual Identity disabled, PAI and From are identical and are set to what the From header was set to with Dual Identiity enabled. Below are some example scenarios to better understand the usage of this setting:
|
| 6 |
Click Save. |
| 7 |
The P-Charge-Info Support addresses the need for PSTN providers to have a more reliable method for authenticating and billing calls within Webex Calling. The local gateway may receive a caller ID that differs from the number you want to use for billing or authorization. To send an additional identifier for these purposes, use the P-Charge-Info header. Enable this option to include the P-Charge-Info header in the outbound PSTN call information sent to the trunk, using a number based on the selected policy option. The PSTN provider can then rely on the single P-Charge-Info header to determine the chargeable number, eliminating the need to use the PAI header for regular originations and the Diversion header for call redirections. By default, the system sets the P-Charge-Info Support policy to Disabled.
Limitations:
|
What to do next
The trunk information appears on the screen Register Domain, Trunk Group OTG/DTG, Line/Port, Outbound Proxy Address. We recommend that you copy this information from Control Hub and paste it into a local text file or document so you can refer to it when you’re ready to configure the local gateway. If you lose the credentials, you must re-generate them from the trunk information screen in Control Hub. Click Retrieve Username and Reset Password to generate a new set of authentication credentials to use on the trunk.
This action impacts service, so it's recommended to do during non-business hours.
You can edit the trunk name or view the trunk details and usage in the Control Hub.
| 1 |
Sign in to Control Hub. |
| 2 |
Go to . |
| 3 |
Select the trunk you want to view or modify. |
| 4 |
On the side panel, next to the trunk name, click the You can also view the usage information for the trunk. |
| 5 |
To view additional details, click Manage next to Trunks. Use this setting if you lose the trunk information credentials and need to regenerate them. Click Retrieve Username and Password to generate a new set of authentication credentials to use on the trunk. This is service impacting. |
| 6 |
Dual Identity Support setting impacts the handling of the From header and P-Asserted-Identity (PAI) header when sending an initial SIP INVITE to the trunk for an outbound call. With Dual Identity disabled, PAI and From are identical and are set to what the From header was set to with Dual Identiity enabled. Below are some example scenarios to better understand the usage of this setting:
|
 icon to change the name of the trunk.
You can delete a trunk as long as it's not in use.
| 1 |
Sign in to Control Hub. |
| 2 |
Go to . |
| 3 |
Select the trunk you want to delete. |
| 4 |
Click |
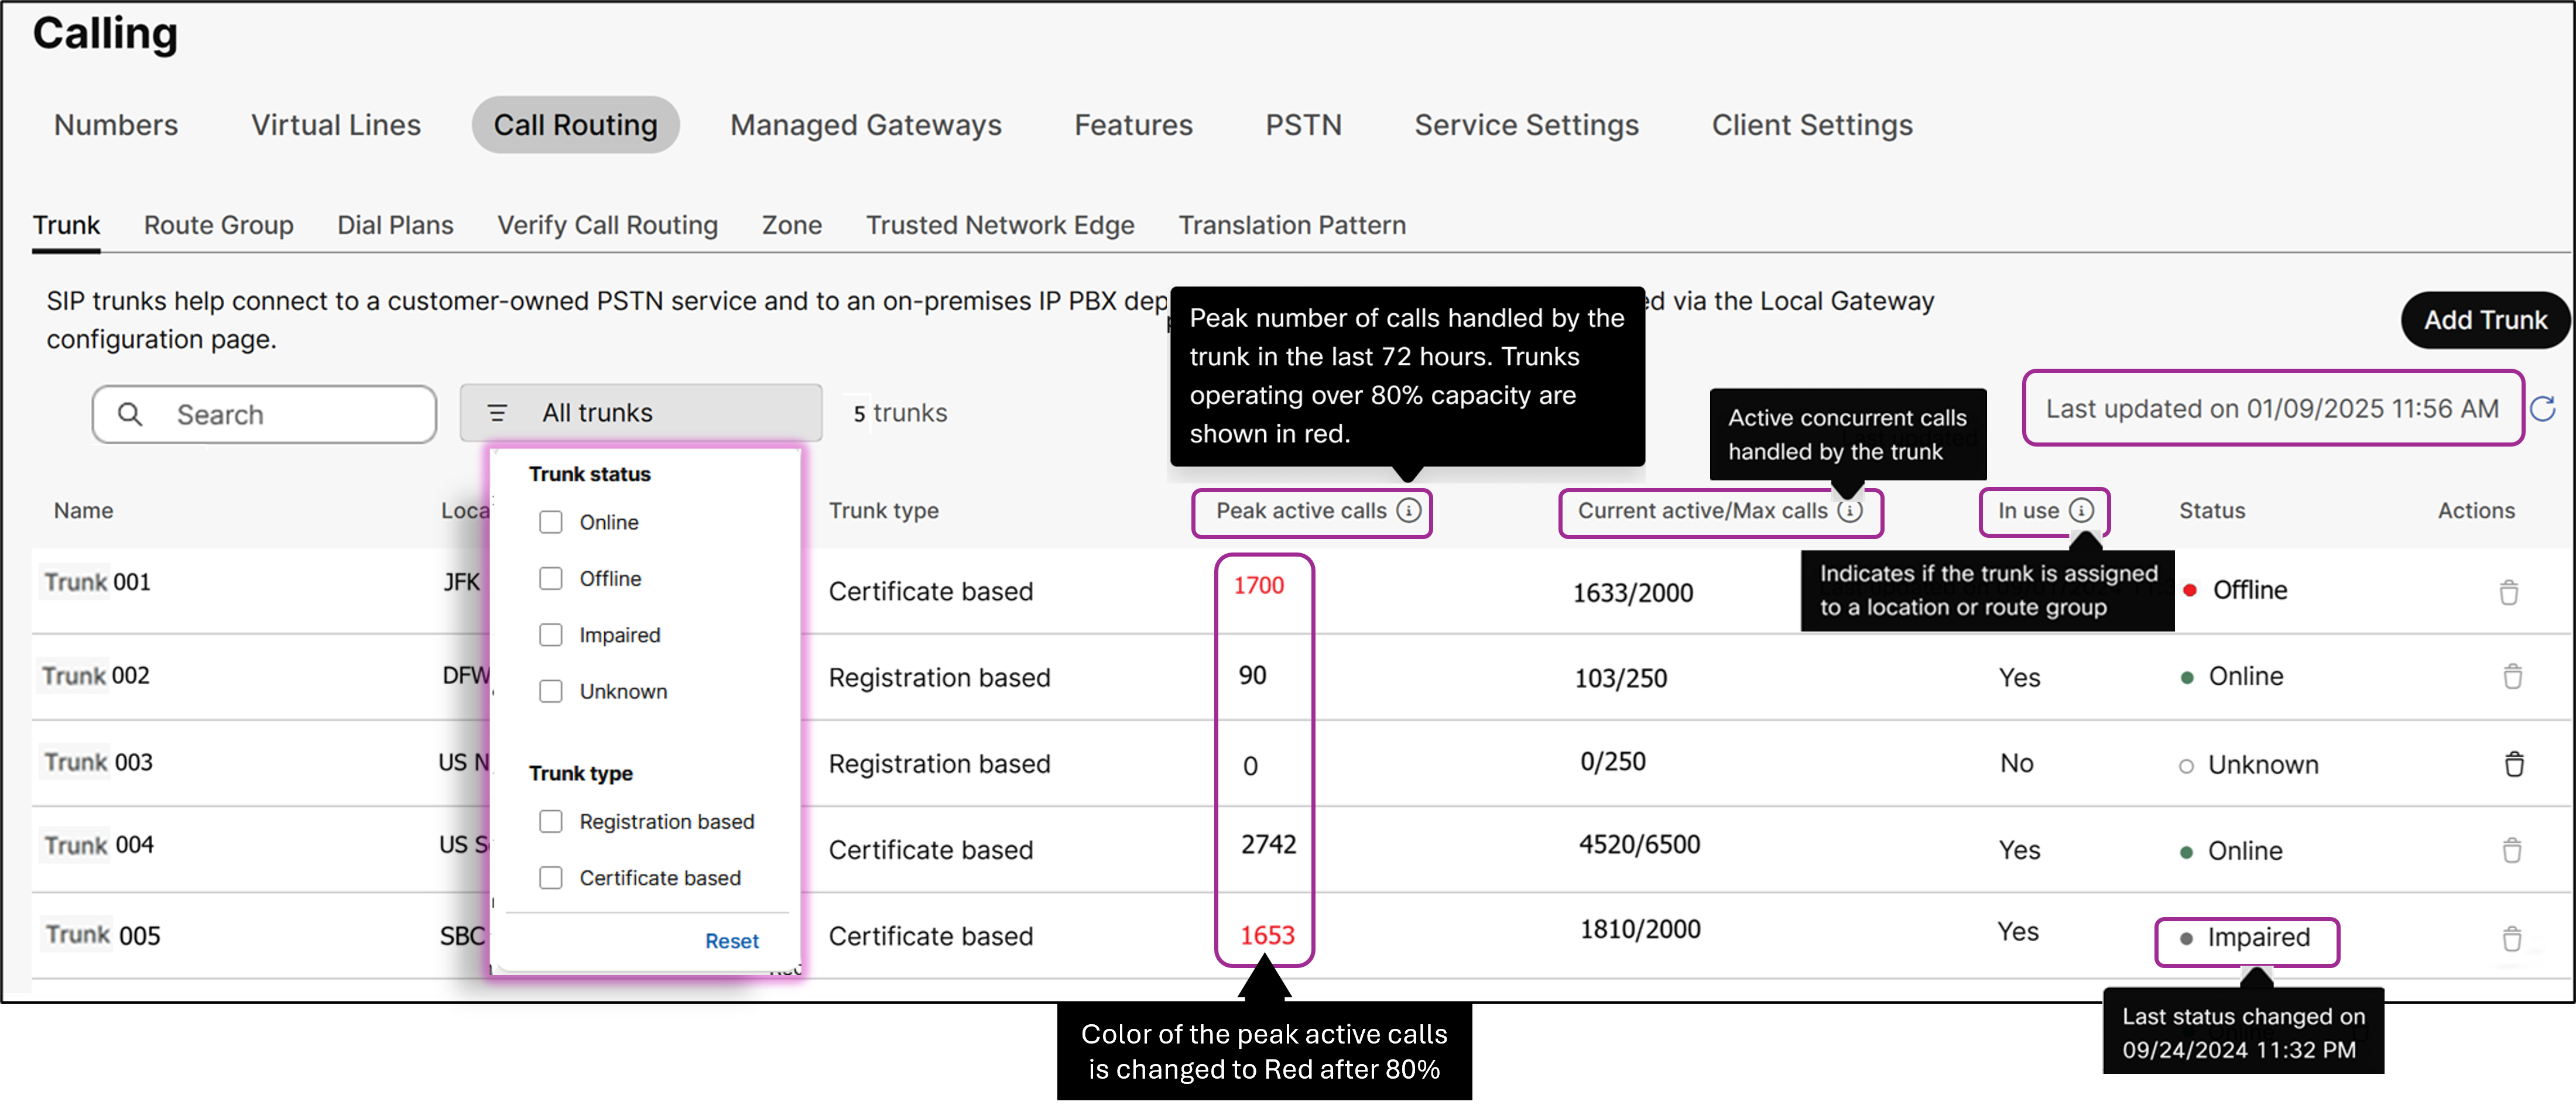
To check the trunk status in the Control Hub.
| 1 |
Sign in to Control Hub. | |||||||||||||||||
| 2 |
Go to .
The page lists your trunks and displays information about them,
including Status—online, offline, unknown, and impaired.
| |||||||||||||||||
| 3 |
(Optional) You can Filter the trunk records based on Trunk status or Trunk type. From the All trunks drop-down filter menu, select any of the following filter options to populate the page. Trunk status updates every 3 minutes.
| |||||||||||||||||
| 4 |
Click Refresh to see the most recent updates on the status of the trunk. The timestamp for the last page refresh is shown. Use the manual
Refresh to update the page.
| |||||||||||||||||
| 5 |
(Optional) You can search for a specific trunk record using the Search option based on the Name or the Location. If your search returns more than 1000 trunks, you can't sort or search within results. | |||||||||||||||||
| 6 |
Select a trunk from the list to check for detailed information. A popup window appears displaying detailed information about the
selected trunk.
| |||||||||||||||||
| 7 |
Click to view the complete trunk information.
For more information on various error conditions, see Local Gateway Troubleshooting. |
While adding a certificate-based trunk, you must enter a Fully Qualified Domain Name (FQDN). Then, Webex Calling uses a combination of the FQDN and the local gateway's certificate to trust a Local Gateway.
Requirements for configuring a Local Gateway from the Control Hub:
-
The Local Gateway MUST be directly reachable from the internet using a public IPv4 address. This address MUST be resolved from a DNS A or SRV record from a domain that has been verified in the Control Hub. If the Local Gateway has been configured with a private IP address, then a 1:1 static address translation (NAT) is required to ensure that it can be reached directly from the Internet.
-
When deployed behind a firewall, suitable rules MUST be configured to allow TLS SIP signaling and UDP/SRTP media to pass between the Local Gateway and the Internet.
-
Refer to the Webex Calling port reference Guide for details of the ports used in flows between the Local Gateway and the Webex Cloud.
-
This configuration guide assumes that the standard TLS SIP port of 5061 is used by the Local Gateway to receive signaling. If required, an alternative signaling listen port may be used.
-
-
A signed certificate is required for a successful authorization and authentication of calls from the trunk. A Local Gateway MUST meet the following requirements when establishing a bidirectional mutual TLS connection with Webex Calling services for SIP:
-
A Local Gateway's certificate MUST be:
-
Signed by a CA mentioned in What Root Certificate Authorities are Supported for Calls to Cisco Webex Audio and Video Platforms?
-
Signed certificates MUST always have a valid expiry.
-
Root or intermediate certificates used to sign the certificate MUST have a valid expiry and shouldn't be revoked.
-
Certificates containing only Server Authentication Extended Key Usage (EKU) are supported. Webex Calling doesn't validate or enforce the presence of Client Authentication EKU during TLS handshake establishment.
Some third-party Session Border Controllers (SBC) may enforce strict EKU validation and could reject certificates that don't include Client Authentication EKU. In such cases, ensure the SBC is configured to accept certificates with Server Authentication EKU only or to disable strict EKU validation (if supported). -
Certificates MUST contain the Fully Qualified Domain Name (FQDN) as a common name or subject alternate name in the certificate with the FQDN for the trunk is chosen in the Control Hub. Requirements are elaborated in the next section.
-
-
A trust bundle mentioned in What Root Certificate Authorities are Supported for Calls to Cisco Webex Audio and Video Platforms? should be uploaded to validate certificates from Webex services for SIP.
-
Before you begin
-
Claimed or verified domain: When adding a trunk, a host address from a verified or a claimed top-level domain name MUST be chosen, see Manage-your-domain.
-
Unique address across the organization: A trunk is created with a unique FQDN or SRV host address. This address MUST be unique for the entire organization and no two trunks can use the same address.
-
A trunk with an FQDN london.lgw.cisco.com:5062 can only be created if there exists no other trunk with a host address london.lgw.cisco.com. This is not allowed even if there exists a trunk with the same address name as an SRV address or an FQDN and with a different port combination.
-
A trunk with SRV address london.lgw.cisco.com can only be created if there exists no other trunk with a host address london.lgw.cisco.com. This is not allowed even if there exists a trunk with the same name as SRV address or an FQDN and with a different port combination.
-
-
DNS configuration: The Local Gateway MUST be resolved from the public internet through a DNS A or DNS Service Record (SRV) type record.
-
If an FQDN is chosen, the address MUST resolve to a DNS A Record and not to a DNS CNAME(s).
-
If an SRV address is chosen, then the service type MUST have a prefix of "_sips._tcp".
-
Address may resolve to one or more DNS A Records with differing weight and priority. While doing so, it is recommended to use the same listening port for all records.
-
Records within the service record must have an appropriate weight and priority. Usage of differing weight and priority influences traffic distributions for calls originating from Webex Calling.
-
-
All record types MUST have a reasonable high TTL 300 seconds or higher is preferred.
While configuring the trunk address in Control Hub, both FQDN and SRV formats are allowed. However, for tenant-side configuration to connect with Webex Calling, only SRV-based Webex Calling Edge addresses should be used on the Local Gateway.
-
-
All trunks must be assigned to a location in the Control Hub.
The following table has examples with different types of records that are chosen in your organization as the trunk's address at the same time.
|
Trunk configuration as FQDN or SRV |
Rule for DNS configuration |
Address present in the certificate as a Common Name (CN) or Subject Alternate Name (SAN) |
SIP Contact Header requirement |
|---|---|---|---|
|
FQDN: london.lgw1.cisco.com with port 5061 |
london.lgw1.cisco.com is a DNS A record |
london.lgw1.cisco.com |
sip:london.lgw1.cisco.com:port;transport=tls or sip:user@london.lgw1.cisco.com:port;transport=tls |
|
SRV: frankfurt.lgw.cisco.com |
_sips._tcp.frankfurt.lgw.cisco.com resolves to ONE A Record frankfurt.lgw1.cisco.com |
frankfurt.lgw.cisco.com |
sip:frankfurt.lgw.cisco.com;port;transport=tls or sip:user@frankfurt.lgw.cisco.com;port;transport=tls |
|
SRV: frankfurt.lgw.cisco.com |
_sips._tcp.frankfurt.lgw.cisco.com resolves to TWO or more A Records fr.lgw1.cisco.com fr.lgw2.cisco.com Both the records MUST resolve to a unique IP address and as suggested, may have different weight and priority. |
frankfurt.lgw.cisco.com |
sip:frankfurt.lgw.cisco.com;port;transport=tls or sip:user@frankfurt.lgw.cisco.com;port;transport=tls |
Every SIP transaction Local Gateway initiates towards Webex Calling cloud, should contain Contact header with FQDN of a Local Gateway.
OPTIONS Transactions from Local Gateway is specially important for the Local Gateway status in the Control Hub to be online.
You are required to add the SRV record and the derived A record in the SAN of the certificate.
| 1 |
Sign in to Control Hub. |
| 2 |
Go to . Alternatively, customers using the Cisco Calling Plan can add a Trunk from
.
|
| 3 |
Select Add Trunk. |
| 4 |
Select a Location from the drop-down list. |
| 5 |
Enter a Name for the trunk. |
| 6 |
Select Certificate-based from the Trunk Type drop-down list. |
| 7 |
Select a Device Type from the drop-down. The SBC integration with Cisco Webex Calling as third-party Local Gateway (LGW) is only supported with Certificate-based trunk. Only SBCs shown in the device type list in Control Hub are validated by our trusted partners as Compatible Webex Calling Local Gateways. For more information on supported third-party vendor information, see: Third-party SBC support under the Trunk section. |
| 8 |
Enter the Session Border Controller (SBC) Address, Domain, and Port. This is the FQDN or SRV address for Webex Calling to reach out to your
Enterprise SBC.
You must have a verified domain. For more information, see
Manage your domains |
| 9 |
Enter the maximum number of concurrent calls.
|
| 10 |
Click Save. If validation doesn’t pass, the Save button won’t appear. Validation may
not pass if the FQDN or SRV chosen is not unique per your organization.
Check the requirement for unique FQDN or SRV addresses above. If the issue
persists contact the Cisco support team. |
What to do next
-
Save the Webex Calling Edge addresses shown on the final screen.
-
To configure a CUBE as your Local Gateway, see: Configure Local Gateway on IOS-XE for Webex Calling
You can edit the trunk name or view the trunk details and usage in Control Hub.
| 1 |
Sign in to Control Hub. |
| 2 |
Go to . |
| 3 |
Select the trunk you want to view or modify. |
| 4 |
On the side panel, next to the trunk name, click You can also view the usage information for the trunk. |
| 5 |
To view additional details, click Manage next to Trunks. Use this setting if you wish to update a value for Max Concurrent Calls. If you have to update the SRV address or FQDN or port of your local gateway you must add a new trunk and delete the old trunk. |
| 6 |
Dual Identity Support setting impacts the handling of the From header and P-Asserted-Identity (PAI) header when sending an initial SIP INVITE to the trunk for an outbound call. Below are some example scenarios to better understand the usage of this setting:
|
You can delete a trunk as long as it's not in use.
| 1 |
Sign in to Control Hub. |
| 2 |
Go to . |
| 3 |
Select the trunk you want to delete. |
| 4 |
Click |
To check the trunk status in the Control Hub.
| 1 |
Sign in to Control Hub. | |||||||||||||||||
| 2 |
Go to .
The page lists your trunks and displays information about them,
including Status—online, offline, unknown, and impaired.
| |||||||||||||||||
| 3 |
(Optional) You can Filter the trunk records based on Trunk status or Trunk type. From the All trunks drop-down filter menu, select any of the following filter options to populate the page. Trunk status updates every 3 minutes.
| |||||||||||||||||
| 4 |
Click Refresh to see the most recent updates on the status of the trunk. The timestamp for the last page refresh is shown. Use the manual
Refresh to update the page.
| |||||||||||||||||
| 5 |
(Optional) You can search for a specific trunk record using the Search option based on the Name or the Location. If your search returns more than 1000 trunks, you can't sort or search within results. | |||||||||||||||||
| 6 |
Select a trunk from the list to check for detailed information. A popup window appears displaying detailed information about the
selected trunk.
| |||||||||||||||||
| 7 |
Click to view the complete trunk information.
For more information on various error conditions, see Local Gateway Troubleshooting. |
|
SI No. |
Error Description |
Action |
|---|---|---|
|
1. |
TLS Connection to Local Gateway failed due to DNS resolution failure of the FQDN configured for your gateway |
Verify the DNS configurations for the SRV /FQDN configured and ensure they are resolvable |
|
2. |
TLS Connection to Local Gateway failed due to a transport issue |
Verify that the resolved IP addresses and port to the Local Gateway are valid |
|
3. |
TLS Connection to Local Gateway failed as the gateway's certificate is signed by an invalid Certificate Authority |
Verify and ensure that the Local Gateway certificate is signed by a valid Certificate Authority ( What Root Certificate Authorities are Supported for Calls to Cisco Webex Audio and Video Platforms?) |
|
4. |
TLS Connection to Local Gateway failed as the gateway's certificate has expired |
Verify and ensure that the Local Gateway certificate is not expired |
|
5. |
TLS Connection to Local Gateway failed as the gateway's certificate has been issued by an expired Certificate Authority |
Verify and ensure that the Local Gateway certificate is not signed by an expired Certificate authority certificate chain |
|
6. |
TLS Connection to Local Gateway failed as the FQDN configured for your gateway is missing from CN or SAN |
Verify and ensure that the Local Gateway certificate has CN / SAN same as the FQDN/SRV configured |
|
7. |
SIP options sent to the Local Gateway received no response |
Verify and ensure that the CUBE is configured to receive OPTIONS requests and respond. Verify the CUBE configuration |
|
8. |
TLS connection from Local Gateway to Webex Calling failed due to an invalid gateway certificate |
Verify and ensure that the Local Gateway certificate is valid |
|
9. |
TLS connection from Local Gateway to Webex Calling failed as we were unable to trust the Certificate Authority |
Verify and ensure that the Local Gateway certificate is signed by the valid Certificate Authority ( What Root Certificate Authorities are Supported for Calls to Cisco Webex Audio and Video Platforms?) |
|
10. |
TLS connection from Local Gateway to Webex Calling failed due to expired certificates in the chain |
Verify and ensure that the Local Gateway certificate is not signed by the expired certificate chain |
|
11. |
TLS connection and SIP options from Local Gateway to Webex Calling have failed |
Verify and ensure that the CUBE is configured to send OPTIONS requests |
|
12. |
SIP options response from the Local Gateway indicates a Server error or Service Unavailable |
Verify and ensure that the Local Gateway is not in Maintenance mode or call routing is not disabled |
|
13. |
TLS Connection to Local Gateway failed as Local gateway's certificate has been revoked |
Verify and ensure that the Local Gateway certificate is not revoked |
|
14. |
TLS Connection from Local Gateway to Webex Calling failed as the gateway's certificate has been revoked |
Verify and ensure that the Local Gateway certificate is not revoked |
|
15. |
TLS Connection from Local Gateway to Webex Calling failed as the gateway's certificate has expired |
Verify and ensure that the Local Gateway certificate is not expired |
|
16. |
TLS Connection from Local Gateway to Webex Calling failed due to a certificate error |
Verify and ensure that the Local Gateway certificate is valid and meets requirements |
|
17. |
TLS Connection to Local Gateway from Webex Calling failed due to a certificate error |
Verify and ensure that the Local Gateway certificate is valid and meets requirements |
Error SI No.: 2,6,11, and 12 are shown only when all the edge proxy nodes experience an issue.
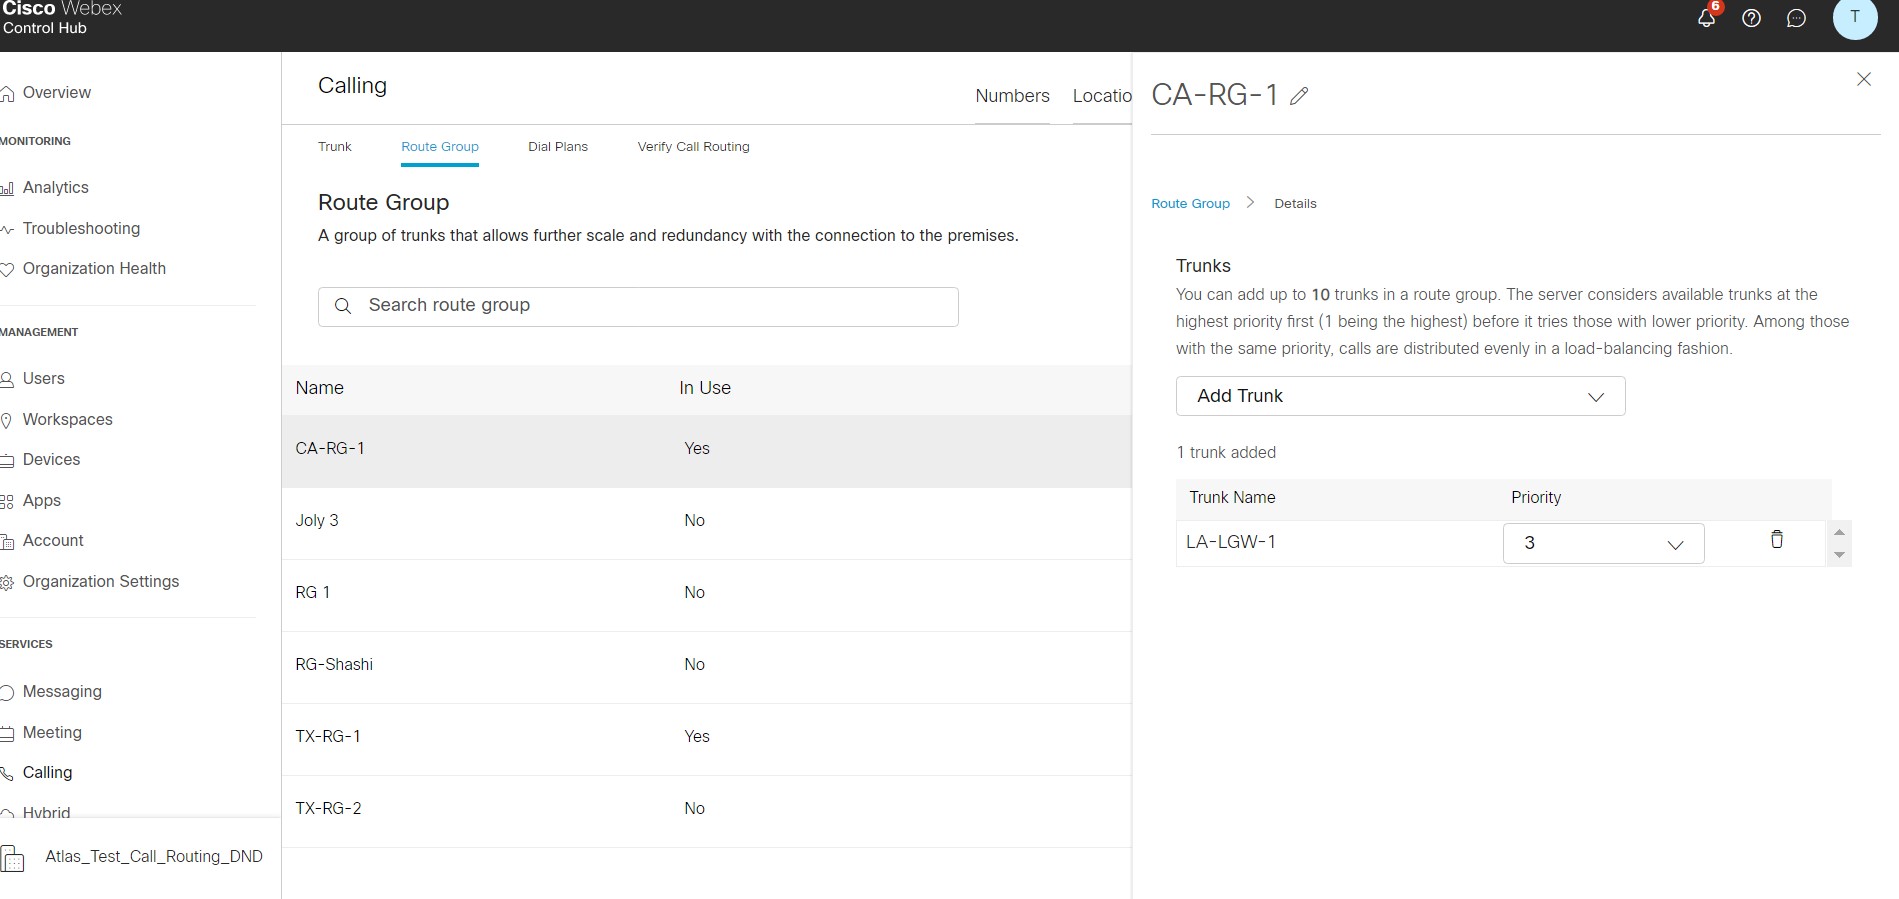
Route group
A Route Group is a group of trunks that allow Webex Calling to distribute calls over multiple trunks or to provide redundancy.
Before you begin
-
Add trunks before configuring a route group.
-
Route groups can include configured trunks from multiple locations.
-
Trunks can be configured singularly or assigned to a route group. Add trunks to route groups to provide redundancy and scalability.
-
Each route group must include at least one trunk with a maximum of 10 trunks per route group.
-
When configuring a route group, you set a priority level to the trunks within that route group. This setting enables calls to be routed in a load-balanced manner.
-
Calls are distributed randomly among trunks with the same priority. If a trunk that is set as highest priority is not available, the system attempts to route the call to a trunk with a lower priority setting. For example:
-
Trunk 1 and Trunk 2 are set at priority level 1.
-
Trunk 3 is set at priority level 2.
-
Webex Calling routes calls to Trunk 1 and Trunk 2 in a load-balanced manner.
-
If Trunk 1 and Trunk 2 are unreachable, calls are routed to Trunk 3.
-
| 1 |
Sign in to Control Hub. |
| 2 |
Go to . Alternatively, customers using the Cisco Calling Plan can add a Route Group
from
|
| 3 |
Select . |
| 4 |
Name the route group, then select the trunk(s) to add from the drop-down menu. |
| 5 |
Select the priority level for the trunk. |
| 6 |
Click Save. |
What to do next
From the confirmation screen, you can visit the Locations page to configure the PSTN connection to individual locations, or you can visit the Dial Plans page to use this route group as the routing choice for a dial plan. A route group can also be used as a routing choice for unknown extension routing on a location.
You can change an existing route group's name, add trunks, modify the number of trunks assigned, and change the trunk priority levels. From the route group details page, you can also view the Calls to On-Premises Extensions, Dial Plans, and PSTN Connection.
| 1 |
Sign in to Control Hub. |
| 2 |
Go to . Alternatively, customers using the Cisco Calling Plan can modify a Route Group
from
|
| 3 |
Select the route group you want to modify. |
| 4 |
On the side panel, next to the route group name, click the |
| 5 |
To add or edit trunks in the route group, click Manage next to Trunks. You can add a trunk from the drop-down menu, edit the priority level of an existing trunk within the table, and/or delete an existing trunk from the table. |
| 6 |
Click Save.
|
You can delete a route group as long as it's not in use.
| 1 |
Sign in to Control Hub. |
| 2 |
Go to . Alternatively, customers using the Cisco Calling Plan can delete a Route Group
from
|
| 3 |
Select the route group you want to delete. |
| 4 |
Click the |
Dial plans allow you to route calls to on-premises destinations by use of trunks or route groups. Configure the dial plans globally for an enterprise and apply to all users, regardless of location. A dial plan also specifies the routing choice (trunk or route group) for calls that match any of its dial patterns. Define the specific dial patterns as part of your dial plan. A dial pattern represents on-premises extensions:
-
ESN/on-net numbers
-
+E.164 patterns
-
SIP URI domains
Numeric Dial Patterns
Numeric patterns can either represent E.164 numbers or enterprise numbers. Patterns for E.164 numbers start with a leading +, followed by a sequence of digits (1-9), and then optional wildcard characters.
Enterprise Dial Pattern
An enterprise dial pattern has a sequence of digits (1-9), followed by optional wildcard characters. Valid wildcard characters are! (matches any sequence of digits) and X (matches a single digit, 0-9). The! wildcard can only occur once at the end and only in an E.164 pattern.
You cannot use:
-
The wild card "X" in the middle of numbers, for example: 617495X3XX
-
The wild card "!" when using the wild card "X" in the dial plan configuration, for example: 1617495X3!
|
Enterprise Dial Plan Examples | |
|---|---|
|
+1408555XXXX |
11-digit +E.164 number starting with +1408555 |
|
+14085551234 |
Exact dial string +14085551234 |
|
+496100! |
Any dial string starting with +496100 |
|
84969XXX |
8-digit ESN starting with 84969 |
|
84969764 |
Exact 8-digit ESN 84969764 |
The dial plan in Webex Calling accepts the from and to headers in E.164 or extensions and can’t be a combination. For example:
From: 1-222-333-4444
To: 1-555-666-7777
SIP URI Dial Pattern Syntax:
Only domains on the right-hand side of SIP URI after @ are matched. Options are either:
-
Fully qualified domain
-
Domain with a leading * (indicating all sub-domains of a given domain)
Examples:
|
SIP URI Dial Patter Syntax Examples | ||
|---|---|---|
|
Prefix |
Meaning |
Examples |
|
example.com |
Only URIs with host portion “example.com” |
alice@example.com |
|
us.example.com |
Only URIs with host portion “us.example.com” |
alice@us.example.com |
|
*.example.com |
URIs with host portion being sub-domain of “example.com” |
alice@eu.example.com alice@sales.us.example.com Note: alice@example.com isn’t matched |
Once you’ve created your trunks and route groups, you can configure a dial plan in Control Hub.
| 1 |
Sign in to Control Hub. |
| 2 |
Go to . Alternatively, customers using the Cisco Calling Plan can create Dial Plans
from .
|
| 3 |
Click Dial Plans, then Create Dial Plan. |
| 4 |
Enter a Name for the dial plan. |
| 5 |
Select a Routing Choice. Select either a previously created trunk or route group. |
| 6 |
(Optional) You can manually create or import a dial pattern for the route choices selected. |
| 7 |
Click Save. |
What to do next
You can also bulk-add dial patterns after your dial plan is created. To bulk-add dial patterns using a CSV file, go to the Dial Plans screen and select the Actions drop-down menu from the dial plan to edit, and then choose Import Dial Patterns CSV or Export Dial Patters CSV. Choose Download Template or Import CSV File and click Submit.
You can change an existing dial plan's name, routing choices, and dial patterns in Control Hub.
| 1 |
Sign in to Control Hub. |
| 2 |
Go to . Alternatively, customers using the Cisco Calling Plan can modify Dial Plans from .
|
| 3 |
Select the dial plan you want to modify. |
| 4 |
On the side panel, next to the dial plan name, click |
| 5 |
To change the Routing Choice choose another option from the drop-down menu. |
| 6 |
To manually add a new dial pattern, click Add dial patterns. Or click Import CSV to bulk-add dial patterns. |
| 7 |
To remove a dial pattern, click the |
| 8 |
Click Save. |
 icon next to the dial pattern you would like to remove.
| 1 |
Sign in to Control Hub. |
| 2 |
Go to . Alternatively, customers using the Cisco Calling Plan can delete Dial Plans from .
|
| 3 |
Select the dial plan you want to delete. |
| 4 |
Click |
You can enable the Calls to On-Premises Extensions setting in Control Hub. This setting applies to users within a location that are registered to a PBX and allows you to route unknown extensions (calling number length of 2-10 digits) to the PBX using an existing trunk or route group.
Before you begin
The Calls to On-Premises Extensions setting is enabled per location.
This setting allows preservation of dialing habits in a mixed cloud/premises environment. Users can continue to use abbreviated dialing (for example, 4 digits), even if the site is partially migrated to Webex Calling.
When enabled, calls made by users at the location to an unknown extension (between 2-10 digits) are routed to the selected route group/trunk as premises calls.
Calls routed through trunks at the location from an unknown extension are handled as premises calls. This is referring to upstream calls incoming into Webex Calling from a trunk.
Calls are considered as originating from an unknown extension when the caller ID does not match any of the existing dial plan patterns.
| 1 |
Sign in to Control Hub. |
| 2 |
Go to . |
| 3 |
Select the location to modify. |
| 4 |
Click on the Calling tab. |
| 5 |
Click Internal dialing, under the Dialing section. |
| 6 |
Toggle on to enable Routing unknown extensions to the Premises as internal calls. |
| 7 |
Select a routing group or trunk from the drop-down menu to route calls. |
| 8 |
Click Save. |
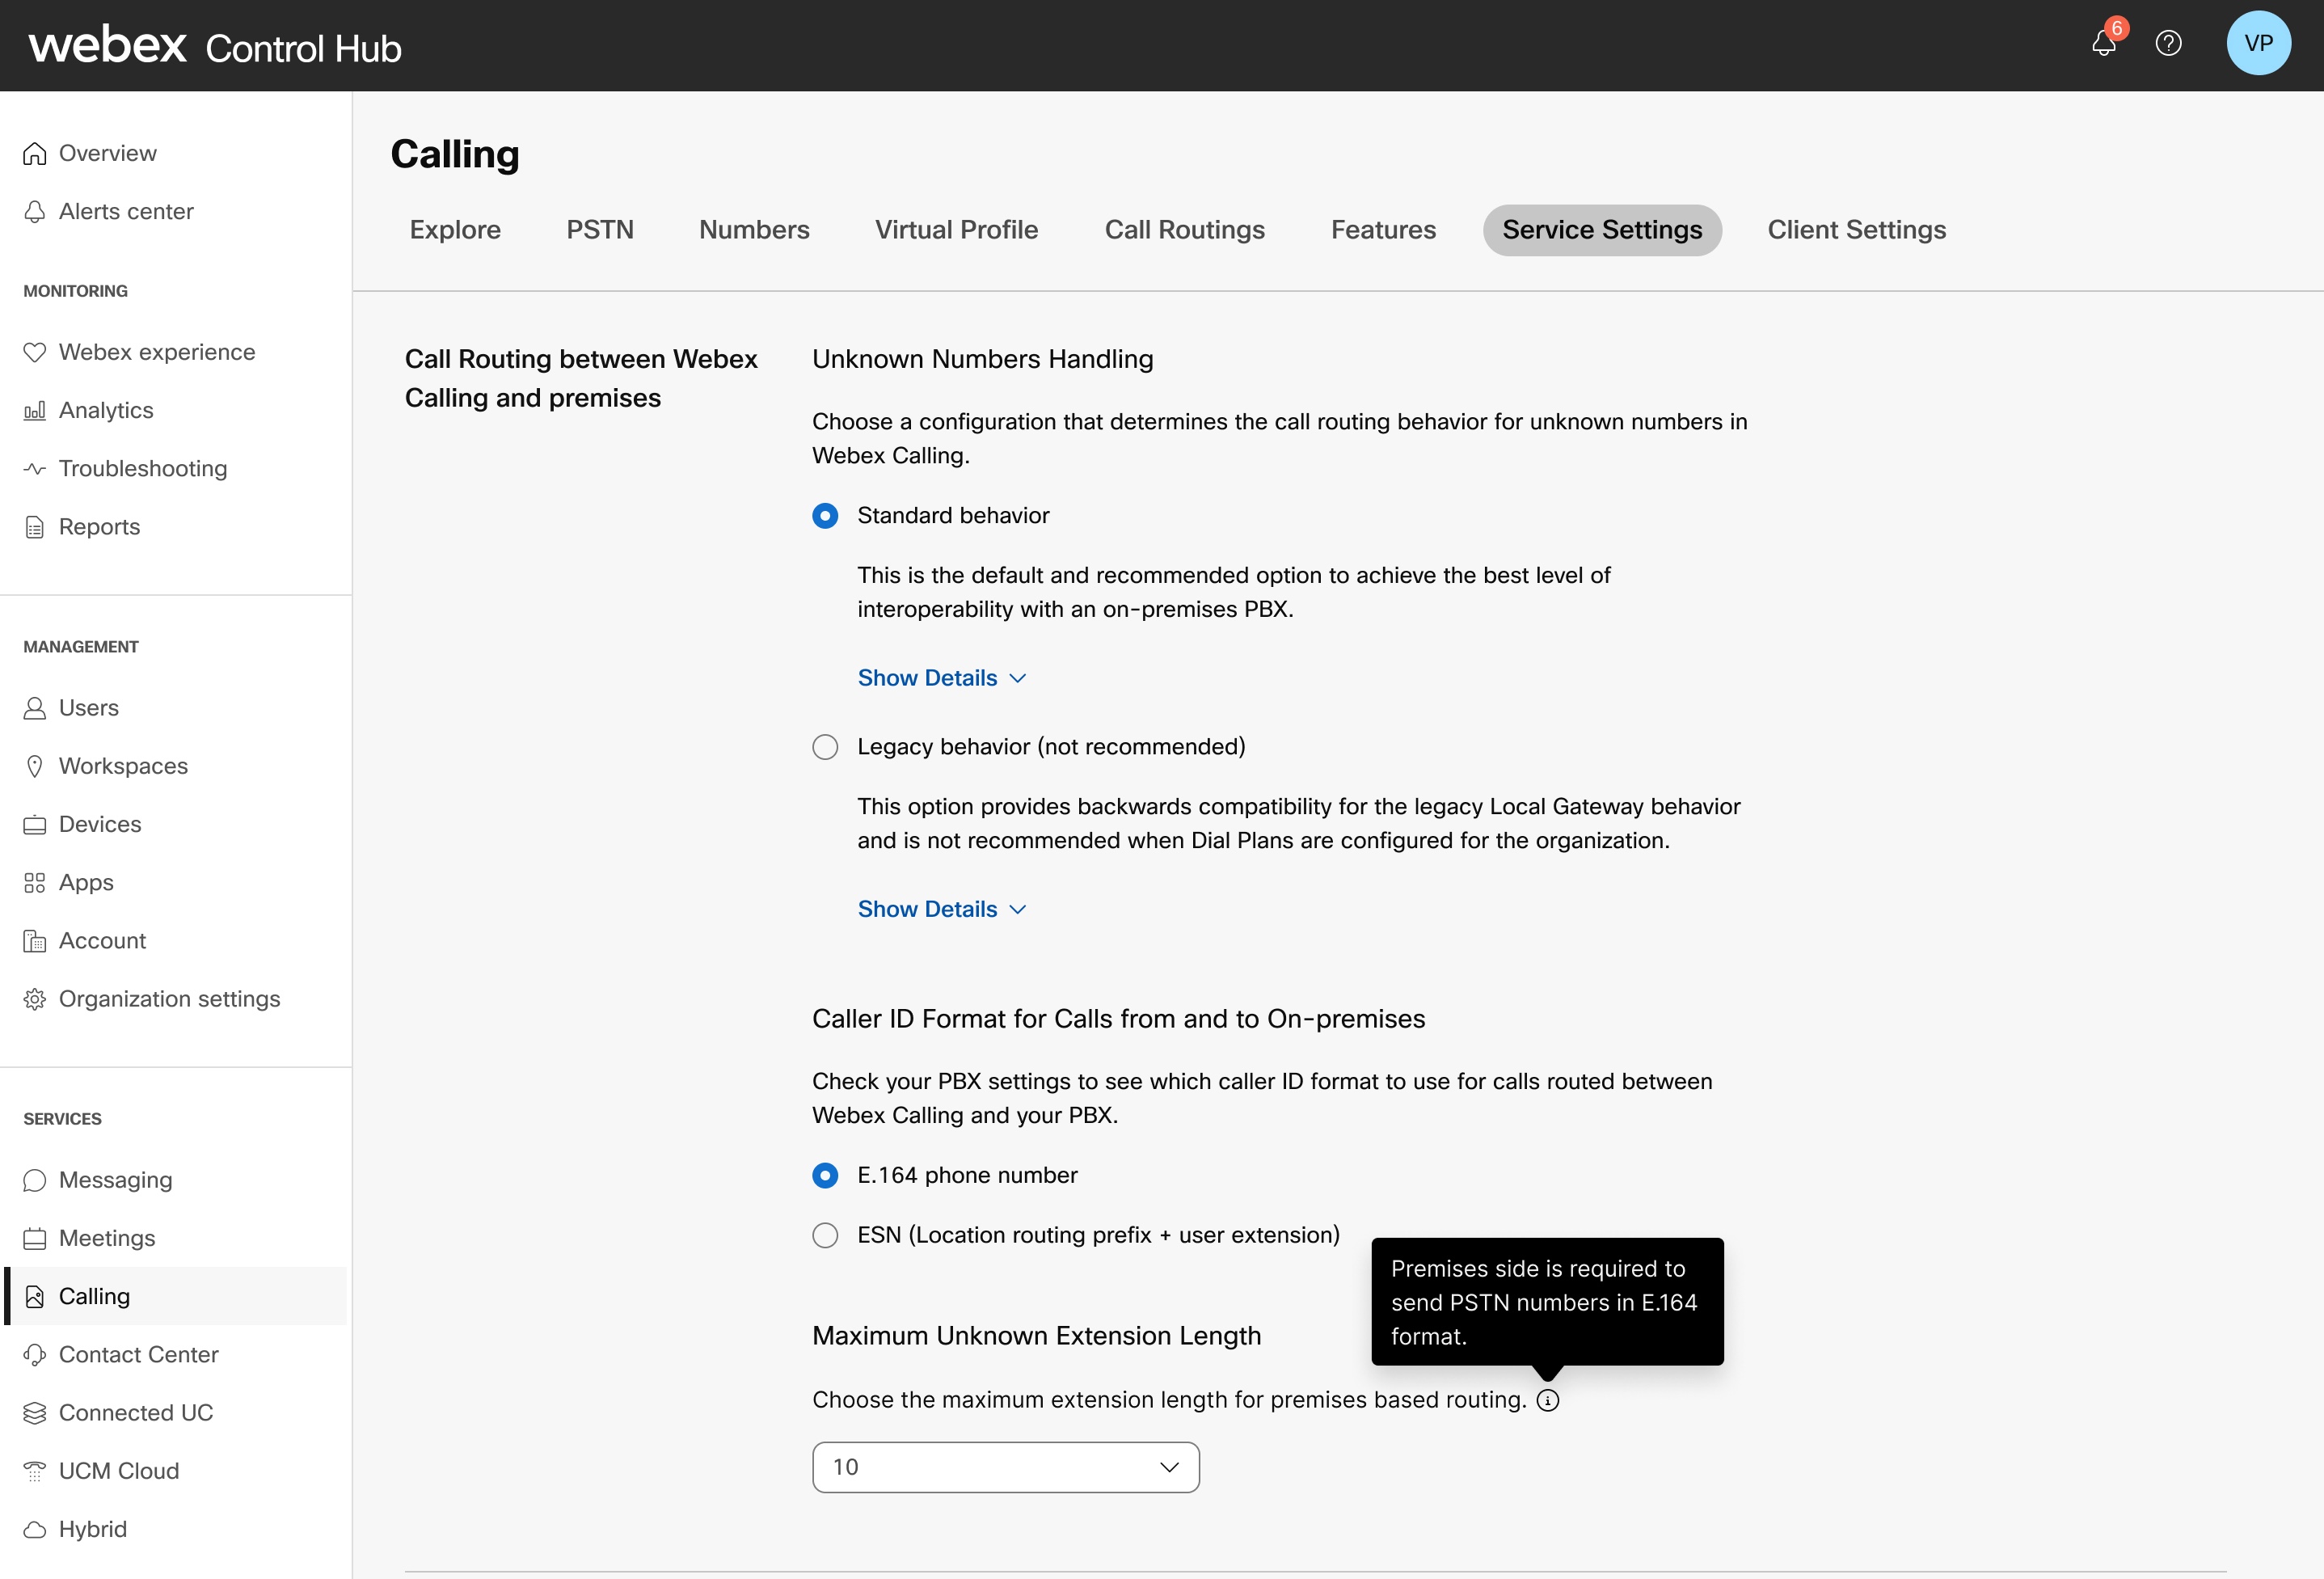
In Control Hub you can configure call routing settings between Webex Calling and premises. These settings determine how your unknown numbers are handled when using trunks and route groups to an on-premises PBX, and the caller ID format for calls routed between Webex Calling and your PBX.
| 1 |
Sign in to Control Hub. |
| 2 |
Go to . |
| 3 |
Scroll to Call Routing between Webex Calling and premises and choose how you would like to handle unknown numbers.
The unknown number handling service setting is set to Legacy Behavior to preserve routing behavior. This setting can be modified to take advantage of new call routing features (for example, dial plans and route groups). |
| 4 |
Choose your caller ID format. When the +E.164 phone number option is chosen, Webex Calling selects the external Calling Line ID (CLID), which is an E.164 number. When the ESN (enterprise significant number) option is chosen, Webex Calling selects the internal CLID, which is an ESN. |
| 5 |
Choose the Maximum Unknown Extension Length (2-10 digits) that you want to set for premises based routing. When you increase the extension length and if the number schema used by PSTN provider is non-E.164, the incoming PSTN calls will be considered as local calls coming from on-premises. Hence, to avoid any potential misrouting, we recommend enforcing E.164 format to such incoming PSTN calls before sending it to Webex Calling. |
| 6 |
Click Save.
|
The Verify Call Routing tool in Control Hub provides:
-
Simulation of calls to analyze routing decisions.
-
Useful guidance during the design and configuration phases of a deployment.
-
Events in Webex Analytics Platform that include call routing decisions.
-
Support in troubleshooting instances.
The feature is enhanced to display outgoing call permissions, fraud prevention, digit patterns, call intercept, and translation patterns applied while routing a call.
| 1 |
Sign in to Control Hub. |
| 2 |
Go to . Alternatively, customers using the Cisco Calling Plan can their routing from .
|
| 3 |
Select Verify Call Routing. |
| 4 |
From the drop-down menu, choose Select Call Source of a cloud user, workspace, virtual line or a premises trunk to verify call routing. |
| 5 |
Enter a number or URI. |
| 6 |
Click See Routing Result to view the call routing. |
| 1 |
Sign in to Control Hub. |
| 2 |
Go to and select the location you want to update. |
| 3 |
Next to PSTN Connection, click Manage. |
| 4 |
Next to the Emergency Service Address, click Edit. |
| 5 |
Enter the new address and click Save. If ESA (Enterprise Service Address) address validation fails while configuring premise or CCPP connections, administrators can close the ESA screen and continue with the setup. The validation failure will not prevent setting up the connection. If the ESA is not validated, emergency call handling may be delayed, and additional charges may apply if calls are routed to an emergency relay center. |
You can configure a custom emergency service address for fixed devices such as mobile devices that is assigned to a workspace. This configuration applies to U.S. and Canada locations and complies with the E911 service.
| 1 |
Sign in to Control Hub. |
| 2 |
Go to . |
| 3 |
Select the workspace that you want to modify and click Calling. |
| 4 |
Select the right arrow to expand the primary phone number settings under Numbers. |
| 5 |
Under Emergency Service Address, select Custom Address. 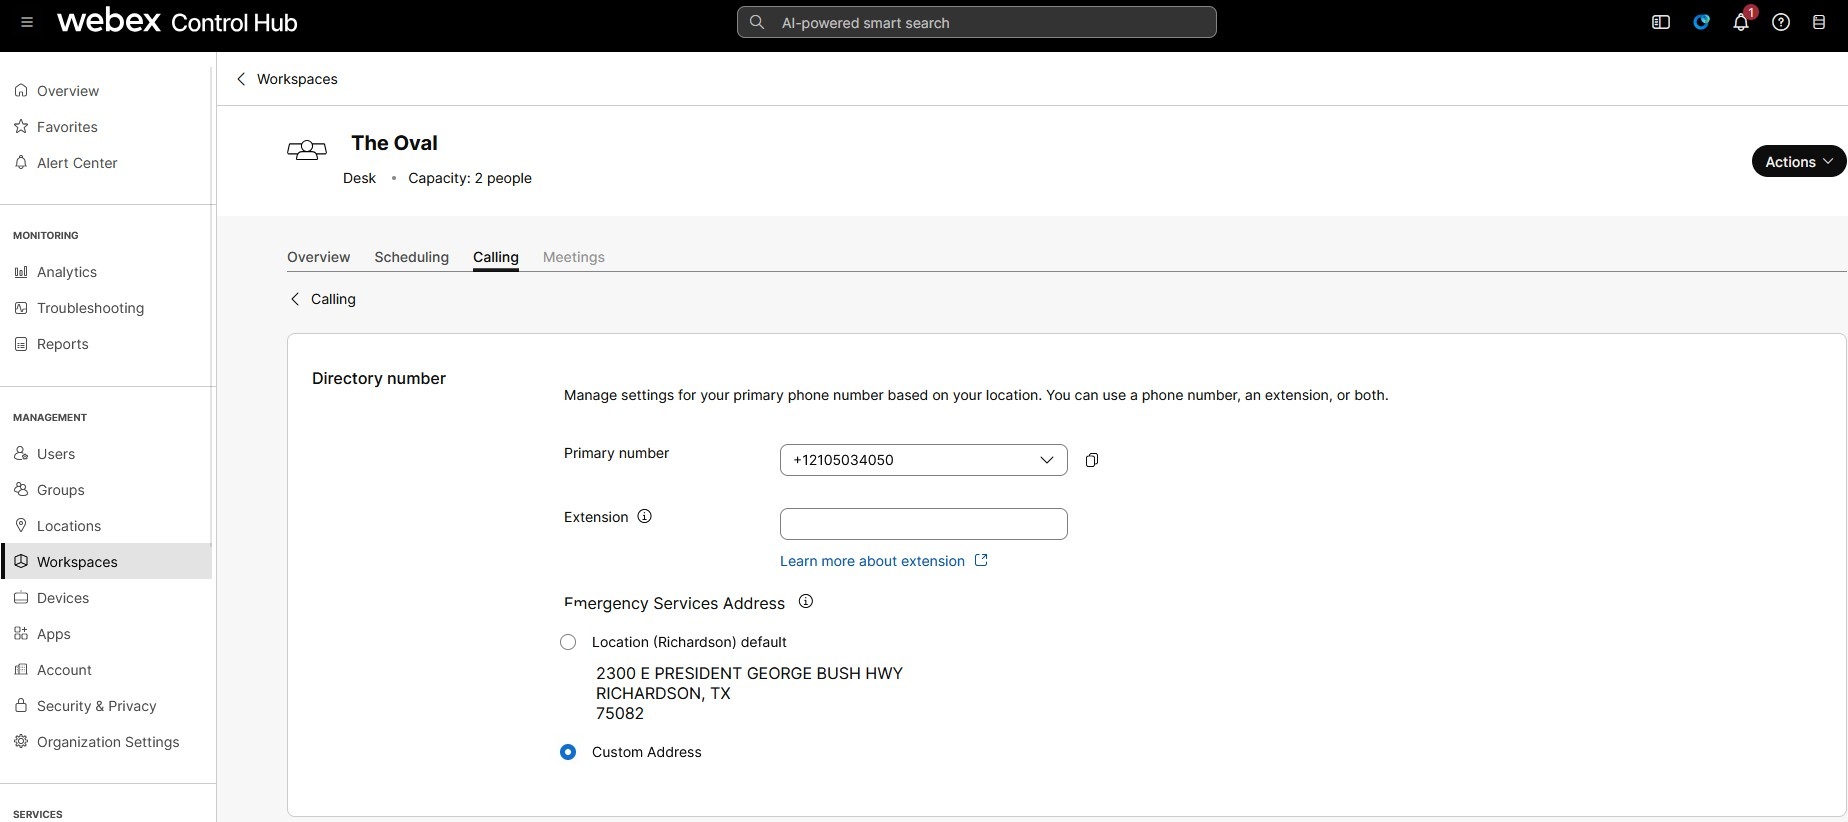
Enter the following details. In case of an emergency, the local emergency response crew will use this address to locate the caller.
|
| 6 |
Update the information for the workspace and click Validate. On entering a service address, the system validates the address. If the system cannot find the address, a Suggested Address displays in a side panel. Review the suggested address and click Apply to update the Emergency service address. Click Save , to save the changes. |
A custom emergency address overrides the location's default emergency address for the specific workspace.
To configure an ESA for an user, ensure the following conditions are met:
- The user has a non-mobile primary phone number assigned.
- The user’s location is within the U.S. or Canada.
These conditions are necessary because the ESA is tied to the user's phone number and location. This setup allows accurate routing of emergency calls and proper callback to the user through the Emergency Callback Number (ECBN) associated with their location or phone number.
| 1 |
Sign in to Control Hub. |
| 2 |
Go to . |
| 3 |
Select the user that you want to modify and click Calling. |
| 4 |
Select the right arrow to expand the primary phone number settings under Numbers. |
| 5 |
Under Emergency Service Address, select Custom Address. Enter the following details. In case of an emergency, the local emergency response crew will use this address to locate the caller.
|
| 6 |
Update the information for the workspace and click Validate. On entering a service address, the system validates the address. If the system cannot find the address, a Suggested Address displays in a side panel. Review the suggested address and click Apply to update the Emergency service address. Click Save , to save the changes. |
A custom emergency address overrides the location's default emergency address for the specific user.
Example 1: Multi-site PBX
Deployment description
-
Enterprise customer with 100 sites across US.
-
Multi-site PBX deployment (or network of PBX’s), with main PBX spread over two main sites for HA.
-
8-digit enterprise dial plan: 8 + 3-digit site code + 4-digit extension.
-
30 sites remain on-premises, 70 sites move to Webex Calling. PSTN remains on-premises, through SIP Trunks at the two main sites.
-
No mixed sites. For each site users are either all on-premises or all cloud-registered.
Deployment solution
-
Single Dial Plan with 30 E.164 + 30 ESN patterns that routes calls for the on-premises users to a Route Group with two Trunks, terminating on two local gateways at the two main sites.


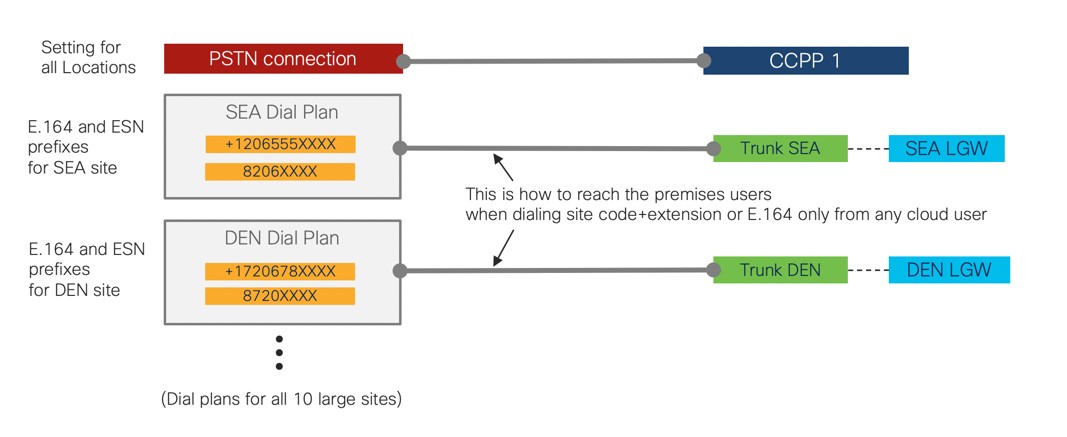
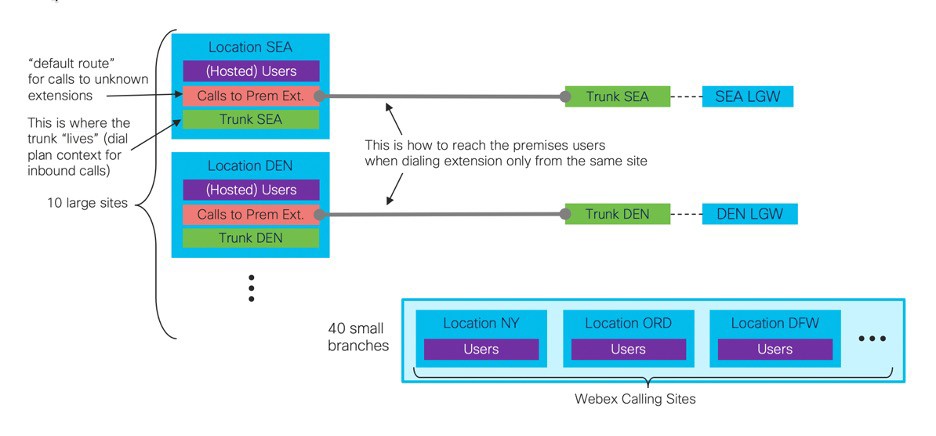
Example 2: Mixed cloud-PBX sites
Deployment description
-
Enterprise customer with 50 sites across the US: 10 large sites and 40 small branches.
-
PBX’s at large sites, key switches at branches.
-
7-digit Enterprise dial plan: 8 + 2-digit site code + 4-digit extension.
-
Webex Calling only at branches, slow migration from PBX’s at large sites (mixed sites with both Webex Calling and PBX users).
-
Cloud-connected PSTN for all cloud users (premises users continue to use existing PSTN).
-
Cloud and PBX users at each large site must retain extension-only dialing capabilities.
Deployment solution
-
Dial plans to route calls to each of the PBX’s from any other site. Also, for each large site, Calls to On-Premises Extensions configured to route calls to a trunk that terminates on a local gateway at the site.
|
Configurable limitations for trunks, route groups, and dial plans | |
|---|---|
|
Description |
Maximum Limitation |
|
Dial patterns that a CSV can upload to a dial plan |
10000 |
|
Trunks that can be configured per location |
100 |
|
Route groups per enterprise customer |
10000 |
|
Trunks configurable within a route group |
10 |
|
Dial plans configurable per enterprise customer |
10000 |
|
Dial patterns configurable with one dial plan |
10000 |


