
Thanks for your feedback.
Your Cisco Room Phone
 Feedback?
The Cisco Room Phone provides a collaborate work experience for huddle spaces and meeting rooms. You can use the phone to make calls, to share information, and to collaborate during meetings. Connect a screen display, and you can collaborate with everyone in the room.
The device has two states—Wake and Half-wake. When the device is idle for two minutes, it enters into the Half-wake state.
You wake the device when you touch the LCD screen, or receive a call or meeting notification.
The phone has one line that handles up to 2 calls. It uses four built-in microphones with 360-degree coverage so people hear you clearly from up to 10 feet (3 m) away.
If you use the Cisco Room Phone in a large room, then consider the two wired expansion microphones. These microphones accessories expand your coverage to 20 x 34 feet (6.1 m x 10 m) and up to 22 people. For best results, place the microphones between 3 feet (0.91 m) and 7 feet (2.1 m) away from the phone.
We recommend that you connect the phone to a HDMI display screen so you get the full benefits of the device. Only use the included HDMI cables when you connect to an HDMI screen or a laptop. Don't use any other cables or adapters.
The Cisco Room Phone has several buttons and hardware features that allow you access to the phone features.
Use the following figures to identify the phone buttons and hardware items.
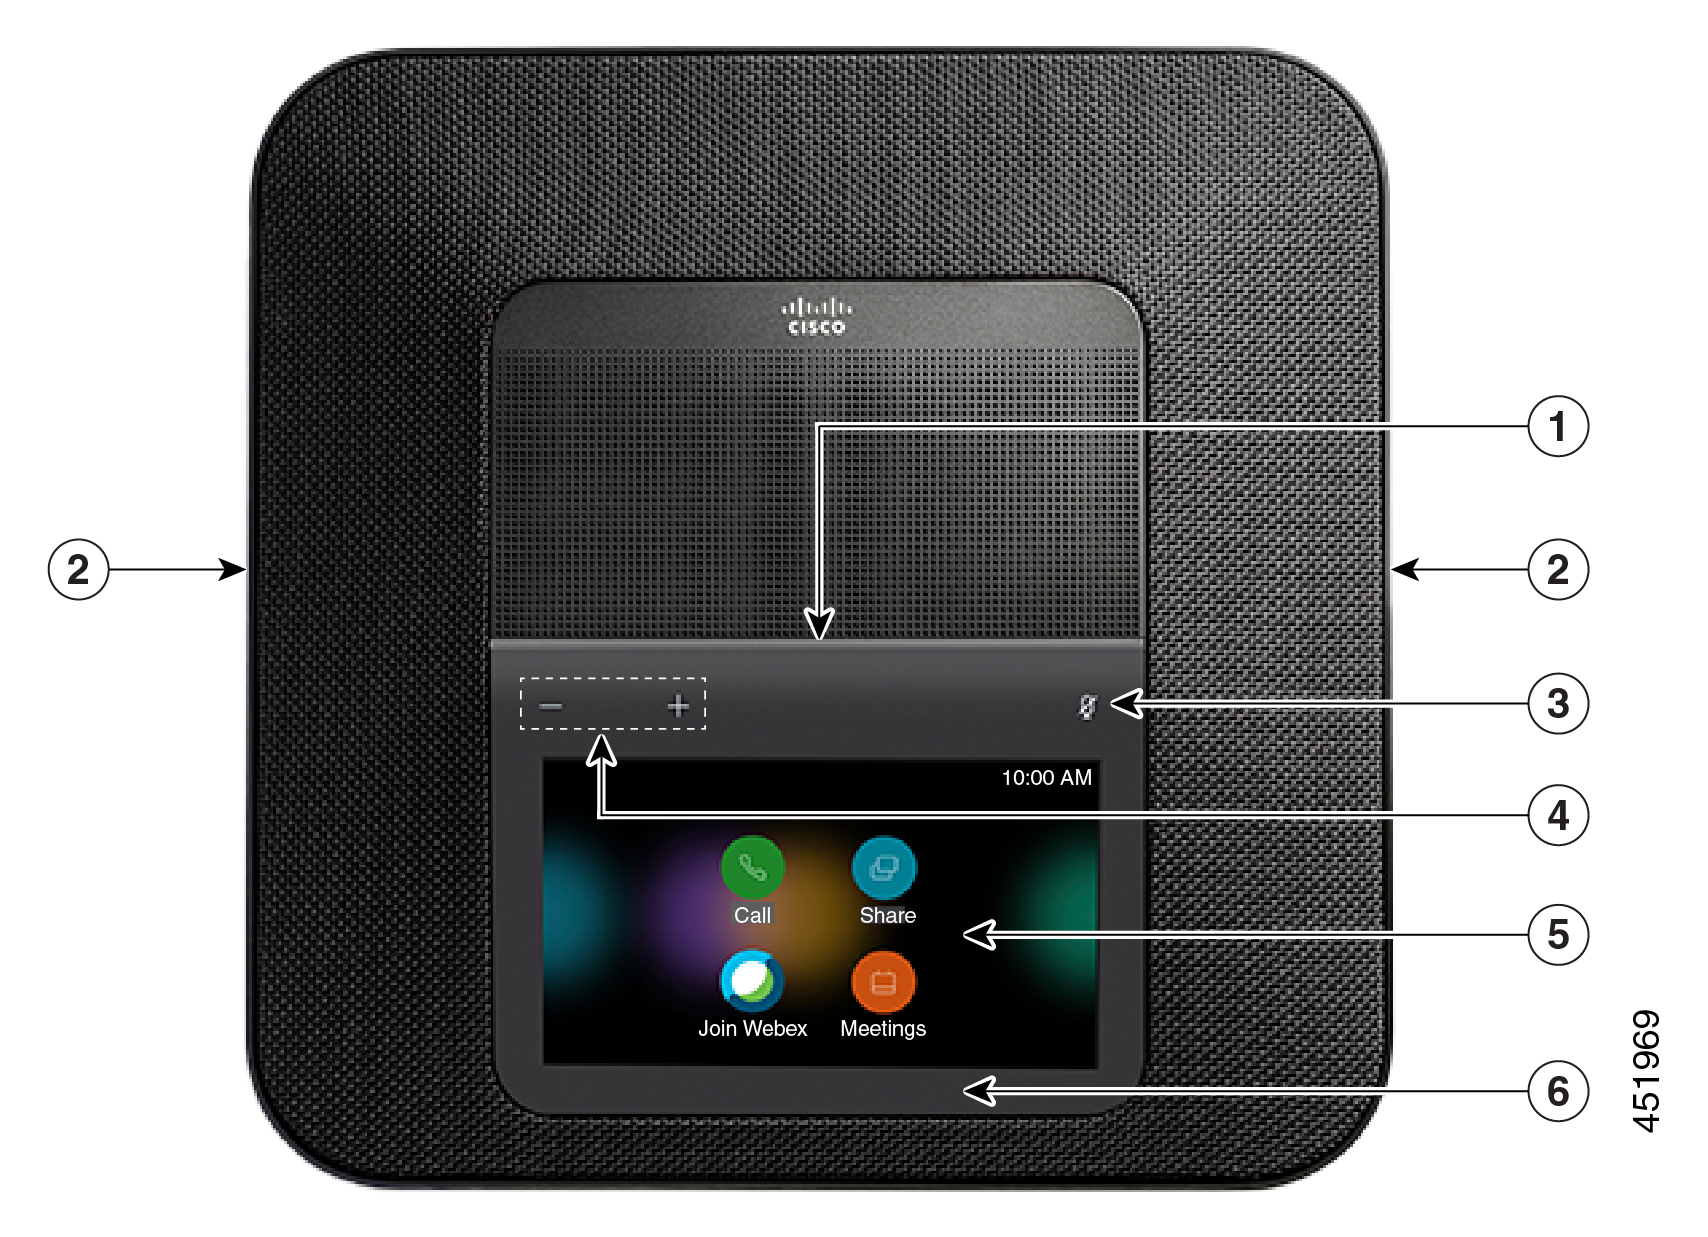
The following table describes the hardware features on the Cisco Room Phone.
|
Hardware feature |
Purpose |
|---|---|
|
1. LED bar |
Indicates call states:
|
|
2. Expansion microphone port |
The wired expansion microphone cable plugs into the port. |
|
3. Mute | Toggles the microphone on or off. When you mute the microphone, the LED bar lights red. If you mute your phone, then the wired expansion microphones also mute. |
|
4. Volume | Adjusts the speakerphone volume and silence an incoming call. |
|
5. Home screen |
Displays the Call
|
|
6. Standby LED |
Indicates when the device is in Standby mode. |
|
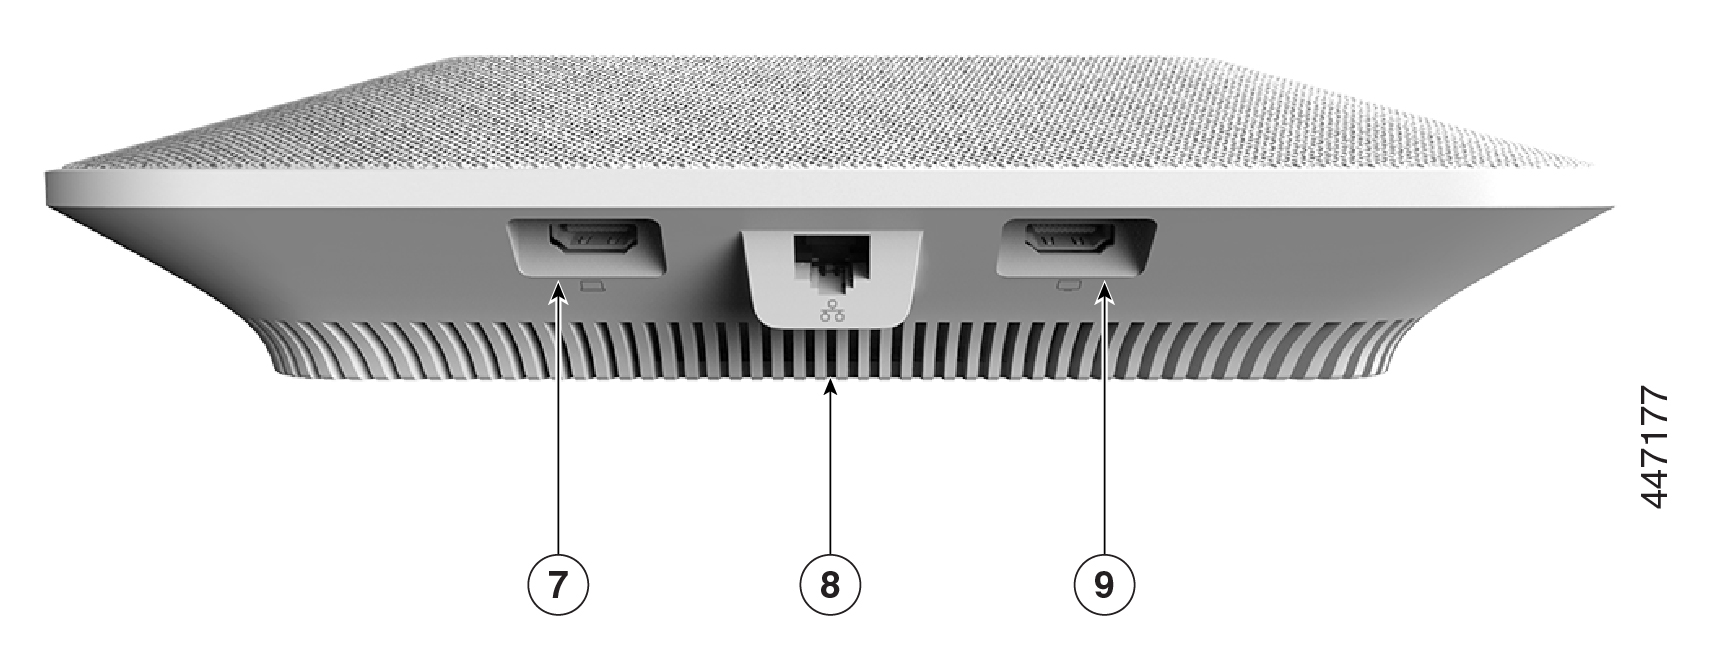
7. HDMI-in port |
Connects your phone to your computer. |
|
8. LAN port |
Connects your phone to your network. |
|
9. HDMI-out port |
Connects your phone to your external HDMI screen. |
It depends upon how your network is set up, but you may be able to use the Cisco Room Phone in one of two modes:
-
Shared mode—For people who share a workspace or huddle room. The name of your workspace displays in the top-left corner of your phone. Your meetings calendar shows the Webex meetings for your workspace.
Shared mode is the default mode and it is available to everyone.
-
Personal mode—For people who have dedicated work spaces and require a personal work phone. You see your name in the top-left corner of your phone. Your meetings calendar displays your personal Webex meetings.
This feature is only available if your administrator configures it. If Personal mode is available, then you enable it from Webex Settings at https://settings.webex.com/.
The Cisco Room Phone home screen allows you easy access to your features.
Features availability is based on how your phone connects to the network. If you don't see an icon on your home screen, then the feature isn't available to you.
Use the following figures to identify the home screen icons.
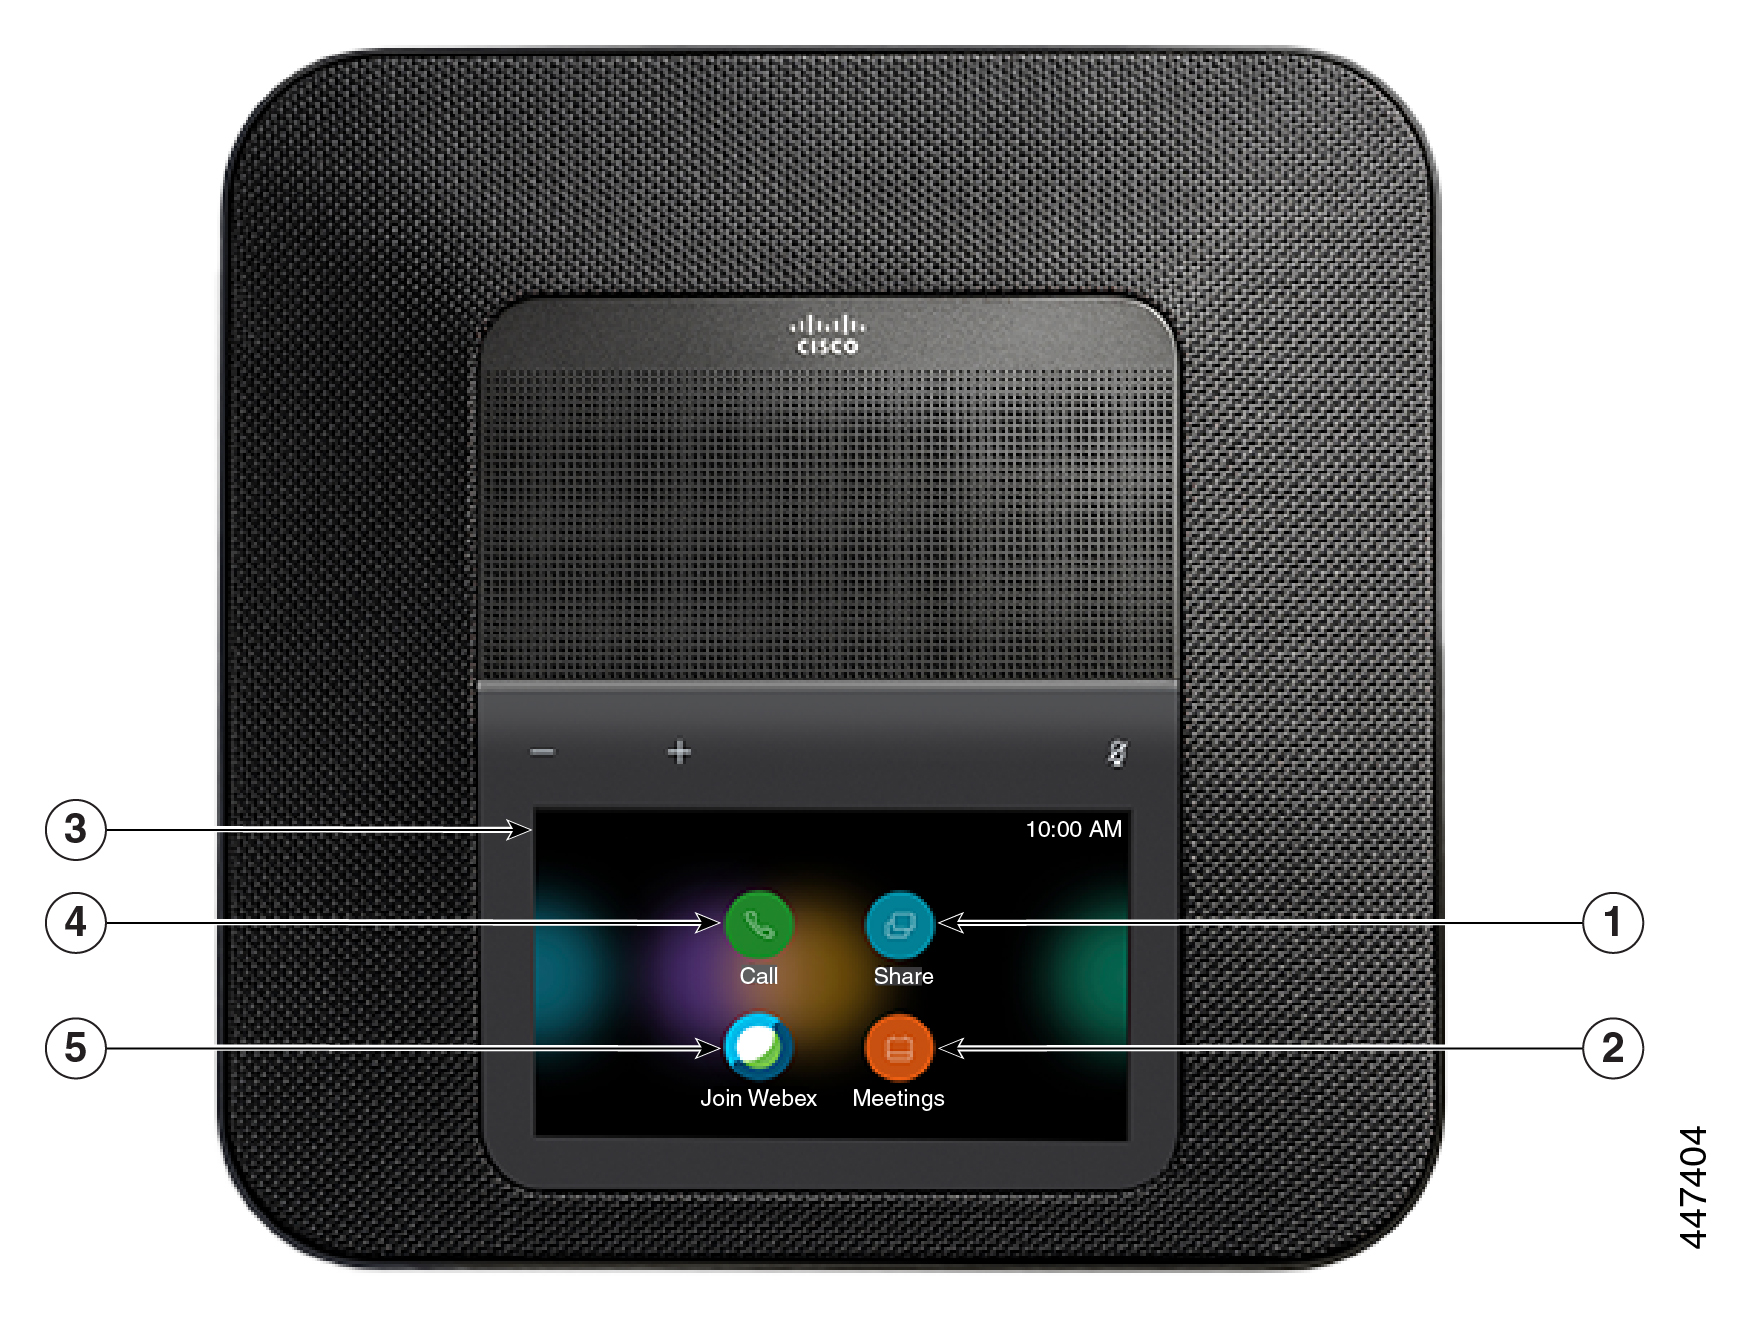
The following table describes the home screen features.
|
Icon |
Purpose |
|---|---|
|
1. Share |
Tap Share to share information on an HDMI display screen. Choose from one of the following options:
|
|
2. Meetings
|
Tap Meetings to view a list of scheduled Webex meetings or to join a meeting from your calendar. |
|
3. Top-left corner of the phone screen. |
Tap the top-left corner of the phone screen to adjust the screen brightness, or to access the phone settings menu. Your phone status also displays here. A red dot |
|
4. Call |
Tap Call to place a call, view a list of recent calls. |
|
5. Join Webex
|
Tap Join Webex to join a Webex meeting. |
When you haven't used your phone for several minutes, it enters into Standby mode to save energy and to prolong the device life. Both the device and your HDMI display screen enter into this mode.
This feature is only available if your administrator configures it.
There are three stages to Standby mode:
-
Idle—Both the phone and the display screen are awake, but not in use.
-
Half Awake—If Digital Signage is enabled, then you see your company's advertisements or notifications on your display screen. Otherwise, you see a prompt to tap your phone screen or start an activity.
-
Sleep—Both the phone and the display screen are dark. The Standby LED glows white.
Depending upon your phone configuration, it goes into Standby mode if one of the following conditions occurs:
-
No incoming calls for two minutes, or the LCD touchscreen isn't tapped for two minutes
-
No scheduled meetings in the next 30 minutes
-
No paired devices
For Cisco Unified Communications Manager (Unified CM) Calling with Control Hub and Webex Calling with Control Hub, administrators configure this feature from Control Hub with the Standby parameter.
But for Cisco Unified Communications Manager (Unified CM) Calling this feature is included in the phone firmware and doesn't require configuration.
Put your device into Standby mode when you will be away from your desk. This helps to save energy and to prolong your device life.
Your phone wakes up when you receive a call or touch the LED screen. You cannot put your device to sleep if you are on an active call.
This feature is only available if your administrator configures it.
| 1 |
Tap the top-left corner of the phone screen. |
| 2 |
Tap Settings. |
| 3 |
Select Standby. |
If your phone is asleep, then you must wake it before you can make a call or use a feature.
|
Depending your device configuration, do one of the following actions:
|
Your device upgrades to new firmware as new features become available. This upgrade happens when you activate the device for the first time, or when an upgrade is available and the device is idle.
When it is time for your device to upgrade, you see an upgrade notification on your device, and a timer begins. If you do nothing, then the upgrade proceeds. But if you are busy, then you can postpone the upgrade for 6 hours.
You cannot postpone critical upgrades.
This feature is only available if your administrator configures it.
|
Tap Postpone to delay the upgrade. |
If you want to install the current firmware release then upgrade the phone from About this device. This feature is only available if your administrator configures it.
You can also view your current firmware version and other firmware-related information from this menu.
| 1 |
Tap the top-left corner of the phone screen. |
| 2 |
Navigate . |
| 3 |
Scroll down and tap Upgrade now. |
The phone supports an optional kit with two wired expansion microphones. You can extend the microphones up to 7 feet (2.13m) from the phone. For best results, place the microphones between 3 feet (0.91 m) and 7 feet (2.1 m) away from the phone.
| 1 |
Plug the end of the microphone cable into the port on the side of the phone. |
| 2 |
Extend the microphone cable to the desired position. The following figure shows installation of a wired expansion microphone. 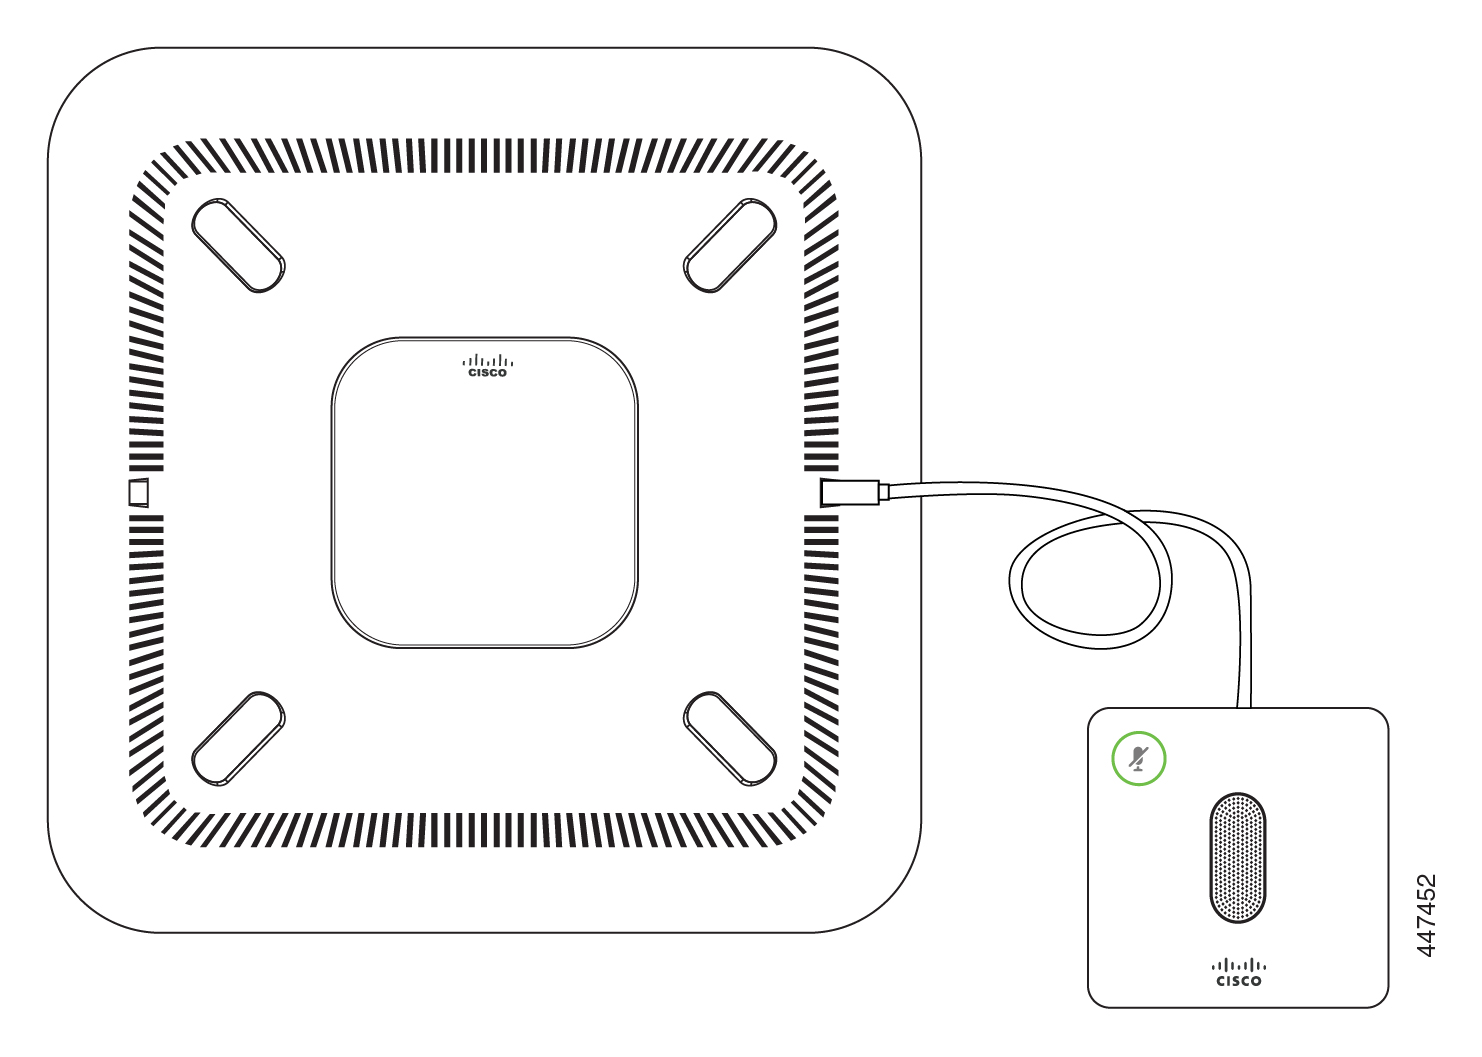 |
To get the most out of your phone, use it with Webex app. Once you connect, you can collaborate with your coworkers by sharing ideas and having meetings.
For more information, see "Webex App Automatically Connects with Room and Desk Devices" ( https://help.webex.com/en-us/nliifbo/Webex-Teams-App-Automatically-Connects-with-Room-and-Desk-Devices) or "Use the Webex Meetings Desktop App" ( https://help.webex.com/en-us/nqx2ohdb/Use-the-Cisco-Webex-Meetings-Desktop-App).
To clean your Webex Room Phone, use only a dry soft cloth to gently wipe the phone and the phone screen. Do not apply liquids or powders directly to the phone. As with all non-weatherproof electronics, liquids and powders can damage the components and cause failures.
Special terms apply to your hardware warranty and services that you can use during the warranty period.
Your formal Warranty Statement, including the warranties and license agreements applicable to Cisco software, is available at: Product Warranties.


