- Home
- /
- Article

Thanks for your feedback.

Migration deployment guide
 In this article
 Feedback?
The structured migration process from on-premises Cisco Unified CM to cloud-based Webex Calling, utilizing the PPDIO methodology. This involves critical design considerations such as region selection, dial plans, emergency services, and call recording. The process also details licensing, user provisioning, SSO, and network readiness to ensure a smooth and efficient transition.
Introduction
Before you begin
This guide is intended for teams or individuals with experience configuring and administering Cisco Unified Communications Manager (Unified CM) and Cisco endpoints, including IP desk phones, video devices, and Jabber soft clients. Throughout this document, there are links to product and support documentation to assist.
This document focuses on transitions from Unified CM to Webex Calling multi-tenant only. The term Webex Calling in this document always refers to Webex Calling multi-tenant.
Before beginning the migration from Unified CM to Webex Calling, it is imperative to have a comprehensive understanding of the Webex Calling solution and its respective components. A successful migration requires familiarity with the Webex Calling architecture, service models, deployment options, and associated features to properly map existing Unified CM workloads and design an effective transition plan.
A thorough understanding of the following Webex Calling components is essential to inform an effective transition strategy and operational readiness.
-
Control Hub
-
Directory and user provisioning
-
Webex Calling platform
-
Supported calling endpoints
-
PSTN connectivity options
-
Webex Calling dial plan and number management
-
Security and compliance features.
For more information, see Cisco Preferred Architecture for Webex Calling.
This guide will highlight tools and processes to use throughout the transition lifecycle. However, a transition from on-premises calling, Unified CM, to a new cloud calling platform, Webex Calling, can be a significant effort with potential business, technical and complex challenges. To help overcome these challenges Cisco has a few different options available to assist you with your journey. It is important to review the information at Enterprise cloud calling - Calling migration and understand each option and how each one can possibly help you with your own migration.
-
Webex migration tools: self-service, free tools built into Control Hub to streamline your transition to Webex Calling
-
Certified migration providers: Cisco validated software and tool providers who have developed migration solutions to help Webex partners and customers with complex and large migrations. These solutions can help simplify, manage and accelerate the transition to Webex Calling
-
Webex Setup Assist: a Cisco-led migration service that guides customers and partners through the Webex Calling deployment and configuration, which is needed to successfully migrate Unified CM users and services to Webex Calling.
Overview
With the growth of cloud-delivered collaboration services, more customers are looking to move their existing collaboration workloads to the cloud given the promises of reduced total cost of ownership, simplified management, continuous feature delivery, increased scale, and superior reliability inherent in cloud-based services. As customers look to make the transition from on-premises to cloud collaboration services, it's important for them to understand what the transition entails, and the steps required to make the transition.
The purpose of this document is to provide deployment guidance for customers specifically looking to transition from on-premises Unified CM to Webex Calling in the cloud. This deployment guide assumes that the reader has a basic understanding of the calling transition between Unified CM and Webex Calling, including what changes when making this transition and what the differences are when moving the calling workload from on-premises to the cloud. Before proceeding, ensure you have reviewed and are familiar with the information available in the Transition map. This transition map document provides information about the changes and differences of this transition.
As shown in Figure On-premises collaboration architecture: call control and remote access, a typical on-premises deployment includes different collaboration infrastructure components on the network, a call control platform, an edge platform, hardware and software endpoints, and in some cases even conferencing and scheduling platforms. In the Cisco architecture this would include Unified CM for call control, Expressway for remote access and business-to-business (B2B) edge services, Cisco Meeting Server / Cisco Meeting Management for on-premises conferencing, Unity Connection for voice messaging, and user-facing hardware (Cisco IP Phones, Cisco Desk and Room video systems) and software (Cisco Jabber) IP-based endpoints. These components may vary slightly in some environments, but this is the starting point for the transition described in the rest of this document.
The architecture shown in Figure On-premises collaboration architecture: call control and remote access is based on the Preferred Architecture (PA) for Cisco Collaboration Enterprise On-Premises Deployments. For more information on the Enterprise On-premise, see Cisco collaboration preferred architectures.
Before: On-premises calling infrastructure components table lists the key elements of the on-premises architecture prior to transitioning to Webex Calling in the cloud.
| Product | Description |
|---|---|
| Unified CM | On-premises call control providing device registration and call routing services |
| Cisco Expressway-C/E | Edge infrastructure providing Mobile and Remote Access (MRA) and business-to-business (B2B) functionality enabling remote endpoints to connect securely from outside the organization. Expressway is deployed in pairs to provide firewall traversal for external endpoints. |
| Cisco Meeting Server (CMS), Cisco Meeting Management (CMM), and Cisco Telepresence Management Suite (TMS) | On-premises voice, video, and web conferencing infrastructure providing multipoint meetings, meeting management, and scheduling capabilities. [Optional] |
| Cisco Unity Connection | On-premises voice messaging platform providing voicemail and unified messaging capabilities. [Optional] |
| Cisco Desk, Cisco Room, Cisco Board, Cisco IP Phones, and Cisco Jabber | IP-based devices registered to Unified CM and providing voice and video calling capabilities |
As illustrated in Figure Transition decision: on-premises calling to Webex Calling, customers who have an on-premises call control with Unified CM and desk and video IP endpoints have a choice of transitioning the architecture toward a Webex Calling cloud architecture.
The decision needs to be made based on customer’s functionality requirements. Customers who have the following requirements should consider carefully before making this decision and may ultimately decide to keep call control on-premises:
- Phone models not supported by Webex Calling
- Complex or numerous integrations with other on-premises systems or solutions, especially where replicating these integrations with Webex Calling is difficult or no equivalent alternative solutions are available
- Complex dial plan, highly granular classes of service or both
- Restrictive, limited, or unreliable Internet access
- Stringent data privacy and ownership policies
- Compliance requirement for on-premises or in-country media recording and storage
- Third party integrations without viable alternate Webex Calling integration
- Contact center integrations where the contact center inter is not moving to the cloud just yet.
This document focuses on customers with Unified CM call control deployments who wants to understand the general steps, considerations, and requirements for enabling Webex Calling deployment as depicted in the next section.
Core components
The target architecture for this migration includes several new components. This includes the Webex Calling service for cloud-based calling, Webex App, Cisco Directory Connector for identity integration, and Local Gateway (LGW) for PSTN access, as well as on-premises to cloud calling integration. Cisco Calling Plans or Cloud Connected PSTN (CCP) facilitated by a Cloud Connect for Webex Calling partner are additional options for PSTN access.
As shown in Figure After: Webex Calling Architecture, the new components (Webex Calling, Directory connector, Local gateway, and Survivability gateway) are added to the existing on-premises deployment.
After: Cloud calling infrastructure components table lists the new elements of the architecture after transitioning to Webex.
| Product | Description |
|---|---|
| Webex Calling | Cloud-based call service delivered from the Webex platform and providing endpoint registration and call routing |
| Cisco Directory Connector | Windows application running on a Windows domain machine providing identity
synchronization between the enterprise on-premises Active Directory and the identity
store of the Webex organization. For customers moving from on-premises Active Directory to Entra ID, the identity integration with Webex instead of Cisco Directory Connector uses the Entra ID Wizard app. |
| Local Gateway | A Local gateway acts as a bridge between a customer's on-premises unified communications network and the Webex Calling cloud. It can be deployed on-premises or hosted by a partner, delivering PSTN access for cloud-registered endpoints as well as calling integration between Unified CM registered and cloud registered endpoints. Cisco IOS-XE Integrated Services Router (ISR 1100 and 4000 series), Cisco Catalyst 8200/8300 Series, Cisco Catalyst 8000V Edge Software, and various certified third-party Session Border Controllers (SBCs) can be used as a LGW for a phased migration approach. |
| Survivability Gateway | Survivability Gateway (SGW) is a local network IOS-XE based gateway that provides fallback calling services to on-site Webex Calling endpoints during network outages. |
| Cisco Calling Plan, Cloud Connect for Webex Calling | Cisco Calling Plan and Cloud Connect for Webex Calling are cloud-based options for PSTN access for Webex Calling endpoints. PSTN access is facilitated by a cloud PSTN provider and requires no on-premises equipment. |
| Webex App | Client application running on desktop OS (Windows, Mac) or mobile OS (Android, iOS) and registered directly to Webex Calling platform for calling functionality. |
PPDIO process overview
The PPDIO process stands for Prepare, Plan, Design, Implement, and Optimize. It is a structured Cisco methodology that guides projects from initial assessment through continuous improvement, ensuring efficient and successful deployments or migrations.
General description of PPDIO
-
Prepare: Assess the current environment, gather requirements, and align stakeholders to establish a solid foundation.
-
Plan: Develop detailed project plans including timelines, resources, and risk mitigation strategies.
-
Design: Architect the target solution tailored to business and technical needs.
-
Implement: Execute the deployment or migration according to the design, validating functionality and performance.
-
Optimize: Continuously improve the solution post-implementation by monitoring performance, refining configurations, and leveraging automation and integration tools.
Using PPDIO for Unified CM to Webex Calling migration projects
When transitioning from Unified CM to Webex Calling, the PPDIO process provides a clear roadmap to ensure a smooth and efficient transition:
Prepare
-
Assess the existing Unified CM environment and migration readiness
-
Collect detailed data on users, devices, network, and dependencies
-
Collect location details including emergency response address, number of users, internet access, PSTN access
-
Identify risks and define project scope to align all stakeholders.
Plan
-
Create a comprehensive migration plan with batch schedules, resource assignments, and timelines
-
Define tasks such as device firmware upgrades, license provisioning, and user onboarding
-
Coordinate migration windows with Cisco and partners to minimize disruption.
Design
-
Map current Unified CM configurations, dial plans, and user profiles to Webex Calling equivalents
-
Design the Webex Calling environment, including PSTN strategy (interim and final), locations, user roles, and integration points like Local Gateway (CUBE) and directory synchronization
-
Plan for coexistence scenarios where Unified CM and Webex Calling operate simultaneously during migration.
Implement
-
Use Control Hub migration tools alongside 3rd party tools to perform device firmware mode changes, feature configuration and user migrations
-
Employ bulk operations and provisioning using Webex APIs to streamline large-scale migrations and configurations
-
Execute license provisioning, device registration, and configuration updates
-
Validate migration success through testing and operational verification.
Optimize
-
Continuously monitor Webex Calling performance and user experience
-
Refine configurations and workflows based on operational data and feedback
-
Leverage automation and integration capabilities to enhance efficiency and scalability
-
Decommission legacy Unified CM components as appropriate and provide ongoing support for day-2 operations.
This enhanced PPDIO approach ensures a controlled, transparent, and efficient migration from Unified CM to Webex Calling, leveraging Cisco's tools, APIs, and partner ecosystem to maintain business continuity and improve collaboration capabilities.
PPDIO feedback loops
The high-level overview depicted in Figure Iterations while executing PPDIO illustrates a single feedback loop from the optimize phase back to the prepare phase. This signifies that, following the initial implementation, there is an ongoing opportunity for continuous improvement. Each cycle of optimization can identify new requirements or areas for enhancement, which may be addressed through subsequent projects or initiatives. These individual projects, in turn, each follow the established PPDIO (Prepare, Plan, Design, Implement, Optimize) lifecycle. This iterative approach ensures that the system remains aligned with evolving business objectives and technological advancements, fostering a culture of ongoing refinement and adaptability.
During the execution of the PPDIO process, it is common for findings in the later phases to necessitate revisiting and potentially revising decisions made in earlier stages. For instance, issues encountered during the implementation phase, such as the identification of design ambiguities or missing details, may reveal that certain aspects were not fully addressed during the design phase. In such cases, it becomes necessary to iterate back to the relevant earlier phase to resolve these issues before proceeding. This iterative feedback mechanism, as illustrated in Figure Unified CM assisted PPDIO process ensures that the solution is thoroughly validated and refined, ultimately contributing to a more robust and effective deployment.
When undertaking a transition from Unified CM to Webex Calling, each phase of the PPDIO process can benefit significantly from information gathered from the existing Unified CM environment. For example, comprehensive inventories of users, phone numbers, calling features, and dial plan components can be extracted from the current Unified CM configuration. This data supplements information provided directly by stakeholders and helps streamline planning and design activities. Leveraging appropriate tools to automate data extraction and analysis not only enhances accuracy but also accelerates the overall process. By utilizing insights from the existing deployment, the transition to Webex Calling can be executed more efficiently than a traditional greenfield implementation, while still adhering to the structured PPDIO methodology. This process is illustrated in Figure Unified CM assisted PPDIO process.
Migration approach
As you plan your transition from on-premises Unified CM to Webex Calling, you need to determine how you will approach this journey. First you will need to decide if the migration will be a flash-cut (everything at once) or a phased approach (migrate groups of users/devices over an extended period).
Doing a flash-cut migration moves all your users and devices the fastest. With this method, you will move all users and devices from on-premises Unified CM to Webex Calling at the same time. In essence, it is one single migration window for all users and devices. After this migration is completed, all your users and devices will be on the Webex Calling platform and all your Unified CM infrastructure can be decommissioned. However, many organizations cannot use this approach due to the scale and size of their calling deployment.
The second approach is a phased migration. Most organizations will use this approach as it provides better control, management, and scale with the migration. Also, it is better suited for larger UC deployments and/or deployments across multiple regions. Therefore, this document focuses on the phased approach with two steps in the transition.
As shown in below Figure Phased calling transition: Hybrid and cloud, the first transition phase (Phase 1) results in a co-existence deployment with dual calling environments. In this phase, some users, devices, and soft clients are transitioned to Webex Calling while others are still on the on-premises Unified CM call control. The final transition phase (Phase 2) results in a pure cloud calling environment where all users, devices, and soft clients have been fully transitioned to the Webex Calling platform.
How long it takes an organization to completely transition to cloud calling will vary based on its current deployment. In some cases, an organization may make the initial transition and remain in the co-existence dual call control phase (Phase 1) for an extended period (months or even years), while in other cases, an organization may fully transition to Webex Calling (Phase 2) in a very short period (weeks or months). This document is intended to cover both phases (Phase 1 - coexistence and Phase 2 - fully transitioned).
It is possible that some organizations may maintain a coexistence dual call control deployment indefinitely with no plans to ever fully transition to cloud calling.
The second consideration is how you will transition users, devices, and soft clients from the on-premises call control to the cloud call control. The recommended approach is a 3-Phased Transition. The figure Recommended 3-phase transition below breaks down this approach into the 3 phases.
Pre-Migration: This phase focuses on getting both the Webex and Unified CM environments ready for the migration. This is not about calling specific planning or configurations and focuses on completing activities that can be done now and before any Webex Calling migration project starts. The goal is to build the foundation for the two environments to prepare for the migration.
Migration Prep: This phase is where the effort begins to prepare for the migration to Webex Calling. Here, business and technical requirements need to be reviewed and updated. Do not just do a lift and shift of what is currently deployed with Unified CM and instead redefine the business and technical requirements that your company needs today and in the future by leveraging the power of Webex Calling. In addition, this is the phase where you will complete your design, configuration planning, and migration planning/schedule.
Migration (Rollout and decommission): This phase is where the actual migration of users, devices, phone numbers, and soft clients happens. As discussed above this phase can be completed for everyone at one time (flash-cut) or over multiple change windows (phased-cut). End-user adoption plans, training, and communications are critical, so your users are aware of the changes, how to use the new calling platform, and know when the change will happen. The last step is to decommission all the on-premises UC infrastructure that is no longer being used.
The pre-migration phase has activities (required, recommended, and optional) that you can start working on immediately. It is recommended to complete these sooner rather than later and preferably before your project begins. Some of the activities can take longer to complete, therefore starting them earlier will help streamline your actual migration project.
The Figure Pre-Migration Activities below highlights five specific categories of activities that are related to a Webex Calling migration.
Prepare
Business and technical requirements
When planning a migration from to , it's crucial to thoroughly gather both technical and business requirements during the planning phase. This step ensures that migration aligns with your organization's operational goals and technical capabilities, minimizing risks and disruptions.
Why gathering requirements is important:
-
Aligns business objectives: Understanding business needs helps tailor the migration to support key workflows, user experience, and growth plans.
-
Ensures technical compatibility: Identifying technical requirements early prevents integration issues with existing infrastructure, network, and endpoints.
-
Facilitates resource planning: Clear requirements help estimate timelines, costs, and necessary resources accurately.
-
Mitigates risks: Early detection of potential challenges allows for proactive solutions, reducing downtime and service interruptions.
Business requirements
Typical business requirements include:
-
Number of users and locations to be migrated
-
Desired features and services (example, call routing, voicemail, conferencing, auto attendants, call queues)
-
Compliance and security policies
-
Budget constraints and cost expectations
-
User training and support needs
-
Migration timeline and business continuity considerations.
Gathering desired features and services is a critical step to ensure the new system meets business needs. When gathering these requirements, it's important to not only consider what's currently configured in but try to gather the actual requirements from the business entities that are going to use the system. Otherwise, there is a risk that the plan is based on non-current assumptions. Make sure to evaluate additional or enhanced features available in that may not exist in , such as cloud-based calling, advanced call queues, , and . This helps in leveraging the full benefits of the cloud platform.
When evaluating the current configuration in , it is important to recognize that not all existing settings may remain necessary due to evolving requirements throughout the system's lifecycle. The focus should be on identifying and retaining only those configurations that align with the current and future needs of the deployment.
Focus more on what you need than what you have.
Compliance and security policies are critical considerations during the migration from to Webex Calling to ensure that the new cloud-based communication system adheres to legal, regulatory, and organizational standards.
-
Regulatory compliance: Organizations must verify that meets industry-specific regulations such as GDPR, HIPAA, or SOX, addressing requirements for data privacy, retention, and handling, as well as country-specific mandates related to data residency, toll bypass, and media locality.
-
Data security: Ensuring that voice and signaling data are encrypted both in transit and at rest to protect against interception or unauthorized access.
-
Access controls: Defining and enforcing user authentication, authorization, and role-based access to prevent unauthorized use of communication resources.
-
Audit and monitoring: Implementing logging and monitoring capabilities to track access and usage for compliance audits and security incident investigations.
-
Policy alignment: Aligning the migration with existing corporate security policies, including endpoint security, network segmentation, and incident response plans.
-
Vendor security assurance: Evaluating Cisco's security certifications and compliance attestations for to ensure trustworthiness.
Addressing these compliance and security policies during the planning phase helps mitigate risks, avoid legal penalties, and maintain the integrity and confidentiality of communications throughout and after the migration.
User training and support needs are essential components during the migration from to to ensure a smooth transition and user adoption. Key considerations include:
-
Training programs: Develop tailored training sessions for different user groups (end users, administrators, help desk staff) to familiarize them with features, user interfaces, and new workflows.
-
Documentation: Provide clear, accessible user guides, FAQs, and quick reference materials, including What's New and Different resources and step-by-step Before and After how-to guides (in video or quick guide format), to support users as they adapt to the updated experience post-migration.
-
Change management: Communicate changes proactively to manage user expectations and reduce resistance.
-
Support structure: Establish a dedicated support team or escalation path to address user issues promptly during and after the migration.
-
Ongoing education: Plan for continuous training updates as new features or updates are released in .
-
Feedback mechanisms: Implement channels for users to report issues and provide feedback to improve training and support processes.
Addressing these training and support needs during the planning phase helps minimize disruption, enhances user confidence, and maximizes the benefits of migrating to .
Technical requirements
Several key technical requirements need to be collected and documented for a successful migration from to , including details for:
-
Network readiness and bandwidth capacity
A comprehensive network assessment is critical to ensure your existing infrastructure can support the new Webex Calling environment. This includes:
-
Bandwidth analysis: Evaluating current and projected bandwidth usage to handle voice, video, and data traffic without congestion.
-
Quality of Service (QoS): Implementing QoS policies to prioritize voice traffic and minimize latency, jitter, and packet loss.
-
WAN and internet connectivity: Verifying that WAN links and internet connections meet the requirements for cloud-based calling, including redundancy and failover capabilities.
-
Firewall and NAT configuration: Ensuring that firewall and NAT settings permit required signaling and media traffic for .
-
-
Integration with existing system
Seamless integration with existing business systems is essential for user experience and workflow continuity:
-
Directory services: Assessing integration with an enterprise directory for automated user provisioning and authentication.
-
CRM and business applications: Identifying integration points with customer relationship management systems and other business-critical applications.
-
Legacy PBX interworking: Planning for coexistence or phased migration strategies if any legacy telephony systems will remain during the transition.
-
-
Endpoint compatibility and provisioning
All endpoints including desk phones, softphones, and mobile devices should be evaluated for compatibility:
-
Device support: Confirming that existing IP phones and devices are supported by or identifying required replacements.
-
Provisioning processes: Establishing automated or streamlined provisioning methods for efficient onboarding of endpoints.
-
Firmware and software updates: Planning for necessary updates to ensure interoperability and security.
-
-
Security configurations and encryption standards
Security is paramount in cloud communications:
-
Encryption: Enforcing end-to-end encryption for signaling and media streams, in line with Cisco security best practices.
-
Authentication and access control: Implementing secure authentication mechanisms (such as SSO, multifactor authentication) and granular user access controls.
-
Compliance: Ensuring the solution meets relevant regulatory and industry compliance standards (example, GDPR, HIPAA).
-
Security monitoring: Integrating with SIEM tools and setting up alerting for potential security incidents.
-
| Requirement | Key considerations |
|---|---|
| Network readiness and bandwidth | Bandwidth, QoS, WAN/Internet, Firewall/NAT |
| Integration with existing systems | Directory, CRM, PBX, Email/Calendar |
| Endpoint compatibility and provisioning | Device support, provisioning, firmware updates |
| Security configurations and encryption | Encryption, authentication, compliance, security monitoring |
| User training and change management | Training programs, documentation, change communication |
| Number portability and dial plan | Number migration/porting, dial plan translation |
| Third-party integrations | Paging, contact center, fax, analog devices |
Network readiness and requirements
Network readiness is critical to a successful migration to any cloud-based calling solution like . Poor network planning can lead to degraded call quality, dropped calls, and unhappy users. Customers need to conduct a network assessment prior to migrating to . It is recommended to confirm network bandwidth availability for expected call volume, ensure quality of service (QoS) requirements are met, and understand the various ports that must be opened in the edge firewall(s).
Reliable network connectivity with sufficient quality of service (bandwidth, packet loss, RTT) is a base requirement to ensure the best possible user experience end-to-end for all voice and video capable endpoints, clients, and applications using .
Customers and partners have access connectivity options beyond Over-the-top (OTT) Internet that can optimize the connection to including Webex Edge Connect. For more information on Webex Edge Connect design details, see Cisco Preferred Architecture for Webex Edge Connect for Webex Meetings, Calling Multi-Tenant, and Dedicated Instance.
Customers can utilize CScan for network assessment which gives information on customer's network quality, how many calls can be established, latency, and so on. For more information on the CScan tool, see Use CScan to test Webex Calling network quality.
To ensure the network is ready for migration to , consider the following checklist:
-
Bandwidth planning
Calculate concurrent calls per site to ensure you have enough upstream and downstream bandwidth and include headroom for other business-critical traffic and future growth.
The Webex Calling call type bandwidth calculations table shows the call types available with a deployment along with the codec and maximum bandwidth required for each call type. As shown in the Webex Calling call type bandwidth calculations table required audio call bandwidth for each call type can be calculated using the following general formula:
Number of expected concurrent calls * Bandwidth per call based on codec = Required network throughput.
Table 2. Webex Calling call type bandwidth calculations Call types Codec - bandwidth Bandwidth calculations / Desk phone -> OPUS - 70 kbps Number of concurrent calls * 70 kbps = Required network throughput / Desk phone -> Desk Phone OPUS – 70 kbps Number of concurrent calls * 70 kbps = Required network throughput / Desk phone -> PSTN via LGW G.711 – 80 kbps Number of concurrent calls * 80 kbps = Required network throughput / Desk phone -> PSTN via Cloud PSTN (e.g. Cisco calling plan) G.711 – 80 kbps Number of concurrent calls * 80 kbps = Required network throughput / Desk phone -> Enterprise via LGW G.722 – 80 kbps Number of concurrent calls * 80 kbps = Required network throughput / Desk phone -> voicemail OPUS – 70 kbps Number of concurrent calls * 70 kbps = Required network throughput By summing the concurrent required network throughput per call type, the total potential bandwidth requirement for a specific site can be determined.
All call legs are always anchored on the access SBCs. To determine the required internet bandwidth for any given location not only the inter-location calls need to be considered, but also intra-location calls and calls to and from a Local Gateway at that location. For example, an intra-site call between two MPP phones would need up to 2 x 70 kbps full duplex on the location's internet access.
The Webex Calling bandwidth calculation examples table shows an example of a complete bandwidth calculation exercise, assuming that all devices are in the same site.
Table 3. Webex Calling bandwidth calculation examples Call types Number of concurrent calls Total bandwidth Webex App / Desk Phone → Webex App 15 2 * 15 * 70 kbps = 2,100 kbps Webex App / Desk Phone → Desk Phone 15 2 * 15 * 70 kbps = 2,100 kbps Webex App / Desk Phone → PSTN via LGW 50 2 * 50 * 80 kbps = 8,000 kbps Webex App / Desk Phone → PSTN via Cloud Connect for Webex Calling 0 0 * 80 Kbps Webex App / Desk Phone → Enterprise via LGW 15 2 * 15 * 80 kbps = 2,400 kbps Webex App / Desk Phone → Webex Calling Voicemail 5 5 * 70 kbps = 350 kbps Total calls / Bandwidth 100 calls 14,950 kbps / 14.95 Mbps -
All bandwidth values in the above tables refer to IP bandwidth. Link bandwidth is higher depending on WAN encapsulations.
-
The bandwidth in the above tables is for audio calls. For video call bandwidth, Webex App and the MPP 8845/65 phones support H.264 video with maximum resolution of 720p at a maximum bandwidth of 1,500 kbps per call. However, the amount of bandwidth consumed at any point during the call will fluctuate based on variable bit rate inherent in video communications.
-
-
Quality of Service (QoS)
Implement QoS policies within your on-premises environment to prioritize real-time traffic, and ensure QoS is maintained across switches, routers, and firewalls.
-
Latency, jitter, and packet loss targets
The following thresholds are recommended for optimal voice quality when calls go Over-the-Top (OTT) and across the internet:
-
Latency - less than 100ms one-way
-
Jitter - less than 10ms
-
Packet Loss - 0.5% or less.
-
-
Firewall and NAT
Ensure the firewall is configured to allow traffic as listed in the article available at Port reference information for Webex Calling. Additionally, allow access to domains and IP ranges listed in the same guide and avoid SIP ALG as it interferes with SIP signaling. Media traffic through proxies should be avoided.
-
DNS and NTP
Ensure proper DNS resolution of domains and reliable NTP servers to sync device clocks for TLS certificate verification and logging.
-
Failover planning
Consider existing provider data connections (MPLS, SD-WAN, and so on) and generally plan for direct internet access at each location within your deployment. Plan for redundant internet links where high availability is required. Because you will be consuming cloud-based services, reliable internet connectivity with sufficient bandwidth is a base requirement. You should reconsider making this transition if your organization locations' internet connection(s) are not generally reliable with low latency and adequate up and downstream throughput.
-
Site survivability
Site survivability ensures that your business is always reachable, even if your network connection to breaks. Site Survivability uses a gateway in your local network to provide a fallback calling service to on-site endpoints for situations where the network connection to breaks. Consider site survivability with a local Survivability Gateway (SGW) if business requirements require continuous calling in the event of network outage. For more information about site survivability check, see Site survivability for Webex Calling.
Set up Cloud-Connected UC
Cloud Connected UC (CCUC) is a cloud-based management and analytics solution designed to provide centralized visibility, administration, and insights for deployments both on-premises (such as Unified CM) and cloud (). It acts as a bridge between traditional on-premises environments and Cisco's cloud services, supporting organizations throughout the migration journey from to .
During the transition to , CCUC plays a vital role in streamlining the migration process by facilitating the collection of comprehensive data from the existing Unified Communications deployment. CCUC assists with key transition tasks such as migrating devices, features and user contacts, as well as automating firmware updates for supported IP phones. By providing centralized visibility and management, CCUC helps ensure a smoother and more efficient migration experience.
Cisco highly recommends that CCUC be deployed and deployed early in the transition project, ideally before or during the preparation phase. This will enable the insights and capabilities needed to thoroughly assess, inventory, and plan for subsequent migration activities and to start your journey to and future hybrid capabilities.
Assessing the current environment
A key activity in planning for your migration is assessing the current on-premises environment and deployment. This provides insights into what potential changes may be required to successfully transition to . It also allows you to assess the key elements of platform in comparison to the existing on-premises deployment. You can use this information to help identify what specific tasks are required for the transition and what changes you want to make to meet your business and technical requirements and use cases.
The following aspects are important to review as part of this effort.
Licensing
Understanding the current licensing structure of the existing deployment is key when preparing to migrate to . Perform a license assessment of the following areas of your existing Cisco on-premises solution.
-
Platform
The ability to fully articulate what is currently licensed on your core platform will be critical when working with your account team or partner to determine the best path to flex licensing. is licensed using flex licensing. For more information on flex licensing, see Cisco collaboration flex plan.
-
Users and devices
Identify what license category your existing users and devices require. This will be used to determine which type of license is required for the users and devices. offers multiple licensing types, including Professional and Standard licenses for users and Professional and common area licenses for workspaces. For more information on device licensing, see the data sheet available at Device licensing.
-
Local gateway
If the Cisco Unified Border Element (CUBE) is required for PSTN access for this transition, CUBE licensing must also be considered. CUBE licensing considerations are covered later in this document.
Locations/Sites
The number and types of sites (large central, regional, branch, and so on) within your existing deployment should be considered when planning this transition. A full understanding of the existing deployment sites will aid in strategically planning for a successful transition particularly when it comes to determining what sites to migrate and in what order. Understanding in detail dial plan requirements (numbering, dialing habits, classes of restriction, and so on), site network connectivity and bandwidth (Internet, WAN, LAN), and PSTN access (local or centralized, IP or TDM) for each site will be critical when making migration decisions. For more information on common deployment models and key considerations, see the collaboration deployment models information available in the Collaboration SRND.
Another important deployment consideration when transitioning to is location availability. has different capabilities, subscriptions and devices that are available depending on where your deployment is located. For more information on geographic availability, see Where is Webex available?.
Finally, it is important to understand the impact the transition to will have on other collaboration services. Based on the objective of this document, the general assumption is that if existing collaboration services outside of the calling workload are to be maintained, then transition to the phase 1 hybrid deployment mentioned above is expected. Examples of collaboration services that may require hybrid deployment include on-premises contact center not yet migrated to Webex contact center and tight integrations into systems like paging systems and billing. For more information on the transition of additional collaboration workloads and services, see Collaboration transitions.
Inventory existing devices/clients
Before beginning the transition it's important to inventory your existing hardware and software endpoints. Having a complete list of device types/models, hardware versions, soft client OS types and quantities will ensure that you can adequately plan for transitioning the devices and mitigating the impact for those devices that cannot be migrated to cloud calling. The inventory should be used to determine the devices to transition and the devices to replace prior to the transition.
Desk phones
For audio and video desk phones only the 6800, 7800, 8800 and 9800 series desk phones are supported with . This is a subset of the Cisco IP Phones that are supported with . There are some models and versions of the 6800, 7800 and 8800 phones that cannot be used with . For more information on which models and hardware versions are supported, see Supported devices for Webex Calling.
The Cisco 6800 series IP phones cannot be upgraded from Enterprise firmware to Multiplatform (MPP) firmware, which is required for . Therefore any 6800 phones registered to running enterprise firmware must be replaced with a 6800 MPP model or with another supported phone model.
The Cisco 7800 and 8800 series IP phones must be upgraded to the Multiplatform Phone (MPP) firmware prior to transition and registering them to . To determine which 7800 and 8800 models and hardware versions support the MPP firmware, see Convert Cisco 7800 and 8800 series IP phones between Enterprise and MPP Firmware.
The 8845, 8865 and 8865NR have reached End-of-Sale and are not recommended to be migrated to .
Older versions of the 8800 series phones (8811, 8841, 8851, 8851NR, 8861) are not recommended to use with Webex Calling. Phones with hardware versions VID 14 or earlier will register with but may experience some performance issues due to the hardware.
The 9800 series desk phones run PhoneOS, which supports both and registration. Therefore, these phones can be transitioned to without a firmware upgrade.
All other IP phones will need to be replaced with a 6800, 7800, 8800 or 9800 series phones supported by Webex Calling. For more information on the supported IP and Desk Phones with , see the article at Supported devices for Webex Calling.
Video endpoints
Personal and room video endpoints, including the Cisco Board series, Room series, and Desk series, can natively SIP register to . Any of these endpoints that need to make audio and/or PSTN calls require a calling license:
-
Shared devices in conference rooms, huddle spaces, etc. require either a Professional Workspace or Workspace license.
-
An end user's personal device requires a professional or standard license.
Determine how many video endpoints are registered to and are used to make audio calls. It is possible some of the video endpoints may only be used for joining meetings or making SIP video calls. In either case, the endpoints still need to migrate to before the servers are decommissioned, however this will help determine how many of them will need a licenses to continue to make phone calls.
-
When video devices are moved from registration to , the URI for these endpoints will change as they are now cloud registered.
-
Phone models 8845, 8865 and 8875 are personal video phones that are supported with .
Soft clients
The is the only soft client supported by , unlike Unified CM which supports both the Webex App and Jabber, and is the new default soft client for end users.
Depending on the deployment mode(s) implemented for Jabber (IM-only, phone-only, and/or full UC modes), you may also need to consider the transition of the Messaging and/or Meetings workloads from Jabber to the . The can be deployed in phone-only mode if it will be used as a calling only client or it can be deployed as the full Webex Suite if other workloads, e.g. Webex Messaging and/or Webex Meetings, are being transitioned to the app with calling.
The enhances the end-user's experience by providing AI features like audio/video intelligence, call transcription, and others. For more information, see https://www.webex.com/all-new-webex.
Before moving users to you will need to transition their Jabber clients to the . You have two options to complete this transition.
-
Before you transition them to
-
When you transition them to .
To ease the initial transition to the , it is recommended to use option 1 and move users to the with calling first. This gives users time to familiarize themselves with the new application while they are still using the existing on-premises calling platform. Once you are ready to move users to , you will configure their to register with the cloud calling platform.
For more information, about these two options see Migration journey - one or two steps?.
For a complete list of the supported devices for , see Supported devices for Webex Calling.
Verify device eligibility
As mentioned previously, supports a subset of the Cisco IP Phones and requires a different firmware type for the 7800 and 8800 series phones. Unified CM phones run the Enterprise firmware whereas Phones run the Multiplatform Phone (MPP) firmware. It is recommended to verify which registered phones are eligible to upgrade to the MPP firmware during the Prepare phase. This gives you time to replace ineligible phones with one of the supported phone models or to identify an alternative plan, like moving a user to the Webex App only.
To help with determining the eligibility of the phones, Control Hub has a built-in tool called Migrate Your Phone to Webex Calling. When using this tool to check device eligibility, select the Migration option Generate device license only.
This option allows you to upload a CSV file containing the phones so can check the eligibility of each phone. By selecting this Migration option, it does not add the phones to since you are still in the prepare phase and not ready to do this yet. For more information, see Migrate your phone to Webex Calling.
It is possible that some of the phones may come back with an Unknown eligibility. This is typically because is unable to validate some information about the phone in the back-end system. For any phones that have an Unknown status, you have two options to verify if they are eligible to upgrade to the MPP firmware.
-
Manually check each phone and verify the model and hardware version (PID VID)
7800/8800 phone label with model and hardware version info -
Use the Cisco IP phone readiness tool
Download the tool from https://github.com/joemar2/mpp_readiness_check.
This tool is not an official Cisco tool nor is it TAC supported. It has best-effort support but is free to use.
This tool must be run on a machine that is on-premises and can access the servers and the IP Phones. It has an option to enable web access on the IP Phones, which is recommended and needed to get the best results. Therefore, it should be used during off hours to avoid disruption to the end users. The output of the tool provides a report listing which of the 7800 and 8800 series phones are eligible to upgrade to the MPP firmware. Because it directly accesses the phone it can verify the Unknown devices that were reported from the Control Hub tool.
Cisco IP phone readiness tool report
Users
One of the most important prepare steps to ensure you have a successful migration is proper user provisioning. You need to properly plan for all users even if you are doing a phased migration. Users must be provisioned in for any of the following:
-
Deploying the with Calling
-
Deploying the with
-
Configuring services for a user
-
To make users searchable in the directory ( click-to-call, User contact info, phone directory search).
It is recommended that you provision all users in before or at the start of your project. This includes users who are still using Unified CM for their calling platform is independent of their calling device (IP phone, Jabber, ). As users get migrated to (and/or the ) you will update their licenses to enable the services they need. By provisioning all enterprise calling users before starting your transition, it allows a user who has transitioned to the or to to search the directory for an enterprise calling user who is still on Jabber and/or on . This ensures transitioned users can find any other user's contact information and make a call to them using the directory lookup.
The figure directory search show an example of a user searching for another user. The search results show the user's contact information and can be for a user who is still on Jabber and or for a user who has transitioned to the and/or .
Next determine which of the existing on-premises calling users will be transitioned to . If all or a large number of users will be transitioned, then it is recommended to move users in groups to ensure that project team, IT staff and support personnel are able to handle the transition and any issues that may arise. You should also allocate some time to provide initial information and training sessions to prepare users for this transition. User transition grouping can be done based on a variety of criteria including the location or site users are assigned to, users' departments, or even user types (knowledge workers, executives, mobile workers, and so on).
As an example, if users in the deployment are divided across three main sites, New York (NYC), San Francisco (SFC), and Research Triangle Park (RTP), a user transition plan may look like the plan outlined in User transition plan by site table.
| User site / location | Pre-transition information and training sessions | Transition period | Post-transition support |
|---|---|---|---|
| NYC (1,525 users) | Week of April 1 | April 15 – April 27 | Week of April 29 |
| SFO (1,600 users) | Week of May 6 | May 20 – May 31 | Week of June 3 |
| RTP (1,275 users) | Week of June 3 | June 17 – June 28 | Week of July 1 |
Another important factor is transitioning users together who have dependencies between each other. This could include but is not limited to the following:
-
BLF monitoring
-
Same hunt pilot/group
-
Share lines
-
Part of the same Call pick-up group
-
Using the same call-park numbers
-
Intercom
-
Admin/Exec.
You can review the configuration (GUI or export) or use the Migration Insights tool to help identify the groups of users with these dependencies.
PSTN connectivity
can access the PSTN in three ways: Cisco calling plans, Cloud connect for (formerly Cloud Connected PSTN), and on-premises PSTN (Local gateway). However, a single location as defined within the can only be assigned to a single PSTN option.
On-premises PSTN with a local gateway (LGW) is an essential component of the transition strategy. It provides connectivity between the on-premises deployment and/or PSTN and the platform. supports both Cisco and certified third-party session border controllers (SBC) that can be used as local gateway. For the latest list of supported SBCs, see List of supported SBCs.
supports up to 250 concurrent calls from a single local gateway that is registration-based and more than 250 concurrent calls from a single Local Gateway that is certificate-based. Certificate-based Local Gateways can support up to 6500 concurrent calls, but this is based on the type of connectivity the local gateway has to (Over-the-Top vs interconnect peering) and the SBC model the Local Gateway is deployed on. These limits are in essence the default count limit for both local gateway-based PSTN calls and inter-site calls between and endpoints. For more information, see Get started with local gateway.
Any calls exceeding this limit are rejected with a 403 Forbidden. The show call active voice command can be run on the local gateway at any instance to determine the total number of active calls.
Poor network conditions between a local gateway and the access SBC can limit the performance of the signaling connection, leading to an even lower concurrent calls limit. One-way latency between the local gateway and the data center should not exceed 100 ms and jitter should be less than 10 ms while packet loss is less than 0.5 %.
Features & feature usage
When assessing the current environment, it is important to identify and review which features are configured. In addition, it is important to understand the usage of the features so you can (re)define your business and technical requirements for your deployment.
To determine which features are configured, analyze the configuration. This is all static data that is set when a feature or setting is configured on the system. The following options can be used to complete this analysis:
-
Review configuration in admin GUI
-
config export -- bulk export or AXL
-
migration insights tool (Recommended)
-
Cisco 3rd party partner tools (Recommended).
To analyze feature utilization effectively, it is essential to examine dynamic system data such as utilization, registrations, and call activity. Various analytical tools and dashboards provide insights into these metrics, enabling a comprehensive understanding of system performance and capacity, which supports informed decision-making during migration and optimization efforts. The following options can be used to complete this type of analysis:
-
Review of raw CDR records
-
Review of Unified CM RTMT data
-
migration Insights tool using CDR data
-
Review of Cloud-Connected UC analytics in
-
Call volume
-
Registered endpoints
-
(CAC) locations
-
Trunk utilization.
-
-
Cisco 3rd party partner tools.
Cisco recommends starting with the Webex Control Hub Migration Insights tool for this analysis. You will import your export .TAR file and the Unified CM CDR files (optional, but required for feature utilization analysis) into the tool. The tool will generate the following CSV based reports that can be used to start the analysis:
| Report name Report description |
|---|
| ImportedDataBulk.csv
All users and devices from Unified CM data |
| DeviceEligibility.csv
Identifies devices eligible to Migrate to Webex Calling (IP phones, Room OS devices, ATAs, and Third-Party) |
| DevicePoolNumbers.txt List of all numbers in a particular device pool |
| HuntGroup_CallQueue_CallPark_CallPickUpGroups.csv Details about devices and users that should be migrated together based on shared lines, hunt pilot, call queue, call park and call pickup group config |
| HuntGroupMigrationInsight.csv Detailed information on assigned hunt lines, line groups, and associated agents |
| SharedlineGroupMigrationReport.csv Overview of how phone numbers (directory numbers) are shared between users |
| Report name Report description |
|---|
| FeatureUsageBasedDeviceEligibilityReport.csv Information about device migration eligibility based on the feature usage |
| FeatureUsageWithLastUsageDateReport.csv Usage count for the number of times hunt pilot(s) and call queue(s) have been called along with the last usage date |
| UserWorkspaceLastUsage.csv Last usage date for users and workspaces for both soft clients and hard phones |
| DIDUsageReport.csv DID usage for both assigned and unassigned DIDs |
For more details about the Migration Insights reports, see Migration insights.
If you need more information about the features and usage after reviewing the information in the Migration Insights reports, Cisco recommends considering one of Cisco's 3rd party partner migration tools and/or to review the configurations in the GUI or in the config export data.
Cisco integrations: Unity Connection UCCX UCCE
Voicemail is an integral part of the offer and natively build-in to the solution. cannot integrate with a premise-based voicemail solution such as Unity Connection or Unity Connection Express. Further, there is no native way to migrate existing Unity connection voicemail messages or greetings to the native voicemail service available with . Some of Cisco's 3rd party partner's migration tools do have capabilities to migrate some of this data. For more information on voicemail for , see Configure and manage voicemail settings for a Webex Calling user.
also supports shared voicemail and fax mailboxes. For more information, see Manage a shared voicemail and inbound fax box for Webex Calling.
has a built-in Auto Attendant feature that is included as part of the core platform. This feature allows for the transition of your Unity Connection's call handlers and auto-attendant functionality. The Control Hub tool, Migrate Features from Unified CM, supports migrating the Unity Connection configurations to Auto-Attendants. For more information about using this tool, see Migration of devices and features from Unified CM to Webex Calling.
Call recording
includes two options for call recording at no additional cost.
-
Webex call recording
-
Dubber Go recording (partner offer) - an integration between and dubber where all recorded media is securely kept in the cloud.
included recording options table highlights some key features of the two call recording options that are available at no additional cost.
| Webex | Dubber Go |
|---|---|
| Available to all users | Available to all users |
| Unlimited recordings | Unlimited recordings |
| 1 year retention period* | 30-day retention period |
| 100 GB storage per Org | - |
| Compliance officers can access and manage call recordings | - |
| APIs to manage recordings | - |
Admins can configure and manage users’ access to their call recordings
|
Only users can access and manage their recordings
|
If your organization requires additional recording capabilities like compliance call recording, longer retention periods, more storage, AI analysis, and/or administrator access, paid offers or add-ons exist from both Cisco and 3rd parties recording providers. For more information on recording providers, configurations and add-on partner services, see Manage call recording for Webex Calling.
Third party integrations
supports a variety of 3rd party integrations including but not limited to SBCs for Local Gateways, IP phones, Intercom phones, Speaker/Pagers, ATAs, etc. In addition to these 3rd party devices, Webex Calling supports different 3rd party solutions for customer support, analytics, recording, billing, etc. For more information on 3rd party solutions, see Webex App Hub.
Plan
High-level project plan
When developing a high-level project plan for migrating from to , it is essential to establish clear phases and milestones that align with both business objectives and technical requirements. The plan should begin with a comprehensive assessment phase, including gathering detailed technical and business requirements, as well as identifying stakeholders and defining success criteria. Key considerations include resource allocation, timeline estimation, risk management, and communication strategies to ensure all parties are informed and engaged throughout the migration. Additionally, the plan should incorporate validation checkpoints such as pilot testing and phased rollouts to minimize disruption and allow for adjustments based on feedback.
Examples of elements to include in the project plan are:
-
Defining the scope of migration (e.g., which users, devices, and features will transition)
-
Scheduling training sessions for end-users and support teams
-
Coordinating network readiness assessments, and
-
Planning for cutover activities with fallback options. It is also important to integrate compliance and security reviews, as well as post-migration support and optimization phases.
By structuring the project plan with these considerations, organizations can better manage complexity, reduce risks, and achieve a smoother transition to .
Migration journey - one or two steps?
requires users to use the for their calling soft client. Therefore, if any users are still using , you have two options on when you can move them to the . You can either do a single step user migration or a dual step user migration.
Option 1: Single step user migration
In a single step migration, users transition from to the at the same time they are transitioned from Unified CM to . This option is typically for customers with a small number of users to migrate and can manage moving both the user's soft client and calling service to at the same time. The figure User’s calling service, soft client & phone migrates to at same time below highlights this type of migration. With this option a user will have the following completed all at the same time:
-
Calling services moved from to
-
Phone numbers and extensions moved from to
-
Soft client transitioned from Jabber to the - will register to
-
Phone registration moved from to .
This can still be a phased migration where groups of users are moved at different times, but when each user is moved all of these happen at the same time.
Option 2: Dual step user migration
The other approach is a dual step migration. In step 1, users are transitioned from to the but stay on for calling services. Then in step 2, users are moved from Unified CM to . This option is recommended for larger customers to manage the end user changes and want to separate the user's soft client change from the calling service change. The following figure Migrate soft client; then migrate calling service, soft client & phone to Webex Calling below highlights this type of migration.
Step 1
-
Soft client transitioned from to - will register to .
Step 2
-
Calling services moved from to .
-
Phone numbers and extensions moved from to .
-
registration moved from to .
-
Phone registration moved from to .
This can still be a phased migration where groups of users are moved at different times in both steps.
The option you choose depends on how you want to manage your users' transition to the and . The recommendation is to take it in steps (Option 2). This allows you to minimize the end user's changes at one time and divide the effort up across different parts of the project. However, if you prefer to have users only impacted once, then using Option 1 is also valid.
Looking at the recommended journey (Option 1), Jabber to Webex App high-level transition map figure below shows the high-level transition for Step 1.
In this step users are transitioned from Jabber to the for all their calling services. However, the calling platform is still Unified CM and the will register its calling services to . As seen in the Jabber to Webex App high-level transition map figure the on-premises infrastructure does not change, and the works the same way Jabber does. The only change is the requires a connection out to .
For more information about this transition, see Jabber to Webex Transition Map and Deployment Guide under the Client section on the Collaboration Transition page.
Unified CM to Webex Calling high-level transition map figure is the high-level transition from to . This is Step 2 of the recommended journey.
If you decide to use the single step approach, this applies too.
In this step users are transitioned to in groups. At this point the users start using for their calling services, calling registration and IP Phone registration.
Since users are moving in groups, Enterprise users will be split between the two calling platforms during the transition. Phase 1 in Unified CM to Webex Calling high-level transition map figure depicts this state. During this phase planning is required for how to manage calls between users on the two platforms and how PSTN calls will be routed. Each time a group of users is transitioned to , dial-plans and call routing updates will be required on , and the Local Gateway(s).
Once all users, soft clients and devices have been transitioned to (Phase 2), then all on-premises UC infrastructure can be removed and decommissioned.
Design
Region selection
is available globally and is delivered from redundant data centers in multiple regions: US (Dallas, Chicago), Canada (Vancouver, Toronto), Europe (Frankfurt, Amsterdam), UK (London, Manchester), Australia (Melbourne, Sydney), Japan (Tokyo, Osaka), Saudi Arabia (Riyadh, Jeddah) and India (Mumbai, Chennai). The media PoPs provide media services to optimize media round-trip times. The Singapore data center for example is used to optimize media round trip times for customers in Asian countries where the round-trip times to either the Australia or Japan region might be suboptimal. The data centers are interconnected by a multi-gigabit and fully redundant backbone. The figure globally distributed data centers shows an overview of all data centers. For the latest list of available data centers, see Data Center locations for Webex Calling.
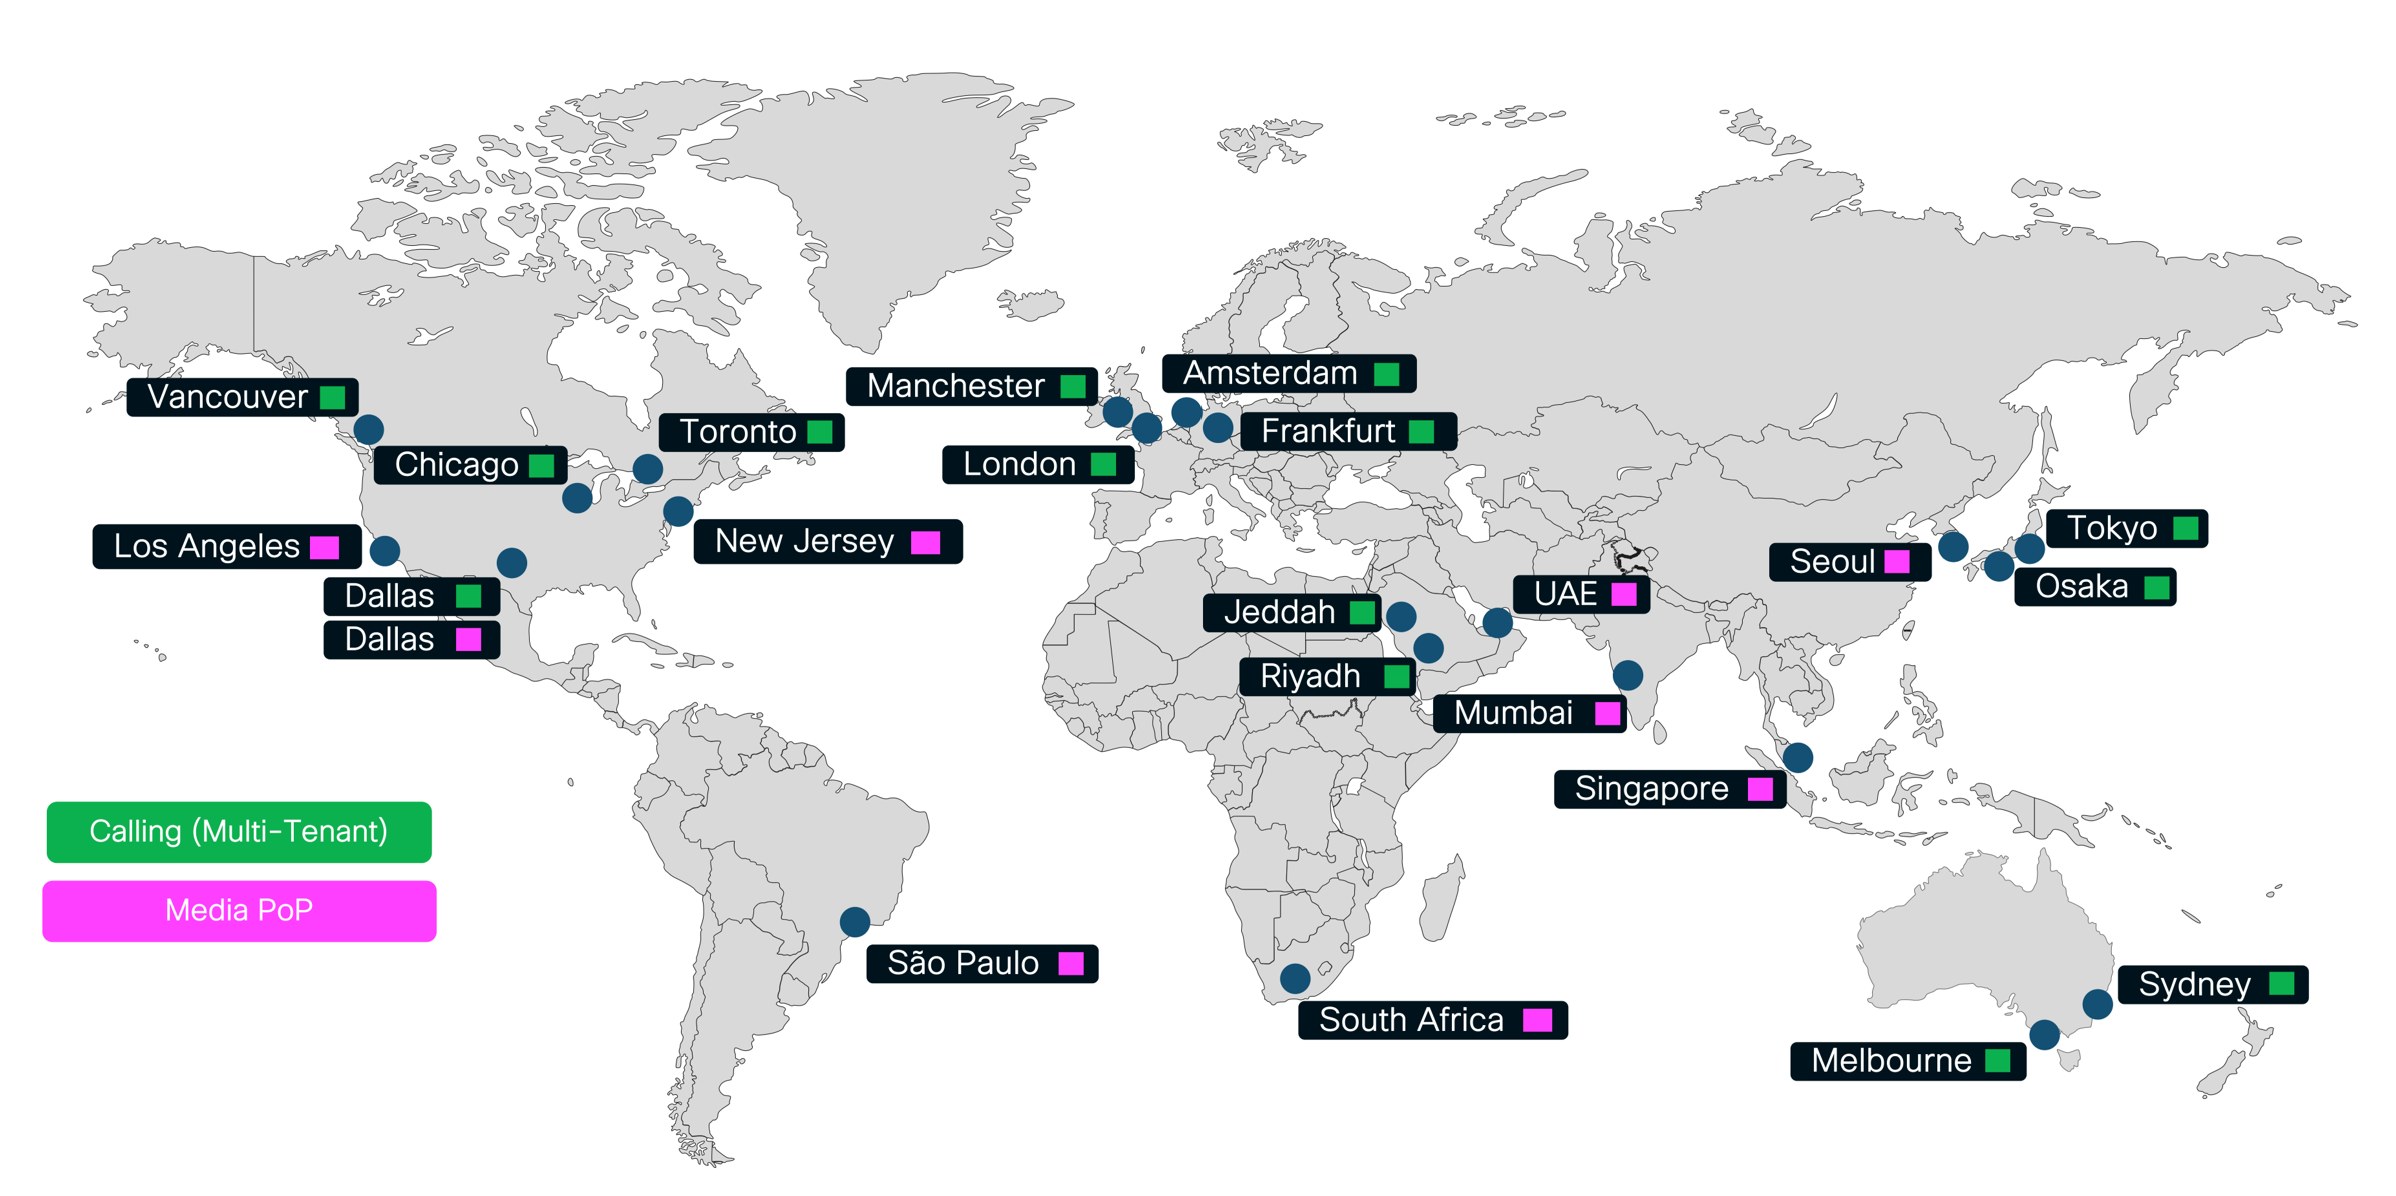
Each customer is provisioned on one of the instances. All provisioning information of that customer is stored in that instance and the SIP signaling of all endpoints and Local Gateways provisioned for that customer is tied to the instance the customer is provisioned on. Because it is hard to change the initial region selection, it is important to consider all relevant factors as part of the decision process leading to the region selection. To avoid excessive signaling round-trip delay, it is important to decide early in the transition process which instance should be used. Cisco recommends selecting the instance which provides the lowest signaling round-trip times for the largest number of users within the deployment.
For country availability, see Where is Webex available?.
Locations
To prepare for the provisioning of locations on the required information for all migration target locations needs to be collected. The information needed for each location is summarized in Information to capture for each location.
| Information | Comment |
|---|---|
| Extension range(s) | Each location in can have extensions starting with different digits. One digit must be spared for
the inter-site dialing steering digit (for example 8) and one for the PSTN
steering digit (for example 9). No extension range can start with either of
these two digits. All extension ranges of all locations must be of equal length. |
| DID range(s) | - |
| PSTN steering digit | - |
| Site code | All site codes of all locations need to be unique and to have the same length. |
| Main number | When creating a location two DIDs need to be provisioned. One as
main number (for example to be assigned to an auto attendant service) and one for
the voicemail portal. Provision one DID for the voicemail number. |
| Voicemail number | |
| Number of licenses | Required licenses by type including Standard, Professional, Workspace, Route List, Outbound Calling Plan. |
| Concurrent calls in the busy hour | Sum of concurrent calls between devices and between devices and the Local Gateway (PSTN and calls to devices). Needed to determine the required internet access bandwidth. |
| Country | - |
| Time zone | - |
| Language | - |
| Contact (Name, Phone, Email) | - |
| Address (Street address, City, State, Zip code) | - |
| Emergency services physical dispatchable location for endpoints | Device dispatchable location used for emergency calling generally includes the following: building address, building address + floor number, building address + suite number, or building address + floor number + office/cubical number. |
| Per device unique physical network location for emergency services | Physical network location for emergency calling generally includes the following: switch / switchport for wired devices, wireless Access Point (AP) Basic Service Set Identifiers (BSSIDs) for wireless connected devices, and/or on-premises IP subnet(s) for endpoint devices. |
PSTN
When designing a deployment, customers have three primary PSTN connectivity options: Cisco Calling Plans (a cloud-delivered PSTN service managed by Cisco), Cloud Connected PSTN Providers (CCPP, where providers deliver PSTN service through the cloud), and on-premises PSTN (where local gateways connect the enterprise network to the PSTN). With the introduction of PSTN trunking for hybrid deployments (For more information, see PSTN trunking for hybrid Webex Calling deployments at PSTN trunking), organizations gain additional flexibility in their migration approach. This feature enables customers to move their PSTN to CCPP at the start of the transition journey and begin transitioning to cloud PSTN for users, while leveraging CCPP to maintain PSTN service for users who remain on Cisco during a phased migration.
This hybrid approach allows organizations to move select user groups to the cloud first, without immediately overhauling their entire telephony environment. However, it introduces additional complexity and risk, particularly around adapting existing call routing logic to support the new architecture. Interoperability with legacy applications, such as fax servers, contact centers, or paging systems, also requires careful consideration. Key technical challenges may include ensuring seamless end-to-end codec negotiation and DTMF (Dual-Tone Multi-Frequency) signaling across the mixed environment, as well as validating compatibility with specialized telephony features. Proper planning and testing are essential to minimize disruption and maintain reliable voice services throughout the migration process. Additionally, commercial considerations are important, as hybrid trunking requires a usage license that is based on the number of concurrent calls between the on-premises environment and the Cloud Connected PSTN Provider (CCPP).
Alternatively, organizations may choose to retain their on-premises PSTN connectivity throughout the transition phase. In this scenario, migration to CCPP can be executed in two ways: as a single, coordinated cutover for all users and locations once the migration is complete, or incrementally, with PSTN migration occurring on a per-location basis as users are moved to . This approach can help streamline coexistence and maintain continuity for legacy integrations, but it introduces several operational complexities. Among these are challenges related to number porting, such as the need for precise coordination of number port orders, potential delays, and provider-imposed limitations like a cap on the number of concurrent port requests or restrictions on porting subsets of large number blocks. Organizations must carefully plan their PSTN transition strategy, factoring in these logistical considerations to avoid service interruptions and ensure a smooth migration experience.
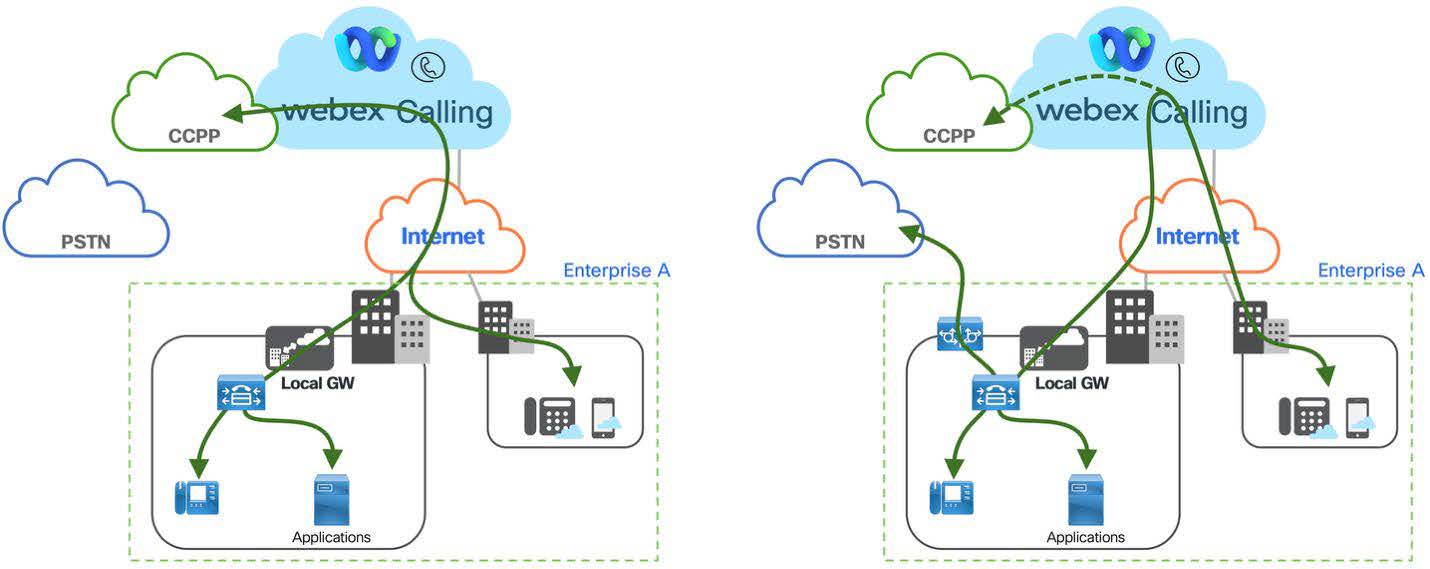
The figure Migration to CCCP at the start vs. keeping on-premises PSTN shows the two PSTN migration options explained above. The illustration on the left shows the scenario where all on-premises users and application consume Cloud Connected PSTN services through an on-premises trunk and a Local Gateway connecting the on-premises to while the illustration on the right shows the scenario where the existing on-premises PSTN stays in place and users on Webex Calling utilize on-premises PSTN through the Local Gateway connection between on-premises and . During the transition locations can be switched to using Cloud Connected PSTN.
In both scenarios calls between on-premises and user utilize the Local Gateway connection. The connection between on-premises and needs to be designed and sized accordingly based on the expected number of concurrent calls and the required redundancy.
Dial plan
To achieve seamless interoperability between and during the migration period, a comprehensive dial plan architecture must be developed and implemented across both platforms. This dual-platform dial plan design ensures consistent call routing, number translation, and feature transparency, enabling users on either system to communicate without service degradation or user experience disruptions throughout the coexistence phase.
On-premises dial plan in
During the transition to allow for coexistence of devices registered on Unified CM and on the enterprise dial plan on needs to be changed so that at least the following requirements can be met:
-
+E.164 dialing from to
-
Extension dialing from to (intra-site but also inter-site if the extension ranges are unique)
-
Abbreviated inter-site dialing from to
-
Forced on-net dialing from to
-
Call-back from missed calls directory to destinations on
-
PSTN calls from to PSTN if during the transition on-premises PSTN is used for
-
PSTN calls from to if during the transition PSTN trunking for hybrid deployments is used to provide PSTN access to on-premises users through Cloud Connect for
-
Forced on-net from to
-
Extension dialing from to (inter-site).
If any of the above are not supported dialing habits prior to the transition, for example no abbreviated inter-site dialing habit exists, then they don't necessarily need to be introduced during the transition.
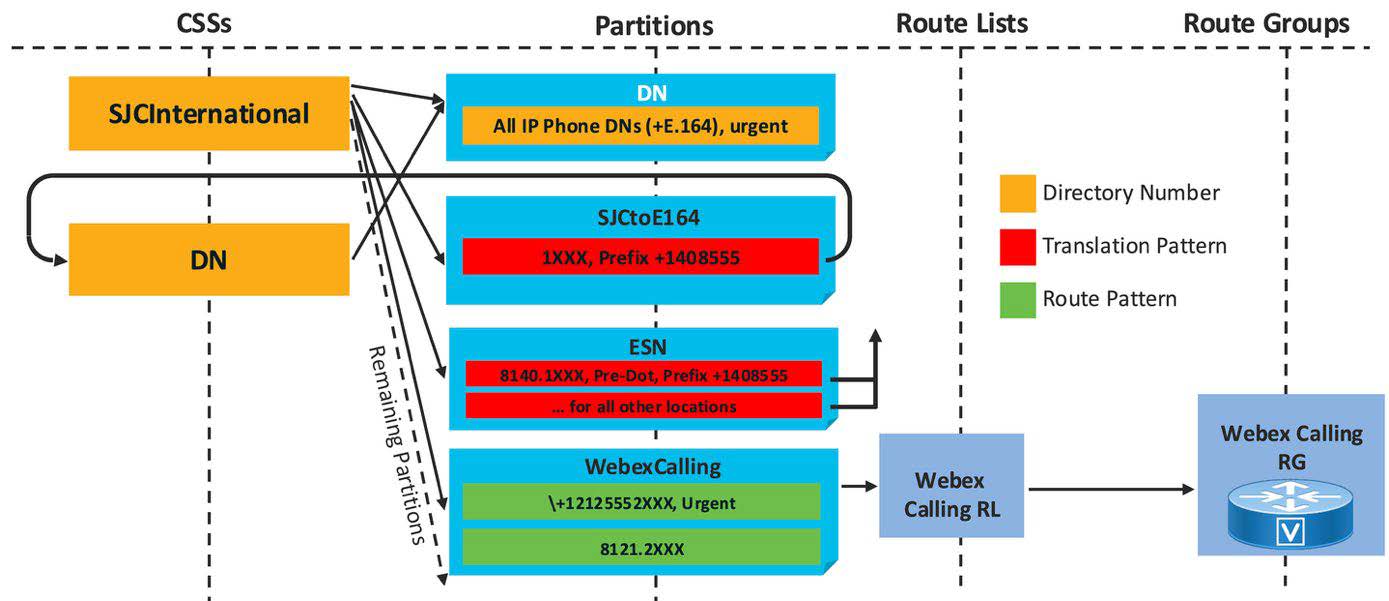
The Figure Best practices dial plan shows the best practice dial plan approach as described in the Preferred Architecture for Cisco Collaboration 12.x Enterprise On-Premises Deployments, CVD. Key characteristics of this approach include:
-
Single partition for +E.164 directory numbers
-
Core routing based on +E.164 route patterns
-
Normalization of all dialing habits to +E.164 using translation patterns
-
Use of translation pattern calling search space inheritance (option Use originator's calling search space set on translation patterns).
For example, PSTN dialing (9+1+10D) from a device in SJC provisioned with line calling search space SJCInternational will first get matched by the 9.1[2-9]XX[2-9]XXXXXX translation pattern which normalizes the called party number to +E.164. The secondary lookup then uses the same calling search space SJCInternational again (calling search space inheritance) and the +E.164-digit string will either get matched by a +E.164 directory number in the DN partition or by one of the PSTN route patterns in the USPSTNNational or SJCPSTNLocal partition. Abbreviated intra-site and inter-site dialing habits are implemented by the translations in the ESN and SJCtoE164 partition. While the ESN partition is a global partition (accessible for phones in all locations) the SJCTOE164 partition is only accessible for users in location SJC. This is assuming overlapping extension ranges.
The first step to enable calling from to is to make sure that +E.164 destinations get routed accordingly. This can be achieved by adding a partition to the dial plan, adding +E.164 route patterns for all destinations to that partition, and finally adding the partition to all calling search spaces representing classes of service which need to be able to reach . Creating a dedicated partition is required to enable creation of a differentiated class of service for calls originating from . To avoid call loops the inbound calling search space on the trunk from the Local Gateway should not have access to the partition.
As shown in Figure +E.164 routing to Webex Calling, to enable routing from to for a location with +E.164 DID range +1 221 555 2XXX and site code 121, an urgent route pattern matching this +E.164 range needs to be added to the partition.
If no site-specific Local Gateway selection is required, then instead of using a route list with a local route group as the destination for route patterns pointing to a single route group can be provisioned with the Local Gateway as the only member and then the route patterns point to a single route list with this one route group as only entry.
To enable inter-site abbreviated dialing to the site the required route pattern 8121.2XXX is added to the partition. For sites to be transitioned to a dialing normalization pattern 8121.2XXX that normalizes ESN dialing to +E.164 might already exist in the ESN partition. In that case the 8121.2XXX seems to be redundant, but as soon as all DNs of the respective location have been migrated over to the 8121.2XXX dialing normalization translation pattern can be removed and then the 8121.2XXX route pattern enables ESN dialing even for extension only users in that range.
With these dial plan changes calls to the location can be placed not only by dialing abbreviated inter-site and +E.164. Also, international and national PSTN dialing are possible because these dialing habits are first normalized to +E.164 through the already existing dialing normalization translation patterns and then get routed to by matching the +E.164 route pattern in the partition.
The +E.164 route pattern matching on the location's DID range can be provisioned while all DIDs are still hosted on . The best match pattern matching algorithm of makes sure that when a number hosted on is dialed then the +E.164 directory number provisioned on is a better match than the wildcarded +E.164 route pattern pointing to so that the calls get extended to a line on and not sent to .
dial plan
Each user in is provisioned with an extension and/or a +E.164 phone number. The extension length is a fixed global setting: all extensions in a deployment have the same length. Extension dialing can be used between users both within a location and between locations. Abbreviated inter-site extension dialing (the latter case) only works if the dialed extension is unique.
If abbreviated inter-site dialing between locations is a requirement but there are overlaps between extensions assigned in different locations, then an enterprise specific numbering plan needs to be created by prefixing the extensions with an access code a site code. For more information, see Preferred Architecture for Cisco Collaboration 15 On-Premises Deployments, Design Overview available at Cisco collaboration preferred architectures.
The extension length, inter-location extension dialing behavior, prefix length for inter-location dialing and the steering digit in the routing prefix for inter-location dialing are configured in the calling service settings in :
-
Location routing prefix length: Prefix length including the steering digit. Only required if an enterprise numbering plan needs to be established as alternate abbreviated enterprise inter-location dialing habit.
-
Steering digit in routing prefix: Steering digit for abbreviated enterprise inter-location dialing habit. Overlaps with first digit of any location and location outbound dial digits should be avoided. Only required if an enterprise numbering plan needs to be established as alternate abbreviated enterprise inter-location dialing habit.
-
Internal extension length: Standard length of extensions. Can be any value between two and ten.
When extension dialing or dialing using enterprise significant numbers (steering code, site code, extension) is required from an on-premises call control to and the on-premises call control sends an extension as the caller id, then make sure to also set the Maximum unknown extension length parameter in the Call Routing between and premises section to make sure that upstream calls from the on-premises call control to can get classified as on-premises calls correctly. -
Allow extension dialing between locations: Toggle to enable/disable extension dialing between locations. This option should only be enabled if all extensions within the organization are unique. If the option is disabled then enterprise significant numbers (steering code, site code, extension) or phone numbers need to be dialed between locations.
The first three parameters are mainly used to build a dial plan for phones to minimize inter-digit timeouts when using off-hook dialing. Deviations from these global settings are still possible (Example - extensions with a different length can be provisioned), but a warning message will pop up in Control Hub and dialing from phones might require en-block dialing to avoid conflicts within the pre-loaded dial plan.
The table Enterprise numbering example shows an example of three locations where the extension ranges of two locations, NYC and RTP, are identical. Establishing an enterprise numbering scheme with inter-site steering digit 8, followed by a three-digit site code, and the four-digit extension creates a non-overlapping abbreviated inter-site dialing habit.
| Site | Extension range | Site code | Enterprise range |
|---|---|---|---|
| NYC | 2XXX | 202 | 8 202 2XXX |
| SFO | 3XXX | 203 | 8 203 3XXX |
| RTP | 2XXX | 204 | 8 204 2XXX |
To allow for a smooth transition the set of dialing habits for users before and after transitioning to ideally should be the same. To prepare for the transition for each location the DID ranges and extension ranges (or abbreviated intra-site dialing habits) need to be documented. Based on this information then the inter-site steering digit needs to be selected.
The table Fixed length extension ranges shows an example of three locations and fixed length extension ranges. Because overlapping dialing habits need to be avoided, it is important to make sure that for any extension range the first digit of the range does not match the steering digit for abbreviated inter-site dialing. If for example 8 is selected as the steering digit for inter-site dialing, then no extension range in any site can start with 8. Typically, the extensions at a given location match the last few digits of the DIDs assigned to that location. To avoid conflicts the first digit of the extension can be changed. If, for example, DIDs in the +1 408 555 8XXX range are used in a location, then instead of using 8XXX as extension range 7XXX can be used for the extensions in that site
| Site | Extension range | Extensions | Site code | Enterprise range |
|---|---|---|---|---|
| NYC | 2XXX | 2XXX | 202 | 8 202 2XXX |
| SFO | 8XXX | 7XXX | 203 | 8 203 7XXX |
| RTP | 1XX | 11XX | 204 | 8 204 11XX |
Seven digit dial strings dialed on a device using the US dial plan overlap with a seven-digit pattern for local dialing in the pre-loaded US dial plan. To avoid overlaps between any on-net and off-net (PSTN) dialing habits a mandatory outside access code can be used in that location. If the existing enterprise numbering schema and the corresponding abbreviated inter-site dialing overlaps with patterns in the national dial, then during the transition to the numbering schema to avoid overlaps can also be changed to a longer or shorter form. The easiest way to achieve this is to add an additional padding digit to the numbering schema. The new longer inter-site dialing schema only needs to be adopted by users already migrated to . Users still on can continue to dial seven digits. The enterprise dial plan on in this case needs to make sure that abbreviated seven-digit dialing from Unified CM to gets transformed to either +E.164 or to the abbreviated dialing format deployed on . This needs to be done before sending the call to the Local Gateway.
The Table Transitioning seven-digit dialing shows an example of this renumbering. In this example abbreviated inter-site dialing on uses steering digit 8 followed by a two-digit site code and a four-digit extension. To avoid seven-digit abbreviated inter-site dialing for locations on , the site codes can easily be changed to three digits by prefixing an arbitrary padding digit (8 in the example) to the two-digit site codes used in so that inter-site dialing from phones uses steering digit 8 followed by the padding digit 8, the old two-digit site code, and the four-digit extension. Users on don’t need to remember new site codes; they only need to remember to use 88 as prefix for inter-site dialing instead of 8 on .
| Site | Extensions | Site Code | Enterprise range | Site ode | Enterprise ange |
| NYC | 2XXX | 22 | 8 22 2XXX | 822 | 8 822 2XXX |
| SFO | 8XXX | 23 | 8 23 7XXX | 823 | 8 823 7XXX |
| RTP | 1XXX | 24 | 8 24 11XX | 824 | 8 824 11XX |
In a scenario with different enterprise number formats on and if enterprise numbers are presented as calling party information for calls from to (for example - Calls from devices without a DID), it is important to also implement a mapping between the different number formats for calling party information to ensure callback works. This mapping can be achieved by using calling party transformation pattern on the trunk between and the Local Gateway.
Recording
A well-architected call recording solution requires careful consideration of several key design elements to ensure it aligns with organizational goals, regulatory requirements, and technical constraints. Two of the most critical decisions involve provider selection and region selection, both of which may need to be tailored globally and overridden at specific locations, based on business needs.
1. Call recording provider selection
Selecting the appropriate call recording provider is fundamental to meeting business objectives and ensuring feature alignment across the organization:
-
Global provider selection: Organizations typically designate a primary call recording provider at the global level, ensuring consistency in feature set, compliance, and support across all locations
-
Location-based overrides: In scenarios where specific sites or regions have unique business needs or regulatory requirements, it may be necessary to override the global provider selection and specify alternative providers for those locations. This flexibility supports varying compliance mandates and local operational needs
-
Business requirements: The choice of provider should be driven by an assessment of business drivers such as regulatory compliance (Example - MiFID II, HIPAA), quality assurance, dispute resolution, or training needs
-
Feature availability: Providers should be evaluated based on their ability to deliver required features, such as real-time monitoring, search and playback capabilities, encryption, retention policies, integration with analytics platforms, and support for different call types (inbound, outbound, internal).
2. Region selection
Determining the region where call recordings are stored and processed is critical for compliance and performance:
-
Global region selection: By default, organizations may choose a single region for storing call recordings to simplify management and governance
-
Location-based region overrides: Where data residency laws or corporate policies require, it may be necessary to override the global region setting for specific locations, ensuring that call recordings are stored and processed within the required geographic boundaries
-
Data residency requirements: The design must account for international and local data protection regulations (such as GDPR, CCPA, or country-specific mandates) which may dictate where and how call recordings are retained.
Another critical aspect to be addressed during the planning and design of a call recording solution for is the estimation of storage requirements. Accurately forecasting storage needs is essential to ensure that sufficient capacity is available to support ongoing business operations, maintain compliance, and avoid service disruptions.
Several key parameters should be considered when determining the expected storage demand:
-
Volume of recorded calls: Assess the anticipated number of calls that will be recorded within a given time interval (e.g., per day, week, or month). This includes not only external calls but also internal communications, if required by business policy or regulatory mandates
-
Average call duration: Calculate the typical length of recorded calls, as longer calls will consume more storage space. Variations in call duration across different departments or user groups should also be factored into the estimate
-
Retention period: Define the length of time that recordings must be retained, which is often dictated by organizational policies or external regulations (such as industry-specific compliance standards). Longer retention periods will increase overall storage requirements
-
Growth projections: Consider anticipated growth in call volumes or expansion of recording scope, which may result from business scaling, new regulatory requirements, or the onboarding of additional users or locations.
By thoroughly analyzing these parameters, organizations can develop a robust storage strategy that ensures scalability, cost-effectiveness, and regulatory compliance for their call recording solution. It is also advisable to regularly review and adjust storage allocations as usage patterns evolve over time.
Emergency calling
The requirement to route an emergency call to the appropriate dispatch center is a requirement for any calling service that offers PSTN service. With , the routing of emergency calls is native to the solution and includes support for all national emergency numbers in the countries that supports. The routing of an emergency call in is based on the location defined within and the PSTN access method of the location. The emergency numbers in are predefined and specific to the country that the users and devices are deployed in.
There are two methods to deliver emergency calls in . There is a basic emergency call routing service and an Enhanced Emergency call routing service. The basic emergency call routing service will use an admin selected number to identify the location and call route to reach emergency services. For basic emergency calling the call path is typically through the customer's PSTN option for that location. also has Enhanced Emergency call routing designed for US and Canada deployments that have regulatory compliance requirements that require the use of a nationwide provider to deliver emergency calls to the correct dispatch center.
All customers should deploy, at minimum, the basic emergency calling configuration. Basic emergency calling requires that at least one customer owned +E.164 number be assigned to each location defined in . For basic emergency calling, each location will be defined by a street address that police, fire or ambulance services are dispatched to in case of emergency. In most cases, the main number for the location is the best choice to represent the physical location of the emergency. Typically, the assignment of the address to the +E.164 number is coordinated with the PSTN provider. The images below show the assignment of the main number to be used as the emergency callback number for the Richardson location.
In most situations, a building address is sufficient for the dispatch address for the location. But if additional location details are needed for specific users or devices, then an administrator can use the same process described above and assign those devices to a specific address or a more precise location inside the address (like a floor or room). In User management in , the Calling tab allows for a specific number to be used for a user and their devices to get specific dispatch address. The following images illustrate how a specific number can be assigned to a device. The administrator is responsible for making sure the number used by the device will have the correct dispatch address assigned to it. The address assignment is typically done through PSTN provider of that location.
For US based telephony deployments that must provide Enhanced Emergency calling solutions, uses RedSky's Horizon Mobility integrated into for emergency call routing. When using RedSky for call routing, an administrator must enroll for an account through Cisco and configure the appropriate information in the Calling -> Service Settings to enable this feature. Once the RedSky service has been enabled at the system level, an administrator will enable the RedSky service at each Location level. The enablement of Enhanced Emergency Calling in a Location will activate the service for all devices that are assigned to that location. Devices that support Enhanced Emergency calling are Cisco MPP phones, Cisco PhoneOS phones and Cisco's .
There are two settings for enabling Enhanced Emergency Calling at a location. The Allow RedSky to receive network connectivity information and test calls should be used to verify that the RedSky configuration for device and infrastructure mappings are correct. This setting also allows test calls to be placed to 933 to perform location verification using RedSky's IVR system to read out the location of the caller. Although this document will not cover the RedSky configuration for location tracking, an administrator should ALWAYS test their location discovery prior to activating emergency calls to route to RedSky. Once testing has been completed and verified as accurate, the administrator will route calls to RedSky by toggling the route emergency calls to RedSky. This toggle will direct all emergency calls for the location to RedSky for delivery to the answering center for the location.
The Enhanced Emergency Calling settings also apply to clients both on-premises and off premises. When on-premises, the can be tracked the same way that desk phones are tracked. When off-premises, the user will be able to set their location dynamically directly within the . For more information on emergency calling, see Enhanced emergency calling for .
Licensing
There are multiple options to assign licenses to users.
Manual assignment through
Administrators manually assign licenses to individual users through the interface.
Admins can edit service licenses for individual users and assign calling licenses directly.
Automatic license assignment templates
Use license assignment templates in to automatically assign licenses to users based on group or organizational settings.
Automatic licensing can be done thorugh directory synchronization or manual user updates, but users must have a valid +E.164 formatted phone number and the phone numbers must exist in a location prior to user provisioning. If conditions are not met (e.g. invalid phone number format), licenses will not be assigned.
Bulk assignment through CSV template
Upload a CSV file with user details and license assignments to add or modify multiple users at once.
CSV import supports adding up to 20,000 users and assigning licenses, but licenses require specific fields like phone number and extension.
API-based assignment
Use APIs to programmatically assign licenses and manage users.
supports API operations for user and license management (People, SCIM 2.0 and Licenses APIs), which can be leveraged for license assignment automation. The Licenses API allows simultaneous assignment of licenses, phone numbers and extensions.
| Assignment Method | Pros | Cons |
|---|---|---|
| Manual through | Simple for few users. Allows precise and granular control over license assignment. | Not scalable, time-consuming Prone to human error during manual entry. |
| Automatic license templates | Scalable Reduces manual errors Can be applied to new and existing users. | Requires valid phone numbers and locations. More complex to set up Also requires user groups per group of users with equivalent licensing requirements. |
| Bulk CSV Upload | Efficient for large user sets Allows simultaneous assignment of licenses, phone numbers and extensions. | Requires careful CSV formatting Potential for errors if phone numbers or extensions are missing or incorrect. |
| API-based assignment | Automatable, flexible. Allows simultaneous assignment of licenses, phone numbers and extensions. | Requires development and API knowledge. |
The table User provisioning options - summary summarizes user provisioning options and their pros and cons. This overview helps to choose the best license assignment method based on customer organization size, automation capabilities, and user provisioning processes and requirements.
Wherever possible Cisco recommends assigning calling licenses using license templates. This requires that for each group of users that requires a unique set of licenses (Example - Standard vs. Professional) a group with the respective group memberships exists. As discussed in the User Groups sections, user groups can be defined manually in or synchronized from a corporate directory. A combination of both approaches is possible.
Users belonging to multiple groups gain licenses from all assignments applied to all their groups. This allows to use license specific security groups in the enterprise directory to manage license assignment where the resulting user license assignment is controlled by the union of group memberships.
For more information, see Set up automatic license assignments in Control Hub and Set up automatic license assignment templates for Webex Calling users.
License requirements
This section only covers related licenses. Other license types (Example - Webex device registration, messaging, meetings) are not covered. As part of the design process the license requirements need to be determined. License counts for the following license types need to be calculated:
-
Standard: number of individual users requiring standard telephony features.
-
Professional: number of users and workspaces requiring advanced telephony features. Virtual lines and group voicemail are entitled to a 1:1 ratio for each professional license. Hence, in rare cases where the number of required virtual lines or group voicemails exceeds the number of users and workspaces requiring advanced telephony features, additional professional licenses need to be accounted for.
-
Workspace for Common Area: number of shared use or common area locations requiring standard calling capabilities.
-
Customer Assist: number of agents and supervisors requiring Customer Assist features. The customer assist includes the Professional license.
-
Route List Calls: number of required Cloud Connected PSTN calls between on-premises users and/or on-premises specialized 3rd party applications.
-
Attendant Console: number of users who require access to the attendant console client.
-
Cisco Calling Plan (Outbound Calling Plan): number of users who require a PSTN number and/or outbound PSTN calling access for the Cisco PSTN service.
There is no dedicated license type for professional Workspaces. Professional workspaces consume a Professional license.
Hot-desk only workspaces offer the hot-desking host service and emergency calling from the hot-desking host and don't require any license. For more information, see Add and manage hot desk only devices.
To determine the required license type for each user and workspace based on features needed, see Features available by license type for Webex Calling.
To differentiate between functionality offered by call queues combined with the professional license in contrast to customer assist, see Webex Calling call queue and customer assist feature comparison.
User provisioning
When provisioning users in Webex , there are several options available, each suited to different organizational needs and environments:
-
Manual provisioning: Administrators can add and manage individual users directly within . This method is straightforward but best suited for small organizations or limited user changes.
-
Bulk provisioning through CSV: For larger user bases, administrators can import and update users in bulk by uploading CSV files into . This allows efficient management of up to thousands of users at once.
-
Directory synchronization options:
Directory Connector: This is an automatic synchronization tool used in Microsoft Active Directory environments. It synchronizes user accounts, groups, and attributes on a scheduled basis (hourly, daily, or weekly). It supports multi-domain and multi-forest Active Directory setups and can synchronize profile images and room objects.
Entra ID (Azure AD) wizard app: Designed for organizations using Microsoft Entra ID (Azure AD), this method provides automatic, near real-time synchronization of user accounts and attributes directly from Entra ID to . It is fully managed within and requires minimal setup.
SCIM 2.0 Applications: For non-Microsoft environments or other identity providers like Okta or Duo, SCIM-based synchronization apps enable automatic user provisioning and deprovisioning with attribute mapping and group synchronization.
-
Unified CM user sync: This option allows creating user accounts based on existing end-users by synchronizing from to . This requires Cloud Connected UC (CCUC) to be running on the on-premises clusters. However, it is generally recommended to synchronize users from a centralized cloud directory like Entra ID rather than directly from .
-
API provisioning: Public APIs (People, SCIM 2.0) can be used to provision users. The main benefit of using APIs is the option to integrate the user provisioning with other enterprise systems.
This overview and table reflect the main user provisioning options, their benefits, and limitations to help you choose the best approach for your organization’s needs.Table 6. User provisioning options for Provisioning method Description Pros Cons Manual Create/manage users individually in Simple for few users; no infrastructure needed Not scalable; time consuming for many users Bulk (CSV File) Import/update users in bulk through CSV in Efficient for groups; no coding required Manual CSV prep; less dynamic People and SCIM 2.0 API Programmatic user management through Webex APIs Flexible; supports automation and integration Requires development and infrastructure Directory sync Automatic sync from AD, Entra ID, SCIM apps, Unified CM Automates lifecycle; supports filtering and mapping Setup complexity: some of the options have limited features or require infrastructure
User groups
User group management in allows administrators to organize users into groups for efficient bulk management of licenses, settings, and resources. Groups help streamline administration by applying policies, licenses, and settings templates to multiple users simultaneously, rather than managing users individually.
User group management offers several benefits including:
-
Simplified administration: Manage licenses, settings, and policies for multiple users at once.
-
Consistency: Apply uniform settings and licenses across users in the same group.
-
Scalability: Supports up to 250,000 members per group.
-
Integration: Synchronize groups from Microsoft Entra ID (Azure AD) or Active Directory for automated user and group management.
-
Flexibility: Create local groups or synchronize security groups; manage group membership manually or through CSV files.
-
Resource allocation: Control access to embedded apps and services based on group membership.
The main use cases for user groups when provisioning are:
-
License assignments: Assign licenses to groups to automatically provision services like Calling, Meetings, Messaging, or Hybrid services to group members.
-
Settings templates: Apply collections of service settings (e.g., messaging, meeting, calling) to groups for consistent user experience.
-
Bulk user management: Add or remove users in bulk through CSV files or directory synchronization.
-
Automation and integration: Use APIs or directory sync for automated user and group lifecycle management.
The following table summarizes the different options to manage user groups and group management in .
| Option | Description | Pros | Cons |
|---|---|---|---|
| group provisioning ( groups) | Create and manage groups directly in . Add/remove members manually or through CSV. | Full control over group membership Immediate application of licenses and templates Easy to create and edit groups |
Manual updates required Risk of errors in manual CSV uploads No automatic sync with external directories |
| Synchronized groups from Entra ID (Azure AD) or Active Directory | Automatically sync security groups and memberships from external directory services. | Automated synchronization reduces manual work Ensures consistency with corporate directory Supports large organizations |
Cannot edit group membership in Sync delay up to 12 hours Nested groups require manual selection |
| Groups and SCIM 2.0 API ( Groups) | Use Groups or SCIM 2.0 API for programmatic group and membership management | Automation and integration with other systems Scalable for large or complex environments |
Requires development effort Complexity depends on API usage |
While synchronized groups ensures consistency and offers a single point of administration, a hybrid approach combining synchronized groups and groups (either managed in control hub or through APIs) is possible. So, for example groups for license assignment could be synchronized groups and a separate set of groups can be used for assigning user and calling templates.
This comprehensive approach to user group management in enables organizations to efficiently manage user licenses, settings, and policies, ensuring consistent and scalable collaboration experiences.
Recommended approach when migrating from to
The primary data source for users on is the database, which contains end-user information. However, is not typically the authoritative source for user identity management and more importantly will be shut down at the end of the transition and is therefore ruled out as long-term authoritative source for identity information.
Cisco recommends using a centralized cloud directory such as Microsoft Entra ID (Azure AD) as the single source of truth for user identities. Synchronizing users from Entra ID to ensures consistency, simplifies management, and supports single sign-on (SSO) capabilities.
To ensure all users on are also present in Entra ID, organizations should verify that the user accounts in correspond to accounts in Entra ID. This can be done by exporting user lists from and comparing them with Entra ID user lists.
In summary, the recommended provisioning method is to synchronize users from Microsoft Entra ID (Azure AD) to Webex using the Azure AD Wizard or SCIM apps. Manual and CSV bulk provisioning are available as supplementary methods but are less scalable and more error-prone for large organizations. Ensuring that Entra ID is the authoritative source and that all users exist in Entra ID is critical for a successful migration and consistent user experience across and environments.
Transitioning from an on-premises directory service, like Active Directory, to a cloud directory service, like Entra ID (Azure ID), is independent from the calling transition. Cisco recommends finishing the transition to a cloud directory service before starting the calling transition.
Designing User Groups
After transitioning the enterprise directory from on-premises to the cloud collect the required user groups driven by licensing and feature template requirements. For each group document:
-
Group Name: unique name of the group.
-
Licenses: licenses to be assigned to this group (if any) and scope (should licenses be assigned to existing users or only to new users)
-
Settings templates: Webex App and User calling templates.
-
Directory sync: Will this group be synced from the enterprise directory or is this a local Webex group provisioned in Control Hub or through an API.
-
Description: how will this group be used and which users should be members of this group
These details will be used later during the implementation phase to create local groups or groups in the enterprise directory and manage group membership of users.
Single Sign-On (SSO)
Cisco recommends the use of SSO for user authentication. Using SSO has some compelling benefits including:
-
Simplified user authentication: Users can sign in once using their corporate credentials (e.g. from Azure ID) to access and other integrated applications, eliminating the need for multiple passwords and reducing login prompts. This enhances security by ensuring corporate passwords are never stored or transmitted to after authentication.
-
Simplified user management: Automates user account creation, updates, and deactivation based on changes in the corporate directory, reducing administrative overhead and ensuring only authorized users have access.
-
Improved security: SSO reduces password fatigue and the risk of password-related breaches by centralizing authentication through trusted identity providers (IdPs).
-
Easy integration of multi-factor-authentication (MFA): MFA can be easily supported either through an Identity Access Management solution like Cisco Duo or through MFA support of the IdP.
There are multiple options to implement SSO for services:
-
SAML 2.0-based SSO: The primary protocol supported for SSO integration, enabling secure exchange of authentication information between the IdP and service provider.
-
OpenID connect (OIDC): Supported as an alternative modern authentication protocol for SSO integration.
-
Webex identity: Also supported as an identity provider option.
SSO is configured and managed centrally through , requiring metadata exchange between and the chosen IdP.
After configuration, SSO can be tested within before activation to ensure proper setup.
Cisco supports integration with multiple tested and commonly used IdPs and Identity Management Systems (IAM), including but not limited to:
-
Cisco Duo
-
Okta
-
Microsoft Active Directory Federation Services (ADFS)
-
Microsoft Azure
-
PingFederate
-
OpenAM
-
F5 BIG-IP.
These IdPs conform to SAML 2.0 or OpenID Connect standards and have been validated for compatibility with Cisco collaboration solutions.
Multiple IdP support
allows organizations to configure SSO with multiple IdPs to accommodate complex IT environments such as mergers, acquisitions, or decentralized IT departments where different groups use different IdPs. Multiple IdP support can either be implemented using the Multiple IdP feature in or through the integration of an enterprise IAM system like Cisco Duo.
's multiple Identity Provider (IdP) support addresses several key use cases where organizations require flexible and secure authentication across diverse IT environments:
1. Mergers and acquisitions
When companies merge or acquire others, they often have separate IT infrastructures and distinct IdPs that cannot federate. Multiple IdP support allows users from both organizations to authenticate and collaborate securely without needing to unify their identity systems immediately.
2. Multiple independent IT departments
Large organizations or government institutions may have multiple independent IT departments, each managing their own IdP. 's multiple IdP feature enables these departments to maintain their own authentication systems while allowing users to access seamlessly.
3. Different user groups or domains
Organizations with various user groups (e.g., employees vs. contractors) or multiple email domains can configure routing rules to direct authentication requests to the appropriate IdP based on domain or group membership. This supports differentiated access policies and security controls.
4. Support for various authentication protocols
supports SAML and OpenID Connect (OIDC) IdPs, allowing organizations to integrate different types of identity providers according to their existing infrastructure and security requirements.
5. Enhanced security and compliance
By enabling multiple IdPs, organizations can implement stronger authentication mechanisms, including multi-factor authentication (MFA) through integrations like Duo, and enforce consistent security policies across diverse user bases.
6. Simplified user experience
Users can authenticate using their existing credentials from their respective IdPs, providing a unified sign-on experience despite the underlying complexity of multiple identity systems.
While multiple IdP support provides flexibility, it requires careful coordination among security and identity teams to maintain consistent security policies and avoid potential vulnerabilities.
Duo MFA with SSO for
Duo Access Gateway (DAG) can authenticate users using existing on-premises or cloud-based directories such as Active Directory (AD) and OpenLDAP. It also supports integration with other identity providers like Microsoft ADFS, Microsoft Azure, Okta, OneLogin, CAS, and Shibboleth. This flexibility allows organizations to use their current directory infrastructure for Webex SSO with Duo MFA.
Duo acts as a strong authentication layer on top of the primary directory authentication. It functions as an identity provider (IdP) using SAML 2.0 to enforce two-factor authentication (2FA) before granting access to . Duo evaluates user, device, and network context against configurable policies to allow or deny access, enhancing security beyond just username and password. Duo also provides flexible policy controls, such as requiring MFA at every login for some apps and less frequently for others.
Benefits of Cisco Duo include:
-
Enhanced Security: Adds phishing-resistant MFA to protect access, reducing risk from compromised passwords.
-
Flexible Policies: Allows granular control over authentication requirements per application or user group.
-
Integration with Existing Directories: Supports on-premises AD, OpenLDAP, cloud directories, and various SSO providers, minimizing infrastructure changes.
-
User Convenience: Supports Single Sign-On (SSO) to reduce password fatigue by enabling users to log in once and access multiple resources securely.
-
Trusted Endpoints: Supports device trust for clients on Windows and macOS, improving security posture.
-
Self-Service Enrollment: Inline enrollment and duo prompt improve user experience during MFA setup.
Duo MFA with SSO for leverages existing directories like Active Directory and OpenLDAP, or cloud identity providers, to authenticate users. Duo's role is to provide a strong, policy-driven second factor of authentication integrated through SAML 2.0, enhancing security while maintaining user convenience through SSO. The benefits include improved security posture, flexible policy enforcement, seamless integration, and a better user experience.
Cisco recommends implementing SSO for users. For enhanced security integration with Cisco Duo is recommended.
The Enterprise IAM and SSO strategy should be deployed before starting the transition from to .
Features
has a full complement of core features that are included with the service. This includes many enterprise-grade calling features that have been available in for many years. You may not see 100% parity between features and features, however as you can see in the below figure, the key calling features are available in .
Besides the many user features, has core system features that are included with the platform. These include features like auto attendants, call queues, call park, etc. You can see all the available core system features in under Service → Calling →Features as depicted in figure Webex Calling core features.
Auto Attendant
The Auto Attendant allows for 24/7 automation of incoming call handling, which allows for efficient call handling without the need for a person to answer every call.
The auto attendant answers incoming calls and provides the caller with a menu of options on where they want to route their call. This could be to a person, a voicemail box or a calling service (e.g. Call Queue). The caller uses their phone's dial pad to enter the number from the auto attendant menu.
The Auto Attendant supports the following key features:
-
Business and after-hour schedules
-
Holiday schedule
-
Dialing menu option to direct your customers to where they need to go
-
Customize greetings
-
Dial by name option
-
Call forwarding options
-
Control Hub analytics and reports.
For more information, see Manage auto attendants.
Call Park
Call park gives users the ability to easily to put a call on-hold for another user to easily retrieve when they are available to take it. It also frees up the user who answered the original call to make or receive other calls while the call is parked.
There are two types of call parks available in :
-
Call park direct - allows for any user to park a call to another user's extension or to a call park extension, as defined by the Administrator
-
Call park group - allows for a defined group of users to automatically park calls against available park destinations defined for the group. These destinations can be the group members' extensions or call park extensions.
Based on the configuration and park type, users can retrieve calls by dialing *88+><extension of parked call>, pressing the line key associated with the call park extension or using a softkey on their IP Phone.
A recall option is available to recall a parked call after a specified period to the user who parked the call or to an alternate user.
For more information, see Manage call park in Control Hub.
Call Pickup
Call pickup allows for an administrator to define a group of users (members) who can answer a call to another member's phone. This gives a user the ability to answer calls when their teammates are busy and unable to answer an incoming call.
The users in a group must be in the same location.
Users can use either the or their desk phone to pickup a call.
-
:
-
Supports visual and audio notifications
-
Incoming call notification
-
FAC-based (dial *98) or notification toast call pickup
-
Call pickup notifications for multiline.
-
-
Desk Phones:
-
Incoming call notification
-
Audio chimes and visual notification through the handset LED. The 6821 only supports audio chimes
-
When notification type selected in the is not none
-
-
Call pickup notifications only for primary lines only.
-
For more information, see Configure call pickup group.
Call Queue
includes voice-only call queues as part of its core features and any user with a Professional license can be part of a call queue, agent or supervisor. This feature allows users to efficiently engage with customers. Call queues support a subset of some of the call center core capabilities like voice queues, call back, skill or priority routing, agent queue management, analytics, reporting, etc.
Cisco's call for Microsoft Teams integration allows agents to access call queue calls and features directly from their Microsoft Teams client.
Call Queues support the following key features:
-
Greetings and messages (welcome, comfort, whisper, etc)
-
Hold music
-
Callback
-
Queue Routing Policies (night service, holidays, forwarding)
-
Agent queue login/logout
-
Agent queue status management
-
or Desk Phone support
-
Supervisor agent call monitor, coach, barge or take over through Feature Access Codes (FACs)
-
(administrator access) for:
-
queue management
-
Agent and queue analytics and reporting
-
Queue, agent and supervisor management.
-
For more information, see Configure call queue.
has a Customer Assist add-on feature that provides additional call queue capabilities and gives agents and supervisors a better user experience within the . For a comparison of the Call Queue and Customer Assist features, see Webex Calling call queue and customer assist feature comparison.
Hunt Group
Hunt Groups allow for the routing of incoming calls to specific group of users through a predetermined call routing pattern. This ensures calls are answered by the right group of users or send to a voicemail for follow up.
One big difference between Hunt Groups and Call Queues is that calls are not queued in a Hunt Groups, so if no users in the Hunt Group are available to answer the call it will be disconnected, sent to voicemail or forwarded to another number (user or service).
For more information, see Manage hunt groups in Control Hub.
Operating Modes
The Operating Modes feature allows businesses to efficiently route calls to various destinations (users, voicemail, calling services like a call queue). The where and when a call is routed is based on a time-of-day and day-of-week schedule and any user can be authorized to manage these modes (schedules) to control changes to the call routing.
As an example, calls to a Call Queue can be routed to another Call Queue with agents in a different time zone to answer calls after hours, during business hours be routed to the local agents, and during holidays be routed to voicemail for follow up after agents return to the office.
An authorized user can switch between these different call forwarding scenarios (modes) if they need to change where incoming calls are routed for certain period. These users can manage the modes through their 6800/7800/8800 MPP phones, 9800 phones or in the User Hub at Manage modes.
For more information, see Call routing based on operating modes in Webex Calling.
Paging Group
Paging Groups allow users to place a one-way call to send an audio message to a group of users. Each group can contain up to 75 target users and/or workspaces that are reached by dialing a predefined number or extension.
When a user calls a Paging Group a simultaneous call is made to all the assigned targets in the group at which point the caller can speak their messages and hang up once they are finished.
For more information, see Configure a paging group in Control Hub.
Recordings
supports recording of calls made or received by a user. This may be required for quality, assurance, security or training needs. By default, calls are recorded in , but other third-party recording providers can also be used if other recording features or compliance and regulatory requirements are required.
When using as the recording platform all recorded calls are managed within . Full administrators with the Compliance officer role can play and download the recordings. Without the Compliance officer role, the Administrator can only delete the recordings.
For more information about this feature and a list of third-party recording, see Manage call recording for Webex Calling.
Single Number Reach
Single number reach allows calls to a user's phone number to ring multiple devices. This can include other desk phones as well as mobile phones. Calls can also be placed from these devices and users can push and pull calls between them.
For more information about this feature and how an administrator configures it in , see Configure single number reach (office anywhere).
For more information on how a user can manage and configure this feature for themselves in the Webex User Hub (portal), see Configure single number reach (office anywhere).
Voicemail Group
Voicemail Groups allow for a shared voicemail box which can be assigned to a user or call routing feature. Some of the reasons a voicemail group may be required are:
-
General purpose voicemail for a department or workgroup
-
Add voicemail option to an auto attendant or hunt group
-
To send overflow calls from a call queue
-
Users who only need a voicemail box.
For more information, see Manage a shared voicemail and inbound fax box for Webex Calling.
Attendant Console is listed on the Calling Features page in Webex , however it is an add-on feature that requires the purchase of the attendant console license to use.
For more information, see Get started with the Attendant Console.
For information about all features, including some add-on features, see Features available by license type for Webex Calling.
Implement
Network readiness
The first step in transitioning to is to ensure reliable and secure Internet connectivity between the on-premises network and the cloud.
Since most organizations connect to the internet through one or more firewalls or security devices, it is essential to validate that the required traffic flows are supported.
Network and security administrators must understand these flows in terms of:
-
Direction (inbound vs outbound)
-
Protocols (Example - SIP TLS, SRTP, HTTPS)
-
IP address ranges used by services
-
Port numbers that must be opened or allowed.
This ensures that corporate firewalls, NAT devices, and other network infrastructure are properly configured to accommodate traffic while maintaining enterprise security policies.
For information on the required flows including IP address, ports, and protocols, see Port reference information for Webex Calling. Use this information to configure the firewall, proxies, and other network infrastructure in the existing deployment to enable network flows.
Decentralized internet breakout from each branch or site is the recommended approach for cloud collaboration services such as . By allowing traffic to exit locally, this model:
-
Reduces round-trip delay and jitter, improving overall call quality
-
Scales efficiently as more users and sites transition to
-
Works seamlessly with SD-WAN, which can dynamically route sessions to the nearest cloud entry point for optimal performance
- Allows to track user location based on their public IP address which helps with media path analysis and troubleshooting.
In addition, organizations must ensure adequate internet bandwidth at each site. Bandwidth should be sized based on the expected number of concurrent calls, the selected codec (e.g., Opus or G.711), plus overhead for signaling, retransmissions, and growth. This aligns with the Prepare phase of the PPDIO lifecycle and establishes a solid foundation for migration.
Initial setup
The initial setup subsection within the implement phase of deploying is foundational to establishing a well-structured and manageable cloud calling environment. This stage encompasses critical tasks such as setting up the organization, procuring and assigning licenses, and verifying and claiming your company's domains to ensure proper user management and security. Additionally, it includes provisioning license templates to automate user license assignments, configuring Single Sign-On (SSO) to streamline user authentication and enhance security, and adjusting service and client settings to align with organizational policies and user needs. Completing these initial setup activities ensures that the environment is properly configured for scalability, security, and seamless user experience, setting the stage for subsequent deployment and operational phases.
Domain verification
To enable to identify users registered with your company's email domains on , it is essential to verify your domains. Without domain verification, users will be assigned to a consumer organization, complicating user management for your company. Domain verification is a mandatory step that allows your organization to claim and manage these users effectively.
Ensure that all domains associated with your users' email addresses are verified. Domain verification is not exclusive; the same domain can be verified across multiple organizations.
For more information on managing domains, see Manage your domains.
Claim (convert) existing users
After successfully verifying your domains, you can proceed to claim users who have registered for using your company's email domains into your organization. This process consolidates all users under a single organizational umbrella, enabling centralized management and streamlined administration. By claiming these users, you ensure that your company has full control over user accounts, allowing you to assign appropriate licenses, configure services, and provide necessary support efficiently. This unified management approach enhances security, simplifies user provisioning, and ensures consistent access to services across your organization. Claiming users also prevents them from being managed in external or consumer organizations, thereby maintaining organizational integrity and control over collaboration resources.
For more information on claiming users, see Claim users to your organization (convert) users.
Configure and test directory synchronization
To enable seamless user and group management, you can synchronize users and groups from your corporate directory either Microsoft Entra ID (formerly Azure AD) or Microsoft Active Directory (AD) to . This process ensures that user identities and group memberships are consistently maintained across your environment.
For organizations implementing phased deployments, it is crucial to control and limit the scope of synchronization during initial rollouts. This minimizes the risk of unintended changes and allows for targeted testing before broader adoption.
The most effective method for filtering which users are synchronized is to leverage directory group membership:
| 1 |
Create a dedicated synchronization group: In your enterprise directory (Microsoft Entra ID or AD), create a security group specifically for synchronization (example, sync group). |
| 2 |
Populate the group with target users: Add only the users you want to synchronize (such as a test group during the pilot phase) to this group. This allows you to tightly control who is included in the synchronization process. |
| 3 |
Configure the sync agreement with group- based filtering: When setting up the synchronization agreement in Directory Connector or Entra ID provisioning, configure the scope to include only users who are members of the designated group.
|
| 4 |
Expand the group as needed: As you progress to broader deployment phases, simply add additional users or groups to the synchronization group. The sync scope will automatically expand to include these users, allowing for controlled and gradual rollout. Example implementation steps:
References: Synchronize Entra ID users into Control Hub |
Set up and test Single Sign-On (SSO)
Single Sign-On (SSO) enhances security and simplifies user access by allowing users to authenticate once with their corporate credentials and gain seamless access to . supports SSO integration with SAML 2.0-compliant IdPs, including Microsoft Entra ID (formerly Azure AD), Active Directory (AD) federated solutions, and various third-party IdPs.
At this point the designed SSO setup should be implemented and tested.
References:
Single sign-on integration in control hub
configure single sign-on for webex administration
Procure, provision and verify licenses
As part of the initial setup for , it is essential to procure, provision, and verify the appropriate licenses to enable and manage services effectively. The procurement process involves selecting license types based on user roles and workloads, such as Professional, Standard, and Workspace licenses. Licenses are generated and provisioned through Cisco's software platforms or through partners. After procurement and provisioning, proper license counts need to be verified in . This process ensures that the organization has the correct licenses activated and ready for use in deployment.
As part of the initial licensing setup in , it is important to configure organization-based automatic licensing to streamline license assignment for new users. This setup allows licenses to be automatically granted when users are added to the organization, eliminating the need for manual license assignment. When configuring automatic licensing at the organization level, you select the services to assign and define the scope, such as applying licenses to future users only or including existing users as well.
However, if your deployment plan involves using automatic licensing at the group level instead, you may choose not to assign licenses at the organization level to avoid conflicts or duplicate license assignments. With group-level automatic licensing, licenses are assigned based on group membership. Users in multiple groups receive licenses from all applicable group assignments.
Group-based license assignment configuration must be performed after directory synchronization has been completed so that synchronized groups exist and can be used for license assignment.
For specifically, automatic license assignment requires additional provisioning details such as user location and phone number assignment. The user's work phone number must be in +E.164 format, pre-provisioned, and assigned to a valid location in for the license to be activated automatically. If these conditions are not met, the user will not be provisioned with services automatically and may require manual intervention.
In summary, configure organization-based automatic licensing for new users if you want a broad, organization-wide license assignment. If you prefer more granular control or have different licensing needs per group, configure automatic licensing at the group level and avoid assigning licenses at the organization level to prevent overlap and ensure proper license management.
Webex Calling service settings
It is essential to conduct a comprehensive review and configuration of the global service settings within .
Begin by accessing the and navigating to the settings section. Carefully examine each configurable option, including, but not limited to, internal dialing configuration, emergency calling parameters, call routing policies, voicemail management and device default settings.
Adjust these global settings to reflect your organization's policies and design decisions.
Also, setup settings and user and app templates.
Pilot migration
During the implement phase, executing a pilot migration represents a critical milestone in validating the transition from to . This pilot involves provisioning a representative subset of users across one or more locations onto the platform, ensuring that the selected population reflects diverse use cases and organizational roles. In parallel with user migration, essential collaboration services including voicemail, auto attendants, call queues, and hunt groups must be transitioned to their equivalents to maintain business continuity and service functionality.
The pilot migration should leverage the same combination of Cisco-provided tools and third-party migration utilities that are planned for the broader organizational deployment, ensuring that the processes, automation workflows, and integration points are thoroughly validated under representative conditions.
The primary objectives of this pilot deployment are two fold: first, to validate and refine the end-to-end transition processes including user provisioning workflows, data migration procedures, and endpoint configurations; and second, to comprehensively verify the functionality of migrated services under real-world operational conditions.
This phased approach allows the project team to identify and remediate any technical or procedural issues in a controlled environment, gather user feedback on the new platform experience, assess the effectiveness of selected migration tools, and establish confidence in the migration methodology before proceeding with broader organizational deployment.
The insights gained during this pilot phase are instrumental in optimizing subsequent migration waves and ensuring a smooth, risk-mitigated transition for the entire enterprise.
Procure PSTN
To procure PSTN services for , first select a PSTN connectivity option in the .
If an organization plans to maintain hybrid dual call control ( phase 1 in figure Phased Calling Transition: Hybrid and Cloud) either temporarily or indefinitely, they will need to deploy one or more Local Gateways for on-premises PSTN to allow calling between and endpoints.
If a full transition ( phase 2) to the cloud is the end goal including PSTN, then either a Cisco Calling Plan or a Cloud Connect for option will be required for PSTN.
Work with your chosen provider to order and port phone numbers before configuring them in . Ordering phone numbers or initiating port orders is only required/possible for on-premises PSTN and Cloud Connect for . For Cisco Calling Plans, ordering and porting is initiated from within Control Hub as soon as the location is created, and in countries where Cisco Calling Plan is available. For more information on Cisco Calling plans, see Getting started with the Cisco plans.
As part of the PSTN implementation, ensure that your provider has enabled both inbound and outbound PSTN services for your location. Additionally, perform test calls to verify that calls are being routed correctly through your chosen PSTN connection.
Configure locations
Before adding users and devices to , you must provision calling locations. For each location, a valid street address must be entered. In the US and Canada, this address is validated and used by the platform to send PIDF-LO location information for emergency calls.
When configuring locations that use on-premises PSTN, you need to set up the local gateways accordingly. In , a trunk and a route group must be created for each local gateway, and the route group is then assigned as the PSTN choice for the location. Cisco strongly recommends always selecting a route group as the PSTN choice, as this approach allows you to easily add additional trunks in the future, supporting both scalability and redundancy. Cisco also recommends enabling dual-identity and P-Charge-Info support on every PSTN trunk, since this simplifies the identification of the billable party for outgoing direct or diverted calls. If your PSTN provider uses a different header for billing, you can copy the information from the P-Charge-Info header on the local gateway to the required billing header.
For locations that use Cloud Connect for or the Cisco Calling Plan as their PSTN option, simply select the respective PSTN choice for the location during setup. If the location uses either Cloud Connect for or on-premises PSTN, you will need to add the phone numbers that were ordered in the previous step. Numbers can be added as inactive if you do not want them included in call routing right away; you can activate these numbers later when they are assigned to users or features.
It is important to always set the main number for each location. The main number can be assigned to either a user or a feature, such as an auto-attendant. To enable voicemail at the location, make sure to set the voicemail pilot number, also known as the voice portal number.
Additional settings for calling locations include configuring emergency calling details such as the emergency callback number, notification options, and enhanced emergency calling features. You should also review and adjust recording settings, language preferences, and device configurations as required for each location. If your organization uses abbreviated inter-site on-net dialing with enterprise significant numbers, remember to configure a unique site code for the location in the internal dialing settings. Finally, if external dialing requires an outbound dial digit, be sure to set this in the external dialing settings. When an outbound dial digit is configured, Cisco recommends enabling outbound dial digit enforcement to ensure consistency.
Integration with on-premises call control
To integrate with on-premises call control, it is necessary to configure trunks, route groups, enterprise dial plans, and both location and global settings. Begin by setting up the trunks and local gateways intended for interconnection with the on-premises call control system; this step is only required if dedicated trunks are necessary. If existing trunks and route groups are sufficient for your deployment, they can be reused for the on-premises interconnect without additional configuration.
Once the trunks and route groups are established, proceed to create the enterprise dial plans and assign the appropriate route group as the destination for each dial plan. When integration involves multiple on-premises call control systems connected through different trunks, multiple dial plans will be required. It is important to ensure that these dial plans contain only the patterns necessary for routing calls to on-premises destinations.
If your deployment requires support for unknown extension routing, this feature should be enabled at the location level. Additionally, when unknown extension routing is activated, you must specify the maximum unknown extension length within the Call Routing between and premises section of the calling services settings in . This ensures seamless call routing and proper handling of extension-based dialing scenarios in your integrated environment.
Migrate users in batches
When you migrate users from to you may not be able to move all users at the same time. This can be due to multiple reasons, including but not limited to the number of sites or users, how long it takes to transition a site and/or group of users at one time, limited IT or site resource to support the change window, duration of change window, complexity of change, etc.
When you migrate users in phases it is critical to identify which users need to migrate together in the same batch. The primary goal is to migrate users together who have dependencies with each other for their calling services and features. You want to ensure all their calling features (Example - Call Queues) are fully functional on as they were before the transition on .
Even if you implement calling interworking between and with Local Gateways, you cannot split shared services or features across this connection. Therefore, you need to identify the dependencies between users by looking at features like:
-
Monitoring other users using BLFs
-
In the same hunt pilot, call queue, etc
-
Shared lines
-
Using call pick-up
-
Using the same call-park numbers
-
Intercom
-
Executive/Admin.
An example would be a user who is part of a Hunt Group that is being transitioned to . This user will transition to with the Hunt Group and with all other members of the Hunt Group. Therefore, post-transition the Hunt Group and its members can successfully answer calls on the new platform.
This becomes more challenging when users are connected to different groups of users for different calling services and features. This will require transitioning more than one group of users and one calling service to at the same time.
Use the output from the Migration Insights tool or third party tool that you used in the prepare phase to determine which users and features should be grouped together. This output should have been used to develop your migration plan and will give you insights into how you will group users and features that need to transition together.
The key steps when transitioning a batch of users are:
-
Identifying users to migrate together
-
Verify all users are in
-
Verify all TNs for the users exist in
-
Verify correct phone number format in directory
-
Make sure that licensing and settings template for the user groups are set up correctly
-
Verifying or configuring all calling services and features for the group of users (before or during the transition as appropriate)
-
In the corporate directory add users to group of calling enabled users
-
Leverage Tools - user and feature migration tools and/or third party tools
-
Disable/Delete user/device directory number and calling features/services on after the transition.
After migration a group of users, test a subset of the users to validate all their calling features and services are working correctly. If calling features such as Call Queue, Hunt Groups, etc. are transitioned with the group of users, then test these calling services for proper functionality.
Workspaces
In , a workspace refers to a shared location (like a conference room, huddle space, or hot desk) that can be assigned devices, extensions, and users. Unlike traditional Unifed CM phones, workspaces are:
-
Location-centric: tied to physical spaces.
-
Device-flexible: can have one or more devices (Desk Phones, Boards, etc.).
Once workspaces have been identified as part of the transition to , they can be added in under Devices. Each workspace needs a device assignment, and if they are already in Unified CM, they need to be reset or re-provisioned for . features such as voicemail, call forwarding, and call pickup can be enabled or disabled, and policies can be applied for video calls, call park, and mobility as required. Test each workspace by making internal and external calls, testing video, conferencing, and mobility features. Lastly, let users know of any applicable processes for workspace devices and bookings.
For more information on workspaces in , see Workspaces.
Provision devices
Phones that are currently registered to will need to be migrated to as part of the cloud transition. To make the migration as simple as possible with minimal chance for failure, Cisco recommends migrating physical sites or departments at the same time. However, you may be required to migrate users in batches due to feature dependencies. See the section Migrate users in batches for more details.
Any supported phones that you need to transition from will need to be configured on as a user or workspace and the physical phone will need to be reconfigured to register with . In addition, the 7800 and 8800 series phones need their firmware upgraded from Enterprise firmware to Multiplatform Phone (MPP) firmware. This process includes loading transitional firmware before loading the MPP firmware required for registration. It also requires the appropriate migration license. Cisco has improved this process over the past few years to make it easier for you to upgrade your Enterprise firmware phones to MPP firmware. For more information on the steps to complete the firmware upgrade, see Convert Cisco 7800 and 8800 series IP phones between Enterprise and MPP Firmware.
In addition to the steps outlined in this article, has a built-in tool, Migrate your phone to Webex Calling, that you can use to help migrate your 7800 and 8800 phones from Enterprise to MPP firmware. This tool also allows you to add the phones to and assign them to the appropriate users or workspaces. For more information on tool usage, see Migrate your phone.
For any 9800 series phones registered with the above firmware migration requirement does not apply. These phones run PhoneOS, which is supported by both and . To transition these phones to you will need to add them to Webex Calling, assign them to a user or workspace and then factory reset the phones. PhoneOS boot sequence for registration figure below shows the PhoneOS boot sequence and how the phone will register to once it has been added to , even if the phone is still provisioned on and/or DHCP Options (Example - 150) are in use.
supports factory resetting PhoneOS devices to allow for Zero-Touch onboarding to . admins can remotely factory reset the 9800 and 8875 phones through the CUCM Administration pages, which eliminates the need for physical access to the phones to onboard the phones to . This feature is supported with the Device Packs from September 9, 2025:
-
CUCM v15 - Unified Communications Manager Version 15
-
CUCM v14 - Unified Communications Manager Version 14.
For more information on registration process for the 9800 series, see Registration process.
In addition to the Cisco IP phones, provisioning of other devices such as analog telephone adapters (ATAs), wireless (Wifi, DECT) phones, video devices, voice gateways, and 3rd party devices and phones may be required. Many of these devices do not have a firmware upgrade path like the IP phones to transition them from enterprise firmware to cloud firmware. Therefore, you will provision each of these devices in Control Hub. Some of these cannot be transitioned to and the equivalent model will need to replace it (e.g. ATA 191/192) and others will require manual reconfiguration and/or software changes.
-
Voice gateways - To migrate your local gateway, see Migrate local
gateway.
For more information to configure your voice gateway VG400, VG410, or VG420 in Control Hub, see Local gateway
-
Analog telephone adapter (ATA) - To get started with your Cisco ATA 191 and 192, see Cisco ATA.
-
Wifi wireless phone - To integrate wireless phone 840 and 860, see Integrate Webex wireless phone.
-
DECT wireless phones - To get started with your new Cisco IP DECT 6800 series, see Cisco IP DECT.
To build and manage digital DECT network in Control Hub, see Manage DECT network
For more information on Cisco IP DECT 6800, see Deployment guide
-
3rd party devices and phones - Work with 3rd party vendors on device/phone requirements and the process to migrate or replace them to support .
Configure features
Any calling features that are required in need to be provisioned before or during the transition. As discussed during the Migrate users in batches section, the calling features need to be configured and transitioned when the users who are using them are transitioned.
For details on how to configure each of the features, see the corresponding configuration help articles.
-
Auto attendants - To manage auto attendants, see Auto attendants
-
Call park - To manage call park, see Call park
-
Call pickup - To configure call pickup group, see Call pickup
-
Call queues - To configure Call Queue, see Call queue
-
Hunt groups - To Manage hunt groups, see Manage hunt group
-
Operating modes - To call routing based on operating modes, see Call routing based on operational modes
-
Paging groups - To configure a paging group, see Configure a paging group
-
Recordings - To manage call recording for , see Manage recordings
-
Single number reach - To configure single number reach (office anywhere), see Configure single number
-
Voicemail group - To manage a shared voicemail and inbound fax box for , see Manage voicemail.
Acceptance testing
Acceptance testing ensures that the migrated environment meets the functional requirements, operates as expected, and delivers a seamless user experience across all communication workflows. This validation process is multifaceted, covering everything from user provisioning and number assignments to the operational performance of advanced calling features.
This section provides examples and highlights key aspects to consider during acceptance testing; however, it is not intended to serve as an exhaustive or comprehensive checklist.
User provisioning and number assignment
A foundational aspect of acceptance testing involves verifying that all users are provisioned accurately and completely within . This requires a thorough comparison between the source () directory and the newly established user base to ensure that every user account, along with associated attributes such as extension numbers, and direct inward dial (DID) assignments has been correctly migrated. Completeness of provisioning is critical not only for day-one operability but also for ongoing administration and support.
Number assignment validation includes confirming that each user is assigned the correct extension and external number, and that these numbers route correctly in both internal (on-net) and external (PSTN) call flows. It is essential to check for any overlaps, missing assignments, or misconfigurations that could lead to call routing errors or service interruptions.
PSTN Call flows and caller ID presentation
A robust acceptance testing procedure must encompass end-to-end validation of PSTN call flows. This includes both inbound and outbound call scenarios. For incoming PSTN calls, the testing team should confirm that calls are delivered to the intended endpoints, whether these are individual users, call queues, hunt groups, or auto attendants. Outgoing PSTN calls must be placed successfully, with particular attention given to the correct delivery and presentation of caller ID information. This involves ensuring that the correct caller name and number are displayed to external recipients, in accordance with organizational policies and regulatory requirements.
Testing should also address failover scenarios, such as the handling of unreachable endpoints or network disruptions. This helps to confirm that fallback mechanisms and alternate routing are functioning properly, maintaining service continuity and reliability.
On-net call flows
Internal, or on-net, call flows form the backbone of enterprise communication. Acceptance testing in this area verifies that calls between users within the organization are routed correctly, with features such as call transfer, hold, forwarding, and conferencing operating as intended. The integrity of dial plans, extension-to-extension connectivity, and the support for organizational call policies must all be confirmed.
User Call handling and feature validation
An important aspect of acceptance testing involves validating how users handle calls using the and supported desk phones. This process focuses on confirming that day-to-day calling workflows are intuitive and reliable, and that users have seamless access to the core features necessary for their roles. Testing should assess the ease with which users can place and receive calls, manage hold and resume functions, and perform both blind and consultative transfers. It is also essential to verify that call forwarding, conferencing, and other advanced capabilities, such as parking and retrieving calls or activating do not disturb, are readily available and operate smoothly.
The experience should be evaluated for clarity and responsiveness, considering how users interact with call history, voicemail, and integrated directories. Additional attention should be paid to the ability to move active calls between devices and to use in-call controls effectively within the application or on physical phones. The ultimate goal is to ensure that the end-user experience is consistent, efficient, and fully supports the organization's communication needs following the migration.
Call Queues: Agent and supervisor experience
Call queues are frequently used for handling high-volume inbound call scenarios. Acceptance testing here focuses on several dimensions. First, it should be verified that calls are distributed to agents according to the configured queue logic, such as round robin, longest idle, or simultaneous ring. The presentation of queued calls on agent desktops must be examined for clarity and ease of use, ensuring agents can efficiently accept, hold, and transfer calls.
For supervisors, the desktop experience should be evaluated for features such as real-time monitoring, call barging, and analytics or insights into queue performance. This includes but is not limited to validating dashboards and reporting tools that provide actionable data on call distribution, agent activity, and queue metrics.
Hunt Groups: Call distribution
Hunt groups are a key mechanism for distributing calls to predefined sets of users. Acceptance testing needs to confirm that calls are routed to group members based on the configured hunting algorithm, and that overflow, forwarding, and no-answer scenarios are handled according to design. Ensuring that group membership and call routing behaviors match those previously established in is essential for operational consistency and user satisfaction.
Auto Attendants: Announcements and menu operations
Auto attendants represent the front line of automated call handling. Testing must cover the playback of announcements, the accuracy of recorded greetings, and the correct operation of menu trees. Menu selections should reliably route callers to the appropriate departments, individuals, or external numbers. Testing should also include invalid or timeout scenarios to confirm that callers receive clear guidance or are redirected as intended.
Voicemail operation
Finally, voicemail functionality is critical to the user experience. Acceptance tests should verify that voicemail boxes are correctly assigned and accessible, both from within the organization and remotely. The ability to record, retrieve, and manage messages must be confirmed, along with notification delivery.
Optimize
PSTN migration to Cloud Connect for
Once all endpoints and users are migrated to cloud calling the single purpose of Unified CM is to act as a transit between the PSTN gateways and via Local Gateway. Removing PSTN gateways, , and Local Gateway from the picture by using Cloud Connect for as the PSTN access for all Webex Calling users has several benefits, including cost reduction and improved reliability. To transition on-premises PSTN access to Cloud Connect for , follow these steps:
-
Cloud Connect for partner selection.
Refer to the list of Cloud Connect for partners and select from the available partner(s) available for your organization's location.
-
Cloud Connect for validation.
Before switching PSTN access for locations to Cloud Connect, connectivity to PSTN via the selected Cloud Connect partner should be verified and validated. For this purpose, a test location needs to be provisioned in with some test users provisioned in that test location. PSTN access for this test location is then set to the Cloud Connect partner before validating PSTN connectivity using the test phones. Upon successful validation, the test location can be deprovisioned.
-
Number porting.
To prepare for the cut-over to Cloud Connect a port order for all numbers currently assigned to the PSTN trunk terminating on needs to be placed. All numbers need to be ported to the Cloud Connect partner. To maintain inter-location reachability, all numbers of all locations need to be ported at the same time.
-
Switch to Cloud Connect partner.
At date of the cutover, PSTN access for all locations in needs to be set to the Cloud Connected PSTN provider, and inbound and outbound connectivity should be verified.
As discussed in the PSTN section of the design chapter customers can also choose to move their PSTN access to Cloud Connect for at the start of the transition using PSTN trunking for hybrid deployments. For more information, see PSTN trunking for hybrid Webex Calling deployments. In that case during the transition PSTN access for is via Local Gateway and and after moving all users to there is no additional PSTN related migration step other than decommissioning and the Local Gateways.
Optimize on-premises infrastructure
Once all users have been transitioned to and all endpoints have been transitioned to cloud registration (or have been decommissioned), update appropriate on-premises infrastructure now that cloud calling is in use. Updates to the infrastructure include:
-
Remove on-premises call control and messaging DNS SRV records from the on-premises DNS server(s) including cisco_uds._tcp.<domain>, cup_login._tcp.<domain>. These SRV records are no longer required for client service discovery.
-
Remove edge-related DNS SRV records from the public DNS system including collab_edge._tls.<domain>. These SRV records are no longer required for client service discovery of collaboration edge services.
-
Update all relevant DHCP scopes to remove option 66 and option 150 TFTP/boot server addresses. These scopes are no longer required for endpoint call control configuration discovery and download.
-
Update/remove appropriate dial-peers in Local Gateway/CUBE that route calls to and from Unified CM. These dial-peers are no longer required for on-premises call routing.
-
Delete or remove all and cluster node virtual machines and/or servers. Repurpose compute resources and hardware as needed. These resources are no longer needed for call control and edge services.
-
Delete or remove all cluster node virtual machines and/or servers. Repurpose compute resources and hardware as needed. These resources are no longer needed for voicemail and unified messaging services.
-
Clean-up: After migrating PSTN access to Cloud Connected PSTN , PSTN trunks, PSTN gateways, and Local Gateway can be decommissioned.
-
For any existing on-premises E911 solution, delete any locations or numbers that have migrated to and once full transition is complete, remove application virtual machines or servers. Repurpose compute resources and hardware as needed. These resources are no longer needed for emergency calling and location services.
-
DNs belonging to migrated users should be placed in a hidden partition to avoid call routing failures and to ensure all CSS' have priority access to the cloud path of the same DNs.
-
Update the physical dispatchable location and network element in horizon mobility whenever changes occur. Common activities that require updates are:
-
Network switch replacement
-
Wireless access point replacement
-
DHCP scope changes
-
Physical changes inside the building (if resolving to cubical/office)
-
Physical office space expansion or contraction inside a building.
-
Utilize analytics and troubleshooting
provides comprehensive analytics and troubleshooting capabilities to help you visualize and track your deployment. These cover media quality, detailed call history, call queue, hunt group, and auto attendant analytics. An example of media quality analytics is shown in figure media quality analytics.
Under troubleshooting, each call made using can be viewed with detailed information about key media quality and signaling-related issues to help pinpoint media issues as well as failed calls, as shown in figure media quality troubleshooting.
troubleshooting can also integrate with other Cisco products like ThousandEyes and Meraki switches to provide an even richer integrated experience in Control Hub. For more information on using Webex Calling analytics and troubleshooting, see Troubleshoot Webex Calling calls in Control Hub.


