- Home
- /
- Article

Thanks for your feedback.

Migrate devices and features from Unified CM to Webex Calling
 In this article
 Feedback?
Now you can migrate features from Unified CM to Webex Calling. It covers key steps to help you manage feature migration efficiently. Use this tool to simplify your transition and take advantage of Webex Calling capabilities.
Overview
This gives the information about the migration and mapping of Auto-Attendant, Devices, Configured Lines, Device Layout (Speed Dial, Shared Line), Virtual Line, Call Queue, Hunt Group, Call Park, and User Calling data (Call forwarding and Call Monitoring) migration from Unified CM to Webex Calling.
(Webex for Government only) The commercial Device migration eligibility check is now supported for FedRAMP organizations. When this option is selected, the device’s MAC address is sent to the Cisco corporate network to verify eligibility. If you prefer not to have the MAC address sent automatically, you can follow <FedRamp device migration process Migrate your phone to Webex Calling.
The steps outlined here is applicable to Dedicated Instance also.
Migration of data
Migration for Auto-Attendant, Devices, Configured Lines, Device Layout (Speed Dial, Shared Line), Virtual Line, Call Queue, Hunt Group, Call Park, and User Calling data (Call forwarding and call monitoring) adds usability improvements to reduce migration times and reduce human error.
Once you upload the Unified CM .tar file, you can see the two functionalities:
Export CSV - The downloaded zip file contains feature CSVs and can be modified, updated, and uploaded either through Import Config or through respective feature bulk migration.
These CSV files are specifically for Webex Calling bulk provisioning, corresponding to the respective features and services.
Import Config -You can use Import config to provision the updated CSV files for the migration features. You can provision only Configured lines and device layout using the Import Config option. Provision the rest of the CSVs on that respective feature bulk manage option.
Use the Export CSV and Import config option to retrieve and provision the files for migration.
You can use the Bulk Admin Tool to generate .tar file and use it to migrate Auto-Attendant, Devices, Configured Lines, Device Layout (Speed Dial, Shared Line), Virtual Line, Call Queue, Hunt Group, Call Park, and User Calling data (Call forwarding and call monitoring) features.
| 1 |
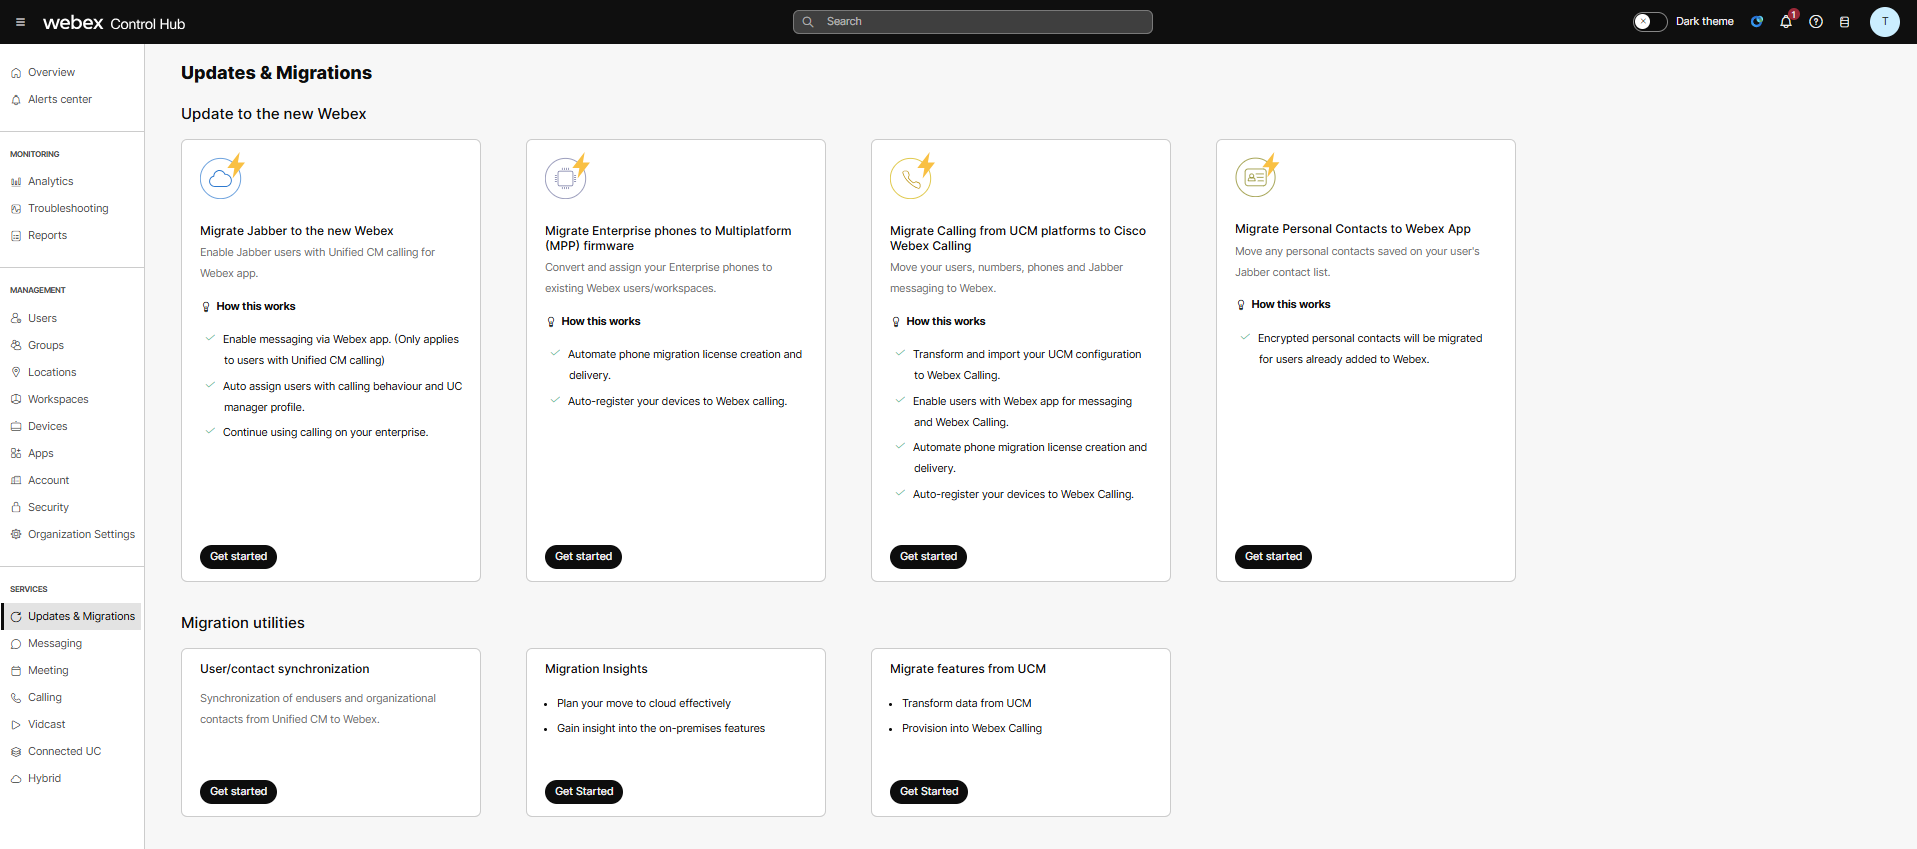
From the customer view in https://admin.webex.com, go to Services > Updates & Migrations. |
| 2 |
In the Migration utilities section, go to Migrate features from UCM card and click Get Started. |
| 3 |
In the Import into Webex Calling page, go to Import data to provision into webex calling. Use the Unified CM Bulk Admin Tool to get the tar files, See Import Users Using the Bulk Administration Tool (BAT) for detailed information. |
| 4 |
Select Choose a file or drag and drop the Unified CM .tar file. The maximum size of upload is 350 MB. If you want to cancel or replace the Unified CM .tar file, click Cancel cancel the import or Click Replace to replace the Unified CM .tar file. |
| 5 |
(Optional) For Auto-Attendant, Drag, and drop the Unity Call Handler .zip file in the Drag and drop Unity .zip file here or browse for files. To create the unity call Handler .zip file. Refer to CallHandlerDataDump. The maximum size of upload for Unity .zip file is 2GB. |
| 6 |
click Next. The Unified CM .tar file takes some time to upload. Once uploaded, the successful window appears. |
| 7 |
To delete the uploaded Unified CM .tar file, click three dots on the top right and select Delete. |
| 8 |
To download the ZIP files which contain the generated CSV files, click three dots on the top right and select Export CSV. After a successful download, you can view the detailed information on the CSV files. Refer to Import Config to know how to use the export CSVs and to provision to Webex Calling. |
Export ZIP file
Once you export and download the .zip file, here are the list of output CSV files included in this zip file:
-
CallQueueBulk.csv - Contains provisioning data which includes errors and notes that require an Administrator to make corrections before it’s ready to upload in the Control Hub.
-
CallQueueBulkCsvFromUCMHuntGroup.csv - This is an optional file to help transform Unified CM hunt groups to provision as call queues in bulk. It includes errors that require an admin to make corrections before it’s ready to upload to Control Hub.
- DeviceBulk.csv - Contains the valid provisioning data for firmware migration and needs to delete the extra column before the Administrator uploads it to the Control Hub.
- DeviceBulkError.csv - Contains data that are having errors and require an administrator to make corrections.
-
CallParkExtensionBulk.csv - Contains provisioning data to configure the call park extensions.
- HuntGroupBulk.csv - Contains provisioning data which includes errors and notes that require the Administrator to make corrections before it’s ready to upload in the Control Hub.
- ImportDataBulk.csv - Contains the extracted data from enduser.csv, phone.csv, and device_pool.csv of the imported Unified CM tar files.
-
DeviceLineKeyConfiguration.csv – Contains provisioning data to configure Speed Dials on Line Keys and KEM modules.
-
Auto-AttendantBulk.csv – Contains provisioning data which includes errors and notes that require an Administrator to make corrections before it’s ready to upload in the Control Hub.
-
ConfiguredLineBulk.csv - Contains provisioning data to configure the configured lines.
-
VirtualLineBulk.csv - Contains provisioning data to configure the virtual lines.
-
VirtualLineBulkFromUCMHuntPilot.csv - This is an optional file to help transform Unified CM hunt Pilots to provision as VirtualLines in bulk. It includes errors that require an admin to make corrections before it’s ready to upload to Control Hub.
-
UserFeatures_Internal.csv/UserFeatures_External.csv - Contains the provisioning data for corresponding Internal/External call forward, i.e., transfer or forwarding of calls to another phone number or directly to voicemail for the user. They also contain monitored lines data.
- README.txt - Contains detailed information on the CSV files.
Migration utility script
The python script (UserBasedUCMFeatureMigration) helps with Webex Calling migration tasks. It processes the Call detail records (CDR) data collected on a server or Unified CM. The corresponding compressed files can then be uploaded on Control Hub. For more information, see Migration utility script.
Here’s what the script does:
-
Filters output from the Migrate features from Unified CM tool based on a user list. You can also override user or device locations using the Location column
-
Identifies users who are part of group features but not included in the provided user list
-
Identify directory numbers that exist in multiple device pools and lists them in DNInMultipleDevicePool.csv in the insightDir folder.
-
Creates CallPark.csv and CallPickupgroup.csv files for Webex Calling, which the Migrate features from Unified CM tool doesn't currently support.
View Details on each CSV File
Use this table to see what fields and descriptions on each of the CSV contains.
DeviceBulk.csv
| Column | Description | Example |
|---|---|---|
| Username | The full name of the UCM user. | user@example.com |
| Type | The workspace/USER | USER |
| Extension | You must have either a phone number or an extension. | 3409 |
| Phone Number | The UCM phone number of the device. | +12225553409 |
| Device Type | IP Phones | IP Phone |
| Model | The model of the device | Cisco 8865 |
| MAC Address | The MAC Address of the device | AABBCCDDEEFF |
| Location | Enter the location to assign the device. | New York |
| Device Pool | The UCM device pool to which the device belongs. | AshwiniOPUS-UP |
DeviceBulkError.csv
| Column | Description | Example |
|---|---|---|
| Username | The full name of the UCM user. | user@example.com |
| Type | The workspace/USER | USER |
| Extension | You must have either a phone number or an extension. | 3409 |
| Phone Number | The UCM phone number of the device. | +12225553409 |
| Device Type | IP Phones | IP Phone |
| Model | The model of the device | Cisco 8865 |
| MAC Address | The MAC Address of the device | AABBCCDDEEFF |
| Location | Enter the location to assign the device. | New York |
| Calling Plan |
FALSE | |
| Device Pool | The UCM device pool to which the device belongs. | AshwiniOPUS-UP |
| Errors | The errors in exporting the CSV file |
Username not found in UCM data |
Here are the list of errors:
-
Eligibility check timeout
-
Device isn't eligible.
-
Username not found in CUCM data
-
The user doesn’t have a Webex Calling Professional License.
-
User isn’t present in CI.
CallQueueBulk.csv/CallQueueBulkCsvFromUCMHuntGroup.csv
To view the list of features shared with CSV fields, see Prepare your CSV.
Before uploading the csv file, the Administrator has to see the error count and additional information to resolve all the errors mentioned in the CSV. It’s mentioned for reference only.
Remove the Errors and Notes columns before you upload to the Control Hub.
Here are the lists of errors:
- The call Queue number from UCM is assigned to another user in Webex Calling. Update the available number, Location, Language, and Timezone columns manually.
- A derived extension from the Call Queue number from UCM is assigned to another User in Webex Calling. Update this column manually.
- The call Queue number from UCM is assigned to another user in Webex Calling. Update the Phone number, Extension, Location, Language, and Timezone columns manually.
- Location can’t be derived based on the Call Queue number from UCM, update it manually.
- Language can’t be derived based on the Call Queue number from UCM, update it manually.
- Timezone can’t be derived based on the Call Queue number from UCM, update it manually.
HuntGroupBulk.csv
To view the list of features shared with CSV fields, see Prepare your CSV.
Before uploading the csv file, the Administrator has to see the error count and additional information to resolve all the errors mentioned in the CSV. It’s mentioned for reference only.
Remove the Errors and Notes columns before you upload to the Control Hub
Here are the list of errors:
- Hunt Pilot number from UCM is assigned to another user in Webex Calling. Update the available number, Location, Language, and Timezone columns manually.
- A derived extension from Hunt pilot number from UCM is assigned to another User in Webex Calling. Update this column manually.
- Hunt Pilot number from UCM is assigned to another user in Webex Calling. Update the Phone number, Extension, Location, Language, and Timezone columns manually.
- Location can’t be derived based on Hunt Pilot number from UCM, update it manually.
- Language can’t be derived based on the Hunt Pilot number from UCM, update it manually.
- Timezone can’t be derived based on the Hunt Pilot number from UCM, update it manually.
ImportedDataBulk.csv
| Column | Description | Example |
|---|---|---|
| User ID | The unique identifier of the UCM user. | user@example.com |
| The email address of the UCM user. | user@example.com | |
| User Name | The full name of the UCM user. | user@example.com |
| Primary Extension | You must have either a phone number or an extension. | 3409 |
| Device Pool | The UCM device pool to which the device belongs. | AshwiniOPUS-UP |
| Device ID | The unique identifier of the UCM device. | The UCM device ID |
DeviceLineKeyConfigurationBulk.csv
| Column | Description | Example |
|---|---|---|
| Device MAC | The MAC Address of the device |
AABBCCDDEEFF |
| Device Model | The model of the device |
Cisco 8865 |
| KEM Type | The configuration of the KEM Module keys |
KEM_14_KEYS|KEM_18_KEYS SHARED_LINE is not supported for 18 Keys KEM module configuration. |
| KEM Module | Number of key extension module being configured |
1|2|3 |
| Apply config | To update the configuration on phone |
TRUE|FALSE |
|
Line Key Assignment |
Line 1 Key acts as a primary key Configure other keys as required |
SPEED_DIAL, SHARED_LINE |
|
Shared Line Index |
Shared line index is the line label number of the shared or virtual line assigned in the configured lines. As you can add multiple appearances of the same shared or virtual line on a phone, entering the index number assigns the respective line to a line key. Enter this value if you've entered SHARED_LINE as the Line Key Assignment. |
1|2|3 |
|
Line SpeedDial Label |
Speed dial name |
Reception |
|
Line SpeedDial Destination |
Speed dial destination number |
+12225554444 |
AutoAttendantBulk.csv
| Column | Description | Example |
|---|---|---|
| Name | Name of the Auto-Attendant | Auto Attendant-1 |
| Phone Number | The UCM phone number of the device. | +12225553409 |
| Extension | You must have either a phone number or an extension. | 3409 |
| Location | Enter the location to assign the device. | New York |
| Time Zone |
Enter the time zone key. This time zone applies to the schedules applied to Auto-Attendant.
|
Americas/Chicago |
| Language Code | Language code for audio announcements | en-us |
| Caller ID First Name | Enter the first name to display for the line ID (CLID). | Auto |
| Caller ID Last Name | Enter the last name to display the calling line ID (CLID). | Attendant 1 |
| Business Schedule |
Hours during which your Business Hours Auto Attendant operates |
All Hours |
| Holiday Schedule | Blank | - |
| Dialing Type | Always Set to ENTERPRISE | - |
| BusinessHoursMenu Extension Enabled | Always Set to FALSE | - |
| AfterHoursMenu Extension Enabled | Always Set to FALSE | - |
| AutoAttendant Enabled | Always Set to ENABLED | - |
| Alternate Numbers Action | Blank | - |
| Business Hours Greeting Type | This is the message that your customers hear when they call the Business Hours Auto Attendant. | Set to DEFAULT or CUSTOM |
| Business Hours Announcement Name | Name of the CUSTOM greeting announcement set for Business Hours Greeting | "autoattendantgreeting.wav" |
| Business Hours Announcement Media Type | Media type of the CUSTOM greeting announcement set for Business Hours Greeting. | wav |
| After Hours Greeting Type | Always set to DEFAULT | - |
| After Hours Announcement Name | Blank | - |
| After Hours Announcement Media type | Blank | - |
| After Hours Announcement Level | Blank | - |
| Business Hours Press [0-9,*,#] Description | Blank | - |
| Business Hours Press [0-9,*,#] Action | Assign different functions to each keypad number. These settings direct your customers where they need to go when they enter a specific number on their phone. | TRANSFER_WITH_PROMT |
| Business Hours Press [0-9,*,#] Value |
A phone number or extension to transfer the call to when action is set to TRANSFER_WITH_PROMPT Business hours key value needed if action is "TRANSFER_WITH_PROMPT" else will be blank | +12225554444 |
| After Hours Press 0 Description | Blank | - |
| After Hours Press 0 Action | Its a mandatory field and Set always to EXIT. | Exit |
| After Hours Press 0 Value | Blank | - |
| After Hours Press [0-9,*,#] Description | Blank | - |
| After Hours Press [1-9,*,#] Action | Blank | - |
| After Hours Press [0-9,*,#] Value | Blank | - |
|
Alternate Number[1-10] | Blank | - |
|
Alternate Number[1-10] Ring Pattern | Blank | - |
Here are the list of errors for Auto-Attendant:
- Auto Attendant number from UNITY cannot be determined in Webex Calling. Update Phone number, Extension, Location, Language and Timezone columns manually.
- Auto Attendant number from UNITY is assigned to another user in Webex Calling. Update available number, Location, Language and Timezone columns manually.
- Location cannot be derived based on Auto Attendant number from UNITY, you have to update it manually.
- Extension column empty from source data.
- The business schedule does not exist in the location/org.
- Name cannot be null.
- The greetings file cannot be found in WxC.
- Cannot be migrated as there is no equivalent feature in WxC.
ConfiguredLineBulk.csv
| Column | Description | Example |
|---|---|---|
| Device MAC | The MAC Address of the device | AABBCCDDEEFF |
| Device Model |
The model of the device Note: It is an optional field | Cisco 8865 |
| ACTION |
Set ACTION = ADD, To add the secondary lines to a device, ACTION = MODIFY, To edit the primary or secondary line's attributes ACTION=REMOVE, To try to remove a secondary line. |
ADD MODIFY REMOVE |
| Username 1 |
User - The e-mail id of the UCM user. Workspace or Virtual Line – The name of the UCM user. |
87807bdd-e1f8-4dca-9908-26e6730f72d8 |
| Type 1 | User type whose Id was populated in the previous cell. | USER | PLACE | VIRTUAL_PROFILE |
| Location 1 | To update the extension with the location. You can set location and extension across user types | Richardson |
| Extension 1 | You must have an extension and it can be repeated across locations. | 0007 |
| Phone Number 1 | The UCM phone number of the device. | +12225553409 |
| Line Label 1 |
Shared line description To clear a line's attribute, set ACTION = MODIFY and attribute cell value as REMOVE Note: It is an optional field | Default |
|
Appearances |
Can only be set >1 for the device owner (line 1) During ADD operation, if appearance is not populated, it will be set to default value of 1 The number of assignable Appearances depends on the number of available Shared Call Appearance (SCA) for the user or workspace. Note: It is an optional field | 1 |
| Hotline Enabled 1 | Set to TRUE when Hotline is required | TRUE|FALSE |
| Hotline Destination 1 | Destination for Hotline | 4444 |
| T38 Fax Compression Enabled 1 | To Enable T38 Fax Compression on ATA devices | TRUE|FALSE |
| Allow Call Decline 1 | When set to TRUE, it will allow to decline an incoming call. | TRUE|FALSE |
CallParkExtensionBulk.csv
| Column | Description | Example |
|---|---|---|
| Location | Enter the location to assign the device. | New York |
| Call Park Extension Name |
Enter the monitoring line or call park extension option. | Call Park 3 |
| Extension | You must have either a phone number or an extension. | 10006 |
VirtualLineBulk.csv
| Column | Description | Example |
|---|---|---|
| First Name |
End user First Name |
Timothy |
| Last Name |
End user Last Name |
Robinson |
| Display Name |
End user Display Name |
Robinson, Timothy |
| Location | Enter the location of assigned device. | New York |
| Phone Number | The UCM phone number of the device. | +12225553409 |
| Extension | The UCM Huntpilot extension of the device. | 3409 |
VirtualLineBulkFromUCMHuntPilot.csv
| Column | Description | Example |
|---|---|---|
| First Name |
It is the Ascii Alerting Name given to huntpilot in UCM. If there is space in name then first name is first part else if no space then full value is first name. |
Ascii Alerting Name : firstName lastName, firstName : firstName |
| Last Name |
If Ascii Alerting Name given to huntpilot in UCM has space then it is second part , if no space then it is '.' Dot |
Ascii Alerting Name : firstName lastName, lastName : lastName |
| Display Name |
It is full ascii alerting name given to huntpilot in UCM. |
Ascii Alerting Name : firstName lastName, DisplayName : firstName lastName |
| Location | Enter the location of the assigned device. | New York |
| Phone Number | The UCM Huntpilot phone number of the device. | +12225553409 |
| Extension | The UCM Huntpilot extension of the device. | 3409 |
UserFeatures_Internal.csv/UserFeatures_External.csv
To view the list of features shared with CSV fields, See Prepare your CSV.
Once you download the .zip file from Export data. You can modify or update the files.
Use Import Config to provision into Webex Calling for the Device layout and Configured lines and use the respective feature bulk management option for the other feature CSVs.
To use import config:
- From the customer view in Control Hub, navigate to Services > Updates & Migrations.
- In the Migration utilities section, go to Migrate features from Unified CM card and click Get Started.
- In the Import into Webex Calling page, click Actions under the Import data to provision into Webex Calling tile.
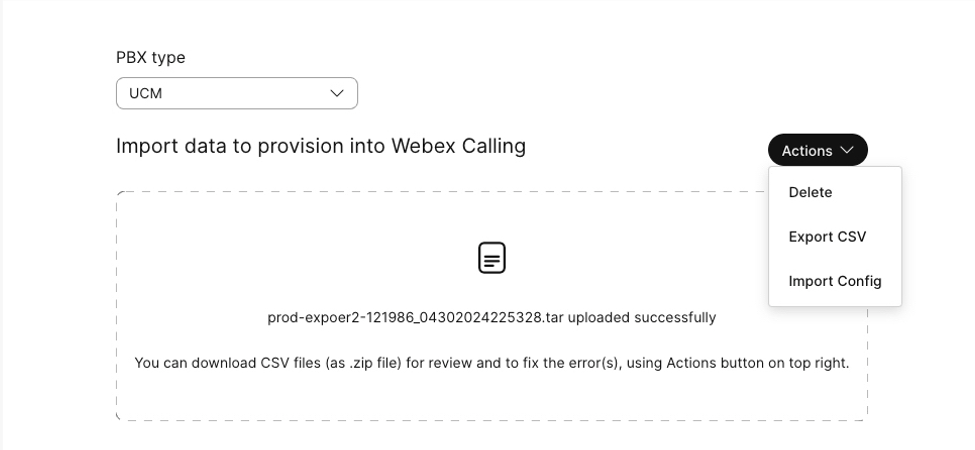
- You can see the list of options under the Action tab:
- Delete - If the CSV file is with errors, you can delete the tar file using the Delete option.
- Export CSV - Click Export CSV to export and review the CSVs.
- Import Config - After deleting the CSV with error, Use Import config to import a new CSV configuration.
| 1 |
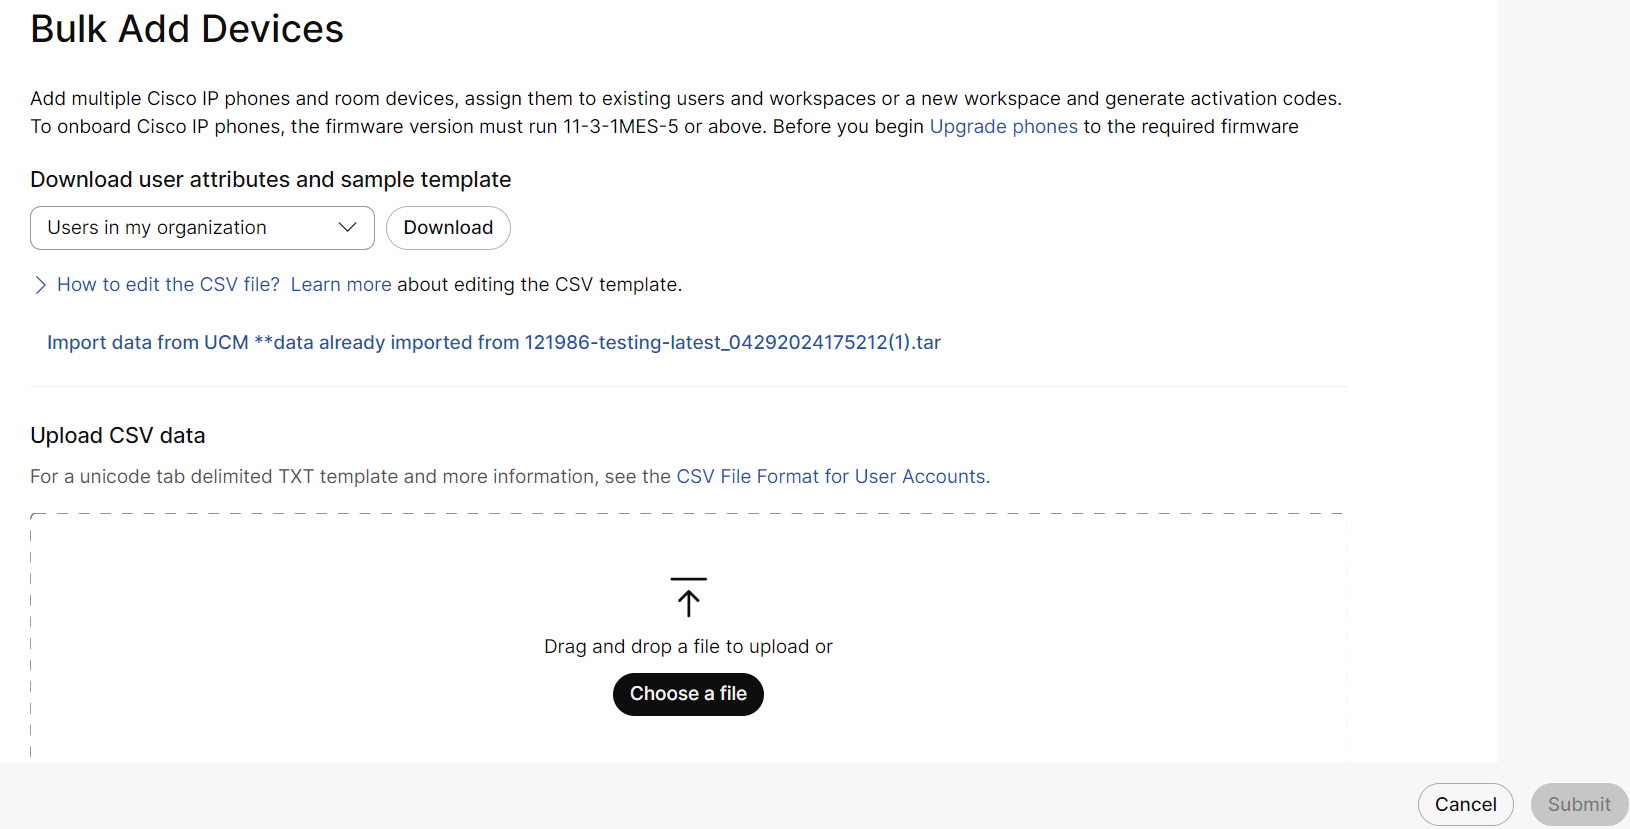
To import features like Configured Lines or Device Layout (Speed Dial, Shared Line)
|
| 2 |
To Import Devices,
For more information, see Manage devices in bulk.
|
| 3 |
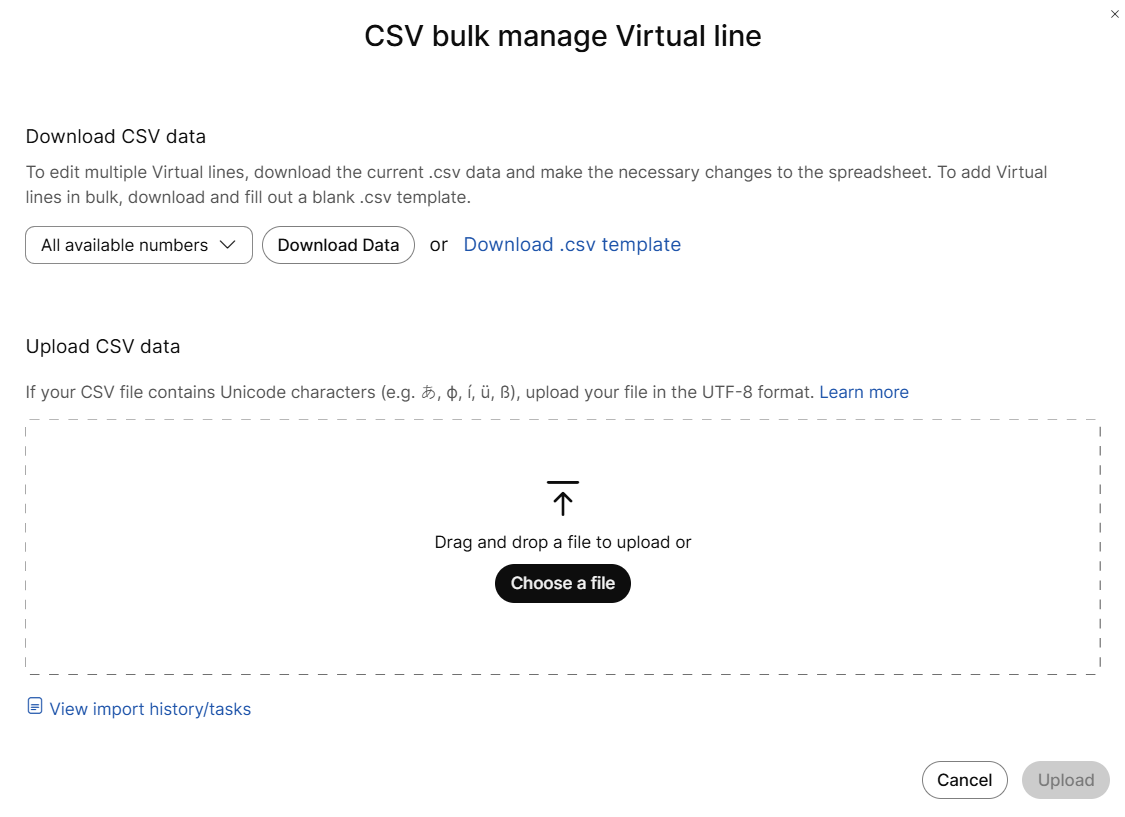
To import Virtual Line
For more information, see Manage virtual line in bulk.
|
| 4 |
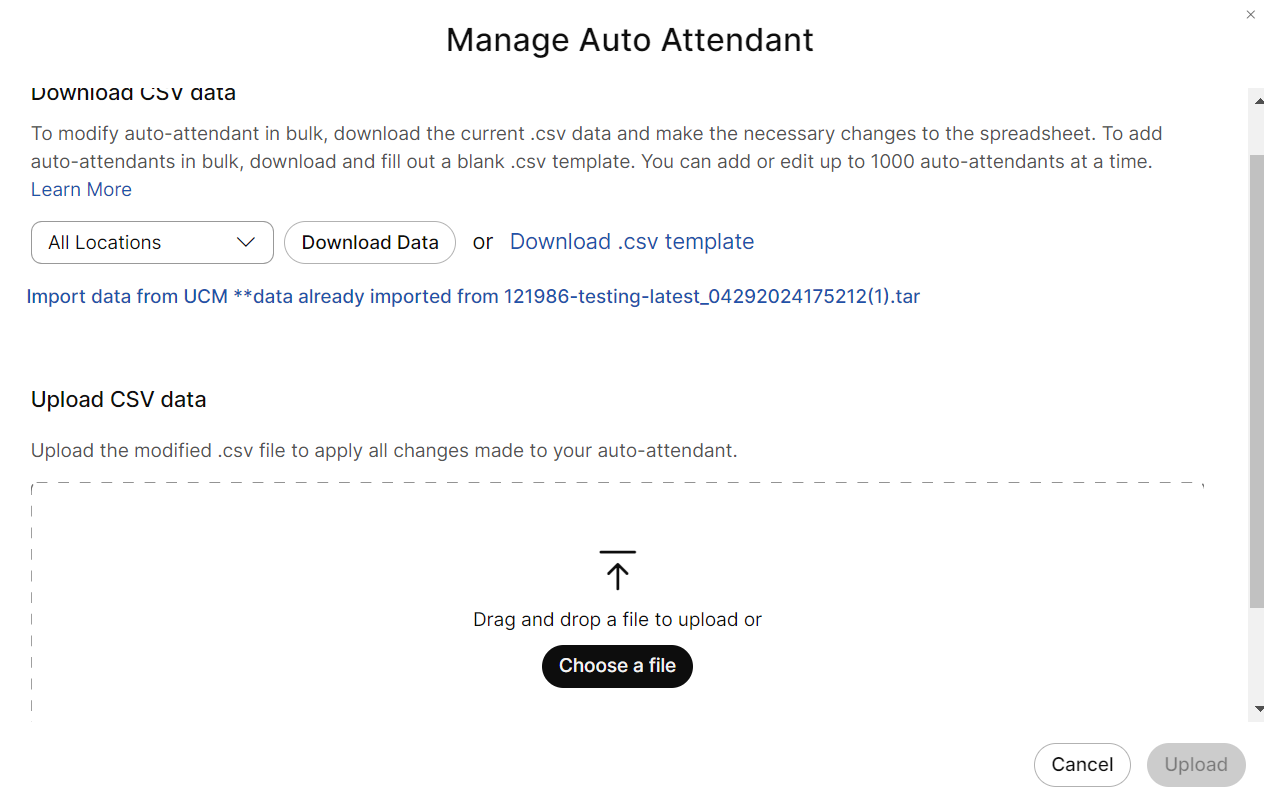
To import Auto-Attendant,
For more information, see Manage auto-attendants in bulk
|
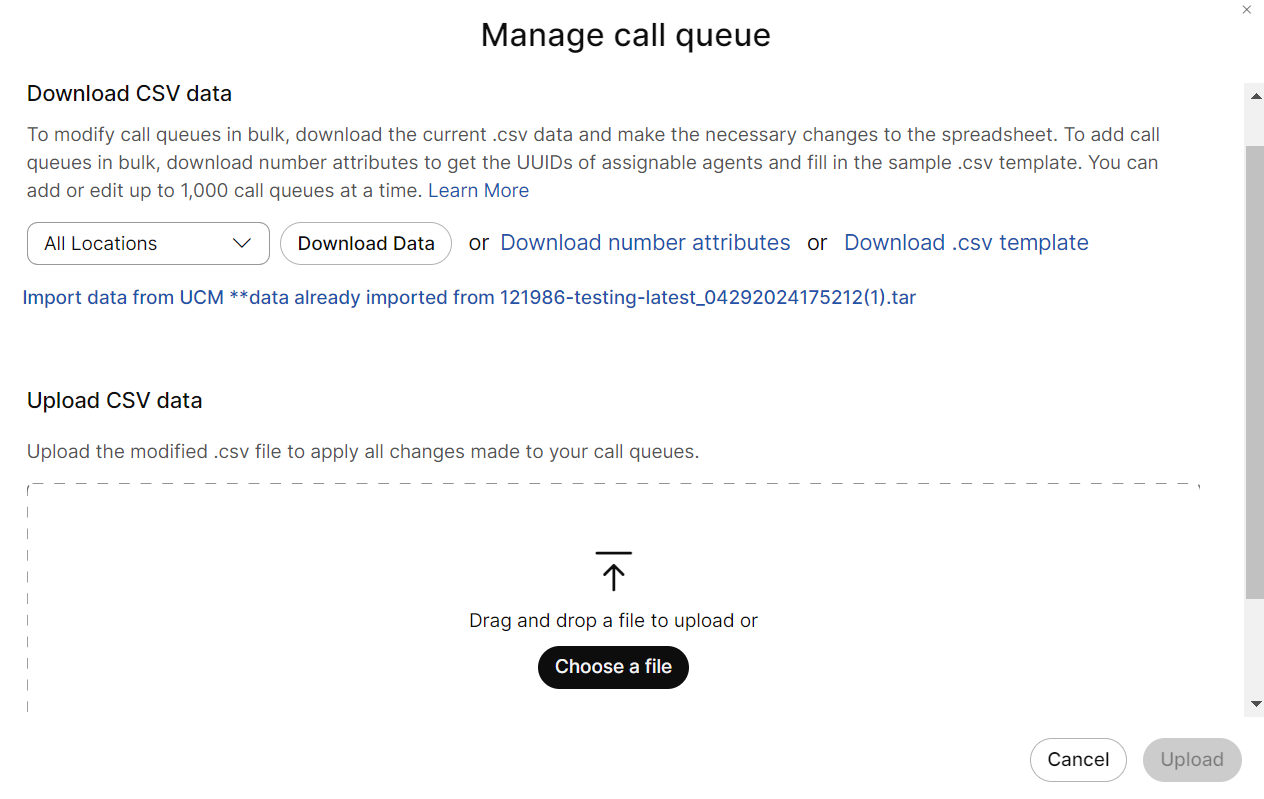
| 5 |
To import Call Queue,
|
| 6 |
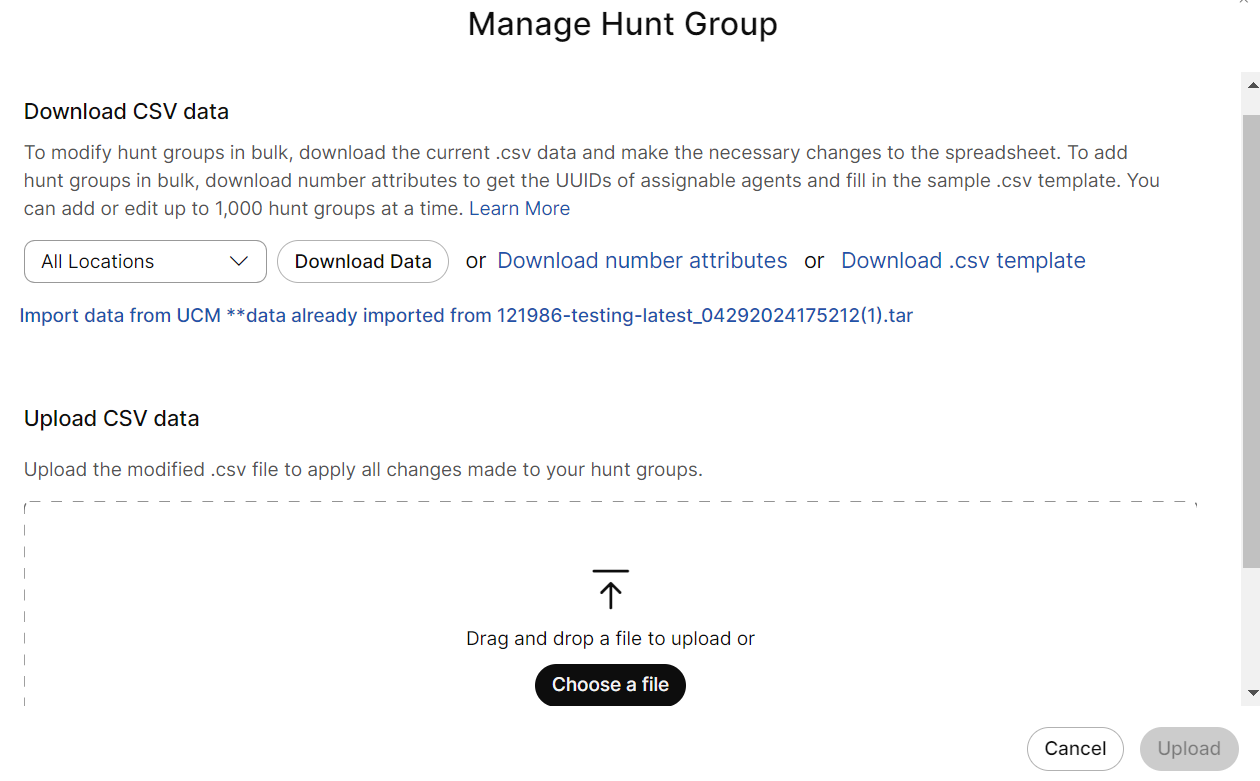
To import Hunt Group,
For more information, see Manage hunt group in bulk.
|
| 7 |
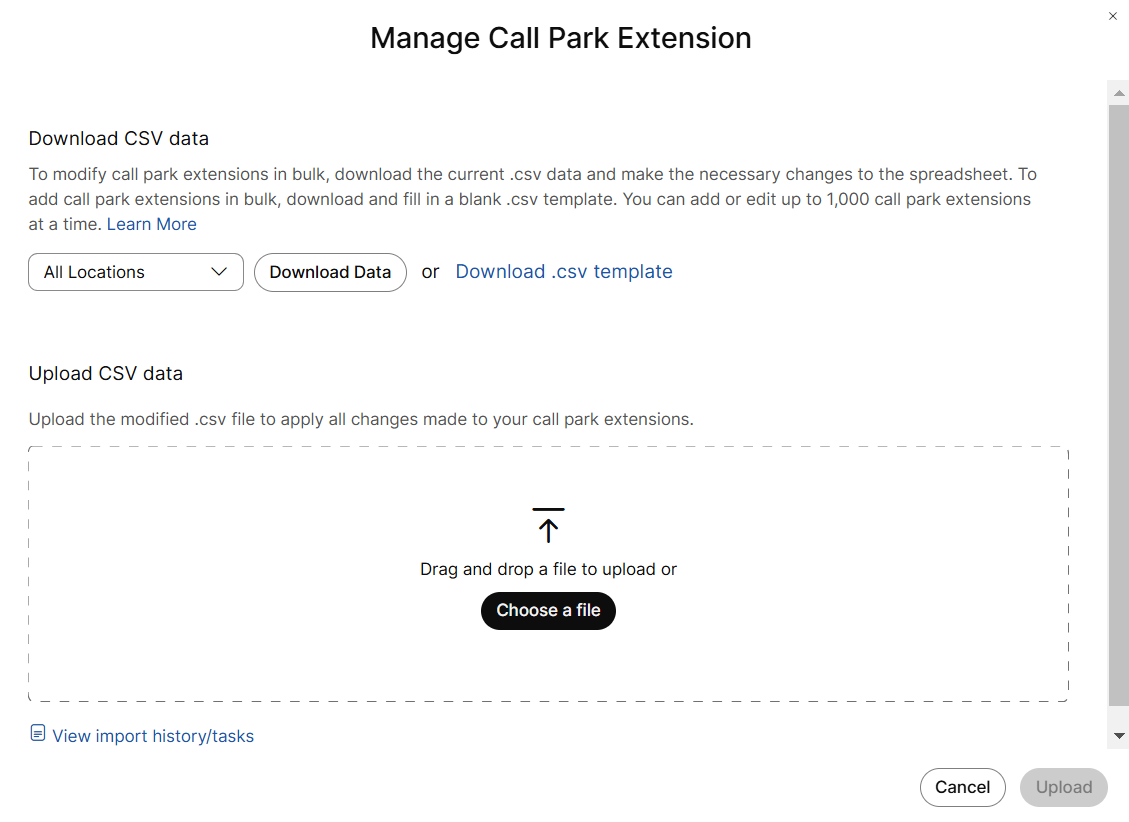
To import Call Park,
For more information, see Manage hunt group in bulk.
|
| 8 |
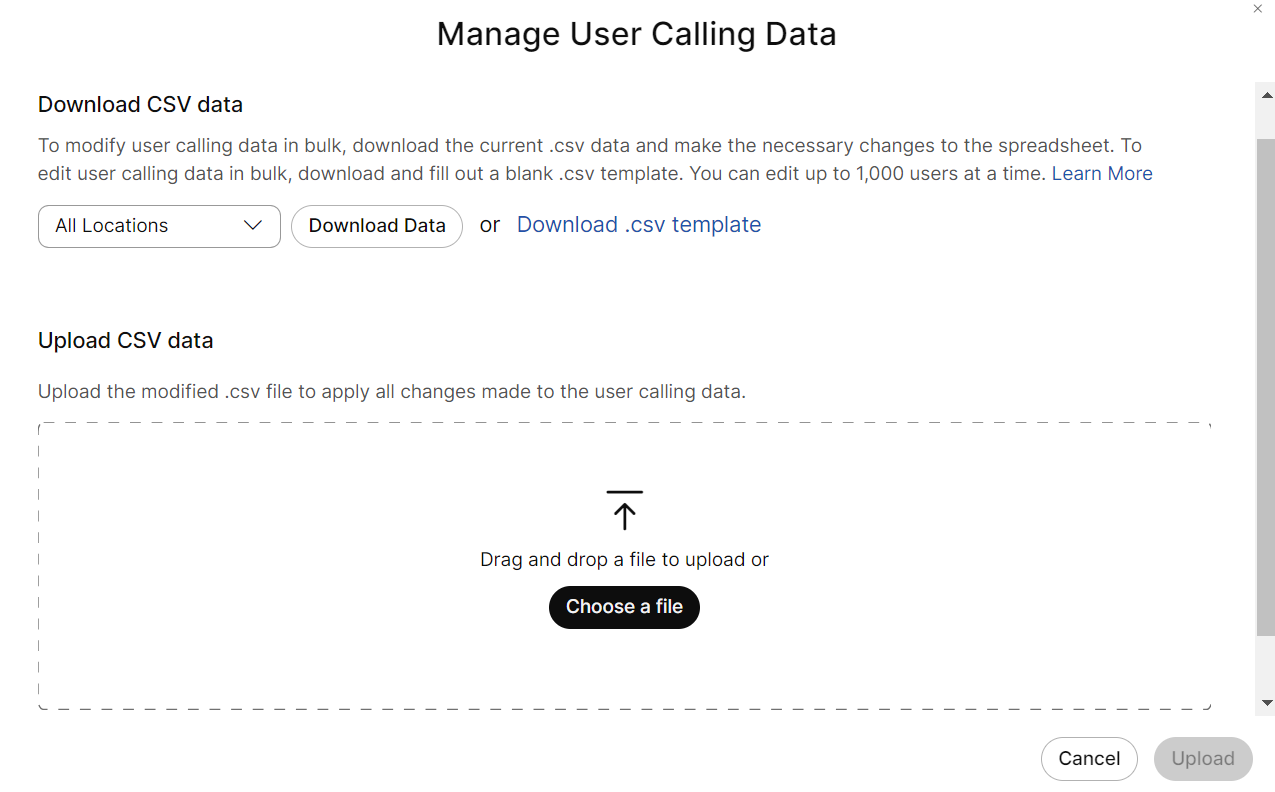
To import User Calling data (Call forwarding and Call Monitoring),
For more information, see Manage user calling data in bulk.
|