- Home
- /
- Article

Thanks for your feedback.

PSTN trunking for hybrid Webex Calling deployments
 In this article
 Feedback?
PSTN trunking in Webex Calling allows organizations to connect their on-premises PBX systems and specialized vertical applications, such as financial turrets, to Cloud Connected Partner PSTN and Local Gateway PSTN.
PSTN trunking enables users of organizations migrating to Webex Calling to communicate externally without the need for multiple PSTN contracts or complex routing setup.
Benefits of PSTN Trunking
PSTN trunking offers the following benefits to your organization:
-
Cloud PSTN migration before user migration—Organizations can transition their PSTN connectivity to the cloud before moving users to Webex Calling. This phased approach results in simplifying network architecture and lowering the cost.
-
Reduced infrastructure costs—Eliminates the need for multiple on-premises gateways and PSTN circuits, simplifying network architecture that lowers the cost.
-
Simplified integration with vertical applications—Makes it easier to connect specialized applications, such as financial turrets, nurse call system, and others, directly to the cloud PSTN without complex configurations.
-
Unified dial plan—Consistent extension and dial plan management across all sites and applications.
Key features of PSTN trunking
-
Supported PSTN types are:
-
Cloud Connected Partner PSTN (CCPP)
-
On-premises PSTN with Local Gateway
-
-
Direct PSTN access—On-premises PBX users can place and receive PSTN calls through the cloud PSTN via Webex Calling.
-
Caller ID features are:
-
Caller ID delivery and blocking
-
Calling number and name delivery
-
-
Emergency calling—Emergency calling from on-premises users using cloud PSTN.
-
Redundancy and Failover support—Route groups combine multiple trunks to allow for multiple routes between on-premises and cloud PSTN. Calls are automatically rerouted if one trunk connection fails.
Webex Calling Route List Calls License
You need an add-on Webex Calling Route List Calls license to enable the PSTN trunking feature. The number of licenses you buy sets the limit for concurrent off-net (PSTN) Route List calls allowed between your on-premises system and either cloud or on-premises PSTN.
The add-on license automatically includes 20% bursting beyond your licensed call volume, which allows your organization to handle occasional increases in call traffic without service interruption.
|
Customer type |
Included concurrent Webex Calling Route List Calls licenses |
How to add more capacity |
Bursting policy |
Notifications and monitoring |
|---|---|---|---|---|
|
Enterprise Agreement |
25% of Webex Calling licensed users |
Using change order, you can purchase Add Route List SKU for an existing subscription. |
20% bursting, then non-emergency calls are blocked. |
Alert on Control Hub when call is blocked beyond bursting capacity. CDR includes fields to show bursting and blocked calls. |
|
Named User |
Not included. |
Using change order, you can purchase Add Route List SKU for an existing subscription. |
20% bursting, then non-emergency calls are blocked. |
Alert on Control Hub when call is blocked beyond bursting capacity. CDR includes fields to show bursting and blocked calls. |
|
Trial |
10 concurrent calls |
Not Applicable |
20% bursting, then non-emergency calls are blocked. |
Alert on Control Hub when call is blocked beyond bursting capacity. CDR includes fields to show bursting and blocked calls. |
Existing Enterprise Agreement customers need to do a subscription modification to get Route List Calls licenses.
How PSTN trunking works
Architecture overview
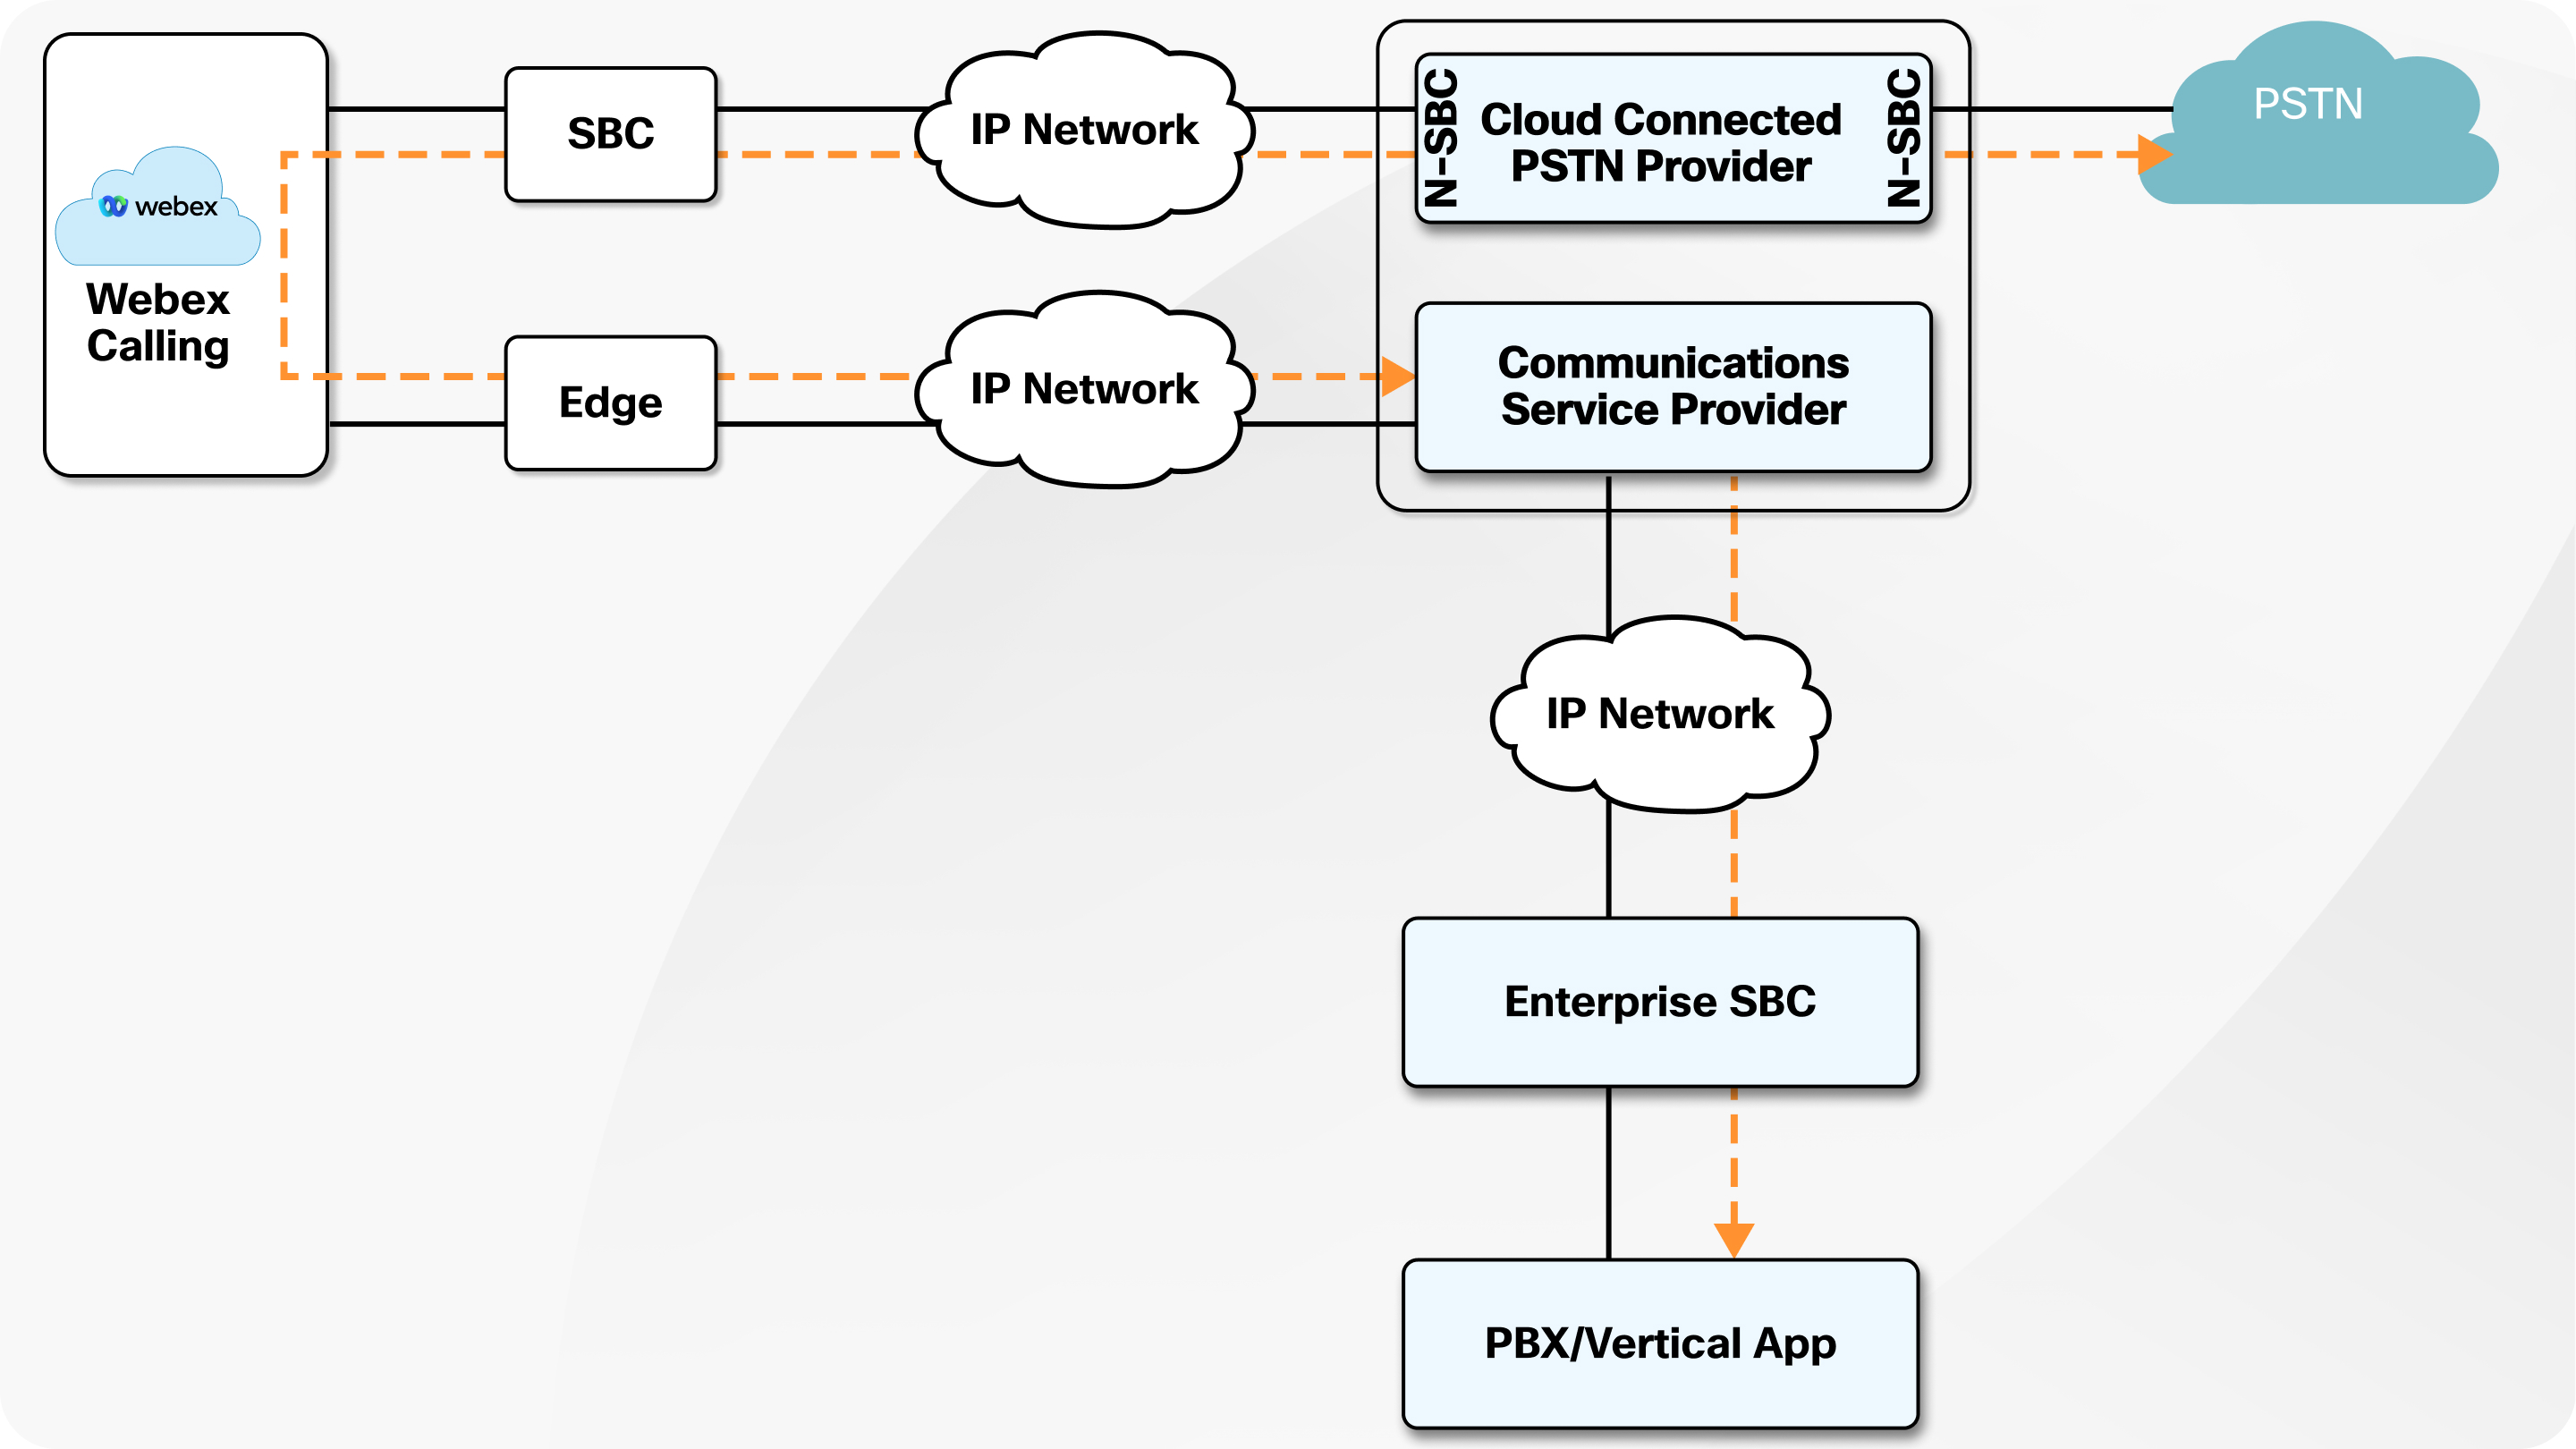
PSTN trunking uses Route Lists in Webex Calling to integrate your on-premises PBX system, or any specialized vertical applications, with Cloud Connected Partner PSTN (CCPP) or local gateway based PSTN.
Route Lists in Webex Calling are lists of numbers reachable through a Route Group. Each Route List is exclusively assigned to a location that supports up to 40,000 unassigned numbers from the hosted pool.
The following diagram illustrates the high-level architecture of PSTN trunking. The Enterprise Session Border Controller (SBC) terminates the Route Groups from Webex Calling. You can use any of the SBCs supported by Webex Calling.
Call flows
-
Inbound Calls—External calls from the PSTN are routed on one of the trunks associated with the Route Group, if the called number matches a number configured in the Route List.
-
Outbound Calls—Outgoing calls from an on-premises user are routed on the PSTN trunk associated with the location, when the calling number matches a number configured in the Route List. Route List can also make internal (in-org) calls.
Emergency Calling
If you enable RedSky for the route list's location, the emergency calls from that route list is routed through RedSky. You must map the route list number in the RedSky portal.
If RedSky is not enabled for the route list location, emergency calls will route through location's PSTN provider. See article Enhanced emergency calling for Webex Calling.
How to enable PSTN trunking
This article shows provision flow for enabling PSTN trunking for on-premises PBX and for integration with vertical application.
Before you begin
-
The calling party number in the SIP INVITE from on-premises system to Webex Calling must match the E164 number configured in the Webex Calling route list for the call to succeed.
-
Review the Audio specifications for Webex Calling documentation for supported/preferred audio codec by Webex Calling. This must be considered for the design of PSTN trunking for hybrid Webex Calling deployments.
| 1 |
Sign in to Control Hub. |
| 2 |
Provision Location(s) in Control Hub. |
| 3 |
Select Cloud Connected PSTN as the connection type for the location(s) and select the corresponding CCP provider(s). 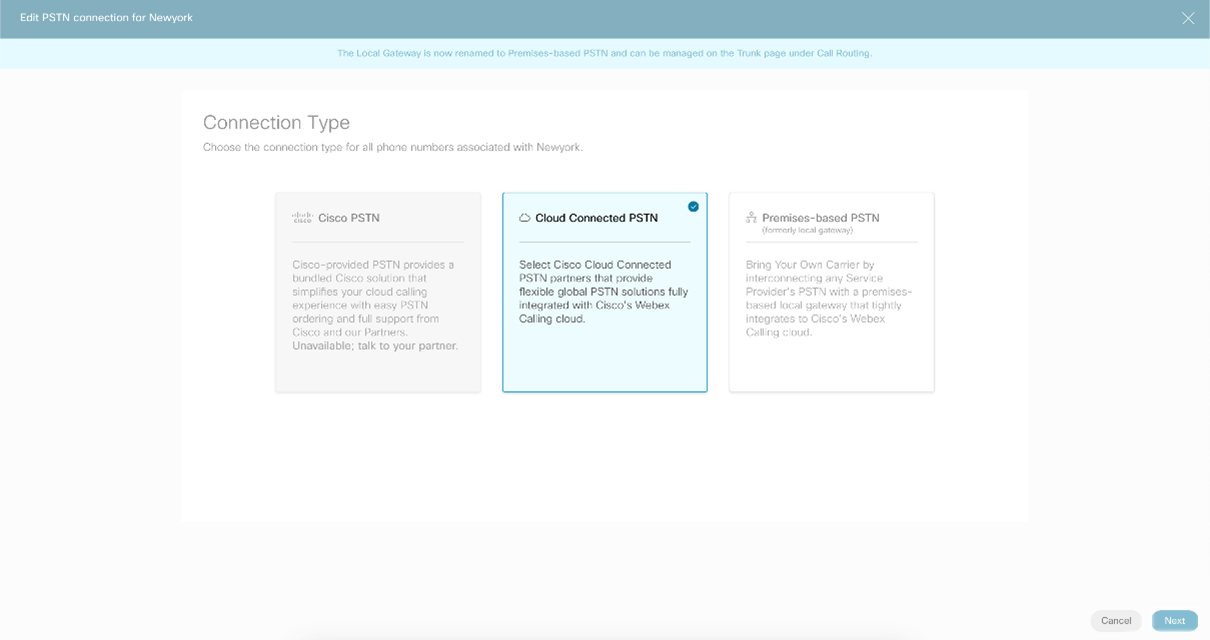
|
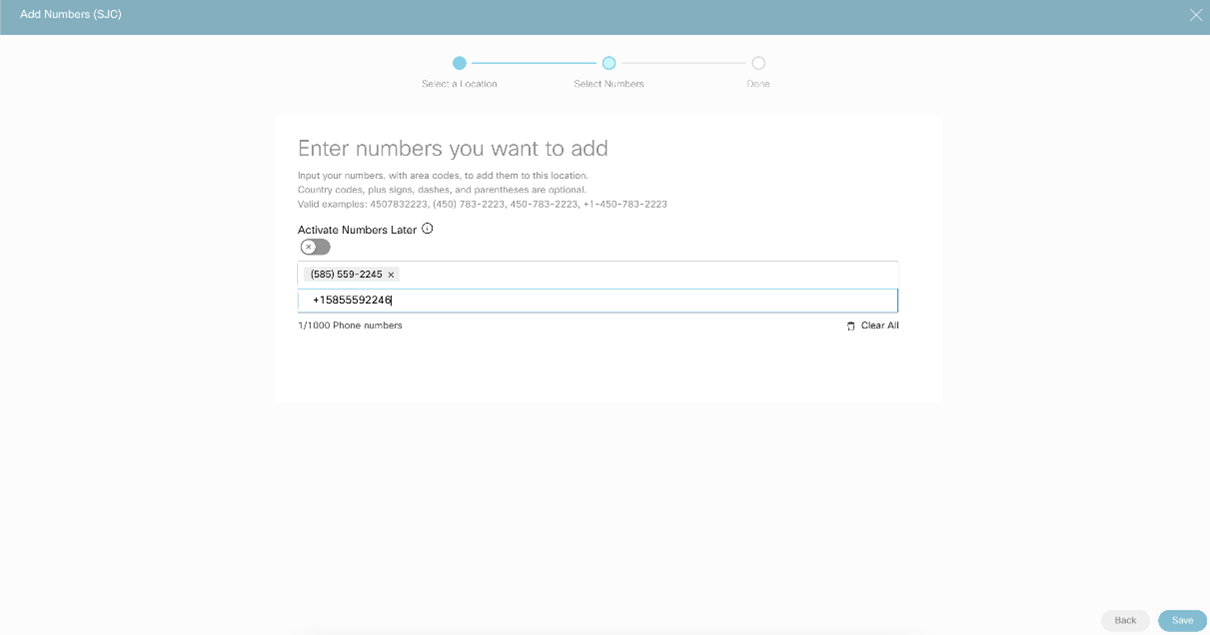
| 4 |
Order PSTN numbers from a CCP provider (integrated or non-integrated). Integrated providers will supply numbers directly to Control Hub, where they will appear automatically. For non-integrated providers, import the PSTN
numbers as follows:
|
| 5 |
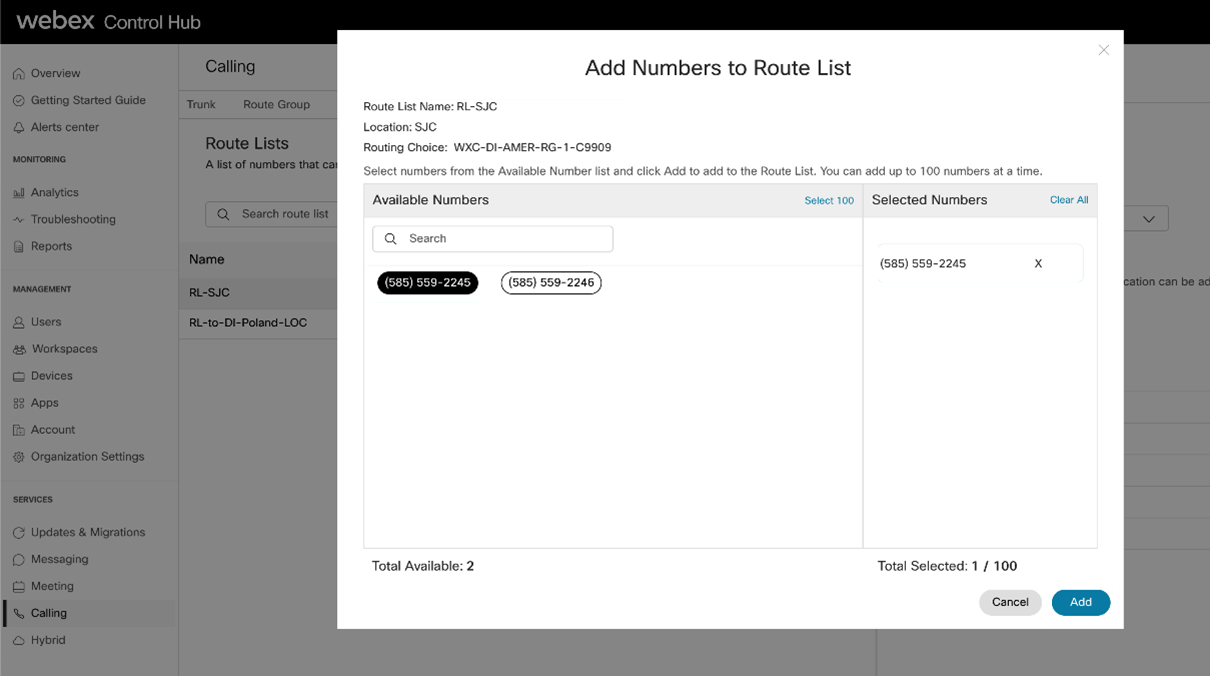
Perform the following steps for each location to create a Route List, assign it to an appropriate Route Group, and select which numbers will be used on-premises.
|
| 6 |
(Optional) If there are on-premises numbers in addition to route list numbers, configure Enterprise Dial Plans in Webex Calling with patterns pointing to on-premises and associate it with a Route Group. |
| 7 |
Configure on-premises call handling: |
| 8 |
To enable international calling, select the relevant location in the page. |


PSTN trunking usage metrics
The existing Route List page in Control Hub is enhanced to give administrators real-time visibility into active off-net calls across all numbers in the Route List, along with insights into peak concurrent call volumes over the past 72 hours. By translating call usage into clear capacity trends, it enables proactive planning to avoid costly over-provisioning. The Route List page call usage metrics ensures that every call gets through that enhances user experience and ensures that the organization can scale seamlessly to meet business growth. You can also view call usage metrics of all the trunks in Trunk page in Control Hub.
What happens when call volume exceeds Route List Calls license limit?
When the number of concurrent calls exceeds the Route List Calls license limit, up to 20% additional capacity (bursting) is allowed. If off-net calls occur during this bursting period, the originating on‑premises user hears an announcement informing them that the call is in bursting mode and advising them to contact their administrator to help prevent future off‑net calls from being blocked. The announcement is only played for outbound off-net calls (excluding emergency calls), not for inbound calls.
When the off-net call volume exceeds 20% bursting limits, they are blocked. In case of outbound off-net calls (excluding emergency calls), the caller hears an announcement that the call is blocked since it exceeds the Route List Calls license limit. Incoming calls are rejected but caller does not hear this announcement.
The Blocked call system alert is added to "Alert center" in Control Hub, it appears as:
-
Service—Calling
-
Type—Route List Calls Blocked
-
Severity—High
-
Description—A PSTN call was blocked because the number of simultaneous calls exceeded the license limit for all Route List numbers. Review your organization's Route List Calls licenses. Consider increasing your Route List Calls license quantity to prevent future disruptions.
You can enable alerts for delivery in Control Hub and also select the delivery channels such as Email, Webex space, Webhook, and PagerDuty.
CDR changes
These are the changes to the Webex Calling CDR introduced by PSTN trunking:
-
Route List Calls Overage—This new field is added to CDR. This is triggered when an off‑net Route List call exceeds the organization’s Route List Calls license limit. It shows the total number of calls, including this one, that were in bursting at the time the call was made or received.
-
Call Outcome Reason—The Call Outcome Reason field has a new
RouteListCallsvalue added. It’s set whenever an off-net route list call is blocked because the organization has exceeded its Route List Calls license limit.
PSTN on-premises migration scenario
As a part of their migration from Cisco Unified Communications Manager (CUCM) to Webex Calling, customer wants to migrate PSTN to Cloud Connected Partner PSTN (CCPP) to reduce infrastructure cost by eliminating the need for multiple on-premises gateways to maintain PSTN connection. By using PSTN trunking, their on‑premises users can use CCPP PSTN without having to migrate to Webex Calling. This phased approach allowed the organization to transition users in stages while minimizing the risk.
To use PSTN trunking for the migration, the customer migrates their existing PSTN service from on-premises to cloud PSTN, adds E.164 numbers in Control Hub. The customer administrator follows the instructions in Provisioning Flow to enable PSTN Trunking for On-Premises PBX and for Integration with vertical applications to configure Route List on Webex Calling.
Configuration on Local Gateway/SBC:
Follow instructions in this article, Get started with Local Gateway to configure local gateway.
Configuration on Cisco Unified Communications Manager (CUCM):
The following are the configuration steps on CUCM:
-
Go to , to configure the E.164 numbers that you ordered from PSTN in CUCM.
-
Assign these numbers to devices of the migrated users.
-
Create a SIP trunk on CUCM that connects to the Local Gateway.
-
Configure a Route Group. Add the SIP trunk created in the previous step to this Route Group.
-
Configure a Route List and add the Route Group to this list.
-
Configure the Route Pattern for the PSTN calls. Assign to the Partition accessible only by users allowed to use Cloud PSTN.
-
Set Up Calling Search Space (CSS) for migration.
-
Create a CSS that includes the partition containing PSTN Route Pattern.
-
Apply this CSS to phones or device profiles of migrated CUCM users, so their PSTN calls routes to Webex through the Local Gateway.
-


