- Hjem
- /
- Artikel


Konfigurer dine indstillinger for telefonsvareren
 I denne artikel
 Har du feedback?
Du kan administrere dine telefonsvarerindstillinger, f.eks. hilsner, transskription, lagring og notifikationer, fra brugerhub.
Før du begynder
- Din administrator skal have aktiveret indstillingerne for telefonsvarer, for at du kan få adgang til og konfigurere dem. Hvis du ikke finder nogen indstillinger for telefonsvarer, skal du kontakte din administrator.
- Opkaldsmulighed i brugerhub
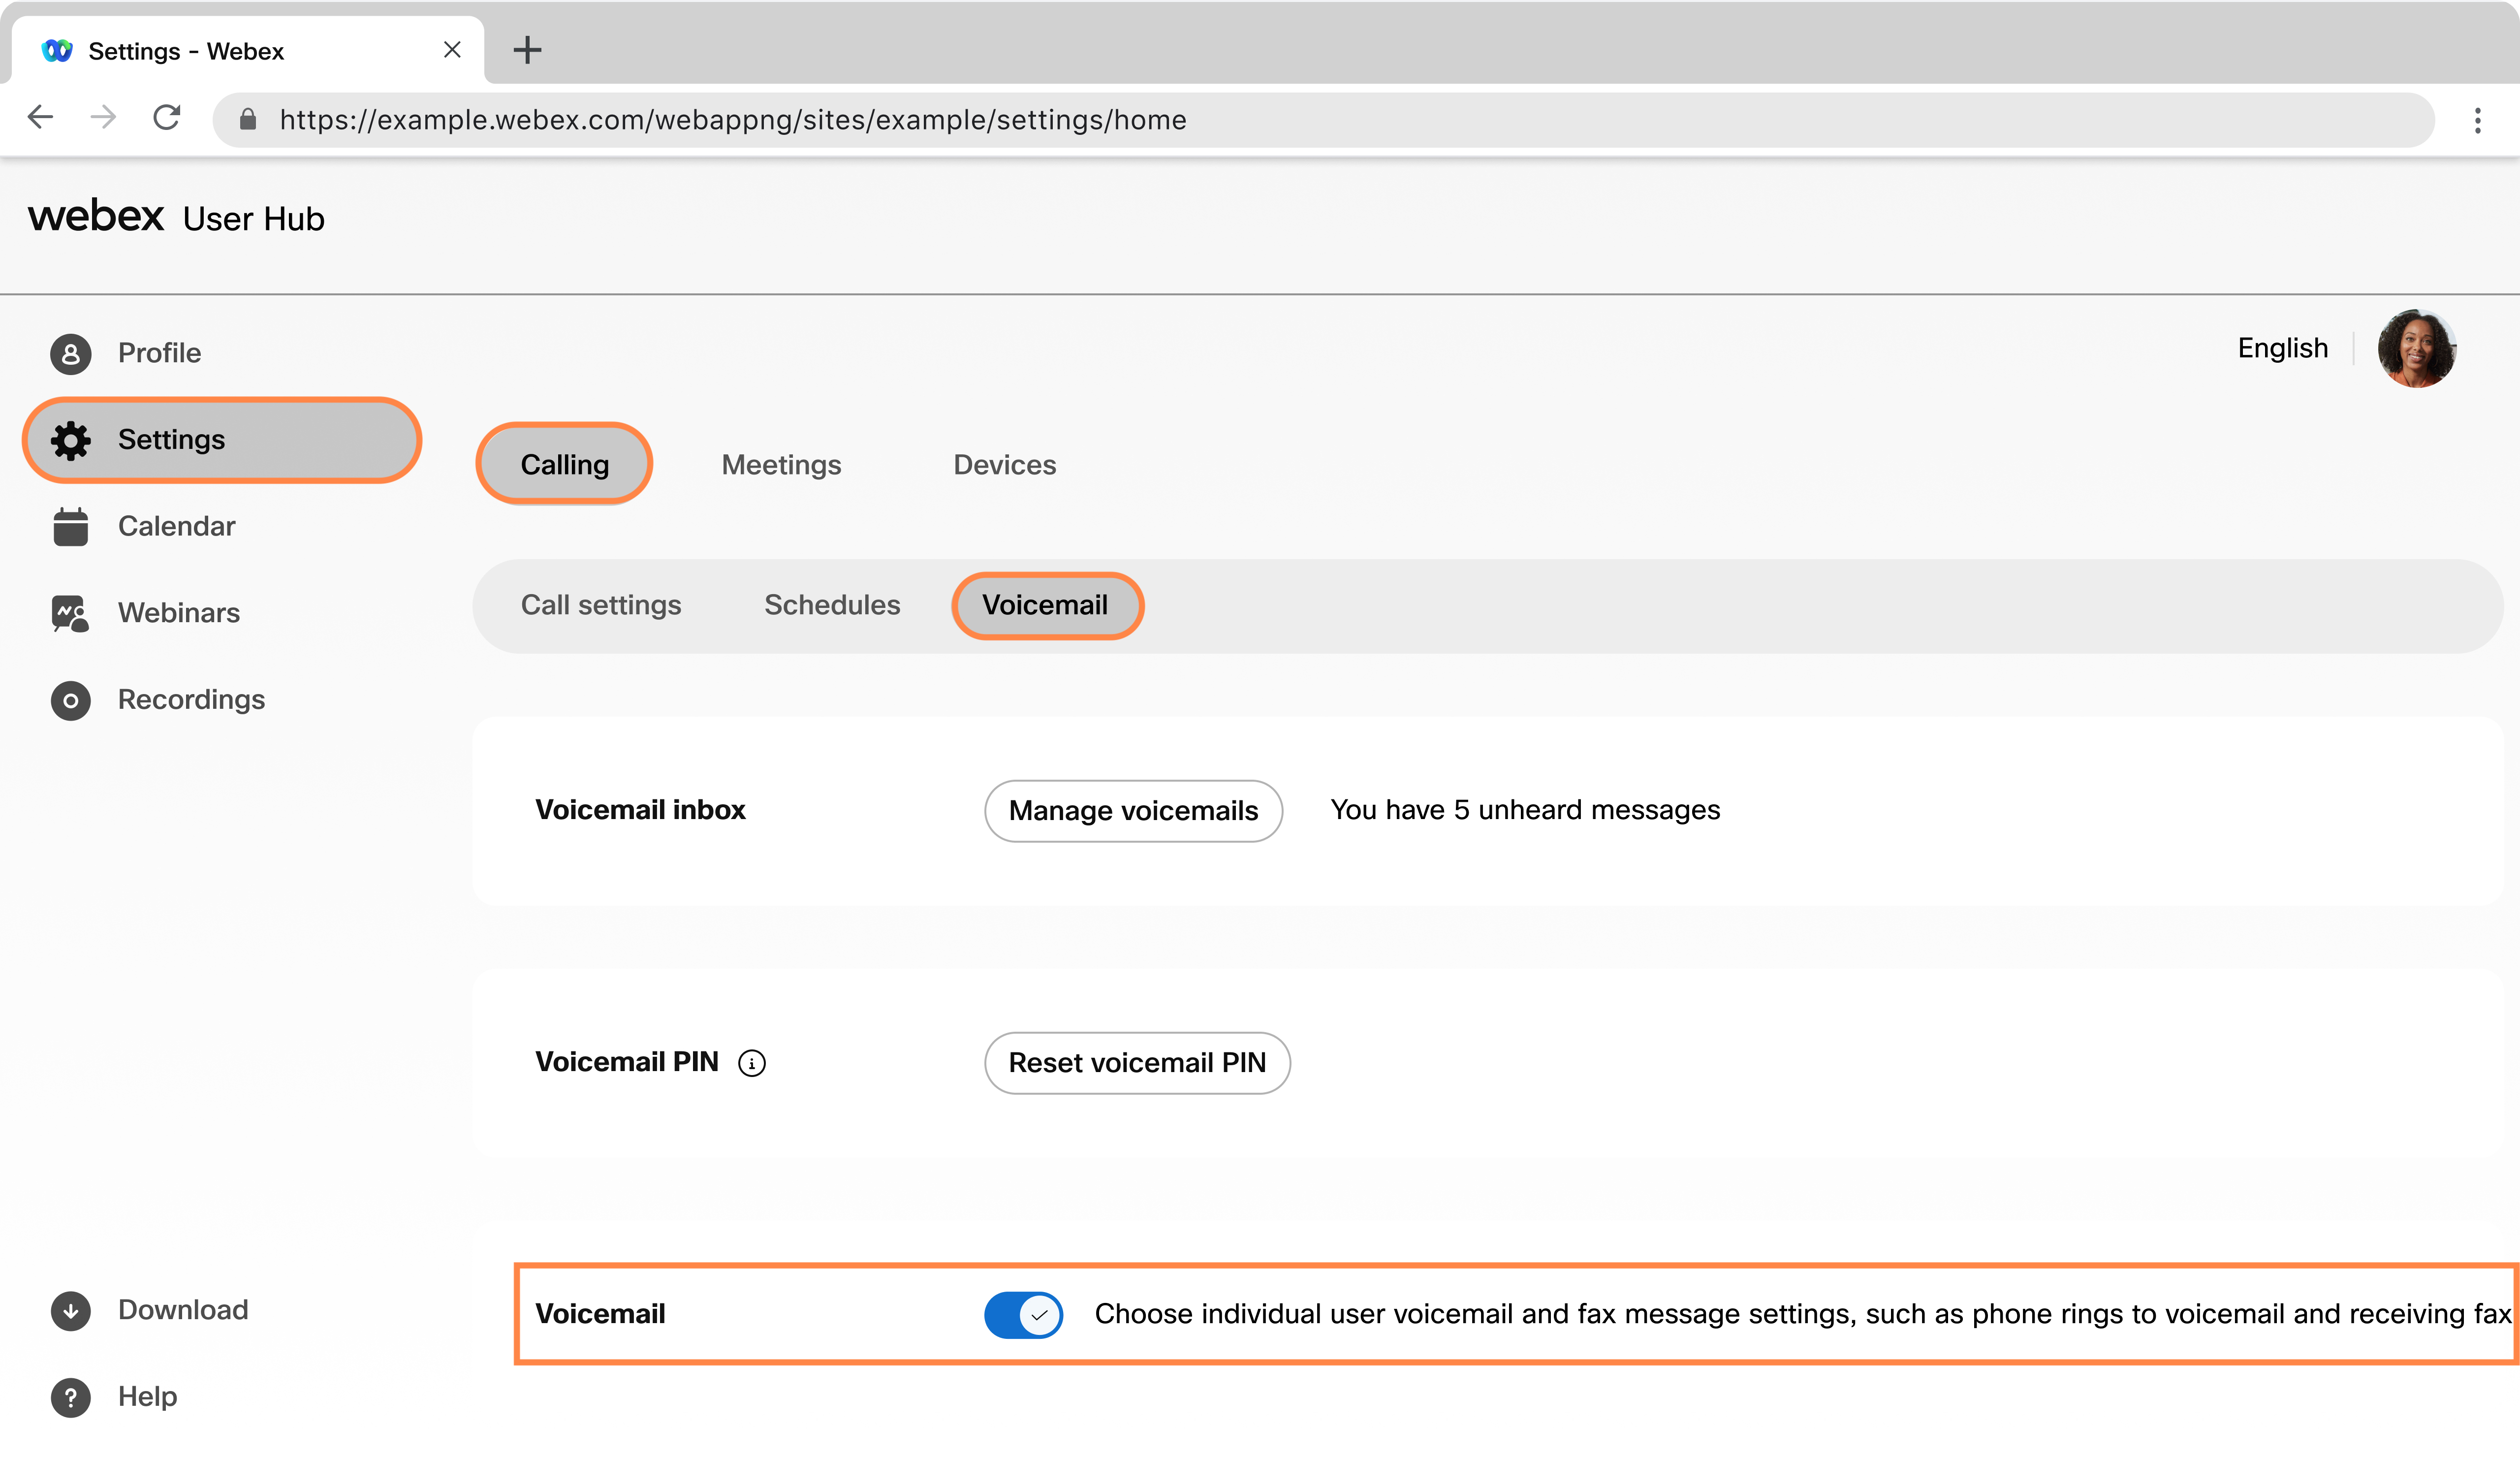
Du kan konfigurere alle voicemail-indstillinger fra brugerhubben ved at navigere til .
Indstillingen Opkald er kun tilgængelig for brugere med en Webex Calling-licens. Hvis du ikke ser indstillingen Opkald, betyder det, at du ikke har en Webex Calling-licens.
Hvis du vil finde ud af, hvilken opkaldstjeneste du er konfigureret med, kan du tjekke det i Webex-appen. For yderligere oplysninger, se Find ud af, hvilken opkaldstjeneste du har.
- Videresendelse af indtalt besked
Når din administrator har aktiveret denne indstilling, kan du videresende talebeskeder til en anden brugers nummer eller lokalnummer. Når den er deaktiveret, kan du ikke videresende talebeskeder, bruge en ekstern postkasse eller sende en kopi af talebeskeden til en bestemt e-mailadresse.
- Sletning af indtalt besked
Din administrator kan indstille udløbsperioden for talebeskeder (1-180 dage) og betingelserne for sletning af udløbne beskeder.
Når din administrator har konfigureret indstillingerne, arkiveres talebeskeder, der er over 180 dage gamle, automatisk. Hvis du har brug for adgang til arkiverede talebeskeder, skal du kontakte din administrator.
Hvis administratoren ikke har konfigureret indstillingerne, skal du slette beskederne manuelt.
- Voicemail-adgangskode eller pinkode
Din administrator kan indstille det mindste antal dage (1-7) mellem ændringer af adgangskoden og udløbsperioden for adgangskoden (15-180 dage). Hvis administratoren ikke har konfigureret indstillingerne, udløber din adgangskode aldrig.
Du kan nulstille din voicemail-adgangskode fra brugerhubben. Se Indstil eller nulstil din voicemail-pinkode for at få flere oplysninger. For at lytte til dine talebeskeder fra Brugerhub, se Lyt til dine talebeskeder.
Hvis du oplever problemer med at konfigurere indstillingerne, skal du kontakte din administrator. Din administrator kan også konfigurere alle telefonsvarerindstillingerne på dine vegne.
Relaterede artikler
Aktivér telefonsvarerbesked
For at modtage telefonsvarerbeskeder og faxbeskeder og konfigurere forskellige telefonsvarerindstillinger, f.eks. at sende opkald til telefonsvarer, aktivere notifikationer og indstille lagring af beskeder, skal du først aktivere telefonsvarerknappen.
| 1 |
Log ind på Brugerhub, og klik derefter på . |
| 2 |
Gå til sektionen Voicemail og slå til/fra-knappen til.  |
Næste trin
Send opkald til telefonsvareren med hilsner
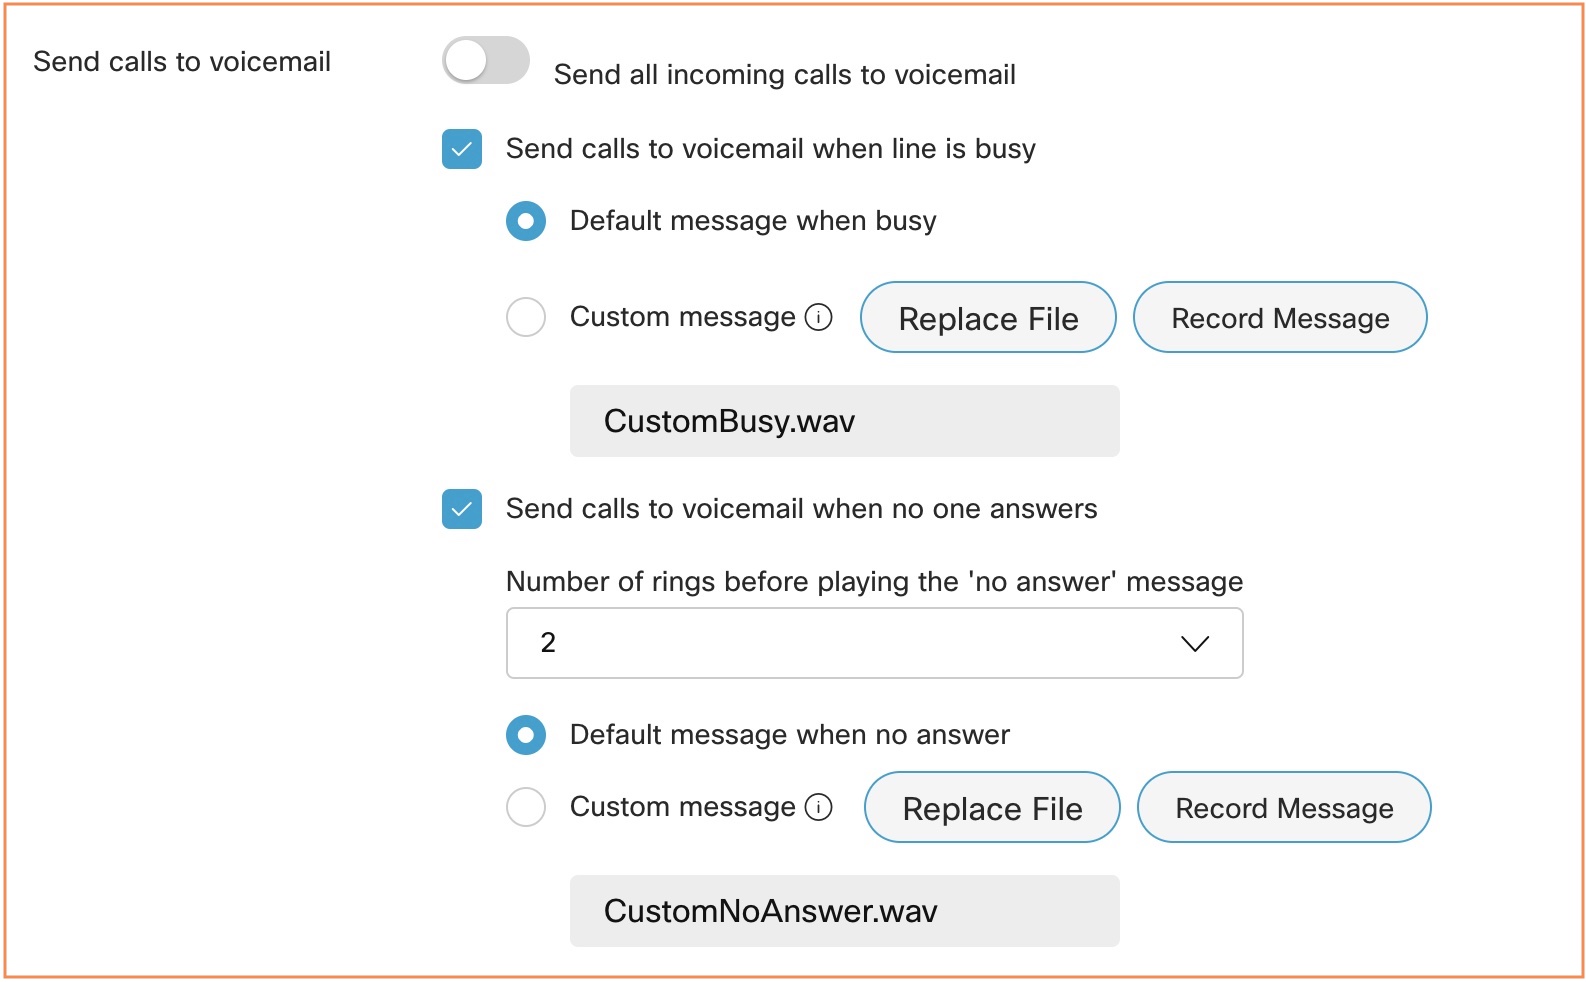
Du kan indstille, hvornår du vil sende opkaldere til din telefonsvarer. Du kan for eksempel sende alle opkald til indtalt besked, når du ved, at du ikke er på kontoret og ikke tager telefonopkald.
Du kan indstille en telefonsvarerhilsen, som er den besked, dine opkaldere hører, når de når din telefonsvarer. Der findes to typer indtalt besked-hilsner - optaget og Intet svar. Optaget-hilsenen afspilles, når du er i gang med et andet opkald og ikke har et ventende opkald, og Intet svar-hilsenen afspilles, når du ikke besvarer opkaldet.
- Indgående opkald bliver ikke viderestillet til telefonsvarer, når du har aktiveret ventende opkald.
- Hvis du har aktiveret videresendelse af opkald, tilsidesætter disse indstillinger for videresendelse af opkald de indstillinger for telefonsvarer, som du har konfigureret.
| 1 |
Log ind på Brugerhub, og klik derefter på . |
| 2 |
Gå til Send opkald til telefonsvarer og vælg mellem følgende muligheder:
Når du har uploadet filen eller optaget hilsenen, kan du ændre den ved at vælge Erstat fil eller optage en anden hilsen. Optagelse af en ny hilsen eller upload af en ny fil tilsidesætter den forrige hilsen. Lydfilen (WAV) skal være i 8 kHz, 8-bit mono, CCITT µ-law, maks. 2 MB, .wav-filformat. Den maksimale filstørrelse er 960 KB for 90 sekunders afspilning. Du kan også optage hilsnerne ved at ringe til Voice Portal *62 fra dine Cisco IP-telefoner eller Webex-appen. Hvis du vælger Send alle opkald til telefonsvarer, kan du ikke vælge de to andre muligheder. Du kan vælge at dirigere til indtalt besked med begge Send opkald til indtalt besked, når linjen er optaget, og Send opkald til voicemail, når ingen svarmuligheder er valgt sammen. |
| 3 |
Klik på Gem. |
Gem dine telefonsvarer- og faxbeskeder
Du kan vælge, hvor du vil gemme dine telefonsvarerbeskeder og faxbeskeder – i brugerhubben eller på en bestemt e-mailadresse som en .tiff-fil.
| 1 |
Log ind på Brugerhub, og klik derefter på . |
| 2 |
Gå til Beskedlagring og vælg, hvor du vil gemme dine beskeder:
|
| 3 |
Klik på Gem.  |
Næste trin
Hvis din placering har aktiveret transskription af telefonsvarerbeskeder, skal indstillingen Brug intern postkasse og Send en kopi af telefonsvarerbeskeden via e-mail være valgt for at du kan modtage transskriptioner af telefonsvarerbeskeder. For yderligere information, se afsnittet Opsæt transskription af telefonsvarerbeskeder.
Aktiver indtalt besked-underretninger
| 1 |
Log ind på Brugerhub, og klik derefter på . |
| 2 |
Gå til Notifikationer og slå Modtag telefonsvarerbeskednotifikationertil. |
| 3 |
Vælg én af følgende valgmuligheder:
 |
| 4 |
For at sende en telefonsvarerbesked til en e-mailadresse med den vedhæftede besked skal du gå til Yderligere indstillinger, slå Send en kopi af telefonsvarerbeskeden via e-mailtil og indtaste den e-mailadresse, som transskriptionerne skal sendes til. Denne valgmulighed er muligvis ikke tilgængelig, hvis indtalt besked-videresendelse er deaktiveret.  |
| 5 |
Klik på Gem. |
Hvad er næste trin?
Hvis din placering har aktiveret transskription af telefonsvarerbeskeder, skal indstillingen Brug intern postkasse og Send en kopi af telefonsvarerbeskeden via e-mail være valgt for at du kan modtage transskriptioner af telefonsvarerbeskeder. For hjælp, se afsnittet Opsæt transskription af telefonsvarerbeskeder.
Konfigurer transskription af telefonsvarerbeskeder
Før du begynder
-
De understøttede sprog er:
- Engelsk
- Tysk
- Spansk
- Fransk
-
Administratoren skal aktivere afskrift af indtalt besked for din placering.
| 1 |
Log ind på Brugerhub, og klik derefter på . |
| 2 |
Gå til Beskedlagring og vælg Brug intern postkasse.  |
| 3 |
Gå til Yderligere indstillinger og slå Send en kopi af telefonsvareren via e-mail til, og indtast den e-mailadresse, som transskriptionerne skal sendes til. Denne valgmulighed er muligvis ikke tilgængelig, hvis indtalt besked-videresendelse er deaktiveret.  |
| 4 |
Klik på Gem. |
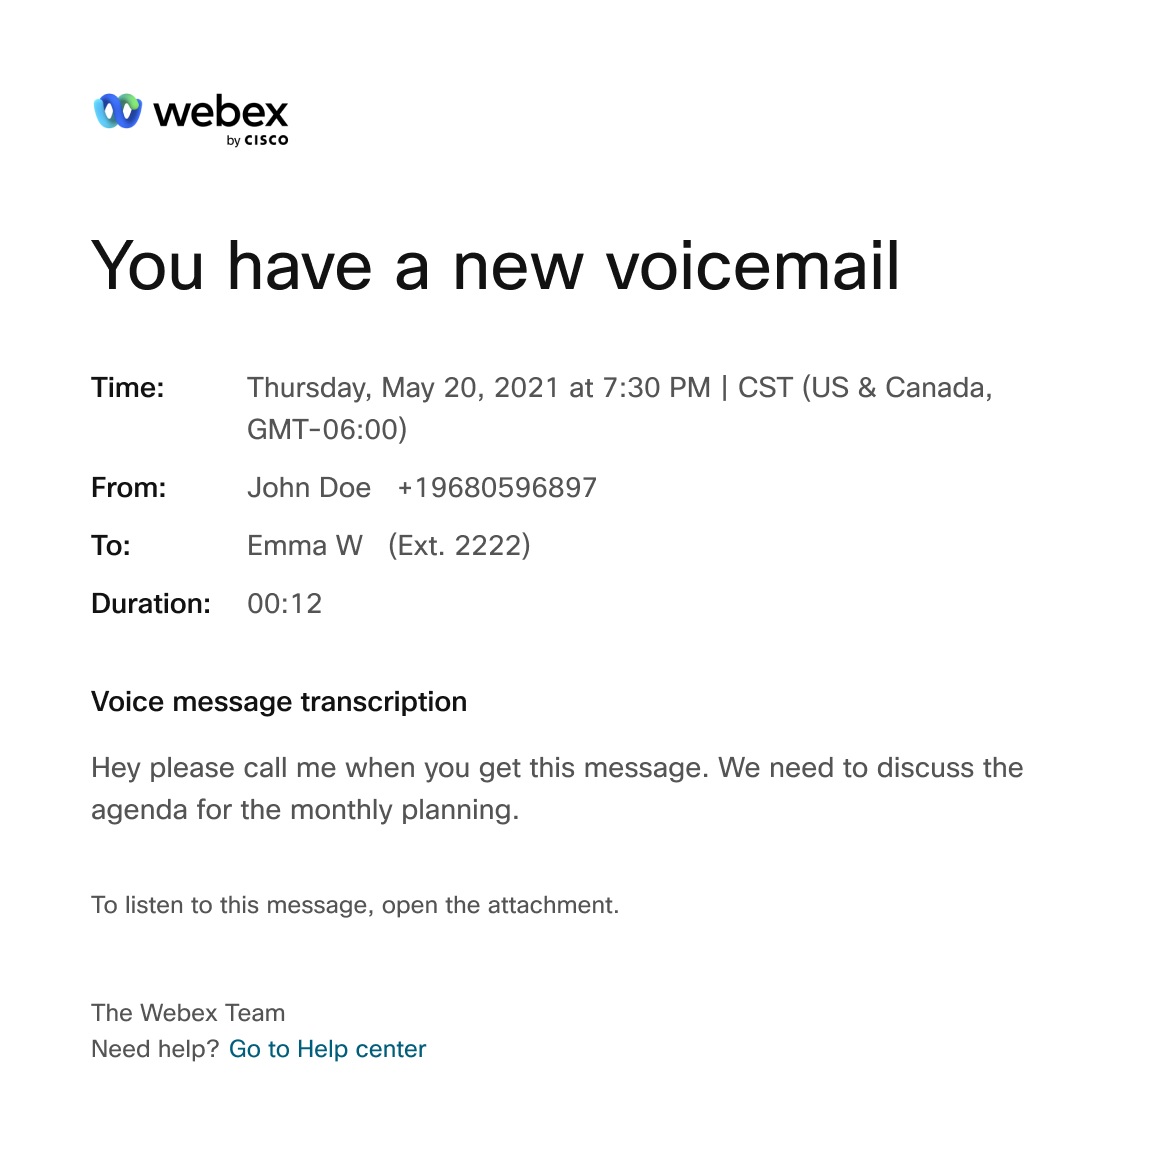
Du kan bruge følgende billede som et nyttigt eksempel på en e-mail-notifikation til transskription af telefonsvarerbeskeder.

Årsager til, at afskrift af indtalt besked ikke er tilgængelig
Systemet producerer ikke en transskription, hvis den samlede kvalitet eller nøjagtighed af transskriptionen er dårlig. Det kan ske, hvis lydkvaliteten var dårlig på grund af følgende begrænsninger:
-
Støjende baggrund
-
Dårlig overensstemmelse
-
Ikke-understøttede sprogord i lyden
Transskription af telefonsvarerbeskeder er kun tilgængelig for telefonsvarerbeskeder, der er indtalt på de understøttede sprog.
-
Stor afd.
Begrænsninger ved transskription af telefonsvarerbeskeder
-
Når du videresender eller besvarer en telefonsvarerbesked fra telefonsvareren, transskriberes telefonsvarerbeskeden ikke.
-
Når du skriver en telefonsvarerbesked og sender den til en anden bruger fra telefonsvareren, transskriberes telefonsvarerbeskeden ikke.
Tillad opkaldere at overføre fra din telefonsvarerhilsen
Du kan give personer, der ringer op, mulighed for at trykke på 0 og overføre dem til et andet telefonnummer efter eget valg, når de når deres telefonsvarerhilsen.
Hvis denne funktion er aktiveret, skal du sørge for at optage en indtalt beskedhilsen med den passende vejledning til opkalderen. Tryk f.eks. på 0 for at nå min assistent.
| 1 |
Log ind på Brugerhub, og klik derefter på . |
| 2 |
Gå til Yderligere indstillinger og slå Viderestil på '0' til et andet telefonnummertil, og indtast det telefonnummer, som opkaldere skal viderestilles til. |
| 3 |
Klik på Gem.  |
Opsæt til at modtage faxbeskeder
Faxbeskeder giver dig mulighed for at modtage direkte indgående faxer fra telefonsvareren.
Faxer gemmes i et delt lagerområde sammen med talebeskeder. Lagerkapacitet er 100 minutters indtalt besked eller 1000 siders faxmeddelelser. Sørg for at afsætte plads til nye faxbeskeder og arkiver dem med omhu.
For yderligere oplysninger om faxbeskedfunktionen, se Konfigurer faxbeskedfunktionen for Webex Calling-brugere.
Før du begynder
Funktionen Faxbeskeder vises kun, hvis din administrator har aktiveret funktionen for dig.
| 1 |
Log ind på Brugerhub, og klik derefter på . |
| 2 |
Gå til Faxbeskeder og slå til/fra-knappen til. Hvis Faxbeskeder er aktiveret af administratoren, er knappen som standard slået til. Dit faxnummer og lokalnummer vises. |
| 3 |
Klik på Gem. |


