- Start
- /
- Artikel

Tack för din feedback.

 I den här artikeln
 Har du feedback?
Du kan hantera dina röstbrevlådans inställningar, till exempel hälsningar, transkription, lagring och aviseringar från användarhubben.
Innan du börjar
- Din administratör måste ha aktiverat röstbrevlådans inställningar för att du ska kunna komma åt och konfigurera dem. Om du inte hittar några inställningar för röstbrevlådan, kontakta din administratör.
- Samtalsalternativ i användarhubben
Du kan konfigurera alla röstbrevlådans inställningar från användarhubben genom att navigera till .
Alternativet Samtal är endast tillgängligt för användare med en Webex Calling-licens. Om du inte ser alternativet Samtal betyder det att du inte har en Webex Calling-licens.
Om du vill ta reda på vilken samtalstjänst du är konfigurerad med kan du kontrollera det i Webex-appen. För mer information, se Ta reda på vilken samtalstjänst du har.
- Vidare vidarebefordran av röstbrevlåda
När din administratör har aktiverat den här inställningen kan du vidarebefordra röstmeddelanden till en annan användares nummer eller anknytning. När det är inaktiverat kan du inte vidarebefordra röstmeddelanden, använda en extern brevlåda eller skicka en kopia av röstmeddelandet till en angiven e-postadress.
- Ta bort röstbrevlåda
Din administratör kan ställa in utgångstiden för röstmeddelanden (1–180 dagar) och villkoren för radering av utgångna meddelanden.
När administratören har konfigurerat inställningarna arkiveras röstmeddelanden som är äldre än 180 dagar automatiskt. Om du behöver åtkomst till arkiverade röstmeddelanden kontaktar du din administratör.
Om administratören inte har konfigurerat inställningarna måste du ta bort meddelandena manuellt.
- Röstbrevlådans lösenord eller PIN-kod
Administratören kan ställa in det minsta antalet dagar (1–7) mellan lösenkodsändringarna och lösenkodens utgångsperiod (15–180 dagar). Om administratören inte har konfigurerat inställningarna upphör ditt lösenord aldrig att gälla.
Du kan återställa ditt röstbrevlådans lösenord från användarhubben, se Ställ in eller återställ din röstbrevlådans PIN-kod för mer information. För att lyssna på dina röstmeddelanden från användarhubben, se Lyssna på dina röstmeddelanden.
Om du stöter på några problem med att konfigurera inställningarna, kontakta din administratör. Din administratör kan också konfigurera alla röstbrevlådans inställningar åt dig.
Relaterade artiklar
Aktivera röstbrevlåda
För att ta emot röstmeddelanden och faxmeddelanden och konfigurera olika röstbrevlådans inställningar, som att skicka samtal till röstbrevlådan, aktivera aviseringar och ställa in meddelandelagring, måste du först aktivera röstbrevlådans växling.
| 1 |
Logga in på Användarhubboch klicka sedan på . |
| 2 |
Gå till avsnittet Röstbrevlåda och aktivera reglaget. 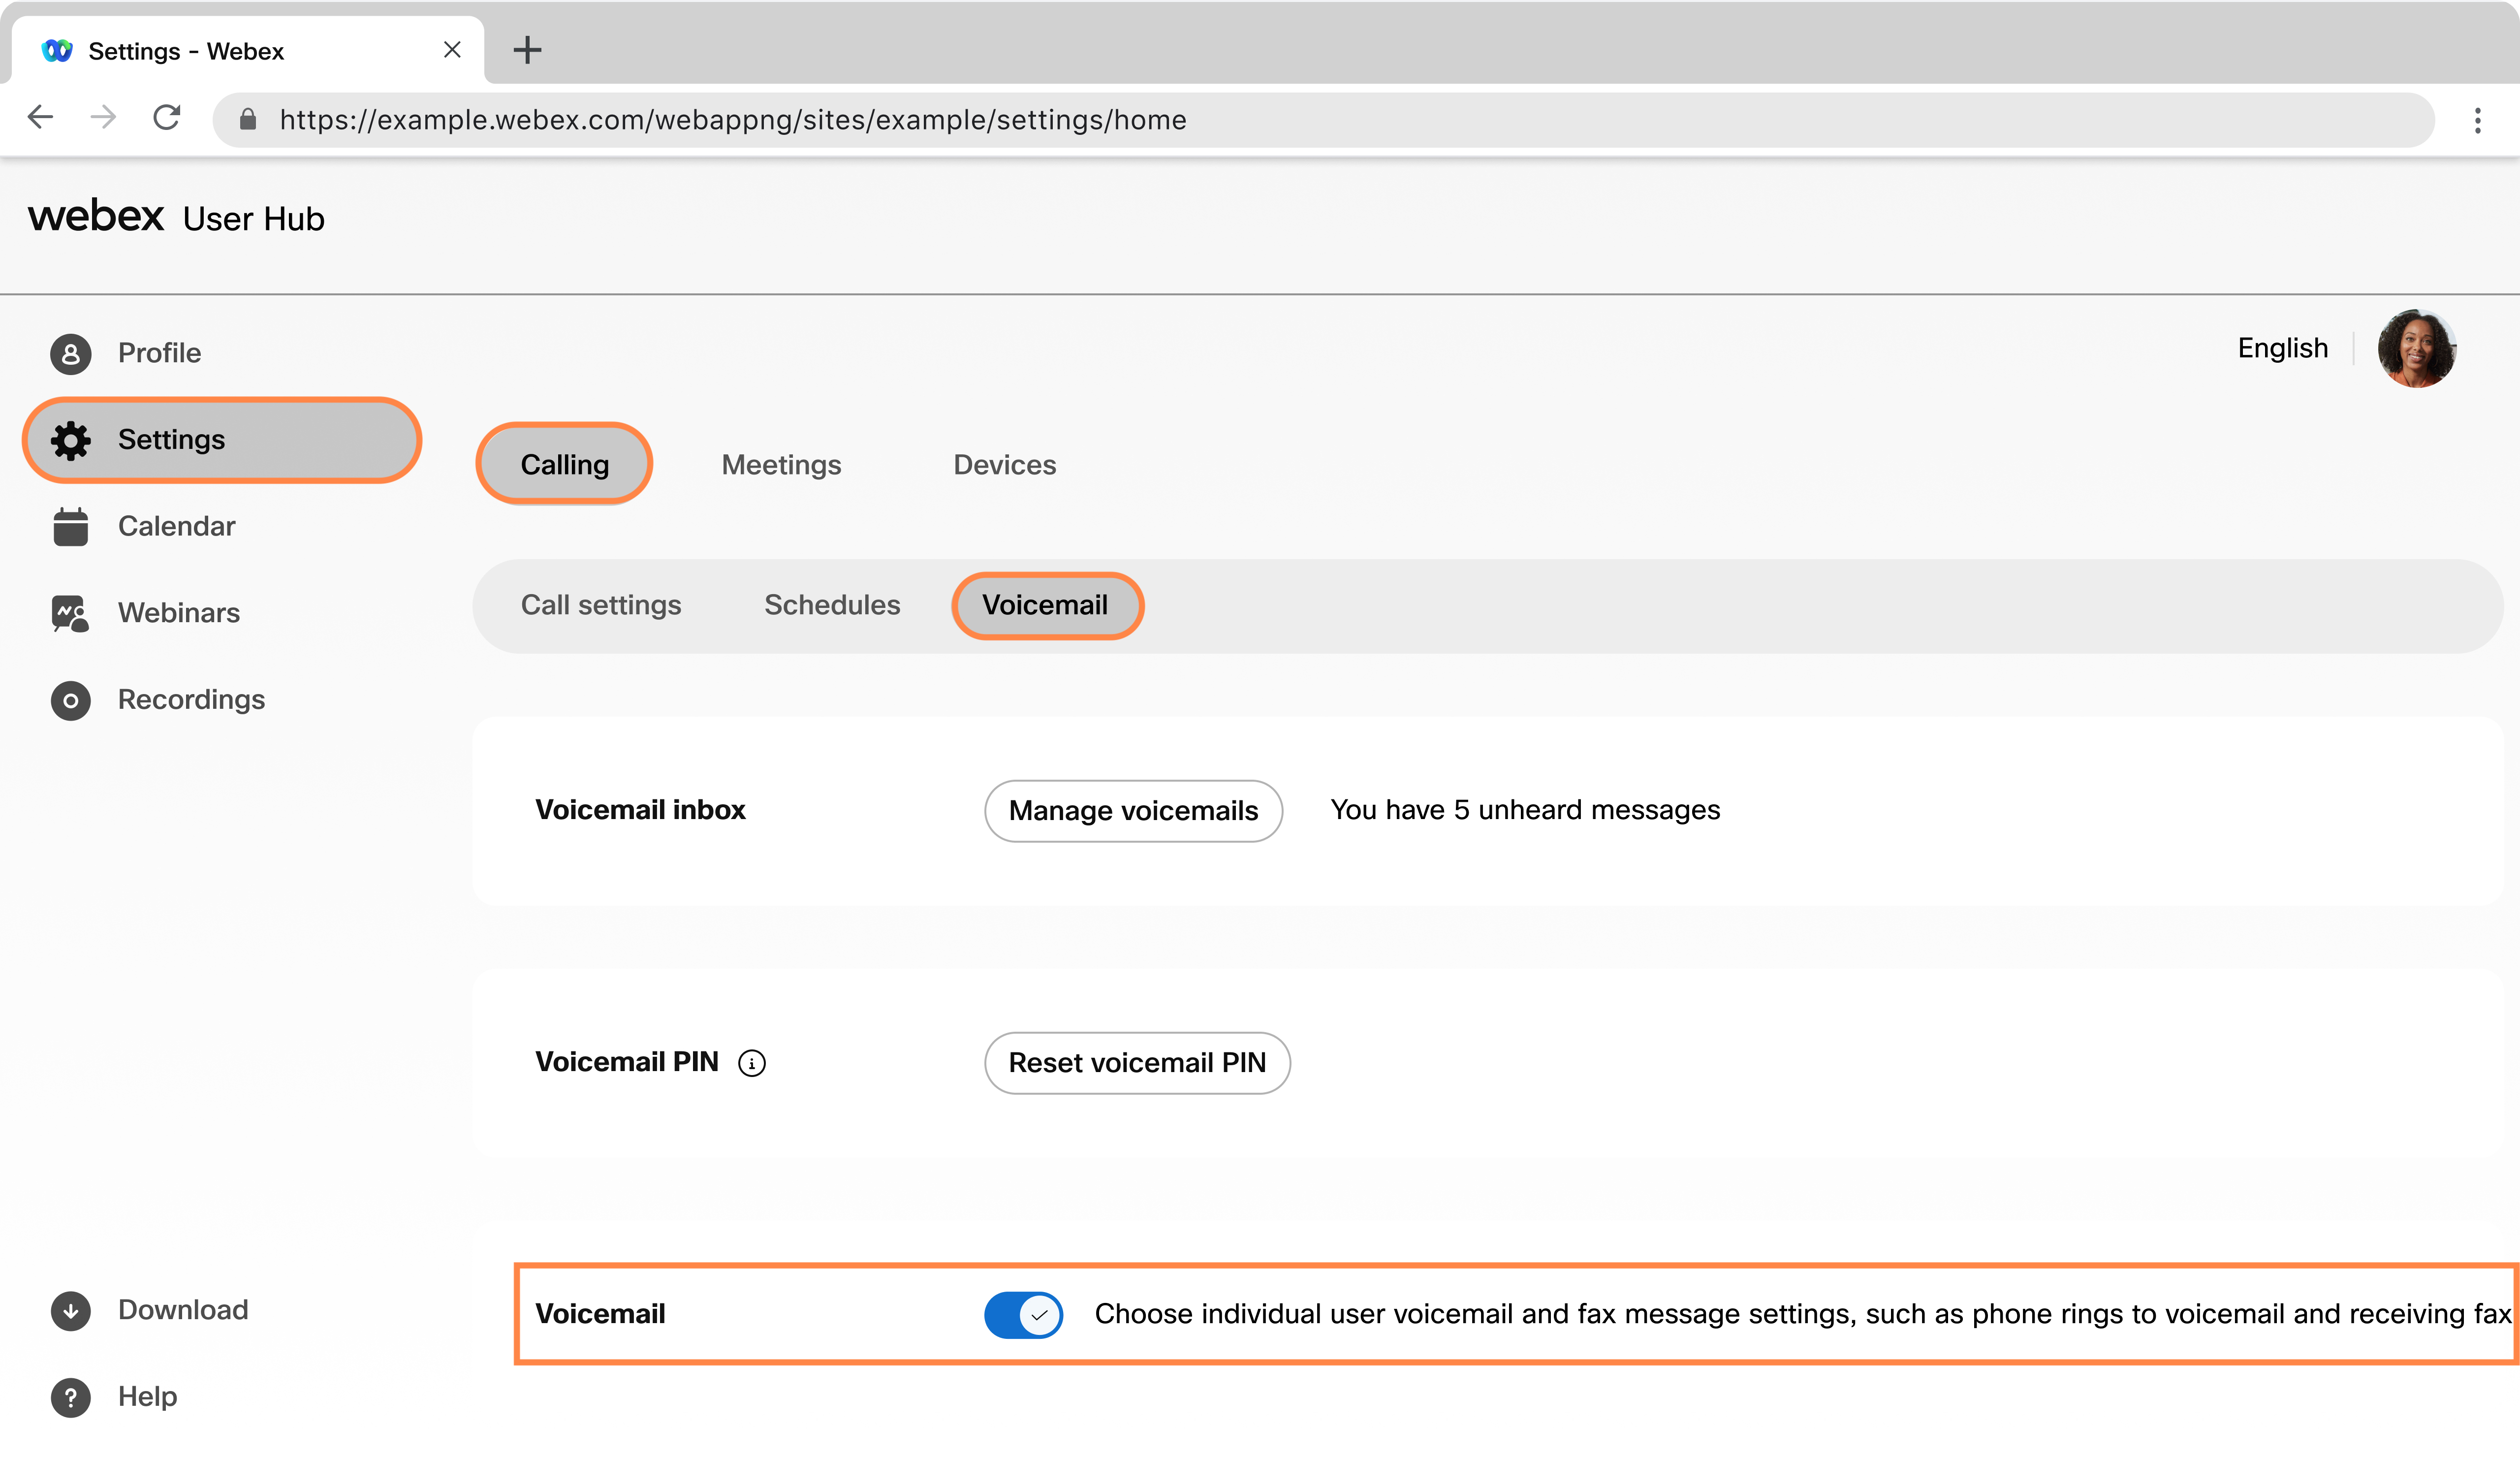 |
Nästa steg
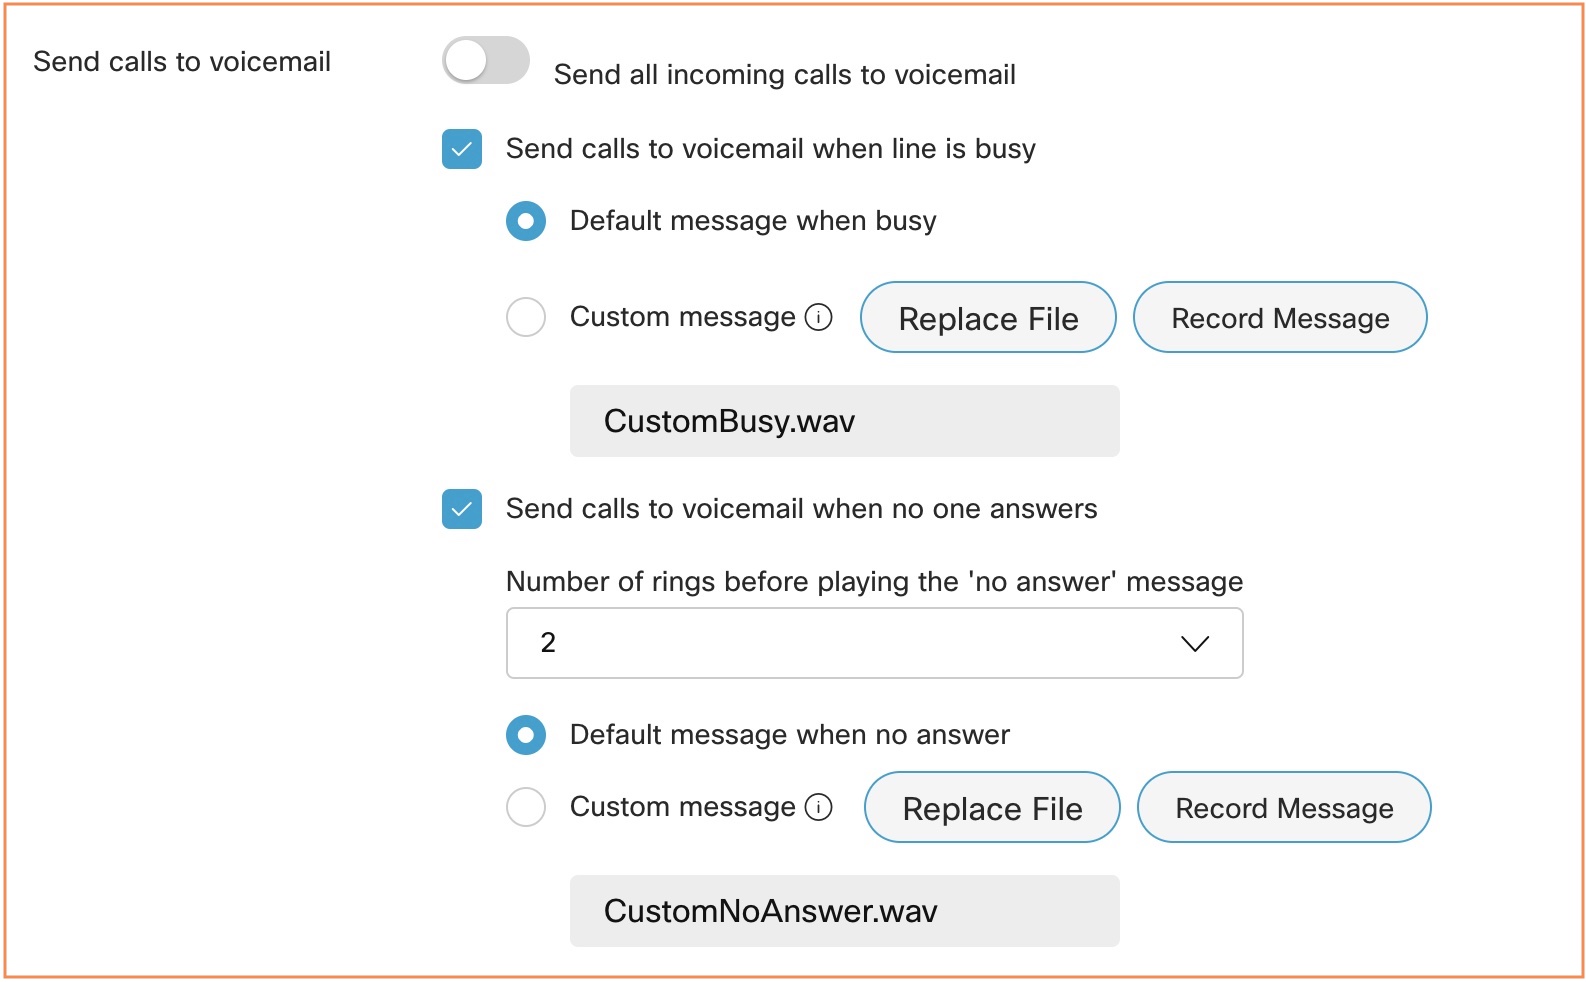
Skicka samtal till röstbrevlådan med hälsningar
Du kan ställa in när du vill skicka uppringare till din röstbrevlåda. Du vill kanske till exempel skicka alla samtal till röstbrevlådan när du vet att du kommer att vara borta från kontoret och inte ta några telefonsamtal.
Du kan ställa in en röstbrevlådashälsning, det är det meddelande som dina uppringare hör när de når din röstbrevlåda. Det finns två typer av hälsningsfraser till röstbrevlådan – upptaget och inget svar. Upptaget-hälsningsfrasen spelas upp när du är i ett annat samtal och inget samtal väntar, och Inget svar-hälsningsfrasen spelas upp när du inte svarar.
- Inkommande samtal dirigeras inte till röstbrevlådan när du har aktiverat samtal väntar.
- Om du har aktiverat samtalskoppling kommer dessa inställningar för samtalskoppling att åsidosätta de röstbrevlådeinställningar som du har konfigurerat.
| 1 |
Logga in på Användarhubboch klicka sedan på . |
| 2 |
Gå till Skicka samtal till röstbrevlåda och välj bland följande alternativ:
När du har laddat upp filen eller spelat in hälsningen kan du ändra den genom att välja Ersätt fil eller spela in en annan hälsning. Att spela in en ny hälsning eller ladda upp en ny fil åsidosätter den föregående hälsningen. Ljudfilen (WAV) måste vara i 8 kHz, 8-bitars mono, CCITT µ-lag, max 2 MB, .wav-filformat. Den maximala filstorleken är 960 KB för 90 sekunders uppspelning. Du kan också spela in hälsningsfrasarna genom att ringa Röstportalen *62 från dina Cisco IP-telefoner eller Webex-appen. Om du väljer Skicka alla samtal till röstbrevlådakan du inte välja de andra två alternativen. Du kan välja att direkt till röstbrevlådan med båda Skicka samtal till röstbrevlådan när linjen är upptagen och Skicka samtal till röstbrevlåda när inga svarsalternativ har valts tillsammans. |
| 3 |
Klicka på Spara. |
Lagra dina röstmeddelanden och faxmeddelanden
Du kan välja var du vill lagra dina röstmeddelanden och faxmeddelanden – i användarhubben eller till en angiven e-postadress som en .tiff-fil.
| 1 |
Logga in på Användarhubboch klicka sedan på . |
| 2 |
Gå till Meddelandelagring och välj var du vill lagra dina meddelanden:
|
| 3 |
Klicka på Spara. 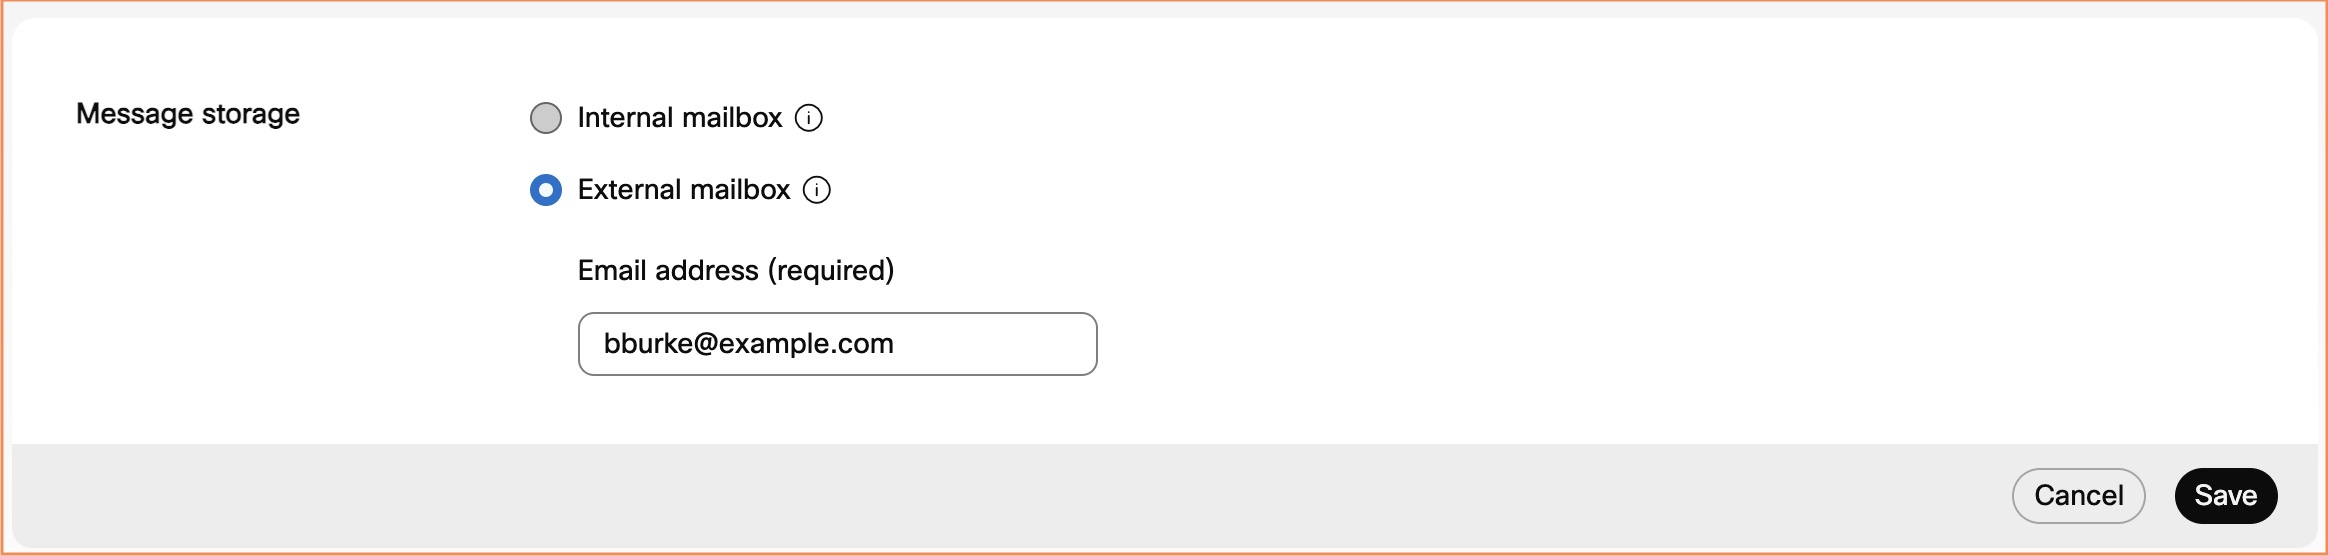 |
Nästa steg
Om din plats har röstbrevlådans transkription aktiverad måste alternativen Använd intern brevlåda och Skicka en kopia av röstmeddelandet via e-post vara markerade för att du ska kunna ta emot röstbrevlådans transkriptioner. För mer information, se avsnittet Konfigurera transkription av röstmeddelanden.
Aktivera aviseringar via röstbrevlåda
| 1 |
Logga in på Användarhubboch klicka sedan på . |
| 2 |
Gå till Aviseringar och aktivera Ta emot röstmeddelandeaviseringar. |
| 3 |
Välj ett eller båda av följande alternativ:
Webex Calling stöder endast SMS-aviseringar för telefonnummer i USA och Kanada. Webex för myndigheter stöder endast e-postmeddelanden. När du väljer SMSska du granska villkoren för SMS och sekretessinformationen som visas i användarhubben innan du sparar. 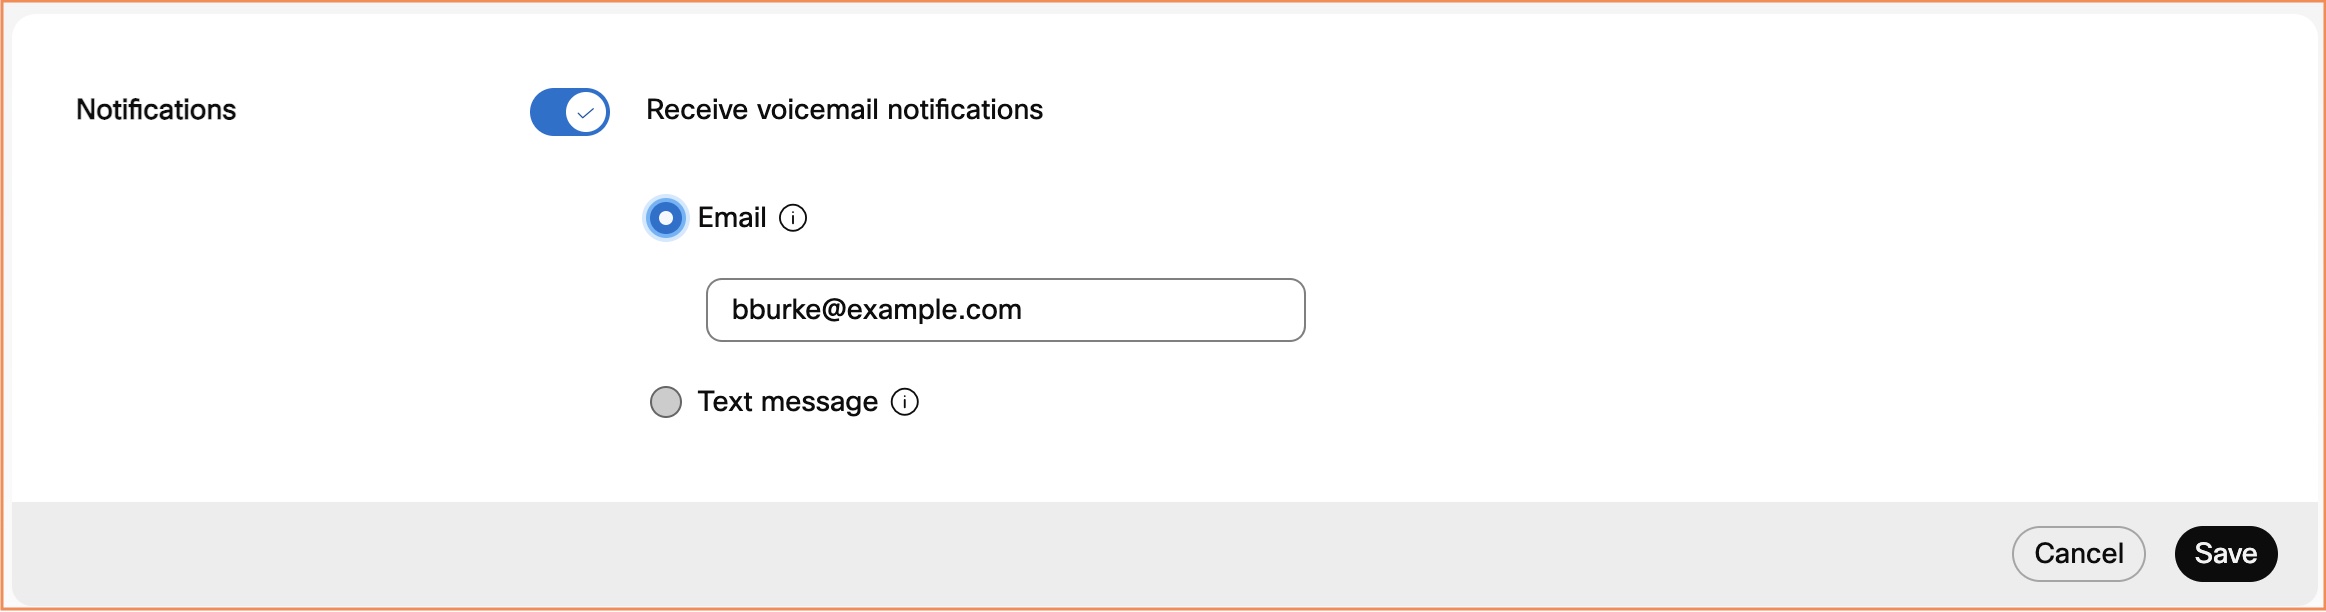 |
| 4 |
För att skicka ett röstmeddelande till en e-postadress med meddelandet bifogat, gå till Ytterligare inställningar, aktivera Skicka en kopia av röstmeddelandet via e-postoch ange e-postadressen att skicka transkriptionerna till. Det här alternativet är eventuellt inte tillgängligt om röstbrevlådan är inaktiverad. 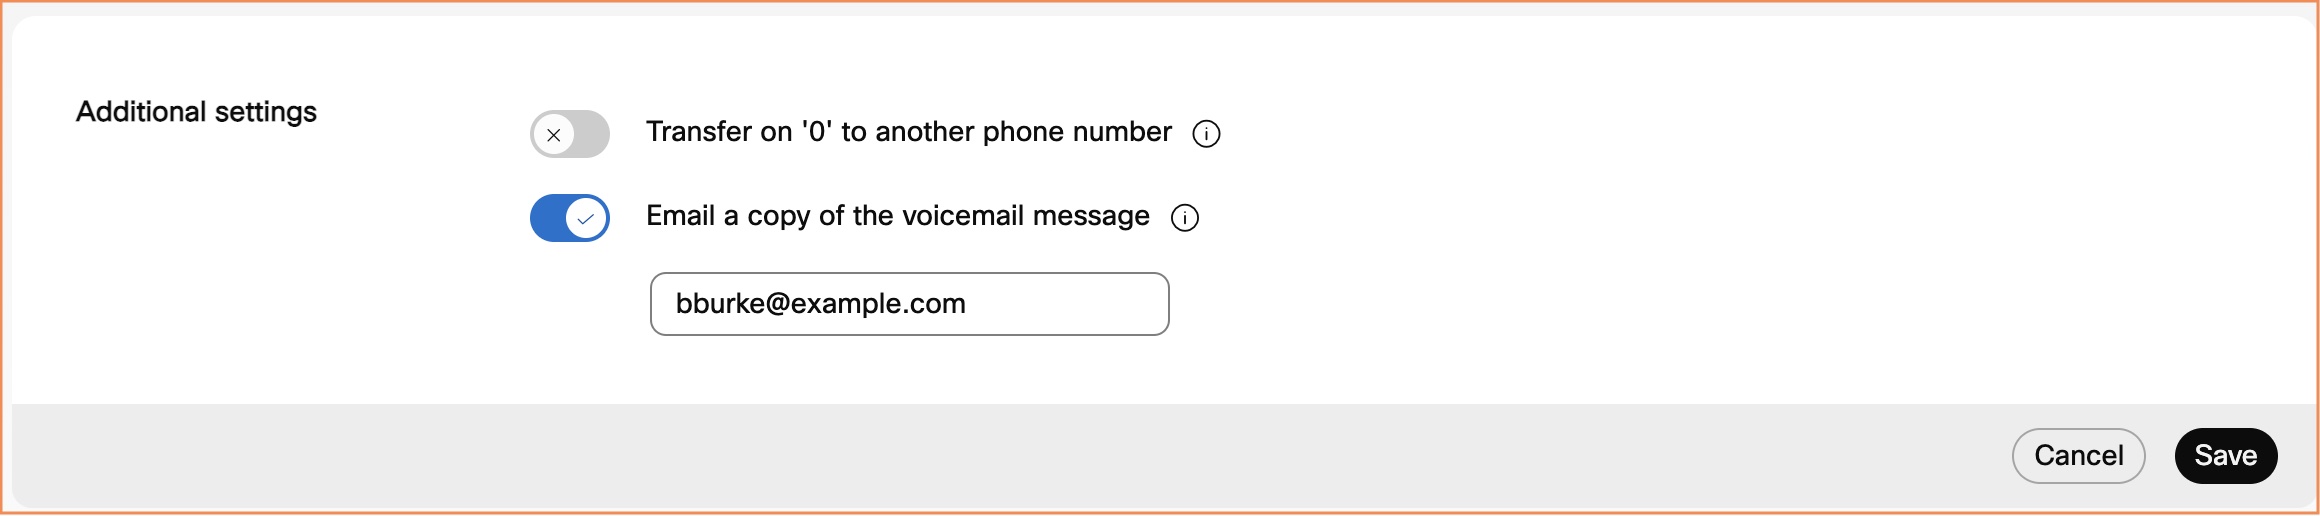 |
| 5 |
Klicka på Spara. |
Nästa steg
Om din plats har röstbrevlådans transkription aktiverad måste alternativen Använd intern brevlåda och Skicka en kopia av röstmeddelandet via e-post vara markerade för att du ska kunna ta emot röstbrevlådans transkriptioner. För hjälp, se avsnittet Konfigurera transkription av röstmeddelanden.
Konfigurera transkription av röstmeddelanden
Innan du börjar
-
De språk som stöds är:
- Engelska
- Franska
- Tyska
- Italienska
- Japanska
- Spanska
-
Administratören måste aktivera transkribering av röstbrevlåda för din plats.
| 1 |
Logga in på Användarhubboch klicka sedan på . |
| 2 |
Gå till Meddelandelagring och välj Använd intern brevlåda. 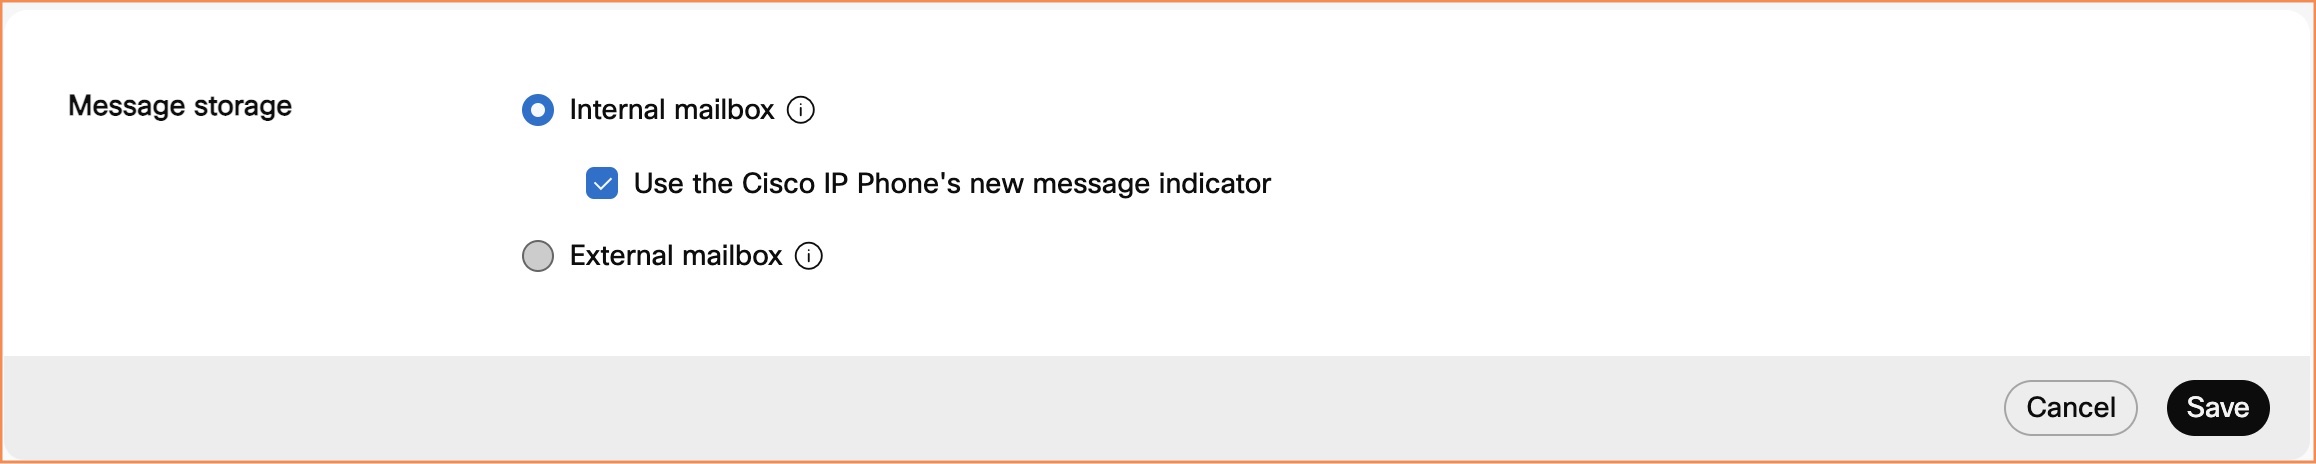 |
| 3 |
Gå till Ytterligare inställningar och aktivera Skicka en kopia av röstmeddelandet via e-postoch ange e-postadressen att skicka transkriptionerna till. Det här alternativet är eventuellt inte tillgängligt om röstbrevlådan är inaktiverad. |
| 4 |
Klicka på Spara. |
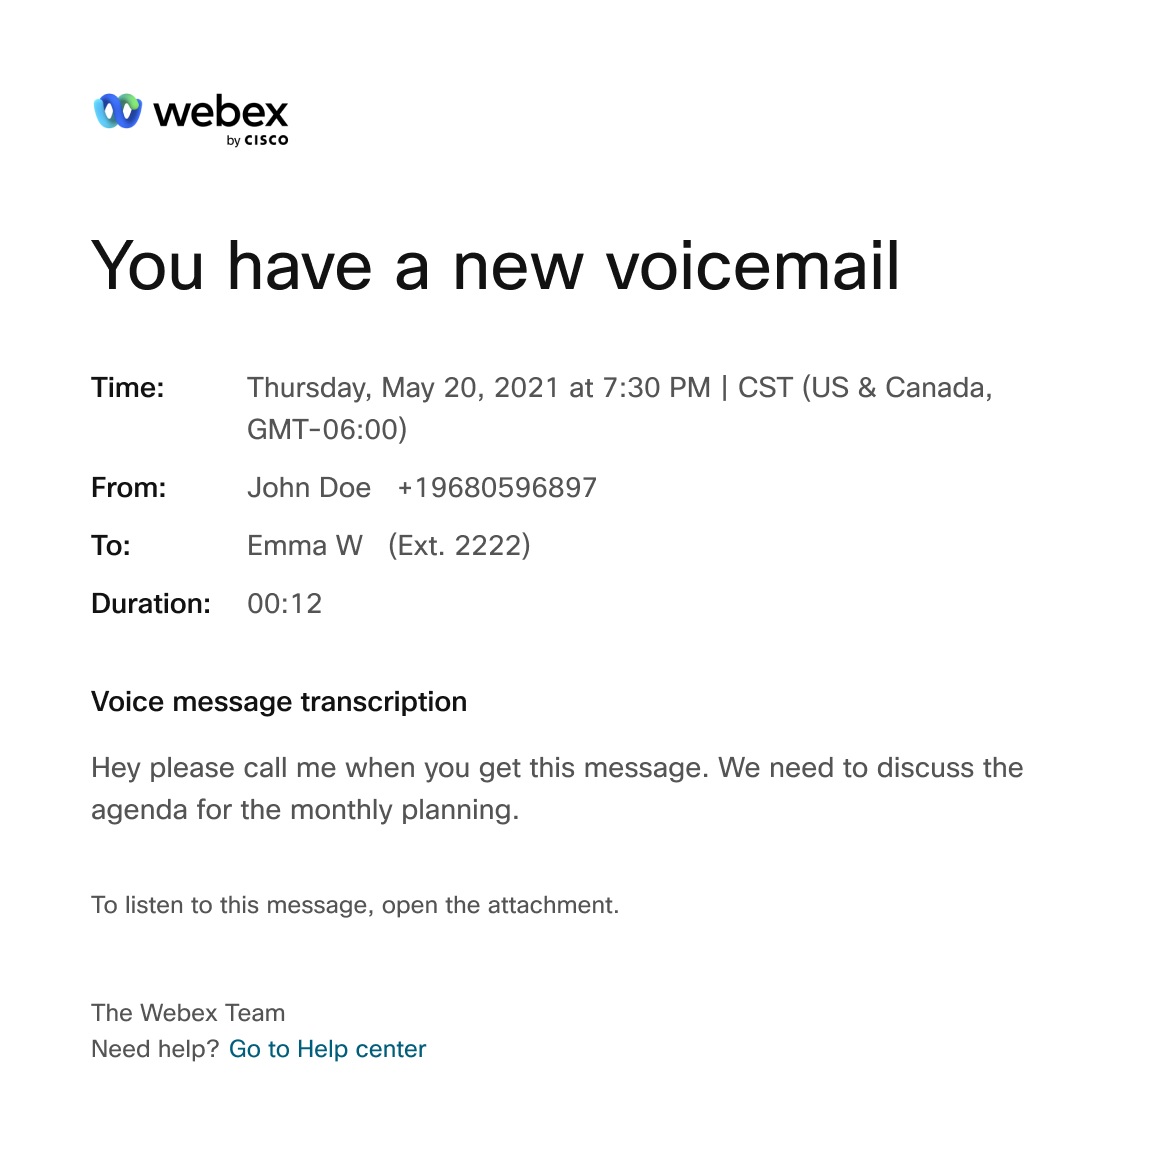
Du kan använda följande bild som en användbar illustration av ett e-postmeddelande för transkription av röstmeddelanden.
Orsaker till varför transkribering av röstbrevlåda inte är tillgänglig
Systemet producerar inte en transkription om transkriptets övergripande kvalitet eller noggrannhet är dålig. Det kan hända om ljudkvaliteten var dålig på grund av följande begränsningar:
-
Brusig bakgrund
-
Dålig audibility
-
Språkord som inte stöds finns i ljudet
Röstmeddelandetranskription är endast tillgänglig för röstmeddelanden som lämnats på de språk som stöds.
-
Tung belastning
Begränsningar med transkription av röstmeddelanden
-
När du vidarebefordrar eller svarar på ett röstmeddelande från röstportalen transkriberas inte röstmeddelandet.
-
När du skriver ett röstmeddelande och skickar det till en annan användare från röstportalen transkriberas inte röstmeddelandet.
Tillåt att uppringare överförs från din hälsningsfras till röstbrevlådan
Du kan tillåta att uppringare trycker på 0 och överförs till ett annat telefonnummer, som du själv väljer, när de når din hälsningsfras till röstbrevlådan.
Om den här funktionen är aktiverad ska du se till att spela in din hälsning till röstbrevlådan med lämplig vägledning för den som ringer. Till exempel "För att nå min assistent trycker du på 0".
| 1 |
Logga in på Användarhubboch klicka sedan på . |
| 2 |
Gå till Ytterligare inställningar och aktivera Överför på '0' till ett annat telefonnummeroch ange telefonnumret som uppringarna ska kopplas till. |
| 3 |
Klicka på Spara. 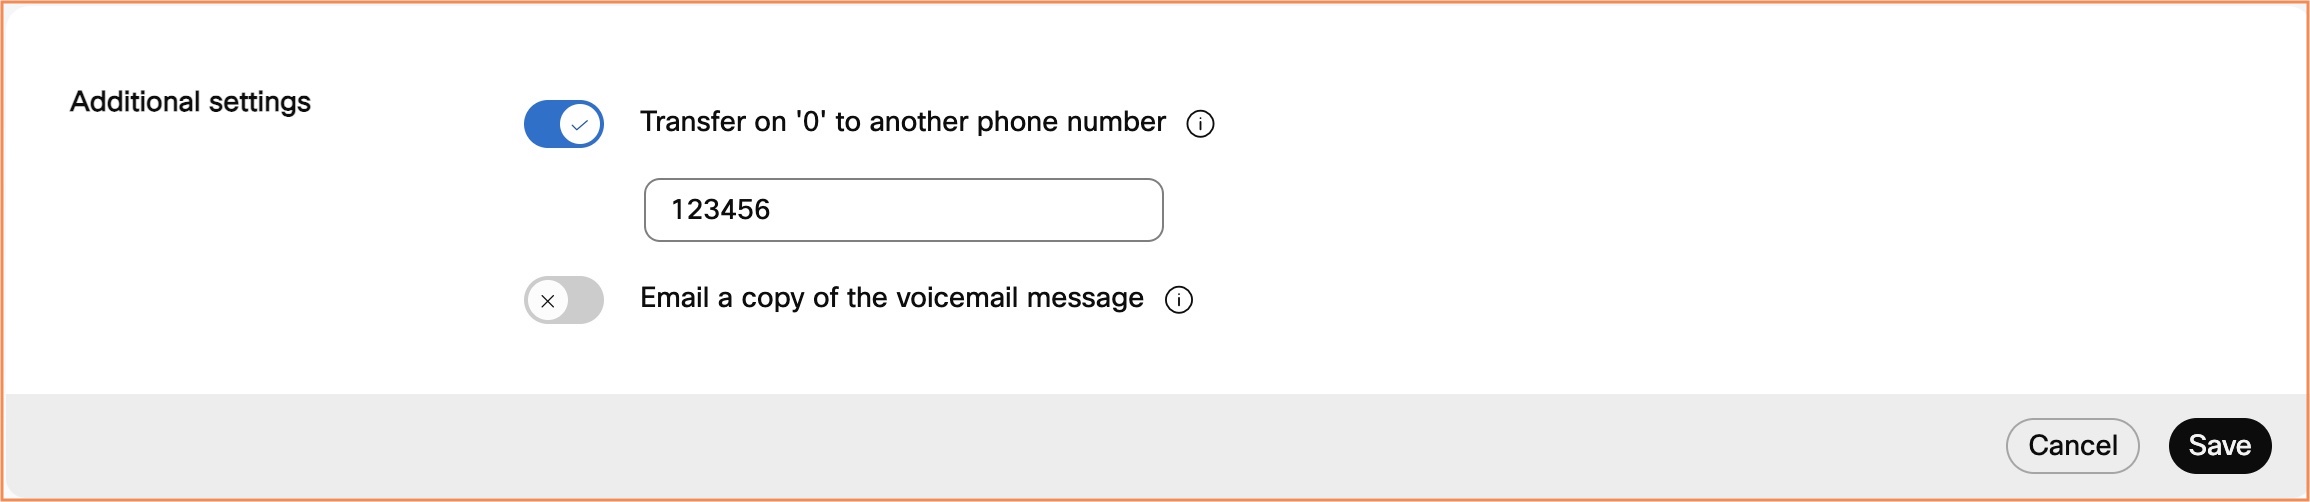 |
Ställ in för att ta emot faxmeddelanden
Faxmeddelanden låter dig ta emot direkta inkommande fax från röstbrevlådan.
Fax lagras i ett delat lagringsområde tillsammans med röstmeddelanden. Lagringskapaciteten är 100 minuters röstbrevlåda eller 1 000 sidor med faxmeddelanden. Se till att avsätta utrymme för nya faxmeddelanden och arkivera dem klokt.
För mer information om faxmeddelandefunktionen, se Konfigurera faxmeddelandefunktionen för Webex Calling-användare.
Innan du börjar
Alternativet Faxmeddelanden visas bara om administratören har aktiverat funktionen åt dig.
| 1 |
Logga in på Användarhubboch klicka sedan på . |
| 2 |
Gå till Faxmeddelanden och aktivera reglaget. Om Faxmeddelanden är aktiverat av administratören är reglaget på som standard. Ditt faxnummer och din anknytning visas. |
| 3 |
Klicka på Spara. |


