- Home
- /
- Article

Thanks for your feedback.

 In this article
 Feedback?
This article gives an overview of how Webex Contact Center handles and directs incoming interactions to agents. It covers different types of queues, like skill-based and non-skill-based, and routing methods such as Longest Available, Circular, and Best Available. It also explains flow activities that help admins manage interactions, assign agents, control call flow, and get real-time queue updates to improve operations and customer experience.
Overview
In Webex Contact Center, a queue serves as a holding area for incoming interactions like telephony, chat, email, or social channels. Contacts are parked in queues until they are automatically distributed to agents or agents manually pick them up for handling. Additionally, they support features such as skill-based routing, priority management, and fair workload distribution.
Supervisors can use queues to observe different lines of work and improve how tasks are handled in the contact center.
Some of the key benefits of using queues effectively are:
- Better customer experience: Manage wait times and let customers know they’re in line to be helped.
- Increased efficiency: Ensure that calls are handled in an orderly manner, reducing chaos and mismanagement.
- Fair Distribution of contacts: Distribute calls evenly among agents to prevent overburdening any single agent.
- Priority Handling: Allow prioritization of certain calls, such as VIP customers or urgent issues.
Types of Queues
Webex Contact Center supports several types of queues that enable a wide variety of use-cases for contact-centers of all sizes and complexities, across all media types with uniform capabilities.
There are queues that consider agent skills in routing contacts, and queues that don't. These queues also differ in terms of how agents are associated with them to work on contacts.
There are two broad categories of queues:
- Non-skill-based queues
- Skill-based queues
Non-skill-based queues
Non-skill-based queues don't consider skills associated with agents. You can configure non-skill-based queues with the following options:
- Team assignments
- Agent assignments
Non-skill-based queues with team assignments
In non-skill-based queues with team assignment, you can organize agents into teams and combine these teams to form Call Distribution Groups (CDG). You can set a time delay between each group to manage call flow.
Call Distribution Groups help define multiple levels of agents who become eligible for working on contacts in this queue over configured intervals of time. Contacts are assigned to agents based on their team's level. If no agents are available, contacts are parked for a preconfigured duration before expanding to include the next group of teams. This process continues until an agent is available or all groups have been checked.
You can set up these types of teams:
- Individual teams: Agents can be organized into teams which could represent a specific org function, which can then become part of queues so that contacts can be routed to agents in these teams. You can tag an agent to multiple teams to handle contacts from various queues for efficient routing.
- Capacity-based teams: Capacity-based Team (CBT) is a feature that directs voice calls to a capacity-based direct number (DN), where the capacity determines how many calls can be handled concurrently. It enables routing calls to phone numbers without requiring agents to sign on to the system, making it suitable for scenarios where calls are answered by voicemail, answering machines, or hunt groups, rather than traditional call center agents. In this setup, there are no specific agents assigned to the team, and they don't use Webex Contact Center Agent Desktop.
In this example, there are three Call Distribution Groups, which allow for target expansion, which means expanding to more agents across teams over configured time intervals.
The first Call Distribution Group contains TEAM 1, which has 3 agents configured – A1, A2 and A5.
The second call distribution group contains TEAM 2, which has 3 agents configured – A2, A3, and A4.
The third (and final) call distribution group contains TEAM 3, which has 2 agents configured – A6 and A7.
When a contact is queued, the system first searches for a matching agent in the first Call Distribution Group. If there are no agents found, the contact is parked for the configured duration before making the target expansion to the next group. This adds new teams to the existing ones. This process repeats until it finds a match, or all groups are expanded.
A capability called 'Check Agent Availability' causes the contact to instantly expand through to the subsequent Call Distribution Group if there are no matching agents found in the current group. This can be enabled in the Queue Contact activity <LINK TO section 3.1.1> in the flow.
This setup results in the following scenarios:
- A2 belongs to TEAM 1 and TEAM 2. If A2 chooses TEAM 1 to log in to Agent Desktop, the system considers A2 part of TEAM 1 and hence the first Call Distribution Group only.
- A5 belongs to TEAM 1, however, could have also been part of some other team in the organization into which they have currently logged in. Therefore, A5 is not considered as a part of TEAM 1 and is not associated with this queue.
Queues with team assignment provide this powerful capability for agents to move between queues by simply choosing a team during login.
Available routing pattern:
Non-skill-based queues with agent assignments
Non-skill-based queues are a type of queue where a pool of agents is directly assigned to the queue. Unlike other queue types, which indirectly determine the pool of agents assigned to them, these queues allow administrators to select agents directly and manually. For example, team-based assignment queues assign agents based on their logged-in teams, and skill-based assignment queues match agents based on required skills. In contrast, administrators can directly add agents to these queues to become part of the queue. This provides a straightforward way to manage agent allocation without relying on system-driven assignments.
Queues with agent assignment provide simple, yet effective routing algorithms which help in distribution of contacts among the pool of agents. They don't consider the skills of agents in routing contacts. However, agents can be ordered within each queue, and this is considered when routing contacts to them. In this context, teams primarily serve as an organizational construct for supervisors rather than a factor in agent-queue association and contact routing decisions which simplifies queue management.
This type of queue is best-suited where static assignment of agents and management of agent-queue association is feasible and desirable for operational control, and the selection of routing algorithms is suitable for work distribution among agents. These queues are also particularly useful for scenarios where several types of customer inquiries require specialized expertise that can be served by a pre-created segment of expert agents.
However, complex contact center organizations might find it difficult to manually manage agent assignments in these queues. They could benefit more from other queue types that offer dynamic routing and agent-queue associations.

In this example, the queue has a set of agents mapped to it in a specific order such as A4, A9, A7, and so on. This order plays a role in specific routing algorithms that match incoming contacts to agents. The system matches contacts with these agents based on their availability and the chosen routing algorithm.
Unlike queues with team assignment, there is no concept of target expansion over time intervals. If none of the configured agents are available to route this contact, it is parked in queue until one of these agents becomes available to handle contacts before the park timeout. Target expansion is not applicable to these queues.
Available routing patterns:
Skill-based queues
Skill-based queues provide the ability for contacts to be routed to agents with the right skills to meet their needs.
You can configure the following types of skill-based options:
Skill criteria assigned to queue
Administrators can assign skill criteria to queues. Skill-based queues with skill criteria allow administrators to configure required skills directly in the queue. All agents in the organization who have all the required skills of the queue via direct skill-profile implicitly become part of this queue.
This setup helps administrators have a live view of agents mapping to the queue by virtue of skills. In situations like high volume or low volume, administrators may consider adjusting the required skills of the queue and agent skill-profiles to expand or shrink the agent pool on need basis.
This type of queue differs from team assignment-based queues in the sense that there is no call distribution group setting which means the team plays no role in agent to queue association. Moreover, the required skills are statically configured in this queue unlike with team-based skill queues where the flow injects (static or variable) required skills. Hence, technically the skills are part of queue rather than the contact itself.
Any agent in the organization who entirely satisfies the skill criteria of the queue (having skills from direct skill-profile) implicitly becomes associated with this queue. Team doesn't play any role in agent association with these queues. These agents can be part of any team for management and operational purposes.
Every contact queued into this queue will automatically assume the skill criteria defined in the queue itself. Individual contacts can’t define or override their own skill requirements/criteria unlike in skill-based queues with team assignment.
In this example,
- Only agents A1, A3, and A7 entirely meet the skill criteria configured in the queue, hence only these agents would be associated with this queue.
- Agents A2, A4, and A6 who partially meet the criteria or A5 who lacks relevant skills can’t be associated with this queue.
Updating the skill-profile of an agent (called reskilling) such that it satisfies the skill criteria of the queue will automatically and dynamically make that agent part of this queue. Alternately, updating the queue skill criteria itself such that more (or less) agents satisfy the updated skill criteria will also automatically and dynamically add (or remove) agents from this queue.
Unlike queues with team assignment, there is no concept of target expansion over time intervals. If the contact can’t be matched to any of the associated agents, it is parked in queue until one of these agents becomes available to handle contacts before the park-timeout.
Skill-based queues are best-suited where static assignment of skills and management of queue to agent association is feasible and desirable for operational control. They are also suitable when the selection of routing algorithms is appropriate for work distribution among agents. These queues are also particularly useful for scenarios where different types of customer inquiries require specific skills that can be served by a pre-derived segment of expert agents.
Complex Contact Center organizations may find managing queue to agent assignments in skill-based queues easier, compared to queues with agent assignment where each agent must be manually added to the list, which is cumbersome especially for a larger organization.
Skill requirements assigned in flow
Skill based Queues with skill requirements assigned in flow are a type of team-assignment based queue in Webex Contact Center where a set of teams are configured at multiple levels, called as Call Distribution Groups. Agents who are logged in to these configured teams are assigned contacts from this queue based on the Call Distribution Group level at which their team is configured in the queue if they also entirely satisfy the skill requirements of the contact.
Within such a queue, agent teams are grouped into Call Distribution Groups with configurable time delays between them. If no agent is available for the contact the request is parked, and after the delay, routing expands to the next Call Distribution Group. This process continues until an agent is assigned or all groups are exhausted. Meanwhile, if an agent in a previously checked group becomes available during this process, that agent is selected.
Agents acquire skills via skill profile directly assigned to the agent. Agent skills are determined based on the team selection during Sign-in.
Each contact can optionally specify skill requirements in the flow, which are matched against the skills of available agents to select the most suitable agent.
Additionally, contacts can also specify skill relaxations at configured time intervals. These are modified set of skill requirements that would overwrite the original skill requirements of the contact upon configured time intervals. This allows a contact to modify (typically used to "relax") its skill requirements while parked in queue so that more agents can match with these relaxed skill requirements.
Target expansion through Call Distribution Groups can occur simultaneously with skill relaxation cycles - both aimed at matching a parked contact with eligible agents quicker, thus reducing overall wait time and improving service-levels of the queue.
Like non-skilled queues with team assignment, it has three Call Distribution Groups which allow for "target expansion" i.e. expanding to more agents across teams over configured time intervals.
- The first call distribution group contains TEAM 1, which has 3 agents configured – A1, A2 and A5.
- The second call distribution group contains TEAM 2, which has 3 agents configured – A2, A3, and A4.
- The third (and final) call distribution group contains TEAM 3, which has 2 agents configured – A6 and A7.
However, there are two main things to note:
- Every contact that gets queued into this queue will define its skill requirements and skill relaxation through the flow.
- Agents could have skills configured (through a skill-profile – direct or inherited from the logged-in team).
While A2 is configured to be part of both TEAM 1 and TEAM 2, depending on the choice of team this agent has made during login, in his current session he is considered as part of that team, and will therefore also inherit the skill-profile (and thus the skill values) from that team (unless this is overridden with a direct skill-profile configuration for this agent).
This is a powerful capability provided by queues with team-assignments where agents can move between queues simply by choosing a team during login.
Coupled with the ability to inherit skill-profile settings from the selected team, an agent can work with different sets of skills as well.
In this example,
- Contacts are queued with an initial skill requirement (sk_1 >= 6) during escalation from flow, with a skill relaxation (sk_1 >= 3) after a configured time interval.
- Across all agents in all call distribution groups, only A1, A3, A6 and A7 have skills that satisfy the initial skill requirement of queued contacts.
- The remaining agents either have the skill (sk_1) but don't satisfy the skill requirements (e.g. A2 in TEAM 1 and A4 in TEAM 2), or don't have this skill at all (e.g. A5, A2 in TEAM 2).
- Over time, upon skill relaxation, additionally A2 and A4 also now satisfy the "relaxed" skill requirements of the contact.
For every contact that gets queued into this queue, the system attempts to find a matching agent within the first call distribution group who entirely satisfies the current skill requirements of the contact. If no matching agent is found, the contact is parked for the configured duration before the target expansion happens to the second call distribution group. All the teams configured in the second call distribution group are also added to existing teams from the first group. Now the system attempts to find a matching agent within the expanded group. Note that while this is happening, skill relaxation would also update skill requirements of the contact at configured time intervals and the system would use updated skill requirements to match with available agents in the current call distribution group.
This continues until all the configured call distribution groups are expanded and all skill relaxations are applied, unless a matching agent is found before.
Available routing patterns:
Queue Configuration
Set up skill-based queues
Assign skill criteria to a queue
- Create Skills and, if required, Dynamic Skills.
- Create Skill Profiles.
- Assign Skill profile to Agents directly.
- Assign Dynamic Skills directly to agents. Dynamic Skills are not assigned through Skill Profiles.
- Create queue with channel type of Telephony or Chat or Email or Social.
- Assign skills and Dynamic Skills requirements to queues in Control Hub.
- View list of agents who can handle contacts in the queue.
- Select a routing Algorithm either LAA or BAA. For BAA, configure weights for proficiency skills and proficiency Dynamic Skills, when needed.
- Add a Queue Contact activity in flow and select this queue.
Assign skill requirements to a queue
- Create Skills and, if required, Dynamic Skills.
- Create Skill Profiles.
- Assign Skill profile to Agents directly or Team.
- Assign Dynamic Skills directly to agents. Dynamic Skills are not assigned through Skill Profiles.
- Create a Team.
- Add agents to the team.
- Create Queue with channel type of Telephony or Chat or Email or Social.
- Add teams to the queue in a single CDG or multiple CDGs.
- Select a routing pattern either LAA or BAA.
- Add a Queue Contact activity in flow and select the queue for which Skills-Based Routing is configured. For more information, see Queue Contact.
- Assign skills, Dynamic Skills, and skill relaxation in Queue Contact activity. For BAA, configure weights for proficiency skills and proficiency Dynamic Skills, when needed.
- Use Escalate Call Distribution Activity in flow post queuing to quickly move to the next call distribution group or the last.
Set up non-skill-based queues
Assign team to a queue
- Create a Team.
- Add agents to the team.
- Create Queue with channel type of Telephony or Chat or Email or Social.
- Add teams to the queue in a single CDG or multiple CDGs.
- Select a routing pattern either LAA.
- Add a Queue Contact activity in flow and select this queue.
- Use Escalate Call Distribution Activity in flow post queuing to quickly move to the next call distribution group or the last.
Assign agent to a queue flow
- Create Queue with channel type of Telephony or Chat or Email or Social.
- Add agents directly to queues (Note: Neither Skills nor team is used in this type of queue).
- Select routing patterns such as Circular or Linear or Longest Available agent.
Routing Concepts
Agent Surplus Scenario
Agent Surplus scenario occurs when there are more available agents than there are contacts in queue. In this case, when a customer interaction (contact) is queued, the system attempts to find a matching agent for this specific contact immediately, and if a matching agent is found, the contact need not be parked in queue and wait for a matching agent to be available later.
Each time a contact undergoes expansion through a Call Distribution Group, or through skill relaxation, the system again attempts to find a matching agent for this specific contact immediately.
Finding a matching agent for a specific contact uses the configured routing pattern in the queue.
Webex Contact Center offers multiple routing patterns across different types of queues, which allow organizations to optimize customer service by minimizing wait times, balancing agent workloads, and ensuring that customers are connected with agents who have the necessary skills to address their specific needs. Refer to Routing Pattern section for detailed information about routing patterns.
Contact Surplus Scenario
Contact Surplus Routing occurs when the number of incoming customer interactions (or contacts) exceeds the available agents. This situation often occurs during peak times or unexpected surges in contact volume. The primary goal of contact surplus routing is to manage this overflow efficiently, ensuring that customer service standards are maintained despite the excess demand. For an agent who has just become available on a specific channel, contact surplus routing works to find and assign the appropriate contact, among all parked contacts across all queues that this agent is associated with.
The key strategies to perform contact routing efficiently with limited agent availability are:
-
Queue Ranking
Queue ranking enables administrators to specify the relative importance of queues. Administrators can define queue rankings to set the order in which calls are routed from queues to agents logged-in to teams, on a per-team basis.
For example, consider that agents logged-in to Team A are associated with two queues – "Billing" and "Sales". Administrators could use queue ranking to assign a higher ranking to the "Billing" queue, so when contacts come into the queues, contacts from "Billing" will be routed to agents belonging to Team A ahead of contacts from "Sales" queues. This will happen even though there might be older and higher-priority contacts that could be waiting in "Sales" queue - just because "Billing" queue has a higher queue ranking than "Sales" queue. Only when there are no more waiting contacts in "Billing" queue, agents from Team A will be routed contacts from "Sales" (and any other) queue that they are associated with.
The following are some of the important characteristics of queue ranking:
-
- If a rank is assigned to only to some of the queues, calls in those queues will take precedence over calls in the queues for which no rank is specified.
- Queue ranking can be set on a maximum of 50 queues across all media types with a value ranging between 1 and 50 with 1 as the highest rank.
- You can assign the same rank to multiple queues.
- If you enable queue ranking, queues that are not assigned any explicit rank are treated lower than all ranked queues.
-
Queue Ranking works within the same media type.
For example, if Queue Sale is a voice media type queue with rank 2 and Queue Billing Support is a chat queue with rank 1 for Team A, then agents who are available on voice channel in Team A get voice call first even though the rank is 2.
However, consider two chats queues for Team B - Queue Credit Card with queue rank 2 and Queue Debit Card with queue rank 1. Then the available agents in Team B will be offered contacts from Queue Debit Card first.
-
Queue ranking doesn't apply to capacity-based teams.
-
-
Contact Priority
When a contact is queued, its priority can be defined by assigning a hierarchical importance ranging from 1 (highest) to 10 (lowest, default). This prioritization ensures that certain contacts are addressed more quickly based on their importance, urgency, or strategic value to the organization. When an agent is available to handle the next contact among all parked contacts across all queues that the agent is associated with, the highest priority contact across all queues is routed to the agent (provided other criteria such as skill matching and others are satisfied).
For the contacts that are queued without any explicit priority, a default priority of 10 (lowest) is considered. Among multiple contacts that have the same priority, the contact waiting in the queue for the longest duration is routed first to the available and eligible agent.
-
Longest Waiting Contact
This is a basic strategy that ensures that the longest waiting contact across all queues that the agent is associated with is routed to the agent.
This is the ultimate criterion that determines the contact to be routed when multiple contacts across queues with the same queue ranking and same contact priority are waiting to be processed.
Essentially, contact surplus routing for an agent who just became available means selecting a single contact which:
- is of the same media-type as the one on which agent is available
- is parked in any of the queues that this agent is associated with
- whose skill requirements (if any) are all satisfied by this agent
- is parked in a queue whose rank is higher than other queues as configured in the agent's team
- is having the highest priority among all such contacts
- is the oldest waiting contact among contacts with same priority
In the above example that illustrates a contact surplus scenario, agent A1 has logged-in to TEAM 1 and become available to handle contacts on multiple media-types.
A1 is associated with 3 queues – Q1, Q2 and Q3. TEAM 1 has also defined queue ranking where Q1 is ranked the highest, then Q2 and Q3 respectively.
There are contacts already parked in all these queues, with skill requirements and priority defined for each contact.
Now, the contact surplus scenario works as follows:
-
Among all the parked contacts across these queues, only 4 contacts can be routed to A1 – C2, C7 (from QUEUE 2) and C3, C8 (from QUEUE 3).
Only the skill requirements of these 4 contacts are entirely satisfied by the skills of A1.
-
Among these 4 contacts, precedence is given to contacts from QUEUE 2 (i.e. C2, C7) because QUEUE 2 has the higher queue ranking.
Note that even though QUEUE 1 is the highest ranked queue, none of its parked contacts can be routed to A1 since their skill requirements are not satisfied by A1.
-
Between C2 and C7, the highest priority contact is C7. So, the final choice is C7, and the system routes it to A1.
This happens even though C2 was queued earlier, because contact priority takes precedence over queued time.
Blended Multimedia Profiles
Through Multimedia Profile configuration, Webex Contact Center allows agents to service contacts across different media types (voice, chat, email, and social). Based on this configuration, agents get channels provisioned per media type.
Every contact routed to an agent consumes one channel of that media-type as long as the agent is working on that contact. While agents can only have one voice channel, they can have upto five channels of other media-types.
The blended routing setting in Multimedia Profiles allows administrators to control how different channels can be used concurrently for each agent. This enables organizations to provide dedicated attention to customers, promoting better quality of service, improved customer experience, and better conversion rates. Also, organizations can balance the load across media channels when experiencing uneven load in some channels, enabling efficient utilization of agents.
There are three choices:
-
Exclusive
-
Blended
-
Blended-Realtime
For more information on configuring multimedia profiles, see Manage Multimedia Profiles.
Routing Patterns
Skill Based
Skill-based routing patterns in Webex Contact Center direct incoming customer interactions to agents based on specific skills required to resolve the inquiry, such as language proficiency or technical expertise. These patterns ensure that each customer connects to the most qualified agent, enhancing service efficiency and customer satisfaction. Benefits include reduced handling time, improved resolution rates, and optimized use of agent resources by aligning their expertise with customer needs.
Skill-based routing can use skills that agents receive from skill profiles and Dynamic Skills that are assigned directly to agents. Dynamic Skills represent agent attributes that can change independently of an agent's skill profile.
When skill-based routing patterns are used, first the skill requirement of the contact (assigned in flow) or the skill criteria assigned to queue are used to filter available agents whose skills and Dynamic Skills satisfy these requirements / criteria entirely. Then, among agents who are filtered, a single one is selected for the contact based on the routing pattern configured.
For Best Available routing, proficiency skills and proficiency Dynamic Skills can also use weights to influence the score used for agent selection. Weights do not affect Longest Available routing; that pattern uses skills and Dynamic Skills only to determine agent eligibility.
Longest Available
The Longest Available skill-based routing pattern routes a contact to that agent whose skills satisfy the contact skill requirements / queue skill criteria entirely, and who has been available the longest since handling their last contact among all eligible agents in that queue.
This routing pattern helps distribute work evenly across agents by assigning interactions to those who have been available the longest, preventing workload imbalances. It helps maintain fairness in work distribution, ensuring no agent is overburdened while others remain free.
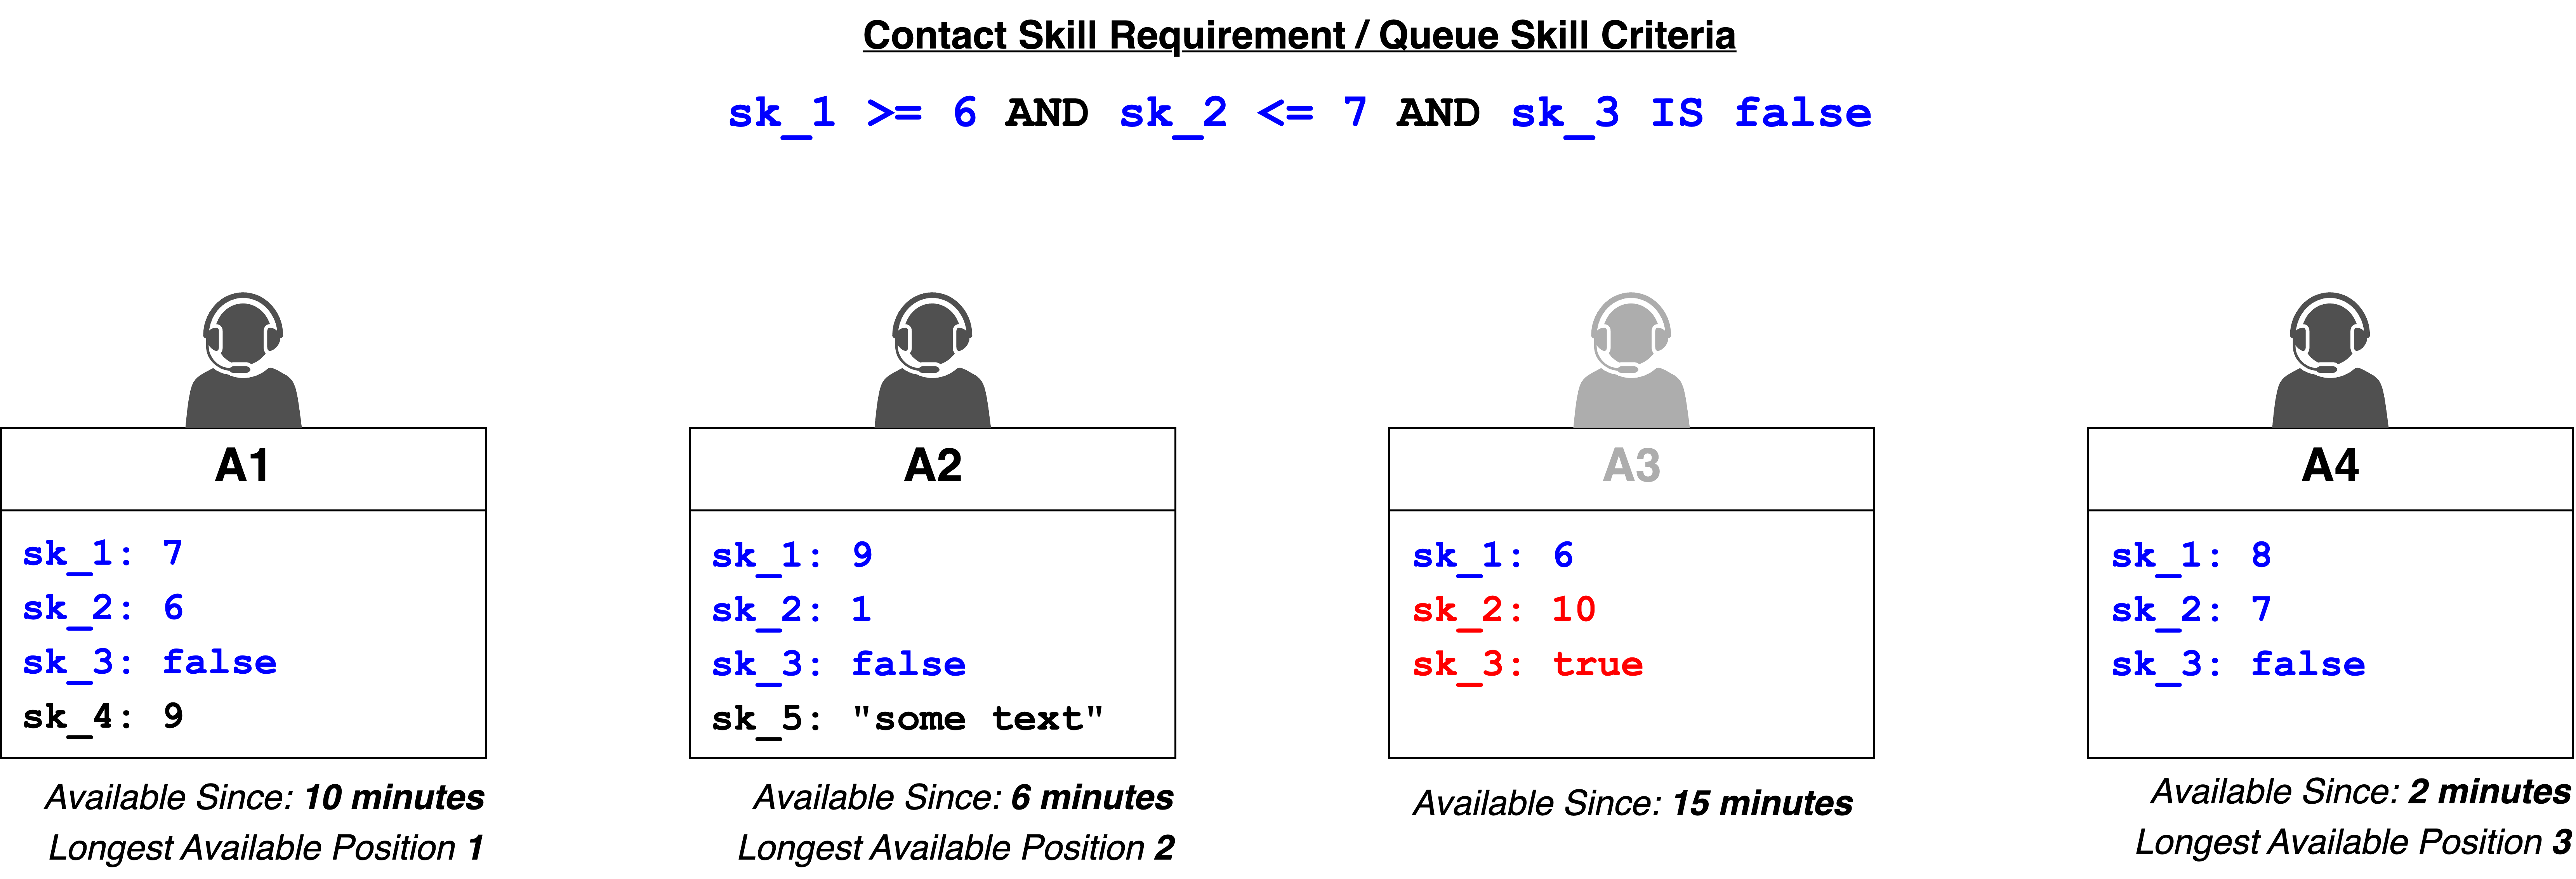
In the above example, there are 4 agents having proficiency and non-proficiency skills with varying proficiency skill values.
Consider a contact that is queued into a skill-based queue having the "Longest Available" routing pattern:
- with the above skill requirements assigned via flow, or
- with the above skill criteria being configured in the skill-based queue
In this scenario:
-
Only agents that entirely satisfy the contact skill requirements / queue skill criteria are considered for routing. Only agents A1, A2 and A4 satisfy the contact skill requirements / queue skill criteria entirely.
Agent A3 is not eligible. In the case of Skill criteria assigned to queue, A3 is not even associated with the queue.
-
Among A1, A2 and A4 the contact will be routed to the longest available agent – A1 who has been available since 10 minutes, longer than A2 or A4.
By virtue of A1 being assigned the contact, A1 will no longer be the longest available agent across all media channels.
- The next contact with the exact same skill requirements would be routed to the next longest available agent – A2, and so on.
This routing pattern is supported in the following types of skill-based queues:
Best Available
The Best Available skill-based routing pattern ensures customer interactions are directed to the most qualified agent available. This pattern evaluates not only the presence of required skills among agents but also the proficiency levels of these skills, calculating a skill score to determine the most qualified ("best") agent for each contact.
This pattern filters available agents whose skills satisfy the contact skill requirements / queue skill criteria entirely. Then, a score is calculated for each eligible agent using proficiency values of all skills mentioned in the contact skill requirements / queue skill criteria. The agent with the highest skill score is considered the "best" agent for each contact.
Effectively, the sum of skill values of the agent which match the contact skill requirements / queue skill criteria determines the score.
Some key points to understand:
- Normally, the actual skill value is used in score calculation, because a higher skill score indicates a stronger match. Except, when a skill requirement uses the less-than-equal-to (<=) condition, that specific skill value of the agent is inverted in score calculation i.e. effective_skill_value = (10) minus (actual_skill_value). This is done to ensure that a lower score indicates a stronger match.
- When multiple eligible agents have the same score, the longest available agent among them is selected
- Only proficiency skills are considered for score calculation. Any boolean, text, or enum skills in the contact skill requirements / queue skill criteria are not considered for score calculation.
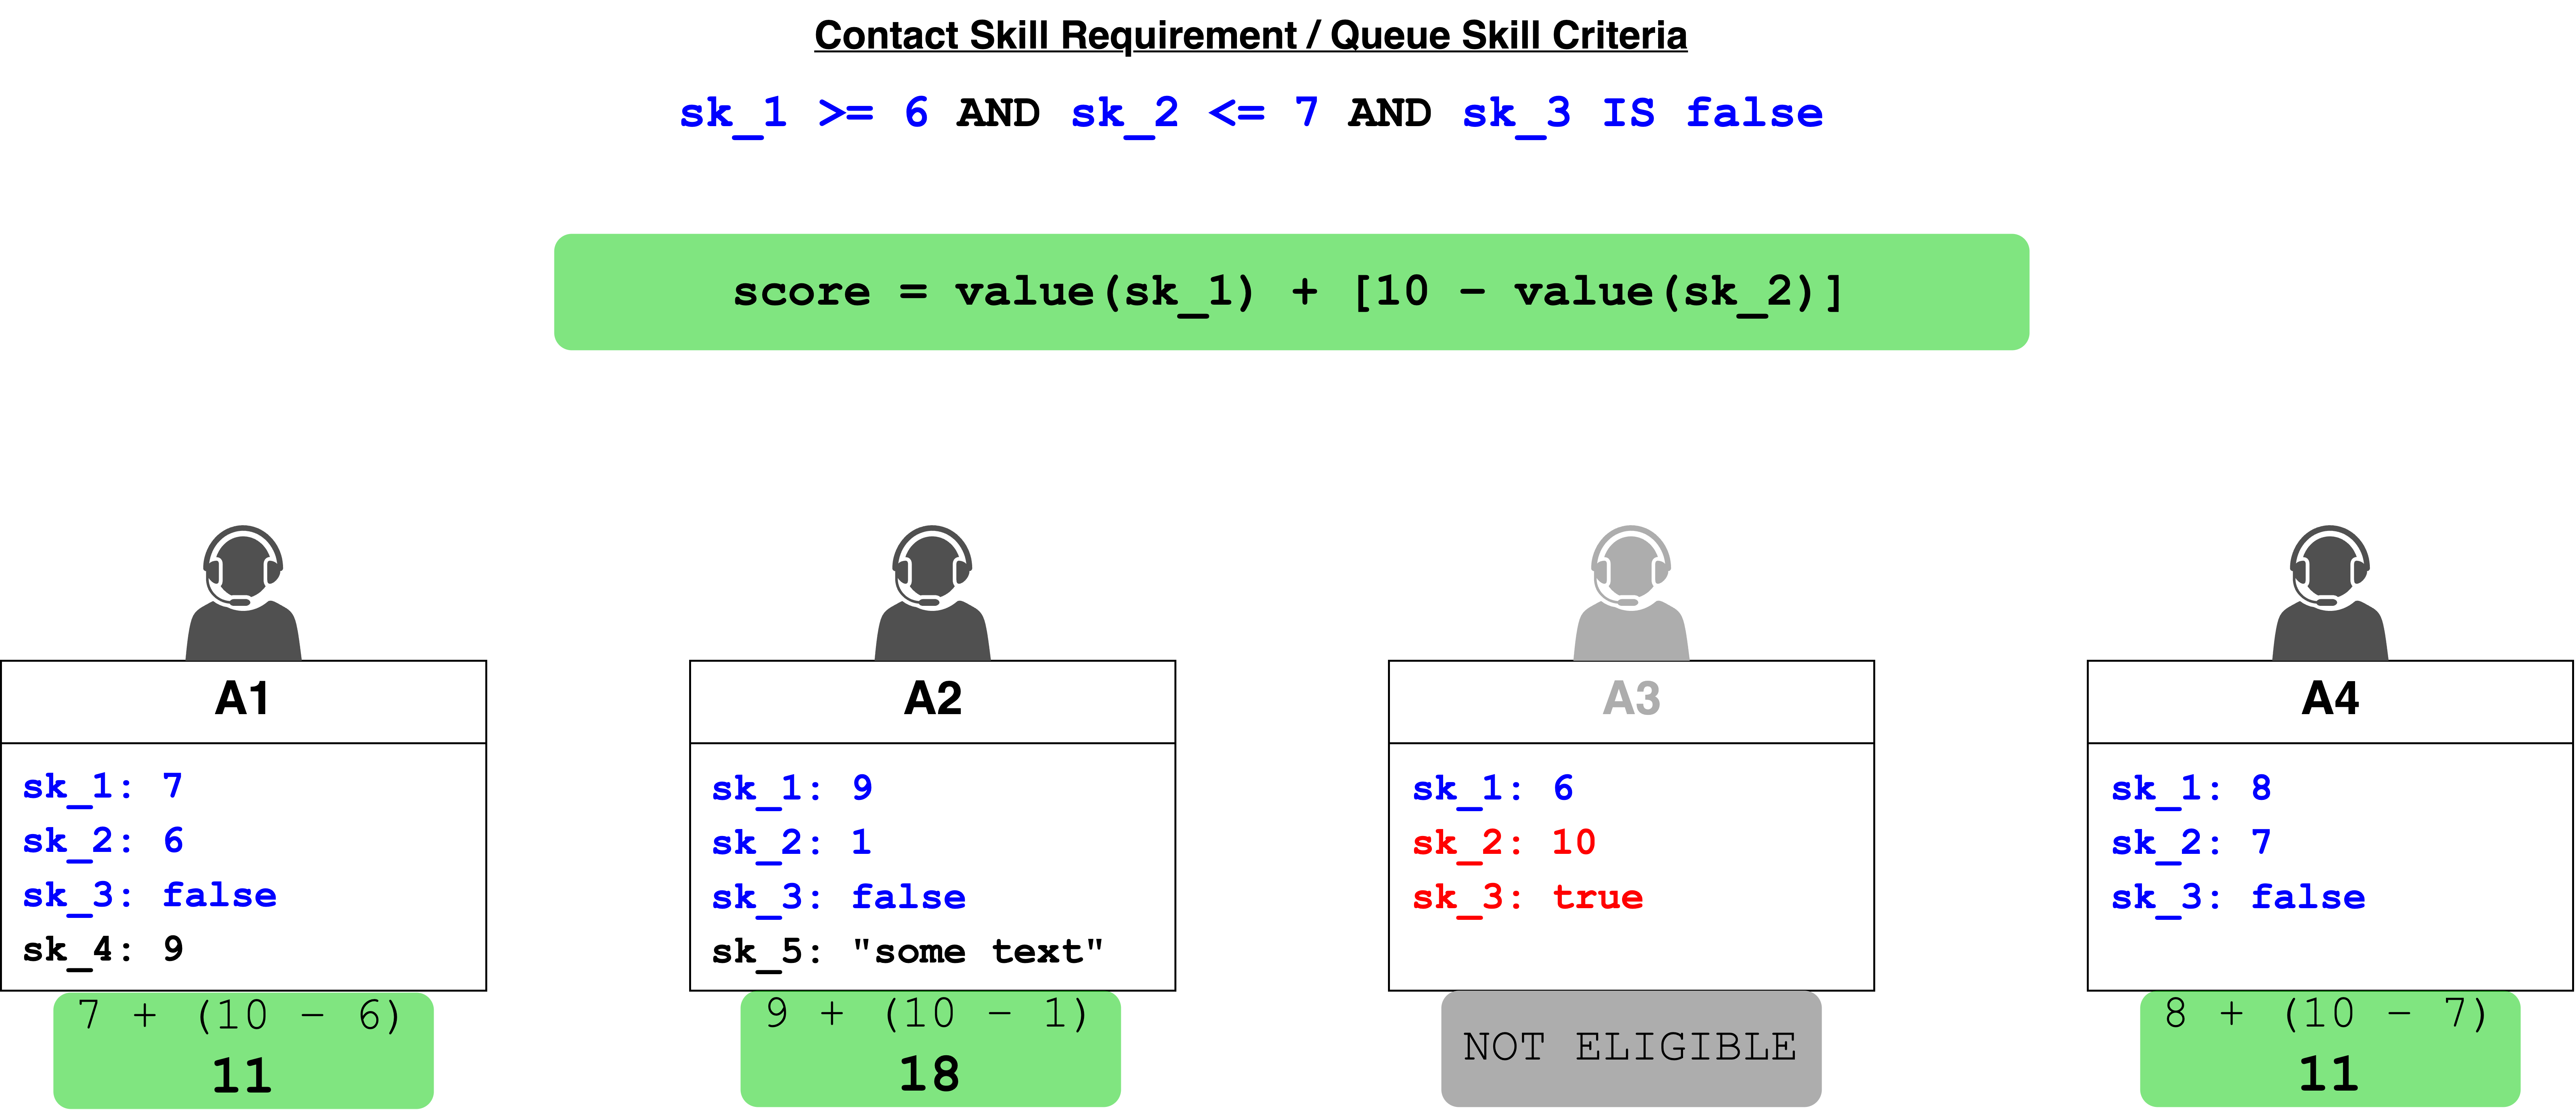
In the above example, there are four agents having proficiency and non-proficiency skills with varying proficiency skill values.
Consider a contact that is queued into a skill-based queue having the "Best Available" routing pattern:
- with the above skill requirements assigned via flow, or
- with the above skill criteria being configured in the skill-based queue.
In this scenario:
-
Only agents that entirely satisfy the contact skill requirements / queue skill criteria are considered for routing. Only agents A1, A2 and A4 satisfy the contact skill requirements / queue skill criteria entirely.
Agent A3 is not eligible. In the case of Skill criteria assigned to queue, A3 is not even associated with the queue.
-
Among A1, A2 and A4 the score calculation is done by the system based on the contact skill requirements / queue skill criteria, where only proficiency skills are considered.
Only the skills mentioned in the contact skill requirements / queue skill criteria are considered for score calculation, even though agents might have additional / other proficiency skills.
Also notice the inversion of skill value in score calculation when less-than-equal-to (<=) condition is used.
-
Contact is routed to A2 as this is the best available agent based on score. If A2 is unavailable / busy, the contact will be routed to the next best available agent with the second highest score, and so on.
However, we have 2 agents – A1 and A4 with the next highest score. The contact is routed to the longest available agent between A1 and A4.
This routing pattern is supported in the following types of skill-based queues:
Non-Skill based Routing
Webex Contact Center also supports a variety of non-skill based routing patterns which focus on distributing incoming customer interactions without considering the specific skills or expertise of agents. Unlike skill-based routing patterns, these don't consider agent skills or require the contact or queue to define skill requirements / criteria for routing. Rather, they prioritize factors such as availability, workload distribution, and predefined sequences, allowing for efficient handling of contacts based on operational logic rather than individual agent competencies. These patterns are particularly useful in environments where interactions are relatively uniform or don't require specialized handling.
Longest Available
The Longest Available routing pattern routes a contact to that agent in the queue who has been available the longest since handling their last contact across all agents who are available and associated with that queue.
This routing pattern ensures fair and balanced workload distribution by assigning interactions to agents who have been idle the longest. By preventing workload imbalances, it ensures no agent is overburdened while others remain free. This approach is especially effective during periods of steady contact flow, maintaining consistent engagement across the agent pool.
Agents lose their "longest available" positions across all channels when they are offered a contact of any media-type. This means after an agent handles a contact, the next contact of any media-type queued will be assigned to the next longest available agent in that queue.
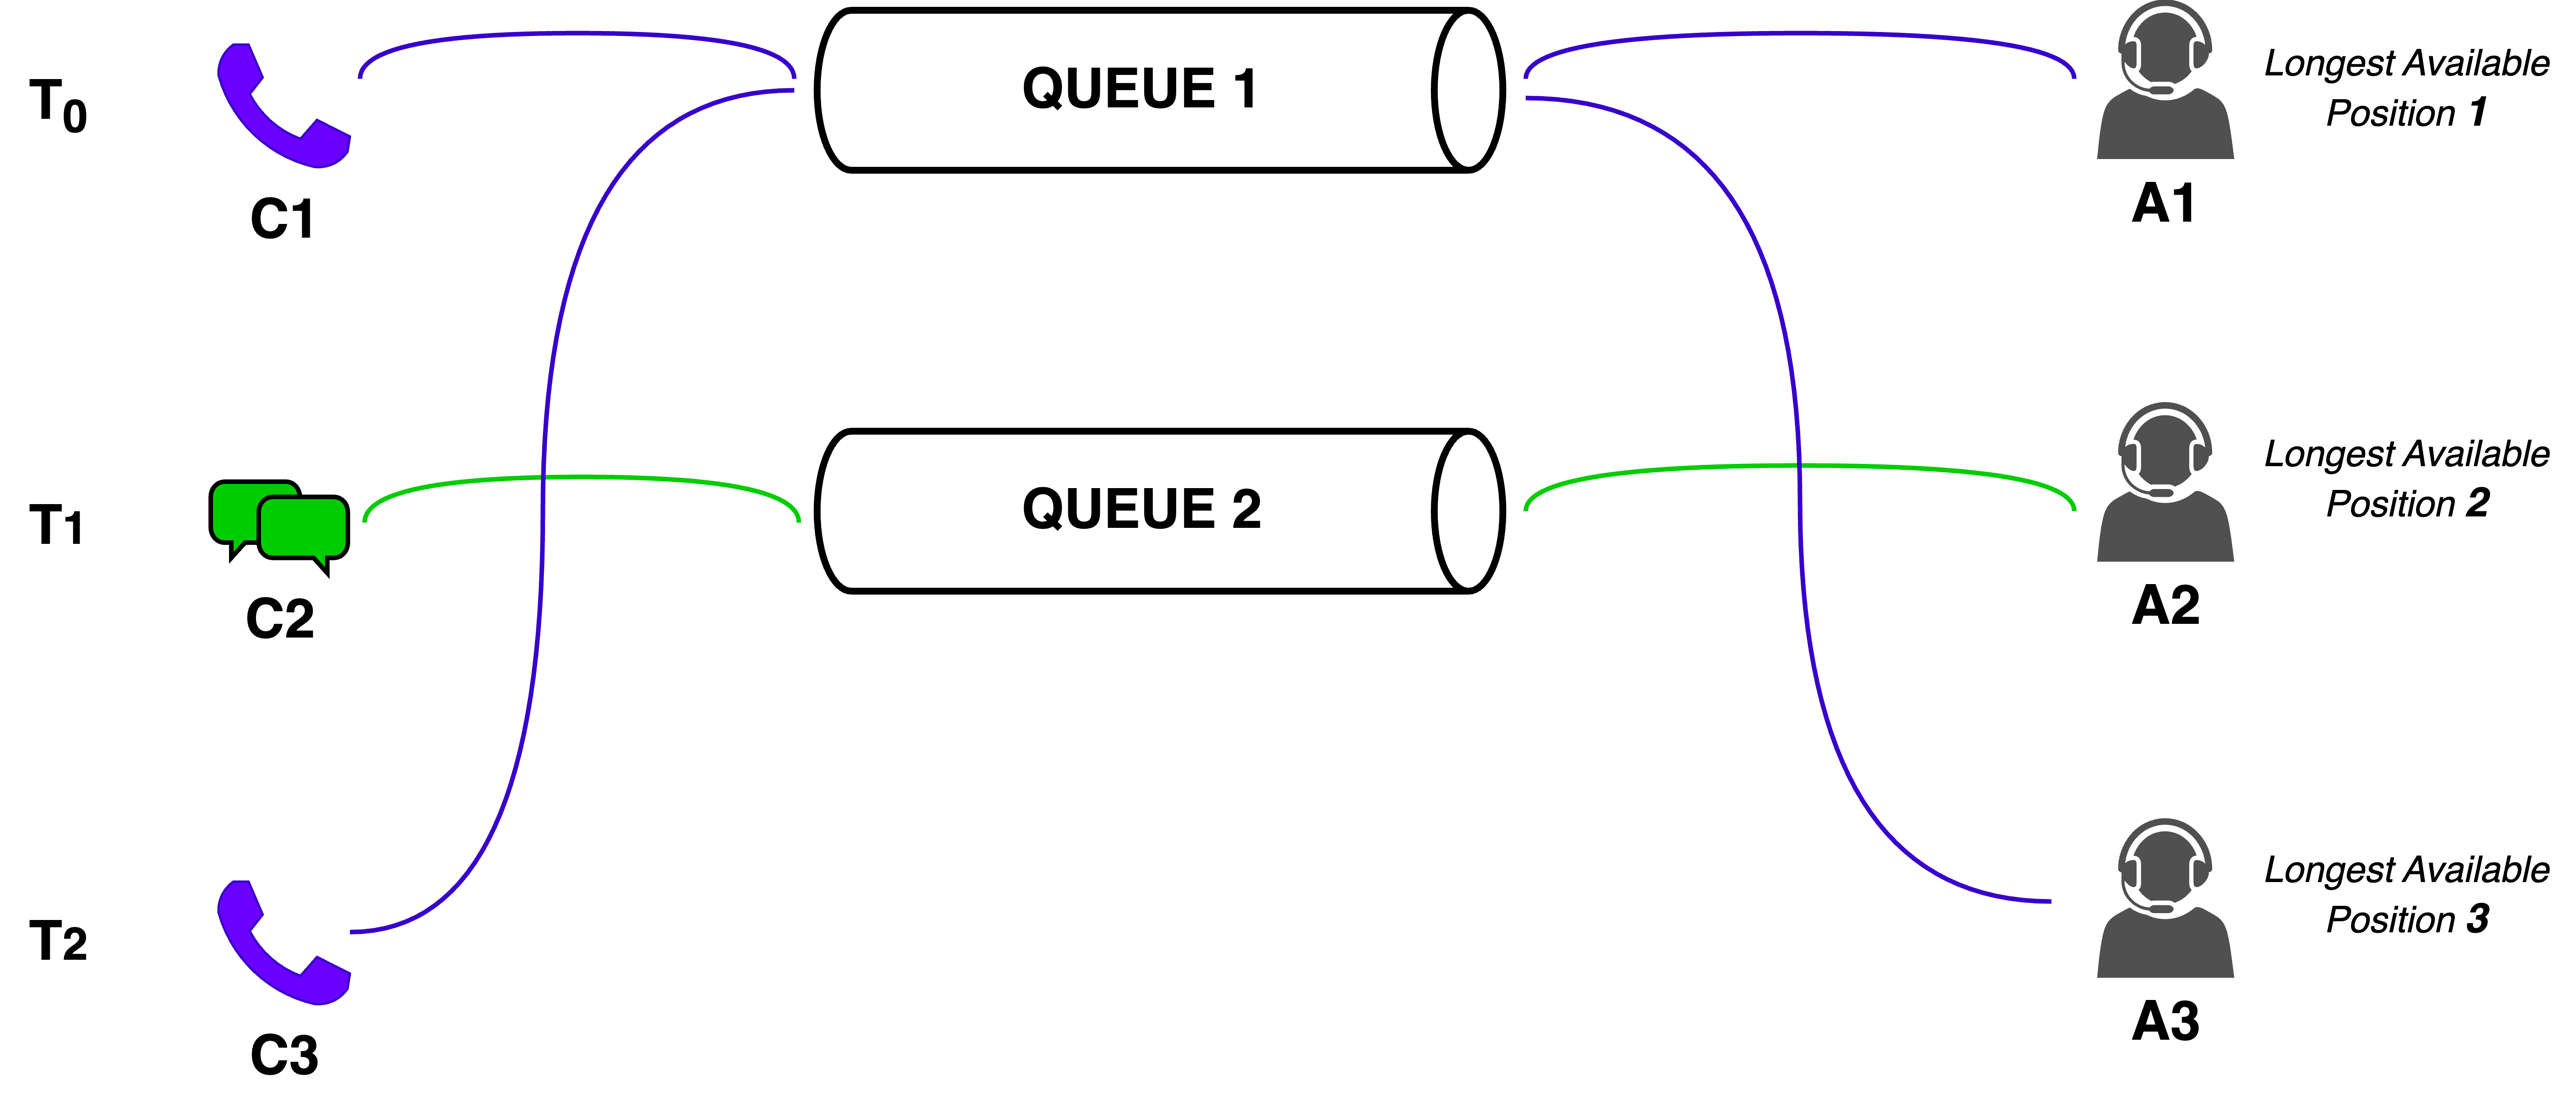
In the above example, agent A1 is the longest available agent (position 1) – either this agent logged-in first or has not been assigned a contact longer than any other agent.
Agents A2 (position 2) and A3 (position 3) are also available, but they have either logged-in, or have handled contacts after A1. All agents are associated with both queues which have this routing pattern.
Consider the following scenario:
-
At time T0, a voice contact C1 is queued and routed to the longest available agent i.e. A1.
By virtue of A1 being assigned C1, A1 is no longer the longest available agent across all media channels.
- At time T1, a chat contact C2 is queued and routed to the longest available agent, which is now A2.
-
Finally, at time T2, another voice contact C3 is queued and routed to A3.
A1 and A2 recently got contacts – at this point in time, it is A3 which has been waiting the longest.
This routing pattern is supported in the following types of non-skill-based queues:
Circular
The Circular routing pattern distributes incoming contacts among a group of available agents in a round-robin order. When a contact is queued, the system assigns it to the next available agent in the queue based on a predetermined sequence.
The process begins with agents in a configured order. The first incoming contact is assigned to the first available agent in that sequence. For subsequent contacts, the system selects the next available agent, continuing from where it left off in the defined queue order. This pattern repeats, cycling through the agents but always starting after the last selected agent's position.
This approach is effective for distributing contacts fairly and evenly among agents. It helps ensure that no single agent is overwhelmed with contacts, and that all agents have equal opportunities to handle interactions consistently. However, the Circular routing pattern doesn't consider current workload, or other factors that might affect an agent's ability to handle a particular contact.
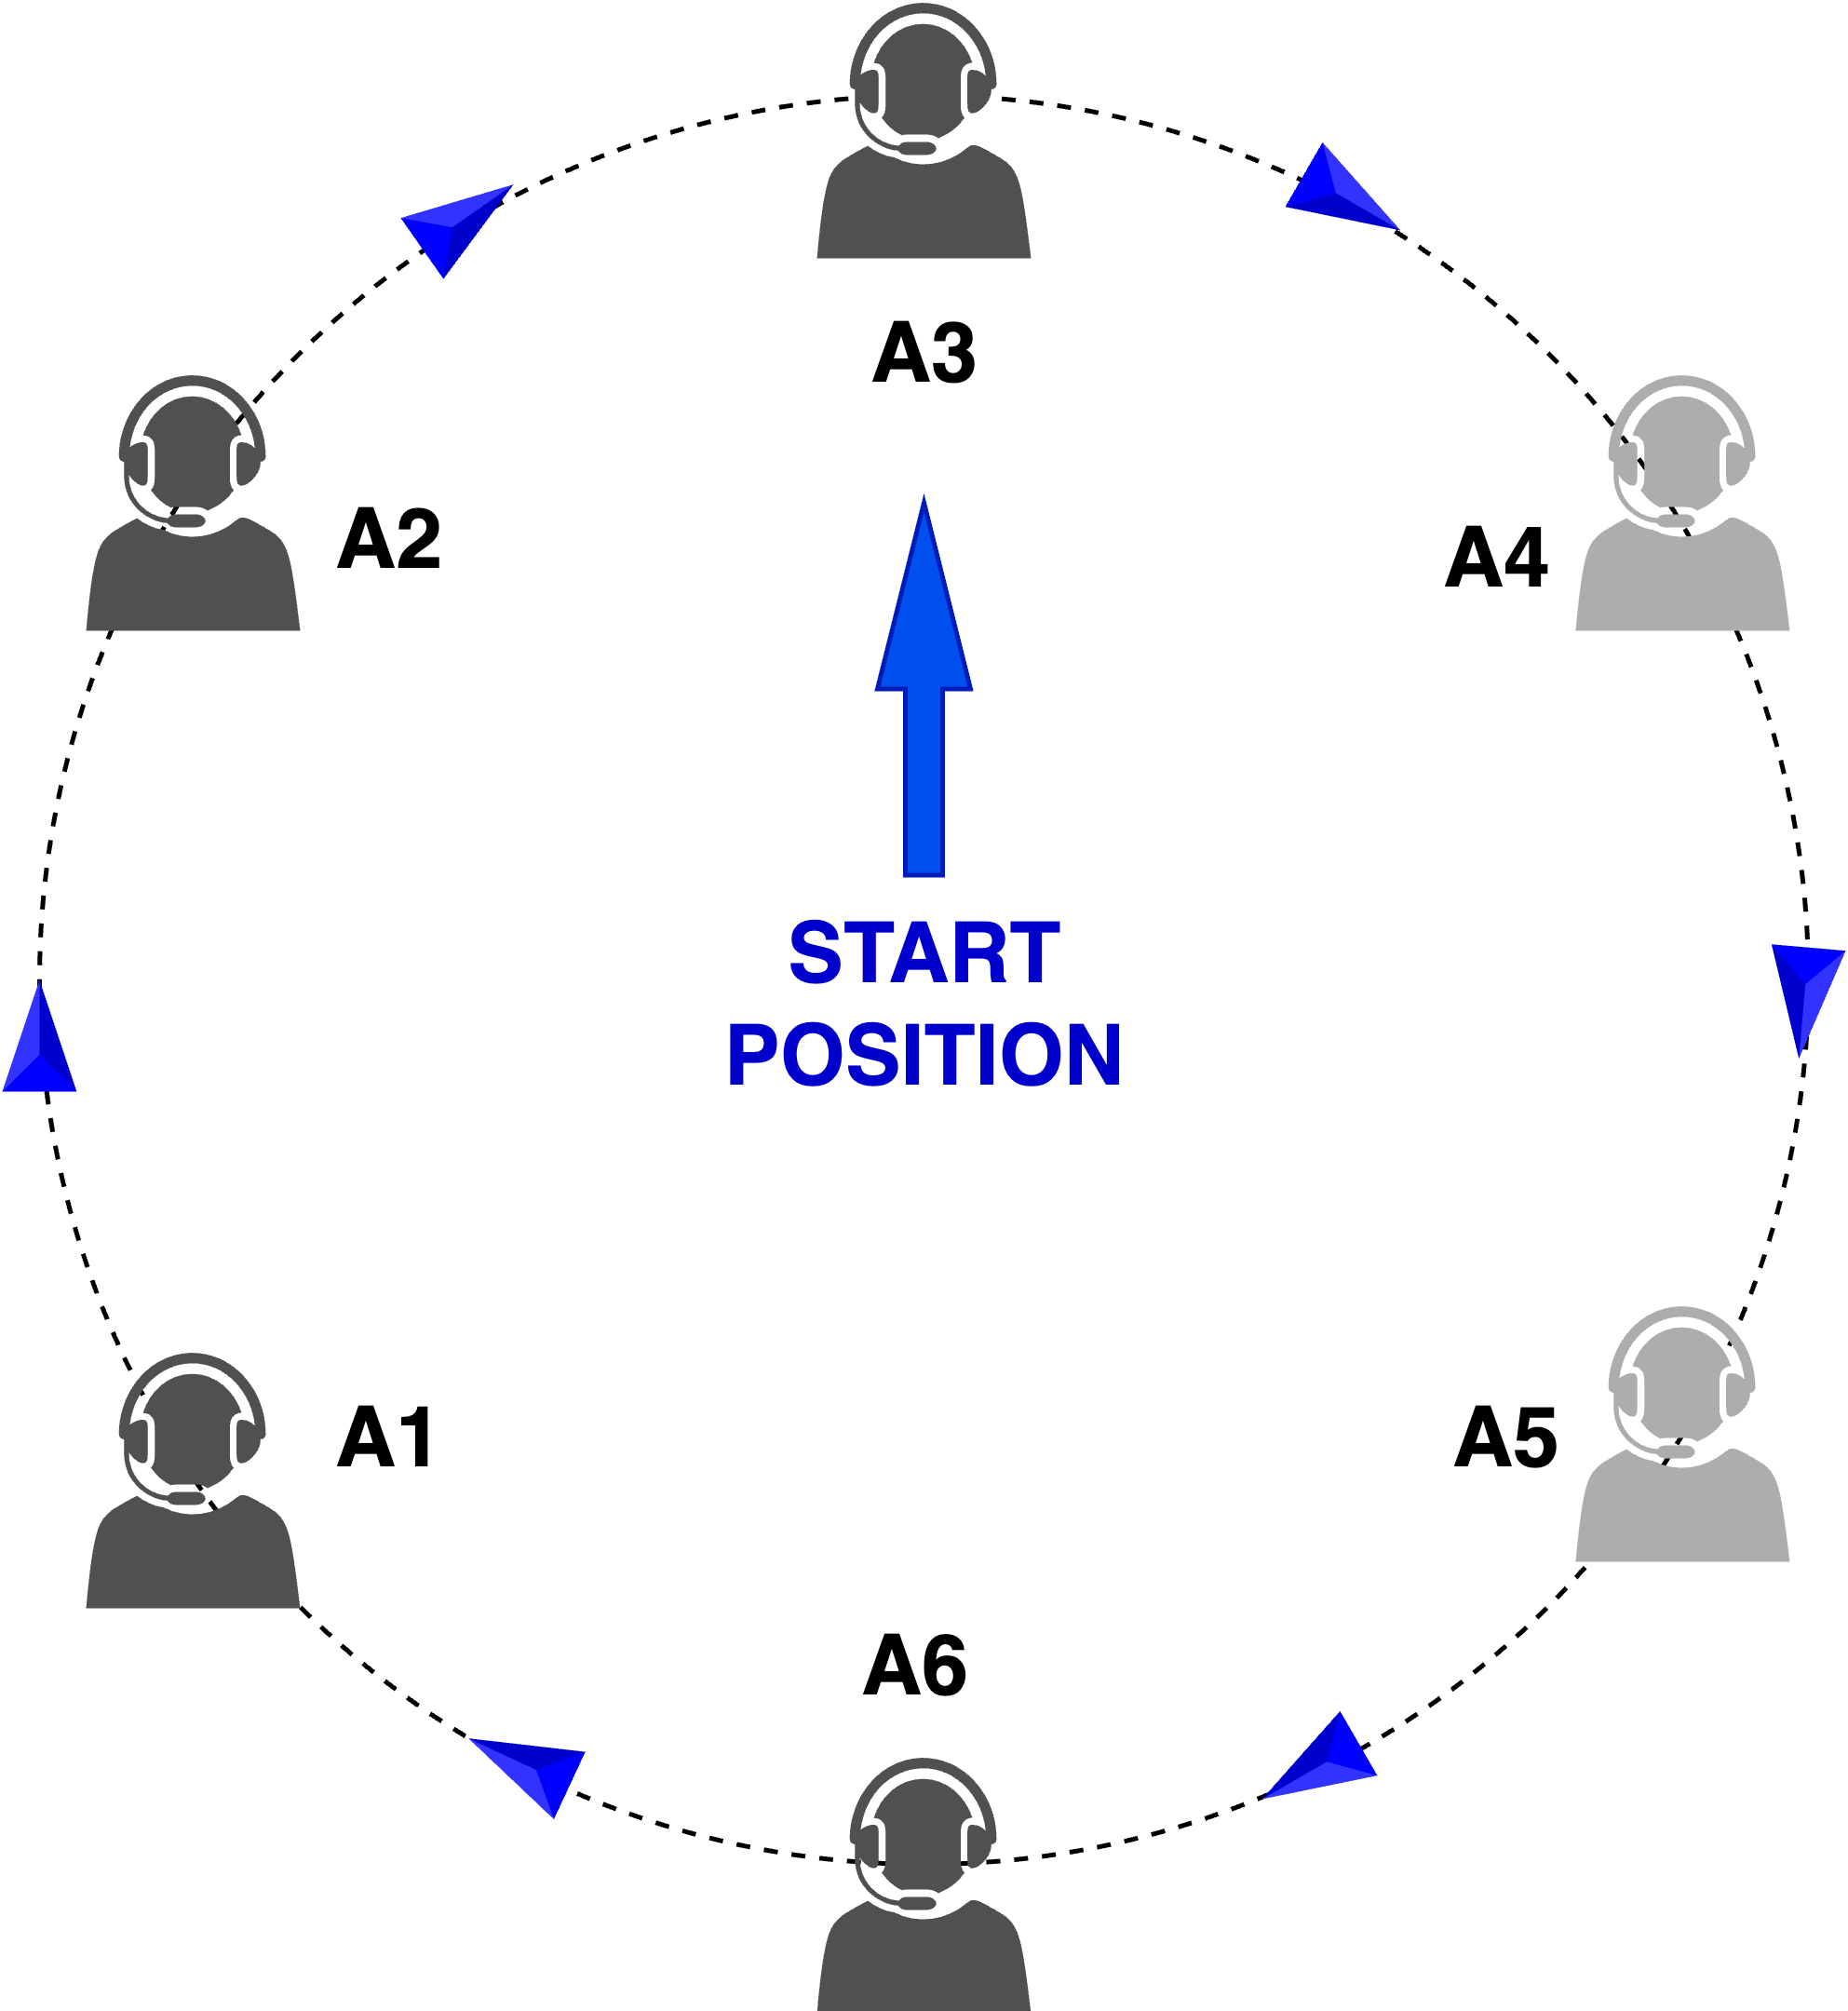
In the above example, agents are configured in a circular queue in the following order: A3 → A4 → A5 → A6 → A1 → A2.
To begin with, the start position is the first agent in the configured order (A3). As contacts are routed to agents in this queue, the position moves around the circle, positioned to the agent who is next in configured order to the agent to whom the last contact was routed to.
Consider the following scenario:
-
The first contact (C1) is queued, and it is routed to agent A3.
The pointer is updated to the next agent in configured order i.e. A4.
-
When the second contact (C2) is queued, the system starts to find available agents starting from A4 i.e. A4 → A5 → A6 → A1 → A2 → A3.
However, A4 and A5 are unavailable (either they are not even logged-in, or Idle, or fully busy with other contacts of this media-type), so C2 is routed to the next available agent – A6. The pointer is updated to the next agent in configured order i.e. A1.
-
Similarly, the third contact (C3) is routed to A1, the fourth contact (C4) routed to A2. The pointer is at A3 again.
This logic continues, and contacts are distributed among available agents in the "circular" / "round-robin" pattern.
If there are parked contacts in queue, agent surplus scenario will match the next agent who becomes available on this media-type to the the highest-priority, oldest contact among them.
This doesn't consider or affect the existing position value in this queue, which is updated only when contact surplus routing successfully matches with an agent.
This routing pattern is supported in the following types of non-skill-based queues:
Top-Down
The top-down routing pattern distributes incoming contacts among a group of available and ordered agents in a sequential order. When a contact is queued, the system always traverses through the ordered list of agents from the beginning and matches the contact with the first available agent (who has a free available channel of the contact's media type) in that sequence.
This happens for every contact that is queued. The contact is attempted to be matched always starting from the top (first configured agent) and proceeding down the list until a matching agent is found.
Unlike circular routing pattern, there is no "pointer" that dynamically changes the starting point based on the last selected agent's position.
This approach is effective for distributing contacts among agents who are ordered based on some bias / preference as determined by the administrator. It helps ensure that the agents at the top are always preferred to handle contacts over agents below them. However, the top-down routing pattern doesn't consider current workload, or other factors that might affect an agent's ability to handle a particular contact.

In the above example, agents are configured in a top-down queue in the following order: A3 → A4 → A5 → A6 → A1 → A2.
This means that the administrator wants every contact to be routed to the first agent (A3) if available, else the next agent (A4) if available and so on, in configured order.
Consider the following scenario:
- The first contact (C1) is queued, and it is routed to agent A3, since A3 is at the top of the order.
-
When the second contact (C2) is queued, routing is once again attempted from top of the order (always starting with A3).
If A3 has more channel capacity for this media-type, C2 is also routed to A3. However, if A3 is fully busy on this media-type, the routing proceeds down the list to A4.
- However, A4 and A5 are unavailable (they are either not even logged-in, or Idle, or fully busy with other contacts of this media-type), so C2 is routed to the next available agent in the top-down order – A6.
-
Similarly, the third contact (C3) is attempted to be routed starting from A3 down towards the bottom. The first matching agent would be A1.
This logic continues, until a contact doesn't find any available agents until the bottom of the order, in which case it is parked in queue.
This routing pattern is supported in the following types of non-skill-based queues:
Agent Based Routing
Agent-based Routing is a capability that routes or queues a contact to a specified ("preferred") agent directly. An agent lookup with agent's email address or agent's ID routes a contact to the preferred agent. The Queue To Agent activity in the flow helps to achieve Agent-based Routing. For more information, see Queue To Agent activity.
A contact can have a mapping to one or more preferred agents, which could be typically managed in an external application outside Webex Contact Center. The preferred agent lookup for a contact is done via the HTTP Request activity, which retrieves the mapping from an external application. To route or park the contact with the preferred agent, configure the Queue To Agent activity using the agent's Webex Contact Center ID or email address. The contact can also be parked against a preferred agent if that preferred agent isn't immediately available.
Agent-based Routing is useful in the following scenarios:
- Preferred agent routing: The customer can assign contacts to dedicated agents or relationship executives. In such scenarios, the Agent-based Routing routes the contacts directly to that preferred agent.
- Last agent routing: When a contact calls back the contact center multiple times to interact with an agent, Agent-based Routing can route the contact to the last agent who handled that contact.
In both use cases, the details of the contact and the agent mapping are stored outside the Webex Contact Center.
Queueing and Routing capabilities in Flow
In Webex Contact Center, a wide range of routing, queueing and call control capabilities can be orchestrated through flows.
A variety of flow activities and event handlers provided in the Flow Designer, can be placed in the flow to effectively manage the lifecycle of inbound and outbound contacts.
For more information on setting up and using flows, see Build and manage flows with Flow Designer.
Queueing Activities
Queue Contact
The Queue Contact activity provides the ability to queue a contact into an active inbound queue from the organization so that it can be matched and routed to the right agent in that queue.
The following aspects of queueing can be managed through this activity:
- Priority - Assigning a hierarchical importance ranging from 1 (highest) to 10 (lowest, default) to the contact being queued.
- Skill Requirements - Set the skill criteria that must be met by agents in a skill-based-queue, to be considered eligible for routing the contact.
- Skill Relaxations - Tuning, modify or remove previously set skill requirements after a period of time to improve the chances of finding an agent.
- Check Agent Availability - Allow the system to instantly expand through all Call Distribution Groups where no available agents are found, to avoid waiting time.
See Routing, for more information on how priority, skill configuration and agent availability play a role in routing contacts.
Once the Queue Contact activity successfully queues the contact,
If a matching agent is already available, the system attempts to route the contact to an agent.
This interrupts the Main flow execution and further events can trigger the respective Event Flows, if configured.
If no matching agent is found, the contact gets parked in the queue and waits for a matching agent to become available.
The flow execution then continues with the activities attached after Queue Contact activity, which provides the ability to:
- Play a pre-configured music to the customer waiting in queue - by attaching a
PlayMusicactivity. - Register a callback based on the customer's request - by attaching a
Callbackactivity. - Re-queue i.e. remove the contact from current queue and add into a new queue - by
attaching another
Queue ContactorQueue to Agentactivity.
- Play a pre-configured music to the customer waiting in queue - by attaching a
When a matching agent becomes available, the system attempts to route the contact to the agent.
When successful, this interrupts the Main flow execution and further events can trigger the respective Event Flows, if configured.
The Queue Contact activity works when:
- The contact is unassigned and ready to be routed to an agent.
- The queue, skill, and other flow configurations are set up correctly.
- The contact remains within the allowed limit of 25 entry point and queue transitions.
- The contact remains within the allowed limit of 20 successful routing attempts.
Configure the Error Handling path to gracefully manage contacts that require alternate routing or additional handling.
In such cases, the activity results in a failure, and the flow execution moves to the Error Handling path.
For more information on the activity settings, usage and output variables, see Build and manage flows > Queue Contact.
Queue To Agent
The Queue to Agent activity provides the ability to queue the contact directly to a preferred agent, by looking up their unique agent ID or email address in Webex Contact Center.
The following aspects of queueing can be managed through this activity:
- Priority - Assigna higher/lower importance to the contacts queued against the same agent.
- Reporting Queue - Identify the queue to be used for configuration such as recording and default music-in-queue, and report purposes of the contact.
- Recovery Queue - Identify the queue to be used as a fallback, when the contact couldn’t be routed to the specified preferred agent.
Once the Queue To Agent activity successfully queues the contact,
If the agent is already available, the contact gets routed to the agent.
This interrupts the Main flow execution and further events can trigger the respective Event Flows, if configured.
If the agent is available, but chooses to decline, not answer or fails to receive the contact, it is moved into the recovery queue provided.
In the recovery queue the contact will be routed to the longest available agent, without any support for skills.
If the agent is unavailable and "
Park Contact If Agent Unavailable" option is selected, the contact gets parked and waits for the agent to go available.The flow execution then continues with the activities attached after Queue To Agent activity, which gives the ability to:
- Play a pre-configured music to the customer waiting in queue - by attaching a
PlayMusicactivity. Callbackactivity.- Re-queue i.e. remove the contact from current queue and add into a new queue - by
attaching another
Queue to AgentorQueue Contactactivity.
Once the agent becomes available, the system attempts to route the contact to the agent.
This interrupts the Main flow execution and further events can trigger the respective Event Flows, if configured.
- Play a pre-configured music to the customer waiting in queue - by attaching a
- If the agent is unavailable and "
Park Contact If Agent Unavailable" option is not selected, the queueing fails.
The Queue To Agent activity works when:
- The contact is unassigned and ready to be routed to an agent.
- The preferred agent ID or email address is valid.
- The reporting queue and recovery queue are configured correctly.
- The preferred agent is logged in, available, and ready to handle the contact.
Configure a recovery queue to ensure the contact is routed smoothly when the preferred agent is unavailable.
In such cases, the activity results in a failure, and the flow execution moves to the Error Handling path.
For more information on the activity settings, usage and output variables, see Build and manage flows > Queue To Agent.
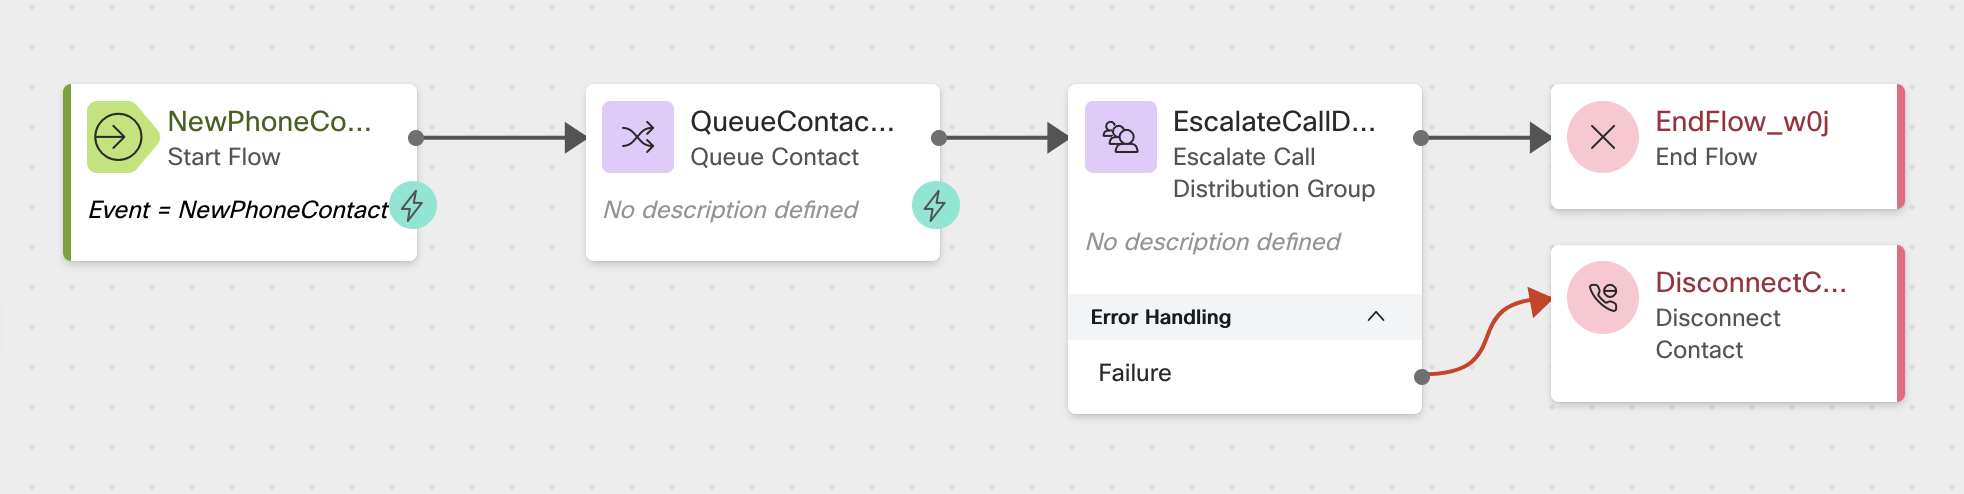
Escalate Call Distribution Group
The Escalate Call Distribution Group activity is only supported for queues with team assignment, and provides the ability to update the Call Distribution Group for the contact immediately, instead of waiting for the automatic expansion update to happen to the next group after the configured wait duration. This enables the contact to be routed to all eligible agents in queue quickly.
By using the Escalate Call Distribution Group activity, the contact can be escalated to:
- Next Group—Expanding the set of teams to include the ones added in the immediate next call distribution group.
- Last Group—Expanding the set of teams to includes all the teams mapped across all call distribution groups configured for the queue.
The Escalate Call Distribution Group activity works when:
- The contact is already queued and ready for escalation.
- The contact is queued in a queue that uses call distribution groups.
For queues that use standard routing, continue distributing contacts through the queue’s configured routing behavior.
In such cases, the activity results in a failure, and the flow execution moves to the Error Handling path.
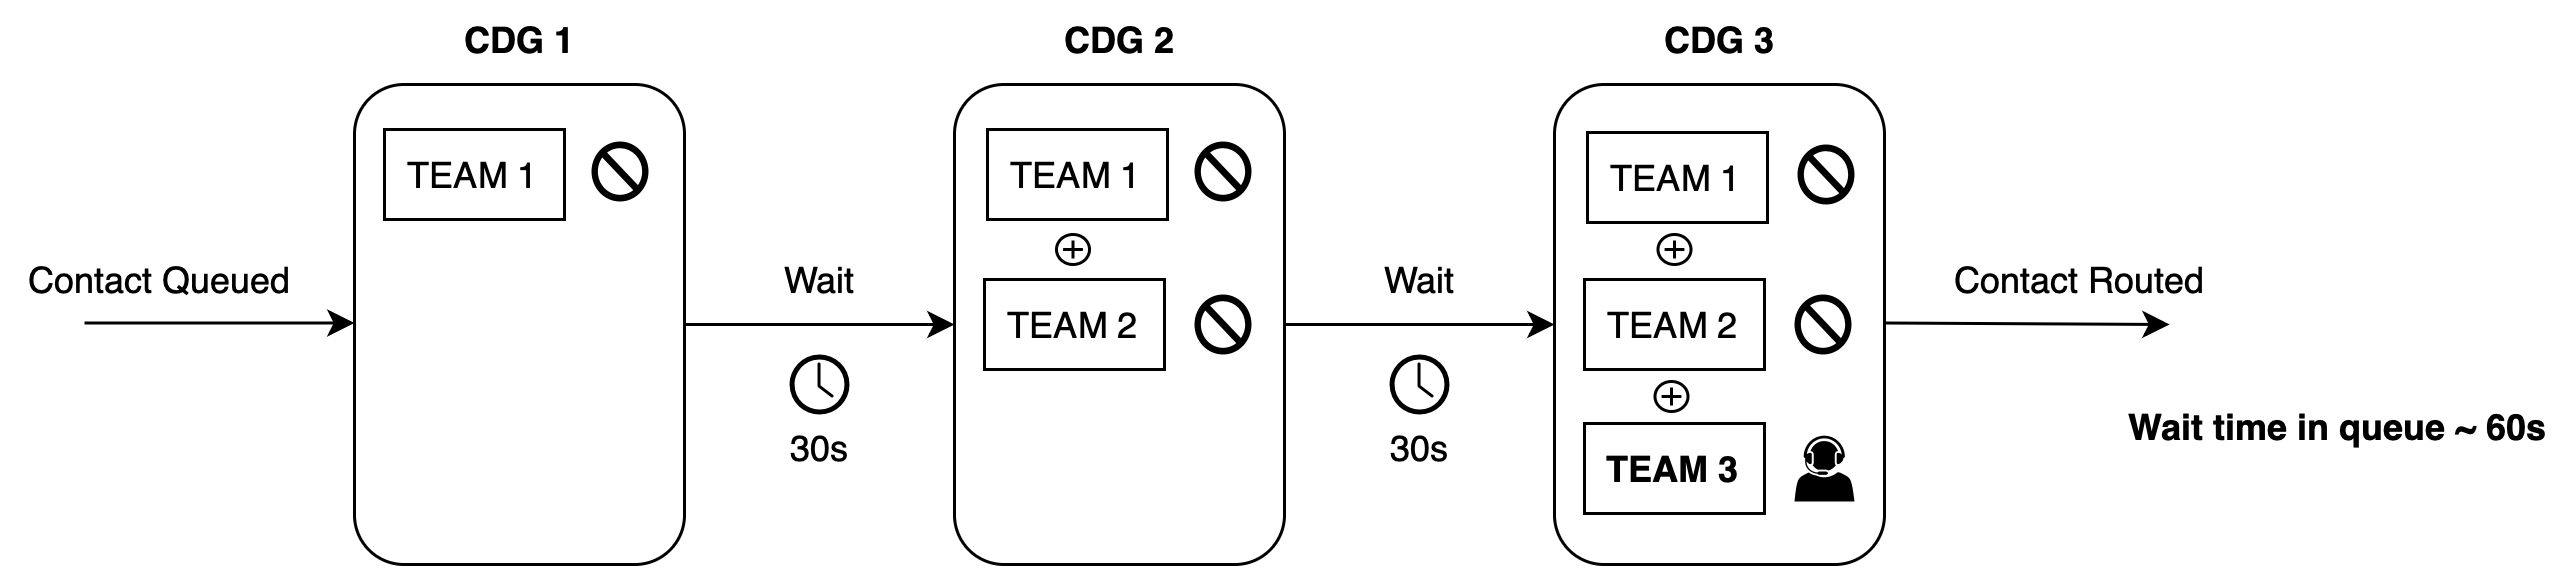
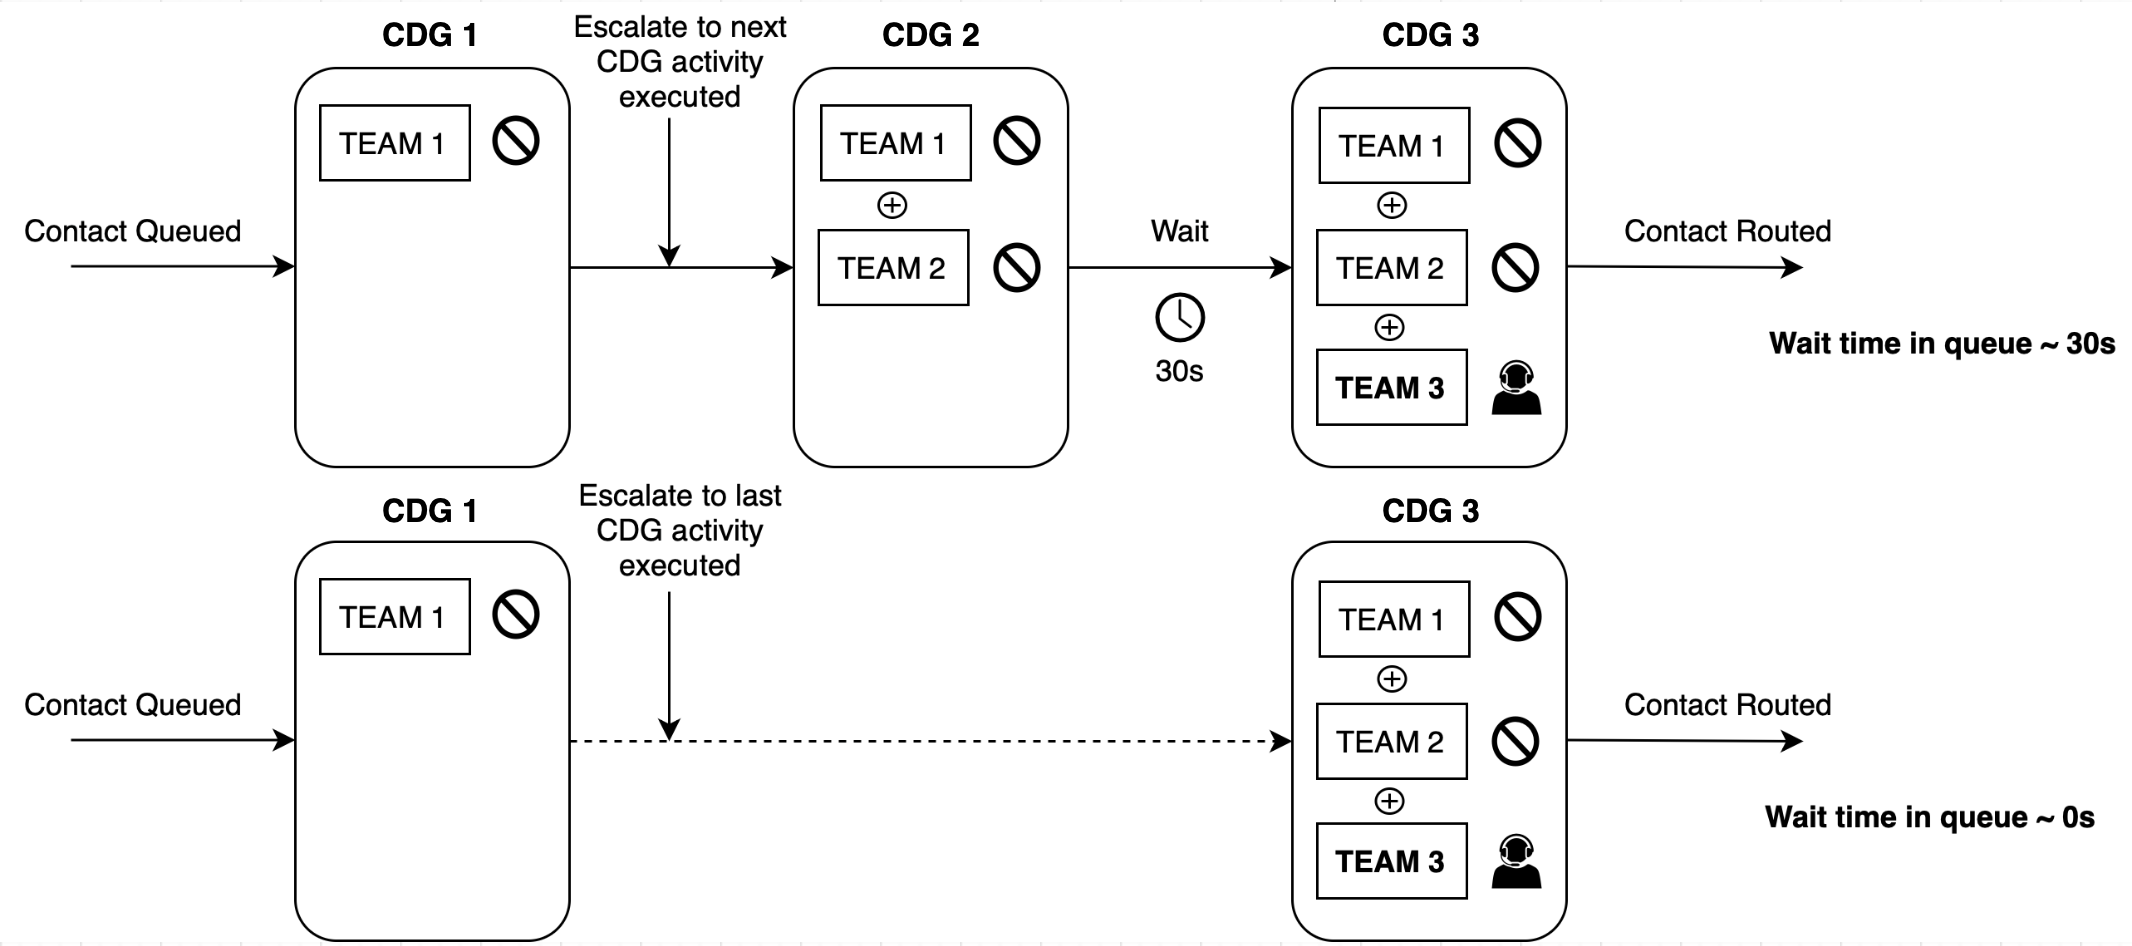
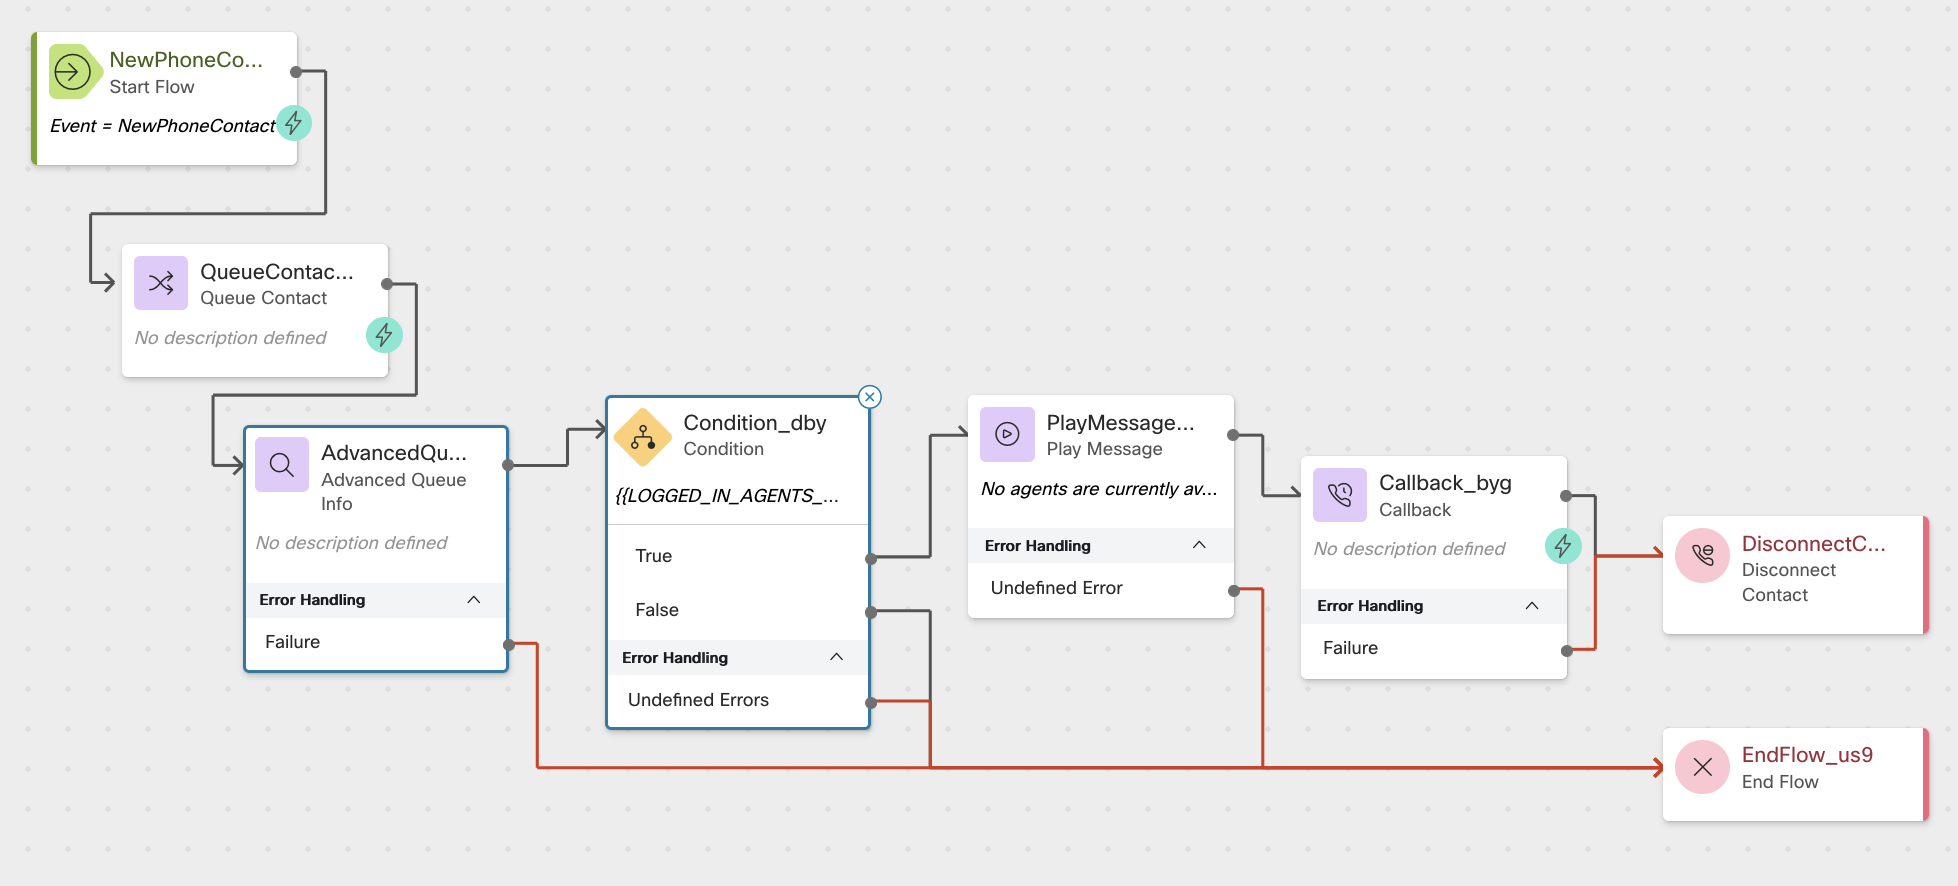
Consider an example scenario, where a contact getting queued into a queue having three call distribution groups, each updated after a period of 30 seconds.
No agents are available in the teams part of CDG 1 and CDG 2, and an agent is
available in TEAM 3 which belongs to the last call distribution group.
When the Escalate Call Distribution Group activity is not used in flow, it results in a long waiting time, as illustrated below:
The waiting time can be lowered by using the Escalate Call Distribution Group activity is used as follows:
Based on the Next Group or Last Group option selected, the waiting time for the contact gets considerably reduced, as illustrated below:
For more information on the activity settings, usage and output variables, see Build and manage flows > Escalate Call Distribution Group.
Queue Information Activities
Get Queue Info
The Get Queue Info activity provides the ability to fetch realtime queue information for a given contact such as:
- The contact's current position in queue (PIQ), or the potential position if not yet queued.
- The estimated wait time (EWT) or duration for which a task is estimated to wait in the queue before being answered.
- The number of agents logged in or available within the contact's current Call Distribution Group.
- The number of agents logged in or available across all Call Distribution Groups for the selected queue.
- The duration for which the oldest contact in the queue has been waiting.
These details are made available in the flow execution as activity output variables.
For more information on the activity usage, the detailed definition and the method of calculation for each queue detail, see Build and manage flows > Get Queue Info.
Some of the ways to use the queue information can be:
- To announce the contact's position in queue and estimated wait time to the customer, while they are waiting to be routed.
- To decide whether a callback can be registered for the customer, if the estimated wait time is too long.
- To escalate the contact to next call distribution group (CDG), if no agents are available in teams mapped to the current CDG.
The Get Queue Info activity works when the selected variable resolves to a valid queue.
Configure the Error Handling path to gracefully manage cases where the selected variable needs validation or does not resolve to an available queue.
- contact is not (yet) queued when the Get Queue Info activity is executed.
- contact is queued in a queue that does not support the concept of call distribution groups.
In these cases, the value of -1 in these output fields indicate that this information is not applicable.
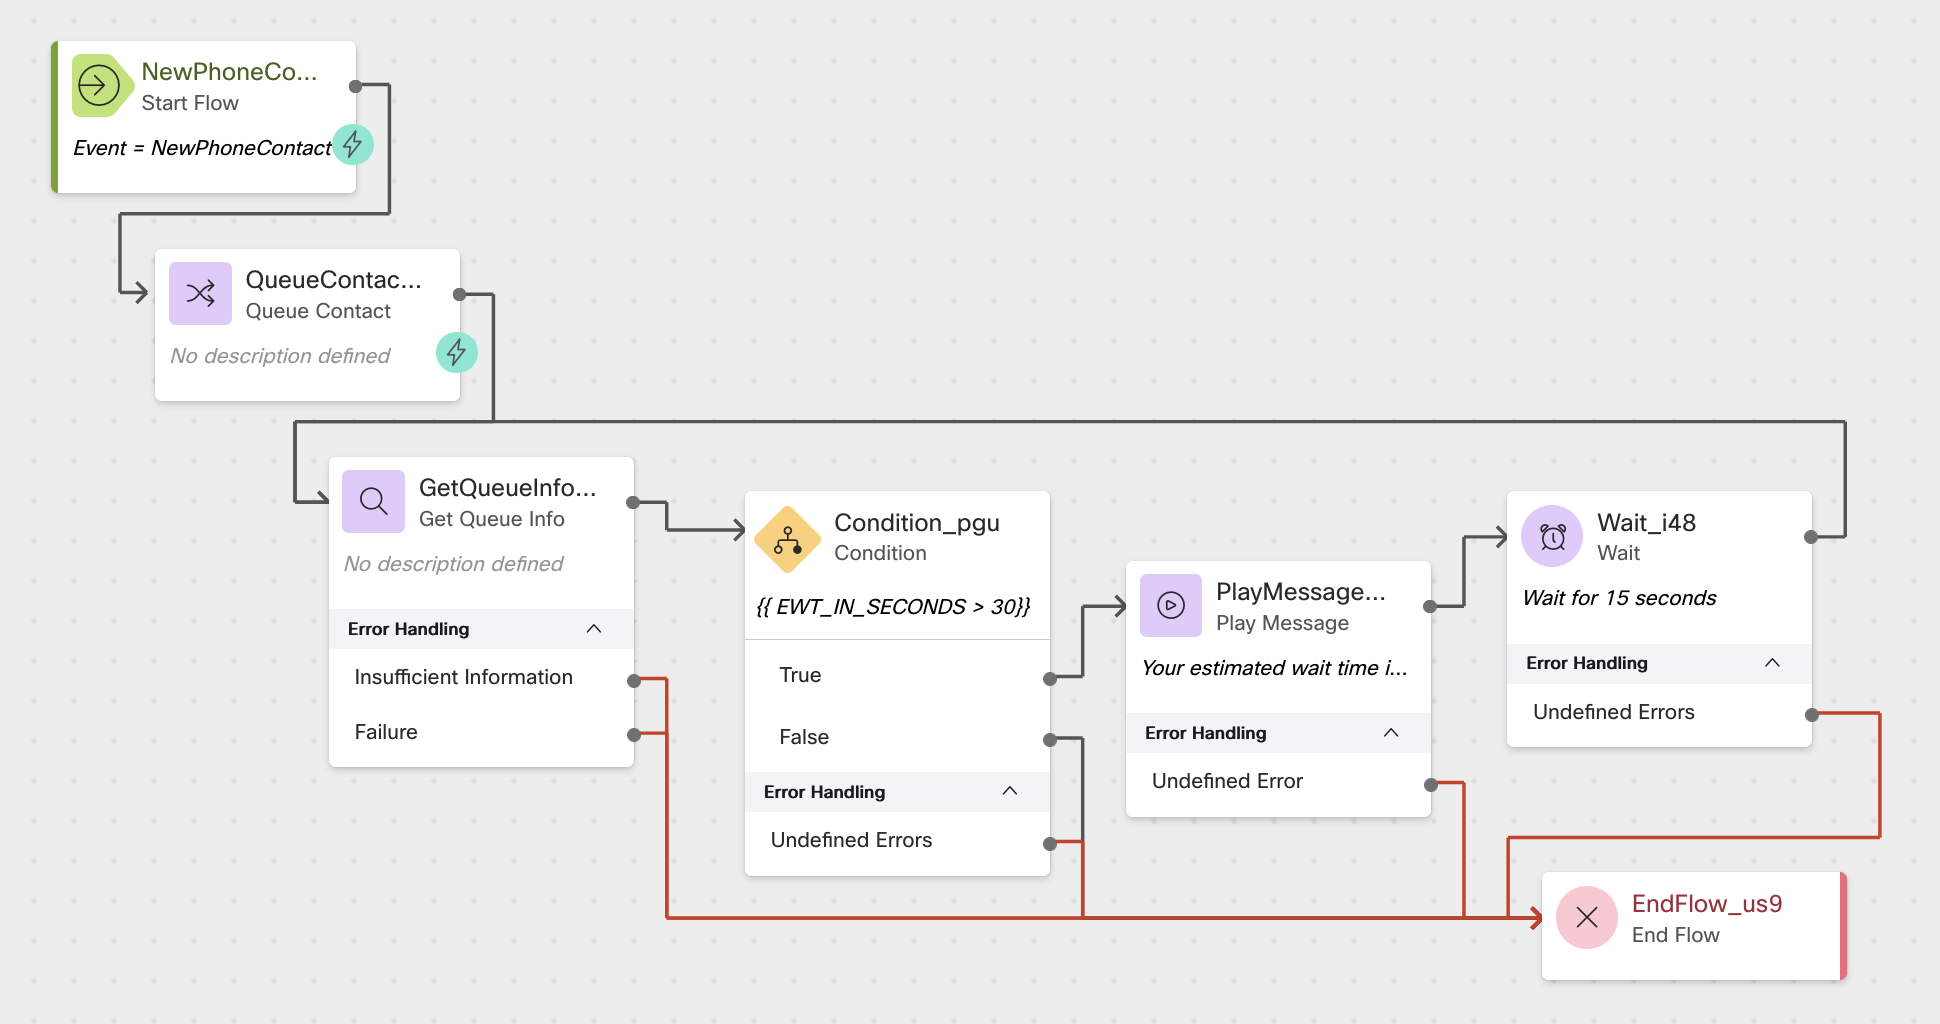
Consider an example scenario where the customer should be informed of a long EWT in the queue, after every 15 seconds spent in the queue.
This can be achieved using the Get Queue Info activity in the flow as follows:
Advanced Queue Info
The Advanced Queue Info activity provides the ability to fetch realtime queue information for a given contact, additionally considering the skill criteria of the contact into account, such as:
- The contact's current position in queue (PIQ), or the potential position if not yet queued.
- The number of agents logged in or available within the contact's current call distribution group, matching the given skill criteria.
- The number of agents logged in or available across all call distribution groups for the selected queue, matching the given skill criteria.
- The current call distribution group where the contact is parked in a provided queue.
- The total number of call distribution groups in a provided queue.
These details are made available in the flow execution as activity output variables.
For more information on the activity usage, the detailed definition and the method of calculation for each queue detail, see Build and manage flows > Advanced Queue Info.
Some of the ways to use the advanced queue information can be:
- To announce the contact's position in queue to the customer, while they are waiting to be routed.
- To escalate the contact to next call distribution group, if no agents matching the skill criteria are available in teams mapped to the current call distribution group.
- To decide whether a callback can be registered for the customer, if no agents matching the skill criteria are logged-in across all call distribution groups.
The Advanced Queue Info activity works when:
- The queue information is requested for queues where skill requirements are configured in the flow, rather than as queue-level skill criteria.
- If the contact is already queued, the information is requested for the same queue where the contact is currently queued.
- The contact is queued to a queue, not directly to a preferred agent.
Configure the Error Handling path to manage requests that don’t meet these requirements.
In such cases, the activity results in a failure, and the flow execution moves to the Error Handling path.
Consider an example scenario where the customer should be informed about receiving a callback considering no agents meeting the skill criteria are available.
This can be achieved by using the Advanced Queue Info activity in the flow as follows:
Call Control Activities
Set Caller ID
The Set Caller ID activity is used to define the caller ID that should display during a call. The Set Caller ID activity must be used only on PreDial Event Flows as a terminal activity that marks the end of the event flow.
The Set Caller ID activity allows configuring the required Automatic Number Identification (ANI) based on the Dialed Number Identification Service (DNIS), operation type, or participant type.
For more information on the activity settings, usage and output variables, see Build and manage flows > Set Caller ID.
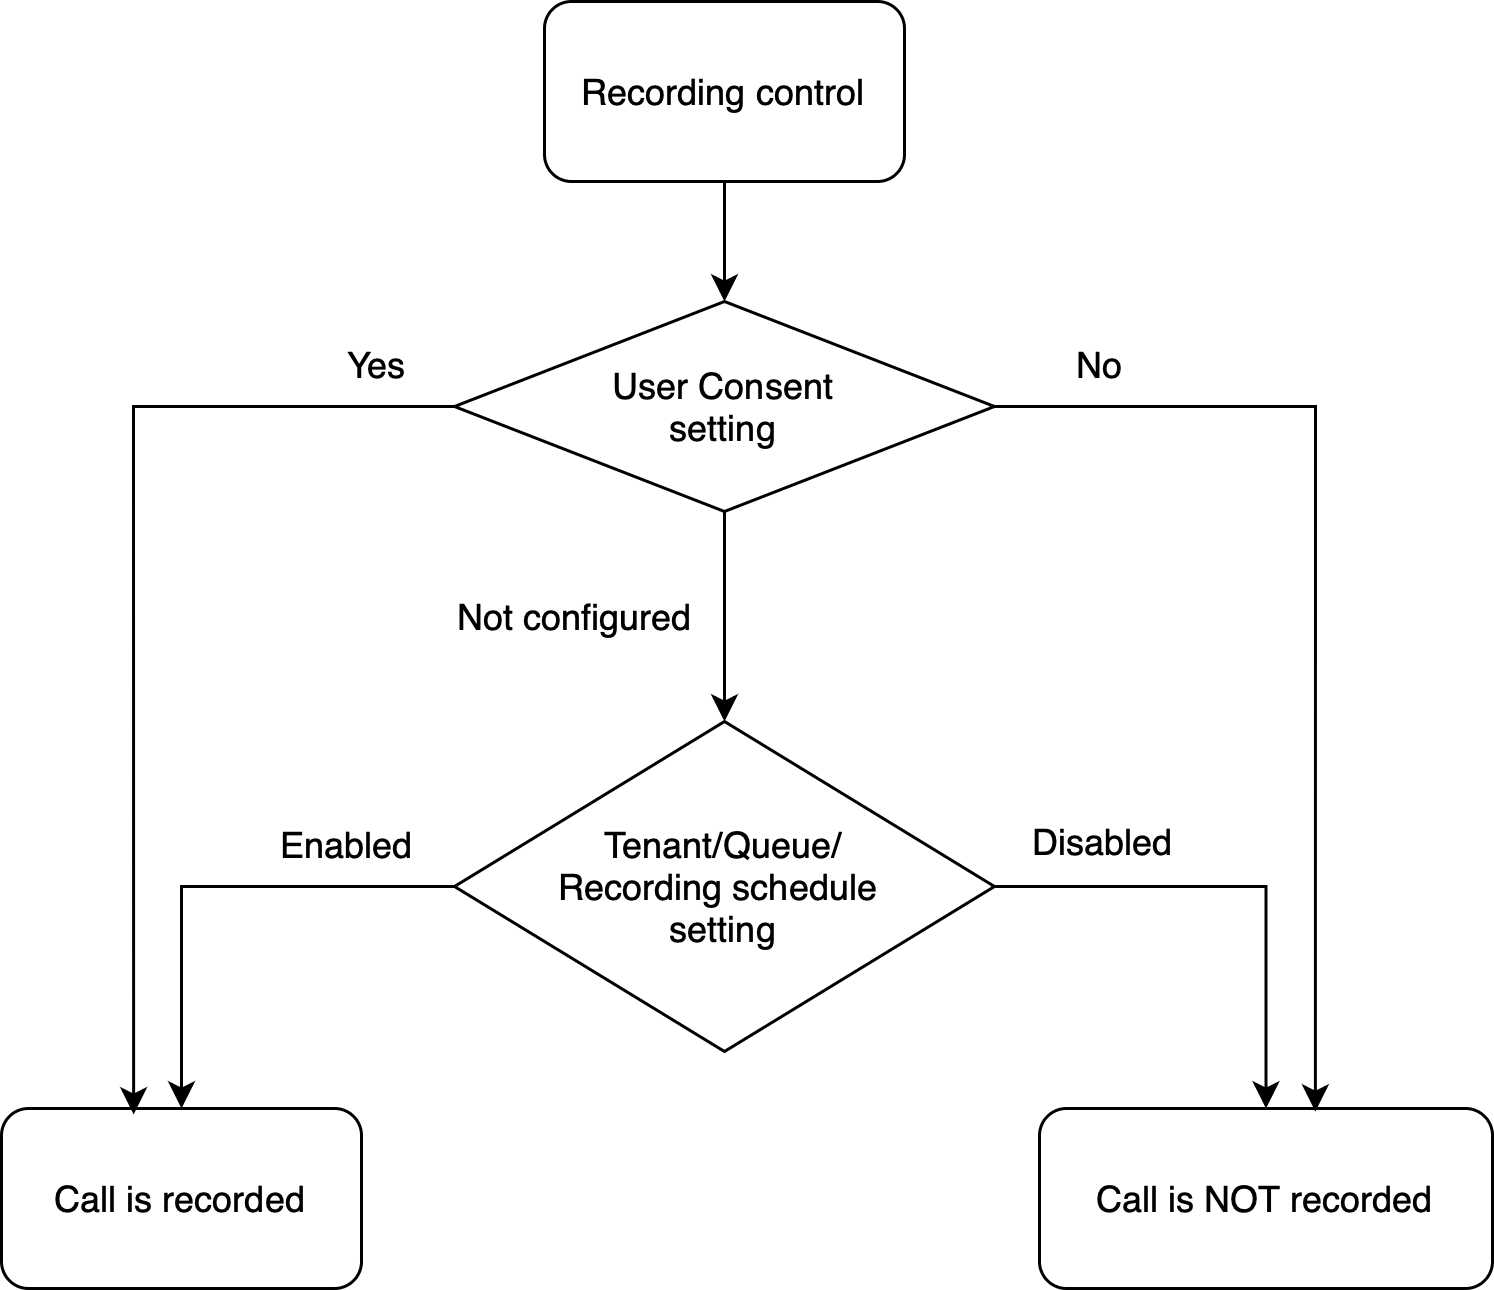
Recording Control
The Recording Control activity is designed to be used along with a Menu activity to capture recording consent from the caller. This ensures compliance with regulations or policies requiring explicit consent before recording begins, seamlessly integrating this step into the workflow.
The Menu IVR activity must capture the user’s consent into a Boolean variable which will be assigned as input to Recording Control activity. If the customer needs to report the user consent in a consent report, the consent value should be stored in a reportable global variable. Alternatively, a local variable can be used if reporting isn't required. This approach provides tenants and customers with enhanced flexibility in managing and utilizing variables effectively.
When this activity is added to the flow, the user’s consent takes precedence over the tenant level or queue level or recording schedule level configuration settings.
The precedence order is as follows:
- If the user consent is Yes in the flow, then the call is recorded, regardless of the recording configuration set at the tenant or queue or recording schedule level.
- If the user doesn’t consent as response to the activity, then the call is not recorded, regardless of the recording configuration set at the tenant or queue or recording schedule level.
- If the Recording Control activity is not configured in the flow, but a configuration is set to Yes at any one of the other levels such as tenant or queue or recording schedule, then the call is recorded.
- If the Recording Control activity is not configured in the flow, and a configuration is set to No at all levels such as tenant, queue and recording schedule, the call is not recorded.
This recording control can be illustrated as below:
Additionally, recording configurations like Continue On Transfer, Pause Resume Enabled, Pause Duration, and others remain applicable according to the existing hierarchy, including tenant, queue, or recording schedule levels.
For more information on the activity settings, usage and output variables, see Build and manage flows > Recording Control.
Blind Transfer
Blind Transfer is a process where a contact is efficiently routed to an external Dial Number (DN) through the IVR system, eliminating the need for agent involvement.
The Blind Transfer activity is used when a call must be transferred to an external or third-party DN. This is a terminal activity, so the flow ends once transfer is executed.
Blind Transfer activity is not supported when the flow is executed for consult.
For more information on the activity settings, usage and output variables, see Build and manage flows > Blind Transfer.
Bridged Transfer
The Bridged Transfer activity allows a contact to be temporarily transferred to an external destination while the flow retains control of the call. The external destination can be an external bridge or an Interactive Voice Response (IVR) service.
When the external destination ends the call, the call flow continues further as required, like queuing it to an agent.
The Bridge Transfer activity dequeues a contact while transferring it to a third-party IVR or automatic call distribution (ACD) system. If the contact is not handled by the third-party system, it can be re-queued back into the original queue, ensuring the contact remains in the workflow for appropriate handling.
For example, assume a contact center has Webex Contact Center agent resources and agent resources on an external call center or Private Branch Exchange (PBX). The customer wants to queue a call against a queue of Webex Contact Center agents for a brief period (say 60 seconds). If no agent is available during that period, the call can then be bridge transferred (with an implicit dequeue) to the external call center for handling the contact.
- Bridged Transfer activity is not supported in outbound call flows and event flows.
- Contacts that are already assigned to an agent are not supported to Bridge Transfer through the flow.
For more information on the activity settings, usage and output variables, see Build and manage flows > Bridged Transfer.
Disconnect Contact
The Disconnect Contact activity provides the ability to disconnect or end an active contact directly from the flow.
This is a terminal activity attached in the flow and can be useful in ending contacts without an agent intervention, suitable for the error path flows or after registering a callback for the customer.
Based on the configuration, the post call survey or feedback is triggered when the contact is ended through this activity.
For more information on the activity settings, usage and output variables, see Build and manage flows > Disconnect contact.
Set Contact Priority
The Set Contact Priority activity facilitates effective contact priority management within the flow by allowing the assignment of specific priority levels to contacts. This enables certain contacts to be given higher or lower importance, ensuring they are routed appropriately in comparison to other waiting contacts when agents become available. This flexibility allows for precise control over contact prioritization throughout the flow.
The priority is established by assigning a hierarchical importance level from 1 (highest) to 9 (lowest). Contacts with the highest priority are routed before those with lower priorities. When multiple contacts share the same priority level, the contact that has been waiting the longest is routed first to the next available and eligible agent. This system ensures that higher-priority contacts receive prompt attention while maintaining fairness among contacts of equal priority based on their wait time.
- The Set Contact Priority activity can be placed at any point within the main or event flow.
- If the Set Contact Priority activity is configured before a queueing activity (such as Queue Contact or Queue To Agent), its priority setting may be overridden by any priority explicitly configured in the subsequent queueing activities. However, if the following queueing activity does not specify a priority, the contact priority set by the earlier Set Contact Priority activity will be applied.
- Conversely, if the Set Contact Priority activity is configured after a queueing activity (such as Queue Contact or Queue To Agent), it will override the priority setting configured by the preceding queueing activity.
- The Set Contact Priority activity is currently unsupported for outdial and campaign contacts.
For more information on the activity settings, usage and output variables, see Build and manage flows > Set Contact Priority.
Callback Activities
Callback
A Callback activity allows callers to request a callback rather than waiting on hold, significantly improving customer satisfaction by reducing wait times and minimizing abandonment rates. When activated, the Callback activity creates a task in a queue, ensuring an available agent can return the customer's call.
The flow designer can configure the activity to either keep the contact in the original queue, where the call originated, or assign it to a different queue based on preferences. If the callback stays in the original queue, the contact maintains its position, skills, priority, and contextual data, allowing for seamless assignment to the next available agent. However, if a different queue is selected, the contact is pushed to the end of the selected queue with no skills and with default priority.
The activity also allows customers to request callbacks from their preferred agents, adding a personal touch to the experience and enhancing customer satisfaction. This can be achieved when the callback activity follows a QueueToAgent activity in the flow. Additionally, the Callback activity offers an optional configuration for customizing the Automatic Number Identification (ANI) used during the callback process. This customization helps in brand consistency and reduces the likelihood of call rejection by ensuring a recognizable Caller ID.
The flow designer has the option to include a CallbackFailed event in the event flow. This event is triggered when a callback attempt fails, enabling the flow designer to implement retries at specific intervals. The delay or interval between retries can be configured using the Wait activity, with a minimum retry interval of 10 seconds and a maximum of 72 hours. The system supports up to 10 retry attempts across a maximum span of 14 days using the Wait activity.
For more information on the activity settings, usage and output variables, see Build and manage flows > Callback.
Schedule Callback
The Scheduled Callback activity empowers the flow to offer customers the convenience of requesting a callback at a specific future date and time—eliminating the need for immediate connection to an agent. This feature improves the customer experience by enabling them to select a convenient callback window, thereby minimizing perceived wait times and decreasing call abandonment rates.
The flow must capture the caller’s inputs, such as preferred date and time, via DTMF prompts and pass them to the activity after performing the necessary input validations.
Before getting started, please make sure the Callback Default Entry Point is configured under Channel Settings in the Control Hub. For more information, see Setup a callback entry point.
The callback can be scheduled using any telephony queue—whether inbound or outbound. For best results, it’s recommended to add a Disconnect activity immediately after the Scheduled Callback activity to ensure the current call ends properly once the callback is scheduled. For more information on scheduling IVR callbacks, see Schedule IVR Callbacks.
When the callback is triggered at the requested future date and time, a new call or interaction is created. This new interaction will follow the standard flow linked to the Callback Default Entry Point. If the callback attempt fails, the flow can automatically retry the call using the CallbackFailed event handler if configured in that flow.
The following input validations should be considered before passing inputs to the activity:
- Date Selection—You can choose any date from today up to 31 days in the future. The date must be in this format: YYYY-MM-DD (for example, 2025-07-18).
- Time Window Start and End Time—The time you choose must start at least 30 minutes from now and can last anywhere between 30 minutes and 8 hours. Please use 24-hour time format (like
14:30:00). - Timezone—You must enter a valid timezone in IANA format (like
America/New_York) so we can call you at the right time.
A reference implementation is provided the form of a sub flow template to demonstrate the DTMF prompts and basic validations that are used along with the activity. For more information, see Scheduled Callback Subflow template.
Call Progress Analysis
The Call Progress Analysis activity (CPA) enables the detection of automated answering systems and live human voices on Callback calls.
When a callback attempt encounters an Answering Machine Detection (AMD) or voicemail, the system identifies the call as unsuccessful. The result of Answering Machine Detection (AMD) is captured in the reason output variable of the CallbackFailed event handler. Based on this output variable, the flow designer can configure callback retries.
- For courtesy callback, the CallProgressAnalysis can be placed at a point after the Callback activity in the main flow. For scheduled callback or personal scheduled callback, it can be placed after NewPhoneContact in the main flow.
- In the event flow, it is supported only in CallbackFailed event handler.
- If a post call customer survey (Feedback activity) is configured in the flow, it will not be initiated if call is answered by an AMD or voicemail. This prevents triggering unnecessary surveys.
For more information on the activity settings, usage and output variables, see Build and manage flows > Call Progress Analysis.


