- Home
- /
- Article

Thanks for your feedback.

Configure Voice Outbound Campaign Modes in Webex Contact Center
 In this article
 Feedback?
Voice Campaigns are used as an outreach mechanism to reach customers for various use cases such as sales outreach, collection, market research, event promotion and other notifications.
Overview
These campaigns can be agent based, indicating that the primary goal is to reach customers and connect them with human agents, or they can be IVR campaigns, where the goal is to reach customers and either play them a message, or connect them to a virtual agent for further treatment.
This article is intended to provide an end-to-end procedure on how to configure voice based outbound campaigns in Webex Contact Center. This procedure also covers configurations of other dependent component applications such as Control Hub, Campaign Manager LCM (List and Campaign Manager), and Webex Contact Center Agent Desktop.
For agent based campaigns, there are three primary types of campaigns, Preview, Progressive, and Predictive. The following is a brief summary of each.
Preview is offered with the Webex Contact Center dialer using a similar mechanism to Progressive/Predictive, whereby the agent is reserved prior to being presented with a customer record. An older, 'pull based model', whereby the agent had to click an icon on their desktop to see the customer record is still in use, but will not be described in this user guide.
The Webex Contact Center provides a dialer which can drive outbound Predictive, Preview, and IVR Campaigns. It must be utilized with a Campaign Manager which provides the ability to manage campaigns, scrub the dial list for any phone numbers which are part of a Do-Not-Call list, and has a compliance module which ensures that the campaign is operating within the regulations for the region it is deployed in.
Webex Contact Center supports the Webex Contact Center Campaign Manager, an OEM Campaign Manager, as well as pluggable "Bring your own" Campaign Managers which utilize the Webex Contact Center Dialer APIs to operate the Campaigns.
Types of Outbound Campaign Modes
The following types of outbound campaign modes are available in Webex Contact Center.
Outbound Preview Campaign Modes
An agent who is not handling active contacts can click the Campaign Contact icon in the Agent Desktop to initiate an outbound preview campaign call. Campaign Management synchronizes the agent state and team information for the enterprise in real-time. Campaign Management dynamically retrieves a contact to whom an agent can dial out to, based on the preview campaigns that are currently active for the agent's team. There can be multiple campaigns that are active at the same time. The contact details are displayed to the agent. The agent can then make the outbound preview campaign call.
For more information on how to make outbound preview campaign calls, see Make an outbound preview campaign call.
Outbound Progressive Campaign Modes
Agents don't need to manually initiate the outbound call in the Progressive dialer. When an agent completes a call and moves to the Available state, the dialer will automatically reserve the agent and dials one or more contacts for every available agent (based on the configured lines to dial per agent). In progressive mode, the number of lines to dial is fixed based on the configuration of the campaign.
For more information on how to make outbound progressive campaign calls, see Make an outbound progressive campaign call.
Outbound Predictive Campaign Mode
Predictive campaign calls are very much similar to progressive calls. Agents don't need to manually initiate the outbound call in the Predictive dialer. When an agent completes a call and moves to the Available state, the dialer will automatically reserve the agent and dials one or more contacts for every available agent (based on the current lines to dial per agent). In predictive mode, the number of lines to dial varies throughout the day in order to maximize agent efficiency while maintaining the configured abandon rate on the campaign.
The system does not support Auto Answer for predictive campaign calls.
IVR Based Campaign Calls
As a part of proactive outreach functionality, IVR based campaigns enable administrators to configure predictive dialers for agents to dial IVR based campaign. This feature completes the campaign offering with Campaign Manager by enabling outbound IVR-based campaigns, allowing proactive outreach to customers without utilizing live agents. The administrator configures a set number of IVR ports to pace the outbound calls in the campaign. IVR ports are utilized when calling a customer and either playing a set of messages or sending them to an AI Agent to collect information. IVR Ports become free if the call is sent to a live agent or the call with the customer completes.
IVR campaigns are available in two modes:
- IVR progressive mode
- IVR predictive mode
For more information on additional steps to configure IVR campaign types, see step-7 below.
The following diagram depicts a summarized workflow that administrators of the respective components perform to set up outbound campaign calls:
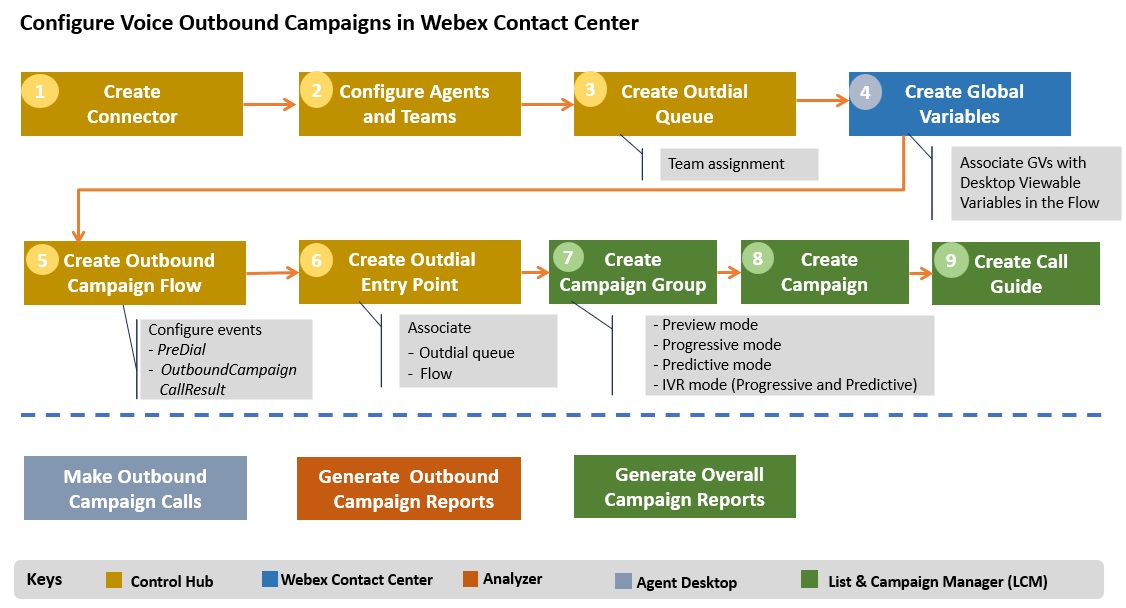
Steps to configure outbound campaign calls
Before you begin
-
You can configure and use outbound campaigns only if your enterprise has purchased the premium agent license and the Campaign Manager SKU.
-
For outbound progressive campaign calls, make sure that you use Campaign Manager LCM version 4.2.1.2310 and above.
- For outbound predictive campaign calls, make sure that you use Campaign Manager LCM version 4.2.1.2401 and above.
-
You must have the administrator role and access credentials for the following applications:
-
Control Hub
-
Webex Contact Center
-
-
Contact your Account Manager to procure the user ID and password to access LCM.
| 1 |
Set up Connector to integrate LCM application with Webex Contact Center. |
| 2 |
In Control Hub, create Agents and Teams. Configure the same team in the outdial queue as confirmed in Campaign Manager. For more information on how to create Agents, see Manage User Profiles in Webex Contact Center. For more information on how to create Teams, see Manage Teams in Webex Contact Center. |
| 3 |
In Control Hub, configure an Outdial Queue for every campaign with the following settings:
Only a single call distribution group can be added. The agents in the teams selected will be utilized for the progressive campaign and will be reserved by the dialer once they are in the available state. The maximum number of agents supported in a queue are 500. When you create the outdial queue for the Progressive or Predictive campaign, choose the maximum time in queue to a large enough time interval to avoid the agent reservation requests from timing out frequently. The recommended value is 3600 seconds. For more information on how to create an outdial queue, see Create an Outdial Queue. |
| 4 |
In Management Portal, create the required Global Variables of type String. For this purpose, create global variables for the customer data that is imported into Campaign Manager. Do not make global variables reportable if they contain Personally Identifiable Information (PII). Set Agent Viewable as True for any variable that you want to show on the Agent Desktop. You can create a maximum of 28 global variables for this purpose. Global variables derived from the campaign manager are accessible within the flow, with the following exception for direct preview calls:
For all other campaign call types, all derived global variables are accessible. |
| 5 |
In Control Hub, create a flow for the Outbound Campaign calls.
|
| 6 |
In Control Hub, configure an Outdial Entry Point for every campaign with the following settings:
For more information on how to create an outdial entry point, see Create an Outdial Entry Point. |
| 7 |
Configure outbound campaign groups using the Campaign Manager interface. For more information about how to configure campaigns using Campaign Manager, see Cisco Webex Contact Center Campaign Manager User Guide. |
| 8 |
Configure outbound campaigns and the questions and answers to display in the call guide at the campaign level using the Campaign Manager interface. For more information about how to configure campaigns using LCM, see Cisco Webex Contact Center Campaign Manager User Guide. |
| 9 |
Create a Call guide using the Campaign Manager interface. For more information, see Call Guide and Form topics in Cisco Webex Contact Center Campaign Manager User Guide. |
What to do next
- Agents can then initiate and make outbound campaign calls from the Agent Desktop. For more information, see Make an outbound preview campaign call and Make an outbound progressive campaign call.
-
Access and configure overall outbound campaign reports available in the Cisco Webex Contact Center Campaign Manager modules. For more information on Campaign Manager LCM reports, see Webex Contact Center Campaign Manager Reports Manual.
- In addition, administrators and supervisors can view campaign statistics via the OEM Integration with Campaign Manager report, to measure the effectiveness of the campaigns. The outbound campaign reports are available in Webex Contact Center Analyzer User Guide.
Post-configuration tasks
Calling line identifiers
The calling line that the customer sees can be customized in three different ways. The most common approach is to associate a single calling line identifier (CLID) with the campaign. It is also possible to provide an individual CLID with each record (Please see the Campaign Manager documentation to achieve this). Finally, the predial event may be configured in the flow in order to perform flow specific ANI selection. The precedence order for these approaches is as follows:
-
CLID on the Campaign (lowest precedence)
- CLID on the individual record
-
PreDial event with SetCaller ID (highest precedence)
Agent Experience for Predictive/Progressive
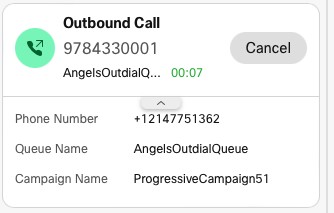
Agents who are working in a predictive or progressive campaign who are selected for the campaign are first reserved by the Campaign and a physical call is placed to their device/desktop (called a reservation call). The agent will be able to see the campaign id that they are being reserved for in the incoming popover, as shown in the figure below. Once answered, the agent remains reserved while the dialer calls on their behalf with 1 or more customer calls per agent. Once a live customer is reached, the customer call is sent to the agent and the agent will hear a 'zip tone' in their headset as the call connects. Additionally, the interaction panel will fill with any customer metadata configured which is specific to the customer.
At the conclusion of a customer call and once the agent performs wrap-up, they will transition to the available state where they may once again be selected for a campaign call, or perhaps an inbound call if the agent is setup to blend between inbound and outbound.
In the event that an agent wants to exit the reservation state before a customer call is sent to them, they may set their state as Idle and drop the reservation call (either on the telephony device or via webRTC if the webRTC desktop is in use).
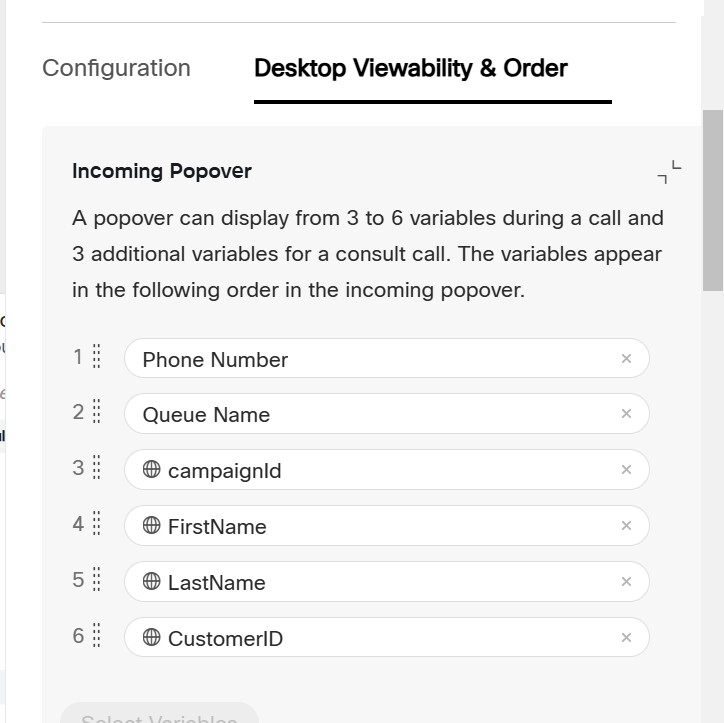
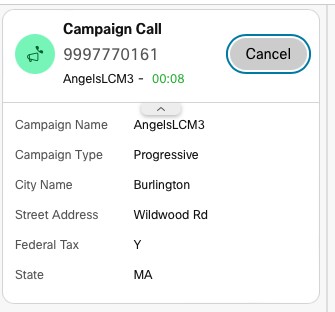
When running a progressive Campaign with a dial rate of 1, a special mode is activated which allows the agent to view a subset of customer metadata in the incoming popover (up to 6 fields may be selected). This is achieved by setting those customer fields in the incoming popover, as shown in the figure below:
Then, when the customer call is being dialed by the dialer, it will display the customer metadata as shown below:
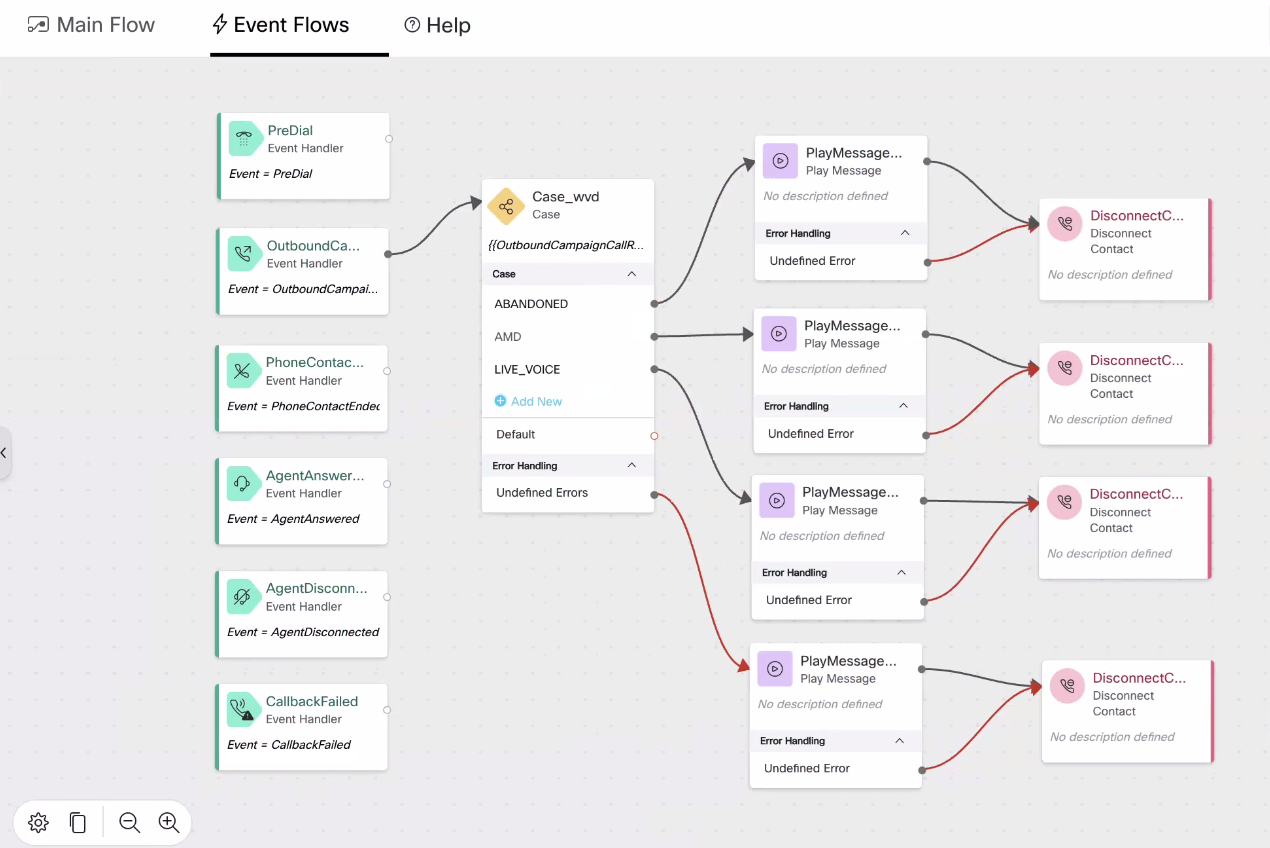
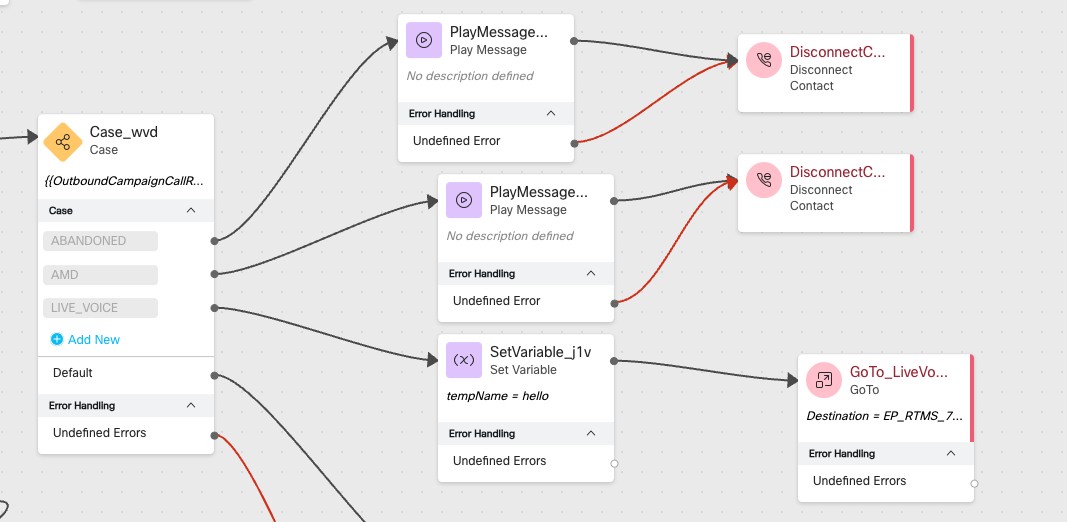
When a LIVE_VOICE customer is reached in an IVR Campaign, they may be played a message (as shown in the diagram), or sent to an AI Agent for more intelligent interactions. Additionally, the call may be escalated to a live agent if desired. In order to do this, a separate flow must be utilized which either queues to a queue or an agent. The destination flow must be associated with an inbound entry point. The "Goto EP" activity must be utilized from the original flow to direct the call to the destination flow where it will escalate to a live agent, as shown in the figure below:
Blending of Campaign Agents
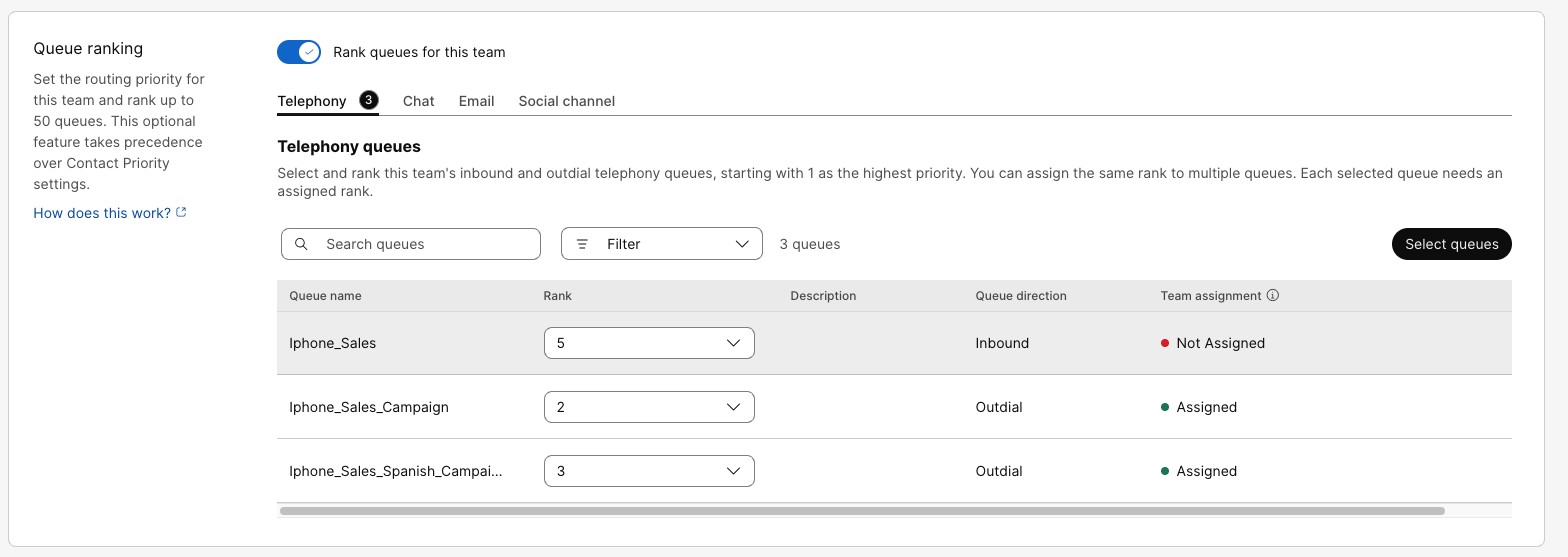
This is applicable only for agent based campaigns. Agents who work on outbound campaigns can be 'blended' between inbound and outbound calls, as well as between multiple campaigns. By default agent reservations for progressive/predictive campaigns are prioritized lower than inbound calls. Therefore, if it is desirable to always favor inbound calls over campaign calls, no configuration is required. When the agent becomes available, an inbound call will be selected above a campaign reservation if an inbound call exists in a queue that the agent belongs to. Alternatively, campaign calls can be given precedence above inbound calls if desired by using the "Queue Ranking" feature configured on the agent team. As shown in the diagram below, set the campaign queue at a higher rank as compared to any inbound queue. For example, the Iphone_Sales_Campaign queue is set at a higher precedence than the Iphone_Sales queue, which is an inbound queue.
Campaign Reporting
In addition to the more detailed Campaign Reporting which is available on the Campaign Manager, there are a series of Campaign reports which provide a breakdown of all the calls made in Predictive/Progressive/Preview or IVR campaigns. The stock Campaign Reports will populate regardless of which Campaign Manager is utilized.
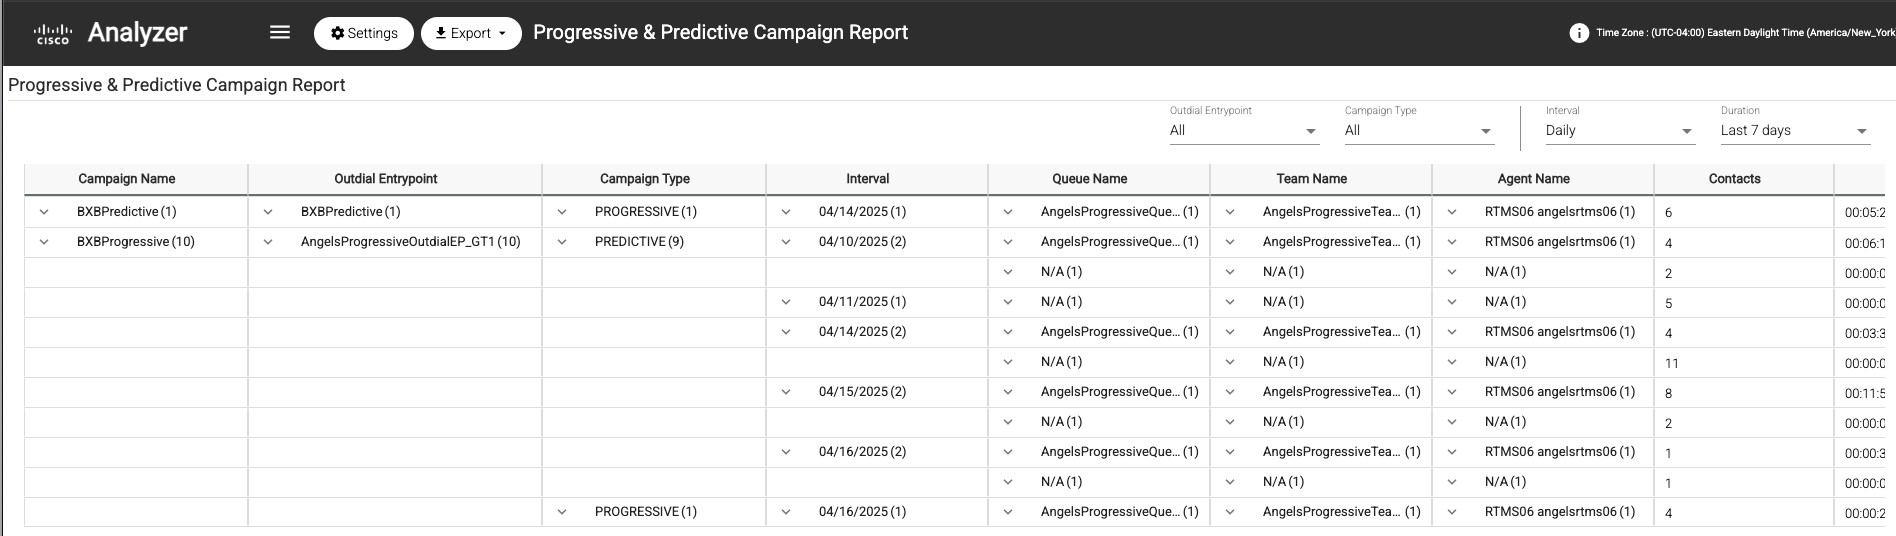
The following screenshot shows the predictive/progressive report, which groups predictive and progressive calls together. Each row can be "drilled down" further to gain further insights.
Campaign APIs
To know how to use the Campaign APIs, see Campaign Manager Outbound Dialers document.
Error scenarios and notifications
The following table describes the notifications that are displayed during different error scenarios:
|
Error |
Notification description |
|---|---|
|
Invalid number format |
When an agent attempts an outdial and direct preview campaign call in the Webex Contact Center Agent Desktop and enters a phone number that is not recognized as valid (due to incorrect format, unsupported country code, or dial plan restrictions), the system displays an error pop-up indicating the number is invalid. The agent is prompted to try another number, and a Tracking ID is provided for further troubleshooting. |
|
Invalid number |
When an agent attempts an outdial and direct preview campaign call in the Webex Contact Center Agent Desktop and dials a phone number that is not available (for example, the number is not currently reachable, is disconnected, or not in service), the system displays an error pop-up indicating the number dialed isn't available. The agent is prompted to try another number, and a Tracking ID is provided for further troubleshooting. |
|
Network issue |
When an agent attempts an outdial and direct preview campaign call in the Webex Contact Center Agent Desktop and the call is not connected due to a network issue, the system displays an error pop-up indicating the call couldn’t connect due to a network problem. The agent is prompted to try again, and a Tracking ID is provided for further troubleshooting. |
|
Customer Declined |
When an agent attempts an outdial and direct preview campaign call in the Webex Contact Center Agent Desktop and the recipient declines the call, the system displays an error pop-up indicating the customer declined the call. The agent is prompted to try again, and a Tracking ID is provided for further troubleshooting. |
|
Customer Busy |
When an agent attempts an outdial and direct preview campaign call in the Webex Contact Center Agent Desktop and the recipient’s line is currently busy, the system displays an error pop-up indicating the customer is busy. The agent is prompted to try again, and a Tracking ID is provided for further troubleshooting. |
|
Customer Unavailable |
When an agent attempts an outdial or direct preview campaign call in the Webex Contact Center Agent Desktop and the call is not connected because the customer is temporarily unavailable. The system displays an error pop-up indicating the same. The agent is informed that the call may succeed if retried later. A Tracking ID is also provided for reference and further troubleshooting if needed. |


