Thanks for your feedback.
Cisco Webex Meetings for Zapier
 Feedback?
Before you begin
Make sure to create a Zapier account if you don't already have one. After you've done that, use the following steps to connect the Cisco Webex Meetings app for Zapier to your Webex Meetings account and make a Zap.
Zapier supports the Cisco Webex Meetings New Meeting trigger. Use it to create a Zap that triggers an action when you create a new Webex meeting.
| 1 | |
| 2 |
If you’re not logged in, click Log In in the upper-right corner. |
| 3 |
Click Make a Zap. |
| 4 |
In the Choose a Trigger App list, search for and select Cisco Webex Meetings. |
| 5 |
For the trigger, select New Meeting and click Continue.  |
| 6 |
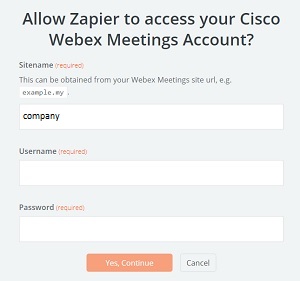
If this is your first time using the Cisco Webex Meeting app for Zapier, Zapier prompts you to connect your Webex Meetings account.
|
| 7 |
If you've used the Cisco Webex Meetings app for Zapier before, select your Webex Meetings account and click Continue. |
| 8 |
When you're prompted to pick a sample, select the Webex meeting that you want to use as a trigger and click Continue. If you haven't created the Webex meeting, go to your Webex site to schedule a new Webex meeting. Then, return to Zapier and click Pull in Samples or Get More Samples. |
| 9 |
Add another app action to follow the New Meeting trigger and set any other options to complete your Zap workflow. |
| 10 |
When you’re done, click Continue and then click Finish. |
| 11 |
After you've tested your Zap, switch it on. |