- Home
- /
- Article

Thanks for your feedback.

Cisco AI Assistant for Webex Contact Center: Administrator's guide to configuring Real-Time Assist (formerly called Suggested Responses)
 In this article
 Feedback?
Overview
Real-Time Assist is a Cisco AI Assistant feature designed to support agents during live customer interactions by continuously understanding the conversation context, identifying customer intent, and providing relevant recommendations instantly. It guides agents in real time by suggesting what to say or do, helping navigate complex procedures, and even initiating workflows automatically. Real-Time Assist enhances accuracy, reduces handling time, and ensures a consistent, high-quality customer experience across every live channel by acting as a real-time AI Assistant to the agent.
Enable Real-Time Assist for Webex Contact Center
Administrators can enable and manage the Real-Time Assist feature for agents, helping improve communication efficiency, agent performance, and customer satisfaction.
Real-Time Assist is an AI Assistant feature in Webex Contact Center that enhances agent productivity and customer satisfaction. This feature leverages advanced artificial intelligence (AI) to provide contextual guidance to human agents during both inbound and outbound voice interactions and inbound digital customer interactions, supporting both voice and digital channels. Real-Time Assist aims to transform the agent experience by offering timely, relevant suggestions on what to say and what actions to take directly within the Agent Desktop. This proactive assistance streamlines workflows, reduces response times, and ensures consistent, high-quality service delivery.
As a Webex Contact Center administrator, you can enable and manage the Real-Time Assist feature for your organization. This process involves ensuring your system meets the necessary prerequisites and activating the feature within Control Hub. Once enabled, you can configure AI Assistant skills to tailor the suggestions provided to your agents.
Prerequisites
Before enabling Real-Time Assist, ensure that your Webex Contact Center organization meets the following requirements:
-
Webex Contact Center Flex 3.0: Your contact center must be running on the Flex 3.0 platform.
-
AI Assistant add-on SKU: Your organization must have purchased the A-FLEX-AI-ASST add-on SKU. This entitlement grants access to all AI Assistant features, including Real-Time Assist. For information on managing your subscription and usage, refer to the Usage and Billing Documentation.
-
Media forking for voice interactions: For voice interactions, media forking must be enabled in Flow Designer for the relevant queues. See the Enabling media streaming for specific queues article.
-
Webex Connect enabled: Enable Webex Connect to create actions and automate workflows.
-
Required user permissions: You must have the necessary Role-Based Access Control (RBAC) privileges to access and modify contact center settings in the Control Hub. Specifically, your role should include access to Real-Time Assist. For more information, see the Manage user profiles in Webex Contact Center article.
Who can use this feature
Real-Time Assist is useful for the following stakeholders:
-
Agents: Benefit from real-time contextual suggestions, reducing the effort required to find information and improving response accuracy.
-
Administrators: Manage and configure Real-Time Assist settings at the organization and queue levels, create and optimize AI Assistant skills, test and debug configurations, monitor performance, and continuously optimize the feature for their contact center.
Benefits
Implementing Real-Time Assist delivers significant benefits across your contact center:
-
Enhanced agent efficiency: Agents spend less time searching for information or consulting colleagues, leading to quicker resolutions and improved productivity.
-
Reduced handle times: Immediate, accurate suggestions help agents resolve queries faster, directly impacting Average Handle Time (AHT).
-
Consistent customer experience: Ensures all agents, regardless of experience, provide accurate and consistent information, enhancing the overall customer experience.
-
Reduced after-call work: Agents can complete necessary actions and documentation during the interaction, minimizing post-call tasks.
-
Improved first contact resolution: With immediate access to relevant information and actions, agents are better equipped to resolve customer issues on the first contact.
-
Reduce onboarding times for new hires: New agents gain confidence and proficiency faster with real-time AI guidance.
-
Scalability: Supports your growing contact center by enabling agents to handle higher volumes of interactions more effectively.
-
Dual-channel capability: Supports both inbound and outbound voice calls, as well as inbound digital interactions, providing real-time suggestions whether agents engage with customers through phone calls or digital channels like chat or email.
How Real-Time Assist work
Real-Time Assist integrates seamlessly into your contact center operations through the following high-level flow:
-
Interaction begins: A customer initiates a voice or digital interaction that is routed to an agent through a configured queue, or an agent initiates an outbound voice interaction.
-
Real-time transcription: For voice interactions, the conversation is transcribed in real-time. For digital interactions, text is captured.
-
Agent receives suggestions:
To request support, agents must open the AI Assistant and click Get Assistance.
Agents can select Get Assistance any time at the start of a call or during the conversation, whenever they require help.
After clicking Get Assistance, the AI Assistant can continue to provide suggestions and guidance throughout the remainder of the call.
If agents choose to activate Get Assistance midway through a call, the AI Assistant uses the full context of the call, including information from the beginning, to generate relevant suggestions.
Agents can minimize the AI Assistant panel at any time and reopen it as needed, without losing access to ongoing assistance.
When you enable notifications, you receive alerts whenever new suggestions are available from the AI Assistant. Administrators are encouraged to advise agents to keep notifications enabled to maximize the benefits of real-time guidance.
-
AI Assistant skill processes: The AI Assistant skill, linked to the specific queue and powered by its knowledge base and defined actions, analyzes the real-time conversation (transcript for voice, text for digital).
-
Suggestions generated: The AI Assistant skill generates relevant text suggestions for replies or proposes actions based on the customer's query.
-
Agent reviews and acts: The agent reviews the suggestions and chooses to use them as-is, modify them, or execute the suggested actions.
-
Continuous support: Suggestions continue to be provided throughout the interaction, adapting to the evolving conversation.
Usage guidelines
The Real-Time Assist feature requires careful management to ensure ethical use and enhance communication. As an administrator, you are responsible for informing agents about the feature's enablement and its AI-powered nature.
For more detailed information on usage guidelines and privacy, refer to the AI Transparency Note.
How to enable Real-Time Assist
Follow these steps to activate the Real-Time Assist feature for your Webex Contact Center:
| 1 |
Sign in to Control Hub and navigate to Services > Contact Center. |
| 2 |
Go to AI Assistant under Desktop Experience in the navigation pane. |
| 3 |
Toggle on Real-Time Assist to enable the feature at the organization level. |
| 4 |
Click Assign AI Assistant skills and select the AI skill you want to assign to your queue. Add one or more queues to the selected skill and save your changes. These skills determine the type of suggestions agents will receive in each queue. If the specific AI Assistant skill you wish to assign is not yet listed, or for a first-time setup where no skills have been created, click Create and manage AI Assistant skills to create a new skill in the Webex AI Studio. After creating the skill, return to this screen and complete the assignment process. For more information on assigning skills to queues, refer to the Link AI Assistant skills to queues article. |
Webex Contact Center can give agents real-time, AI-powered guidance to improve customer conversations and boost efficiency. This feature uses AI Assistant skills—created and managed in Webex AI Studio—to analyze conversation transcripts and suggest helpful responses or actions to agents.
As an administrator, you will set up, configure, and maintain this feature. This article guides you through the entire process and links to detailed articles for each step. Following these steps will help you successfully implement and optimize Real-Time Assist in your organization.
To implement Real-Time AI Assist, follow these steps:
-
Activate the feature in Webex Contact Center—Begin by activating the Real-Time Assist feature in Control Hub and ensuring all prerequisites are met. This foundational step is required for further configuration, and involves the following activities:
- Enable Real-Time Assist in Control Hub.
- Verify licensing requirements.
- Ensure supporting services, such as real-time transcriptions are ready.
For more information, see Enable Real-Time Assist for your Webex Contact Center.
-
Define and manage AI Assistant skills— Create the AI intelligence that powers Real-Time Assist using the Webex AI Studio. This step involves the following activities:
-
Create new AI Assistant skills in Webex AI Studio.
-
Define the goals for each skill.
-
Link skills to relevant Knowledge Bases.
-
Configure specific actions for each skill.
For more information, see Create and manage AI Assistant skills and Configure actions for AI Assistant skills.
-
-
Configure AI Assistant skills to queues—Integrate configured AI Assistant skills into your live contact center environment by assigning them to specific queues. This step involves the following activity:
-
Assign AI Assistant skills to queues—To ensure that Real-Time Assist provides relevant and timely guidance, you must accurately link AI Assistant skills to the appropriate queues in your Webex Contact Center. This ensures that when a human agent handles an inbound or outbound customer interaction from a specific queue, the system knows exactly which AI skill should provide suggestions based on the type of customer query handled by that queue.
For more information on effective linking of queues, see Effectively link queues.
-
-
Monitor and optimize real-time assists—After deployment, verify functionality, monitor performance, and iteratively refine your configurations for maximum effectiveness. This step involves the following activities:
-
Test AI Assistant responses using preview features.
-
Analyze impact on agent performance.
-
Use session data for auditing and debugging.
For more information, see Test and monitor Real-Time Assist performance.
Deployment is an iterative process. Regularly monitor the performance of Real-Time Assist and use insights from monitoring and optimization to adjust your AI Assistant skills and actions. This continuous improvement loop helps ensure the feature remains aligned with evolving customer needs and operational requirements.
-
Create and manage AI Assistant skills
AI Assistant skills are core components that power the Real-Time Assist feature in Webex Contact Center. These intelligent configurations define how the AI Assistant provide real-time guidance to human agents. As an administrator, you use the Webex AI Studio to create, configure, and manage these skills, tailoring them to the specific needs of your contact center’s queues and interaction types.
This section guides you through accessing the Webex AI Studio, understanding its environment, and the detailed process of creating and managing AI Assistant skills.
Accessing Webex AI Studio
To access the Webex AI Studio, follow these instructions—
| 1 |
Sign in to Control Hub and navigate to Services > Contact Center. |
| 2 |
Go to AI Assistant under Desktop Experience in the navigation pane. |
| 3 |
Under the Real-Time Assist section, click the Manage AI Assistant skills link. The AI Assistant skills dashboard opens in a new browser tab within the Webex AI Studio. Alternatively, you can also access Webex AI Studio using Quick Links. |
Understanding Webex AI Studio
The Webex AI Studio provides dedicated dashboards for managing AI Assistant skills and AI Agents.
- If your organization uses only Real-Time Assist, the AI Assistant skills dashboard is displayed by default.
- If your organization also uses AI Agents, both the AI Assistant skills and AI Agents dashboards are available, allowing you to switch between them, as needed.
Understanding AI Assistant skills Dashboard
The AI Assistant skills dashboard serves as your central hub for comprehensive management of all AI Assistant skills configured for Real-Time Assist. It provides an overview of your existing skills and quick access to various management functions.
Dashboard display
On the dashboard, AI Assistant skills are presented as cards or rows in a list view. Each entry provides key details for quick reference:
- Skill Name: The descriptive name you assigned to the AI Assistant skill.
- Queues: The number of queues the skill is currently linked to.
- Assistant's Goal: A brief description of the skill's purpose.
- Last Modified: The date and time the skill was last updated.
- Last Modified By: The user who last modified the skill.
- Creation Date: The date the skill was created.
- Created By: The user who created the skill.
Dashboard actions
From the main dashboard, you can perform the following actions to manage your AI Assistant skills efficiently:
- Create a new AI Assistant skill: Click + Create skills to begin configuring a new AI Assistant skill from scratch.
- Import AI Assistant skill: Use Import skills to upload AI Assistant skills in JSON format. This allows you to quickly add pre-configured skills or restore backups from external sources.
- Search and filter: Utilize the search bar to quickly find skills by name, linked queue, or last modified date.
- Preview: Open the skill's preview widget to test its responses in a simulated environment.
Individual skill management
For each individual AI Assistant skill listed on the dashboard, you can access additional management options:
- Modify skill settings: Click on any skill's name or card to open its configuration page and modify its settings, including its profile, knowledge base, and actions.
-
Quick actions: Access quick actions for a specific skill by clicking the ellipsis
icon (three dots) to perform tasks such as:
- Pin: Pin the skill to the top of your dashboard for quick access.
- Copy Access Token: Copy the skill's access token for seamless integration, authentication, and testing in external applications or development environments.
- Export: Export the skill's details (in JSON format) to your local folder for backup or transfer.
- Delete: Permanently delete the AI Assistant skill.
If you attempt to delete a skill that is linked to one or more queues, a confirmation message appears, informing you that the skill is in use. You must confirm before proceeding. If confirmed, the Control Hub is notified of the deletion.
Creating AI Assistant skills
Follow these steps to configure an AI Assistant skill that provides relevant suggestions to your agents:
| 1 |
On the AI Assistant skills dashboard, click + Create skills. |
| 2 |
Select Start from scratch and click Next. |
| 3 |
Enter a clear, descriptive name in the Skill name field. The System ID field, which uniquely identifies the skill, is automatically populated based on the Skill name. |
| 4 |
Provide a concise goal in the Goal field. For more information on writing skill goals, see follow these instructions. Example: “You are a helpful and polite assistant that helps agents answer queries regarding lost baggage and recommend necessary actions.” For more information, see Guidelines for Writing Instructions for AI Assistant Skills. |
| 5 |
Click Create. |
| 6 |
On the Skill Configuration screen, the Profile tab is selected by default. In the Instructions text box, provide detailed, step-by-step guidance for the AI’s behavior and response generation. |
| 7 |
Switch to the Knowledge tab to select a relevant knowledge base. The skill uses this source to generate suggestions. If a suitable knowledge base does not exist, click + Add new. After creating it, you will return to the skill configuration panel.
|
| 8 |
Go to the Actions tab to enable, disable, edit, or delete actions. You can also create new actions by clicking + New action. Actions enable AI skills to suggest or perform specific tasks (such as creating cases, retrieving information, sending emails, or performing integrations), in addition to suggesting information that can be used to respond to the customers. If you are not connecting to a knowledge base, add at least one action. For detailed instructions, refer to the Configuring actions for AI Assistant skills article. |
| 9 |
When all required fields are complete, click Save changes. Before publishing a skill, test its behavior using the Preview button. This allows you to validate the relevance and accuracy of suggestions. For detailed information, refer to the Previewing AI Assistant skill responses section. |
| 10 |
Click Publish to finalize the skill. |
What's next?
After creating and configuring your AI Assistant skills, proceed with the next steps in deploying Real-Time Assist for your contact center:
- Assign AI Assistant skills to queues: To make your skills available to agents, assign them to the relevant contact center queues. Refer to the Link AI Assistant skills to queues article.
Once your skills are assigned and actions are configured (if needed), continue to test and monitor the Real-Time Assist feature to ensure optimal agent performance and customer experience.
Link AI Assistant skills to queues
Effectively link queues
Follow these notes and considerations for effective linking of AI skills to queues:
-
One queue, one AI skill: One queue can be linked to only one AI skill. If the AI Assistant skill needs to support the agent on multiple topics, we recommend linking all relevant knowledge bases (KBs) and defining the necessary actions within the skill.
-
One AI skill, multiple queues: A single AI skill can be linked to multiple queues, which is useful if several queues handle similar types of inquiries.
-
Media streaming for voice channels: For voice interactions, media streaming must be enabled for all queues linked to AI skills. For details, see Enable real-time transcripts for agents.
-
Impact of removing queues: If you attempt to unassign a queue from an AI skill, a confirmation message will appear, especially if active calls may be affected.
-
Batch unassignment: If an AI skill is linked to more than 50 queues, you may need to unassign them in batches due to system limitations.
-
Deletion of AI skills: An AI skill cannot be deleted while it is still linked to any queues. Unassign all queues before deleting a skill.
Linking AI skills to queues
To ensure agents receive precise, context-aware suggestions, link your AI skills to the appropriate queues as follows:
| 1 |
Sign in to Control Hub and navigate to Services > Contact Center. |
| 2 |
In the navigation pane, go to AI Assistant under Desktop Experience. |
| 3 |
Under Real-Time Assist, click Assign AI Assistant skills to select the AI skills and the queues you want to link. |
| 4 |
Select an AI skill and locate the Assigned Queues section, which displays the queues currently linked to this skill. |
| 5 |
Click Add Queues. |
| 6 |
In the Select Queues screen, use the search bar to find specific queues by name. |
| 7 |
Select the check boxes next to the queues you want to link to this AI skill. You can select up to 50 queues at a time. To link additional queues, repeat this process. |
| 8 |
Click Save to assign the selected queues to the AI skill. |
Test and monitor Real-Time Assist performance
After configuring Real-Time Assist and setting up your AI Assistant skills, it is crucial to test their effectiveness and continuously monitor their performance. This proactive approach ensures that the AI Assistant provides accurate and relevant suggestions, leading to improved agent efficiency and enhanced customer satisfaction. Webex Contact Center provides comprehensive tools within Webex AI Studio and Analyzer for thorough testing and ongoing monitoring.
Previewing AI Assistant skill
Before deploying an AI Assistant skill to live agents, you can test its behavior in a simulated environment within the Webex AI Studio. This allows you to validate the relevance and accuracy of suggestions. Follow the steps below:
| 1 |
Sign in to Control Hub and navigate to Services > Contact Center. |
| 2 |
Go to AI Assistant under Desktop Experience in the navigation pane. |
| 3 |
Under the Real-Time Assist section, click the Manage AI Assistant skills link. The AI Assistant skills dashboard opens in a new browser tab within the Webex AI Studio. |
| 4 |
In the AI Assistant skills dashboard, click on the specific AI Assistant skill you want to test. This will open its configuration page. |
| 5 |
Click the Preview button. |
Chat mode preview: The preview within the Webex AI Studio allows you to simulate a chat interaction. You can assume the role of a customer, type queries, and observe how the AI Assistant skill generates suggestions, just as a human agent would see them.
Note for voice channel testing: For a detailed preview of how suggestions appear and function during live voice interactions, you must switch to the Agent Desktop and test the feature in a real-call scenario. This requires real-time transcription to be active for the call.
Utilizing Analyzer for performance monitoring
Using Real-Time Assist, you can review AI Assistant reports and KPIs in Analyzer to monitor usage and effectiveness.
For more information, refer to the AI Assistant reports in Analyzer article.
Insights offered by Real-Time Assist report
This report provides insights into the real-world impact of Real-Time Assist on agent performance and customer satisfaction, helping you gather feedback for continuous improvement and measure the feature's effectiveness. The report offers insights into the following key areas:
- Usage metrics: Track how often agents use the Get Suggestions button, the number of suggestions offered per interaction, and the feature's adoption rate.
- Impact on KPIs: Monitor changes in Average Handle Time (AHT), consults/transfers, customer satisfaction (CSAT)/ auto CSAT, and First Contact Resolution (FCR) for interactions where Real-Time Assist were used.
- Action execution: Track the number of unmoderated and moderated actions performed and their success rates.
- Real-time transcription KPIs: For voice interactions, cross-reference the performance of Real-Time Assist with the real-time transcription KPIs report to ensure the underlying transcription service is performing optimally.
Utilizing AI Studio for auditing and debugging
Besides the Configuration tab, the Webex AI Studio provides two tabs for auditing and debugging your AI Assistant skills: Sessions and History.
Sessions tab
The Sessions tab provides a detailed record of every interaction where an AI Assistant skill was used for Real-Time Assist. It can be used for auditing, debugging, and continuous improvement of AI Assistant skill performance in live interactions. To effectively leverage the insights from this tab, perform the following actions:
-
View and filter interactions: The Sessions page displays a list of all interactions where AI Assistant skills provided suggestions:
-
- Search: Use the search bar to find specific interactions by contact session ID, consumer ID or interaction ID.
- Filter: Apply filters to narrow down the list by:
- Contact date: Interactions within a specific time range.
- Agents, teams, queues: Interactions handled by specific personnel or routed through particular queues.
- Channel types: Voice or digital interactions.
- Actions suggested/performed: Interactions where specific actions were proposed or performed.
- Errors occurred: To filter sessions in which an error occurred.
- Hide test sessions: To exclude test sessions from your view.
- Agent handover happened: To filter sessions where an agent handover occurred.
- Downvoted: To filter sessions that were downvoted by agents.
- Flagged interactions (if implemented): Interactions flagged by human agents for review.
-
-
Detailed interaction view: Click on any interaction in the list to view comprehensive details:
- Interaction transcript: The full conversation between the human agent and the customer, provided by the real-time transcriptions feature.
- AI Assistant skill used: Identifies which AI Assistant skill provided suggestions for this interaction.
- List of suggestions: Shows all suggestions provided to the human agent, linked to the specific customer query that prompted them.
- Source of suggestions: Displays the top articles, FAQs, or sections from the knowledge base that were used to generate the suggestions. This allows you to verify the accuracy and relevance of the information.
- Actions suggested and performed: Provides details on which actions were proposed and whether they were performed (in unmoderated or moderated mode).
- Agent modifications: If a human agent edited any fields in a moderated action before submission, these modifications are recorded.
- Additional context: Any extra information provided by the human agent to refine suggestions is visible.
- Metadata: Includes contact session ID, human agent ID/name, team ID/name, queue ID/name, contact date/time, and channel type.
History tab
The History tab provides a record of the configuration changes and versions of your AI Assistant skills. While not directly a performance monitoring tool for live interactions, it is crucial for understanding why performance might have changed due to configuration updates.
- Version history: Tracks different published versions of your AI Assistant skill, allowing you to revert to previous configurations, if needed.
- Change logs: Provides a detailed log of modifications made to the AI Assistant skill's settings, including who made the change, when, and what was changed. This is essential for auditing and debugging configuration-related issues.
Strategies for deploying AI Assistant skills
Best practices for optimizing AI Assistant skills
AI Assistant skills are the intelligent core of Real-Time Assist in Webex Contact Center. Unlike AI Agents that interact directly with customers, AI Assistant skills are designed to empower and guide your human agents in real time. Optimizing these skills involves careful crafting of their goals, instructions, knowledge base structure, and action definitions to ensure accurate, relevant, and actionable suggestions.
This section provides best practices for administrators to create highly effective AI skills, focusing on strategic design and content quality. For detailed steps on creating and managing AI skills, defining actions, and linking them to queues, refer to the respective administrator articles.
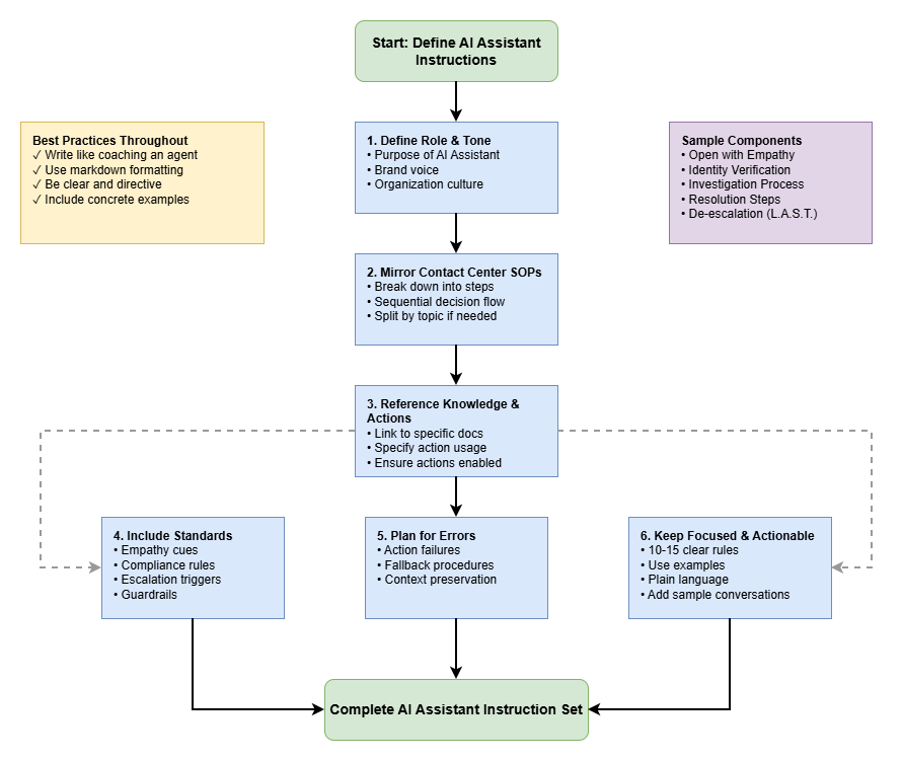
Guidelines for Writing Instructions for AI Assistant Skills
These guidelines help organizations design short, effective instruction sets that refine the behavior of the AI assistant used to guide customer service agents during live interactions.
The AI Assistant is already built to understand how to use the organization’s knowledge and defined actions, maintain adherence to the content shared by the organization, and interact safely—your instruction set will help refine its behavior to match your organization’s tone, processes, and customer service standards.
Provide instructions to the AI Assistant like you would to your Agents
Write the instructions as if you’re coaching a new contact-center employee. Be clear, directive, and conversational — avoid technical or abstract prompt language. Keep it simple and concise.
Examples:
- “Guide the agents to always start the conversation with empathy.
- “Advise the agent to always remain calm and professional, even when dealing with difficult customers. Emphasize that they must not reciprocate any negative or abusive behaviour”.
- “Guide the agent through the probing questions to understand the problem”
For best results, use markdown (headings, ordered/unordered lists) in your instructions.
Define Role and Tone
Specify how the AI Assistant should behave to best fit your organization’s culture.
- Role: Describe the AI Assistant’s purpose (example, “Guide our agents in real time with accurate, policy-aligned suggestions on banking products”).
- Tone: Define the brand voice (example, “Professional, reassuring, and confident.”). This will be helpful to craft responses for digital interactions.
Mirror Your Contact-Center SOPs and Break Down Tasks
Write the instruction set using the same decision flow you’d teach to agents. Break down overall tasks into specific, sequential steps. If there are multiple topics, then you can split the instructions by each topic. This helps the AI Assistant reflect your exact service procedures.
Examples:
- “If the customer asks about a product return, summarize the official return policy from the knowledge base.”
- “If the customer expresses frustration, acknowledge the emotion first, then share the relevant policy information.”
Breakdown Example: "First, confirm the customer's account number. Then, describe their issue."
Reference Actions
Clearly instruct how to use external actions at different steps. Make sure the referenced actions are enabled in the Actions tab to avoid any unexpected behavior.
Example: “Use transaction date, merchant name & transaction amount for \[Case_creation\].
Include Empathy, Compliance, Escalation Cues, and Guardrails
Reinforce your organization’s standards for tone and compliance. Instruct the AI Assistant to provide suggestions only in the context of the goal.
Examples:
- Empathy—“Always acknowledge the customer’s concern or emotion before giving factual information.”
- Compliance—“Never disclose customer PII, payment data, or internal-only policy details.”
- Escalation—“If unsure, instruct the agent to escalate to a supervisor or follow the internal escalation SOP.”
- Guardrail Example—"Keep the conversation restricted to the goal and do not entertain any unrelated queries."
Plan for Errors and Preserve Context
Anticipate potential issues and provide clear instructions for how the AI Assistant should guide the agent to handle them.
- Action Failures—Provide guidelines for handling issues if an integrated action fails. For example, guide the agent to open the case in Salesforce if the automatic action fails.
Keep It Focused, Actionable, and Use Examples
Limit the instruction set to 10-15 clear rules. Each rule should describe a single behaviour, written in plain language. Focus on what’s unique to your organization (brand tone, exceptions, or specialized procedures).
To improve accuracy, add examples wherever needed, including sample conversations. You can also add these to your KBs. Following is a sample instruction set.
- Open with Empathy and Expectations:
- Instruct AGENT to acknowledge customer concern with a calm tone. Example: "I understand you're calling about a charge you don't recognize, and I can definitely help."
- Direct AGENT to briefly explain the process: verify, review, secure, document.
- Remind AGENT: Use Empathy, Efficiency, Education, Empowerment.
- Mandatory Identity Verification:
- Instruct AGENT that they MUST verify identity using at least two approved methods before discussing account details.
- Advise AGENT to state verification is for customer's protection. Summarize key talking points.
- Use Account number, phone number or date of birth to \[Verify_Customer\].
- Investigate & Protect Account:
- Direct AGENT to gather details: Merchant, date, amount for each disputed transaction; document all.
- Use transaction date, merchant name & transaction amount for \[Case_creation\].
- Guide the AGENT on how to scan for fraud patterns.
- Emphasize: IMMEDIATELY block compromised card once fraud is suspected/verified.
- Resolution and Follow-up:
- Guide AGENT to clearly communicate next steps of resolution.
- Instruct AGENT to provide case number.
- Direct AGENT to state regulatory time lines. Example: "Per federal regulations, our investigation can take up to 45 days; provisional credit will be issued within 10 business days."
- De-escalation (Upset Customers): Instruct AGENT to apply
L.A.S.T. Model—Listen, Acknowledge/Apologize, Solve/Secure, Thank. Guide the agent through the process.
Testing and iteration
Creating and optimizing effective AI skills is an iterative process. Continuous testing and refinement are essential to ensure ongoing accuracy and relevance.
- Test and preview regularly: Use the preview feature in AI Studio to simulate interactions and verify that your skill generates accurate and relevant suggestions and actions.
- Monitor performance data: Use Analyzer for performance metrics and Session History in AI Studio for detailed auditing and debugging of interactions. This data is crucial for identifying areas for refinement.
- Refine based on feedback: Pay close attention to agent feedback on suggestions and actions. Use this feedback, along with insights from session history analysis, to refine your skill's goal, instructions, Knowledge base content, and action definitions. This ensures your AI skill remains effective and adapts to evolving agent needs and contact center operations.
AI terminology and concepts in Webex Contact Center
To effectively utilize the AI capabilities in Webex Contact Center, it is important to understand key terminology and how various AI components interact. This article provides a glossary of essential AI concepts, helping you navigate and leverage intelligent features designed to enhance customer interactions and operational efficiency.
AI terminology
-
AI Assistant: The AI capability within Webex Contact Center designed to enhance agent performance. Features such as real-time transcripts, suggested responses, AI-generated summaries, automated wellness breaks, auto CSAT, and topic analytics are core components of the AI Assistant.
-
AI Assistant skills: Configurable entities created and managed in AI Studio that power the suggested responses feature. These skills assist agents in real time by providing contextual suggestions and actions, serving as intelligent guides.
-
AI Agents: Distinct from AI Assistant skills, AI Agents independently handle customer interactions (voice or digital) without immediate human intervention. They can answer Frequently Asked Questions (FAQs), process routine requests, or route customers, often serving as the first point of contact before escalating to a human agent. For more information, refer to the Webex AI Agent.
-
AI Studio: The central platform in Webex Contact Center where administrators create, manage, and configure both AI Assistant skills (for agent assistance) and AI Agents (for autonomous interactions). Depending on your organization's enabled features, you may see one or both dashboards within the AI Studio.
-
Knowledge Base (KB): A centralized repository of information (such as FAQs, articles, and documents) that AI Assistant skills and AI Agents use to generate accurate and contextually relevant responses.
-
Actions: Predefined tasks or workflows that an AI Assistant skill can suggest to an agent or execute on the agent's behalf (with or without agent's review). For AI Agents, actions are tasks they perform autonomously.
-
Fulfillment modes: Define how an AI Assistant skill executes actions:
-
Moderated mode: The AI Assistant skill collects information for an action and presents it to the agent for review and explicit approval before execution.
-
Unmoderated mode: The action is executed independently by the AI Assistant skill, without requiring agent intervention or approval.
-


