- Home
- /
- Article

Thanks for your feedback.

Manage hunt groups in Control Hub
 In this article
 Feedback?
You can use hunt groups to ensure that all of your incoming calls are answered by the right people or routed to voicemail for later response.
Hunt groups route incoming calls to specific employees in a predetermined pattern. The call is routed by assigning a phone number to a group of employees and then defining rules such as how to answer the call, how long the call remains on hold, and who to forward the call.
You may want to set up hunt groups in the following scenarios:
-
A sales team that wants sequential routing. An incoming call rings one phone, but if there's no answer, the call goes to the next hunt group member in the list.
-
A support team that wants phones to ring all at once so that the first available member can take the call.
Create a hunt group
When a hunt group receives a call arrives and forwards it to an agent, the agent call forwarding feature doesn't work.
| 1 |
Sign in to Control Hub. |
| 2 |
Go to . |
| 3 |
Go to the Hunt Group card and click Add New to create a new hunt group. |
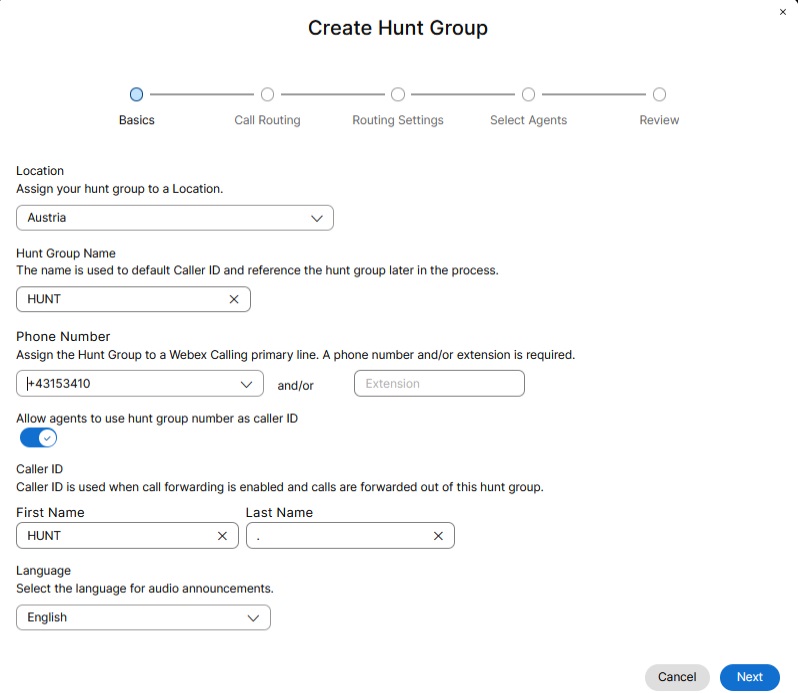
| 4 |
On the Basics page, enter the following details and click Next.
|
| 5 |
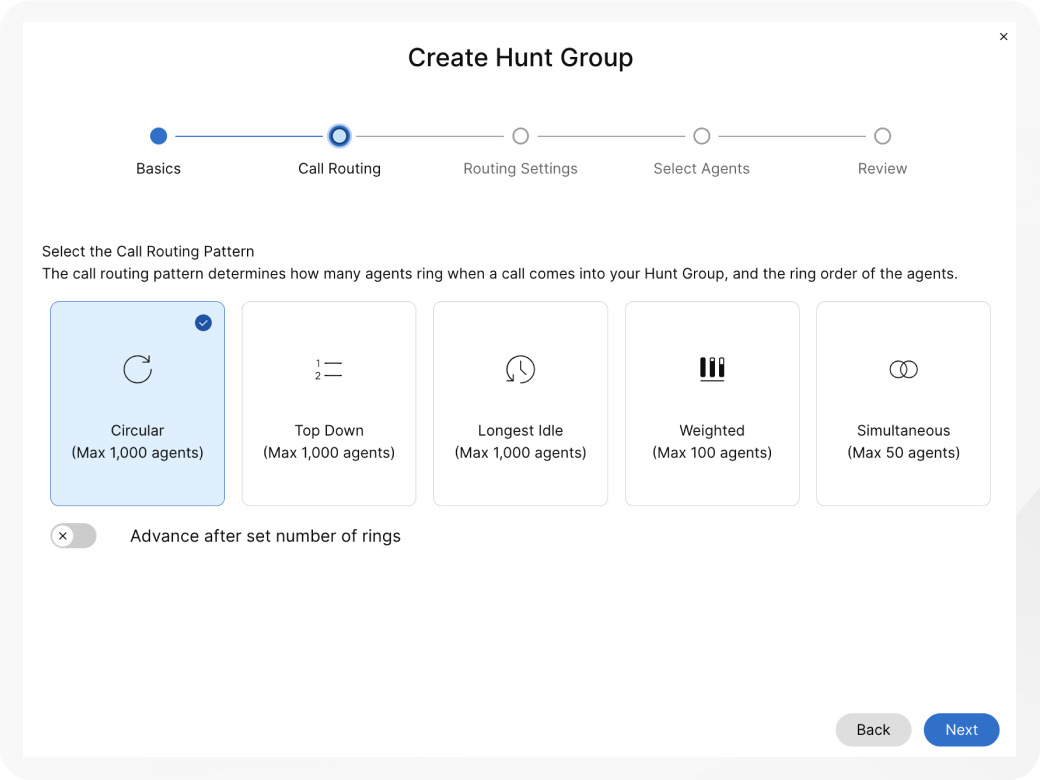
On the Call Routing page, choose one of the following options and click Next.
You can enable the Advance after set number of rings toggle and set the number of rings to apply to your call routing choice, if necessary.
|
| 6 |
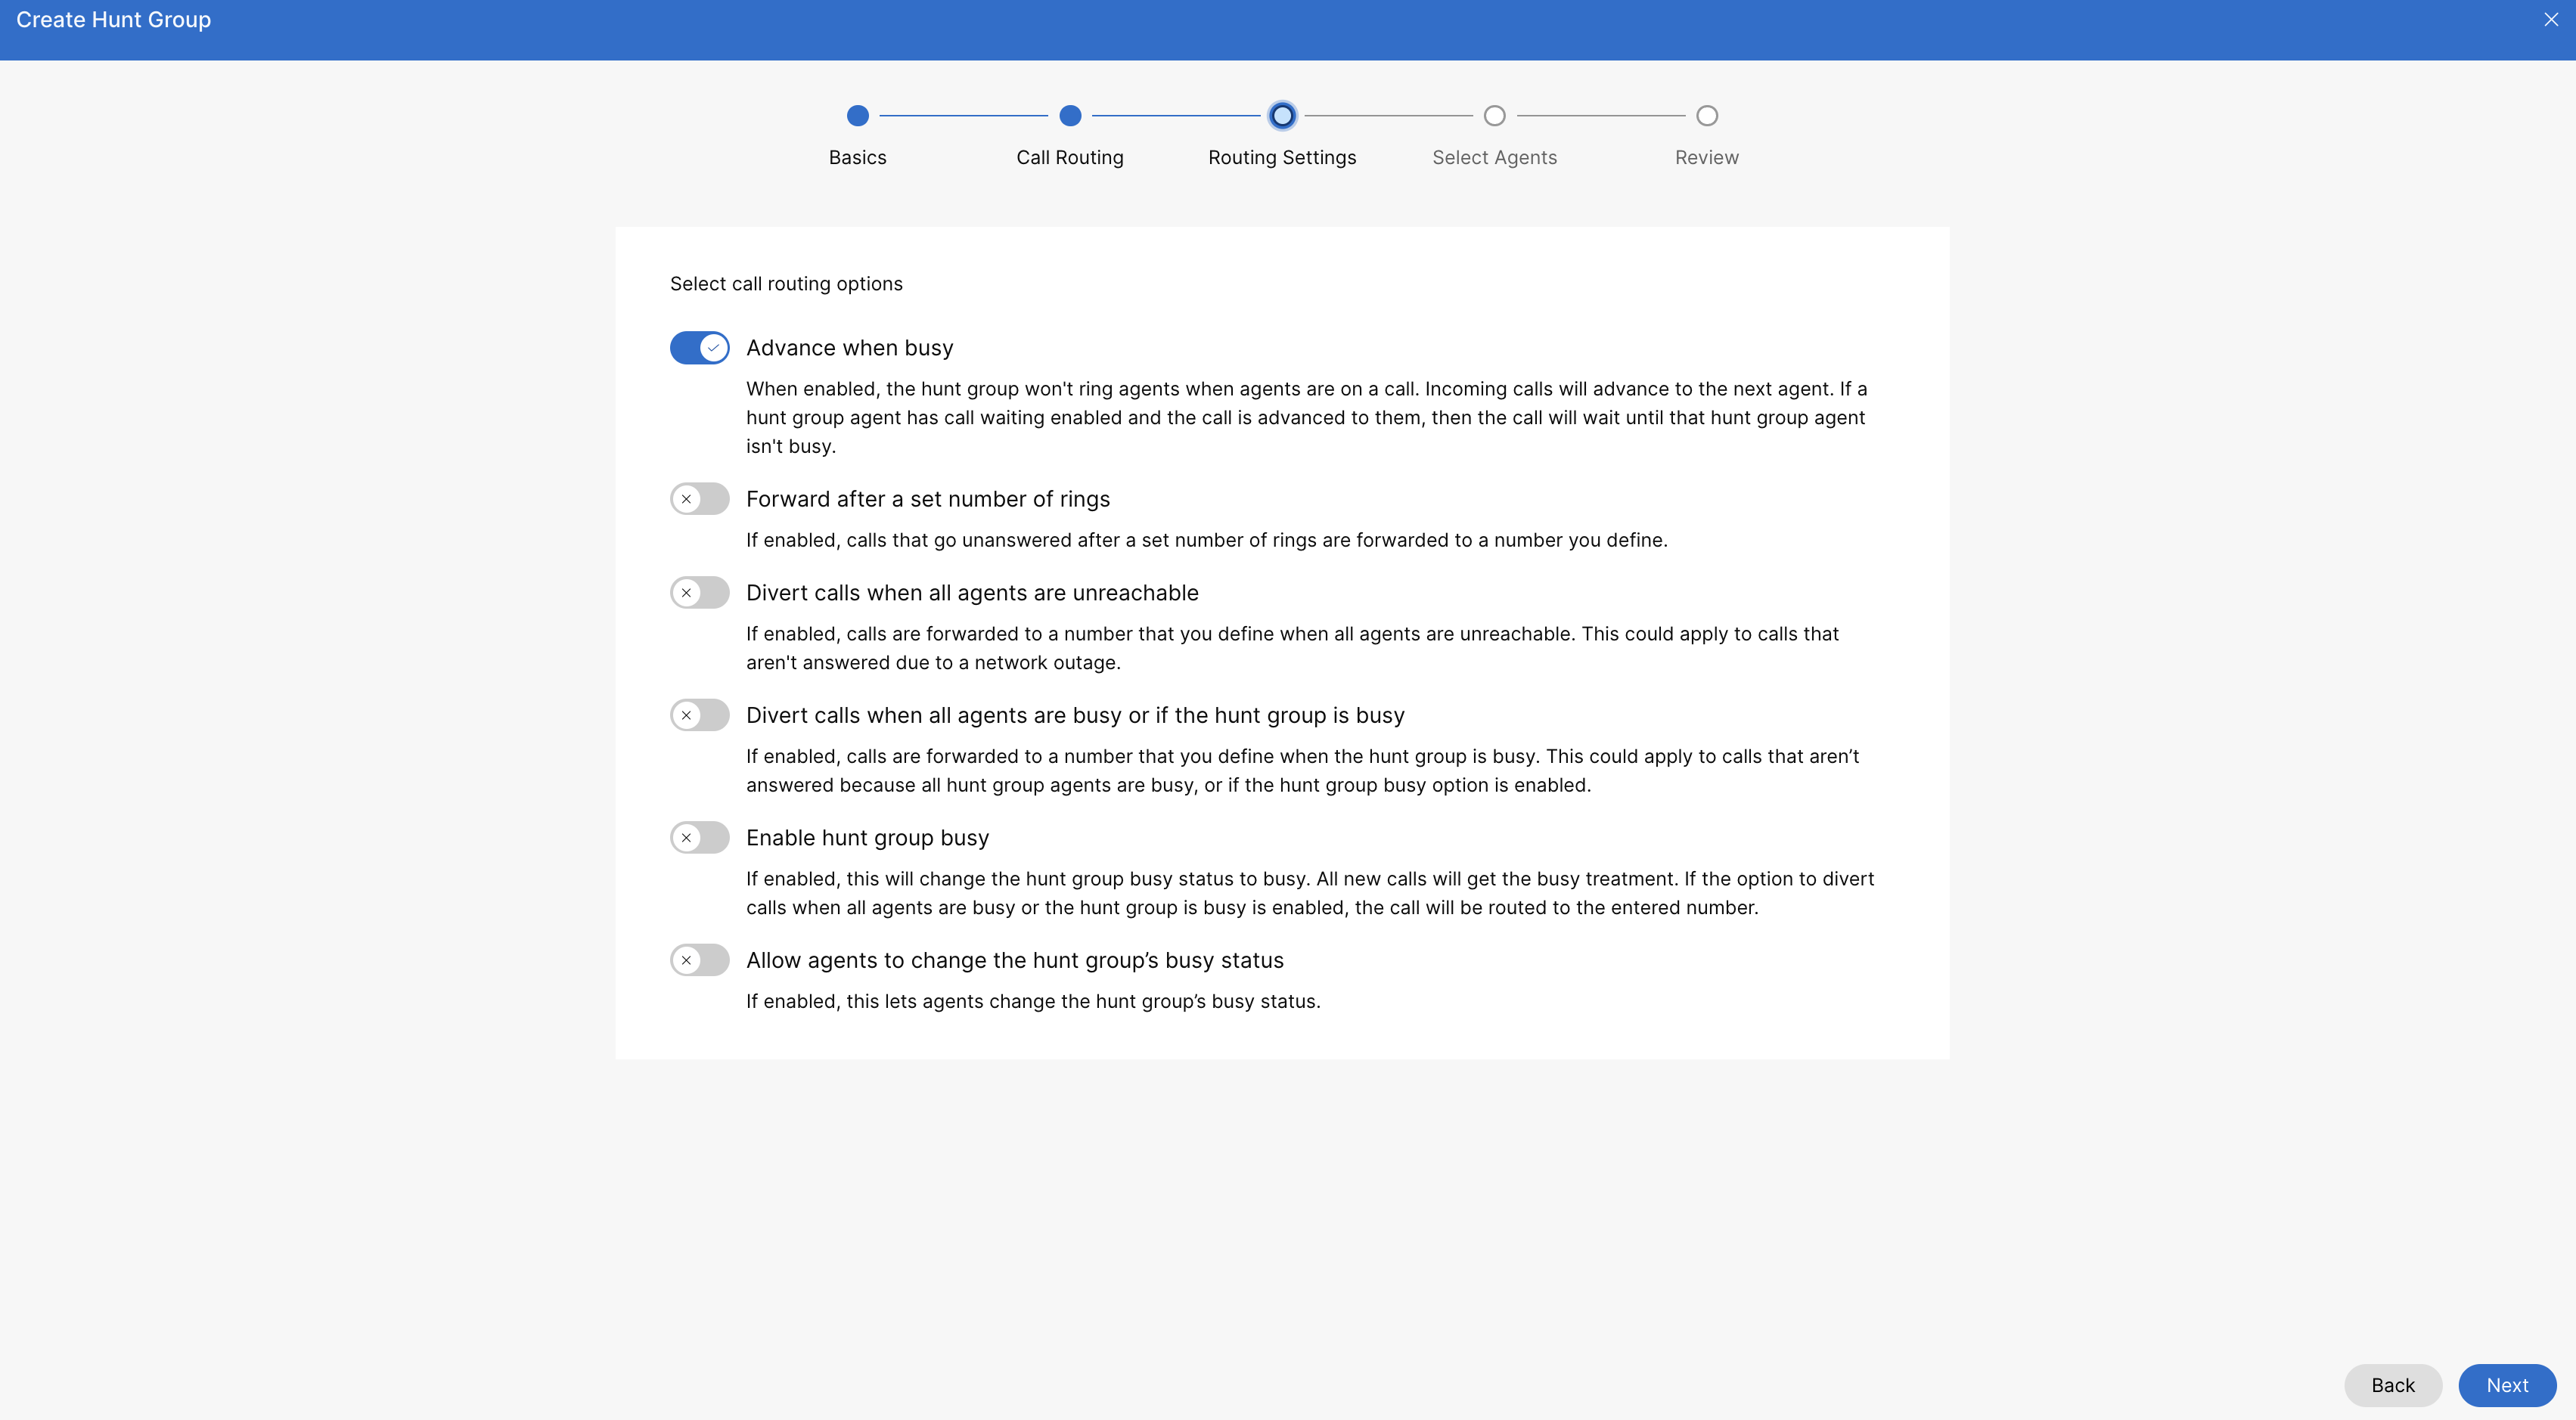
On the Routing Settings page, enable one or more of the following options if necessary and click Next.
|
| 7 |
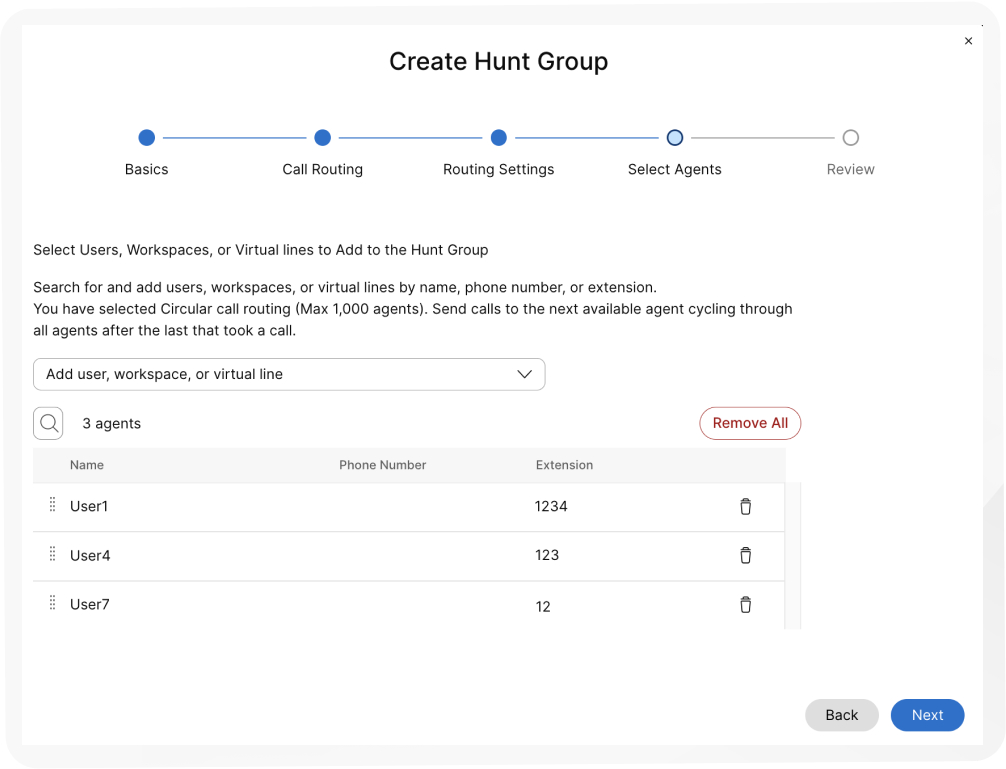
On the Select Agents page, search and add users, workspaces, or virtual lines to the call list and click Next. Depending on the Call Routing option you chose, add information such as adding percentage weighting to users, workspaces, or virtual lines. For circular call routing, drag and drop users, workspaces, or virtual lines in the order of their queue position.
If an agent is assigned only an extension, ensure their location has a main number. Without a main number, calls to the hunt group aren't routed to the extension-only agent. |
| 8 |
On the Review page, review your hunt group settings to make sure you've entered the correct details. |
| 9 |
Click Create to create the hunt group. |
Watch this video demonstration on how to create a new hunt group in the Control Hub.
Disable a hunt group
With this procedure, you can disable a previously created hunt group.
| 1 |
Sign in to Control Hub. |
| 2 |
Go to . |
| 3 |
Go to the Hunt Group card and click Manage. |
| 4 |
Select a hunt group to disable from the list. |
| 5 |
Turn off the Enable Hunt Group toggle to disable the hunt group. |
| 6 |
Click Save. |
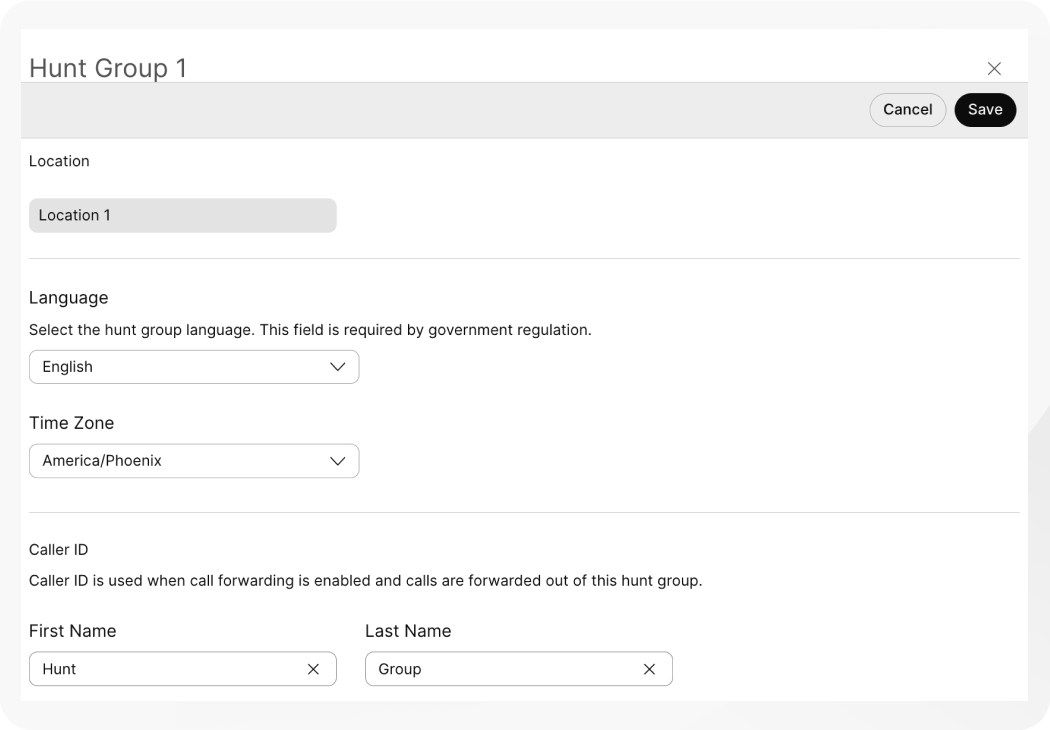
Edit hunt group general settings
Edit the language and Caller ID for each hunt group.
| 1 |
Sign in to Control Hub. |
| 2 |
Go to . |
| 3 |
Go to the Hunt Group card and click . |
| 4 |
Select a hunt group you want to edit. |
| 5 |
Click General Settings. |
| 6 |
View or edit the Language from the Language drop-down. |
| 7 |
View or edit the Time Zone from the Time Zone drop-down. |
| 8 |
View or edit the Caller ID. Caller ID is used when call forwarding is enabled and calls are forwarded out of this hunt group. |
| 9 |
Click Save.
|
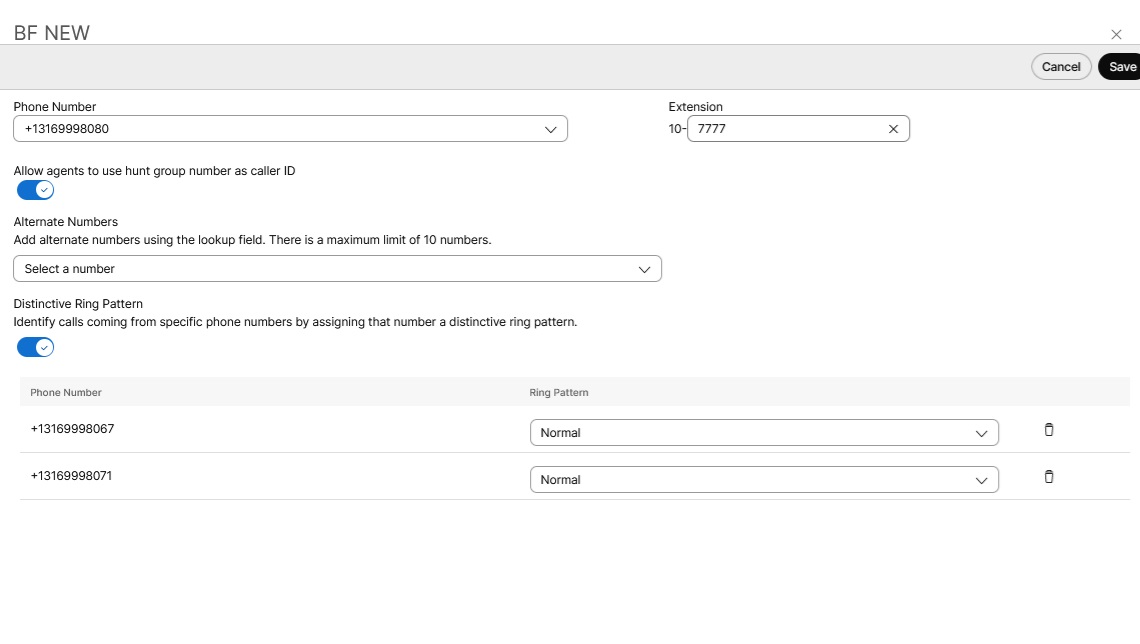
Edit hunt group phone numbers
Edit phone numbers, alternative numbers, and assign distinctive ring patterns for hunt groups.
| 1 |
Sign in to Control Hub. |
| 2 |
Go to . |
| 3 |
Go to the Hunt Group card and click Manage. |
| 4 |
Select a hunt group to edit. |
| 5 |
Click Phone Number. |
| 6 |
Edit the phone number and extension. If you've left the extension field blank when creating the hunt group, the system automatically assigns the last four digits of the phone number as an extension for this hunt group. |
| 7 |
Tun on the Allow agents to use hunt group number as caller ID toggle to allow the agents to use the hunt group number as the caller ID. There’s a restriction that both the hunt group's location and the agent’s location must have the same PSTN provider, country, and zone (this applies only to locations in India). If it’s different, then the hunt group caller ID doesn't display to the agent. This restriction helps to prevent call failure, potential billing issues, and ensures adherence to country-specific telecom regulations. Examples of invalid cross-location number usage:
|
| 8 |
From Alternate Numbers drop-down, search and add the alternative numbers. You can add up to 10 alternative numbers. |
| 9 |
Enable or disable Distinctive Ringing Pattern. |
| 10 |
Click Save.
|
Configure agent settings for user
Before you begin
-
The Control Hub administrator enables the phone number to use as the outgoing phone number for the agents in the call queue/hunt group.
-
On enabling the phone number, the administrator can set the agents outgoing phone number with the specific queue/hunt group CLID as per Persistent Configuration.
- The agents can also set a Temporary CLID Configuration by using the FAC code #80 to use the call queue/hunt group phone number as the CLID displayed for the outgoing call or #81 for outgoing default caller ID as the phone number displayed as CLID.
| 1 |
Sign in to Control Hub. |
| 2 |
Go to . |
| 3 |
Select a user that you want to configure the agent setting for. |
| 4 |
Click Calling and go to the Agent Settings section. |
| 5 |
Click the Agent Caller ID. You can set the agent caller ID to either the agent's own caller ID or a specific call queue or hunt group. |
| 6 |
Configure the agent call queue or hunt group ID from the following options:
|
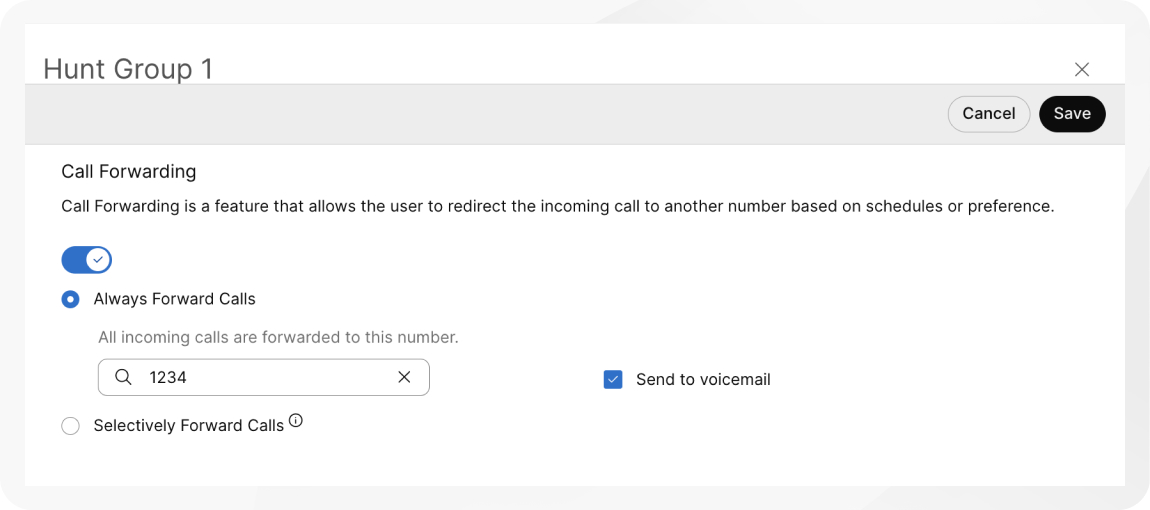
Configure call forwarding for a hunt group
| 1 |
Sign in to Control Hub. |
| 2 |
Go to . |
| 3 |
Go to the Hunt Group card and click Manage. |
| 4 |
Select a hunt group to edit. |
| 5 |
Click Call Forwarding. |
| 6 |
Turn on the Call Forwarding toggle. |
| 7 |
Choose one of the following options:
|
| 8 |
For Always Forward Calls and Selectively Forward Calls, assign the number you want to forward calls to.
When choosing Always Forward or Selectively Forward, you can also select Send to voicemail to forward all calls to an internal voicemail. The Send to Voicemail checkbox is disabled when an external number is entered. |
| 9 |
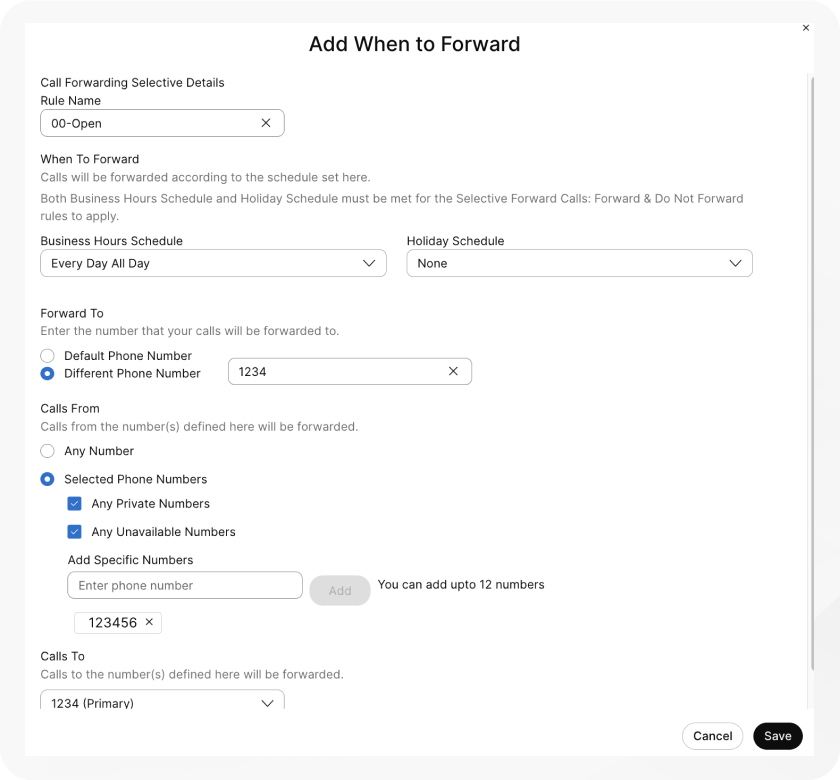
For Selectively Forward Calls, create a rule by clicking Add When to Forward or Add When Not to Forward.
|
| 10 |
Create a Rule Name. |
| 11 |
For When to Forward, select a Business Schedule and Holiday Schedule from the drop-down. It's mandatory to create a new rule specific to holidays. |
| 12 |
For Forward To, select at least one option from Default Phone Number or add a Different Phone Number. |
| 13 |
For Calls From, select Any Number or Selected Numbers with at least one option from the following:
|
| 14 |
For Calls To, select a number from the drop-down to forward calls received on that number. |
| 15 |
Click Save. |

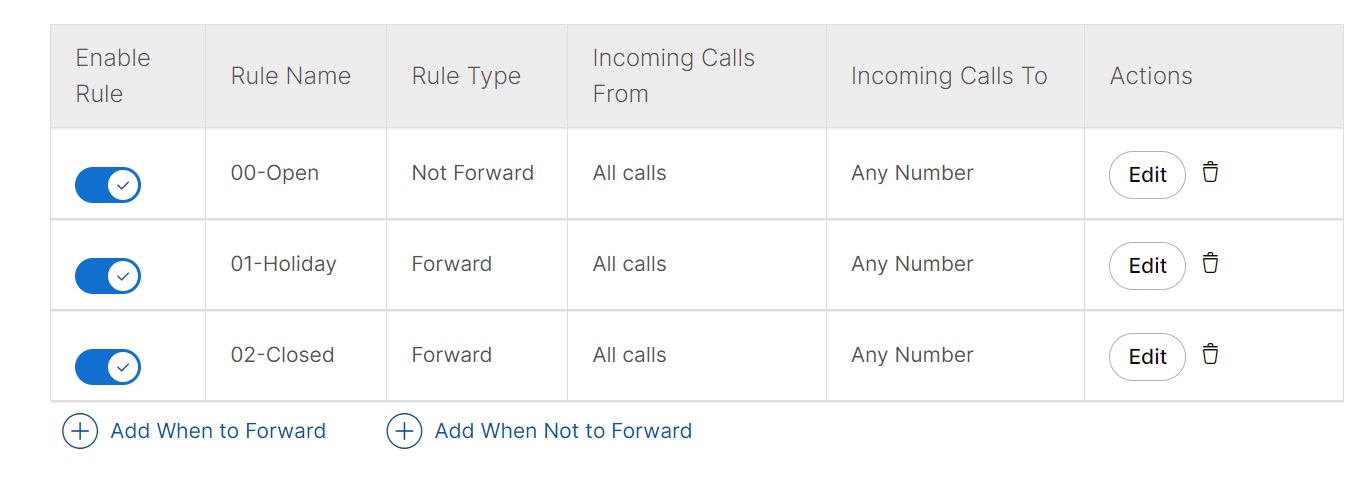
The rules created for the selectively forward calls are processed based on the following criteria:
-
The rules are sorted in the table by rule name character. Example: 00_rule, 01_rule, and so on.
-
The "Not to Forward" rule always takes precedence over the "Forward" rule.
-
The rules are processed based on the order they are listed in the table.
-
You can create multiple rules. However, if a rule is satisfied, the system no longer checks the next rule. If you want the specific rule to check first, we suggest that you update the rule name with numbers. For example: If you want the holiday rule to check before the business closed hours rule, then name the rule as 01-Holiday and 02-Closed.
To know more about the basic functionality and examples of the selectively forward call, see Configure Call Forwarding Selective for Webex Calling.
What to do next
Once a rule is created, you can enable or disable a rule using the toggle beside the rule
in the table. You can also change or delete a rule at any time by clicking
Edit or  to delete.
Add or delete users, workspaces, and virtual lines in an existing hunt group
| 1 |
Sign in to Control Hub. |
| 2 |
Go to . |
| 3 |
Go to the Hunt Group card and click Manage. |
| 4 |
Select a hunt group to edit. |
| 5 |
Click Agents. |
| 6 |
From the Add user, workspace, or virtual line drop-down, select the users, workspaces, or virtual lines that you want to add. To delete hunt group members, click |
| 7 |
Click Save. |
Edit hunt group call routing pattern
Change the pattern of your existing hunt group from the options available.
| 1 |
Sign in to Control Hub. |
| 2 |
Go to . |
| 3 |
Go to the Hunt Group card and click Manage. |
| 4 |
Select a hunt group to edit. |
| 5 |
Click Call Routing Pattern. |
| 6 |
Edit the following options: If you change your call routing pattern from a pattern that accommodates 1,000 hunt group members to a pattern that only accommodates 100 or 50 members, only the first 100 or 50 members are kept. You're asked to confirm this when you make the change.
|
| 7 |
Click Add user, workspace, or virtual line to edit the list of agents. |
| 8 |
Click Save. |
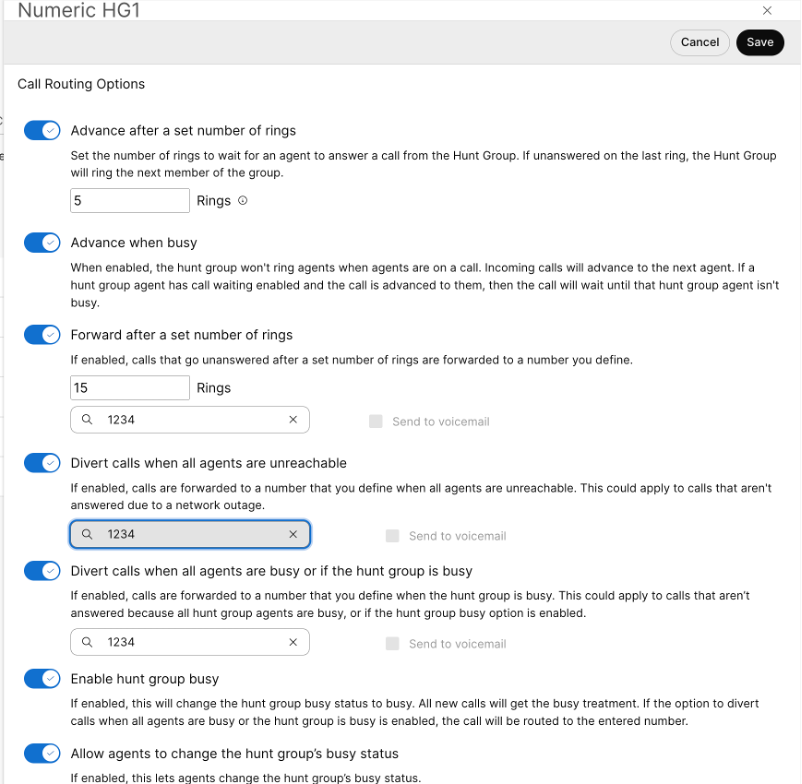
Edit hunt group call routing options
| 1 |
Sign in to Control Hub. |
| 2 |
Go to . |
| 3 |
Go to the Hunt Group card and click Manage. |
| 4 |
Select a hunt group to edit. |
| 5 |
Click Call Routing Options. |
| 6 |
Use the toggles to set each of these features on or off.
|
Bulk manage hunt groups
You can add and manage hunt groups in bulk using a hunt group CSV.
Known limitations and requirements
-
Before uploading your hunt group CSV, make sure to read Bulk provisioning Webex Calling elements using CSV to understand the CSV conventions.
-
You can export the current hunt groups to add, delete, or modify your existing data set, or export a sample set of hunt groups. Once making changes, you can upload the file through the bulk features.
-
Exporting CSV file into ZIP file format: When exporting data to a CSV file, the number of records may exceed 1000. In such cases, the ZIP file is downloaded, where the ZIP file contains the full set of record(s) in a single CSV file. A separate folder containing all the data is broken down into multiple CSV files with less than 1000 records. These files are generated for the administrators to quickly import any updates and upload.
-
Export a new CSV to capture the latest information for the fields and avoid errors during the import of changes.
-
-
It’s important to know the mandatory and optional columns, and information you need to provide when filling out the CSV template. You can find the specific fields for the hunt group CSV in the following table.
-
The maximum number of hunt groups for each location is 1,000.
-
The maximum number of rows is 1,000 (not including the header).
-
Agents can be users or workspaces. For users, enter the user’s email address. For workspaces, enter the workspace's name.
-
Each row can hold a maximum of 50 agents. See Add or edit more than 50 agents at a time for more information.
Prepare your CSV
Use this table to see the mandatory and optional fields and determine what you need when adding or editing hunt groups in bulk.
Columns are either mandatory or optional fields. This varies depending on whether you’re using the CSV to add a new hunt group or edit an existing hunt group.
|
Column |
Mandatory or optional (Add a hunt group) |
Mandatory or optional (Edit a hunt group) |
Description |
Supported values |
|---|---|---|---|---|
|
Name |
Mandatory |
Mandatory |
Enter the name of the hunt group. Hunt group names within the same location must be uniquely identifiable. If the hunt groups are in a different location, they can have the same name. |
Example: San Jose Hunt Group Character length: 1–30 |
|
Phone Number |
Mandatory (if the extension is blank) |
Optional |
Enter the hunt group phone number. You must have either a phone number or an extension. |
The system allows only E.164 numbers for CSV import. Example: +12815550100 The phone number must be on the Numbers tab in Control Hub. |
|
Extension |
Mandatory (if the phone number is blank) |
Optional |
Enter the hunt group extension. You must have either a phone number or an extension. |
Two to ten-digit extension. 00-999999 |
|
Location |
Mandatory |
Mandatory |
Enter the location to assign this call hunt group. |
Example: San Jose Location must be on the Locations tab in Control Hub. |
|
Direct Line ID Caller Name Option |
Optional |
Optional |
Select if you want to use display name or a custom name as a caller ID. |
DISPLAY_NAME CUSTOM_NAME By default DISPLAY_NAME is selected. |
|
CUSTOM NAME |
Optional |
Optional |
Enter a custom name for caller ID. Unicode characters are supported. |
String |
|
Dial By Name |
Optional |
Optional |
Enter the name by which you can dial this Hunt group. ASCII characters are supported. |
String |
|
Language |
Optional |
Optional |
Enter the announcement language for your hunt group. |
Example: en_us |
|
Timezone |
Optional |
Optional |
Enter the hunt group time zone key. This time zone applies to the schedules applied to this hunt group. |
Example: America or Chicago Character length: 1–127 |
|
Call Routing Pattern |
Mandatory |
Optional |
Enter the hunt group routing pattern. Select one of the supported policies. |
CIRCULAR, REGULAR, SIMULTANEOUS, UNIFORM, WEIGHTED |
|
Advance After Set Number of Rings Enable |
Optional |
Optional |
Enable or disable calls to advance after a set number of rings. If enabled, enter the number of rings in the next column. |
TRUE, FALSE |
|
Advance After Set Number of Rings |
Optional |
Optional |
Enter the number of rings to wait for the currently hunted agent to answer before hunting to the next available agent. |
Range: 1–20 |
|
Advance When Busy Enable |
Optional |
Optional |
The hunt group doesn't ring members who are already on another call and advances the call to the next available member. If you disable this setting and the call advances to a busy member with call waiting enabled, the system plays a call waiting tone until the member declines the call or becomes idle. |
TRUE, FALSE |
|
Forward After Rings Enable |
Optional |
Optional |
Enable or disable unanswered calls to be forwarded to a designated phone number after a set number of rings. |
TRUE, FALSE |
|
Forward After Rings |
Optional |
Optional |
Enter the number of rings to wait before forwarding to the designed number. |
Range: 1–99 |
|
Forward Number |
Optional |
Optional |
Enter the phone number where unanswered calls are forwarded. |
The system allows only E.164 numbers for CSV import. Example: +12815550100 The phone number must be on the Numbers tab in Control Hub. |
|
Forward After Rings Voicemail Enable |
Optional |
Optional |
Enable or disable unanswered calls forwarding to a voicemail after a set number of rings. |
TRUE, FALSE |
|
Hunt Group Busy Enable |
Optional |
Optional |
Use this column to enable or disable hunt group busy. |
TRUE, FALSE |
|
Allow Agents to Change Hunt Group Busy Status |
Optional |
Optional |
Enable or disable the toggle to allow agents to change hunt group busy status. |
TRUE, FALSE |
|
Divert When Busy Enable |
Optional |
Optional |
Enable or disable the busy calls diverting to a defined phone number. |
TRUE, FALSE |
|
Divert When Busy Number |
Optional |
Optional |
Enter the phone number to divert calls to when lines are busy. |
Example: +12815550100 |
|
Divert When Busy Voicemail Enable |
Optional |
Optional |
Enable or disable the busy calls diverting to a defined voicemail. |
TRUE, FALSE |
|
Divert When Unreachable Enable |
Optional |
Optional |
Enable or disable unreachable calls diverting to a defined phone number. |
TRUE, FALSE |
|
Divert When Unreachable Number |
Optional |
Optional |
Enter the phone number to divert calls to when unreachable. |
Example: +12815550100 |
|
Divert When Unreachable Voicemail Enable |
Optional |
Optional |
Enable or disable unreachable calls diverting to a defined voicemail. |
TRUE, FALSE |
|
Hunt Group Enable |
Optional |
Optional |
Use this column to activate or deactivate the hunt group. |
ENABLED, DISABLED, enabled, disabled |
|
Alternate Number Distinctive Ringing Enable |
Optional |
Optional |
Enable or disable a distinctive ringing for alternate numbers. If enabled, enter the ring patter in the Alternate Numbers Ring Pattern column. |
TRUE, FALSE |
|
Alternate Numbers Action |
Optional |
Optional |
Enter ADD to add the alternate numbers you list in this row. Enter REMOVE to remove the alternate numbers you list in the row. If you enter REPLACE, you remove all previously entered alternate numbers and replace it with the alternate numbers you’re adding in this row only. |
ADD, REMOVE, REPLACE |
|
Agent Action |
Optional |
Optional |
Enter ADD to add the agents you list in this row. Enter REMOVE to remove this agent you list in the row. If you enter REPLACE, you remove all previously entered agents and replace it with the agents you’re adding in this row only. |
ADD, REMOVE, REPLACE |
|
Allow Agents To Use Hunt Group Number As Caller ID |
Optional | Optional |
Enable the toggle to allow the agents to use the hunt group number as the caller ID |
TRUE, FALSE |
|
Alternate Number1, Alternate Number2… Alternate Number10 |
Optional |
Optional |
Enter the alternate numbers to assign to the hunt group. |
Example: 1112223333 Phone number must be on the Numbers tab in Control Hub. Character length: 1–23 |
|
Alternate Number1 Ring Pattern, Alternate Number2 Ring Pattern… Alternate Number10 Ring Pattern |
Optional |
Optional |
If distinctive ringing is enabled for alternate numbers, choose the distinctive ringing ring pattern. Choose from one of the supported options. |
NORMAL, LONG_LONG, SHORT_SHORT_LONG, SHORT_LONG_SHORT |
|
Agent1 ID, Agent2 ID… Agent50 ID |
Optional |
Optional |
Enter the agents you’d like to assign to the hunt group. Agents can be users or workspaces. For users, enter the user’s email address. For workspaces, enter the workspace name. |
Example: test@example.com Character length: 1–161 |
|
Agent1 Weight, Agent2 Weight... Agent50 Weight |
Optional |
Optional |
If the call routing policy for the hunt group is weighted, enter the agent’s percentage weighting. |
Range: 0-100 |
Add or edit more than 50 agents at a time
Each row can hold a maximum of 50 agents and their associated call routing weight percentage (if applicable). A hunt group can have a maximum of 1,000 agents assigned. To add or edit more than 50 agents using the CSV file, follow these steps.
| 1 |
Enter the 50 agents, and their associated call routing weight percentage (if applicable), that you’d like to add or edit on the first row for the hunt group you’re adding or editing. |
| 2 |
On the next row, you only have to enter information in the following columns to add or edit additional agents:
You can leave all other columns blank. |
| 3 |
Continue to do this until you've added all the agents you need to add or edit. A hunt group can have a maximum of 1,000 agents. |
Bulk add hunt groups
To add hunt groups in bulk, download and fill out a blank CSV template.
You can't modify call forwarding settings for a hunt group in bulk. To edit call forwarding for a hunt group, see Configure call forwarding for a hunt group.
| 1 |
Sign in to Control Hub. |
| 2 |
Go to . |
| 3 |
Go to the Hunt Group card. On the Prefer to create Hunt group in bulk message, click Open the bulk editor. |
| 4 |
The Manage Hunt group window displays. Select a location for the call pickup group you'd like to add. |
| 5 |
Click Download Data or Download .csv templateto verify that your CSV file is properly formatted, making sure to fill in the required information. |
| 6 |
Upload the CSV file by dragging and dropping or clicking Choose a file. |
| 7 |
Click View Import history/Tasks to view the status of your CSV import and see whether you've encountered any errors. When successfully uploaded, you can click See Tasks Page for details to view the status of the changes. |
Bulk edit hunt groups
To modify hunt groups in bulk, download the current CSV data and make the necessary changes to the spreadsheet.
You can't modify call forwarding settings for a hunt group in bulk. To edit call forwarding for a hunt group, see Configure call forwarding for a hunt group.
| 1 |
Sign in to Control Hub. |
| 2 |
Go to . |
| 3 |
Go to the Hunt Group card and On the Prefer to create Hunt group in bulk message, click Open the bulk editor. |
| 4 |
Select a location for the hunt group you’d like to modify. |
| 5 |
Click Download Data or Download .csv templateto verify that your CSV file is properly formatted, making sure to fill in the required information. If the data for the hunt group you’ve selected exceeds the maximum (more than 10,000 rows for each CSV), you receive a zipped file with multiple CSV files included. |
| 6 |
Make the necessary changes to the spreadsheet. |
| 7 |
Upload the modified CSV file by dragging and dropping or clicking Choose a file. |
| 8 |
Click View Import history/Tasks to view the status of your CSV import and see whether you've encountered any errors. When successfully uploaded, you can click See Tasks Page for details to view the status of the changes. |


