- Accueil
- /
- Article

Merci pour votre commentaire.

 Dans cet article
 Un commentaire ?
Installez Cisco Call comme option d'appel par défaut pour tous les utilisateurs de votre organisation.
Utilisez cet article pour configurer votre application Microsoft Teams avec les options d'appel Cisco. L'icône ![]() est ajoutée à la navigation de gauche et en tant qu'extension de messagerie. Avec l’option d’appel Teams désactivée, toutes les personnes de l’organisation utilisent la même plateforme pour effectuer et recevoir des appels.
est ajoutée à la navigation de gauche et en tant qu'extension de messagerie. Avec l’option d’appel Teams désactivée, toutes les personnes de l’organisation utilisent la même plateforme pour effectuer et recevoir des appels.
Prérequis
-
Assurez-vous d'être administrateur de Microsoft Teams.
-
Assurez-vous d'avoir accès au Centre de contrôle.
-
Vérifiez que les utilisateurs ont des licences attribuéesdans Control Hub et sont enregistrés auprès de Cisco Unified Communications Manager ou de Webex Calling pour passer des appels.
-
Les utilisateurs doivent avoir installé l'application Webex et Microsoft Teams.
-
Pour que l'intégration Cisco Call pour Microsoft Teams fonctionne avec le backend de contrôle d'appel Unified CM (sur site, instance dédiée Webex Calling ou UCM Cloud), assurez-vous d'utiliser Unified CM 12.5 SU7 ou 14 SU3, Cisco Unity Connection (CUC) 12.5 ou 14.
-
Pour les clients Unified CM sur site, assurez-vous que Unified CM & Les clusters CUC sont intégrés à Webex Cloud-Connected UC (CCUC).
-
les utilisateurs doivent être synchronisés soit à partir d’Active Directory sur site, soit à partir de Cloud AD tel qu’Azure vers Identité commune (CI) Control Hub.
-
Pour les clients sur site, Webex Calling Dedicated Instance et UCM Cloud, Configurer Cisco Unified CM— Le numéro de ligne sur Cisco Unified CM doit être associé à l'ID utilisateur pour que l'historique des appels centralisé soit rempli avec le nom d'utilisateur. Dans l'administration de Cisco Unified CM, utilisezPériphérique→Téléphone, sélectionnez le téléphone et cliquez surNom du périphérique (Ligne)puis cliquez sur la ligne requise dans le panneauAssociationpour accéder àUtilisateur associé à la ligne.
-
Assurez-vous que l'identifiant de messagerie Unified CM correspond à l'adresse e-mail principale Control Hub utilisée pour obtenir l'identifiant unique universel (UUID).
-
Infrastructure de bureau virtuel (VDI) : Lorsque l'intégration de Cisco Call pour Microsoft Teams est utilisée dans un environnement VDI, Cisco Call et Microsoft Teams doivent être exécutés sur la même machine virtuelle.
Configuration de Microsoft Teams
Accepter les autorisations de synchronisation de présence
Examinez et acceptez les autorisations de synchronisation de présence dans Microsoft Teams afin de synchroniser de manière bidirectionnelle le statut de présence de l'utilisateur entre Microsoft Teams et Webex.
Pour que la synchronisation de présence reste fonctionnelle, les utilisateurs doivent utiliser l'intégration Cisco Call au moins une fois tous les 90 jours.
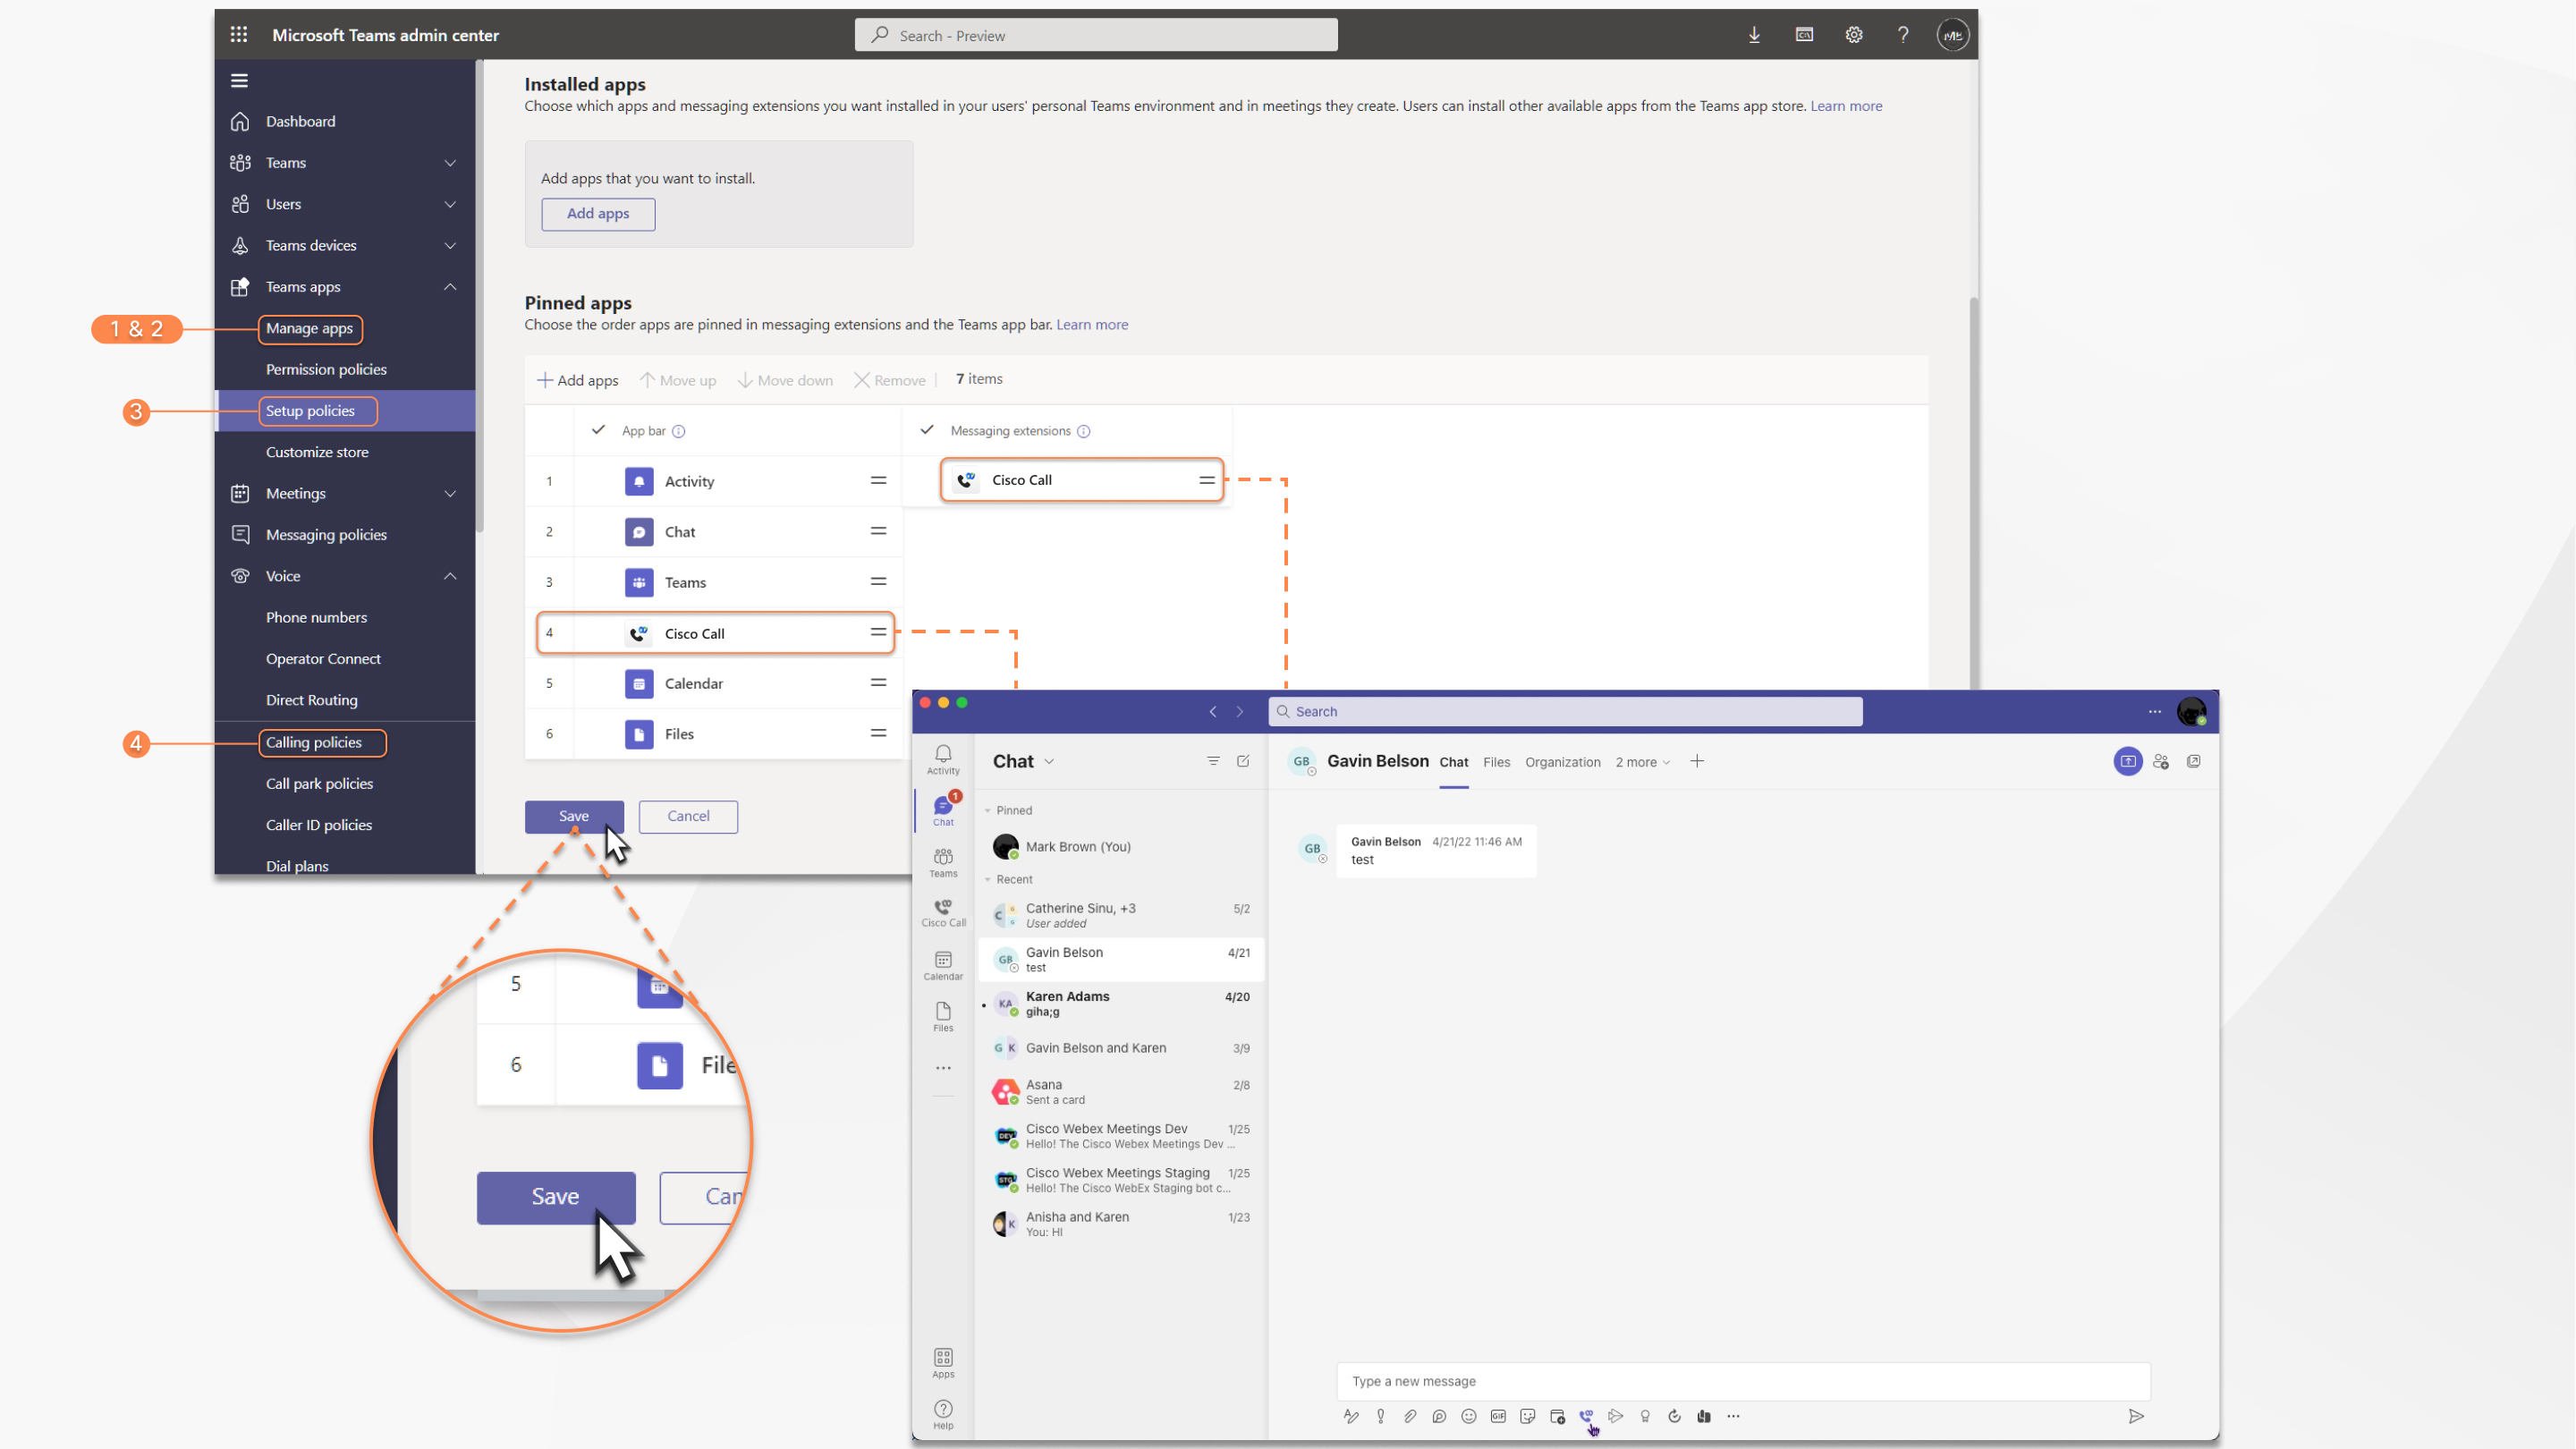
| 1 |
Dans le menu Tableau de bord, accédez à |
| 2 |
Dans le champ de recherche, saisissez |
| 3 |
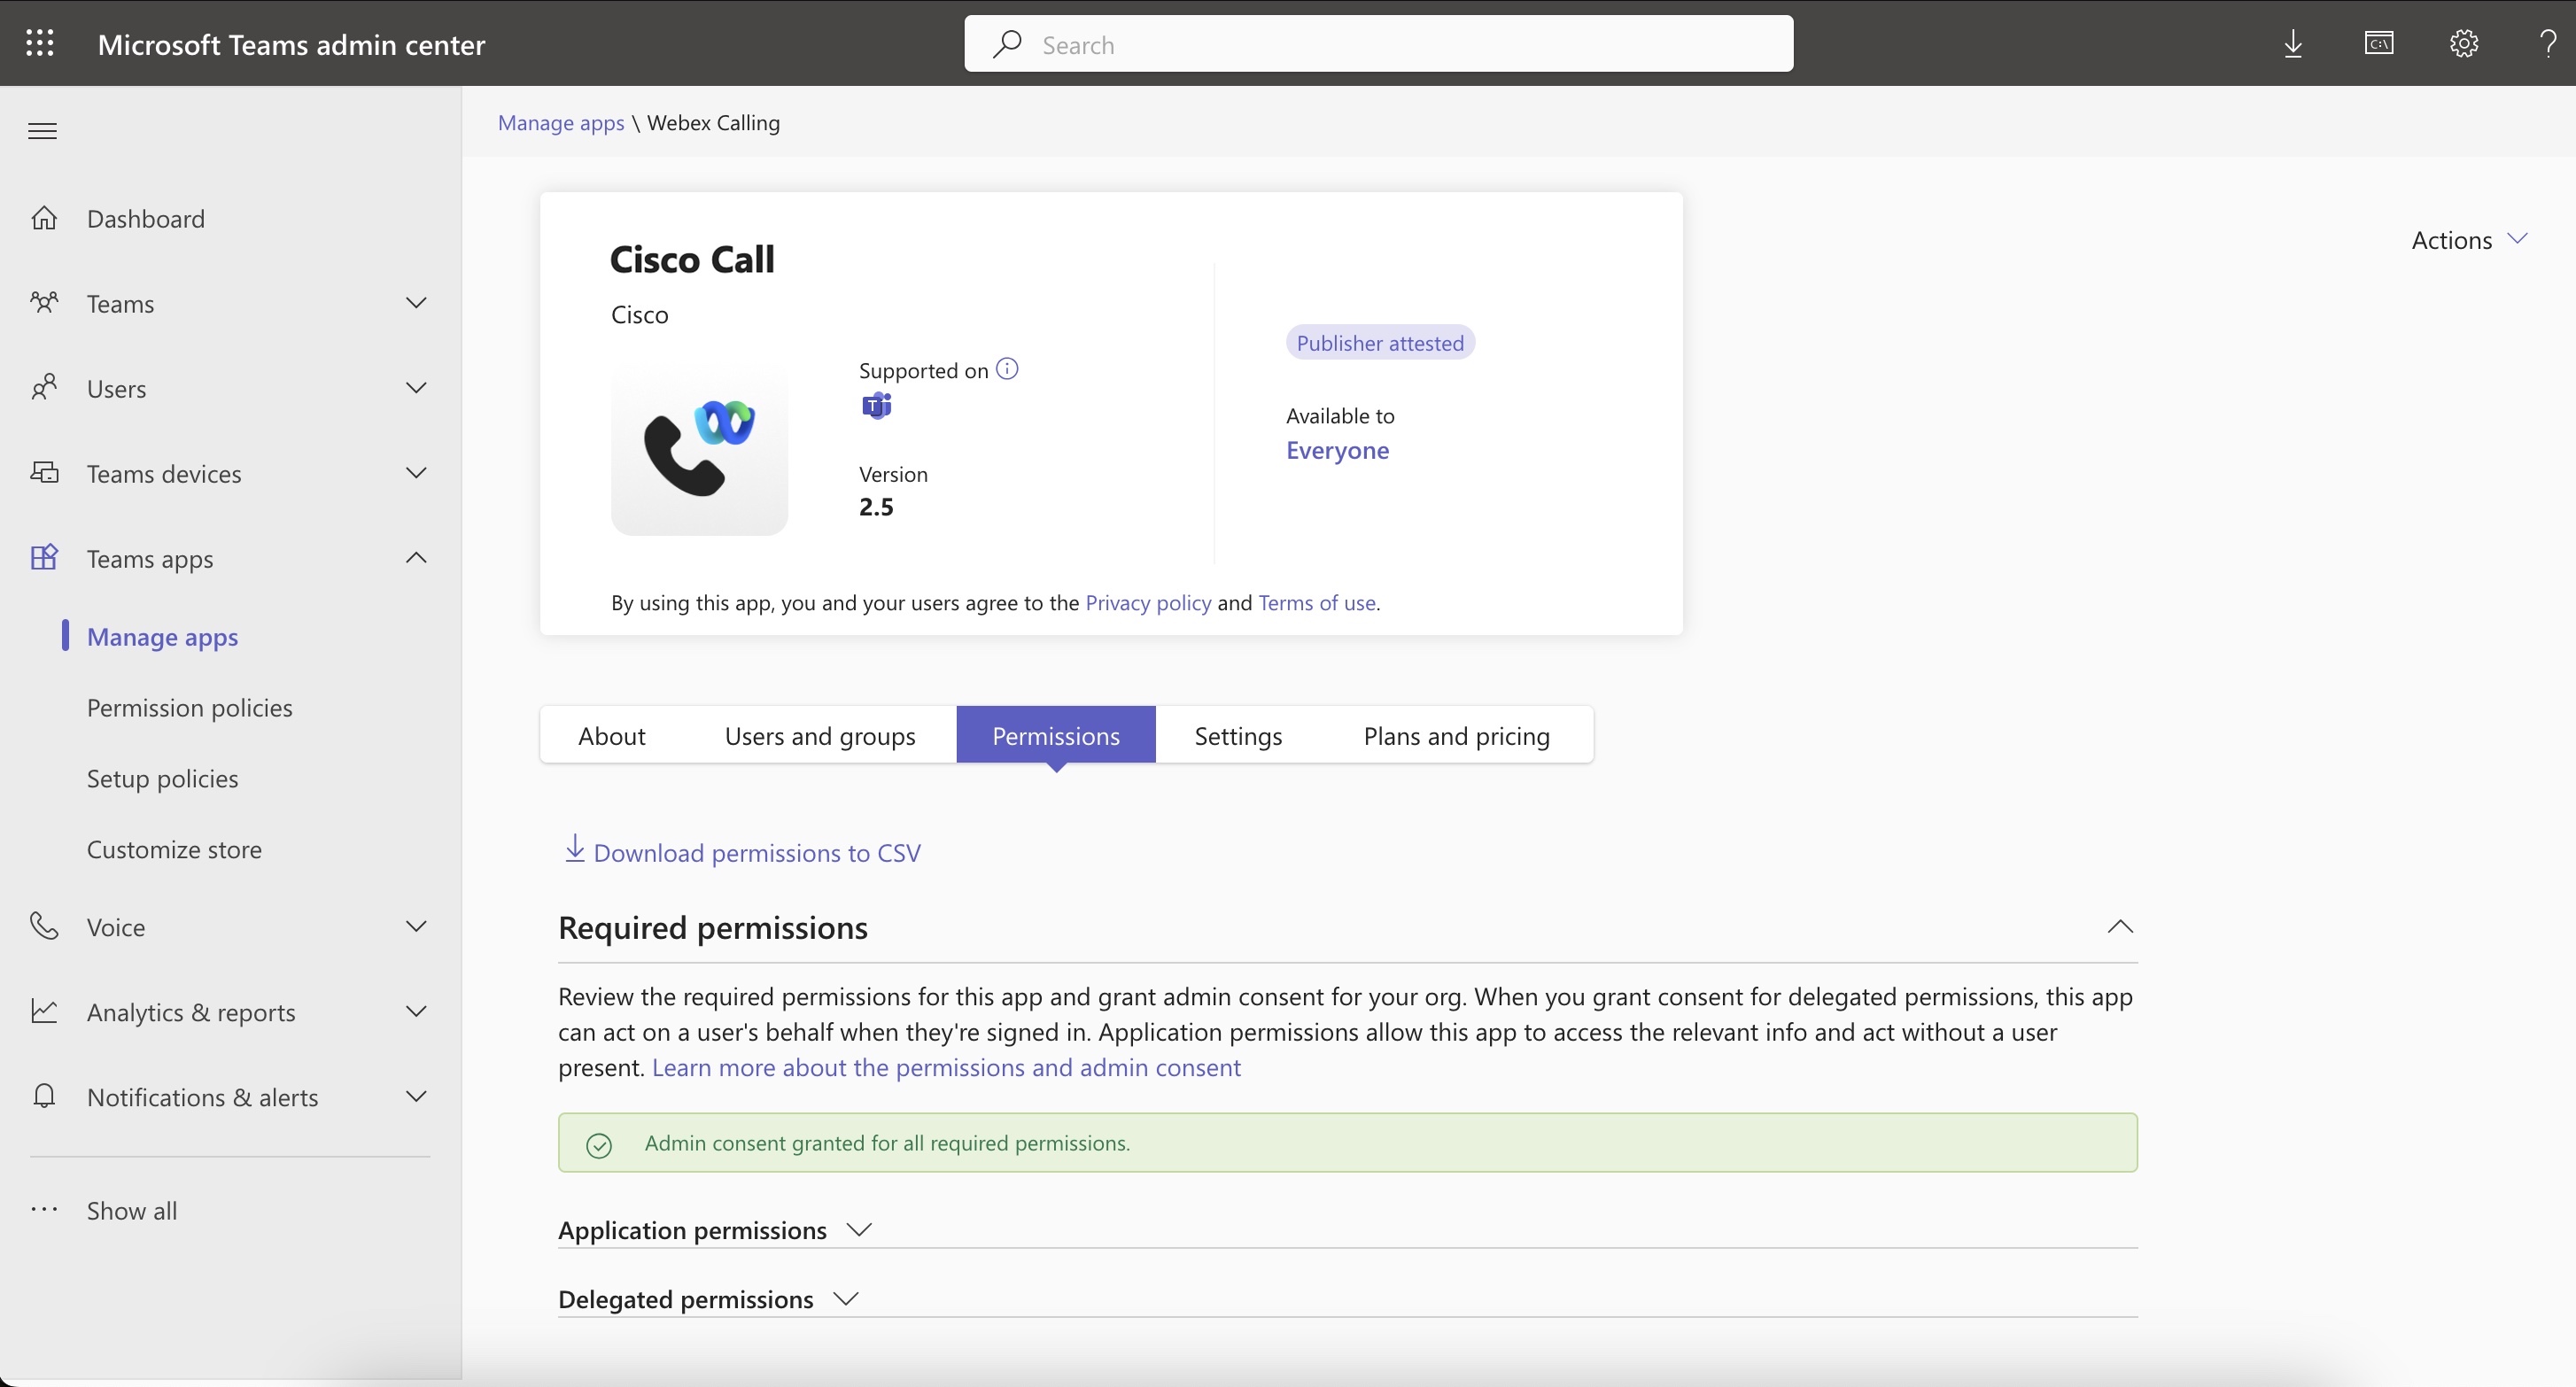
Cliquez sur l'onglet Autorisations puis cliquez sur Accorder le consentement de l'administrateur. |
| 4 |
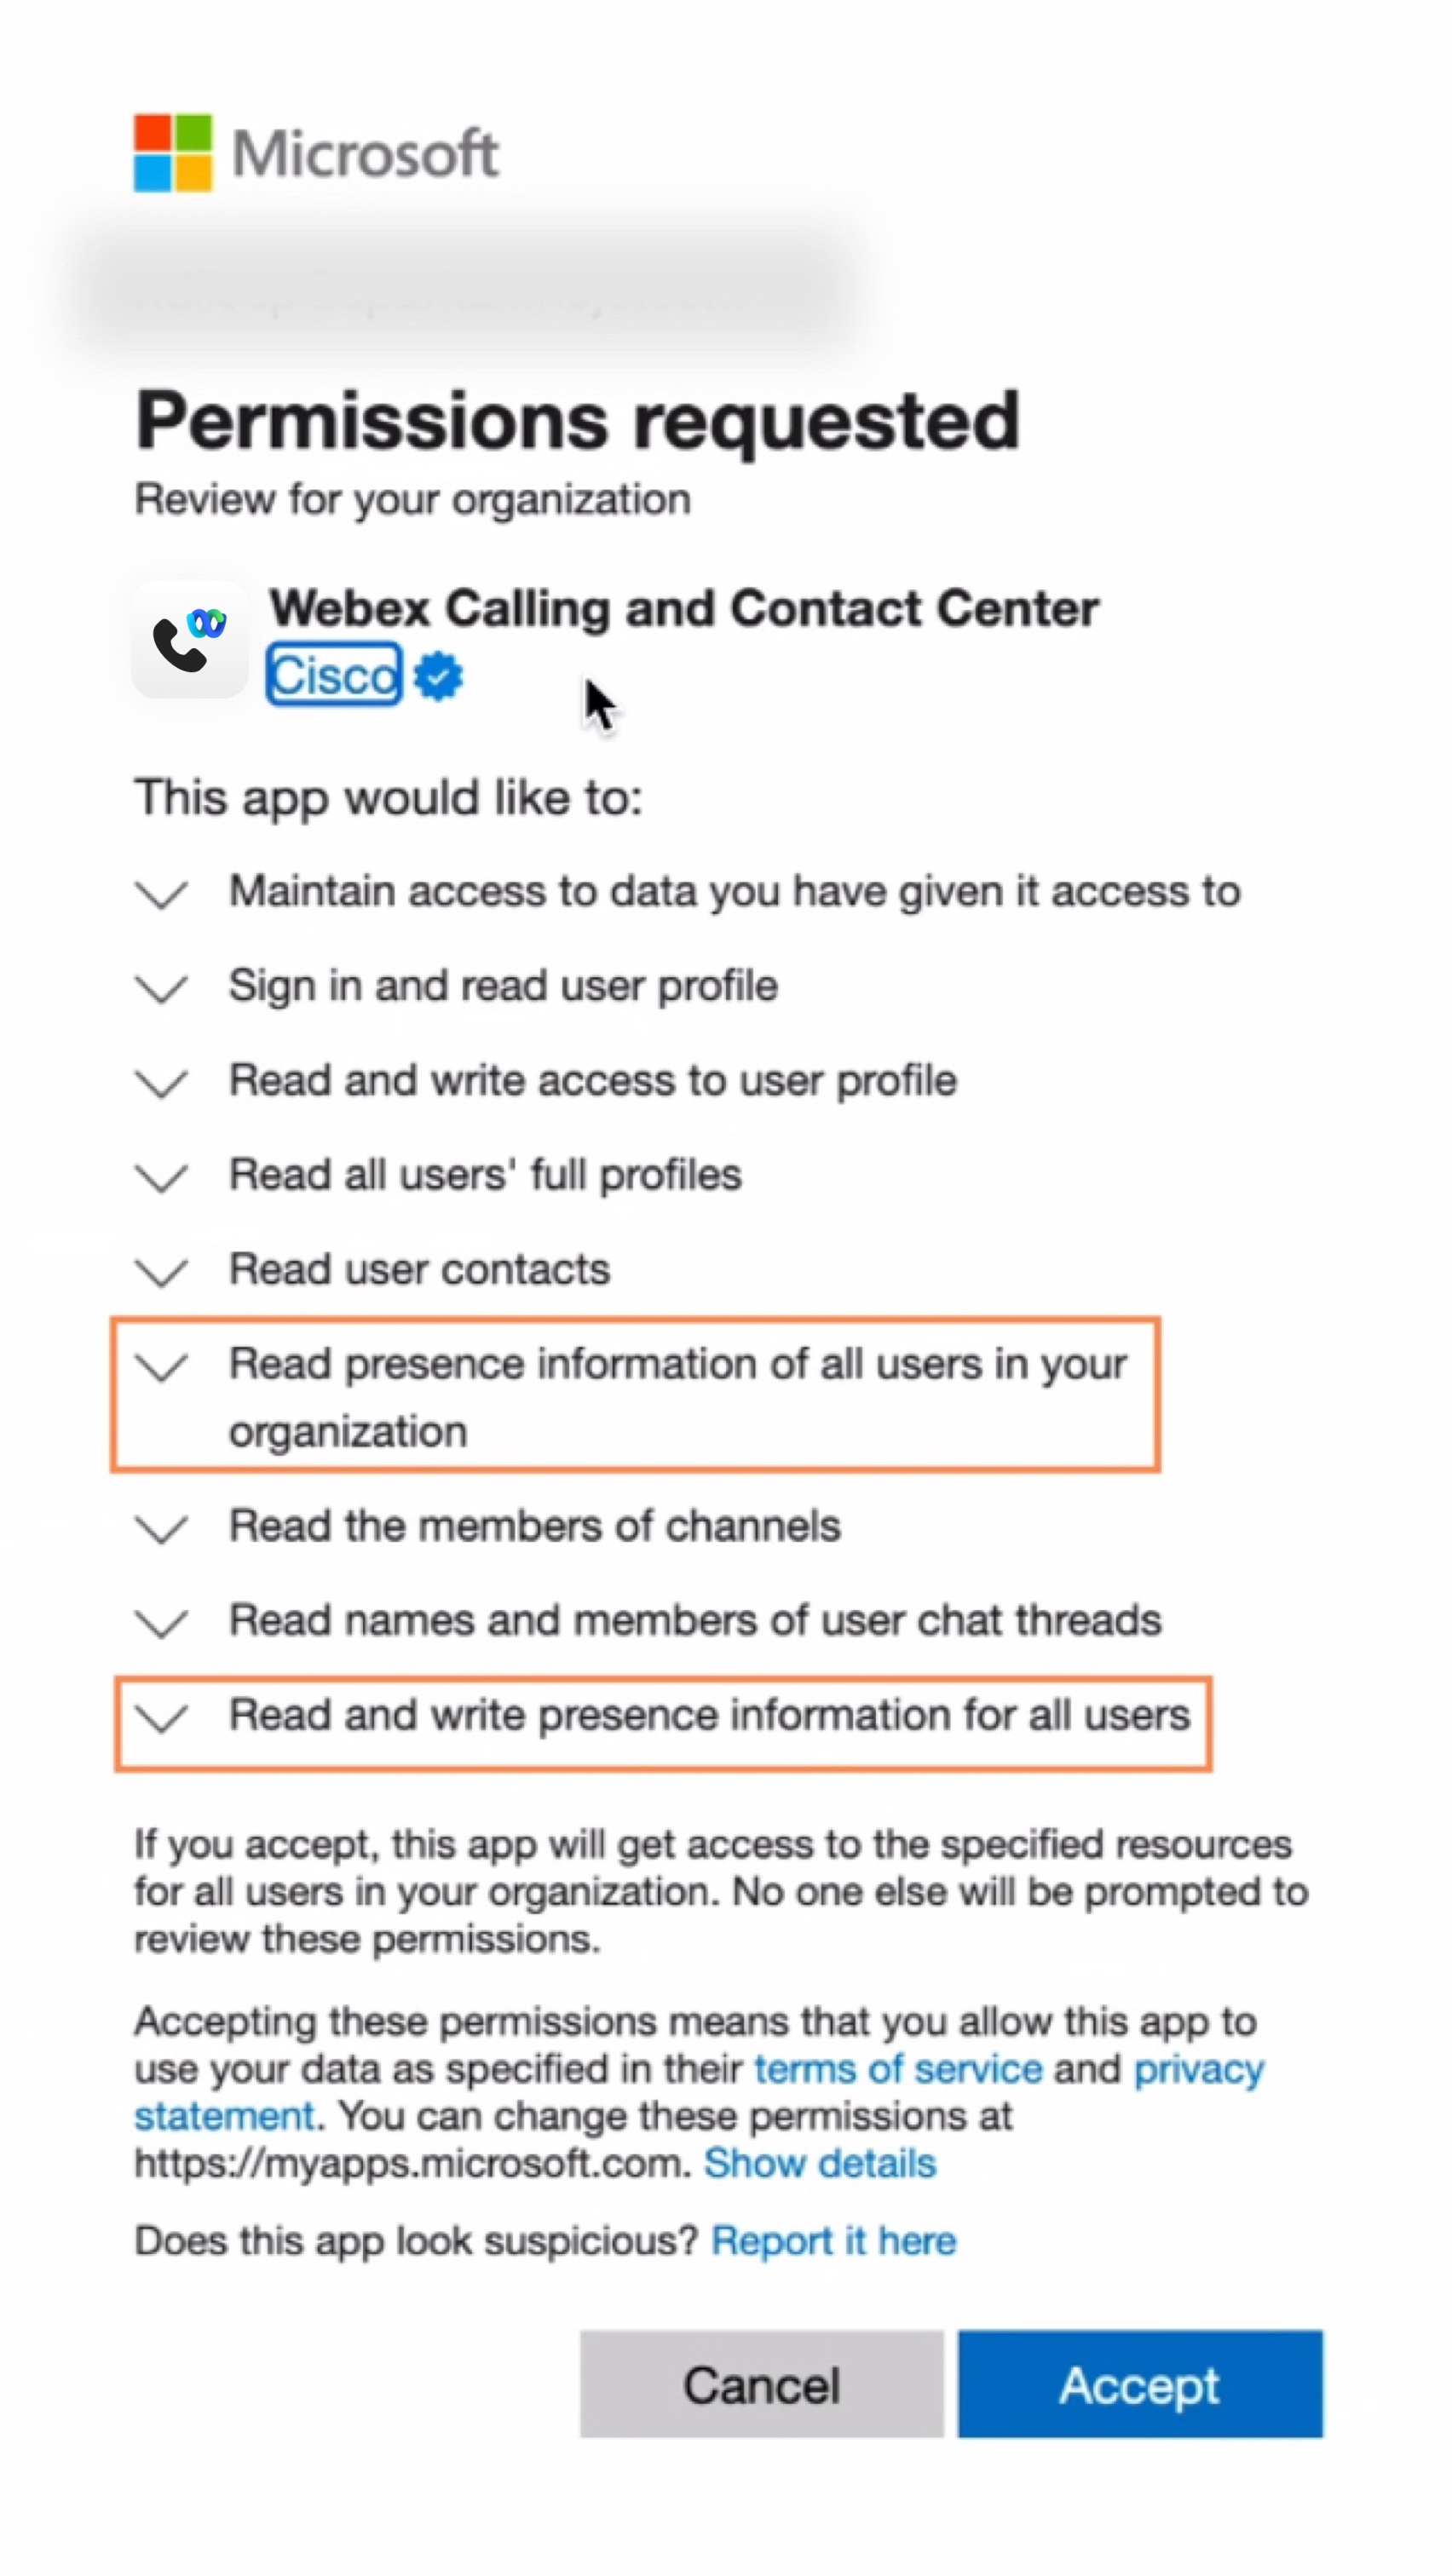
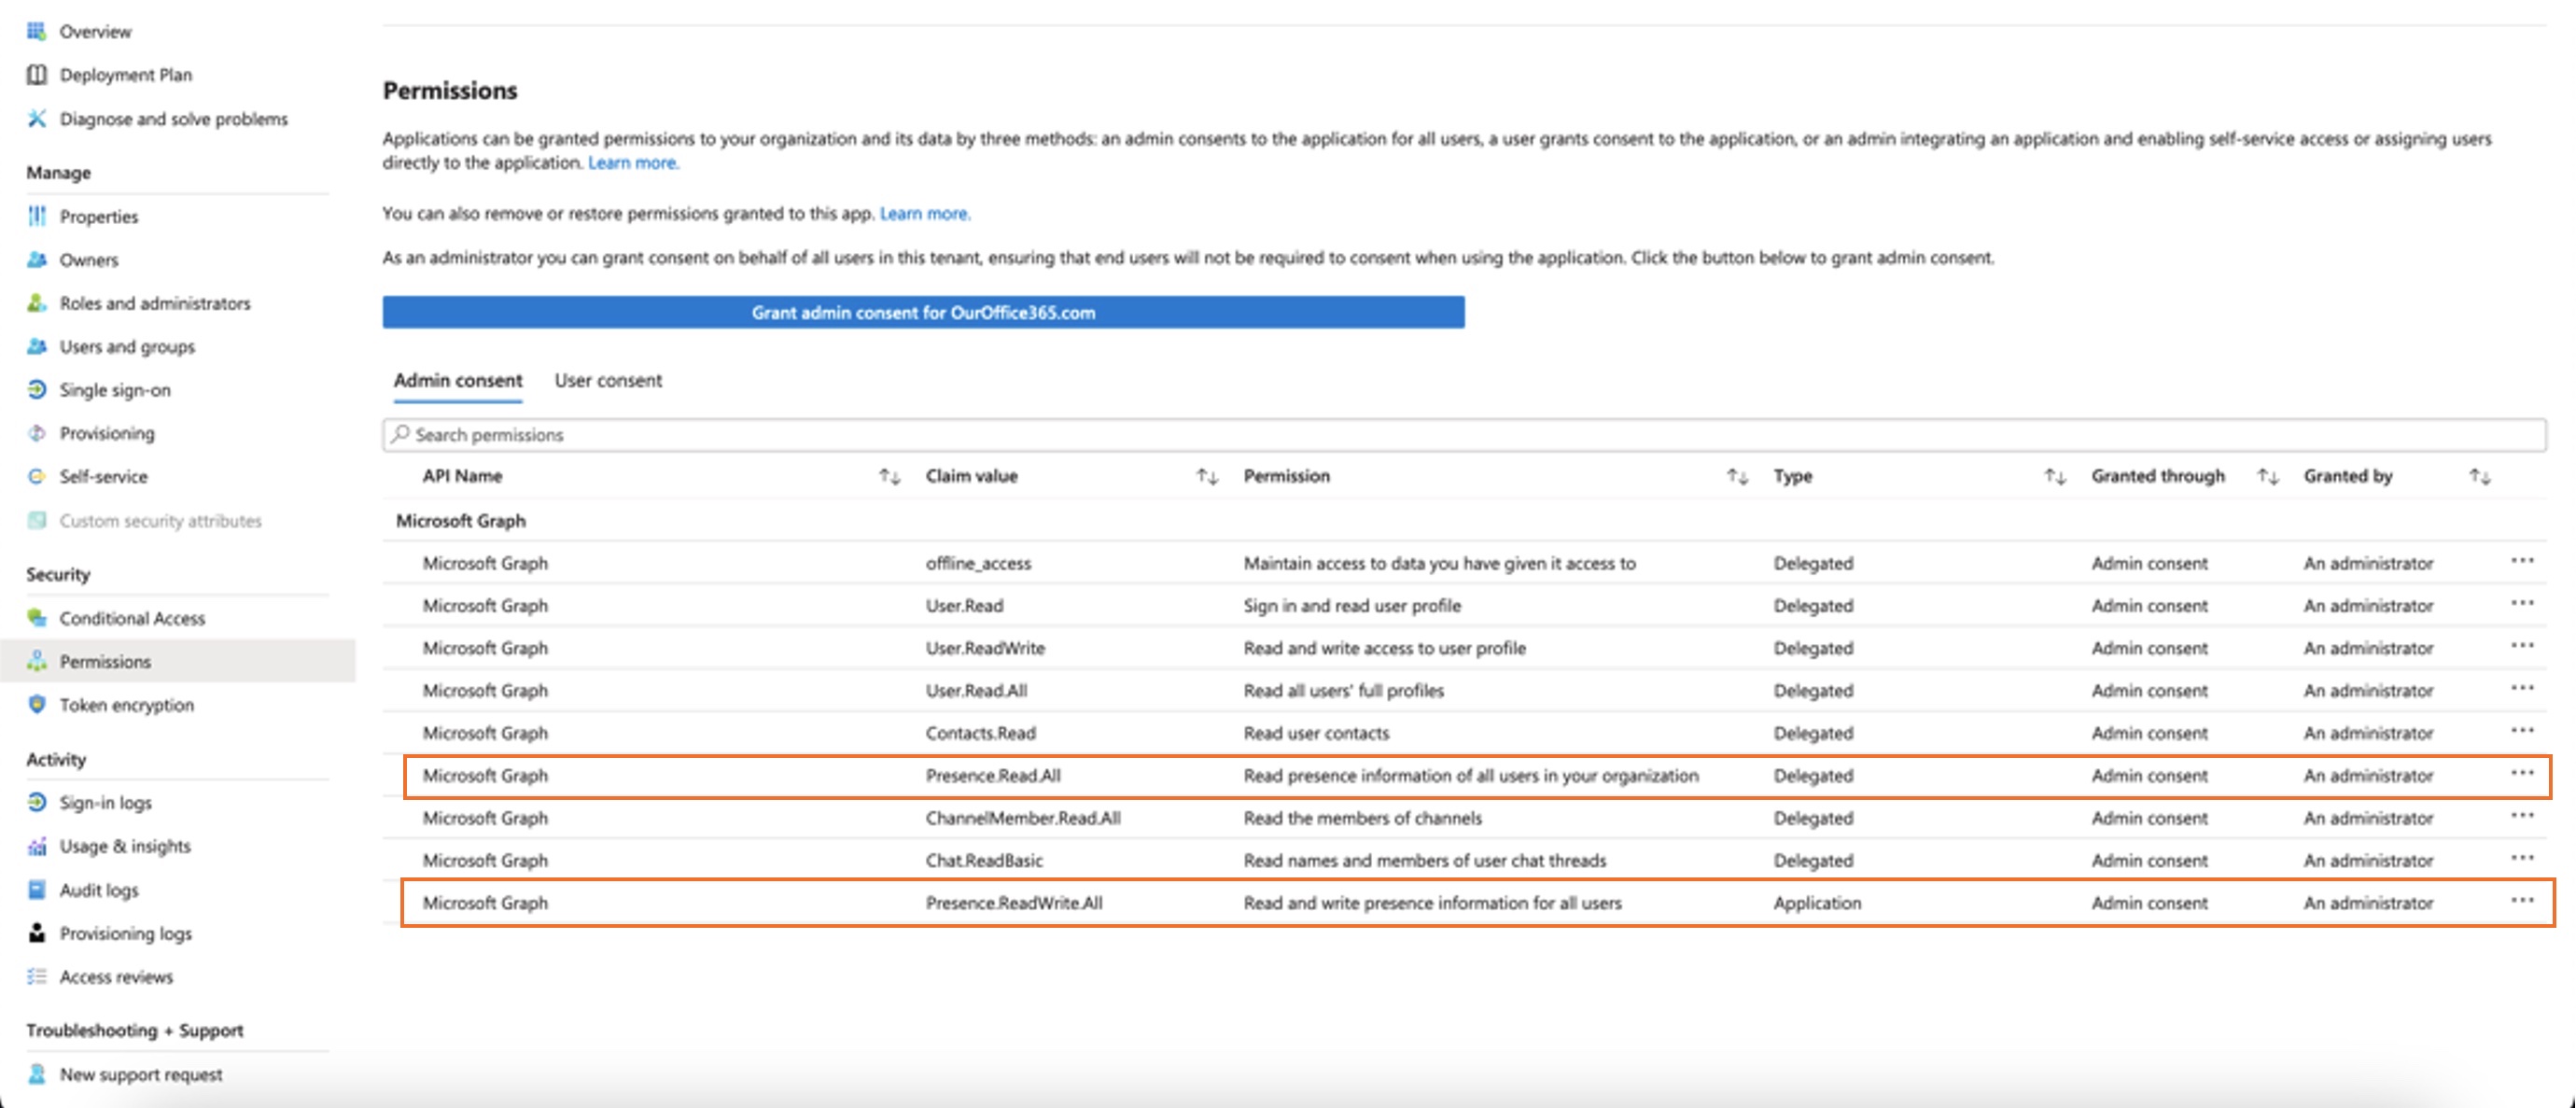
Vérifiez si les autorisations suivantes sont incluses.
 |
| 5 |
Cliquez sur Accepter pour accepter les autorisations. |
| 6 |
Vérifiez que les nouvelles autorisations apparaissent bien comme accordées :
Les autorisations suivantes doivent être respectées dans le consentement de l'administrateur :
Les autorisations
Si votre organisation utilise actuellement l'autorisation Si vous souhaitez passer de Une fois les autorisations vérifiées, activez la synchronisation de présence dans le Centre de contrôle. Consultez la section Activer la synchronisation de présence bidirectionnelle. Pour éviter les problèmes de synchronisation de l'état de présence entre Microsoft Teams et Webex, nous vous recommandons de définir le paramètre Affectation requise sur Non. Pour mettre à jour ce paramètre, accédez au centre d'administration Microsoft Entry ou au portail Azure, puis à et sélectionnez Non. Si vous devez conserver ce paramètre sur Oui pour une raison quelconque, assurez-vous d'attribuer correctement les utilisateurs en suivant les étapes mentionnées dans ces documents Microsoft : Attribuer des rôles d'application aux applications & Gérer l'affectation des utilisateurs et des groupes à une application. |
Personnaliser l'application Cisco Call
Vous pouvez créer plusieurs personnalisations de l'application Cisco Call pour les utilisateurs de Microsoft Teams en fonction des besoins de votre organisation. Vous pouvez créer une personnalisation par défaut de l'application pour tous les utilisateurs, ou créer 10 personnalisations supplémentaires d'une seule application et les attribuer à des utilisateurs ou des groupes spécifiques.
Pour plus d'informations, consultez Personnaliser l'application Cisco Call pour les utilisateurs de Microsoft Teams.
Autorisations pour l'intégration de Cisco Call et Microsoft Teams
Le service d'intégration utilise les API Webex et Microsoft pour accéder aux données, telles que l'historique des appels centralisé, afin d'afficher et de mettre à jour les statuts, comme le marquage des messages vocaux comme lus, sans stocker aucune donnée utilisateur. Tous les transferts de données entre l'intégration et le Webex/Microsoft Les échanges avec les serveurs backend s'effectuent via des canaux HTTPS chiffrés. Ainsi, le service garantit que les données des utilisateurs ne sont pas stockées dans le cloud, renforçant ainsi la confidentialité et la sécurité des données.
Nous demandons à Microsoft les autorisations minimales requises pour appeler l'API Microsoft afin d'activer la fonctionnalité d'intégration. Le tableau suivant décrit chaque autorisation que nous demandons et explique pourquoi elle est nécessaire.
| Autorisation | Raison |
|---|---|
|
offline_access |
Permet au service d'intégration de générer un nouveau jeton d'accès sans demander fréquemment à l'utilisateur de se réauthentifier. |
|
Utilisateur.Lire |
Permet au service d'intégration de lire les informations de base de l'utilisateur, telles que son adresse électronique. |
|
Utilisateur.ReadWrite |
Permet au service d'intégration de stocker les numéros abrégés dans les profils des utilisateurs. |
|
Utilisateur.Lu.Tous |
Permet au service d'intégration de rechercher des utilisateurs dans l'annuaire Active Directory pour passer des appels. |
|
Contacts.Lire |
Permet au service d'intégration de rechercher le contact Outlook de l'utilisateur pour passer des appels. |
|
ChainMember.Read.Tous |
Permet à l'extension de messages d'intégration de lire les membres d'un canal afin que l'utilisateur puisse rechercher un membre spécifique du canal à appeler. |
|
Chat.LireBasique |
Permet à l'extension de messagerie intégrée de lire les membres d'une conversation de groupe afin que l'utilisateur puisse rechercher un membre spécifique à appeler. |
|
Présence.Lire.Tout |
Permet au service d'intégration de lire les informations de présence de tous les utilisateurs dans l'annuaire. |
|
Présence.LectureÉcriture.Tout |
Permet au service d'intégration de lire toutes les informations de présence et d'écrire l'activité et la disponibilité de tous les utilisateurs dans l'annuaire. |
|
Présence.LectureÉcriture |
Permet au service d'intégration de lire les informations de présence et d'enregistrer l'activité et la disponibilité d'un utilisateur. |
Configuration du Control Hub
Vous pouvez configurer et activer les fonctionnalités suivantes dans Control Hub pour les rendre disponibles aux utilisateurs de Microsoft Teams.
Masquer la fenêtre de l'application Webex
Pour les organisations qui ont choisi d'utiliser l'intégration Cisco Call avec Microsoft Teams, cette intégration constitue l'interface principale des utilisateurs avec les services Webex. Une fois configurée, l'application Webex reste installée et fonctionne sur les ordinateurs de vos utilisateurs, mais sa fenêtre sera fermée par défaut. Les actions effectuées dans l'intégration de Cisco Call peuvent déclencher des fonctionnalités spécifiques dans l'application Webex, mais en général, les utilisateurs n'ont pas besoin d'interagir avec l'application Webex.
Via Control Hub, vous pouvez masquer la fenêtre de l'application Webex aux niveaux suivants :
-
Niveau organisationnel
-
niveau du groupe d'utilisateurs
-
Niveau de l’utilisateur
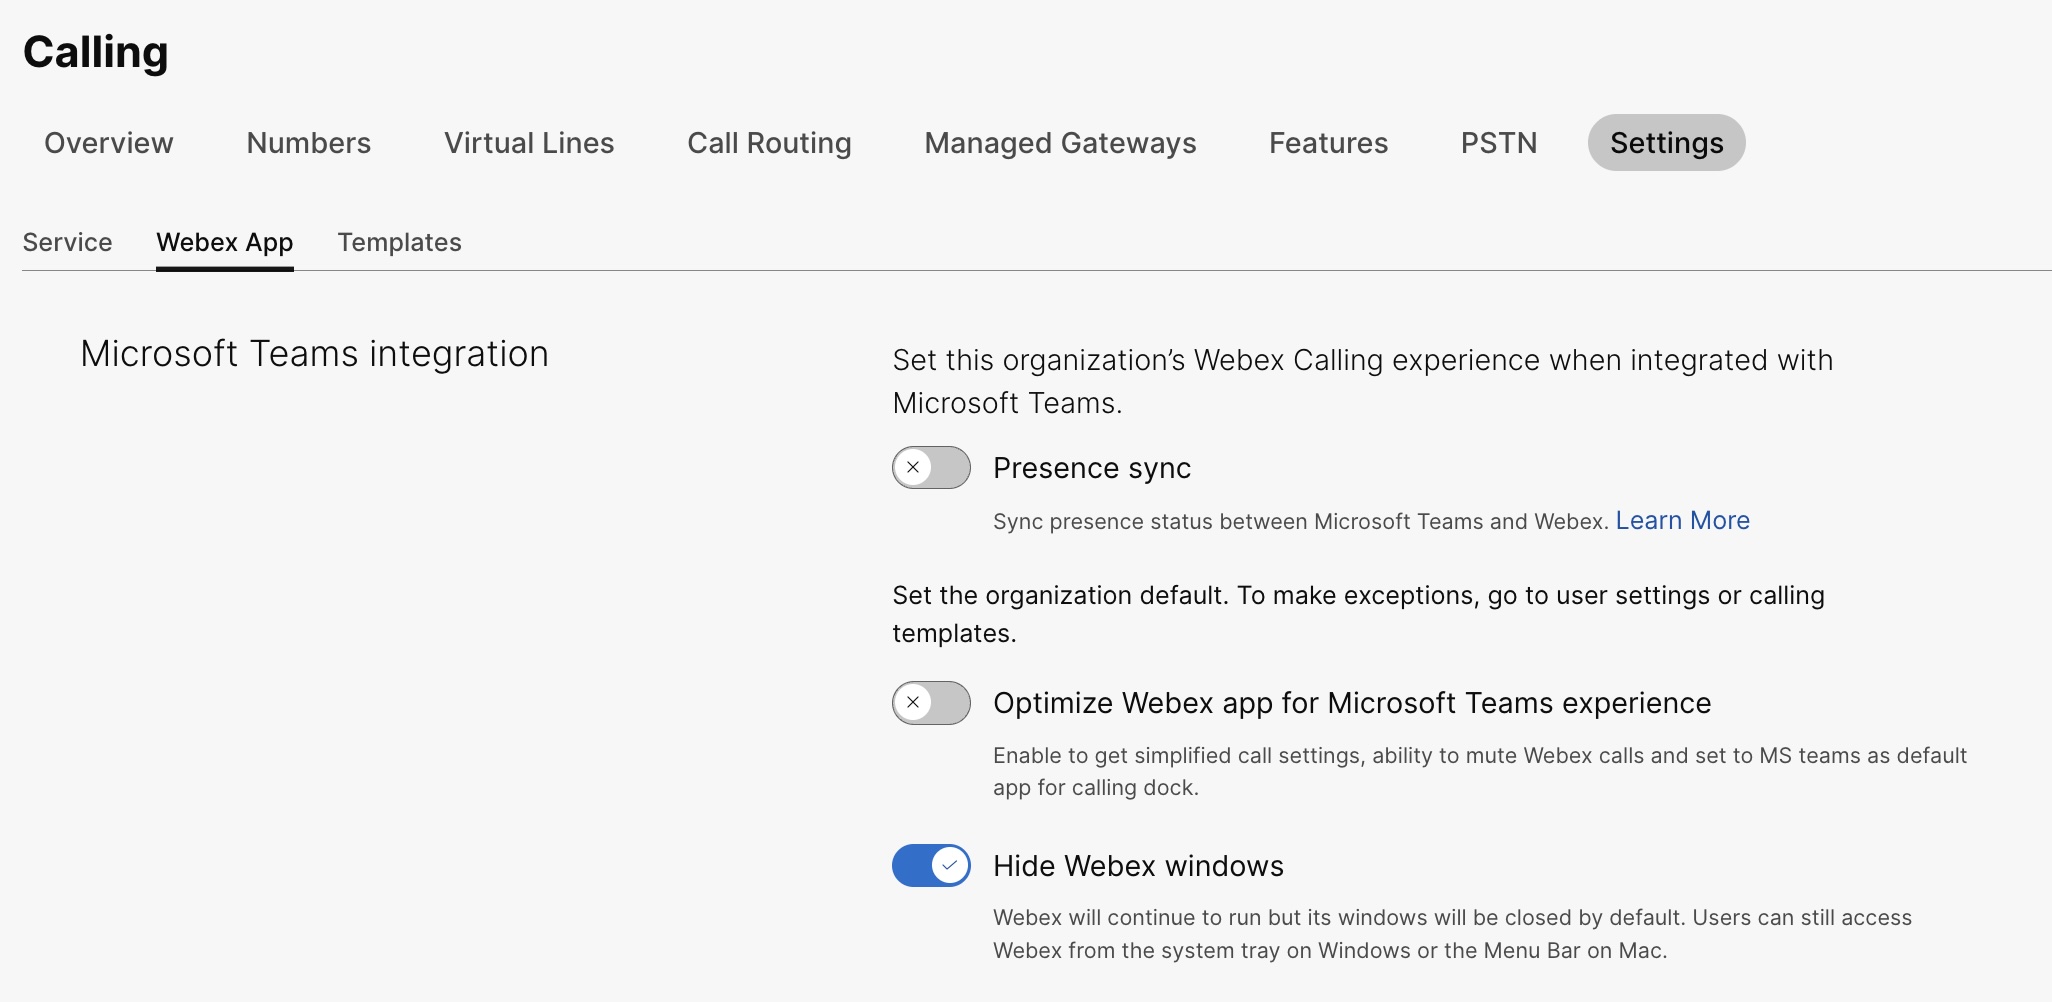
Masquer la fenêtre de l'application Webex pour une organisation
Les paramètres configurés au niveau de l'organisation s'appliquent automatiquement à tous les utilisateurs de cette organisation.
| 1 | |
| 2 |
Aller à . |
| 3 |
Cliquez sur l'onglet Webex App, accédez à la section Intégration Microsoft Teams et activez Masquer les fenêtres Webex.
Vous pouvez également utiliser l'API publique pour masquer la fenêtre de l'application Webex pour tous les utilisateurs d'une organisation qui utilisent l'intégration Cisco Call avec Microsoft Teams. Pour plus de détails, consultez Mettre à jour les paramètres MS Teams d'une organisation sur developer.webex.com. |
Masquer la fenêtre de l'application Webex pour un groupe d'utilisateurs
Pour masquer la fenêtre de l'application Webex pour un groupe d'utilisateurs, créez un modèle d'appel et attribuez-le à ce groupe. La configuration définie dans le modèle s'applique à tous les utilisateurs du groupe.
Pour créer un nouveau modèle permettant de masquer la fenêtre de l'application Webex :
| 1 | |
| 2 |
Aller à . |
| 3 |
Cliquez sur Créer un modèle, choisissez Créer un modèle et cliquez sur Suivant. Si l'éducation est votre secteur d'activité, vous pouvez appliquer des modèles prédéfinis avec des paramètres personnalisés pour les élèves ou les enseignants. |
| 4 |
Dans la section Général, saisissez le Nom du modèle et la Description. |
| 5 |
Accédez à la section Intégration Microsoft Teams et activez Masquer les fenêtres Webex. |
| 6 |
Cliquez sur Créer un modèle et suivant. |
| 7 |
Recherchez et sélectionnez un groupe pour ce modèle et cliquez sur Terminé. Modifier ou supprimer un modèle :
Pour modifier un modèle, cliquez sur le modèle, modifiez les options et cliquez sur Enregistrer. Pour supprimer un modèle, cliquez sur le modèle et choisissez Supprimer dans la liste déroulante Actions. Sur la page Supprimer le modèle, cochez la case vous informant que la suppression d'un modèle est permanente, puis cliquez sur Supprimer. |
Considérations relatives à l'application de modèles d'appel à un groupe d'utilisateurs
-
Lorsqu’un utilisateur est intégré à une organisation, l’utilisateur hérite des paramètres au niveau de l’organisation.
-
Si l’utilisateur est ajouté à un groupe d’utilisateurs, alors les paramètres du modèle d’appel s’appliquent.
-
Si un utilisateur appartient à plusieurs groupes d'utilisateurs, le modèle ayant le rang le plus élevé (Rang 1) a la priorité absolue et ce sont les paramètres de ce modèle qui s'appliquent.
-
Si l'utilisateur dispose de paramètres individuels, ces paramètres prévalent sur les paramètres au niveau du groupe d'utilisateurs ou de l'organisation.
Consultez Configurer les modèles de paramètres pour plus d'informations sur la gestion de vos modèles.
Vous pouvez appliquer le modèle existant soit à partir de la section Groupe soit à partir de la section Appelant.
- Pour appliquer un modèle de la section Groupe, voir Configurer le modèle de paramètres.
- Pour postuler depuis la section « Appel », veuillez suivre les étapes suivantes.
| 1 | |
| 2 |
Aller à . |
| 3 |
Cliquez sur |
| 4 |
Saisissez le nom du groupe auquel vous souhaitez appliquer le modèle, puis sélectionnez le groupe. |
| 5 |
cliquez sur Terminé. |
 à côté d'un modèle existant et cliquez sur
 Masquer la fenêtre de l'application Webex pour un utilisateur
Les paramètres individuels de l'utilisateur prévalent sur les paramètres au niveau de l'organisation et du groupe d'utilisateurs.
| 1 | |
| 2 |
Aller à . |
| 3 |
Sélectionnez un utilisateur et cliquez sur Appel. |
| 4 |
Accédez à Expérience d'appel utilisateur et cliquez sur Intégration Microsoft Teams. |
| 5 |
Activer Masquer les fenêtres Webex. 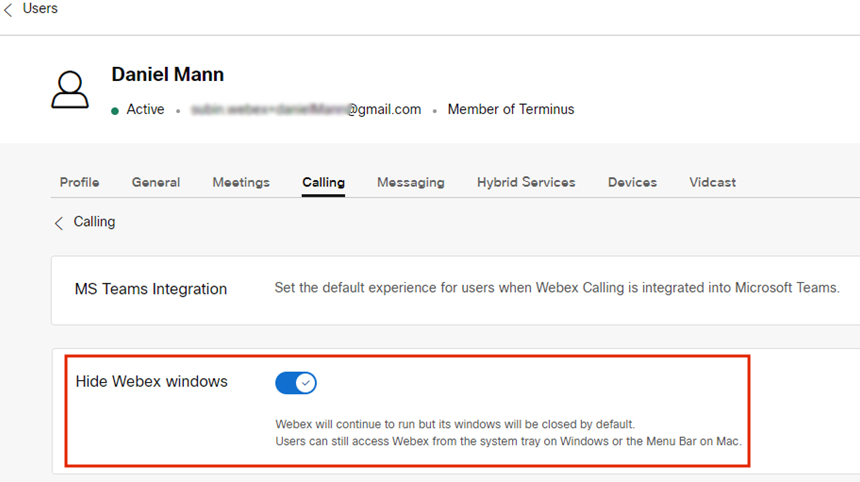 Une fois les paramètres configurés pour un utilisateur, vous pouvez les modifier davantage au niveau de cet utilisateur. Les paramètres utilisateur ne reviennent pas automatiquement aux paramètres par défaut de l'organisation. Vous pouvez utiliser l'API publique pour masquer la fenêtre de l'application Webex dans le client Microsoft Teams pour un utilisateur individuel. Voir Configurer les paramètres MS Teams d'une personne et Récupérer les paramètres de service d'application d'une personne dans developer.webex.com. |
Une fois les paramètres configurés, les utilisateurs doivent redémarrer leur application Webex et se connecter pour voir la modification.
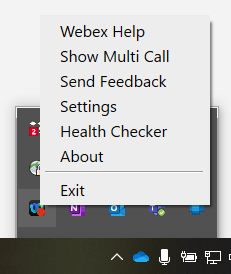
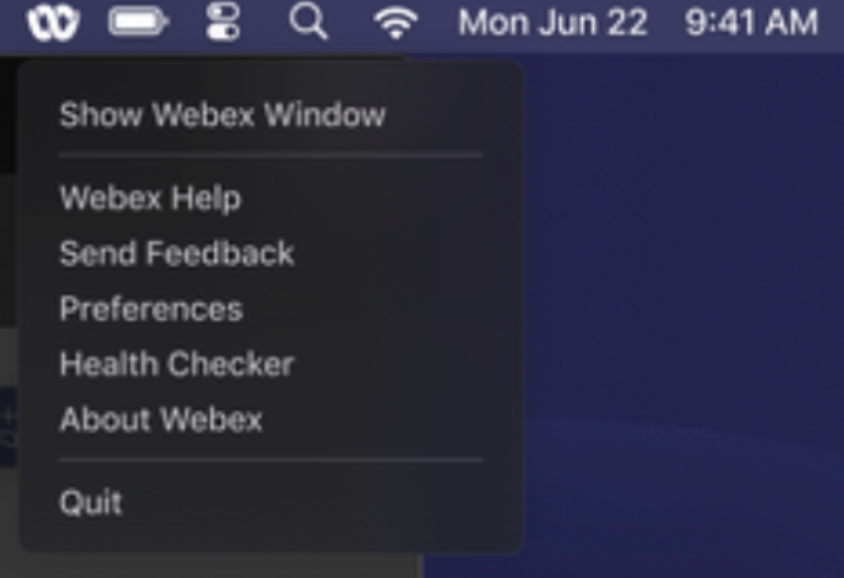
Si les utilisateurs souhaitent interagir directement avec l'application Webex, ils peuvent y accéder depuis la barre d'état système sous Windows et la barre de menus sous Mac. L'application Webex n'est visible dans la barre des tâches Windows ou le dock macOS que lorsqu'une fenêtre est active et utilisée.
|
Application Webex dans la barre d'état système Windows |
Application Webex dans la barre de menus Mac |
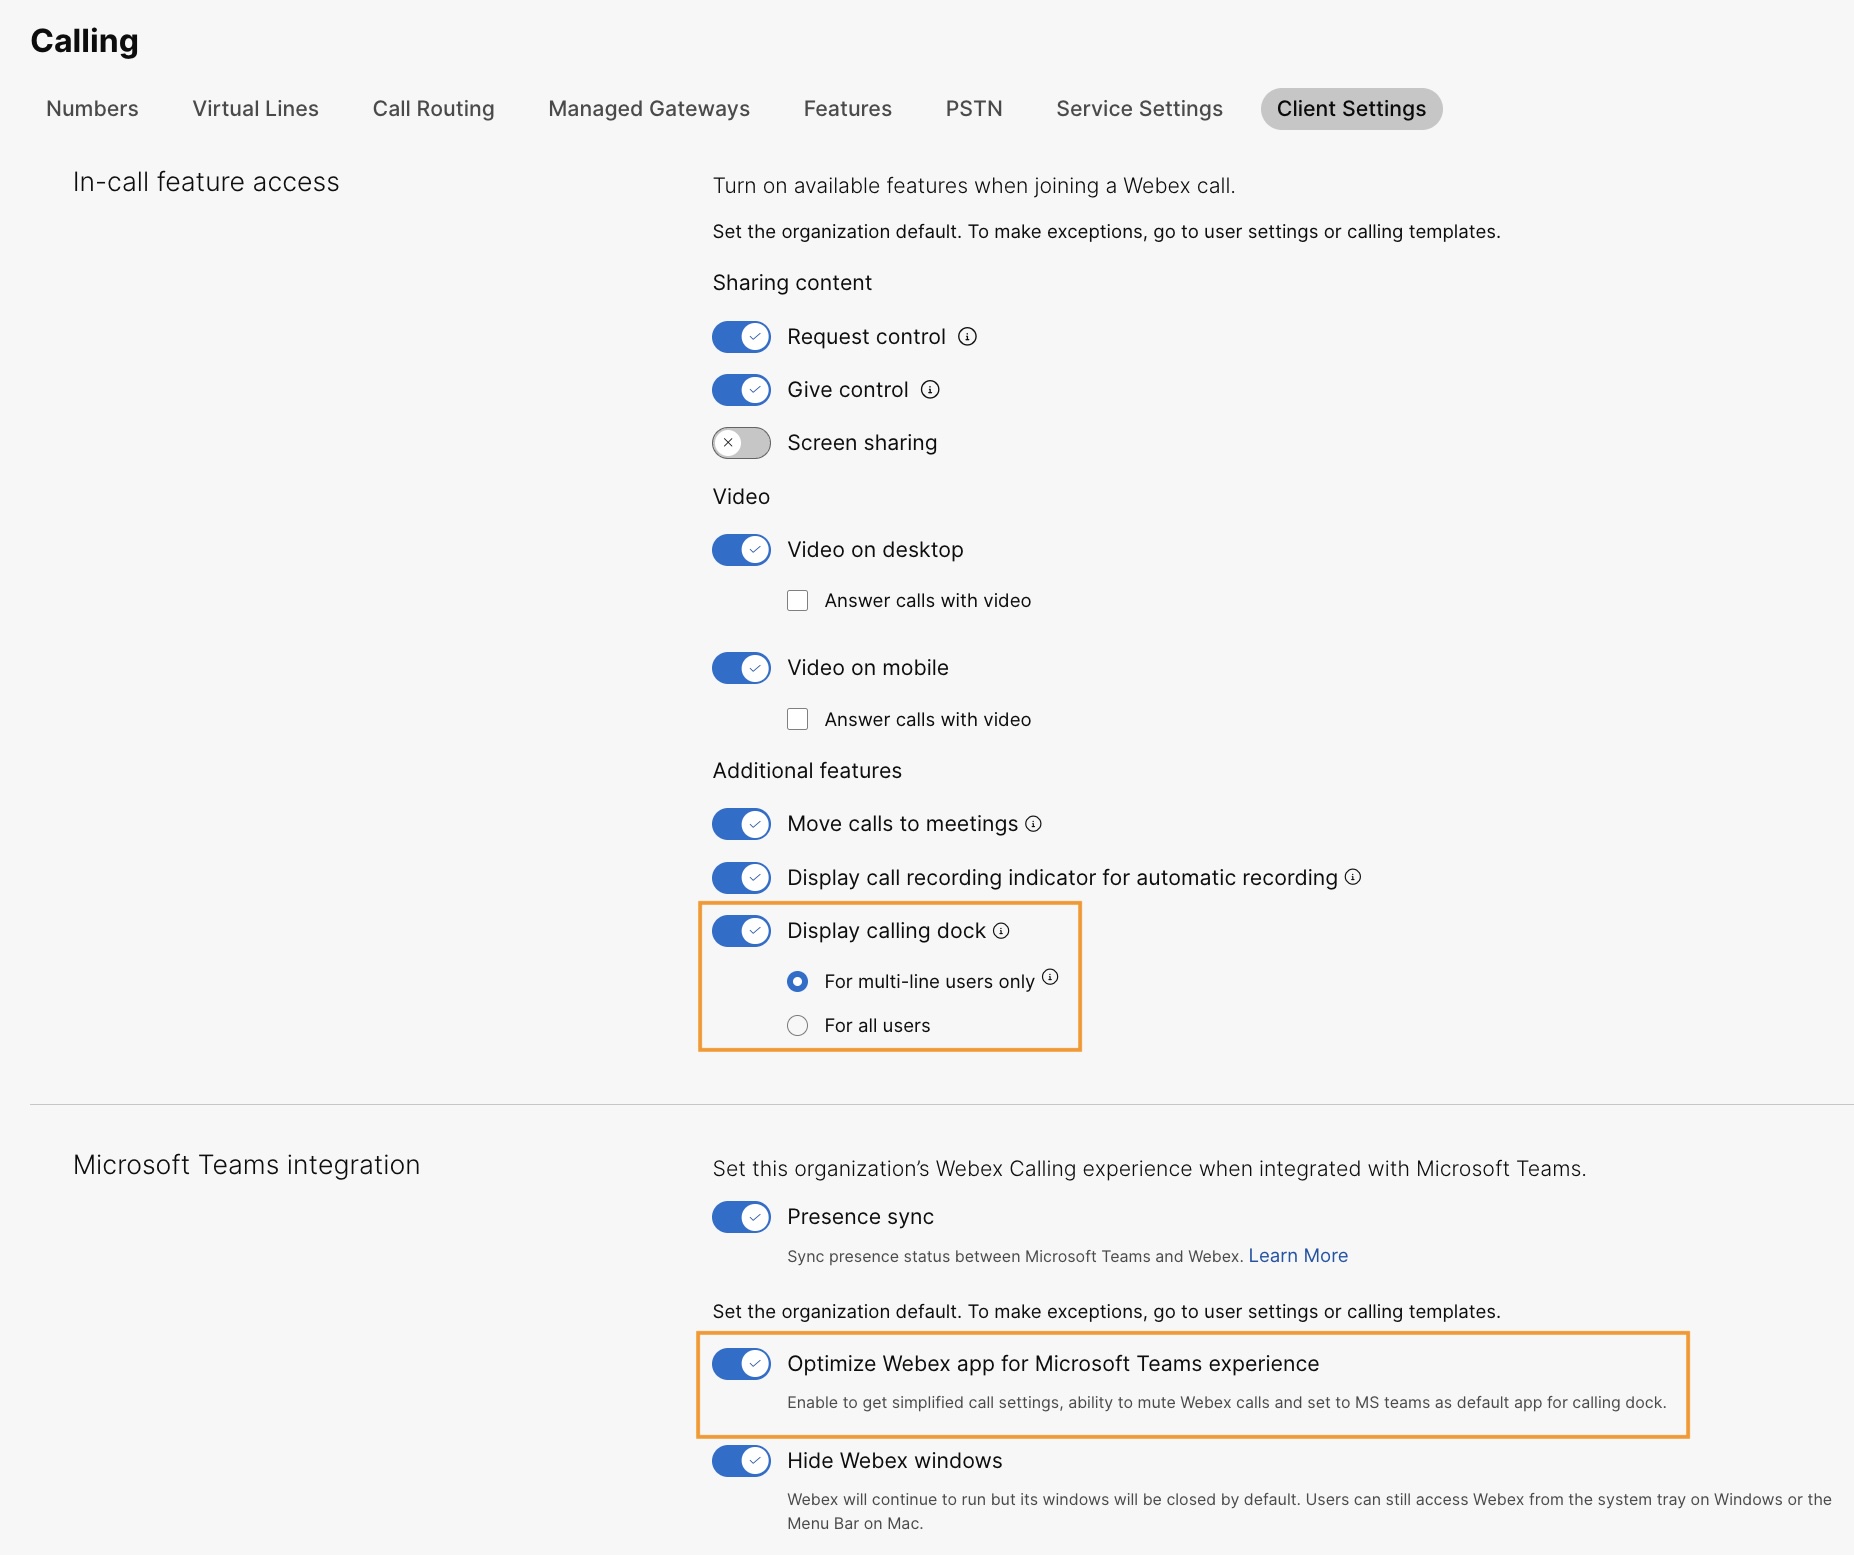
Activer la fenêtre d'appel du dock
La fenêtre d'appel (appel multiple) est une fenêtre flottante distincte qui permet aux utilisateurs de gérer plusieurs lignes ou des lignes partagées dans une seule fenêtre. Les utilisateurs peuvent passer et recevoir des appels, consulter l'état de toutes les lignes et bénéficier d'un meilleur accès à des fonctionnalités telles que la mise en attente, le transfert et l'intervention, sans avoir à changer de fenêtre.
| 1 | |
| 2 |
Aller à . |
| 3 |
Cliquez sur l'onglet Webex App, accédez à la section Accès aux fonctionnalités en appel, et sous Fonctionnalités supplémentaires, activez Afficher le panneau d'appel et choisissez l'une des options suivantes :
Vous pouvez également configurer cette fonctionnalité au niveau du groupe d'utilisateurs et au niveau de l'utilisateur.
|
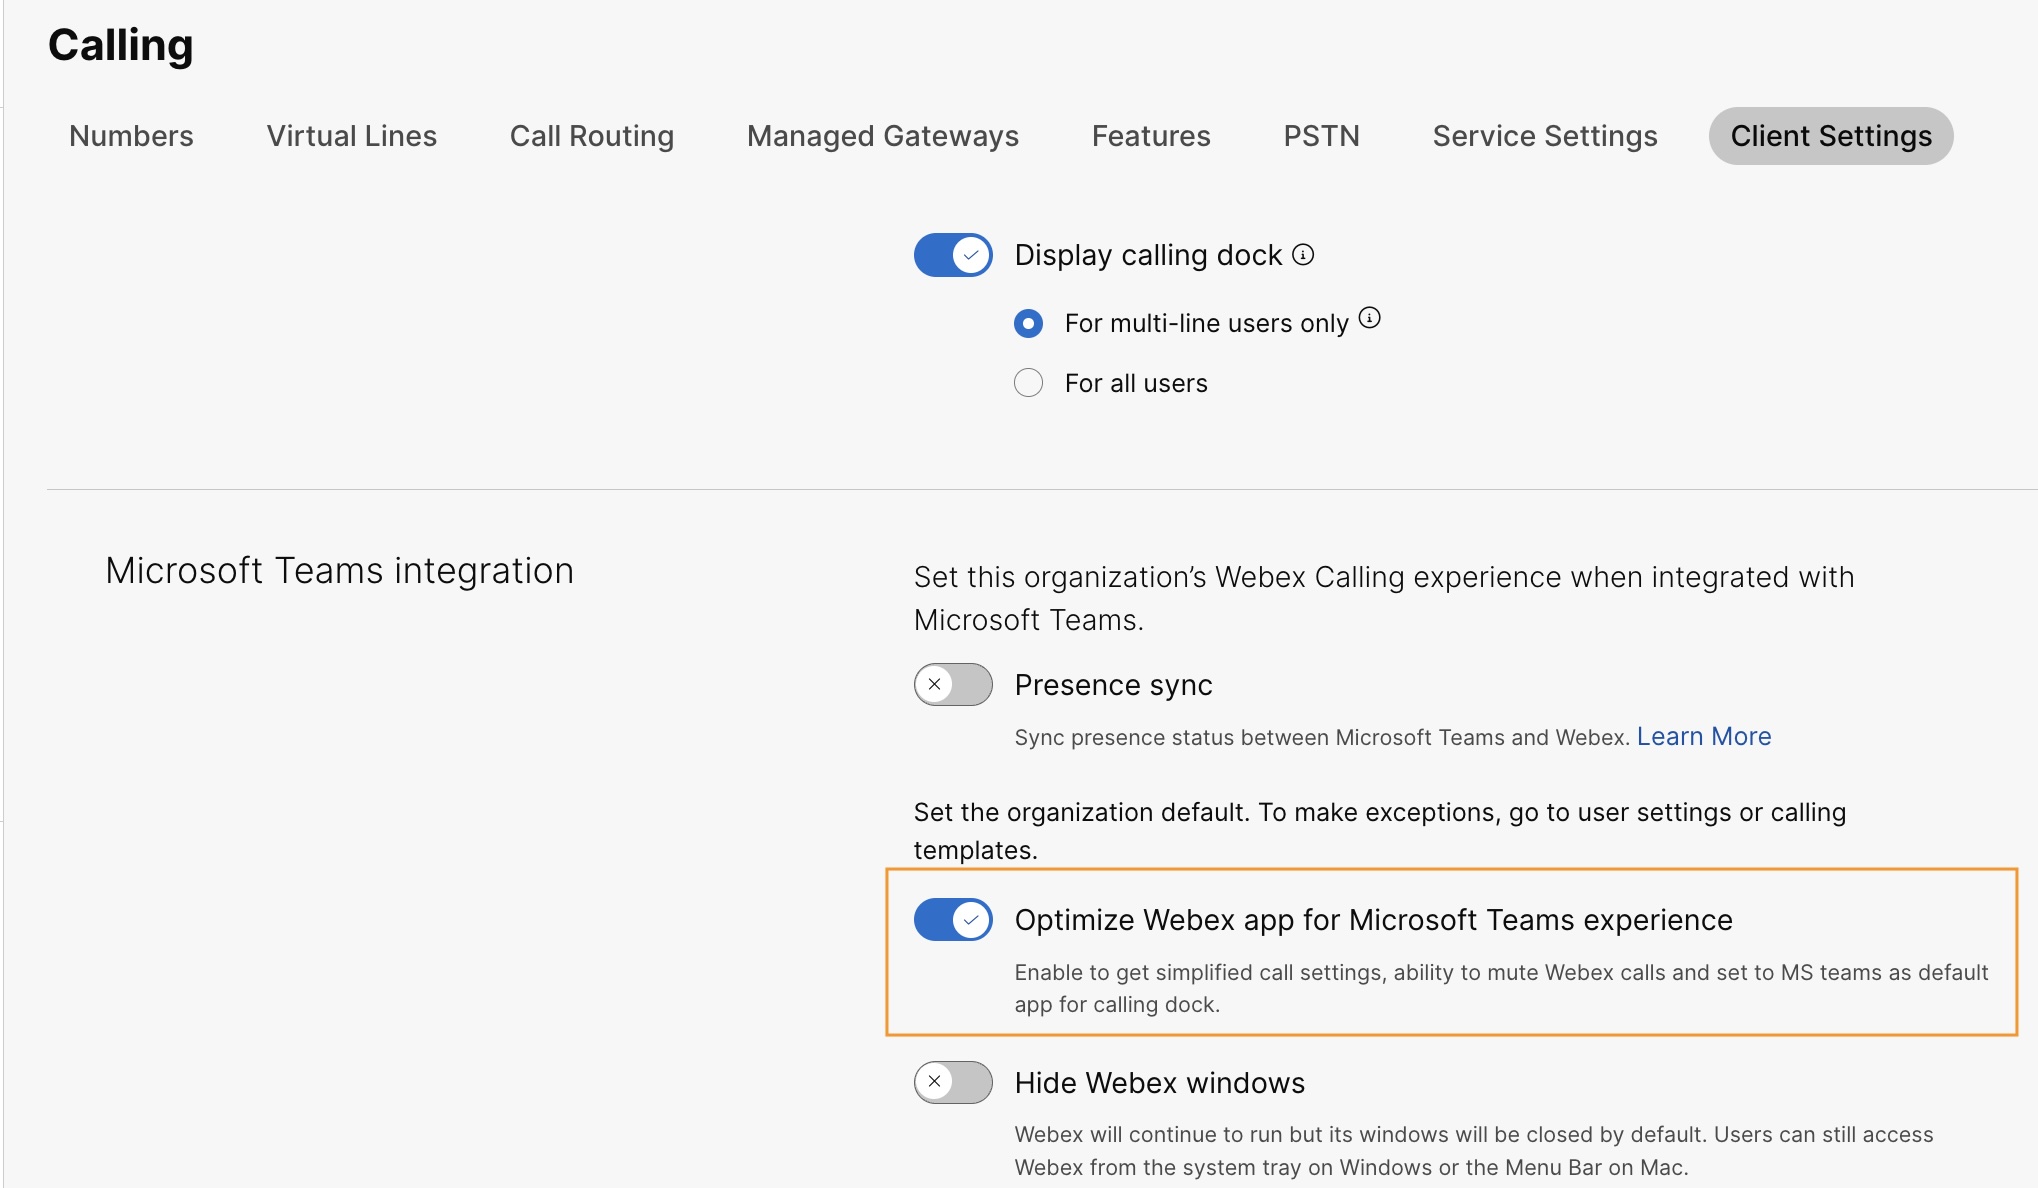
Optimiser l'application Webex pour une expérience Microsoft Teams
Cette fonctionnalité offre aux utilisateurs les expériences suivantes :
-
Paramètres d'appel simplifiés — Les paramètres d'appel n'affichent que les options nécessaires à l'intégration. L'activation de cette fonction simplifie uniquement les paramètres d'appel accessibles via le panneau d'appel. Les paramètres d'appel accessibles depuis l'intégration Cisco Call restent simplifiés par défaut.
-
Couper le son des appels Cisco — Les appels Cisco entrants sont coupés lorsqu'un utilisateur participe à un appel ou une réunion Microsoft Teams. Pour que cette fonctionnalité fonctionne, vous devez l'activer dans Control Hub et l'utilisateur doit activer l'option Désactiver les notifications uniquement lorsque je suis en réunion ou en appel dans les paramètres d'appel de l'intégration Cisco Call.
Si vous désactivez cette fonctionnalité dans Control Hub, les paramètres utilisateur ne fonctionneront que lorsque l'utilisateur participe à un appel ou une réunion Cisco. Si vous activez cette fonctionnalité, les paramètres utilisateur fonctionneront lorsque l'utilisateur participe à un appel ou une réunion Microsoft Teams ou Cisco.
-
Expérience d'application unique — Lorsqu'un utilisateur clique sur les icônes de messagerie vocale et d'historique des appels centralisé dans le panneau d'appel, il est redirigé vers Microsoft Teams Cisco Call au lieu de l'application Webex.
Pour les utilisateurs sous Windows : Cliquer sur l'icône de l'application Webex dans la barre d'état système ouvre la barre d'appel au lieu de l'application Webex.
| 1 | |
| 2 |
Aller à . |
| 3 |
Cliquez sur l'onglet Webex App, accédez à la section Intégration Microsoft Teams et activez l'option Optimiser l'application Webex pour l'expérience Microsoft Teams.
Ce bouton est désactivé si vous n'avez pas activé le bouton Afficher le dock d'appel dans la section Accès aux fonctionnalités en appel. Vous pouvez également configurer cette fonctionnalité au niveau du groupe d'utilisateurs et au niveau de l'utilisateur.
|
Activez la messagerie vocale, l'historique des appels centralisé et la synchronisation de présence.
Messagerie vocale et historique des appels centralisé
Les fonctionnalités de messagerie vocale et d'historique d'appels centralisé sont activées par défaut pour les clients Webex Calling, Dedicated Instance et UCM Cloud.
Pour plus d'informations sur l'activation de la messagerie vocale pour les utilisateurs de Webex Calling, consultez : Configurer et gérer les paramètres de messagerie vocale pour un utilisateur Webex Calling.
Pour plus d'informations sur l'activation de la messagerie vocale pour les utilisateurs de BroadWorks, voir Activation de la messagerie vocale pour l'intégration de Microsoft Teams.
Les administrateurs de BroadWorks doivent activer l'historique des appels centralisé et unifié pour que cette fonctionnalité fonctionne correctement. Voir le Guide de configuration de Webex for Cisco BroadWorks pour plus de détails.
Synchronisation bidirectionnelle de la présence
Cette fonctionnalité permet la synchronisation bidirectionnelle du statut de présence entre Microsoft Teams et Webex, prenant en charge plusieurs locataires Microsoft Teams au sein d'une même organisation Webex. Le statut de présence comprend En appel, En réunion, Présentation, et Ne pas déranger.
Après avoir activé cette fonctionnalité, lorsqu'un utilisateur passe ou reçoit un appel Webex, son statut Microsoft Teams passe à En appel. Lorsqu'ils activent le mode « Ne pas déranger » dans l'application Webex ou sur un appareil Webex, le statut est automatiquement synchronisé avec Microsoft Teams. De même, les statuts En réunion et Présentation se synchronisent entre les applications.
Lorsque l'option « Ne pas déranger » est activée sur l'application Webex de l'utilisateur ou sur tout appareil Webex, celui-ci ne recevra aucune notification d'appels et de messages entrants dans l'application Webex, sur l'appareil Webex ou dans Microsoft Teams.
Vous pouvez également utiliser l'API publique pour activer la synchronisation de présence Webex avec le client Microsoft Teams. Pour plus de détails, consultez Mettre à jour les paramètres MS Teams d'une organisation sur developer.webex.com.
Le tableau suivant présente la représentation de la synchronisation bidirectionnelle des statuts entre Webex et Microsoft Teams.
|
Statut Webex |
État de Microsoft Teams |
|---|---|
|
|
|
|
|
|
|
|
|
|
|
|
Actuellement, cette fonctionnalité ne peut être configurée qu'au niveau de l'organisation.
| 1 | |
| 2 |
Aller à . |
| 3 |
Cliquez sur l'onglet Webex App, accédez à la section Intégration Microsoft Teams et activez la Synchronisation de présence. Vous pouvez activer l'option Masquer les fenêtres Webex pour une expérience optimale, mais cela est facultatif. |
| 4 |
Accédez à la section Synchronisation du statut Ne pas déranger (DND) et activez le commutateur. 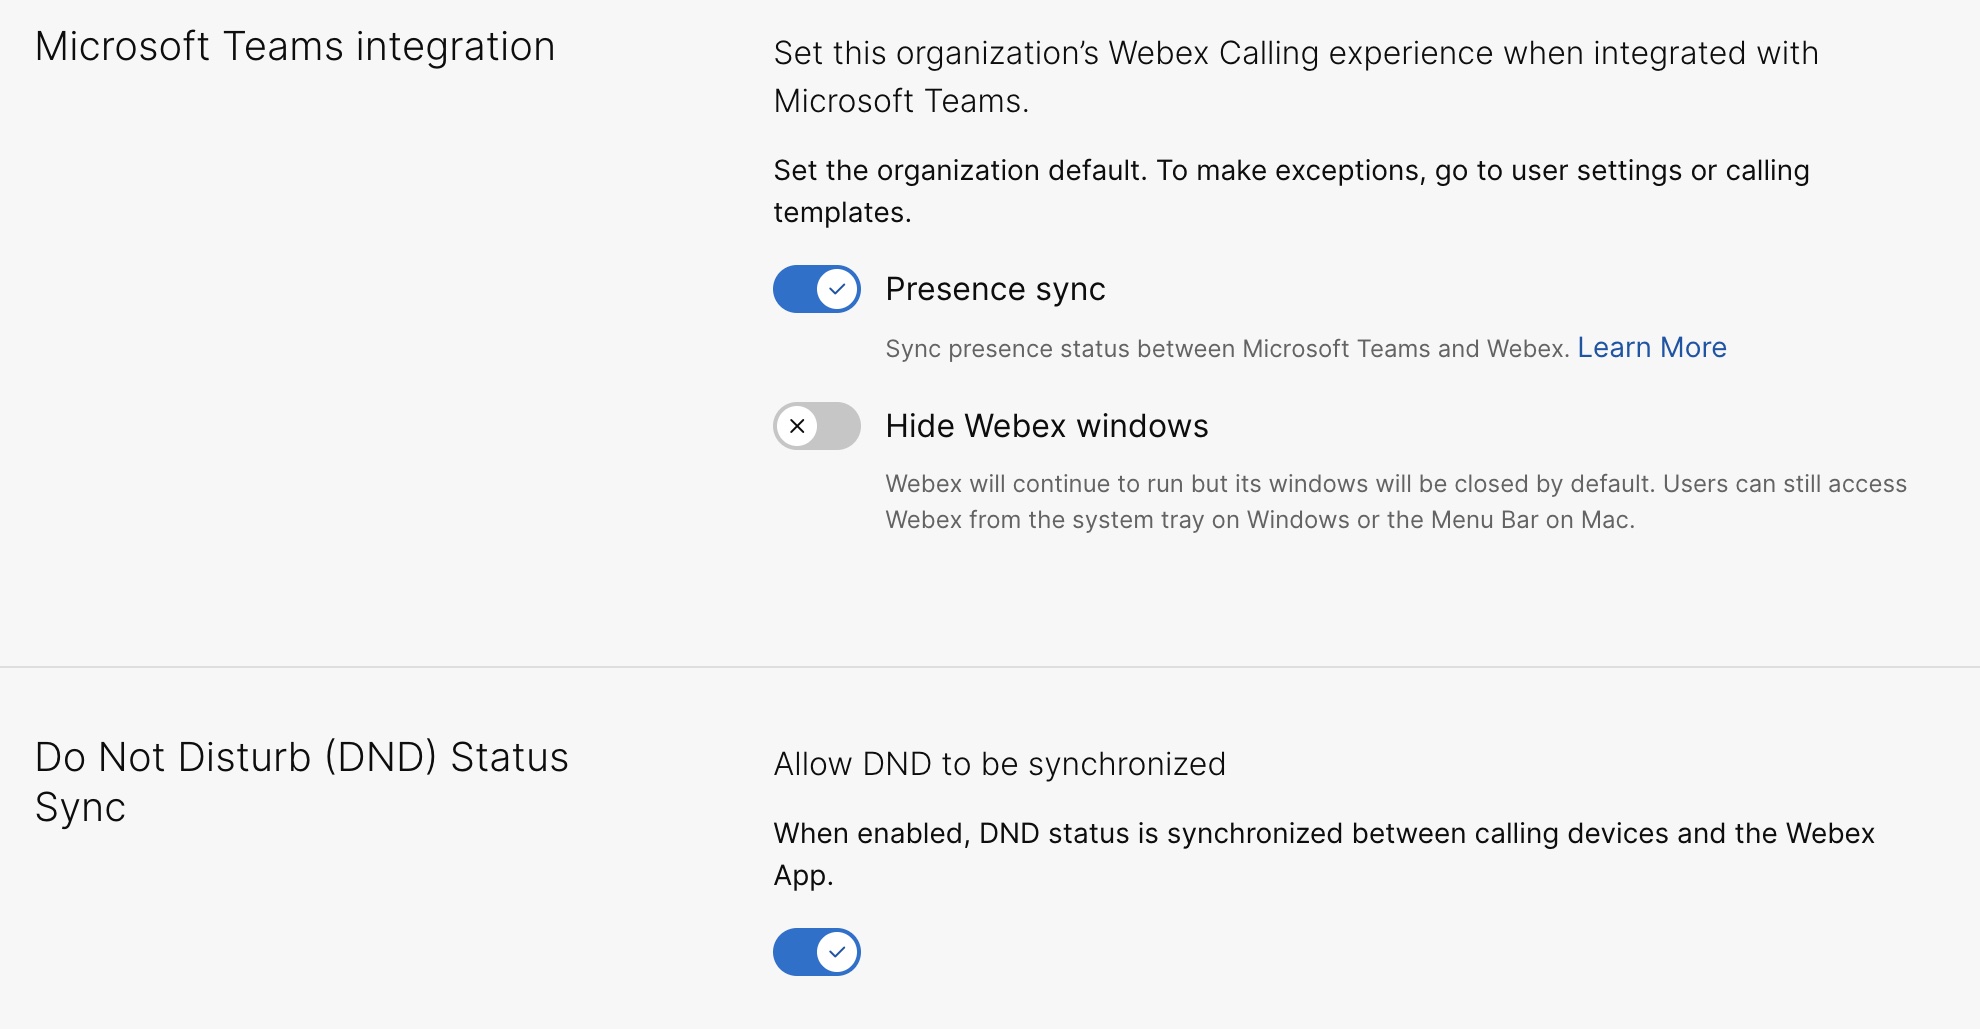 |
Configuration supplémentaire pour les utilisateurs d'Unified CM
Pour activer la messagerie vocale, l'historique des appels centralisé et le service de synchronisation de présence bidirectionnelle pour les clients Unified CM sur site, procédez comme suit :
L'activation du service de messagerie vocale pour les clients sur site prend au maximum 12 heures.
| 1 | |||||
| 2 |
Aller à . Sur la carte Gestion UC, cliquez sur Inventaire. La liste des groupes de clusters apparaît avec la description, le statut, les clusters et les nœuds. | ||||
| 3 |
Effectuez les actions suivantes :
La page Inventaire s’affiche, présentant la liste des clusters appartenant au groupe de clusters sélectionné. | ||||
| 4 |
Cliquez sur Informations à côté du cluster auquel le nœud de produit particulier appartient. Le nom du nœud avec la version, le produit et le statut s’affiche. | ||||
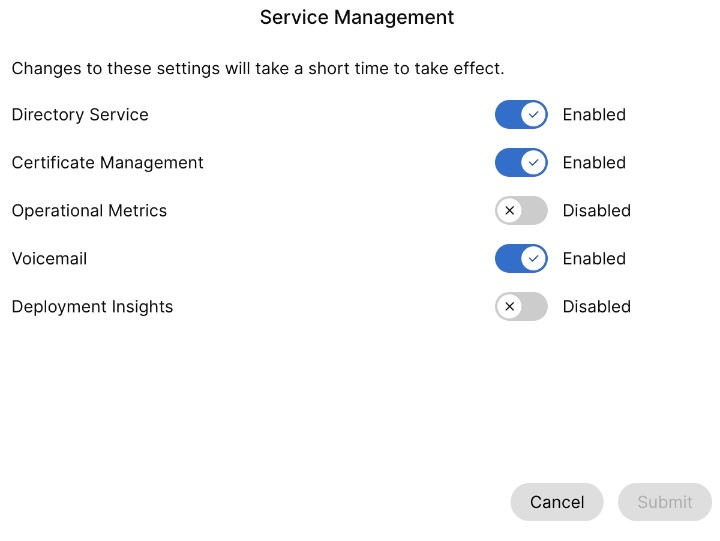
| 5 |
Cliquez sur l’icône représentant une ellipse ⋮ à côté de Historique des événements et choisissez Gestion des services. La page Gestion des services s’affiche et contient la liste des services. | ||||
| 6 |
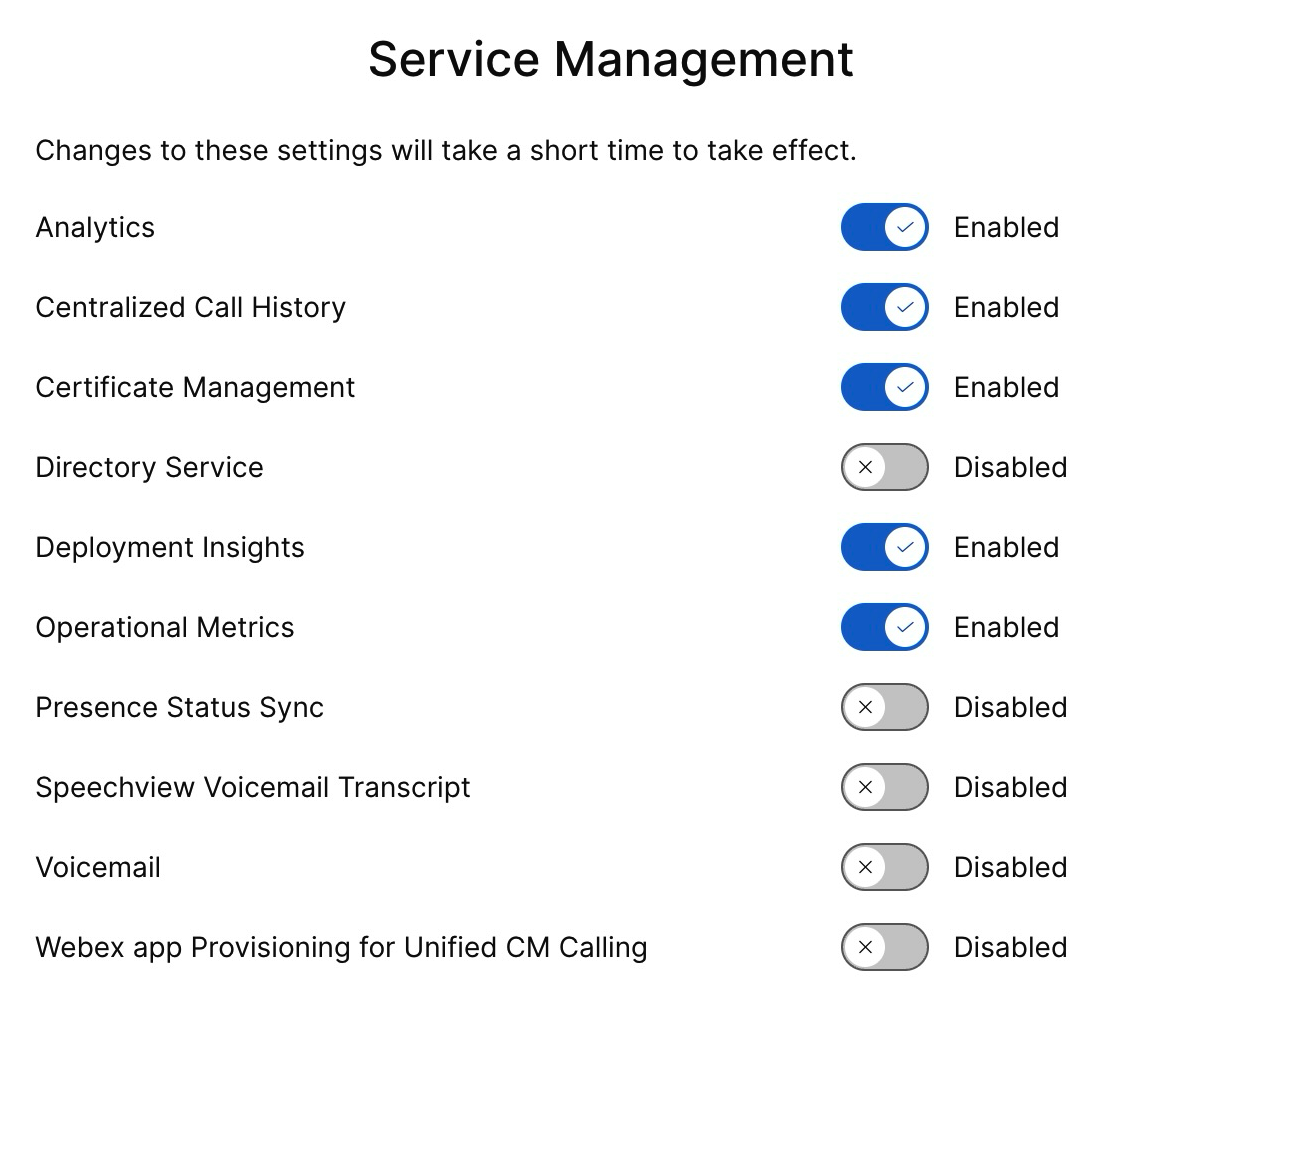
Utilisez le bouton bascule pour activer la Messagerie vocale, Historique des appels centralisé et Synchronisation de l'état de présence.
| ||||
| 7 |
Cliquez sur Soumettre. | ||||
| 8 |
Si la fenêtre contextuelle Confirmation de collecte de données s'affiche, acceptez-la en cochant la case et cliquez sur Soumettre. |
Activer l’assistant IA de Cisco
Cette fonctionnalité s'applique uniquement aux utilisateurs de Webex Calling.
L'assistant IA de Cisco génère des résumés auxquels les utilisateurs peuvent accéder pendant et après une interaction, que l'appel soit enregistré ou non.
Si l'Assistant IA est utilisé pendant un appel, l'utilisateur qui a activé le résumé et la transcription après l'appel a accès aux résumés, aux éléments d'action et aux transcriptions de son historique d'appels. Cette disponibilité s'applique que l'appel ait été enregistré ou non et est contrôlée par les paramètres d'administrateur et d'utilisateur. Les données de l'assistant IA sont conservées pendant une durée fixe de 365 jours.
Vous pouvez activer les paramètres de résumé d'appel de l'Assistant IA pour le transfert d'appels et les conférences au niveau de l'organisation, de l'utilisateur et du modèle. Les fonctionnalités de l'assistant IA ne sont pas disponibles pour les utilisateurs résidant hors d'Inde.
Pour plus de détails sur l'activation de Cisco AI Assistant à partir de Control Hub, consultez Gérer Cisco AI Assistant pour les appels Webex.


