Webex LTI para professores
 Comentários?
Configuração
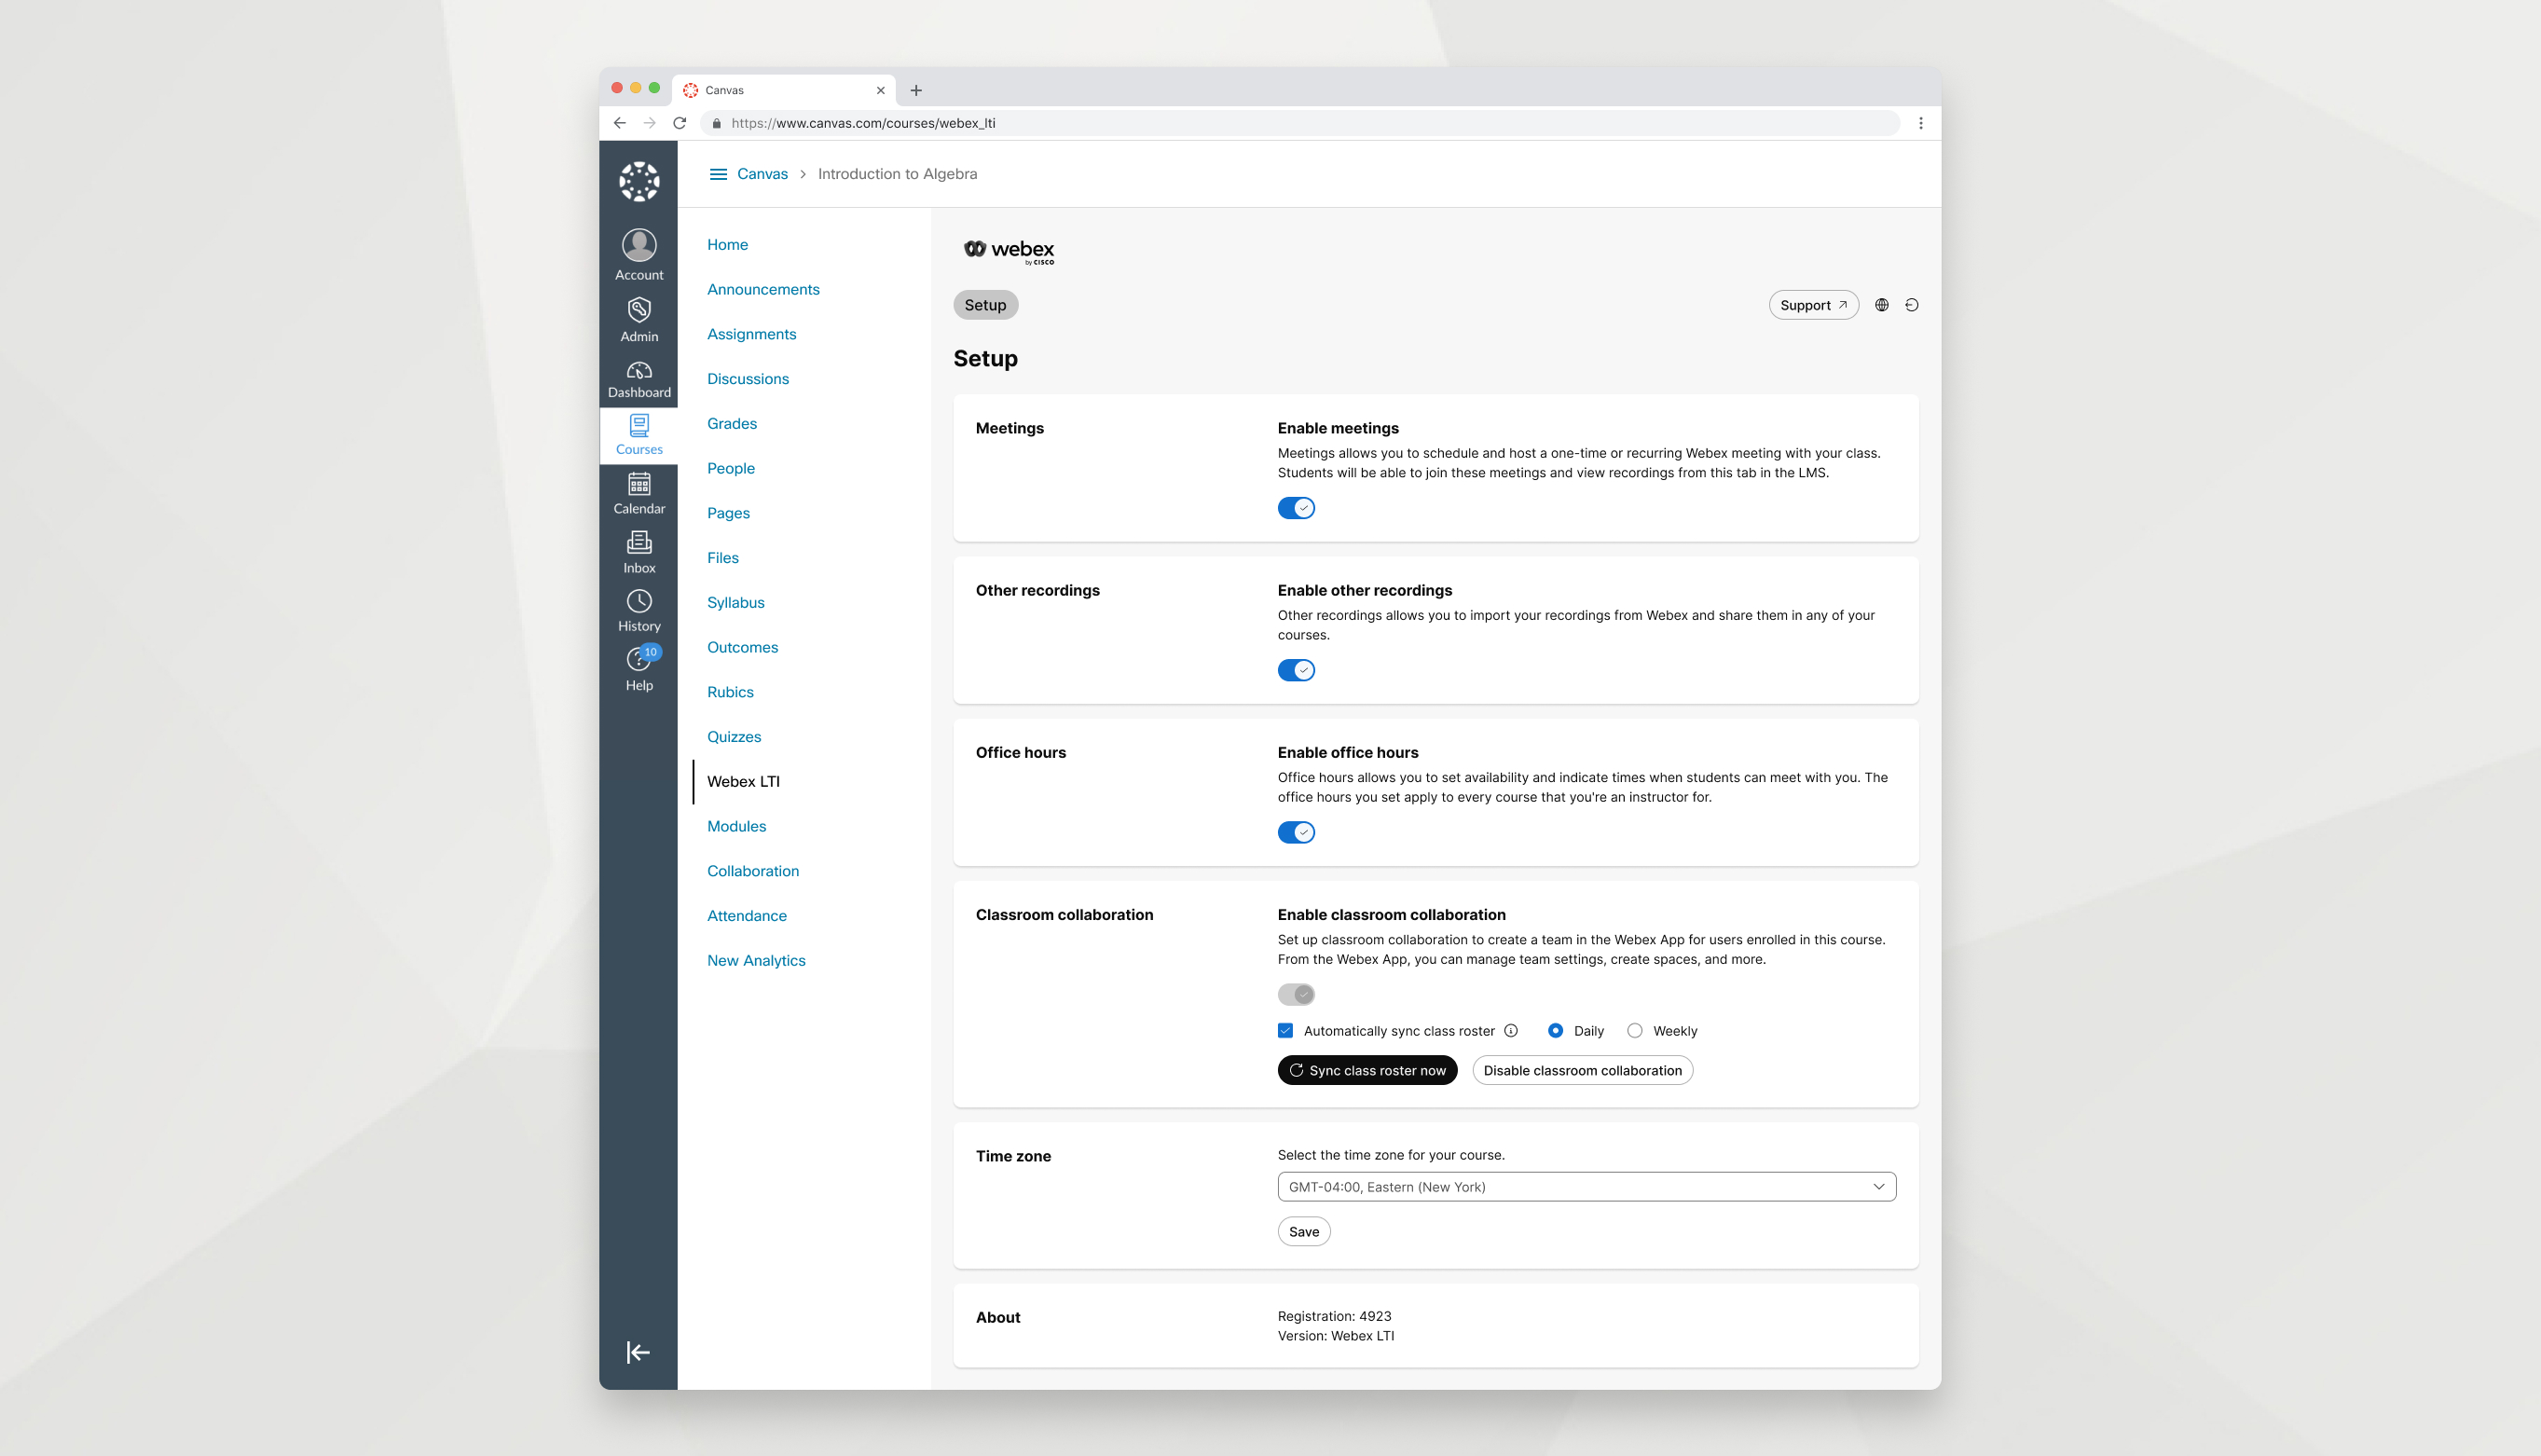
Personalize as preferências de recursos para seu curso.
| 1 |
Abra o Webex LTI no seu LMS e vá para a aba Configuração. |
| 2 |
Escolha os recursos que você deseja habilitar na sua aula.
Cada recurso que você ativa aparece como uma guia própria. Se você não vir uma das opções na aba Configuração, o administrador da sua escola não a habilitou. |
| 3 |
Selecione seu fuso horário e clique em Salvar. |
Reuniões
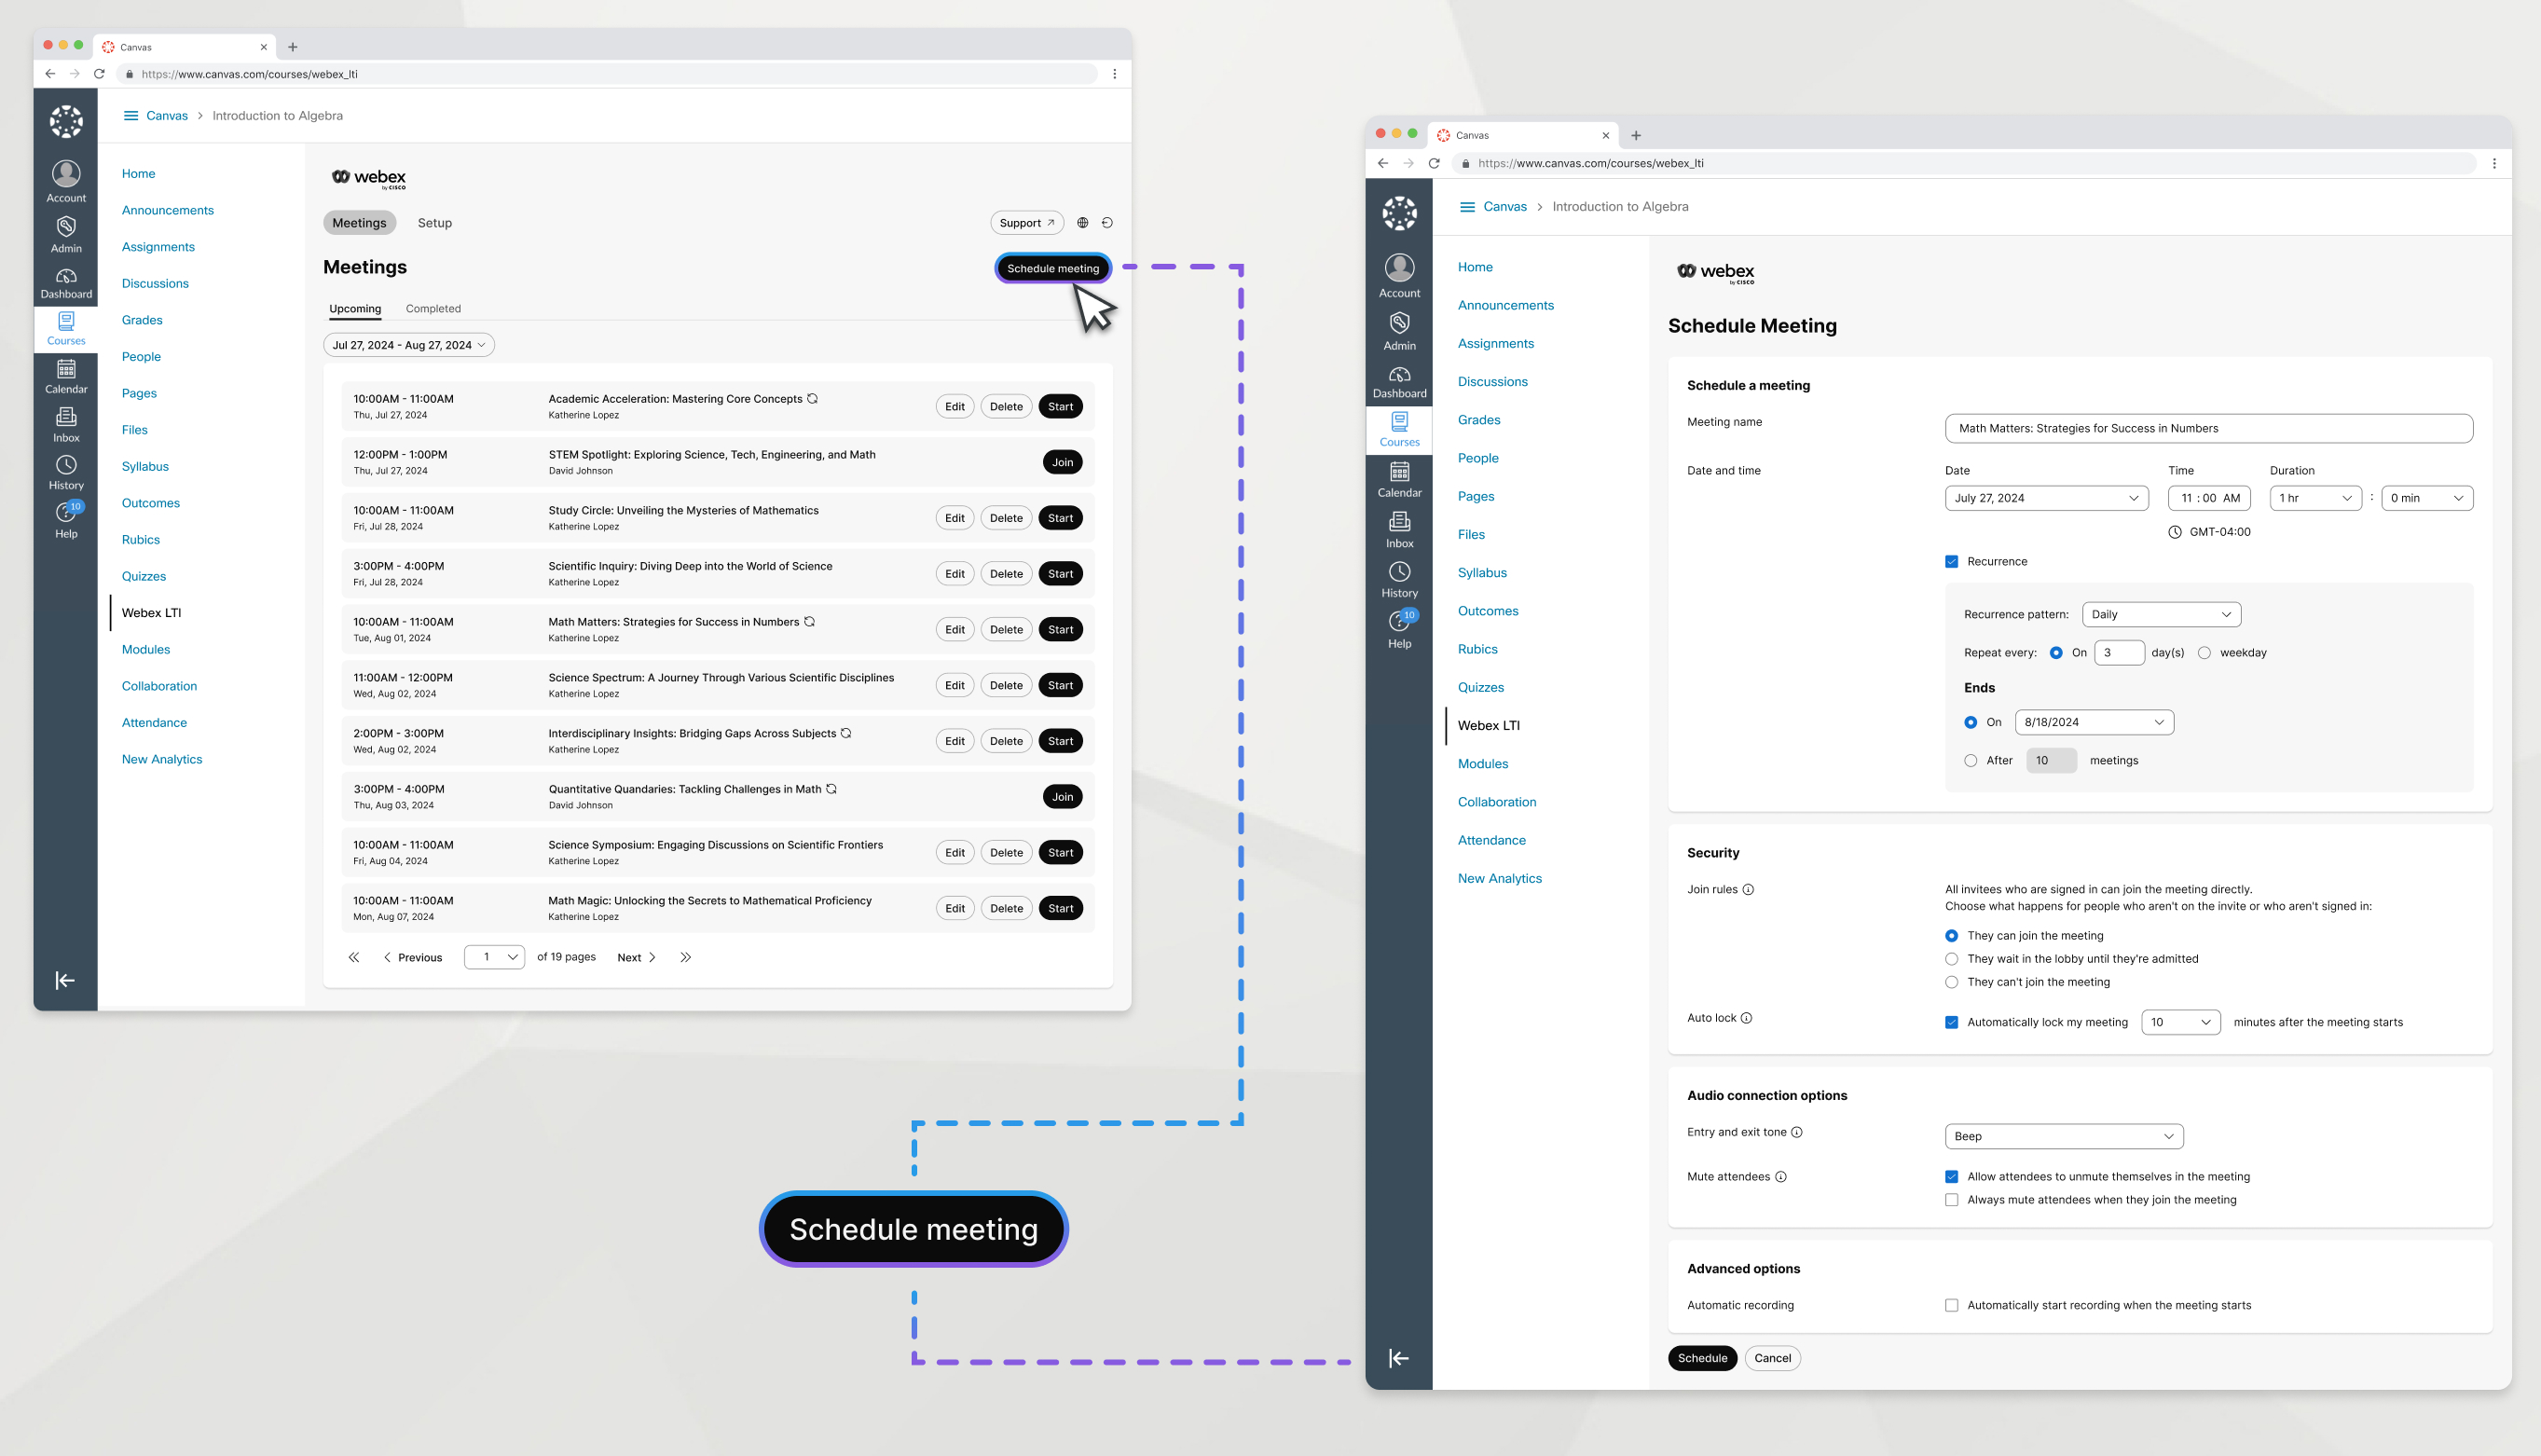
O recurso reuniões permite que você agende e hospede uma reunião única ou recorrente com sua turma.
| 1 |
Vá para Reuniões e clique em Agendar reunião. Se solicitado, entre com o Webex. |
| 2 |
Insira as seguintes informações:
|
| 3 |
Clique em Agendar |
Após você criar uma reunião, ela aparece na sua guia Futuro, onde todos os inscritos no curso podem vê-la. Na aba Próximos, você pode iniciar, editar ou excluir reuniões
Editar ou excluir uma reunião recorrente editará ou excluirá toda a série de reuniões. Reuniões recorrentes não podem ser editadas ou excluídas individualmente.
Se houver vários instrutores em um curso, você só poderá iniciar, editar e excluir as reuniões que você criou.
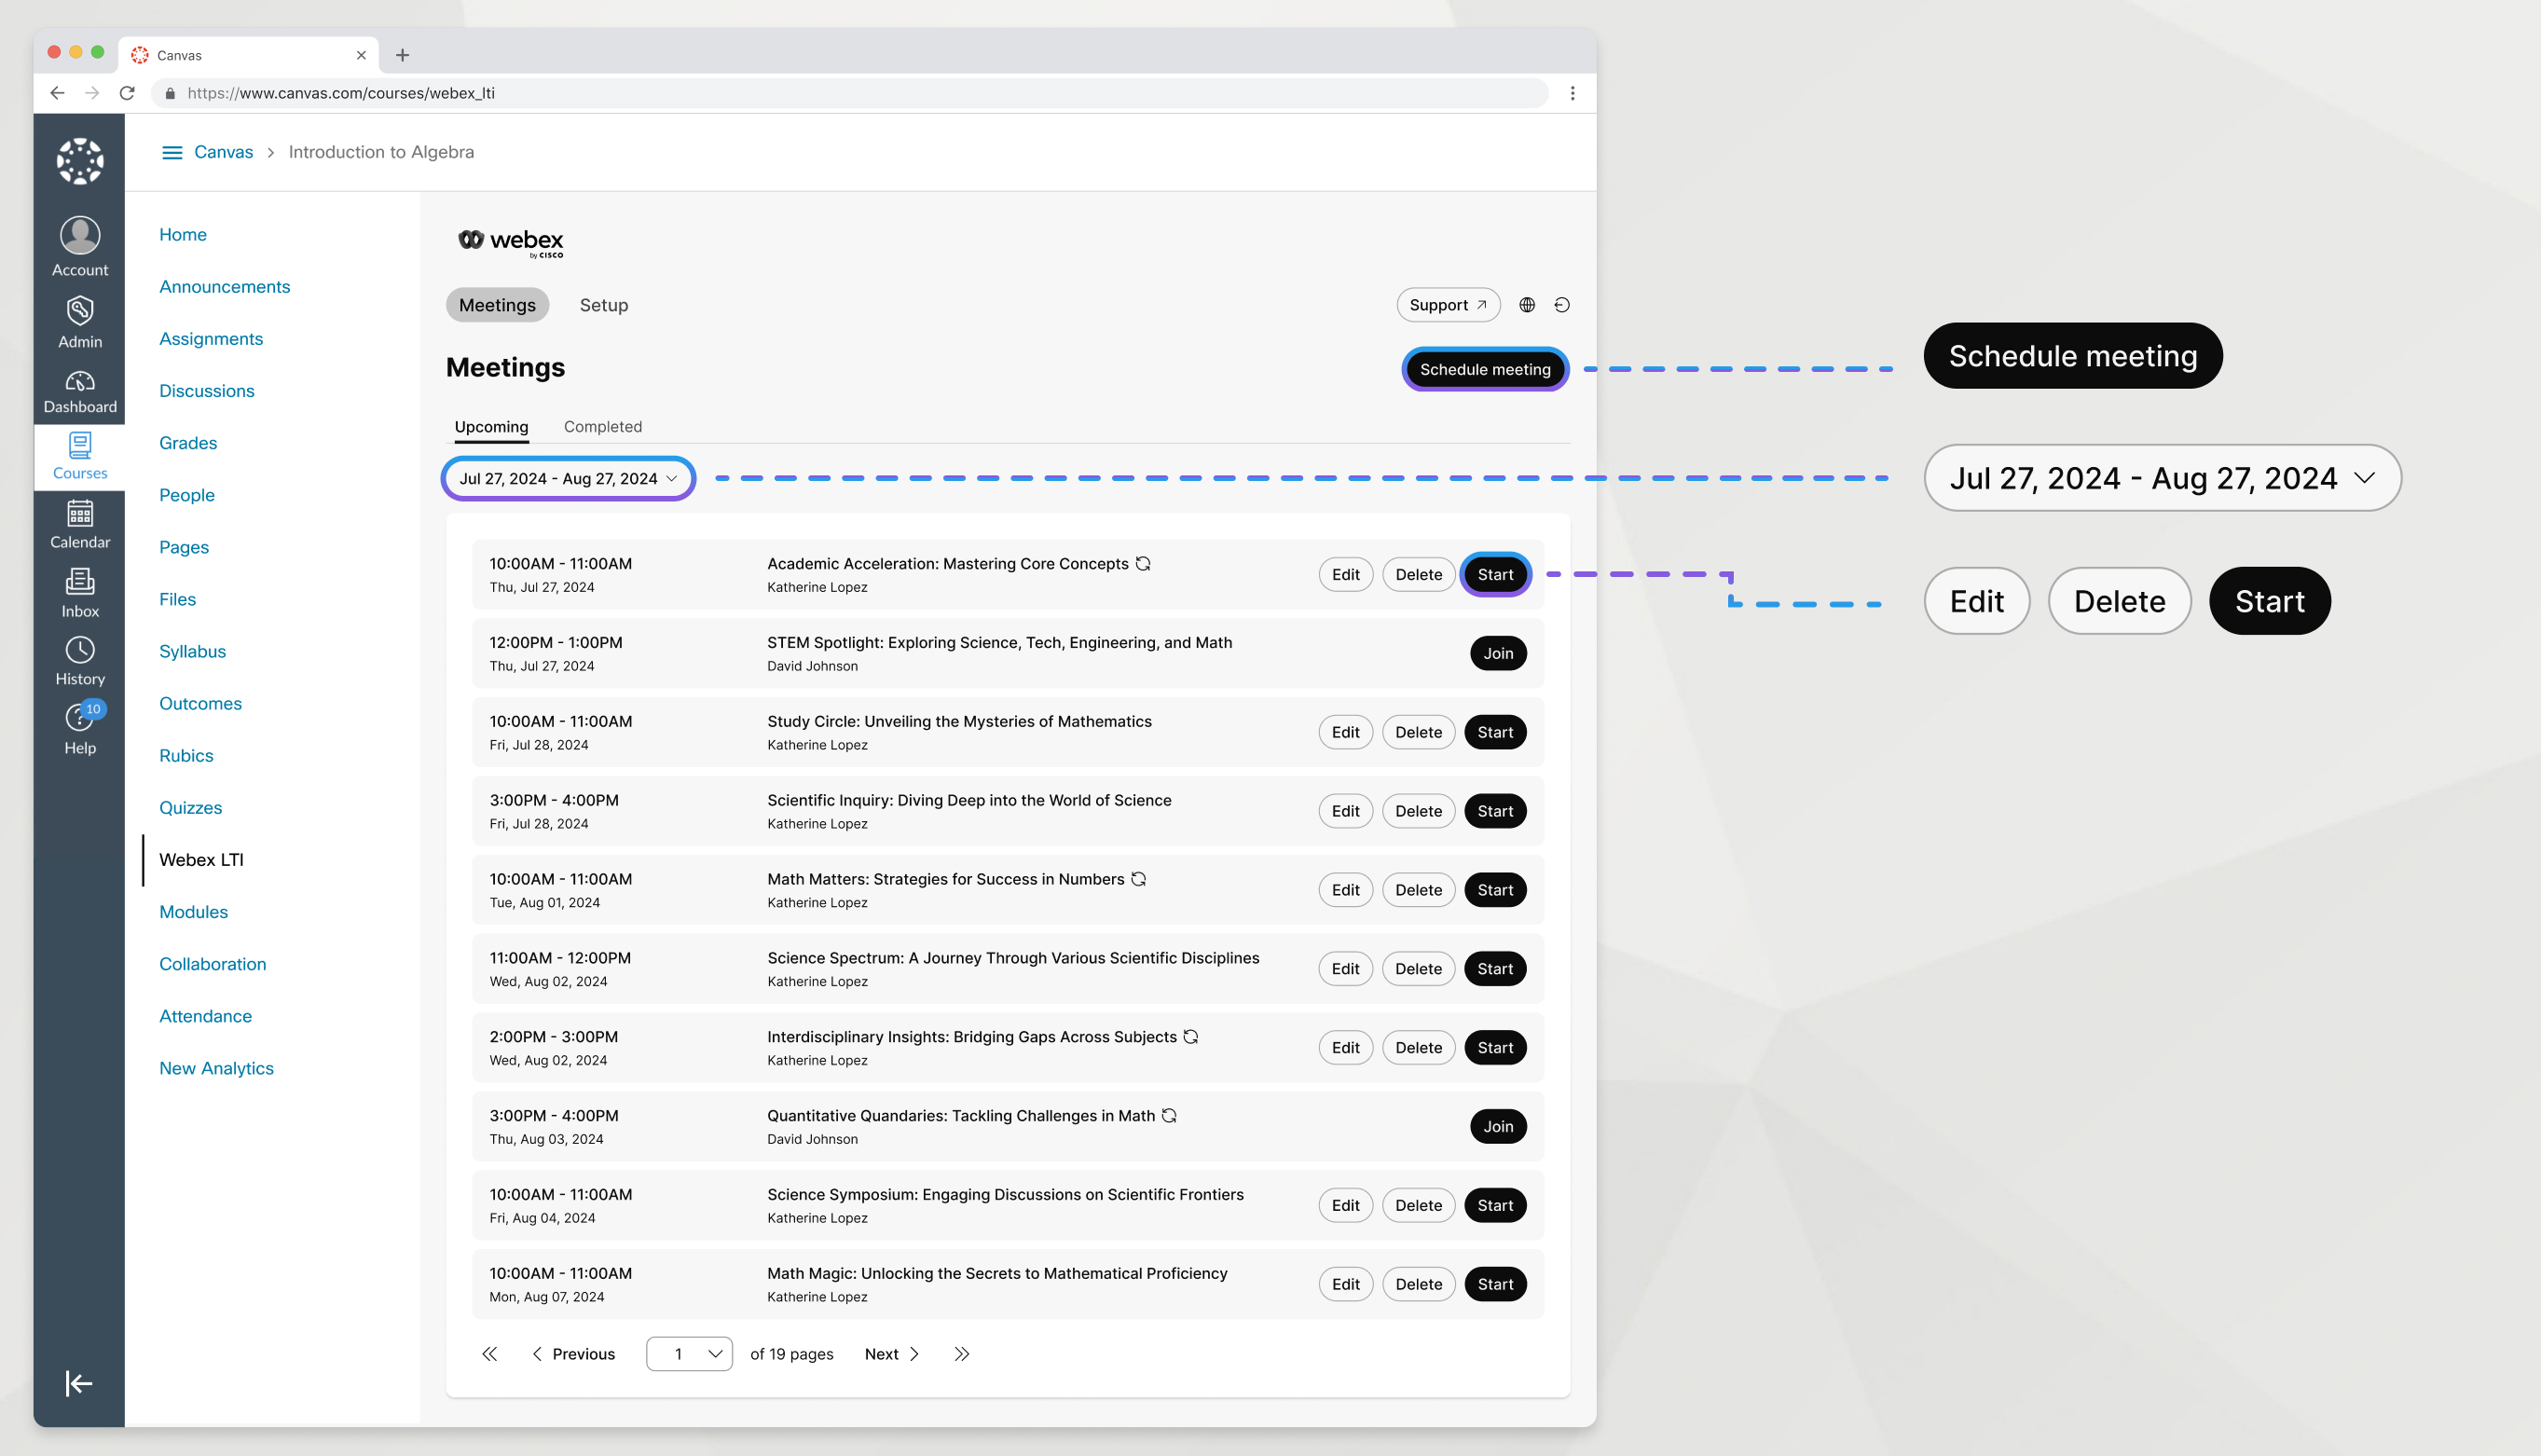
Inicie reuniões de aula no seu LMS com o Webex LTI.
| 1 |
Vá para a aba Reuniões. |
| 2 |
Na aba Próximas, encontre sua reunião e clique em Iniciar. |
Você pode gravar uma reunião agendada no Webex LTI para disponibilizá-la aos seus alunos.
Para que as gravações apareçam no Webex LTI, você deve agendar a reunião no Webex LTI e entrar no Webex a partir do Webex LTI ao iniciar a reunião.
| 1 |
Durante a reunião de aula, clique em Gravar Se você não vir o botão Gravar , procure-o em Mais |
| 2 |
Selecione Gravar na nuvem e clique em Gravar. Você e outros participantes da reunião deverão ver um ícone vermelho no canto superior direito da janela quando uma gravação estiver em andamento. |
| 3 |
Se necessário, clique em Gravar
|
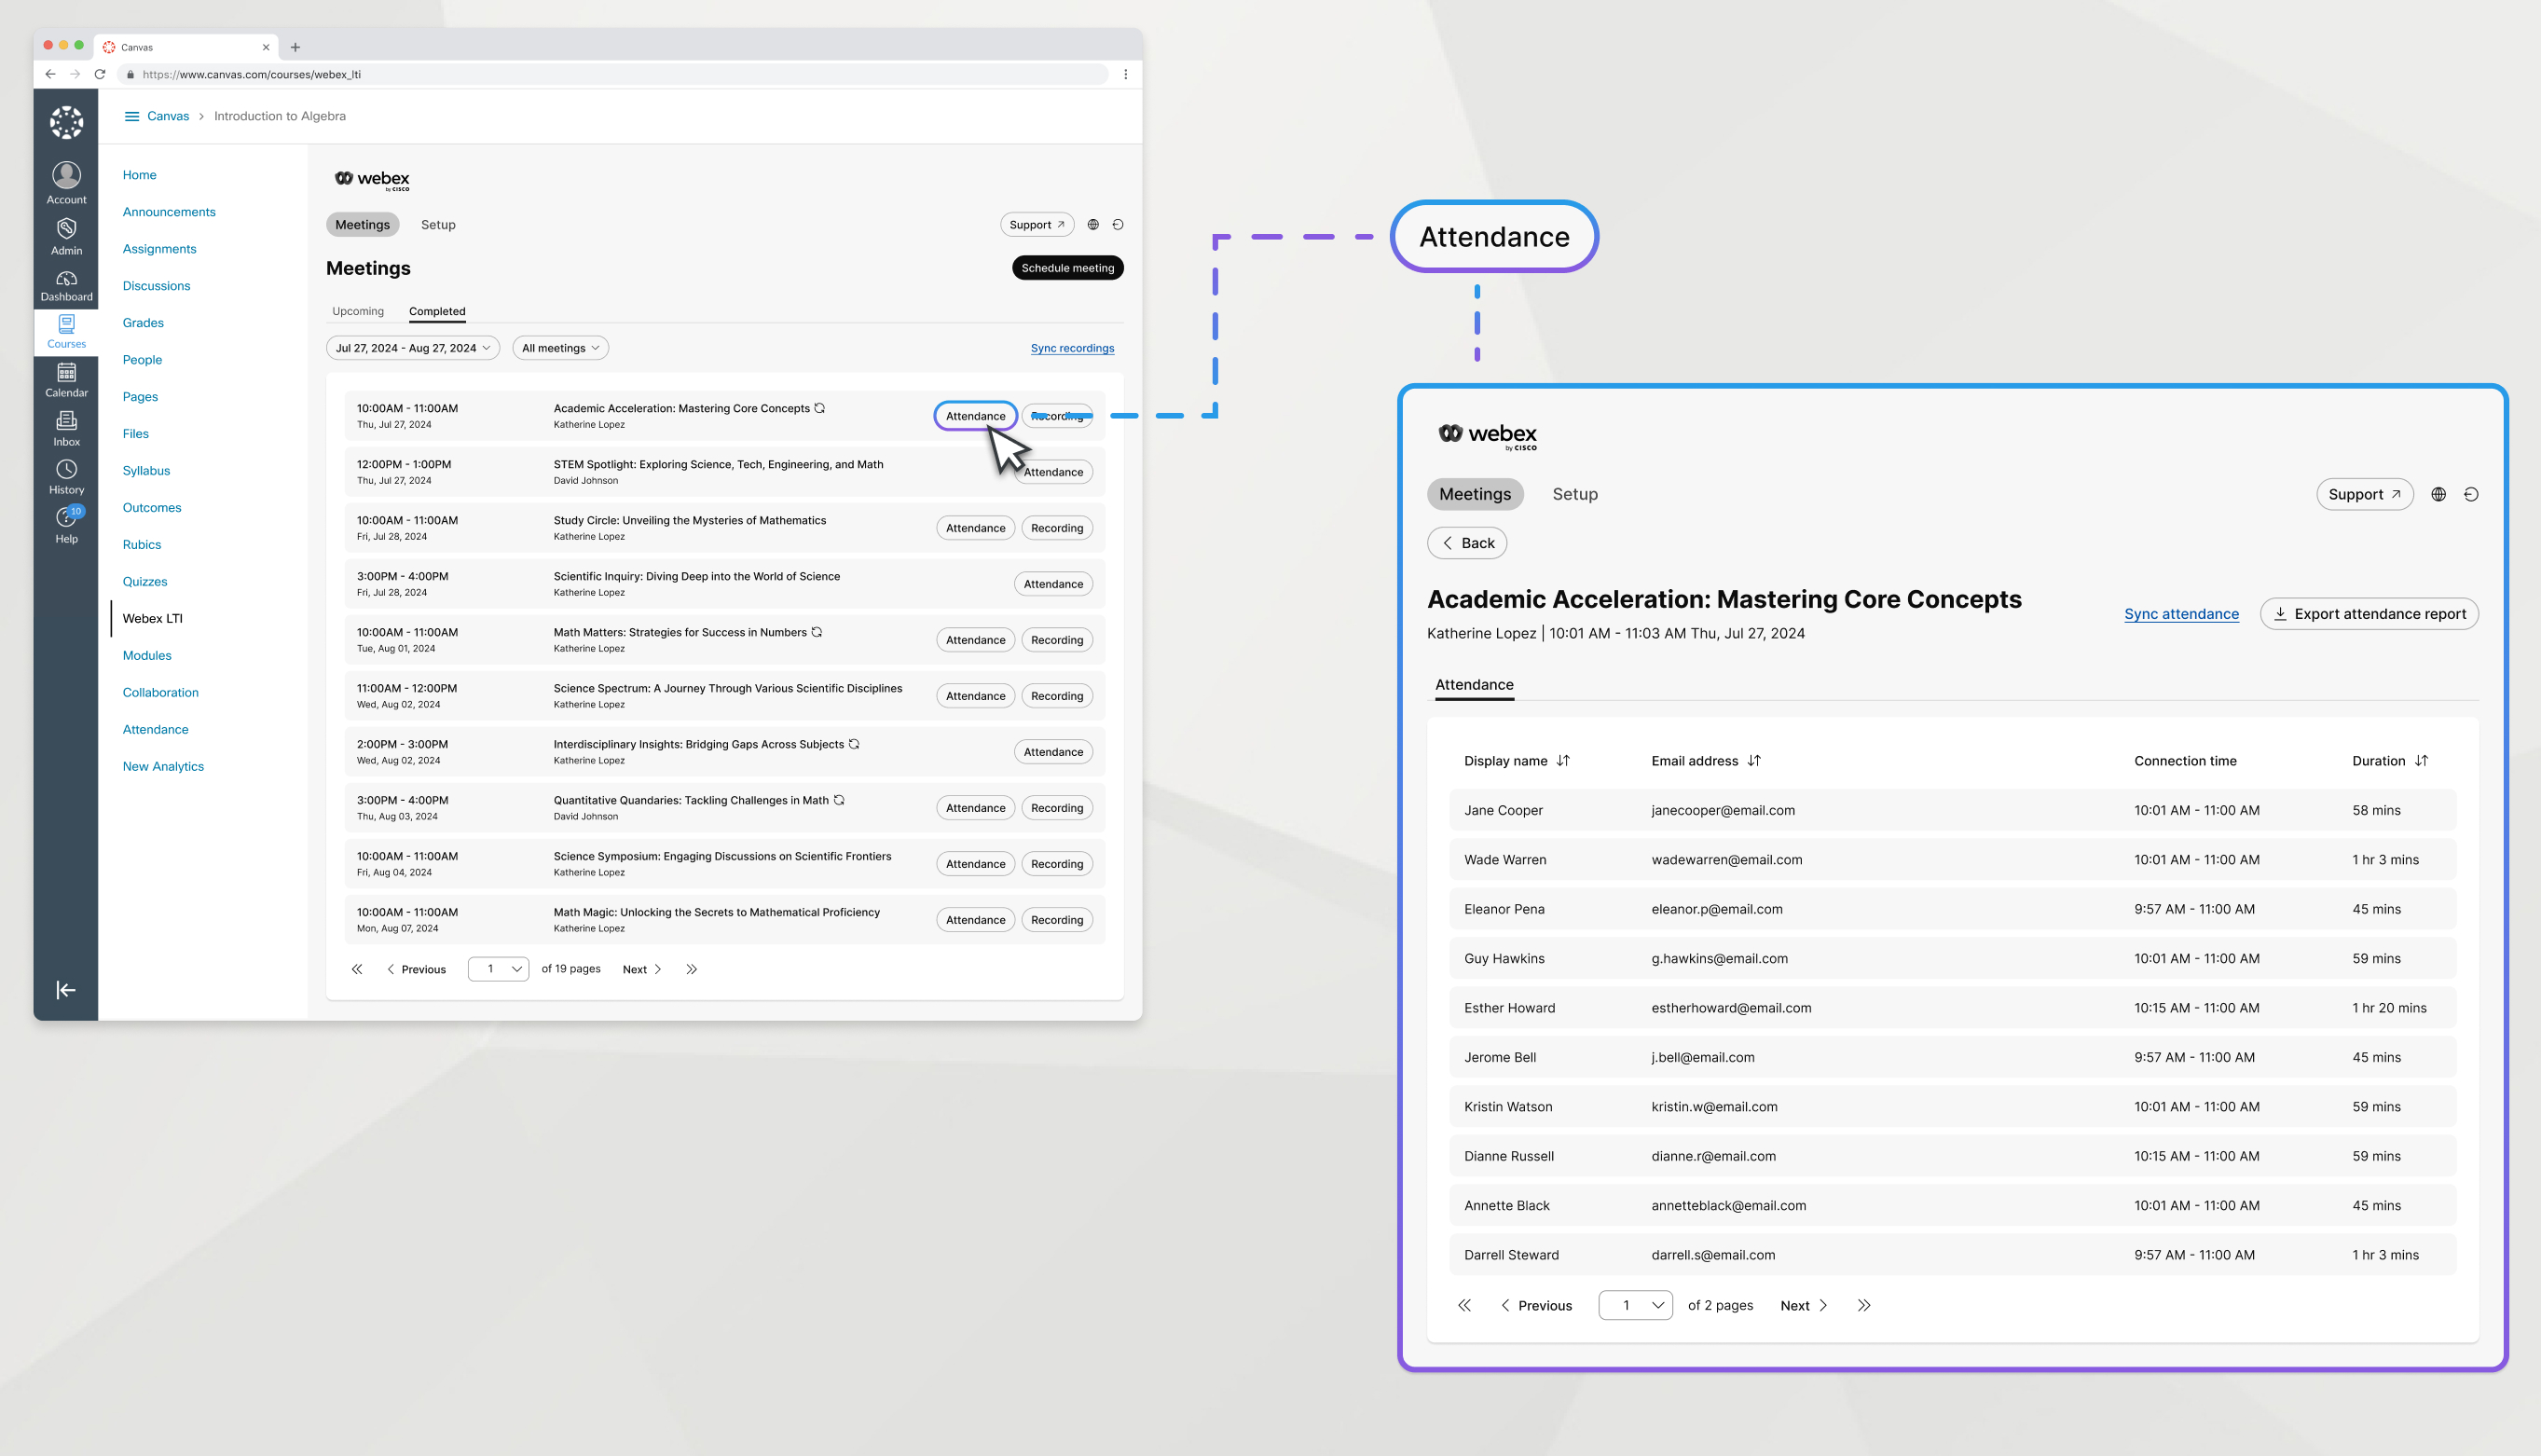
Após o término da reunião, veja uma lista de participantes que entraram na reunião.
| 1 |
Vá para a aba Reuniões e clique em Concluídas. |
| 2 |
Encontre a reunião cuja presença você deseja ver e clique em Presença. |
| 3 |
(Opcional): se ainda não houver presença, clique no botão Sincronizar presença. |
O que fazer em seguida
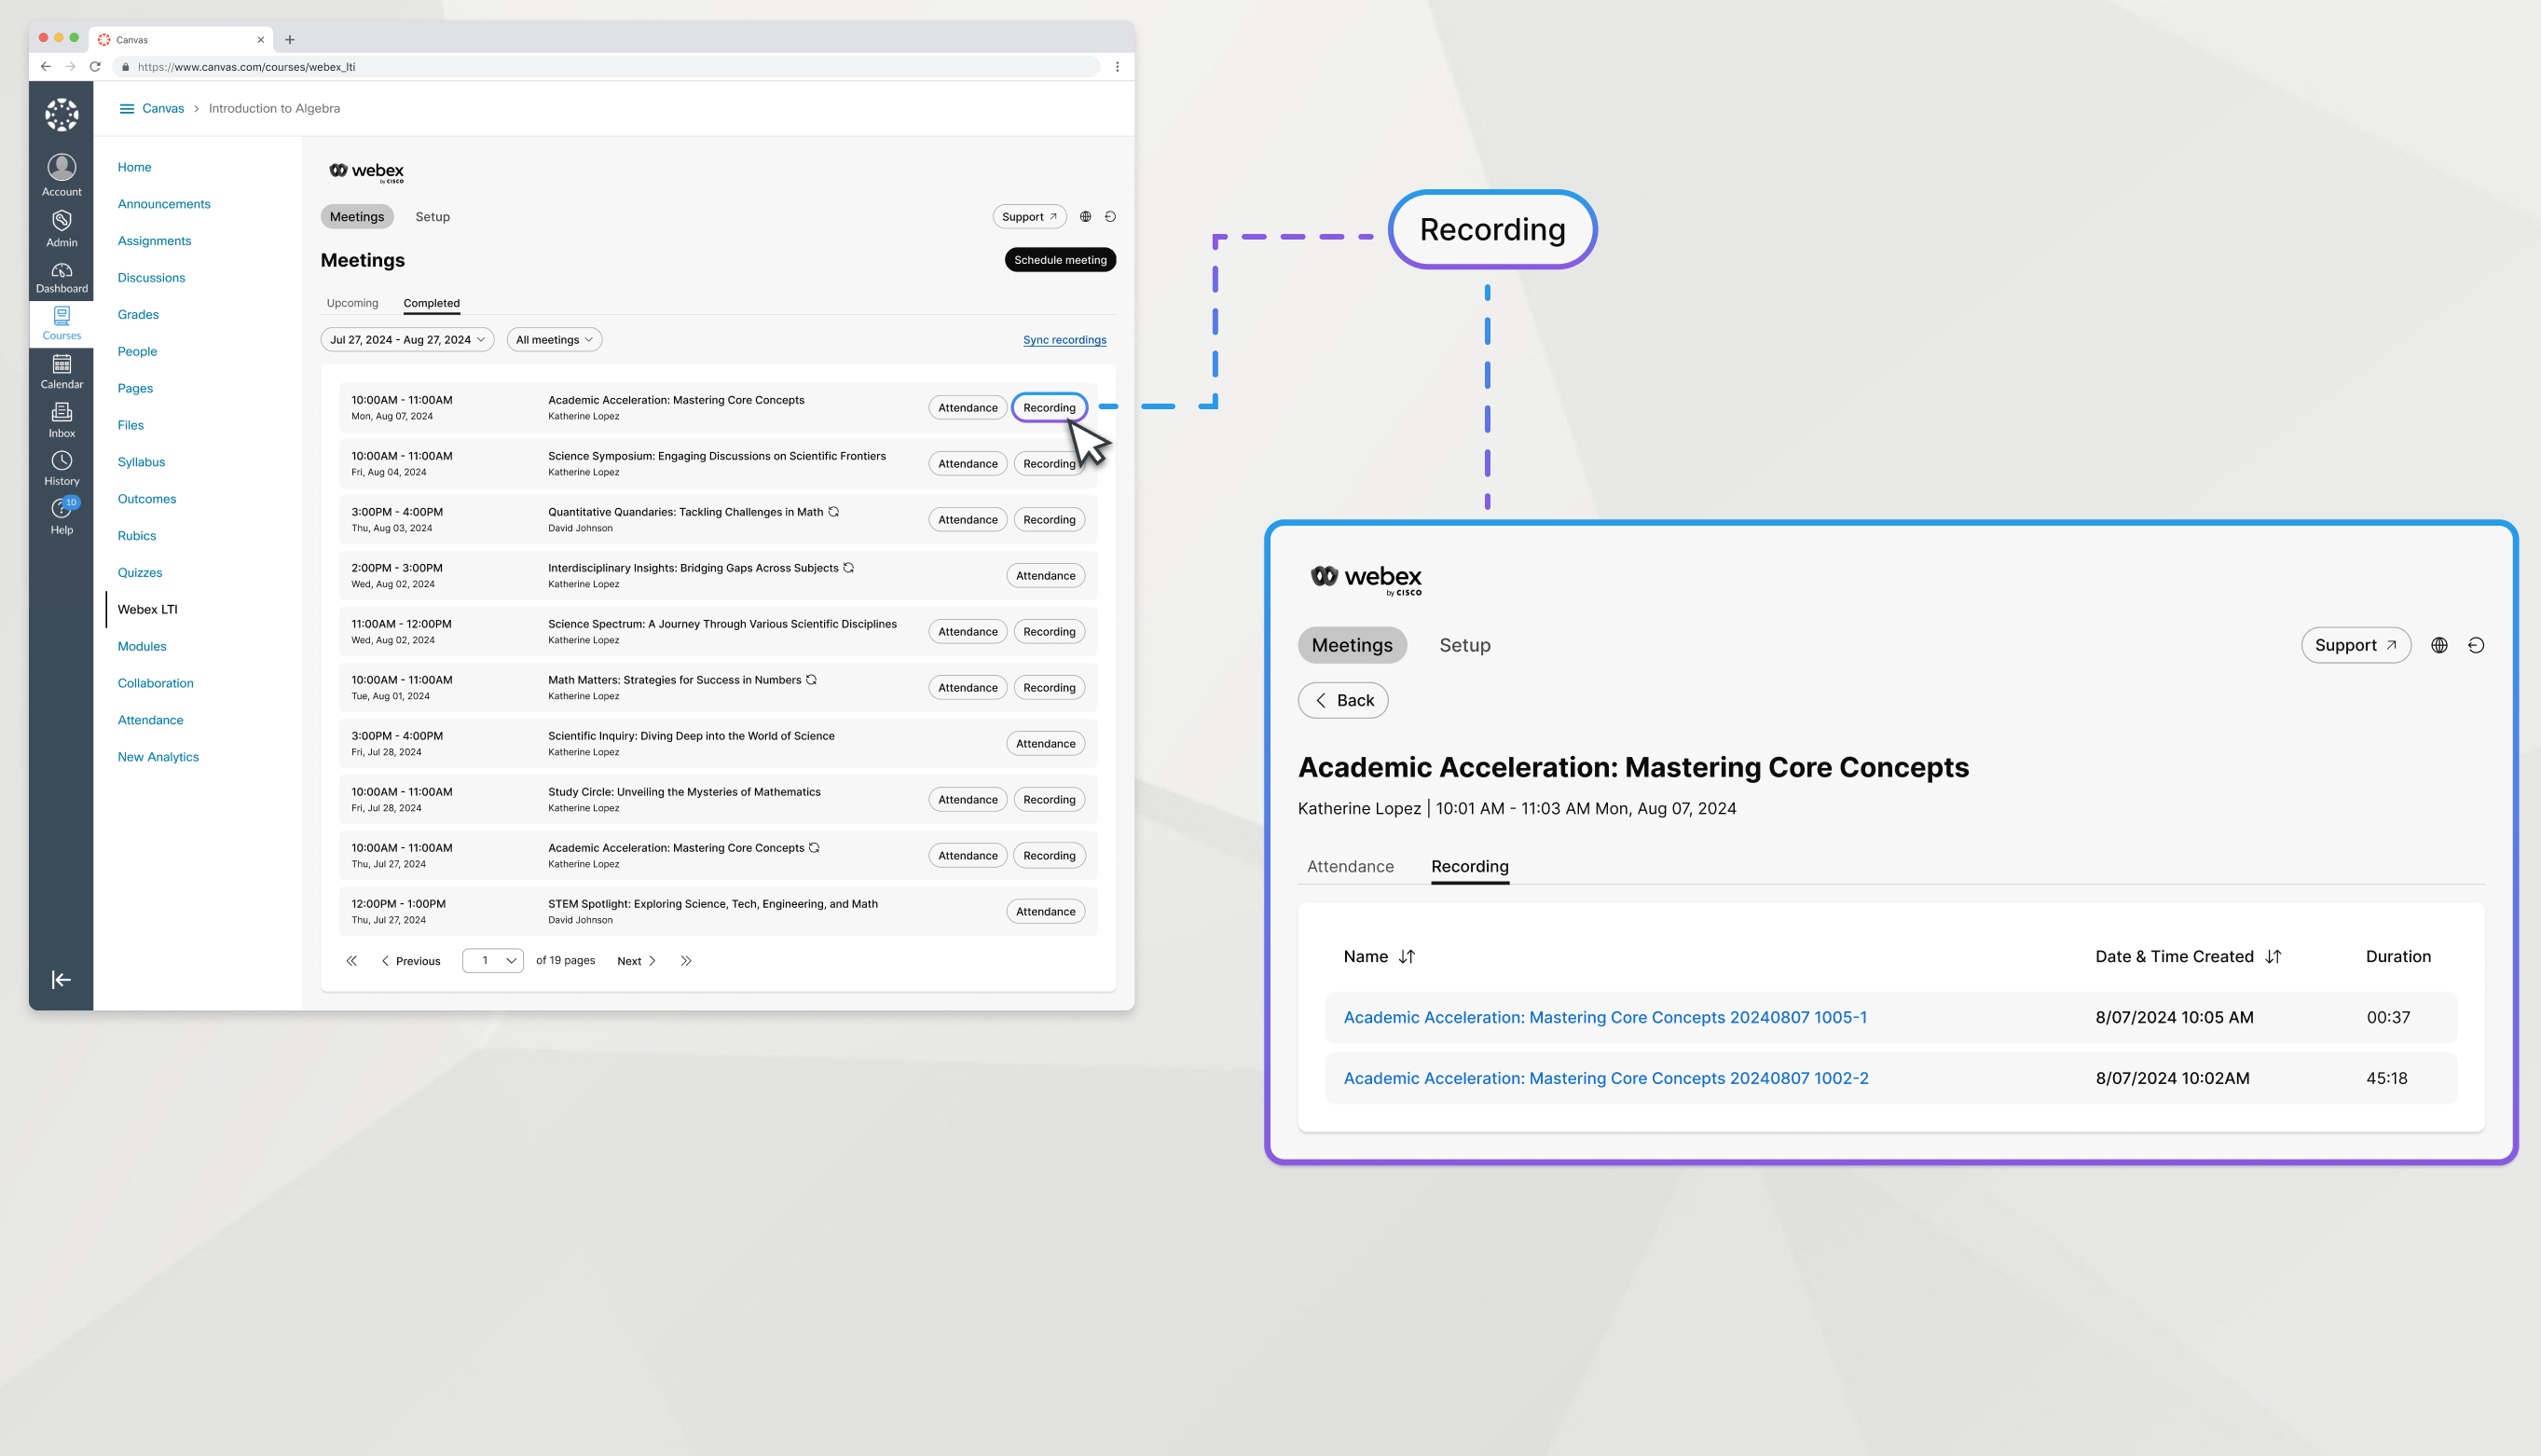
Assista às gravações das reuniões de sua classe.
| 1 |
Vá para a aba Reuniões e clique em Concluídas. |
| 2 |
Encontre a reunião com a gravação que deseja assistir e clique em Gravação. |
| 3 |
Clique no nome da gravação para abri-la. |
| 4 |
Copie a senha de gravação e clique em Visualizar gravação. Digite a senha na próxima tela para visualizar a gravação da reunião.
|
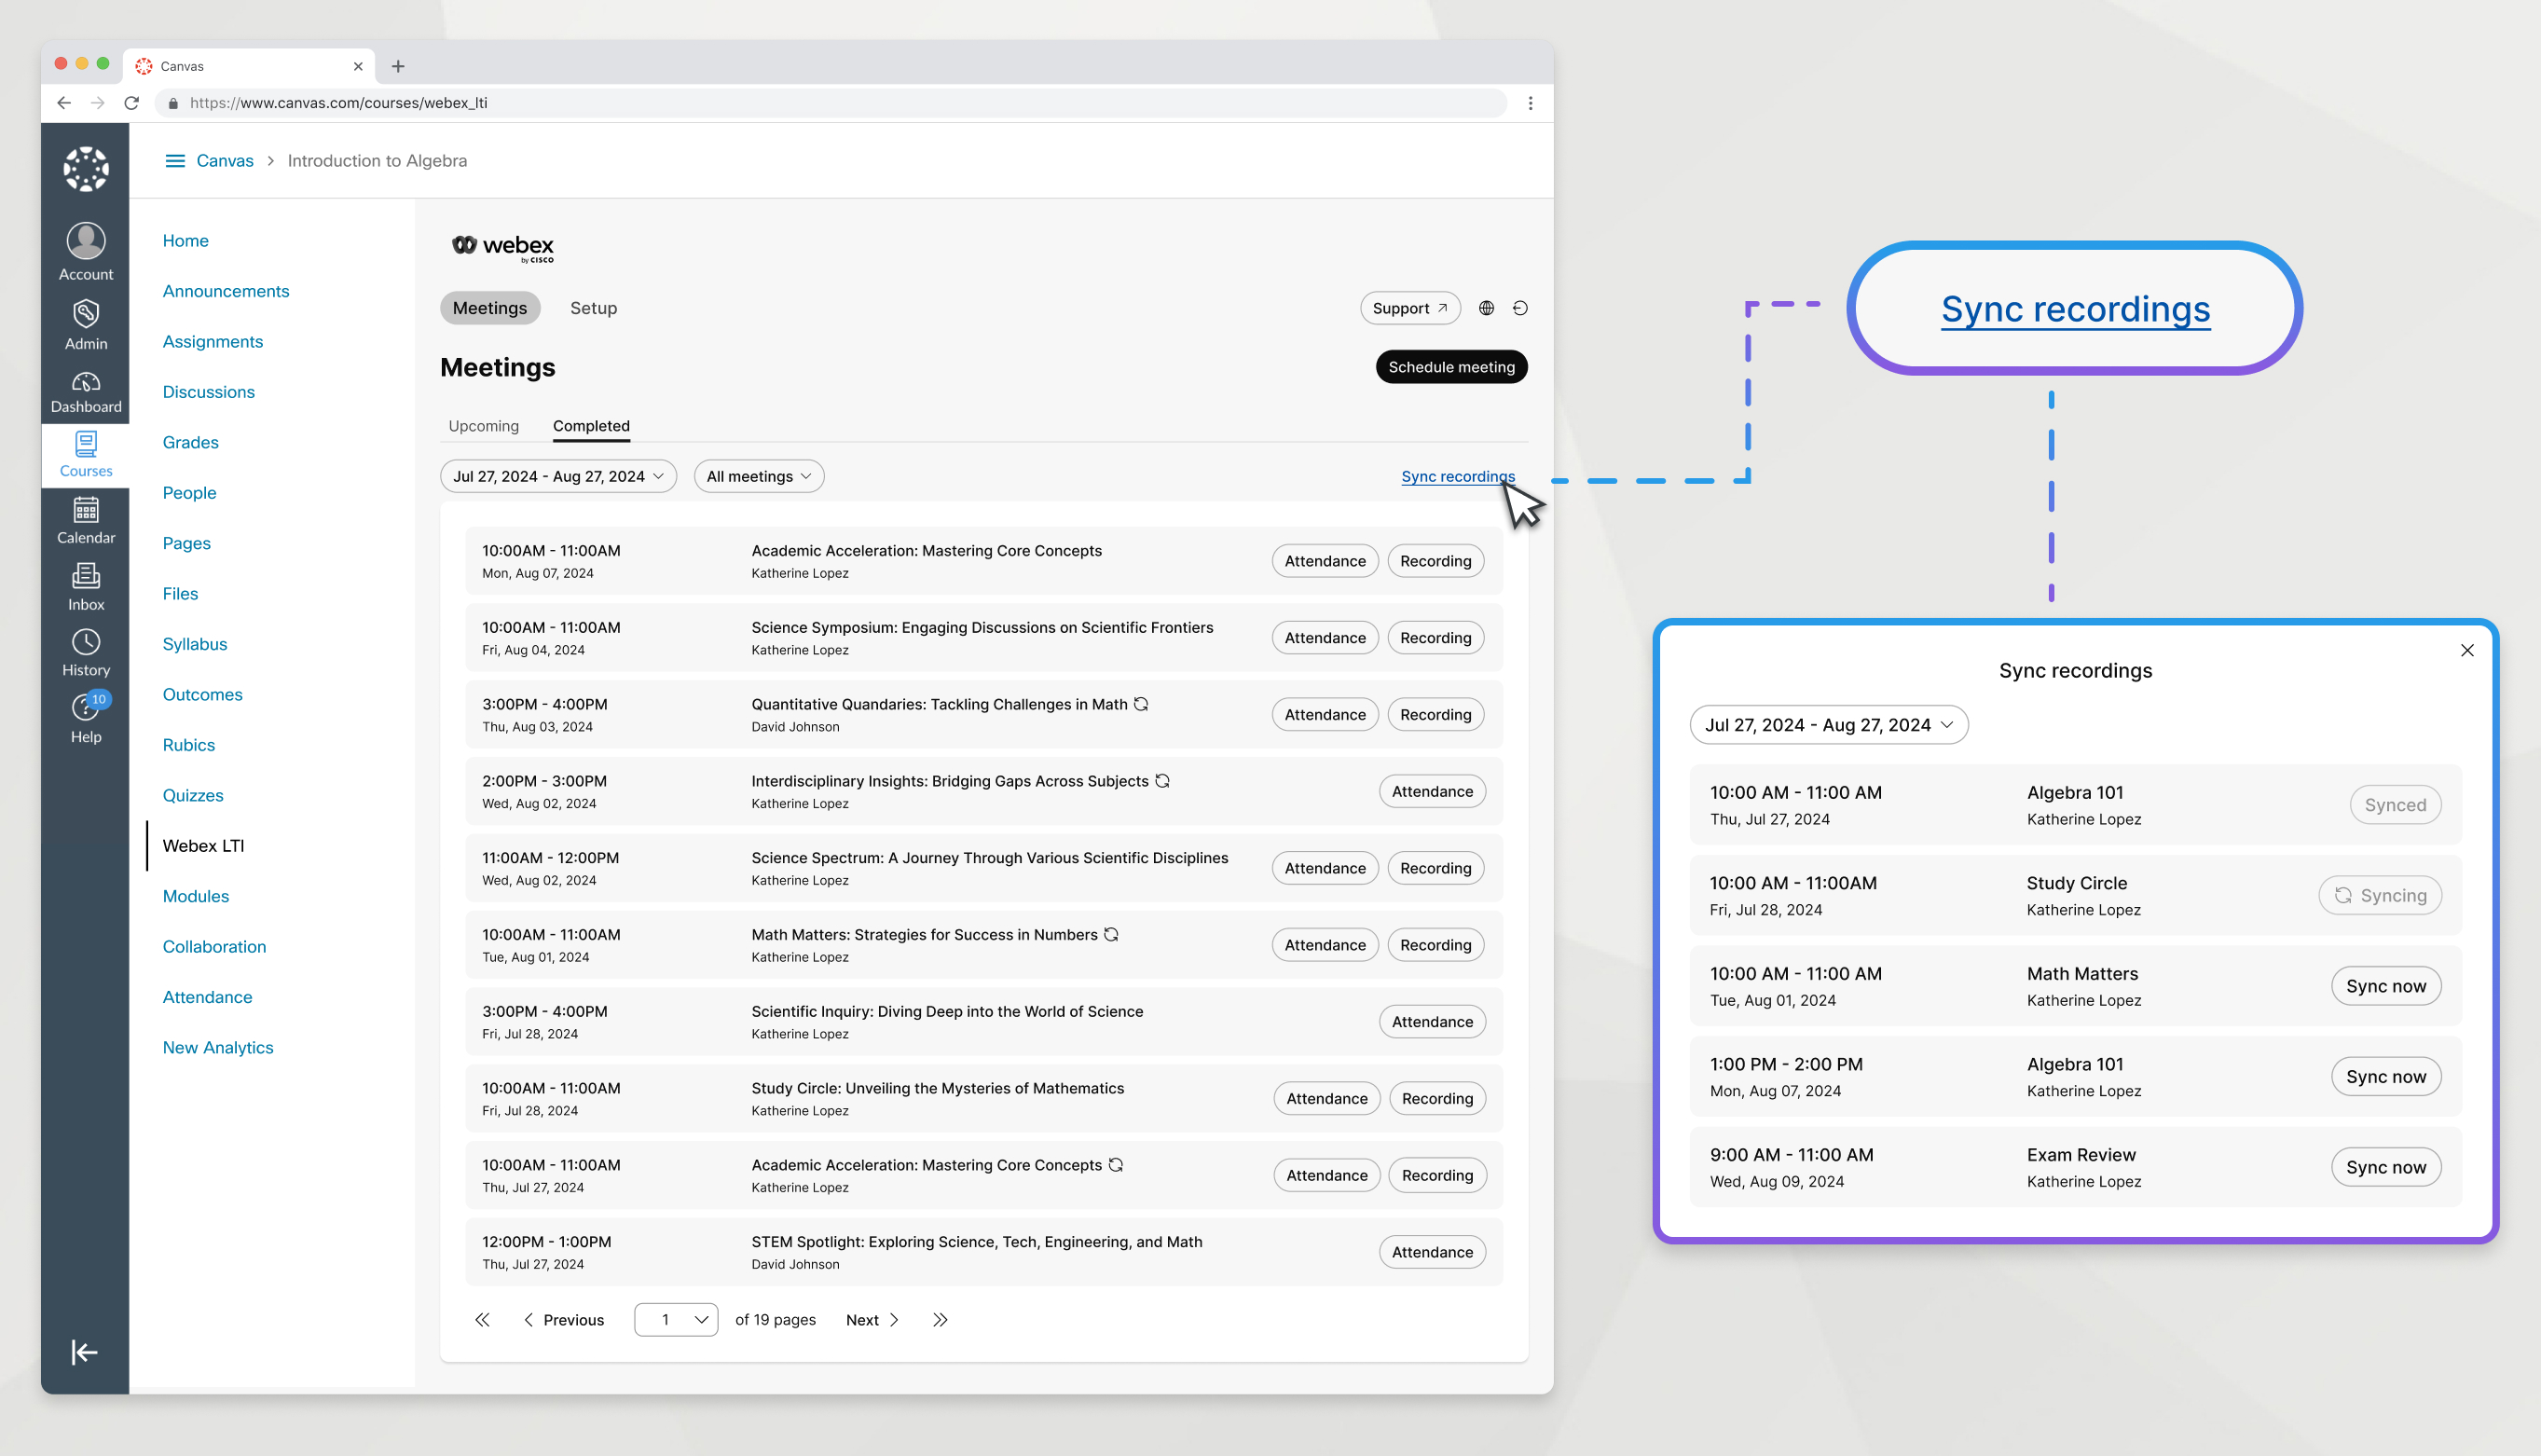
As gravações da reunião aparecerão automaticamente no conteúdo da reunião depois que ela terminar e a gravação for processada. Se precisar que a gravação esteja disponível antes que o processo automático aconteça, você pode sincronizá-la manualmente.
| 1 |
Vá para a aba Reuniões e clique em Concluídas. |
| 2 |
Clique no botão Sincronizar gravações. |
| 3 |
Selecione um intervalo de datas durante o qual a reunião gravada ocorreu. Você só pode selecionar um intervalo de datas de até 7 dias. |
| 4 |
Encontre a reunião com a gravação que você deseja sincronizar e clique em Sincronizar agora. As reuniões só aparecem nesta janela se já tiverem sido processadas pelo Webex. |
| 5 |
Quando a gravação estiver sincronizada, feche a janela. |
O que fazer em seguida
Outras gravações
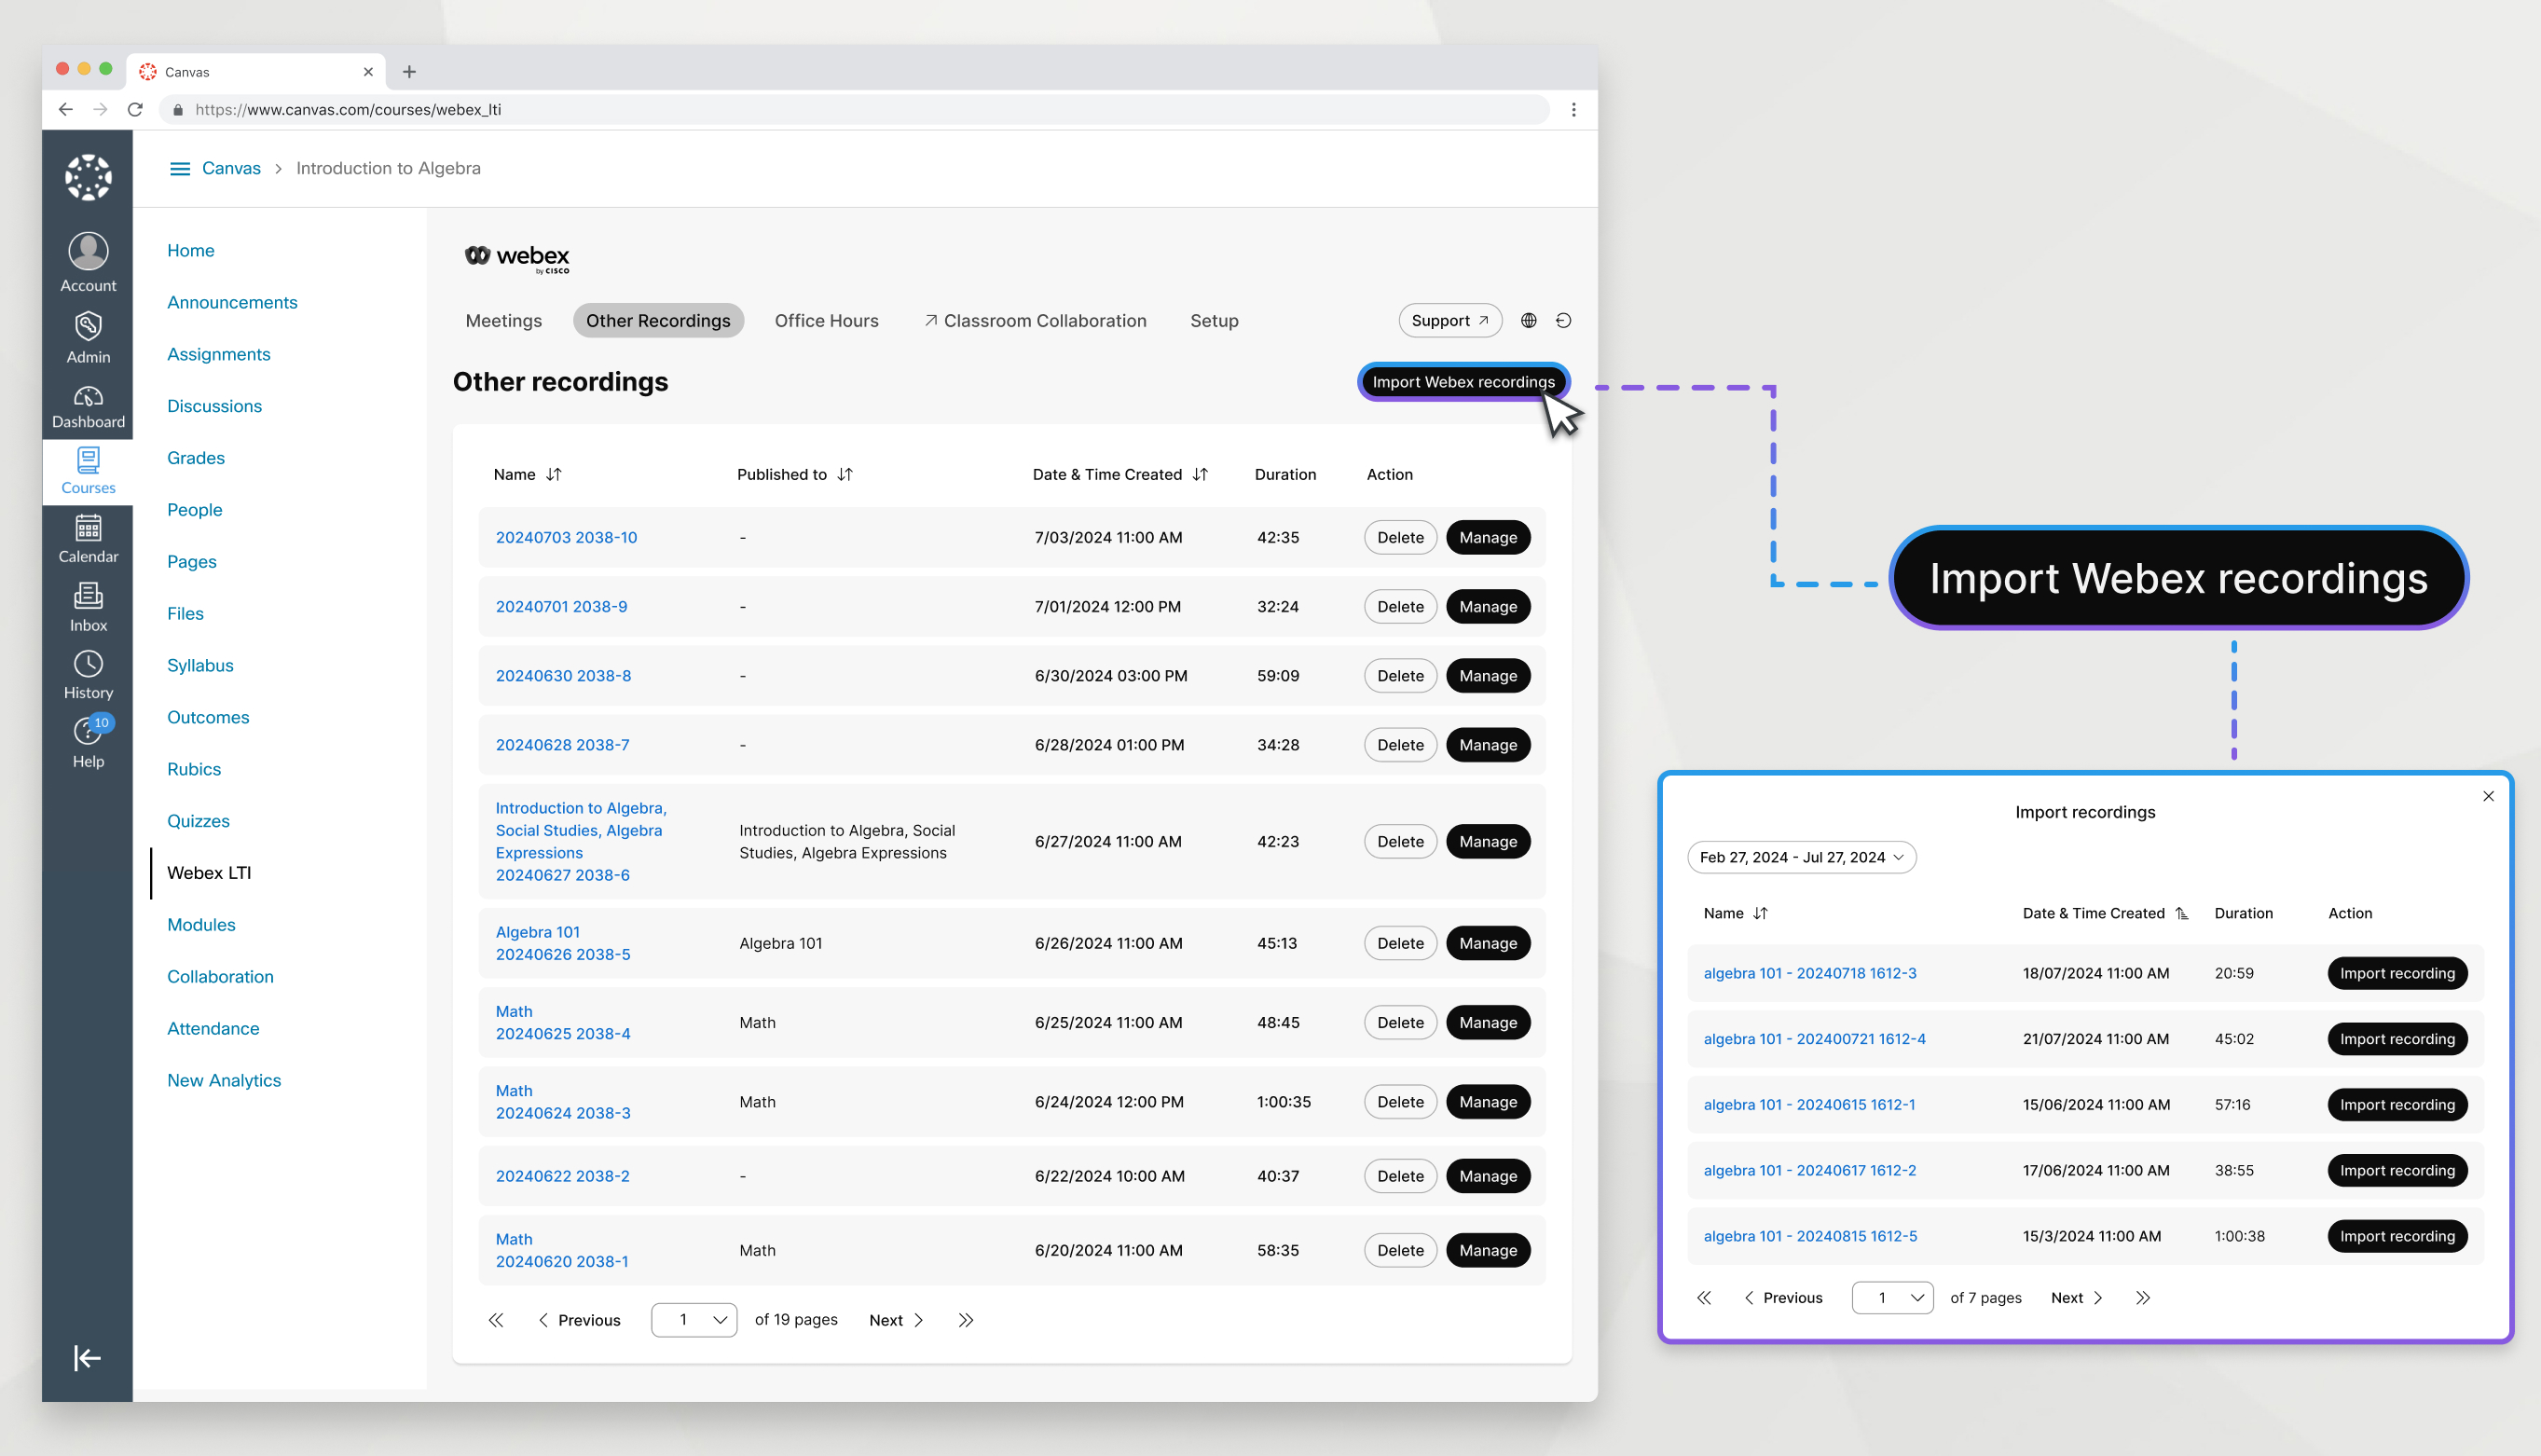
Outras gravações permite que você importe qualquer uma das suas gravações do Webex que não estejam associadas a nenhuma reunião agendada do Webex LTI e as publique em suas aulas. Grave-se dando uma aula ou explicando um tópico sem nenhum participante. Você pode reutilizar essas gravações de semestre para semestre.
| 1 |
Vá para a aba Outras Gravações. |
| 2 |
Clique em Importar gravações Webex. |
| 3 |
Selecione um intervalo de datas que inclua a gravação que você deseja importar. |
| 4 |
Encontre sua gravação e clique em Importar gravação. |
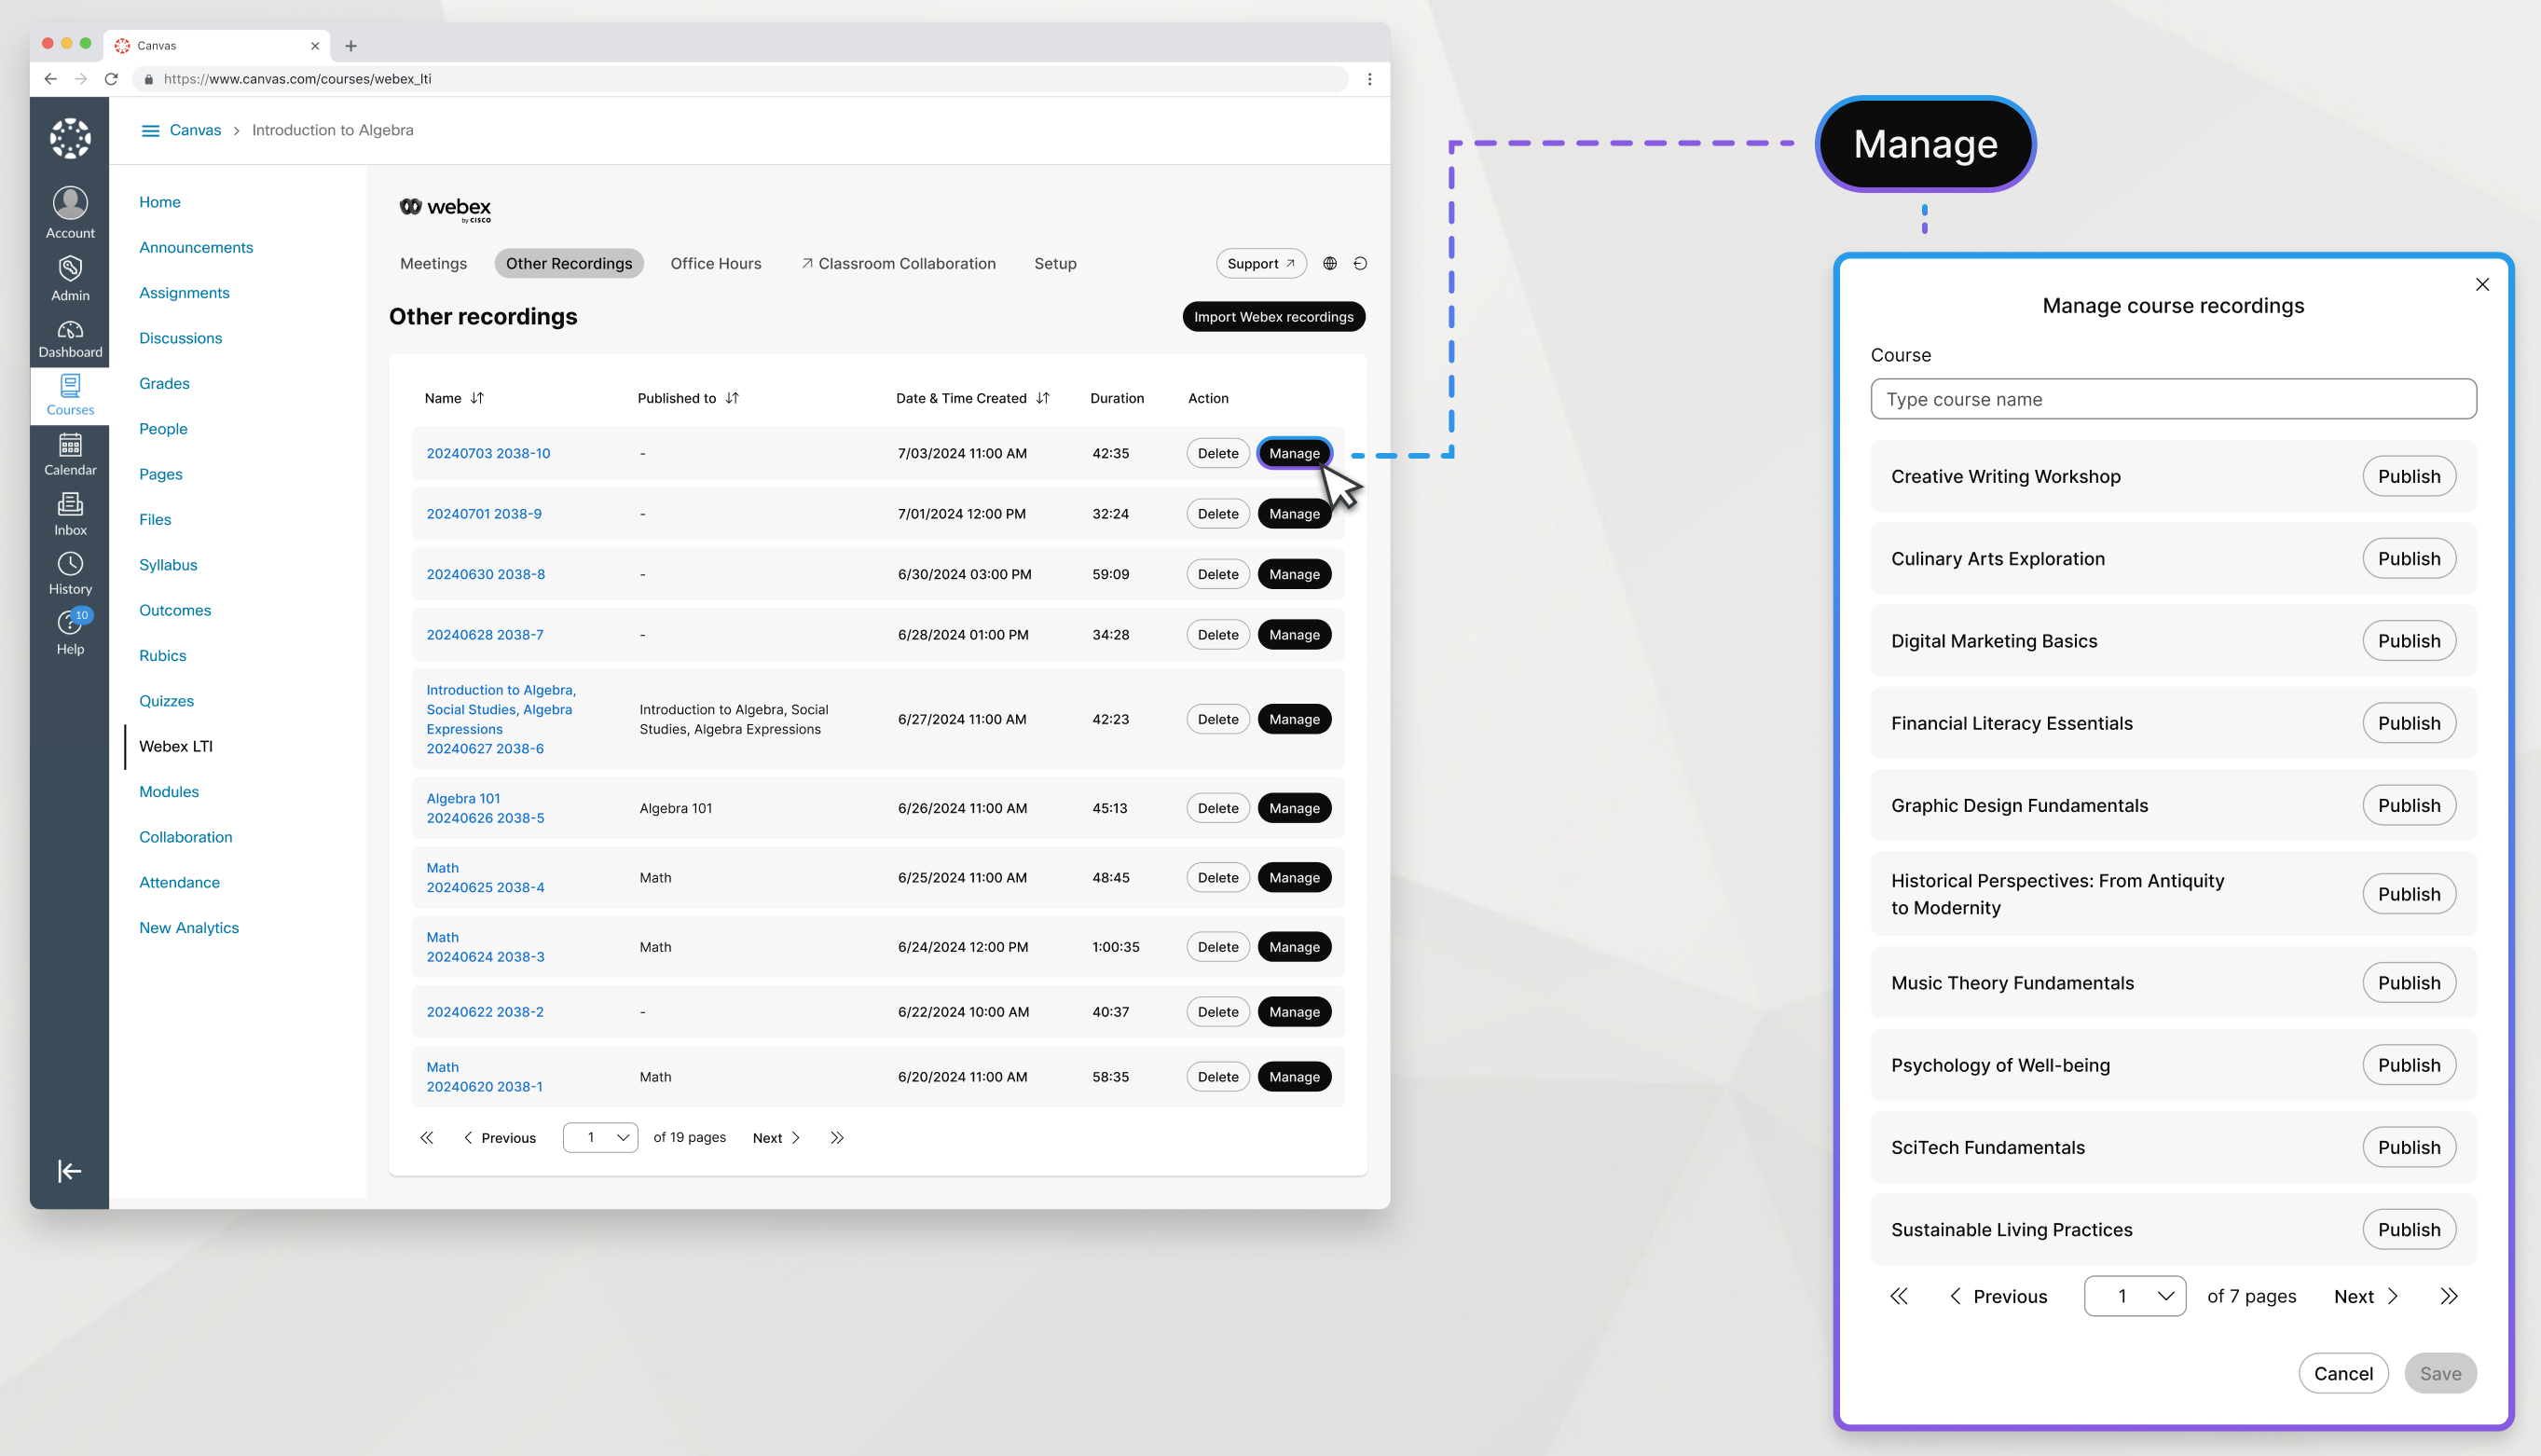
Depois de importar uma gravação do Webex para Outras gravações, você pode publicá-la em qualquer um dos seus cursos para disponibilizá-la aos alunos.
| 1 |
Na aba Outras Gravações, localize a gravação e clique em Gerenciar. |
| 2 |
Encontre o curso no qual deseja publicar sua gravação e clique em Publicar. Para que um curso apareça nesta lista, você deve abrir o Webex LTI pelo menos uma vez nesse curso. |
| 3 |
Clique em Salvar. |
Você pode cancelar a publicação de uma gravação de um curso para torná-la indisponível para os alunos.
| 1 |
Na aba Outras Gravações, localize a gravação e clique em Gerenciar. |
| 2 |
Encontre o curso no qual deseja publicar sua gravação e clique em Cancelar publicação. |
| 3 |
Clique em Salvar. |
Excluir uma gravação a remove de qualquer curso em que você a publicou e da guia Outras gravações.
| 1 |
Vá para a aba Outras Gravações.
|
| 2 |
Encontre a gravação que deseja excluir e clique em Excluir. |
Horários de trabalho
Você pode agendar e hospedar horários de expediente usando o Webex LTI. Na guia Horários de trabalho, de definir sua disponibilidade e indicar horários em que os alunos podem se reunir com você. As horas de trabalho definidas se aplicam a cada curso para o que você for um instrutor. Se houver vários instrutores para um curso, os alunos deverão escolher você na lista de instrutores para agendar uma reunião com você.
As reuniões no horário comercial permitem que os alunos agendem reuniões diretamente com você. Para manter o horário de expediente para vários alunos ao mesmo tempo, recomendamos que você crie uma reunião virtual e a nomeie como “Horário de expediente”.
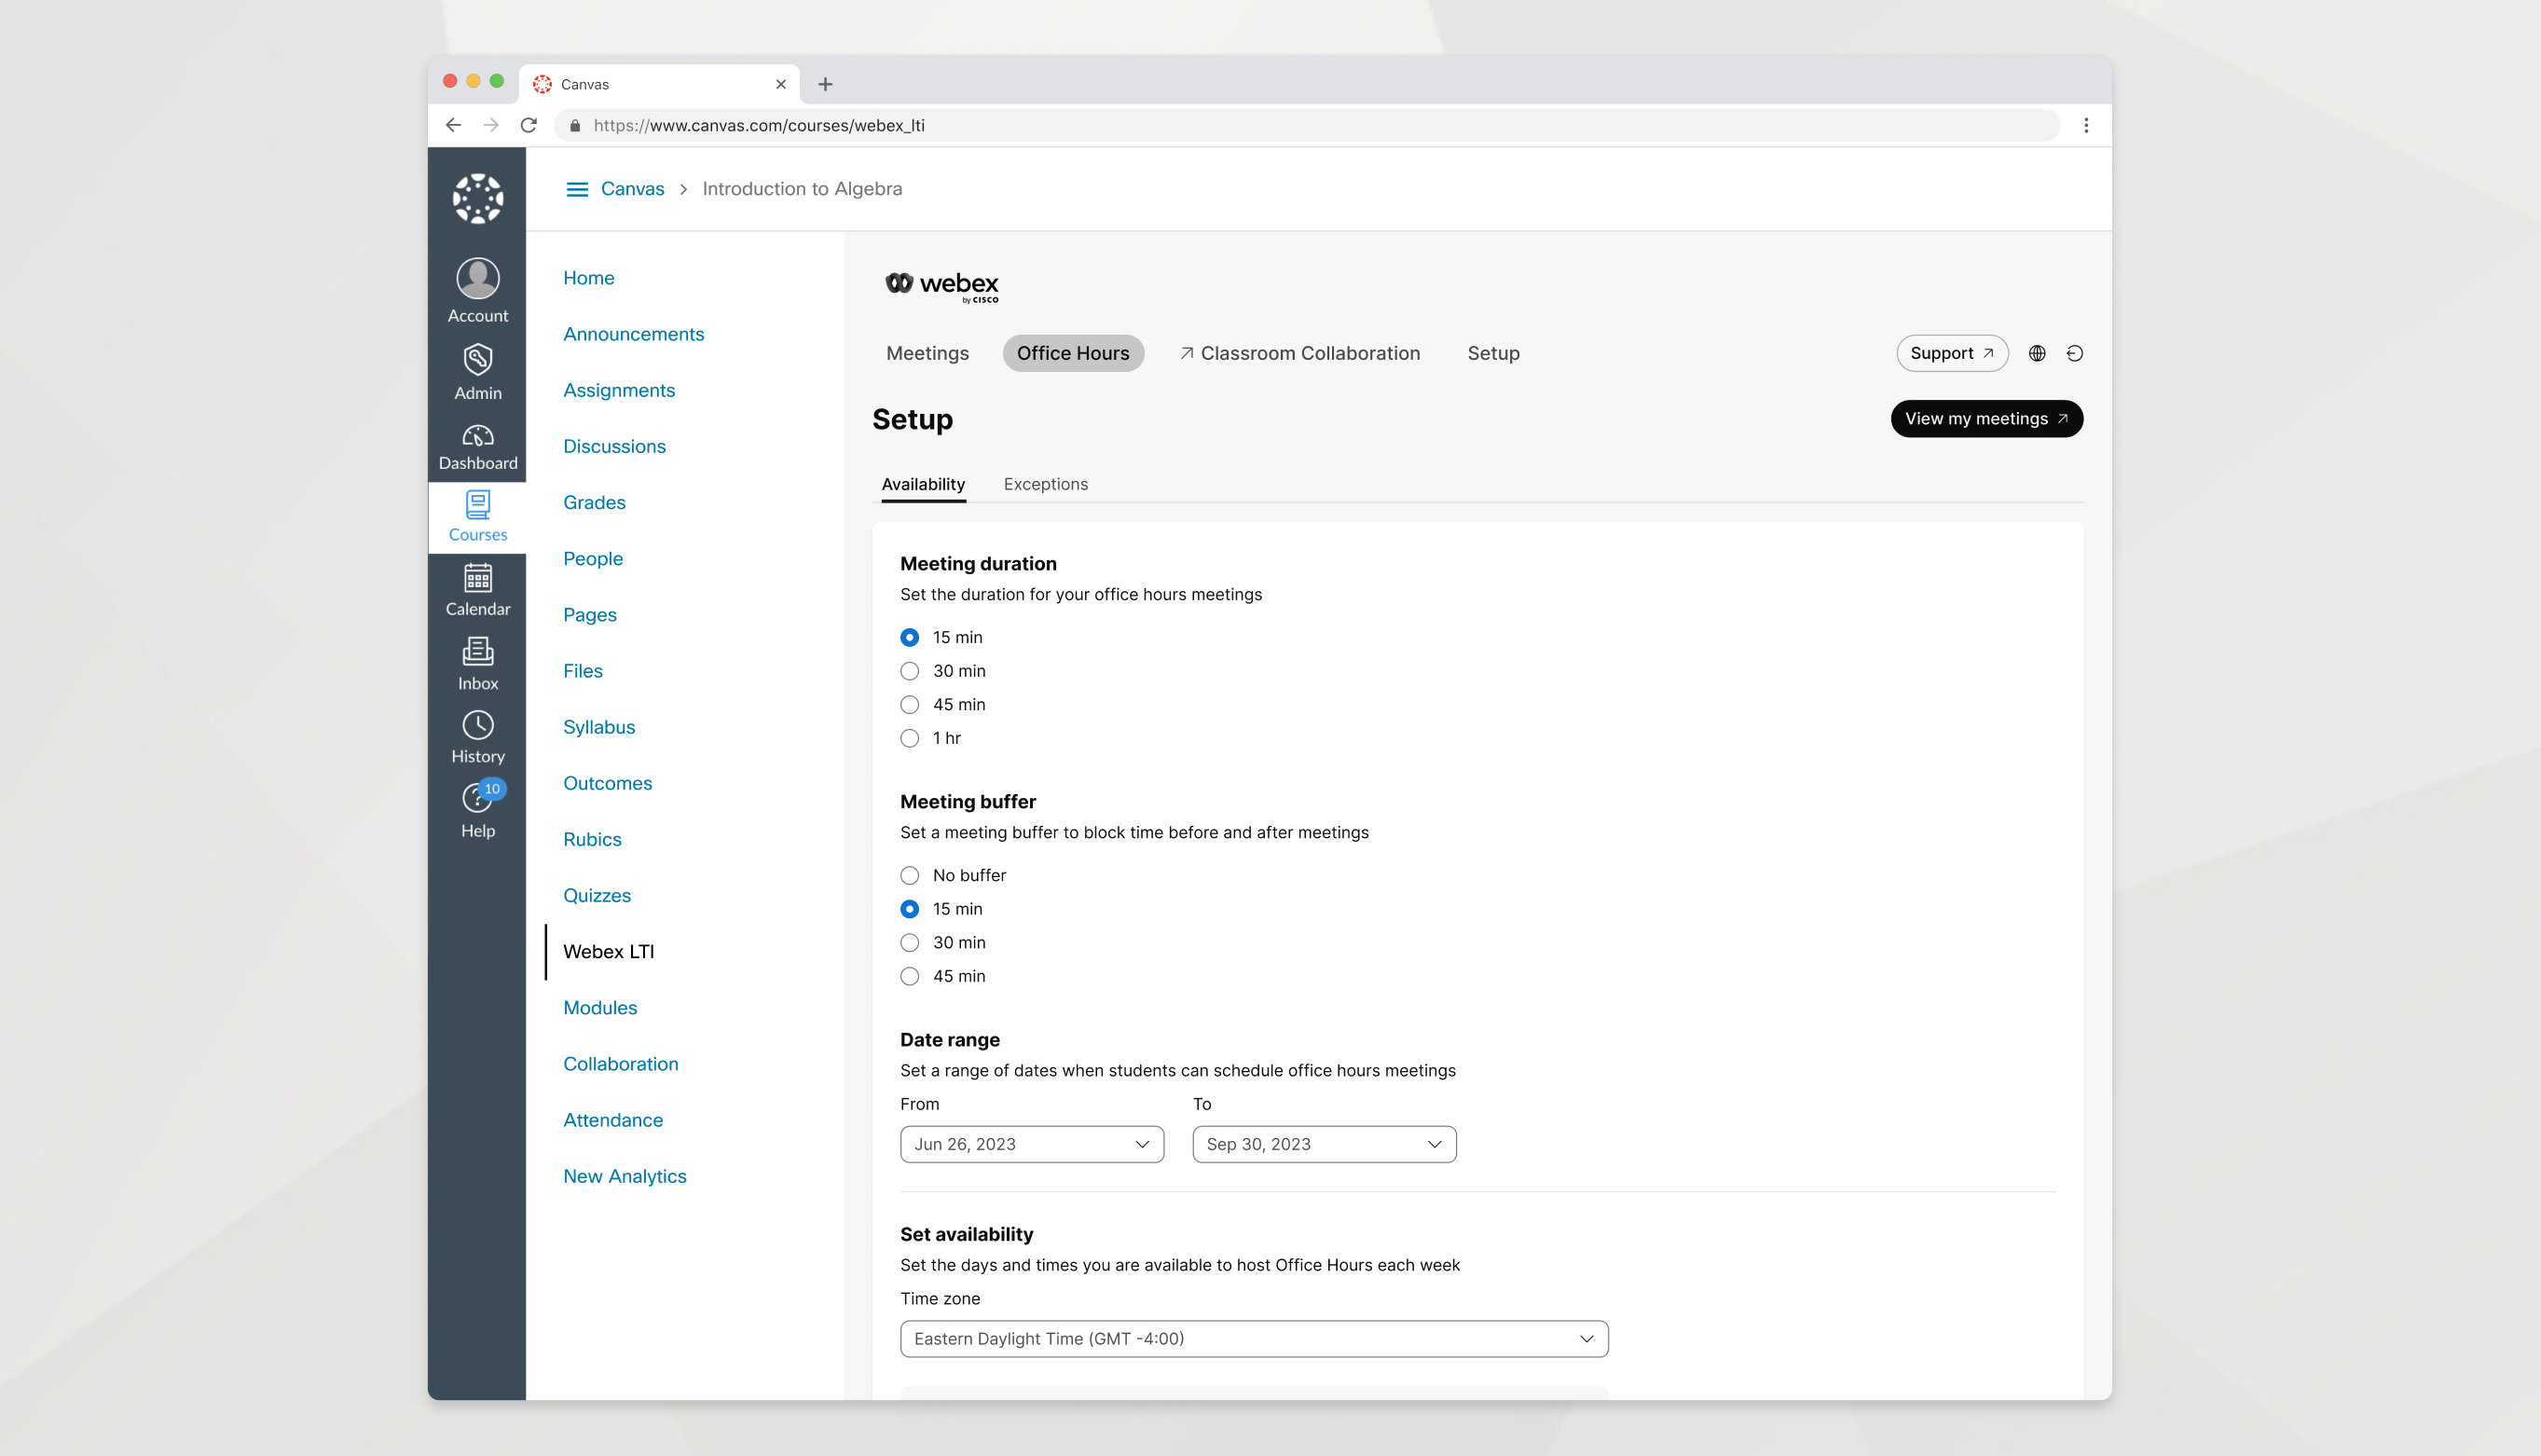
O recurso Horário de atendimento permite que você indique sua disponibilidade em dias e horários diferentes para que seus alunos possam se reunir com você.
| 1 |
Acesse a aba Horário de expediente. |
| 2 |
Na aba Disponibilidade, defina o seguinte:
|
| 3 |
Role para baixo e clique em Salvar. |
Seus alunos agora podem selecionar um horário para se reunirem com você. Quando um aluno agenda um horário com sucesso, esse horário não fica disponível para mais ninguém. Você receberá um e-mail com o link da reunião e verá a reunião na sua lista Próximas reuniões no site Webex.
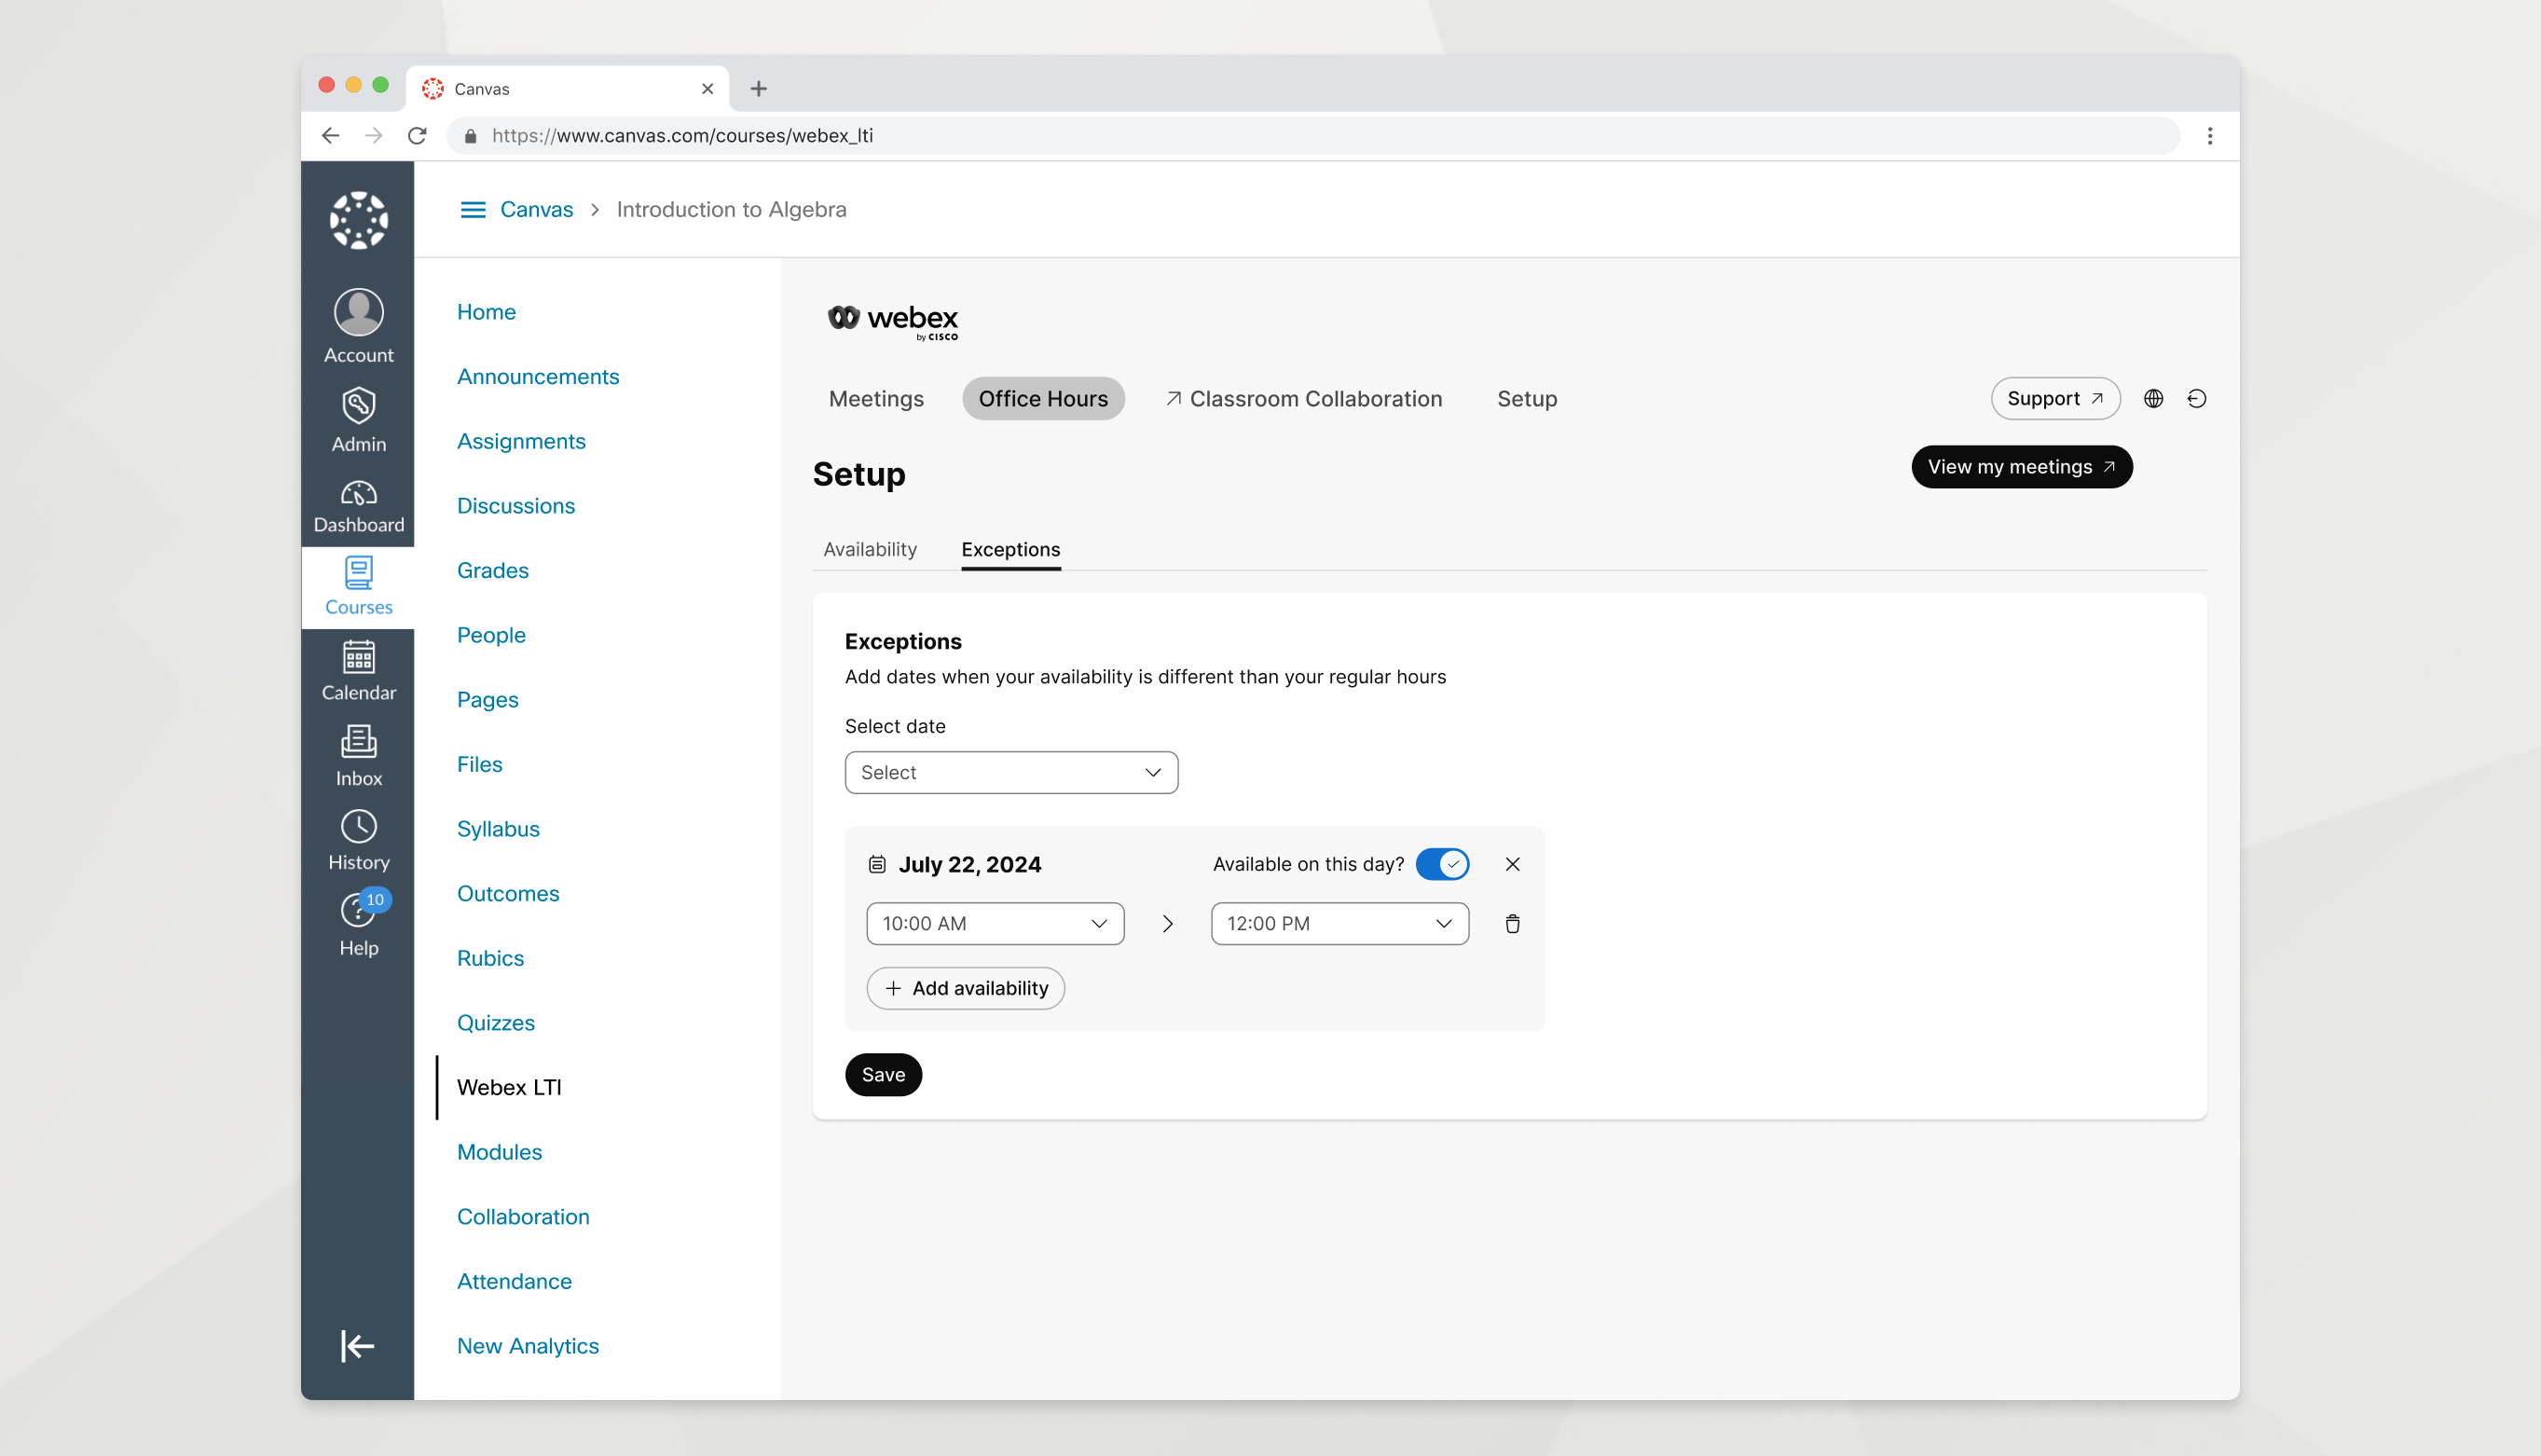
Defina exceções para alterar sua disponibilidade em uma data específica para que seu horário de expediente reflita com precisão sua agenda. Você pode bloquear a disponibilidade para uma data inteira, remover intervalos de tempo de uma data ou adicionar novos intervalos de tempo a uma data.
| 1 |
Vá para a aba Horário de expediente e clique em Exceções. |
| 2 |
Escolha uma data e use as seguintes opções para alterar sua disponibilidade para essa data:
|
| 3 |
Clique em Salvar. |
O que fazer em seguida
Você pode ter no máximo 50 exceções futuras definidas a qualquer momento. Definir uma exceção para uma data não afetará nenhuma reunião de horário comercial que um aluno agendou antes de você definir a exceção. Se necessário, você pode reagendar estas reuniões no Webex.
Colaboração em sala de aula
Antes de começar
Para habilitar a colaboração em sala de aula no Webex LTI Legacy, você deve primeiro autorizar com seu LMS e fazer login no Webex.
| 1 |
Na Configuração, vá para a seção colaboração em sala de aula. |
| 2 |
Clique em Autorizar e siga as instruções na tela para autorizar o Webex LTI Legacy no seu LMS. Se você já tiver autorizado com seu LMS, não verá o botão Autorizar e poderá pular esta etapa. |
| 3 |
Clique em Entrar com Webex para habilitar a colaboração em sala de aula e insira suas credenciais Webex. Se você já tiver feito login com o Webex, não verá o botão Fazer login com o Webex para habilitar a colaboração em sala de aula e poderá pular esta etapa. |
| 4 |
Ative o interruptor para habilitar colaboração em sala de aula. |
Antes de começar
Para habilitar a colaboração em sala de aula no Webex LTI, você deve primeiro fazer login no Webex.
| 1 |
Na Configuração, vá para a seção colaboração em sala de aula. |
| 2 |
Clique em Entrar com Webex para habilitar a colaboração em sala de aula e insira suas credenciais Webex. Se você já tiver feito login com o Webex, não verá o botão Fazer login com o Webex para habilitar a colaboração em sala de aula e poderá pular esta etapa. |
| 3 |
Ative o interruptor para habilitar colaboração em sala de aula. |
Habilitar colaboração em sala de aula cria uma equipe para seu curso no aplicativo Webex e adiciona todos os participantes do curso como membros dessa equipe. Por padrão, o Webex LTI sincroniza automaticamente sua lista de aulas diariamente. A sincronização automática garante que os membros da equipe Webex reflitam com precisão a lista de membros matriculados no seu curso.
|
Vá para a aba Configuração e encontre a seção colaboração em sala de aula.
|
Você pode desativar a colaboração em sala de aula se não quiser mais usá-la em sua turma.
| 1 |
Vá para a aba Configuração e encontre a seção colaboração em sala de aula. |
| 2 |
Clique em Desativar colaboração em sala de aula. |
| 3 |
Leia a explicação sobre o que acontece quando você desabilita a colaboração em sala de aula e clique em OK. |
O que fazer em seguida
Arquive a equipe no aplicativo Webex para tornar a equipe e os espaços indisponíveis para seus alunos.

 no Webex.
 opções.
