
Thanks for your feedback.
Connect customer private network to Webex Calling
 Feedback?
Benefits provided by PNC include:
-
Enables service providers (SP)s to bundle their networks with Webex Calling.
-
Offers large enterprises the ability to integrate directly to Webex Calling.
-
Automates and streamlines the process for provisioning customer VLAN access to Webex Calling.
-
PNC is available to SP and Value Added Reseller (VAR) partners and is ordered for customers through the Cisco Commerce Workspace (CCW). Once ordered in CCW, the feature is visible and configurable within Control Hub.
-
PNC must be used in conjunction with an IP Interconnect to a Webex Calling data center.
PNC provides access to Webex Calling workloads. Other Webex workloads and network services (Meetings, Messaging, DNS, Control Hub, etc.) are accessed Over The Top (OTT) Internet.
IP Interconnect options and specifications are as follows:
Partner-level Interconnect
The Partner (SP or VAR) is responsible for establishing an IP interconnect directly to a Webex Calling data center. This model is used by partners that aggregate Virtual Private Networks (VPNs) or Private IP Networks from multiple customers within a single direct connect. Each customer is provisioned on a Virtual Local Area Network (VLAN) with a contracted amount of bandwidth. A partner can establish direct connects to multiple Webex Calling data centers globally.
Customer-level Interconnect
Direct Connect—A direct connection is used for a single customer and the customer can establish direct connects to multiple Webex Calling data centers globally. The entire bandwidth of this interconnection is available and dedicated to that particular customer.
The partner or the system administrator are able to configure the VPN server for each IP Interconnect that the partner or customer has enabled. The settings per IP Interconnect include:
-
VLAN ID
-
Speed
-
BGP
-
ASN
-
IP address of Webex Calling Interface
-
IP address of customer interface
-
Subnet
If you're a customer administrator managing the PNC on a Partner Interconnect, coordinate any changes with your partner prior to entering in Control Hub to avoid any potential network connectivity issues.
Once you’ve selected the type of interconnect that you use, you can enable PNC for a location in Control Hub.
Partners and administrators who have editing permissions can enable a Private Network Connect (PNC) location.
If the interconnect you want to use is on a router that is in maintenance, you can't create the VLAN.
Before you begin
Ensure to complete these tasks before creating a VLAN, and enabling your location for Private Network Connect (PNC):
-
Partner or customer interconnect established
-
PNC licenses ordered in CCW.
| 1 |
From the customer view in https://admin.webex.com, go to Services. |
| 2 |
Select . |
| 3 |
Click Manage VLAN, then Create VLAN. |
| 4 |
Enter the VLAN name. The name can't exceed 100 characters in length. |
| 5 |
Select the interconnect type from the drop-down list. |
| 6 |
Select the speed (PNC license determines your speed options). |
| 7 |
Enter the VLAN ID number, and then click Next. Partner administrators provide the VLAN ID number, which is from 2 through 4093. |
| 8 |
Enter the ASN (Autonomous System Number). ASN can be within the range of 0–4294967295 except those numbers that are “Reserved” or “Reserved for use in documentation and sample code”, as listed in these guidelines. |
| 9 |
Select Subnet. Value can be a CIDR from /29 to /3. |
| 10 |
Enter the Cisco IP Address (provided by your partner). |
| 11 |
Enter the Organization IP Address. The organization IP address is on the same subnet as the Cisco IP address. |
| 12 |
Toggle to enable BGP Password. |
| 13 |
Enter the password in Create BGP Password and Confirm BGP Password field. |
| 14 |
Toggle to enable Bidirectional Forwarding Detection. Bidirectional Forwarding Detection (BFD) is a network protocol used to detect faults between two forwarding engines connected by a link. The options BGP Password and Bidirectional Forwarding Detection are optional. For BFD, Cisco supports: |
| 15 |
Click Next. |
| 16 |
Review your VLAN settings, and then click Create. It may take several minutes to create the VLAN. If an error occurs while creating a VLAN, the VLAN isn’t created. Make note of the guidance of the error and contact your partner. |
Before you begin
If locations are set to PNC enabled or the Interconnect router is in maintenance, you cannot modify a customer VLAN.
| 1 |
From the customer view in https://admin.webex.com, go to Services. |
| 2 |
Select . |
| 3 |
Scroll to Private Network Connect, then select Manage VLAN. |
| 4 |
Select the VLAN that you'd like to modify. |
| 5 |
From the VPN panel, modify the VLAN settings. |
| 6 |
Click Save. If the BGP Password option is enabled and you wish to update the VLAN settings without a password, then leave the BGP field empty. |
Before you begin
If locations are set to PNC enabled or the Interconnect router is in maintenance, you can't delete a customer VLAN.
| 1 |
From the customer view in https://admin.webex.com, go to Services. |
| 2 |
Select . |
| 3 |
Scroll to Private Network Connect, then click Manage VLAN. |
| 4 |
Click |
 icon on the VLAN you want to delete.
Before you begin
PNC can't be enabled for a customer until a VLAN has been created.
All VLANs should be configured before changing the connection type.
Whether enabling or disabling PNC for a location, once the process starts you can view the progress on the Tasks page.
Additional changes can’t be made during the enable/disable PNC process.
| 1 |
From the customer view in https://admin.webex.com, go to Services. |
| 2 |
Select . |
| 3 |
Scroll to Private Network Connect. |
| 4 |
To enable, select Use Private Network Connect. |
| 5 |
To disable, select Use public internet. |
| 6 |
Click Save. |
Before you begin
-
Whether enabling or disabling PNC for a location, once the process starts you can view the progress on the Tasks page.
-
Additional changes can’t be made during the enable/disable PNC process.
| 1 |
From the customer view in https://admin.webex.com, go to Services. |
| 2 |
Select , then choose the location to modify. |
| 3 |
Scroll to Location Access Connection Type and select Private Network Connection. |
| 4 |
To enable, select the toggle for Use Private Network Connect. |
| 5 |
To disable, select the toggle for Use public internet. Reverting from Use Private Network Connect to Use public internet does not change your network routing policies for that location. Traffic may still traverse the PNC. Please coordinate this change with your network services partner. Additionally, before disabling a location's PNC, verify that the internet connection is working properly per these guidelines. |
| 6 |
Click Start Processing. |
What to do next
Once the process of enabling/disabling PNC is shown as completed on the Manage Tasks page in Control Hub, endpoints will require attention:
-
Phones will need to be resynced. You can resync the phones from Control Hub or have the users resync their phones from the phone settings menu.
-
Users will need to log out and back into mobile & desktop clients.
-
Customer-managed devices will need to have their Outbound proxy (OBP) updated in the configuration files. See Add your customer managed device for more information.
-
Locations using Premise based PSTN will need to reconfigure the Trunks on each local gateway with the new OBP. See information on Managing Premise Based PSTN.
Track the usage of your PNC by VLAN/Interconnect.
| 1 |
From the customer view in https://admin.webex.com, go to Services. |
| 2 |
Select . |
| 3 |
Scroll to Private Network Connect, then select Manage VLAN. |
| 4 |
From the VLAN table, select the VLAN you'd like to analyze. |
| 5 |
From Actions, select the graph icon (hover-over displays View Bandwidth). 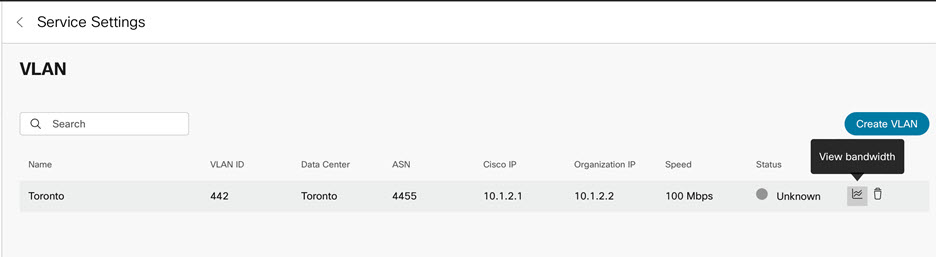
A graph showing bandwidth usage for the past 14 days is displayed and you can view the legend showing ingress and egress traffic. A red line indicates the subscribed capacity. 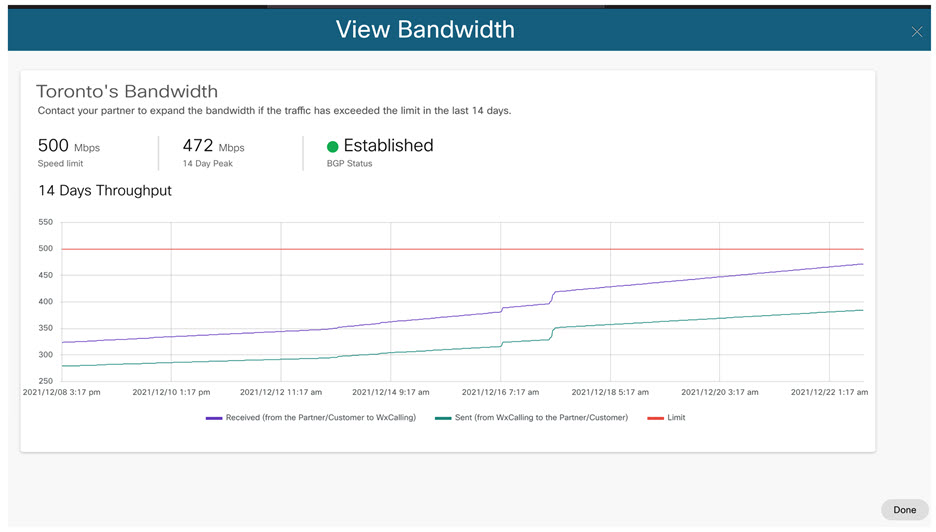
|
| 6 |
Click Done when finished. |


