- Home
- /
- Article

Thanks for your feedback.

Best practices for secure meetings: hosts
 In this article
 Feedback?
Learn about how to keep your Webex meetings, webinars, events, and training sessions secure for you and for your guests.
Overview of Webex security
The Webex Meetings Suite helps enable global employees and virtual teams to meet and collaborate in real time as though they were working in the same room. Businesses, institutions, and government agencies worldwide rely on Webex. Webex helps to simplify business processes and improve results for sales, marketing, training, project management, and support teams.
For all organizations and their users, security is a fundamental concern. Online collaboration must provide multiple levels of security, from scheduling meetings to authenticating participants to sharing content.
Webex provides a secure environment that you can configure as an open place to collaborate. Understanding the security features as site administrators and end users can allow you to tailor your Webex site to your business needs.
For additional information, see the Webex security technical paper.
Best practices for hosts
As a host, you’re the final decision maker concerning the security settings of your meetings, events, webinars, and training sessions. You control nearly every aspect of the meeting, event, webinar, or training session, including when it begins and ends.
Keep your meetings and information secure. Know and follow the security policies for your organization. Follow security best practices when you schedule a meeting, during a meeting, and after a meeting.
Use Meeting Lobby and Auto Lock controls when available.
Don’t publish passwords to publicly accessible websites.
Don’t share your Audio PIN with anyone.
Provide meeting passwords only to users who need them.
Never share sensitive information in your meeting until you’re certain who is in attendance.
Webex Meetings Personal Rooms are a form of Webex meeting that are continuously available to the meeting host. The meeting host activates their Personal Room when they join and deactivates the meeting room when they leave. Personal Rooms provide a quick and convenient way for trusted participants to meet, and therefore have a limited set of configurable security features. If meeting security is your primary concern, we recommend using scheduled Webex meetings which have a comprehensive set of configurable security features.
Personal Room lobby
The lobby is enabled by default for all Personal Room meetings. With this default setting, when you start your Personal Room meeting, and the meeting is unlocked, all guests get placed into the lobby, until you (the host) admit them.
A guest is defined as follows:
-
Not signed in (identity isn't authenticated)
-
Signed in, but belongs to an external organization
With the default setting, They wait in the lobby until the host admits them, people in your organization who signed in with a Webex account using a host or attendee license bypass the lobby and join unlocked meetings directly.
The Webex site administrator can change the lobby setting for all Personal Rooms in your organization from They wait in the lobby until the host admits them to one of the following:
-
They can join the meeting—Disables the lobby for all Personal Rooms in your organization, allowing anyone to directly join your Personal Room meeting while it's unlocked. We strongly discourage disabling the lobby, as doing so makes your meeting vulnerable to unwanted attendees joining your meeting and meeting toll fraud.
-
They can't join the meeting—All attendees must have an account on your site and be signed in to attend the meeting. This setting makes Personal Room meetings internal only, which means they are available only to people in your organization.
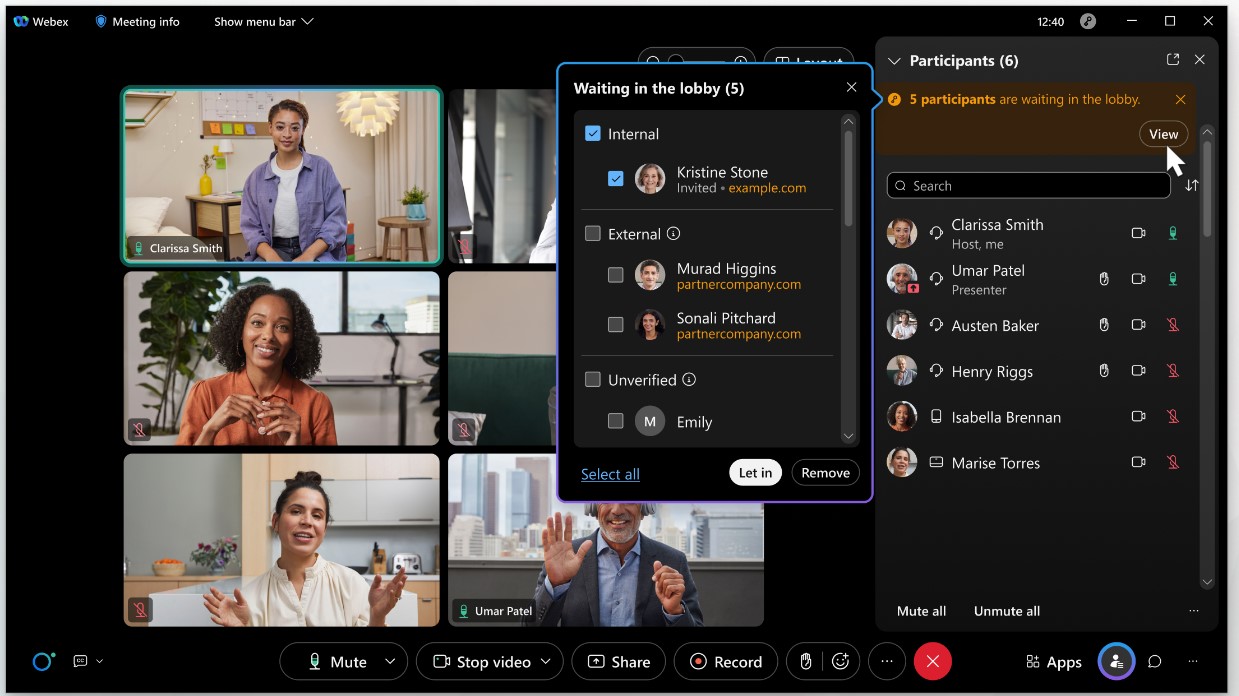
When people get placed into the lobby of your Personal Room, they get put in one of three categorized groups to simplify your screening and meeting admission choices:
-
Internal users (authenticated users in your organization)
-
External users (authenticated users in external organizations)
-
Unverified users (users who haven't signed in and aren’t authenticated)
Internal and external authenticated users have signed in and verified their identity. The identity of unverified users (users who didn't sign in) can't be assumed to be true because they aren't authenticated.
People can be admitted to the meeting, or removed from the lobby individually or as a group.
Auto lock your Personal Room
Locking your Personal Room room affects the meeting entry behaviour for everyone. By default, when the meeting is locked, everyone must wait in the lobby until the host admits them.
A more restrictive setting may also be configured by your site administrator for all Personal Rooms in your organization. With this more restrictive setting, no one can join the meeting when the meeting is locked.
As the meeting host, you can always lock and unlock your meeting while it is in progress, using in-meeting controls.
You can set your Personal Room to lock automatically by selecting on your Webex site.
This setting locks your room and prevents attendees from joining the meeting automatically. With this setting, you see notifications when attendees wait in the lobby. You can screen people in the lobby and allow only authorized attendees into your meeting.
Your site administrator can lock the autolock setting and set the autolock time period for your Personal Room so that you can't change it. This administrative capability sets the default autolock value for your Personal Room, but you always have the ability to unlock and relock your meeting while it's in progress.
Consider your Personal Room URL as a public URL, anyone who knows this URL can wait for you in your lobby. Always check usernames before you admit them as an attendee into your room.
Personal Room notifications before a meeting
When people enter your Personal Room lobby, they can send you an email notification letting you know that they are waiting for a meeting to begin. Even unauthorized people that gain access to your Personal Room lobby can send notifications.
We recommend that you review your email notifications before starting a meeting to screen unauthorized attendees.
If you’re seeing too many email notifications from unauthorized attendees, consider turning off these notifications. From your Webex site, go to , and uncheck Notify me by email when someone enters my Personal Room lobby while I am away.
Personal Room notifications during a meeting
If you lock your Personal Room, you can screen anyone waiting in your lobby. During a locked meeting, notifications let you know when someone new enters the lobby; you can choose whether to admit them. When multiple attendees wait in your Personal Room lobby, you can choose to admit select individuals, or to admit all waiting attendees to the meeting.
Scheduled meetings
Scheduled Webex meetings are our recommended meeting type when security is important to you, or your organization. Scheduled meetings are password protected one-time meetings, and have wide range of security features, in meeting feature controls, and attendee controls. See the following steps on how to secure your scheduled meetings.
Choose the meeting topic carefully
A listed meeting or a forwarded invitation email could, at a minimum, reveal the meeting titles to unintended audiences. Meeting titles can unintentionally reveal private information. To minimize exposure of sensitive data, such as company names or events, carefully word meeting titles.
Exclude the meeting password from the invitations
For highly sensitive meetings, webinars, events, or training sessions, exclude the password from the invitation email. This measure prevents unauthorized access to meeting details if the invitation email message gets forwarded to an unintended recipient.
If you check Exclude password from email invitation when you schedule a meeting, webinar, event, or training session, the password doesn't appear in the invitation. Provide the password to attendees by another means, such as by phone.
Webex Webinars doesn't support this feature.
Scheduled meeting room lobby
For Webex version 43.3 and later, the lobby is enabled by default for all Webex scheduled meetings. No changes get made to existing sites that don't have the lobby enabled by default.
With this default setting, when the scheduled meeting starts, and the meeting is unlocked, all guests get placed into the lobby, until you (the host) admit them. People who received a meeting invite and who signed in with a Webex account bypass the lobby and join unlocked meetings directly.
A guest is defined as follows:
-
Not signed in (identity isn't authenticated)
-
Signed in, but belongs to an external organization
When you schedule a meeting on your Webex site, you can change the default lobby setting from They wait in the lobby until the host lets them in to They can join the meeting or They can't join the meeting, depending on the admin security settings for your site.
When people get placed into the lobby of your meeting, they get put into three categorized groups to simplify your screening and meeting admission choices:
-
Internal users (authenticated users in your organization)
-
External users (authenticated users in external organizations)
-
Unverified users (users who haven't signed in and aren't authenticated)
Internal and external authenticated users have signed in and verified their identity. The identity of unverified users can't be assumed to be true because they aren't authenticated.
You can admit or remove people from the lobby individually or as a group.
Auto lock for scheduled meetings
Locking your meeting affects the meeting entry behaviour for all users. By default, when you lock your meeting, everyone must wait in the lobby until the host admits them.
A more restrictive setting may also be configured by your site administrator for all scheduled meetings hosted by users in your organization. With this more restrictive setting, no one can join the meeting when the meeting is locked.
As the meeting host, you can always lock and unlock your meeting while it is in progress, using in meeting controls.
When you schedule a meeting, you can set the meeting to lock automatically from the controls in the Security section on your Webex site.
With this setting, you see a notification when attendees wait in the lobby. You can screen users in the lobby and allow only authorized attendees into your meeting.
Your site administrator can lock the auto lock setting and set the auto lock time period for your scheduled meetings so that you can't change them. This administrative capability sets the default auto lock value for your scheduled meeting, but you can always unlock and relock your meeting while it is in progress.
Require invitees to register for your meeting, event, or training session
You can require your invitees to register for your meeting, webinar, event, or training session before they join. This lets you secure meeting information and track and gather information on the invitees who plan to attend your meeting, event, or training session.
This feature is enabled during scheduling. To enable this setting in Webex Meetings and Webex Webinars, go to Advanced options, and under Registration select Require attendee registration.
Use entry or exit tone or announce name feature
Using this feature prevents someone from joining the audio portion of your meeting without your knowledge. This feature is enabled by default for Webex Meetings and Webex Training. You can go to , and in the Entry and exit tone section, select a tone option from the drop-down list.
While scheduling your meeting, webinar, event, or training session, go to Audio connection options, and in the Entry and exit tone section, select a tone option from the drop-down list.
When using the Webex audio option, if you select the announce name feature, attendees joining using the Use computer for audio option don't get the option to record and announce their name.
Restrict available features
Limit the available features, such as chat and audio, if you allow attendees to join the meeting, webinar, event, or training session before the host.
Request that invitees not forward invitations
Request that your invitees don’t forward the invitation further, especially for confidential meetings.
Assign a cohost
Assign a cohost to start and control the meeting, webinar, event, or training session (cohost). This practice keeps meetings, webinars, events, and training sessions more secure by eliminating the possibility that the host role gets assigned to an unexpected, or unauthorized, attendee, in case you lose your connection to the meeting.
When inviting attendees to a scheduled meeting, you can designate one or more attendees as cohosts for the meeting. A cohost can start the meeting and act as the host. Thus, a cohost must have a user account on your Webex site.
Restrict access to the meeting
Lock the meeting, webinar, event, or training session after all attendees have joined. This prevents more attendees from joining. Hosts can lock or unlock the meeting, webinar, event, or training session while the session is in progress. To lock a meeting that you're currently hosting, click  , then click the slider next to Lock Meeting.
This option prevents anyone from automatically joining the meeting, webinar, event, or training session. To unlock a meeting that you're currently hosting, click , then click the slider next to Lock Meeting.
Validate the identity of all users in a call
Accounting for every attendee by using a roll call is a secure practice. Ask users to turn on their video or state their name to confirm their identity.
To attend a meeting using a phone, a caller needs a valid Webex dial-in number and the nine- to eleven-digit meeting ID. If permitted on your site, attendees who join by phone without a password can join the audio conference portion of the meeting.
If permitted on your site, attendees without accounts can join the meeting. Unauthorized users could identify themselves with any name in your meeting.
Remove a participant from the meeting or webinar
You can expel participants at any time during a meeting. Hosts, cohosts, and panelists, can expel participants from webinars, including webinars in webcast view. Select the name of the participant whom you want to remove, and then click .
Share an application, not your screen
When you select Share , you can choose to webinars in webcast view share an application instead of your screen. Sharing an application rather than your
screen helps to prevent accidental exposure of sensitive information.
, you can choose to webinars in webcast view share an application instead of your screen. Sharing an application rather than your
screen helps to prevent accidental exposure of sensitive information.
Control who can share
If allowed at the site level, hosts can choose whether to allow all participants to share. If you don't enable the option, you can assign the presenter role to select participants or attendees.
End the meeting
When the meeting, event, or training session is over, be sure to end it for all participants. A dialog may open to provide you the option to leave the meeting, webinar, event, or training session running without ending it. If you need to leave early, make someone else the host so they can be responsible for ending the meeting, event, or training session.
Assign passwords to recordings
We recommend that you don't create recordings that contain sensitive information.
If you create recordings, you can edit the recordings and add passwords before sharing them to keep the information secure. Password-protected recordings require recipients to have the password in order to view them.
-
To assign passwords to recordings, go to your personal Webex user webpage to and click
 to open the Share Recording Window.
 -
On the Share Recording Window, check the check box next to Public Link.
-
Check the check box next to Password protection, and then type the password in the text field.
-
Click Save.
Delete recordings
Delete recordings after they are no longer relevant.
-
Go to Recordings, then select
 on the recording.
 -
Click Delete, then click Delete again.
Create a strong Audio PIN and protect it. Sign in to your personal Webex site user webpage, and go to to create your Audio PIN.
Your PIN is the last level of protection to prevent unauthorized access to your Personal Conference Meeting (PCN Meeting). Even if an unauthorized person obtained your host access code, the conference can't start without the Audio PIN. Protect your Audio PIN and don’t share it.


