- Home
- /
- Article

Thanks for your feedback.


 In this article
 Feedback?
You can use a number of accessories with your Cisco Wireless Phone 9821. This Help article provides information about the supported accessories.
You can use a number of accessories with your Cisco Wireless Phone 9821.
- Batteries
- Cisco Wireless Phone 9821 AC Power Adapter
- USB cable
- Cisco Wireless Phone 9821 Desktop Charger
- Cisco Wireless Phone 9821 Multi Charger
- Carry cases
- Silicon case
-
Headsets:
-
Standard headsets that use a 3.5 mm jack
-
Bluetooth headsets
-
- Other accessories, including lanyard and battery door
The phone does not support any other type of Bluetooth device than Bluetooth headsets and speakers.
USB cable
You can connect your phone to your computer or power adapter using a special USB cable.
The wide connector on the USB cable connects to the phone with magnets to hold it secure. It has pins that you must align correctly. If you hold the phone so that the screen is toward you, the battery icon on the connector is visible. For more information, see Charge phone battery.
Desktop charger
The Cisco Wireless Phone 9821 Desktop Charger allows for the simultaneous charging of the phone and a spare battery. The charger is powered by an AC adapter and provides a 4.3 V charging output for the battery. You can secure the desktop charger with a standard laptop cable lock.
The following figure shows the desktop charger with a phone.
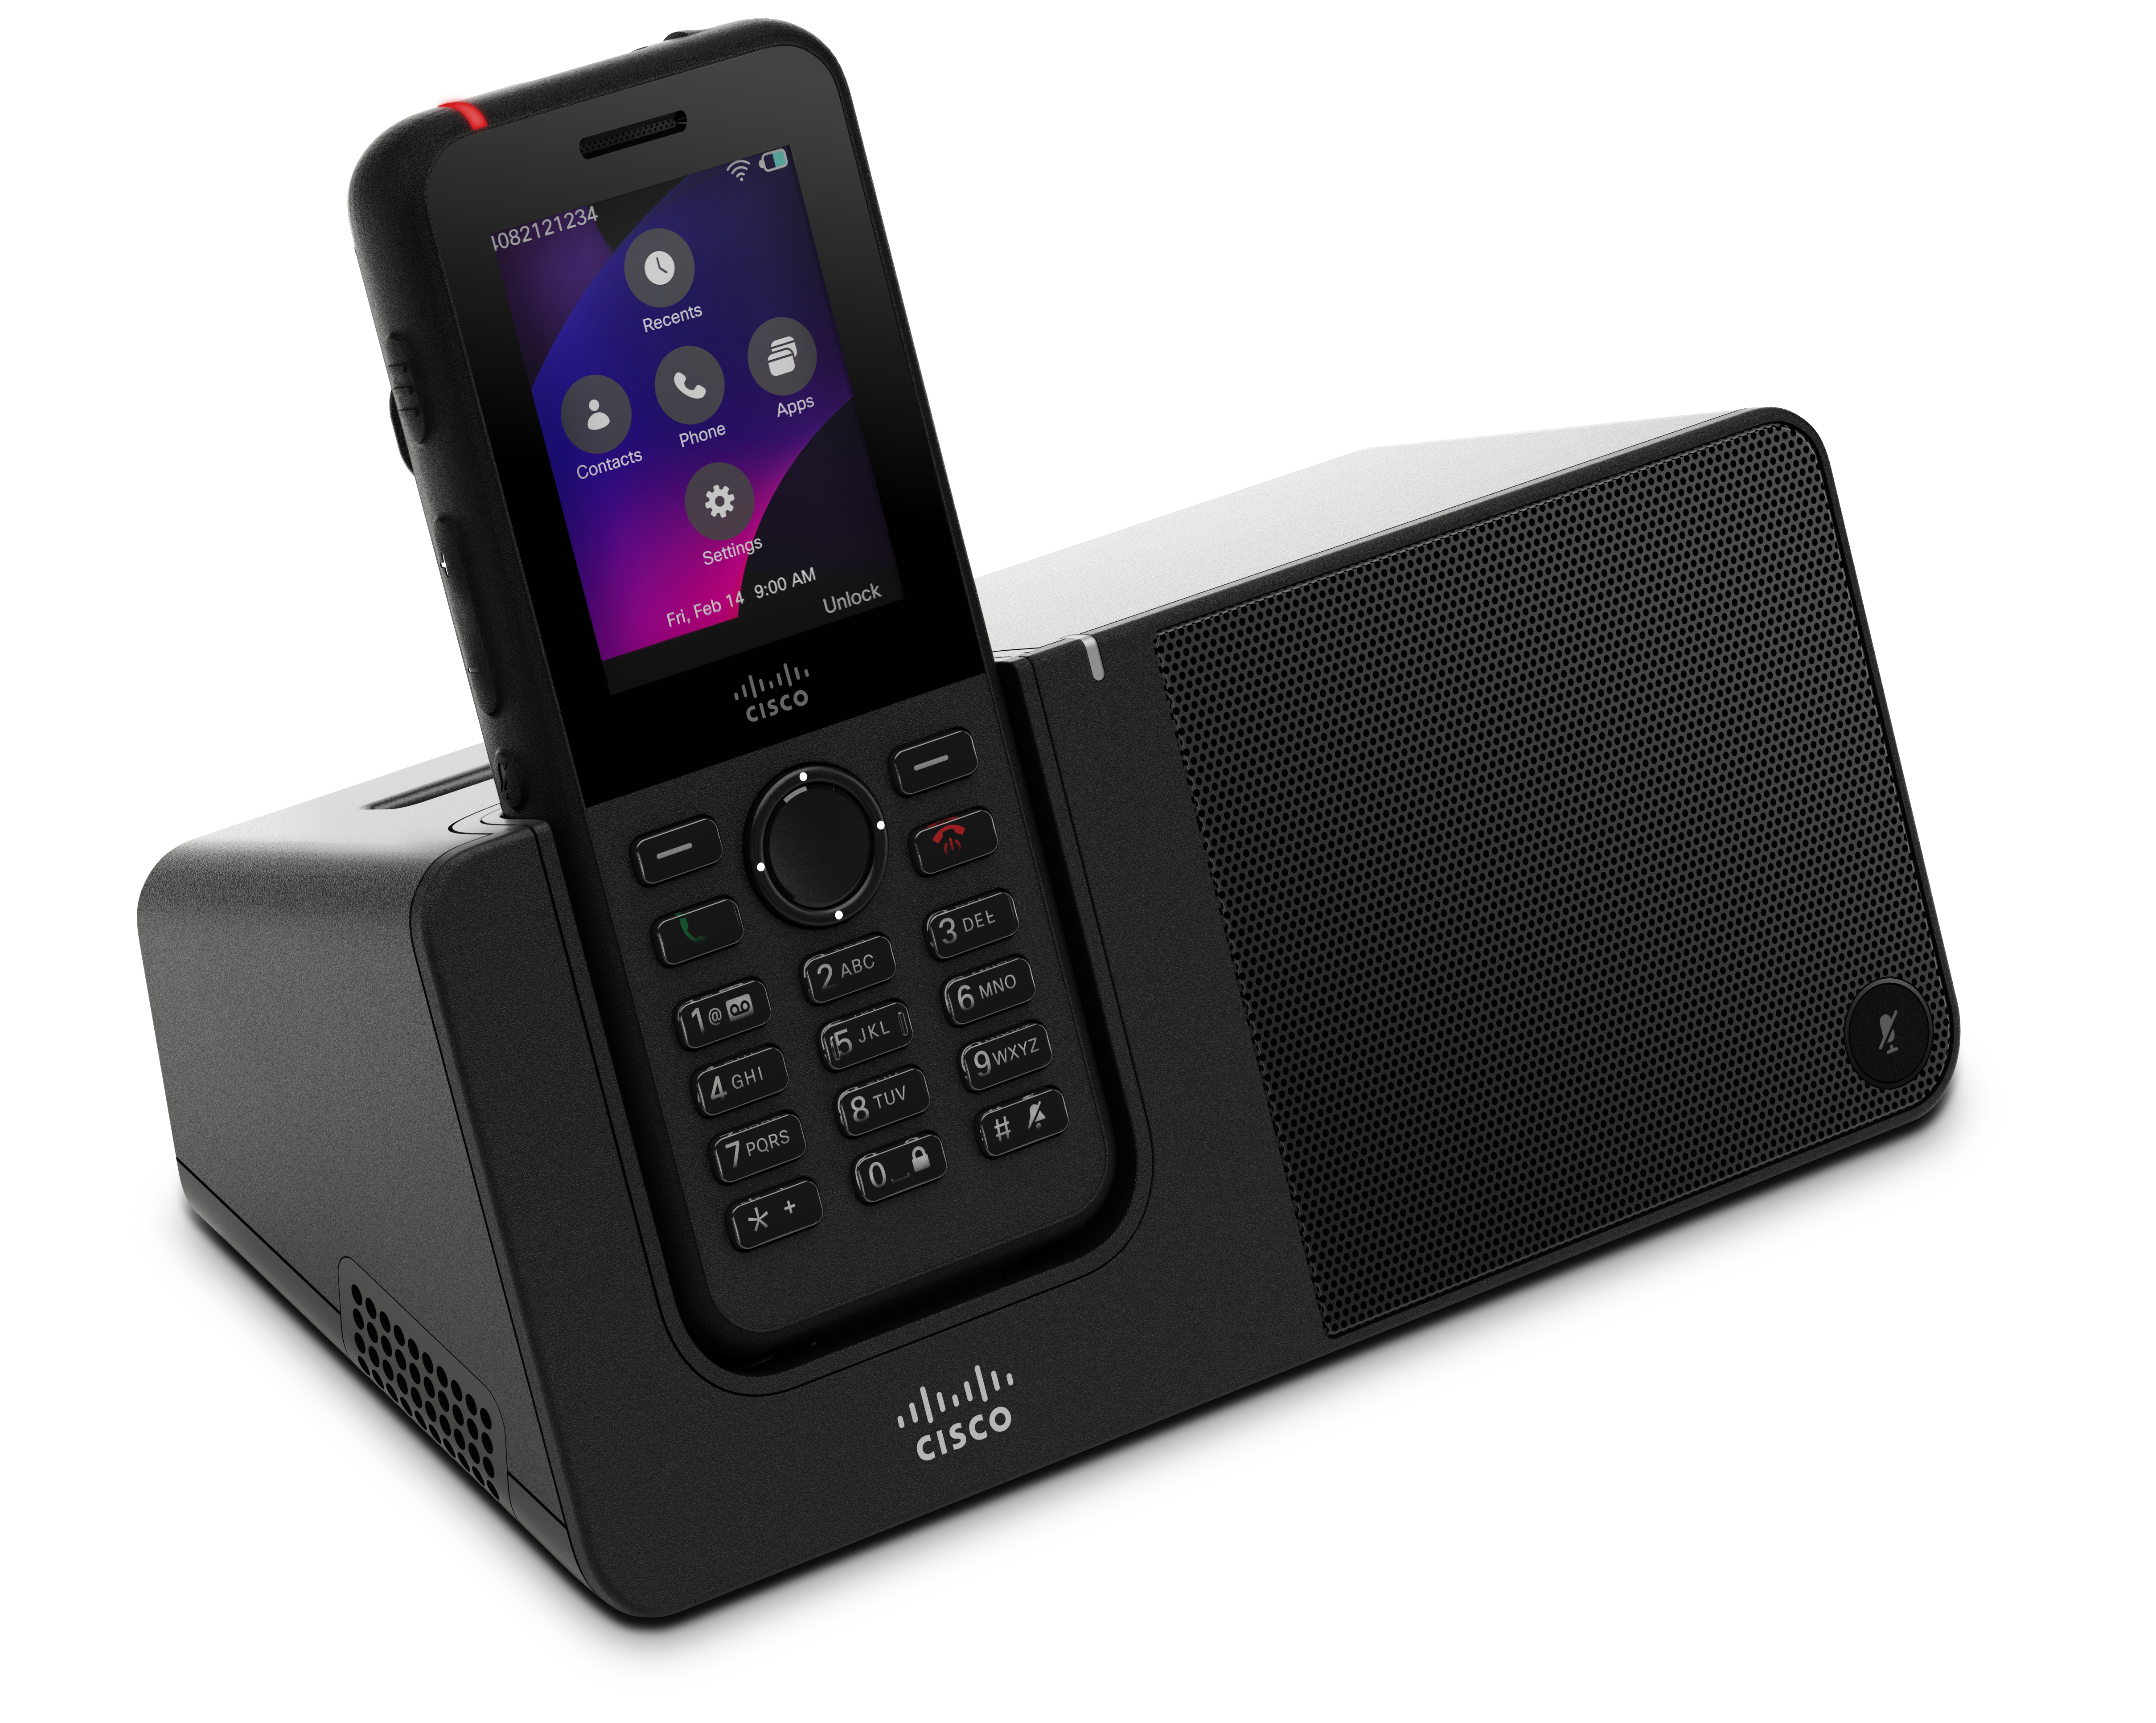
If your phone has a protective case, you don't need to remove the case before you charge the phone in the desktop charger. You adapt the charger to fit the phone.
You can use a USB-to-Ethernet adapter (dongle) to connect the desktop charger to the Ethernet for automatic Wi-Fi profile provisioning and certificate enrollment purposes only. Voice calls over the Ethernet network are not supported.
Built-in speakerphone and microphone
The charger includes a speakerphone and a microphone that you can use while the phone is docked. Use the phone volume buttons to control the speakerphone volume, and the Mute button on the charger itself. When the speakerphone is muted, the Mute button lights red.
Phone charging indicators
When the phone is placed in the desktop charger, the LED indicator on the top of the device displays the charging status:
-
Amber—The battery is charging.
-
Green—The battery is fully charged.
The phone screen provides additional feedback based on the device state:
- If the phone is powered on: A charging message appears on the screen.
- If the phone is powered off or the battery is critically low: A charging icon appears on the screen.
Spare battery charging indicators
You can charge a spare battery with the additional charging port behind the main phone charging port. When you put a spare battery into the charger, the Battery LED (to the right of the phone) lights to show the charging status:
-
Amber—The spare battery is charging.
-
Green—The spare battery is fully charged.
Set up the desktop charger
Place the desktop charger on a stable work surface.
Before you begin
- You need the cable that comes with the charger. This cable has a round barrel plug on one end and a USB connector on the other end.
- You need the power adapter that comes with the charger.
| 1 |
Plug the round barrel plug end of the cable into the desktop charger. |
| 2 |
Plug the USB end of the cable into the power adapter and plug the power adapter into the electrical outlet. |
Charge your phone with the desktop charger
When your phone is charging in the charger, the phone LED lights amber and a message or icon displays on the phone screen. When the battery is fully charged, the LED turns green. Your phone can take up to 3 hours to recharge.
If your phone has a protective case, you don't need to remove the case before you charge the phone in the desktop charger. You adapt the charger to fit the phone.
When you put a powered phone into the charger, make sure that you align the charging pins on the bottom of the phone with the connector in the charger. When the phone is correctly placed in the charger, it is held in place with magnets. If the LED does not light, then the alignment is not correct.
When charging Cisco Wireless Phone 9821 after battery depletion or battery replacement, manually power on the phone by pressing
and holding Power/End Call  until the keypad backlight lights. The phone does not display a
charging indicator until it is powered on.
until the keypad backlight lights. The phone does not display a
charging indicator until it is powered on.
To prevent potential damage or safety hazards, observe the following precautions:
- Hazardous Environments: Do not charge the phone in environments classified as hazardous.
- Moisture: Ensure the device is completely dry before connecting it to a power source. Do not attempt to charge the phone if it is wet.
| 1 |
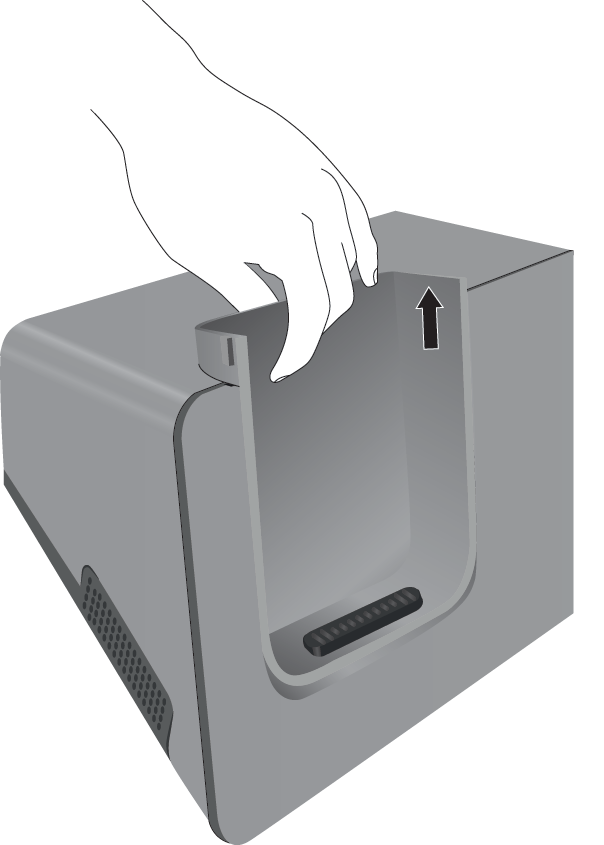
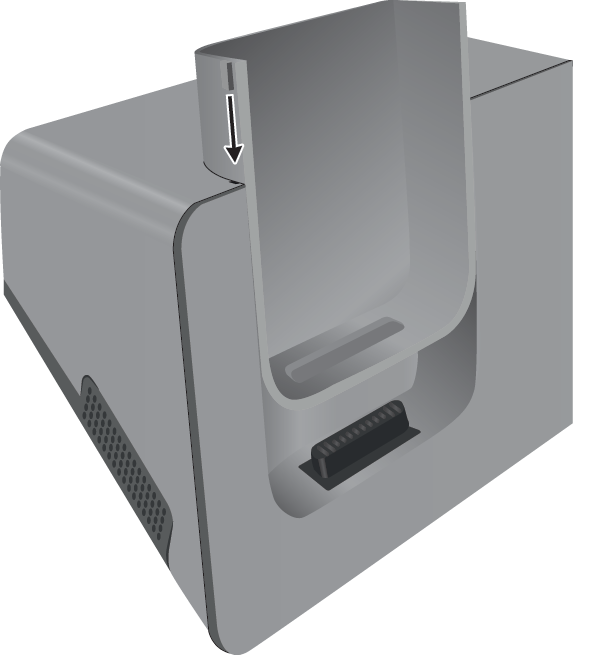
(Optional) Adapt the charger for a phone in a case. Turn the charger so that the back is facing you, put three fingers about 3/4 of the way into the cup, press in, and lift. The cup should slide out.
You might need to use two hands to remove the cup the first time. |
| 2 |
Place your phone in the charging slot with the screen facing towards you. If your phone is in a case, press the phone into the charging slot to ensure that the phone connects with the contacts. Make sure that the LED on the phone lights amber. If the LED does not light up, remove the phone and reinsert it into the charger. If your phone is in a case, the phone and case will tilt out because of the case. |
| 3 |
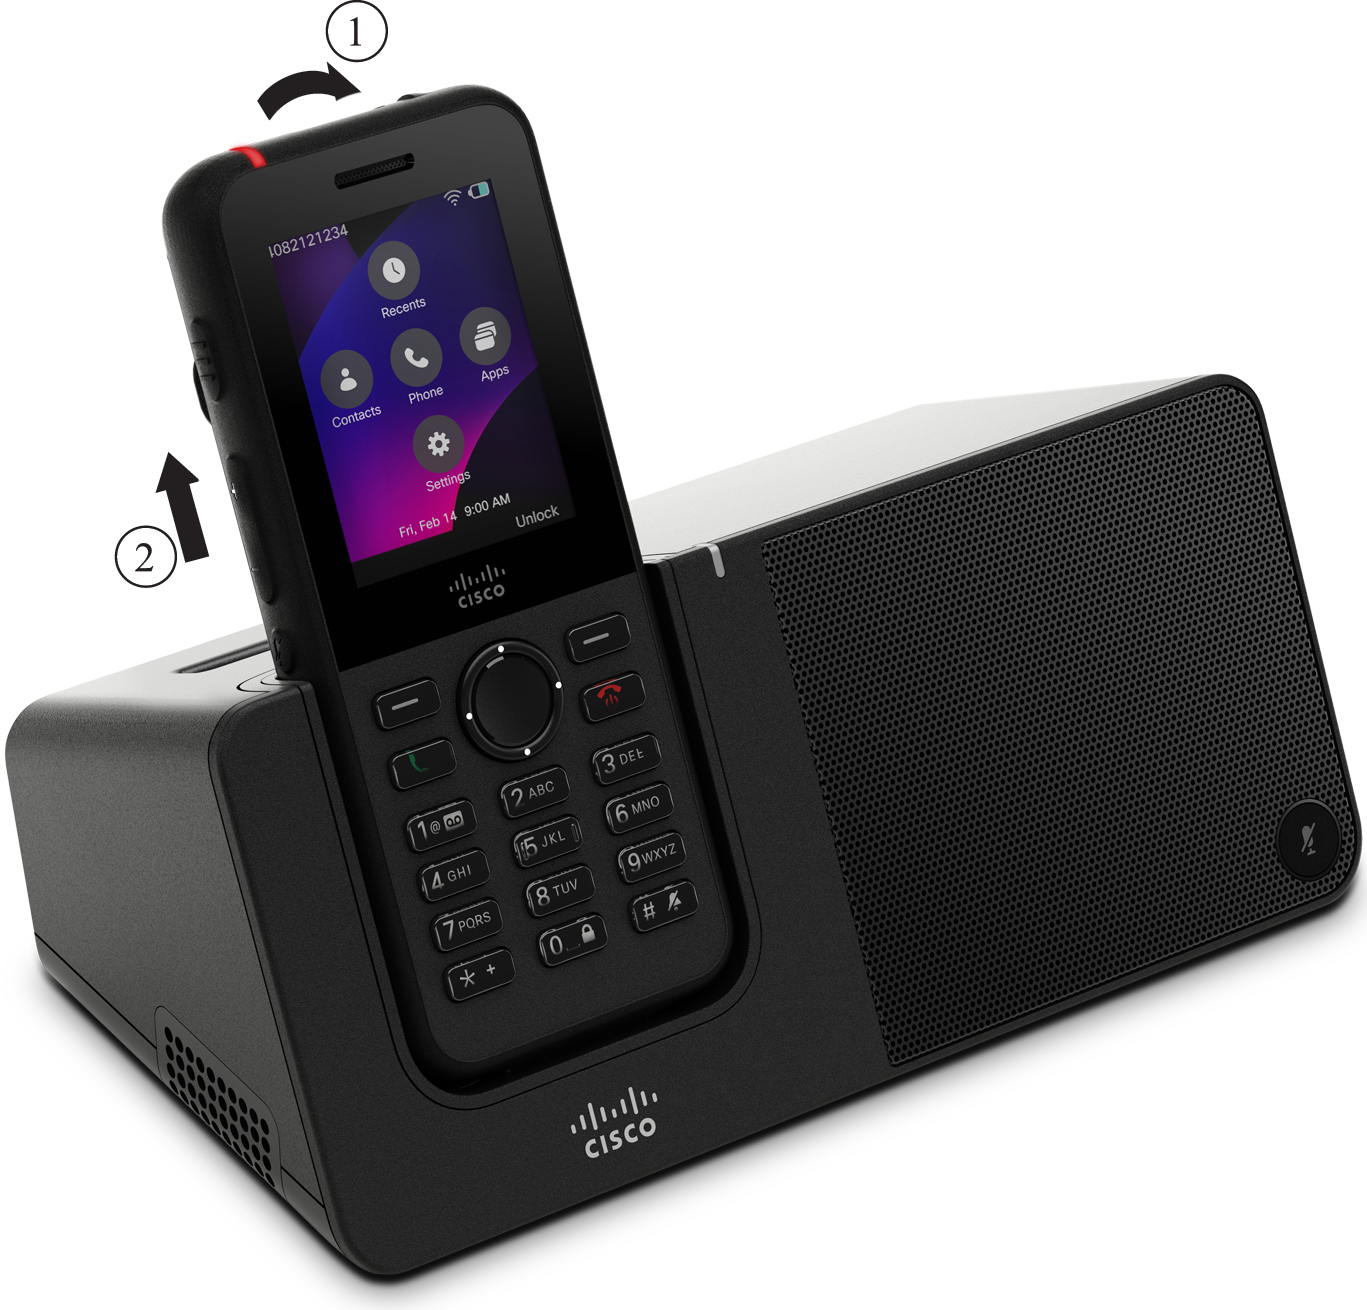
When you remove the phone from the charger, tilt the phone forward and lift it up to disconnect the connecter from the magnets.
|
| 4 |
(Optional) Slide the charging cup into the charger. Make sure that the cup is flush with the front and top of the charger.
|
Charge your spare battery with the desktop charger
You can charge a spare battery in the desktop charger. The battery may take up to 3 hours to fully charge.
When the battery is charging, the spare battery LED on the charger lights red. When the battery is fully charged, the spare battery LED on the charger lights green.
For optimal performance, charge the Cisco Wireless Phone 9821 battery using the designated Cisco Wireless Phone 9821 Desktop Charger. Note that the Cisco Wireless IP Phone 8821-EX desktop charger do not support full charging of a spare Cisco Wireless Phone 9821 battery. To ensure the battery reaches a full charge when using 8821-EX chargers, install the battery into a Cisco Wireless Phone 9821 and place the device into the 8821-EX desktop charger.
| 1 |
Hold the battery so that the Cisco label faces you, and the arrows on the battery point down. |
| 2 |
Place the spare battery in the slot behind the phone cradle and press down firmly. |
Multicharger
The Cisco Wireless Phone 9821 Multi Charger allows for the simultaneous charging of six phones and six spare batteries. The charger is powered by an AC adapter and provides a 4.3 V charging output for the battery. You can place the multicharger on a work surface or mount it on a wall with the wall mount kit. You can also secure the multicharger with a standard laptop cable lock.
The following figure shows the multicharger. The phones are placed in the charging ports on the left and right, and the spare batteries are placed in the center.
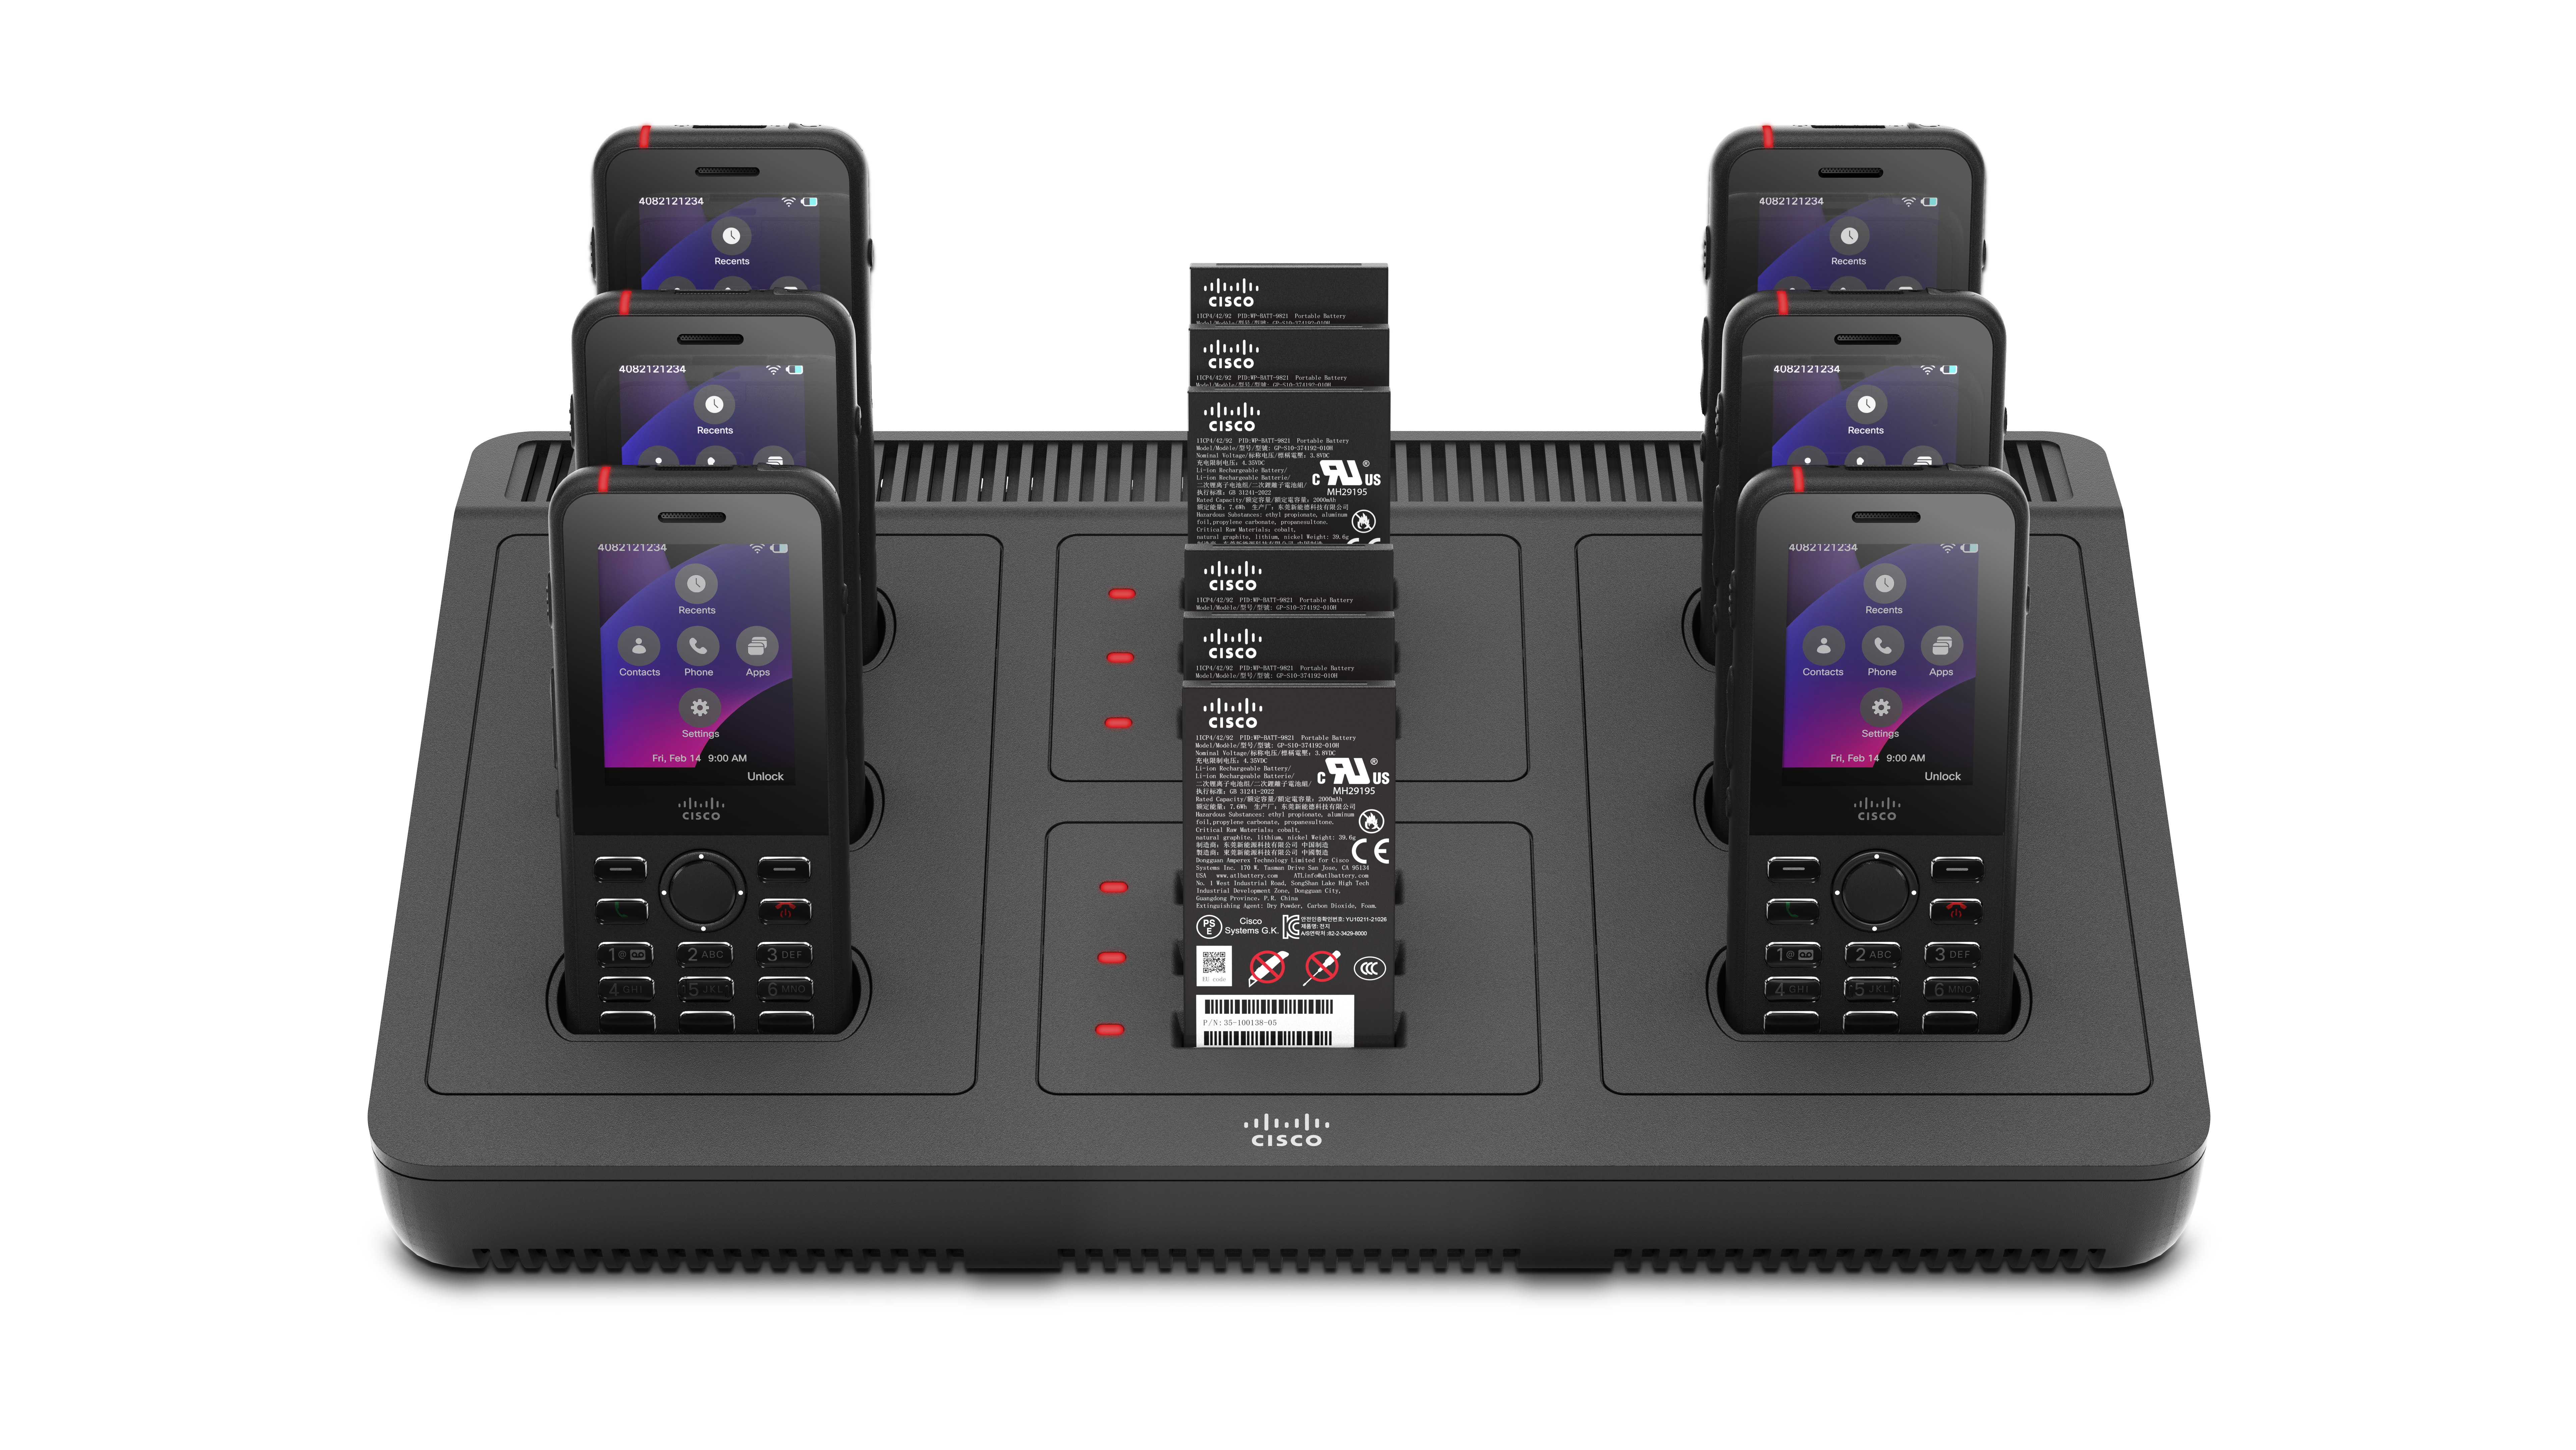
If your phone is in a protective case, you can charge it without removing the case.
Phone charging indicators
When the phone is placed in the desktop charger, the LED indicator on the top of the device displays the charging status:
-
Amber—The battery is charging.
-
Green—The battery is fully charged.
The phone screen provides additional feedback based on the device state:
- If the phone is powered on: A charging message appears on the screen.
- If the phone is powered off or the battery is critically low: A charging icon appears on the screen.
Spare battery charging indicators
You can charge up to six spare batteries with the additional charging ports between the phone charging ports. When you put a spare battery into the charger, the Battery LED (to the left of the battery) lights to show the charging status:
-
Red—The spare battery is charging.
-
Green—The spare battery is fully charged.
It may take several minutes for the LED to update to the fully charged state. If you move a fully charged battery to a different port, the LED may initially light red before transitioning to green as the charger verifies the battery status.
Set up the multicharger
The power jack is on the right side of the multicharger.
| 1 |
Plug the jack end of the power cord into the multicharger. |
| 2 |
Plug the other end of the power cord into the power adapter. |
| 3 |
Plug the power adapter into the electrical outlet. |
| 4 |
Place the multicharger on a stable work surface. |
Install the multicharger wall mount kit
The wall mount kit comes with the following components:
-
bracket
-
package with 5 screws and 5 self-tapping wall anchors
Before you begin
You need the following tools:
-
Drill and a 0.25 inch drill bit
-
Pencil
-
Level
-
Philips #1 and #2 screwdrivers
You need the power cable and power adapter.
| 1 |
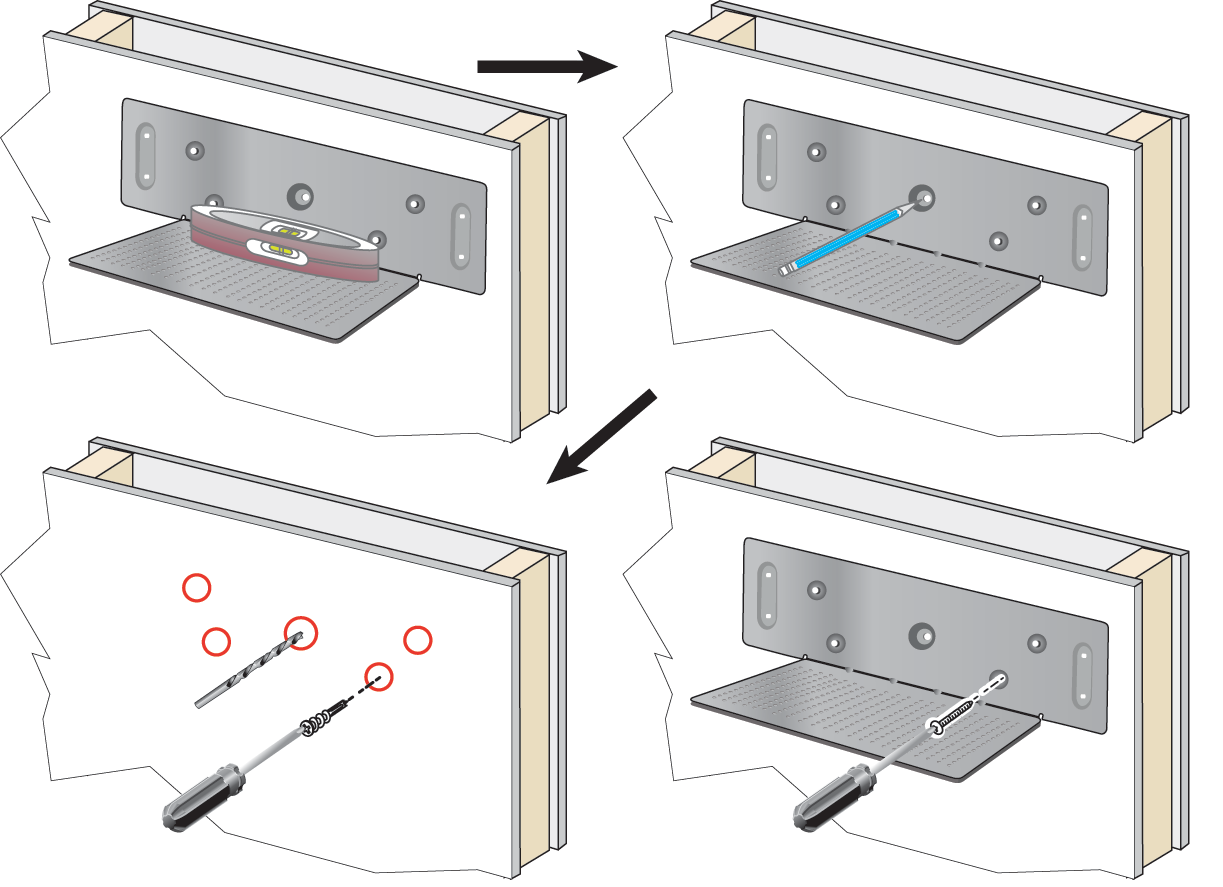
Determine the location for the bracket. The mounting location must be away from sinks, water lines, and areas with high humidity or potential splashes. The bottom right corner of the bracket must be less than 50 inches (127 cm) from an electrical outlet.
|
| 2 |
Mount the wall bracket.
|
| 3 |
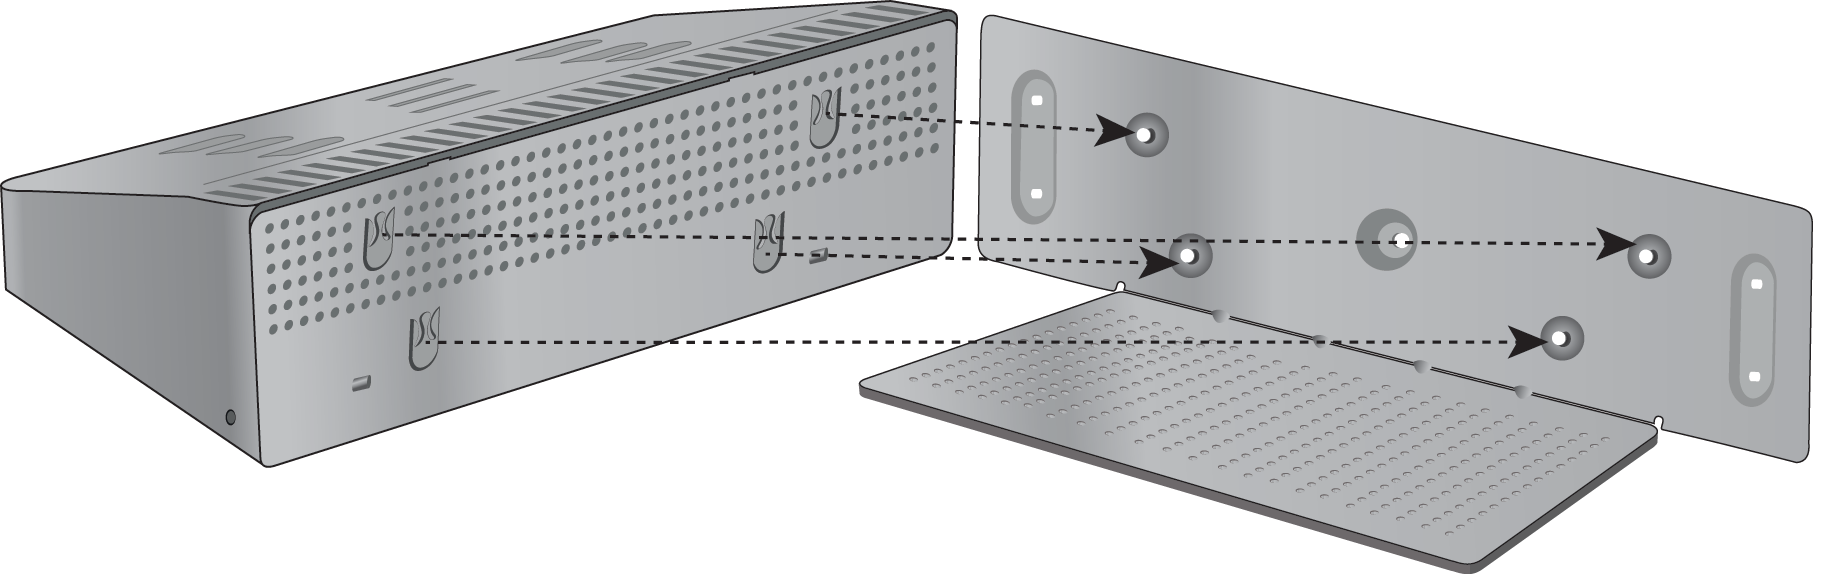
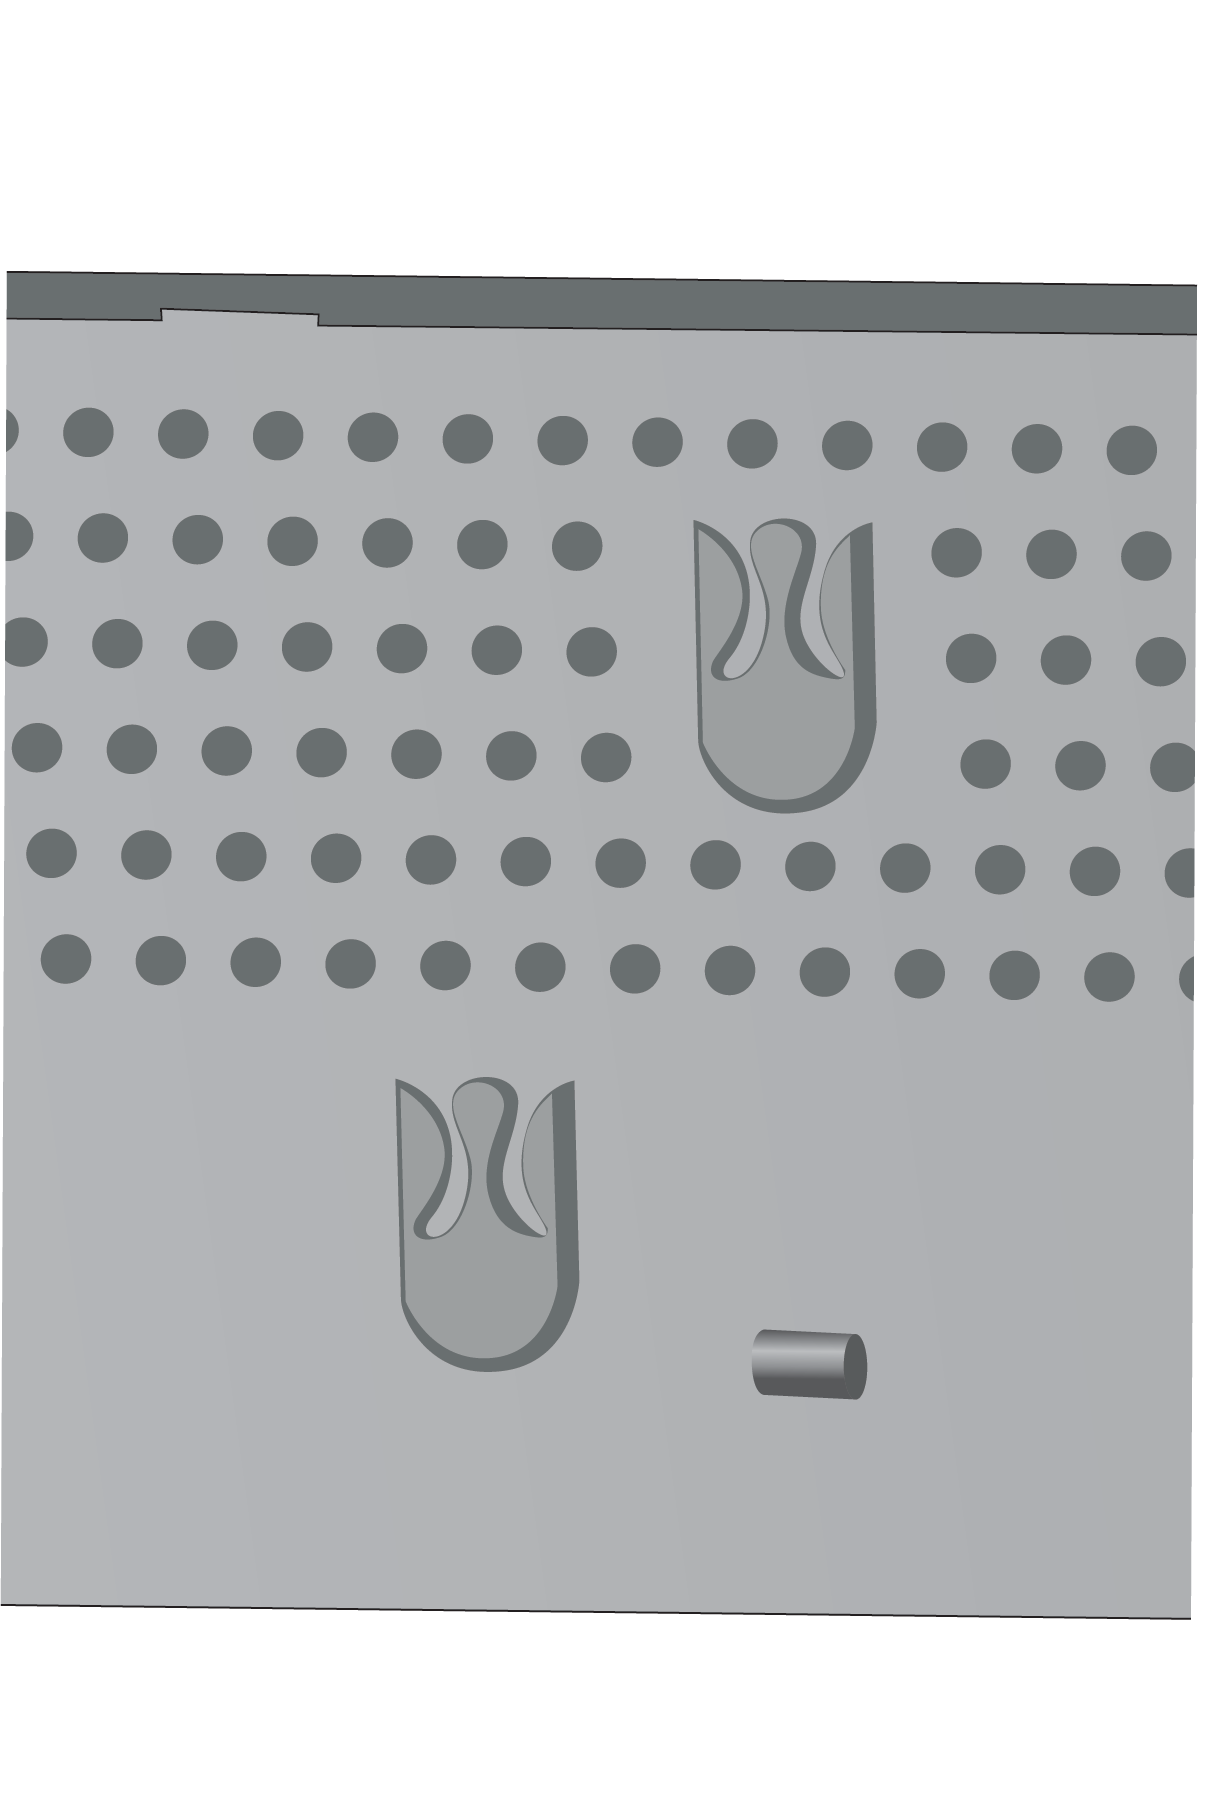
Locate the post holders in the multicharger. |
| 4 |
Hold the multicharger so that the post holders are in front of the posts on the bracket, press the multicharger towards the wall, and then push the multicharger down so that the posts seat into the holder.
Here is a close-up of the post holder.
|
| 5 |
Plug the jack end of the power cord into the multicharger. |
| 6 |
Plug the other end of the power cord into the power adapter. |
| 7 |
Plug the power adapter into the electrical outlet. |
Charge your phone with the multicharger
When your phone is charging in the multicharger, the phone LED lights amber. When the battery is fully charged, the LED turns green. Your phone can take up to 3 hours to recharge.
If your phone has a protective case, you don't need to remove the case before you charge the phone in the multicharger. You adapt the multicharger to fit the phone.
When you put a powered phone into the multicharger, make sure that you align the charging pins on the bottom of the phone with the connector in the multicharger. If the LED does not light, then the alignment is not correct.
When charging Cisco Wireless Phone 9821 after battery depletion or battery replacement, manually power on the phone by pressing
and holding Power/End Call until the keypad backlight lights. The phone does not display a
charging indicator until it is powered on.
To prevent potential damage or safety hazards, observe the following precautions:
- Hazardous Environments: Do not charge the phone in environments classified as hazardous.
- Moisture: Ensure the device is completely dry before connecting it to a power source. Do not attempt to charge the phone if it is wet.
| 1 |
(Optional) Adapt the charger for a phone in a case: Reach into the cup with three fingers, locate the slots on the inside of the cup, and use the slots to pull the cup out. 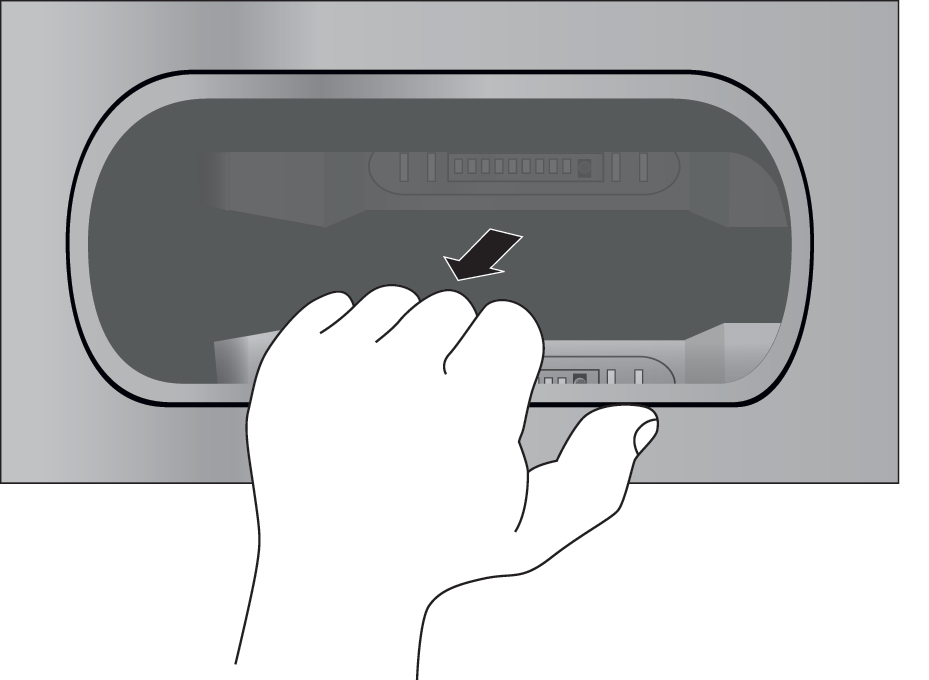
|
| 2 |
Place your phone in the empty charging slot. If your phone is in a case, press the phone into the charging slot to ensure that the phone connects with the contacts. Make sure that the LED on the phone lights amber. If the LED does not light up, remove the phone and reinsert it into the multicharger. |
| 3 |
(Optional) Slide the charging cup into the multicharger and press the cup into place so that the cup is flush with the top of the multicharger. |
Charge your spare battery with the multicharger
You can charge a spare battery in the multicharger. The battery may take up to 3 hours to fully charge.
When the battery is charging, the Battery LED beside the battery lights red. When the battery is fully charged, the Battery LED lights green.
For optimal performance, charge the Cisco Wireless Phone 9821 battery using the designated Cisco Wireless Phone 9821 Multi Charger. Note that the Cisco Wireless IP Phone 8821-EX multicharger charger do not support full charging of a spare Cisco Wireless Phone 9821 battery. To ensure the battery reaches a full charge when using 8821-EX chargers, install the battery into a Cisco Wireless Phone 9821 and place the device into the 8821-EX multicharger.
|
Place the battery in an empty spare battery slot, aligning the battery contacts with the charger connecter. If the Battery LED does not light red, remove the battery and reinsert it into the battery slot. |
Secure the charger with a cable lock
You can secure your desktop charger or multicharger with a laptop cable lock that is up to 20 mm wide.
| 1 |
Take the looped end of the cable lock and wrap it around the object to which you want to secure your phone. |
| 2 |
Pass the lock through the looped end of the cable. |
| 3 |
Unlock the cable lock. |
| 4 |
Press and hold the locking button to align the locking teeth. |
| 5 |
Insert the cable lock into the lock slot of your charger and release the locking button. |
| 6 |
Lock the cable lock. |
Carry cases
You can put your phone into a carry case to make it easy to carry your wireless phone and to provide some protection for the phone. When your phone is in the case, you don't have to remove the case to charge the phone.
We have the following cases available:
-
Cisco Wireless Phone 9821 Leather Case
-
Cisco Wireless Phone 9821 Holster Case
You can attach a Cisco Wireless Phone 9821 Silicon Clip to either case. The following picture shows the silicon clip on a leather case.
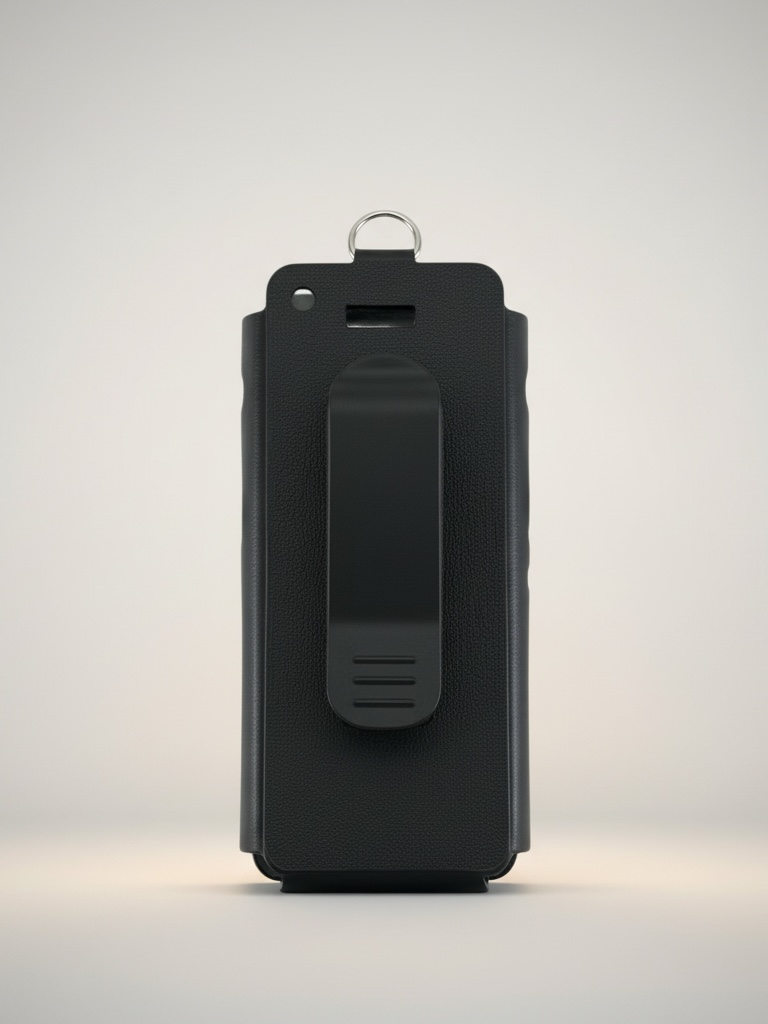
When you buy a case, we supply this clip and you can also order replacement clips.
Cisco does not endorse, support, or test third party cases or covers for the 9821 Wireless Phones. Using your Cisco Wireless Phone 9821 with third party cases or covers may void your warranty.
Cisco Wireless Phone 9821 leather case
You can slide the phone into the leather case to protect the phone and then attach the case to the belt clip or pocket clip. The button on the back of the case attaches to the clip. The following pictures show the front view and back view of the leather case.
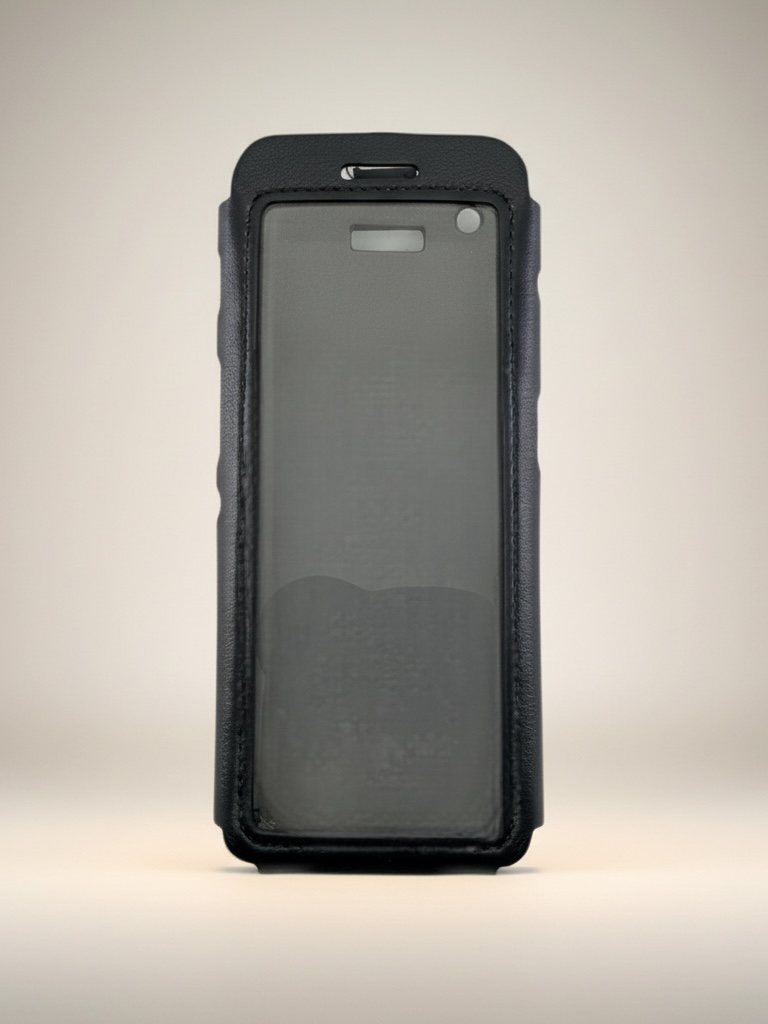
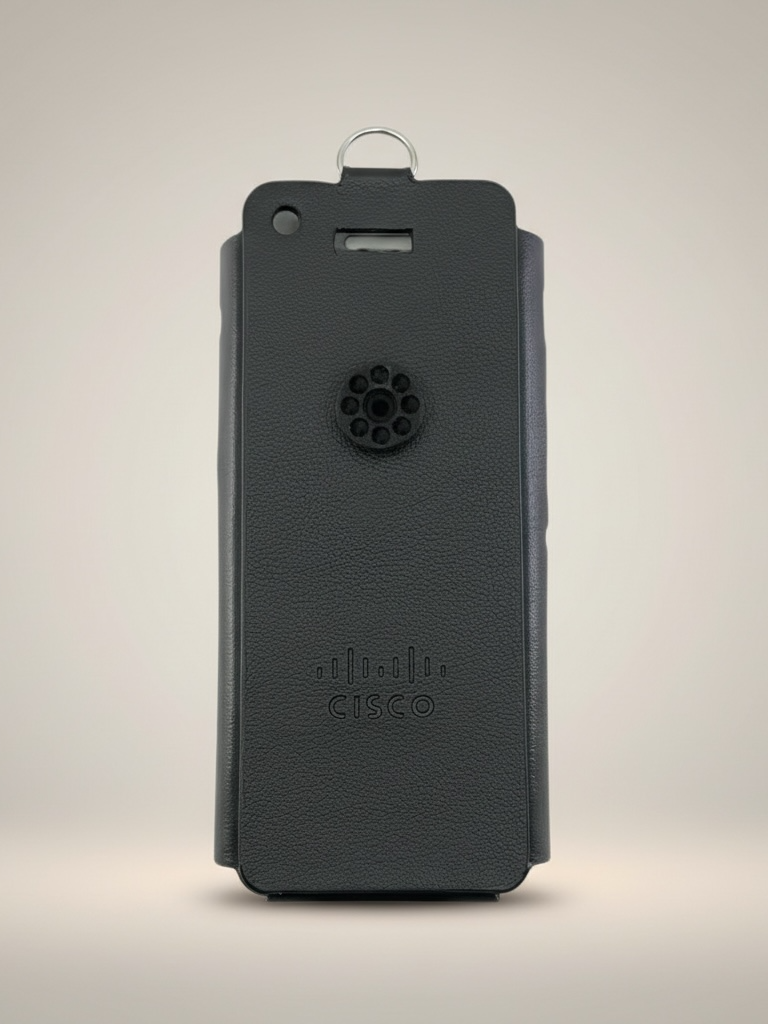
You can also clip a lanyard to the metal ring on the top of the leather case
When your phone is in the case, you don't have to remove the case to charge the phone.
Cisco Wireless Phone 9821 holster case
You can press the phone into the holster case to protect the phone and then attach the case to the belt clip or pocket clip. The button on the back of the case attaches to the case to the clip. The following pictures show the front view and back view of the holster case.
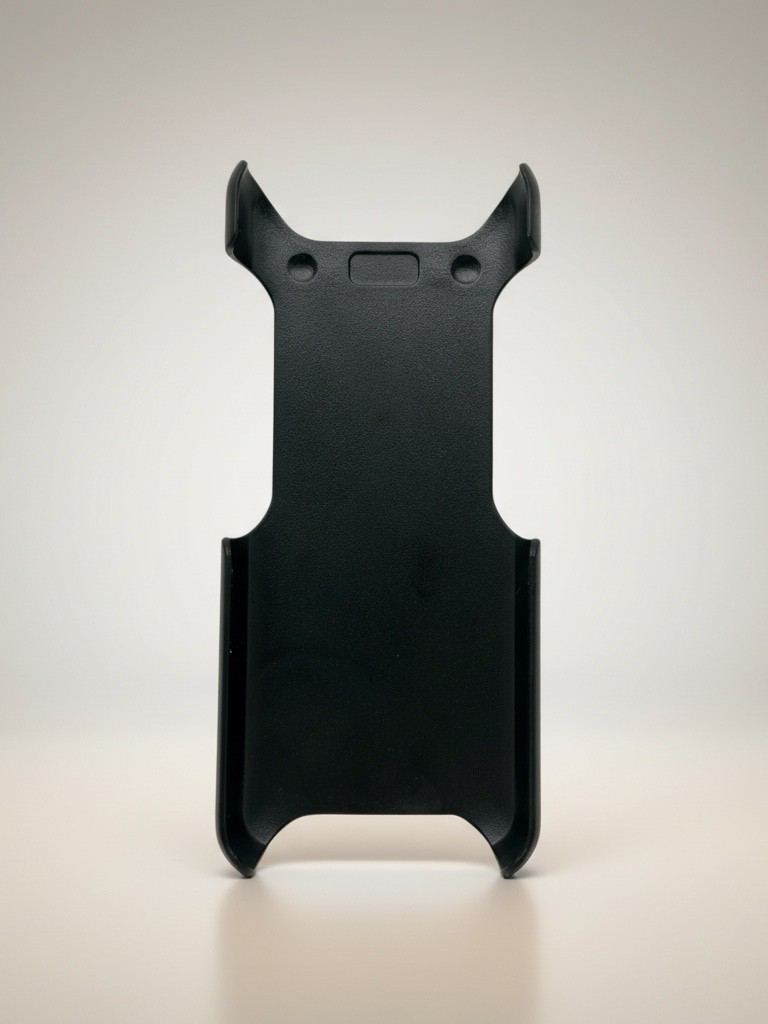
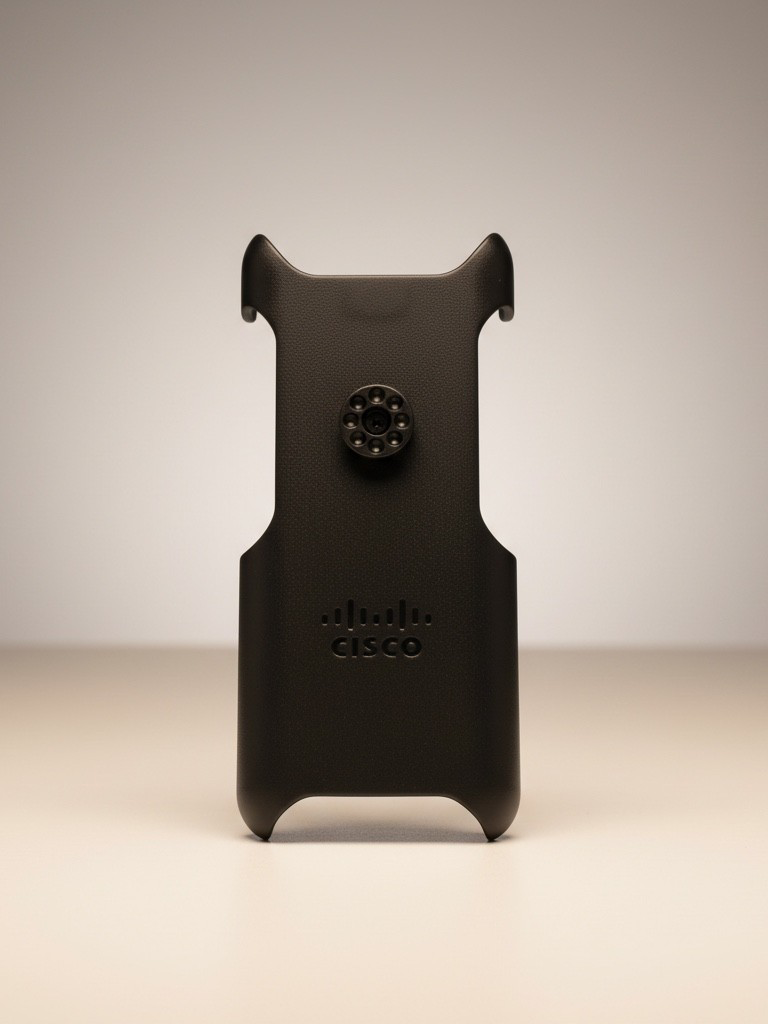
When your phone is in the case, you don't have to remove the case to charge the phone.
Silicone case
You can use the Cisco Wireless Phone 9821 Silicon Case to protect your wireless phone. The following pictures show the front view and back view of the silicon case.
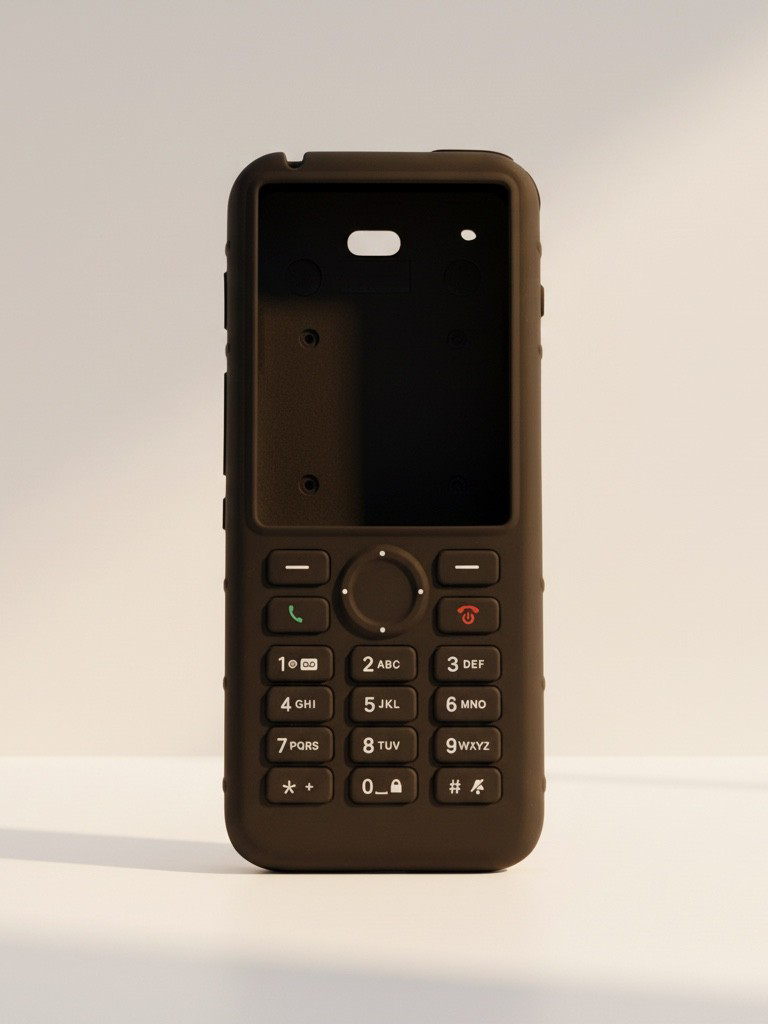
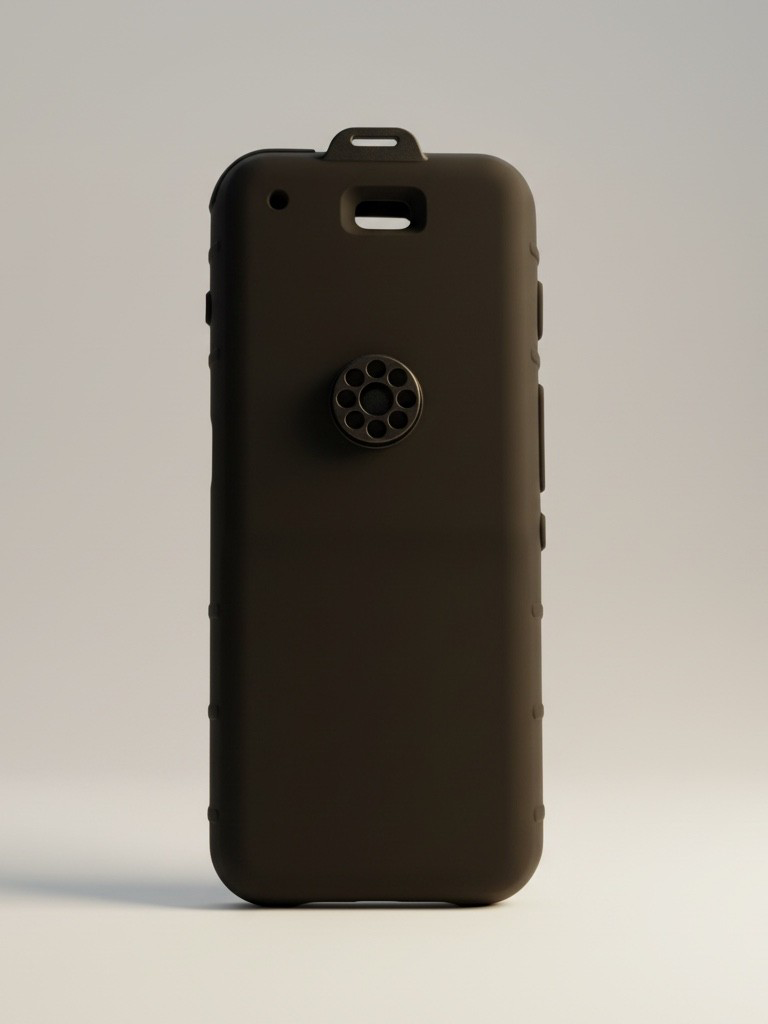
The case has these benefits:
-
Hypoallergenic
-
Antimicrobial
-
Resistant to wear from 15% alcohol, 75% alcohol, 2.5% hydrogen peroxide, mineral oil, soap, water, bleach, and dish soap.
Use the lowest-strength cleaning agent to prolong the life and look of the case.
-
Reduces damage when the phone is dropped
-
Covers more of the phone than the other cases.
The case comes with an optional belt clip that you can slide onto the case.
The case doesn't need to be removed to charge the battery in the desktop charger or multicharger. You remove the cup in the charger to place the phone and case into the charger.
Install the silicone case
You put the phone into the case through the screen opening in the case. If you need to remove the case, reverse the steps below.
| 1 |
Slide the bottom of the phone into the screen opening until the phone is completely in the case. 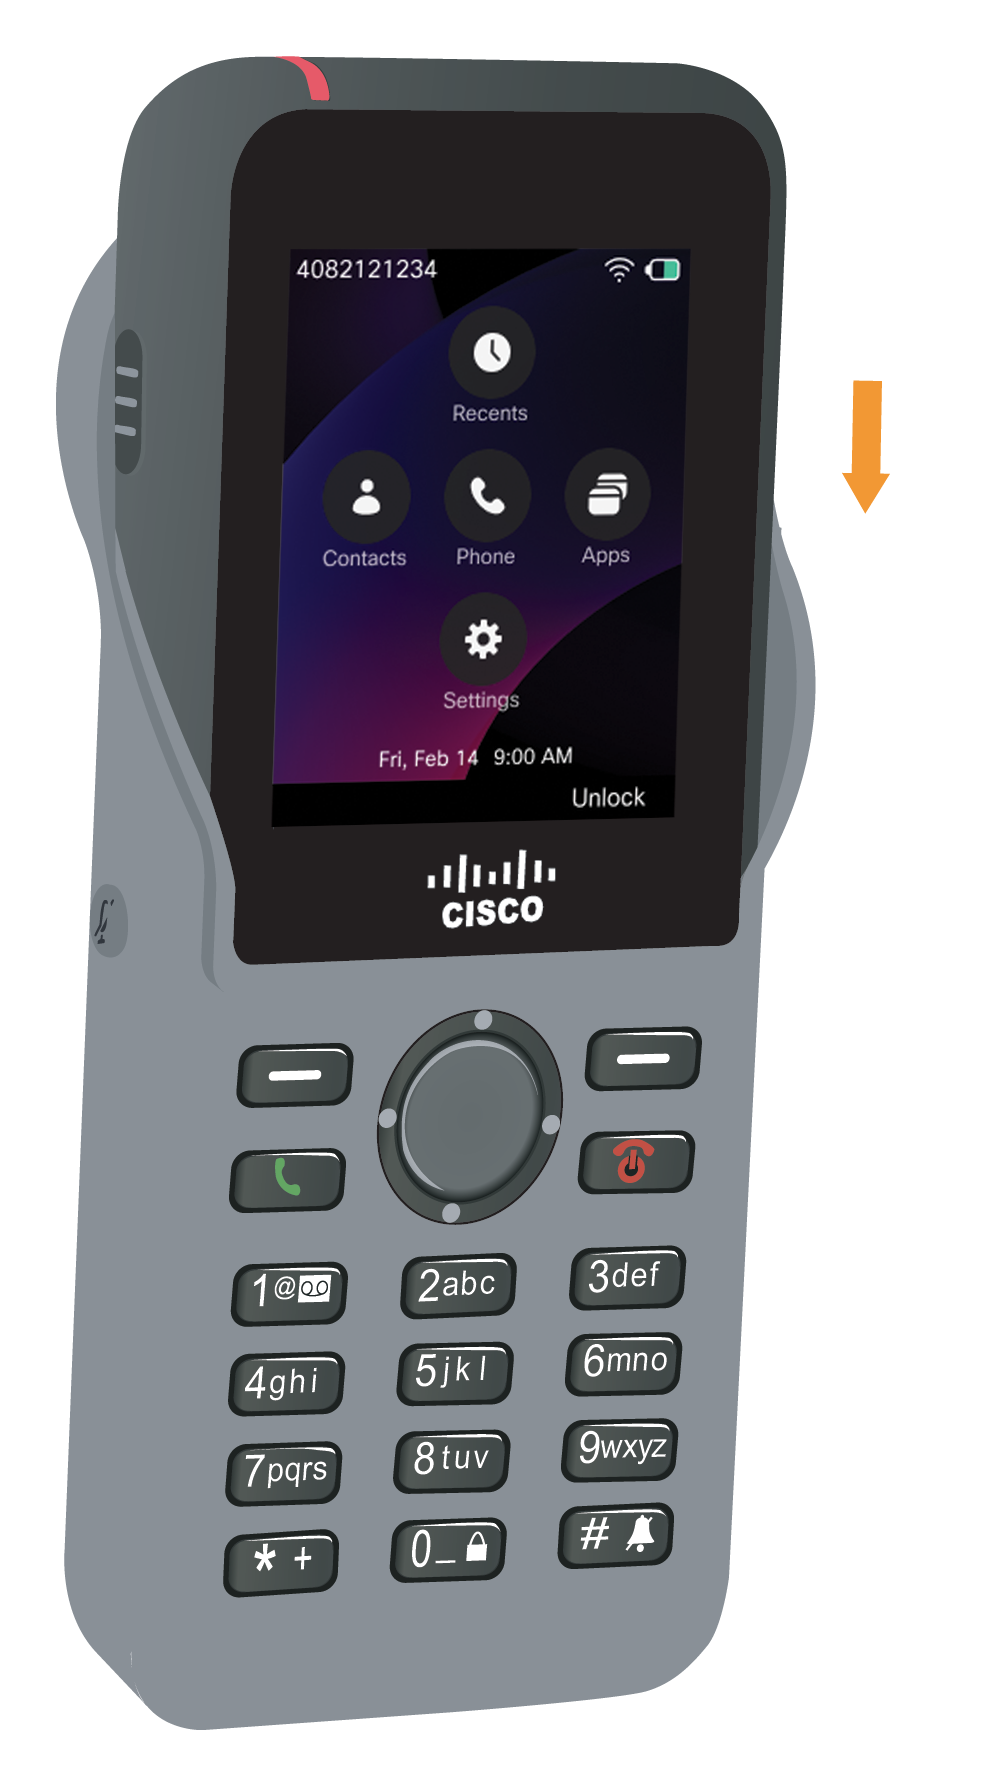
|
| 2 |
If the screen opening has rolled up, unroll it until it is flat. |
| 3 |
One corner at a time, slide the case corner up to cover the phone. 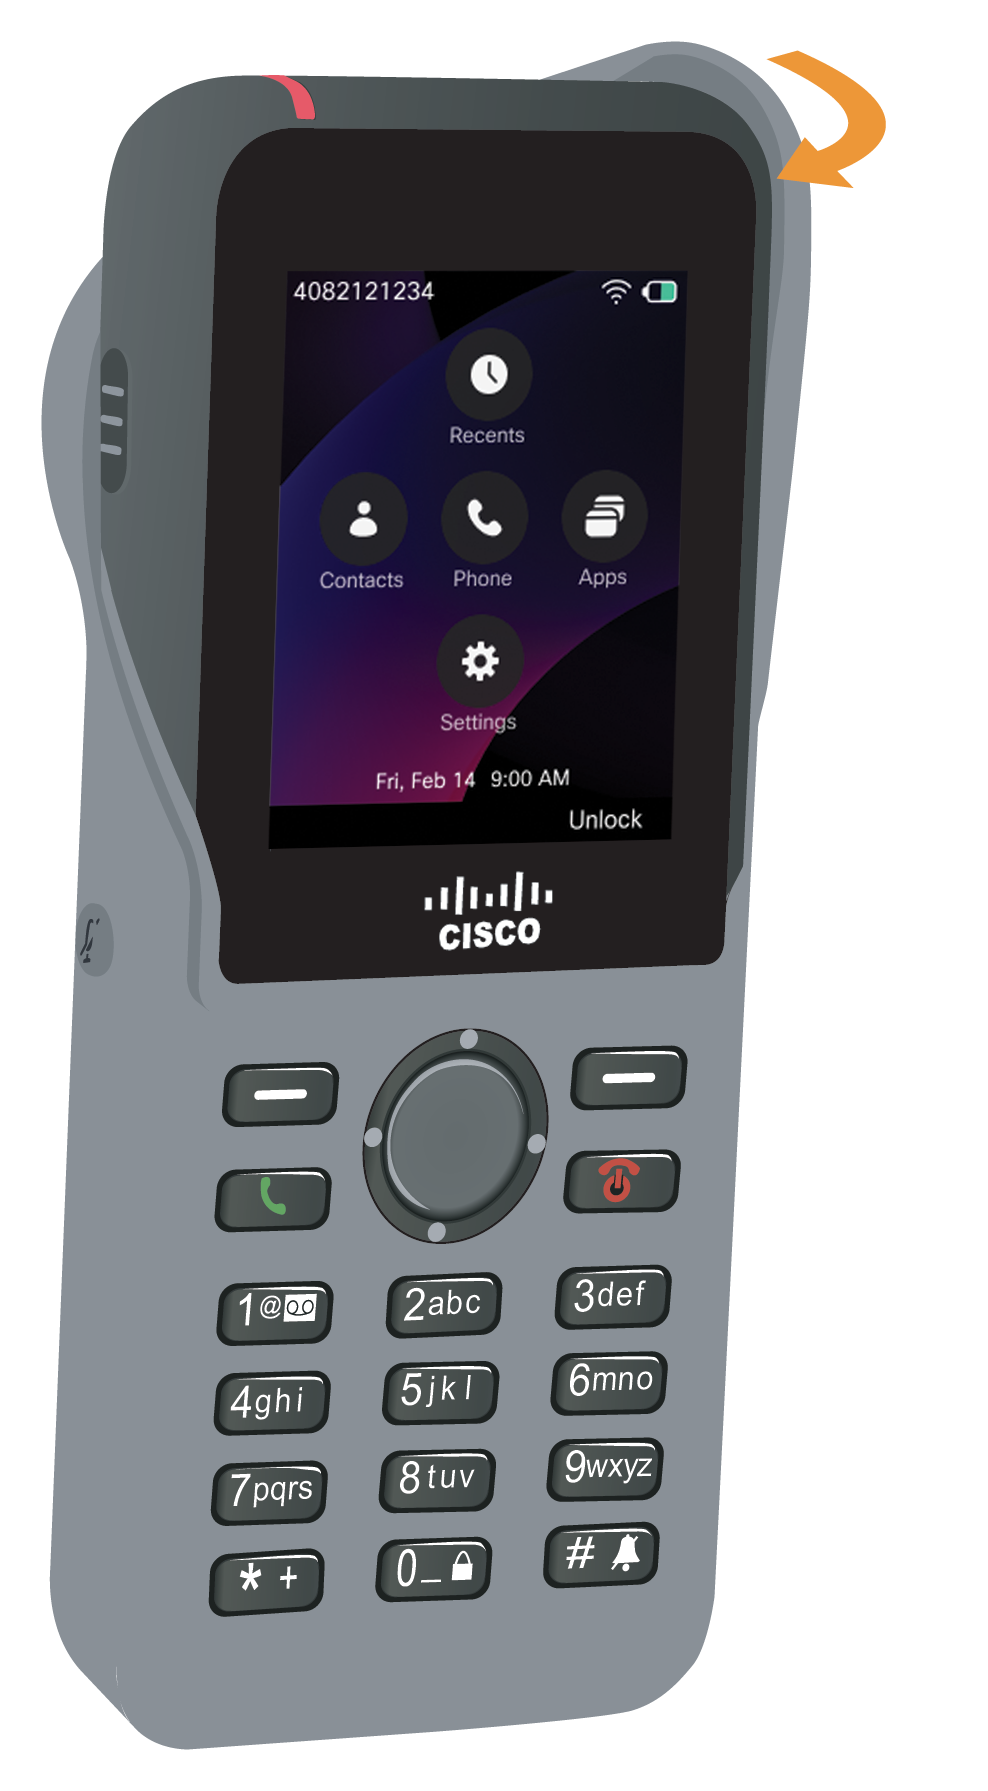
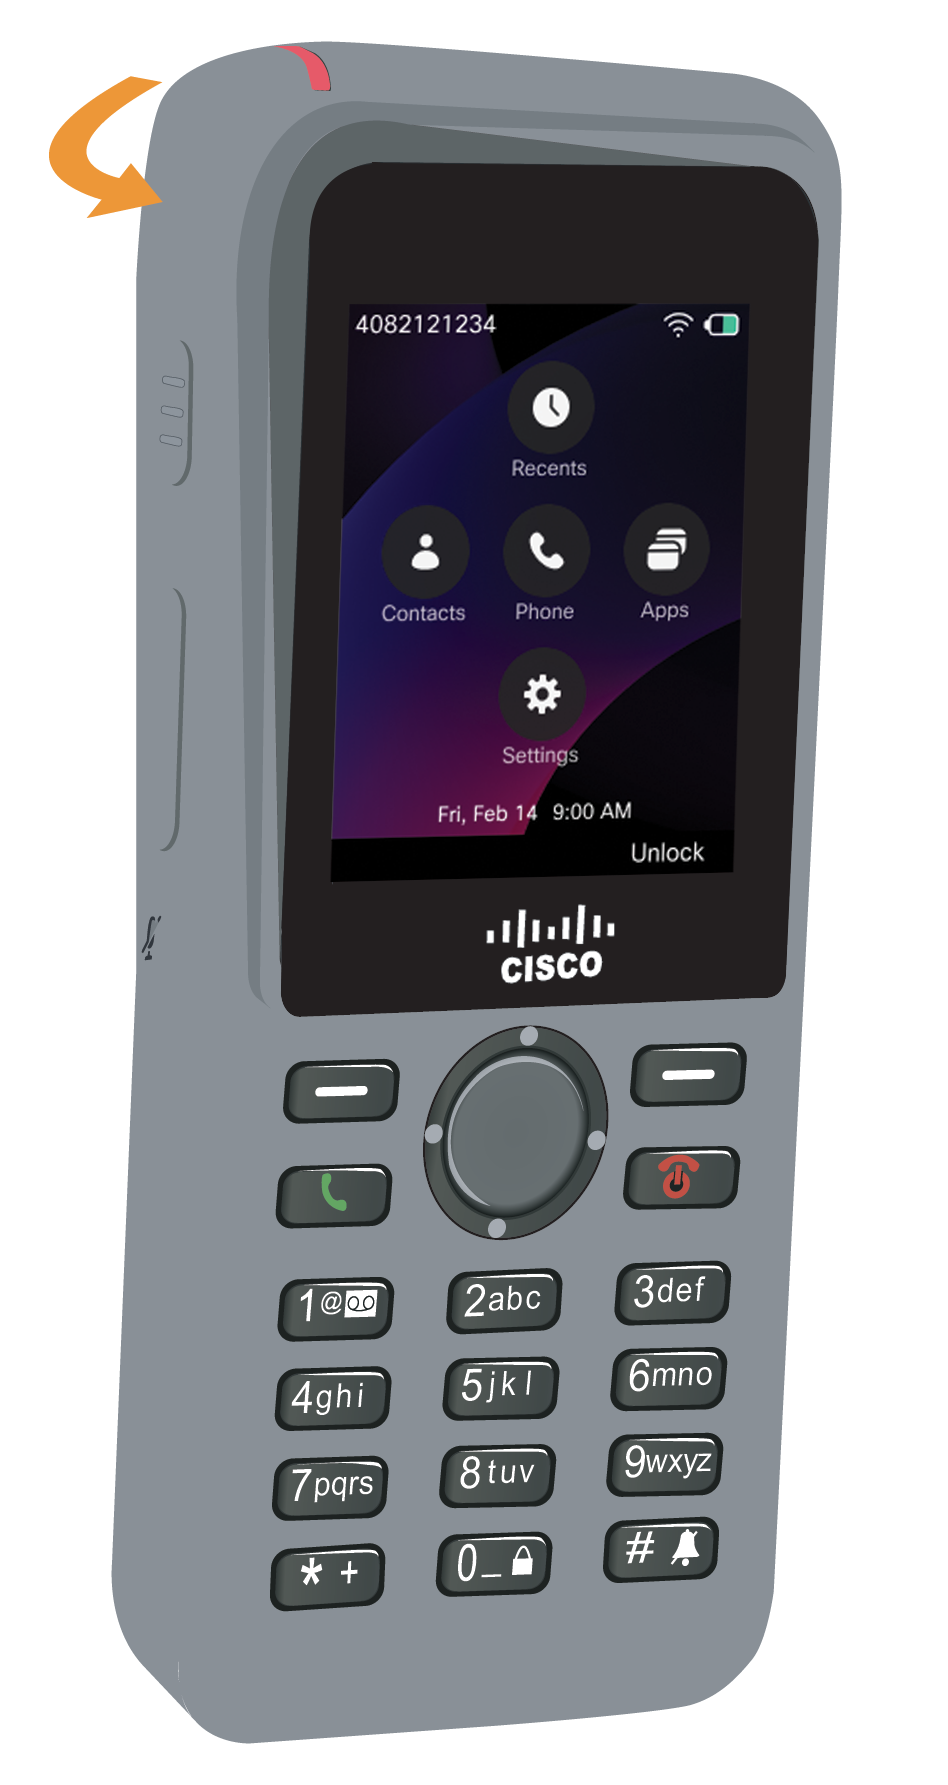
|
| 4 |
If the screen opening has rolled up, unroll it until it is flat. |
| 5 |
(Optional) If required, press the base of the belt clip in and slip the clip onto the post in the back of the case. 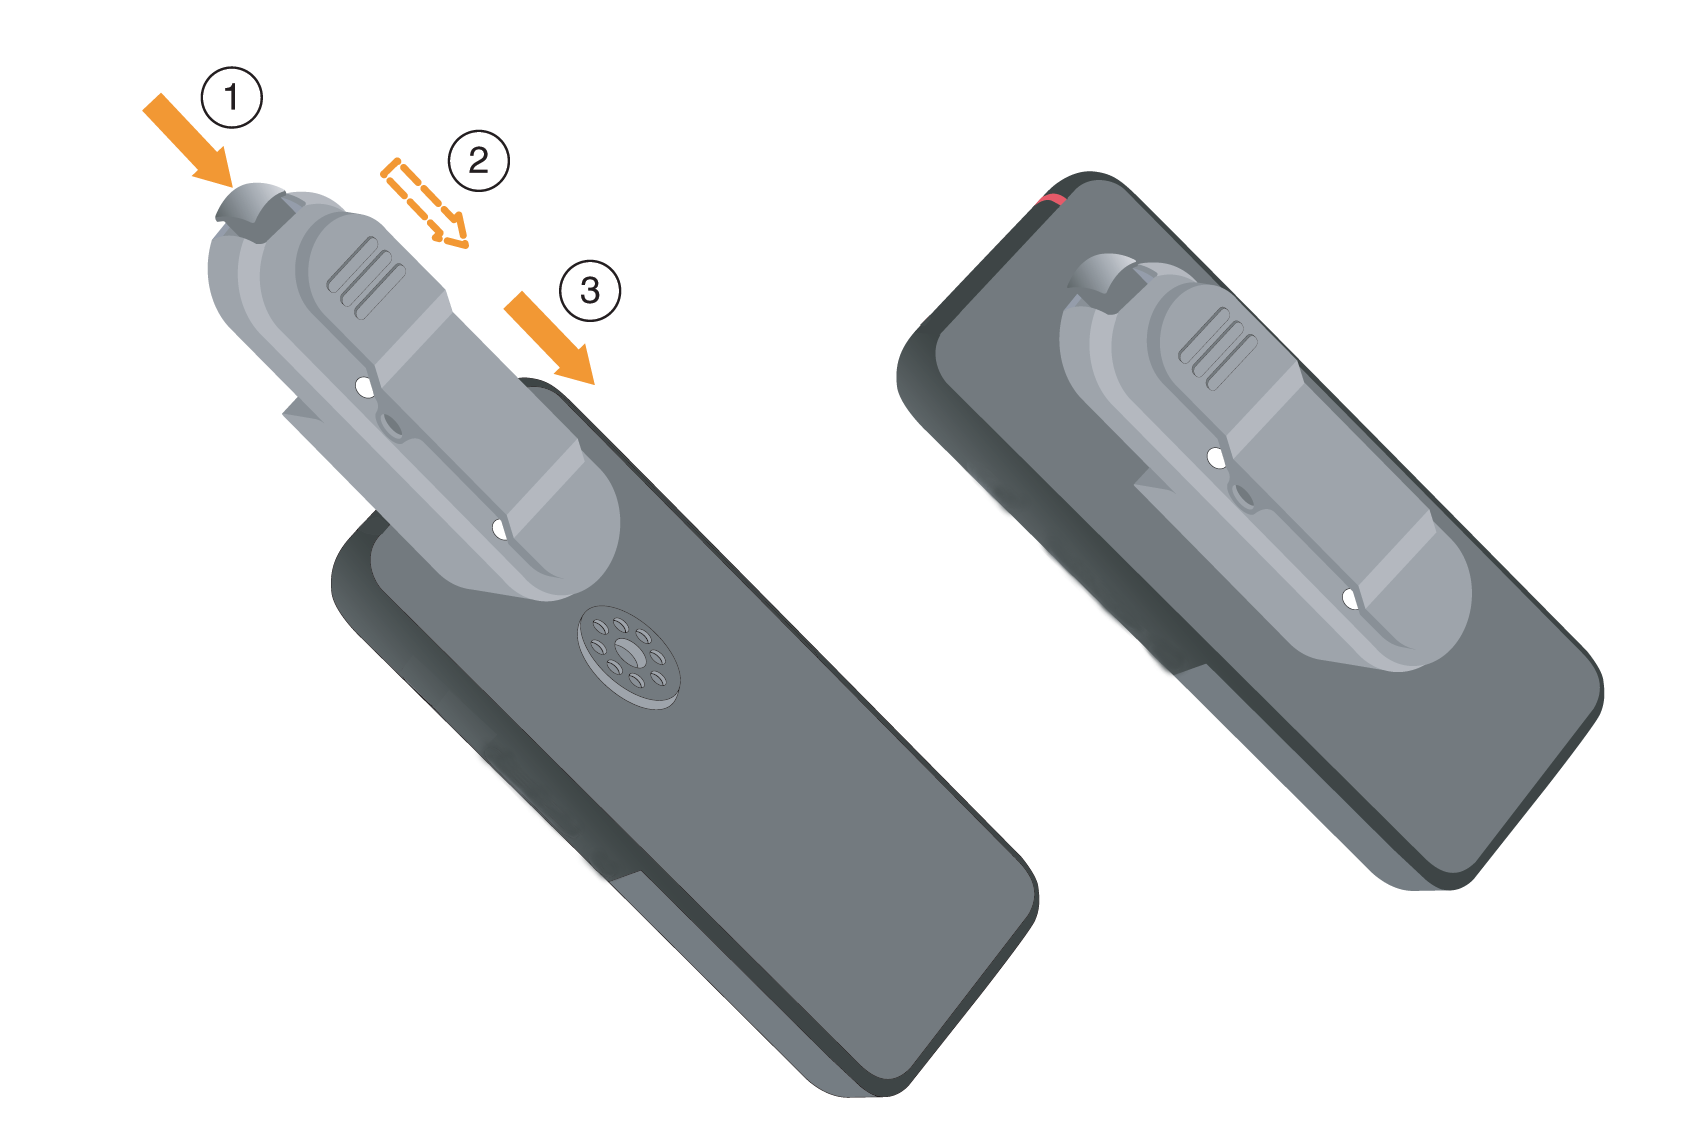
|
Clean the silicone case
| 1 |
Remove the silicone case. You reverse steps in Install the silicone case. |
| 2 |
Clean the case, |
| 3 |
Dry the case thoroughly. Don't put it back on the phone until it is completely dry. |
| 4 |
Put the case back on the phone. See Install the silicone case. |
Headsets
You can use wired and Bluetooth headsets with your phone. Although we perform some internal testing of third-party wired and Bluetooth wireless headsets for use with Cisco Wireless Phone 9821, we do not certify or support products from headset or handset vendors. Because of the inherent environmental and hardware inconsistencies in the locations where phones are deployed, there is not a single best solution that is optimal for all environments. We recommend that customers test the headsets that work best in their environment before deploying a large number of units in their network.
We recommend the use of good quality external devices, like headsets that are screened against unwanted radio frequency (RF) and audio frequency (AF) signals. Depending on the quality of these devices and their proximity to other devices such as cell phones and two-way radios, some audio noise may still occur.
For more information about the Cisco headsets that are compatible to Cisco Wireless Phone 9821, refer to the Cisco Headset Compatibility Guide.
Standard headsets
You can use a wired headset with your phone. The headset requires a 3.5 mm, 3-band, 4-connector plug.
If you plug a headset into the phone during an active call, the audio path automatically changes to the headset.
Bluetooth headsets
You can use a Bluetooth® headset with your phone. When you use a Bluetooth wireless headset, the headset usually increases battery power consumption on your phone and may result in reducing battery life.
For a Bluetooth wireless headset to work, it does not need to be within direct line-of-sight of the phone, but some barriers, such as walls or doors, and interference from other electronic devices, can affect the connection.
Headset tips
The control button on your headset can assist with switching audio paths, answering incoming calls, placing calls on hold, ending calls, and other functions. The specific behavior of the control button varies depending on the headset type and model, and therefore, detailed functionality is beyond the scope of this documentation.
Other accessories
Cisco Wireless Phone 9821 lanyard
You can attach the lanyard to the top of the wireless phone. The following graphic shows the lanyard.
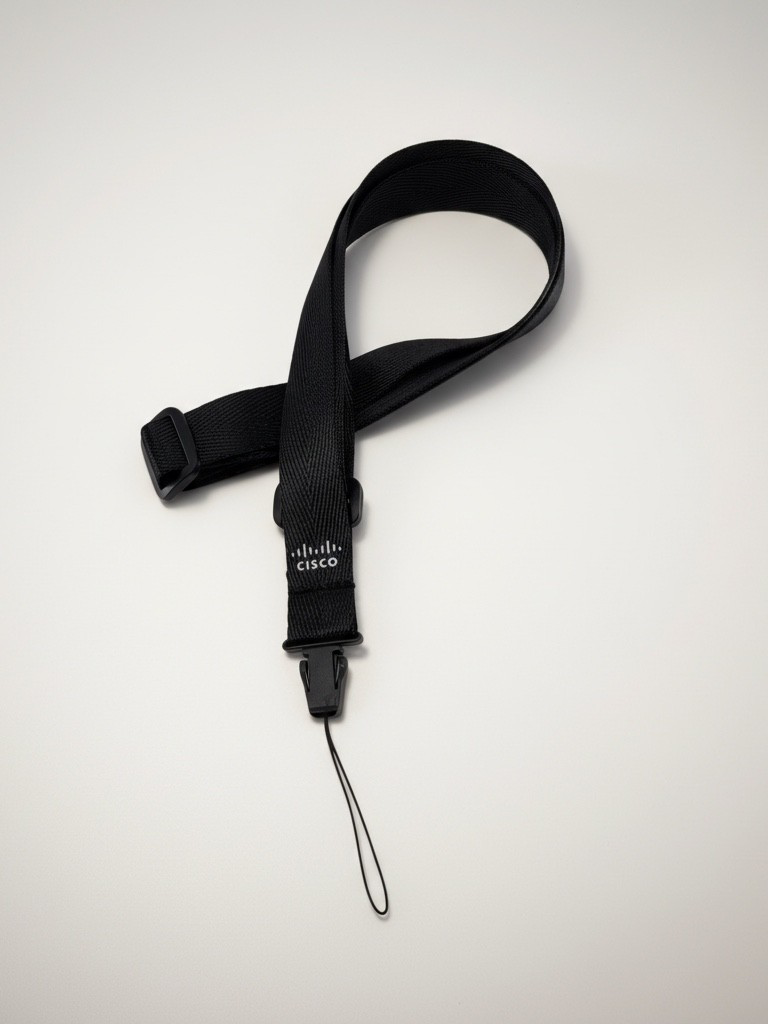
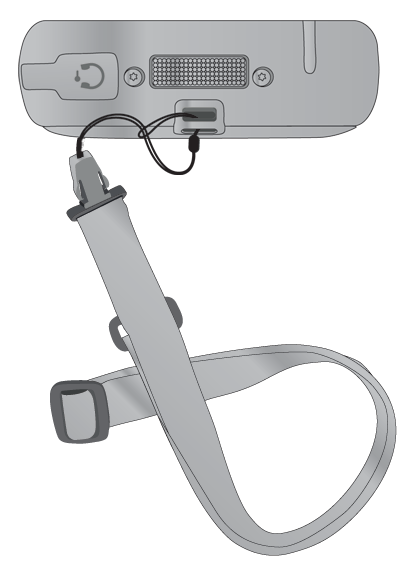
To install the lanyard, slip the loop of cord around the bar on the back of the phone and pass the lanyard through the loop.
Cisco Wireless Phone 9821 battery door
You can replace the battery door if the IP54 gasket on the door gets damaged. If the gasket is damaged, dirt and liquids can get into the battery compartment and cause damage to the phone. Failure to replace a damaged gasket voids the phone warranty.


