Preassign participants to breakout sessions
 Feedback?
This feature is supported on Webex Meetings and Webex Webinars. On Webex App, this feature is available on our Webex Suite meeting platform. Find out if your meetings use the Webex Suite meeting platform.
If you use Webex Meetings or Webex Webinars on Linux, use our web app for breakout sessions.
You can preassign people to breakout sessions either by using your attendee or panelist list or by importing a CSV file:
-
If you use the attendee list for meetings or panelist list for webinars, you can assign people manually or automatically. You can assign attendees to webinars manually.
Any cohosts on your list don't get assigned automatically to breakout sessions.
-
If you import a CSV file, you can download a template, and then enter the names of the breakout sessions and the email addresses of the people that you want to preassign. These people get invited to the meeting.
You can assign, move, or remove participants during the meeting, if you need to make adjustments after the meeting has started.
Preassign invitees from your attendee list
| 1 |
Follow the steps to schedule a meeting. Make sure that you already added the attendees. In Webex App, follow the steps to schedule a meeting from the meetings calendar or schedule a meeting
from a space.
|
| 2 |
On the Schedule page, click . In Webex App, on the Schedule a meeting page, click .
|
| 3 |
Check Enable breakout sessions, then click Preassign breakout sessions. |
| 4 |
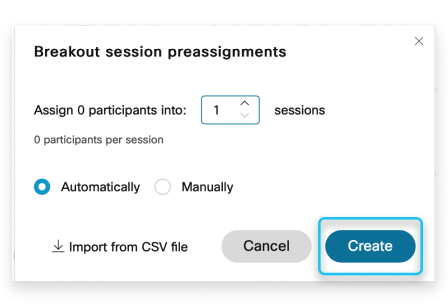
Select the number of breakout sessions that you want to create and how you want to assign your participants:
|
| 5 |
Click Next. By default, they're named Breakout session 1, Breakout session 2, and so on. To rename a breakout session, hover over the name, click , and then enter a new name. If you chose Assign participants automatically, the participants get assigned to breakout sessions evenly. If you chose Assign participants manually, drag the participant to the breakout session you want to add them to. Repeat this step until you assign all the participants. The number of attendees that you assigned to each breakout session shows in
parentheses next to the name of the breakout session.
|
| 6 |
(Optional) Click Settings to set additional conditions for breakout session participants. |
| 7 |
If you want to adjust the breakout sessions, you can move, exchange, or remove participants, or add sessions. |
| 8 |
When you finish preassigning participants, click Create, and then finish scheduling the meeting. |
Preassign people from a CSV file
Preassign attendees using a CSV file.
Before you begin
| 1 |
Follow the steps to schedule a meeting. You don't need to complete the Attendees or Panelists field in the scheduler. Everyone that you include in the CSV file gets invited to the meeting. |
| 2 |
On the Schedule page, click . |
| 3 |
Check Enable breakout sessions, then click Preassign breakout sessions. |
| 4 |
In the Breakout session preassignments window, click Import from CSV. It's OK to accept the default values for now. This information
gets overwritten when you import your CSV file. |
| 5 |
Download the CSV format template. 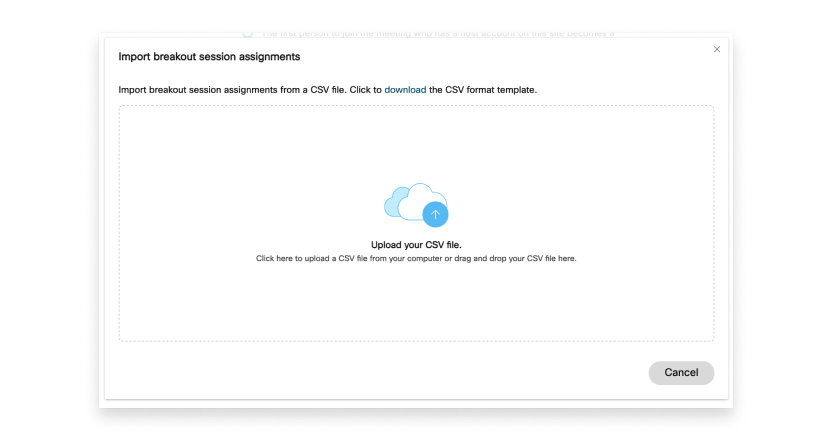 |
| 6 |
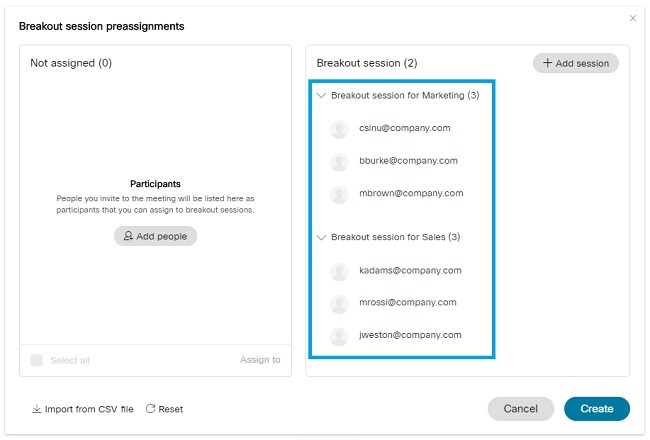
Populate the 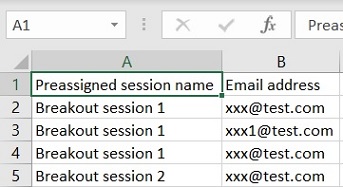 The breakout sessions get created and the people get preassigned.
 |
| 7 |
If you want to adjust the breakout sessions, you can move, exchange, or remove people, or add sessions. 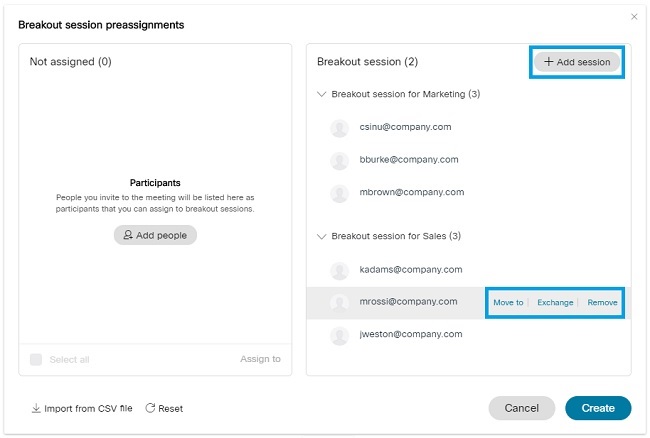 |
| 8 |
When you finish preassigning people, click Create, and then finish scheduling the meeting. To change the preassignments before the meeting starts, go to Meetings, select the meeting from the list, and click Preassign in the Breakout sessions section. |
What to do next
After the meeting starts:
-
Change breakout session settings. You can't change the settings after the sessions start.
-
When you're ready to start all breakout sessions, click Start breakout sessions.
Preassign invitees from your attendee list
| 1 |
Follow the steps to schedule a webinar. Make sure that you've already added the attendees. |
| 2 |
On the Schedule page, click Advanced options. |
| 3 |
Check the Enable breakout sessions check box, and then click Preassign breakout sessions. |
| 4 |
Select the number of breakout sessions that you want to create and how you want to assign your participants:
You can't automatically assign attendees to breakout sessions for webinars. You can add them manually. |
| 5 |
Click Create. By default, they're named Breakout session 1, Breakout session 2, and so on. To rename a breakout session, hover over the name, click , and then enter a new name. If you chose Automatically, the participants get assigned to breakout sessions evenly. If you chose Manually, select the participants to assign under Not assigned, click Assign to, and then select the breakout session or create a New breakout session. Repeat this step until you assign all the participants. The number of attendees that you assigned to each breakout session shows in
parentheses next to the name of the breakout session.
|
| 6 |
If you want to adjust the breakout sessions, you can move, exchange, or remove participants, or add sessions. |
| 7 |
When you finish preassigning participants, click Create, and then finish scheduling the webinar. |
What to do next
After the meeting has started:
-
Change breakout session settings. You can't change the settings after the sessions have started.
-
When you're ready to start all breakout sessions, click Start breakout sessions.
Preassign people from a CSV file
Preassign panelists and attendees using a CSV file.
Before you begin
| 1 |
Follow the steps to schedule a webinar. You don't need to complete the Attendees or Panelists field in the scheduler. Everyone that you include in the CSV file gets invited to the webinar. |
| 2 |
On the Schedule page, click Advanced options. |
| 3 |
Check Enable breakout sessions, then click Preassign breakout sessions. |
| 4 |
In the Breakout session preassignments window, click
Import from CSV file. It's OK to accept the default values for now. This information gets overwritten when
you import your CSV file. |
| 5 |
Download the CSV format template.  |
| 6 |
Populate the  The breakout sessions get created and the people get preassigned.
 |
| 7 |
If you want to adjust the breakout sessions, you can move, exchange, or remove people, or add sessions.  |
| 8 |
When you finish preassigning people, click Create, and then finish scheduling the webinar. To change the preassignments before the webinar starts, go to Meetings or Webinars, select the webinar from the list, and click Preassign in the Breakout sessions section. |
What to do next
After the webinar starts:
-
Change breakout session settings. You can't change the settings after the sessions start.
-
When you're ready to start all breakout sessions, click Start breakout sessions.


