
Grazie per il feedback.
Webex LTI per gli insegnanti
 Feedback?
Imposta
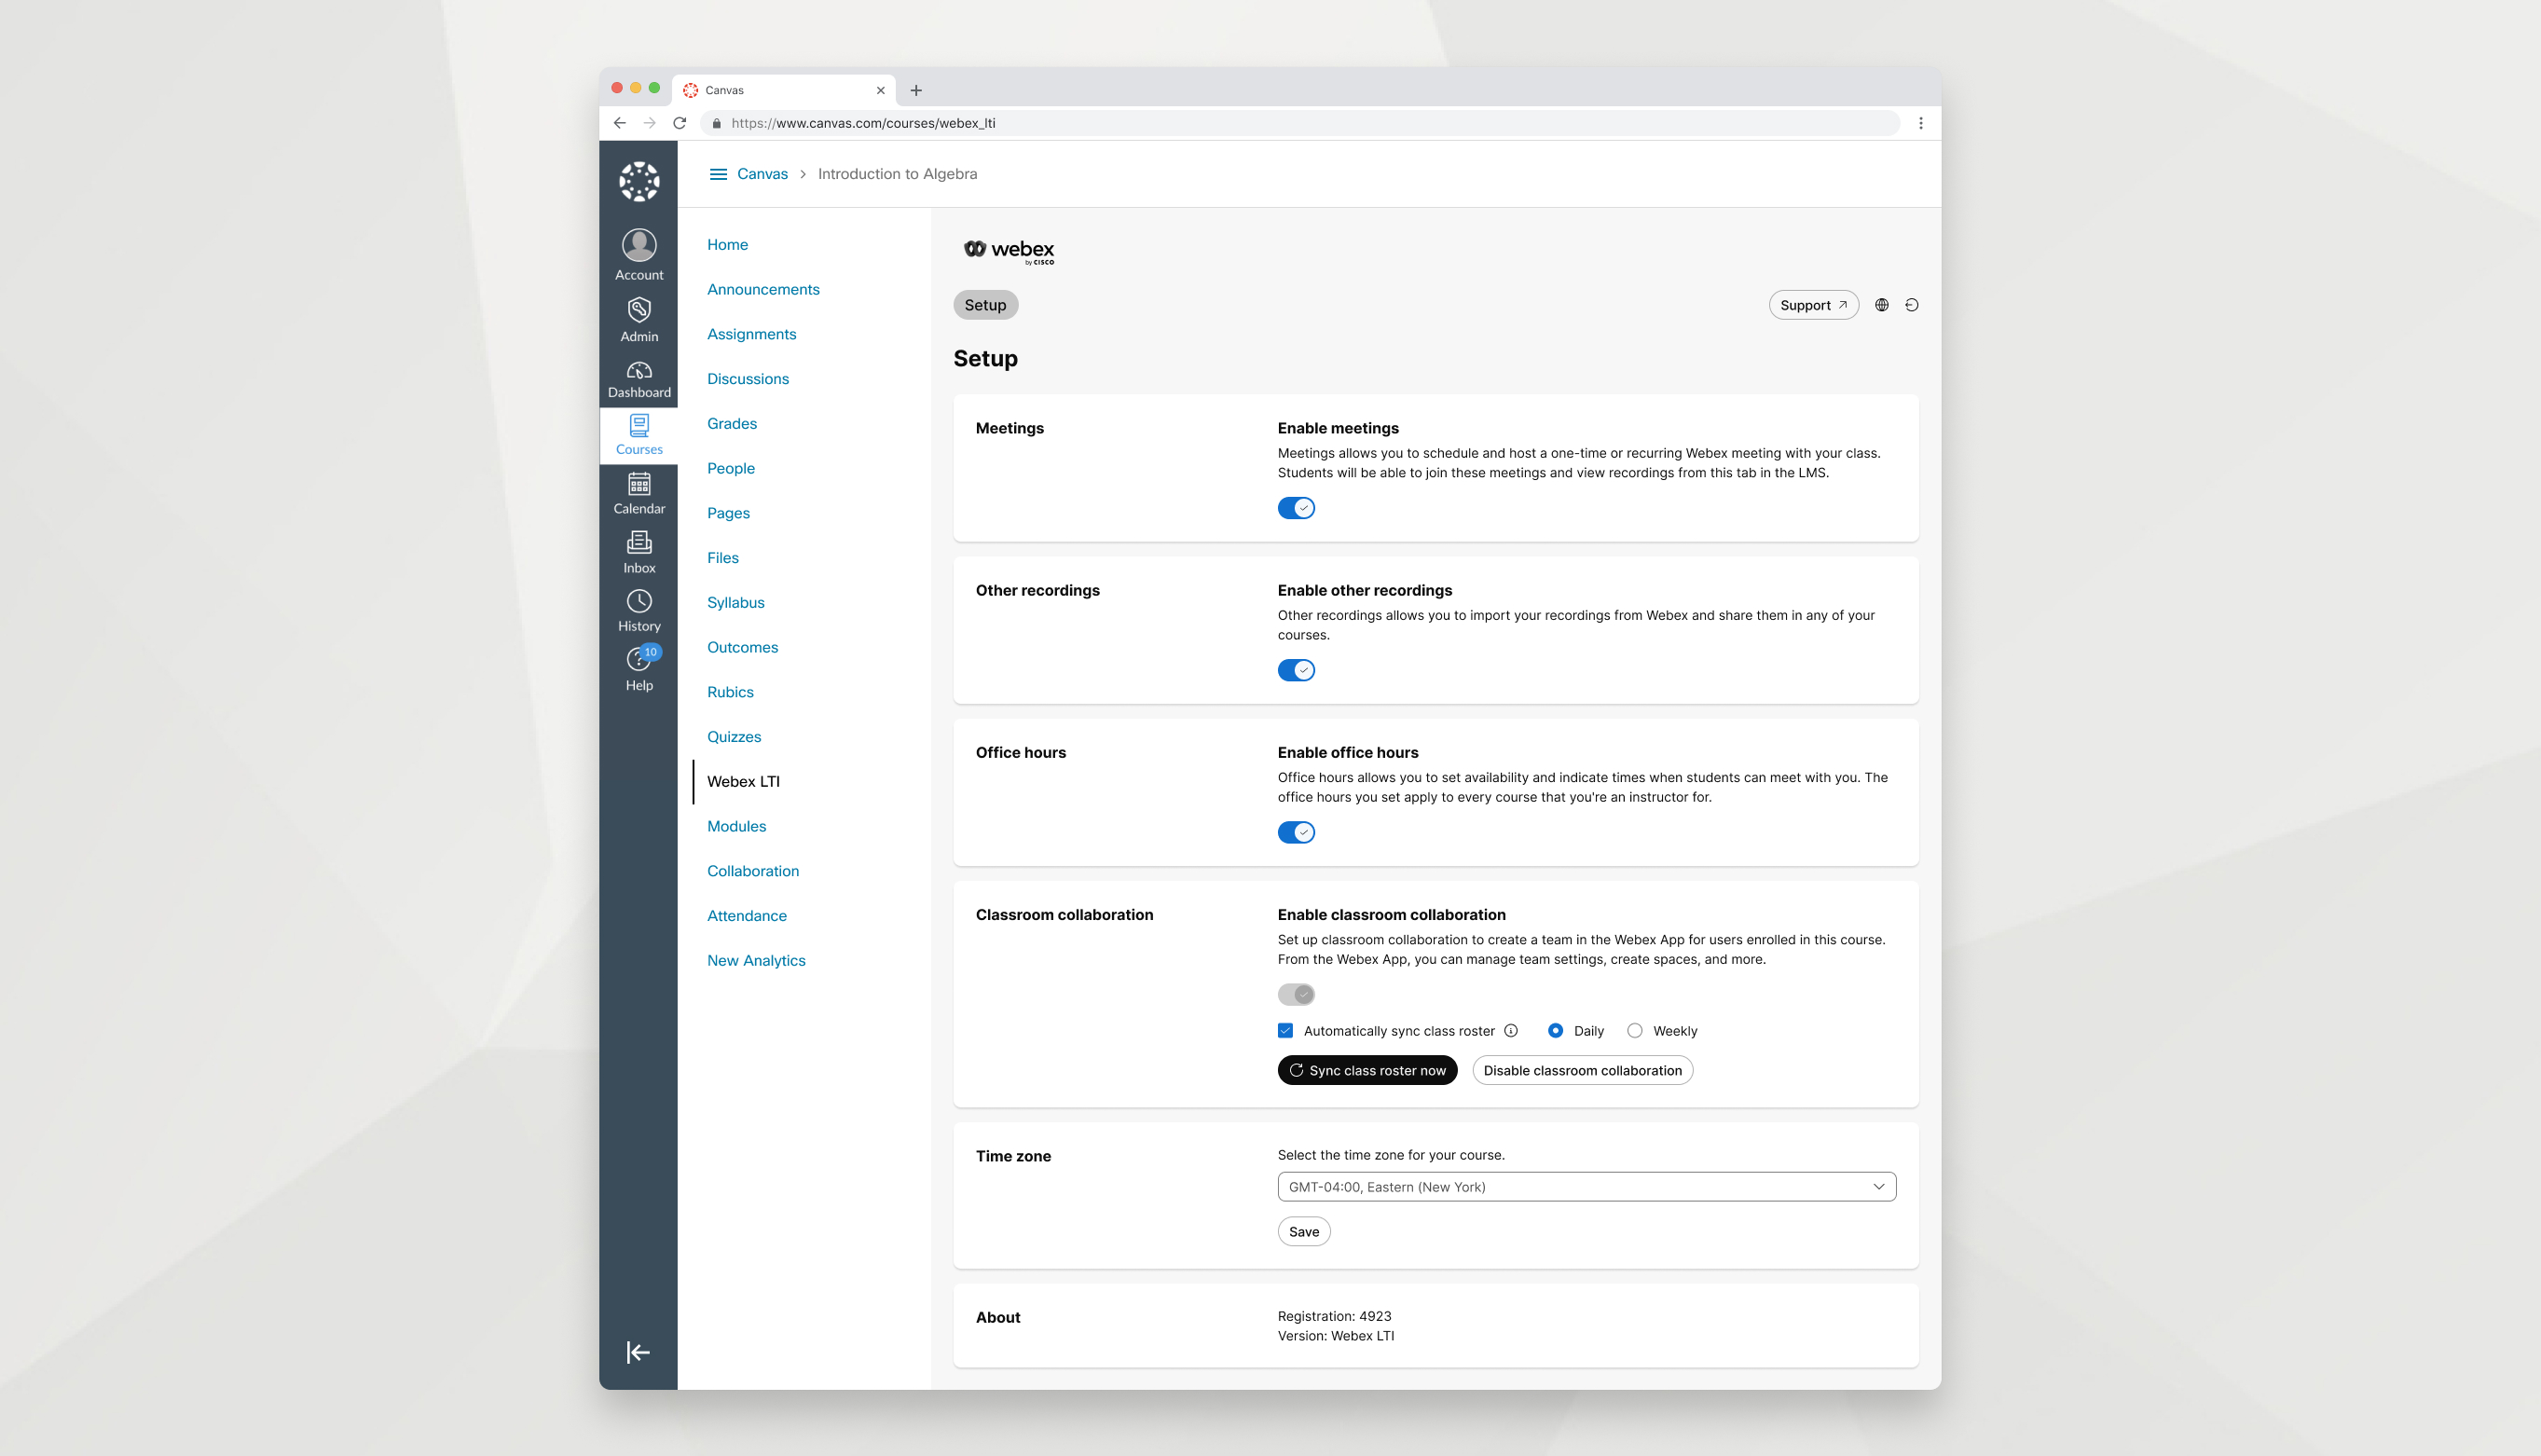
Personalizza le preferenze delle funzionalità per il tuo corso.
| 1 |
Apri Webex LTI nel tuo LMS e vai alla scheda Impostazioni. |
| 2 |
Scegli le funzionalità che vuoi abilitare nella tua classe.
Ogni funzionalità abilitata viene visualizzata come una scheda a sé stante. Se non vedi una delle opzioni nella scheda Configurazione, l'amministratore della tua scuola non l'ha abilitata. |
| 3 |
Seleziona il tuo fuso orario e clicca su Salva. |
Riunioni
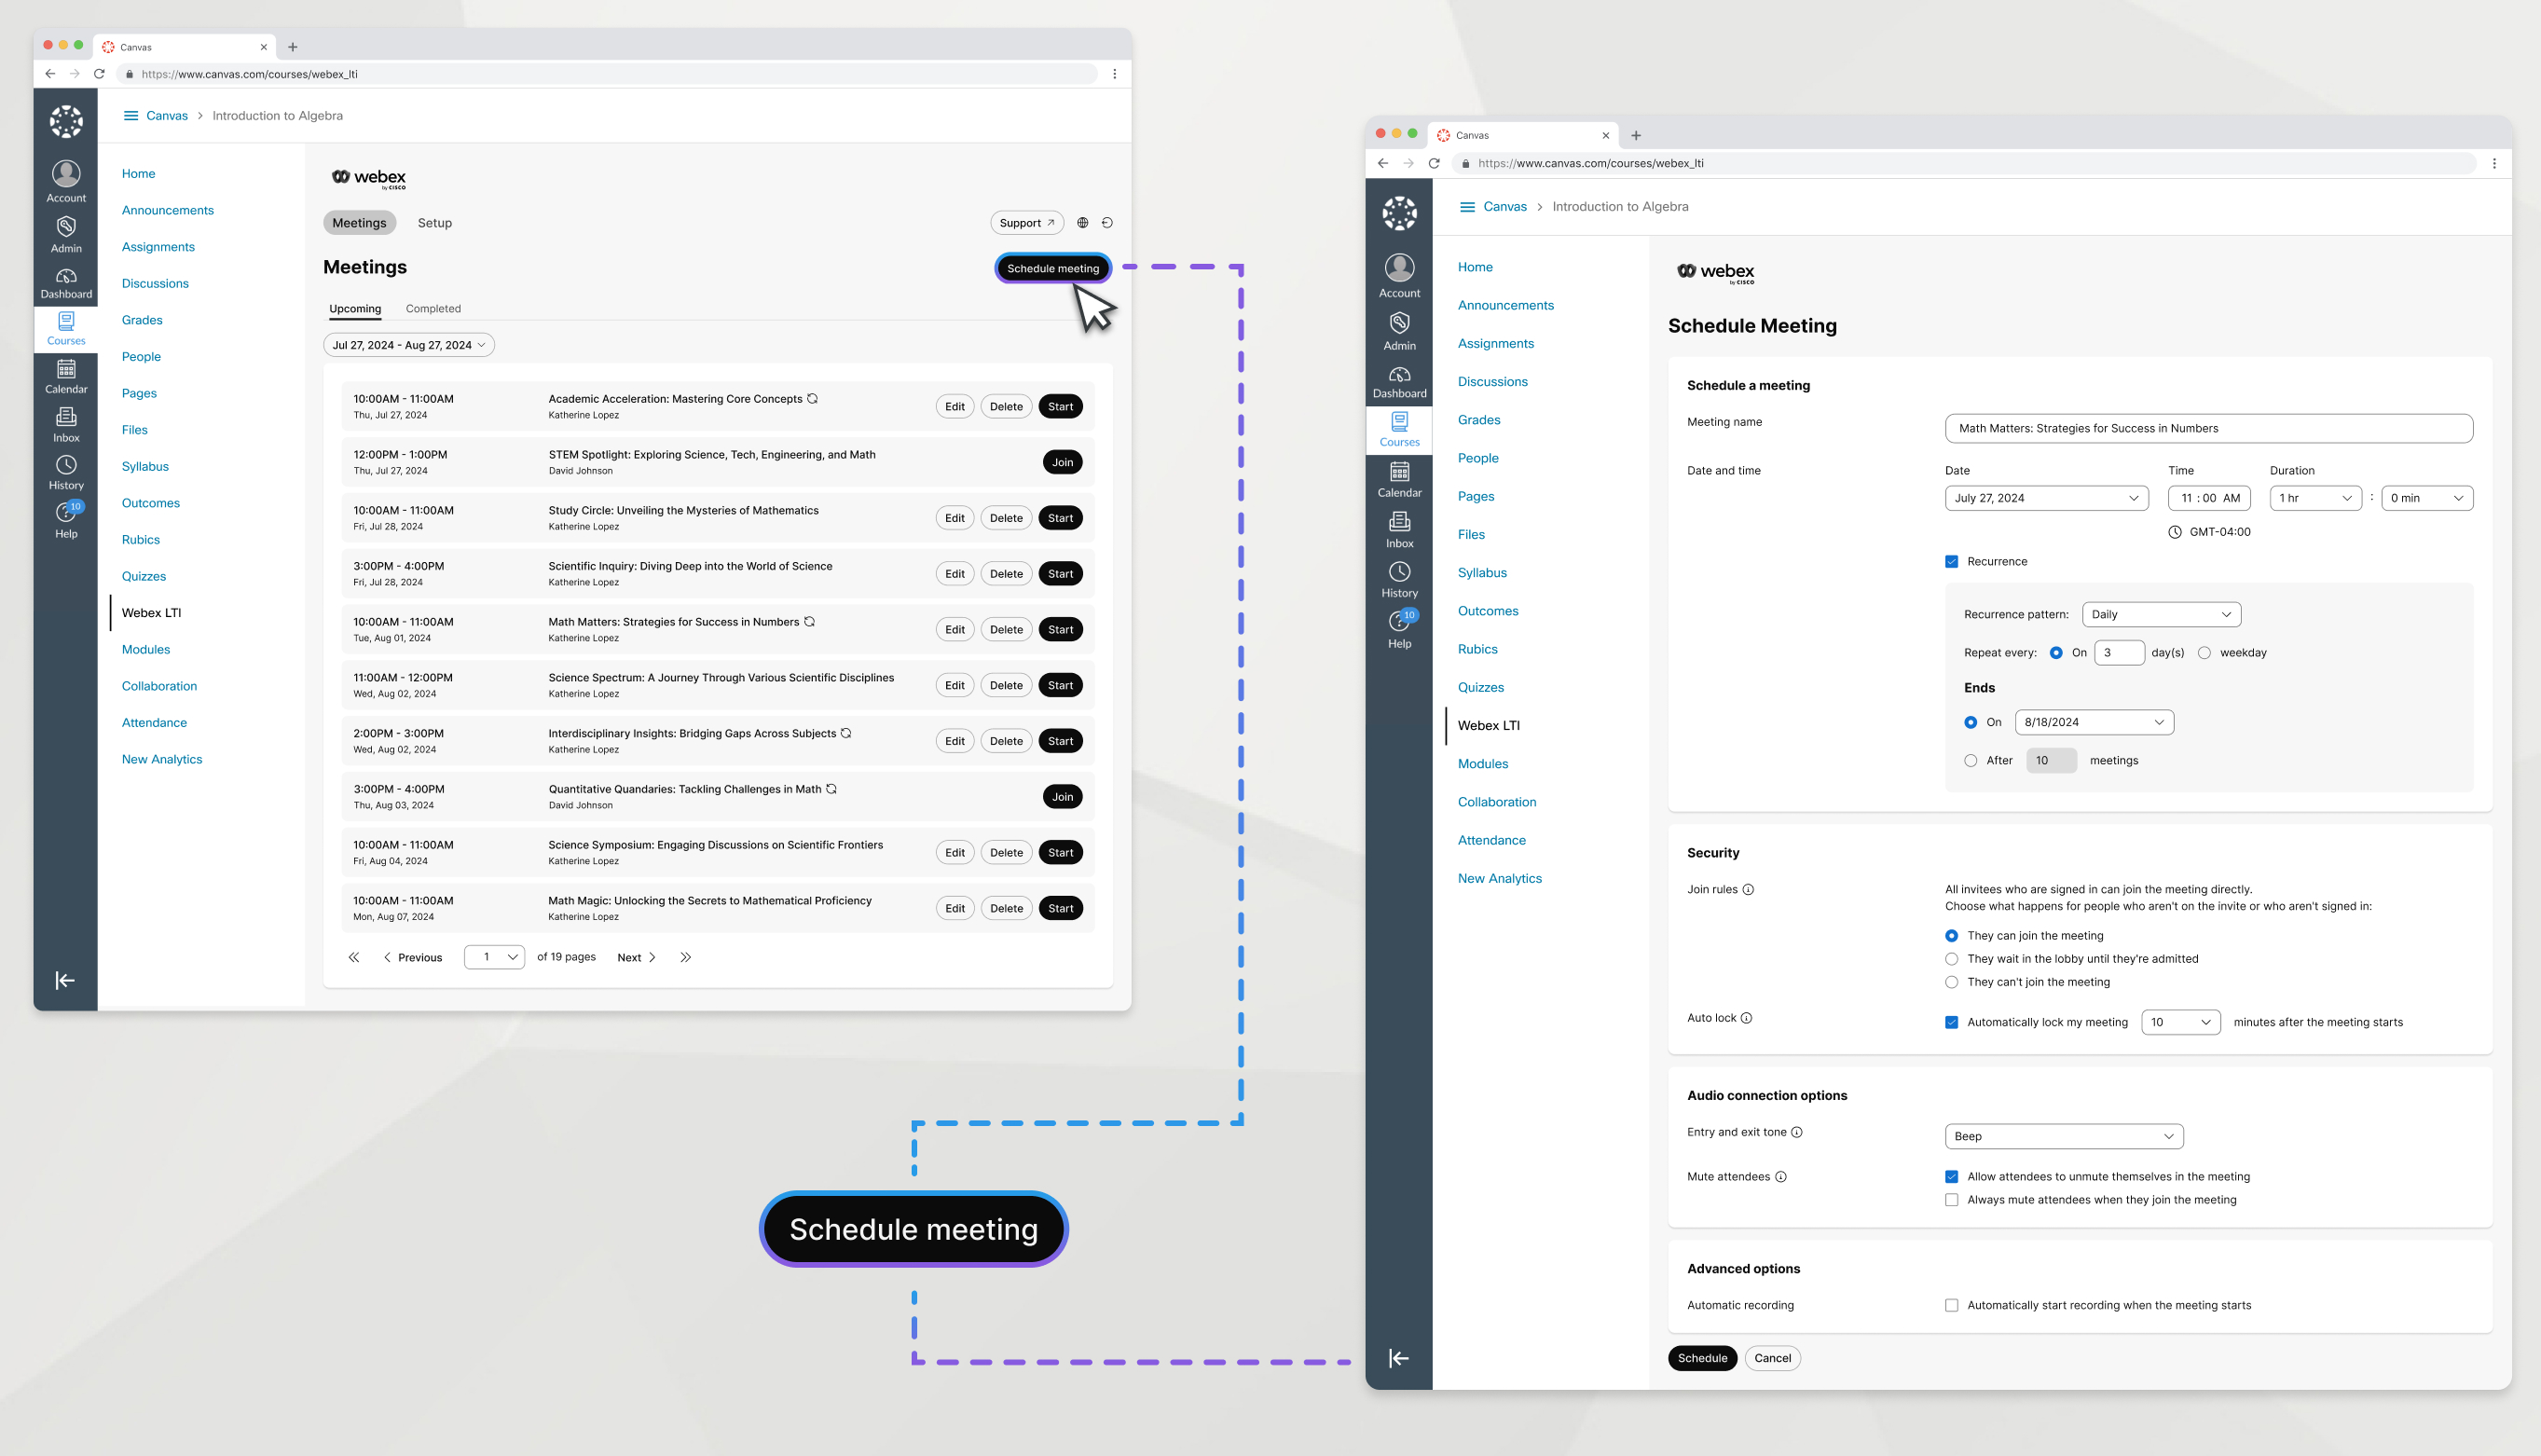
La funzione Riunioniconsente di pianificare e ospitare una riunione una tantum o ricorrente con la tua classe.
| 1 |
Vai a Riunioni e clicca su Pianifica riunione. Se richiesto, accedi con Webex. |
| 2 |
Immettere le seguenti informazioni:
|
| 3 |
Fare clic su Pianifica |
Una volta creata, la riunione viene visualizzata nella scheda Future, in cui può essere visualizzata da tutti gli iscritti al corso. Dalla scheda In arrivo puoi avviare, modificare o eliminare riunioni
La modifica o l'eliminazione di una riunione ricorrente comporterà la modifica o l'eliminazione dell'intera serie di riunioni. Le riunioni ricorrenti non possono essere modificate o eliminate singolarmente.
Se in un corso sono presenti più insegnanti, puoi avviare, modificare ed eliminare solo le riunioni che hai creato.
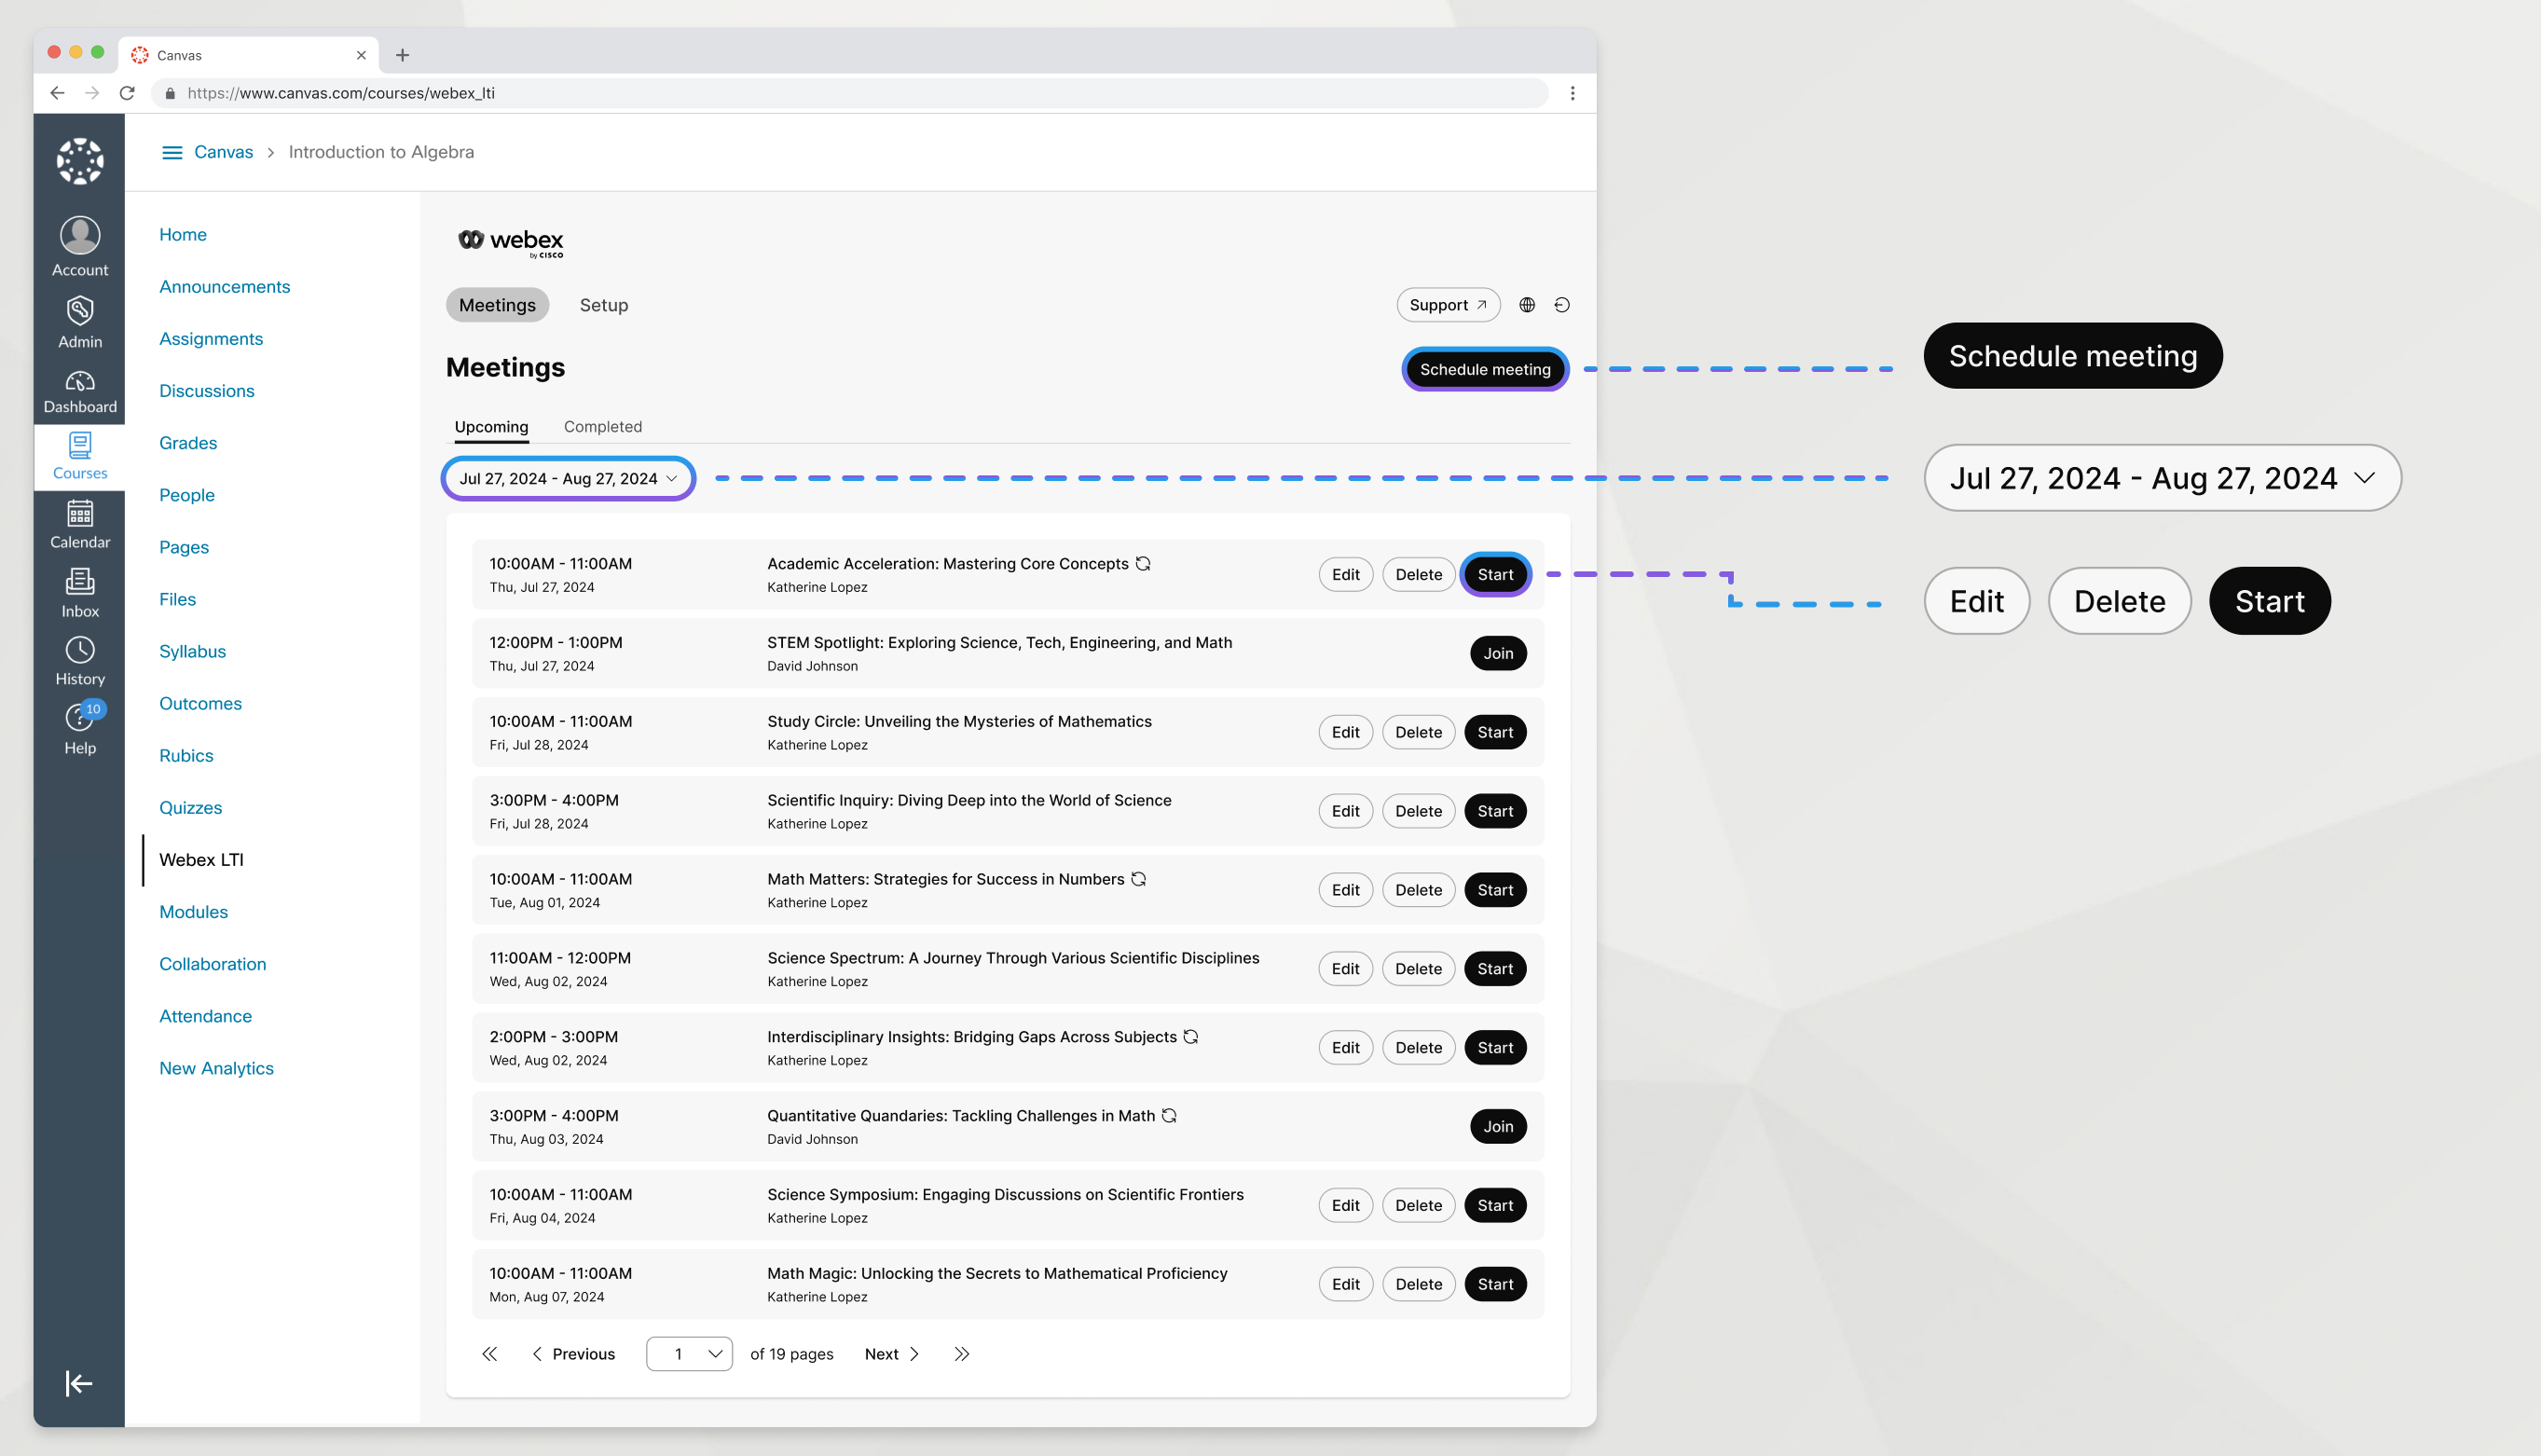
Avvia le riunioni di classe dal tuo LMS con Webex LTI.
| 1 |
Vai alla scheda Riunioni. |
| 2 |
Nella scheda In arrivo, trova la tua riunione e fai clic su Avvia. |
Puoi registrare una riunione pianificata in Webex LTI per renderla disponibile per i tuoi studenti.
Per visualizzare le registrazioni in Webex LTI, è necessario pianificare la riunione in Webex LTI e aver effettuato l'accesso a Webex da Webex LTI quando si avvia la riunione.
| 1 |
Durante la riunione della classe, fare clic su Registra Se il pulsante Registra non è visualizzato, ricercarlo nelle opzioni |
| 2 |
Selezionare Registra nel cloud e quindi fare clic su Registra. Quando è in corso una registrazione, tu e gli altri partecipanti alla riunione dovreste vedere un'icona rossa in alto a destra della finestra. |
| 3 |
Se necessario, fare nuovamente clic su Registra
|
 in Webex.
 Altro.
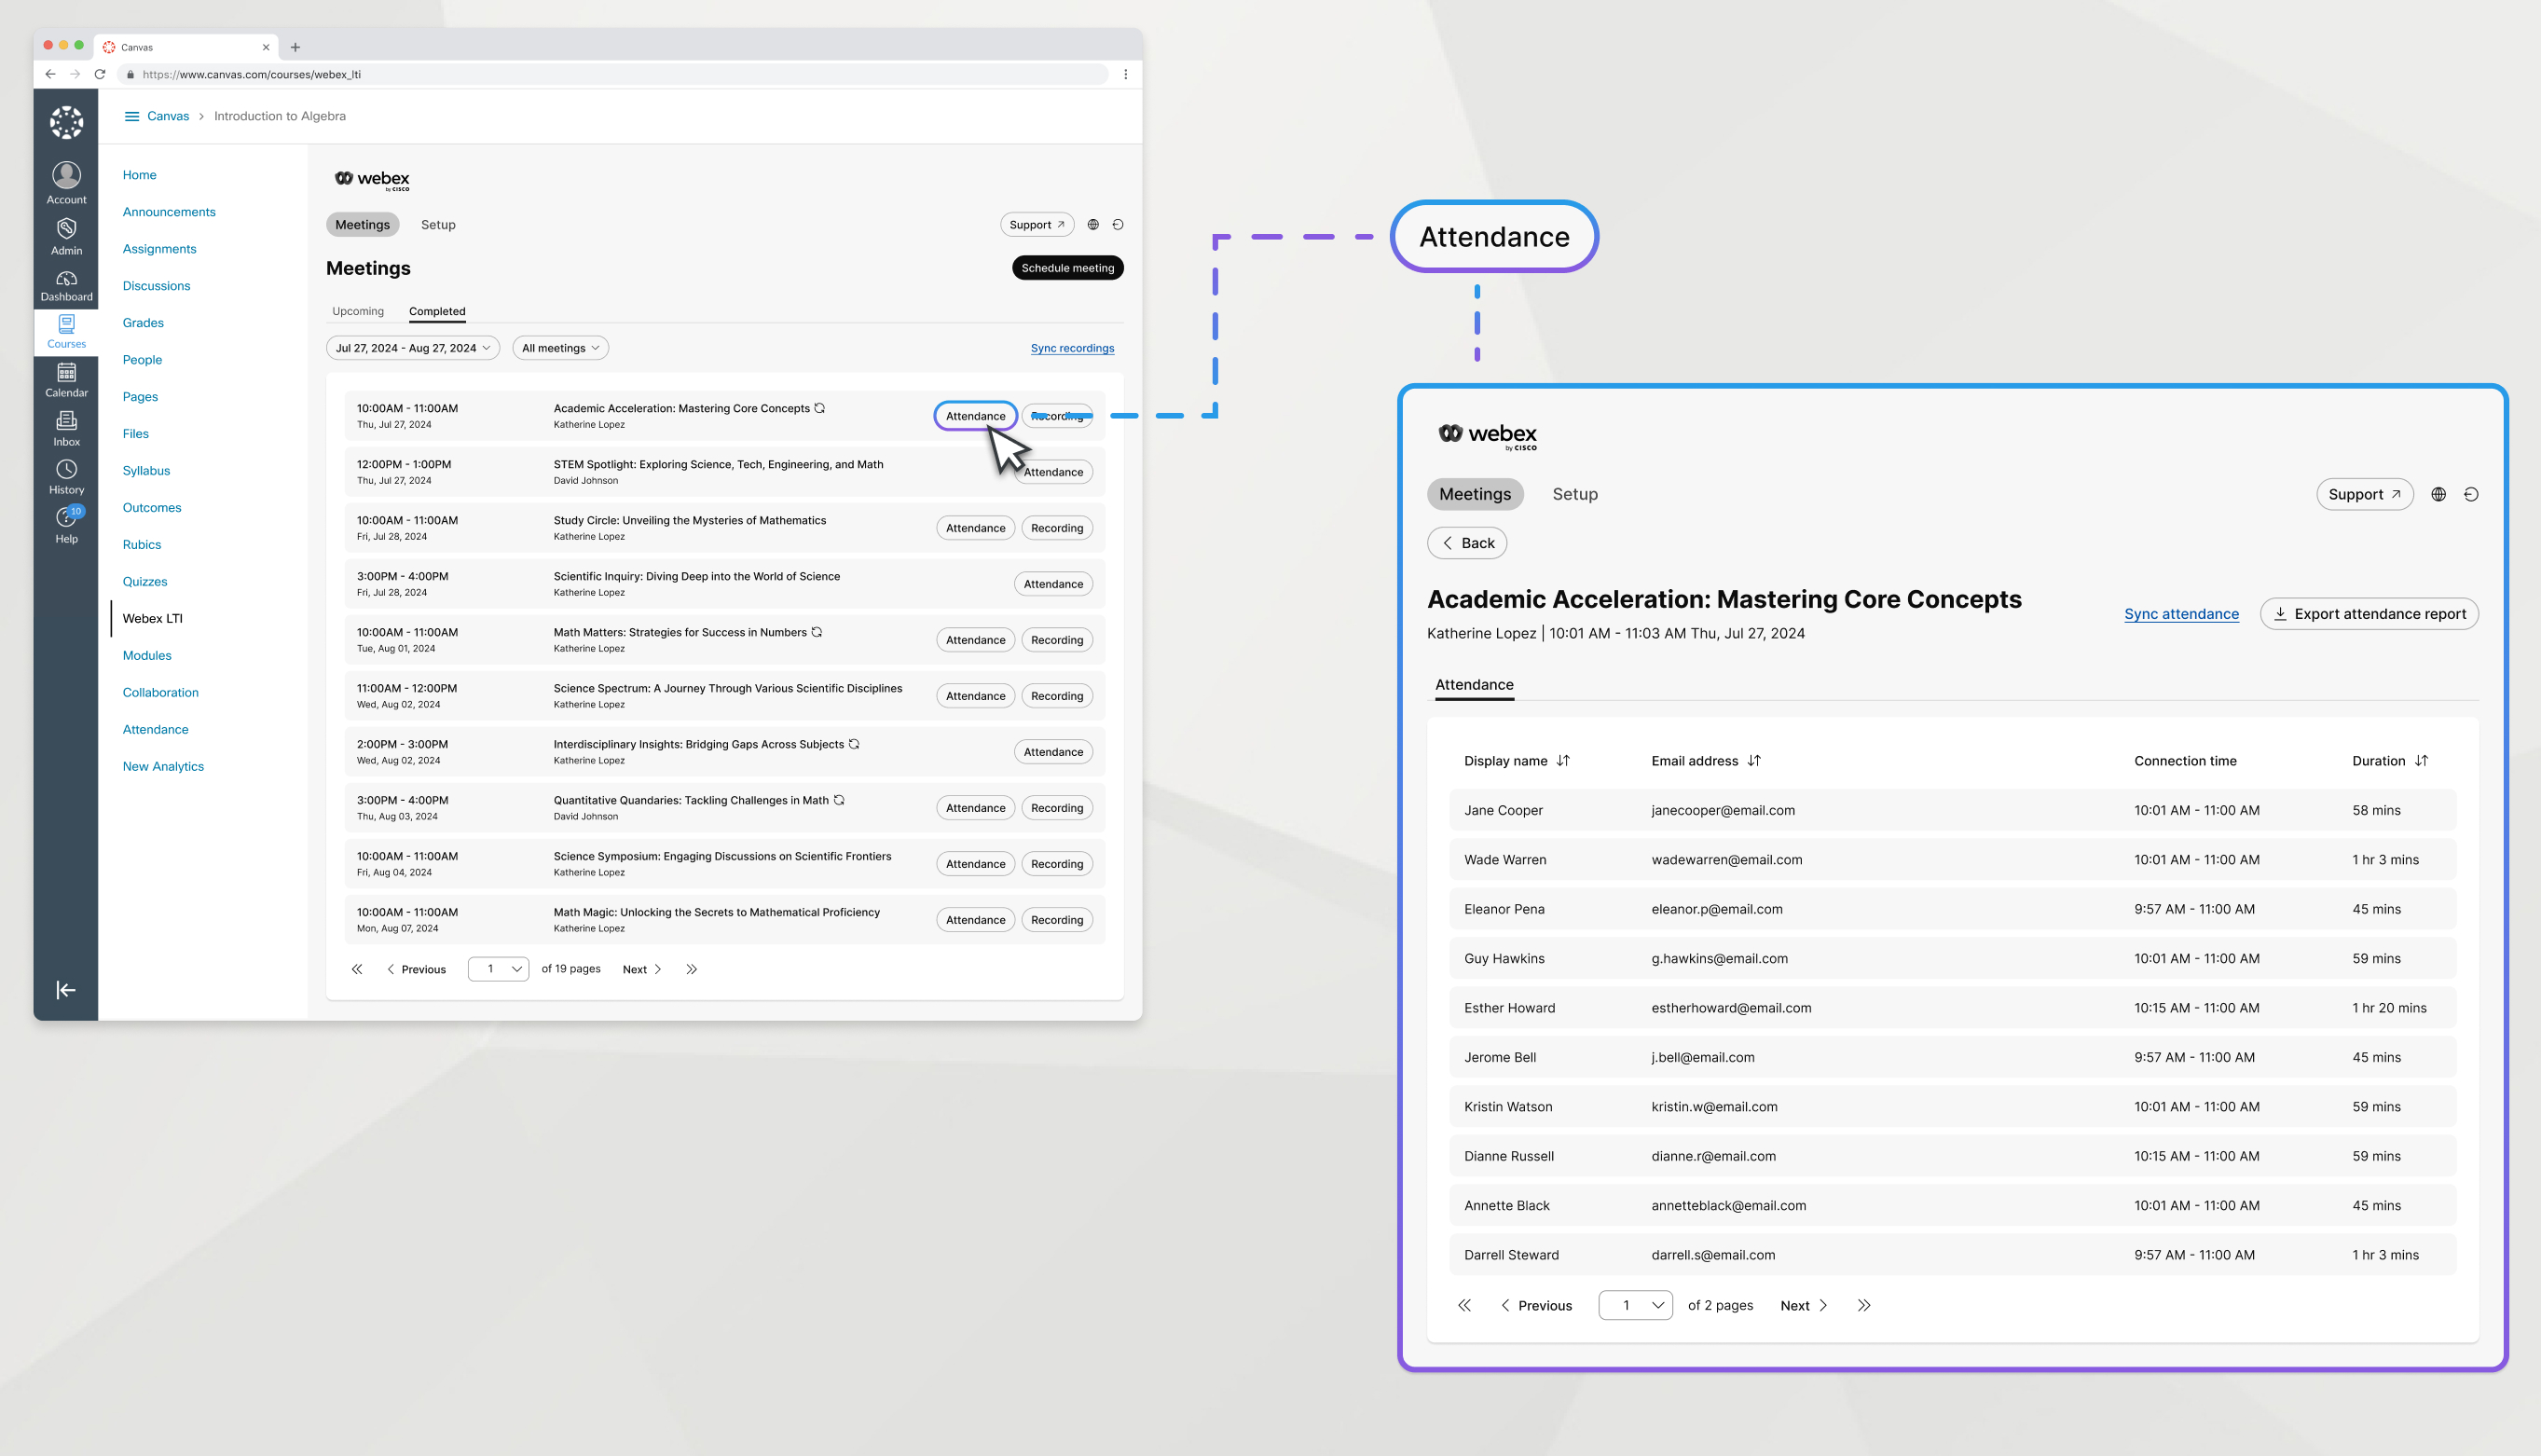
Una volta terminata la riunione, puoi visualizzare l'elenco dei partecipanti che vi hanno aderito.
| 1 |
Vai alla scheda Riunioni e clicca su Completate. |
| 2 |
Trova la riunione di cui vuoi visualizzare la presenza e clicca su Presenze. |
| 3 |
(Opzionale): se non è ancora presente alcuna presenza, fare clic sul pulsante Sincronizza presenze. |
Operazioni successive
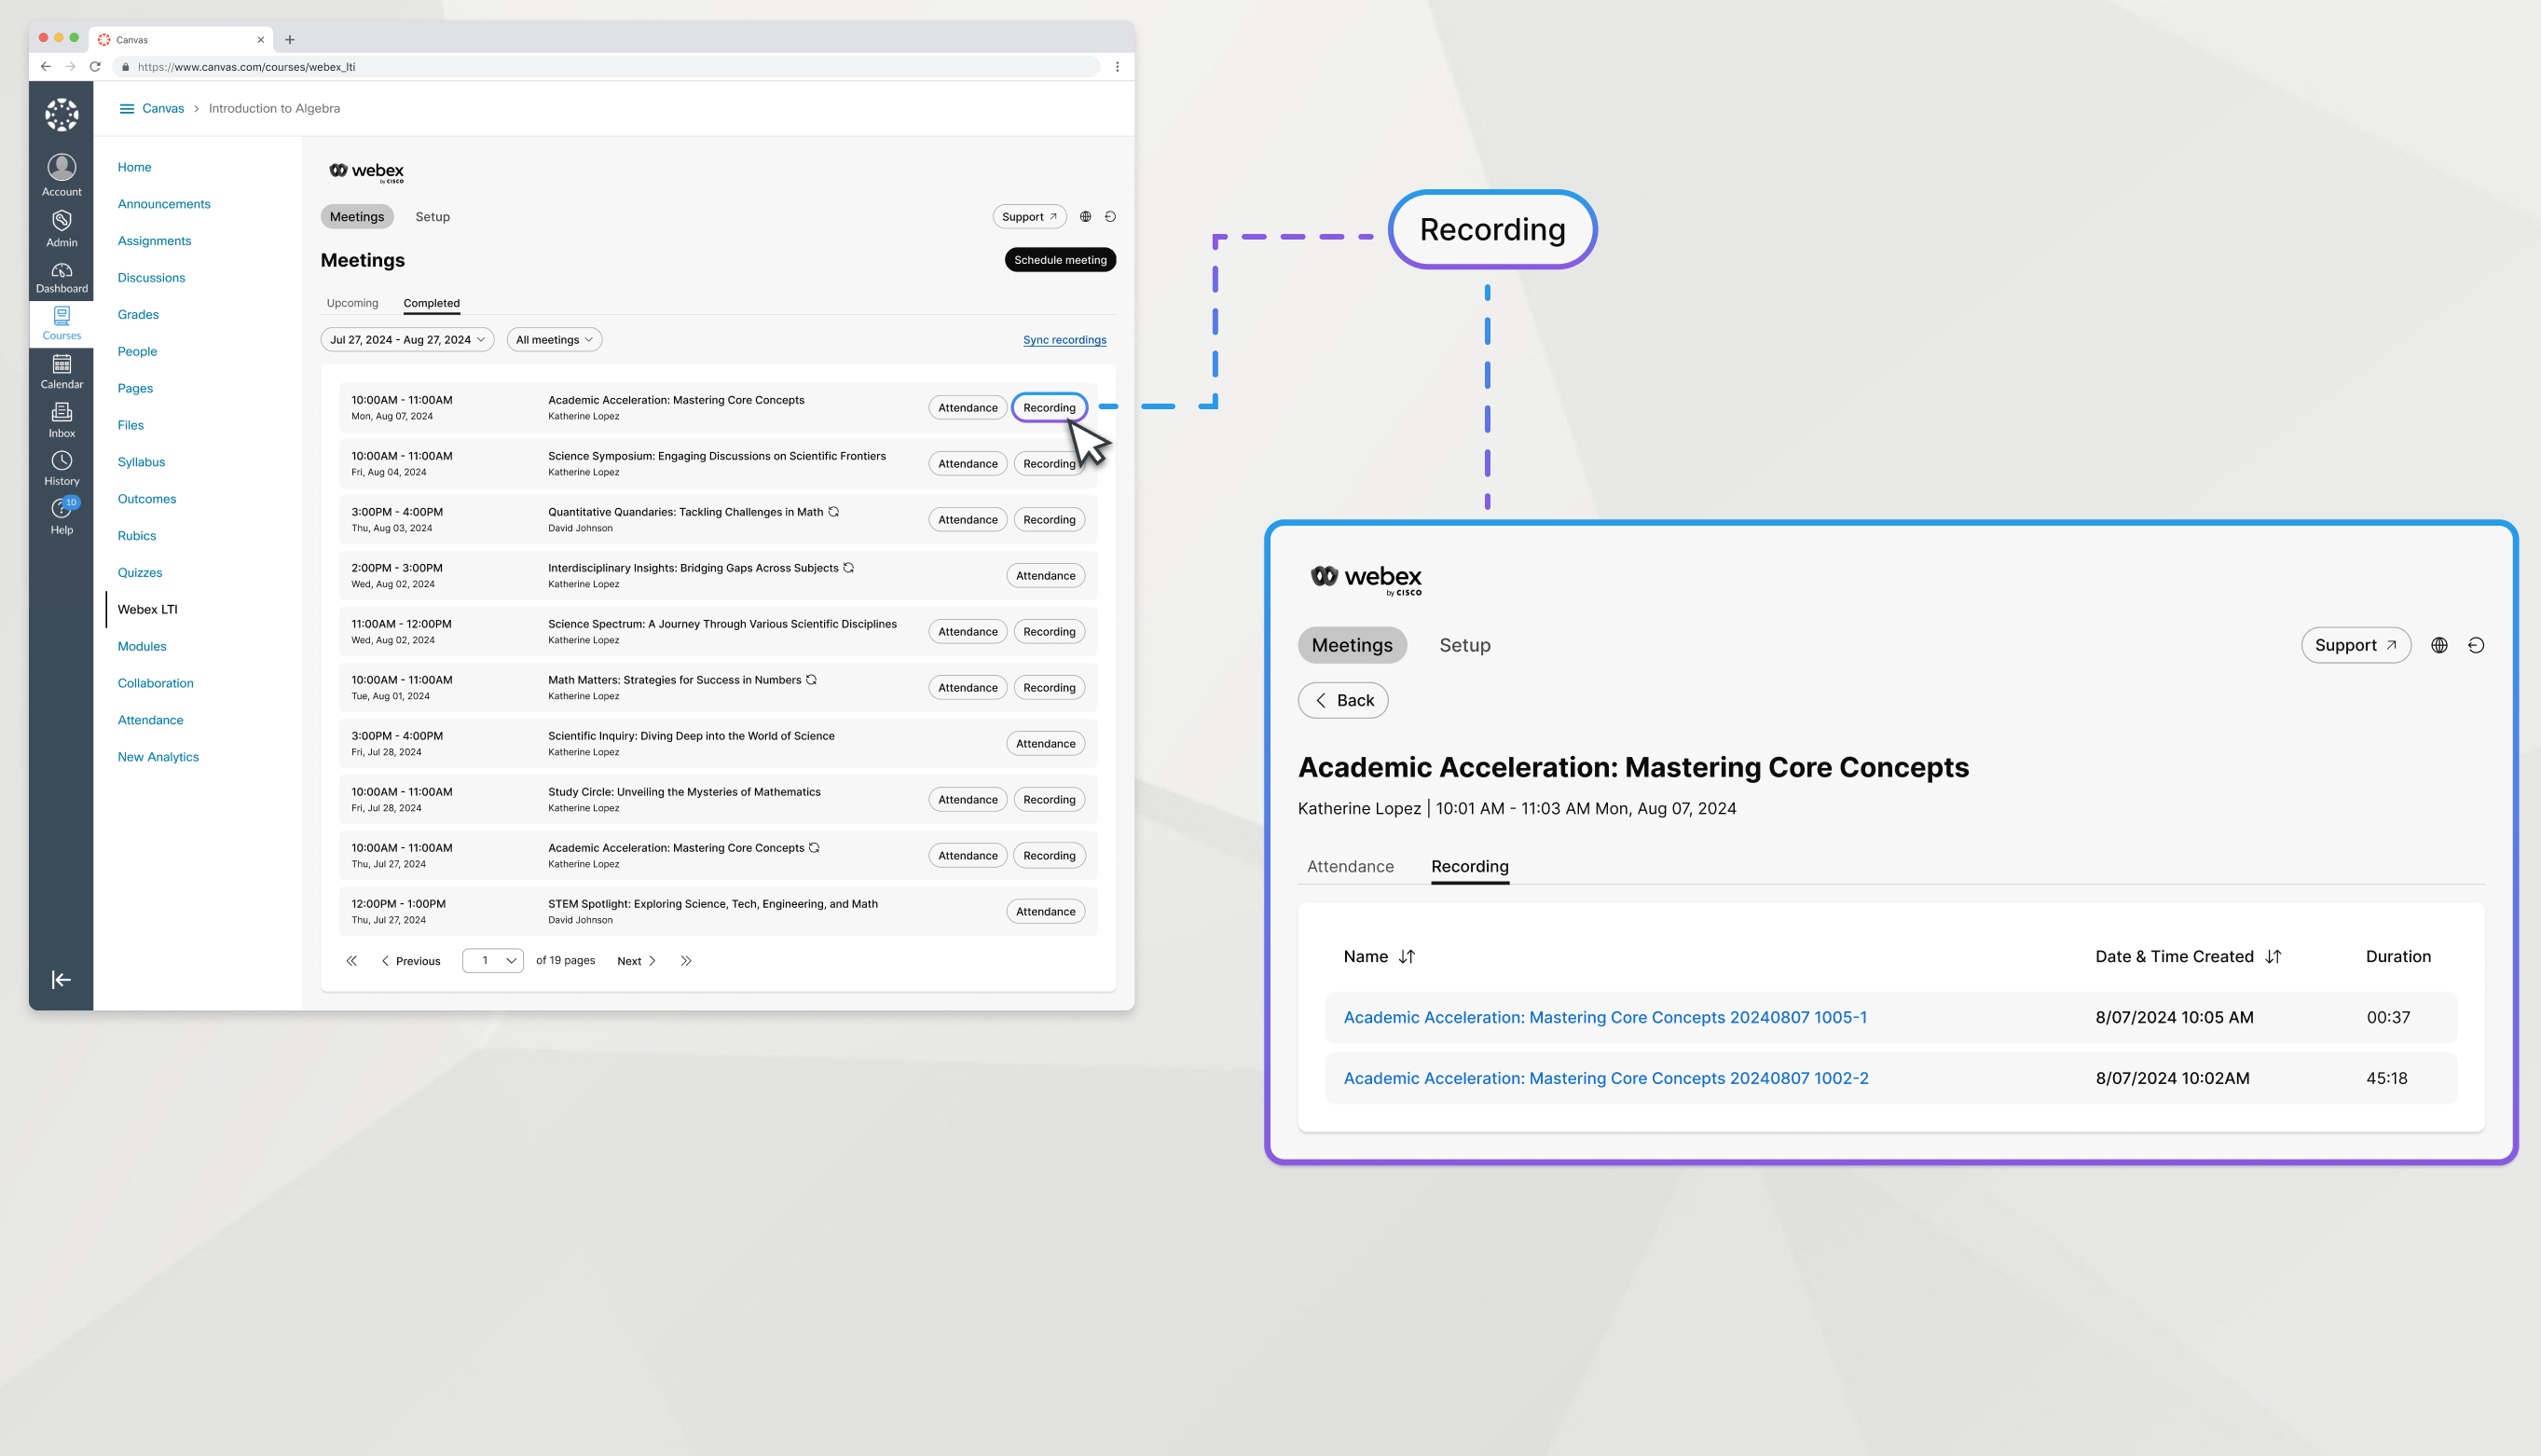
Guarda le registrazioni delle tue riunioni di classe.
| 1 |
Vai alla scheda Riunioni e clicca su Completato. |
| 2 |
Trova la riunione con la registrazione che vuoi guardare e clicca su Registrazione. |
| 3 |
Fare clic sul nome della registrazione per aprirla. |
| 4 |
Copia la password di registrazione e clicca su Visualizza registrazione. Inserisci la password nella schermata successiva per visualizzare la registrazione della riunione.
|
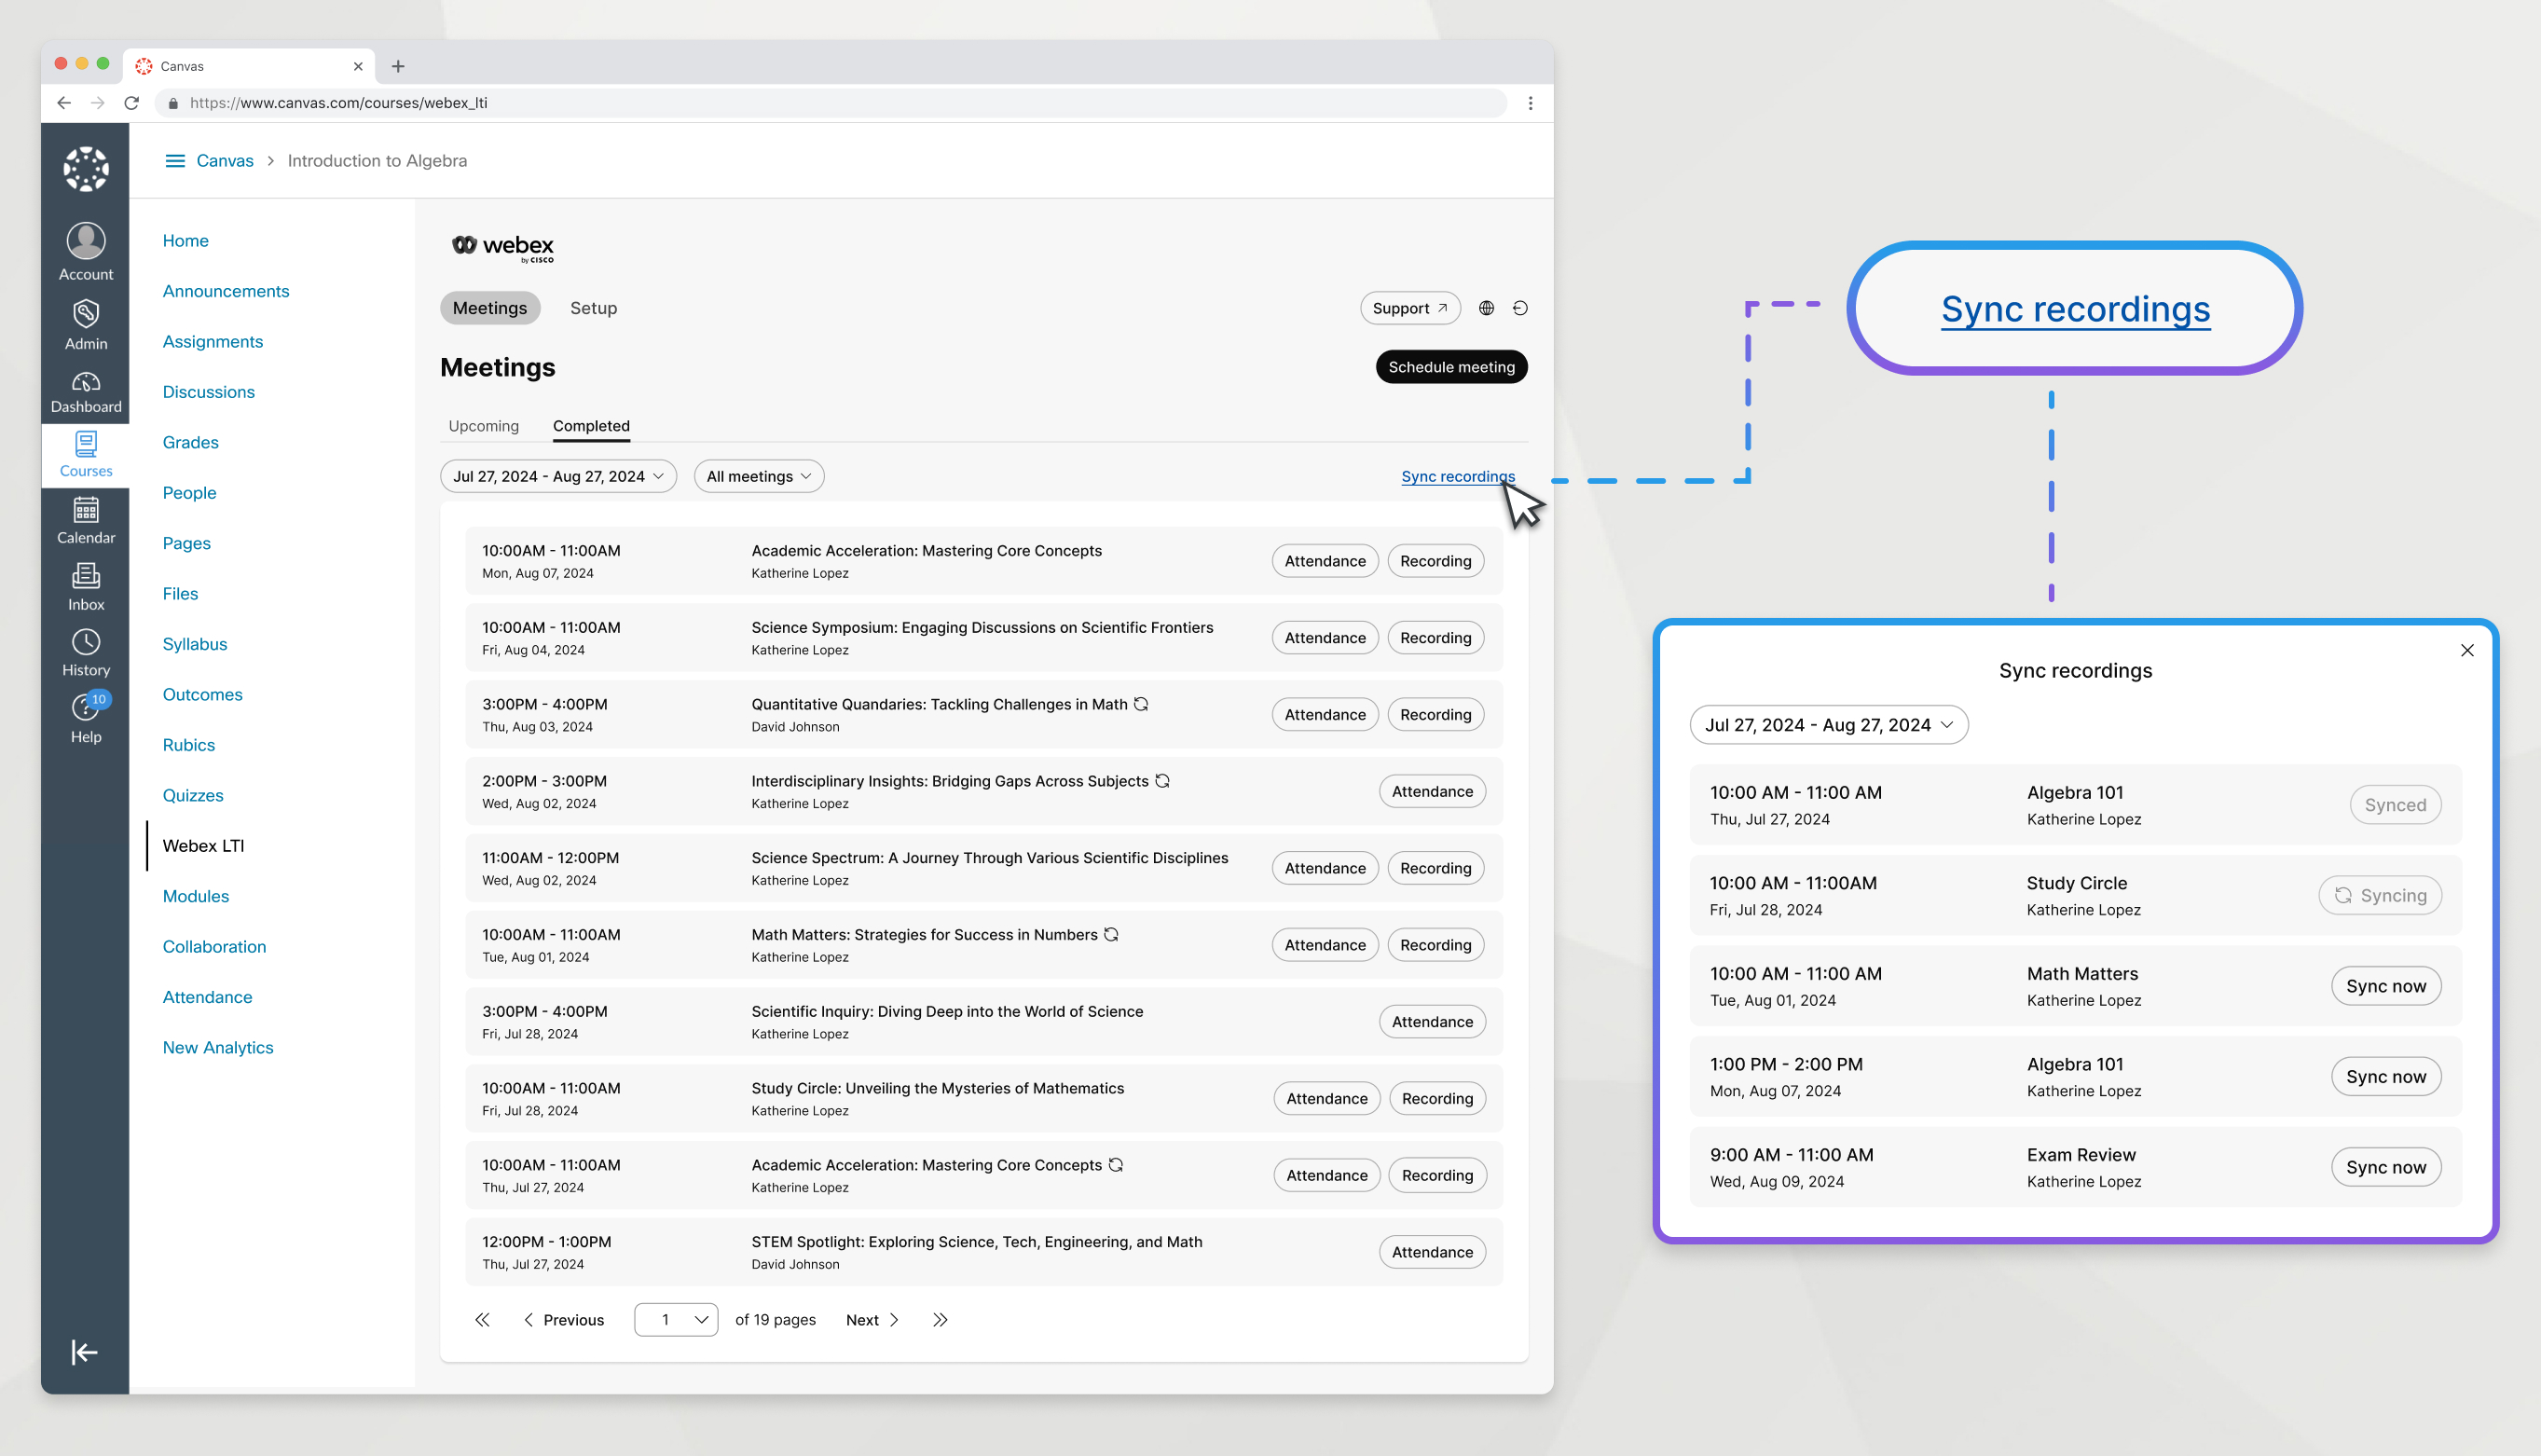
Le registrazioni delle riunioni appariranno automaticamente nel contenuto della riunione una volta terminata la riunione e una volta elaborata la registrazione. Se hai bisogno che la registrazione sia disponibile prima che venga avviato il processo automatico, puoi sincronizzarla manualmente.
| 1 |
Vai alla scheda Riunioni e clicca su Completate. |
| 2 |
Fare clic sul pulsante Sincronizza registrazioni. |
| 3 |
Seleziona un intervallo di date in cui si è svolta la riunione registrata. Puoi selezionare solo un intervallo di date fino a 7 giorni. |
| 4 |
Trova la riunione con la registrazione che vuoi sincronizzare e fai clic su Sincronizza ora. Le riunioni vengono visualizzate in questa finestra solo se sono già state elaborate da Webex. |
| 5 |
Una volta sincronizzata la registrazione, chiudere la finestra. |
Operazioni successive
Altre registrazioni
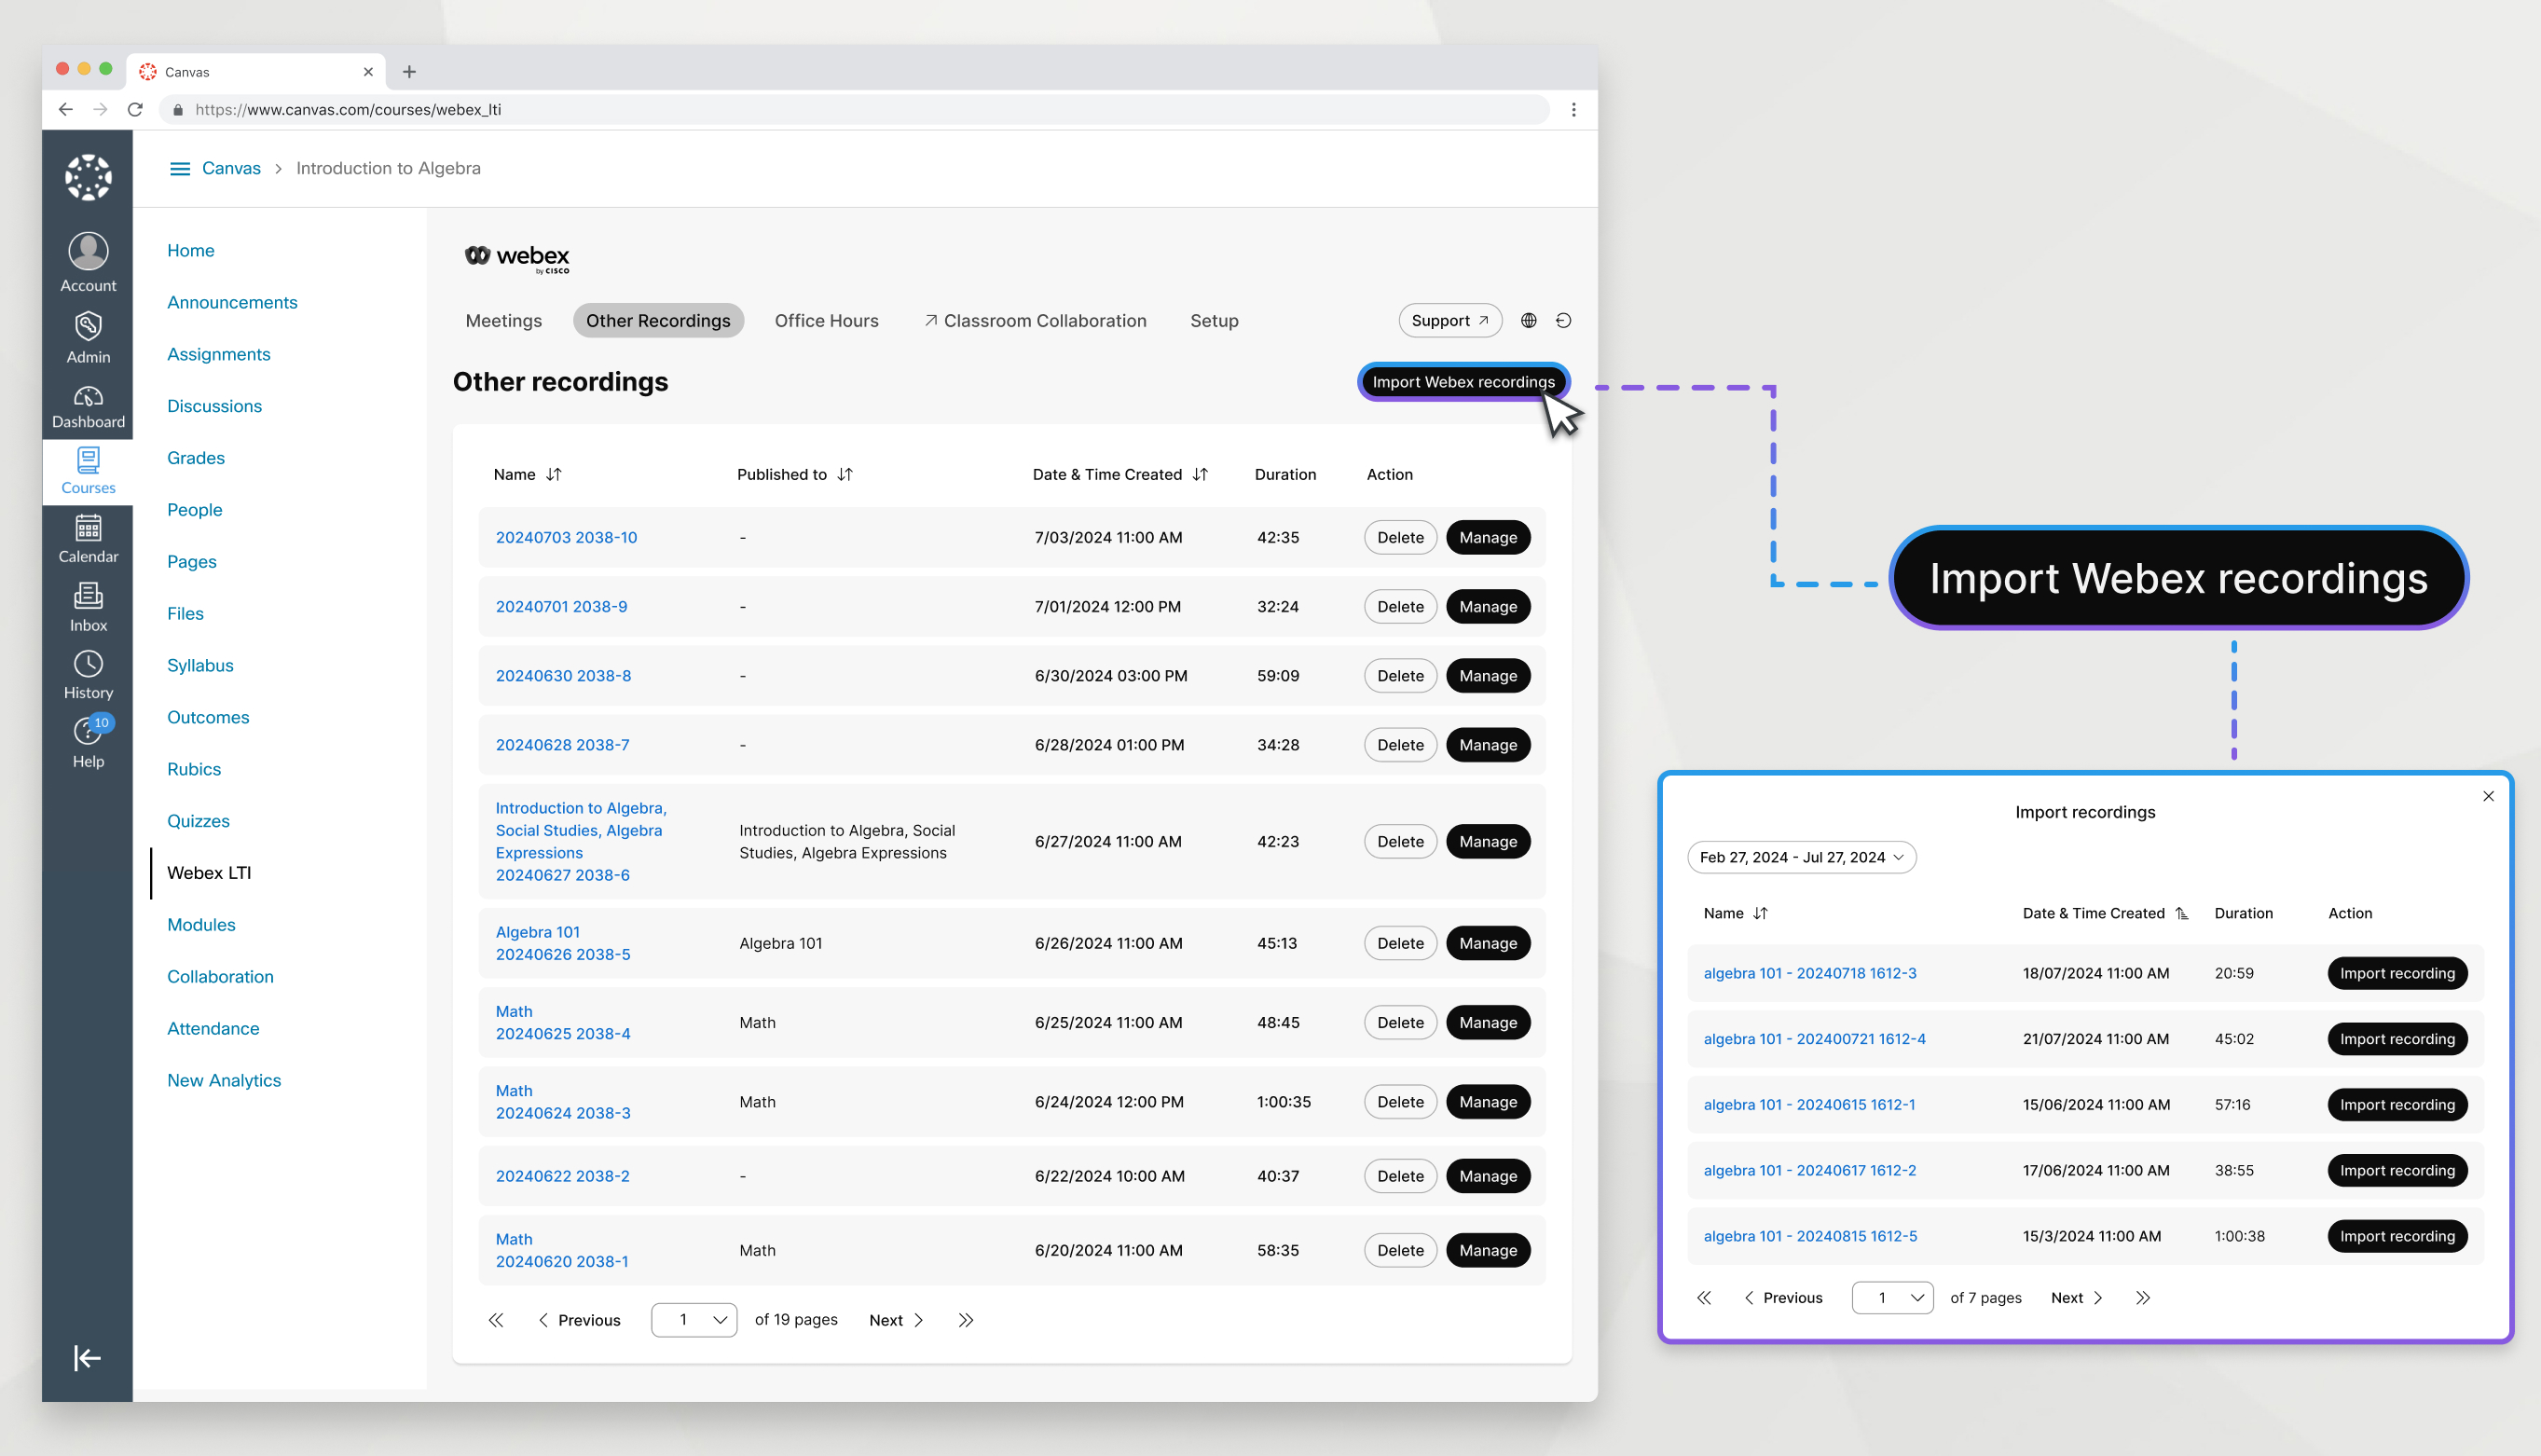
Altre registrazioni consente di importare tutte le registrazioni Webex non associate ad alcuna riunione Webex LTI pianificata e di pubblicarle nelle classi. Registrati mentre insegni una lezione o spieghi un argomento senza partecipanti: potrai riutilizzare queste registrazioni da un semestre all'altro.
| 1 |
Vai alla scheda Altre registrazioni. |
| 2 |
Fare clic su Importa registrazioni Webex. |
| 3 |
Seleziona un intervallo di date che includa la registrazione che desideri importare. |
| 4 |
Trova la tua registrazione e clicca su Importa registrazione. |
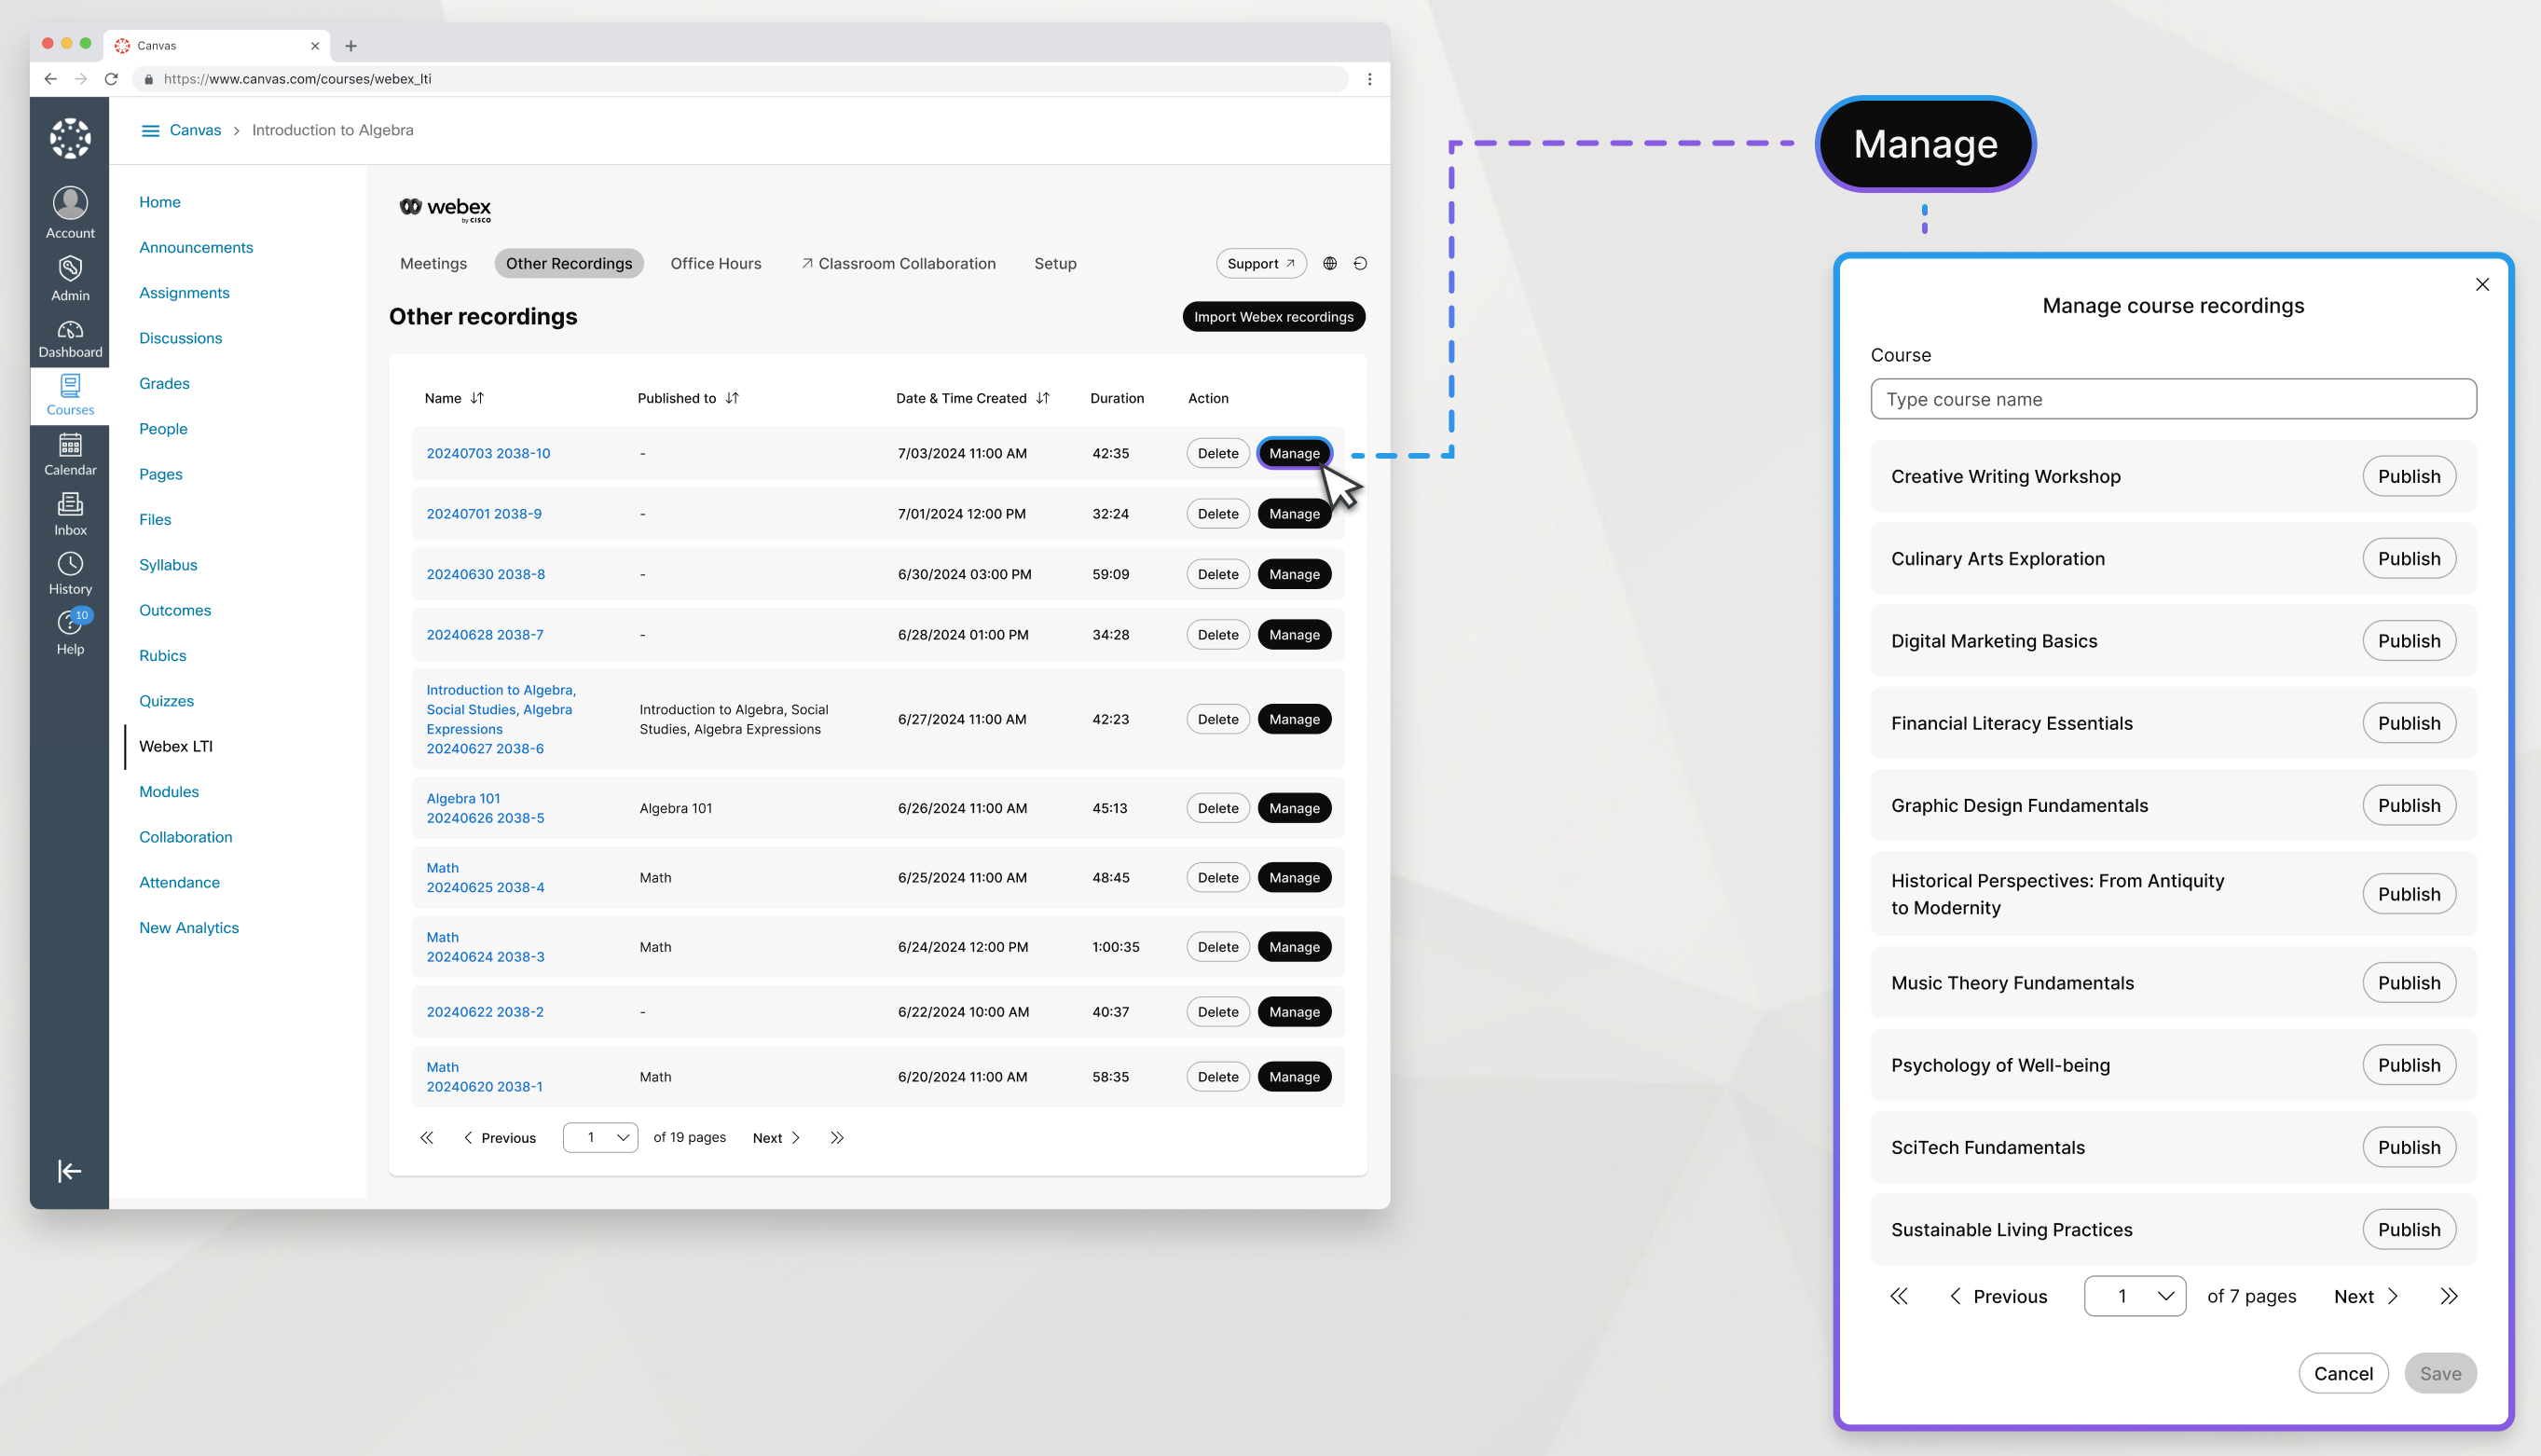
Dopo aver importato una registrazione Webex in Altre registrazioni, puoi pubblicarla in uno qualsiasi dei tuoi corsi per renderla disponibile agli studenti.
| 1 |
Nella scheda Altre registrazioni, trova la registrazione e fai clic su Gestisci. |
| 2 |
Trova il corso in cui vuoi pubblicare la tua registrazione e clicca su Pubblica. Affinché un corso venga visualizzato in questo elenco, è necessario aprire Webex LTI almeno una volta nel corso in questione. |
| 3 |
Fai clic su Salva. |
È possibile annullare la pubblicazione di una registrazione di un corso per renderla non disponibile agli studenti.
| 1 |
Nella scheda Altre registrazioni, trova la registrazione e fai clic su Gestisci. |
| 2 |
Trova il corso in cui vuoi pubblicare la tua registrazione e clicca su Annulla pubblicazione. |
| 3 |
Fai clic su Salva. |
L'eliminazione di una registrazione la rimuove da tutti i corsi in cui è stata pubblicata e dalla scheda Altre registrazioni.
| 1 |
Vai alla scheda Altre registrazioni.
|
| 2 |
Trova la registrazione che vuoi eliminare e clicca su Elimina. |
Orari di apertura
È possibile pianificare e organizzare orari di ufficio utilizzando Webex LTI. Nella scheda Orari di apertura, impostare la disponibilità e indicare gli orari in cui gli studenti possono incontrarsi. Gli orari di ufficio impostati si applicano a tutti i corsi di cui sei istruttore. Se sono presenti più istruttori per un corso, gli studenti devono scegliere l'utente dall'elenco degli istruttori per pianificare una riunione.
Le riunioni di orario di ufficio consentono agli studenti di pianificare le riunioni direttamente con l'utente. Per organizzare ricevimenti per più studenti contemporaneamente, ti consigliamo di creare una riunione virtuale e di chiamarla "Orari di ricevimento".
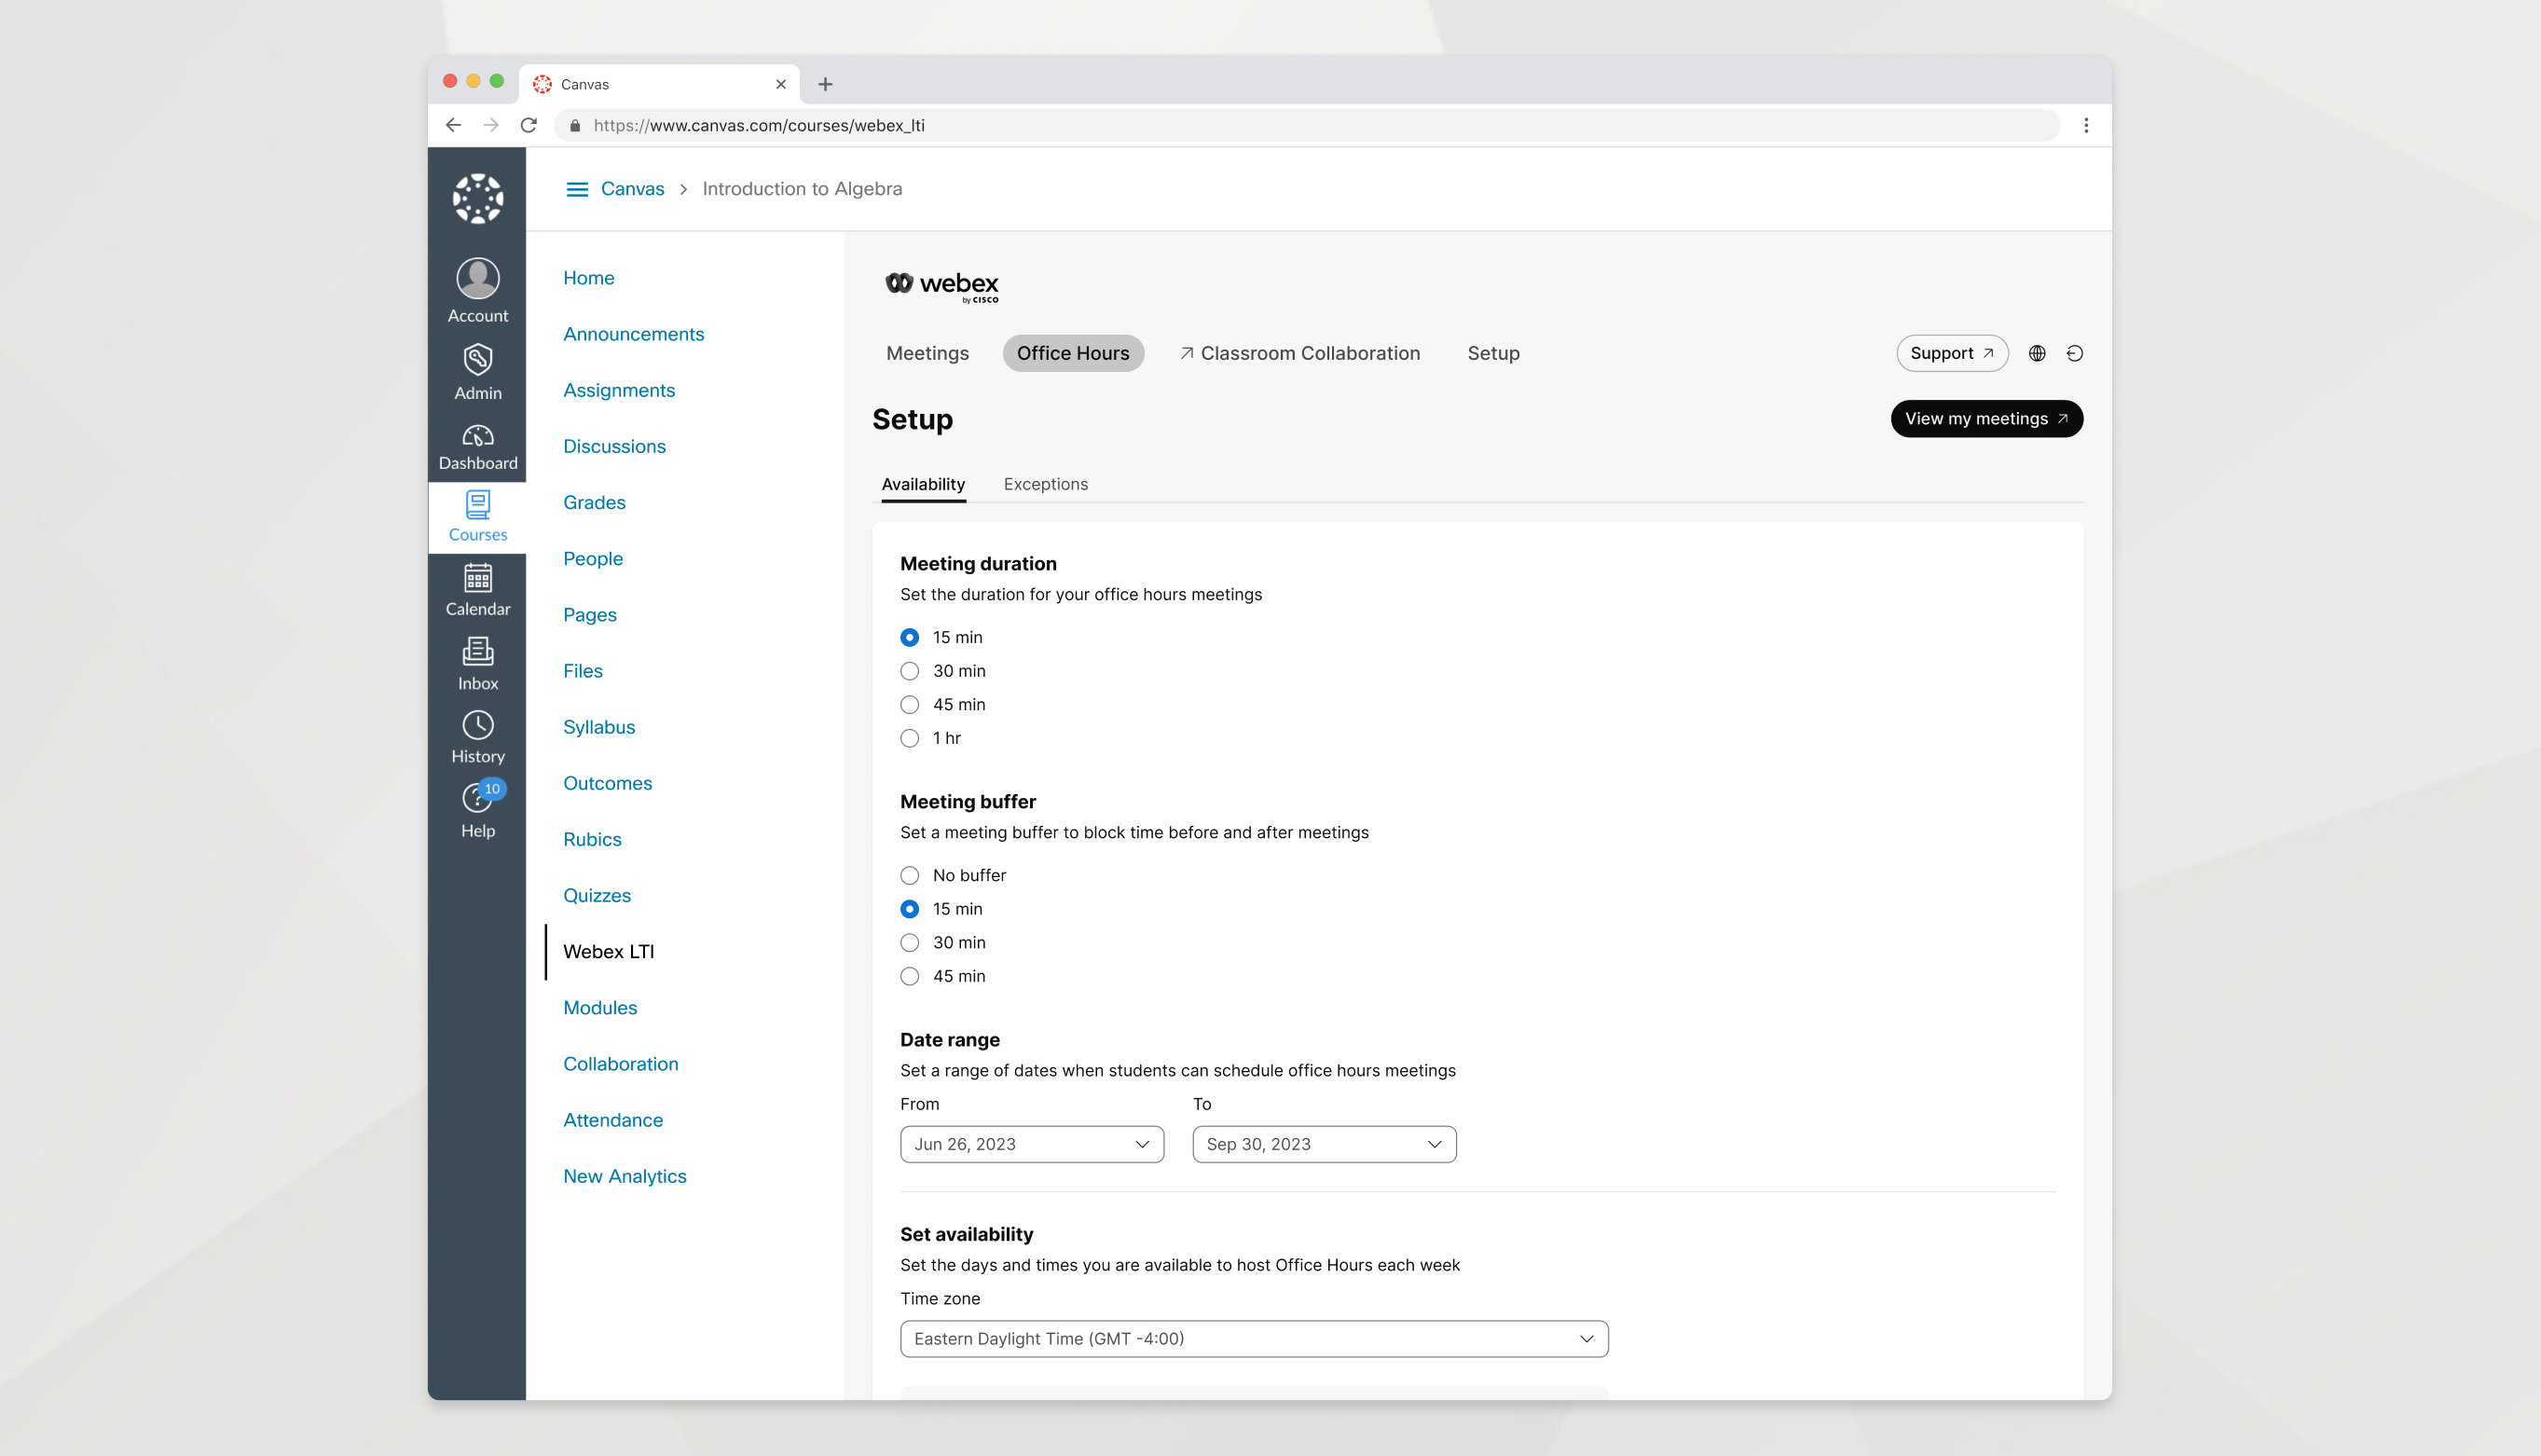
La funzione Orari di ricevimento ti consente di indicare la tua disponibilità in giorni e orari diversi in modo che i tuoi studenti possano incontrarti.
| 1 |
Vai alla scheda Orari di ufficio. |
| 2 |
Nella scheda Disponibilità, impostare quanto segue:
|
| 3 |
Scorrere verso il basso e fare clic su Save(Salva). |
Gli studenti ora possono selezionare un orario per incontrarsi con l'utente. Quando uno studente prenota un appuntamento con successo, quella fascia oraria non è disponibile per nessun altro. Si ottiene un messaggio e-mail con il collegamento alla riunione e si visualizza la riunione nell'elenco Riunioni future sul sito Webex.
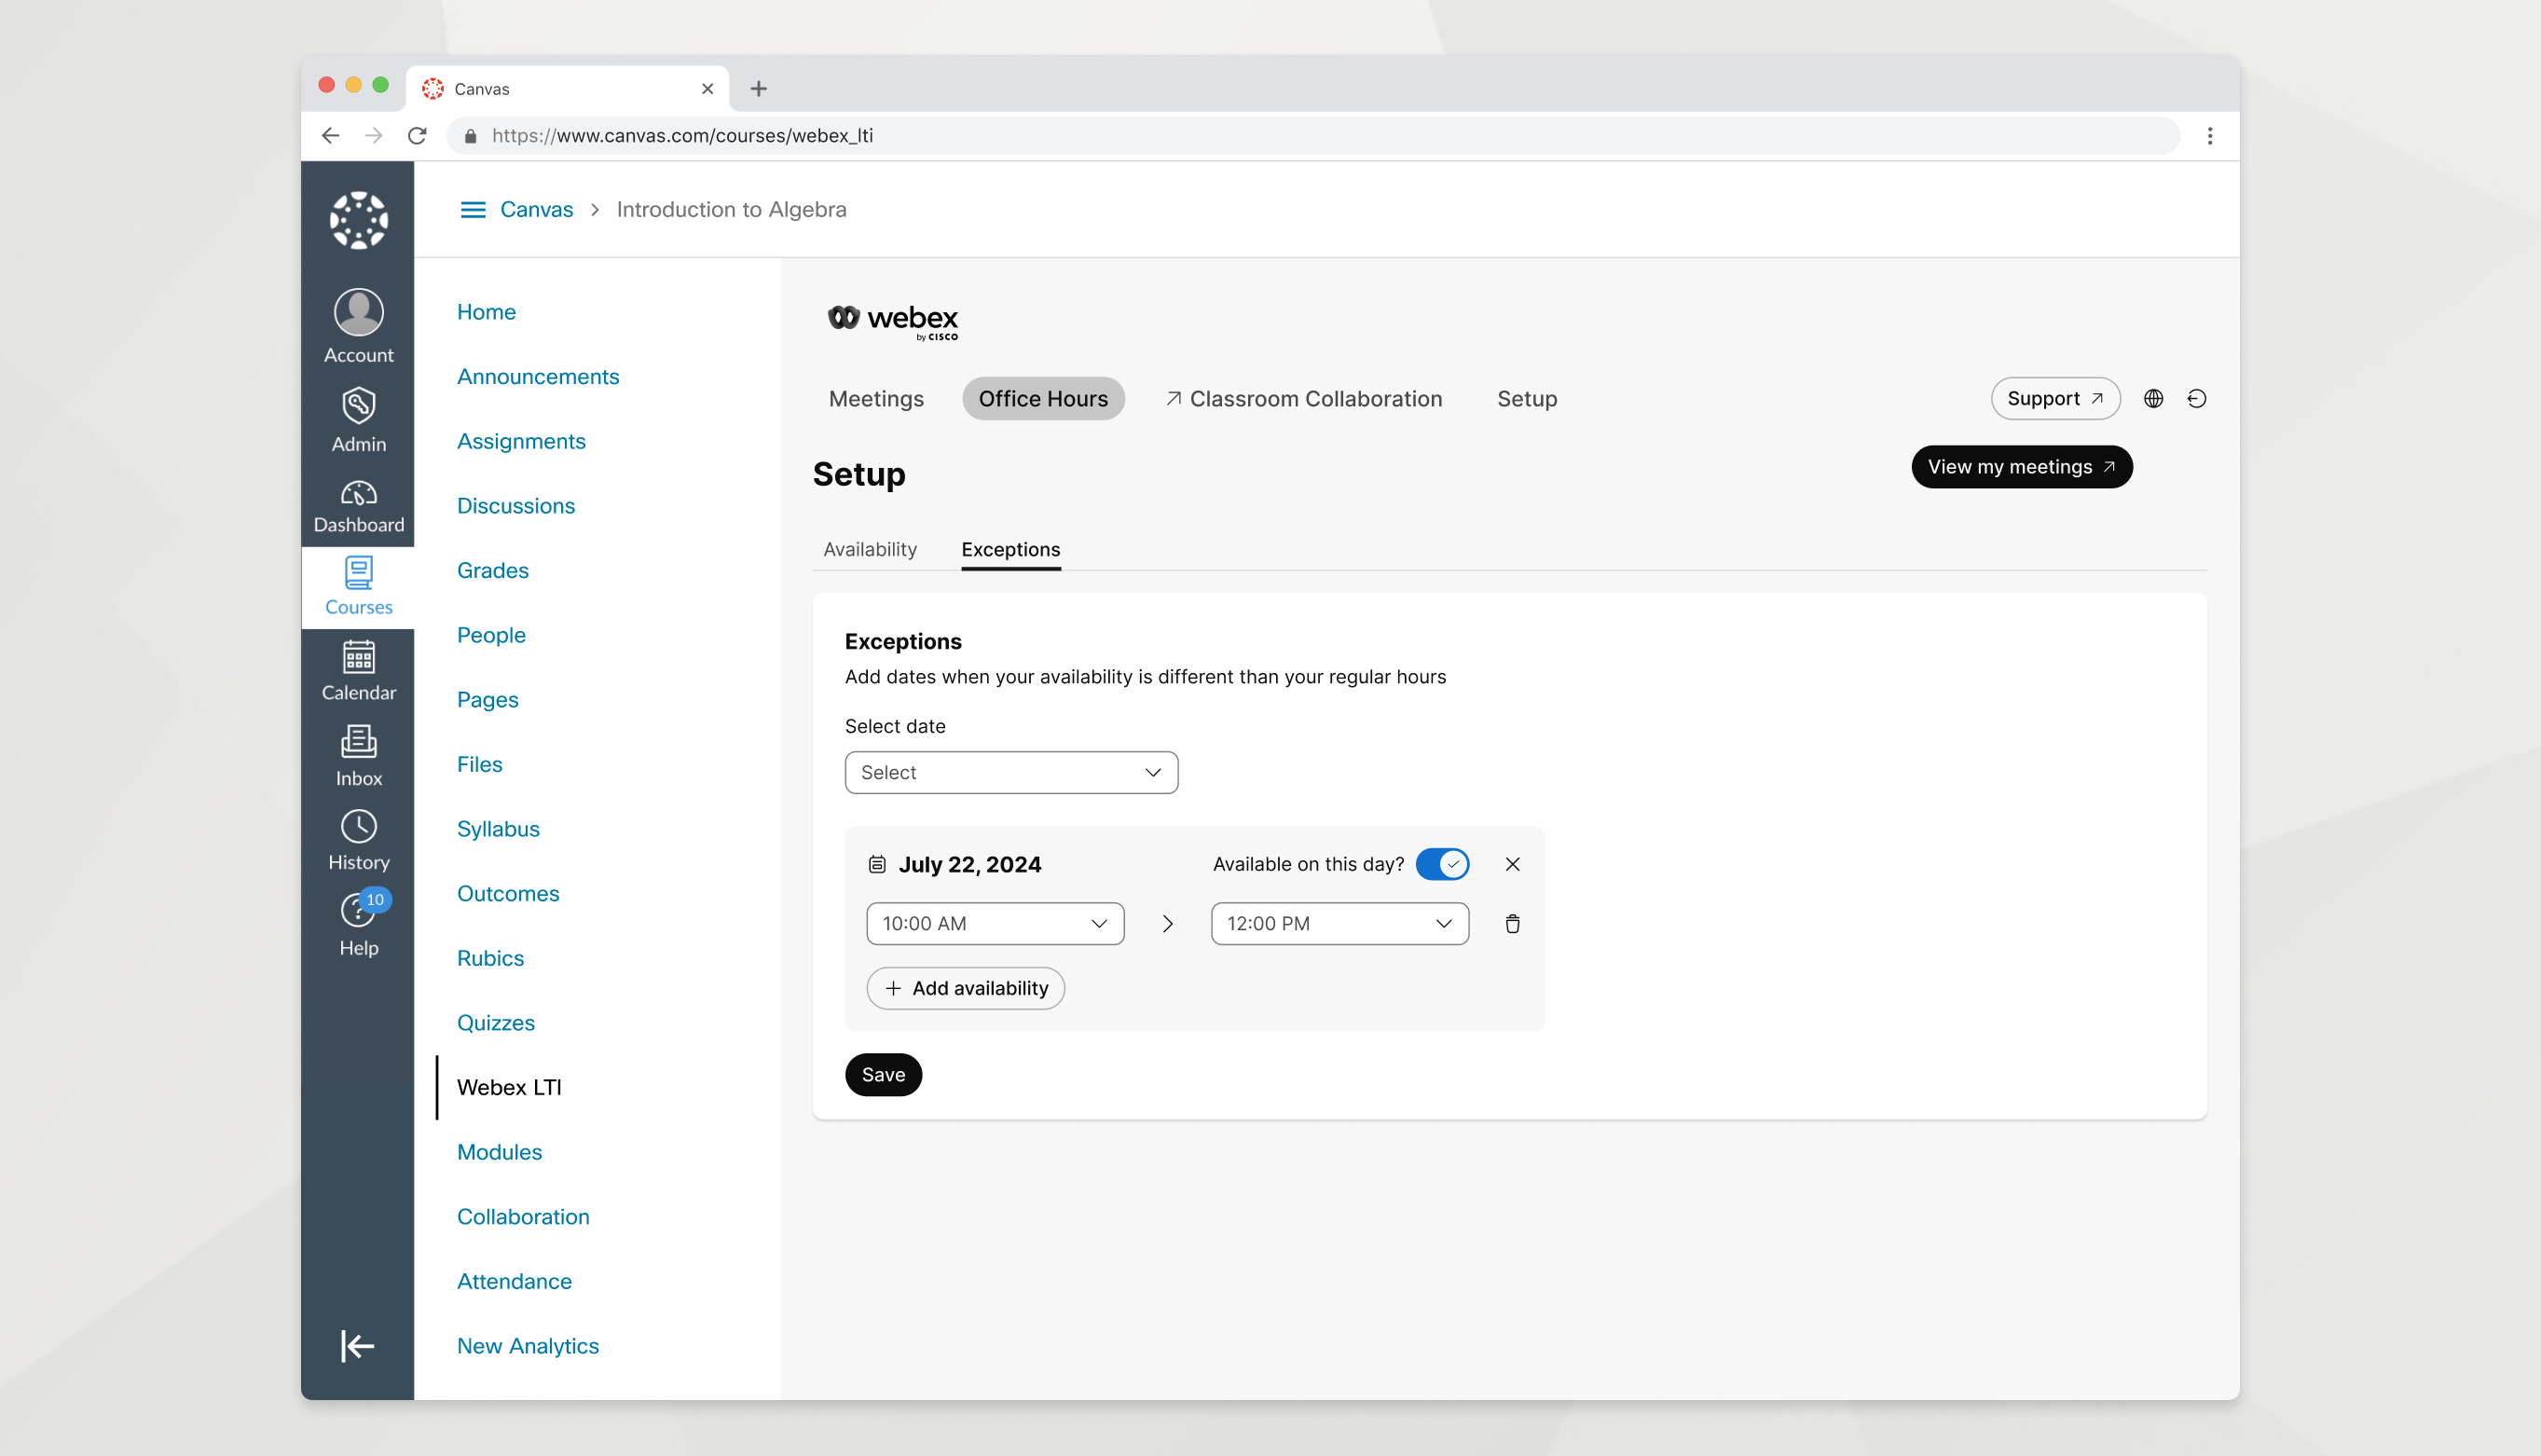
Imposta delle eccezioni per modificare la tua disponibilità in una data specifica, in modo che gli orari d'ufficio rispecchino accuratamente i tuoi impegni. È possibile bloccare la disponibilità per un'intera data, rimuovere gli intervalli di tempo da una data o aggiungere nuovi intervalli di tempo a una data.
| 1 |
Vai alla scheda Orario d'ufficio e clicca su Eccezioni. |
| 2 |
Scegli una data e utilizza le seguenti opzioni per modificare la tua disponibilità per quella data:
|
| 3 |
Fai clic su Salva. |
Operazioni successive
È possibile impostare un massimo di 50 eccezioni future in qualsiasi momento. L'impostazione di un'eccezione per una data non inciderà sulle riunioni in orario di ricevimento programmate da uno studente prima dell'impostazione dell'eccezione. Se necessario, è possibile ripianificare queste riunioni in Webex.
Collaborazione in classe
Operazioni preliminari
Per abilitare la collaborazione in classe in Webex LTI Legacy, è necessario prima autorizzare l'LMS e accedere con Webex.
| 1 |
In Impostazioni, vai alla sezione Collaborazione in classe. |
| 2 |
Fare clic su Autorizza e seguire le istruzioni visualizzate sullo schermo per autorizzare Webex LTI Legacy nel tuo LMS. Se hai già effettuato l'autorizzazione con il tuo LMS, non vedrai il pulsante Autorizza e puoi saltare questo passaggio. |
| 3 |
Fare clic su Accedi con Webex per abilitare la collaborazione in classe e immettere le credenziali Webex. Se hai già effettuato l'accesso con Webex, non vedrai il pulsante Accedi con Webex per abilitare la collaborazione in classe e puoi saltare questo passaggio. |
| 4 |
Attiva l'interruttore per abilitare la collaborazione in classe. |
Operazioni preliminari
Per abilitare la collaborazione in classe in Webex LTI, è necessario prima accedere con Webex.
| 1 |
In Impostazioni, vai alla sezione Collaborazione in classe. |
| 2 |
Fare clic su Accedi con Webex per abilitare la collaborazione in classe e immettere le credenziali Webex. Se hai già effettuato l'accesso con Webex, non vedrai il pulsante Accedi con Webex per abilitare la collaborazione in classe e puoi saltare questo passaggio. |
| 3 |
Attiva l'interruttore per abilitare la collaborazione in classe. |
Abilitando la collaborazione in classeviene creato un team per il corso nell'app Webex e tutti i partecipanti al corso vengono aggiunti come membri di tale team. Per impostazione predefinita, Webex LTI sincronizza automaticamente e quotidianamente l'elenco degli studenti della tua classe. La sincronizzazione automatica garantisce che i membri del team Webex corrispondano esattamente all'elenco degli iscritti al corso.
|
Vai alla scheda Impostazioni e trova la sezione Collaborazione in classe.
|
Puoi disattivare la collaborazione in classe se non vuoi più utilizzarla nella tua classe.
| 1 |
Vai alla scheda Impostazioni e trova la sezione Collaborazione in classe. |
| 2 |
Fare clic su Disattiva collaborazione in classe. |
| 3 |
Leggi la spiegazione di cosa succede quando disabiliti la collaborazione in classe e fai clic su OK. |
Operazioni successive
Archivia il team nell'app Webex per rendere il team e gli spazi non disponibili per i tuoi studenti.


