
感谢您的反馈。
面向教师的 Webex LTI
 反馈?
反馈?设置
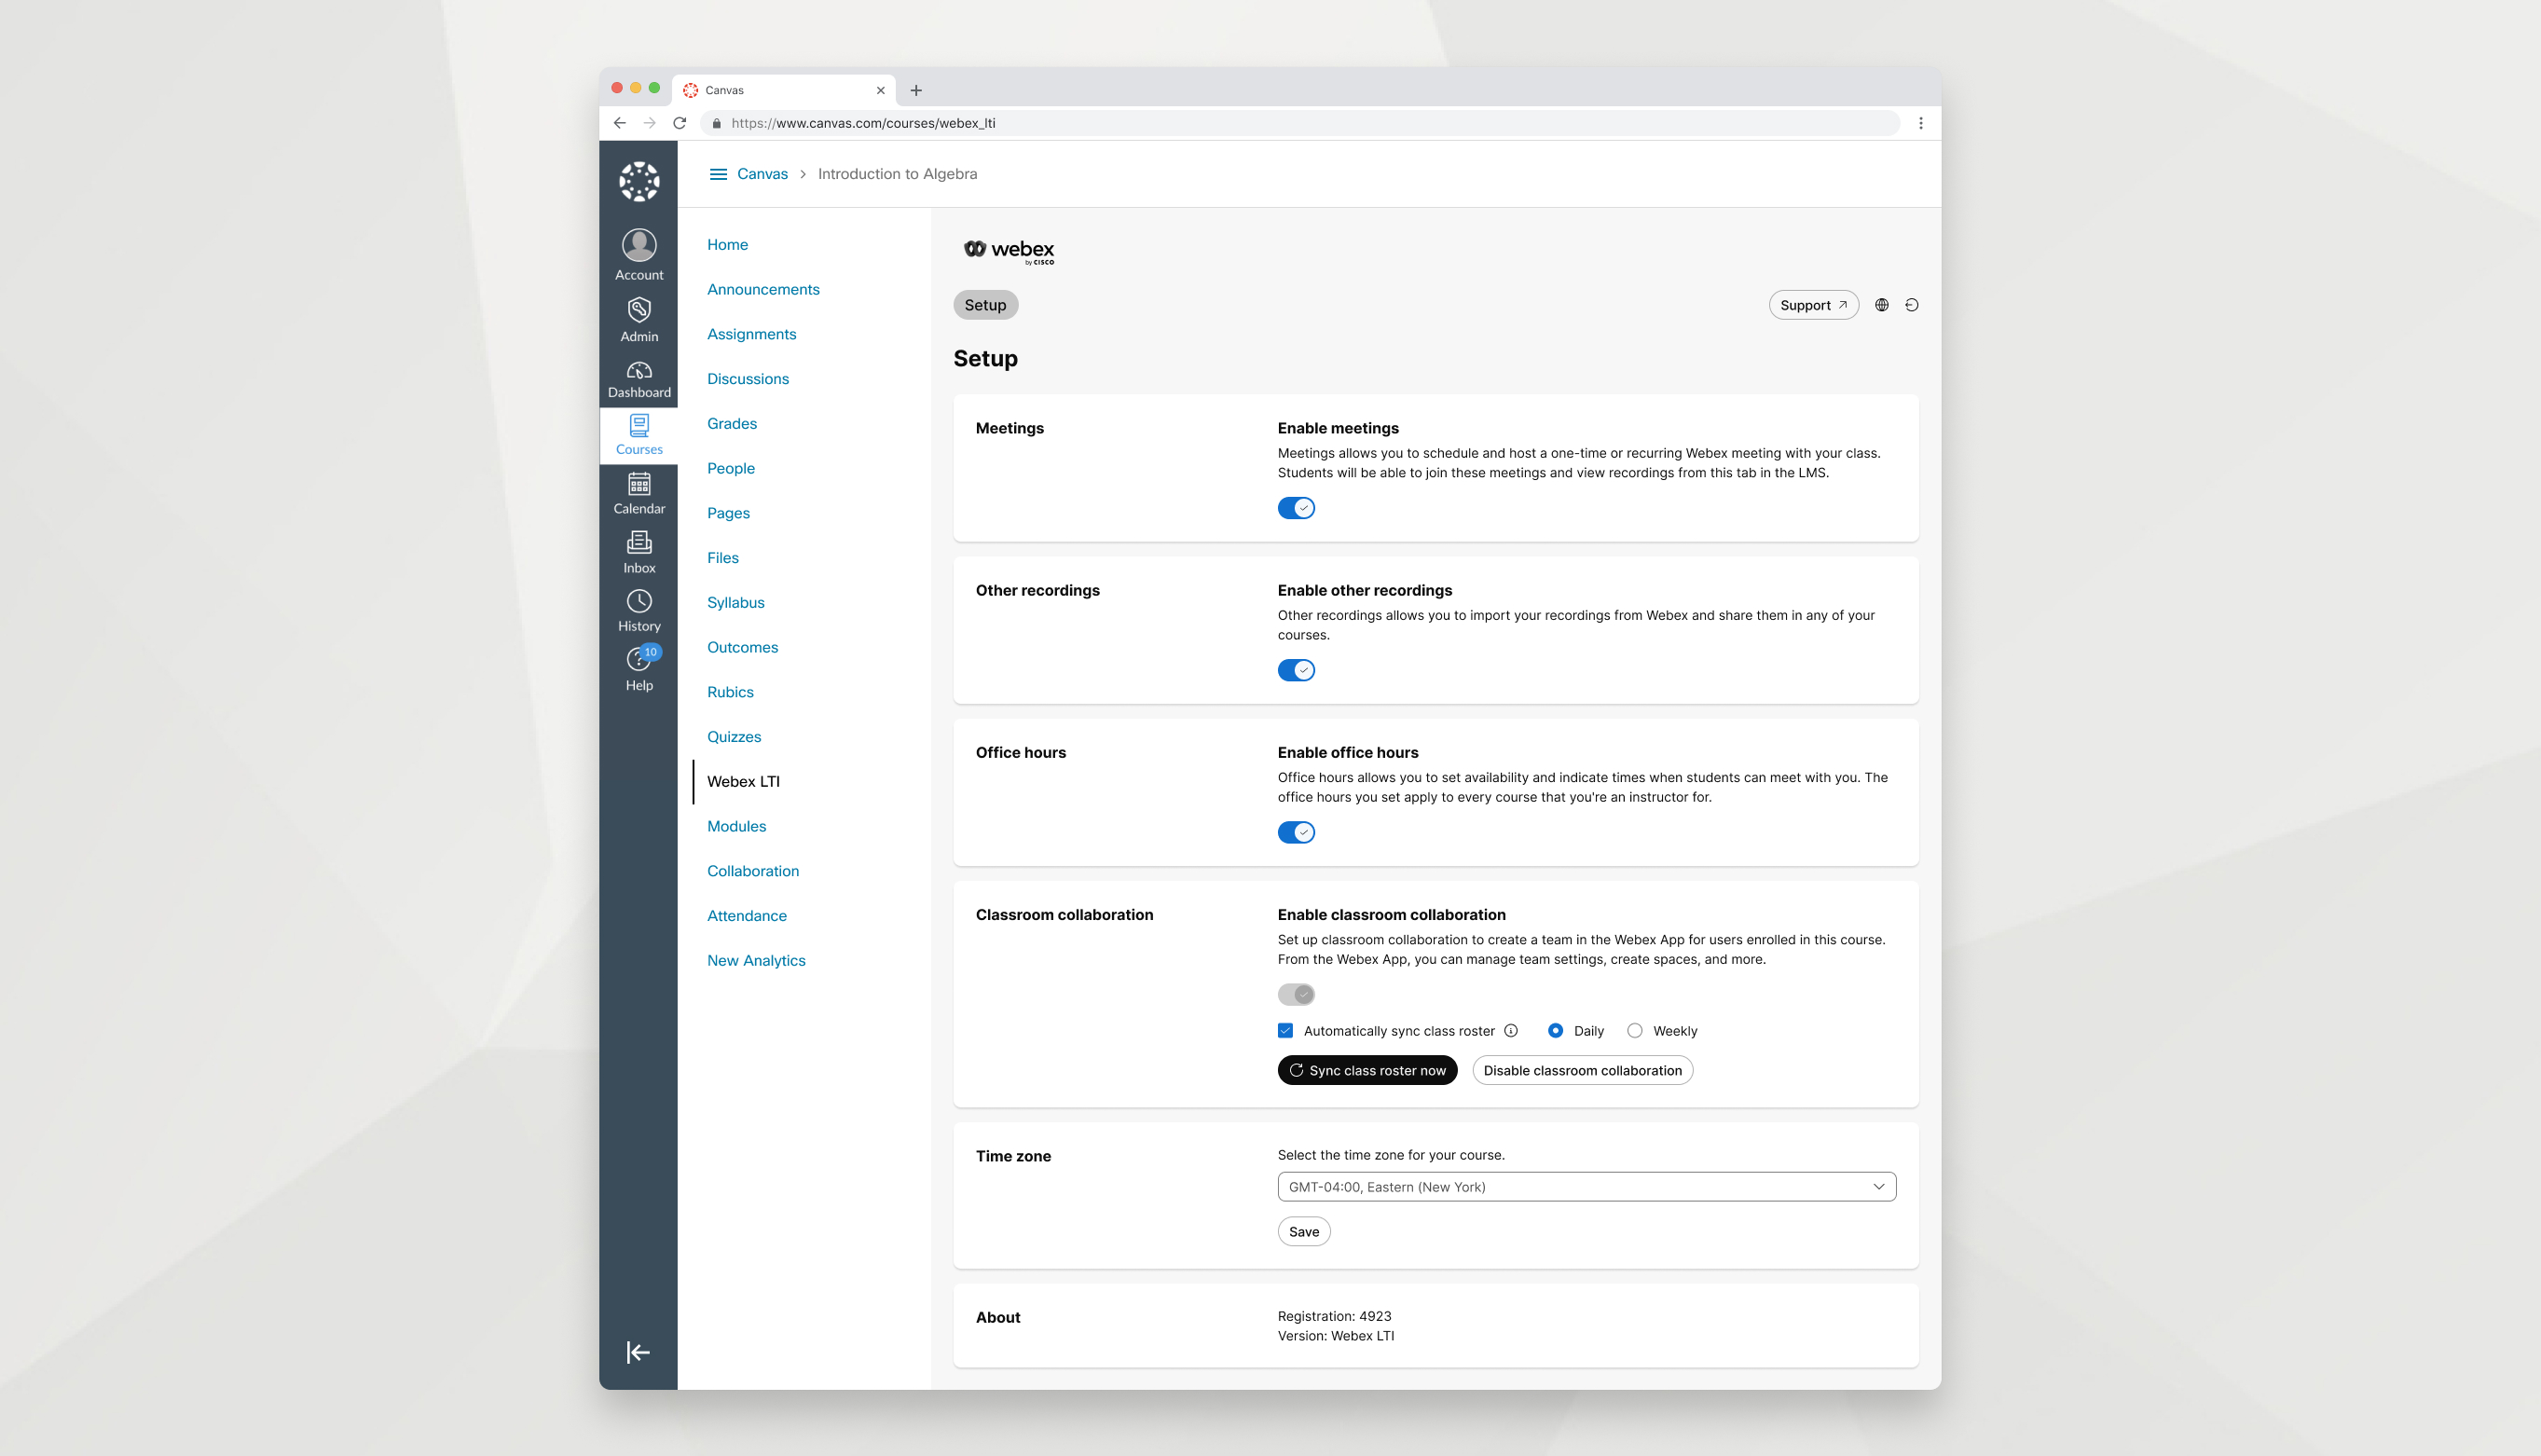
自定义课程的功能偏好。
| 1 |
在您的 LMS 中打开 Webex LTI 并转到 设置 选项卡。 |
| 2 |
选择您想要在课堂中启用的功能。
您启用的每个功能都会显示为其自己的选项卡。如果您在 设置 选项卡中没有看到某个选项,则表示您学校的管理员尚未启用它。 |
| 3 |
选择您的时区并点击 保存。 |
会议
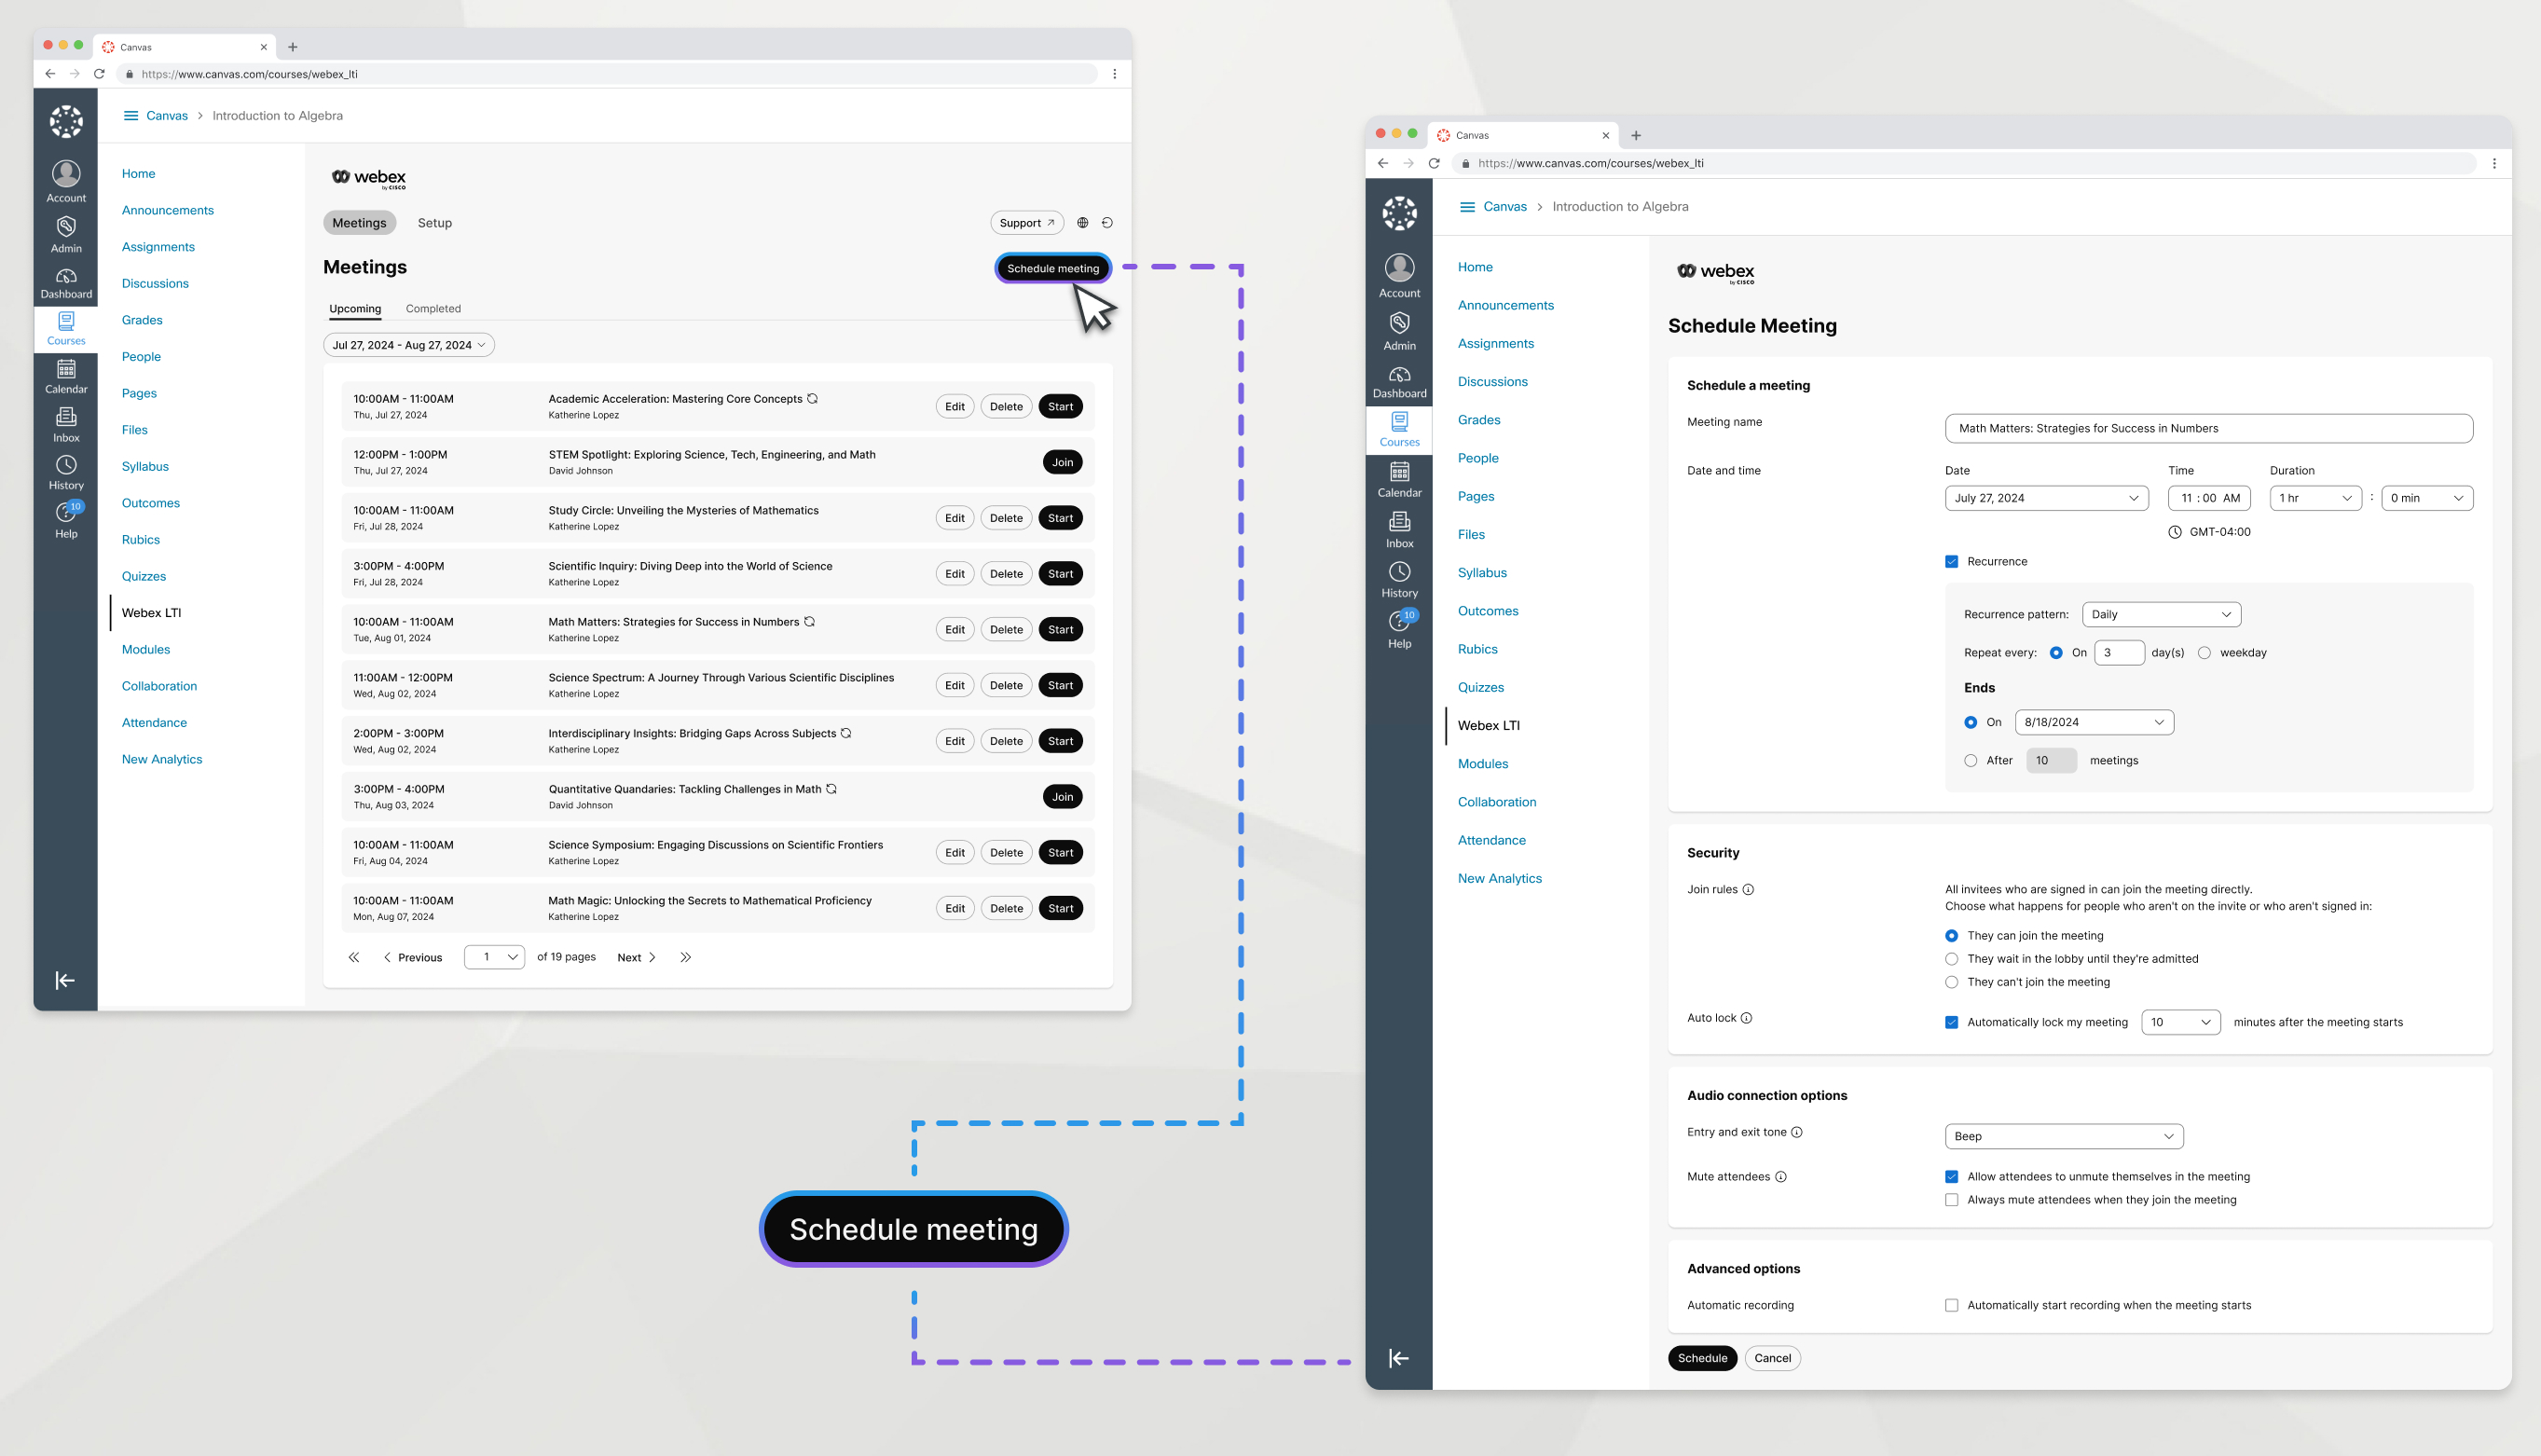
会议 功能允许您安排和主持班级的一次性或定期会议。
| 1 |
前往 会议 并点击 安排会议。 如果出现提示,请使用 Webex 登录。 |
| 2 |
输入以下信息:
|
| 3 |
点击 安排 |
创建会议后,该会议将显示在即将召开的会议标签页中,报名参加本课程的所有人都可以看到它。您可以从 即将举行的 选项卡开始、编辑或删除会议
编辑或删除定期会议将编辑或删除整个会议系列。重复会议不能单独编辑或删除。
如果课程中有多个讲师,您只能开始、编辑和删除您创建的会议。
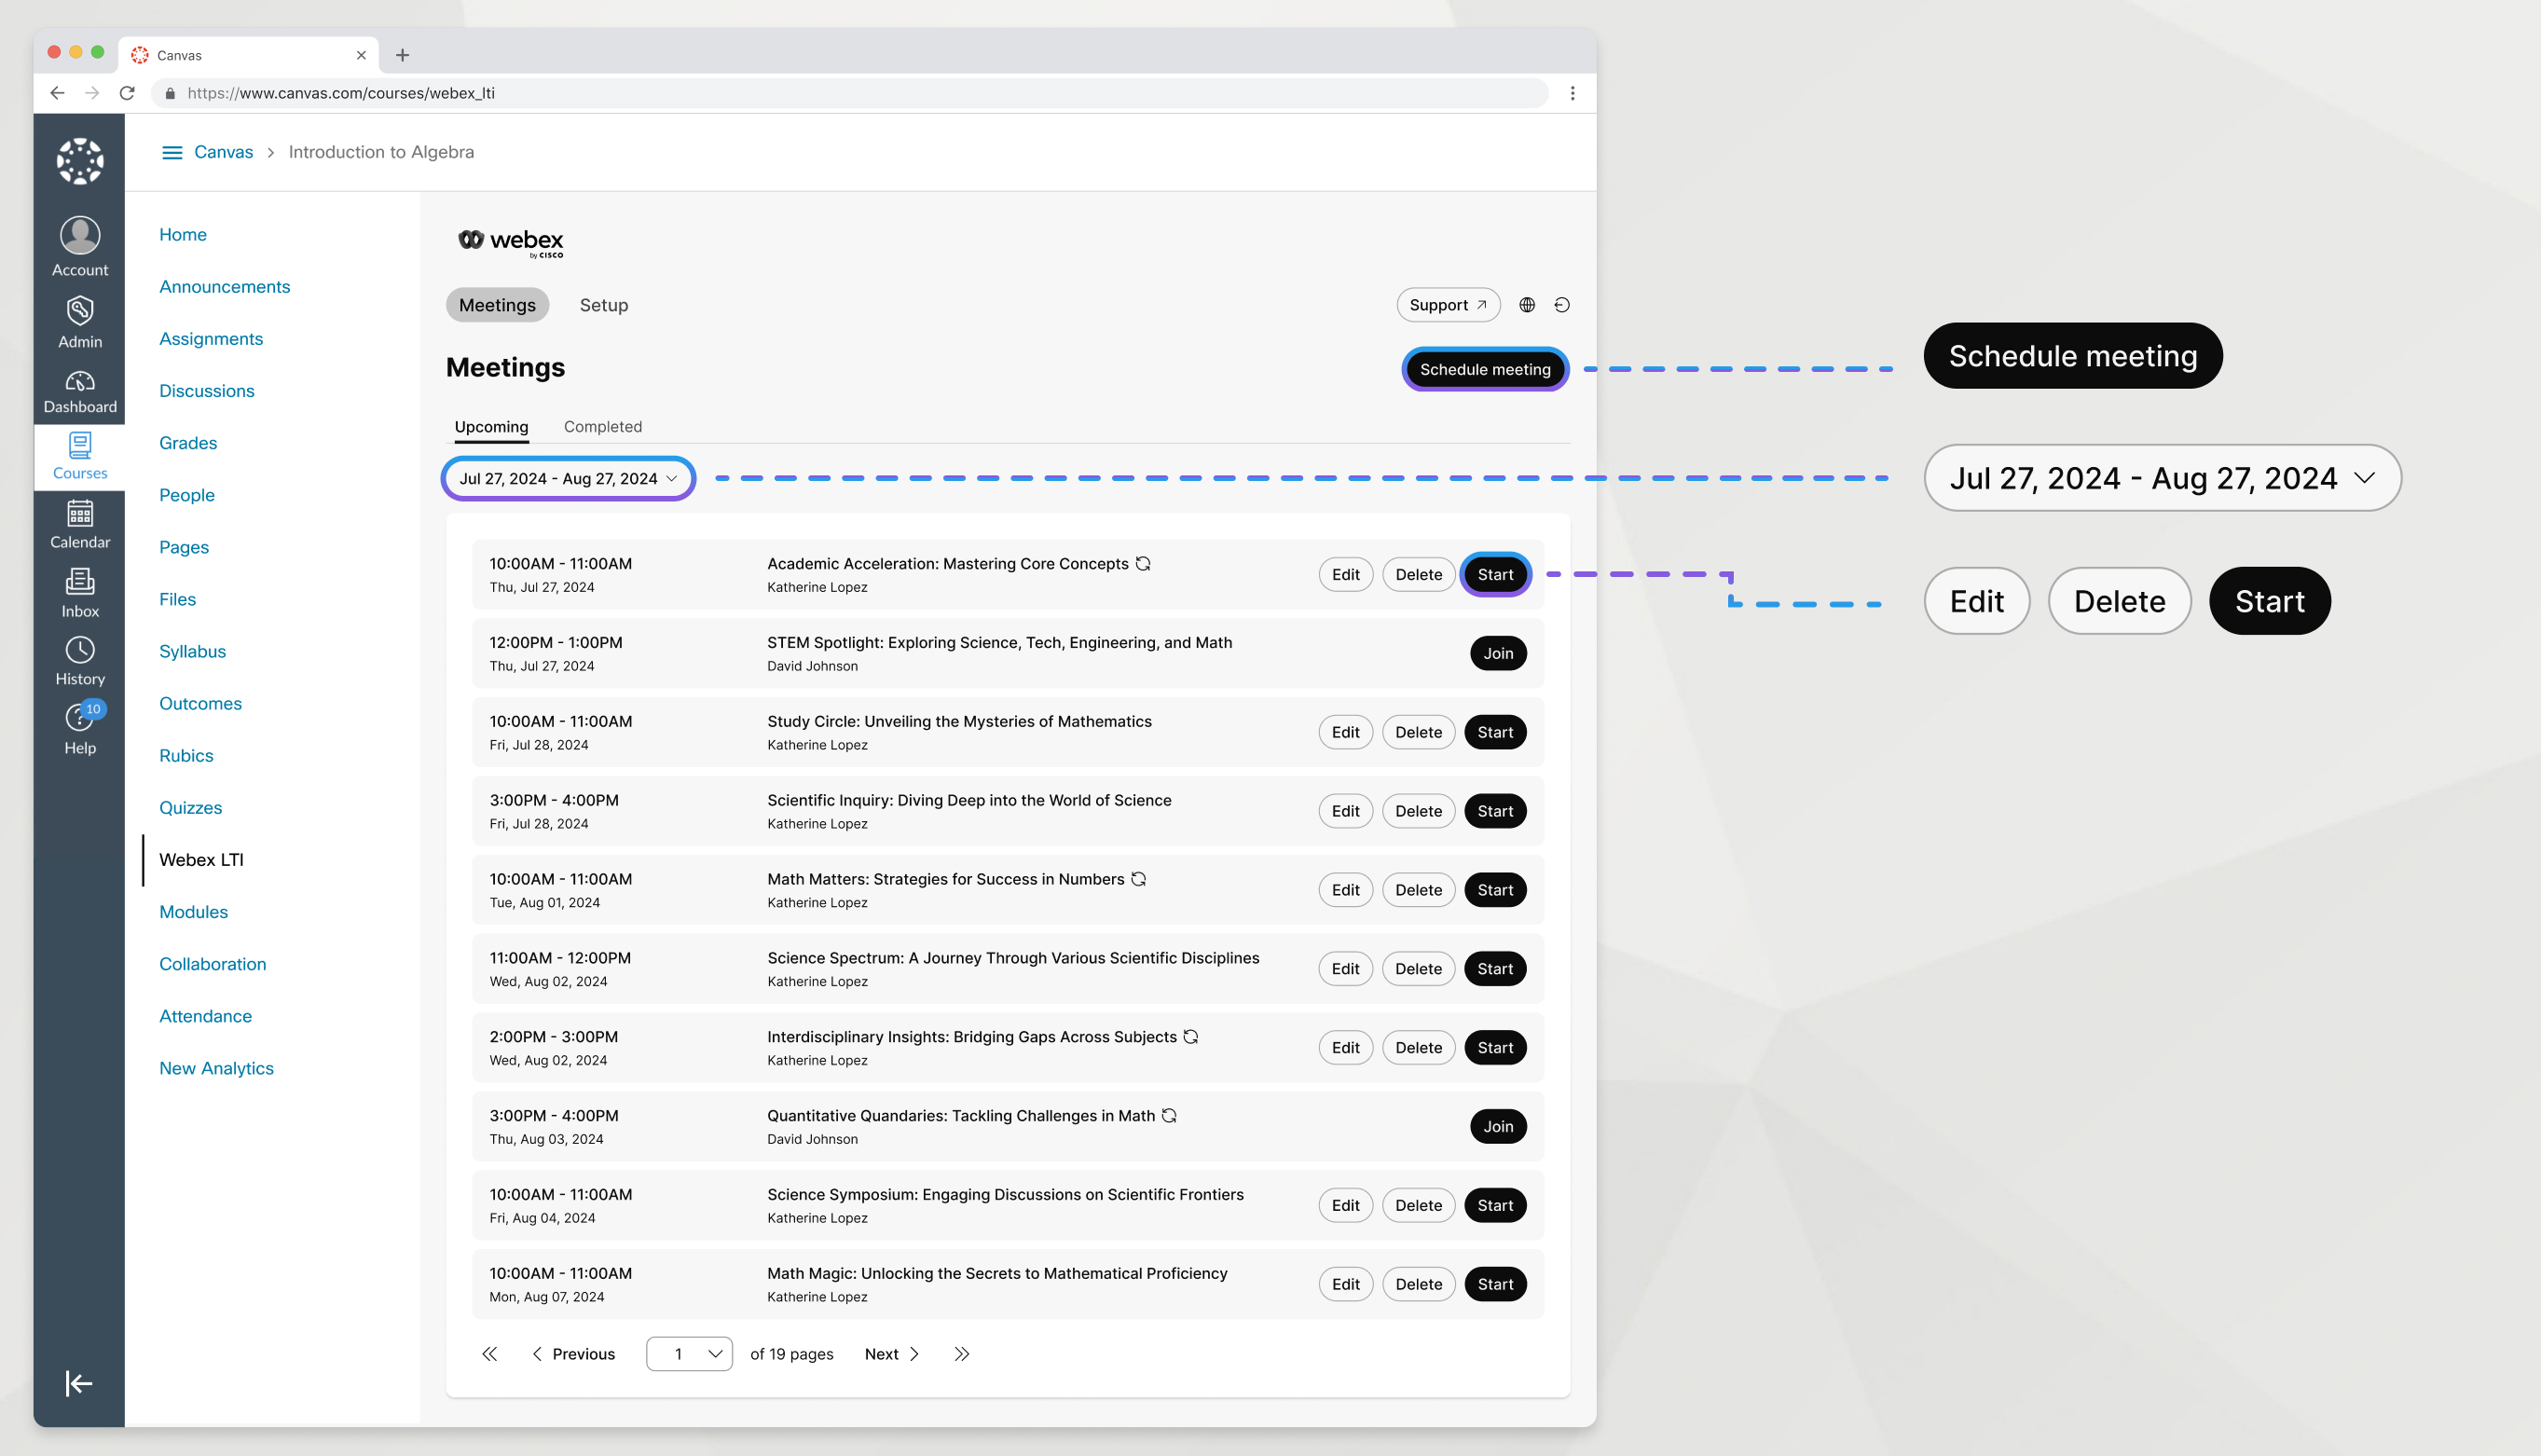
使用 Webex LTI 从您的 LMS 开始课堂会议。
| 1 |
转到 会议 选项卡。 |
| 2 |
在 即将举行 选项卡下,找到您的会议并点击 开始。 |
您可以录制在 Webex LTI 中安排的会议,以供您的学生使用。
要使录制内容显示在 Webex LTI 中,您必须在 Webex LTI 中安排会议,并在开始会议时从 Webex LTI 内部登录 Webex。
| 1 |
在课堂会议期间,单击 Webex 中的 录制 如果您看不到录制按钮,请在更多 |
| 2 |
选择 云端录制 ,然后点击 录制。 录音过程中,您和其他会议参与者应该会在窗口右上角看到一个红色图标。 |
| 3 |
如果需要,请再次单击 录制
|
 。
。 选项下查找。
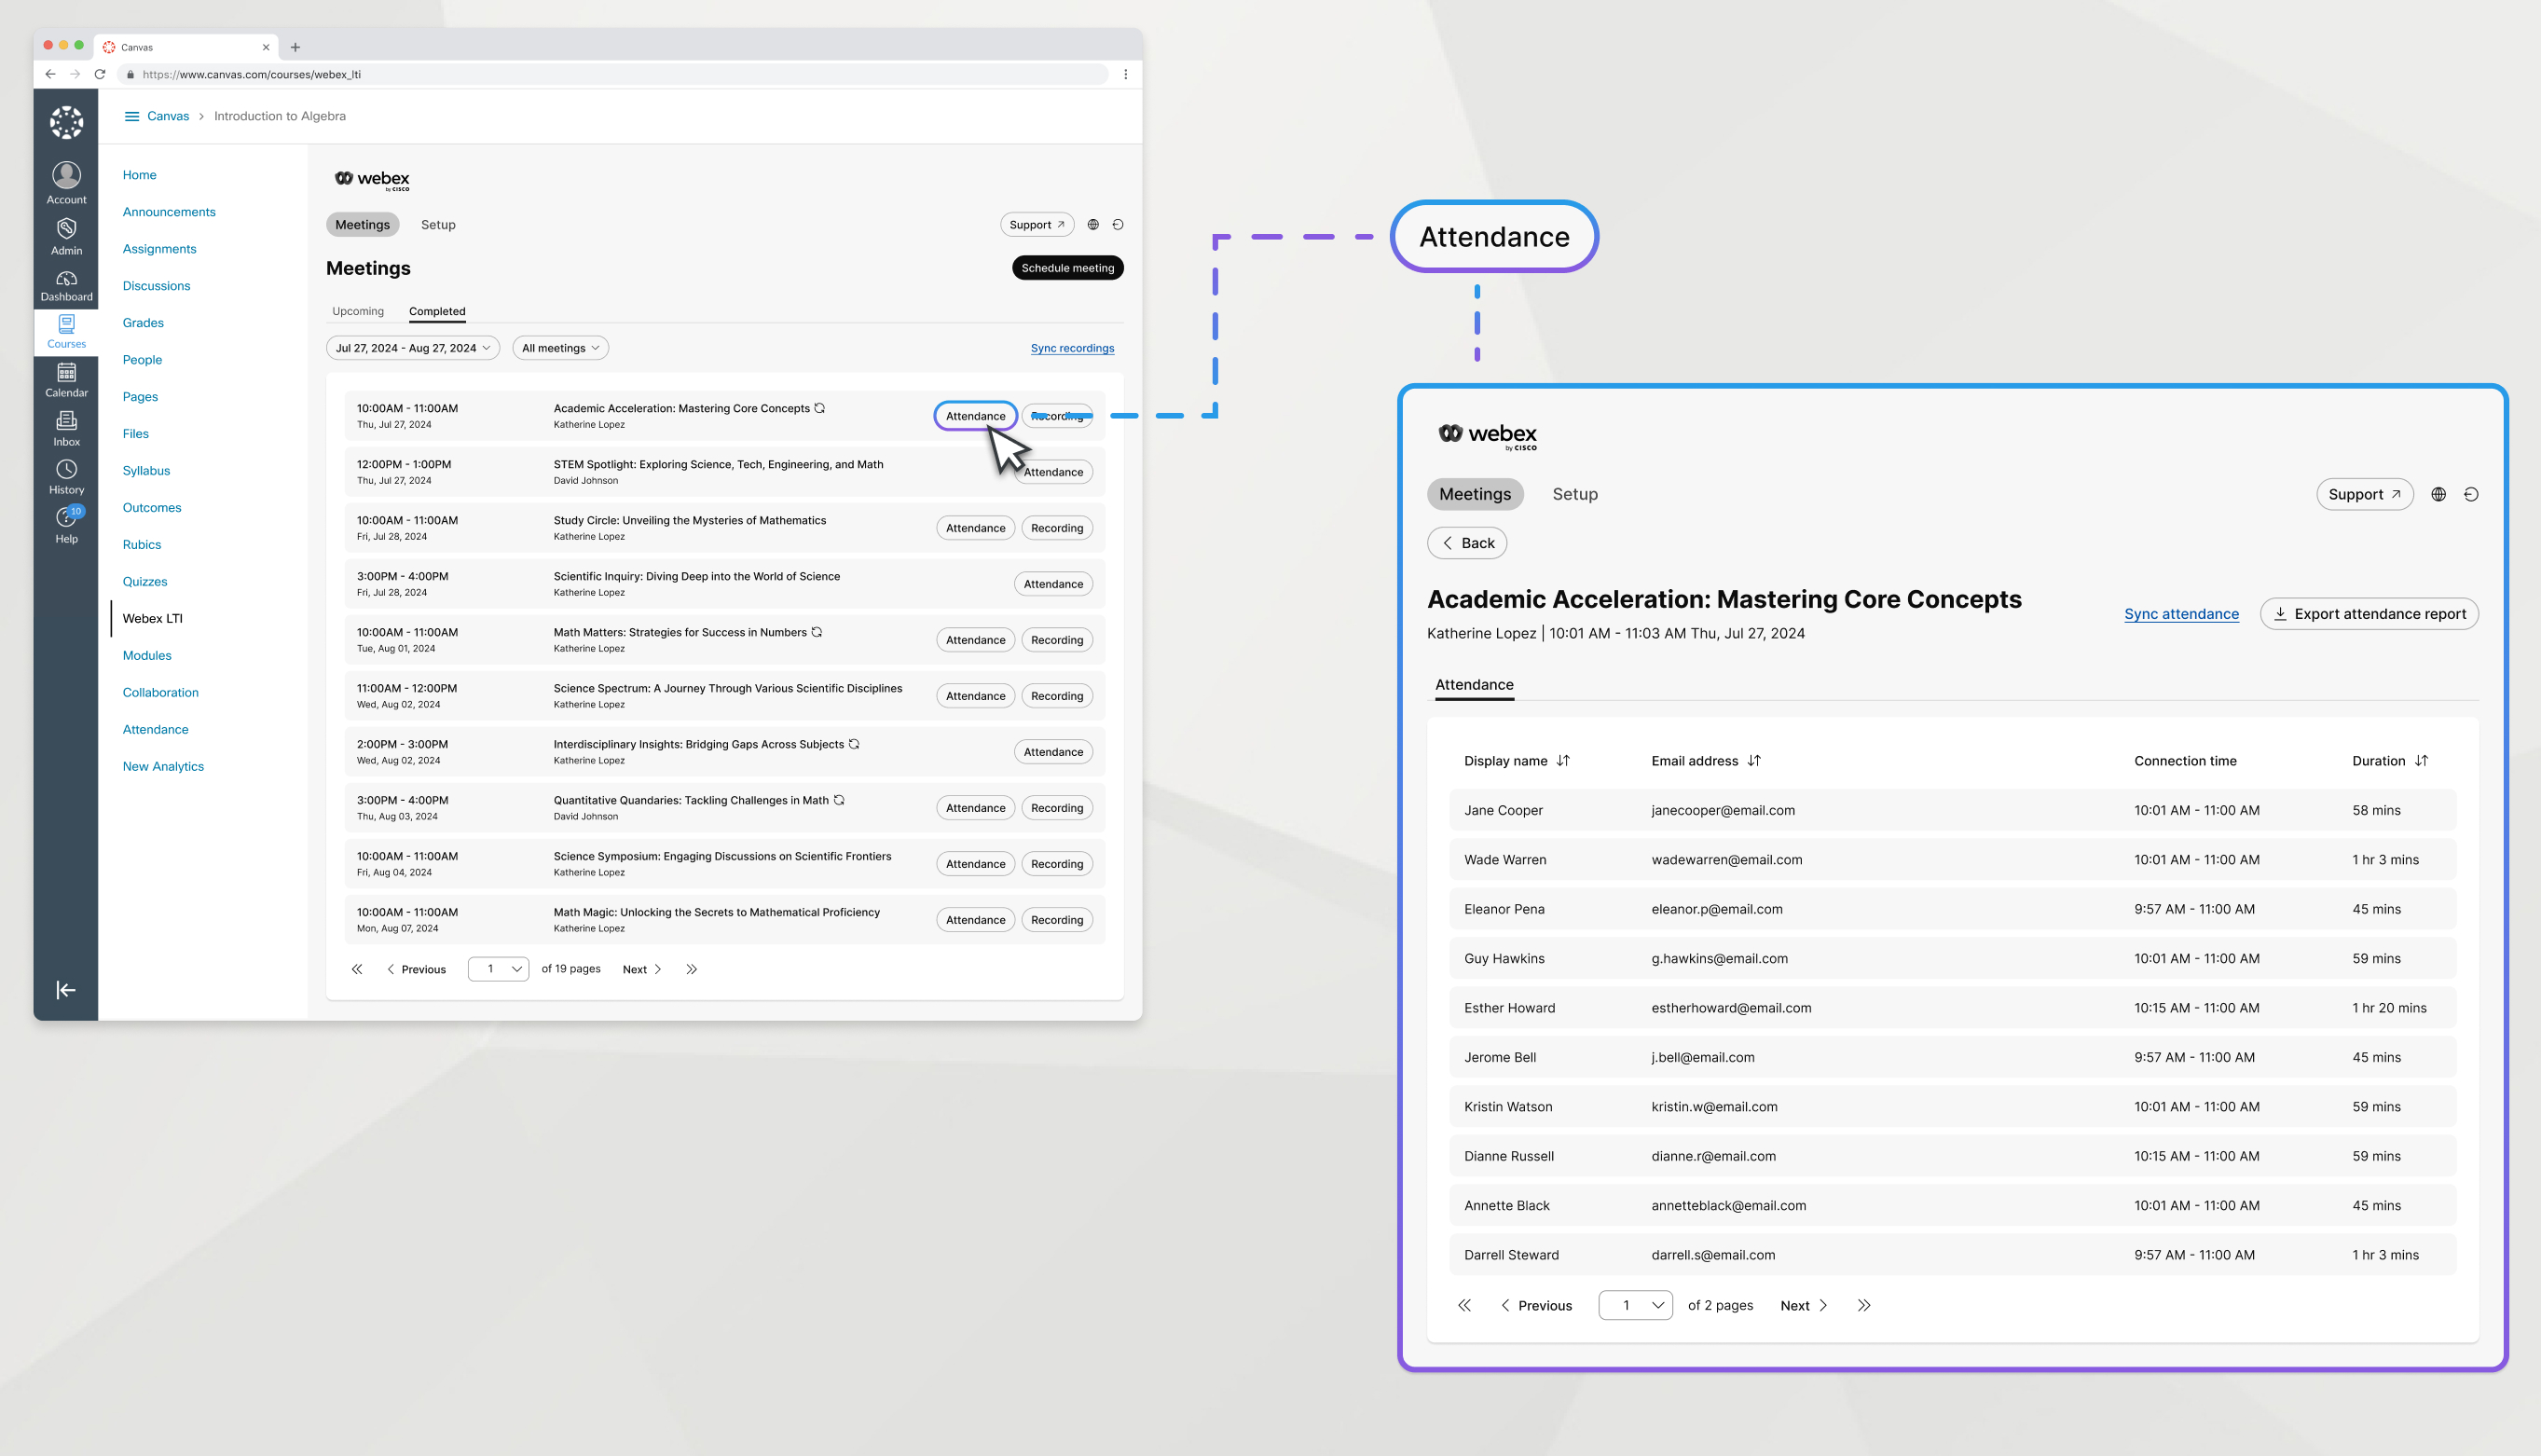
会议结束后,查看加入会议的参与者列表。
| 1 |
转到 会议 选项卡并点击 已完成。 |
| 2 |
找到您想要查看出席情况的会议,然后点击 出席情况。 |
| 3 |
(选修的):如果还没有考勤,点击 同步考勤 按钮。 |
下一步
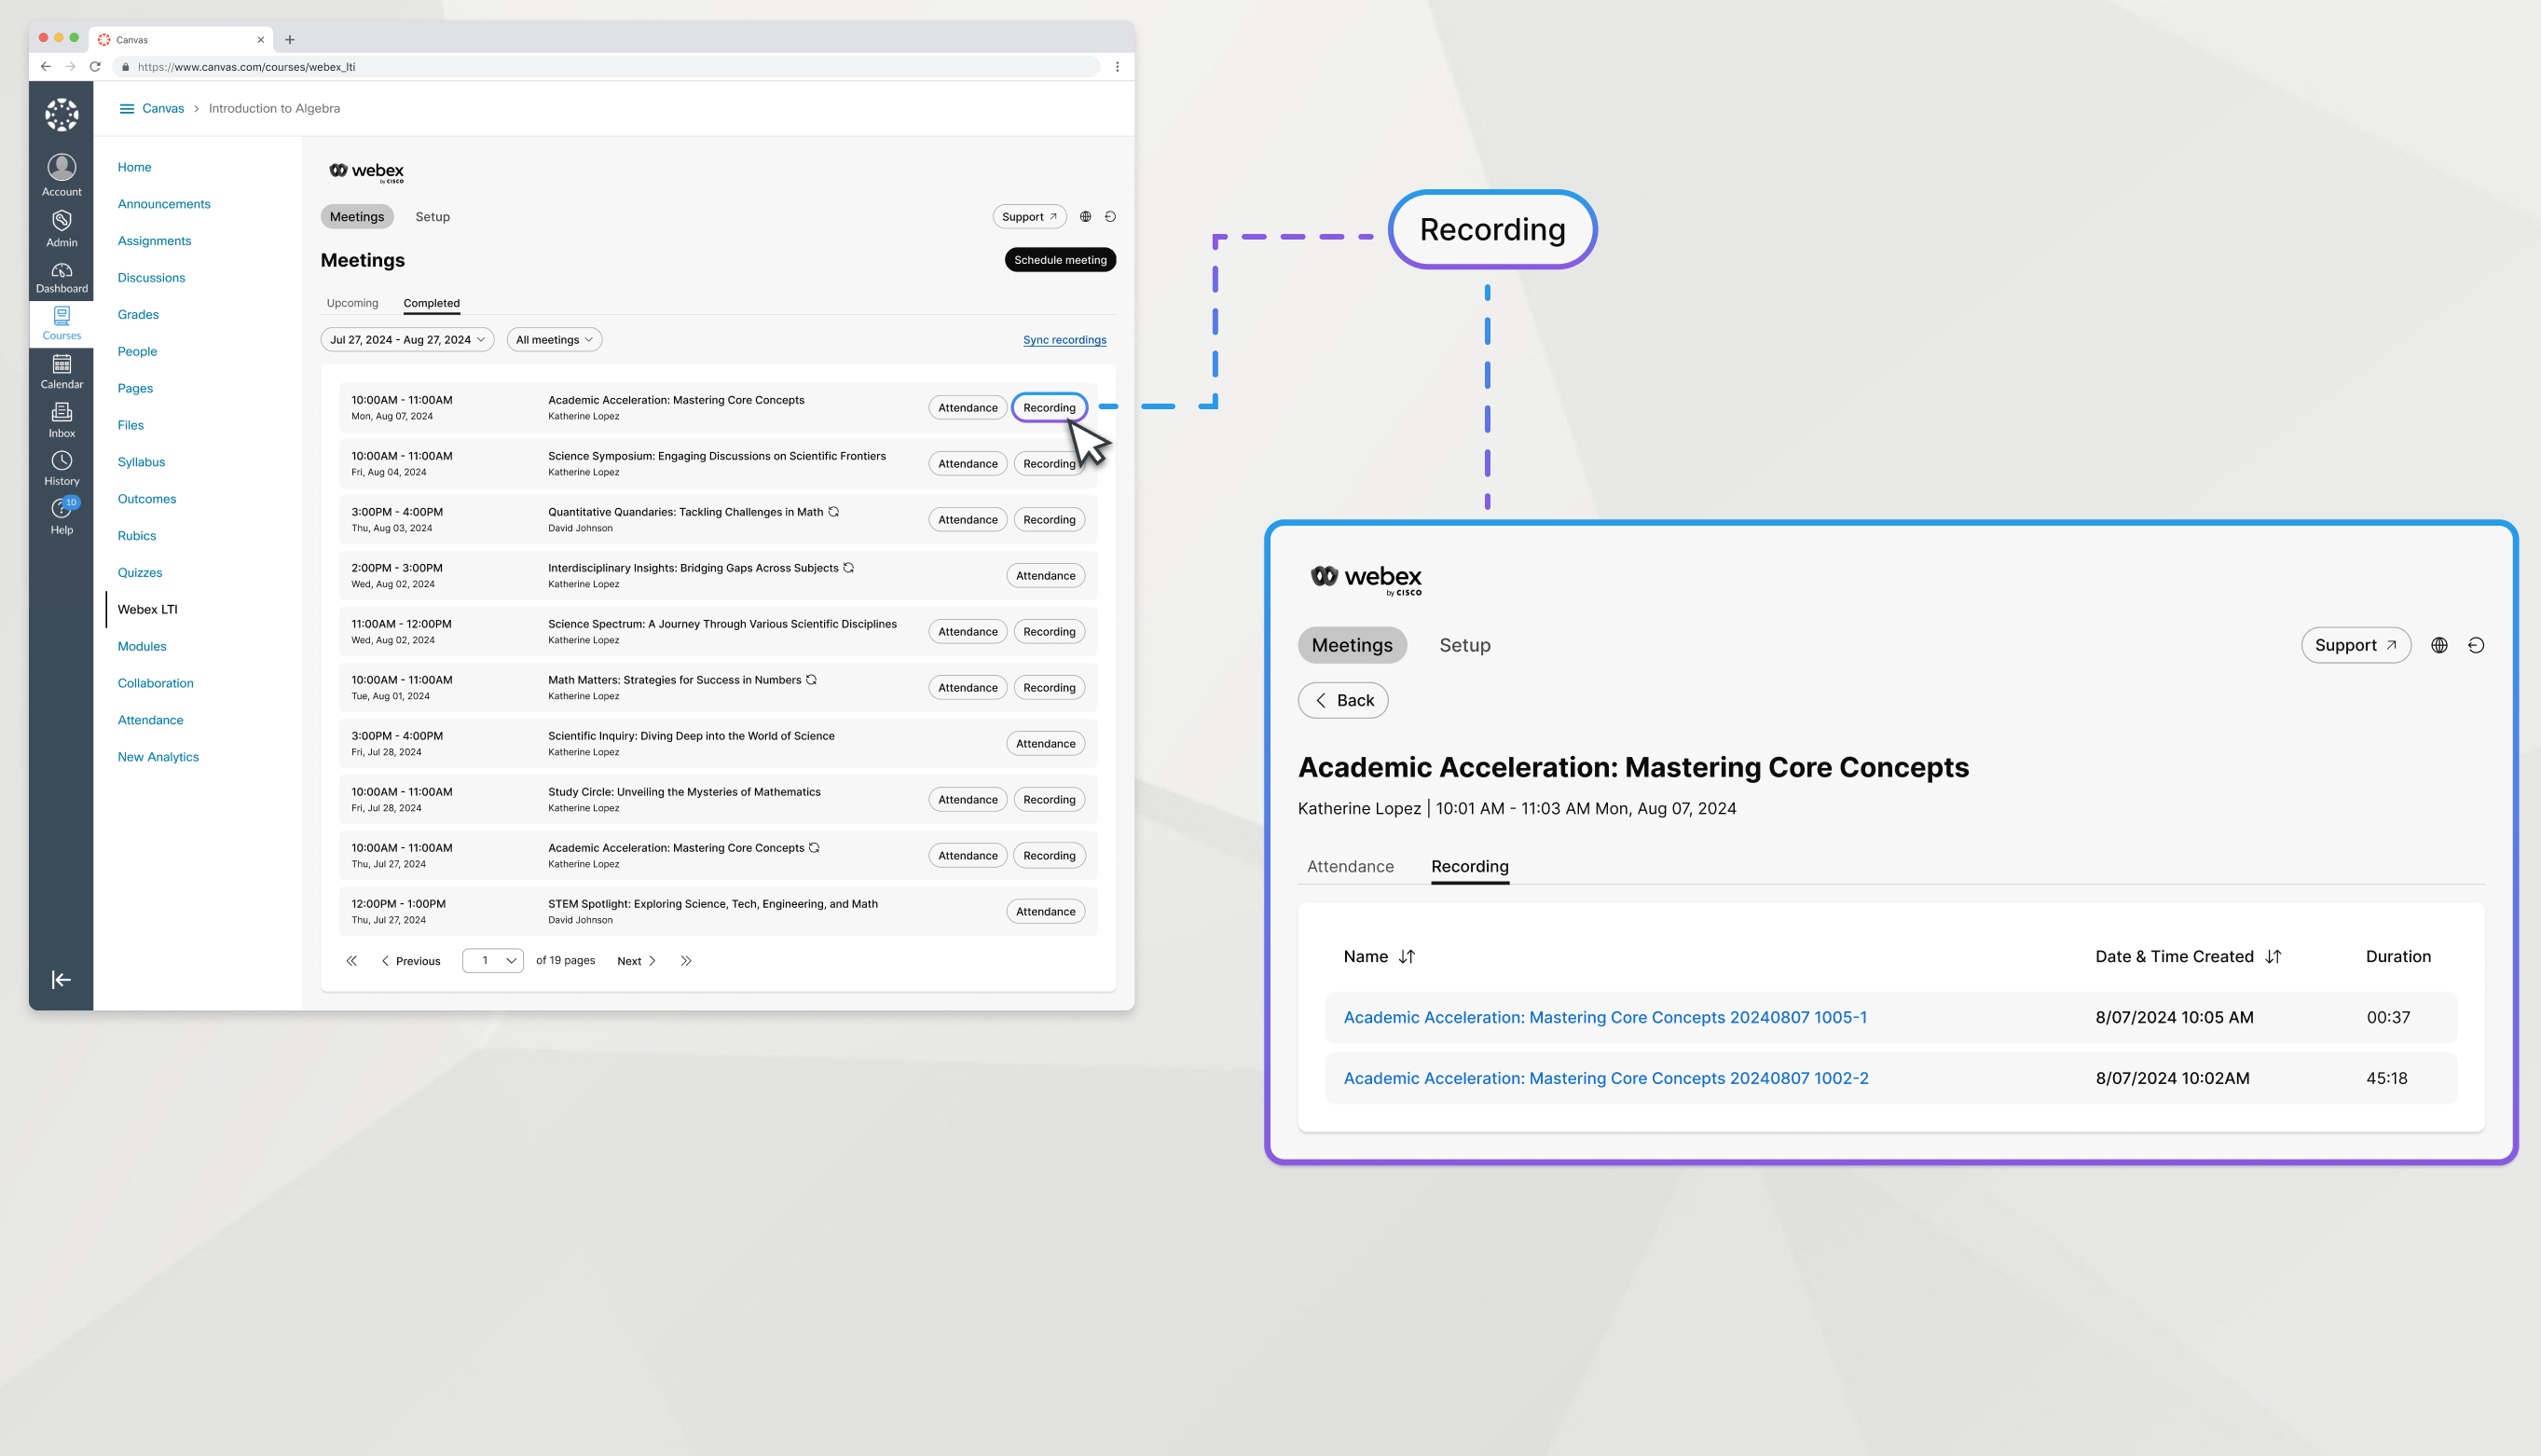
观看课堂会议的录音。
| 1 |
转到 会议 选项卡并点击 已完成。 |
| 2 |
找到您要观看的录音的会议,然后点击 录音。 |
| 3 |
单击录音的名称即可将其打开。 |
| 4 |
复制录音密码,点击 查看录音。 在下一个屏幕上输入密码以查看会议记录。
|
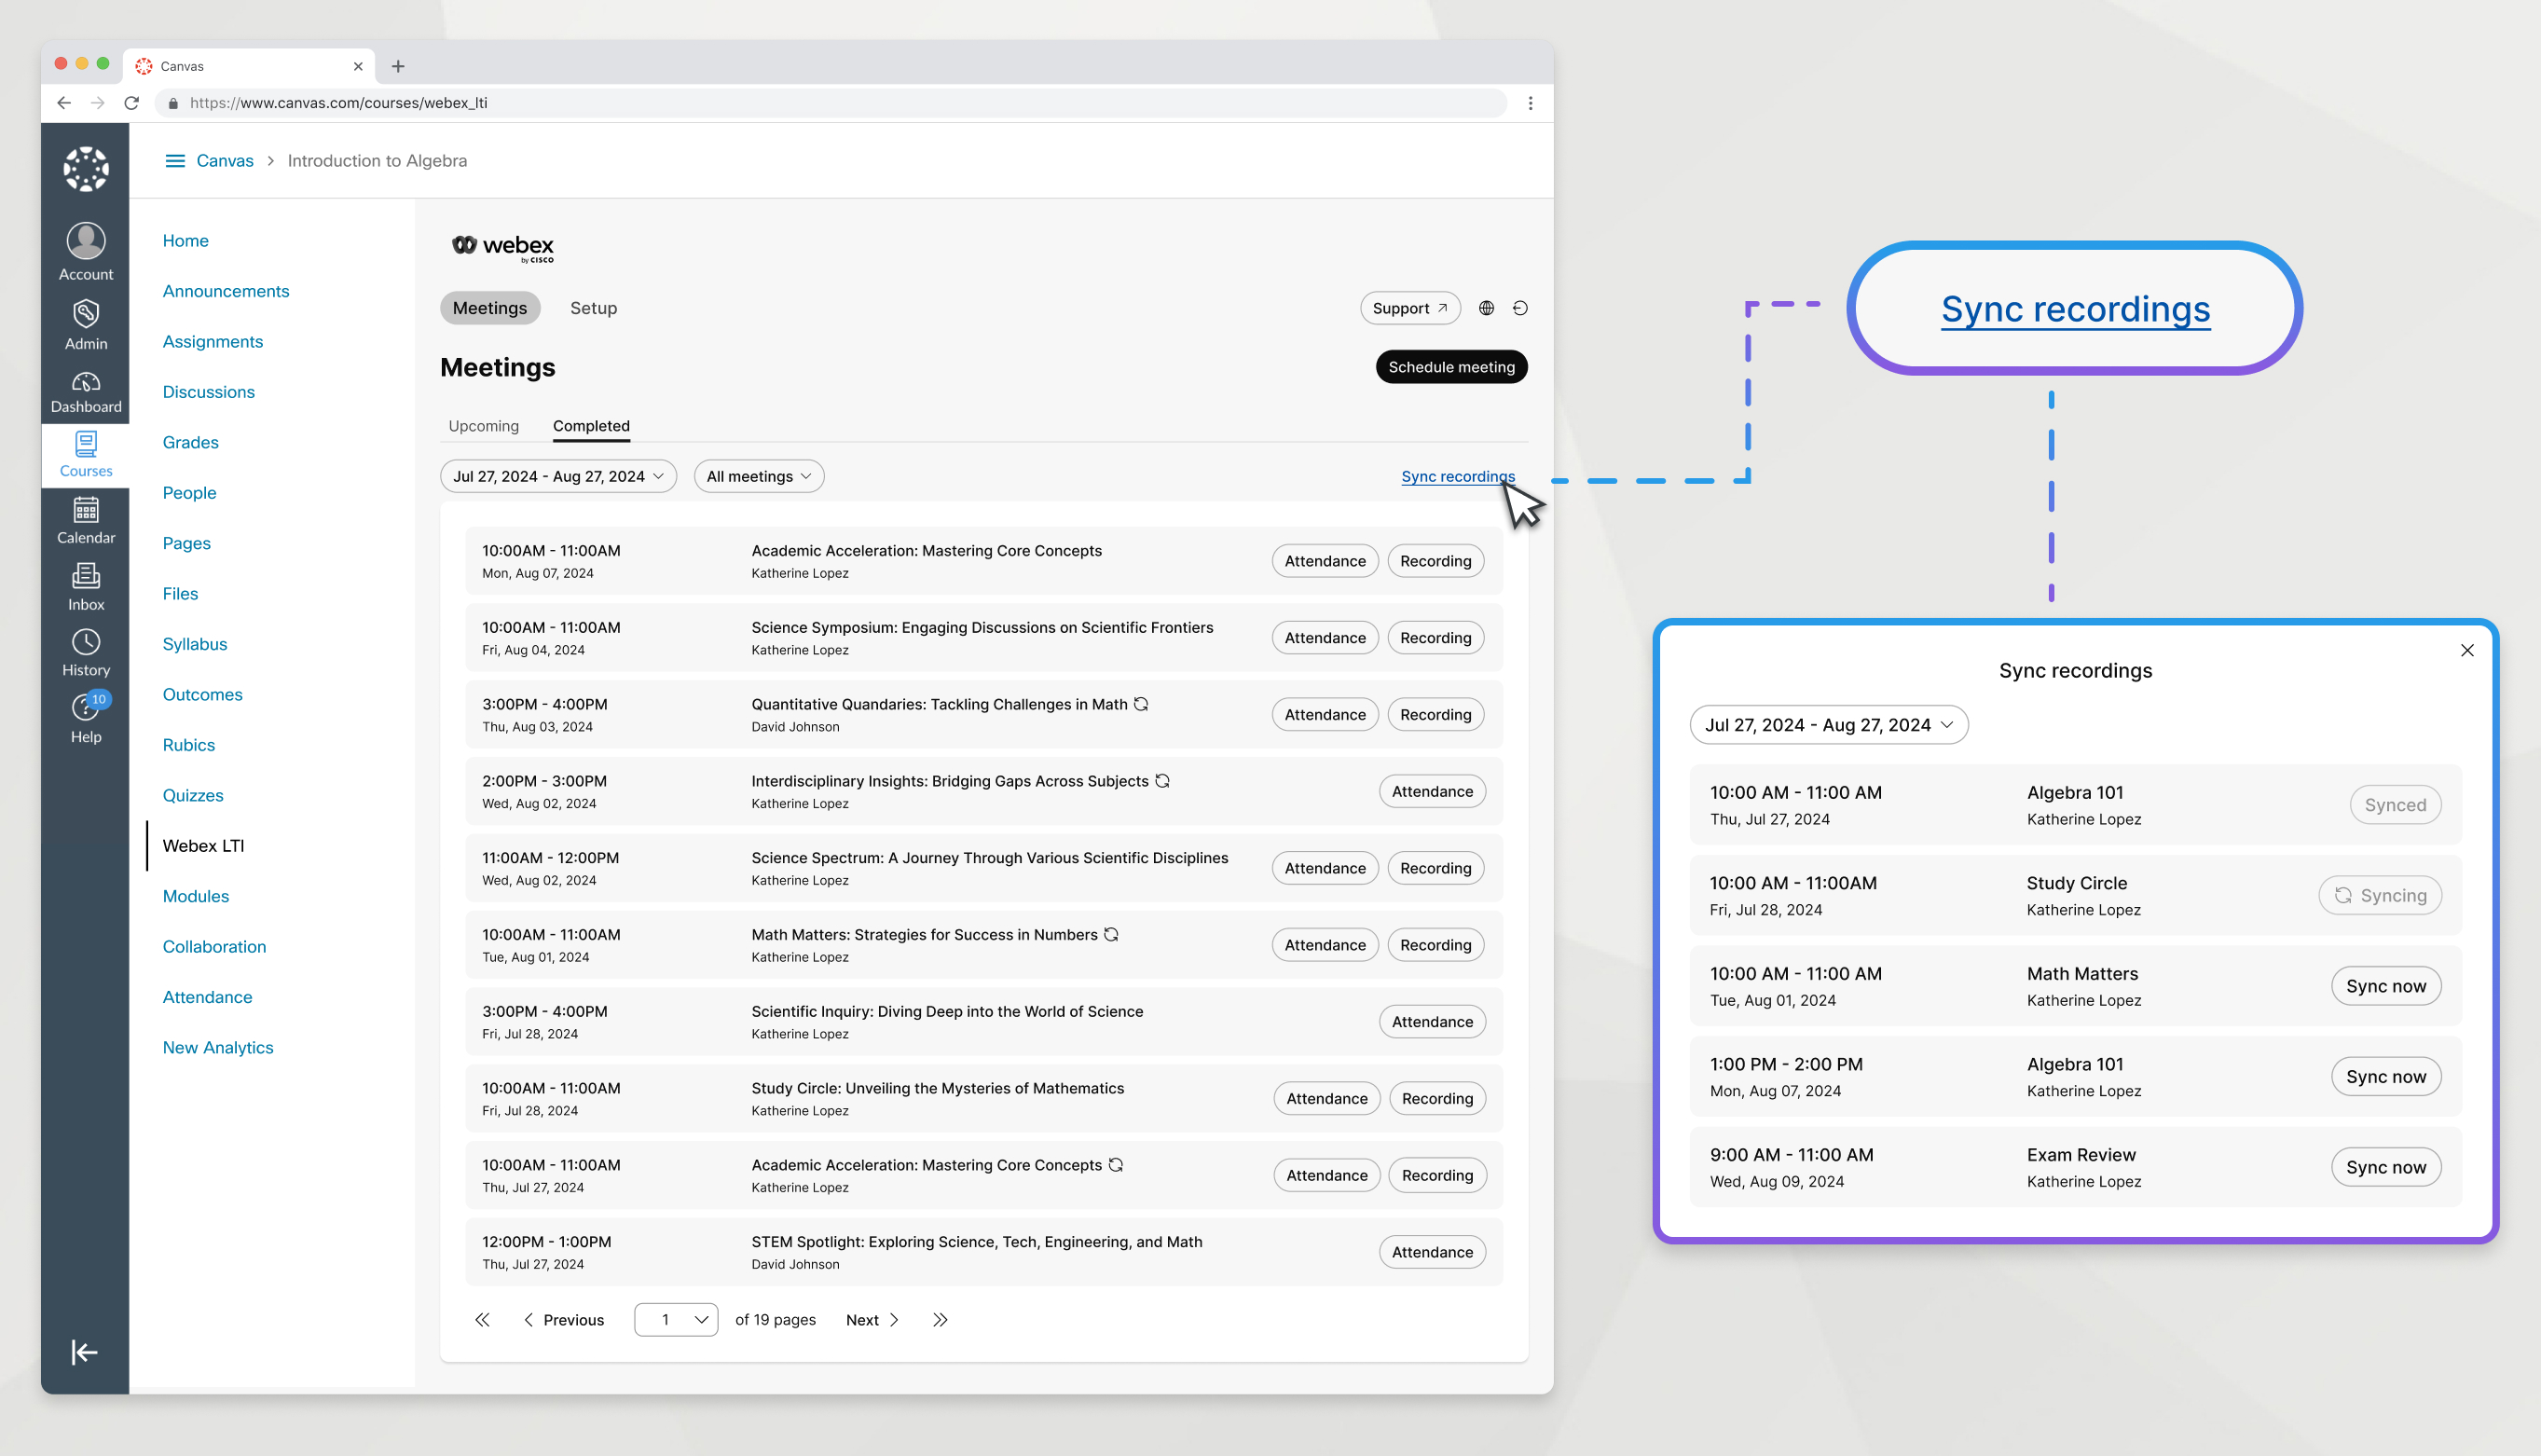
会议结束且录音处理完毕后,您的会议录音将自动出现在会议内容中。如果您需要在自动过程发生之前获得录音,您可以手动同步录音。
| 1 |
转到 会议 选项卡并点击 已完成。 |
| 2 |
点击 同步录音 按钮。 |
| 3 |
选择录制会议发生的日期范围。 您只能选择最多 7 天的日期范围。 |
| 4 |
找到您要同步录音的会议,然后点击 立即同步。 仅当会议已经由 Webex 处理后,才会出现在此窗口中。 |
| 5 |
当录音同步完成后,关闭窗口。 |
下一步
其他录制文件
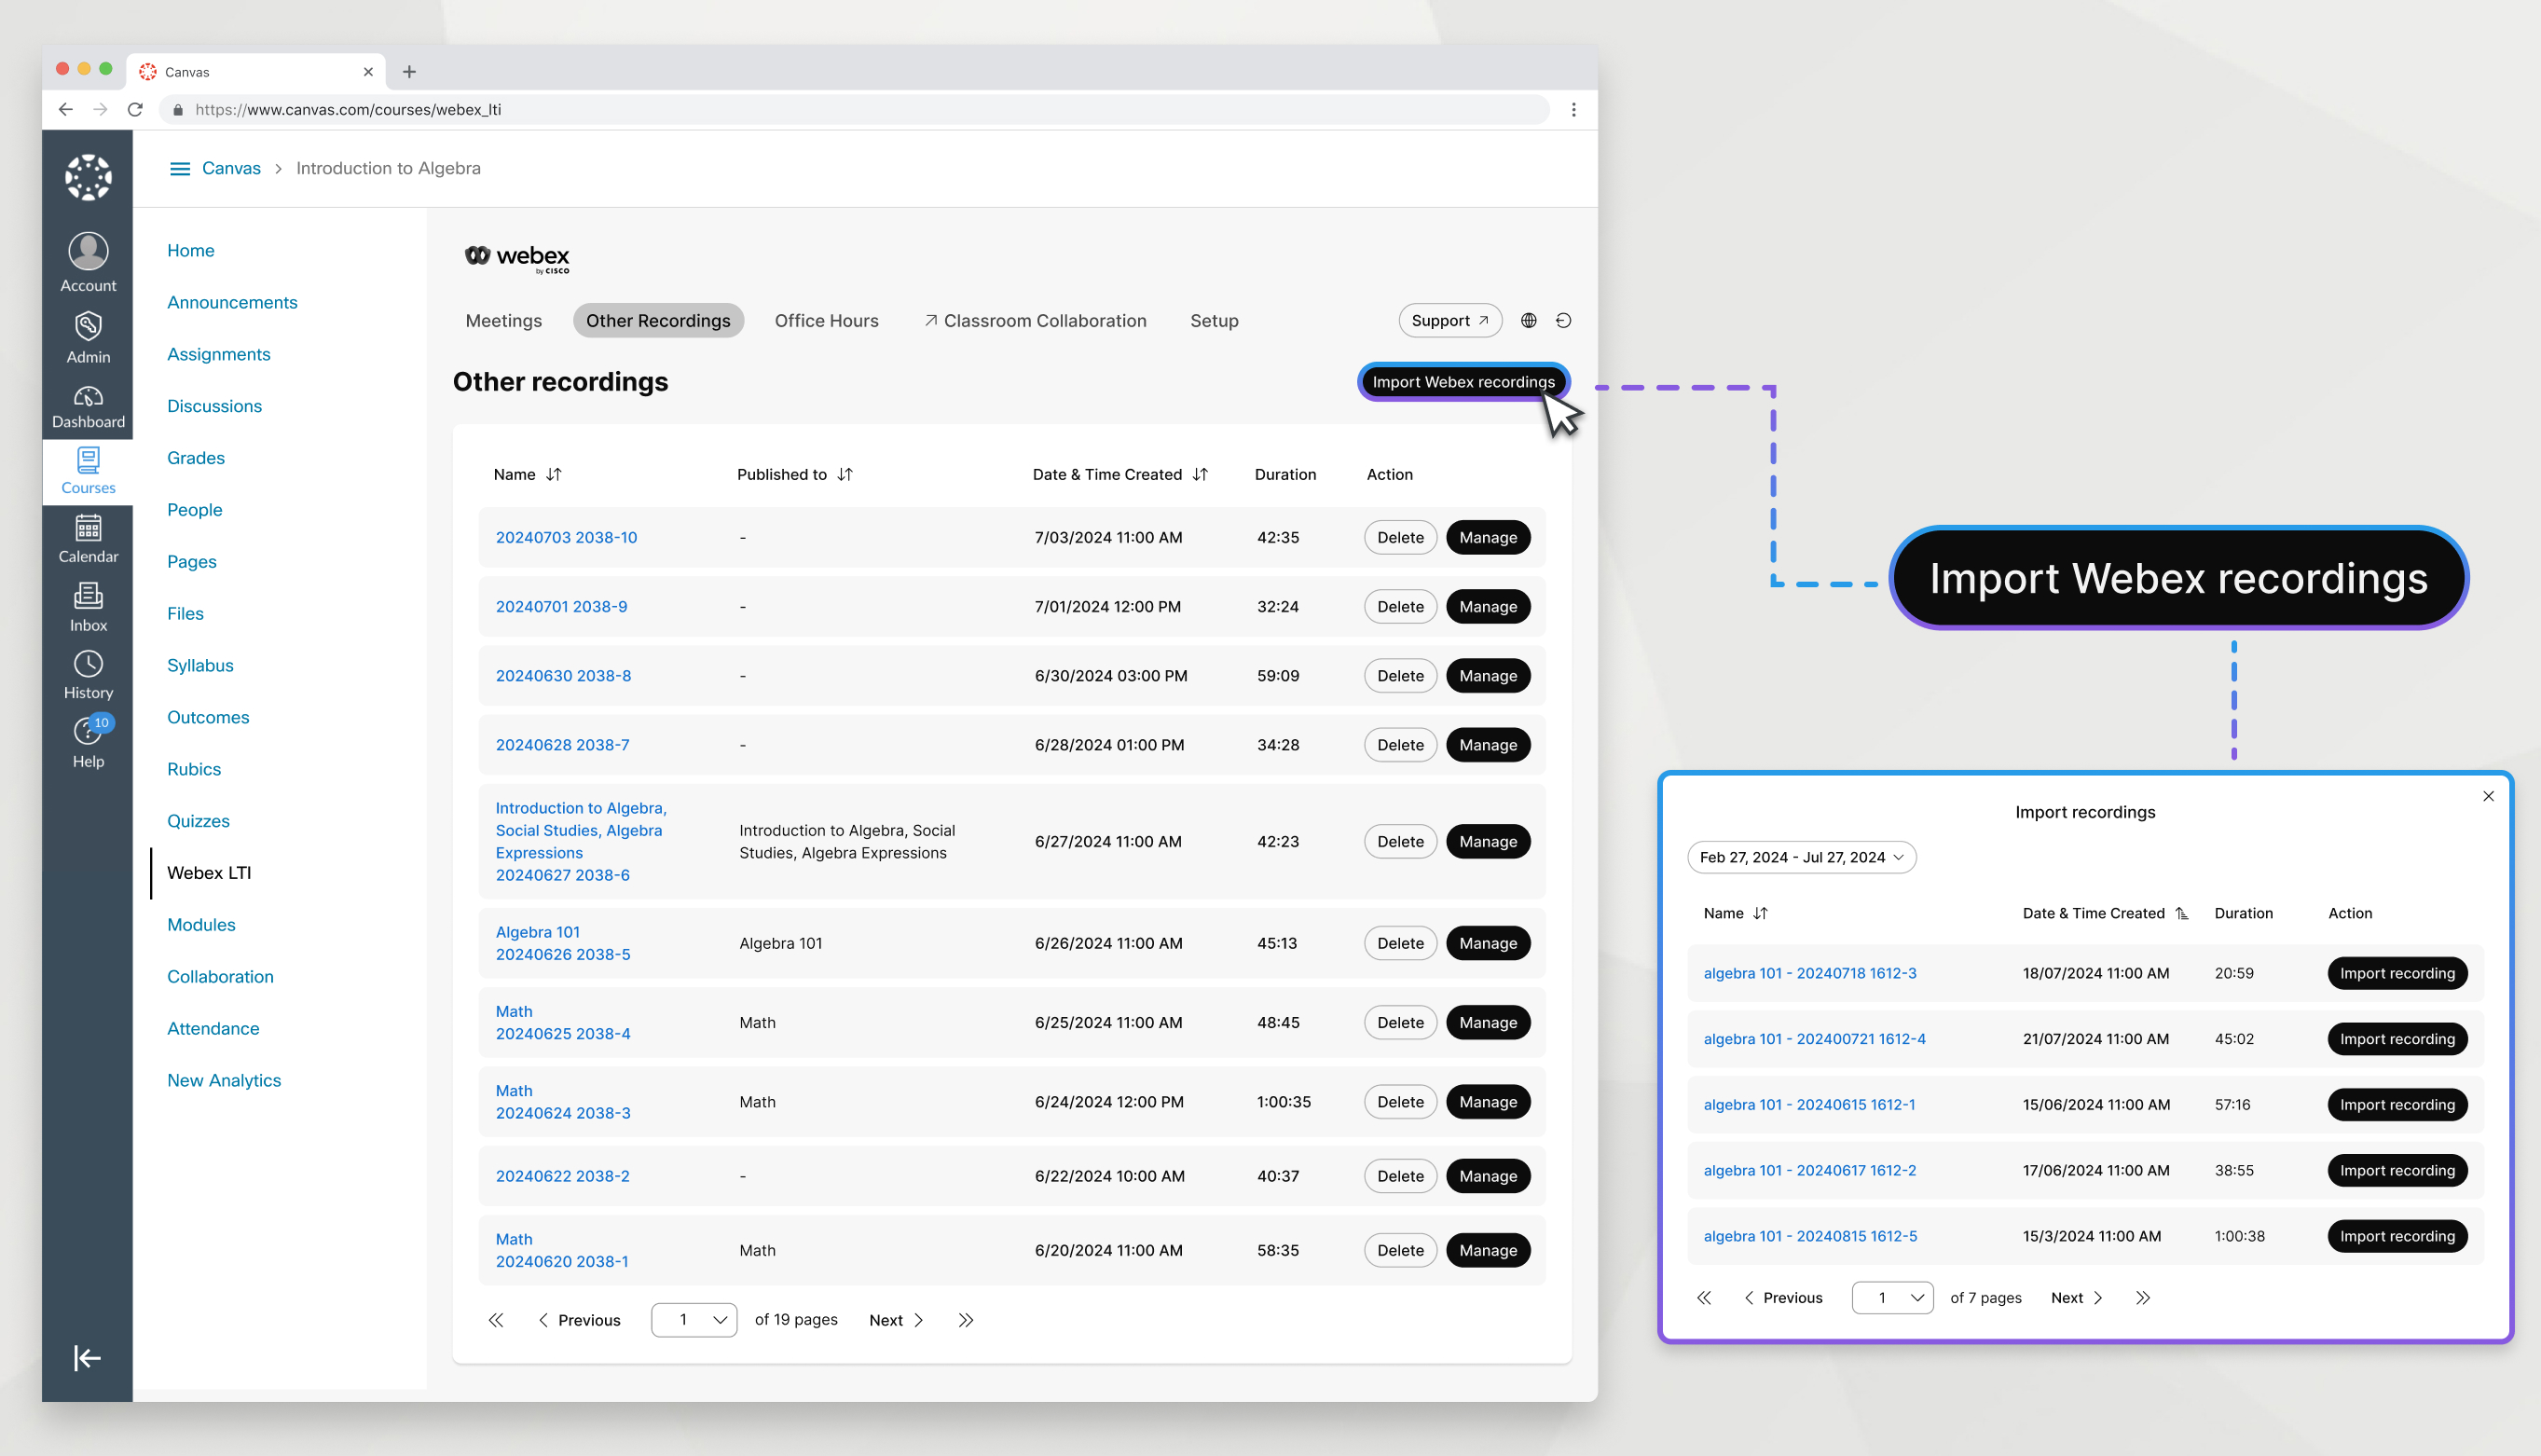
其他录音 允许您导入任何与任何预定的 Webex LTI 会议无关的 Webex 录音,并在您的课堂上发布它们。记录自己在没有任何参与者的情况下讲课或讲解主题的过程——您可以在每个学期重复使用这些录音。
| 1 |
转到 其他录音 选项卡。 |
| 2 |
单击 导入 Webex 录音。 |
| 3 |
选择包含要导入的录音的日期范围。 |
| 4 |
找到您的录音并点击 导入录音。 |
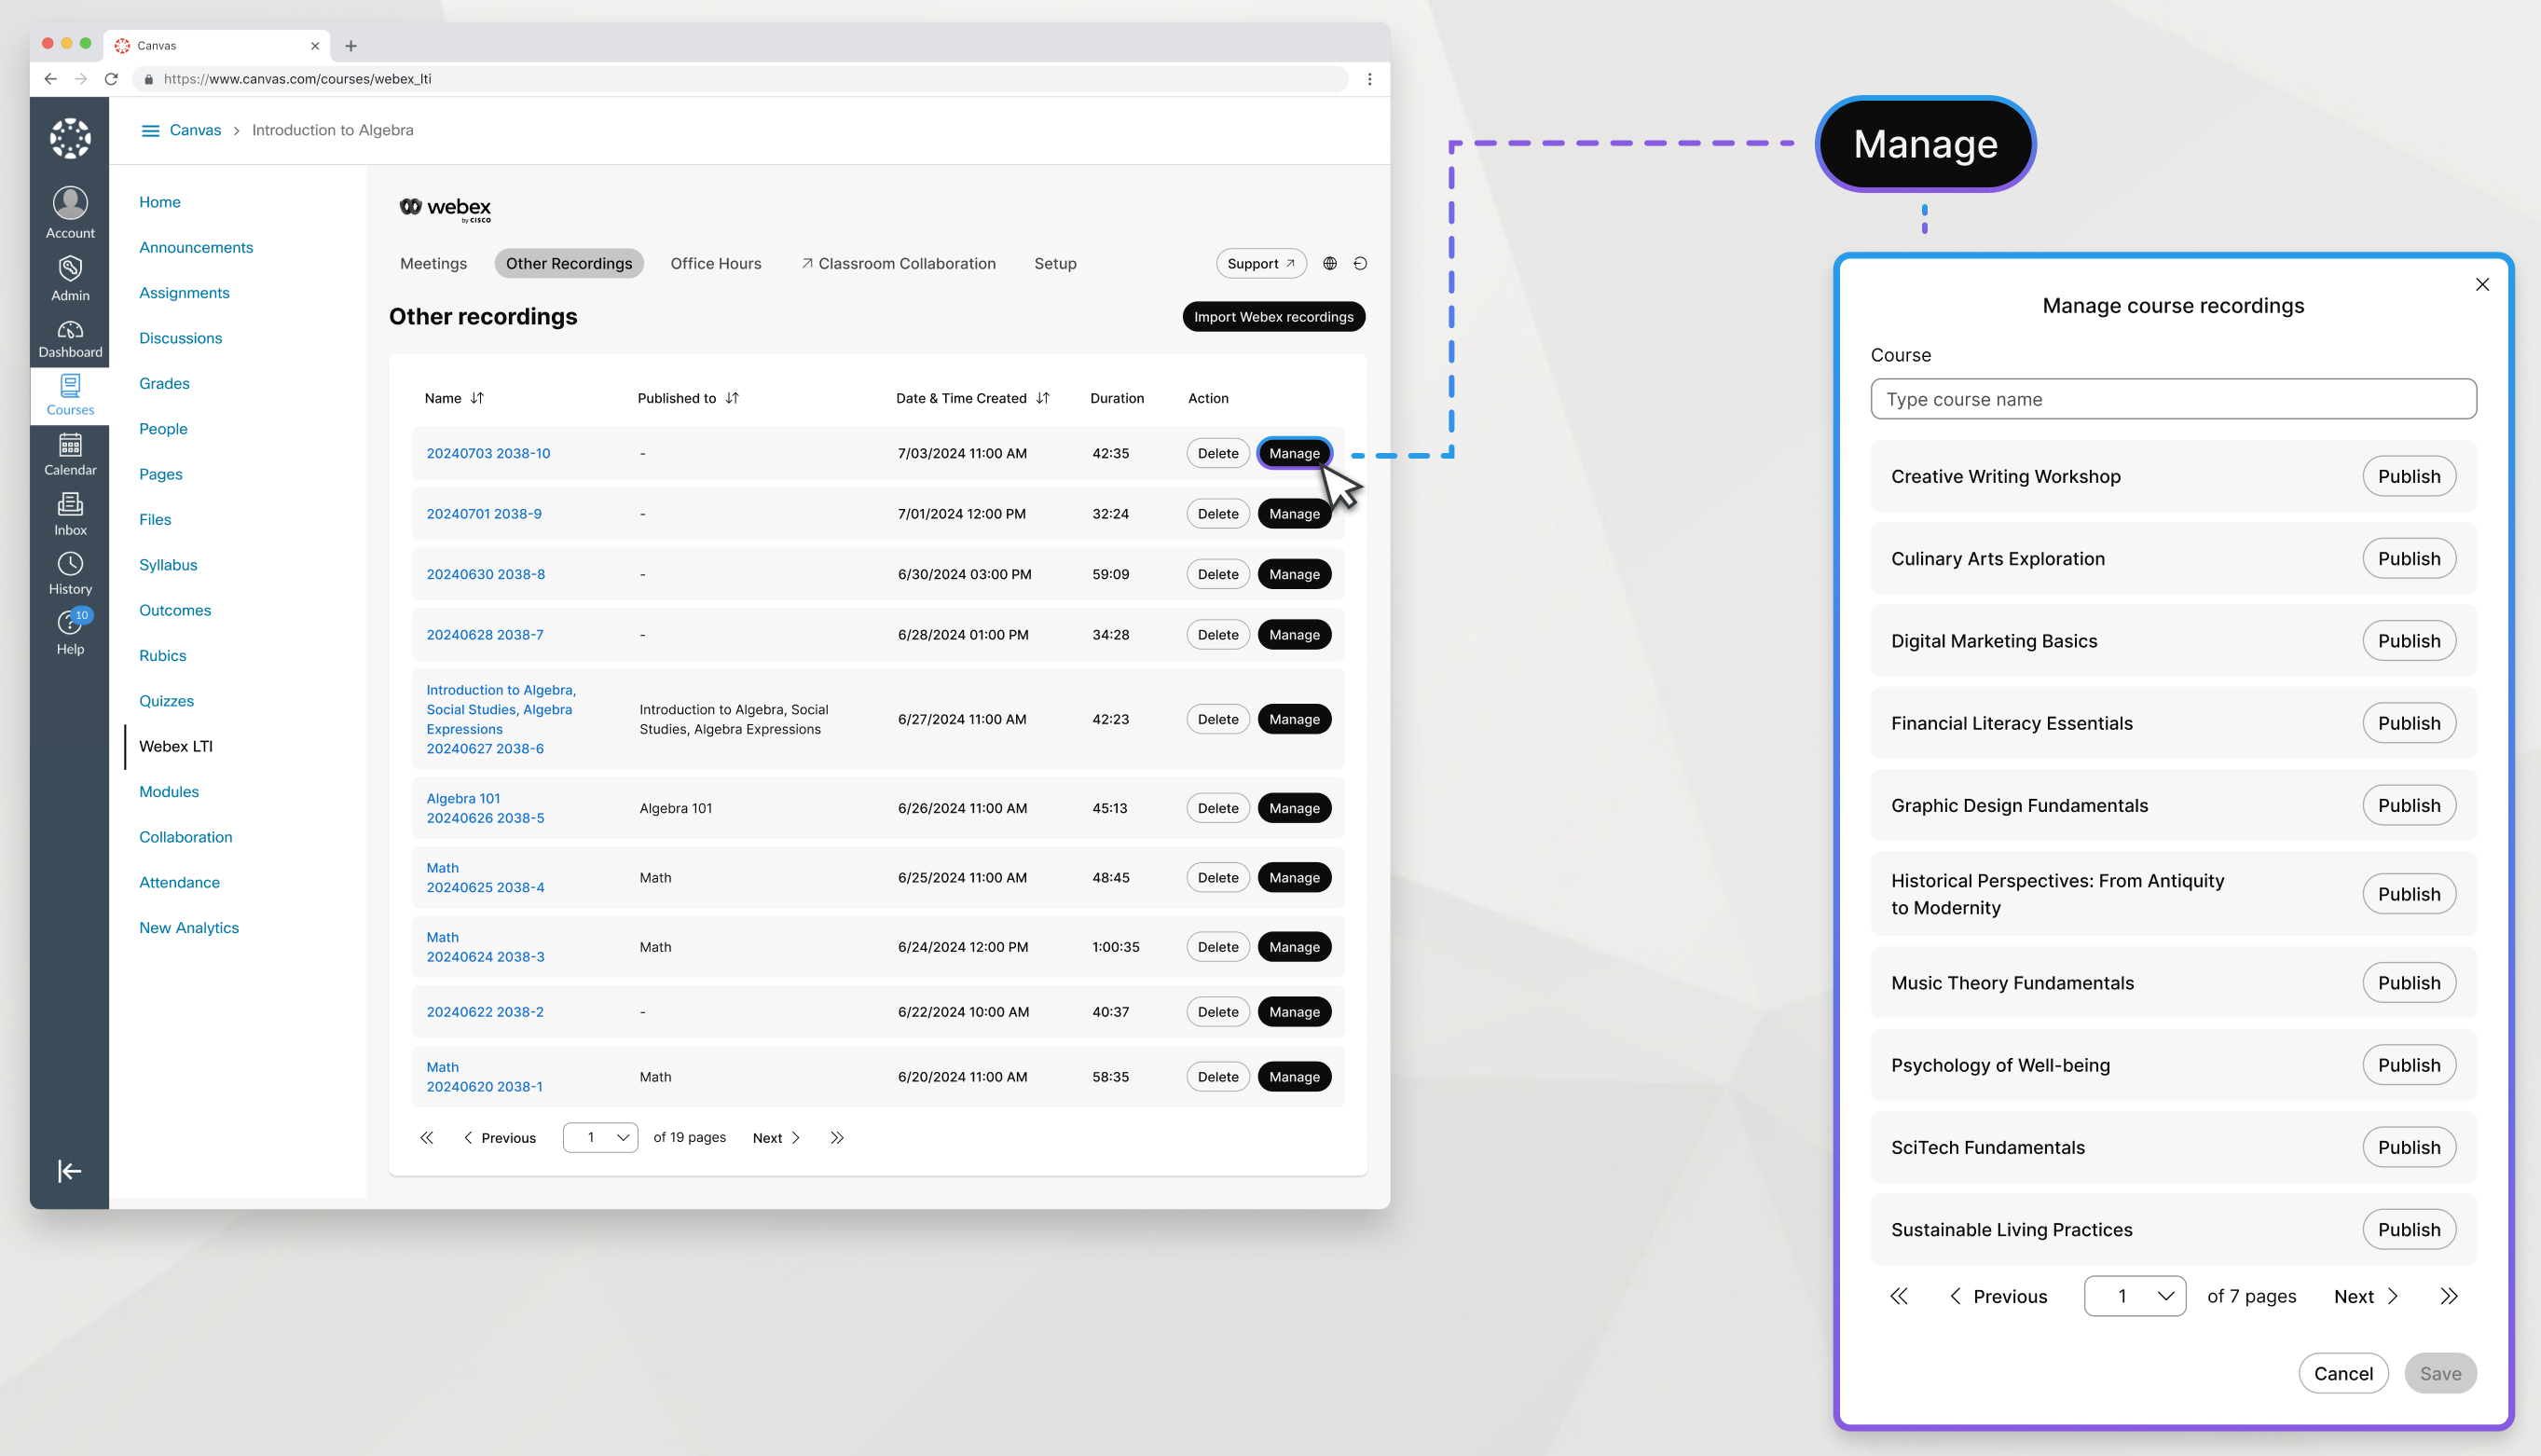
将 Webex 录制文件导入 其他录制文件后,您可以将其发布到您的任何课程,以供学生使用。
| 1 |
在 其他录音 选项卡中,找到录音并点击 管理。 |
| 2 |
找到您想要发布录音的课程,然后单击 发布。 要使课程出现在此列表中,您必须在该课程中至少打开一次 Webex LTI。 |
| 3 |
单击保存。 |
您可以取消发布课程录音,以使学生无法观看。
| 1 |
在 其他录音 选项卡中,找到录音并点击 管理。 |
| 2 |
找到您想要发布录音的课程,然后单击 取消发布。 |
| 3 |
单击保存。 |
删除录音会将其从您发布它的任何课程以及 其他录音 选项卡中删除。
| 1 |
转到 其他录音 选项卡。
|
| 2 |
找到要删除的录音,然后单击 删除。 |
辅导时间
您可以使用 Webex LTI 安排和主持办公时间。在辅导时间标签页下,设置您的空闲状态并指示学生可以与您会见的时间。您设置的辅导时间适用于您作为讲师参加的每个课程。如果课程中有多个讲师,学生必须从讲师列表中选择您以安排与您会见。
通过辅导时间会议,学生可以直接安排与您的会议。为了同时为多名学生举行办公时间,我们建议您创建一个虚拟会议并将其命名为“办公时间”。
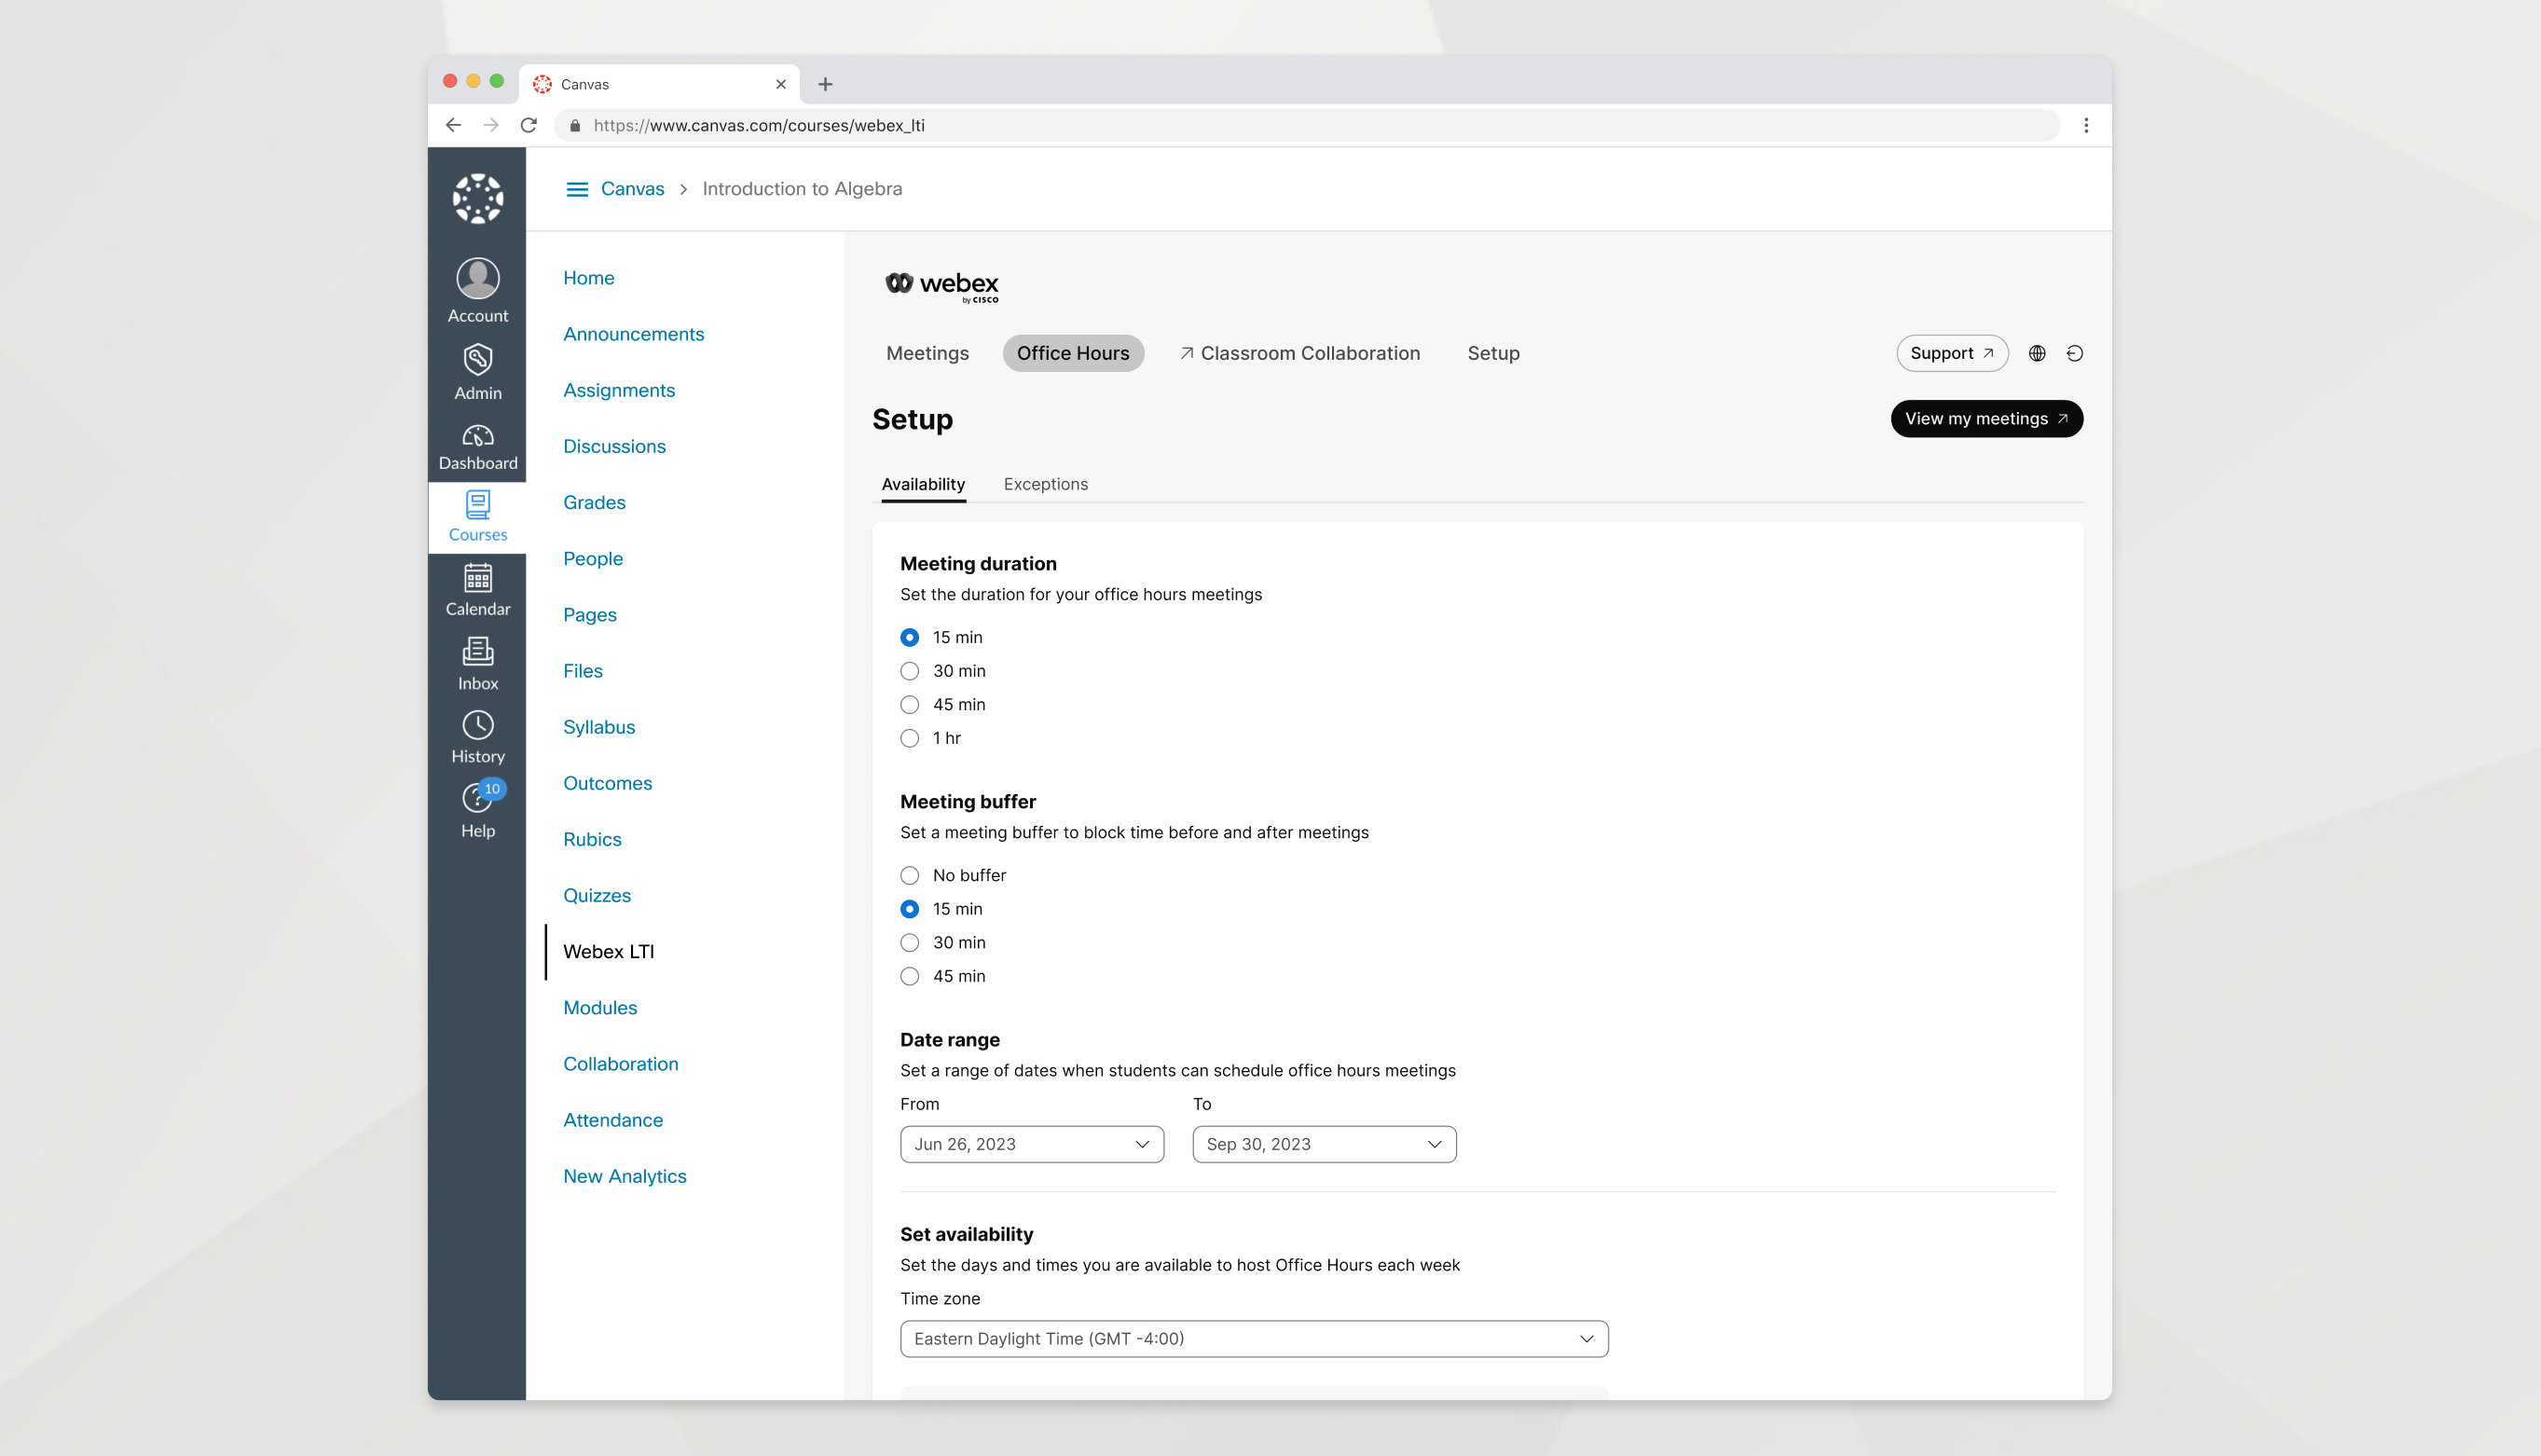
“办公时间 ”功能允许您指示您在不同日期和时间的空闲时间,以便您的学生可以与您会面。
| 1 |
转到 办公时间 选项卡。 |
| 2 |
在 可用性 选项卡中,设置以下内容:
|
| 3 |
向下滚动并单击保存。 |
现在您的学生可以选择与您会见的时间。当一名学生成功预约后,该时间段将不再对其他任何人开放。您会收到包含会议链接的电子邮件,并在 Webex 站点上您的即将召开的会议列表中看到会议。
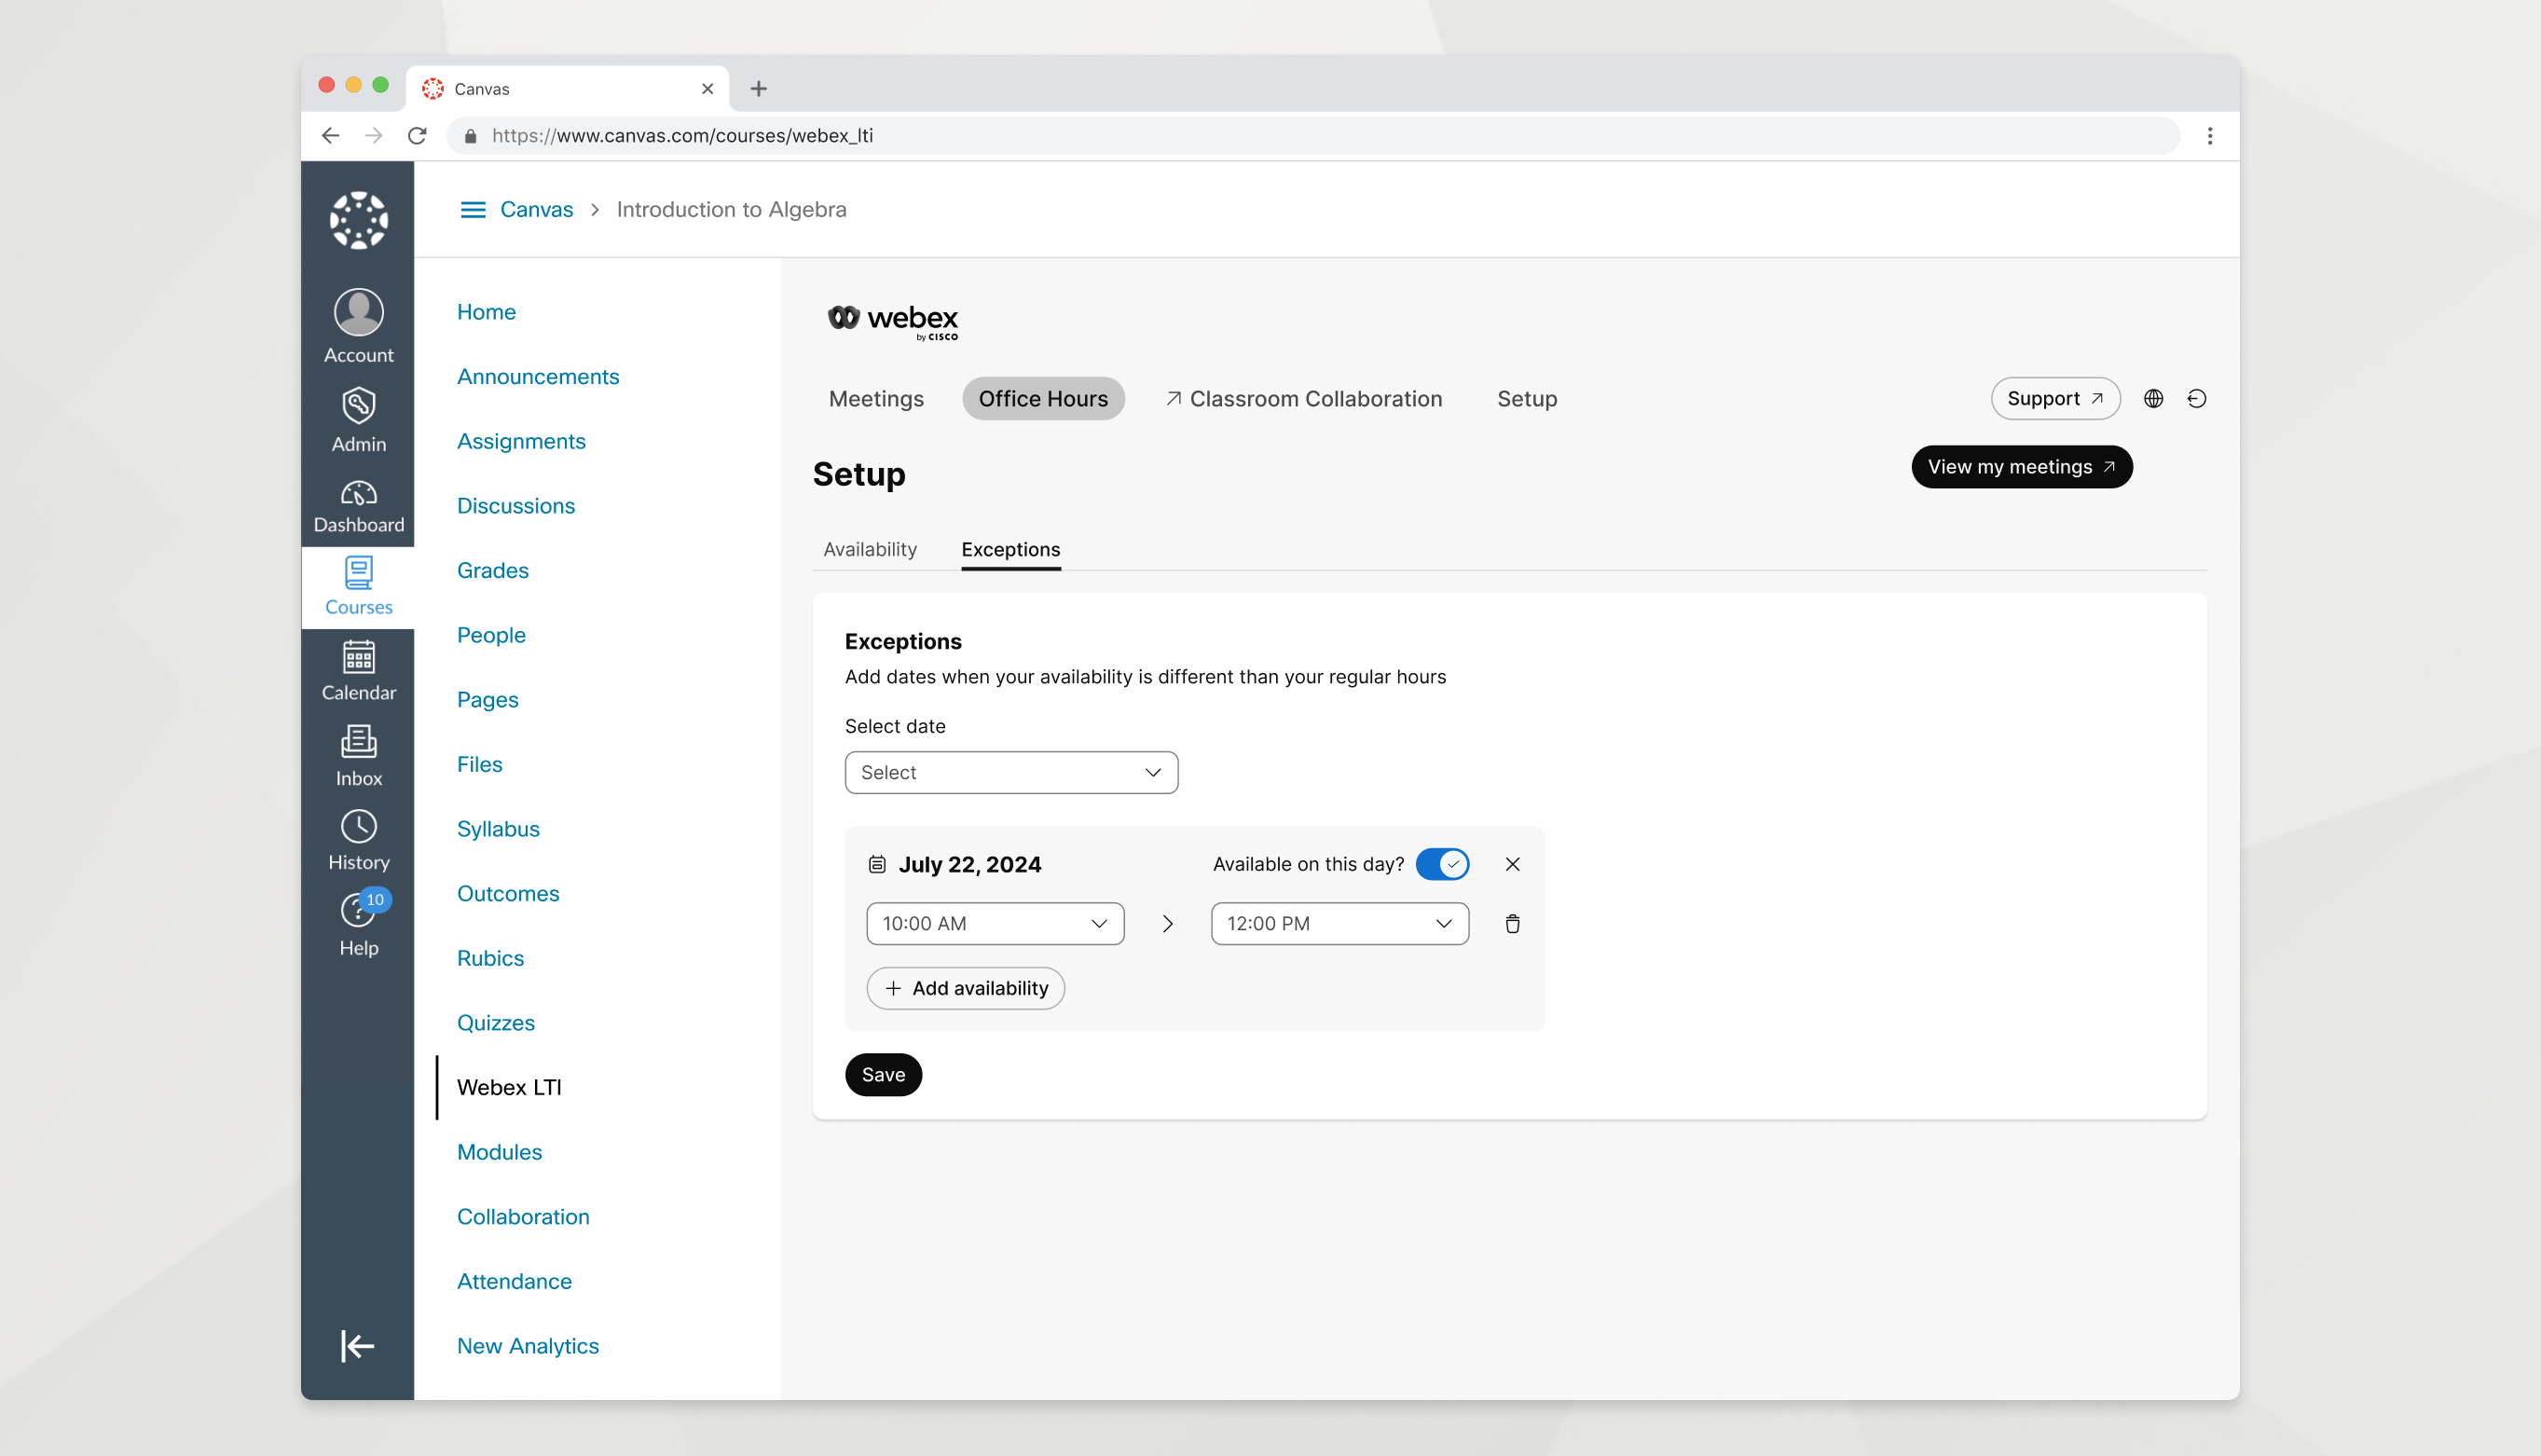
设置例外情况以更改特定日期的可用性,以便您的办公时间准确反映您的日程安排。您可以阻止整个日期的空闲状态,删除某个日期的时间间隔或将新的时间间隔添加到某个日期。
| 1 |
转到 办公时间 选项卡并点击 例外。 |
| 2 |
选择一个日期并使用以下选项更改该日期的可用时间:
|
| 3 |
单击保存。 |
下一步
您最多可以随时设置 50 个未来例外。设置日期例外不会影响学生在您设置例外之前安排的任何办公时间会议。如有必要,您可以在 Webex 中重新安排这些会议。
课堂协作
准备工作
要在 Webex LTI Legacy 中启用课堂协作,您必须首先使用您的 LMS 授权并使用 Webex 登录。
| 1 |
在 设置中,转到 课堂协作 部分。 |
| 2 |
单击 授权 并按照屏幕上的提示在您的 LMS 中授权 Webex LTI Legacy。 如果您已经通过 LMS 授权,您将不会看到 授权 按钮,可以跳过此步骤。 |
| 3 |
单击 使用 Webex 登录以启用课堂协作 并输入您的 Webex 凭据。 如果您已经使用 Webex 登录,您将看不到 使用 Webex 登录以启用课堂协作 按钮,可以跳过此步骤。 |
| 4 |
打开开关以启用 课堂协作。 |
准备工作
要在 Webex LTI 中启用课堂协作,您必须首先使用 Webex 登录。
| 1 |
在 设置中,转到 课堂协作 部分。 |
| 2 |
单击 使用 Webex 登录以启用课堂协作 并输入您的 Webex 凭据。 如果您已经使用 Webex 登录,您将看不到 使用 Webex 登录以启用课堂协作 按钮,可以跳过此步骤。 |
| 3 |
打开开关以启用 课堂协作。 |
启用 课堂协作 会在 Webex 应用程序中为您的课程创建一个团队,并将课程中的每个人都添加为该团队的成员。默认情况下,Webex LTI 会每天自动同步您的班级名册。自动同步可确保 Webex 团队的成员准确反映您课程中注册的成员列表。
|
转到 设置 选项卡并找到 课堂协作 部分。
|


