
피드백을 보내 주셔서 감사합니다.
교사를 위한 Webex LTI
 피드백이 있습니까?
설정
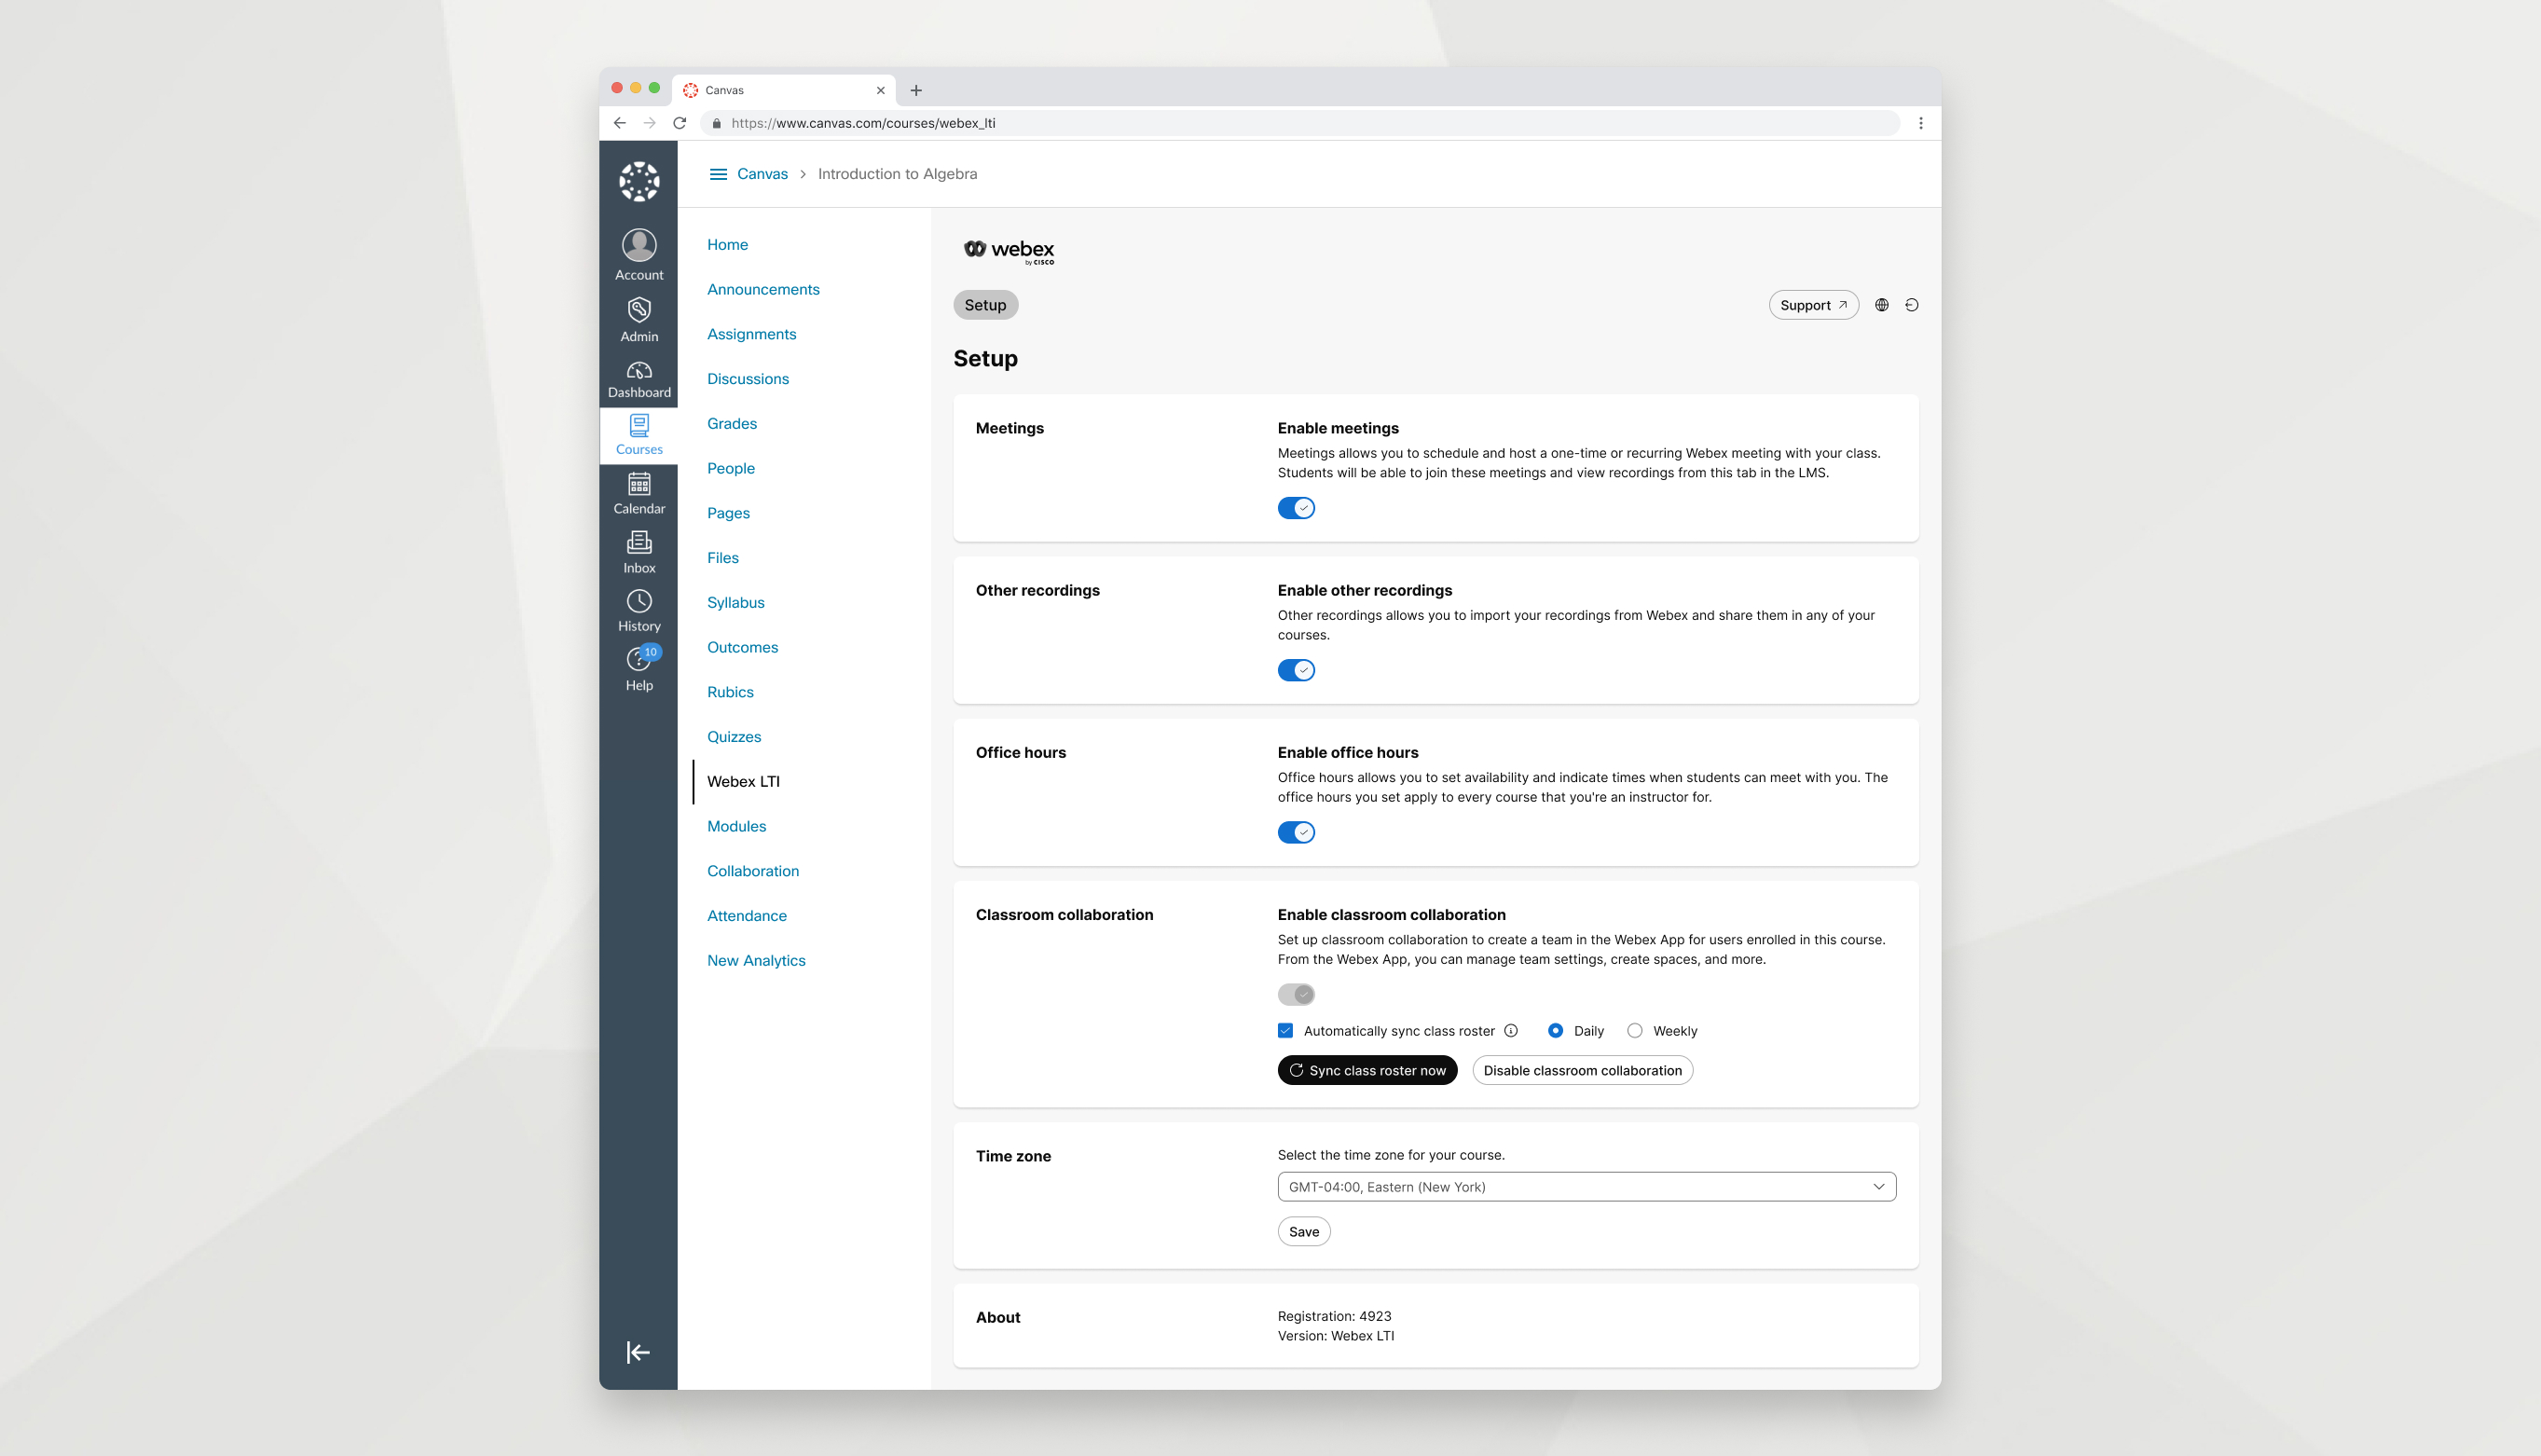
귀하의 과목에 맞는 기능 기본 설정을 사용자 정의하세요.
| 1 |
LMS에서 Webex LTI를 열고 설정 탭으로 이동합니다. |
| 2 |
수업에서 활성화하고 싶은 기능을 선택하세요.
활성화한 각 기능은 별도의 탭으로 표시됩니다. 설정 탭에 옵션 중 하나가 보이지 않으면 학교 관리자가 해당 옵션을 활성화하지 않은 것입니다. |
| 3 |
시간대를 선택하고 저장을 클릭하세요. |
미팅
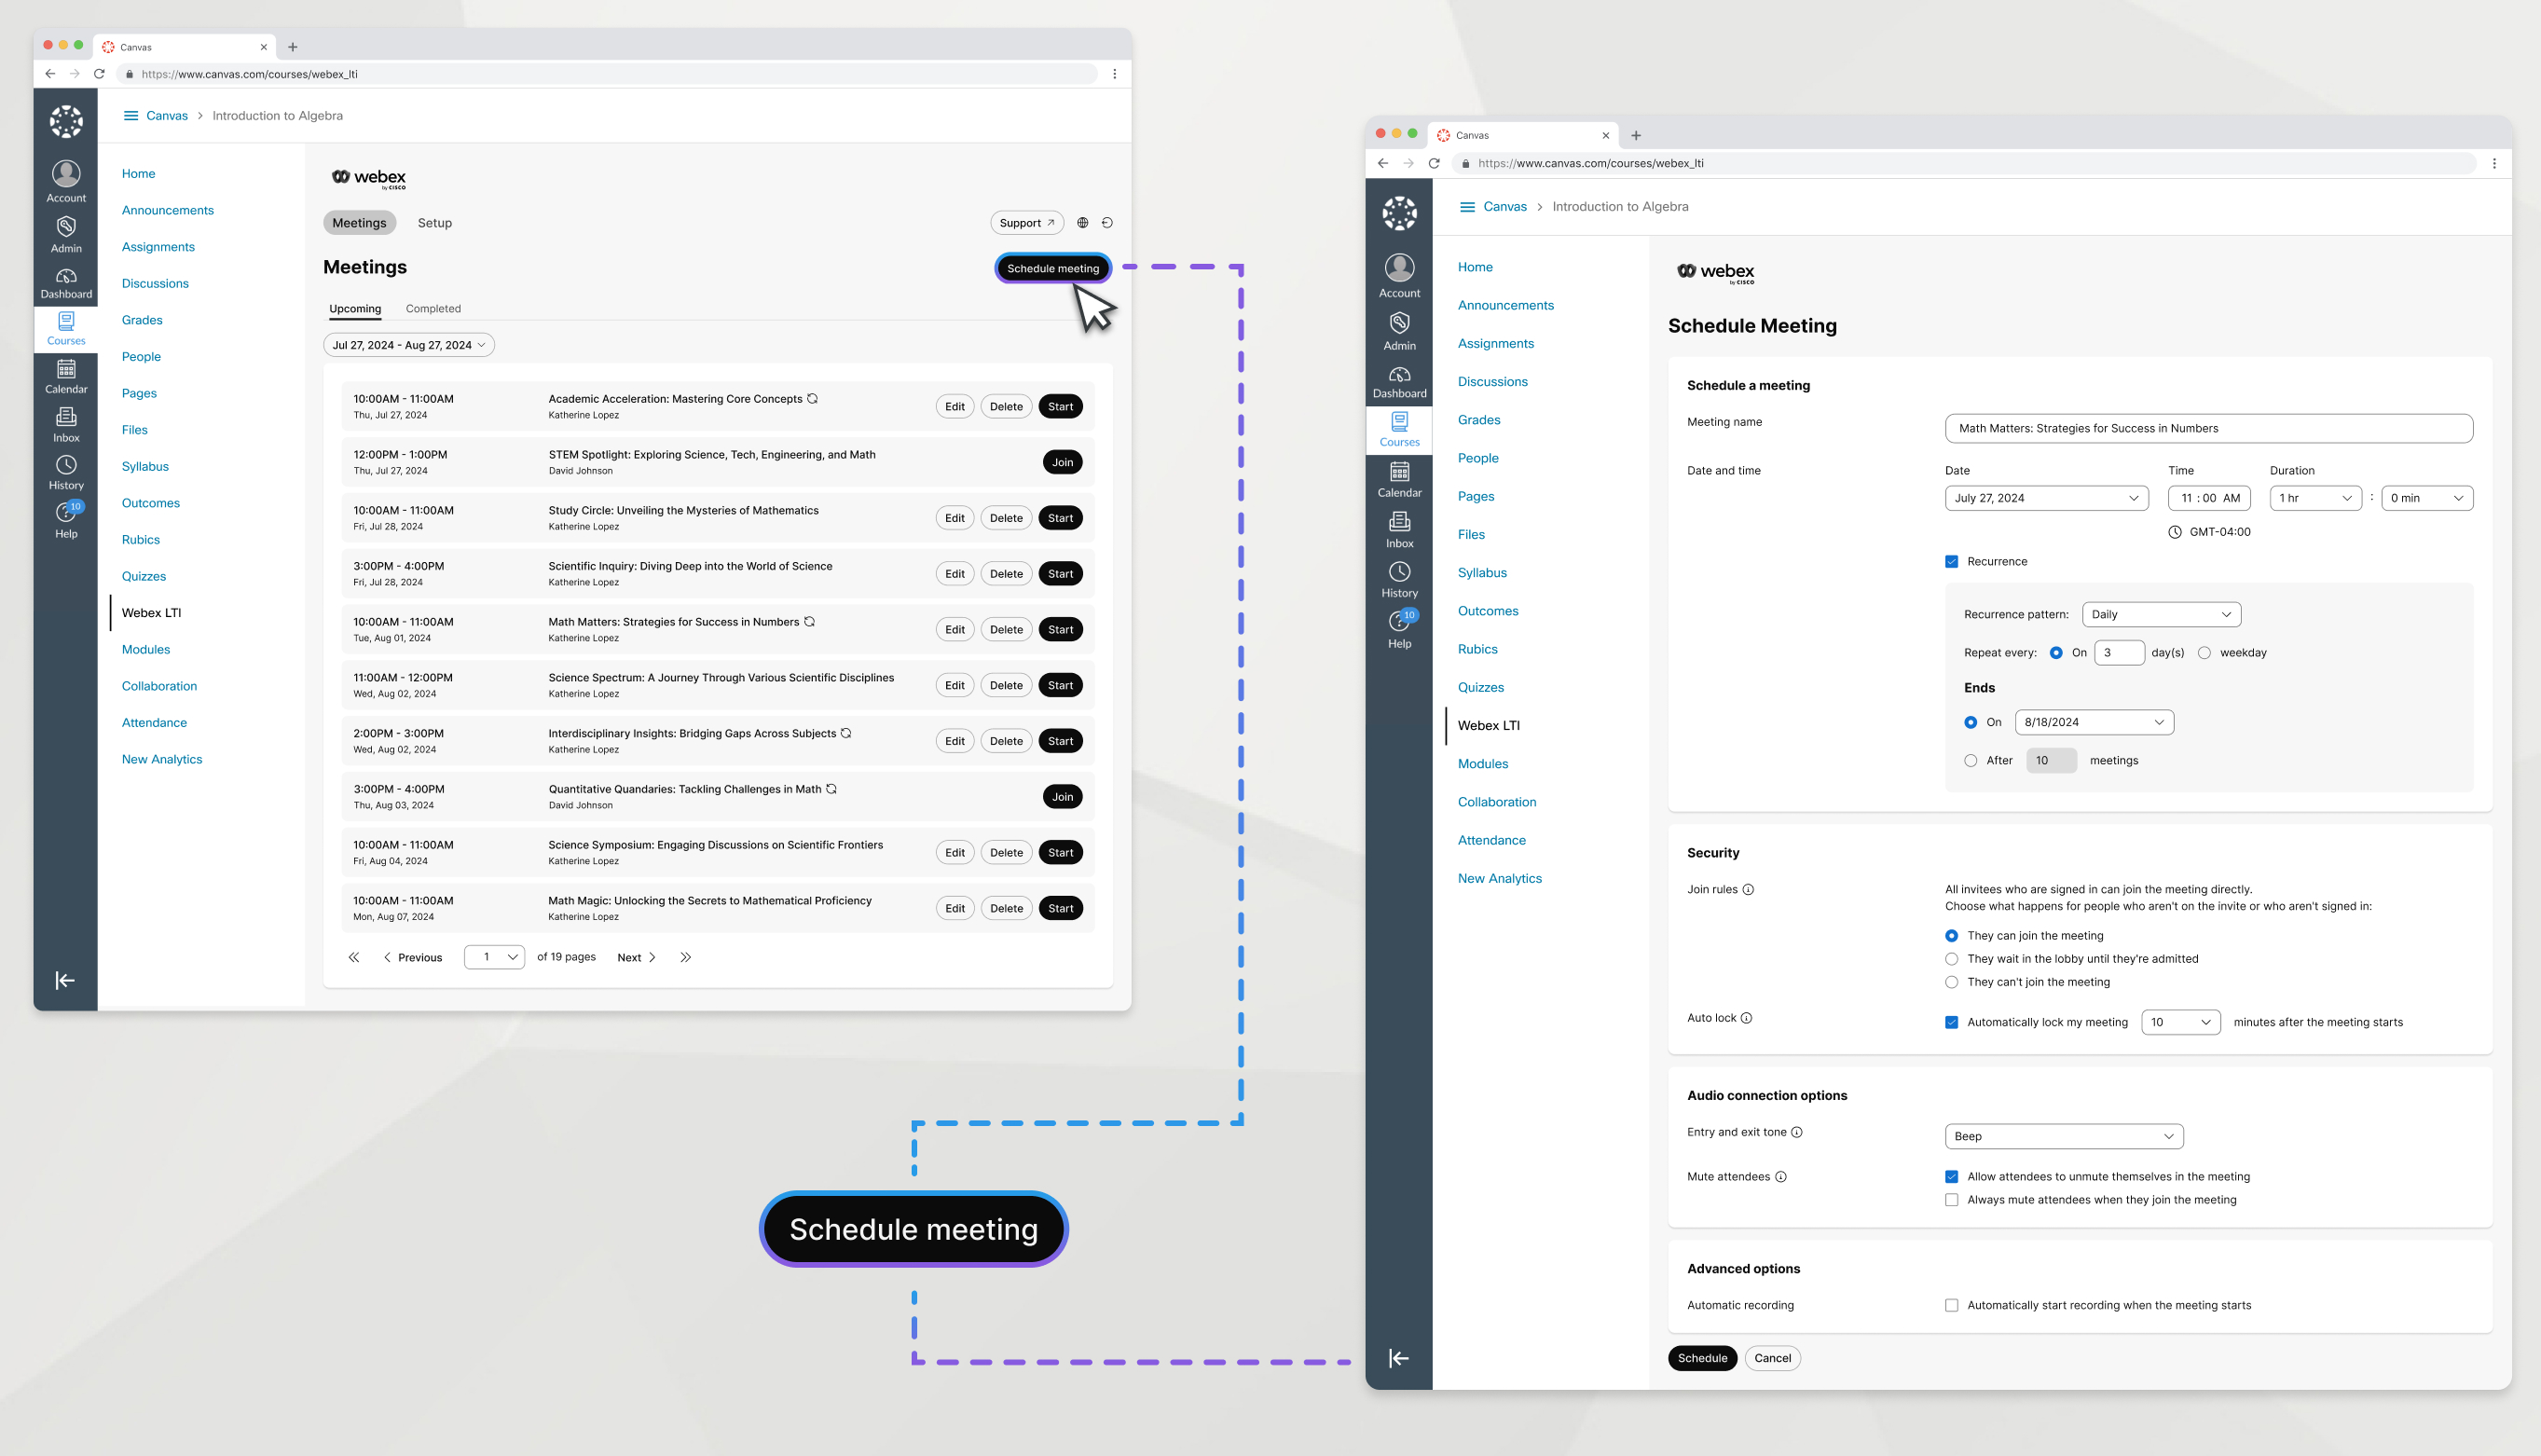
회의 기능을 사용하면 수업에 대한 일회성 또는 정기 회의를 예약하고 주최할 수 있습니다.
| 1 |
회의 로 이동하여 회의 예약을 클릭하세요. 메시지가 표시되면 Webex로 로그인하세요. |
| 2 |
다음 정보를 입력합니다.
|
| 3 |
일정을 클릭하세요 |
미팅을 생성하면 예정 탭에 나타나며, 여기에서 강의에 등록된 모든 사람이 미팅을 볼 수 있습니다. 예정된 탭에서 회의를 시작, 편집 또는 삭제할 수 있습니다.
반복되는 회의를 편집하거나 삭제하면 전체 회의 시리즈가 편집되거나 삭제됩니다. 반복되는 회의는 개별적으로 편집하거나 삭제할 수 없습니다.
한 과목에 강사가 여러 명 있는 경우, 본인이 만든 회의만 시작, 편집, 삭제할 수 있습니다.
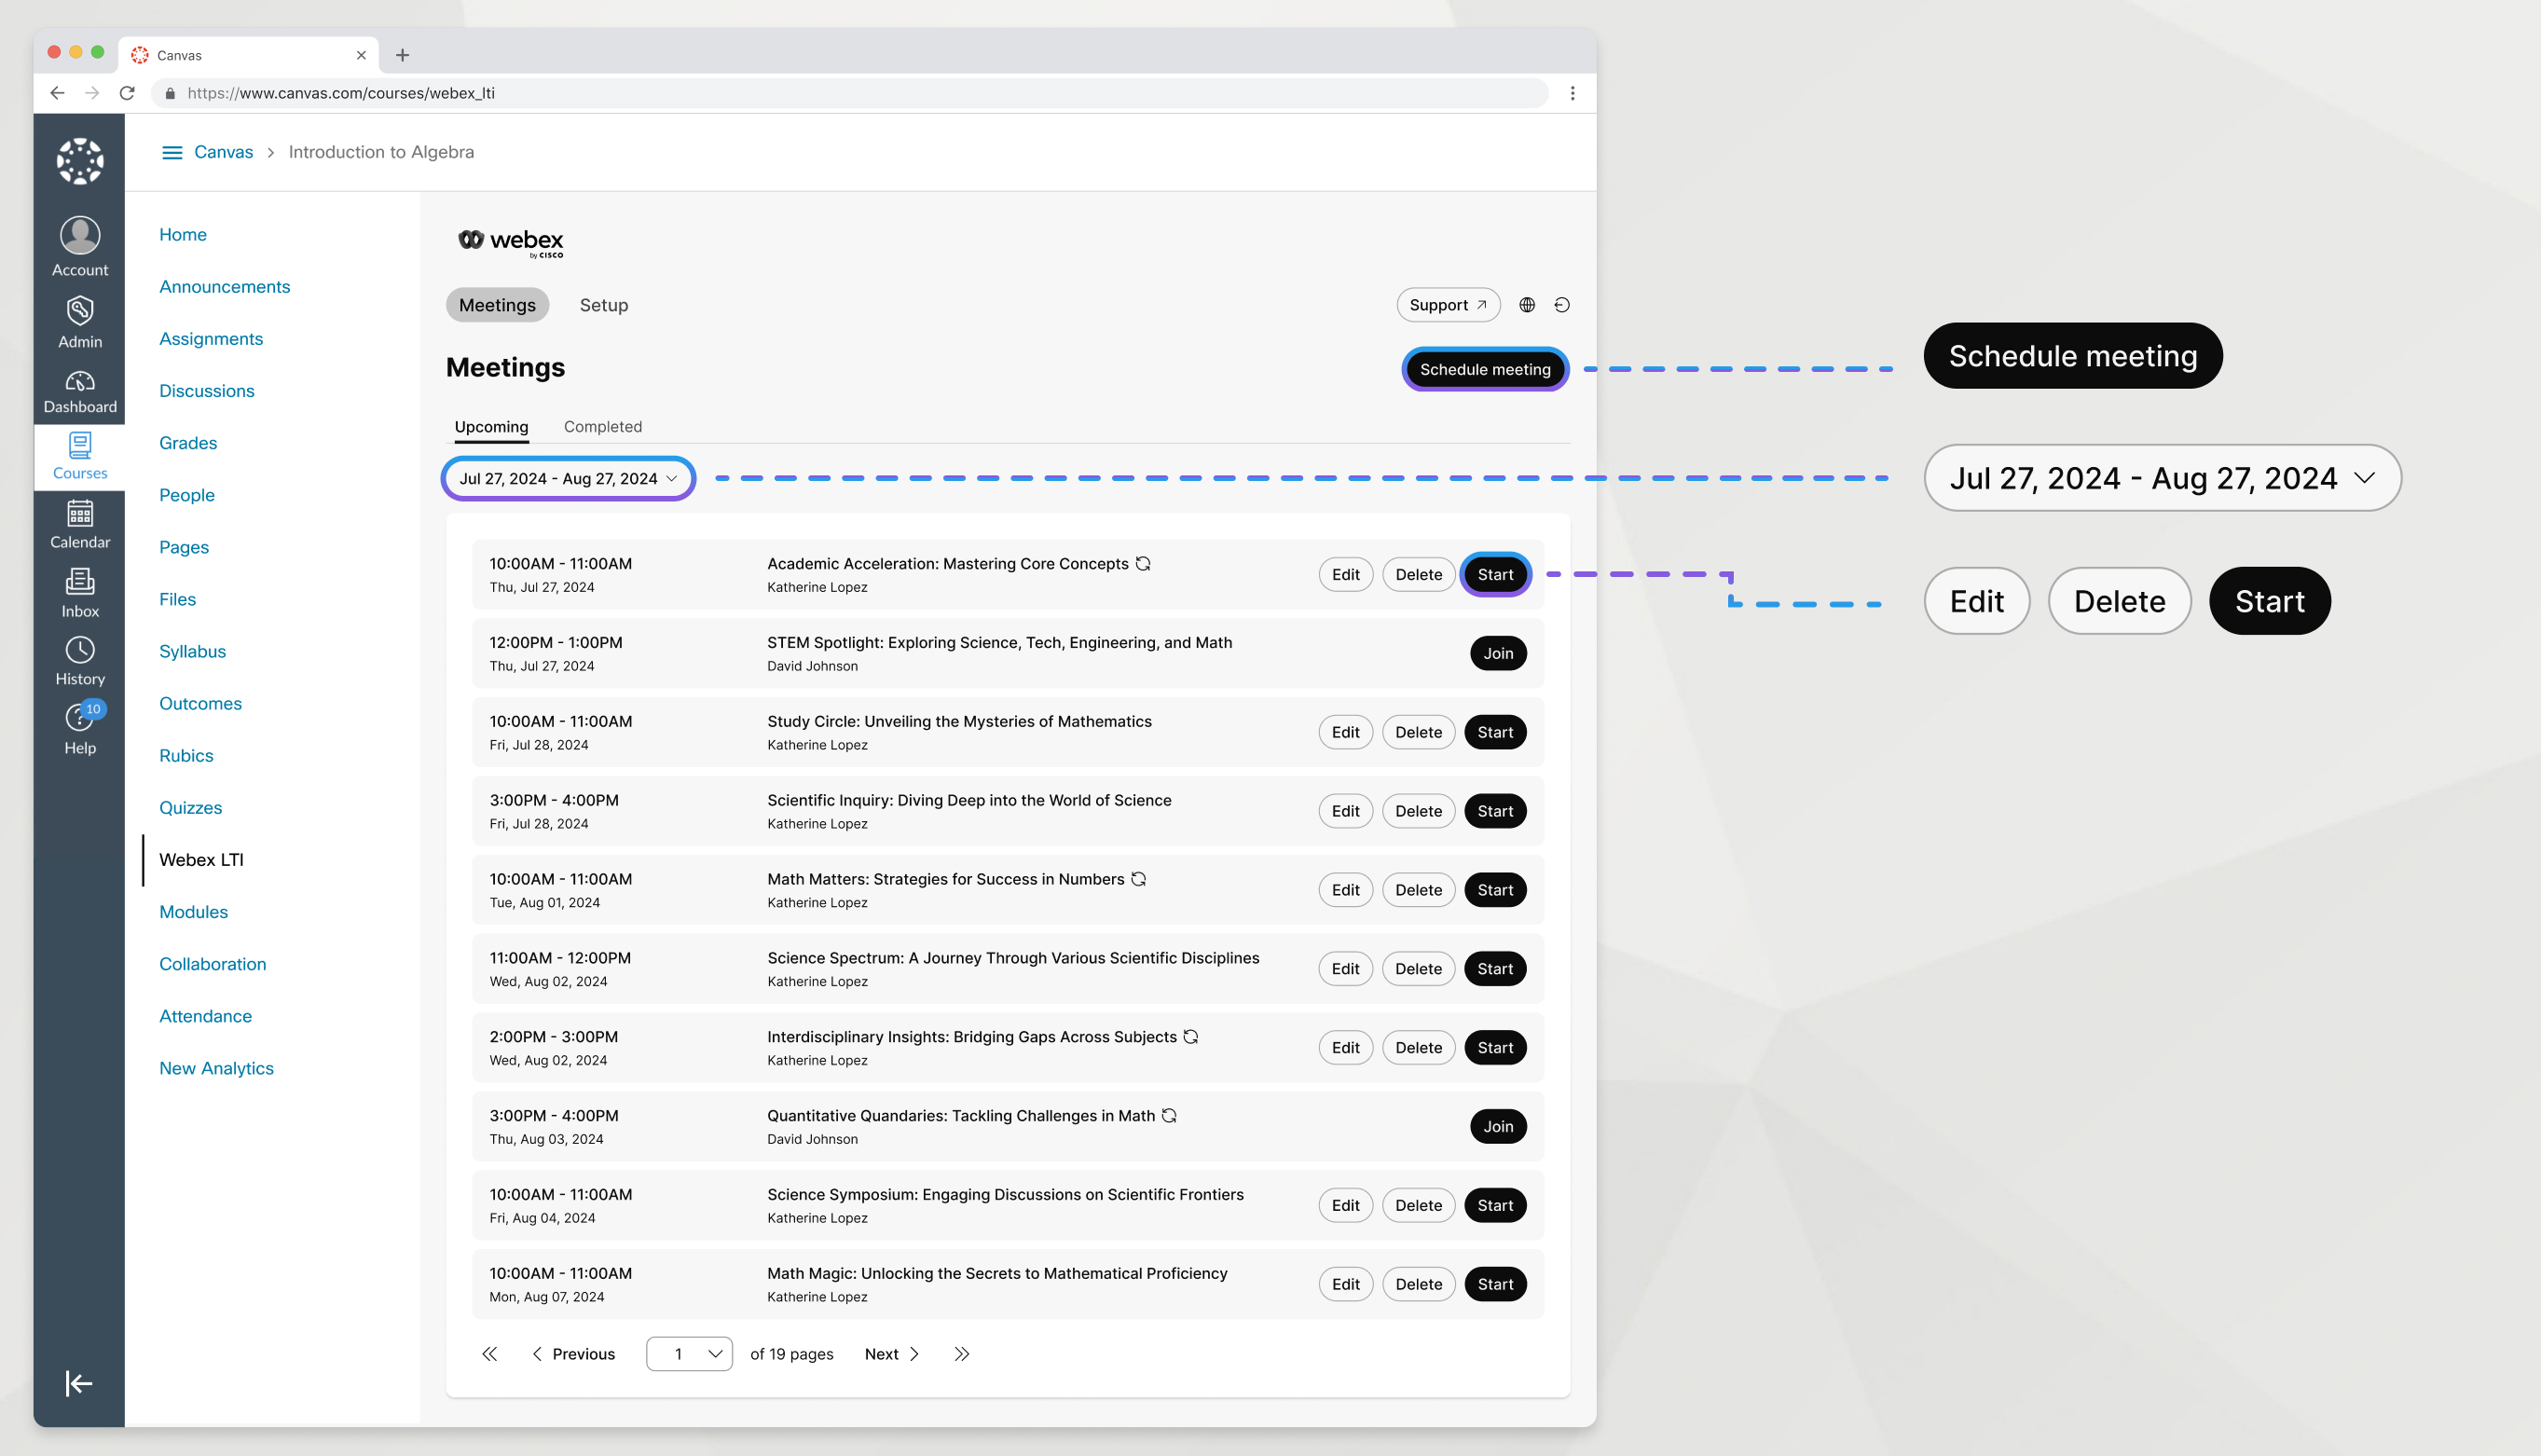
Webex LTI를 사용하여 LMS에서 수업 회의를 시작하세요.
| 1 |
회의 탭으로 이동합니다. |
| 2 |
예정 탭에서 회의를 찾아 시작을 클릭합니다. |
Webex LTI에서 예약한 회의를 녹화하여 학생들이 볼 수 있도록 할 수 있습니다.
Webex LTI에 녹화 내용을 표시하려면 Webex LTI에서 회의를 예약하고 회의를 시작할 때 Webex LTI 내에서 Webex에 로그인해야 합니다.
| 1 |
수업 중 Webex에서 녹화 녹화 버튼이 나타나지 않는 경우, 자세히 |
| 2 |
클라우드에 기록 을 선택한 다음 기록을 클릭합니다. 녹화가 진행 중이면 귀하와 다른 회의 참석자는 창 오른쪽 상단에 빨간색 아이콘을 볼 수 있습니다. |
| 3 |
필요한 경우 녹화
|
 를 클릭하세요.
 옵션 아래에서 찾습니다.
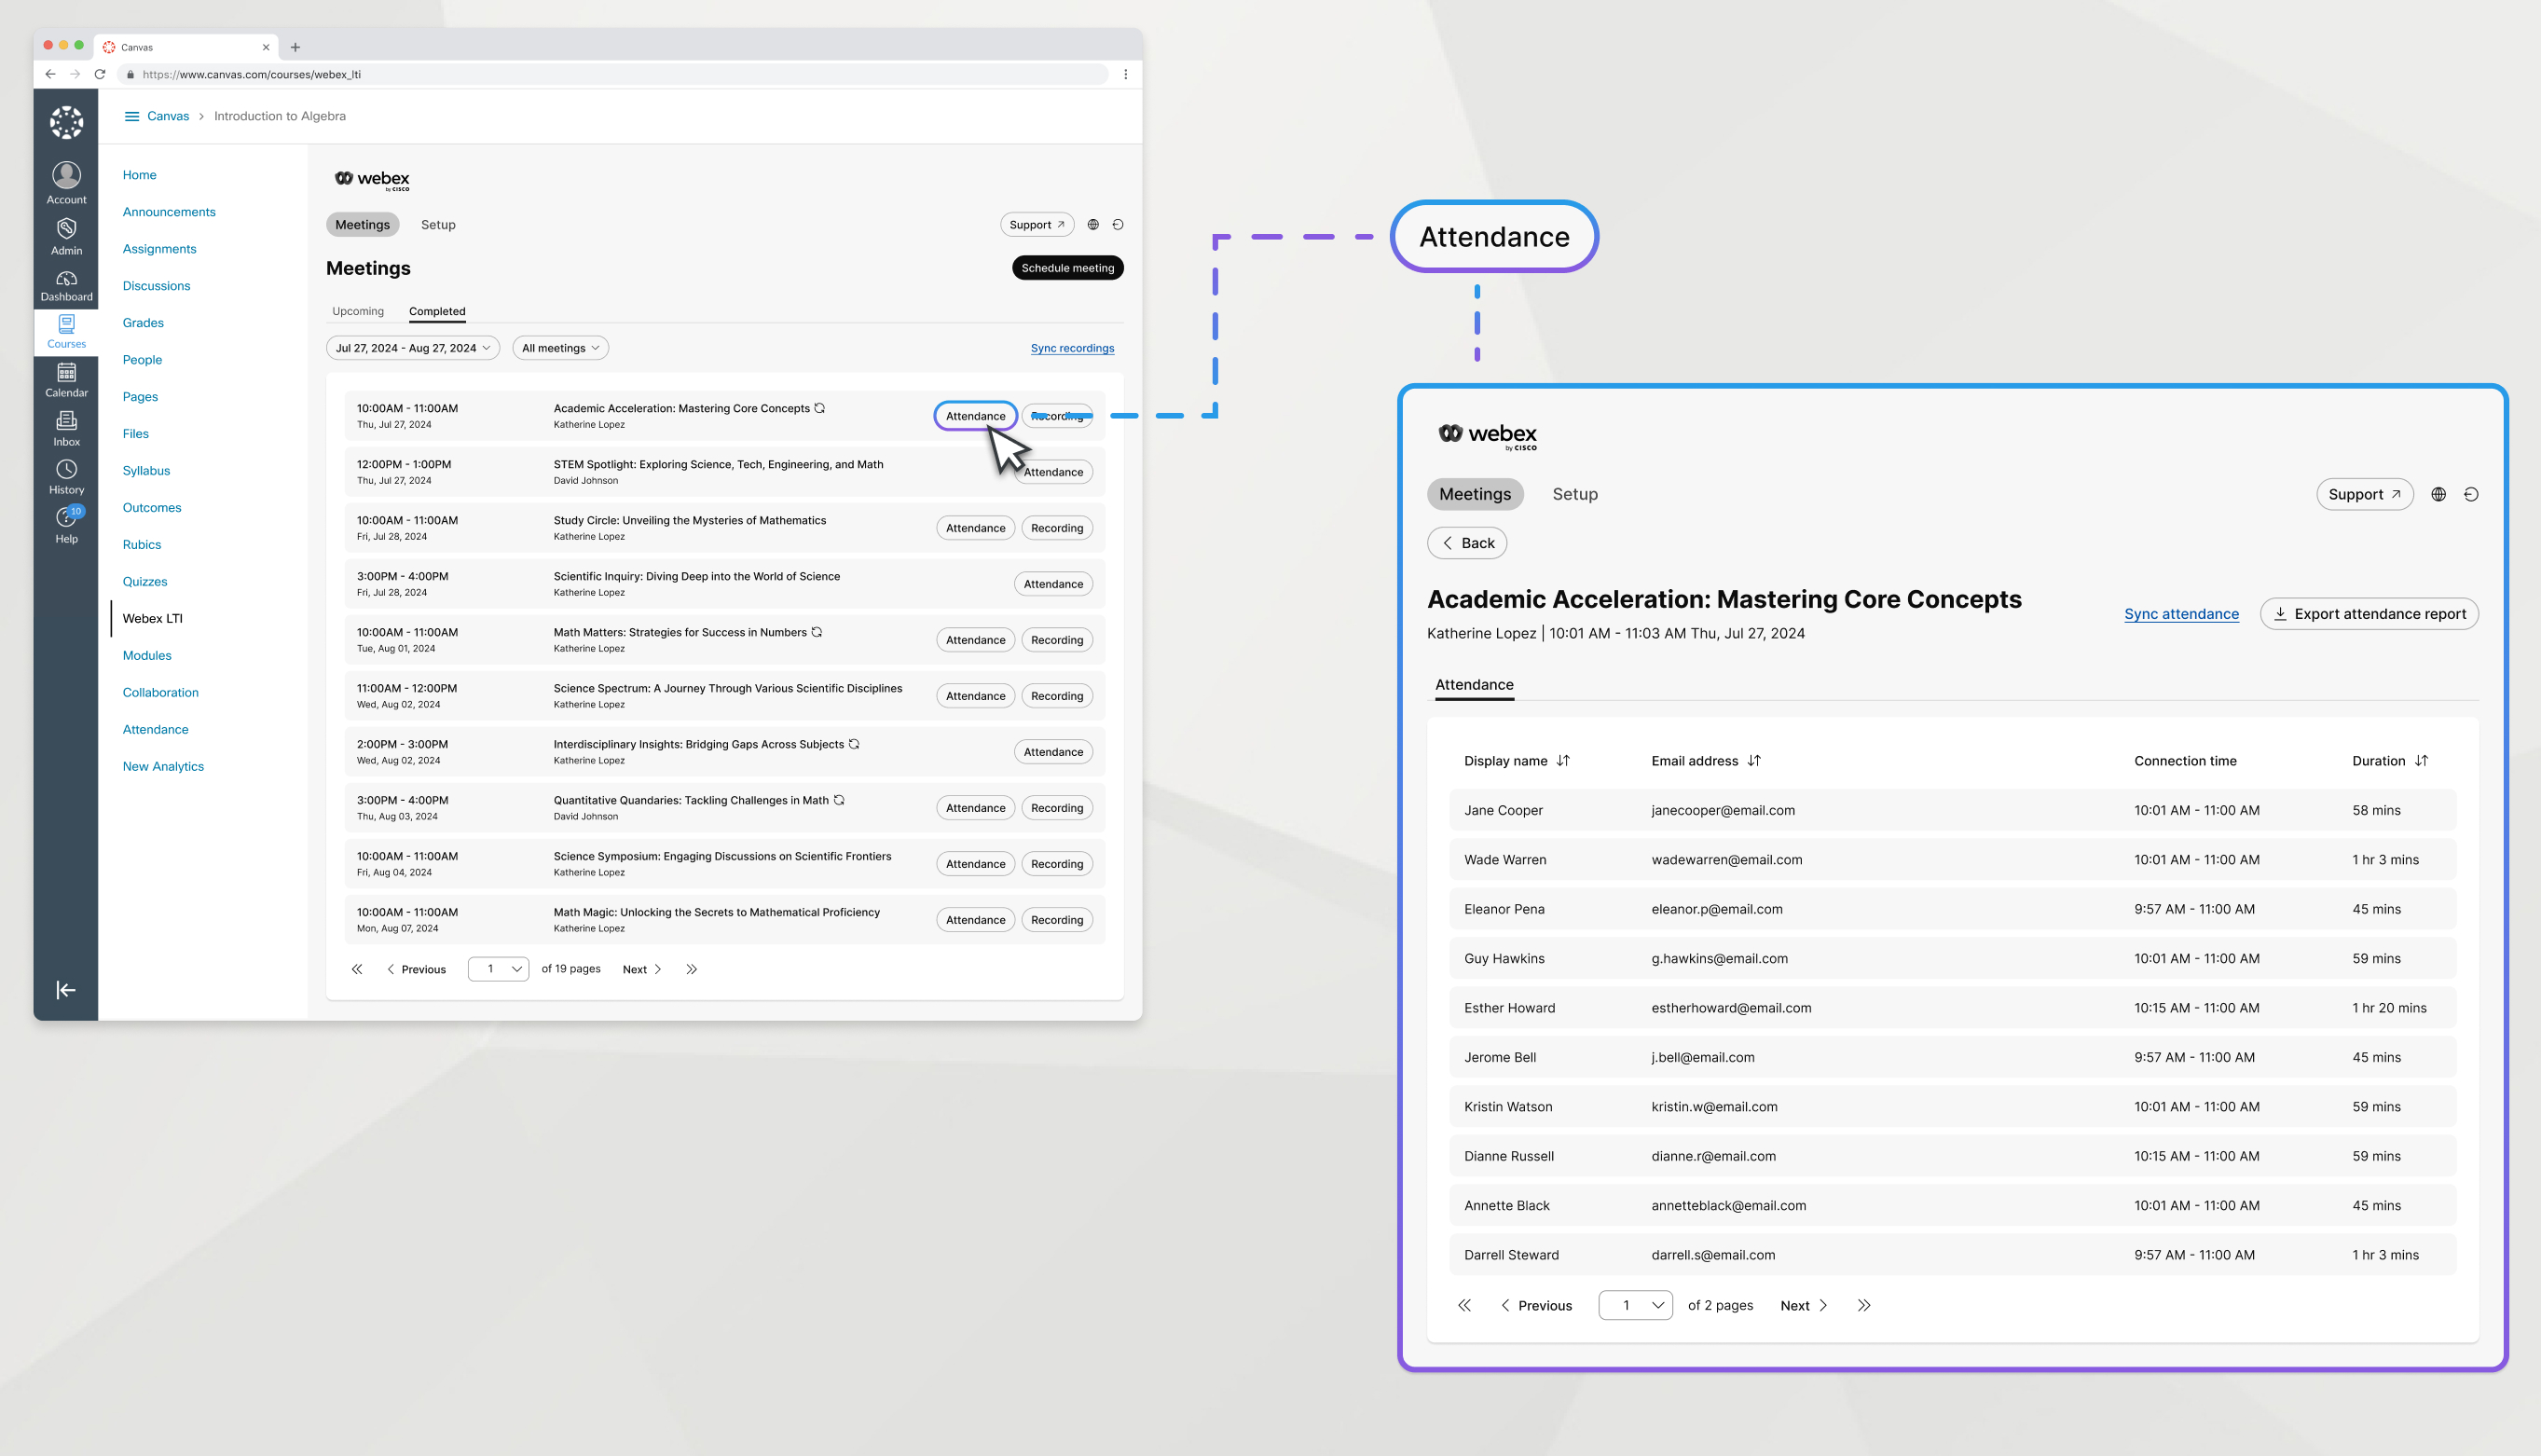
회의가 종료된 후, 회의에 참여한 참가자 목록을 확인하세요.
| 1 |
회의 탭으로 이동하여 완료를 클릭합니다. |
| 2 |
참석자를 확인하고 싶은 회의를 찾아 참석자를 클릭하세요. |
| 3 |
(선택 과목): 아직 참석자가 없으면 참석자 동기화 버튼을 클릭하세요. |
다음에 수행할 작업
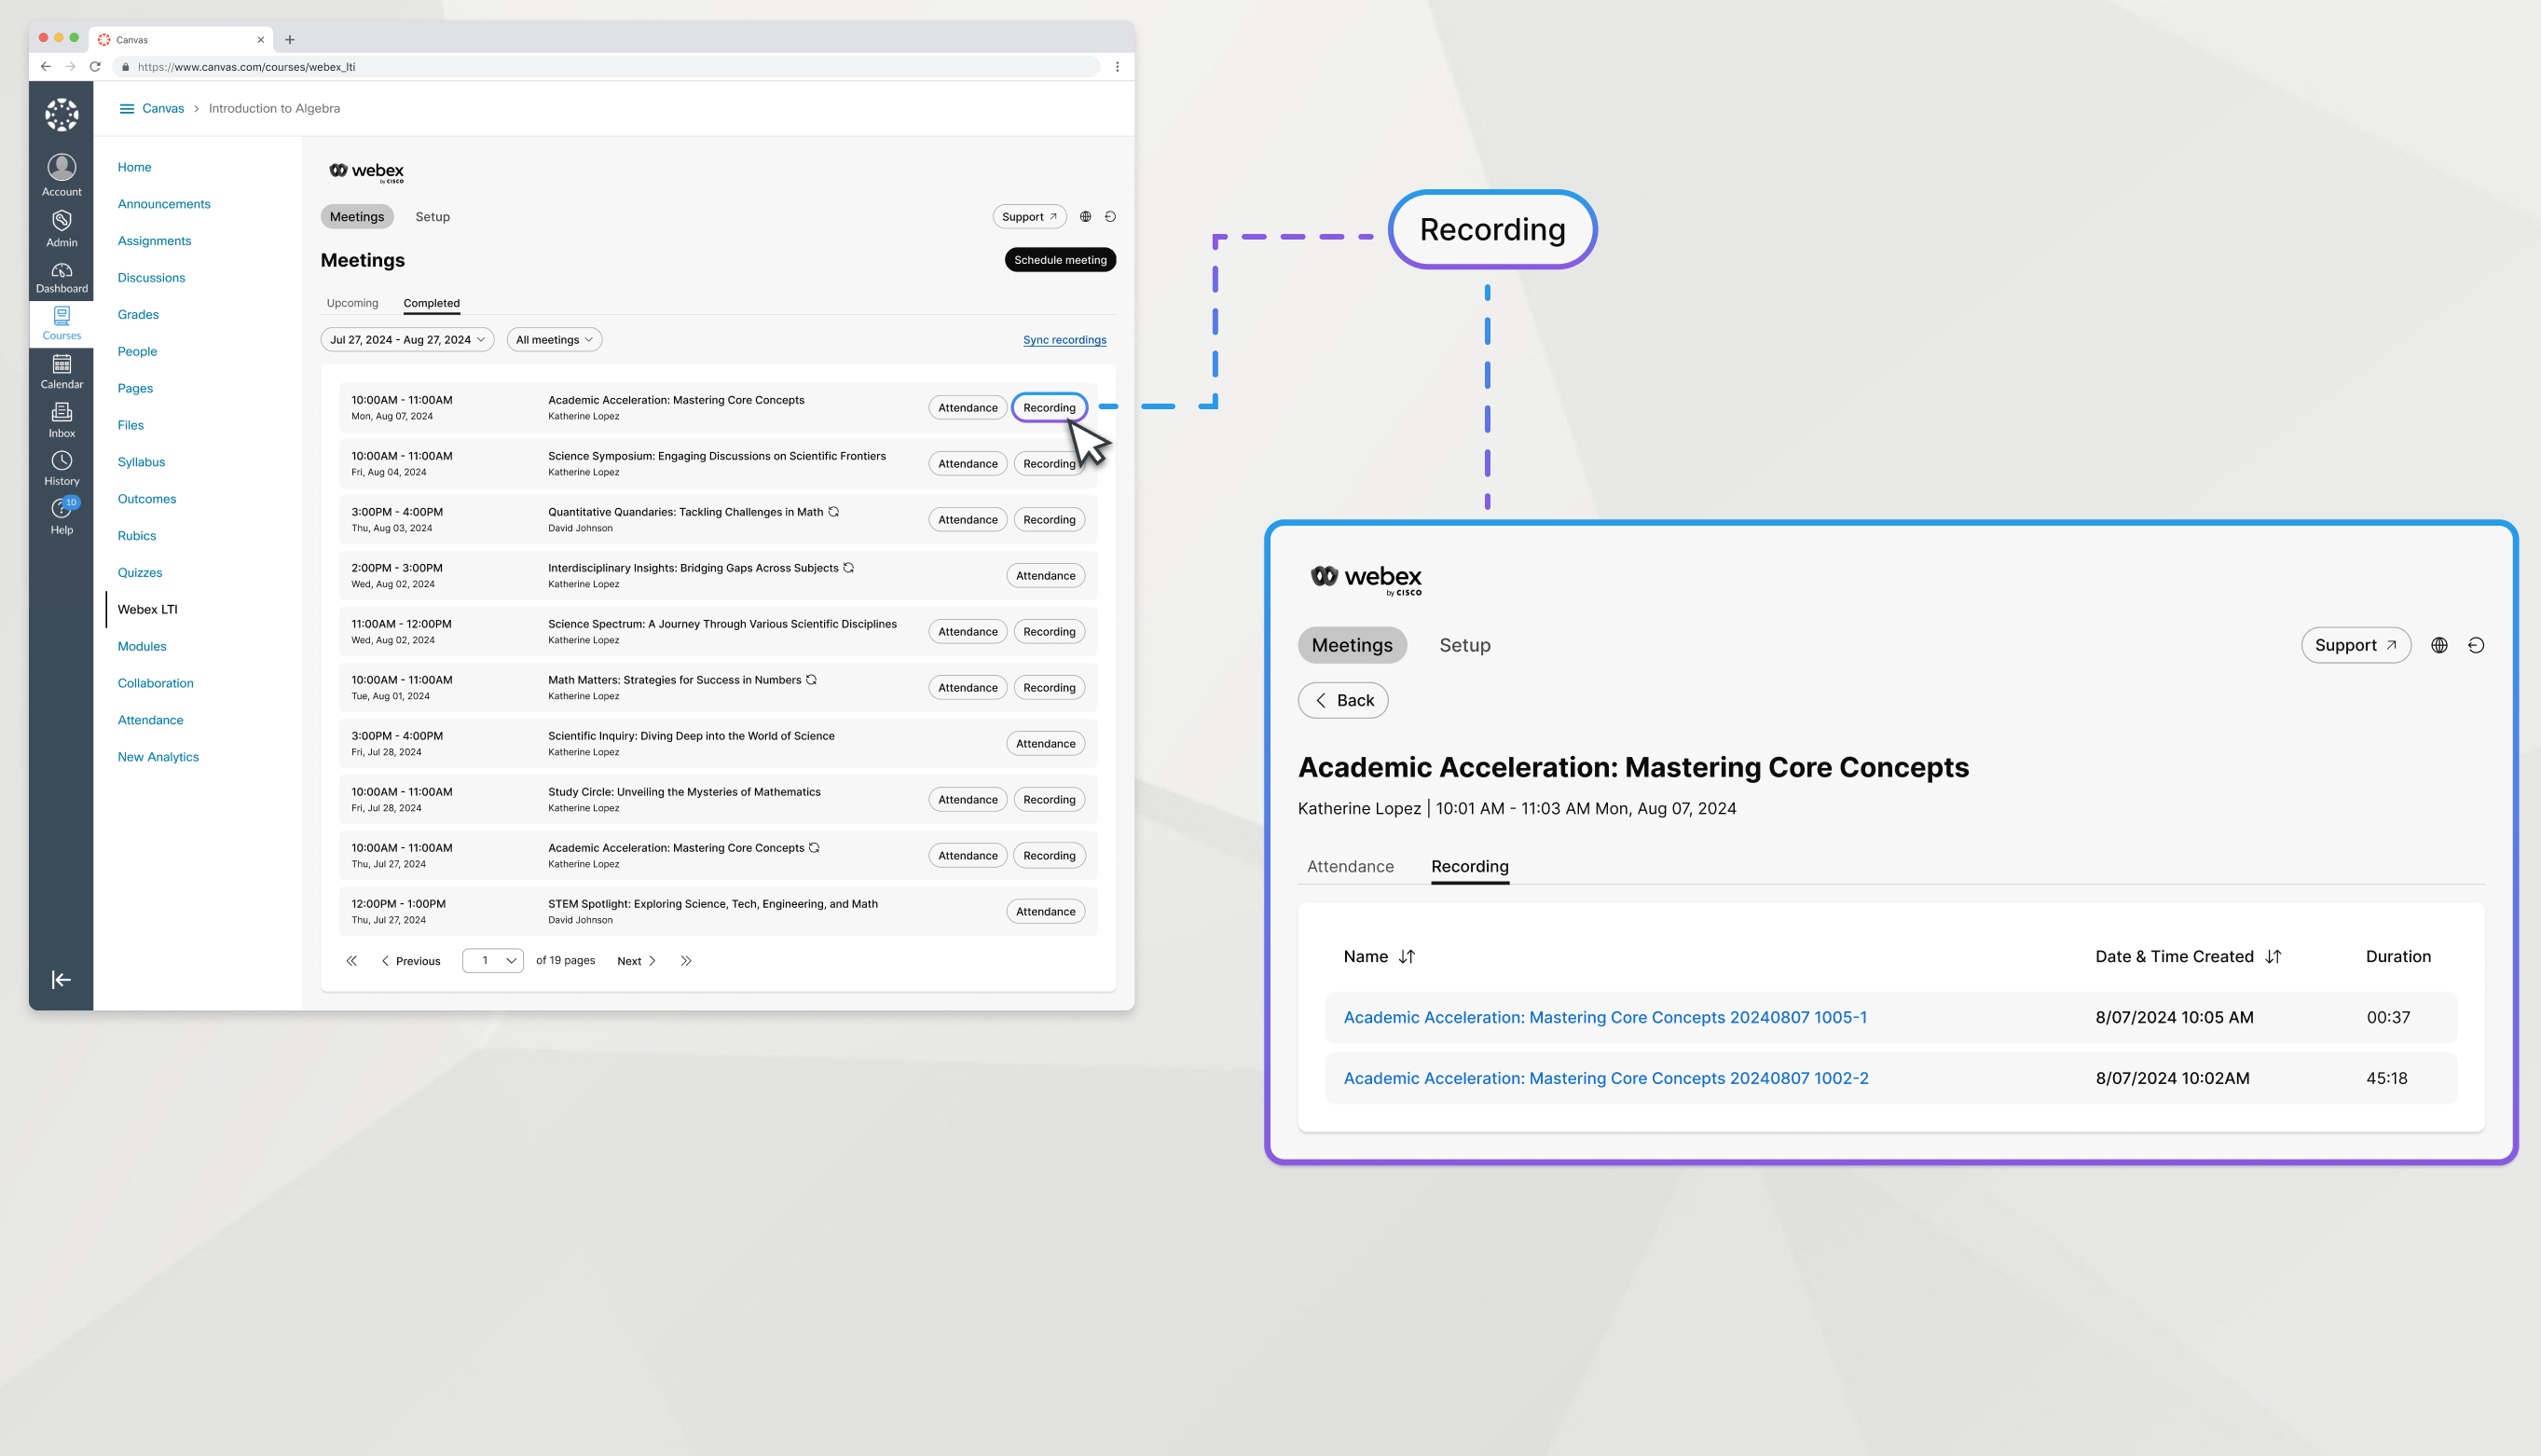
수업 회의 녹화본을 시청하세요.
| 1 |
회의 탭으로 이동하여 완료를 클릭합니다. |
| 2 |
시청하려는 녹화본이 있는 회의를 찾아 녹화본을 클릭하세요. |
| 3 |
녹음 파일의 이름을 클릭해서 열어보세요. |
| 4 |
녹음 비밀번호를 복사하고 녹음 보기를 클릭하세요. 다음 화면에서 비밀번호를 입력하면 회의 녹화 영상을 볼 수 있습니다.
|
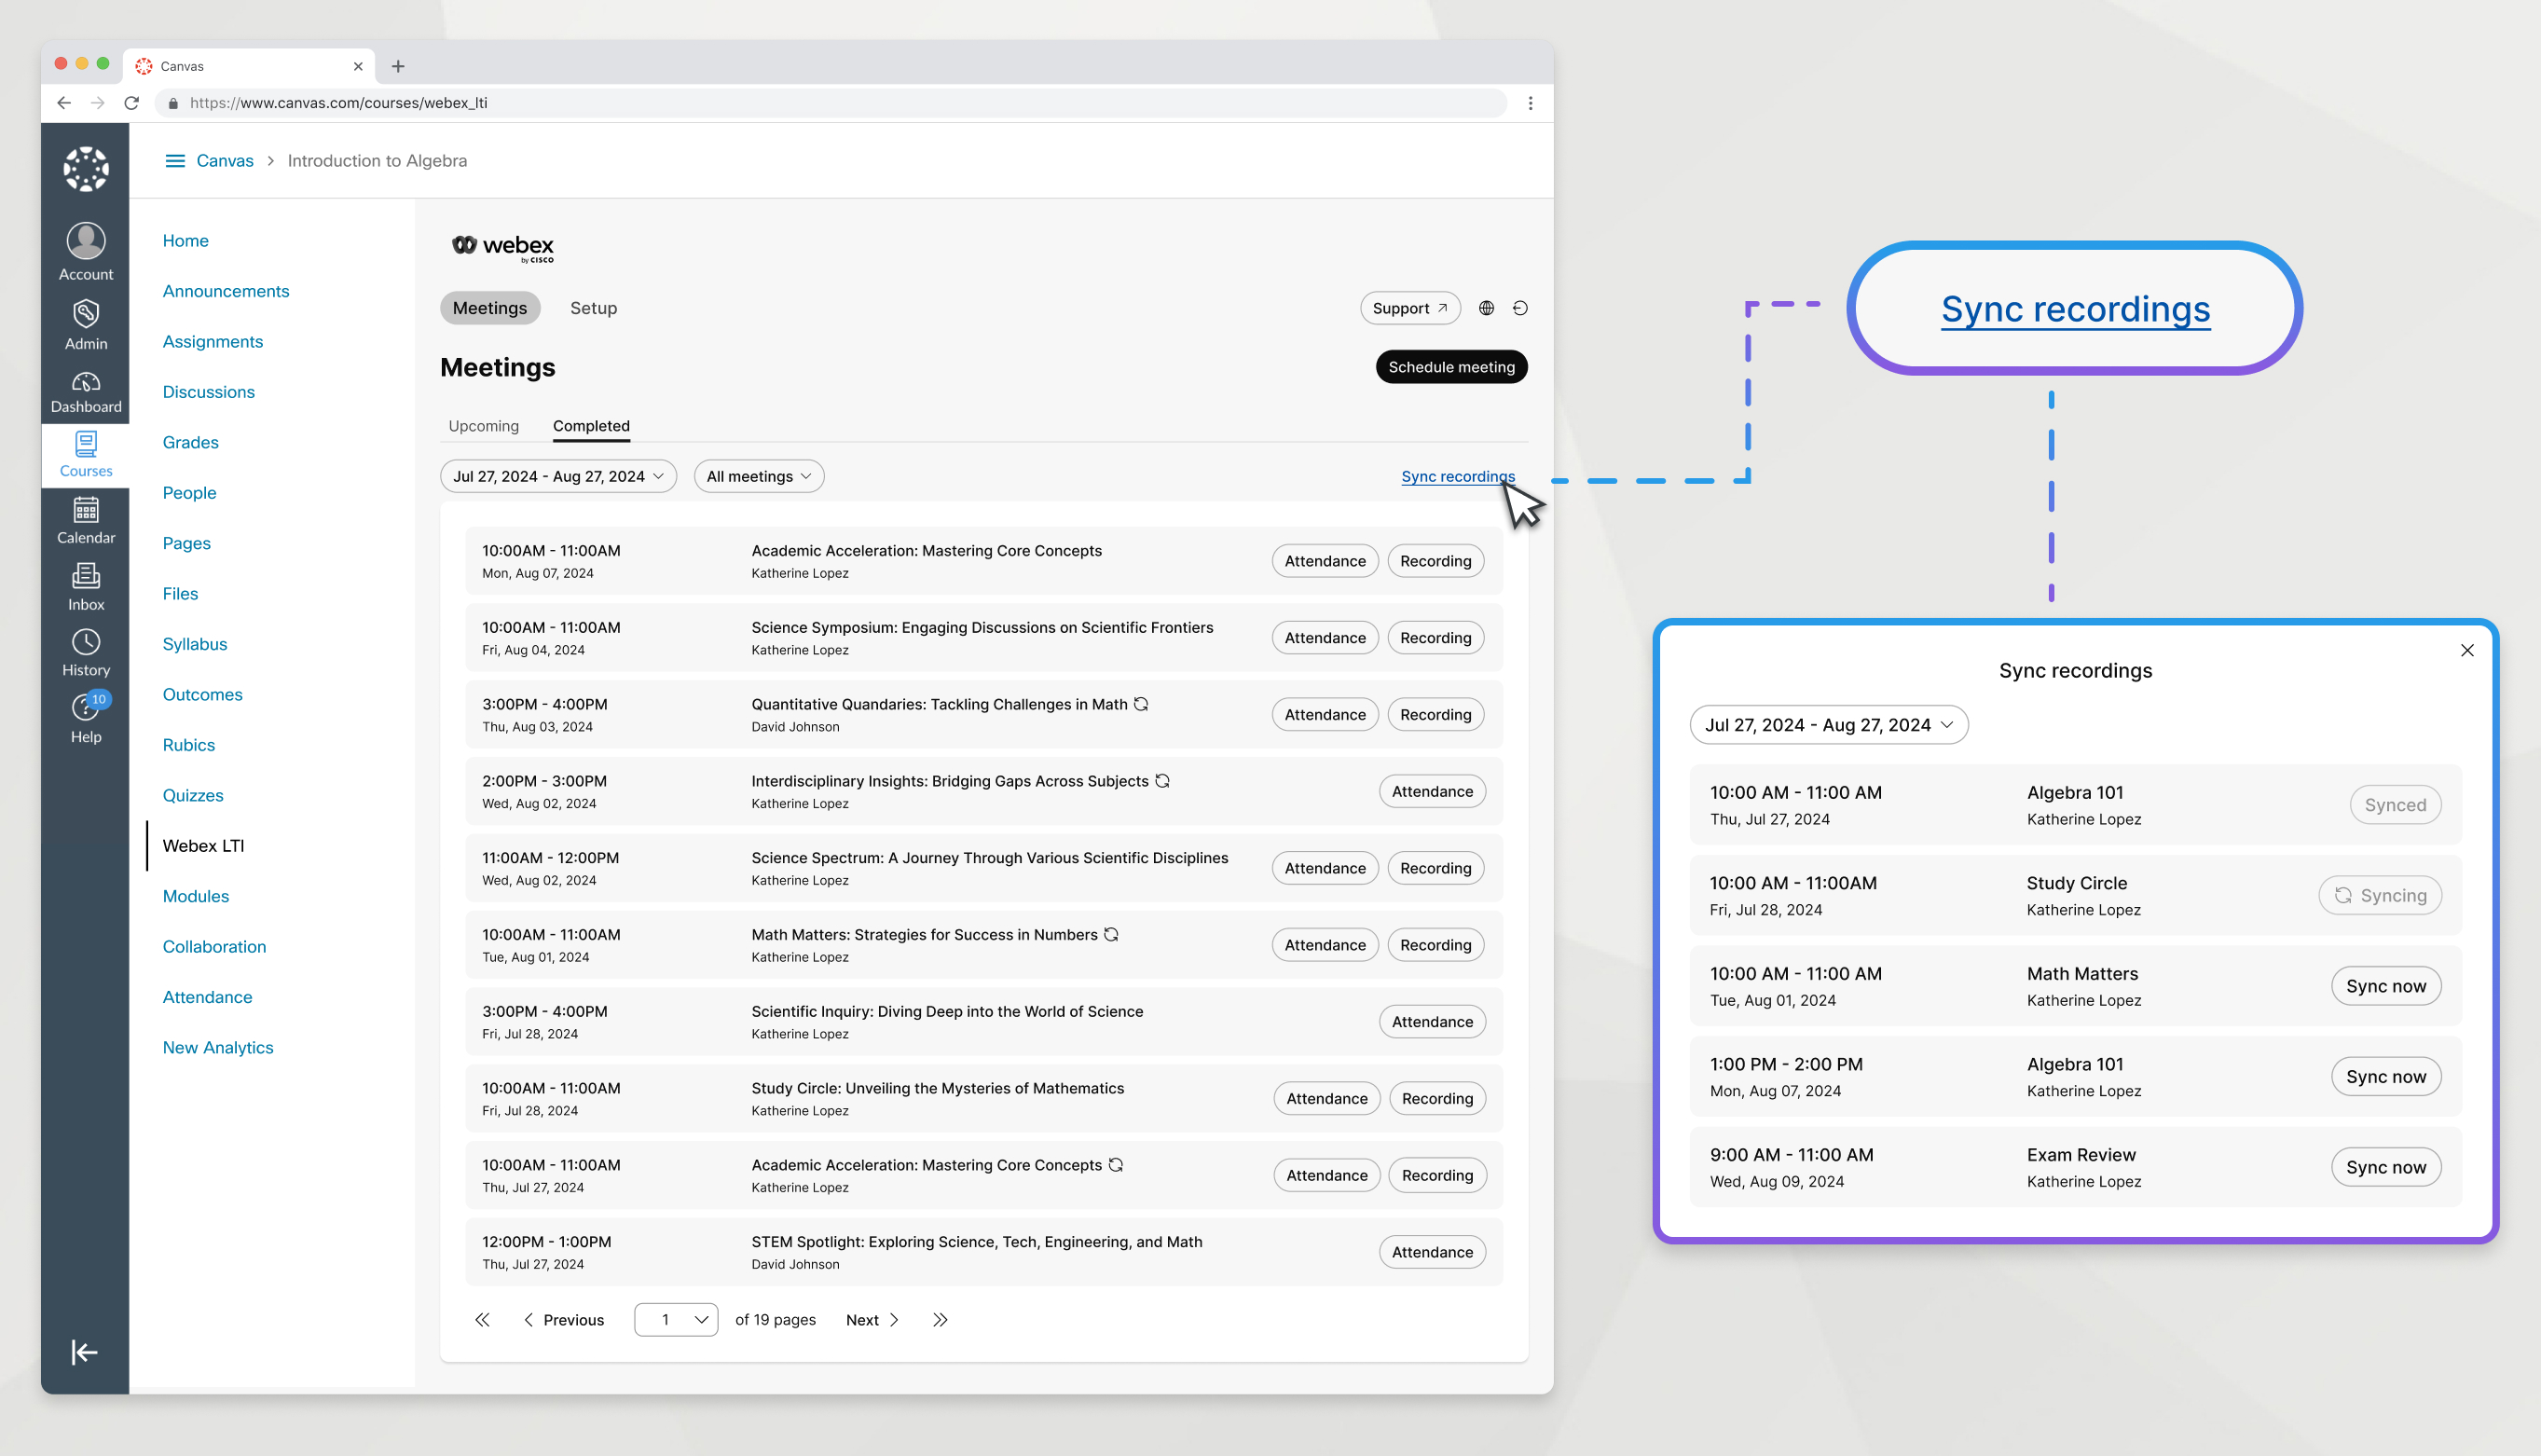
회의가 종료되고 녹음이 처리되면 회의 녹음 내용이 회의 콘텐츠에 자동으로 표시됩니다. 자동 프로세스가 시작되기 전에 녹음을 사용할 수 있도록 하려면 녹음을 수동으로 동기화할 수 있습니다.
| 1 |
회의 탭으로 이동하여 완료를 클릭합니다. |
| 2 |
녹음 동기화 버튼을 클릭하세요. |
| 3 |
녹화된 회의가 발생한 날짜 범위를 선택하세요. 최대 7일까지만 날짜 범위를 선택할 수 있습니다. |
| 4 |
동기화하려는 녹음이 있는 회의를 찾아 지금 동기화를 클릭하세요. 회의는 Webex에서 이미 처리된 경우에만 이 창에 나타납니다. |
| 5 |
녹음이 동기화되면 창을 닫습니다. |
다음에 수행할 작업
기타 녹화
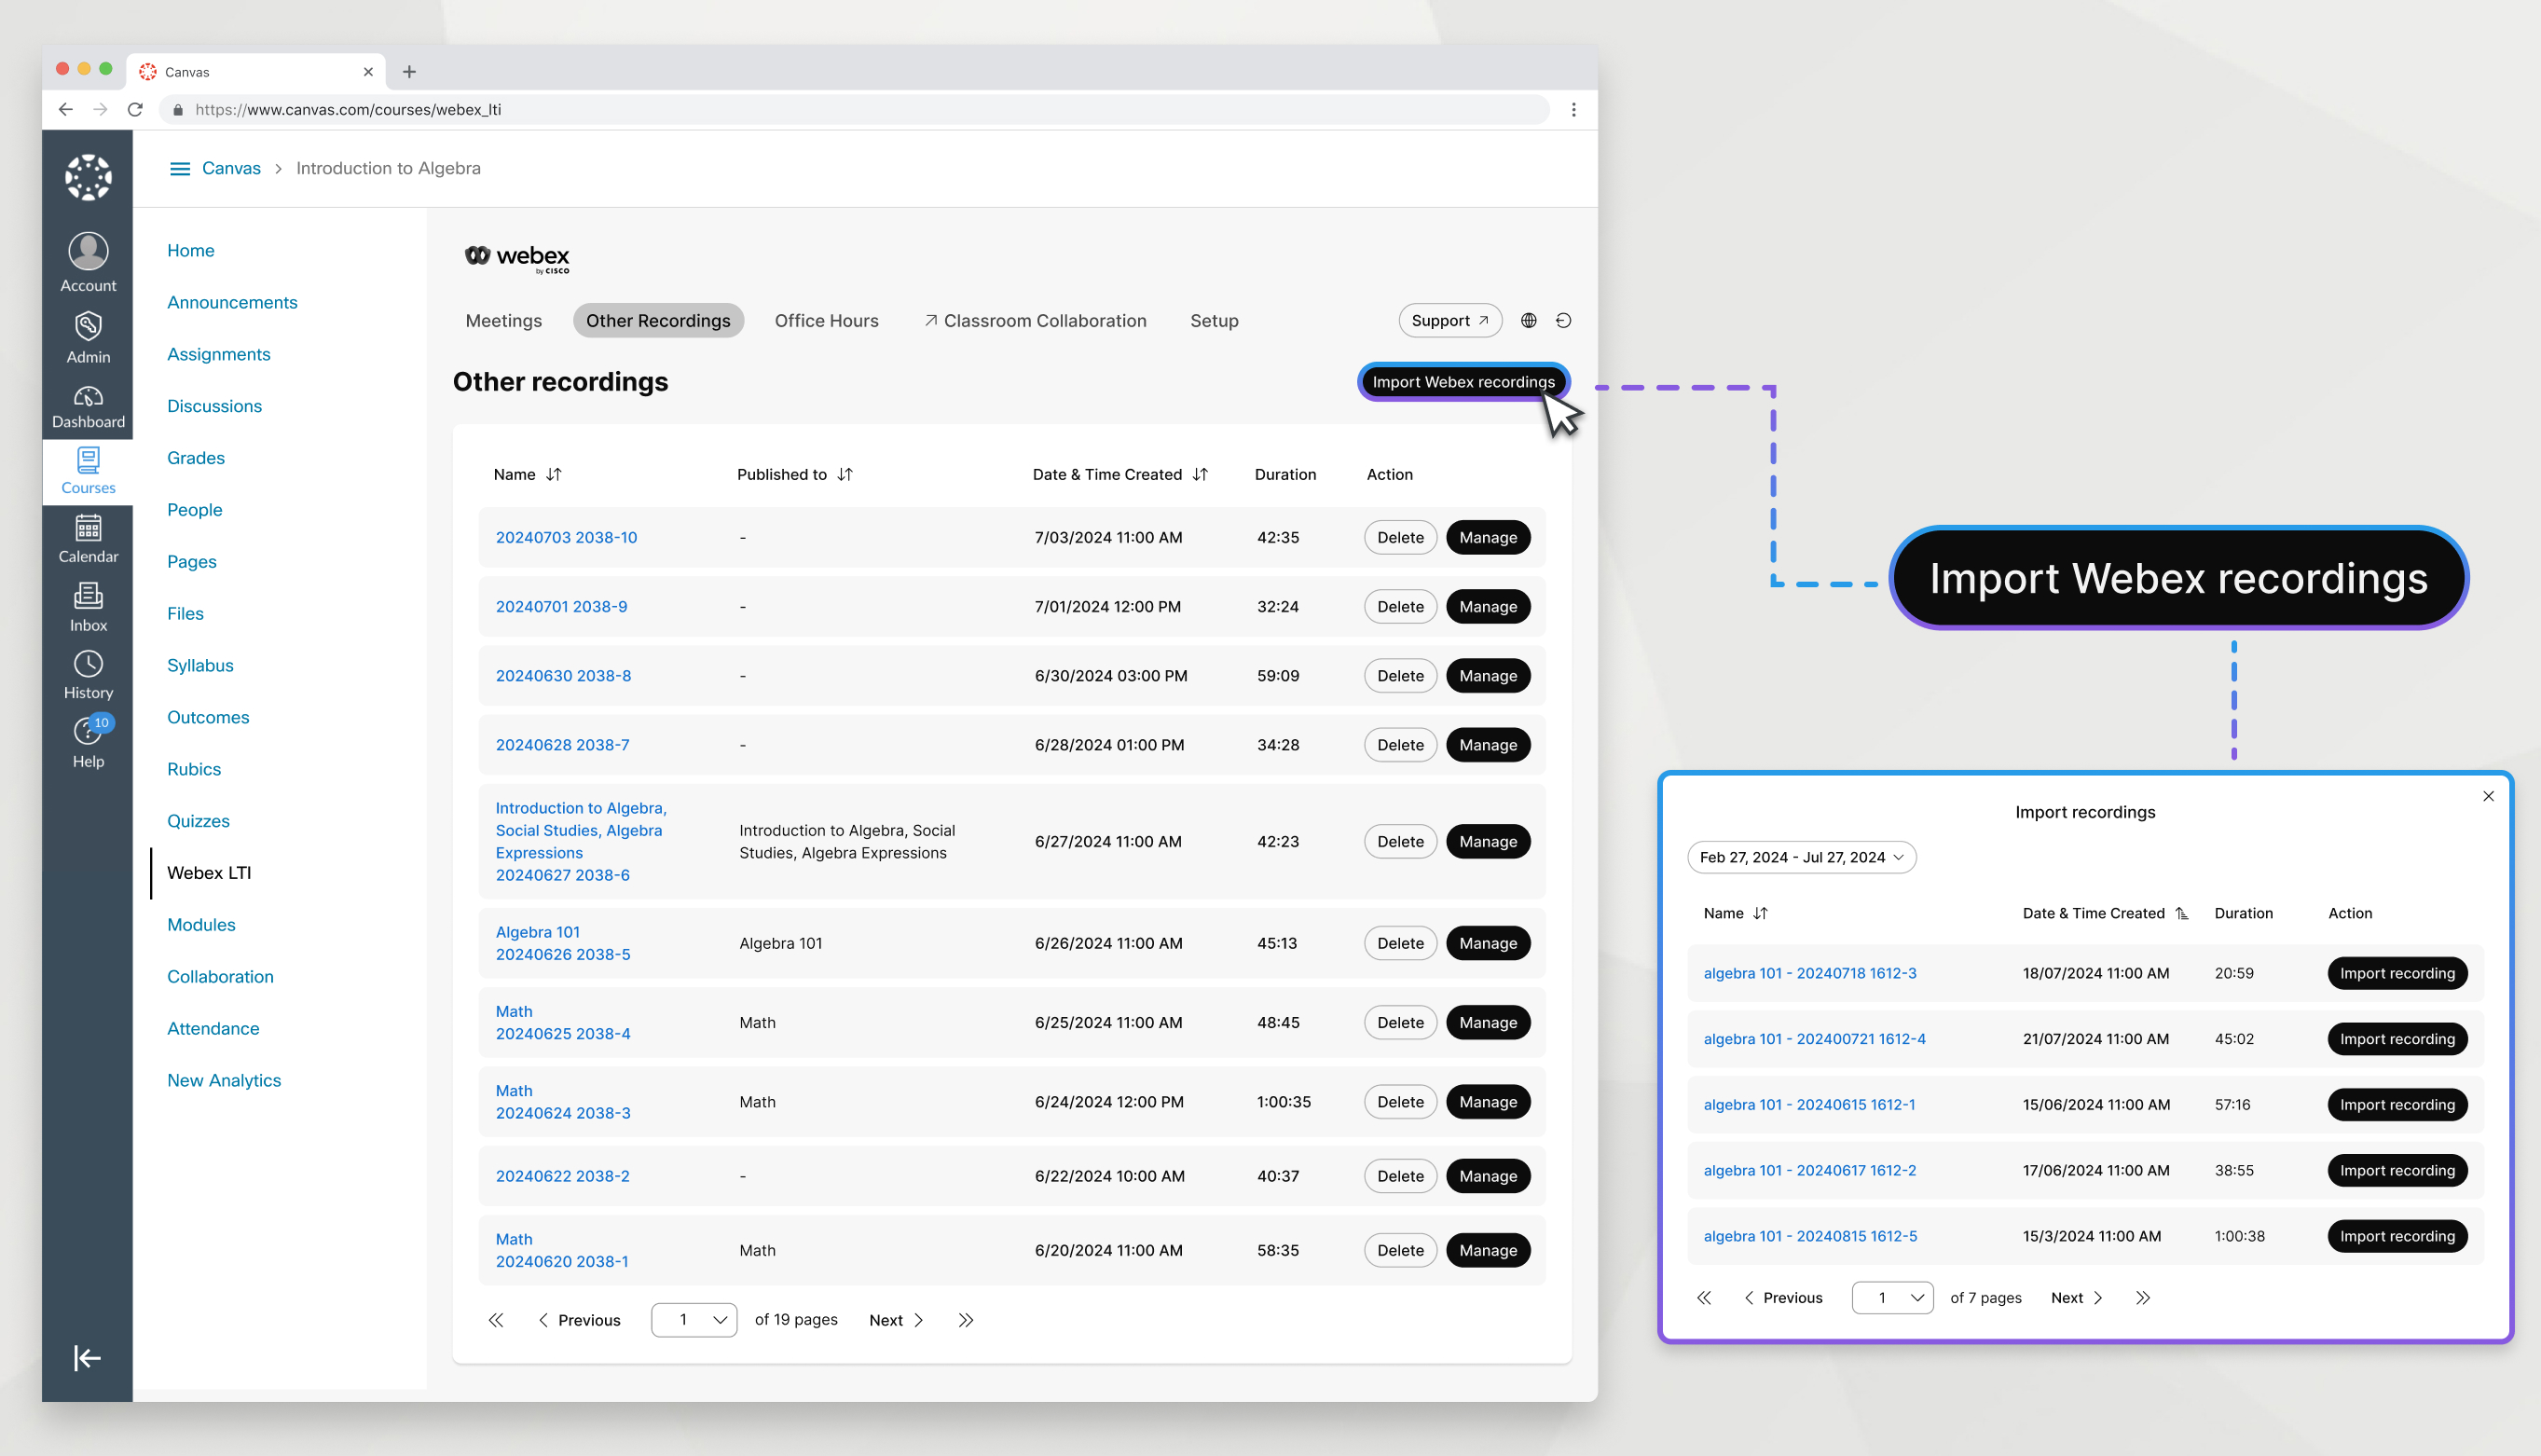
기타 녹화 를 사용하면 예약된 Webex LTI 회의와 관련이 없는 Webex 녹화를 가져와서 수업에 게시할 수 있습니다. 참여자가 없는 상태에서 수업을 하거나 주제를 설명하는 자신의 모습을 녹화해 보세요. 이 녹화 자료는 학기마다 재사용할 수 있습니다.
| 1 |
기타 녹음 탭으로 이동합니다. |
| 2 |
Webex 녹화 가져오기를 클릭하세요. |
| 3 |
가져오려는 녹음이 포함된 날짜 범위를 선택하세요. |
| 4 |
녹음을 찾아 녹음 가져오기를 클릭하세요. |
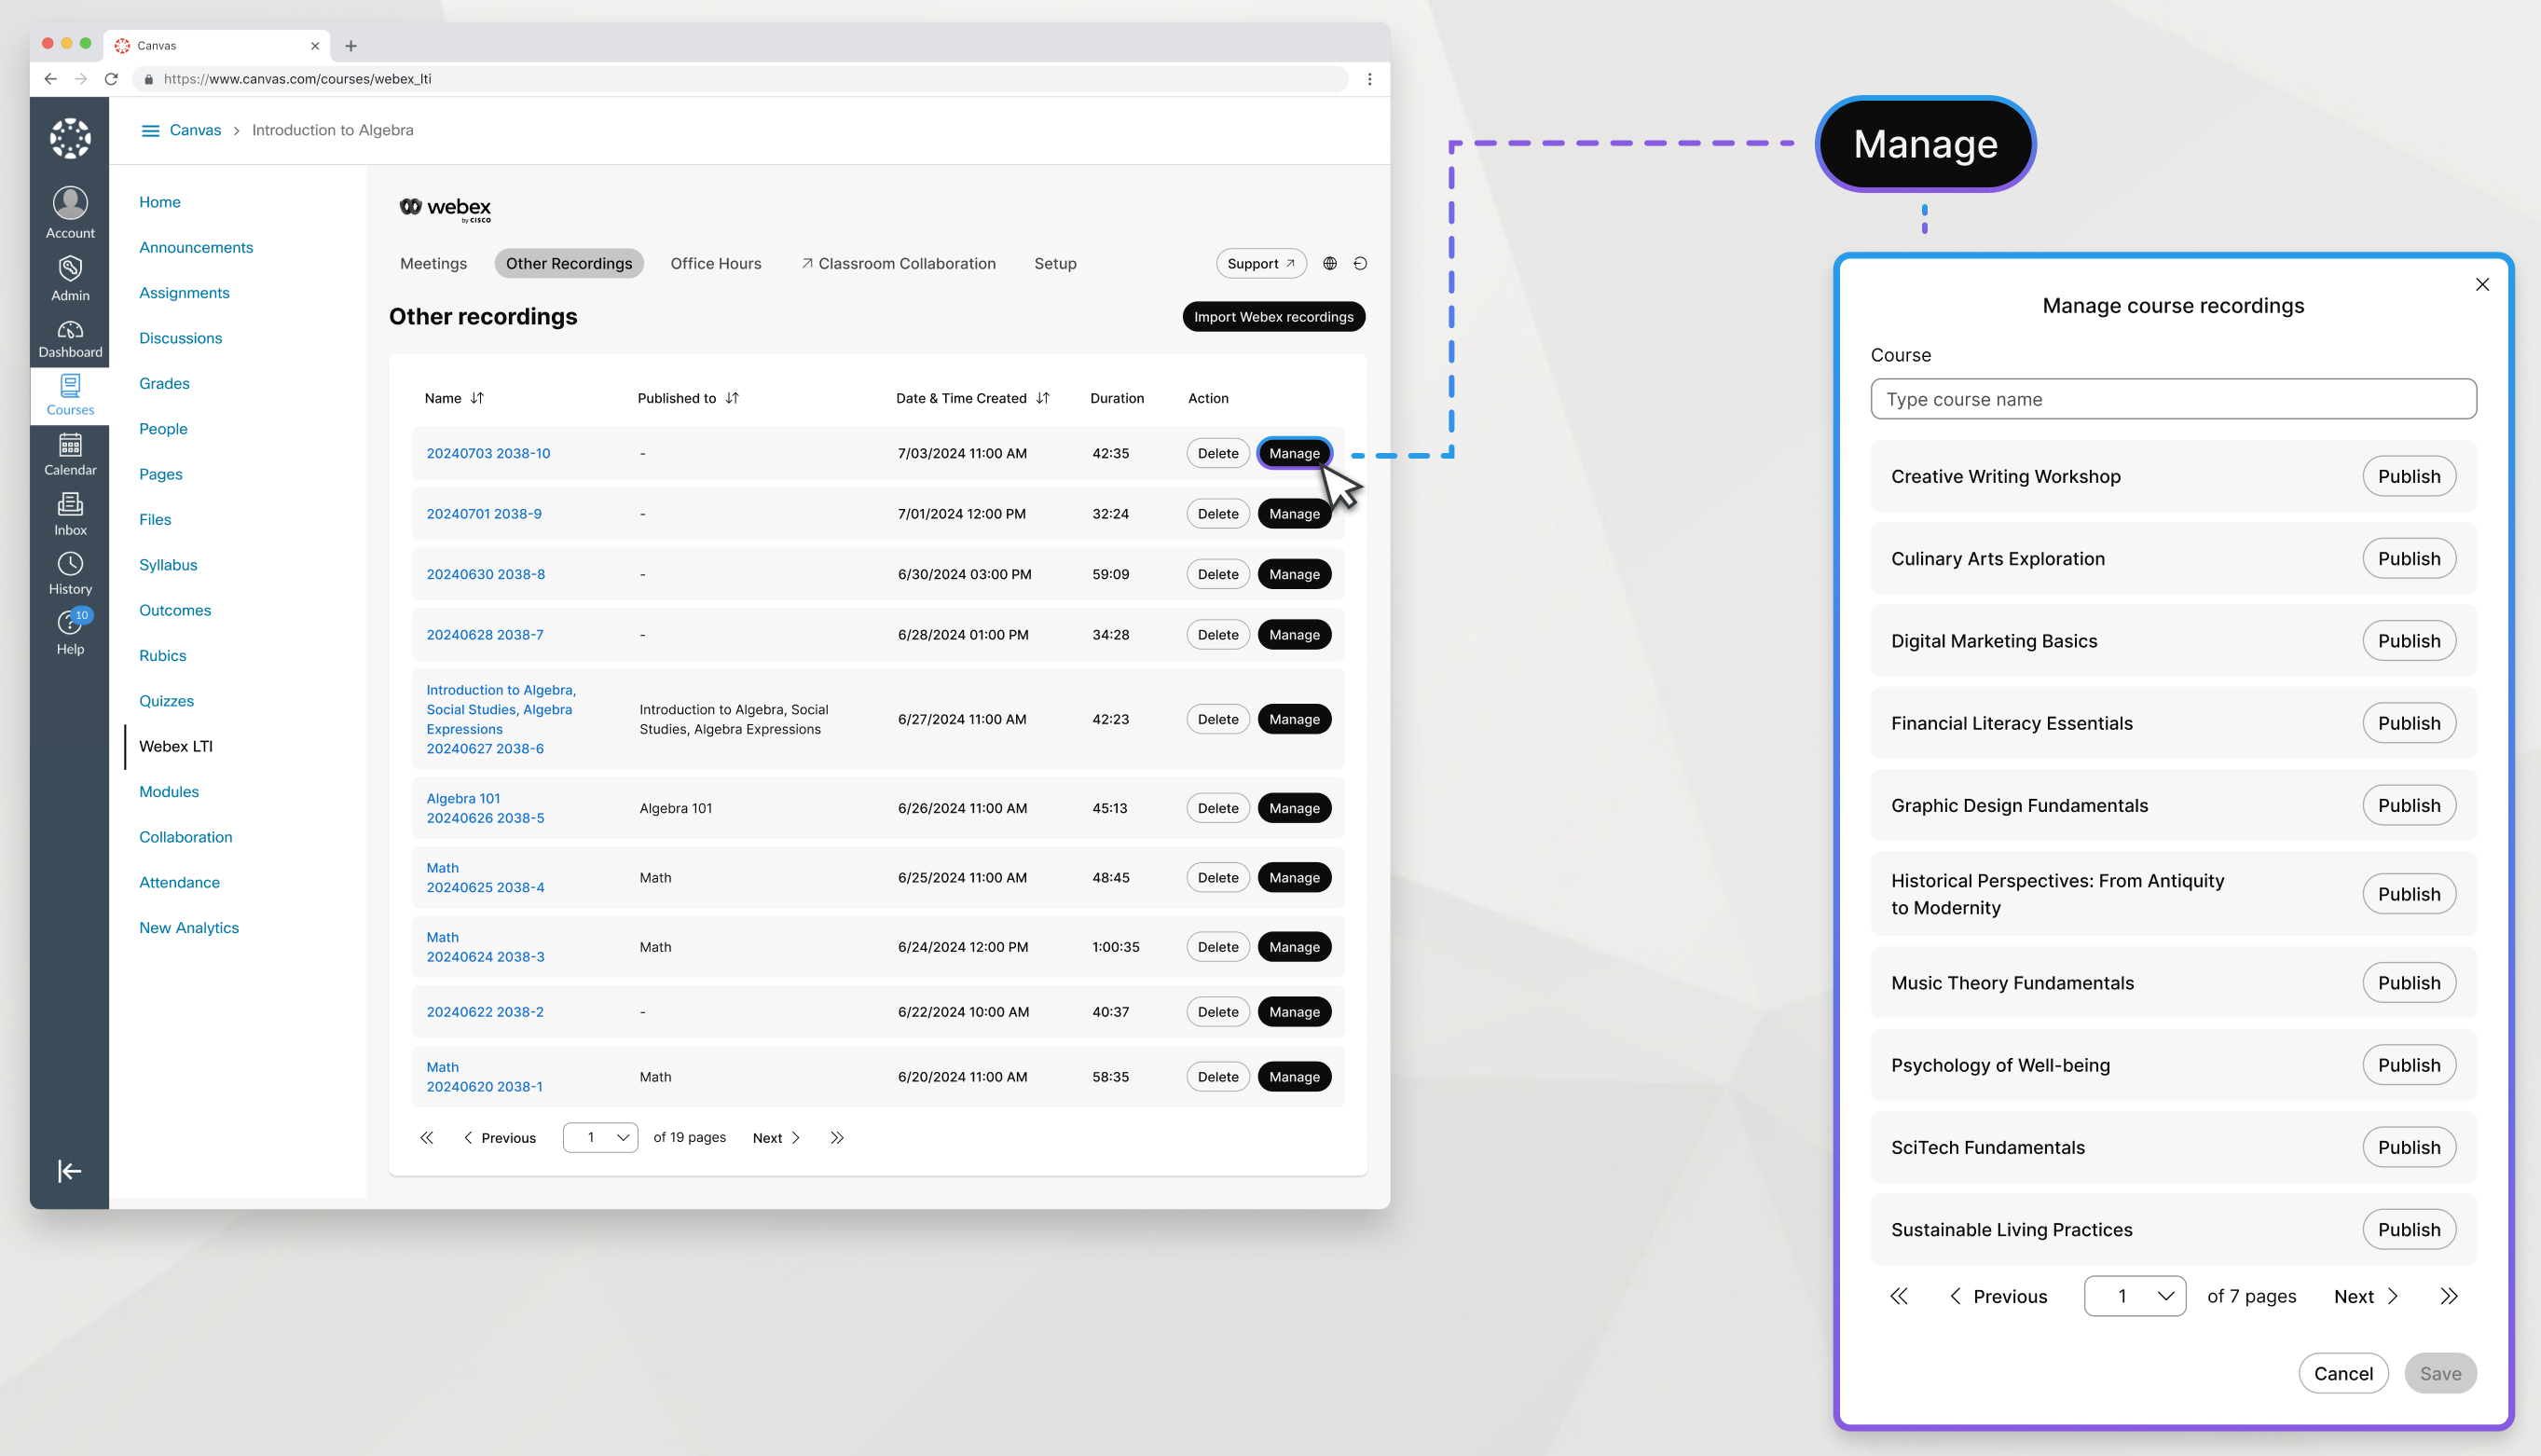
Webex 녹화를 기타 녹화로 가져온 후에는 해당 녹화를 모든 코스에 게시하여 학생들이 이용할 수 있도록 할 수 있습니다.
| 1 |
기타 녹음 탭에서 녹음을 찾아 관리를 클릭합니다. |
| 2 |
녹음을 게시하려는 과정을 찾아 게시를 클릭하세요. 이 목록에 과정이 나타나려면 해당 과정에서 Webex LTI를 최소한 한 번 열어야 합니다. |
| 3 |
저장을 클릭합니다. |
수업에서 녹화본의 게시를 취소하여 학생들이 이용할 수 없도록 할 수 있습니다.
| 1 |
기타 녹음 탭에서 녹음을 찾아 관리를 클릭합니다. |
| 2 |
녹음을 게시하려는 과정을 찾아 게시 취소를 클릭하세요. |
| 3 |
저장을 클릭합니다. |
녹음을 삭제하면 녹음을 게시한 모든 코스와 다른 녹음 탭에서도 녹음이 제거됩니다.
| 1 |
기타 녹음 탭으로 이동합니다.
|
| 2 |
삭제하려는 녹음을 찾아 삭제를 클릭하세요. |
업무 시간
Webex LTI를 사용하여 근무 시간을 예약하고 호스팅할 수 있습니다. 업무 시간 탭 아래에서 대화 가능 상태를 설정하고 학생들이 귀하와 미팅할 수 있는 시간을 지정합니다. 설정하는 업무 시간은 귀하가 강사로 지정된 모든 강의에 적용됩니다. 강의에 여러 강사가 있는 경우, 학생이 귀하와 미팅을 예약하려면 강사의 목록에서 귀하를 선택해야 합니다.
업무 시간 미팅을 통해 학생은 귀하와 직접 미팅을 예약할 수 있습니다. 여러 학생을 대상으로 동시에 상담 시간을 제공하려면 가상 회의를 만들고 "상담 시간"이라는 이름을 지정하는 것이 좋습니다.
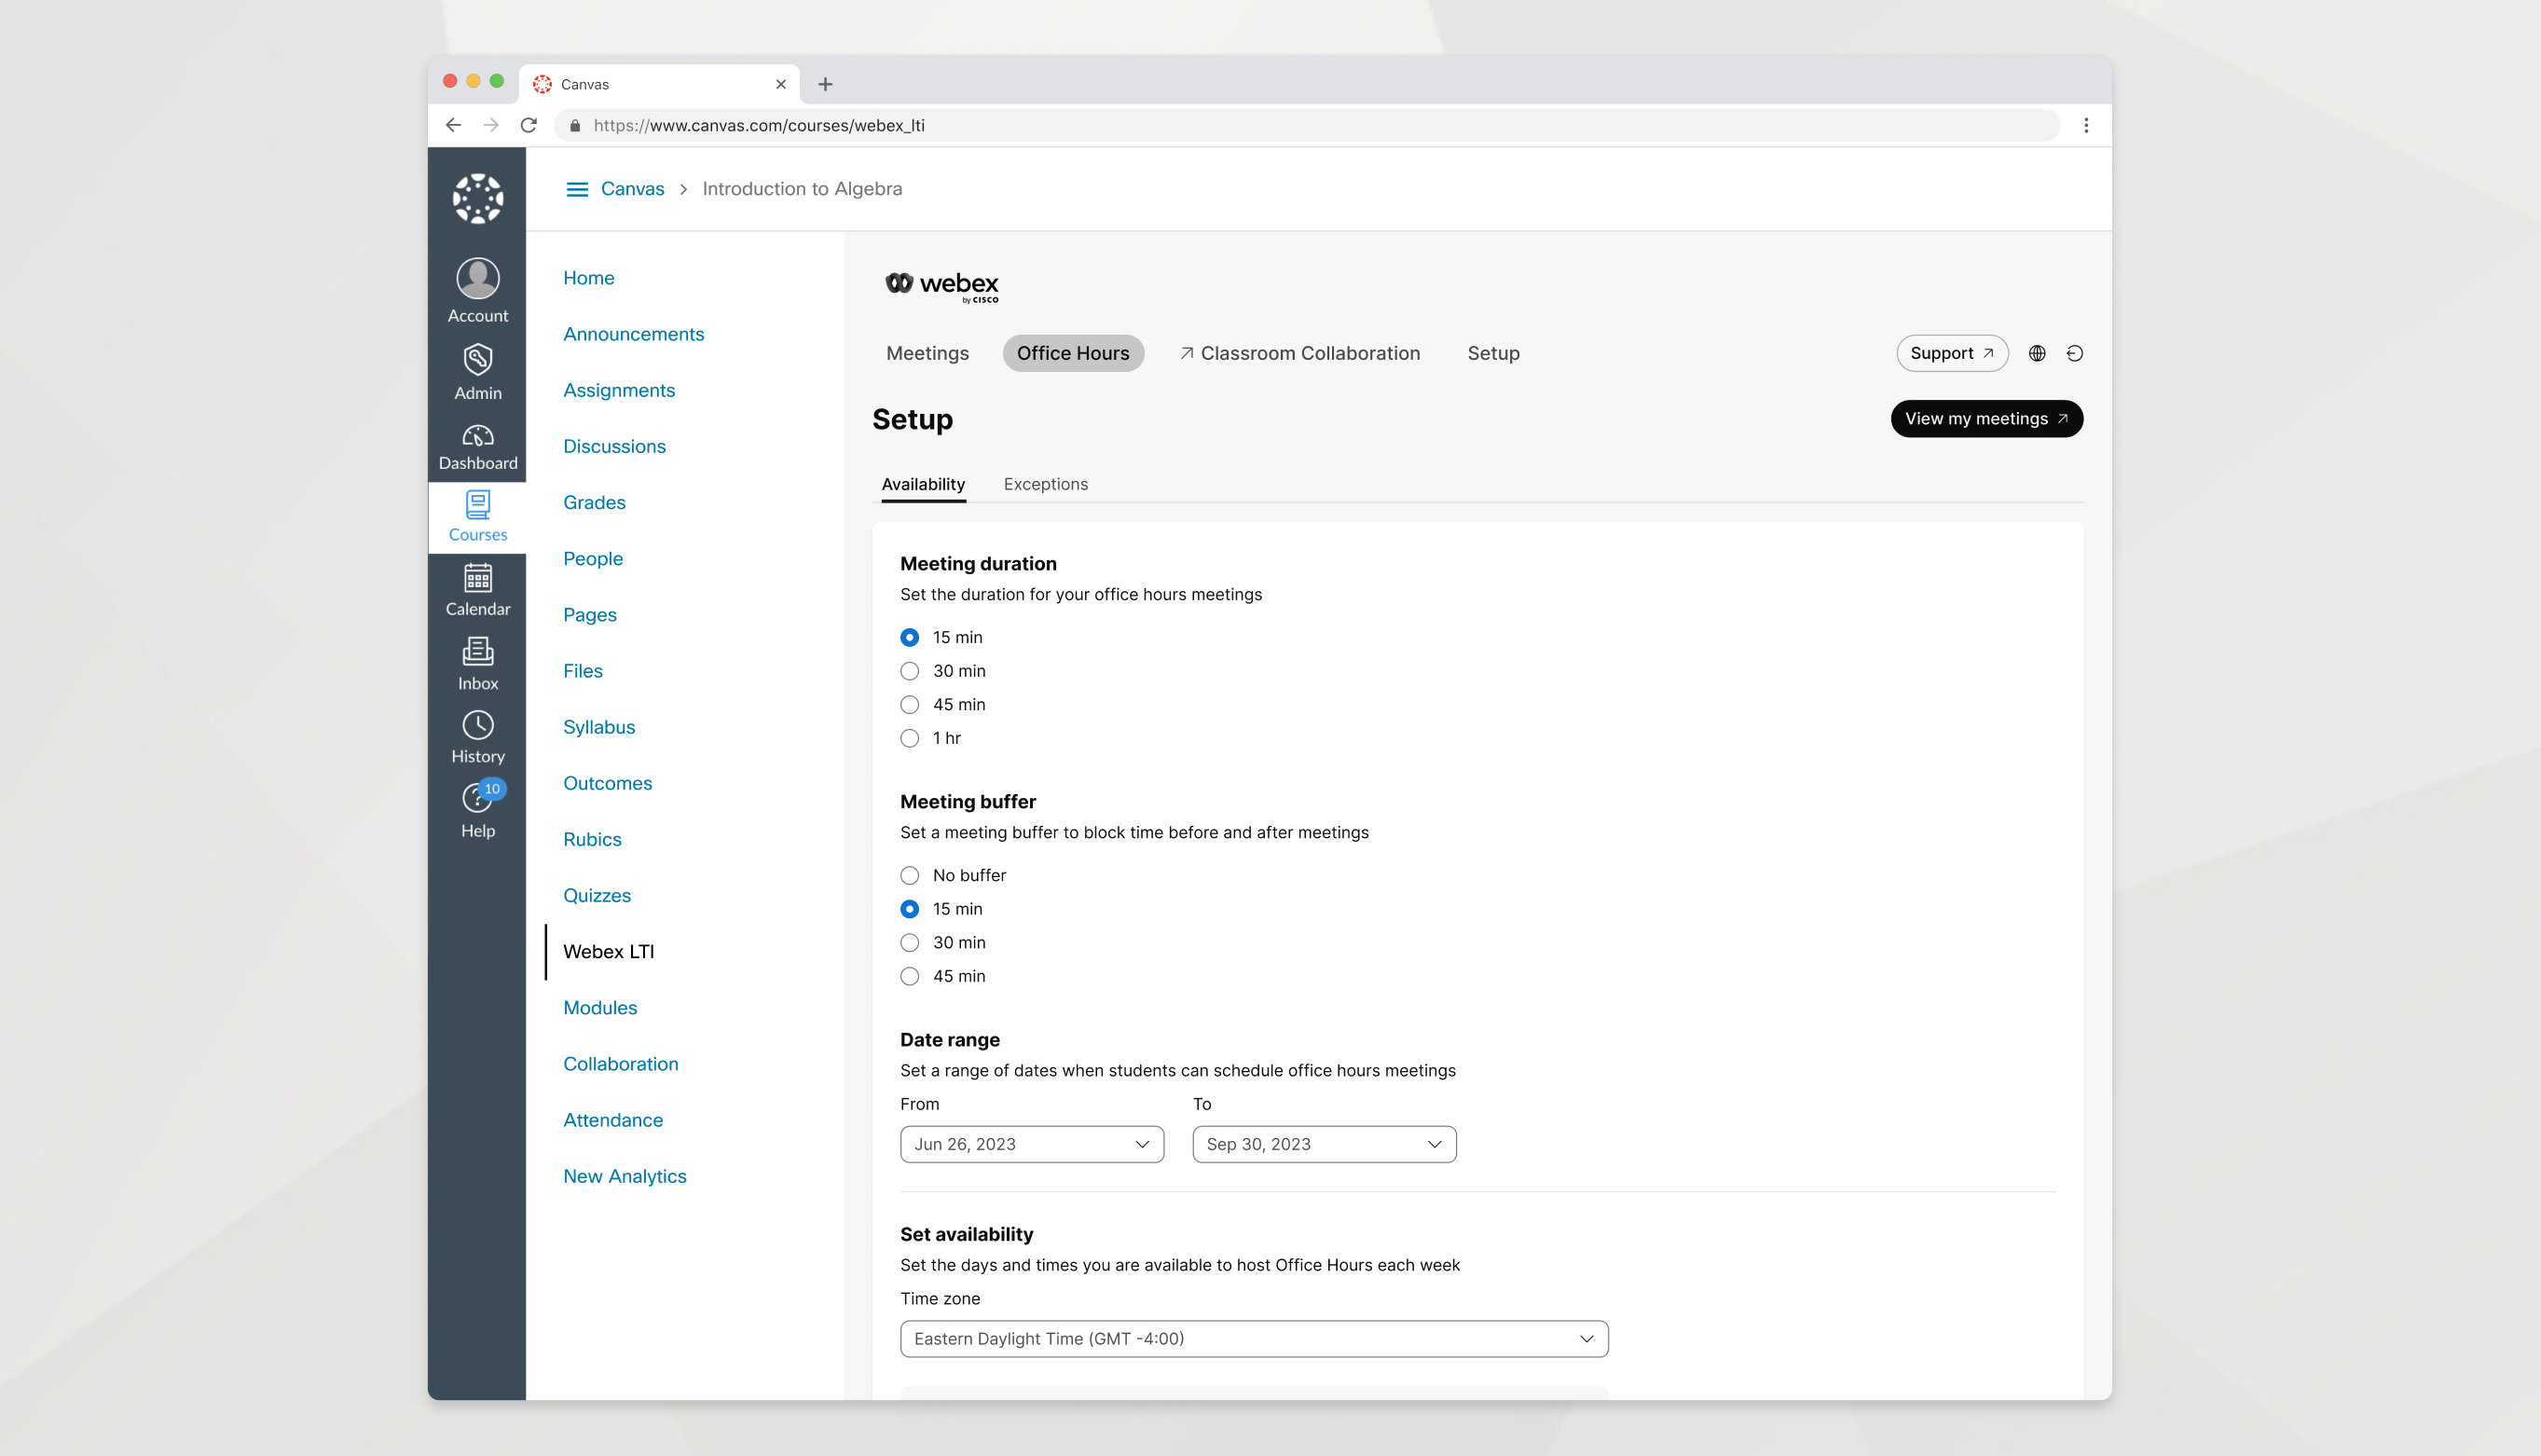
상담 시간 기능을 사용하면 학생들이 귀하를 만날 수 있도록 다양한 날짜와 시간에 귀하의 가능 여부를 표시할 수 있습니다.
| 1 |
영업시간 탭으로 이동하세요. |
| 2 |
가용성 탭에서 다음을 설정합니다.
|
| 3 |
스크롤 다운하고 저장을 클릭합니다. |
학생은 이제 귀하와 미팅할 시간을 선택할 수 있습니다. 학생이 성공적으로 약속을 예약하면, 그 시간대는 다른 사람이 이용할 수 없습니다. 미팅 링크가 포함된 이메일을 수신하고 Webex 사이트에서 예정된 미팅 목록에 미팅이 나타납니다.
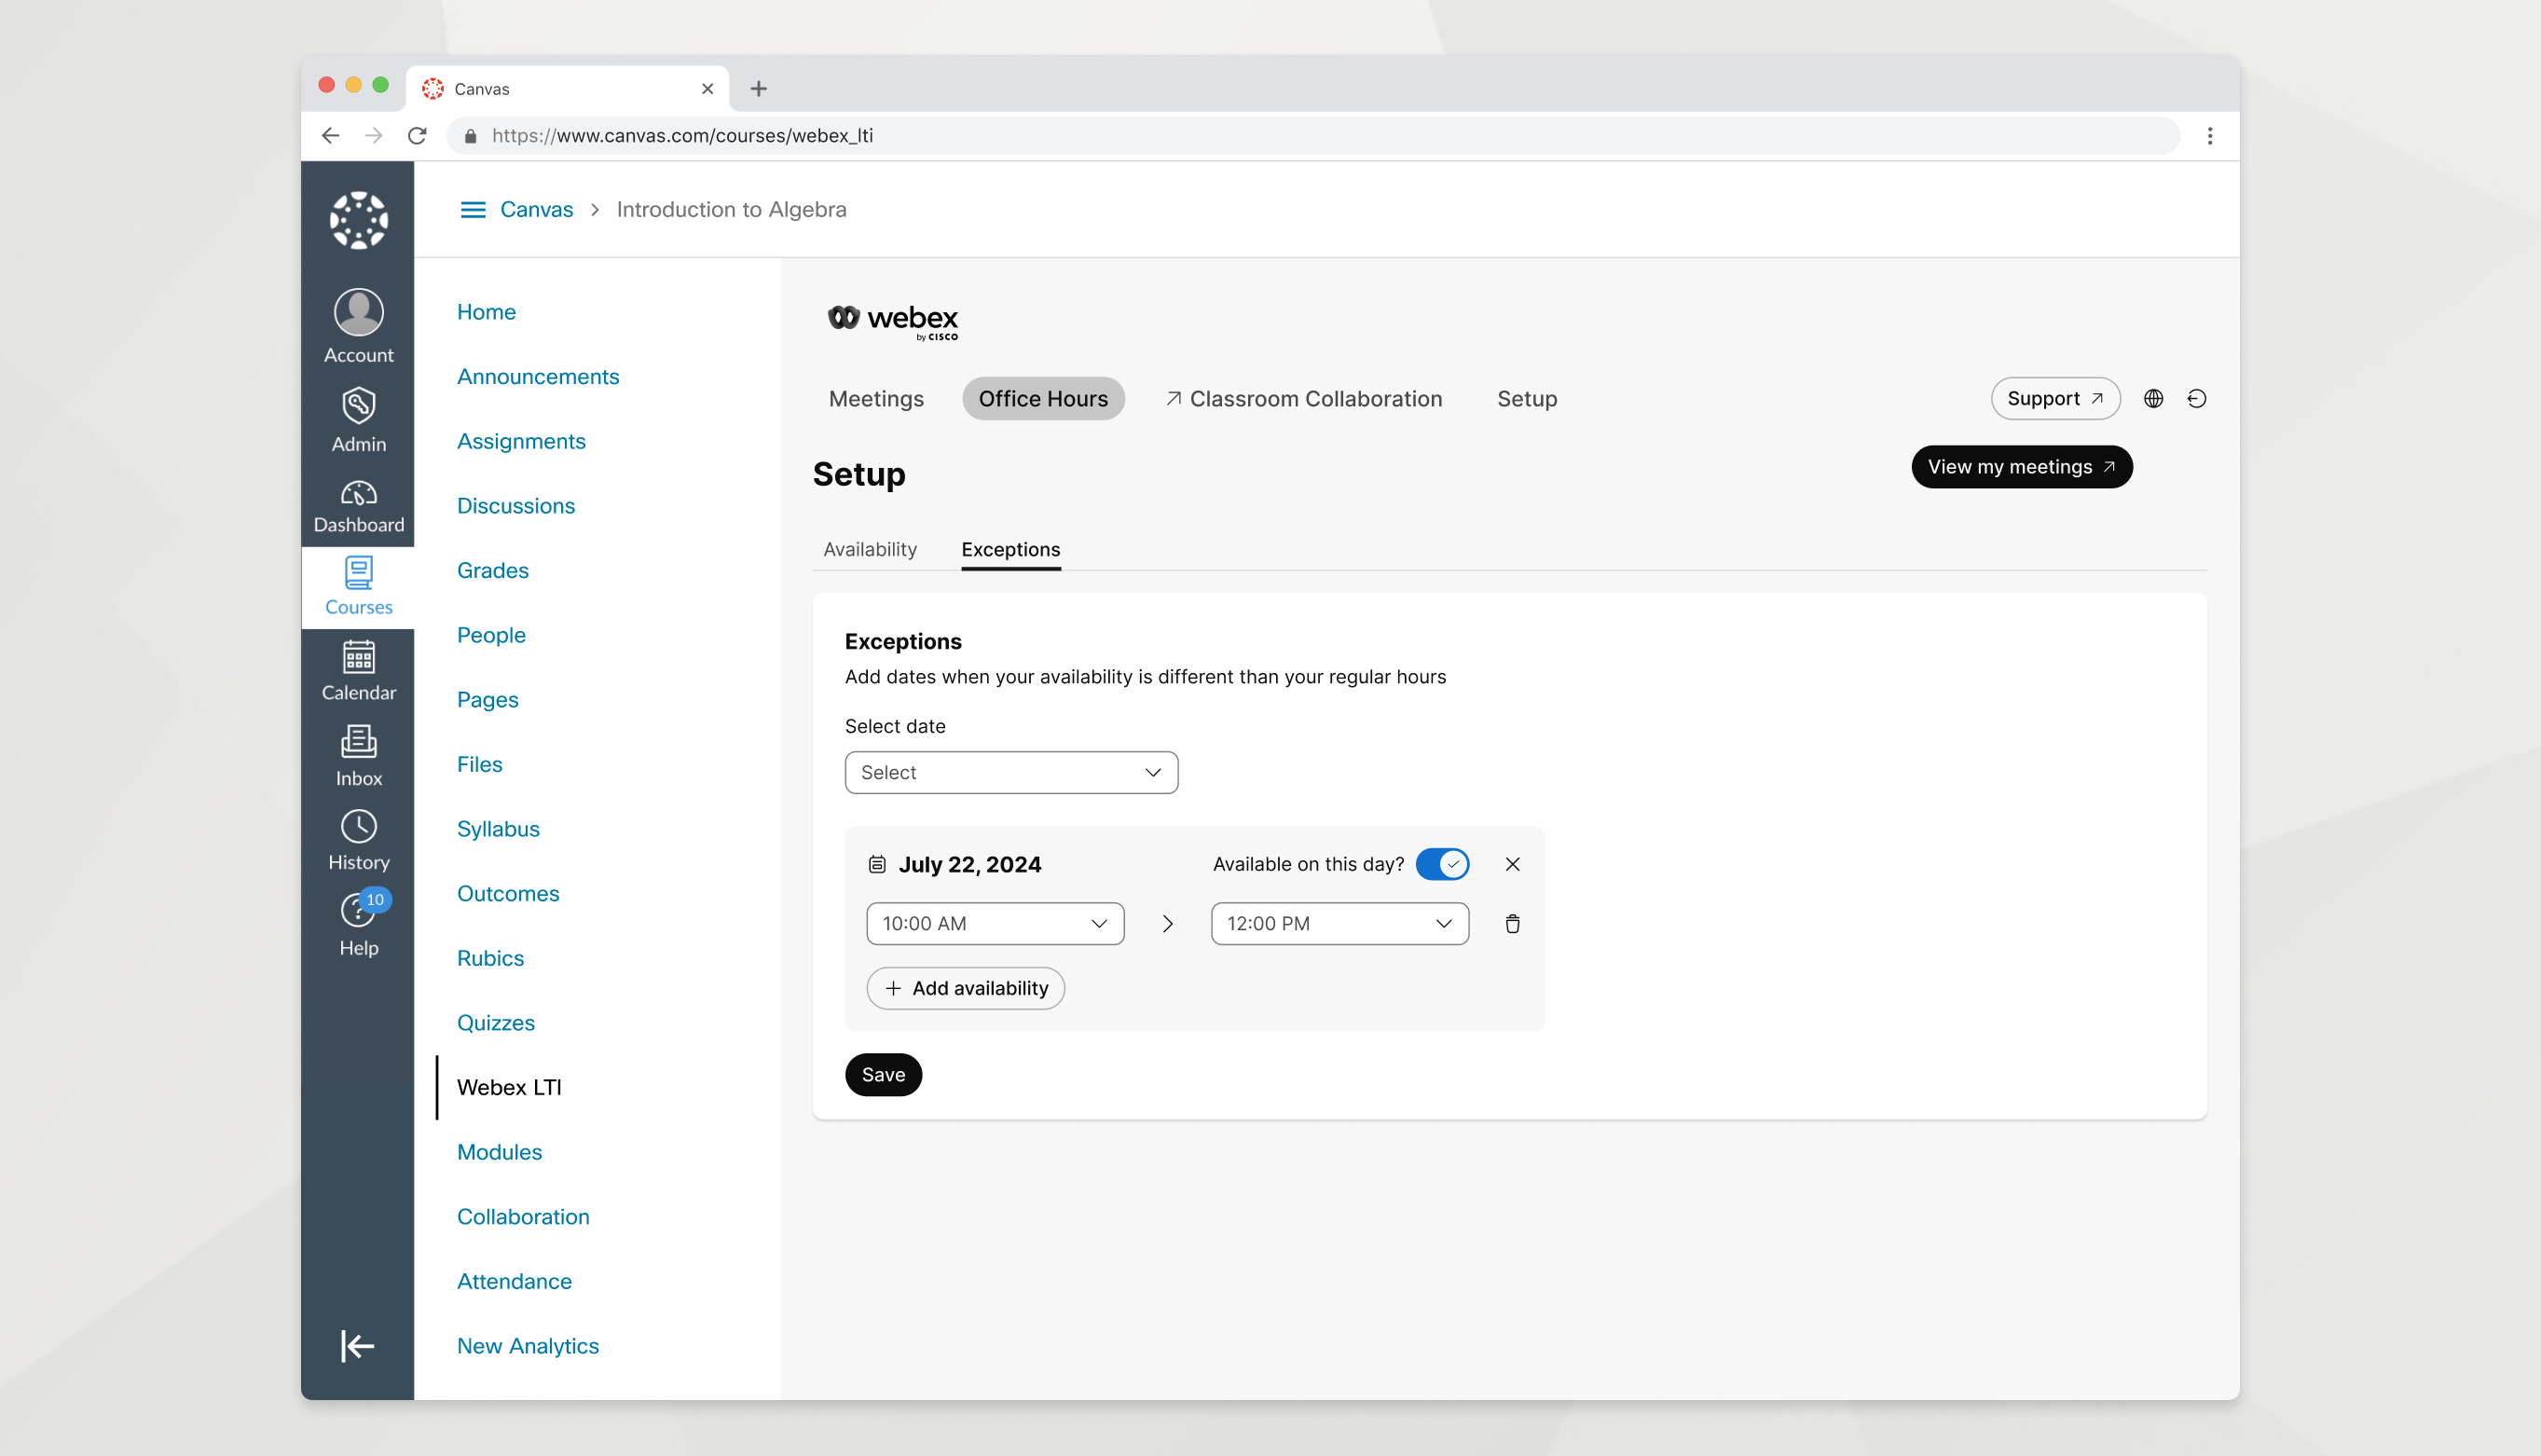
특정 날짜에 업무 가능 시간을 변경하기 위한 예외를 설정하면 사무실 근무 시간이 일정을 정확하게 반영합니다. 전체 날짜에 대해 대화 가능 상태를 차단하거나, 날짜에서 시간 간격을 제거하고, 날짜에 새로운 시간 간격을 추가할 수 있습니다.
| 1 |
근무 시간 탭으로 이동하여 예외를 클릭합니다. |
| 2 |
날짜를 선택하고 다음 옵션을 사용하여 해당 날짜에 대한 예약 가능 여부를 변경하세요.
|
| 3 |
저장을 클릭합니다. |
다음에 수행할 작업
언제든지 최대 50개의 미래 예외를 설정할 수 있습니다. 특정 날짜에 대한 예외를 설정하더라도 해당 예외를 설정하기 전에 학생이 예약한 근무 시간 회의에는 영향을 미치지 않습니다. 필요에 따라 Webex에서 해당 미팅을 다시 예약할 수 있습니다.
교실 협업
시작하기 전에
Webex LTI Legacy에서 교실 협업을 활성화하려면 먼저 LMS에 권한을 부여하고 Webex로 로그인해야 합니다.
| 1 |
설정에서 교실 협업 섹션으로 이동합니다. |
| 2 |
승인 을 클릭하고 화면의 지시에 따라 LMS에서 Webex LTI 레거시를 승인합니다. 이미 LMS에 권한을 부여한 경우 권한 부여 버튼이 표시되지 않으므로 이 단계를 건너뛸 수 있습니다. |
| 3 |
Webex로 로그인하여 교실 협업을 활성화하세요 를 클릭하고 Webex 자격 증명을 입력하세요. 이미 Webex로 로그인한 경우 Webex로 로그인하여 교실 협업을 활성화 버튼이 표시되지 않으므로 이 단계를 건너뛸 수 있습니다. |
| 4 |
교실 협업을 활성화하려면 스위치를 켜세요. |
시작하기 전에
Webex LTI에서 교실 협업을 활성화하려면 먼저 Webex에 로그인해야 합니다.
| 1 |
설정에서 교실 협업 섹션으로 이동합니다. |
| 2 |
Webex로 로그인하여 교실 협업을 활성화하세요 를 클릭하고 Webex 자격 증명을 입력하세요. 이미 Webex로 로그인한 경우 Webex로 로그인하여 교실 협업을 활성화 버튼이 표시되지 않으므로 이 단계를 건너뛸 수 있습니다. |
| 3 |
교실 협업을 활성화하려면 스위치를 켜세요. |
교실 협업 을 활성화하면 Webex 앱에서 수업에 대한 팀이 생성되고 수업에 있는 모든 사람이 해당 팀의 멤버로 추가됩니다. 기본적으로 Webex LTI는 매일 수업 명단을 자동으로 동기화합니다. 자동 동기화를 통해 Webex 팀 구성원이 귀하의 강의에 등록한 구성원 목록을 정확하게 반영하도록 보장합니다.
|
설정 탭으로 이동하여 교실 협업 섹션을 찾으세요.
|


