- Главная
- /
- Статья

Благодарим вас за обратную связь.

Подключите управляемые шлюзы Cisco IOS к облаку Webex.
 В этой статье
 Отправить обратную связь?
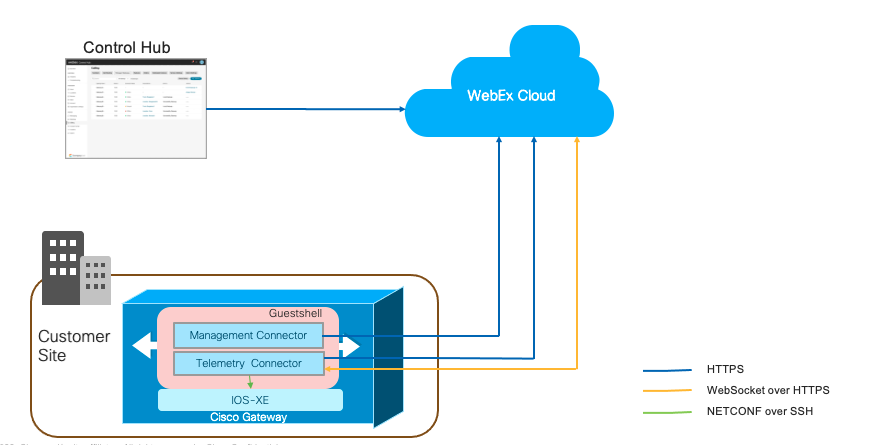
Подключение управляемых шлюзовых устройств IOS к Cisco Webex Control Hub позволяет управлять ими и осуществлять их мониторинг из любой точки мира, совместно с остальной частью вашей инфраструктуры унифицированных коммуникаций.
Управляемые шлюзы
Регистрация ваших шлюзов Cisco IOS в Control Hub упрощает управление устройствами и открывает доступ к новым сервисам Webex Calling. Поскольку шлюзы поддерживают связь с центром управления, вы можете управлять ими и контролировать их из любого места, наряду с остальными устройствами Webex Calling. Для регистрации шлюза необходимо установить приложение для управления и убедиться в наличии защищенного соединения с облаком Cisco Webex. После установления соединения вы можете зарегистрировать шлюз, войдя в Центр управления.
Данный процесс не применяется к голосовым шлюзам Cisco IOS, таким как VG400, которые полностью управляются как устройства в центре управления.
Небольшое приложение-коннектор, известное как GuestShell, отвечает за установление и поддержание соединения от шлюза к центру управления. Приложения GuestShell и коннектор настраиваются и конфигурируются с помощью скрипта, который запускается на шлюзе из облака Webex в процессе регистрации.
Для упрощения процесса установки скрипт добавляет ряд необходимых настроек шлюза.
Соединители шлюза
Коннекторы шлюза — это небольшие приложения, работающие в гостевой оболочке шлюза для поддержания соединения с центром управления, координации событий и сбора информации о состоянии. Для получения дополнительной информации о GuestShell см. GuestShell.
Коннекторы шлюза устанавливаются в контейнере Cisco IOS XE GuestShell.
Существует два типа разъемов:
-
коннектор управления
-
Телеметрический разъем
Интерактивный скрипт TCL с меню помогает настроить GuestShell, а также установить и обслуживать коннектор управления.
Управляющий коннектор отвечает за регистрацию шлюза и управление жизненным циклом телеметрического коннектора.
После успешного завершения регистрации, коннектор управления загружает и устанавливает последнюю версию коннектора телеметрии.
На следующем рисунке показано, как различные компоненты соединяются в решении Webex Calling:
В процессе выполнения скрипта TCL от пользователя собирается следующая информация:
-
Внешний интерфейс
-
адреса DNS-серверов
-
Информация о прокси-сервере
-
IP-адрес коннектора
-
Учетные данные шлюза (имя пользователя и пароль)
Скрипт TCL выполняет следующие настройки:
-
Группа виртуальных портов — необходима для настройки гостевой оболочки.
-
Гостшелл
-
NETCONF Ян
-
Настройка SNMP-ловушек — необходима для получения уведомлений от Cisco IOS XE.
-
IP Route — маршрутизация трафика, связанного с коннектором, через группу виртуальных портов.
Скрипт TCL выполняет следующие настройки:
!
interface VirtualPortGroup 0
 ip unnumbered GigabitEthernet1
 no mop enabled
 no mop sysid
!

!
app-hosting appid guestshell
 app-vnic gateway0 virtualportgroup 0 guest-interface 0
  guest-ipaddress 10.65.125.227 netmask 255.255.255.128
 app-default-gateway 10.65.125.142 guest-interface 0
 app-resource profile custom
  cpu 800
  memory 256
  persist-disk 500
 name-server0 72.163.128.140
 name-server1 8.8.8.8
!

!
netconf-yang
netconf-yang cisco-ia snmp-trap-control trap-list 1.3.6.1.4.1.9.9.41.2.0.1
netconf-yang cisco-ia snmp-community-string Gateway-Webex-Cloud
!

!
logging snmp-trap emergencies
logging snmp-trap alerts
logging snmp-trap critical
logging snmp-trap errors
logging snmp-trap warnings
logging snmp-trap notifications
!

!
snmp-server community Gateway-Webex-Cloud RO
snmp-server enable traps syslog
snmp-server manager
!

!
ip route 10.65.125.227 255.255.255.255 VirtualPortGroup0
!
Пример конфигурации:
-
Интерфейс GigabitEthernet1 назначен внешним интерфейсом. IP-адрес GigabitEthernet1 — 10.65.125.142.
-
IP-адрес коннектора должен находиться в той же сети, что и сеть, выбранная для внешнего подключения. Это может быть частный сетевой адрес, но он обязательно должен иметь доступ к интернету по протоколу HTTPS.
-
Скрипт TCL отслеживает и сохраняет изменения конфигурации в конфигурации запуска Cisco IOS XE.
-
В рамках процесса удаления скрипт TCL стирает внесенные изменения в конфигурацию.
Ограничения и запреты
Перед установкой учтите, что данный разъем нельзя использовать со следующими устройствами:
- Платформы интегрированных сервисных маршрутизаторов Cisco 1100
- Платформы, настроенные в режиме высокой доступности (HA).
- Платформы, настроенные в режиме контроллера для сетей SD-WAN.
Для голосовых шлюзов Cisco IOS, таких как VG400, установка приложения-коннектора не требуется. Вы можете полностью настроить и управлять им через Центр управления.
При настройке маршрутизатора для использования с приложением-коннектором следует учитывать следующее:
-
IOS XE использует прокси ARP для маршрутизации трафика к гостевой оболочке. Не используйте команду `configure no ip proxy-arp ` для отключения этой функции.
-
Не используйте трансляцию сетевых адресов (NAT) на платформах, настроенных для Cisco Unified Border Element (CUBE). Поэтому настройте приложение-коннектор, указав маршрутизируемый IP-адрес. То есть, он не может совместно использовать адрес интерфейса маршрутизатора.
Предварительные требования
Подготовьте ваше устройство к регистрации в качестве шлюза:
-
Доступ к Центру управления для администраторов организации.
-
IP-адрес, имя пользователя и пароль для устройств, которые вы хотите настроить.
-
Версия Cisco IOS XE:
-
Локальные шлюзы — Cisco IOS XE Bangaluru 17.12.3 или новее.
-
Шлюзы обеспечения отказоустойчивости — Cisco IOS XE Dublin 17.12.3 или более поздняя версия.
Рекомендуемые версии см. в Cisco Software Research. Найдите платформу и выберите один из рекомендуемых релизов.
-
- Убедитесь, что устройство настроено с указанием данных NTP-сервера для синхронизации системных часов с указанным NTP-сервером.
-
Системные требования
-
Минимальный объем свободной памяти — 256 МБ.
-
Минимальный объем дискового пространства — на жестком диске (SSD), подключенном к шлюзу и используемом для установки коннектора, должно быть не менее 2000 МБ свободного места. Кроме того, для загрузочной флешки необходимо 50 МБ свободного места. Он используется для хранения логов и RPM-файлов.
Если к шлюзу не подключен жесткий диск, то для установки коннектора используется загрузочная флешка. Затем для загрузочной флешки должно быть 2000 МБ свободного места.
-
Если размер загрузочной флешки вашего маршрутизатора составляет 4 ГБ, а доступного объема меньше 2 ГБ (минимальный объем), удалите все двоичные образы IOS (.bin), кроме того, который запущен в данный момент. После удаления файлов освободите дополнительное место.
Ниже приведены необязательные шаги для освобождения места на загрузочном флеш-накопителе. Выполните следующие шаги и переведите загрузочные файлы в режим установки только в том случае, если:
-
Маршрутизатор использует встроенный режим загрузки (загрузка из .bin).
-
Файл .pkgs еще не извлечен (режим установки).
Выполните следующие шаги, чтобы распаковать двоичный образ и загрузиться с компонентов:
-
Создайте новую директорию, используя...
mkdir bootflash:/image -
Распакуйте двоичный образ IOS, используя...
request platform software package expand file bootflash:/.bin to bootflash:/image
-
В режиме конфигурации удалите текущие параметры загрузки с помощью команды.
no boot system -
Настройте новый параметр загрузки:
boot system
                        bootflash:/image/packages.conf
. -
Выйдите из режима настройки, сохраните конфигурацию и перезагрузите устройство.
-
После перезагрузки маршрутизатора используйте
show versionдля проверки того, что маршрутизатор загрузился изbootflash:/image/packages.conf. Если так:-
Убедитесь, что каталог
bootflash:/sysbootпуст. -
Удалите оставшийся двоичный образ IOS.
-
Удалите все основные образы с помощью...
delete /f /r bootflash:/core/* -
Удалите файлы журналов трассировки с помощью.
delete /f /r bootflash:/tracelogs/* -
Если места на диске по-прежнему недостаточно, проверьте оставшиеся файлы в bootflash: а также удалить все остальные несущественные файлы, такие как журналы и записи CDR.
-
-
Поддерживаемый маршрутизатор Cisco, подключенный к сети с доступом в интернет. Базовая конфигурация должна включать следующее:
-
DNS-сервер настроен на разрешение общедоступных доменных имен.
-
Для настройки DNS-сервера используйте следующую команду:
-
ip name-server <IP address>
-
-
Для доступа к интернету через прокси-сервер используйте HTTP-прокси.
-
Учетные данные шлюза: Для доступа к шлюзу через его интерфейс NETCONF коннектору требуются локальные учетные данные (имя пользователя и пароль) с уровнем привилегий 15.
Для аутентификации и авторизации доступа к NETCONF убедитесь, что списки AAA по умолчанию настроены, как показано в следующем примере. Для управляемых шлюзов проверены и поддерживаются только команды, перечисленные в этом документе. Конфигурации, использующие другие методы (например, TACACS или ISE), не были проверены и в настоящее время не поддерживаются.
aaa new-model
aaa authentication login default local
aaa authorization exec default local if-authenticated
username test privilege 15 secret
Требования к сети
-
IP-адрес коннектора должен находиться в той же сети, что и сеть, выбранная для внешнего подключения. Это может быть частный сетевой адрес, но он обязательно должен иметь доступ к интернету по протоколу HTTPS.
Если вы используете Virtual CUBE на Amazon Web Services (AWS) в качестве локального шлюза, обратитесь к Привязка дополнительного IP-адреса для Virtual CUBE на AWS для получения инструкций по привязке дополнительного IP-адреса для использования коннектора.
-
Для завершения процесса регистрации необходимо подключиться к центру управления и локальным устройствам.
-
URL-адреса сервисов Webex:
-
*.ucmgmt.cisco.com
-
*.webex.com
-
*.wbx2.com
-
-
Протоколы транспортировки: Протокол TLS версии 1.2
-
Импортируйте пакет общедоступных сертификатов центра сертификации IOS. Сертификаты, добавленные в пул доверия шлюза, используются для проверки доступа к серверам Webex. Для импорта пакета используйте следующую команду конфигурации.
crypto pki trustpool import url https://www.cisco.com/security/pki/trs/ios.p7b
-
Привяжите дополнительный IP-адрес к Virtual CUBE на WWS.
Если вы используете Virtual CUBE на AWS в качестве локального шлюза, выполните следующие действия в интерфейсе AWS, чтобы связать дополнительный IP-адрес для использования коннектора.
Мы рекомендуем выполнять эту процедуру во время планового технического обслуживания.
Прежде чем начать
-
Для использования Virtual CUBE в Amazon Web Services (AWS) в качестве локального шлюза необходимо связать дополнительный частный IP-адрес с интерфейсом шлюза. Этот IP-адрес можно использовать в качестве IP-адреса коннектора.
-
Свяжите эластичный публичный IP-адрес со вторичным IP-адресом, чтобы вторичный IP-адрес был общедоступным для регистрации шлюза.
-
Для успешной регистрации соответствующая политика группы безопасности должна разрешать входящий трафик HTTPS. Вы сможете удалить это после завершения регистрации.
| 1 |
Перейти к Услуги > EC2 > Экземплярыи выберите экземпляр шлюза Cisco. |
| 2 |
В окне Сетевые интерфейсы щелкните eth0. В диалоговом окне отображается подробная информация об интерфейсе eth0. |
| 3 |
Нажмите Значение идентификатора интерфейса. |
| 4 |
Нажмите Действияи выберите Управление IP-адресом из выпадающего списка. |
| 5 |
Разверните eth0 и выберите назначьте новый IP-адрес и подтвердите назначение. Обратите внимание на этот дополнительный IP-адрес. |
| 6 |
Нажмите Действия и выберите Связать адрес из выпадающего списка. |
| 7 |
Выберите доступный публичный IP-адрес из списка Эластичных IP-адресов. Убедитесь, что выбранный IP-адрес совпадает с дополнительным IP-адресом, который вы записали. |
| 8 |
(Необязательно) Чтобы переназначить используемый в данный момент публичный IP-адрес, сопоставленный с другим эластичным сетевым интерфейсом (ENI), нажмите Разрешить переназначение. |
| 9 |
Нажмите Связать адрес, чтобы связать публичный IP-адрес (эластичный IP-адрес Amazon) с частным IP-адресом сетевого интерфейса. |
Теперь вы можете использовать этот частный IP-адрес в качестве IP-адреса коннектора при его установке. Для регистрации в Control Hub используйте соответствующий публичный IP-адрес (эластичный IP-адрес Amazon).
Добавьте новый экземпляр шлюза в Центр управления.
Если вы уже добавили шлюз в Control Hub и установили коннектор управления, вы можете пропустить эту процедуру. Перейдите к шагу 5 Зарегистрируйте шлюз в Центре управления, чтобы завершить процесс регистрации.
| 1 | |
| 2 |
Перейти к . |
| 3 |
Нажмите Добавить шлюз. |
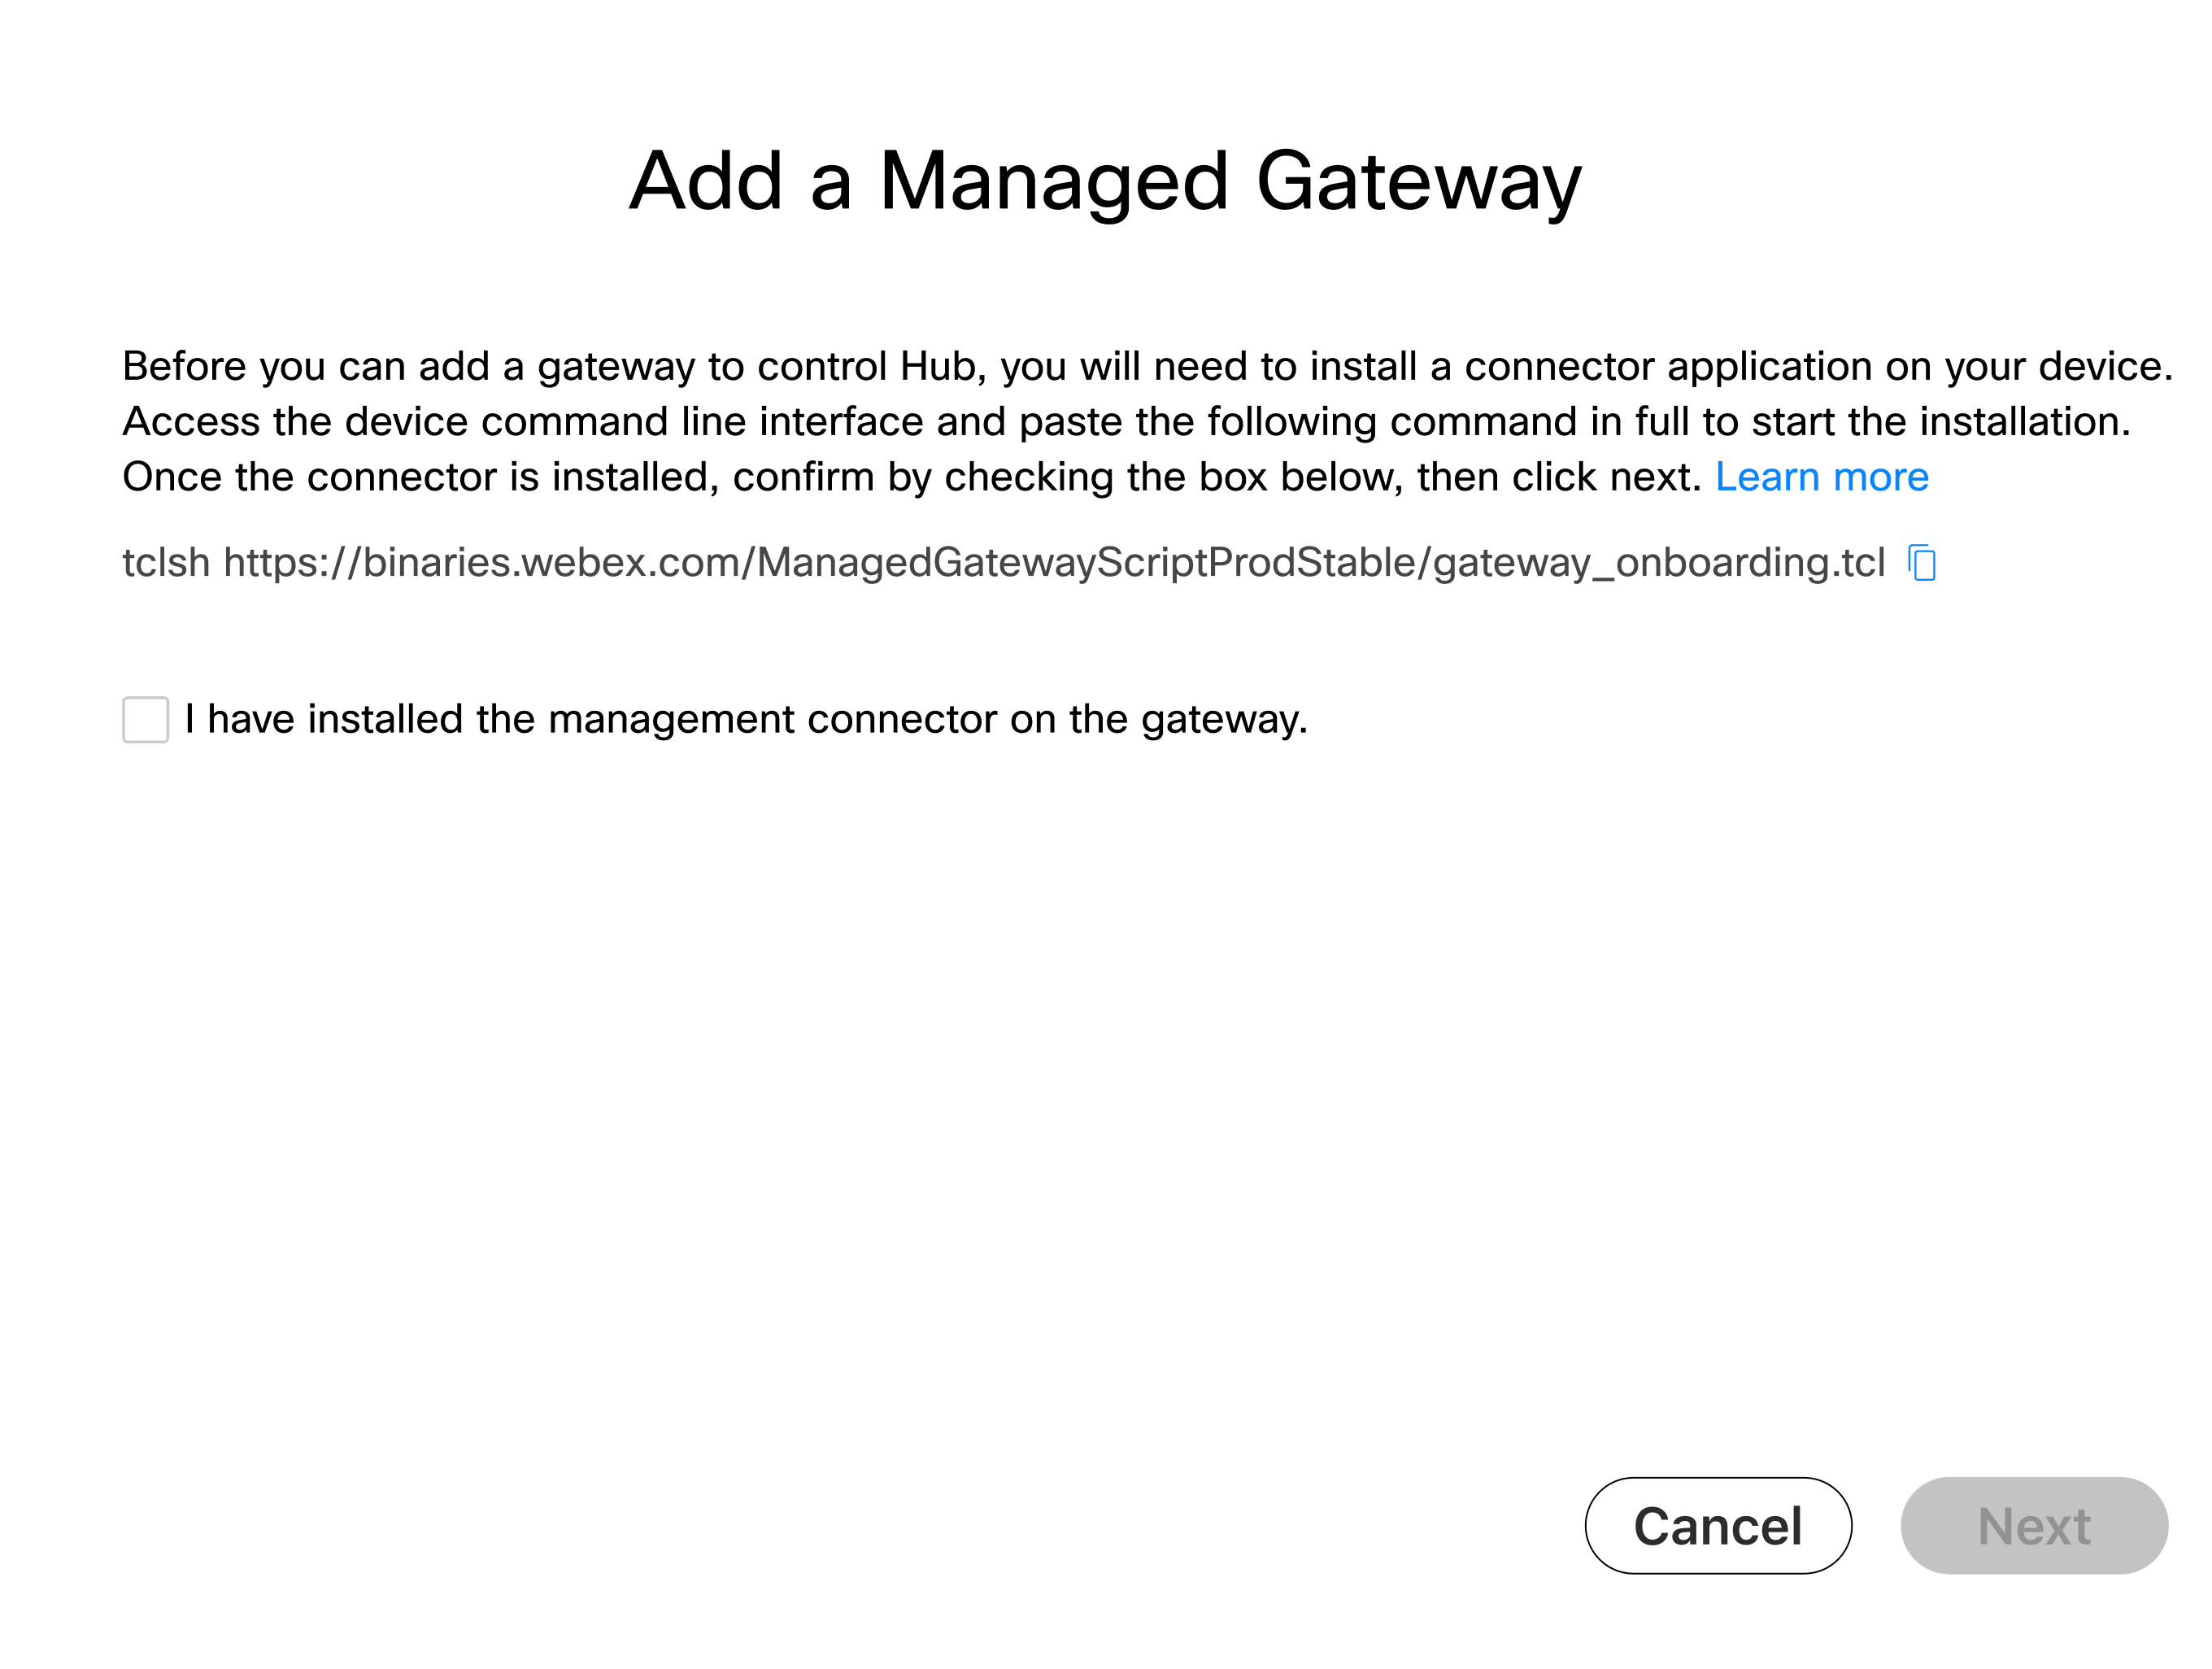
| 4 |
Скопируйте команду tclsh, показанную в окне Добавить управляемый шлюз. Команду необходимо выполнить в интерфейсе командной строки шлюза во время процедуры установки коннектора управления. |
Дальнейшие действия
После установки коннектора на шлюзе вы можете возобновить процесс регистрации в Центре управления.
Установите коннектор шлюза.
Перед установкой коннектора управления убедитесь, что выполнены все предварительные условия.
Выполните скрипт
|
Войдите в шлюз, используя консоль или SSH-соединение, затем вставьте следующую строку в командную строку router.exec: tclsh https://binaries.webex.com/ManagedGatewayScriptProdStable/gateway_onboarding.tcl
|
Начать установку
Если коннектор ещё не настроен, скрипт перенаправит вас в меню установки; если коннектор настроен, он перенаправит вас в главное меню.
| 1 |
Выберите интерфейс, находящийся в той же сети, что и адрес, зарезервированный для коннектора.
|
| 2 |
Настройте DNS-сервер, который будет использоваться коннектором. По умолчанию используются серверы, настроенные в IOS.
Здесь Y — это значение по умолчанию. Если нажать Enter, в качестве входных данных будет использоваться Y. Обнаруженные настройки могут быть изменены при необходимости: |
| 3 |
Если вам необходимо использовать прокси-сервер для доступа к интернету, введите данные прокси-сервера, когда появится соответствующий запрос. Если для шлюза уже настроен прокси-сервер, по умолчанию используются следующие параметры. Введите n, чтобы при необходимости переопределить эти настройки.
|
| 4 |
Настройте параметры SNMP-ловушек. Для отправки уведомлений в облако Cisco Webex скрипт обновляет уровень конфигурации SNMP-ловушек в маршрутизаторе, если он установлен ниже уровня уведомлений. Система запрашивает подтверждение, следует ли изменить конфигурацию SNMP-ловушек на уровень уведомлений. Чтобы сохранить текущий уровень конфигурации SNMP-ловушек, выберите n. |
| 5 |
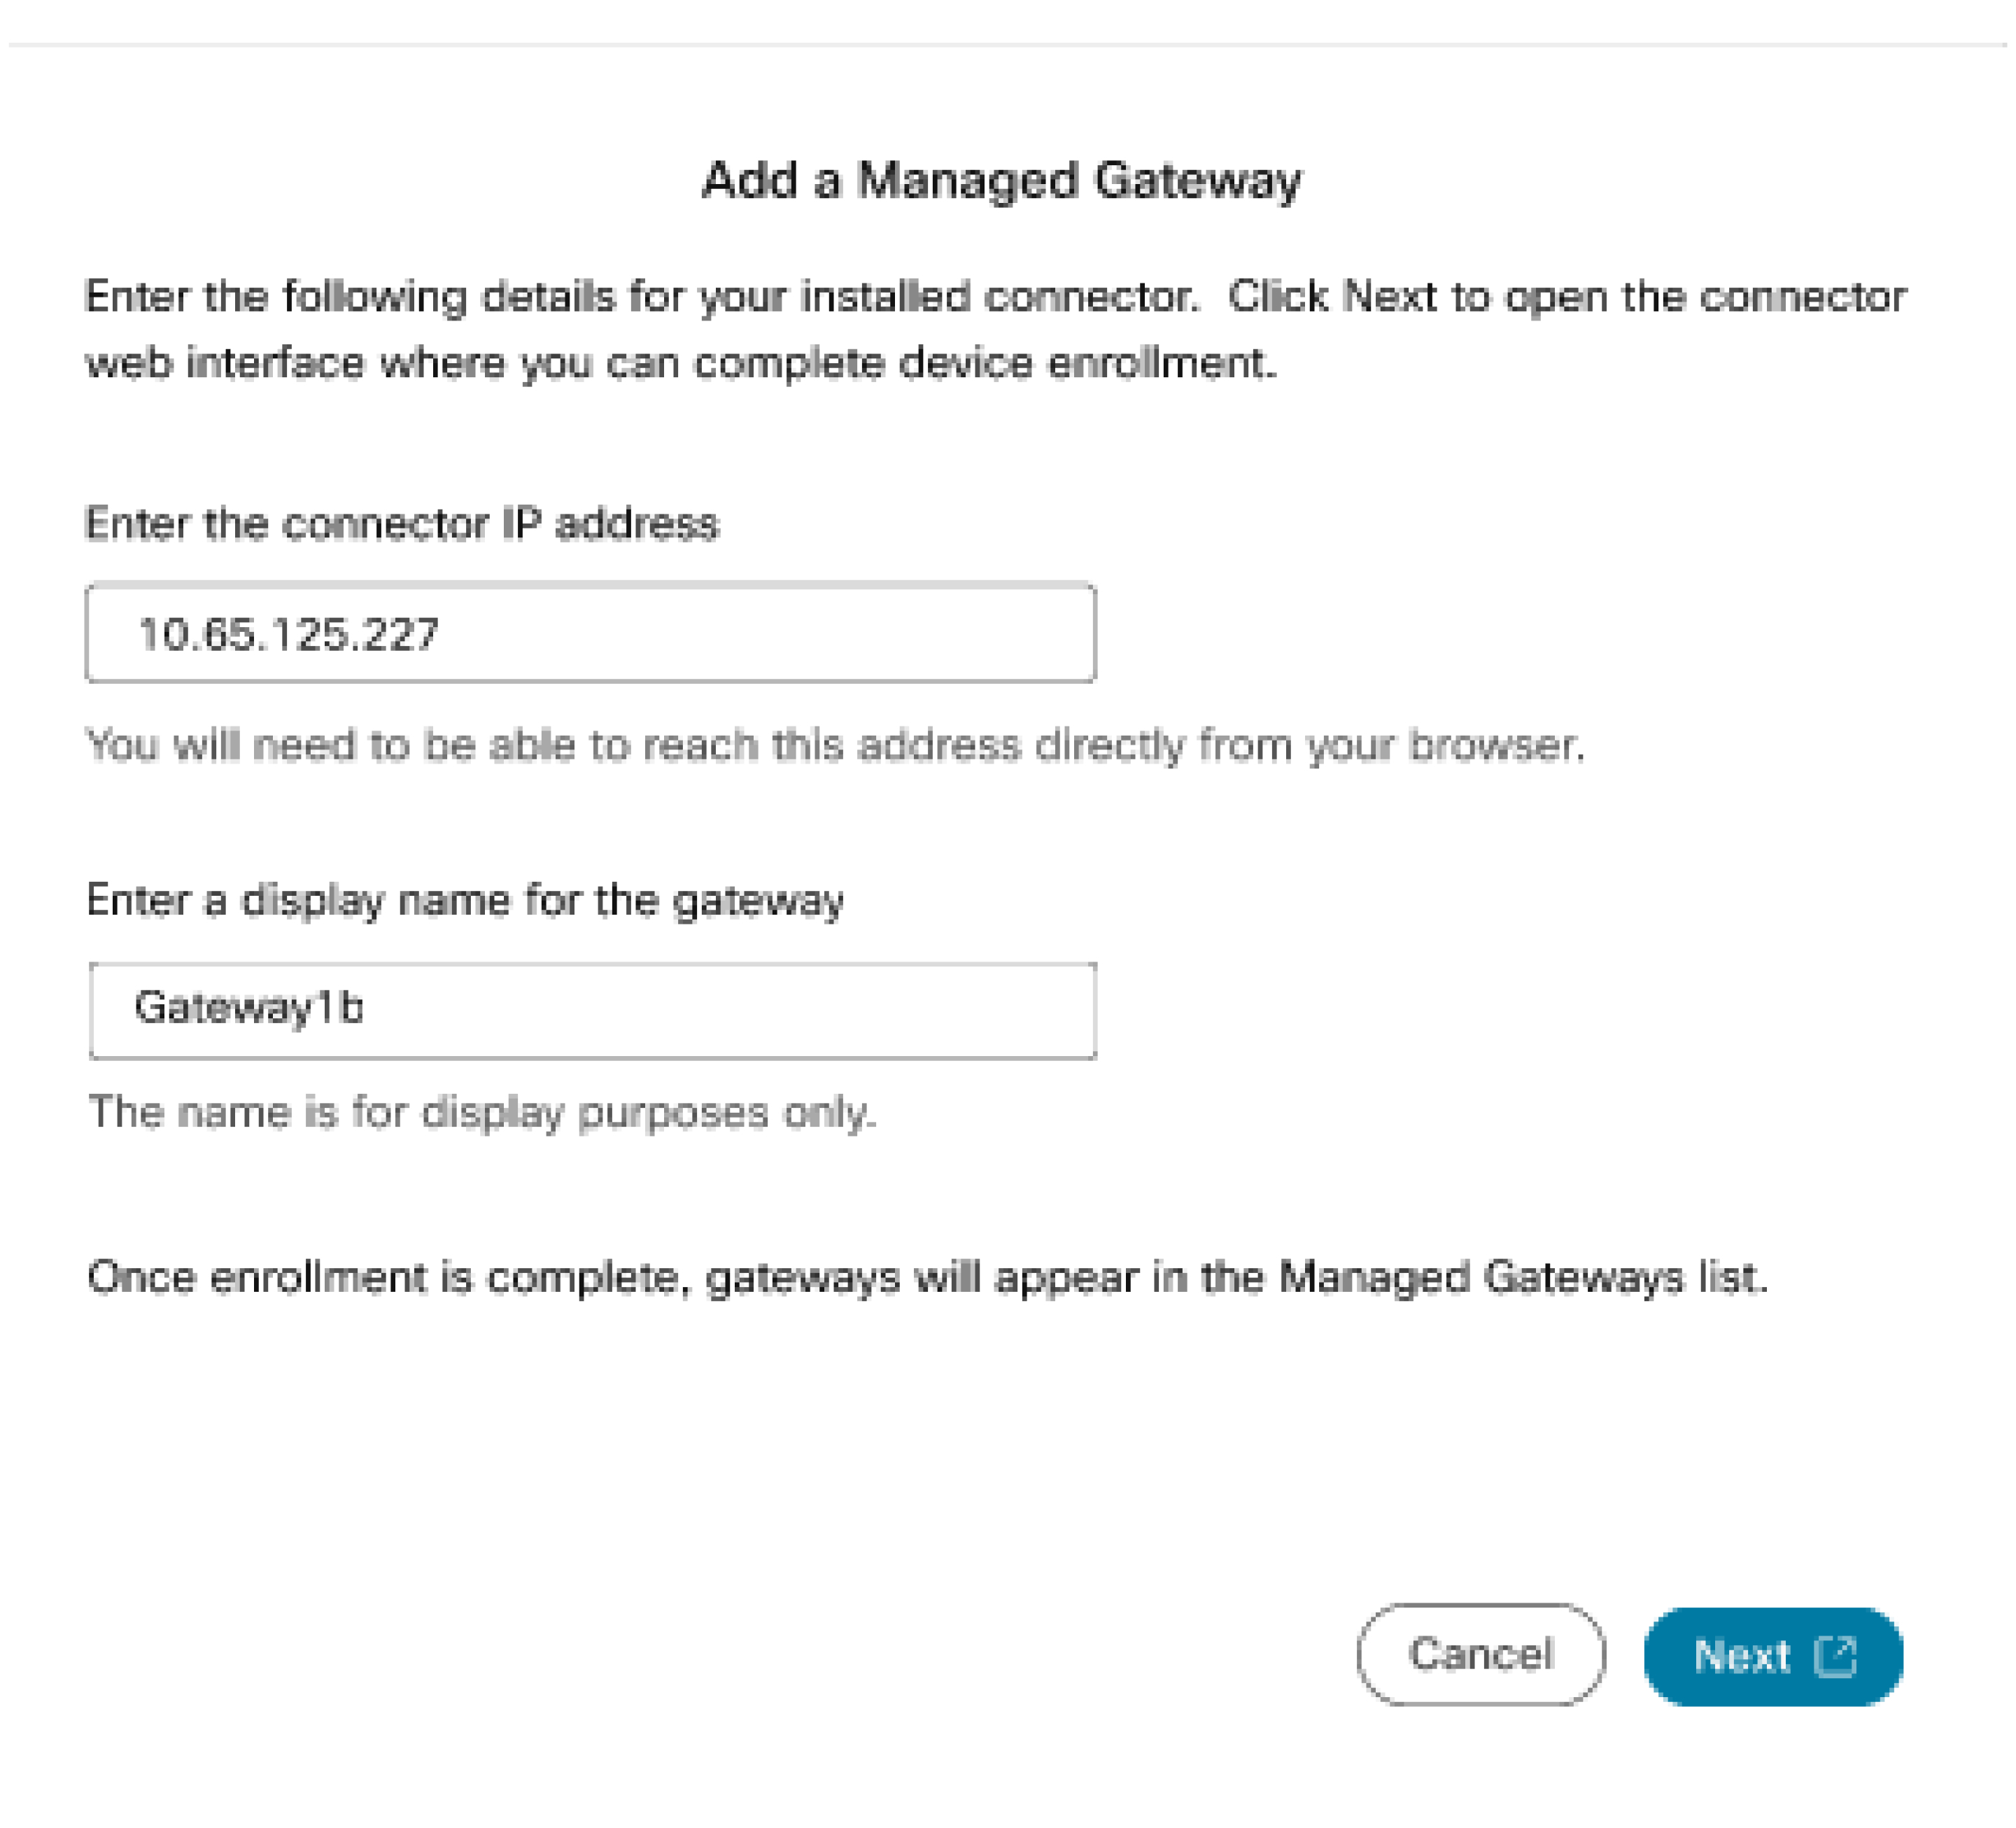
Введите IP-адрес коннектора.
|
| 6 |
Введите имя пользователя и пароль, которые коннектор использует для доступа к интерфейсу NETCONF маршрутизатора.
Введите пароль вручную. Функция копирования и вставки может не сработать. Введите учетные данные шлюза, которые вы указали в разделе «Предварительные условия». Коннектор использует учетные данные для доступа к интерфейсу NETCONF IOS маршрутизатора. После успешной установки вы получите сообщение "Облачный коннектор успешно установлен"
После успешной установки вы можете выйти из скрипта, выбрав опцию «q». В случае сбоя установки вы можете выбрать опцию «h», чтобы изменить любые настройки, собрать журналы и так далее. Более подробную информацию см. в разделе Действия после установки. Если вы хотите повторить установку, вы можете выбрать удаление, а затем перезапустить скрипт, чтобы повторить попытку установки. Вы можете запустить (или перезапустить) скрипт TCL напрямую, используя |
Зарегистрируйте шлюз в Центре управления.
Прежде чем начать
| 1 | |
| 2 |
Перейти к . |
| 3 |
Нажмите Добавить шлюз. |
| 4 |
В окне Добавить управляемый шлюз установите флажок Я установил коннектор управления на шлюзе и нажмите Далее. Перед выполнением этого шага убедитесь, что разъем успешно установлен.
|
| 5 |
На странице Добавить управляемый шлюз введите следующие данные:
|
| 6 |
Щелкните Далее.
Открывается вкладка в браузере, ведущая на страницу управления коннекторами на маршрутизаторе, где вы можете завершить регистрацию.
|
| 7 |
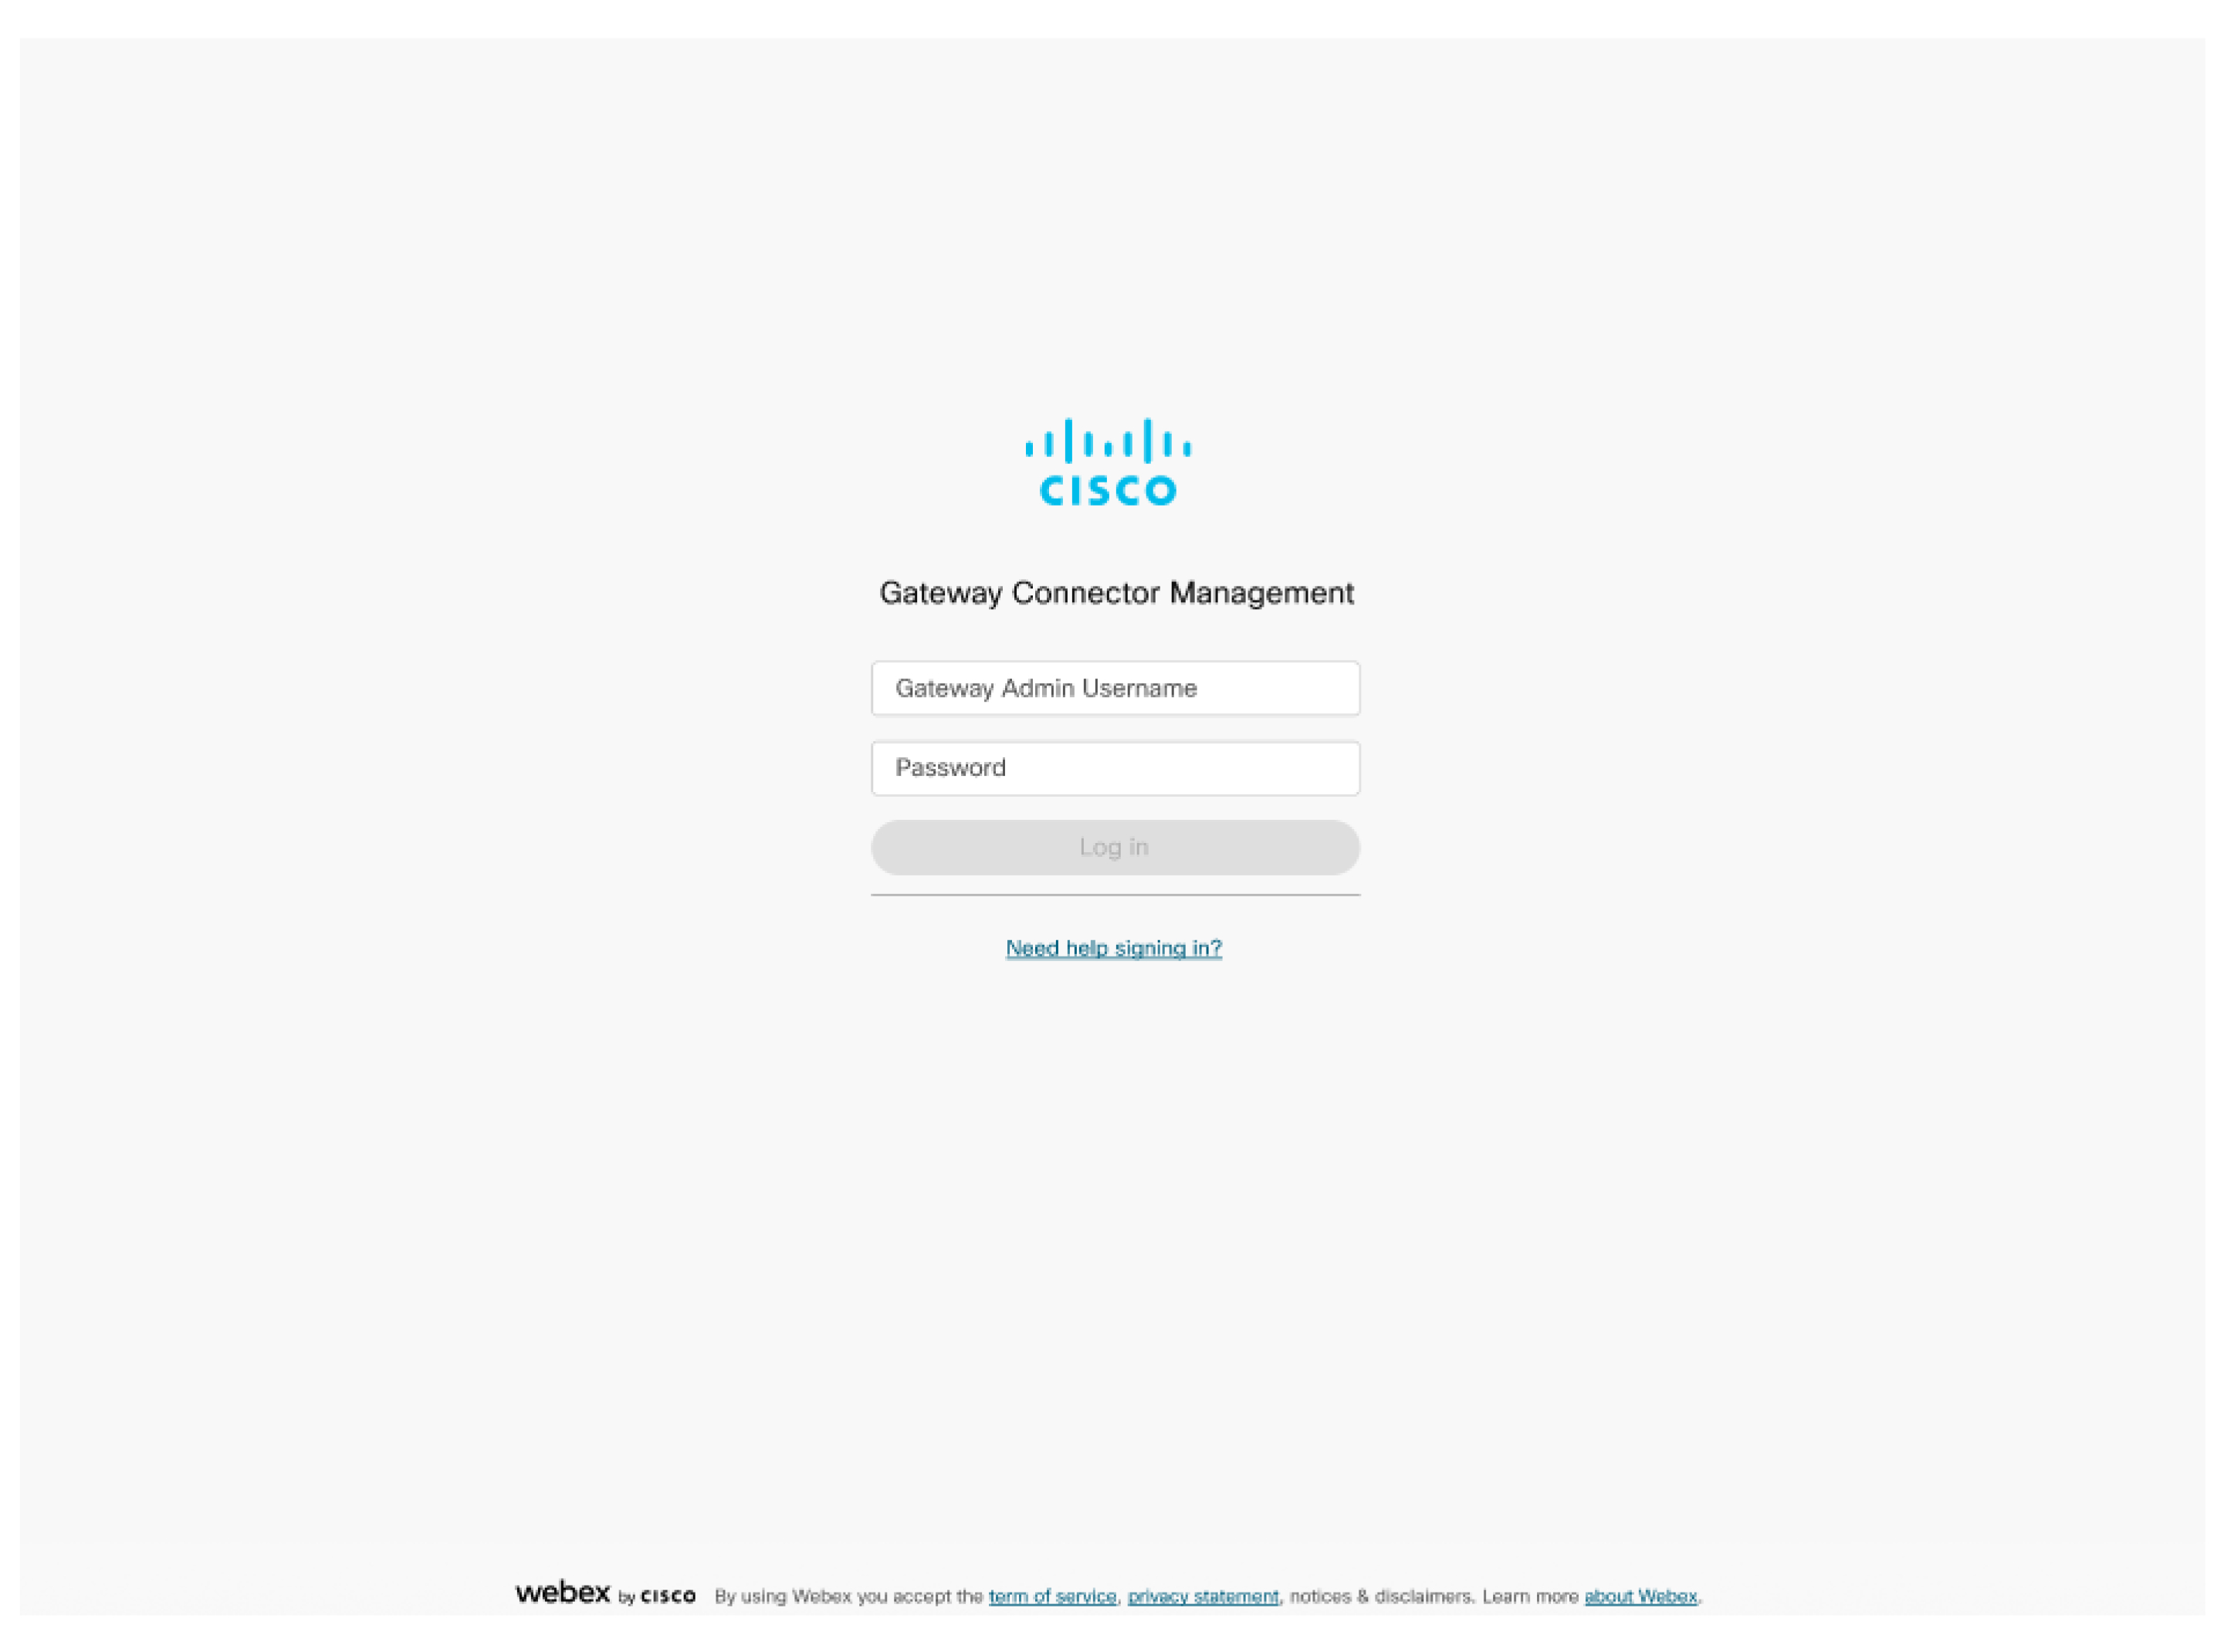
Для входа в систему введите Имя пользователя администратора шлюза и Пароль, которые вы использовали во время процедуры установки коннектора, указанной в шаге 6.
|
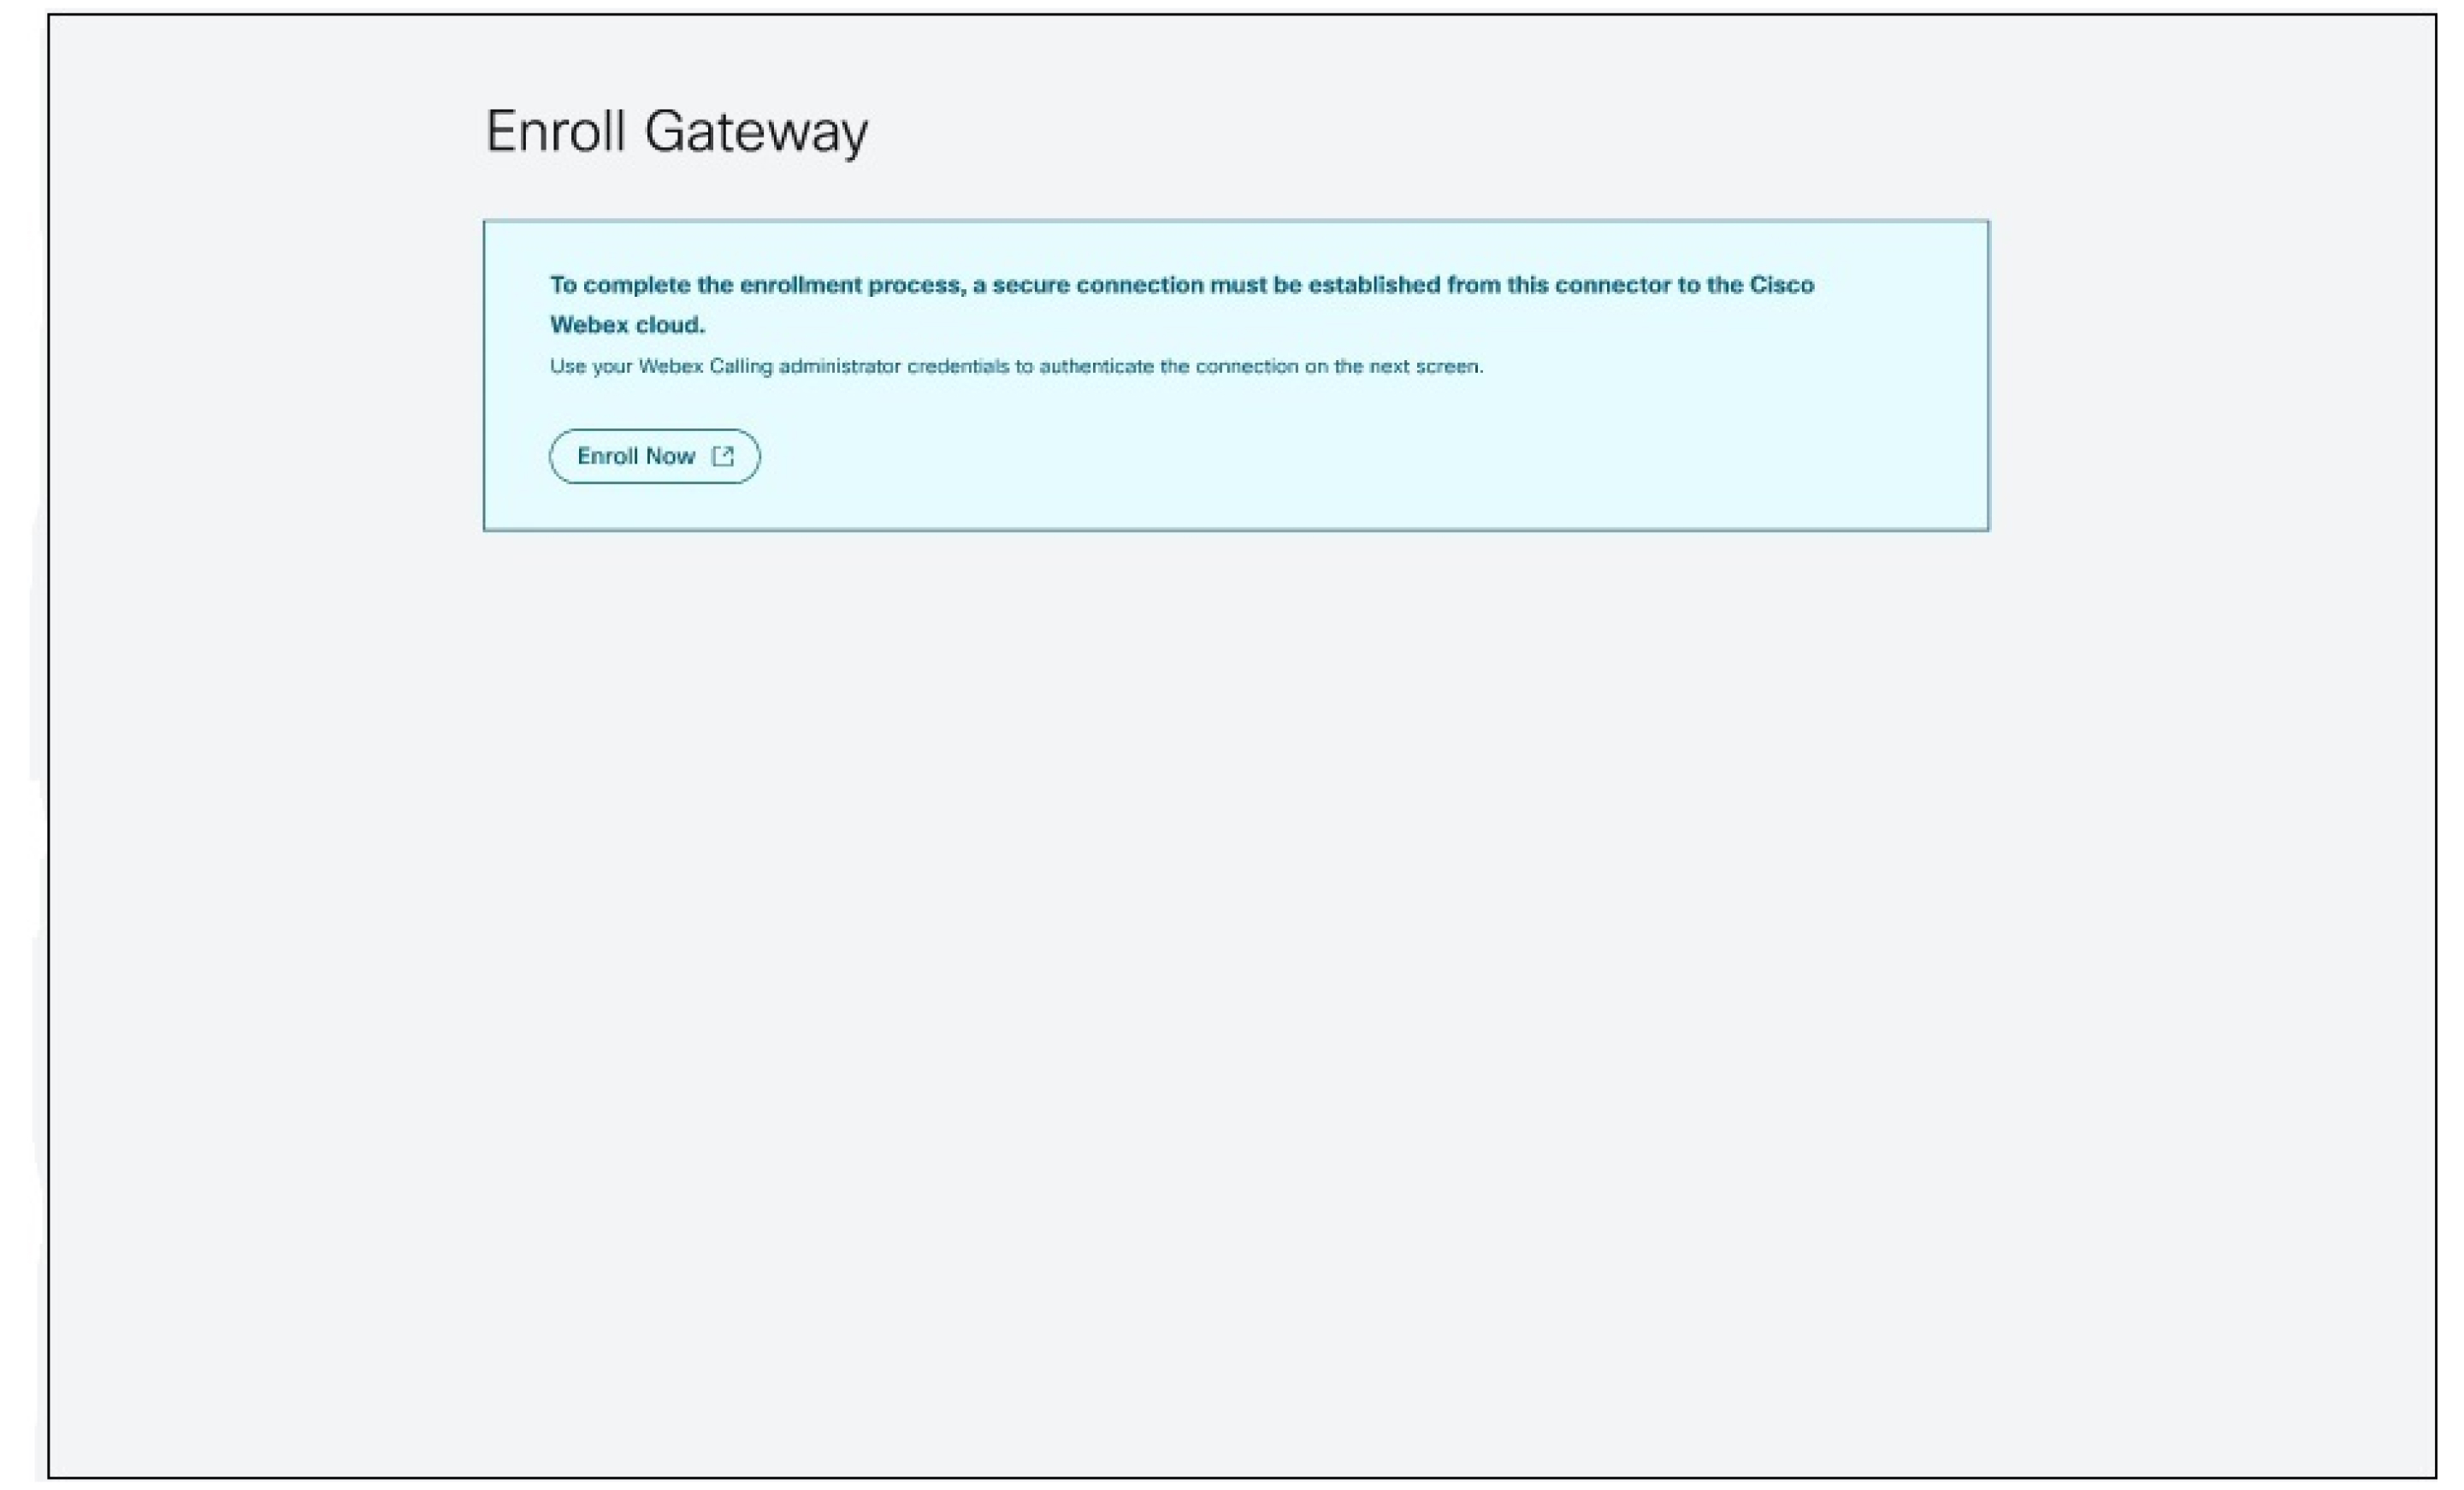
| 8 |
Нажмите Зарегистрироваться сейчас, чтобы открыть новое окно для аутентификации коннектора в облаке Webex. Убедитесь, что ваш браузер разрешает всплывающие окна.
|
| 9 |
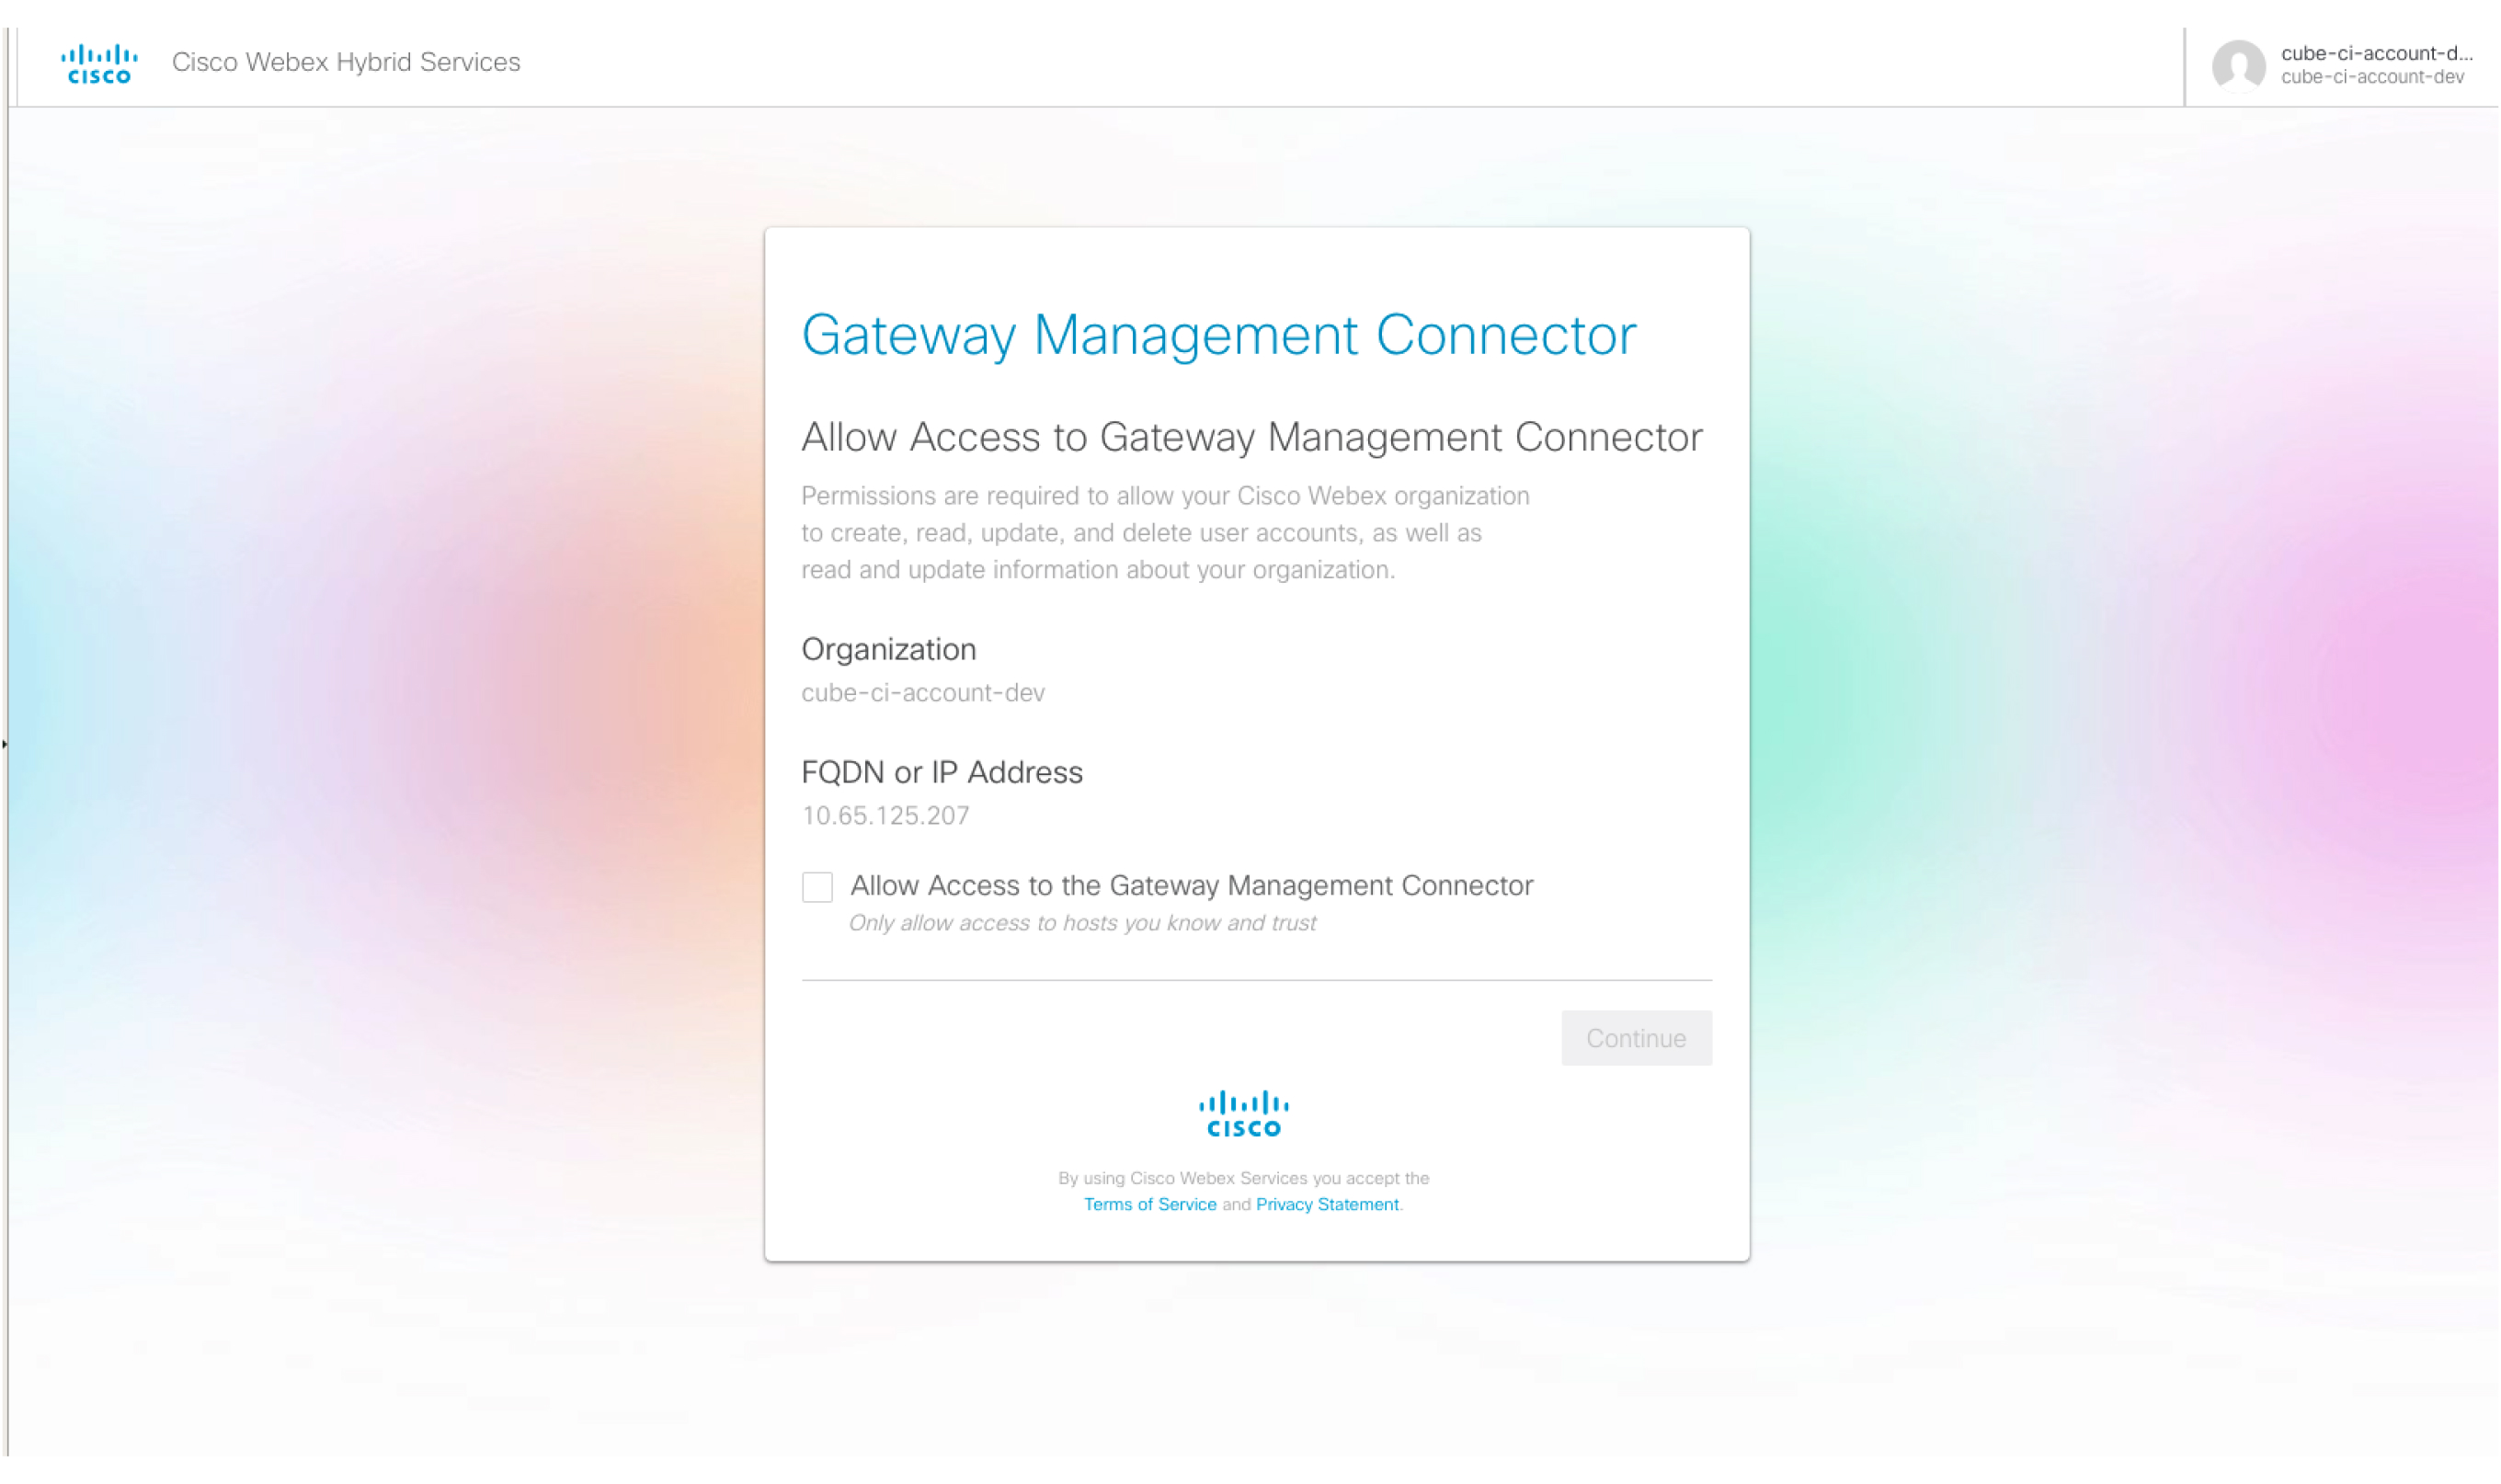
Войдите в систему, используя учетную запись администратора Webex. |
| 10 |
Установите флажок Разрешить доступ к коннектору управления шлюзом .
|
состояния соединителя шлюза
Общее состояние коннектора, отображаемое в Центре управления, зависит от состояния телеметрических и управляющих коннекторов на управляемом шлюзе.
| Состояния соединителей в Центре управления | Описание |
|---|---|
| Онлайн | Указывает, что коннектор подключен к облаку Cisco Webex . |
| Автономно | Указывает, что коннектор не подключен к облаку Cisco Webex. |
| Приостановлено | Указывает, что разъем подключен, но временно приостановлен . |
Сигналы тревоги и события, связанные с разъемами
В этом разделе описываются сигналы тревоги, генерируемые модулем телеметрического разъема. Устройство Telemetry Connector отправляет сигналы тревоги в облако Cisco Webex. В Центре управления, «История событий» отображаются эти оповещения.
Вы можете использовать идентификатор отслеживания, отображаемый на странице с подробными сведениями о событии, для сопоставления с соответствующими журналами на стороне коннектора.
В следующей таблице описаны сообщения, относящиеся к коннектору:
|
Должность |
Описание |
Серьезность |
Решение |
|---|---|---|---|
|
Модуль телеметрии запущен. |
Это сообщение отправляется, когда модуль телеметрии становится работоспособным. |
Предупреждать |
Н/д |
|
Модуль телеметрии модернизирован. |
Это сообщение отправляется при обновлении модуля телеметрии с "old_version" до "new_version". |
Предупреждать |
Н/д |
|
Сбой подключения NETCONF. |
Этот сигнал тревоги срабатывает, когда модуль телеметрии не может установить соединение NETCONF со шлюзом. |
Критически |
Проверьте, включен ли параметр NETCONF на шлюзе и доступен ли он с соединителя. Попробуйте отключить и включить контейнер соединителя. Если проблема сохраняется, перейдите в https://help.webex.com/contact, нажмите Поддержкаи создайте заявку. |
|
Ошибка аутентификации NETCONF. |
Этот сигнал тревоги срабатывает, когда модуль телеметрии не может установить соединение NETCONF со шлюзом. |
Критически |
Убедитесь, что имя пользователя и пароль правильно указаны на шлюзе. Попробуйте отключить и включить контейнер соединителя. Если проблема сохраняется, перейдите в https://help.webex.com/contact, нажмите Поддержкаи создайте заявку. |
|
Ошибка подписки на события NETCONF SNMP. |
Этот сигнал тревоги срабатывает, когда модуль телеметрии не может создать подписку NETCONF для событий SNMP. |
Критически |
Убедитесь, что NETCONF включен на шлюзе и доступен в коннекторе. Попробуйте отключить и включить контейнер соединителя. Если проблема сохраняется, перейдите в https://help.webex.com/contact, нажмите Поддержкаи создайте заявку. Для получения дополнительной информации о включении и отключении см. Действия после установки. |
|
Сбой сбора телеметрических данных. |
Этот сигнал тревоги срабатывает, когда модуль телеметрии не может собрать метрики со шлюза с помощью запроса NETCONF GET. |
Критически |
Проверьте, включен ли параметр NETCONF на шлюзе и доступен ли он с соединителя. Попробуйте отключить и включить контейнер соединителя. Если проблема сохраняется, перейдите в https://help.webex.com/contact, нажмите Поддержкаи создайте заявку. Для получения дополнительной информации о включении и отключении см. Действия после установки. |
|
Сбой подключения к шлюзу телеметрии. |
Этот сигнал тревоги срабатывает, когда коннектору не удаётся установить веб-сокетное соединение со шлюзом телеметрии. |
Критически |
Убедитесь, что URL-адрес шлюза телеметрии правильный. (*.ucmgmt.cisco.com) находится в списке разрешенных адресов корпоративного межсетевого экрана и доступен через шлюз. Если проблема сохраняется, перейдите в https://help.webex.com/contact, нажмите Поддержкаи создайте заявку. |
|
Сбой подключения к шлюзу телеметрии через прокси-сервер. |
Этот сигнал тревоги срабатывает, когда коннектору не удаётся установить соединение с настроенным прокси-сервером. |
Критически |
Убедитесь, что параметры прокси-сервера (IP-адрес и учетные данные порта) правильно настроены на коннекторе и что прокси-сервер доступен. Если проблема сохраняется, перейдите в https://help.webex.com/contact, нажмите Поддержкаи создайте заявку. |
Вход через коннектор
Состояние как управляющего, так и телеметрического коннекторов отображается на странице с подробными сведениями о коннекторе.
Войдите на страницу с подробной информацией о коннекторе по адресу https://<connector-ip-address>
Для входа в систему используйте учетные данные, введенные во время установки.
Вы также можете проверить состояние разъема, выбрав s : Параметр «Отображать страницу состояния » в скрипте TCL. См. Мероприятия после установки.
Для понимания состояния соединительных модулей обратитесь к таблицам.
Состояния соединительного элемента управления
|
Состояния соединительного элемента управления |
Статус подключения |
Описание |
|---|---|---|
|
Выполняется |
Подключено |
Указывает, что коннектор находится в состоянии работающего и устройство подключено к облаку Cisco Webex. |
|
Выполняется |
Не подключено |
Указывает, что коннектор находится в состоянии работающего устройства, но устройство не подключено к облаку Cisco Webex. |
|
Выполняется |
Сердцебиение не удалось |
Указывает, что коннектор находится в состоянии работающего устройства, но проверка работоспособности не удалась для зарегистрированного устройства. |
|
Выполняется |
Запись не удалась |
Указывает на то, что коннектор находится в состоянии работающего устройства, но регистрация устройства в облаке Cisco Webex не удалась. |
Состояния разъема телеметрии
|
Состояния телеметрического коннектора |
Статус подключения |
Описание |
|---|---|---|
|
Не установлено |
Недоступно |
Указывает на то, что разъем телеметрии не установлен. |
|
Скачивание |
Недоступно |
Указывает на то, что загрузка телеметрического коннектора находится в процессе. |
|
Выполняется установка |
Недоступно |
Указывает на то, что установка телеметрического коннектора находится в процессе. |
|
Не настроено |
Недоступно |
Указывает на то, что установка телеметрического коннектора прошла успешно, но службы еще не запущены или не настроены. |
|
Выполняется |
Недоступно |
Указывает на то, что телеметрический коннектор запущен, но информация о его подключении к облаку Cisco Webex недоступна. |
|
Выполняется |
Подключено |
Указывает, что телеметрический коннектор находится в состоянии работающего и подключен к облаку Cisco Webex. |
|
Выполняется |
Не подключено |
Указывает на то, что телеметрический коннектор находится в состоянии работающего состояния, но не подключен к облаку Cisco Webex. |
|
Выполняется |
Сердцебиение не удалось |
Указывает на то, что телеметрический коннектор находится в состоянии работающего и передача телеметрического сигнала в облако Cisco Webex завершилась неудачей. |
|
Отключено |
Недоступно |
Указывает на то, что телеметрический коннектор находится в режиме обслуживания (отключено ) и информация о его подключении к облаку недоступна. |
|
Остановлено |
Отключено |
Указывает на то, что коннектор телеметрии находится в состоянии остановлен (возможно, частично остановлен или остановлены как служба телеметрии, так и служба брокера WebSocket) и не подключен к облаку Cisco Webex. |
Работы после установки
Местное управление соединительного узла управления
После успешной установки коннектора вы сможете использовать Webex Calling с вашим шлюзом. При необходимости вы можете обновить ряд параметров коннектора, используя параметры, доступные в меню скрипта:
Вы можете перезапустить скрипт в любое время, используя следующую команду: tclsh
bootflash:/gateway_connector/gateway_onboarding.tcl.
===============================================================
Webex Managed Gateway Connector
===============================================================
Options
s : Display Status Page
v : View and Modify Cloud Connector Settings
e : Enable Guestshell
d : Disable Guestshell
l : Collect Logs
r : Clear Logs
u : Uninstall Connector
q : Quit
===============================================================
Select an option from the menu:
Статус отображения
Воспользуйтесь пунктом меню s: Display Status Page. Система отображает состояние различных соединительных модулей.
===============================================================
                 Webex Managed Gateway Connector
===============================================================
     -------------------------------------------------------
                     *** Interface Status ***
     -------------------------------------------------------
       Interface               IP-Address          Status
     -------------------------------------------------------
       GigabitEthernet1        10.123.221.224        up
       Connector               10.123.221.223        up
     -------------------------------------------------------
                       *** App Status ***
     -------------------------------------------------------
		Service                   Status
     -------------------------------------------------------
            Guestshell                  RUNNING
            Management Connector        RUNNING
     -------------------------------------------------------
===============================================================
          Select option h for home menu or q to quit: q
Включить гостевую оболочку
Включите облачный коннектор, используя пункт меню e: Enable Guestshell. Это изменяет статус соединителя с INACTIVE на ACTIVE.
Отключить гостевую оболочку
Отключите облачный коннектор, используя пункт меню d: Disable Guestshell. Это изменяет статус соединителя с ACTIVE на INACTIVE.
Удалить коннектор
Удалите облачный коннектор, используя пункт меню u: Uninstall Connector. Это удалит все данные в контейнере Guestshell и все конфигурации, связанные с облачным коннектором.
Сбор журналов
Соберите журналы, используя пункт меню l: Collect Logs. После сбора этих журналов система отображает место их хранения.
Если у вас есть активный запрос в службу технической поддержки Cisco TAC, вы можете прикрепить журналы непосредственно к своему запросу на обслуживание, используя команду copy
bootflash:/guest-share/
scp://:@cxd.cisco.com.
Ниже приведён пример команды:
vcubeprod#copy bootflash:/guest-share/gateway_webex_cloud_logs_2022114090628.tar.gz scp://123456789:a1b2c3d4e5@cxd.cisco.comОчистить журналы
Очистите все файлы журналов на устройстве, используя пункт меню r: Clear Logs. Это удалит все существующие журналы, кроме последних журналов скрипта TCL и коннекторов.
Просмотр и изменение настроек облачного коннектора
Внесите следующие изменения в существующие настройки облачного коннектора, используя пункт меню v: View and Modify Cloud Connector Settings.
===============================================================
                Webex Managed Gateway Connector
===============================================================
		Script Version         : 2.0.2
		Hostname/IP Addr       : 10.65.125.188
		DNS Server(s)          : 10.64.86.70
		Gateway Username       : lab
		External Interface     : GigabitEthernet1
		Proxy Hostname/IP Addr : proxy-wsa.esl.cisco.com:80
===============================================================
             Options
               c :  Update Gateway Credentials
               e :  Update External Interface
               p :  Update Proxy Details
               n :  Update DNS Server
               k :  Update Connector Package Verification Key
               l :  Modify log level for Cloud Connector
               h :  Go to home menu
               q :  Quit

===============================================================
                        Select an option from the menu: c
Обновить учетные данные шлюза
Обновите имя пользователя и пароль шлюза, используя пункт меню c: Update Gateway
Credentials.
Обновить внешний интерфейс
Измените интерфейс, к которому привязан коннектор, и IP-адрес коннектора, используя пункт меню v: View and Modify Cloud Connector Settings.
Обновить данные прокси-сервера
Следующие задачи можно выполнить с помощью пункта меню p: Update Proxy
Details :
-
i: Update Proxy IP and Port -
c: Update Proxy Credentials -
r: Remove Proxy Credentials -
a: Remove All Proxy Details -
h: Go to home menu
Обновить ключ проверки пакета коннектора
В случае возникновения технической проблемы, если инженер службы поддержки запросит замену ключа проверки вашего пакета, загрузите новый gateway-webex-connectors.gpg файл в bootflash:/gateway_connector/ и используйте пункт меню k: Update
Connector Package Verification Key для проверки.
Измените уровень детализации логов для коннектора управления.
Измените уровень логирования для коннектора с помощью пункта меню l: Modify log level for
Cloud Connector и выберите один из следующих вариантов:
=====================================
  Number      Log Level
=====================================
   1           DEBUG
   2           INFO
   3           WARNING
   4           ERROR
   5           CRITICAL
======================================
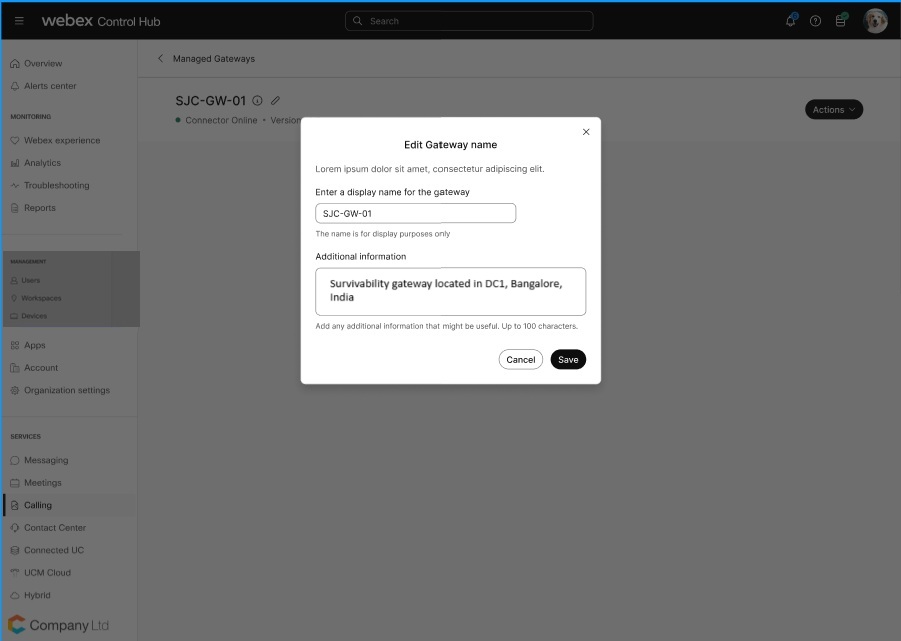
Управляйте экземпляром шлюза в Центре управления.
Для управления экземпляром шлюза:
-
Войдите в Control Hub.
-
Перейти к
-
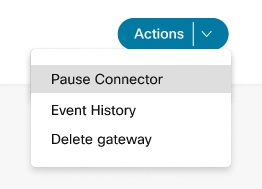
Для соответствующего экземпляра шлюза нажмите
 и выберите нужное действие.
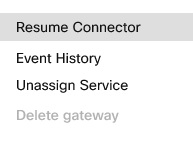
Приостановить или возобновить работу коннектора
Соединитель паузы дает указание соединительному элементу управления остановить соединительный элемент телеметрии. Эту опцию можно использовать для временной остановки телеметрического коннектора во время устранения неполадок со шлюзом. При приостановке работы коннектора такие службы, как проверка конфигурации, не работают. Используйте действие Возобновить работу коннектора для перезапуска телеметрического коннектора.
| 1 |
В меню Действия выберите Приостановить работу коннектора для приостановки работы коннектора управления. |
| 2 |
Чтобы возобновить работу приостановленного коннектора, нажмите Возобновить работу коннектора в меню Действия. |
История событий
Центр управления записывает и отображает историю событий для управляемых вами шлюзов. Просмотрите подробную информацию об отдельном шлюзе или сводную информацию обо всех управляемых вами шлюзах.
| 1 |
Нажмите История событий на странице Вызов для просмотра подробной информации о событиях всех управляемых вами шлюзов. |
| 2 |
Для получения подробной информации о событии, относящемся к конкретному шлюзу, щелкните История событий в меню Действия для этого шлюза. |
Удалить шлюз
| 1 |
В меню Действия нажмите Удалить шлюз для удаления любого из ваших экземпляров шлюза. |
| 2 |
Нажмите Подтвердить. 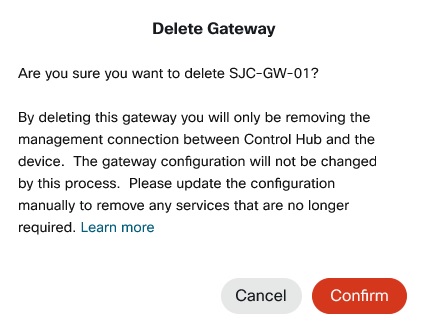 Удалить экземпляр шлюза с назначенными службами невозможно. Сначала отмените назначение услуг. |
Куда отправиться дальше?
После регистрации шлюза вы можете продолжить настройку в разделе Назначение служб управляемым шлюзам.


