- Home
- /
- Article

Thanks for your feedback.

 In this article
 Feedback?
OBTP for Cloud-Registered Devices
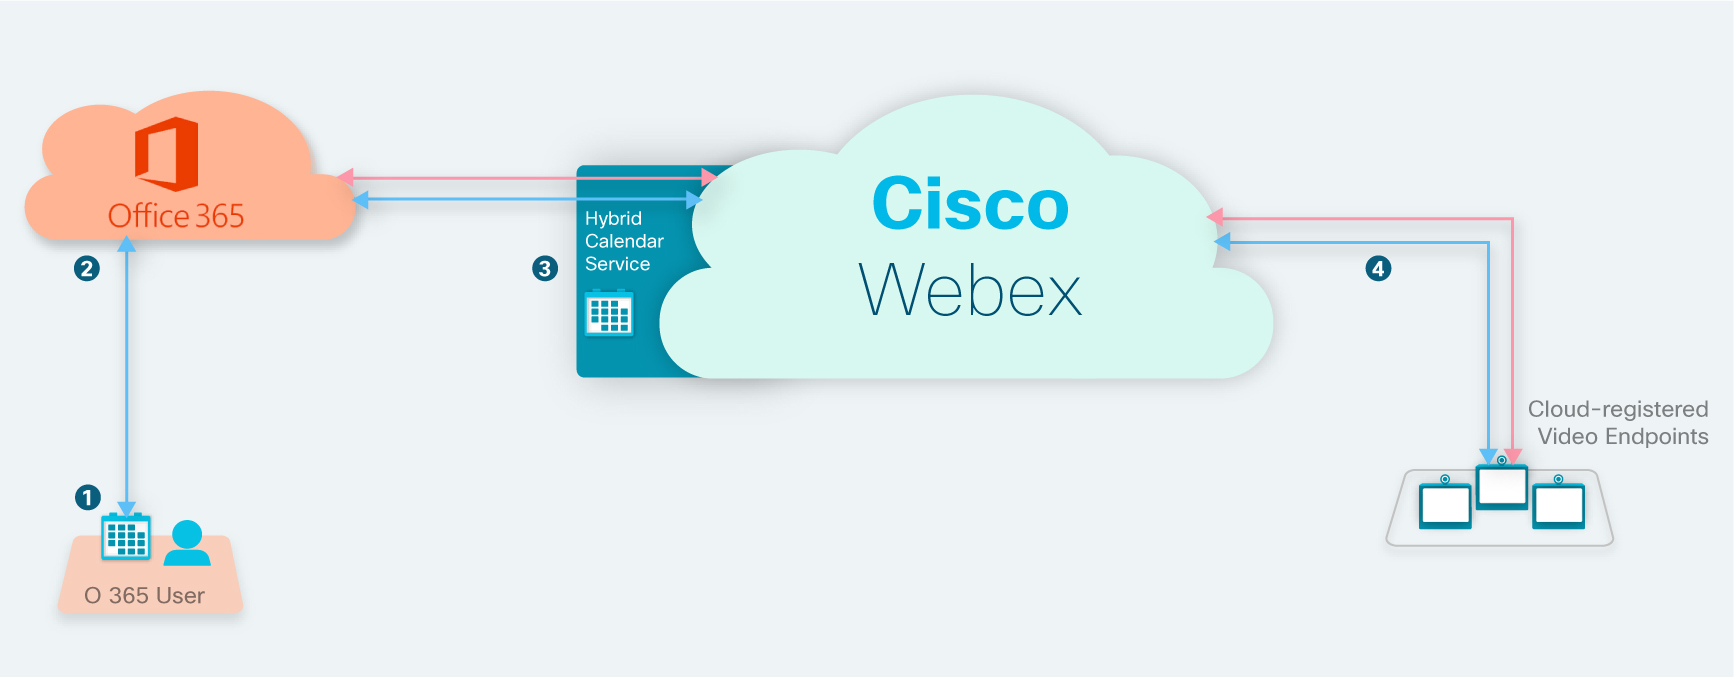
How OBTP Works with Cloud-Registered Devices
-
A user schedules a meeting using a keyword or video address, and invites a cloud-registered video endpoint by its room resource calendar.
-
If the endpoint is available at that time, typically Office 365 automatically accepts the invitation on its behalf.
-
The Microsoft Graph API posts a notification alerting the Hybrid Calendar Service that a meeting has been scheduled.
For Cisco Webex meetings, the Hybrid Calendar Service retrieves the join details from the Cisco Webex cloud and updates the meeting invitation.
-
Just before the meeting time, cloud-registered devices receive OBTP information from the cloud.
OBTP for Cloud-Registered Devices Deployment Task Flow
Before you begin
If you haven't yet set up the Hybrid Calendar Service, see the Deployment guide for Webex hybrid calendar service. If the service is running, proceed with these instructions to add OBTP for cloud-registered room devices and boards.
| 1 |
Add Hybrid Calendar to workspaces with Board, Desk, and Room series Toggle on the calendar service for the device, and configure the room mailbox email address. |
| 2 |
Associate Webex personal rooms with Webex App If your Webex site is managed in Cisco Webex Control Hub, or users on your Webex site have been linked, you can skip this task. |
| 3 |
Test OBTP with Board, Desk, and Room series Schedule a meeting from the calendar and add a cloud-registered device. |
Add Hybrid Calendar to workspaces with Board, Desk, and Room series
Before you begin
This task assumes that you've already created places for the Board, Desk, and Room devices. If you need to create the workspace, see Add shared devices and services to a workspace.
| 1 |
Sign in to the customer view of https://admin.webex.com/login. |
| 2 |
In the left-hand navigation pane, under Management click Workspaces and select the workspace to modify. |
| 3 |
Go to Scheduling and select Calendar so that users can use One Button to Push (OBTP) on their devices. |
| 4 |
Select the calendar provider. |
| 5 |
Enter the email address of the room mailbox. (For help locating this email address, see " Create and manage room mailboxes" on the Microsoft Docs website.) This is the email address that will be used to schedule meetings. |
| 6 |
Click Save. |
Associate Webex personal rooms with Webex App
To provide the join button to devices when scheduling Webex Personal Room meetings, users must have their Personal Room associated with their Webex App account. This can happen in one of the following ways:
-
The users on your Webex site have been Webex App linked. (For site linking steps, see Link Webex sites to Control Hub.)
-
Users change their own preferred Webex site from the Webex App settings or preferences, see Change your default meeting site
-
For a comprehensive approach, use the bulk CSV import process from Control Hub to set users’ preferredWebExSite in the steps that follow.
| 1 |
Sign in to the customer view in https://admin.webex.com. |
| 2 |
In the left-hand navigation pane, under Management click Users. |
| 3 |
Click Manage Users. |
| 4 |
See this article for the detailed CSV import/export procedure. |
| 5 |
Use a CSV editor to change the |
| 6 |
Import the CSV file. |
Test OBTP with Board, Desk, and Room series
Use these steps to set up a test meeting and verify OBTP on a registered device.
| 1 |
In Outlook, Outlook Web Access, or https://mail.office365.com, create a new meeting, and then add |
| 2 |
Go to the Scheduling Assistant and click Add room, and choose the device you want to add. |
| 3 |
Fill out other meeting information as needed, and send the invitation. |
| 4 |
When the meeting is scheduled to begin, verify that the Join button appears on the device. |
OBTP for Premises-Registered Devices
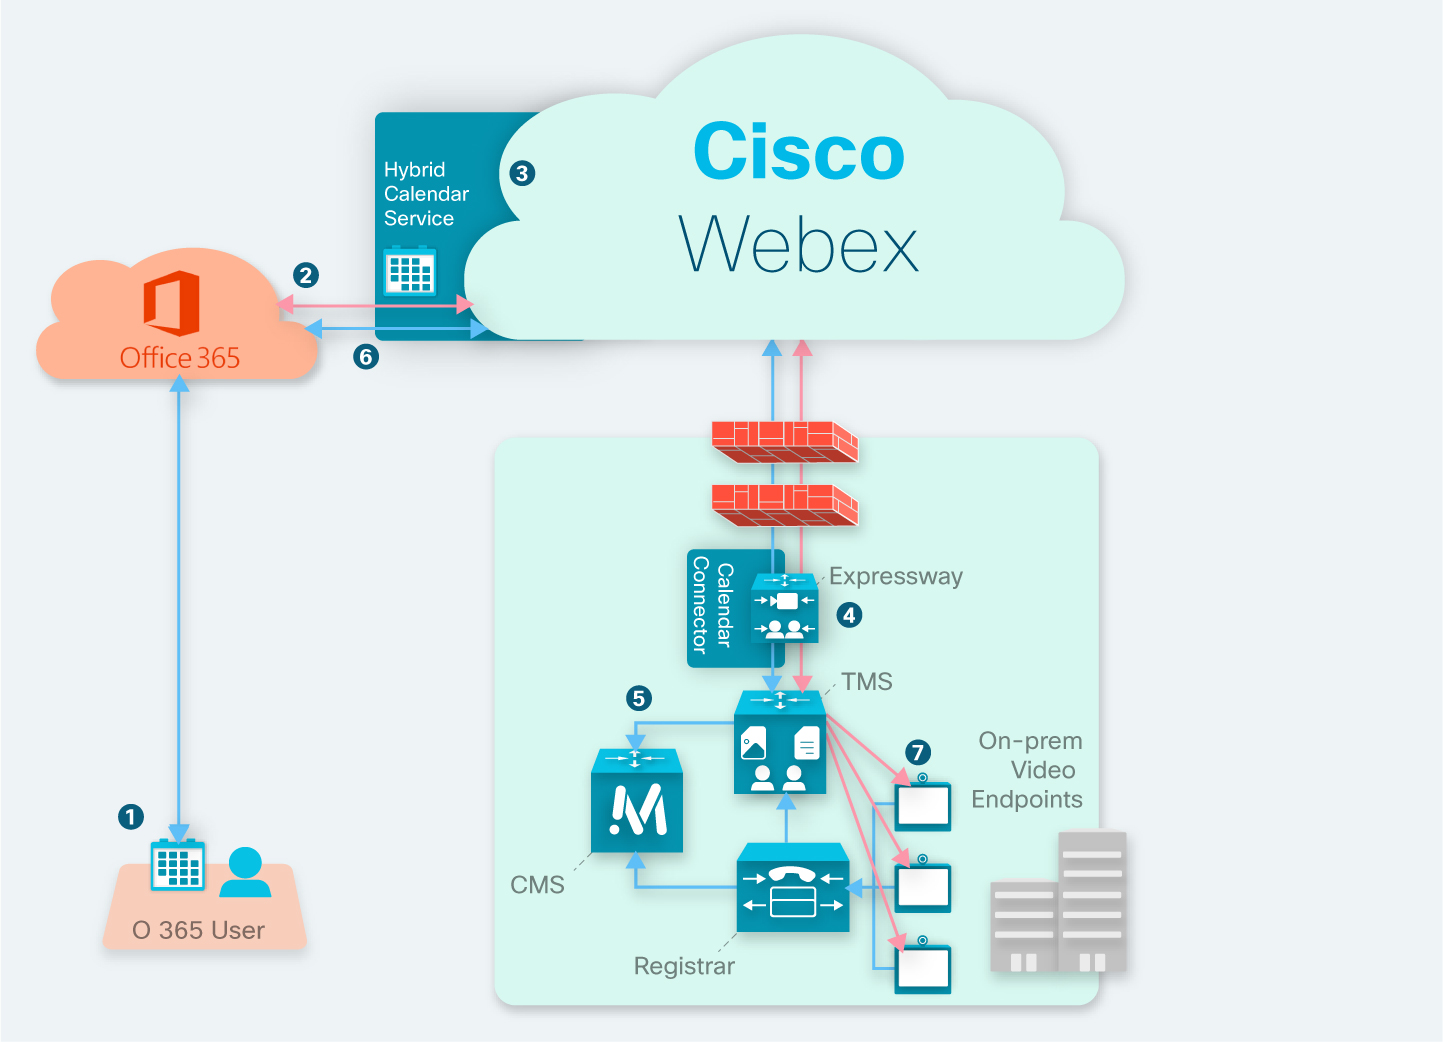
How OBTP Works with Premises-Registered Devices
-
The organizer creates a meeting in Office 365 and then adds
@meetin the Location field. The organizer invites users and video devices from the Office 365 directory. -
Office 365 sends a notification to the Hybrid Calendar .
-
The Hybrid Calendar requests and receives the encryption key, and then uses it to encrypt the meeting information.
-
The Hybrid Calendar validates meeting creation and recipients and the calendar connector sends details to TMS.
-
The TMS creates the meeting on the on-premises conference bridge and sends the join details back to the calendar connector.
-
The connector updates the meeting invitation with the join details that are provided by TMS, and the updated join details appear when invitees view the meeting in Office 365.
-
Just before the meeting time, the video devices that were invited to the meeting receive the Webex join details information from the TMS.
Cisco TMSXE is not part of this integration. The Calendar Connector handles the role of coordinating between Cisco TMS and the calendar system. |
Requirements for TMS integration
This integration requires the following components:
-
The cloud-based Hybrid Calendar with Office 365, deployed and configured
-
Expressway (to serve as the connector host between your TMS and the Hybrid Calendar), installed and running
-
Download from software.cisco.com at no charge.
-
We recommend the latest release of Expressway for connector host purposes. See Expressway connector host support for Hybrid Services for information about Expressway version support.
-
We currently support either a single Expressway node or two nodes operating as single-node clusters, dedicated to hosting this integration. We recommend two hosts. If the active host goes down, after a couple of minutes, new meeting requests are sent to the other host.
The hosts must not be running any other hybrid service connectors. Also, the TMS integration hosts must be the only calendar connector hosts in your Webex App. organization.
-
We recommend a maximum of 10,000 scheduling users for this integration.
-
-
TelePresence Management Suite (TMS) 15.9 or later, installed and running, with the following configuration in place:
-
A valid CA-signed server certificate must be installed. This integration does not support self-signed certificates.
-
Each endpoint to be booked must already be added to TMS and licensed for general TMS usage.
-
The TMS must have the same option key that is required to book endpoints with TMSXE, which is either of the following:
For each Expressway connector host that you deploy, TMS must have one or more option keys, depending on your deployment size. The integration uses the same option keys that are required to book endpoints with TMSXE, which are either of the following:
-
Small deployments—One TelePresence Management Suite Extension for Microsoft Exchange (TMSXE) option key for every 25 telepresence endpoints that are integrated with TMS (part number L-TMS-MSEX-25).
-
Larger deployments—One Application Integration Package option key (part number L-TMS-APPINT).
For example, if you deploy two connector hosts with 50 telepresence endpoints, you would need either four L-TMS-MSEX-25 option keys or two L-TMS-APPINT option keys for the integration on TMS.
If both types of option key are present, TMS only uses the Application Integration Package key.
If you already have TMSXE or Application Integration Package option keys:
-
If you are not currently using the option key, you can use it with the Hybrid Calendar integration.
-
If you are using the option key with TMSXE, contact your partner or sales team to request a second option key (or set of keys) for the Hybrid Calendar integration. If you plan to migrate from TMSXE within a short period of time, you can request a 90 day trial, and then reuse your original option key(s) once the migration to the Hybrid Calendar is complete.
-
-
On-premises conference bridge resources must be configured (Meeting Server recommended).
On-premises conference bridge resources, if used for this integration, must be configured (Meeting Server recommended).
-
Users' time zones in TMS must match their time zones in the calendar system. For instructions on setting the time zone in TMS, see "User Administration" in the applicable Cisco TelePresence Management Suite Administrator Guide.
-
-
A single Expressway node (to serve as the connector host between your TMS and the Hybrid Calendar), installed and running
-
Download from software.cisco.com at no charge.
-
We recommend the latest release of Expressway for connector host purposes. See Expressway Connector Host Support for Cisco Webex Hybrid Services for information about Expressway version support.
-
We currently support only a single Expressway node dedicated to hosting this integration. The node must not be running any other hybrid service connectors. Also, this node must be the only calendar connector host in your Webex APP organization.
-
We recommend a maximum of 10,000 scheduling users for this integration.
-
Deployment task flow for the TMS integration
To add the TMS integration to your Hybrid Calendar with Office 365 deployment, perform the following tasks.
Before you begin
If you haven't yet set up the Hybrid Calendar, see the Deployment guide for Hybrid Calendar instead of this article. If you've already got the service running, proceed with these instructions to add the join button for premises-registered devices.
| 1 | |
| 2 | |
| 3 |
Configure the @meet keyword action Allows users to schedule with the TMS integration. |
| 4 |
Configure Office 365 room mailboxes in TMS Maps video device systems in TMS to the email addresses of Office 365 room mailboxes, so that the Hybrid Calendar can recognize when users invite the devices to meetings and coordinate the join button with TMS. |
| 5 |
Register Expressway-C connector host to the Webex cloud Connects your Expressway to the Webex cloud. This creates a resource in https://admin.webex.com and downloads connector software on to the Expressway. |
| 6 |
Link the calendar connector to TMS Configures the details that the calendar connector needs to communicate with TMS and adds on-premises conference bridge telephony details to invitations, if applicable. |
| 7 |
Enables the integration to schedule |
| 8 |
Test the Office 365 and TMS integration Verifies the integration with TMS. |
Complete the prerequisites for the TMS integration
| 1 |
If you haven't already done so, set up the cloud-based Hybrid Calendar with Office 365. See https://www.cisco.com/go/hybrid-services-calendar for instructions. |
| 2 |
Make sure you have met all of the Requirements for TMS integration. |
| 3 |
Provide the following port access for the Expressway that will serve as your Calendar Connector host for the TMS integration:
|
Configure the @meet keyword action
To provide the TMS integration functionality to users, configure @meet in Control Hub Using an organization administrator account.
Do these steps to have the integration schedule a meeting that is hosted with on-premises conference bridge resources when users use this keyword.
By default, the @meet keyword creates a space in Webex and adds join details for it.
With the TMS integration, when a scheduler invites a room to the meeting, TMS books the room and sends OBTP to the associated devices. OBTP works regardless of how you configure the @meet keyword, and it also works for @webex.
| 1 |
Sign in to the customer view of https://admin.webex.com/login. |
| 2 |
In the left-hand navigation pane, under Services click Hybrid. |
| 3 |
From the Hybrid Calendar card for Exchange, click Edit settings. |
| 4 |
In the Keywords section, for @meet, choose Cisco TelePresence Management Suite. |
| 5 |
Click Save. |
Configure Office 365 room mailboxes in TMS
Use this procedure to add the Office 365 room mailbox addresses of video devices one at a time in TMS. Alternatively, you can use Bulk Upload to configure multiple addresses. For instructions, see "Bulk Room Email Mapping for Endpoints" in the applicable Cisco TelePresence Management Suite Administrator Guide.
Before you begin
-
Each video system that users want to add to meetings must have a room mailbox in Office 365 in order for TMS to provide the join button. For help creating room mailboxes, see Creating and managing resource mailboxes in Office 365.
-
Gather the credentials of an organization domain account with Admin privileges to TMS.
| 1 |
If you have not already done so, create the room mailboxes in Office 365. |
| 2 |
From a web browser, sign in to TMS. |
| 3 |
Go to . |
| 4 |
Locate and click the video system to configure with the room mailbox address. |
| 5 |
On the Summary tab, click Edit Settings and enter the room mailbox address in the Email Address field. 
|
| 6 |
Click Save. |
| 7 |
Repeat steps 4 through 6 for each video device. |
Register Expressway-C connector host to the Webex cloud
Use this procedure to register a single Expressway-C node to the cloud and download connector software onto the Expressway-C. (We currently support only a single Expressway node for this integration.)
Use this procedure to register an Expressway-C node to the cloud and download connector software onto the Expressway-C. (We currently support either a single Expressway node or two Expressway nodes operating as separate single-node clusters for this integration.)
The TMS integration uses Hybrid Calendar for Microsoft Exchange setup process, but ultimately you will link the Calendar Connector to TMS. Once you link to TMS, you must not link any connector in your Webex App organization to Microsoft Exchange.
Before you begin
-
Make sure your Expressway-C is running on a version that's supported for hybrid services. See the Supported Versions of Expressway for Cisco Webex Hybrid Services Connectors documentation ( https://help.webex.com/article/ruyceab) for more information about which versions are supported for new and existing registrations to the cloud.
-
Sign out of any open connections to the Expressway-C interface that are open in other browser tabs.
-
If your on-premises environment proxies the outbound traffic, you must first enter the details of the proxy server on before you complete this procedure. Doing so is necessary for successful registration.
| 1 |
Sign in to the customer view of https://admin.webex.com/login. | ||||
| 2 |
In the left-hand navigation pane, under Services click Hybrid. The Webex cloud rejects any attempt at registration from the Expressway web interface. You must first register your Expressway through Control Hub, because the Control Hub needs to hand out a token to the Expressway to establish trust between premises and cloud, and complete the secure registration. | ||||
| 3 |
Click Set up on the Hybrid Calendar for Microsoft Exchange card, and then click Next.
| ||||
| 4 |
From the customer view in https://admin.webex.com, in the left-hand navigation pane under Services click Hybrid , and then choose one:
The Webex cloud rejects any attempt at registration from the Expressway web interface. You must first register your Expressway through Control Hub, because the Control Hub needs to hand out a token to the Expressway to establish trust between premises and cloud, and complete the secure registration.
| ||||
| 5 |
Choose Register a new Expressway with its Fully Qualified Domain Name (FQDN), enter your Expressway-C IP address or fully qualified domain name (FQDN) so that Webex creates a record of that Expressway-C and establishes trust, and then click Next. You can also enter a display name to identify the resource in Control Hub.
| ||||
| 6 |
Click Next, and for new registrations, click the link to open your Expressway-C. You can then sign in to load the Connector Management window. | ||||
| 7 |
Decide how you want to update the Expressway-C trust list: A check box on the welcome page determines whether you will manually append the required CA certificates to the Expressway-C trust list, or whether you allow Webex to add those certificates for you. Choose one of the following options:
| ||||
| 8 |
Click Register. After you're redirected to Control Hub, read the on-screen text to confirm that Webex identified the correct Expressway-C. | ||||
| 9 |
After you verify the information, click Allow to register the Expressway-C for Hybrid Services.
If registration fails and your on-premises environment proxies the outbound traffic, review the Before You Begin section of this procedure. If the registration process times out or fails (for example, you must fix certificate errors or enter proxy details), you can restart registration in Control Hub. |
What to do next
Certificate Authorities for Hybrid Services
The table lists the Certificate Authorities that your on-premises or existing environment must trust when using Hybrid Services.
If you opted to have Webex manage the required certificates, then you do not need to manually append CA certificates to the Expressway-C trust list.
The issuers used to sign the Webex host certificates may change in future, and the table below may then be inaccurate. If you are manually managing the CA certificates, you must append the CA certificates of the issuing authorities that signed the currently valid certificates for the hosts listed below (and remove expired/revoked CA certificates). |
|
Cloud hosts signed by this CA |
Issuing CA |
Must be trusted by |
For this purpose |
|---|---|---|---|
|
CDN |
O=Baltimore, OU=CyberTrust, CN=Baltimore CyberTrust Root
|
Expressway-C |
To ensure Expressway downloads connectors from a trusted host |
|
Common identity service |
O=VeriSign, Inc., OU=Class 3 Public Primary Certification Authority
|
Windows Server 2003 or Windows Server 2008 hosting the Cisco directory connector Expressway-C |
To synchronize users from your Active Directory with Webex and to authenticate Hybrid Services users |
|
Webex App |
O=The Go Daddy Group, Inc., OU=Go Daddy Class 2 Certification Authority
|
Expressway-C |
|
Link the calendar connector to TMS
Before you begin
| 1 |
From the Expressway-C connector host, go to , and then click New. | ||
| 2 |
Select Type as TMS under Conferencing Services Type. | ||
| 3 |
Enter the username and password of the TMS administrator account that you want the calendar connector to use to connect to TMS.
| ||
| 4 |
Under TMS Server Details, enter the fully qualified domain name (FQDN) and domain in the respective fields.
| ||
| 5 |
Under Telephony Invite Details, enter the appropriate information for Toll Identifier, Toll Number, Toll Free Identifier, Toll Free Number, and Global Call-in Numbers (URL). | ||
| 6 |
Click Save.
TMS is listed under Cisco Conferencing Services Configuration.
| ||
| 7 |
Click TMS and click Test Connection. The calendar connector tests the connection to the TMS environment. If the test returns an error message, correct any errors in the configuration and try the test again.
| ||
| 8 |
When you've confirmed the connection, go to and click Calendar Connector Service. | ||
| 9 |
Select Enabled from the Active drop-down list and click Save. The calendar connector starts and the status changes to Running.
|
Add a meeting server to TMS
When you configure @meet to use the TelePresence Management Suite action, the TMS uses any bridge configured in the .
|
To allow users to schedule meetings on a meeting server using the Hybrid Calendar integration with TMS, add the server using the steps in the meeting server section of the applicable Cisco TelePresence Management Suite Administrator Guide. |
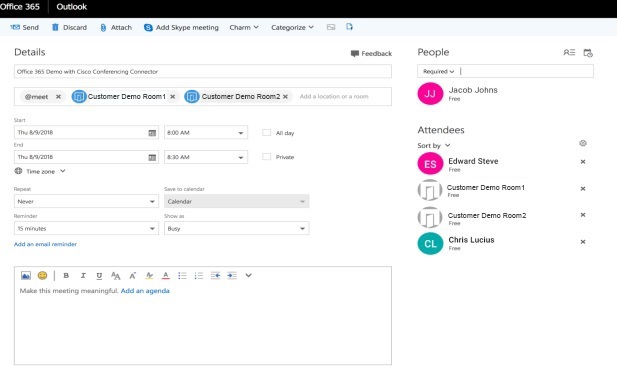
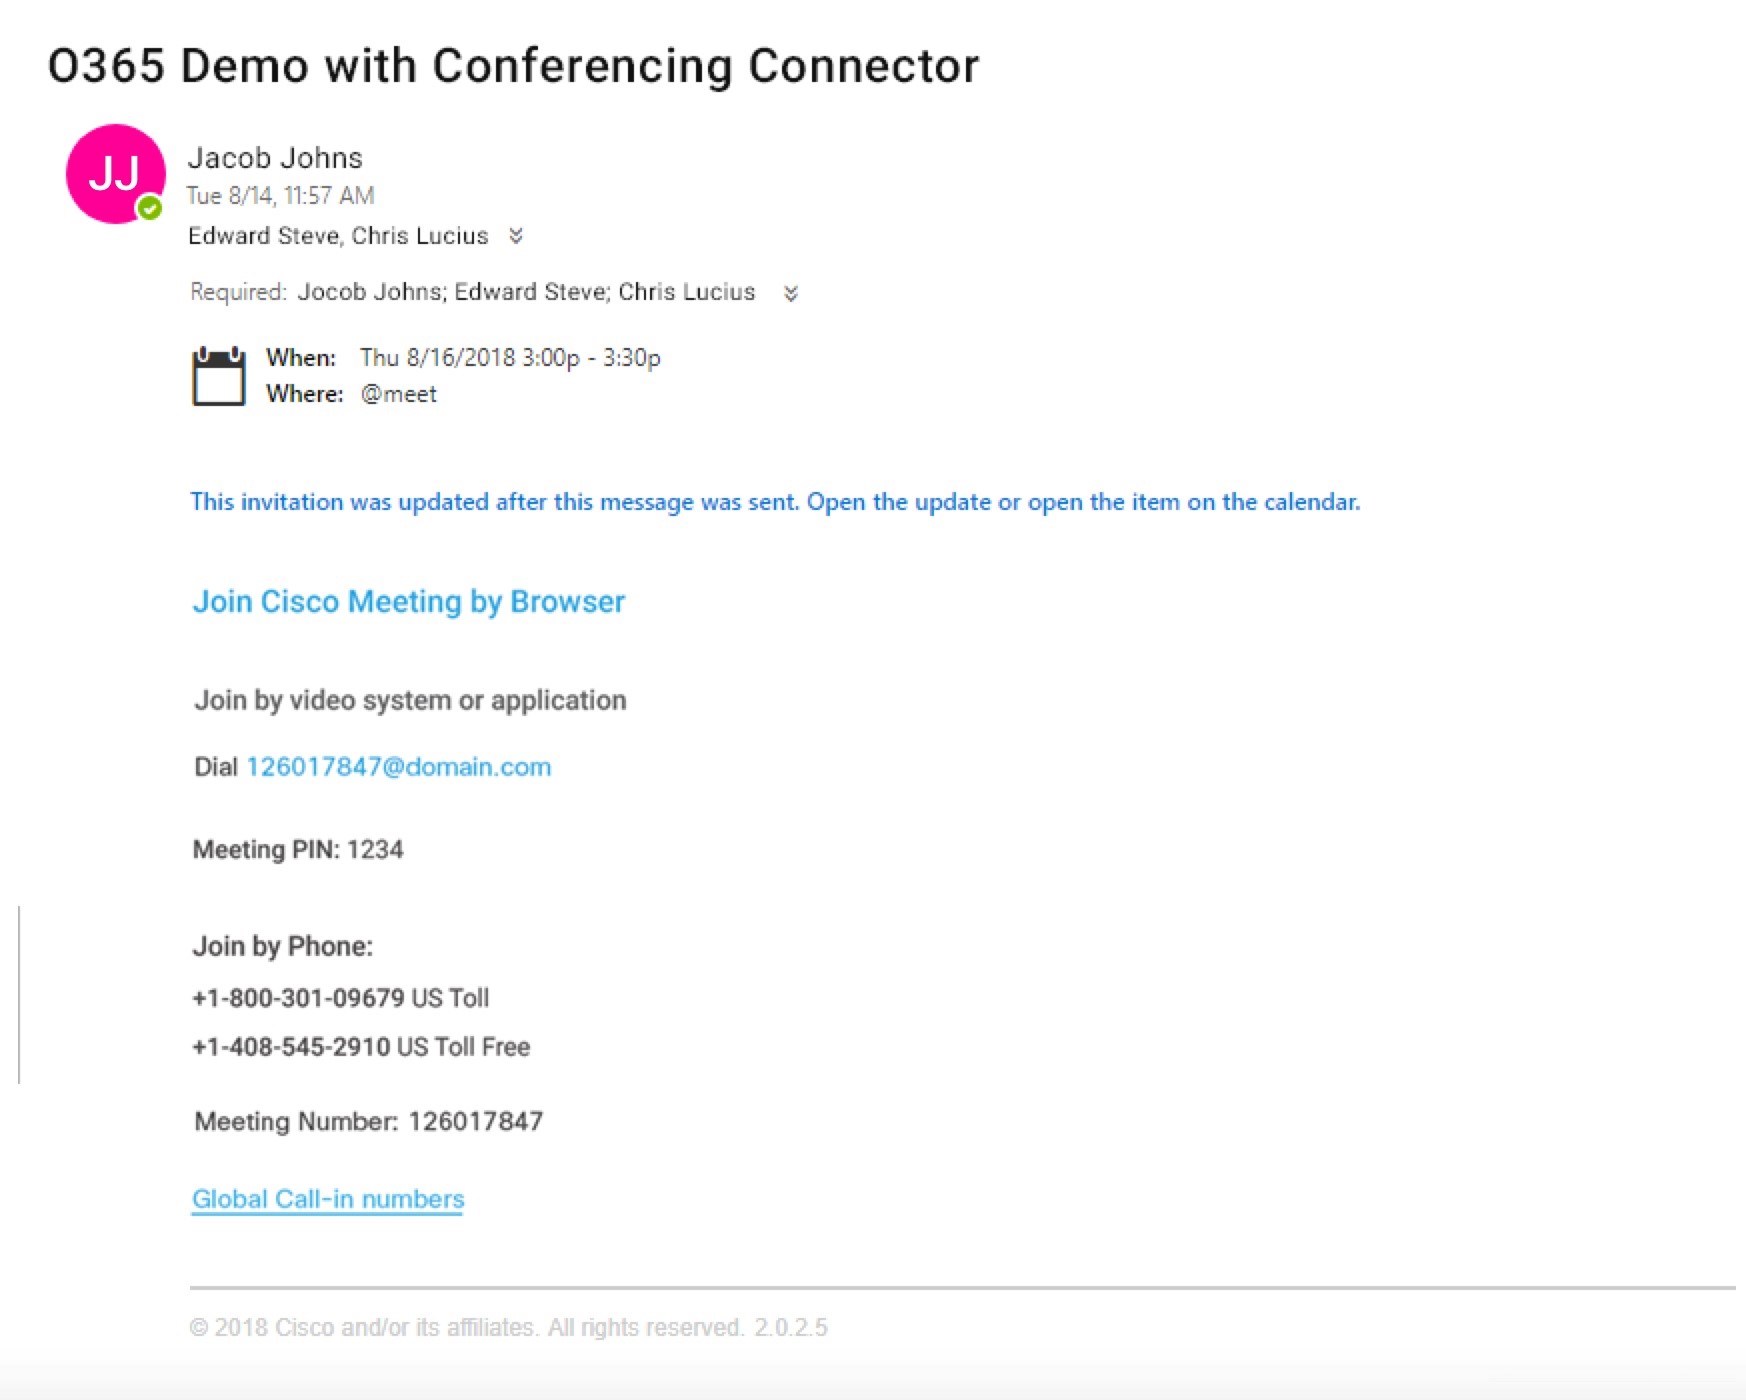
Test the Office 365 and TMS integration
Use these steps to schedule a test meeting and verify the integration.
| 1 |
Test meeting scheduling with @meet:
| ||
| 2 |
In a web browser, sign in to TMS and go to . 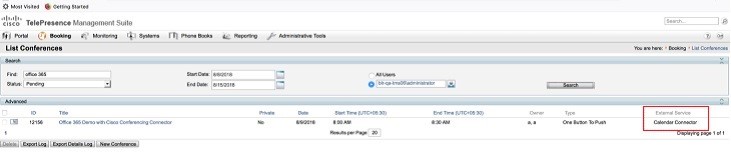
The test meeting and other meetings that are scheduled with @meet are listed in TMS with 'Calendar Connector' in the External Service column.
|
Troubleshoot the TMS integration
Use these tips to check the status of the various components of the TMS integration with the Hybrid Calendar.
| 1 |
Sign in to the customer view of https://admin.webex.com/login. |
| 2 |
In the left-hand navigation pane, under Services click Hybrid. |
| 3 |
Verify the number of users who are enabled for the Hybrid Calendar. 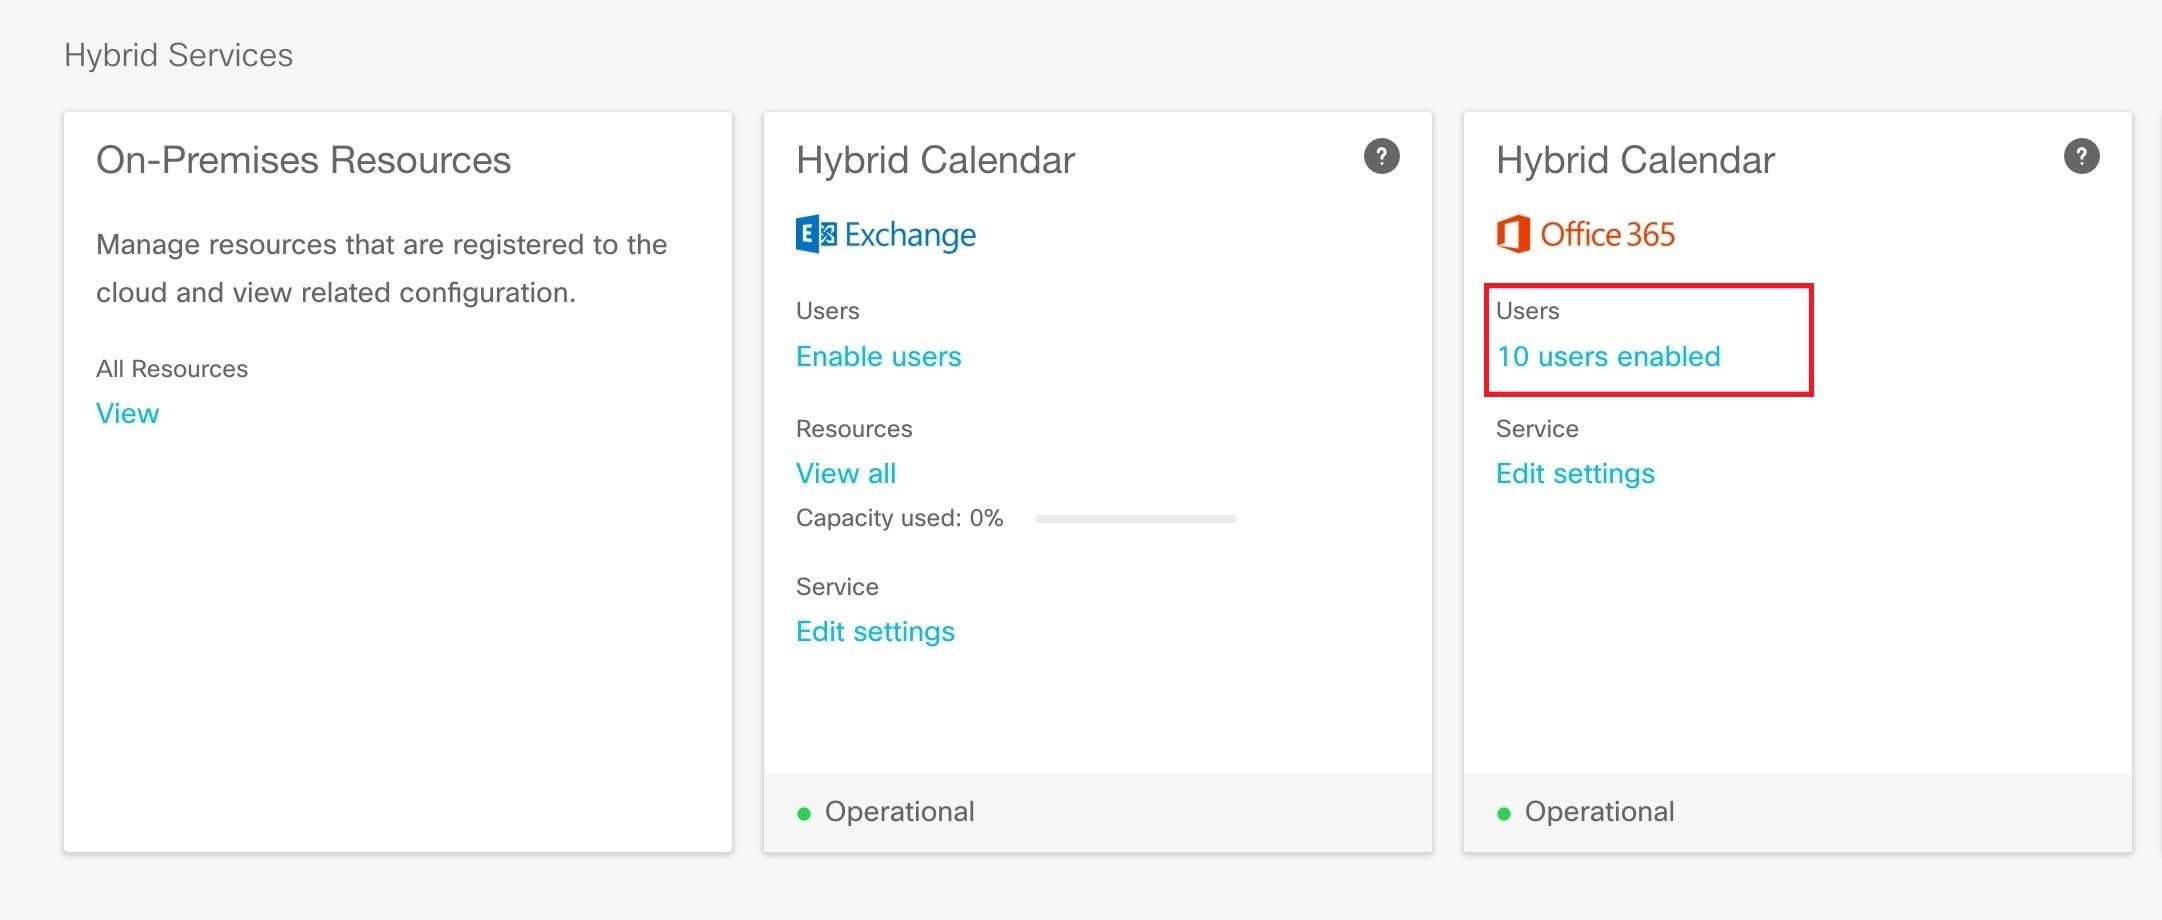
|
| 4 |
Check the status of the connectors in Control Hub. 
|
| 5 |
Compare the status above to the status of the connectors on the Expressway connector host. From Expressway, go to . 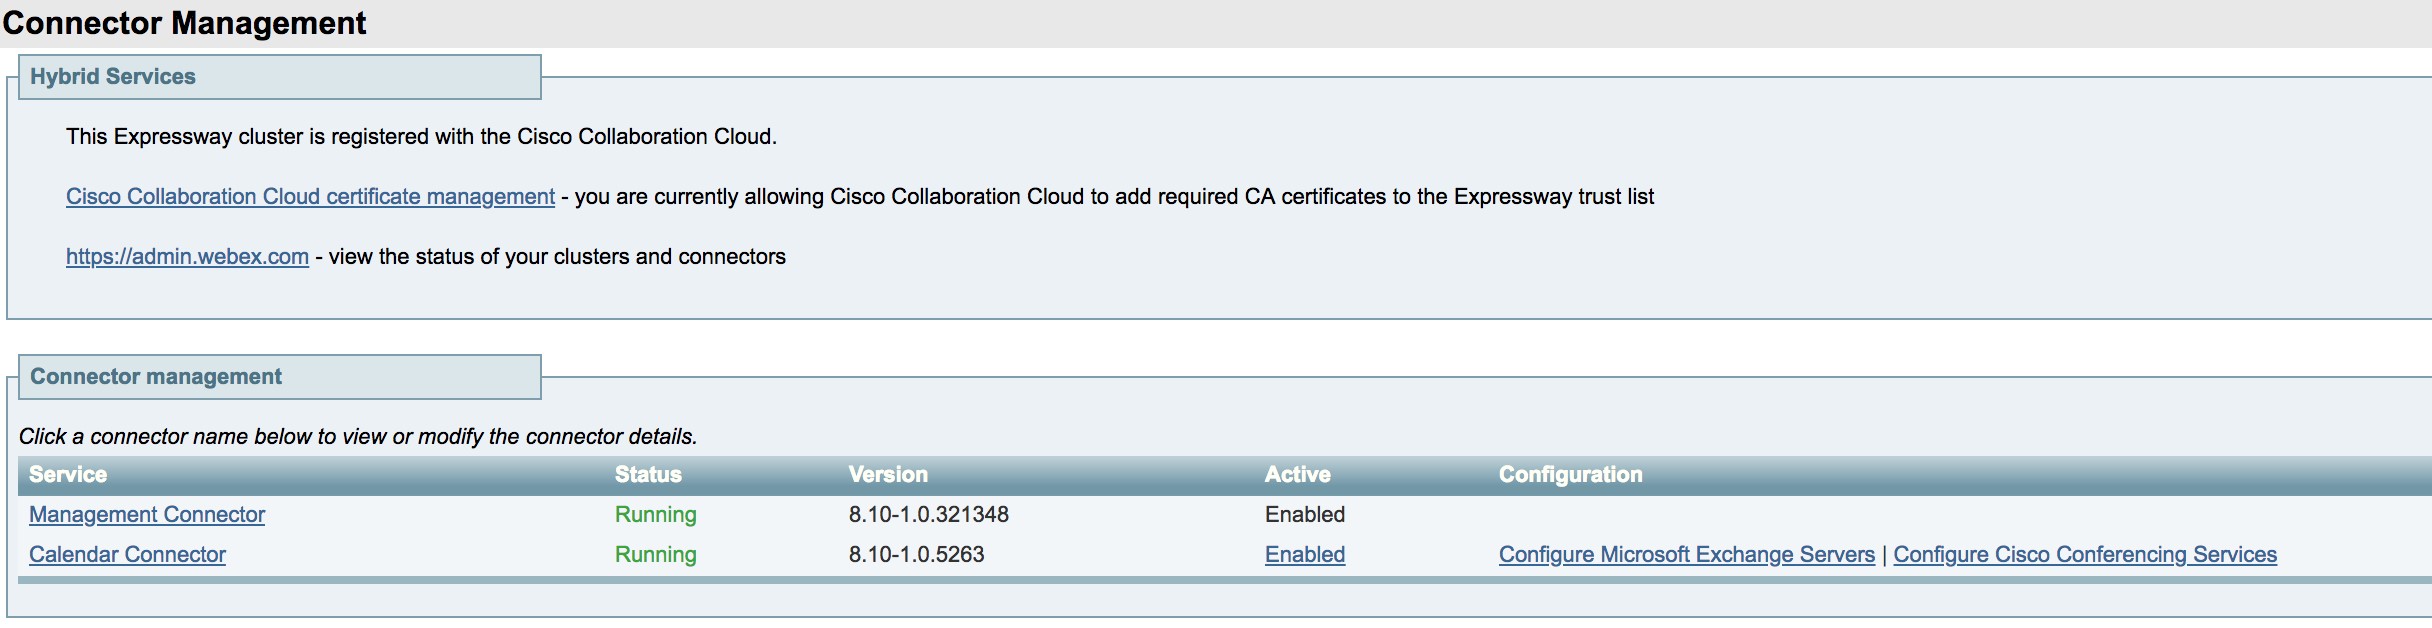
|
Notable behavior for the TMS integration with Office 365
This section lists limitations and notable behavior for the TMS integration with Office 365.
For currently open issues, see the "TMS Integration with Office 365" issues list in the Office 365 (Cloud-Based Service) section of the Known Issues with Hybrid Calendar.
-
Editing a meeting series during an active instance of the series results in the following behavior:
-
TMS updates all instances other than the in-progress instance.
-
The currently active instance becomes an exception in TMS.
This is the expected behavior, but differs from the behavior of Office 365, which updates the active instance as well.
-
-
A meeting that is scheduled more than 5 months in the future may not get immediately processed by the cloud-based Hybrid Calendar for Microsoft Office 365. The service processes meetings that are 5-6 months in the future on a daily basis using a sliding window, so once the meeting's scheduled date falls within the window, it will get processed and the meeting scheduled in TMS.
This is a limitation of the cloud-based Hybrid Calendar for Microsoft Office 365 for all types of meetings.


