- Home
- /
- Article

Thanks for your feedback.


 In this article
 Feedback?
You can configure a single sign-on (SSO) integration between a Control Hub customer organization and a deployment that uses Microsoft Entra ID as an identity provider (IdP).
Single sign-on and Control Hub
Single sign-on (SSO) is a session or user authentication process that permits a user to provide credentials to access one or more applications. The process authenticates users for all the applications that they are given rights to. It eliminates further prompts when users switch applications during a particular session.
The Security Assertion Markup Language (SAML 2.0) Federation Protocol is used to provide SSO authentication between the Webex cloud and your identity provider (IdP).
Profiles
Webex App only supports the web browser SSO profile. In the web browser SSO profile, Webex App supports the following bindings:
-
SP initiated POST -> POST binding
-
SP initiated REDIRECT -> POST binding
NameID format
The SAML 2.0 Protocol supports several NameID formats for communicating about a specific user. Webex App supports the following NameID formats.
-
urn:oasis:names:tc:SAML:2.0:nameid-format:transient -
urn:oasis:names:tc:SAML:1.1:nameid-format:unspecified -
urn:oasis:names:tc:SAML:1.1:nameid-format:emailAddress
In the metadata that you load from your IdP, the first entry is configured for use in Webex.
Integrate Control Hub with Microsoft Entra ID
Webex supports only one IdP for each authentication request. The authentication flow is as follows: User > Webex authentication > IdP 1 > Webex authentication > User. This means that while different users can authenticate using different IdPs, a user cannot switch between multiple IdPs during a single authentication process. Any additional steps such as MFA must be integrated with the single IdP used for that particular request.
The configuration guides show a specific example for SSO integration but do not provide exhaustive configuration for all possibilities. For example, the integration steps for nameid-format urn:oasis:names:tc:SAML:2.0:nameid-format:transient are documented. Other formats such as urn:oasis:names:tc:SAML:1.1:nameid-format:unspecified or urn:oasis:names:tc:SAML:1.1:nameid-format:emailAddress will work for SSO integration but are outside the scope of our documentation.
Set up this integration for users in your Webex organization (including Webex App, Webex Meetings, and other services administered in Control Hub). If your Webex site is integrated in Control Hub, the Webex site inherits the user management. If you can't access Webex Meetings in this way and it is not managed in Control Hub, you must do a separate integration to enable SSO for Webex Meetings.
Before you begin
For SSO and Control Hub, IdPs must conform to the SAML 2.0 specification. In addition, IdPs must be configured in the following manner:
- In Entra ID, provisioning is only supported in manual mode. This document only covers single sign-on (SSO) integration.
- Existing Webex customers with previous federation configurations may encounter issues with the standard Entra ID Webex template due to changes in SAML attributes. We recommend setting up a custom Entra ID federation to resolve this using your previous SAML settings. Ensure you conduct the Control Hub SSO test to allow compatibility and address any discrepancies.
Download the Webex metadata to your local system
Download the Webex metadata before you configure your identity provider. This file contains the Webex service provider settings for your organization, and your identity provider uses those settings to recognize Webex and send SAML sign-in responses back to the correct place. Use this metadata file when you configure the SAML application in your identity provider.
| 1 |
Sign in to Control Hub. |
| 2 |
Go to . |
| 3 |
Go to the Identity provider tab and click Activate SSO. |
| 4 |
Select an IdP. |
| 5 |
Choose the certificate type for your organization:
Trust anchors are public keys that act as an authority to verify a digital signature's certificate. For more information, refer to your IdP documentation. |
| 6 |
Download the metadata file. The Webex metadata filename is idb-meta-<org-ID>-SP.xml. |
Configure SSO application settings in Entra ID
Before you begin
Before you configure the SAML application in Entra ID, make sure your identity provider is ready and that your Webex users already exist. You can create users locally or synchronize them from your directory. Keep the Webex metadata file that you downloaded from Control Hub available, because you’ll upload it into the SAML application during this procedure.
For more background about Entra ID identity provider capabilities, see Microsoft’s documentation.
| 1 |
Sign in to the Microsoft Entra admin center and go to . |
| 2 |
Open the Webex application you added or created in the application gallery. Click here for more information on the difference
between the pre-built Cisco Webex application or the custom SCIM 2.0 application.
|
| 3 |
Click . 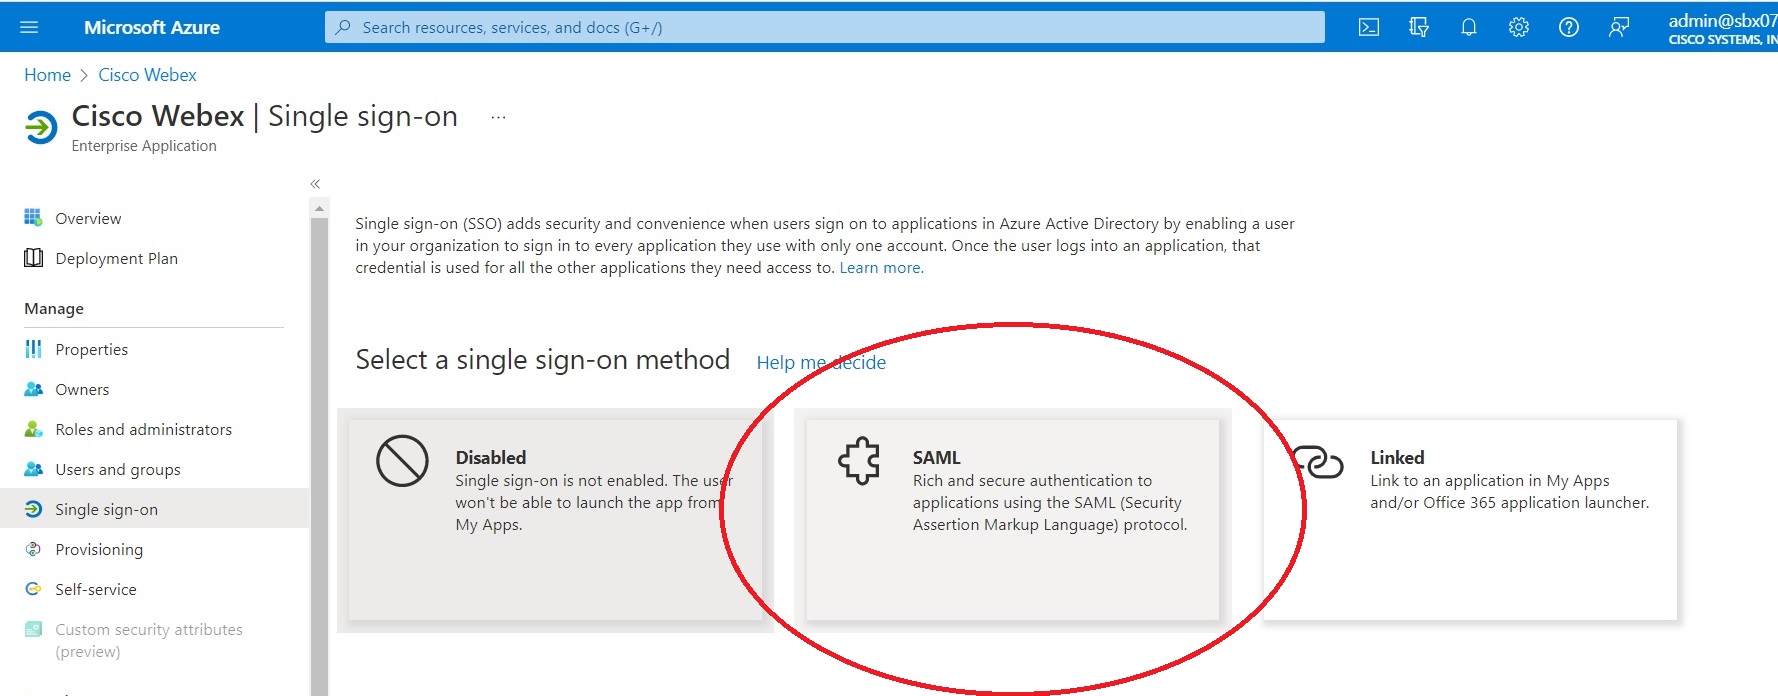
|
| 4 |
Click Upload metadata file and then choose the metadata file that you downloaded from Control Hub. 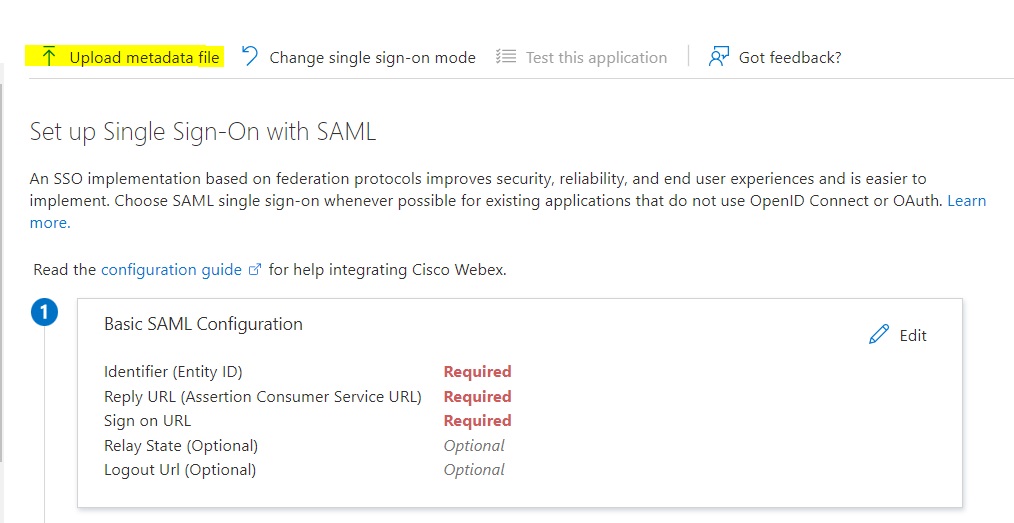
Some fields are automatically filled out for you. |
| 5 |
Under Manage, click . |
| 6 |
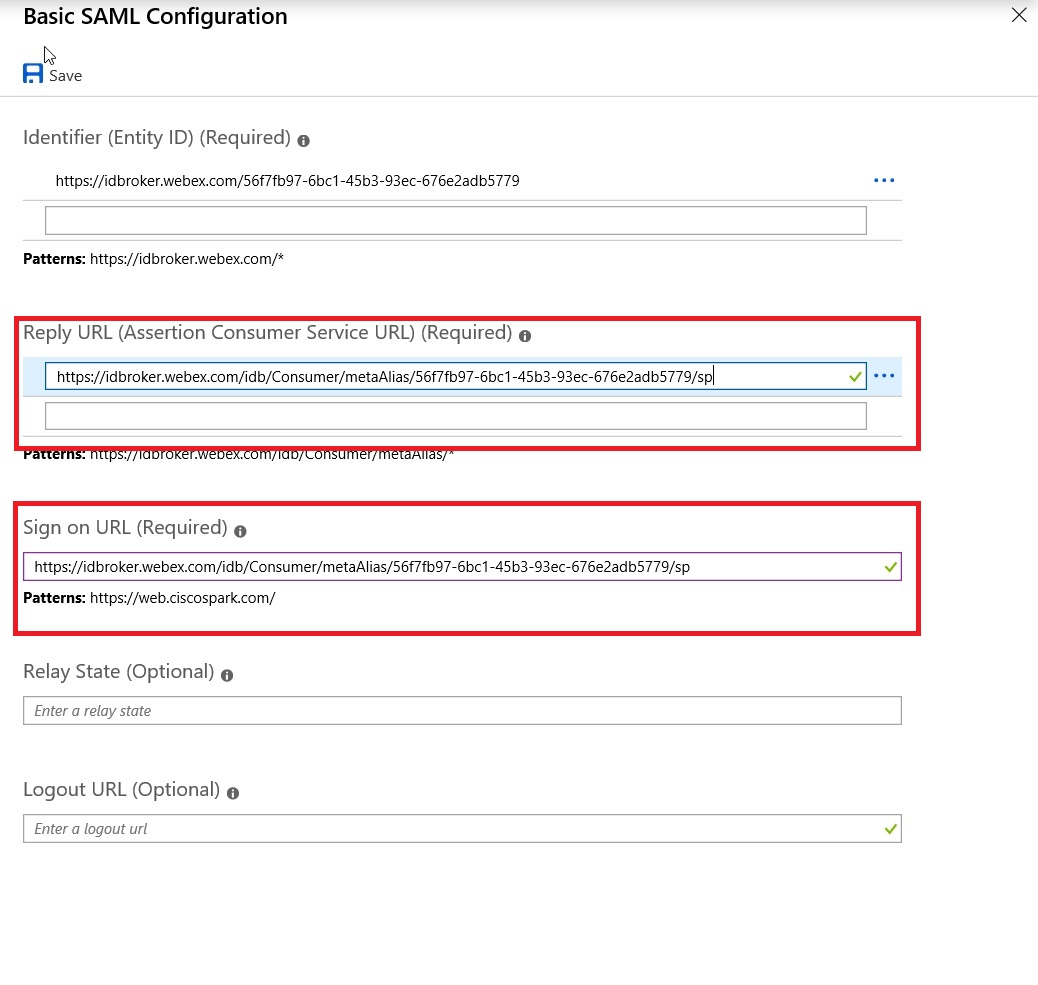
Open Basic SAML Configuration, copy the Reply URL value, paste it into Sign on URL, and save your changes.
|
| 7 |
Go to and choose the applicable users and groups that you want to grant access to Webex App. |
| 8 |
On the Set up Single Sign-On with SAML page, in the SAML Signing Certificate section, click Download to download the Federation Metadata XML and save it on your computer. |
Import the IdP metadata and enable single sign-on after a test
After you export the Webex metadata, configure your IdP, and download the IdP metadata to your local system, you are ready to import it into your Webex organization from Control Hub.
Before you begin
Do not test SSO integration from the identity provider (IdP) interface. We only support Service Provider-initiated (SP-initiated) flows, so you must use the Control Hub SSO test for this integration.
| 1 |
Choose one:
|
| 2 |
On the Import IdP metadata page, either drag and drop the IdP metadata file onto the page or use the file browser option to locate and upload the metadata file. Click Next.
You should use the More secure option, if you can. This is only possible if your IdP used a public CA to sign its metadata. In all other cases, you must use the Less secure option. This includes if the metadata is not signed, self-signed, or signed by a private CA. Okta does not sign the metadata, so you must choose Less secure for an Okta SSO integration. |
| 3 |
Select Test SSO setup, and when a new browser tab opens, authenticate with the IdP by signing in. If you receive an authentication error there may be a problem with the credentials. Check the username and password and try again. A Webex App error usually means an issue with the SSO setup. In this case, walk through the steps again, especially the steps where you copy and paste the Control Hub metadata into the IdP setup. To see the SSO sign-in experience directly, you can also click Copy URL to clipboard from this screen and paste it in a private browser window. From there, you can walk through signing in with SSO. This step stops false positives because of an access token that might be in an existing session from you being signed in. |
| 4 |
Return to the Control Hub browser tab.
The SSO configuration does not take effect in your organization unless you choose first radio button and activate SSO. |
What to do next
Use the procedures in Synchronize Okta Users into Control Hub if you want to do user provisioning out of Okta into the Webex cloud.
Use the procedures in Synchronize Microsoft Entra ID users into Control Hub if you want to do user provisioning out of Entra ID into the Webex cloud.
You can follow the procedure in Suppress Automated Emails to disable emails that are sent to new Webex App users in your organization. The document also contains best practices for sending out communications to users in your organization.
Troubleshoot Entra ID integration
When you test SSO, use Mozilla Firefox with the SAML Tracer add-on to inspect the SAML assertion that comes from Entra ID.
In the assertion, verify that the NameID element uses the transient name ID format.
<NameID Format="urn:oasis:names:tc:SAML:2.0:nameid-format:transient">...</NameID>Also verify that the assertion includes a uid attribute and that the value matches a user in Webex App.
<Attribute Name="uid">
  <AttributeValue>...</AttributeValue>
</Attribute>


