- Home
- /
- Article

Thanks for your feedback.

Directory service integration through Webex Common Identity for Dedicated Instance
 In this article
 Feedback?
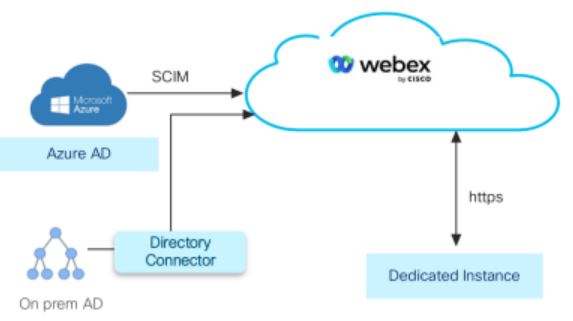
Synchronize users from a Cloud Directory (Microsoft Azure AD) or on-prem directory (MS AD) to Dedicated Instance clusters (Unified CM & Cisco Unity Connection) via the Webex Common Identity Service using the Control Hub interface.
Overview
Synchronize users from cloud-based directory such as Azure AD to Dedicated Instance applications such as Unified CM and Cisco Unity Connection with the Cloud Directory Service. During synchronization, the system imports a list of users and associated user data in the Azure Active Directory (or a similar Cloud Directory service) that is synchronized into the Webex Identity Service. Select the Unified CM cluster from Control Hub for synchronization, choose the appropriate Unified CM User ID field mapping, and then select the required synchronization agreement to complete the synchronization.
Prerequisites
-
If you are using Azure Active Directory as your cloud directory, see Set up Azure AD Wizard App in Control Hub for more information.
-
If you are using Microsoft Active Directory as your directory, see Deploy Directory Connector for more information.
-
Ensure that the existing Active Directory systems integrated with Unified CM are also integrated with Webex Common Identity.
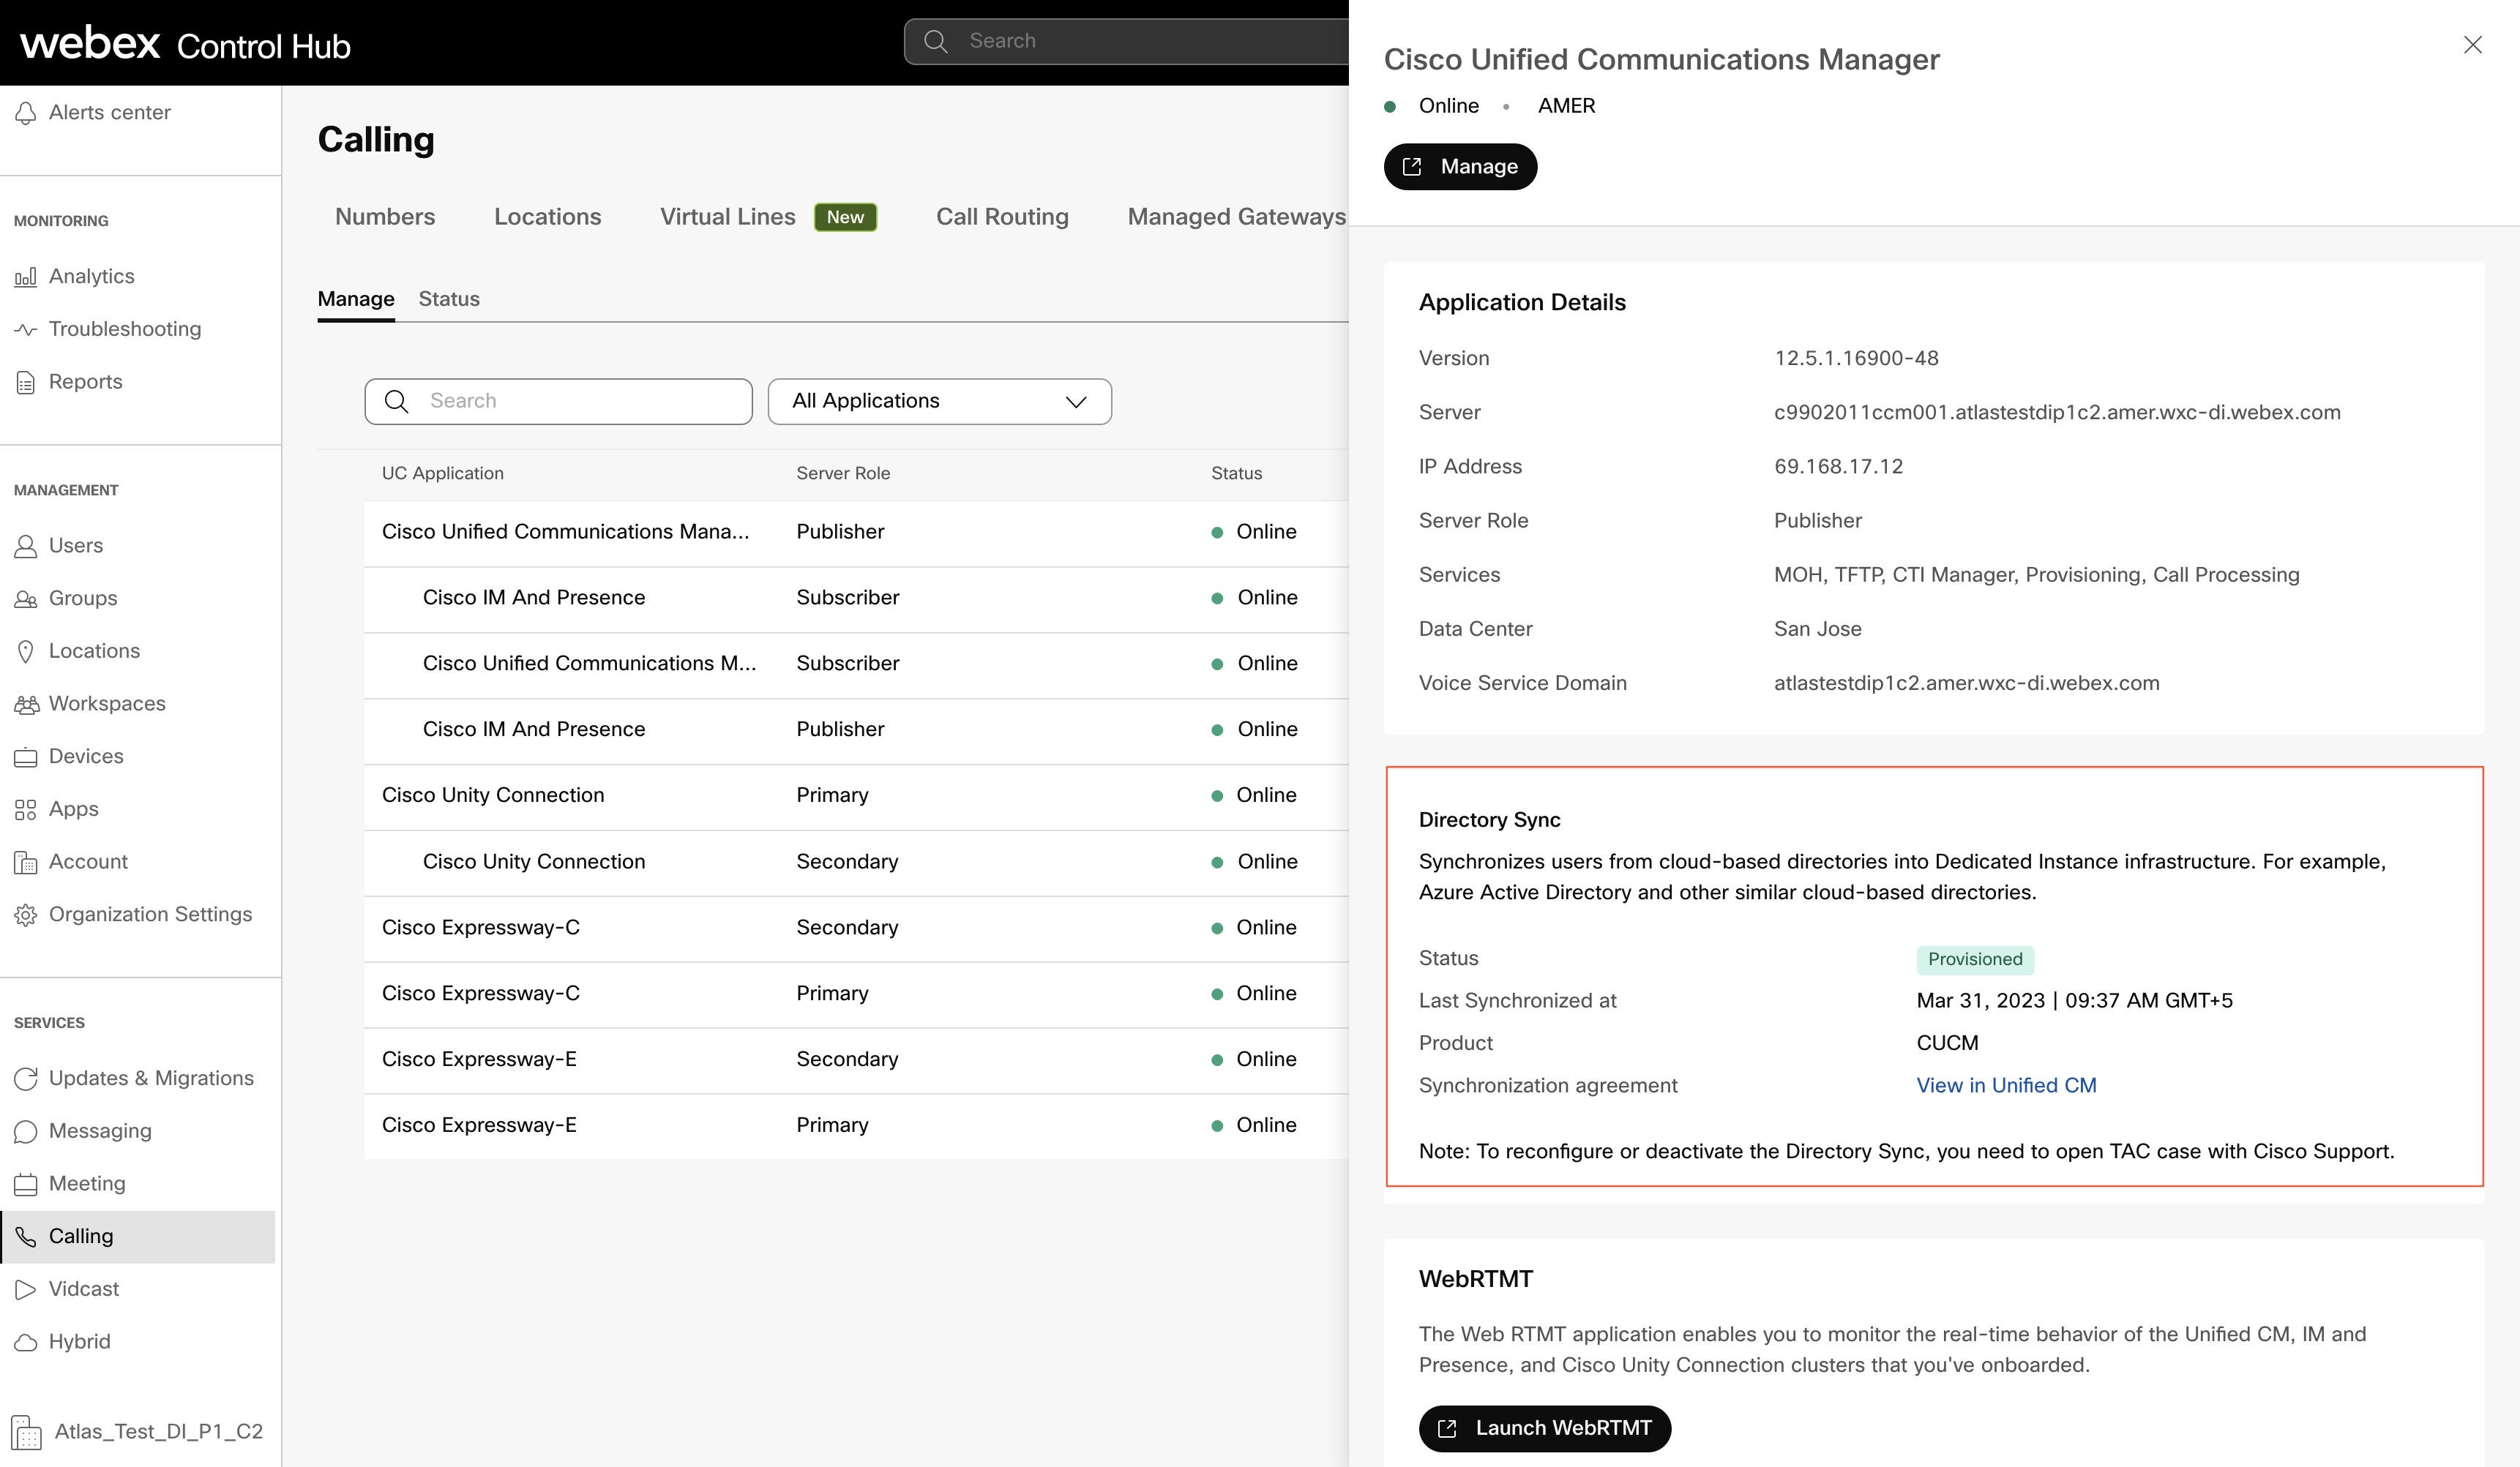
View cluster details
In the Manage page in Control Hub, choose a cluster to which you want to synchronize the user data with.
This selection also provides the cluster details, such as the name of the cluster, status of the cluster synchronization, last synchronized state, and the associated product.
|
Cluster Details |
Description |
|---|---|
|
Cluster Name |
The name of the cluster |
|
Status |
Status of synchronization |
|
Last synced |
Date of the last synchronization |
|
Product |
Details of the product |
Directory synchronization
Depending on your requirement, you can either synchronize users from On-prem Active Directory to Control Hub using Directory Connector or directly from Azure Directory to Control Hub, and then synchronize them to Unified CM.
Perform one of the following:
-
To directly synchronize users from Azure Directory to Control Hub, follow the Synchronize Users from Azure Directory procedure.
-
To synchronize users from On-prem Active Directory to Control Hub using Directory Connector, follow the Synchronize Users from On-prem Active Directory procedure.
Perform synchronization during non-business hours to minimize its impact on calling services.
Synchronize Users from Azure Directory
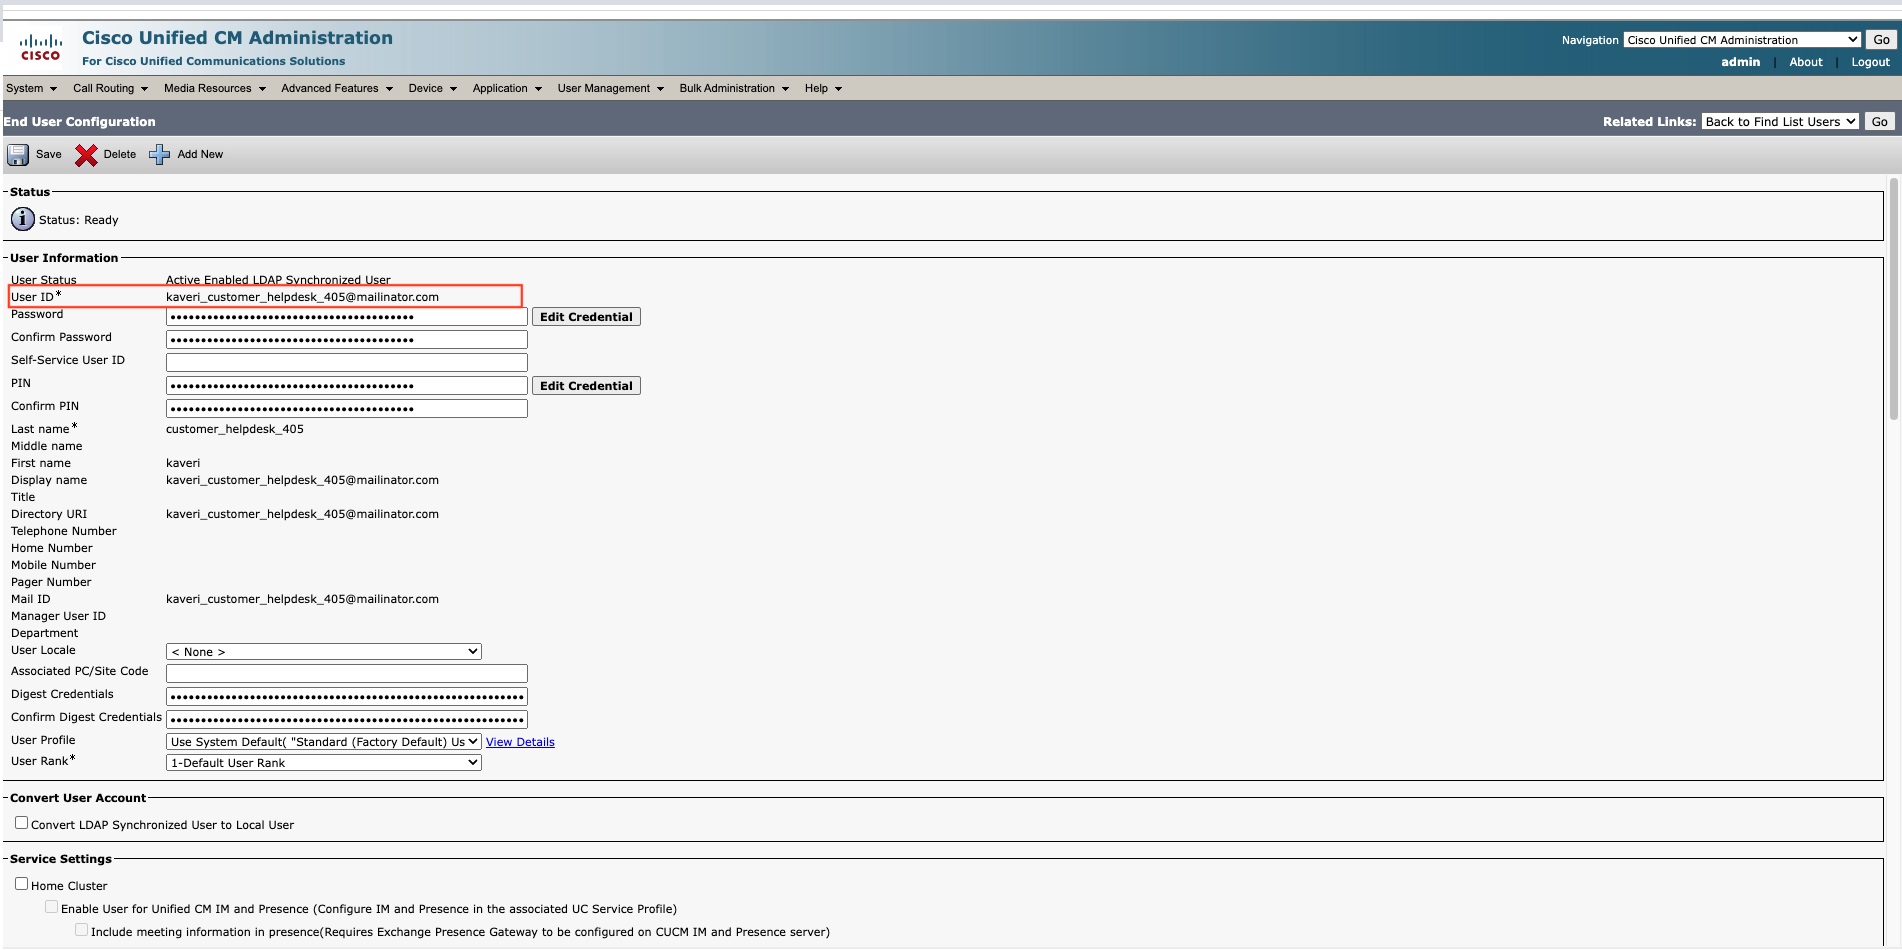
Dedicated Instance Directory Service synchronization allows you to import end-user data in the Azure directory into the Unified CM database such that it displays in the End-User Configuration window.
To synchronize users using Azure Directory:
-
You must Synchronize Azure Active Directory users into Control Hub.
-
Follow the procedure Configure Directory Synchronization to synchronize users in Control Hub to Cisco Unified CM.
Synchronize Users from On-prem Active Directory
On-prem Active Directory users can be synced to Common Identity (CI) using Directory Connector.
Only SSO deployment is supported for directory service. See Single Sign-On Integration in Control Hub and SAML-Based SSO Solution for more information.
To synchronize users from On-prem Active Directory:
-
Synchronize Active Directory users to Common Identity (CI) using Directory Connector. You can download the connector software from Control Hub and install it on your local machine. See Deployment Guide for Directory Connector for more information.
-
Follow the procedure in Configure Directory Synchronization synchronize users in Control Hub to Unified CM.
Configure Directory Synchronization
Sometimes, you might experience additional delays in provisioning a cluster. In such scenarios, the provisioning will still happen though this activity incurs considerable time.
-
Sign in to the Control Hub at https://admin.webex.com/login.
-
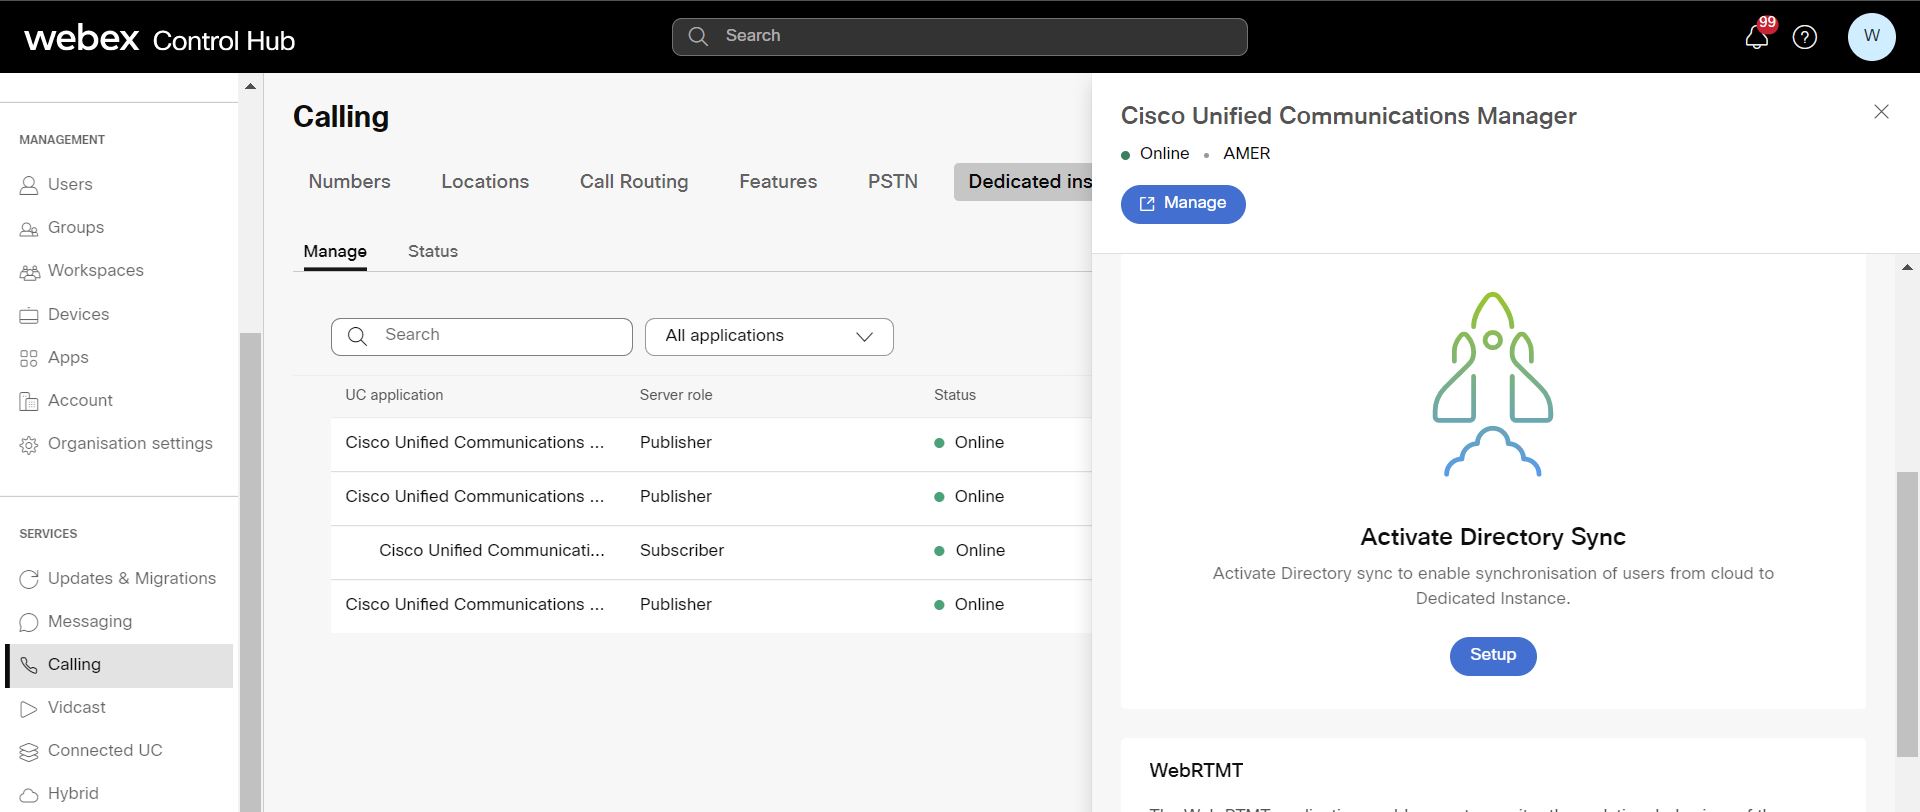
Go to Services > Calling > Dedicated Instance > Manage.
-
Select the UC Application and click Setup under Activate Directory Sync in the right-hand panel.
-
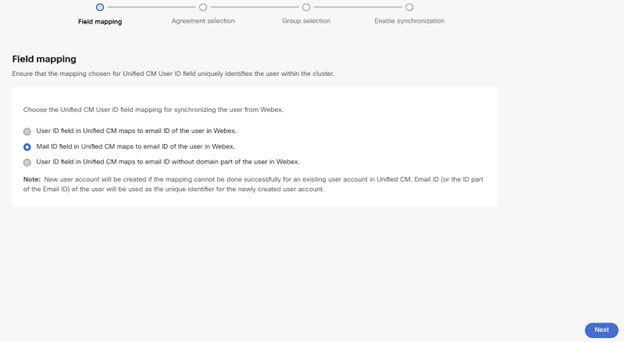
In the Field-Mapping configuration window, ensure that the mapping chosen for the Unified CM User ID field uniquely identifies the user within the cluster after you start provisioning.
-
Choose the appropriate Unified CM User ID field mapping for synchronizing the user from Webex:
-
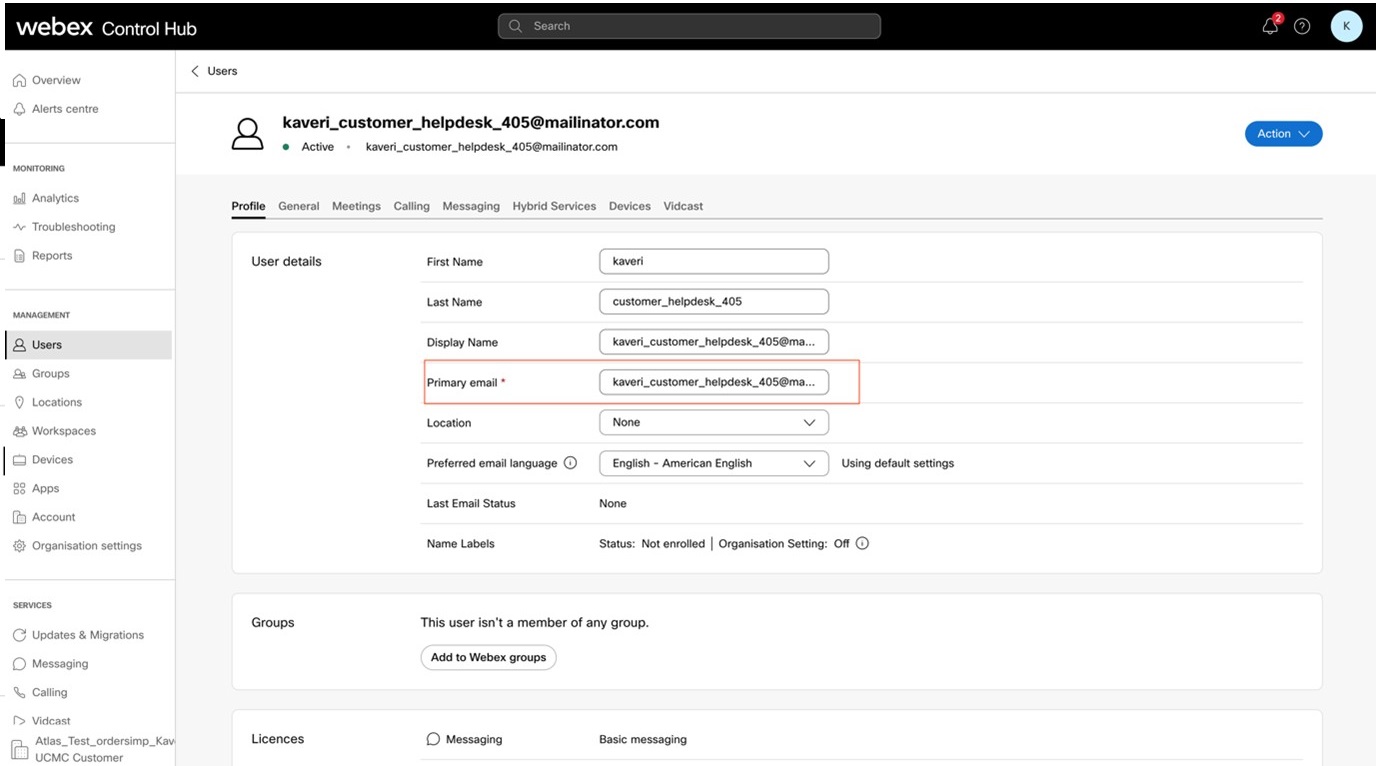
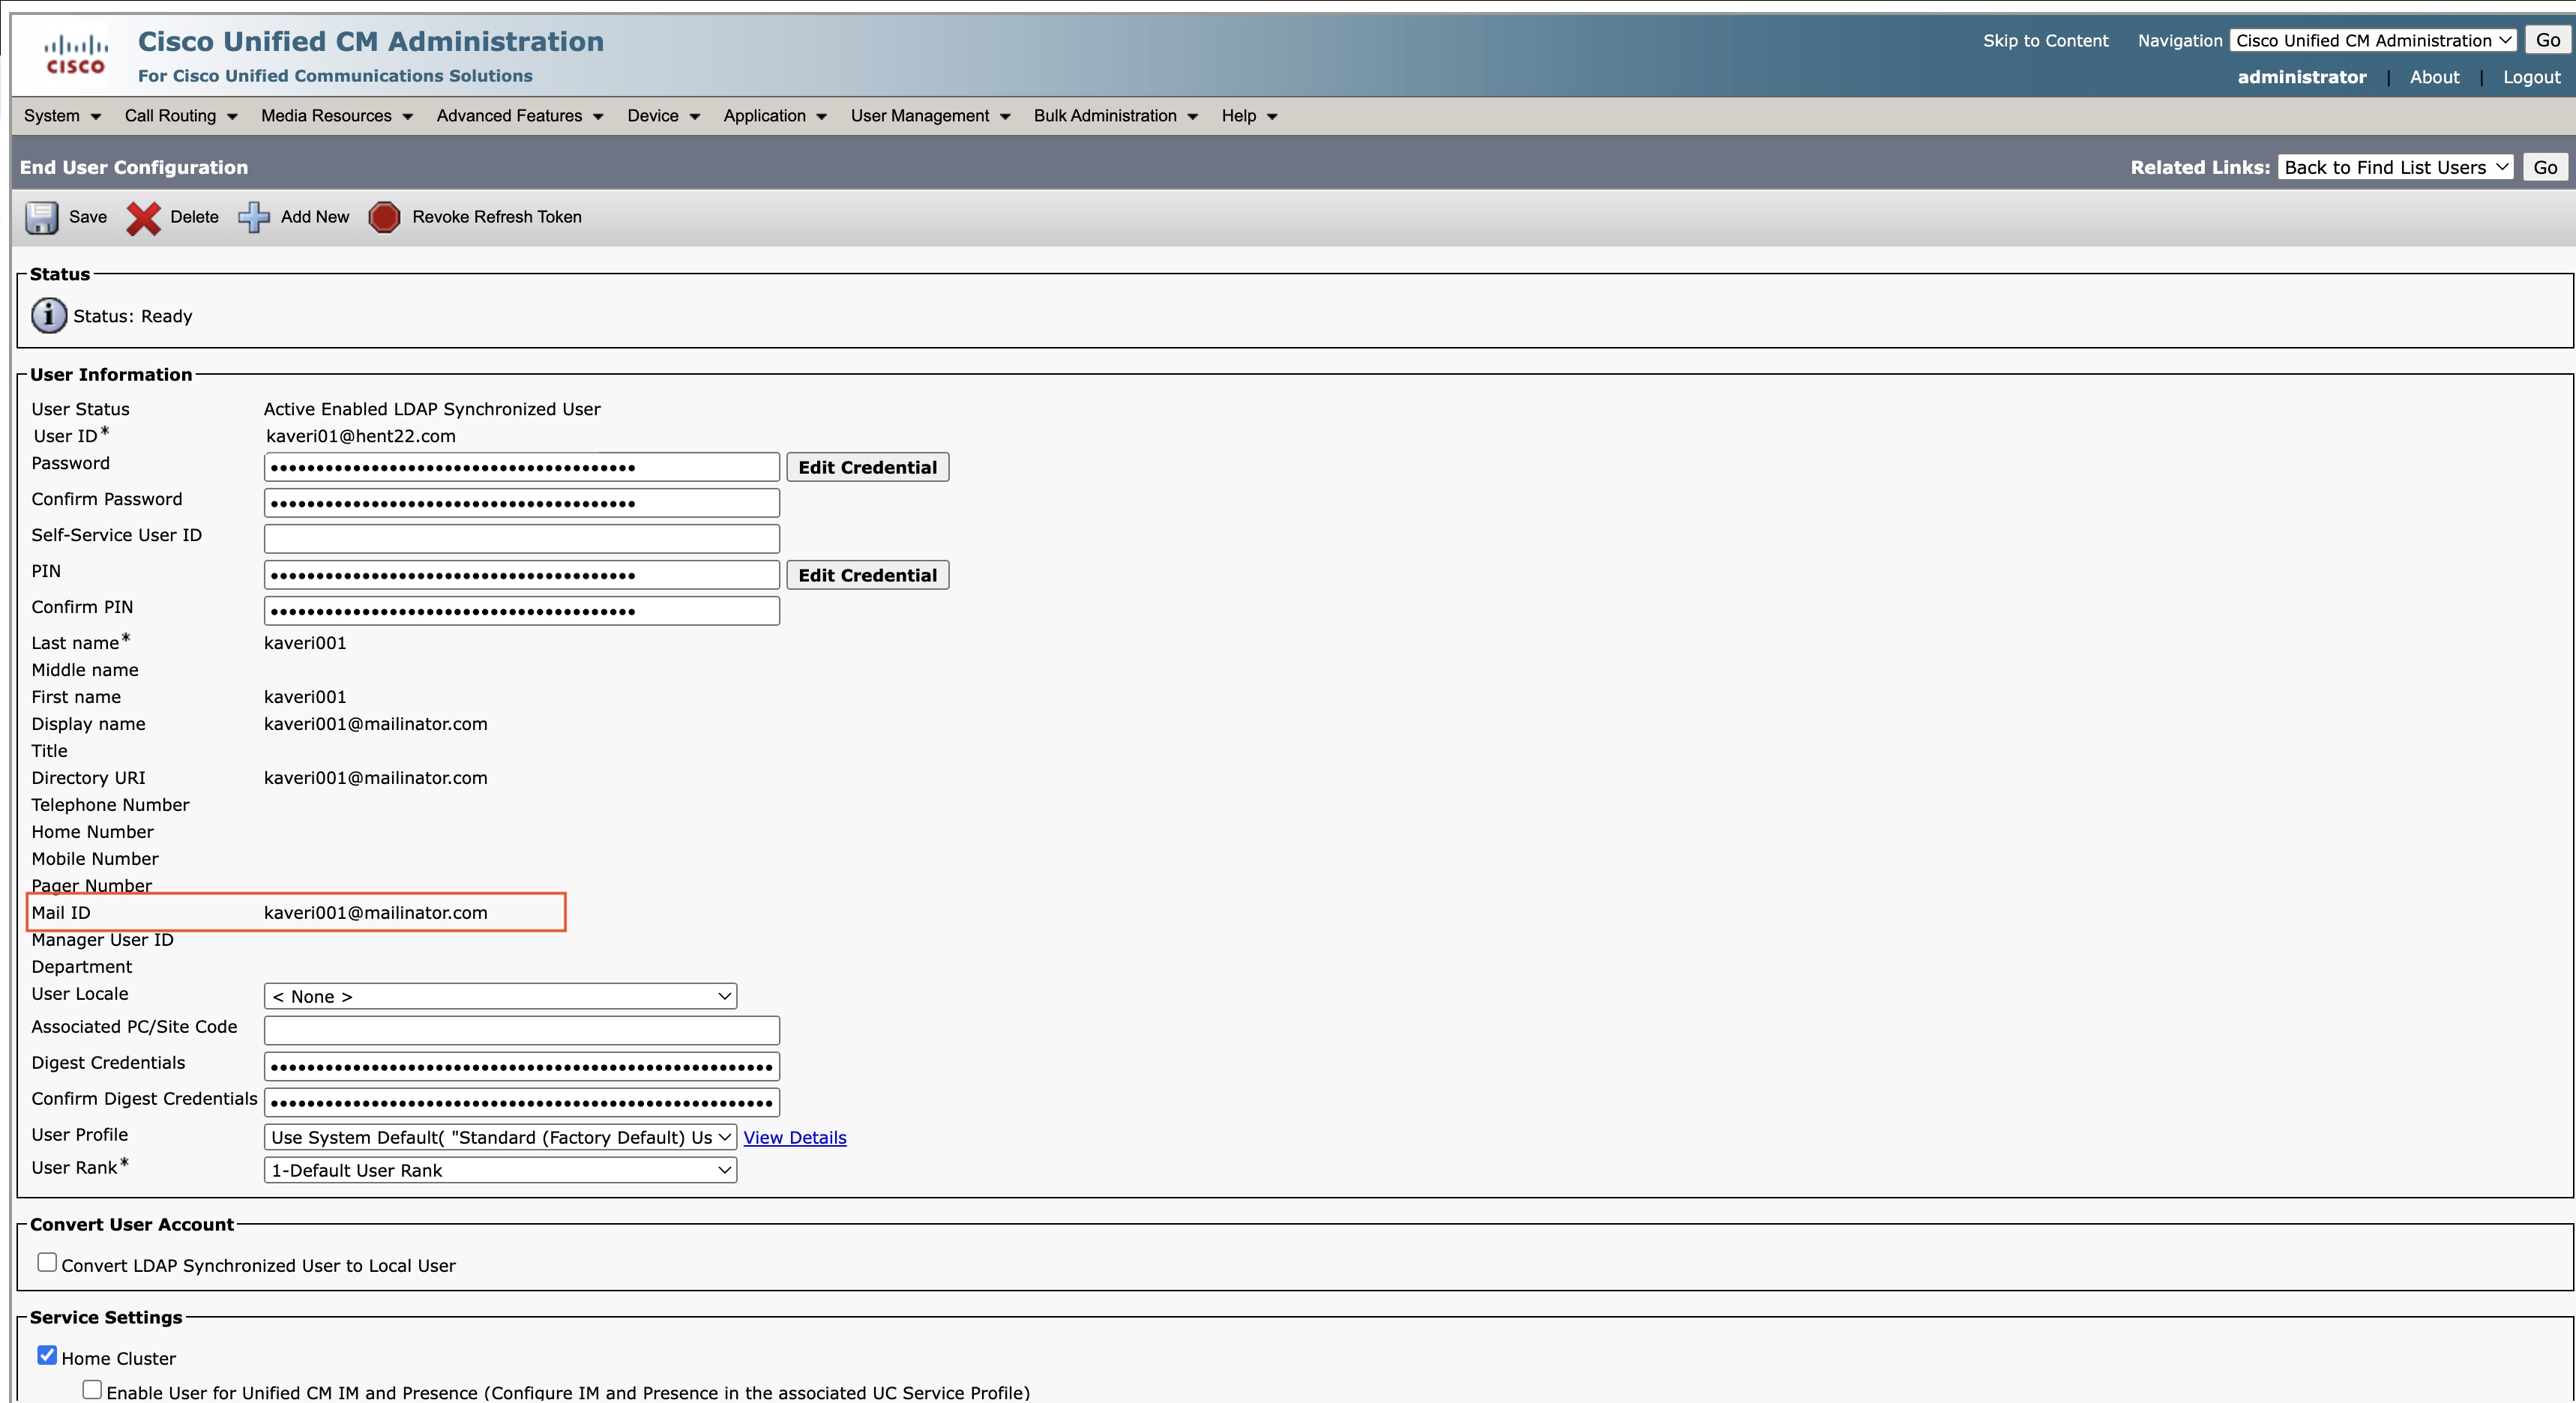
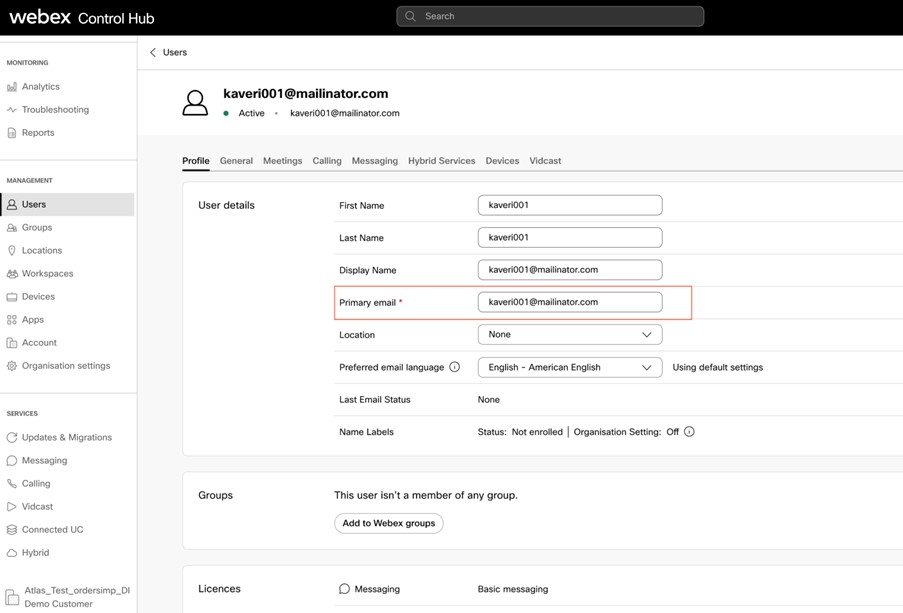
The user ID field in Unified CM maps to the email ID of the user in Webex.
-
The mail ID field in Unified CM maps to the email ID of the user in Webex.
-
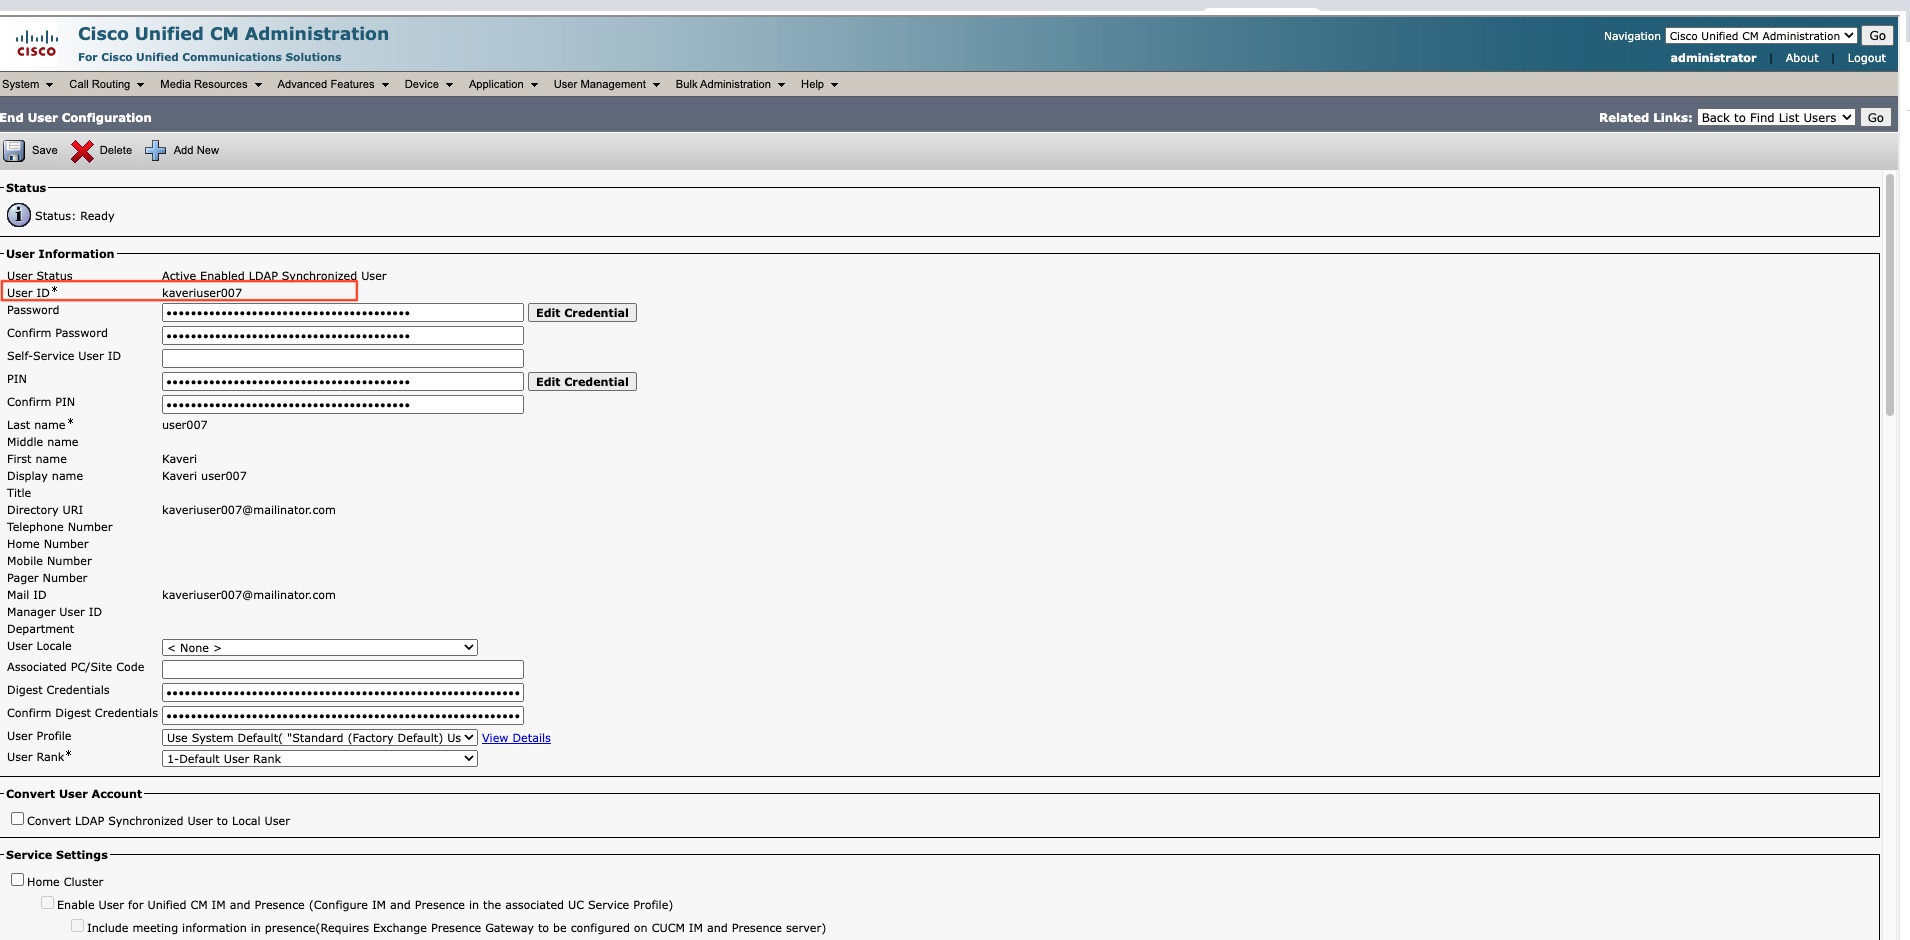
The user ID field in Unified CM maps to the email ID without domain part of the user in Webex.
A new user account is created if the mapping cannot be done successfully for an existing user account in Unified CM. The email ID of the user is used as the unique identifier for the newly created user account. This note is applicable for options 1 and 2.
Options
Unified CM
Control Hub
Option 1
User id field in Unified CM maps to email id of the user in Webex
Option 2
Mail id field in Unified CM maps to email ID of the user in Webex
Option 3
User id field in Unified CM maps to email ID without domain part of the user in Webex
-
-
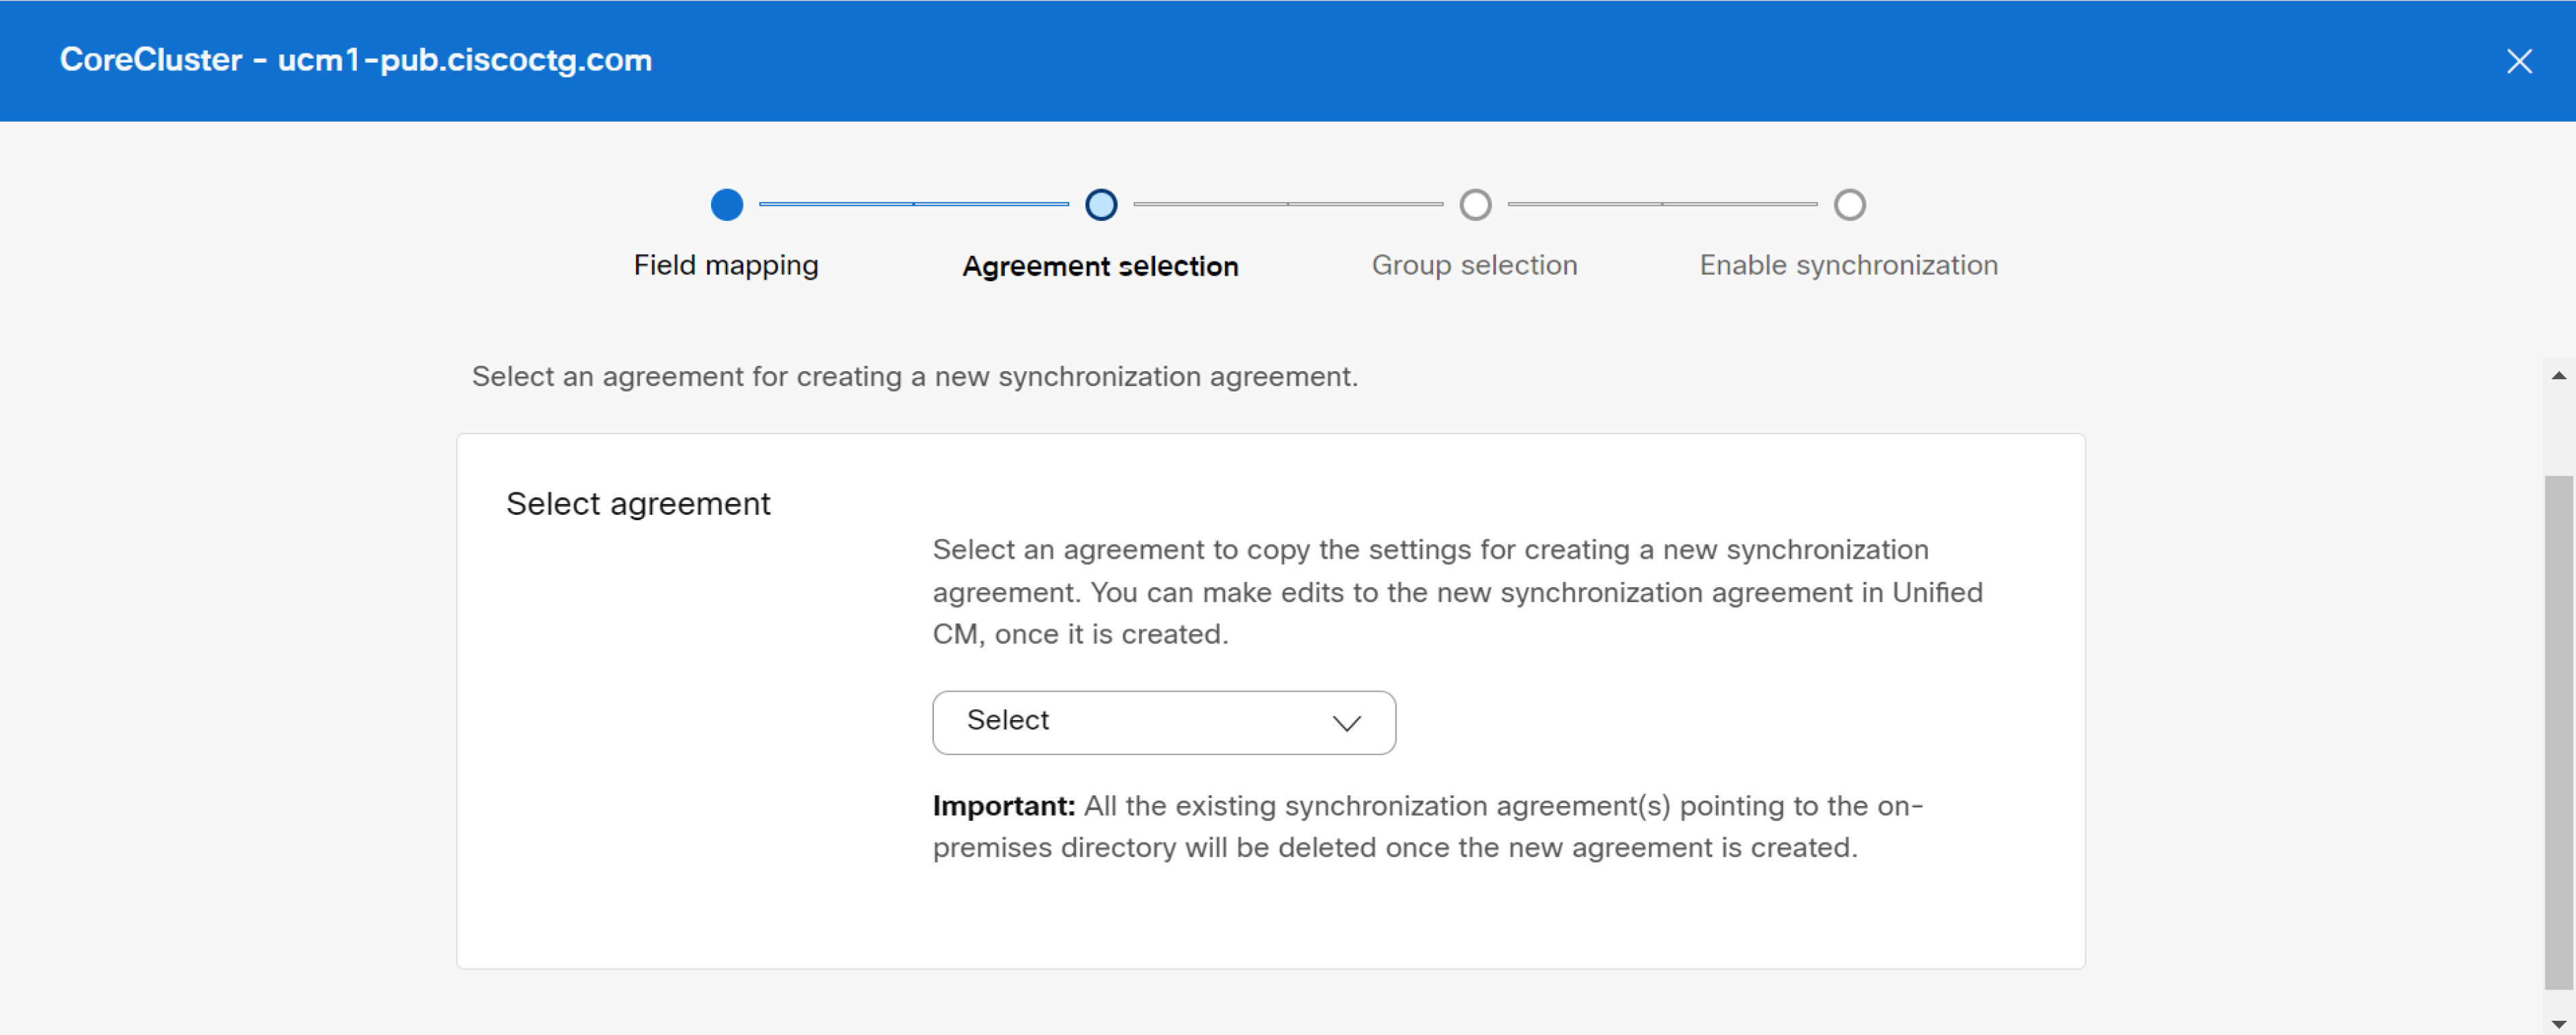
Click Next.
-
Select an agreement in the drop-down list for creating a new synchronization agreement. Once the new synchronization agreement is created, all one or more existing synchronization agreements pointing to the on-premises directory are deleted. You can change the new synchronization agreement after it’s created.
-
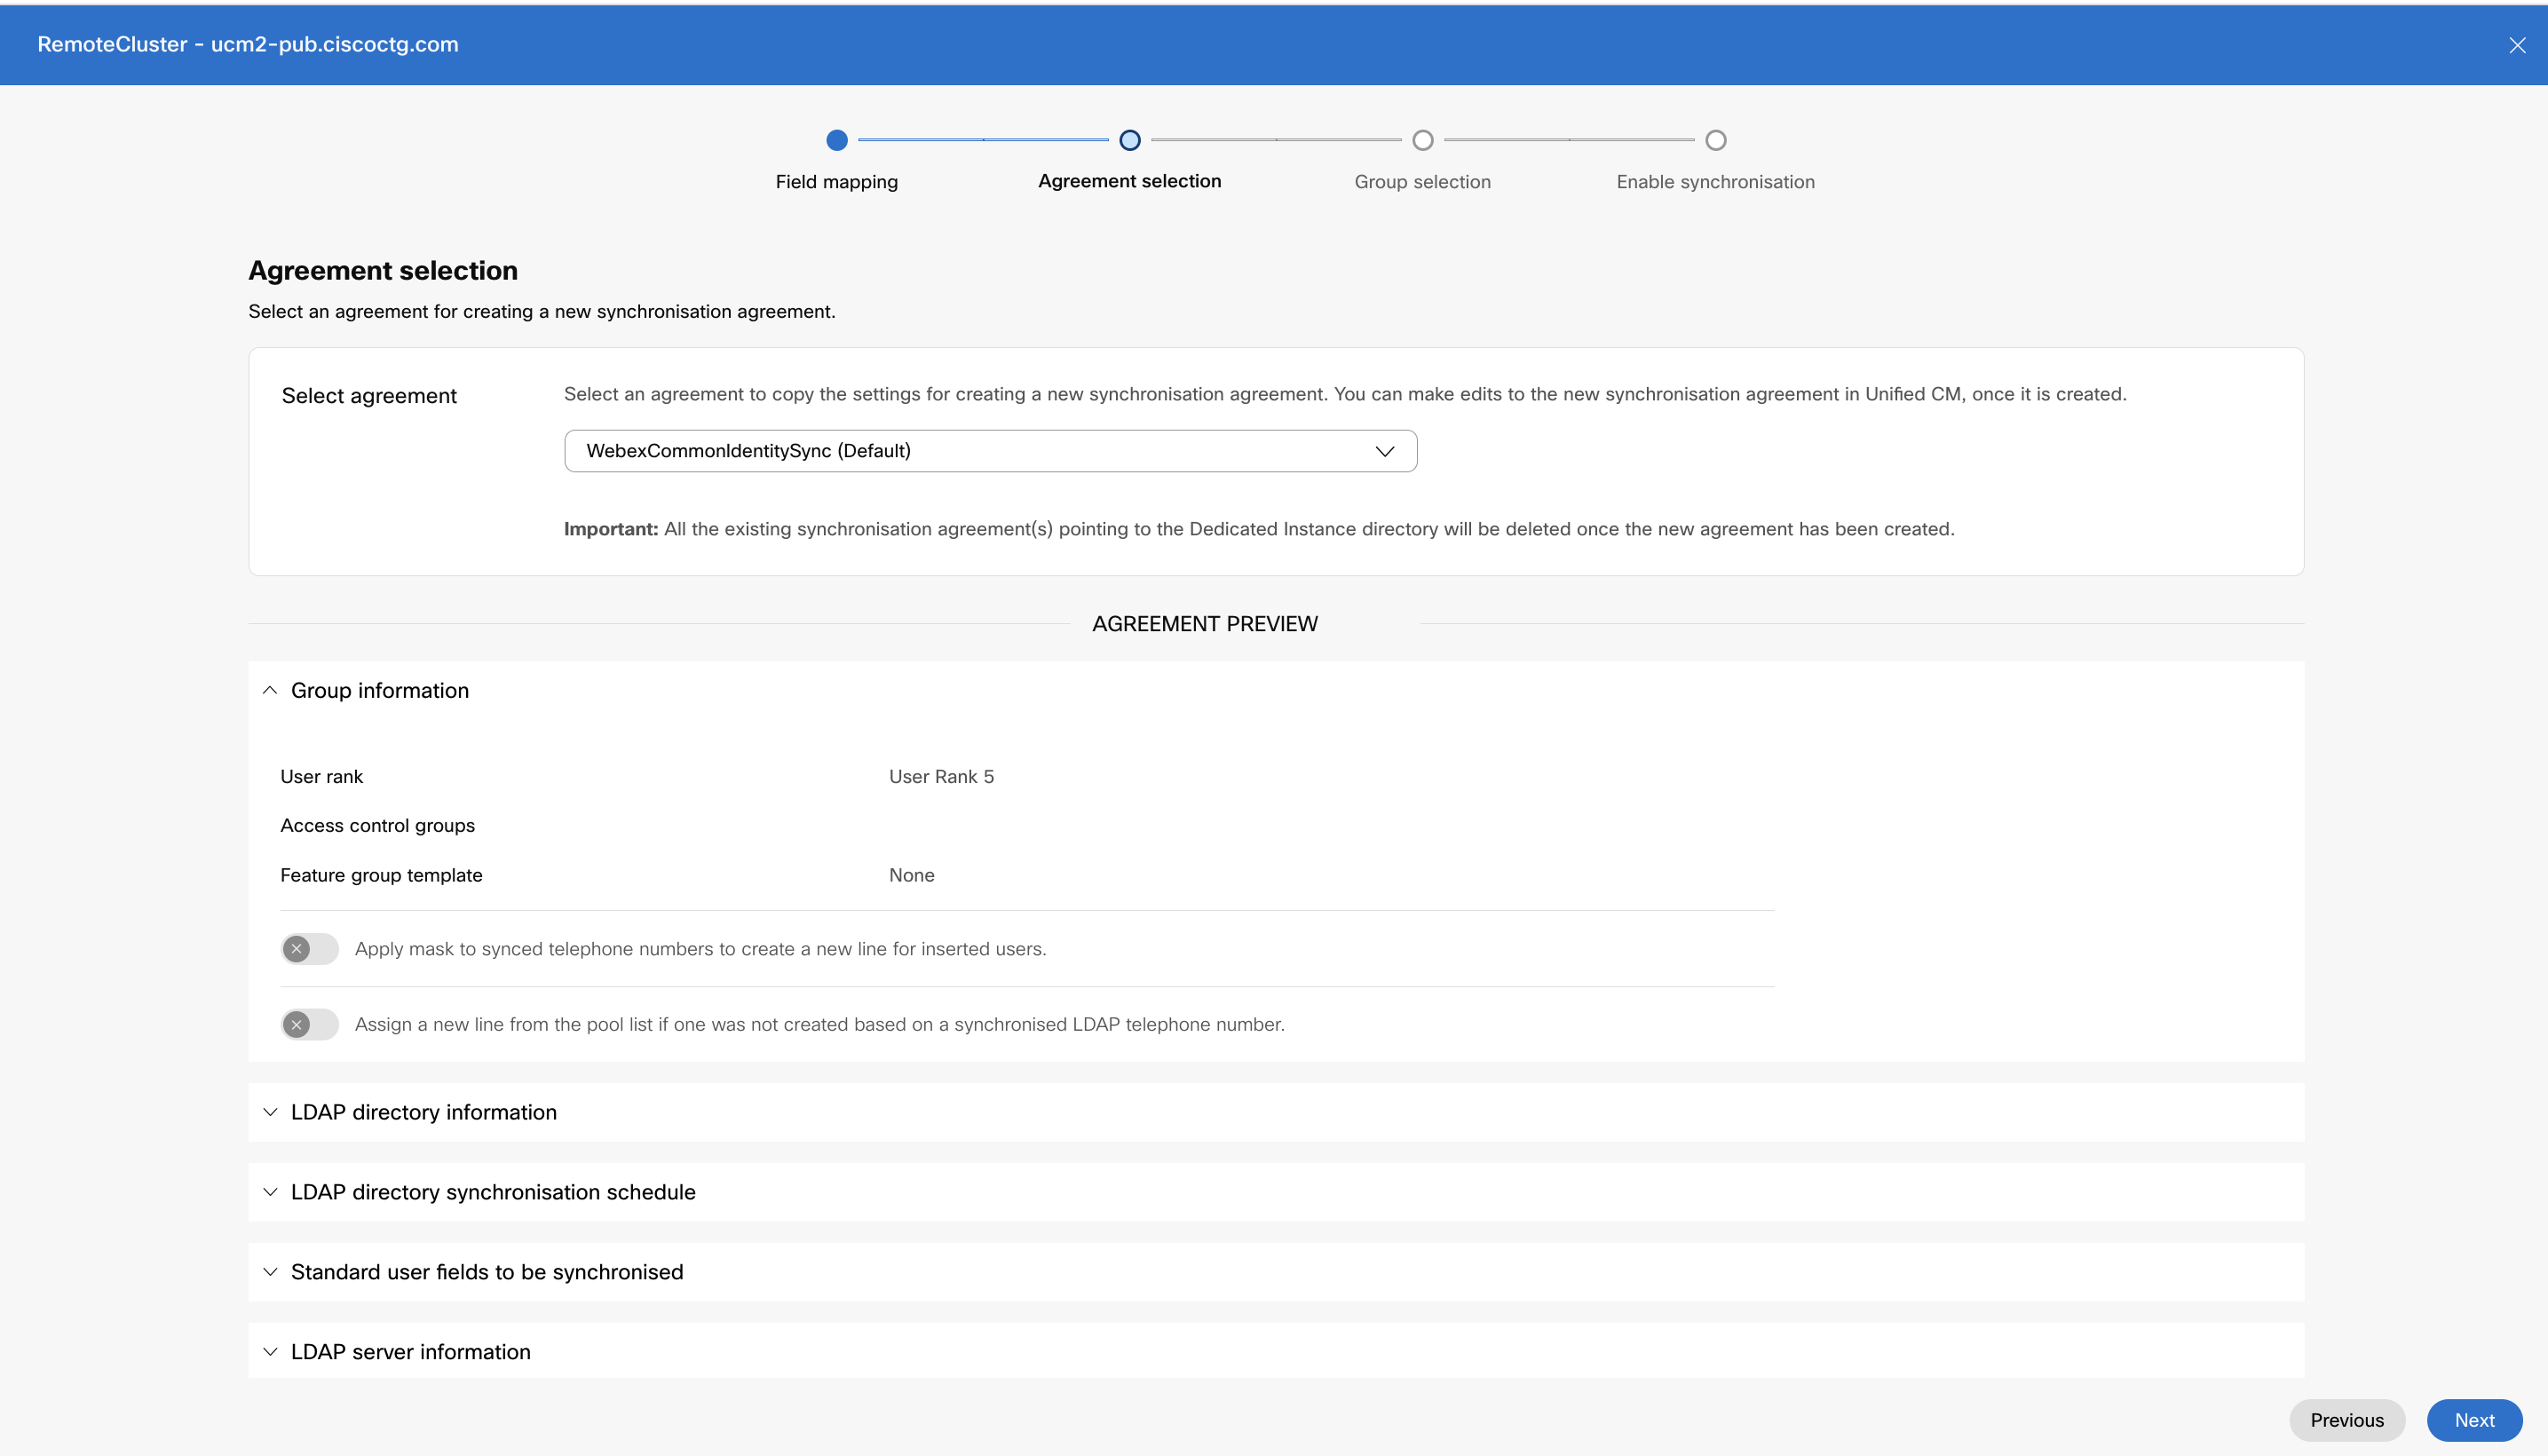
In the Agreement Preview section, review the list of users and contact details (existing external LDAP directory details available in the Unified Communications Manager) before you start the synchronization. You can view the following details:
-
Group information
By default, all users are synchronized with User Rank 5. This can be verified in the Group information window.
-
Applied Feature group template with universal line and device templates
-
Line and mask details to synced phone numbers for inserted users
-
Newly provisioned users and their extensions
-
Standard User Fields to be Synchronized section.
-
Hostname or IP address of the directory server
Click Next to select the group filter.
The group Information section is not applicable for Cisco Unity Connection and hence is not visible on the Agreement Preview section.
-
-
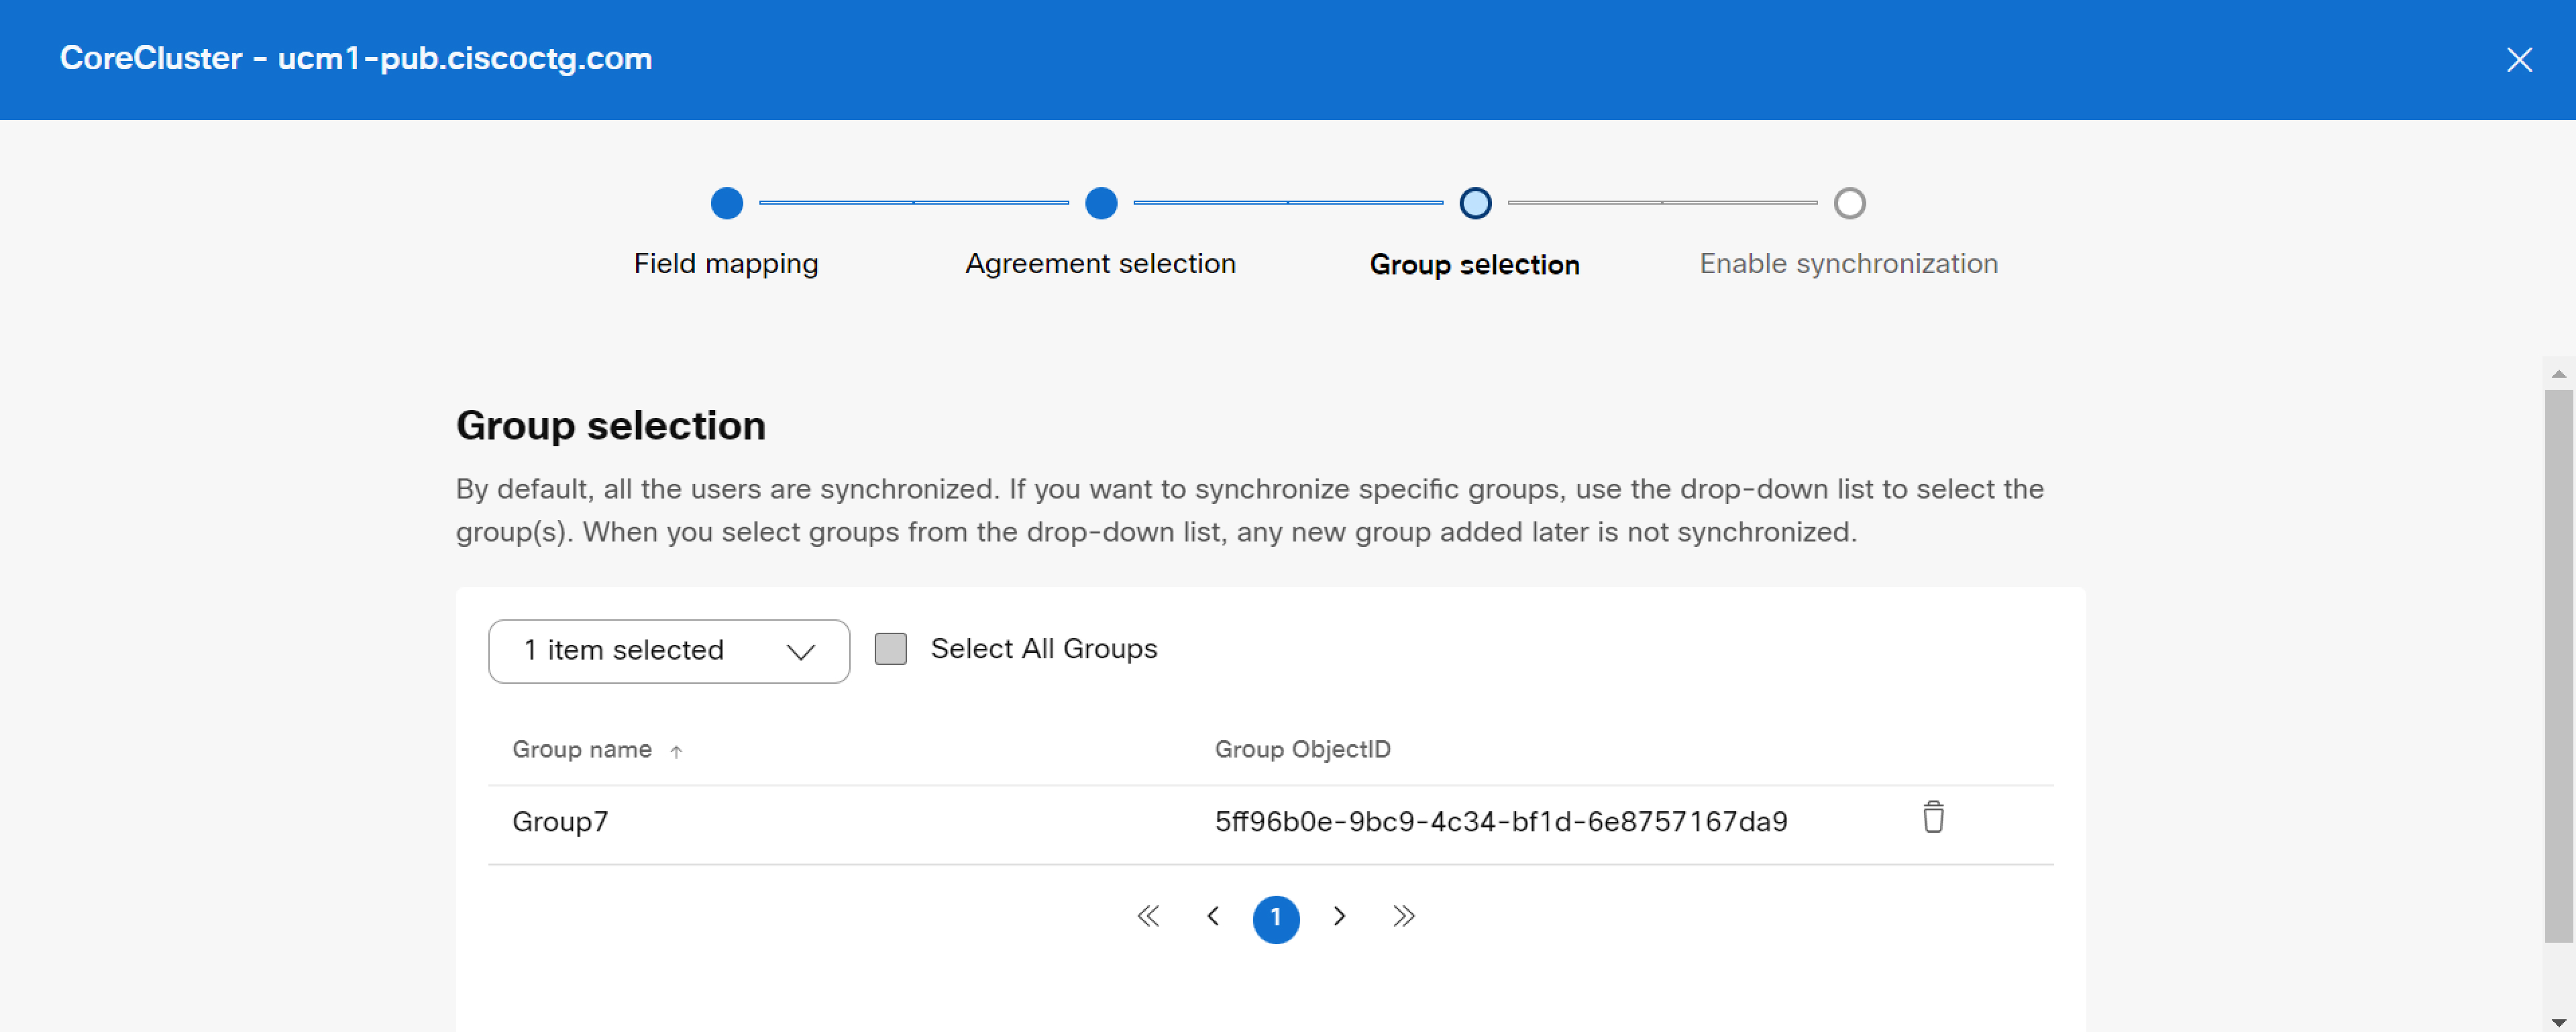
In the Select groups drop-down list, select one or more specific groups that you want to synchronize. Click the Select all groups check box if you want to select all the user groups.
By default, all the users are synchronized. If you don't select any group, all the users and associated user data will be synchronized automatically.
For Nested groups in a directory, users must select the subset user group specifically during provisioning as they aren’t included by default with the parent group. You must verify for any repetitive nesting (if any) to ensure that only the required users are included during provisioning.
Any modifications to the synchronization agreement, for example, removing a target user or group will not be propagated during periodic synchronization. It is required to reset the Directory Service for that cluster and then reprovision the cluster with a new or modified synchronization agreement. Contact Cisco TAC support to reset the Directory Service for the required cluster.
-
Click Next to prepare the synchronization process.
-
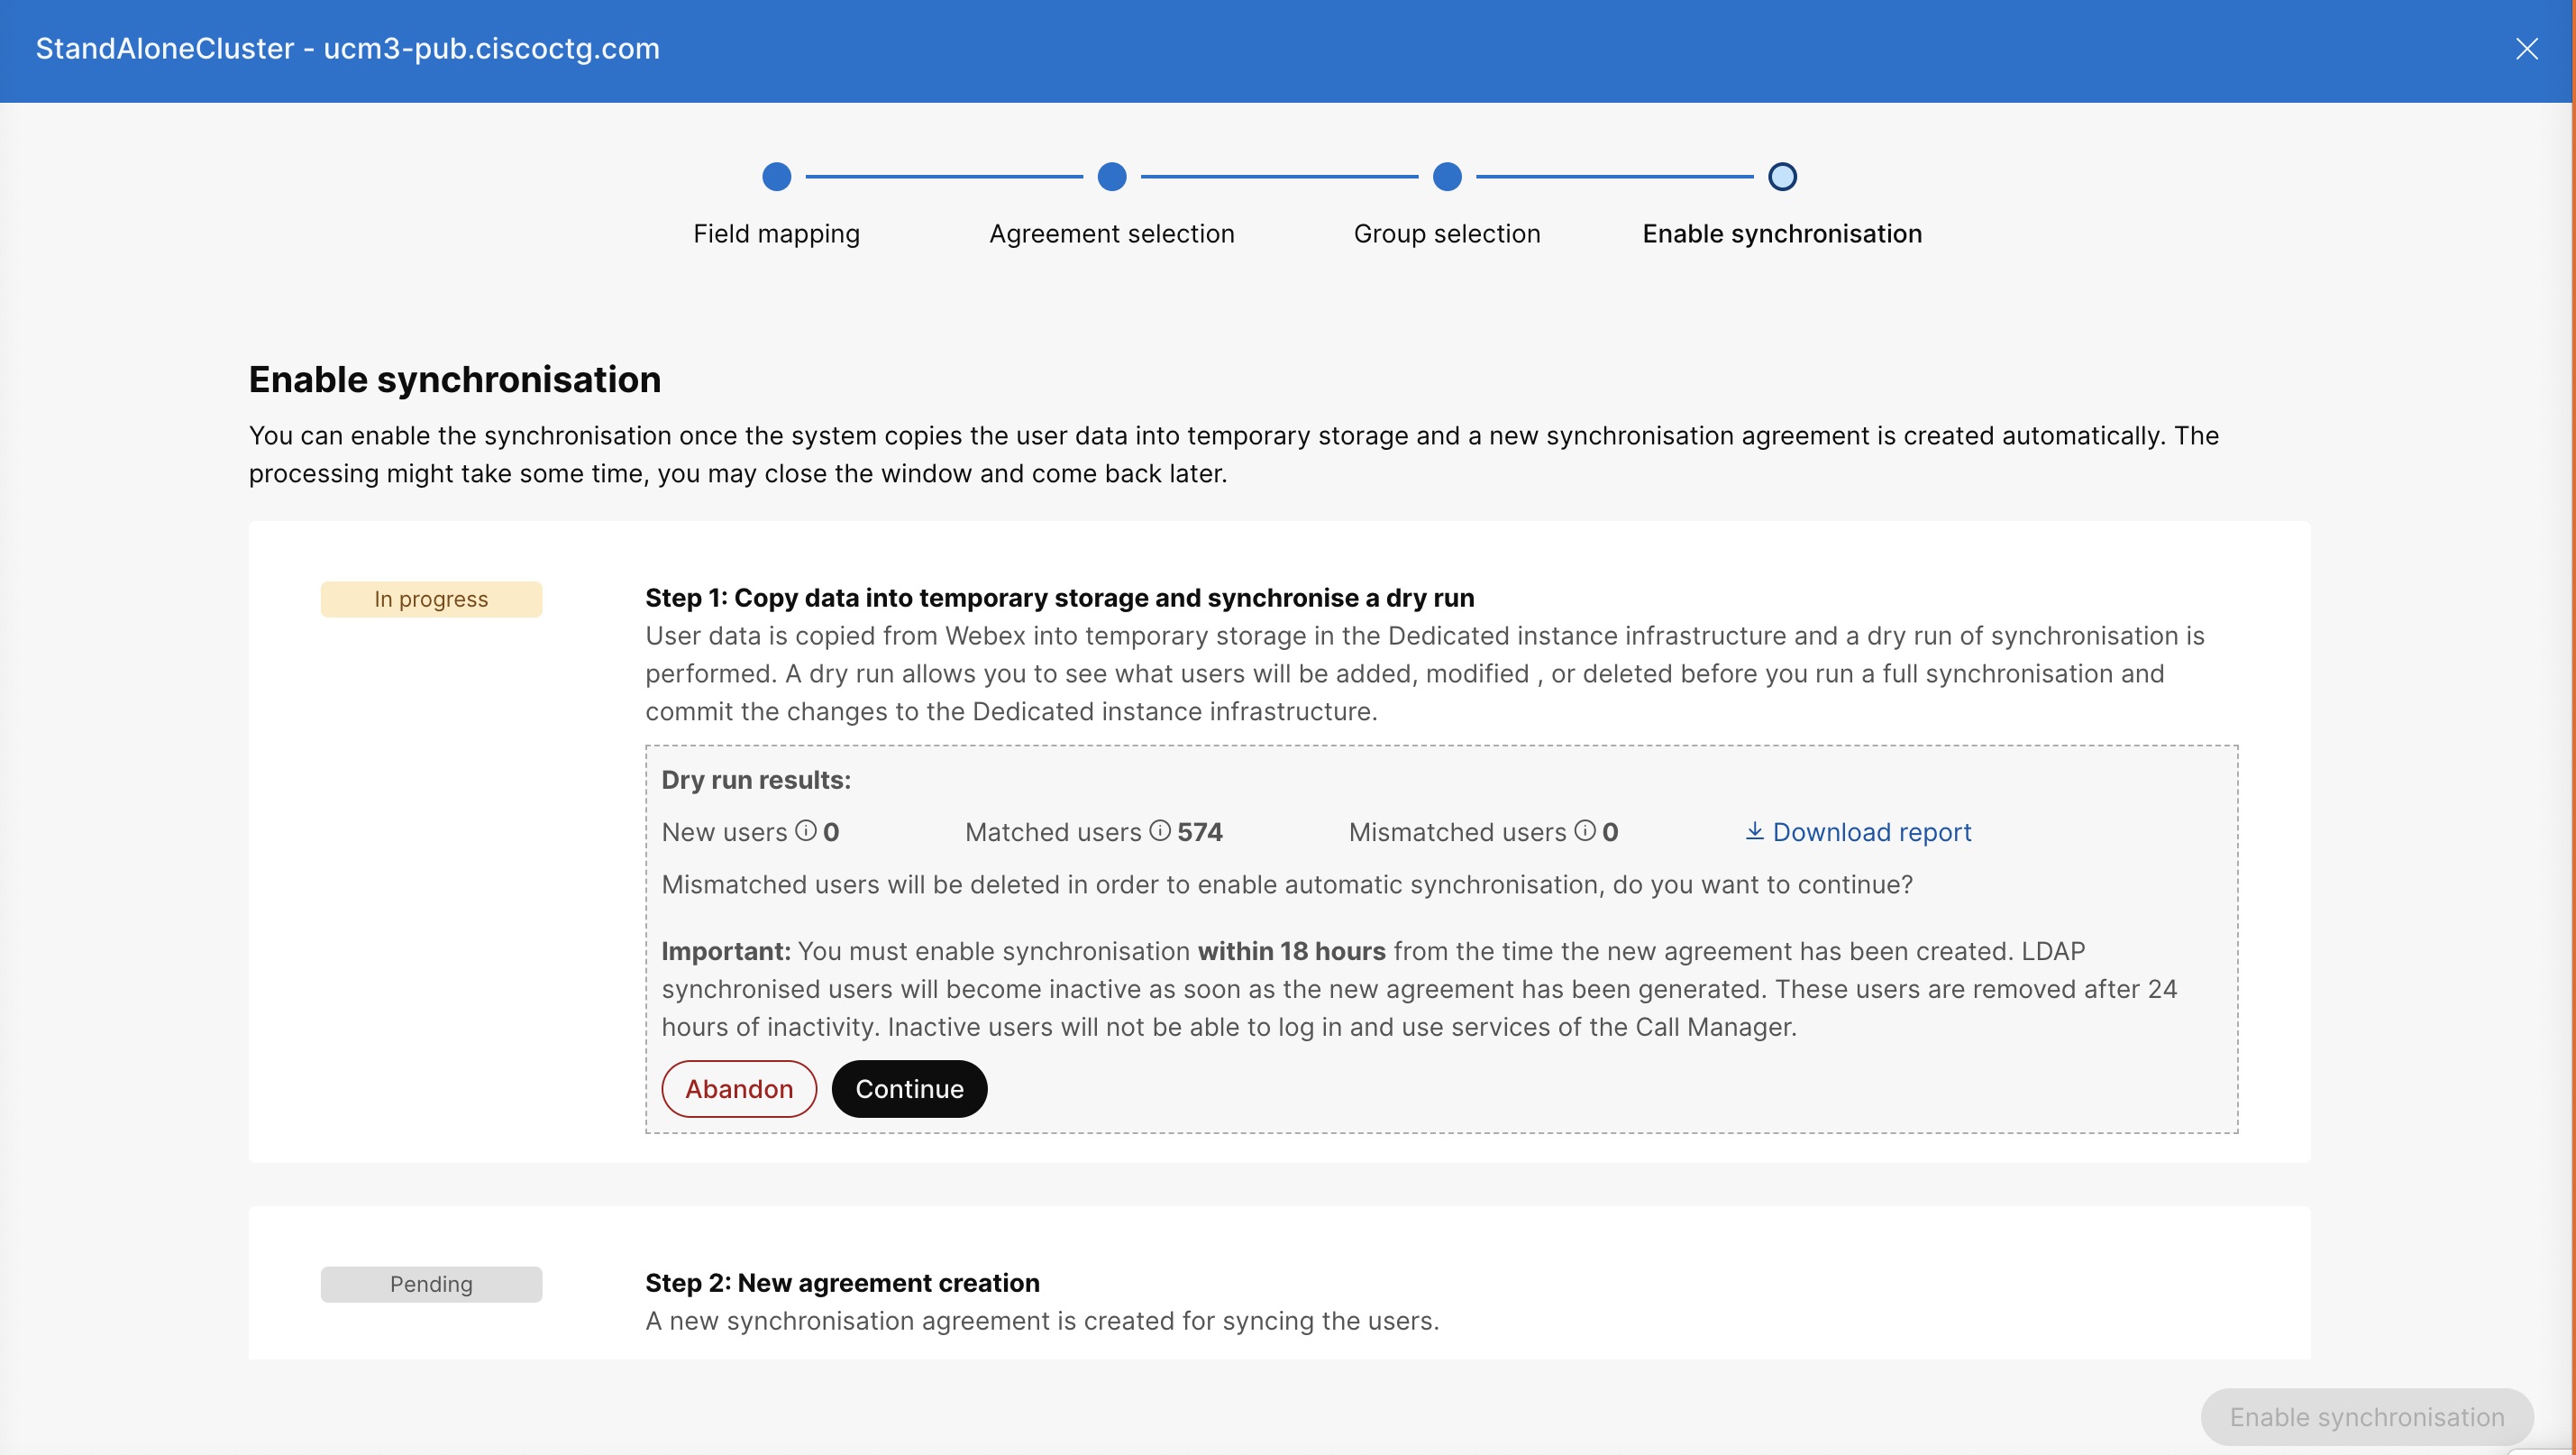
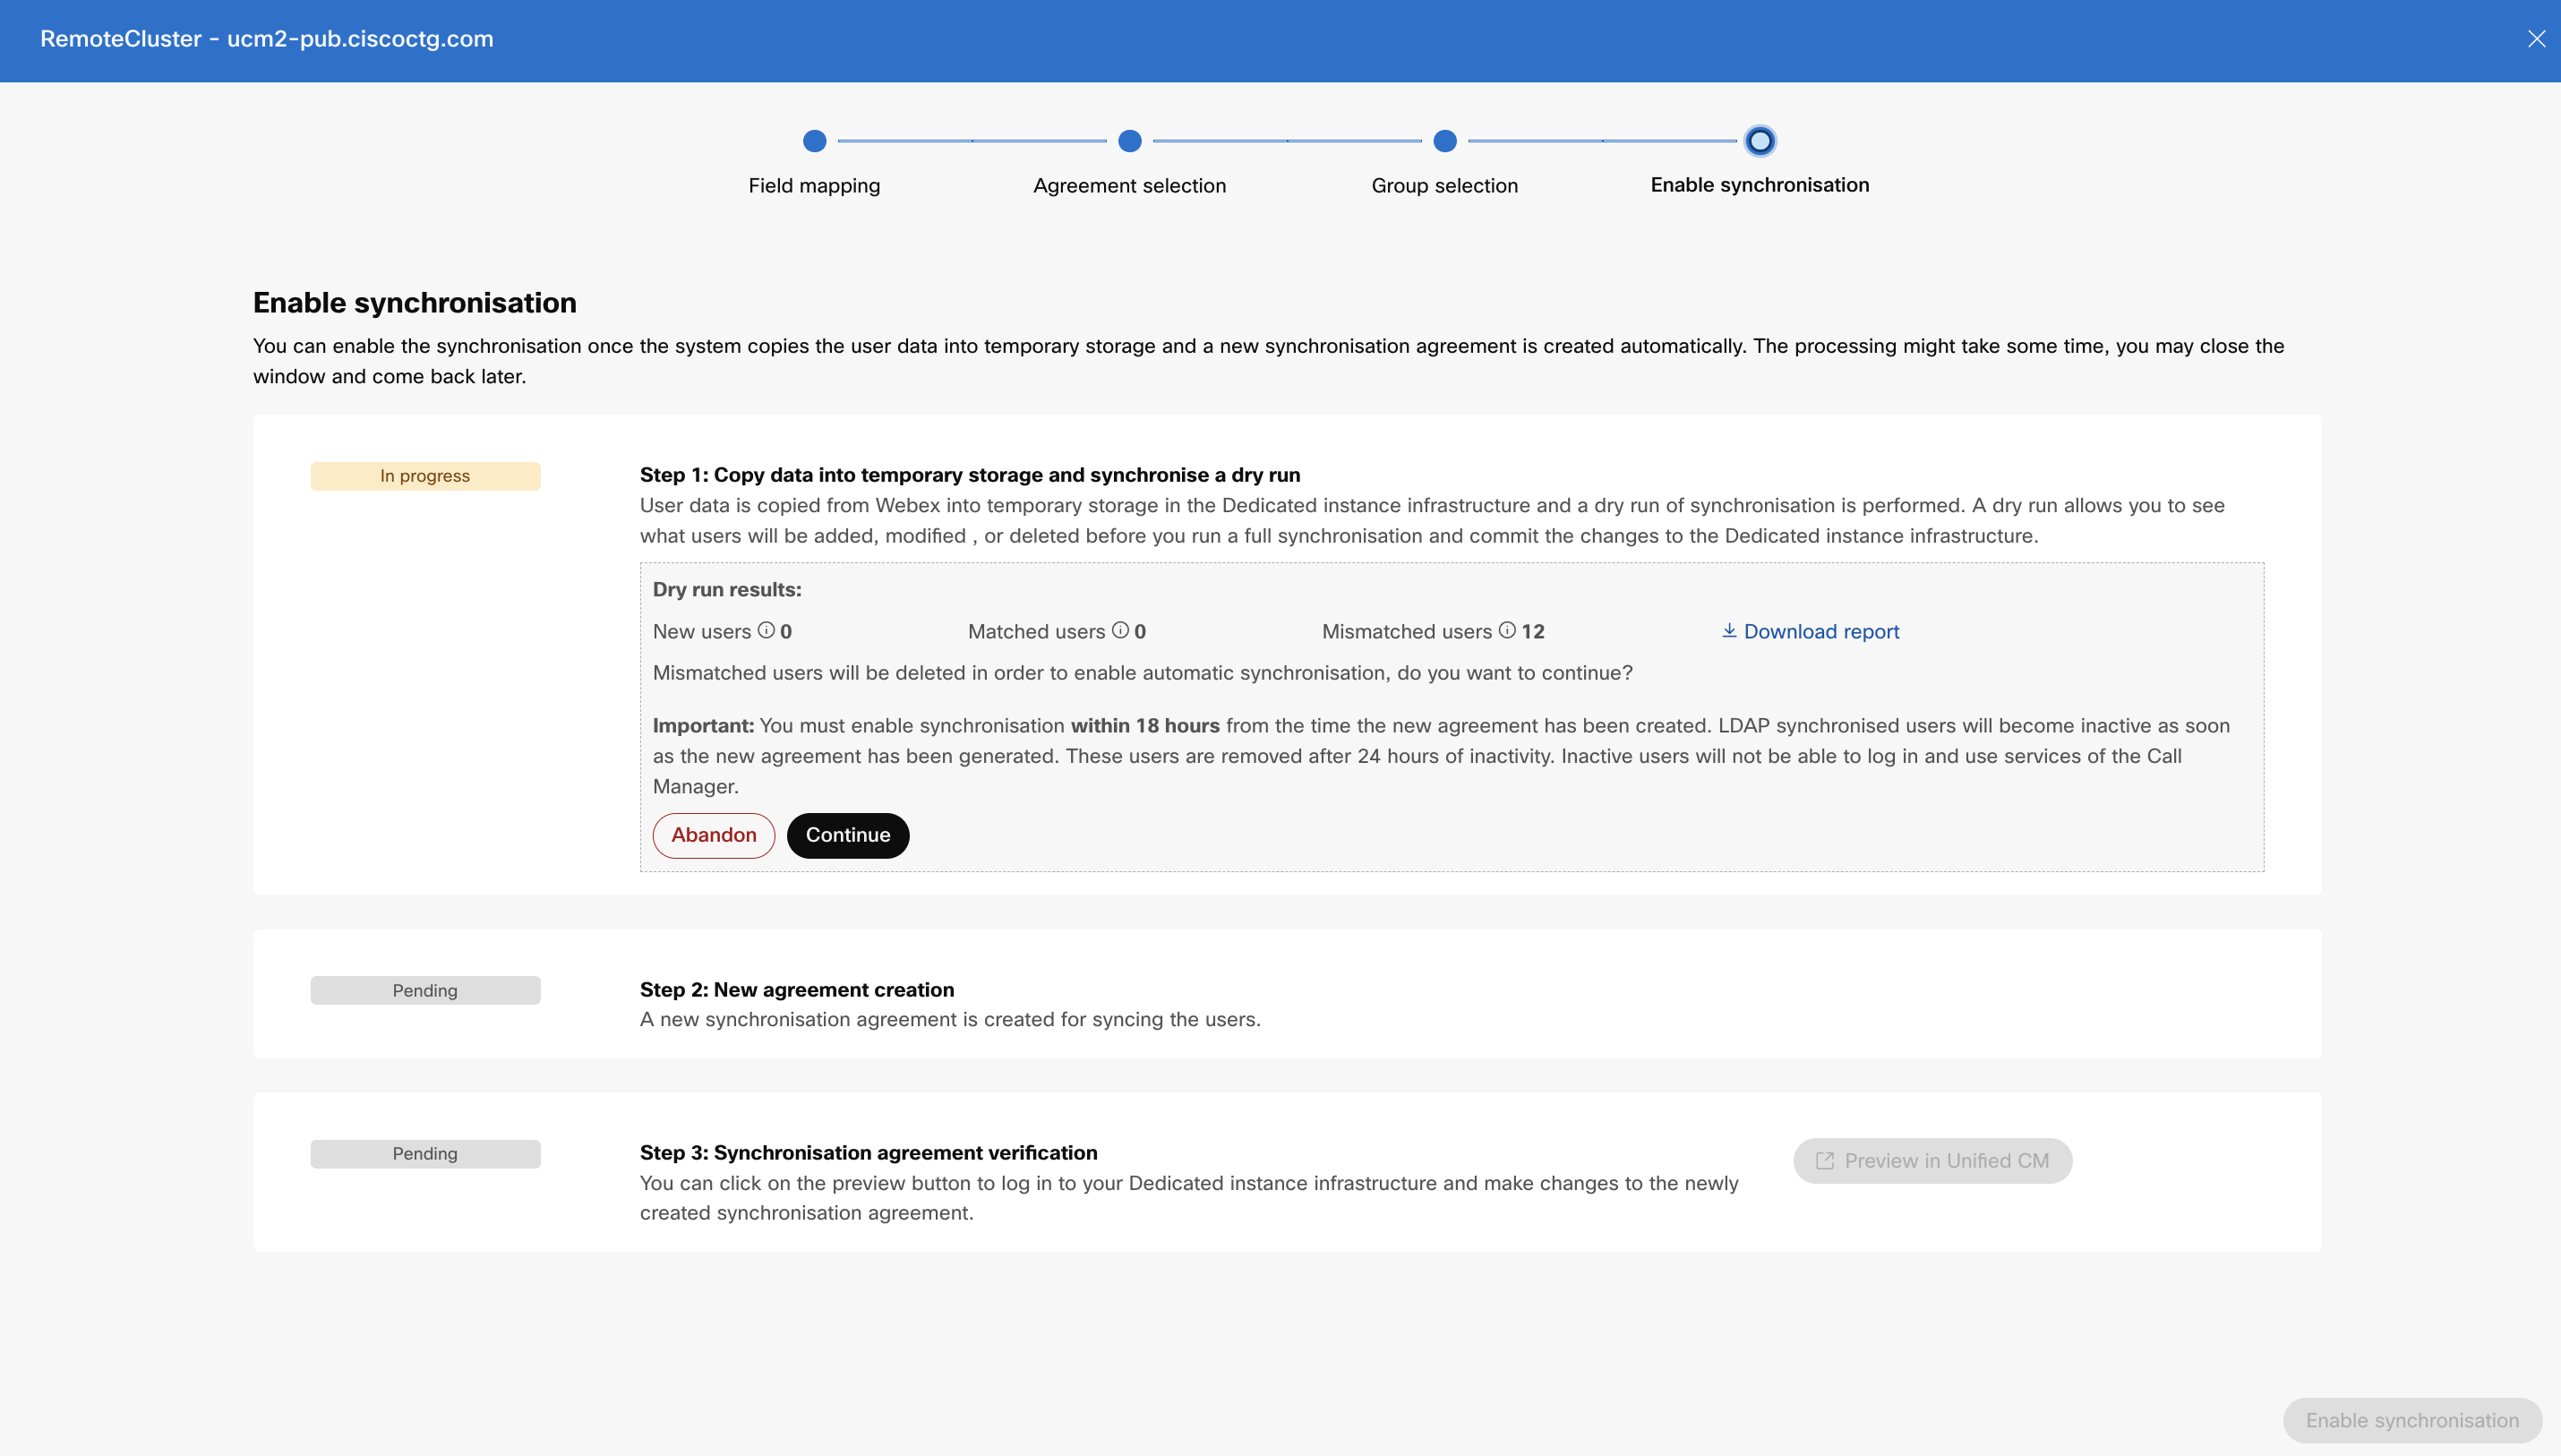
In the Enable Synchronization window, enable the synchronization once the system successfully copies the user data into a temporary storage space in Unified CM and a new synchronization agreement is created (after steps 1 and 2 as seen in the following screenshot) .
-
The Download report option allows you to view the results partially. To fetch the complete reports for the Unified CM cluster, execute the following CLI command: file get activelog /cm/trace/CIService/log4j/DryRunResults.csv
In case you don't have access, contact Cisco TAC support to download the report.
Here, the dry-run result shows the following:
-
New Users—Users aren’t present in Unified CM but present in Webex Identity Service. Users are created in Unified CM after enabling synchronization.
-
Matched Users—Users are present in Unified CM and Webex Identity Service. These users will continue to remain active in Unified CM after synchronization is complete.
-
Mismatched Users—Users are present in Unified CM and Webex Identity Service. The mismatched users are marked inactive in Unified CM after synchronization is complete and will be trashed after 24 hours of inactivity.
You can check the report and decide whether you want to retain the same list of users and add or delete users. Based on the decision, click Abandon to stop the process and revert the provisioning changes.
-
-
After the synchronization agreement verification, click Preview in Unified CM to sign in to your infrastructure and change the newly created synchronization agreement.
You can only edit the Group information. You cannot rename the agreement or modify any of the details.
-
Click Enable Synchronization to proceed with the synchronization.
During synchronization, you won’t be able to perform any action until completion. Once the synchronization is completed for a particular cluster, the Directory Service page lists this cluster with a Provisioned state. At this point, you've successfully authorized Azure AD to provision and synchronize Webex users into UC infrastructure and completed the steps to set up synchronization.
You must enable synchronization within 18 hours from the time the new agreement is created. LDAP synchronized users become inactive and removed after 24 hours of inactivity. Users won’t be able to log in and use the Unified CM services.
After the Azure AD provisioning is completed for a certain cluster, you cannot create any new synchronization agreements nor modify any configuration settings for the same cluster except for the group settings. Contact Cisco TAC support to reset the Directory Service. You can then create a new agreement for provisioning.
If you are using Azure IdP during SSO authentication after successful provisioning, ensure that you configure the right Claims in the Azure IdP. For example, during provisioning, if option 1 is selected for the userid mapping, ensure that user.userprincipalname is set as the UID in the Additional Claims section.
Periodic Synchronization
Once a cluster is successfully provisioned, periodic sync runs daily which takes care of syncing any modification to user data from Webex Common Identity to Unified CM and Cisco Unity Connection. Your intervention is not needed for periodic sync. However, you can verify if periodic sync has happened for the day by observing the Last Synchronized at column in the Cluster Details page on the Control Hub. The time stamp is updated to reflect the time at which periodic sync happened for the cluster.
Unified CM
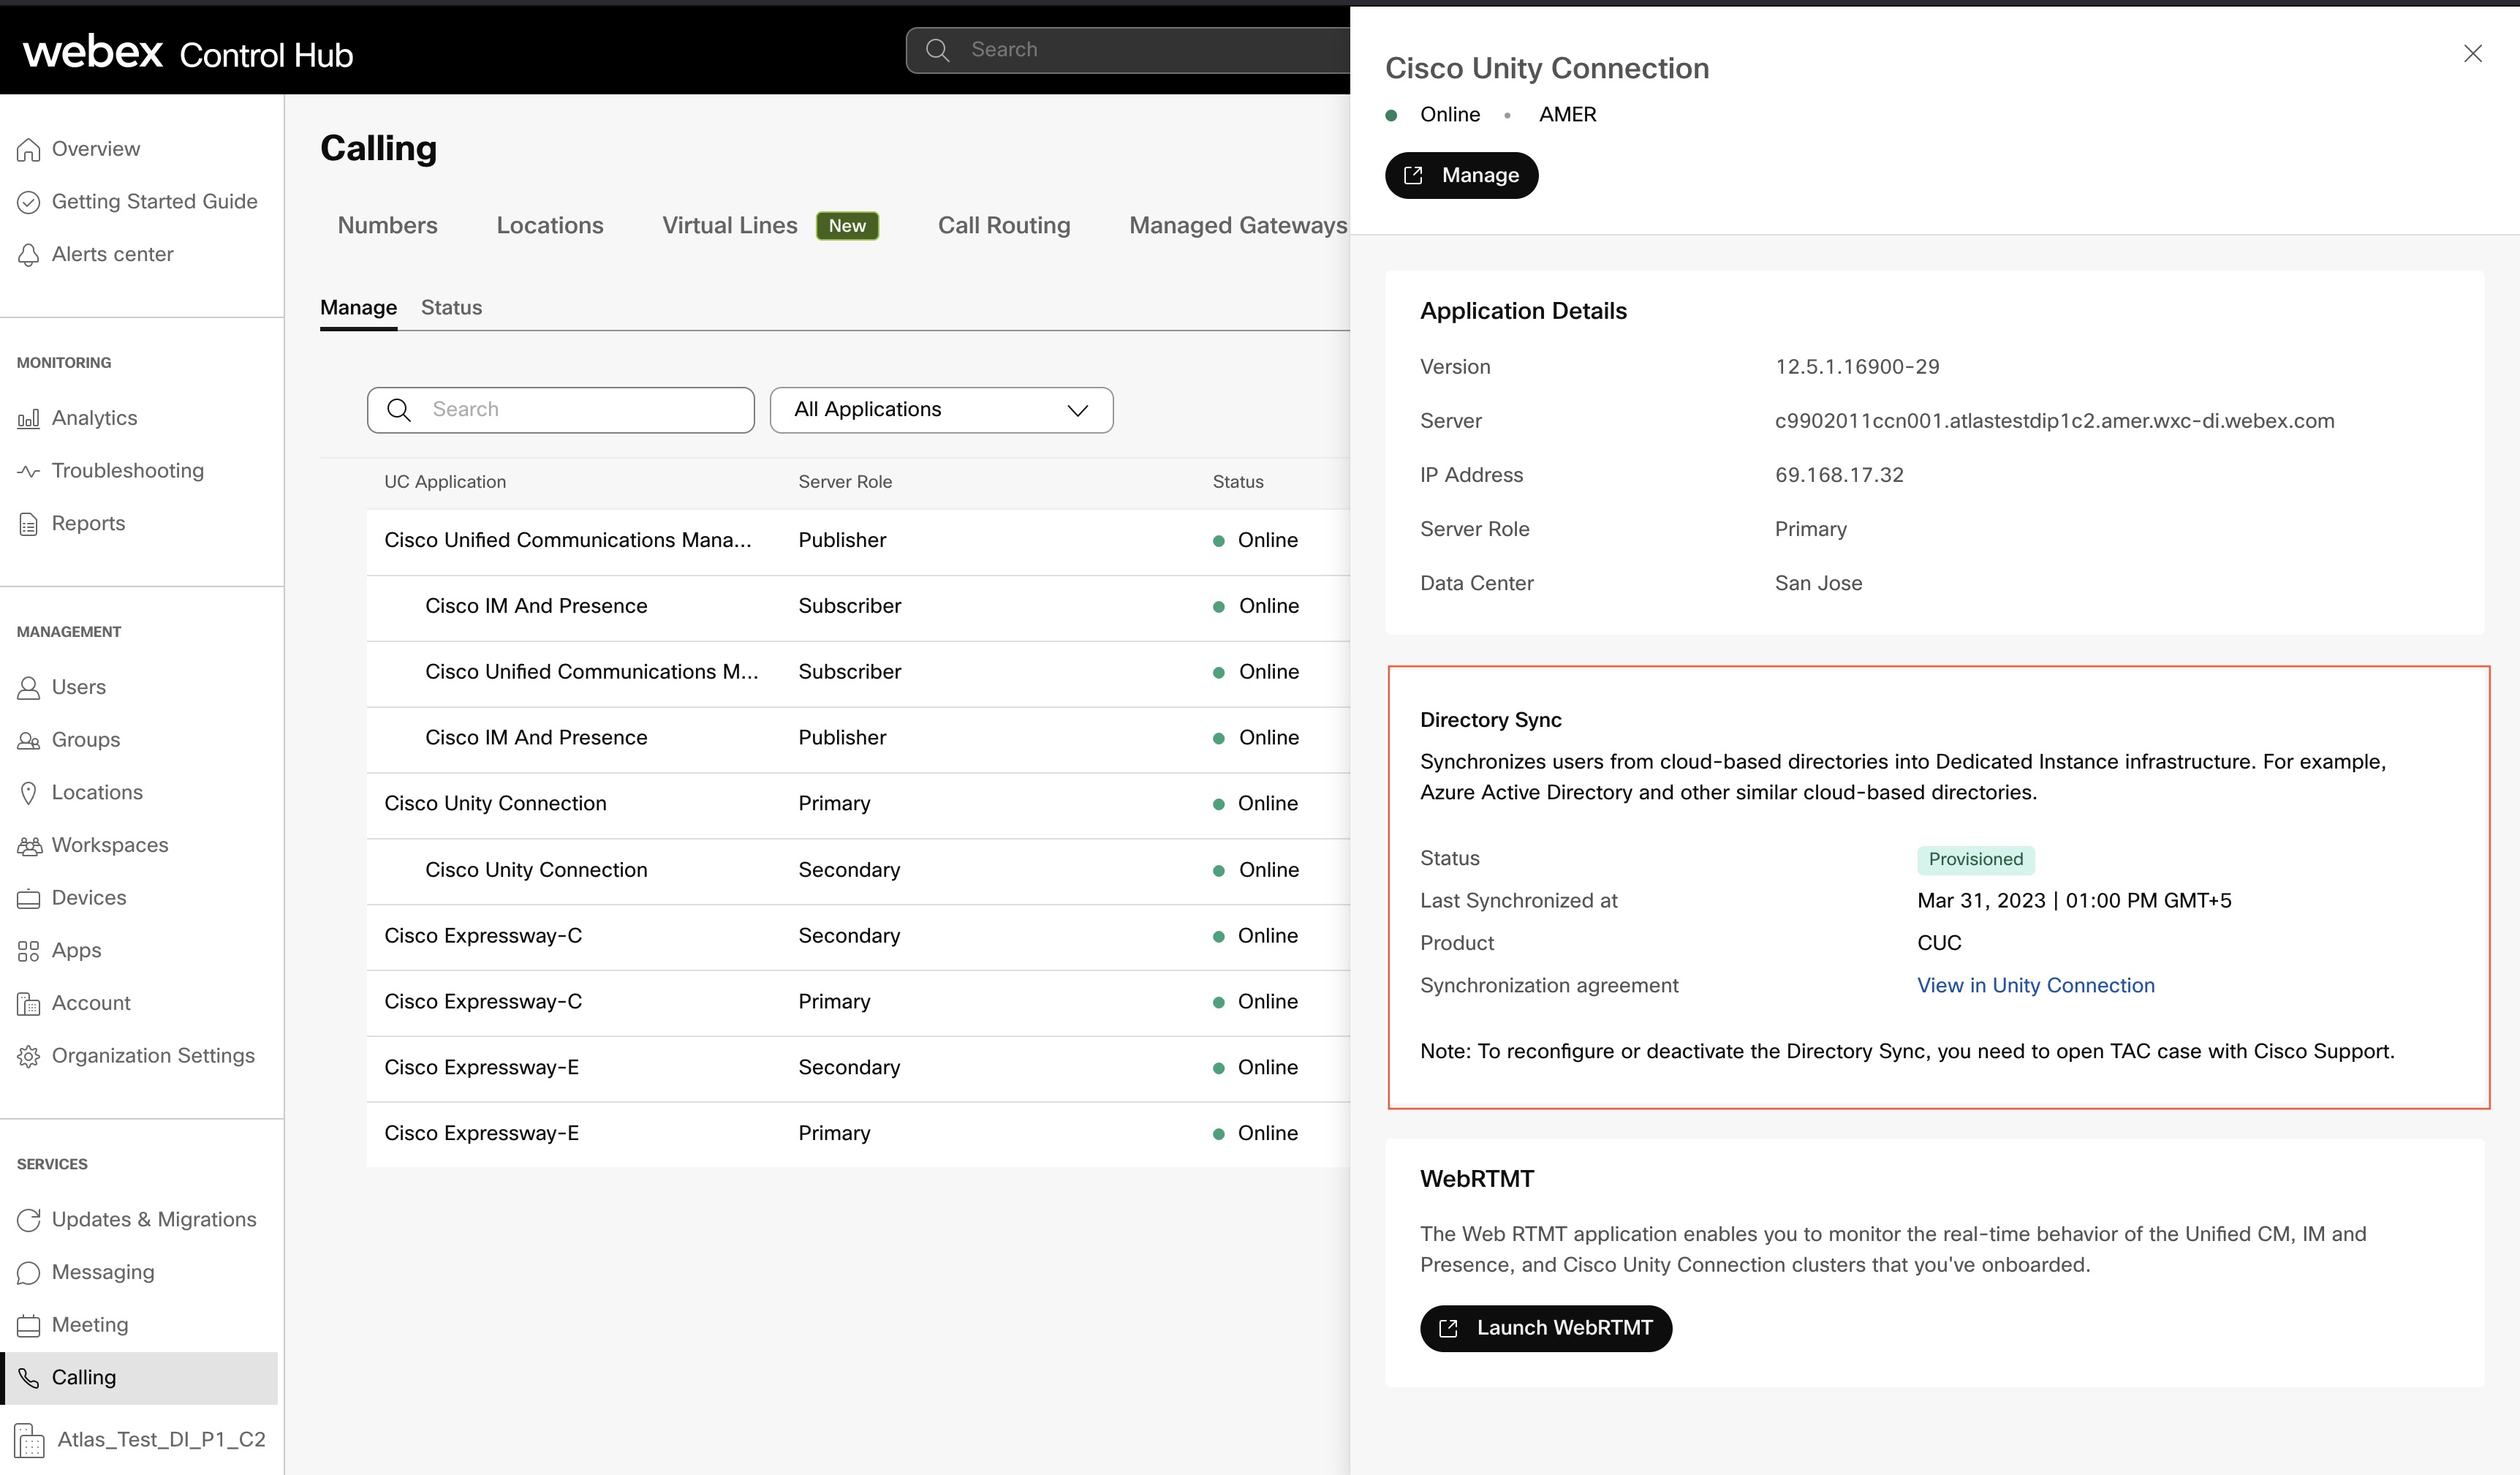
Cisco Unity Connection
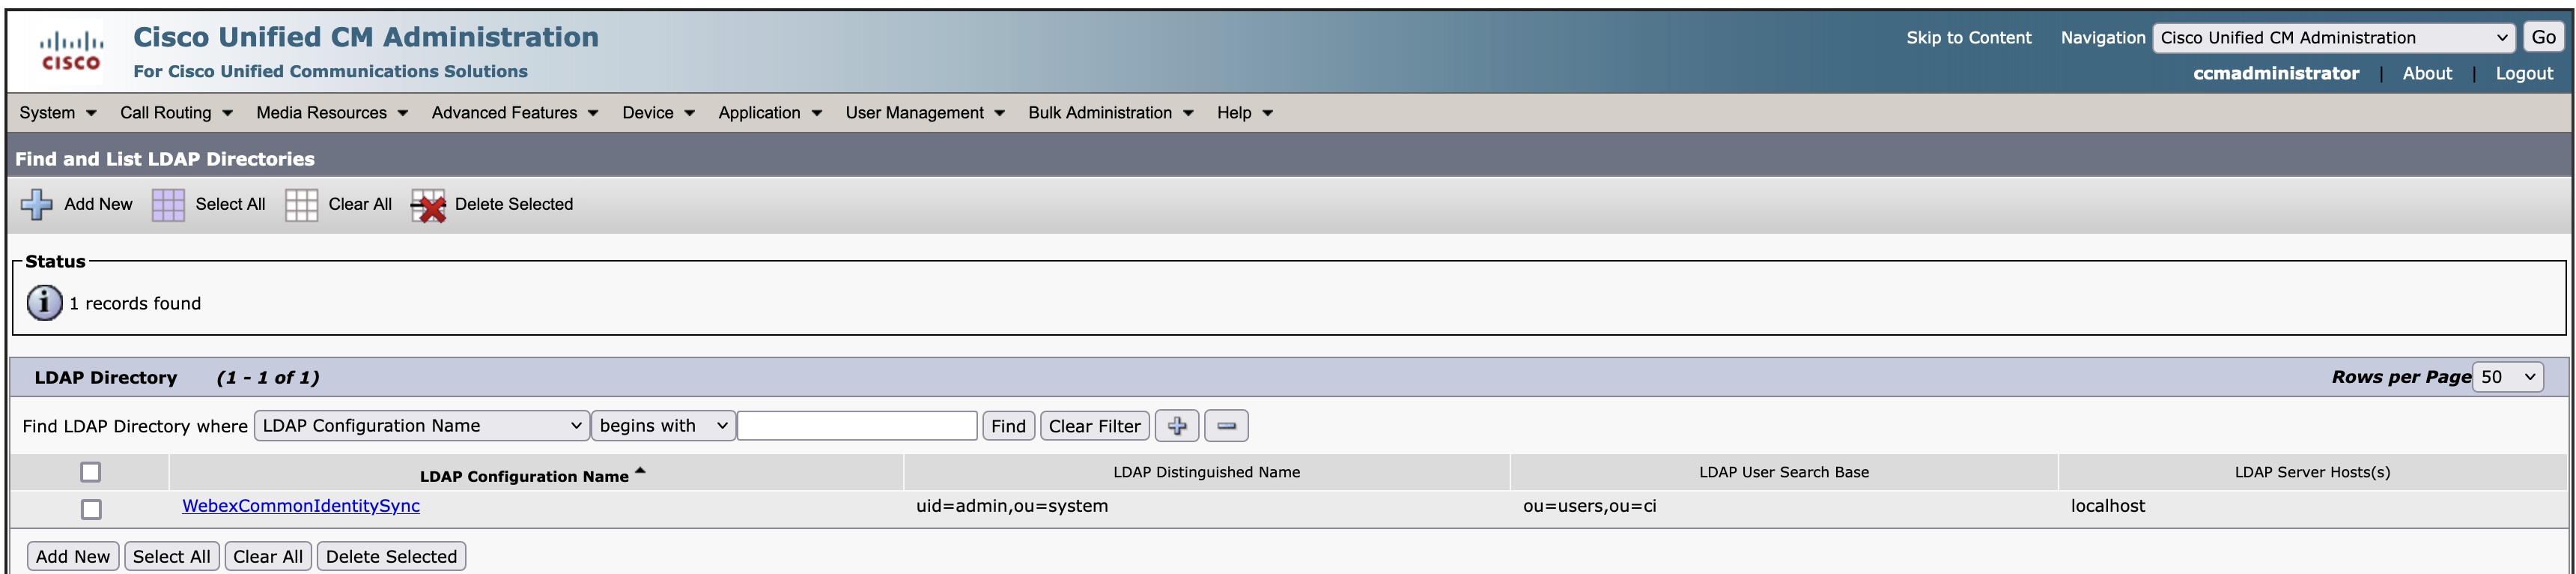
LDAP directory in Unified CM or Cisco Unity Connection
A default LDAP directory is created by the process of synchronization.
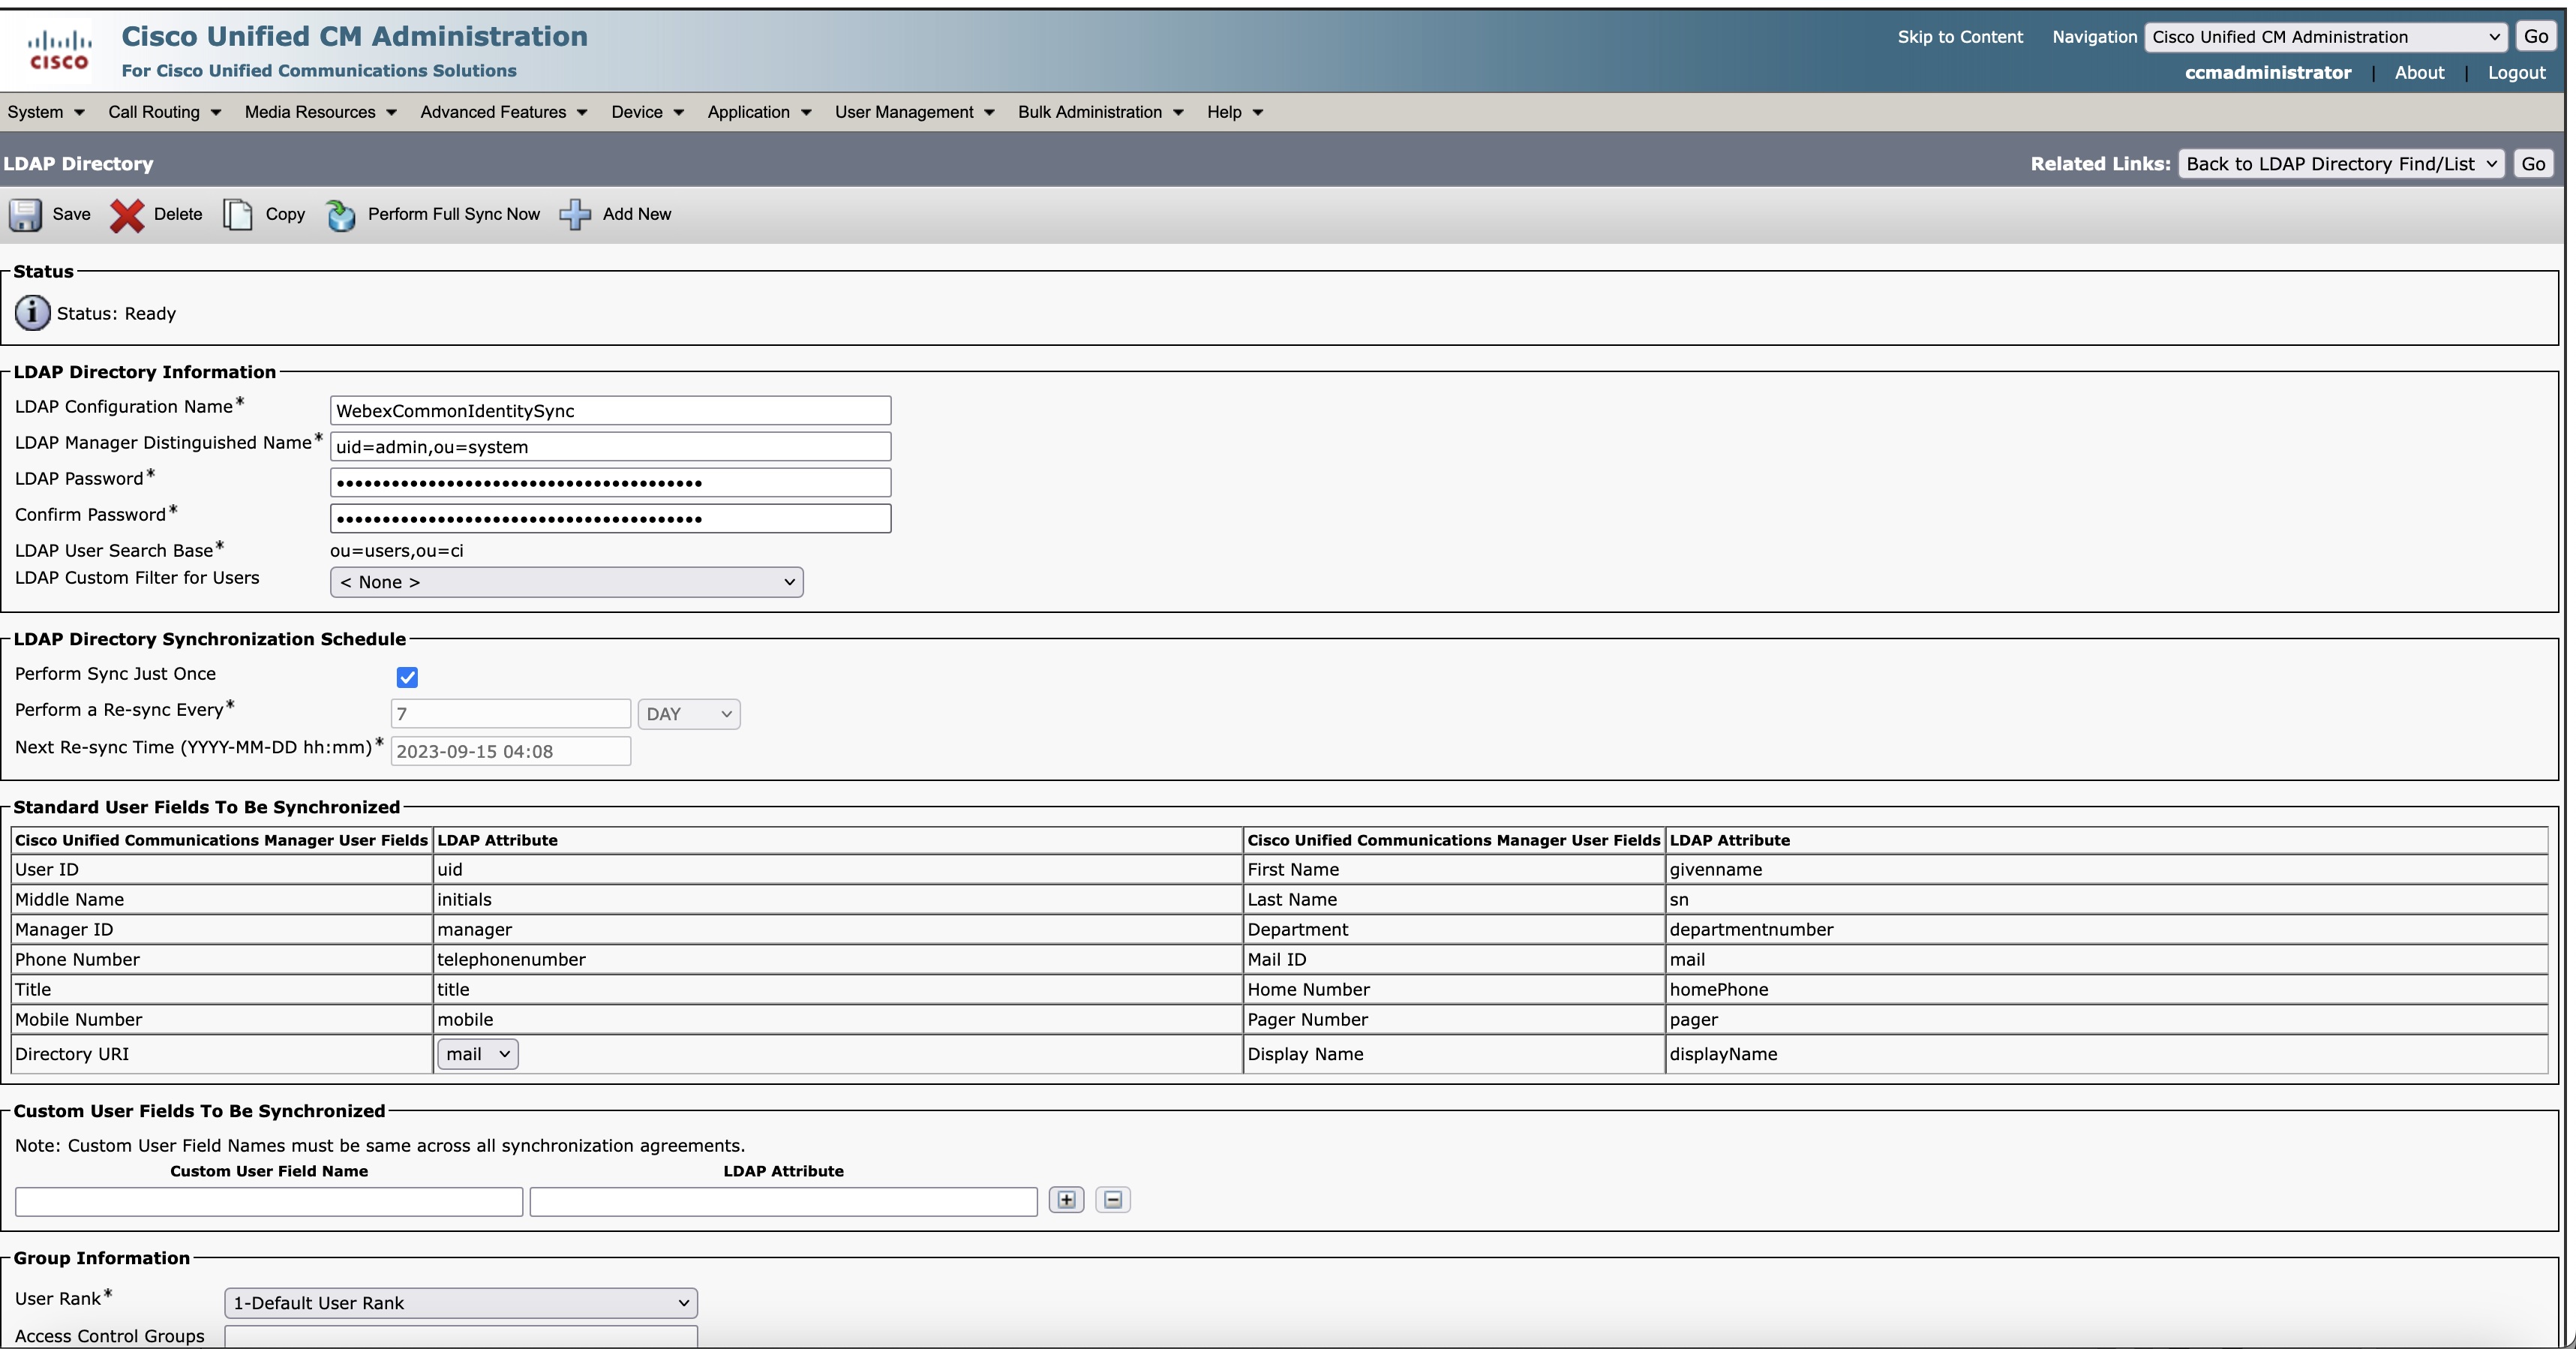
Although the settings show sync once, Control Hub syncs at 24-hour cycle changes on Common Identity to Unified CM or Cisco Unity Connection.
View status of synchronization
View the status of the synchronization in the Directory sync status column. Click on the UC application to get the right-hand panel that shows the status of provisioning, last synchronized state, and the reason for failure, if any. You can also select the local time zone. The default browser time zone is selected.
Provision Status
|
Provision Status |
Description |
|---|---|
|
Processing |
The provisioning is in progress |
|
Action Required |
Take necessary steps if there is any manual intervention required for a particular cluster.
|
|
Error |
If there is any action required in the Enable Synchronization wizard, check them and if required, take necessary actions. |
|
Active |
The cluster provisioning is complete. |
|
Not provisioned |
The cluster provisioning hasn’t started yet. |
Import users for Unity Connection
You can import Azure AD users manually from Import Users in Cisco Unity Connection after cluster provisioning is done from Control Hub.
Two ways of importing Users are as follows:
| 1 |
In Cisco Unity Connection administration, expand Users and select Import Users. |
| 2 |
On the Import Users page, import the LDAP Directory user accounts to create Unity Connection users. |
| 1 |
In Cisco Unity Connection Administration, expand Tools and select Bulk Administration Tool. |
| 2 |
To add Unity Connection users, perform the following steps on the Bulk Administration Tool page: |
| 3 |
When import is complete, review the file that you specified in the Failed Objects Filename field to verify that all users are created successfully. |
Troubleshooting synchronization issues
This section provides the necessary information and solutions to resolve some of the common issues that you might face during the various stages of synchronizing users from Control Hub into the Unified Communications Manager database.
Mismatched Users
Enable synchronization within 18 hours after the new agreement is created. The existing users are marked inactive and are deleted from Unified CM after 24 hours of inactivity.
 Error–Data Copy Failed. Please Retry
-
Communication between Dedicated Instance and Webex cloud is disrupted or unable to fetch user data from Webex cloud.
-
Communication between Dedicated Instance and Unified CM is disrupted or unable to push user data to Unified CM database.
-
User data is not copied to the temporary storage location.
Error–Failed to Create Synchronization Agreement. Please Retry
-
Communication between Dedicated Instance and Unified CM is disrupted or unable to push the synchronization agreement data into the Unified CM database.
-
A synchronization agreement was not created successfully.
Unable to get Synchronization agreement details. Please try after some time.
Communication between Dedicated Instance and Unified CM is disrupted.
Known issues and limitations
If you're experiencing an issue with this feature, check to see if it's something that we already know about and have a recommended workaround.
-
Webex Calling - Dedicated Instance directory service provisioning doesn’t work with LDAP authentication as only the user data is synchronized and not the passwords for the Unified CM server and hence LDAP authentication doesn’t work.
Workaround: Single sign-on (SSO) must be used for sign-ins. This document only covers single sign-on (SSO) integration.
Configure a single sign-on (SSO) if you want your users to authenticate through their enterprise identity provider. See Single Sign-On Integration in Control Hub and SAML-Based SSO Solution for more information.
-
Contact Cisco TAC support to disable the Directory Service. Wait for a minute and then start the setup of the Directory Service again.
-
After deletion, in case you want to onboard the same Unified CM cluster to the organization again, you must first disable the Directory Service and then reprovision the same cluster.
Contact Cisco TAC support to disable the Directory Service.
-
In the synchronization agreement page, the Perform a sync every and Next re-sync time fields appear active. But these fields are grayed out in the Unified CM server when the Perform sync just once option is enabled. Currently, this is a limitation in the Webex Calling - Dedicated Instance Directory Service provisioning feature which will be fixed in the upcoming release.
-
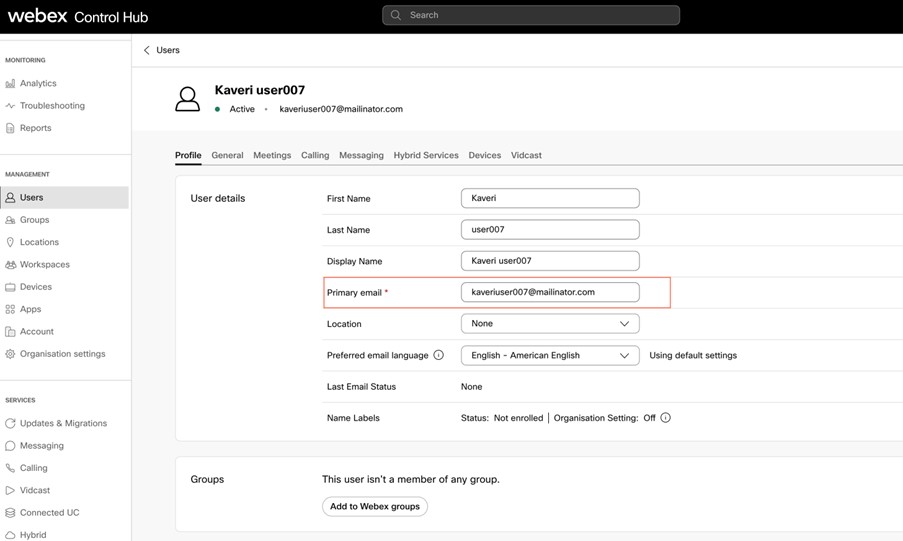
Users who are deleted in the Azure portal become inactive in Webex Identity Service but appears to be active in Unified CM.
Workaround: Go to Management > Users and delete the user from Control Hub. The user is marked Inactive in Unified CM.
-
When provisioning new clusters for larger organizations (having more than 80,000 users), you’ll experience time-out currently. This issue will be resolved soon.
-
During provisioning, when you click the Abandon, Continue, and Enable Synchronization buttons on the Enable Synchronization page, the status of the cluster doesn’t change immediately in the user interface. This limitation is misleading since the actions take place in the backend.
Workaround: Avoid clicking the buttons twice and check the cluster status after a few seconds. You’ll see that the cluster status changes from Action Required to Processing. This issue will be addressed soon.
-
Currently, the Enable Synchronization functionality stops responding when the Unified Communications Manager network is down.
Work around: Contact Cisco TAC support to disable the Directory Service. Wait for a minute and then start the setup of the Directory Service again. This issue will be fixed in the upcoming release.
-
During provisioning, the group details list doesn't populate due to synchronization issues with Webex Common Identity Service. Users are recommended to abandon provisioning and retry after some time.
-
If you are configuring directory sync again on a provisioned cluster, it is advisable to involve the Webex Calling - Dedicated Instance Business Unit in the process.


