- Home
- /
- Article

Thanks for your feedback.

 In this article
 Feedback?
Install the Cisco Call as the default calling option for all users in your organization.
Use this article to configure your Microsoft Teams app with Cisco Call options. The ![]() icon is added to the left navigation and as a Messaging extension. With the Teams calling option turned off, everyone in the organization uses the same platform to make and receive calls.
icon is added to the left navigation and as a Messaging extension. With the Teams calling option turned off, everyone in the organization uses the same platform to make and receive calls.
Prerequisites
-
Make sure you’re a Microsoft Teams administrator.
-
Make sure you've access to the Control Hub.
-
You must add users in Control Hub and they must have at least the Call on Webex service enabled.
-
Users must have Webex App and Microsoft Teams installed.
-
For the Cisco Call for Microsoft Teams integration to work with the Unified CM call control backend (on-premises, Webex Calling Dedicated Instance or UCM Cloud), ensure you are on Unified CM 12.5 SU7 or 14 SU3, Cisco Unity Connection (CUC) 12.5 or 14.
-
For On-prem Unified CM customers, ensure Unified CM & CUC clusters are on-boarded to Webex Cloud-Connected UC (CCUC).
-
For on-premises, Webex Calling Dedicated Instance, and UCM Cloud customers, Configure Cisco Unified CM—The line number on Cisco Unified CM needs to be associated to the User ID for the Centralized Call History to be populated with the username. From Cisco Unified CM Administration, use the Device → Phone, select the phone and click on the Device Name (Line) and then click the required line from Association panel to get to User Associated with Line.
-
Make sure that the Unified CM Mail ID matches the Control Hub Primary email which is used to obtain the Universally Unique Identifier (UUID).
-
Cisco Call uses dual sign-in through Microsoft Teams SSO, then Webex OAuth/SSO. By default, the signed-in Teams user's email address is used as the Webex login hint. It's recommended that the Microsoft Teams sign-in email or user principal name (UPN) should match the user's Control Hub primary email, and Unified CM Mail ID for on-premises, Dedicated Instance, and UCM Cloud deployments.
If the Teams account is not the account used for Cisco Calling, the user can select Use a different account on the Cisco Call sign-in screen and sign in with their Webex/Cisco Calling identity.
Sign-in may fail for individual users if the IdP SAML attributes don’t resolve to a valid Webex user record even after selecting Use a different account. Work with your identity administrator to correct IdP and Control Hub SAML mapping. For Webex SSO and SAML attribute mapping, see Single Sign-On Integration in Control Hub.
-
Virtual Desktop Infrastructure (VDI): When Cisco Call integration for Microsoft Teams is used in a VDI environment, both Cisco Call and Microsoft Teams must be running in the same virtual machine.
-
Recommended: Sync users from on-premises Active Directory or a cloud directory such as Azure to Control Hub Common Identity (CI).
Microsoft Teams configuration
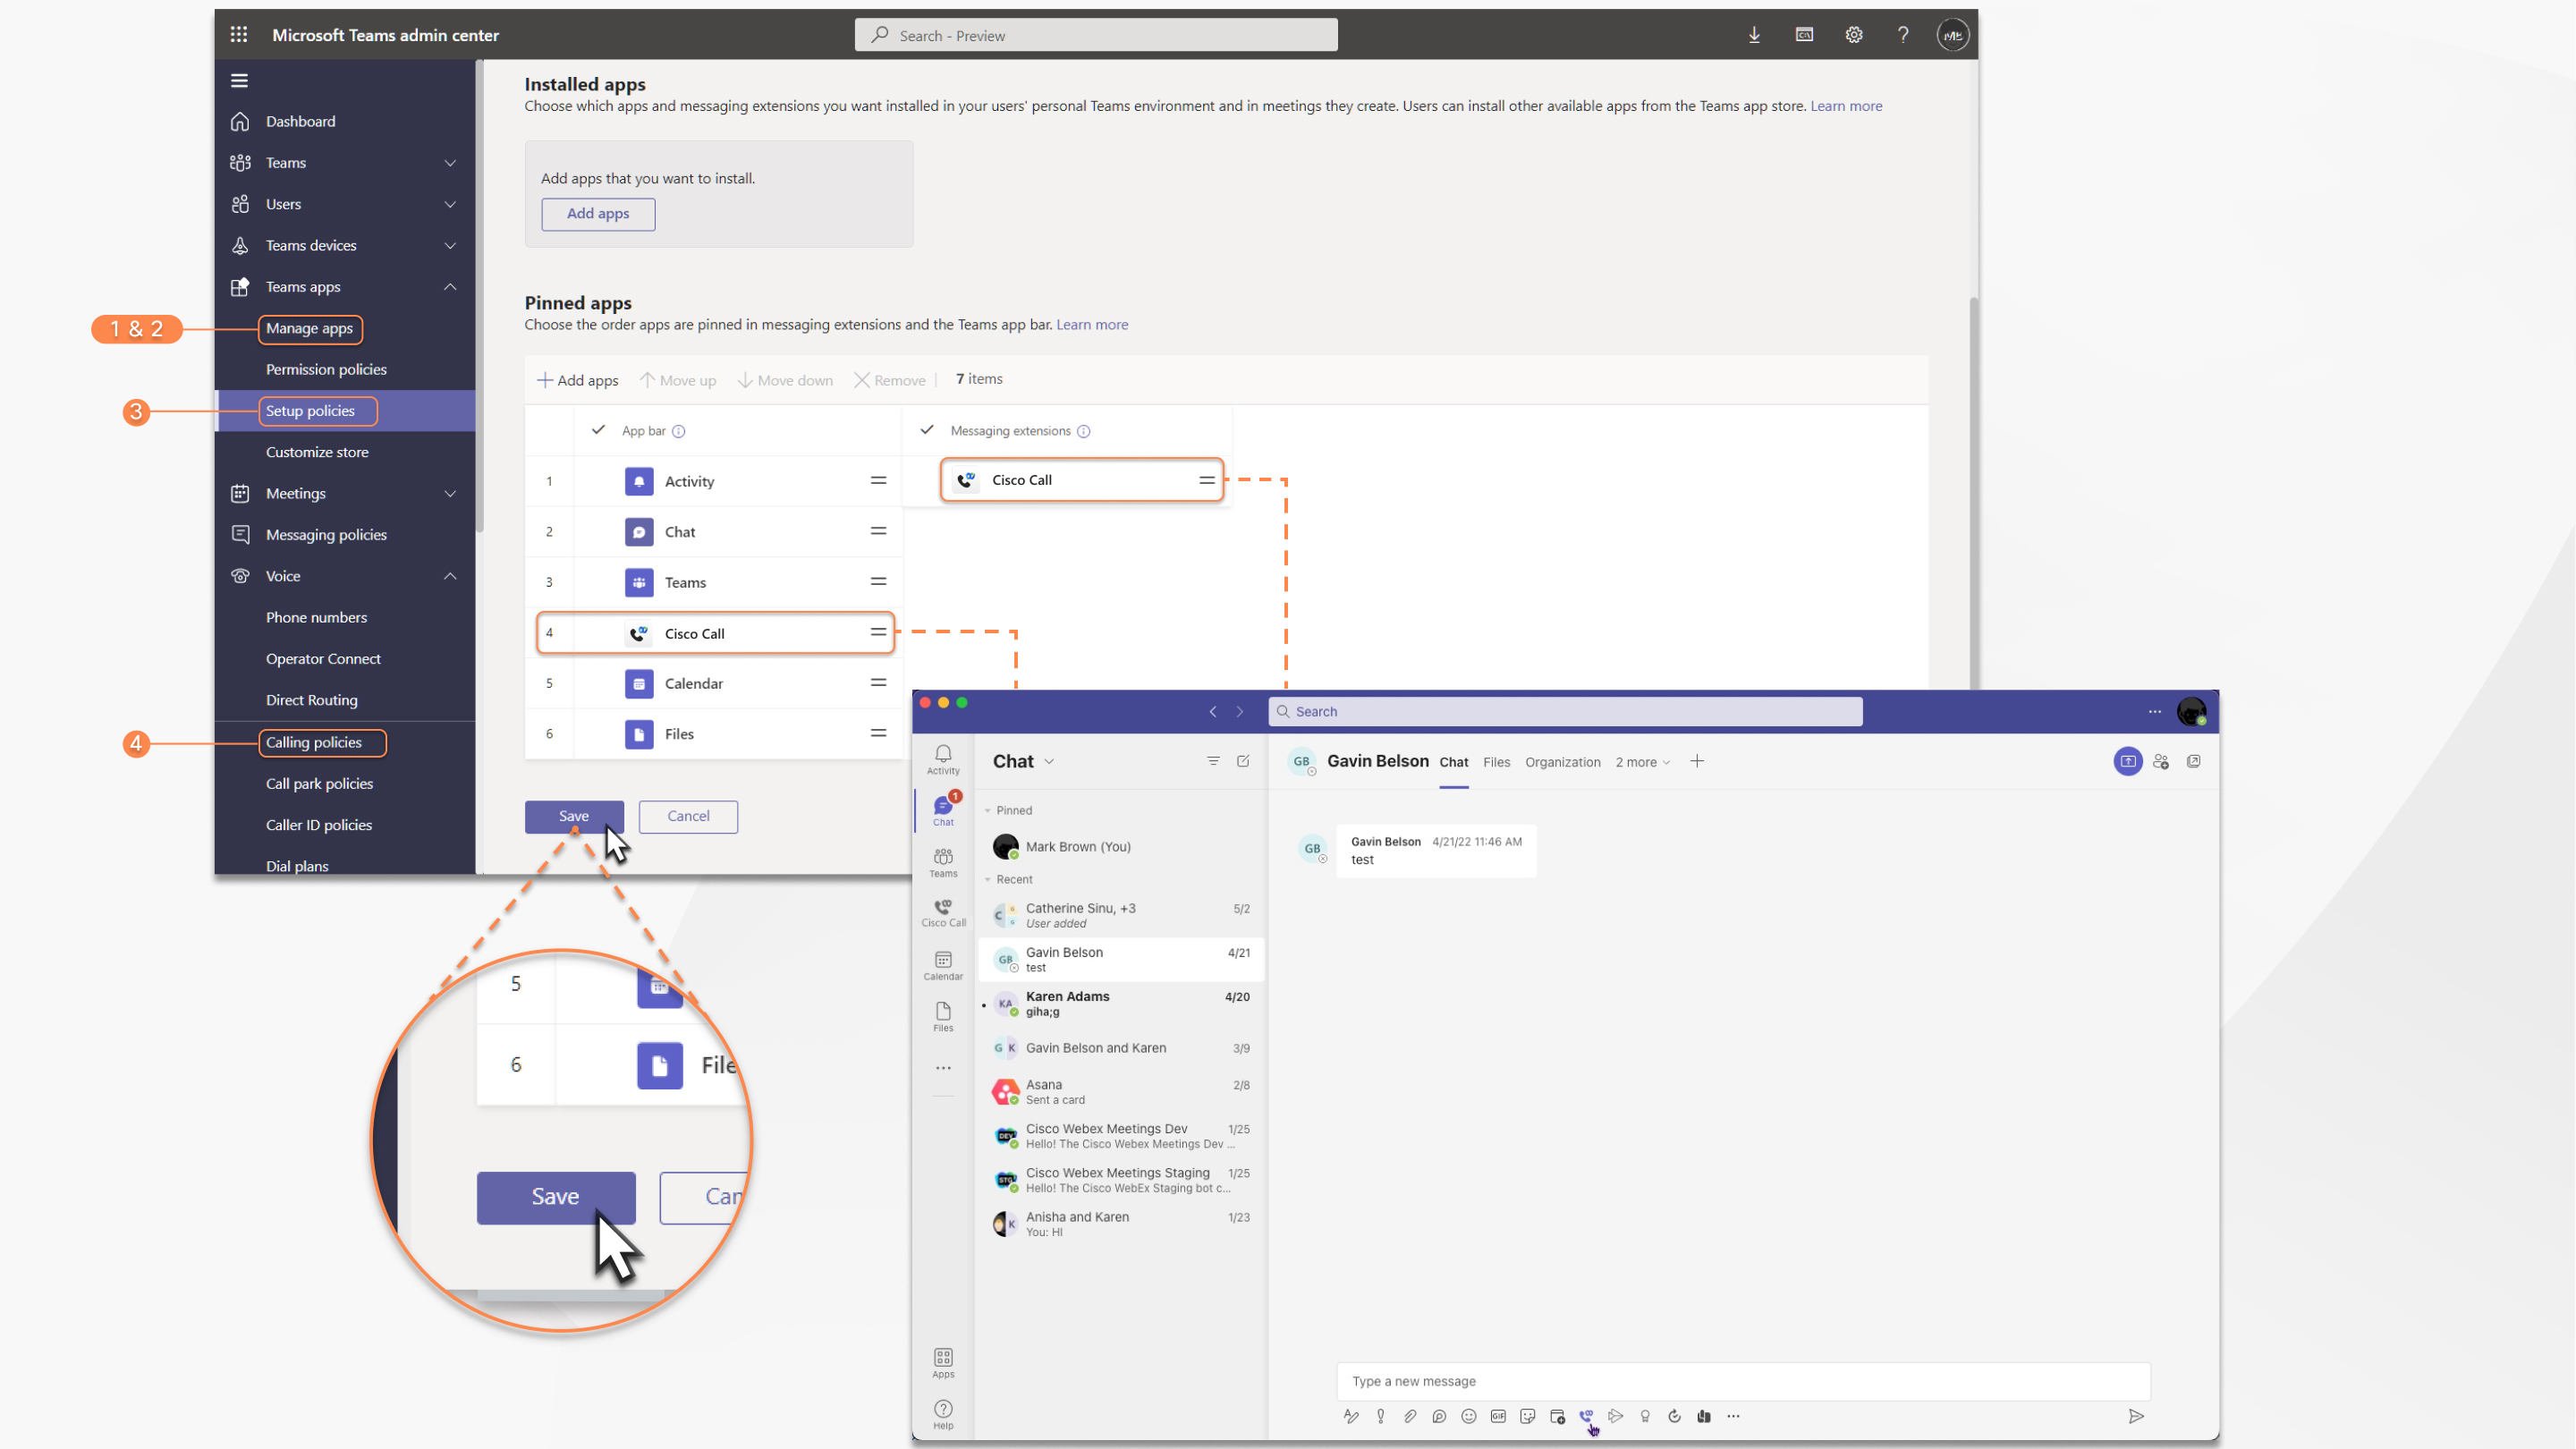
| 1 |
Sign in to Teams admin center to manage your apps and allow Cisco Call. |
| 2 |
Manage who can install Cisco Call. |
| 3 |
Install Cisco Call, then add the icon to the Webex App and unpin the built-in calling option. |
| 4 |
Optional––disable the built-in calling option org-wide and make Cisco Call the only call option:
|
Accept presence sync permissions
Review and accept the presence sync permissions in Microsoft Teams to bidirectionally synchronize the user’s presence status between Microsoft Teams and Webex.
To keep presence sync working, users must use the Cisco Call integration at least once every 90 days.
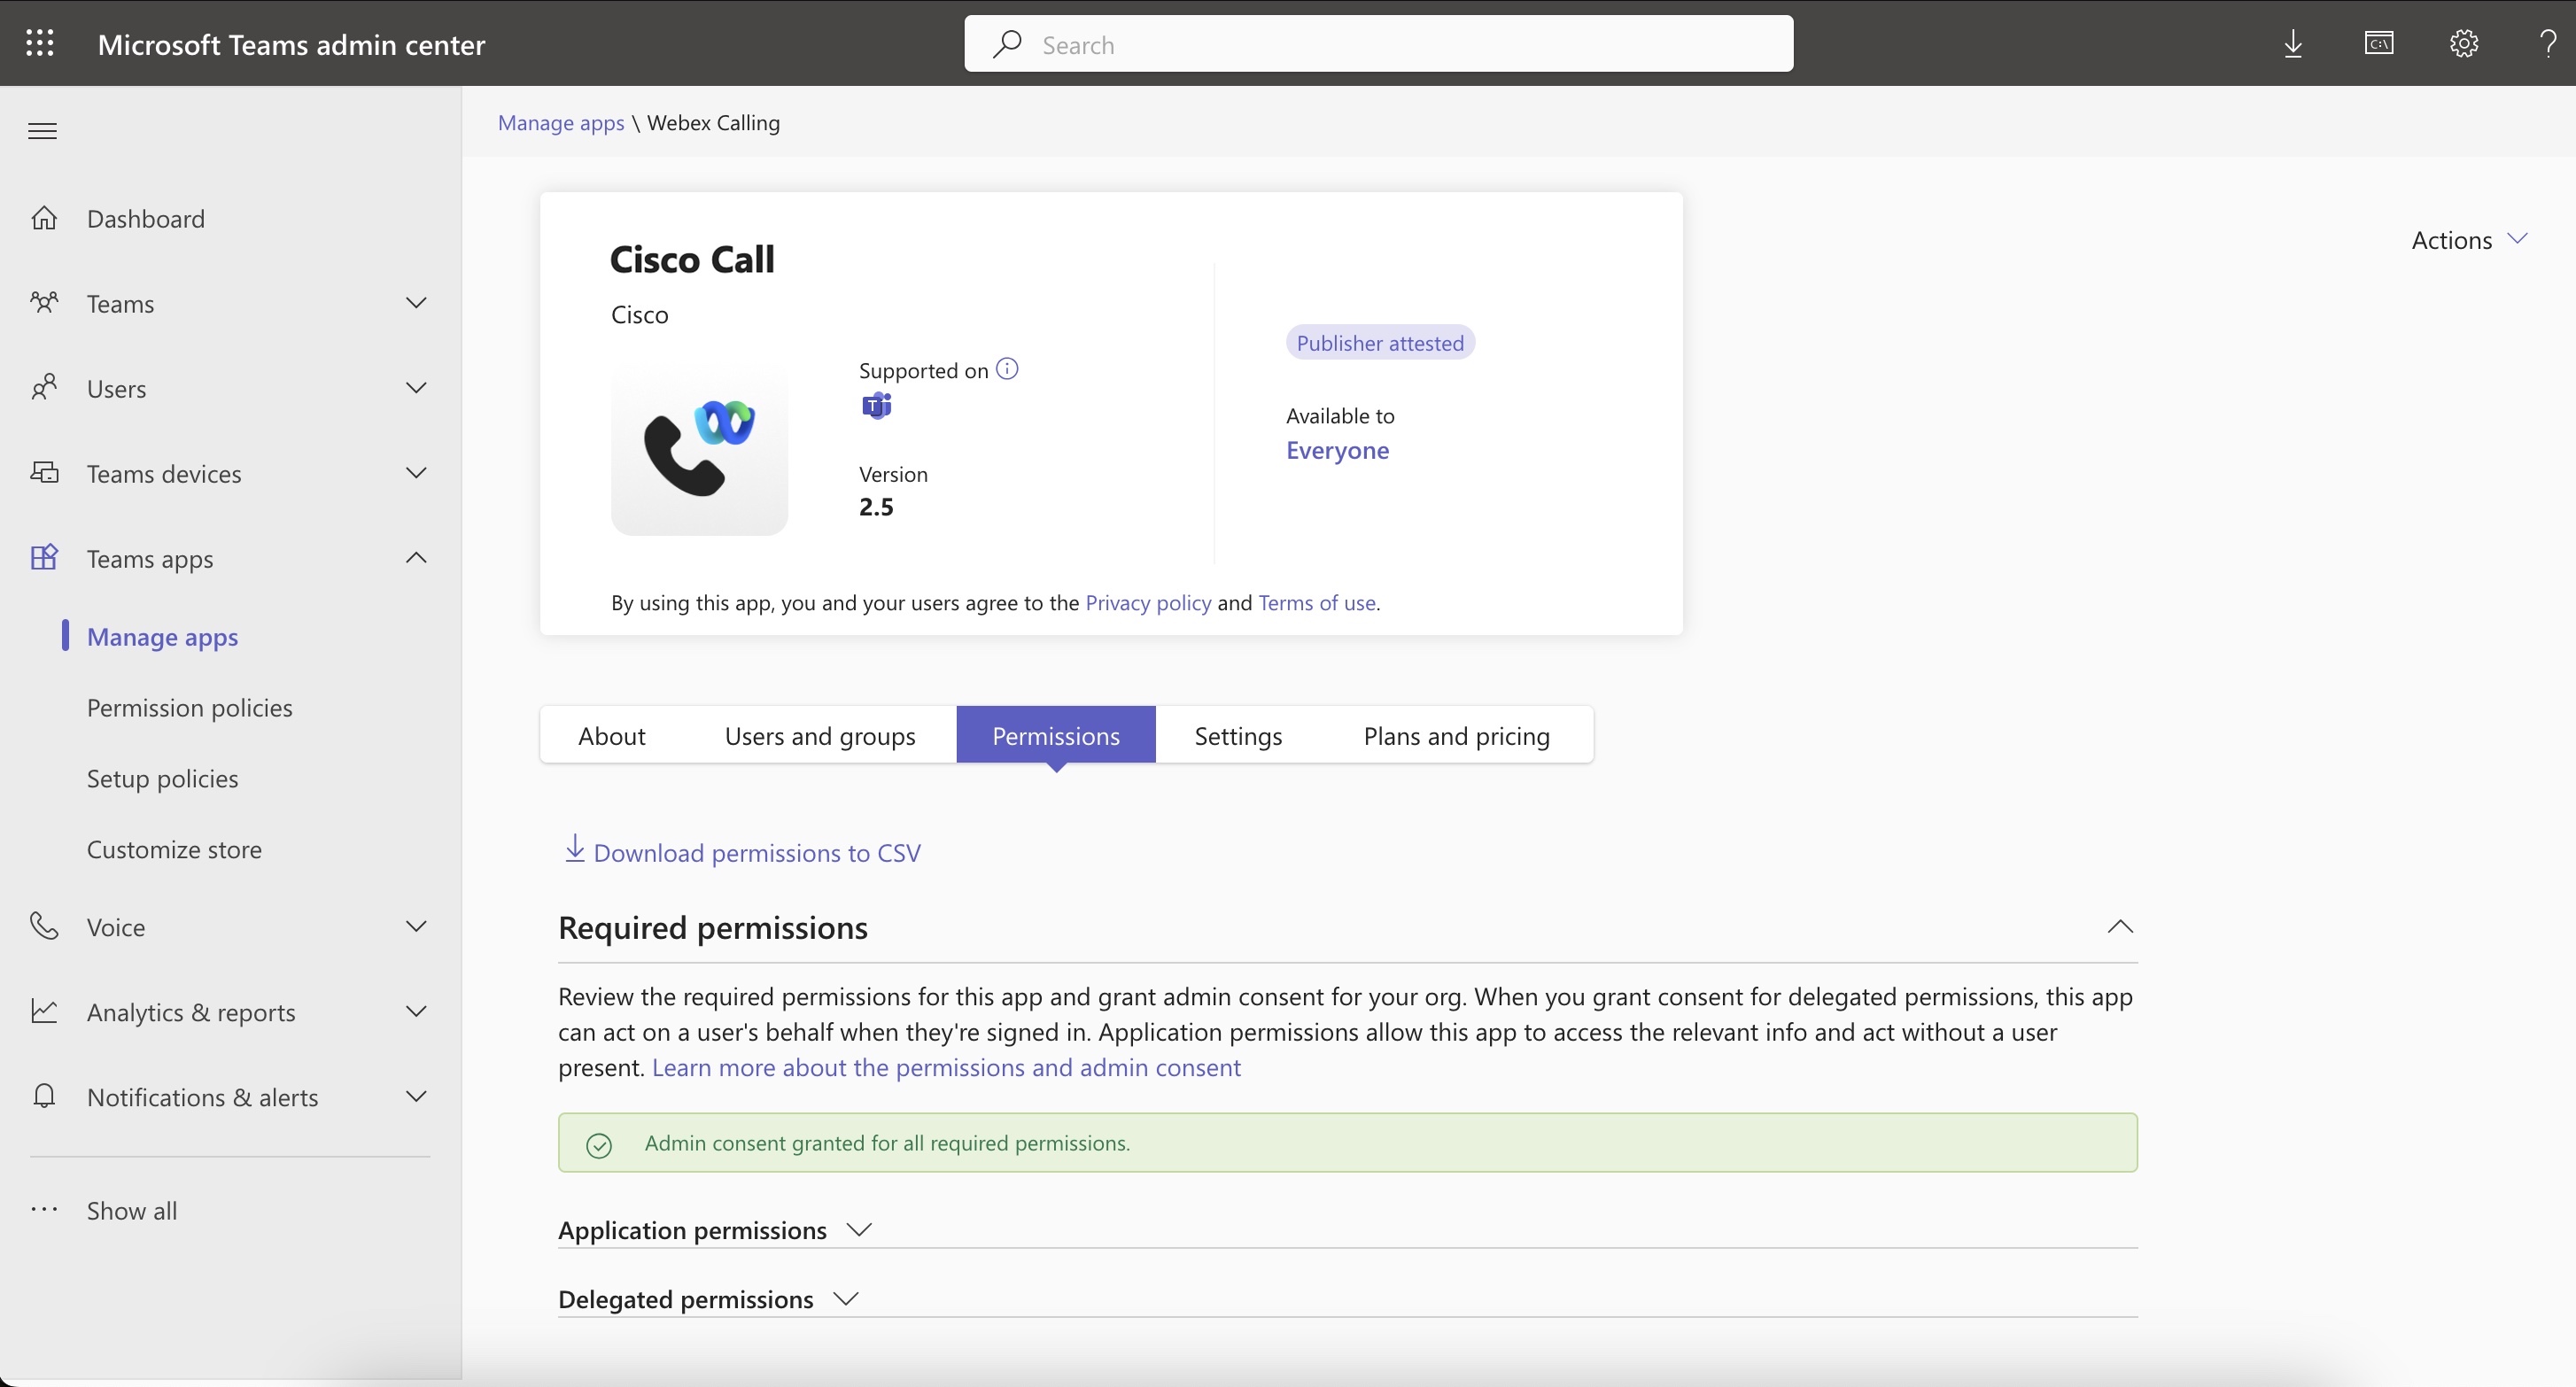
| 1 |
In the Dashboard menu, go to |
| 2 |
In the search box, enter |
| 3 |
Click the Permissions tab, and then click Grant admin consent. |
| 4 |
Check if the following permissions are included.
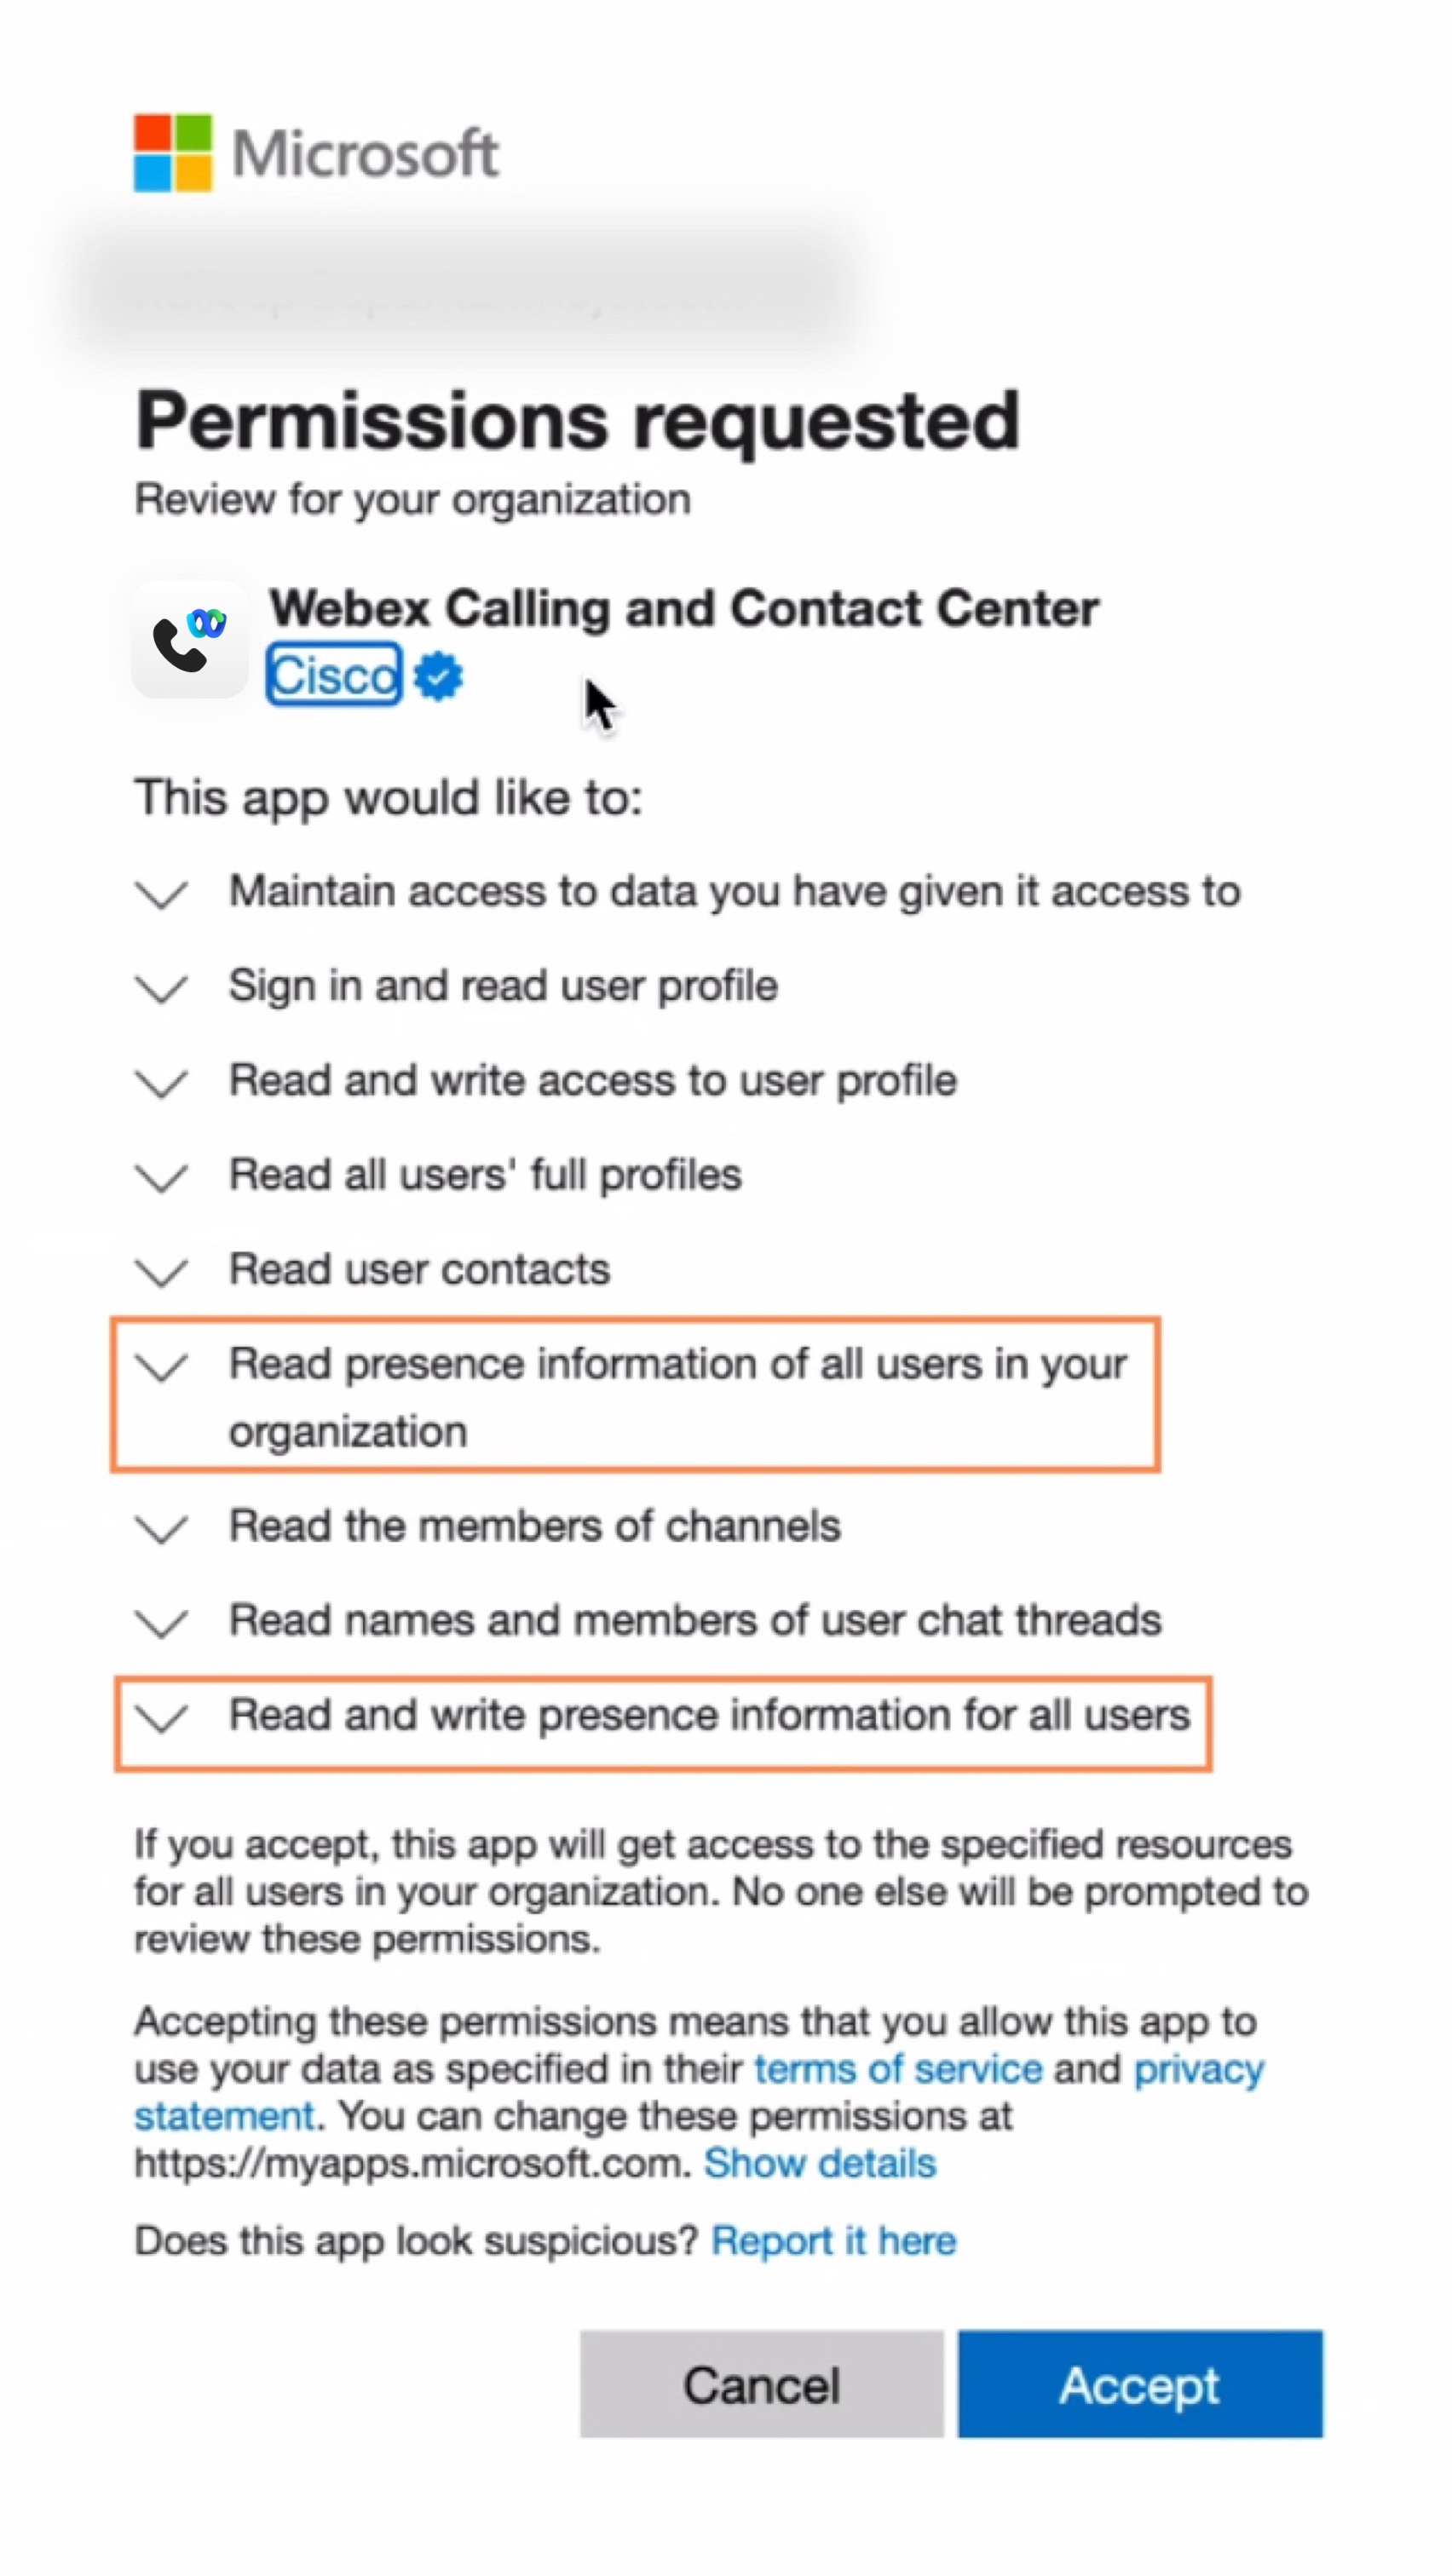
|
| 5 |
Click Accept to accept the permissions. |
| 6 |
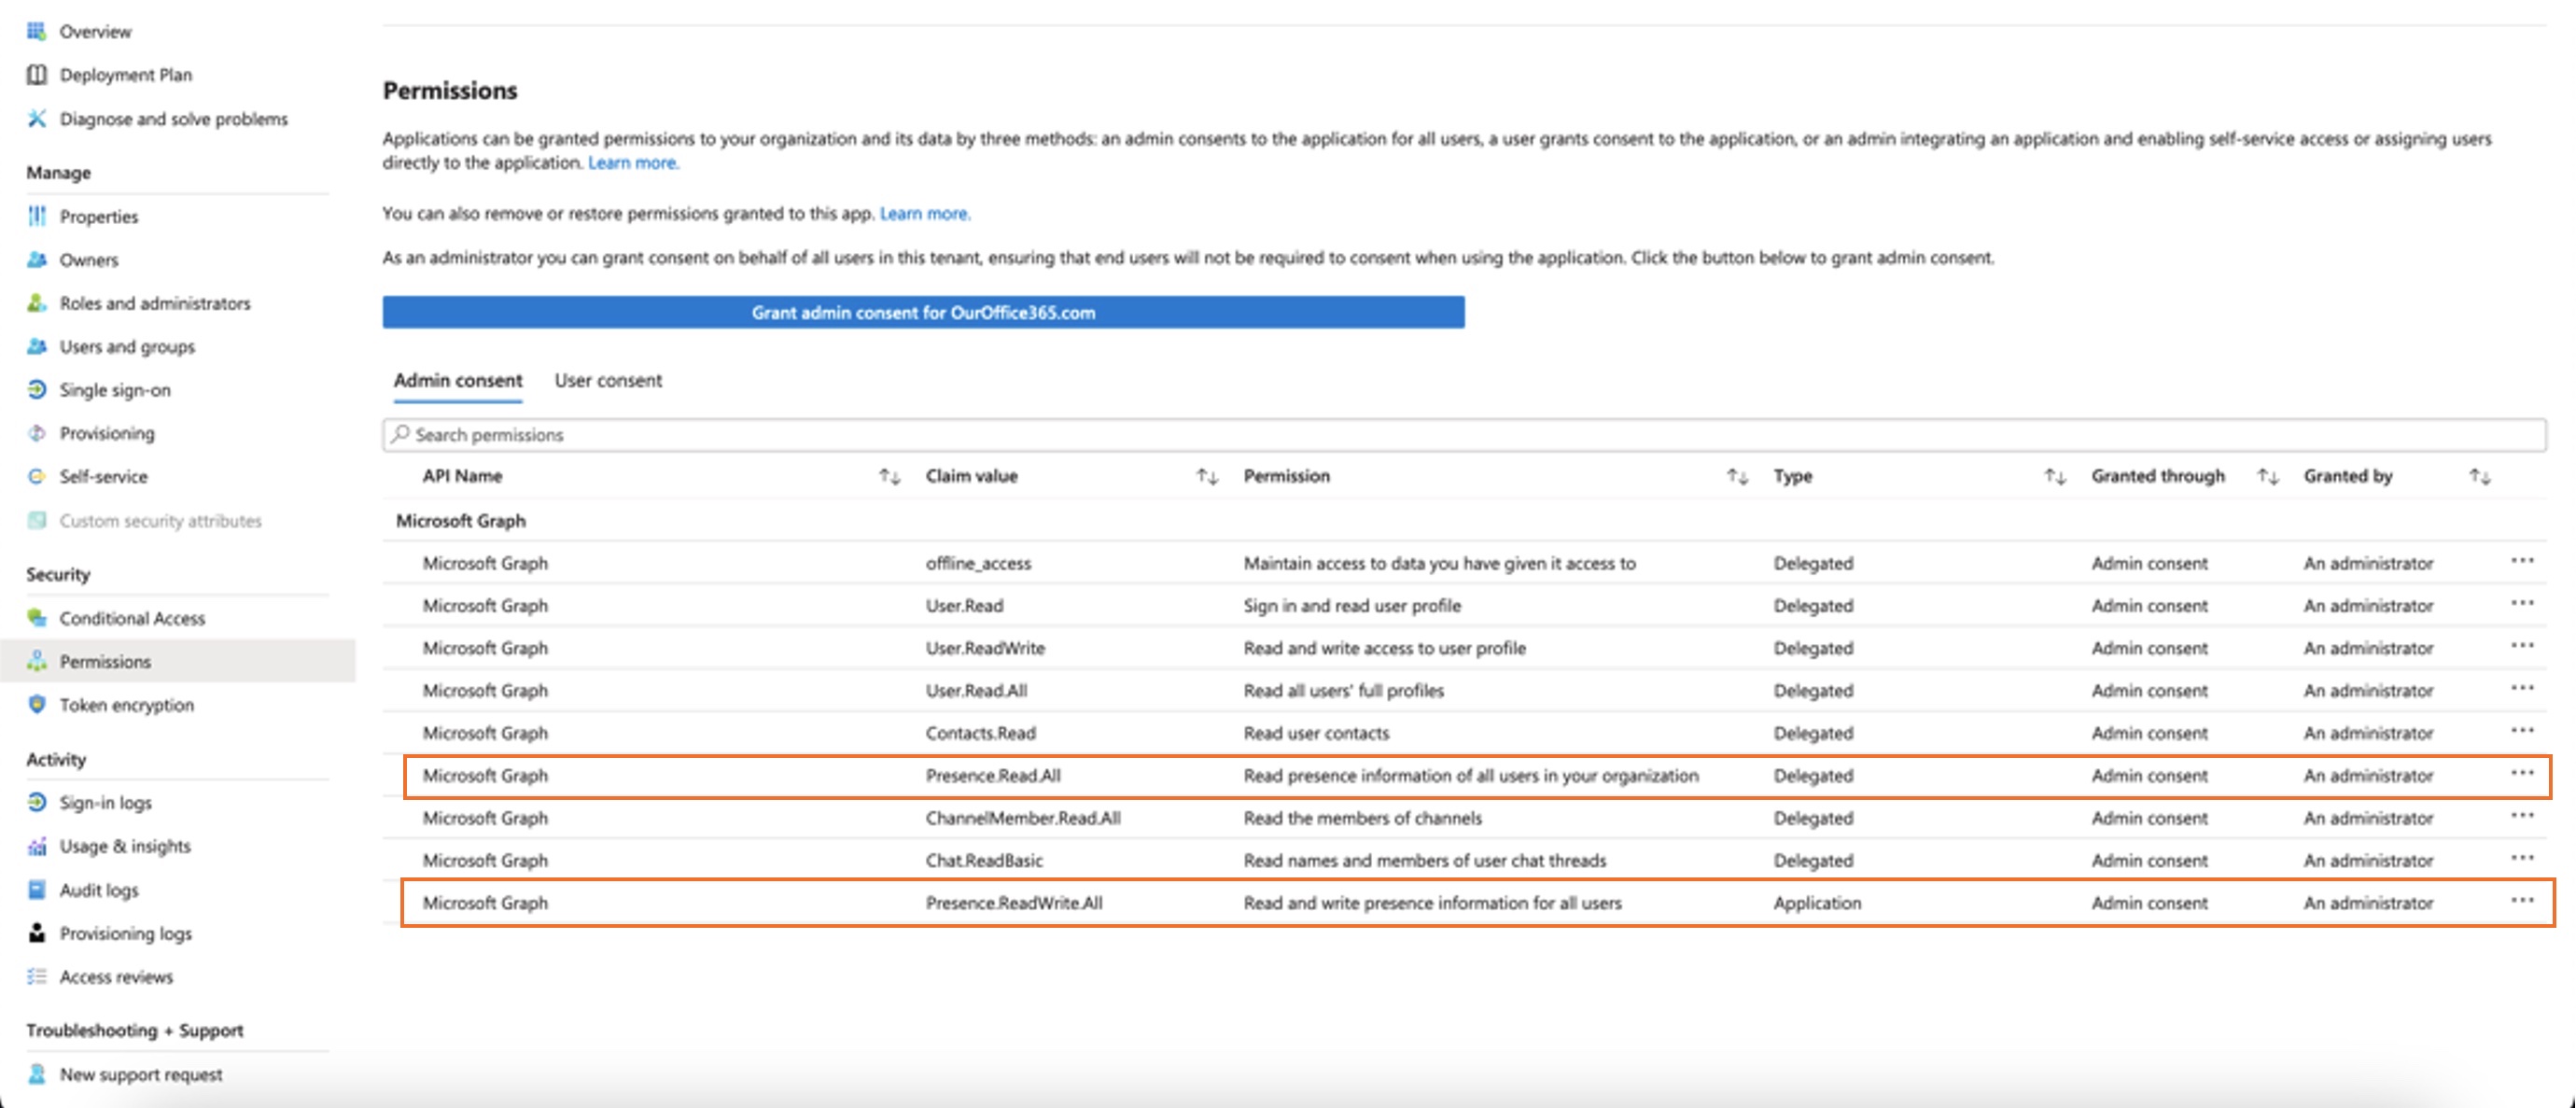
Ensure that new permissions are showing up as granted:
The following permissions should be observed in the admin consent:
Both
If your organization is currently using
If you want to move from Once you've verified the permissions, enable the presence sync in the Control Hub. Refer Enable bidirectional presence sync section. To avoid issues with presence sync status between Microsoft Teams and Webex, we recommend you to set the Assignment required setting to No. To update the setting, go to the Microsoft Entry admin center or Azure portal, and go to and select No. If you need to keep this setting as Yes for any reason, ensure that you assign the users correctly following the steps mentioned in these Microsoft documents: Assign app roles to applications & Manage users and groups assignment to an application. |
Customize Cisco Call app
You can create multiple customizations of the Cisco Call app for Microsoft Teams users based on your organization’s needs. You can create a default customization of the app for all users, or create 10 additional customization of a single app and assign it to specific users or groups.
For more information, see Customize Cisco Call app for Microsoft Teams users.
Permissions for Cisco Call and Microsoft Teams integration
The integration service uses Webex and Microsoft APIs to access data, such as centralized call history, for displaying and updating statuses, such as marking voicemails as read, without storing any user data. All data transfers between the integration and the Webex/Microsoft backends occur over encrypted HTTPS channels. Thereby, the service ensures that user data are not stored in the cloud, strengthening the data privacy and security.
We request the minimum required permissions from Microsoft to call Microsoft API for enabling the integration functionality. The following table describes each permission that we request and why it's required.
| Permission | Reason |
|---|---|
|
offline_access |
Allows the integration service to generate a new access token without asking the user to re-authorize often. |
|
User.Read |
Allows the integration service to read the user's basic information such as the email address. |
|
User.ReadWrite |
Allows the integration service to store speed dials in user profiles. |
|
User.Read.All |
Allows the integration service to search for users in the active directory to make calls. |
|
Contacts.Read |
Allows the integration service to search for the user's outlook contact to make calls. |
|
ChannelMember.Read.All |
Allows the integration message extension to read members of a channel so that the user can search for a specific channel member to call. |
|
Chat.ReadBasic |
Allows the integration message extension to read members of a group chat so that the user can search for a specific member to call. |
|
Presence.Read.All |
Allows the integration service to read presence information of all users in the directory. |
|
Presence.ReadWrite.All |
Allows the integration service to read all presence information and write activity and availability of all users in the directory. |
|
Presence.ReadWrite |
Allows the integration service to read the presence information and write activity and availability of a user. |
Control Hub configuration
You can configure and enable the following features in Control Hub to make them available for Microsoft Teams users.
Hide Webex App window
For organizations that have chosen to use the Cisco Call integration with Microsoft Teams, the integration is the users' primary interface to Webex services. Once configured, Webex App is still installed and running on your users’ computers, but its window will be closed by default. Actions taken in the Cisco Call integration may launch specific features in Webex App, but in general, the users don't need to interact with Webex App.
Through Control Hub, you can hide the Webex App window at the following levels:
-
Organization level
-
User-group level
-
User level
Hide the Webex App window for an organization
The settings configured at the organization level automatically apply to all users under the organization.
| 1 |
Sign in to Control Hub. |
| 2 |
Go to . |
| 3 |
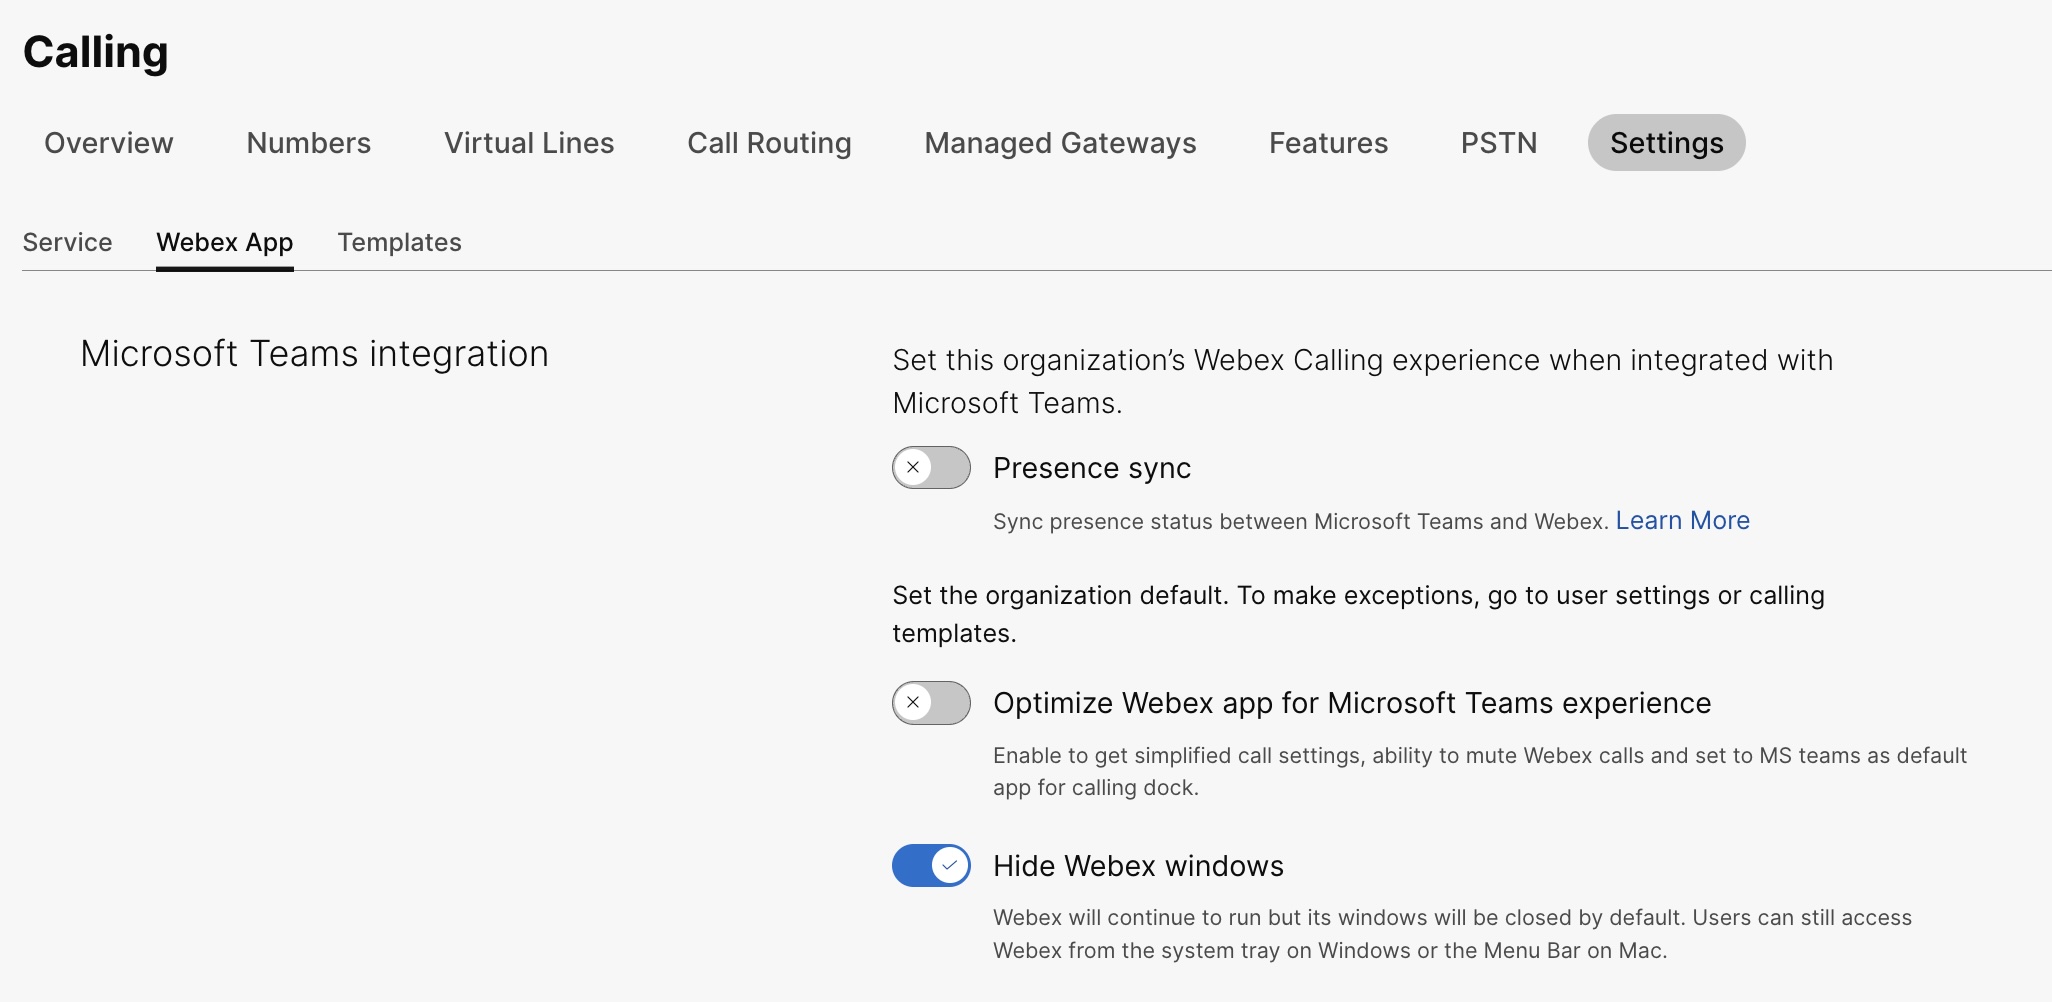
Click the Webex App tab, go to the Microsoft Teams integration section and toggle on Hide Webex windows.
You can also use the public API to hide the Webex App window for all users in an organization that use the Cisco Call integration with Microsoft Teams. For details, see Update an Organization's MS Teams Setting in developer.webex.com. |
Hide the Webex App window for a user-group
In order to hide the Webex App window for a user-group, create a Calling template and assign it to a user-group. The configuration in the template applies to all users in the group.
To create a new template to hide Webex App window:
| 1 |
Sign in to Control Hub. |
| 2 |
Go to . |
| 3 |
Click Create template, choose Create a template and click Next. If Education is your business vertical, you can apply predefined templates with custom settings for students or teachers. |
| 4 |
In the General section, type the Template name and Description. |
| 5 |
Go to the Microsoft Teams integration section and toggle on Hide Webex windows. |
| 6 |
Click Create template and next. |
| 7 |
Search and select a group for this template and click Done.
Modify or delete a template:
To modify a template, click the template, modify the toggles and click Save. To delete a template, click the template and choose Delete from the Actions drop-down list. In the Delete template page, check the box informing you that deleting a template is permanent, and then click Delete. |
Considerations when applying Calling templates to a user-group
-
When a user is onboarded to an organization, the user inherits the settings from the organization-level.
-
If the user is added to a user-group, then the settings from the Calling template apply.
-
If a user belongs to multiple user-groups, then the template with the highest rank (Rank 1) takes the highest precedence and that template's settings apply.
-
If the user has individual user settings, then these settings take precedence over user-group or organization-level settings.
See Configure settings templates for more information about managing your templates.
You can apply the existing template either from Group section or Calling section.
- To apply template from the Group section, see Configure settings template.
- To apply from the Calling section, complete the following steps.
| 1 |
Sign in to Control Hub. |
| 2 |
Go to . |
| 3 |
Click |
| 4 |
Type the group name to which you want to apply the template, then choose the group. |
| 5 |
Click Done. |
 next to an existing template and click
Hide the Webex App window for a user
The individual user settings override the organization-level and user-group level settings.
| 1 |
Sign in to Control Hub. |
| 2 |
Go to . |
| 3 |
Select an user and click Calling. |
| 4 |
Go to User call experience and click Microsoft Teams integration. |
| 5 |
Turn on Hide Webex windows. 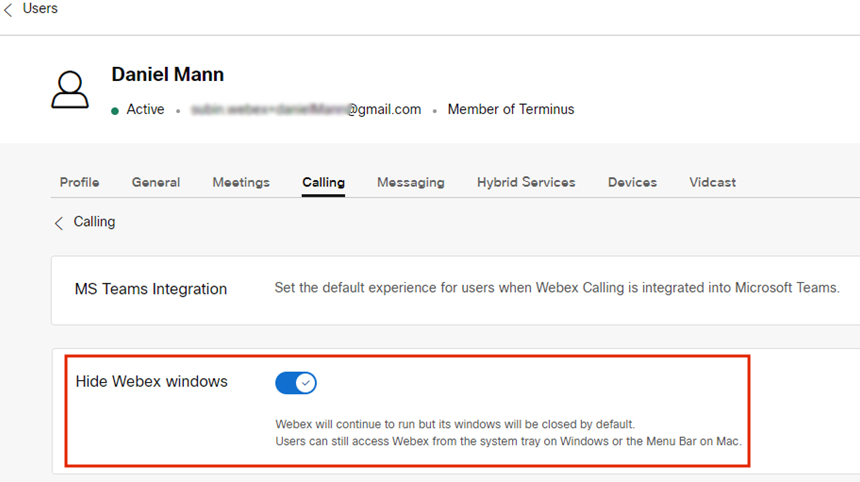
Once you've configured the settings for a user, you can further modify settings at the user-level. User settings don't automatically return to the default setting of an organization. You can use the public API to hide the Webex App window from the Microsoft Teams client for an individual user. See Configure a person's MS Teams setting and Retrieve a person's Application Service Settings in developer.webex.com. |
Once you've configured the settings, users need to restart their Webex App, and sign in to view the change.
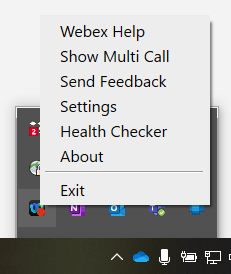
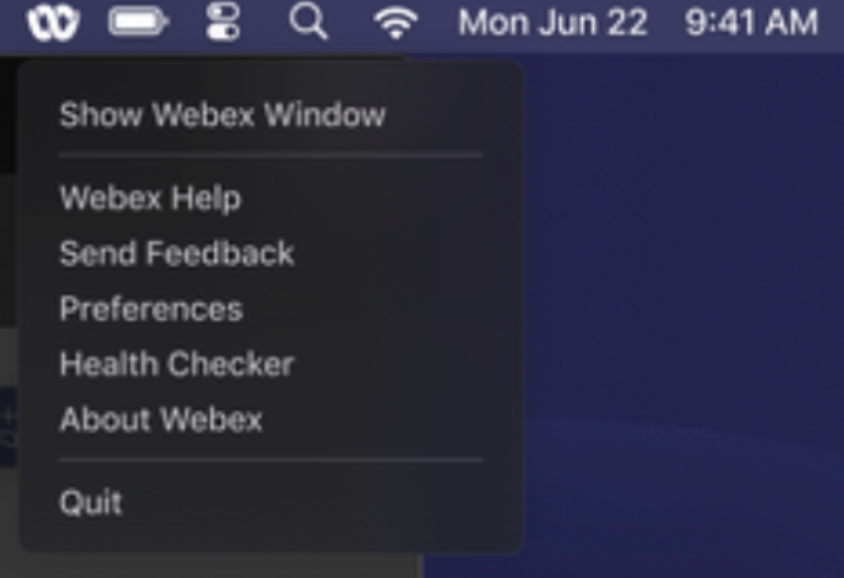
If users want to interact with Webex App itself, they can access it from the system tray on Windows and the menu bar on Mac. Webex App is visible only in the Windows taskbar or macOS dock when a window is active and in use.
|
Webex App in Windows system tray |
Webex App in Mac menu bar |
Enable calling dock window
Calling dock (multi call) window is a separate, floating window that helps users to manage multiple or shared lines in a single window. Users can make and receive calls, see the status of all lines, and have better access to features like hold, transfer, and barge, without changing to another window.
| 1 |
Sign in to Control Hub. |
| 2 |
Go to . |
| 3 |
Click the Webex App tab, go to the In-call feature access section, and under Additional features, toggle on Display calling dock and choose one of the following options:
You can also configure this feature at user-group level and user level.
|
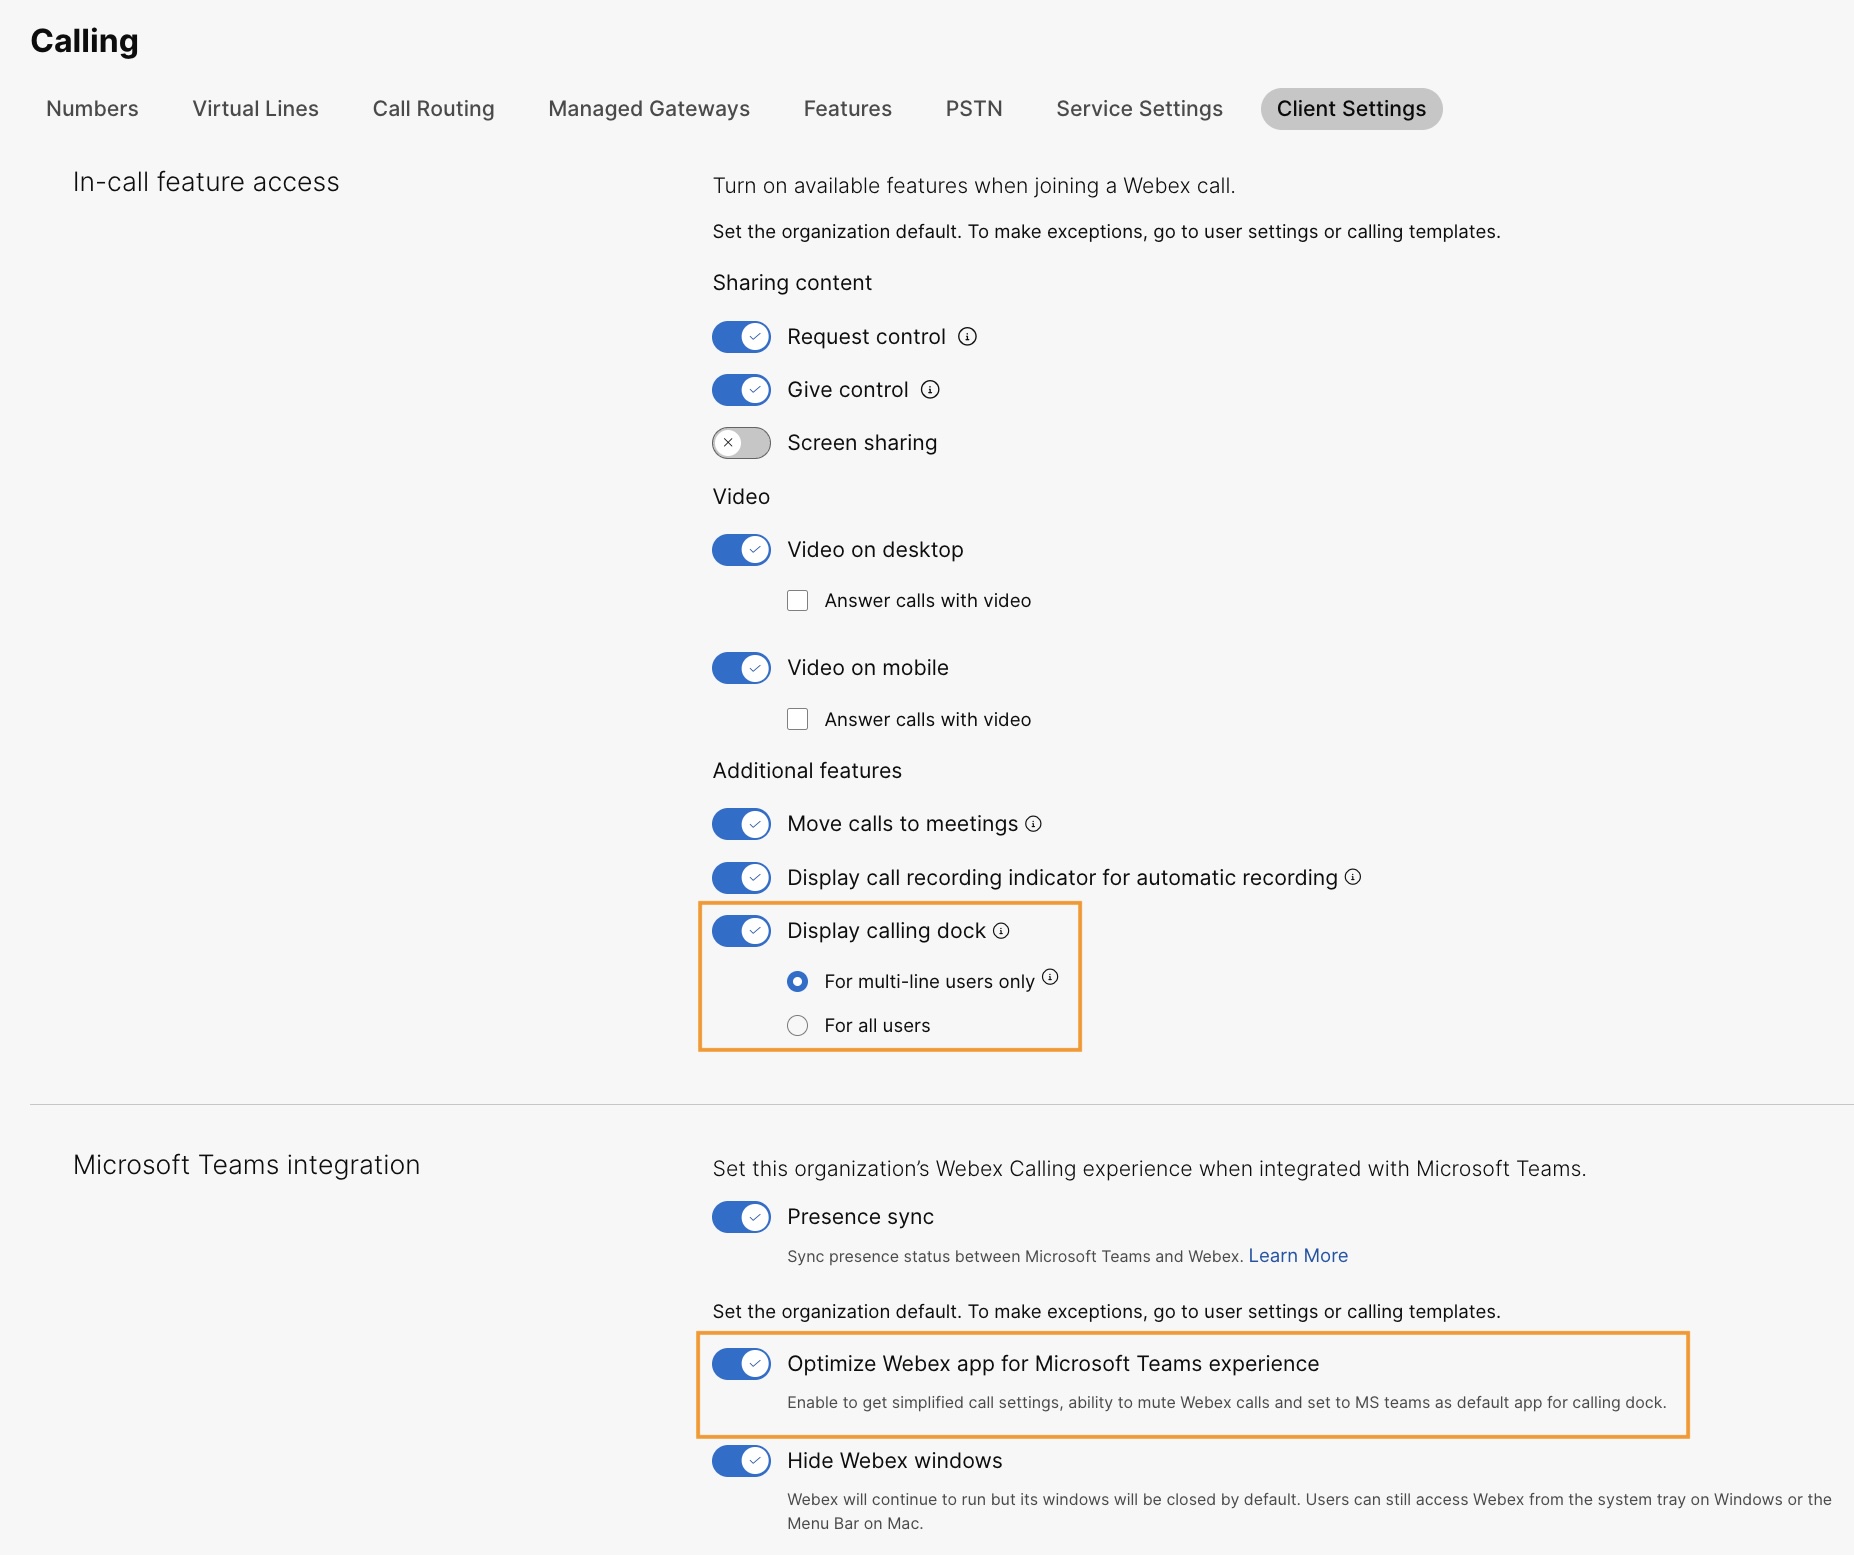
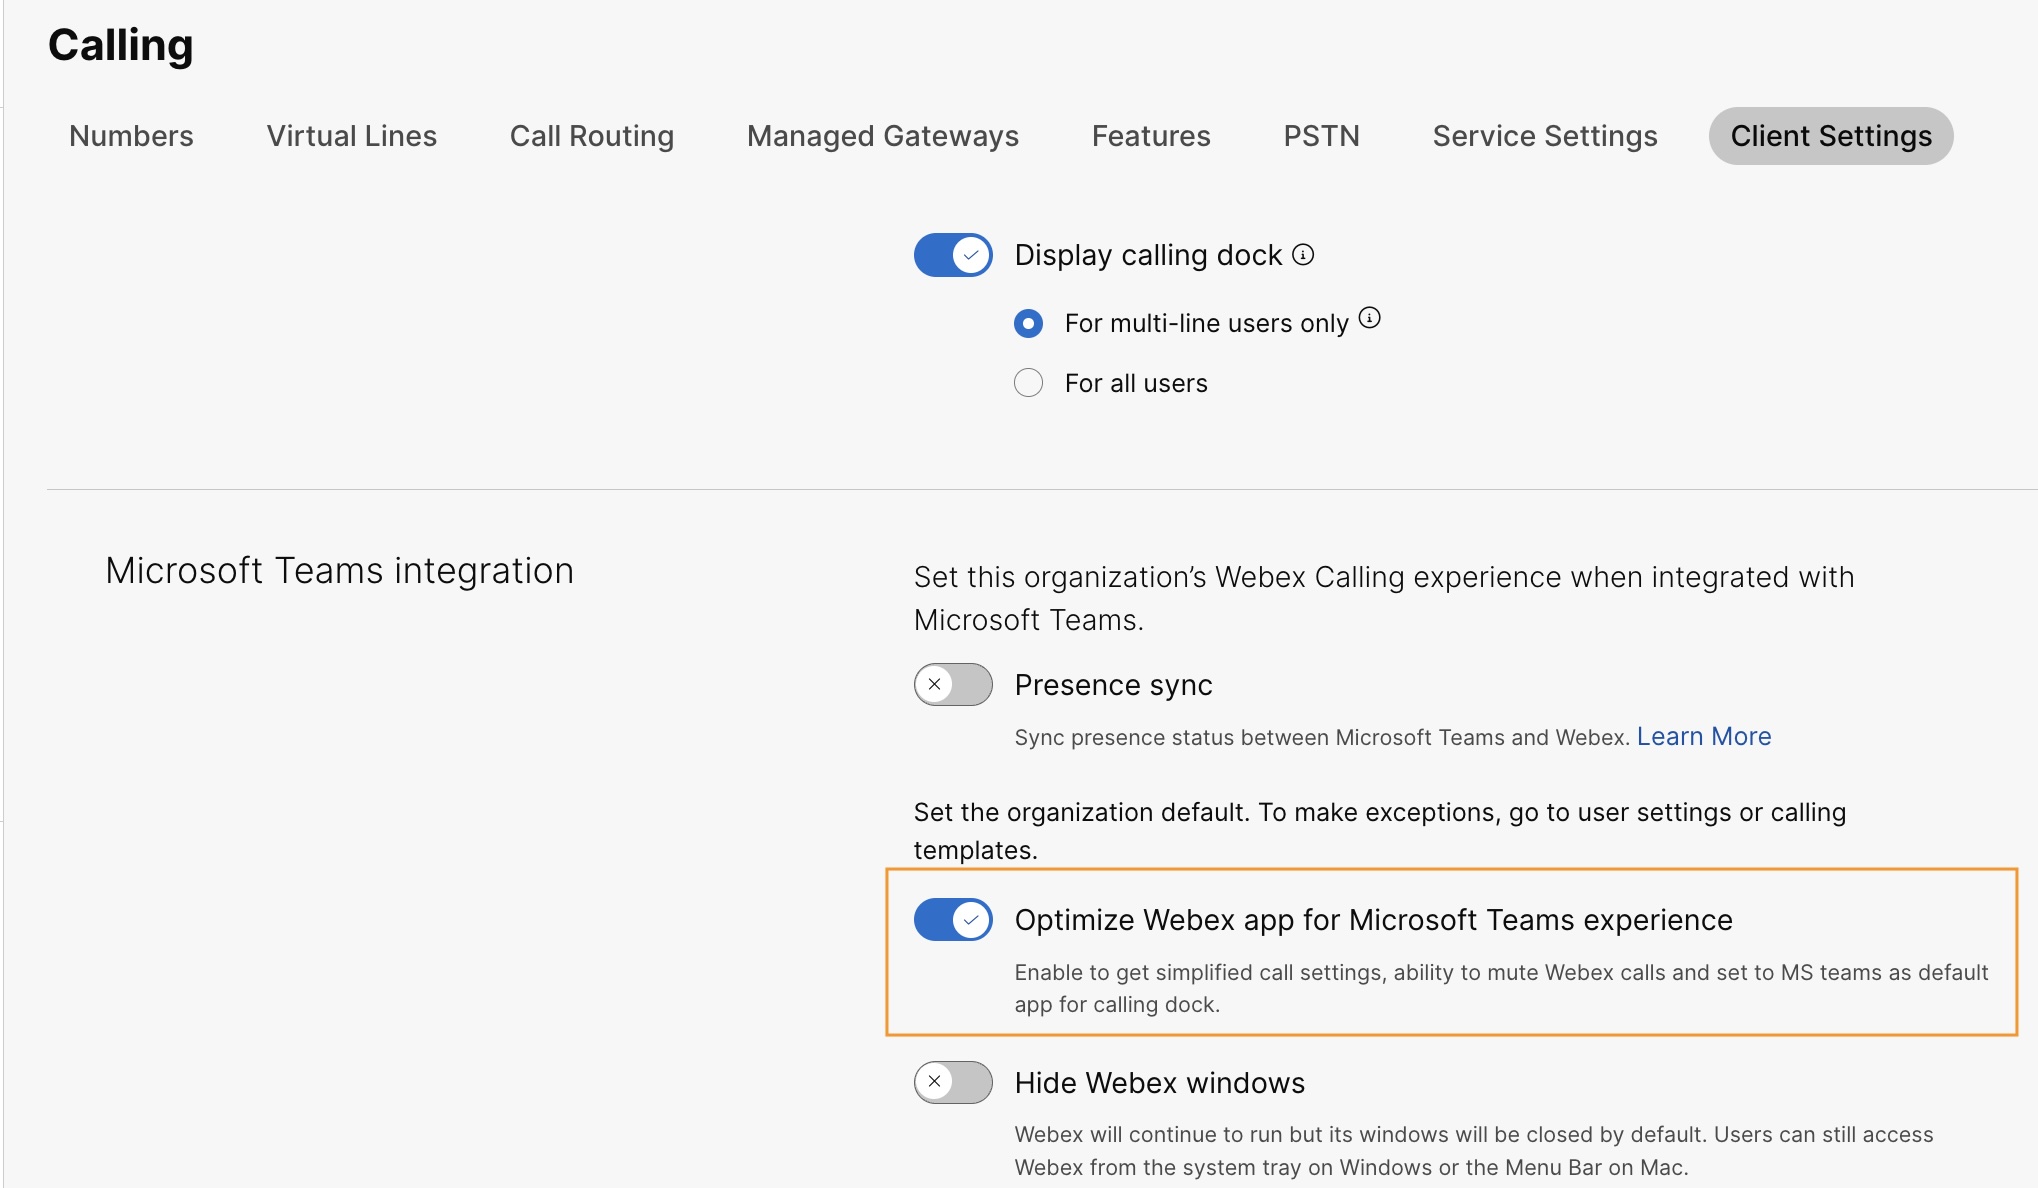
Optimize Webex App for Microsoft Teams experience
This feature provides users the following experiences:
-
Simplified call settings—The call settings display only the options necessary for integration. Enabling this feature simplifies only the call settings accessible through the Calling Dock. The call settings accessible from the Cisco Call integration remain simplified by default.
-
Mute Cisco calls—The incoming Cisco calls are muted when a user is in a Microsoft Teams call or meeting. For this feature to work, you must enable this feature in Control Hub and the user must enable the Only mute notifications when I’m in a meeting or on a call option from the call settings in Cisco Call integration.
If you disable this feature in Control Hub, then the user settings work only when the user is in a Cisco call or meeting. If you enable this feature, the user settings work when the user is in either a Microsoft Teams call or meeting or a Cisco call or meeting.
-
Single app experience—When a user clicks the voicemail and centralized call history icons from the calling dock, it redirects them to the Microsoft Teams Cisco Call instead of Webex App.
For Windows users: Clicking the Webex App in the system tray opens the calling dock instead of Webex App.
| 1 |
Sign in to Control Hub. |
| 2 |
Go to . |
| 3 |
Click the Webex App tab, go to the Microsoft Teams integration section, and toggle on Optimize Webex app for Microsoft Teams experience.
This toggle is disabled if you haven't enabled the Display calling dock toggle under the In-call feature access section. You can also configure this feature at user-group level and user level.
|
Enable voicemail, centralized call history, and presence sync
Voicemail and centralized call history
The voicemail and centralized call history features are enabled by default for Webex Calling, Dedicated Instance, and UCM Cloud customers.
For more information on enabling voicemail for Webex Calling users, see: Configure and manage voicemail settings for a Webex Calling user.
For more information on enabling voicemail for BroadWorks users, see Enabling Voicemail for Microsoft Teams Integration.
BroadWorks administrators must enable unified centralized call history to ensure this feature works correctly. See Webex for Cisco BroadWorks Configuration Guide for more details.
Bidirectional presence sync
This feature enables bidirectional synchronization of presence status between Microsoft Teams and Webex, supporting multiple Microsoft Teams tenants in the same Webex organization. The presence status includes In a call, In a meeting, Presenting, and Do not disturb.
After enabling this feature, when a user makes or receives a Webex call, their Microsoft Teams status gets changed to In a call. When they enable Do not disturb in the Webex App or any Webex device, the status is automatically synchronized to Microsoft Teams. Similarly, the In a meeting and Presenting statuses synchronizes between applications.
When Do not disturb is enabled on user's Webex App or any Webex device, they won’t get any notification of incoming call and messages in Webex App, Webex device or Microsoft Teams.
You can also use public API to enable Webex presence synchronization with the Microsoft Teams client. For details, see Update an Organization's MS Teams Setting in developer.webex.com.
The following table shows the bidirectional status sync representation between Webex and Microsoft Teams.
|
Webex status |
Microsoft Teams status |
|---|---|
|
|
|
|
|
|
|
|
|
|
|
|
Currently, you can configure this feature only at the organization level.
| 1 |
Sign in to Control Hub. |
| 2 |
Go to . |
| 3 |
Click the Webex App tab, go to the Microsoft Teams integration section, and toggle on Presence sync. You can turn on the Hide Webex windows toggle for the best experience, but it's optional. |
| 4 |
Go to the Do Not Disturb (DND) Status Sync section and turn on the toggle. 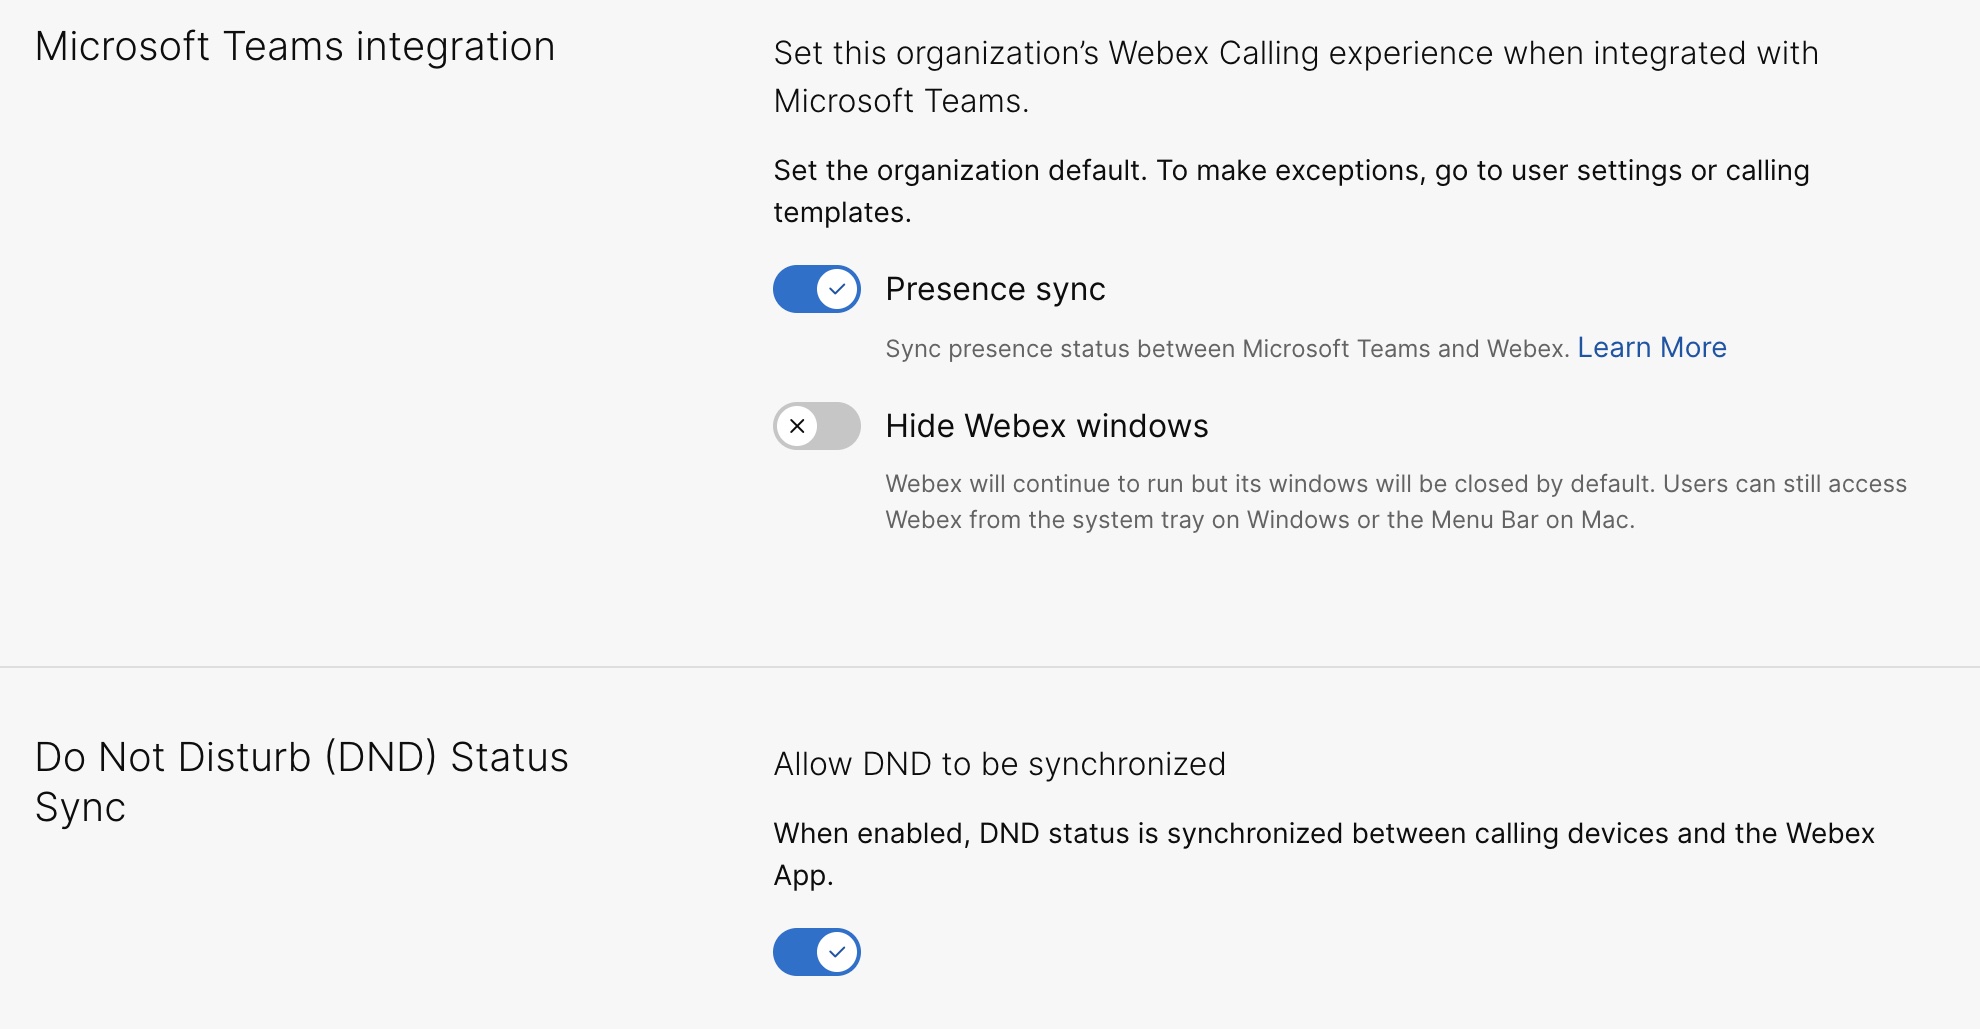
|
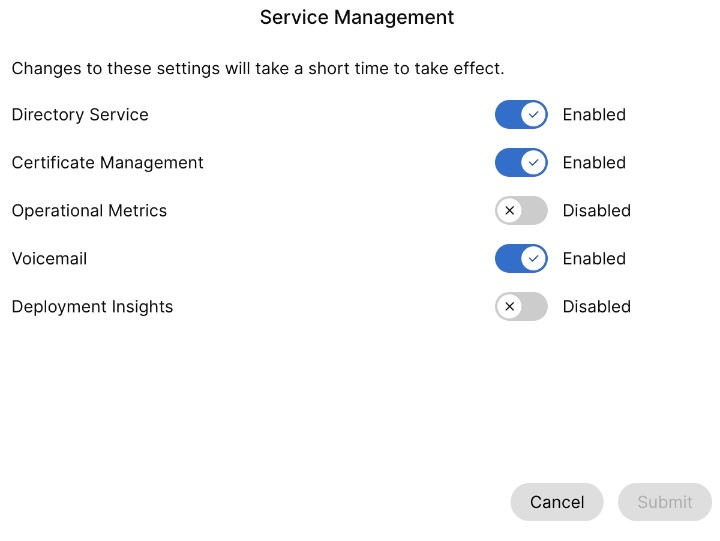
Additional configuration for Unified CM users
To enable voicemail, centralized call history and bidirectional presence sync service for on-prem Unified CM customers, perform the following steps:
Voicemail service enabled for on-prem customers takes a maximum of 12 hours to activate.
| 1 |
Sign in to Control Hub. | ||||
| 2 |
Go to . On the UC Management card, click Inventory. The list of cluster groups appears with the description, status, clusters, and nodes. | ||||
| 3 |
Perform the following actions:
The Inventory page appears, showing the list of clusters belonging to the selected cluster group. | ||||
| 4 |
Click Details next to the cluster to which the particular product node belongs. The Node name with the version, product, and status appears. | ||||
| 5 |
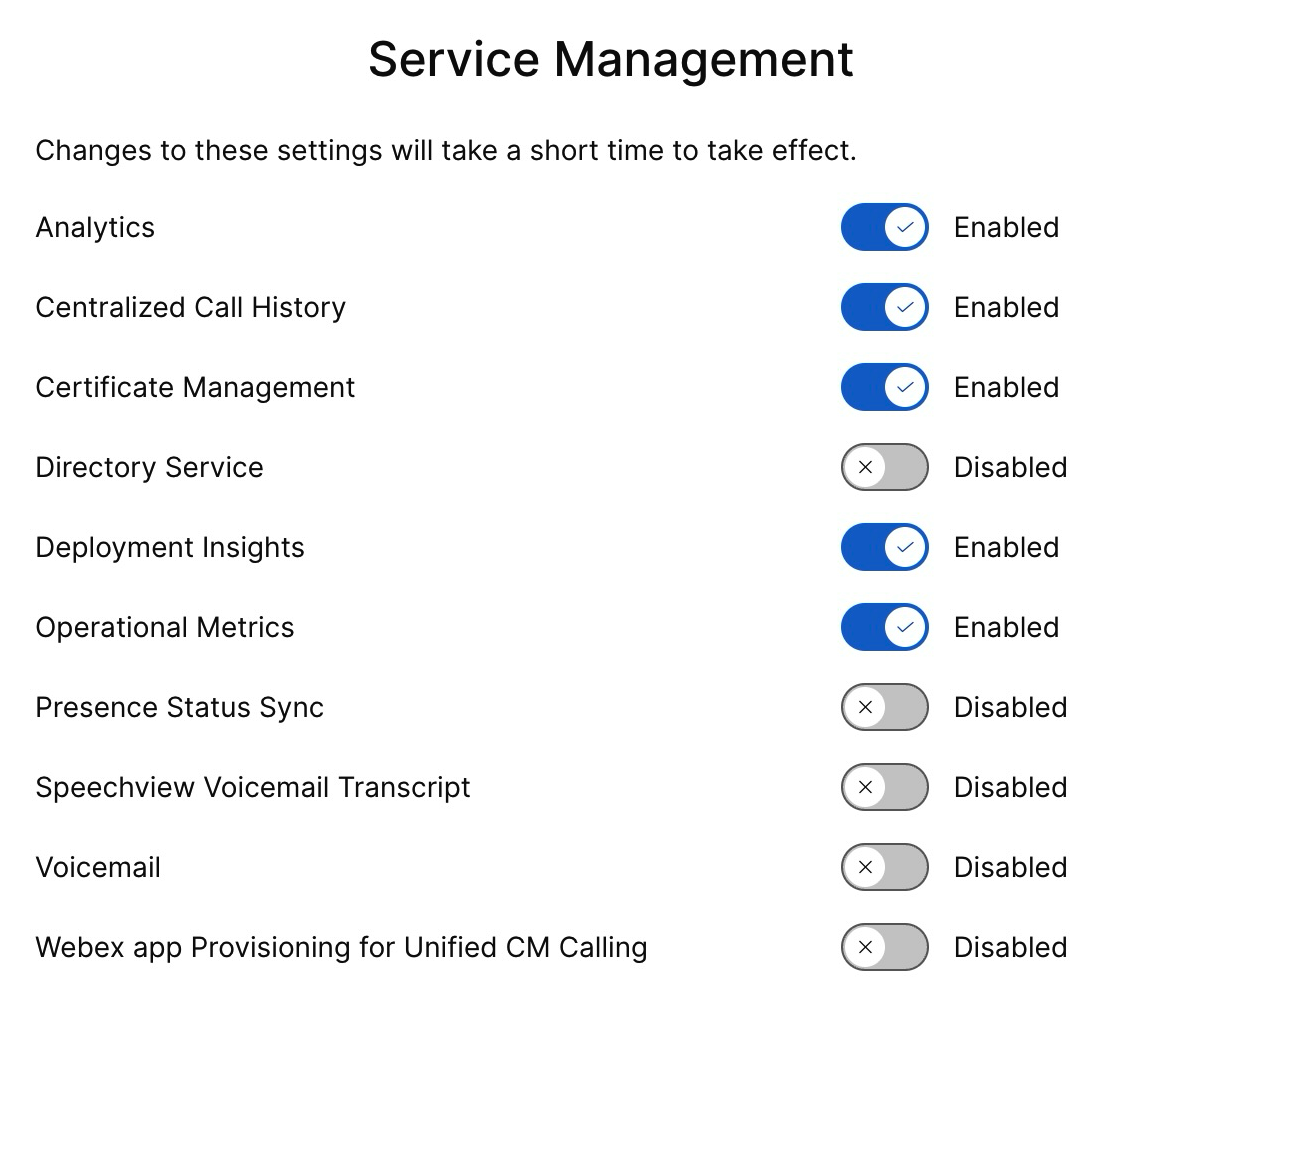
Click the ellipsis ⋮ icon next to Event History and choose Service Management. The Service Management page appears with the list of services. | ||||
| 6 |
Use the toggle button to enable the Voicemail, Centralized Call History and Presence status sync.
| ||||
| 7 |
Click Submit. | ||||
| 8 |
If the Data Collection Confirmation pop-up is displayed, agree to it by enabling the check box and click Submit. |
Enable Cisco AI Assistant
This feature applies only to Webex Calling users.
The Cisco AI Assistant generates summaries that users can access both during and after an interaction, regardless of whether the call is recorded.
If AI Assistant is used during a call, the user who enabled post call summary and transcript have access to post-call summaries, action items, and transcripts in their call history. This availability applies regardless of whether the call was recorded and is controlled by both admin and user settings. The AI Assistant data is stored for a fixed duration of 365 days.
You can turn on AI Assistant call summary settings for call transferring and conferencing at organization, user, and template levels. The AI Assistant features aren’t available for users based out of India.
For more details on enabling Cisco AI Assistant from Control Hub, see Manage Cisco AI Assistant for Webex Calling.


