- Home
- /
- Article

Thanks for your feedback.

Configure and manage Webex Calling devices
 In this article
 Feedback?
You can assign and manage devices for users and workspaces in Control Hub. Choose to add by the MAC address or by generating an activation code to enter on the device itself.
When adding a device, a 16-digit activation code is shown. The activation code expires after 30 days for MPP phones, and after 7 days for Room devices.
Add a phone to a user
With Control Hub, you can assign a phone to a user for personal usage. The phones listed here support Webex Calling. While all these phones can be added using a MAC address, only the following subset can be registered using an activation code:
-
Cisco IP Phone 6800 Series Multiplatform Phones (Audio phones—6821, 6841, 6851, 6861, 6871)
-
Cisco IP Phone 7800 Series Multiplatform Phones (Audio phones—7811, 7821, 7841, 7861)
-
Cisco IP Phone 8800 Series Multiplatform Phones (Audio phones—8811, 8841, 8851, 8861)
-
Cisco IP Phone 8800 Series Multiplatform Phones (Video phones—8845, 8865)
-
Cisco IP Conference Phone 7832 and 8832
-
Cisco Video Phone 8875
-
Cisco Desk Phone 9800 Series
You can only assign DECT base devices (not DECT handsets) in Control Hub. After you assign a base unit to a user, then manually pair a DECT handset to that base unit. For more information, see Connect the Handset to the Base Station.
| 1 |
Sign in to Control Hub. |
| 2 |
Go to . You can also add a device to the user from the Users section by navigating to > select a user > .
|
| 3 |
Choose Personal usage to assign a device to a user and then click Next. |
| 4 |
Enter either the username or the actual name of the phone's owner, choose the user from the results, and then click Next. |
| 5 |
Choose the kind of device you want to set up for the user:
|
Add a phone to a new workspace
When people are at work, they gather in places such as lunch rooms, lobbies, and conference rooms. You can set up shared Webex devices in these Workspaces, add services, and then watch the collaboration happen.
A workspaces device isn’t assigned to a specific user but to a physical location thus allowing for shared usage.
The devices listed support Webex Calling. You can register most of these devices using a MAC address, and register only the following subset using an activation code:
-
Cisco IP Phone 6800 Series Multiplatform Phones (Audio phones—6821, 6841, 6851)
-
Cisco IP Phone 7800 Series Multiplatform Phones (Audio phones—7811, 7821, 7841, 7861)
-
Cisco IP Phone 8800 Series Multiplatform Phones (Audio phones—8811, 8841, 8851, 8861)
-
Cisco IP Phone 8800 Series Multiplatform Phones (Video phones—8845, 8865)
-
Cisco IP Conference Phone 7832 and 8832
-
Cisco Desk Phone 9800 Series
Before you begin
- You can add up to five Cisco desk phones, Cisco MPP phones, wireless, ATAs, Phone OS, or third-party devices to a Workspace with a professional Workspace license.
- You can add multiple devices to a professional workspace only from the new workspace page. Turn on Try new Workspaces from the upper right corner of the workspace page to use the new workspace page.
- You can add only one device to a Workspace with a common area Workspace license.
| 1 |
Sign in to Control Hub. |
| 2 |
Go to . You can also add a device to a new Workspace by going to .
|
| 3 |
Choose Shared usage, then click Next. |
| 4 |
Choose New workspace, then click Next. |
| 5 |
Enter a name for the workspace (such as the name of the physical room), select the room type, add the room capacity, and choose the location of the workspace. Click Next. A workspace name can't be longer than 128 characters, and can't have %, #, <, >, /, \, and " characters. |
| 6 |
Choose the kind of device you want to set up for the workspace:
|
| 7 |
Click the Calling service, and choose the subscription and license type that you want to assign to the workspace.
To find out more about the features that are available with the licenses, see Features available by license type for Webex Calling. |
| 8 |
Assign a Location and Phone Number (determined by the location that you choose), and then click Save. You also have the option of assigning an extension. The location is updated during the nightly resync. If you want to add additional devices to a professional workspace, you can do it in any one of the following ways:
To modify or manage the devices assigned to the workspace, see Manage a device for a workspace section. |
 under the
 Reassigning an existing phone to another user or device
To reuse a phone that is assigned to one Webex Calling user/workspace to another Webex Calling user/workspace, follow these steps:
| 1 |
Sign in to Control Hub. |
| 2 |
Go to the User/Workspace where the device is currently assigned. You can reassign the device in these scenarios:
|
| 3 |
On the phone, go to the settings menu and complete these steps to reassign the phone. |
| 4 |
Follow instructions in the Add and assign phone to user or Add a phone to a new workspace to assign or add a phone to a user/workspace. |
| 5 |
On adding the device in the Control Hub, complete these actions on the phone: |
Add a board, desk, or room device to a user
Assigning a Board, Desk, or Room device as a personal device to someone allows them to get their Webex calls and meetings directly to their device. For more details, see Assign a personal Board, Desk, or Room device to a user.
Add a board, desk, or room device to a new workspace
When people are at work, they get together in lots of workspaces like lunch rooms, lobbies, and conference rooms. You can set up shared Cisco Webex devices in these Workspaces, add services, and then watch the collaboration happen.
The key principle of a Workspaces device is that it’s not assigned to a specific user, but rather a physical location, allowing for shared usage.
The devices listed here support Webex Calling.
| 1 |
Sign in to Control Hub. |
| 2 |
Go to . You can also add a device to a new workspace from the Workspaces section by
navigation to .
|
| 3 |
Choose Shared usage and click Next. |
| 4 |
Choose New workspace and click Next. |
| 5 |
Enter a name for the workspace (such as the name of the physical room), select the room type, add the room capacity, and choose the location for the workspace. Then click Next. |
| 6 |
Choose Cisco Room and Desk device. |
| 7 |
Choose one of the following services and click Next.
|
| 8 |
If you've chosen a Cisco Webex Calling service, then choose the subscription and the license type that you want to assign to the workspace.
To find out more about the features that are available with the licenses, see Features available by license type for Webex Calling. |
| 9 |
Assign a Location, Phone Number (determined by the location that you choose), an Extension, and then click Save. |
| 10 |
Activate the device by using the code provided. You can copy, email, or print the activation code. |
Add and assign devices in bulk
To assign several devices to users and workspaces, you can populate a CSV file with the required information and activate those devices in just a couple of easy steps.
- You can add up to 5 Cisco Desk Phones, Cisco MPP phones, ATAs, or 3rd party devices to a workspace with Professional workspace license.
- You can add only one device to a workspace with a common area workspace license.
The devices listed here support Webex Calling. You can register all devices using a MAC address; however, register the following subset of devices using an activation code:
-
Cisco IP Phone 6800 Series Multiplatform Phones (Audio phones—6821, 6841, 6851)
-
Cisco IP Phone 7800 Series Multiplatform Phones (Audio phones—7811, 7821, 7841, 7861)
-
Cisco IP Phone 8800 Series Multiplatform Phones (Audio phones—8811, 8841, 8851, 8861)
-
Cisco IP Phone 8800 Series Multiplatform Phones (Video phones—8845, 8865)
-
Cisco IP Conference Phone 7832 and 8832
-
Cisco Video Phone 8875
-
Cisco Desk Phone 9800 Series
| 1 |
Sign in to Control Hub. | |||||||||||||||||||||||||||||||||||||
| 2 |
Go to . | |||||||||||||||||||||||||||||||||||||
| 3 |
Choose one of the following options and click Download.
You can use the following table to prepare your CSV file.
The following fields are mandatory when assigning a device to Webex Calling users and workspaces:
These Phone Number and Extension fields were previously titled Directory Number and Direct Line; these column names continue to support for a short time. We recommend that you limit the number of devices to 1000 per CSV file. If you want to add more than 1000 devices, use a second CSV file. | |||||||||||||||||||||||||||||||||||||
| 4 |
Fill out the spreadsheet. | |||||||||||||||||||||||||||||||||||||
| 5 |
Upload the CSV file by dragging and dropping or clicking Choose a file. | |||||||||||||||||||||||||||||||||||||
| 6 |
If the MAC address is blank, you get the options to choose where the activation code gets sent.
You or the user need to enter the activation code on the device for activating it. | |||||||||||||||||||||||||||||||||||||
| 7 |
Click Submit. Displays the updated status when the devices become active.
Multiplatform devices must be running a firmware load of 11.3.1 SR2 or later for users to enter the activation code on their device. For information about upgrading phone firmware, see this article. |
Export a device list
If you want to view the list of devices assigned to users and workspaces, you can export the CSV file.
Sign in to Control Hub and go to Devices.
Select multiple devices from the device list and select the Export option. You can choose the fields to include in the CSV file, and export the content to a local folder.
The fields displayed on the CSV file depend on the connection of the device to the platform. Therefore, some fields aren’t available in the output file.
Manage a device for a user
You can add, remove, reboot, check activation, or create a new activation code for the devices that are assigned to users within your organization. This can be helpful to view and manage devices in the users screen, when needed.
| 1 |
Sign in to Control Hub. |
| 2 |
Go to . |
| 3 |
Select a user and click Devices. |
| 4 |
To add a device to this user, click Add Device. If the user is already assigned a device and you want to add another device, click . For more information on adding the device to a user, see Add phones to a user section. |
| 5 |
To modify an existing device, select the device name. This takes you to the Devices page. Here you can view and edit device settings, delete the device, reboot the device, or create a new activation code for the device, if applicable. For more information about configuring phone settings, see Configure and Update Phone Settings. |
| 6 |
If the device added to the user is Webex Aware, then the Webex Aware option is displayed under the devices as shown in the diagram. Webex Aware indicates that the device has onboarded to the Webex platform and has access to Webex Features supported by the phone.
|
| 7 |
Click Actions to manage the device. Actions enables you to apply configuration changes, reboot the device, Report a problem and collect device logs, or delete the device. The Actions tab has these options for a Webex Aware-enabled device:
|
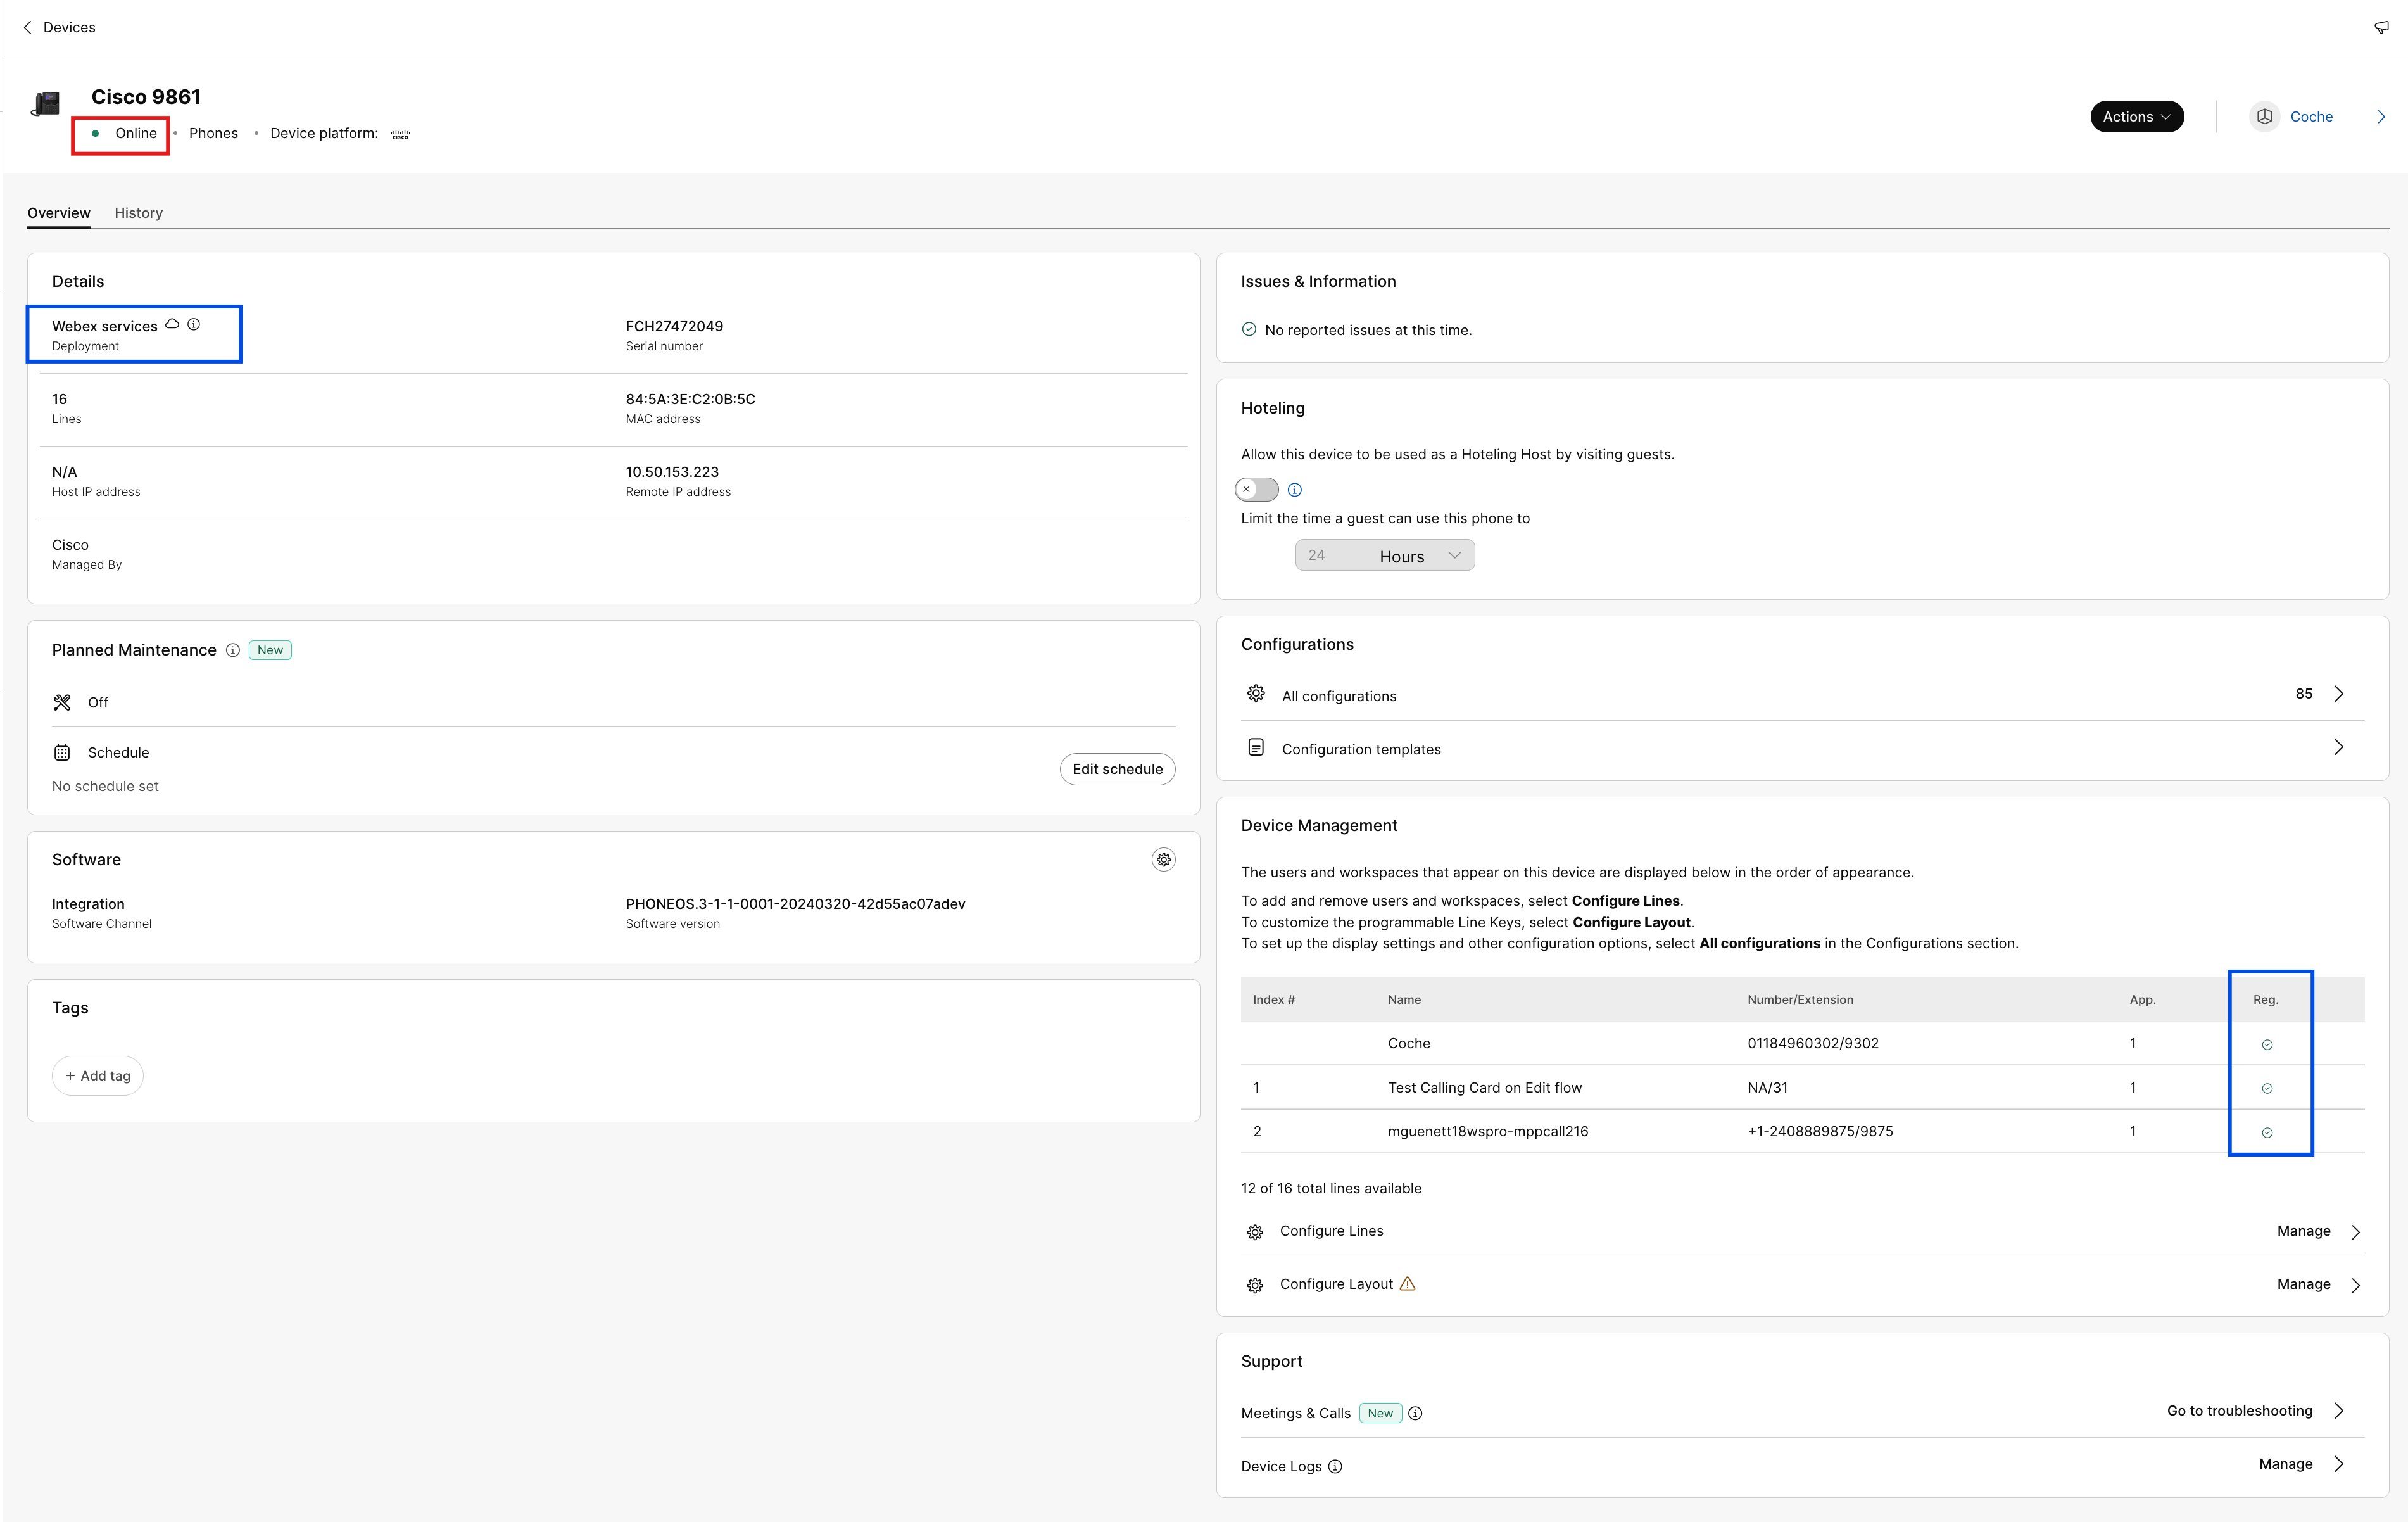
Manage a device for a workspace
You can add and manage devices directly from a workspace profile. Workspace devices can include ATA devices, like fax machines. You can also set up a workspace device as a Hoteling Host. For more information about hoteling, see Hoteling in Control Hub.
| 1 |
Sign in to Control Hub. |
| 2 |
Go to . |
| 3 |
Select the workspace to modify. |
| 4 |
To add a device, click Add Device in the Devices tile. For more information on adding devices to workspace, see Add a phone to a new workspace section. |
| 5 |
To modify an existing device, select the device name. This takes you to the Devices page. Here you can view and edit device settings, delete the device, reboot the device, and enable the device to be used as a Hoteling Host. For more information about configuring phone settings, see Configure and Update Phone Settings. |
| 6 |
If the device added to the workspace is Webex Aware, then the Webex Aware option is displayed under the devices as shown in the diagram. Webex Aware indicates that the device has onboarded to the Webex platform and has access to Webex features that are supported by the phone.
|
| 7 |
Click Actions to manage the device. Actions help to apply configuration changes or update firmware for the MPP devices. The Actions tab has these options for a Webex Aware-enabled device:
|
Configure lines - Add and reorder lines
The Configure Lines feature for assigning primary, shared, and virtual lines to phones allows multiple appearances of a shared line on the same device. The Configure Ports experience for ATAs in not changed.
Here are the updates for the Configure Lines feature for MPP and PhoneOS devices:
-
Primary Lines
-
Assign the owner of the device and ensure it occupies the first line position on the device.
-
Increase the Appearances on that row to add additional appearances.
-
-
Shared Lines / Virtual Lines
-
Assign shared lines from any Calling-enabled user or workspace within the organization with available Shared Call Appearances (SCAs).
-
Increase the Appearances on the shared line row to add additional appearances.
The SCA limits available for the user or workspace may limit the assignable appearances.
-
Assign a Line Index to each shared line. You can rearrange the shared lines through drag-and-drop.
You can't separate the individual appearances of a line.
-
Use the user’s to arrange the position of shared line indexes on a device.
-
-
Appearances
-
Configure multiple appearances of the same primary, shared, or virtual Line as individual weighted line sets.
-
Weighted lines are suffixed with a -1, -2, and so on (Cisco phones only).
-
Calls ring into the first available weighted line appearance.
-
-
New summary information (at the bottom of the page)
-
Unique SIP Registering Lines – Shows the number of unique SIP registering accounts that the phone can support. The maximum number of accounts currently supported is 16.
-
Total Lines Appearances – Shows the total number of assignable line appearances supported by the device. If the phone model supports KEMs, the maximum number of appearances includes the expanded capacity.
-
-
Bulk Line Assignment and Public APIs
- The Bulk CSV and Public API methods for assigning lines include the “Appearances” functionality.
For more information on shared line across locations, see Configuration of shared lines and virtual lines across locations.
When a speed dial is added to a phone using a long press on the desired line key, the speed dial is not visible in Control Hub. A Speed dial can be overwritten by configuring a shared line on that line key.
| 1 |
Sign in to Control Hub. |
| 2 |
Go to Users or Workspaces (depending on where the device to modify is assigned). |
| 3 |
Select a user or workspace. |
| 4 |
Go to Devices and click a device for which you want to add or modify the shared lines. This takes you to the Devices page. |
| 5 |
Under Device Management, click Configure Lines. |
| 6 |
To add a shared line appearance, click the You can assign the same shared line or virtual line to multiple individual
line keys on a phone. In the Appearances column of
the respective line, click the
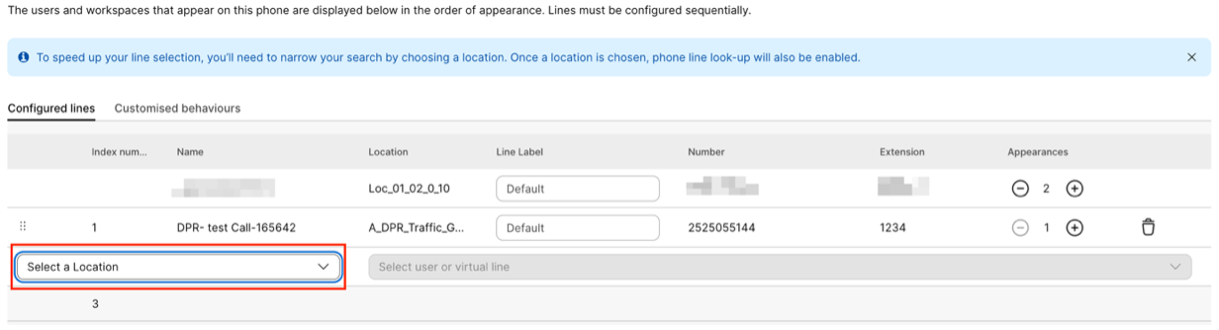
You can add the lines in the order in which you want them to appear. To reorder the line appearance, delete and add to the list in the order you want them to appear. If a user has numbers from other users/groups configured on their devices, you can add a Line label for the shared line. This line label helps to identify one shared line appearance from the other. To remove a line, click the |
| 7 |
Click Save. For large organizations, the administrator must select a location before configuring additional calling lines. click the For a regular organization, the location filter is not available, and the administrator can select a line. |
 icon, search by name or phone number, and choose a
line.
icon, search by name or phone number, and choose a
line.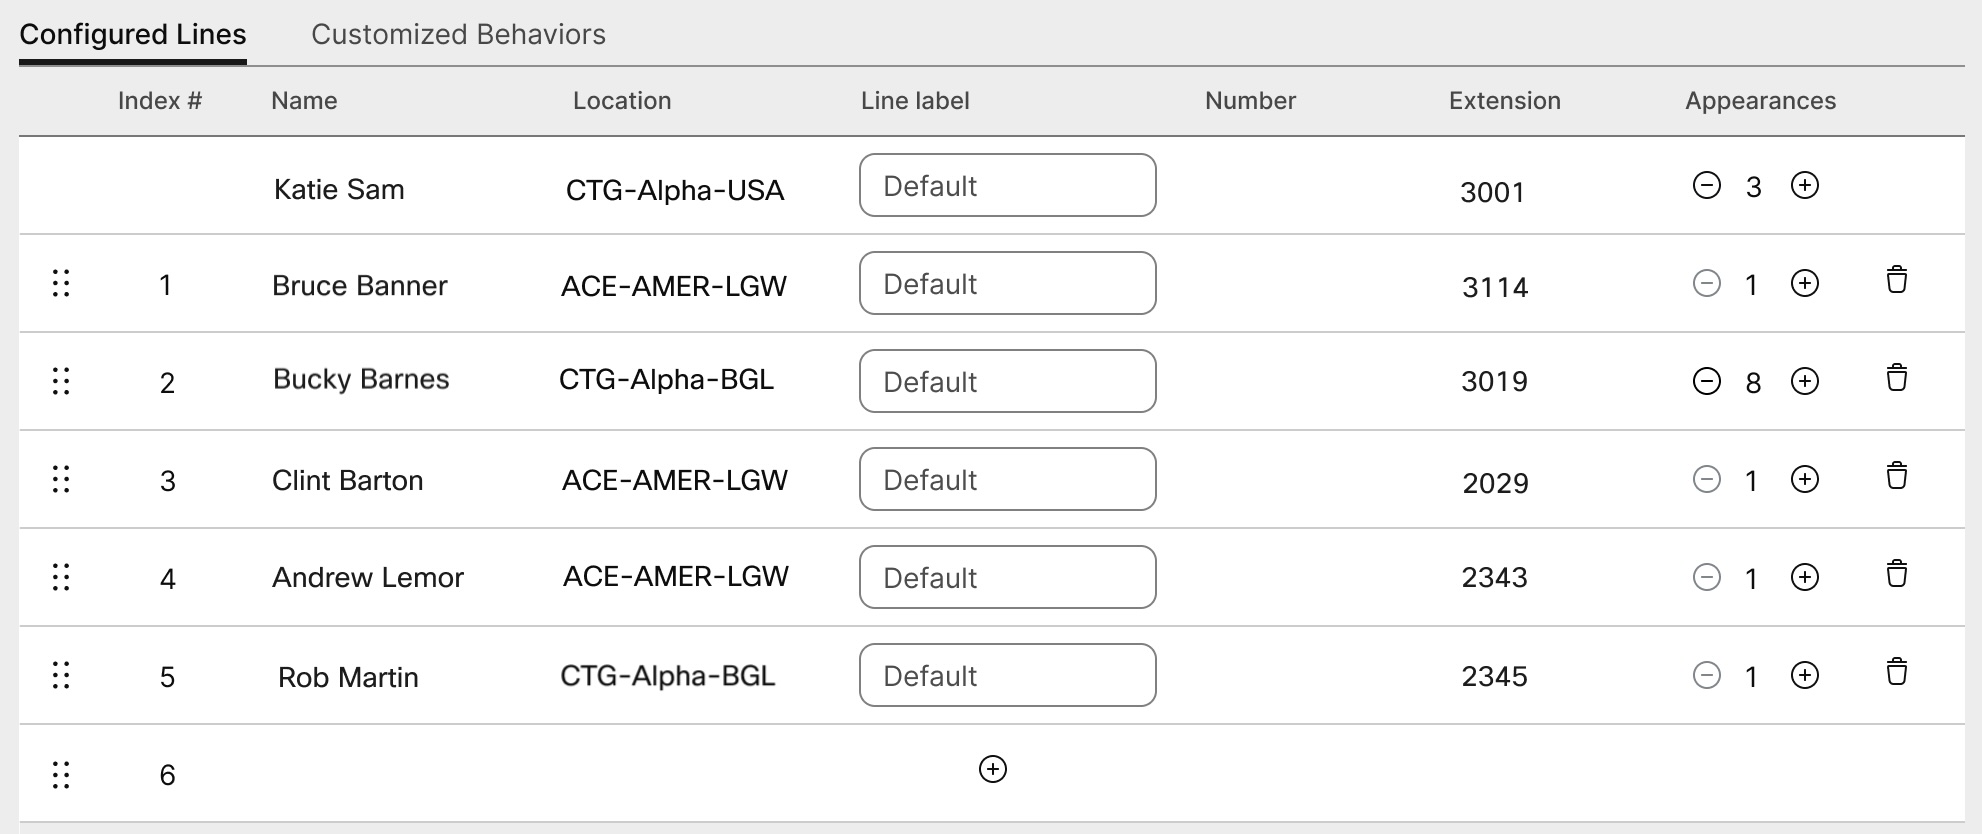
 icon. You can't remove the primary user on line
1.
icon. You can't remove the primary user on line
1.
Configure an ATA device for a user
You can configure the ports on an Analog Telephone Adapter (ATA) device assigned to a user in Control Hub. Currently, the two configurations for ATA devices available are for devices with two ports and devices with 24 ports.
| 1 |
Sign in to Control Hub. |
| 2 |
Go to . |
| 3 |
Select a user to modify and scroll to Devices. |
| 4 |
Select a device where you want to add or modify. |
| 5 |
Under Users on this Device, click Configure Ports. |
| 6 |
To add a shared port configuration, click the |
| 7 |
Enter the name or phone number and select from the options that appear and then click Save. Only workspaces without devices appear in the lookup. |
| 8 |
If the device requires T.38 fax compression, check the box in the T.38 column or override the user-level compression options, and then click Save. A workspace can have an ATA. This is useful for fax machines. |
 icon.
icon.Add numbers to your location
You can add phone numbers to desk and room devices in your customer organization at any time, whether you're in the middle of a trial or have been converted to a paid subscription.
We've increased the number of telephone numbers that you can add in Control Hub from 250 to 1000.
| 1 |
Sign in to Control Hub. |
| 2 |
Go to , and then click Add Numbers. |
| 3 |
Specify the Location and Number Type. If you're porting numbers over, enter both your current and new billing numbers. |
| 4 |
Specify the Location, State, Area Code, Prefix (optional), and then click Search. Available numbers are displayed. |
| 5 |
Select the numbers that you want to add to the location. The numbers you choose move over to the Selected Numbers field. |
| 6 |
Click Save. |
Check the status of ordered PSTN numbers
You can see a list of PSTN numbers that your organization has ordered. With this information, you can see the unused numbers that are available, and the numbers that have been ordered that will soon become available.
| 1 |
Sign in to Control Hub. |
| 2 |
Go to . |
Multiplatform Phone (MPP) connected accessories—Headsets and Key Expansion Modules (KEMs)
When you connect accessories (Headsets/KEMs) to an MPP device, they appear as an inventory item under the Devices tab in the Control Hub. From the Control Hub Devices inventory you can find out the accessory model, the status, and to whom the accessory belongs. When you select an accessory, additional information can be obtained, such as the accessory serial number and current software version. The accessory status field is reported as "online" as long as the accessory is connected to MPP. An MPP-connected headset will automatically upgrade its software with the latest version available from Device Management.
|
Phone Model |
Cisco Headset 520 Series |
Cisco Headset 530 Series |
Cisco Headset 560 Series |
Cisco Headset 730 Series |
|---|---|---|---|---|
|
Cisco IP Phone 8811/8841/8845 |
— |
— |
RJ9 & RJ11 |
— |
|
Cisco IP Phone 8851/8861/8865 |
USB |
USB |
USB RJ9 & RJ11 |
— |
|
Cisco IP Phone 7811/7821/7841/7861 |
— |
— |
— |
— |
|
Cisco IP Phone 6821/6841/6851/6861 |
— |
— |
— |
— |
|
Cisco IP Phone 6871 |
USB |
USB |
USB |
— |
|
Cisco IP Conference Phone 7832/8832 |
— |
— |
— |
— |
|
Phone Model |
KEM |
|---|---|
|
Cisco IP Phone 8811/8841/8845 |
— |
|
Cisco IP Phone 8851/8861/8865 |
BEKEM CP-8800-A-KEM CP-8800-V-KEM |
|
Cisco IP Phone 7811/7821/7841/7861 |
— |
|
Cisco IP Phone 6821/6841/6861/6871 |
— |
|
Cisco IP Phone 6851 |
CP-68KEM-3PCC |
|
Cisco IP Conference Phone 7832/8832 |
— |
To troubleshoot the issues faced with Key Expansion Module (key expansion module) on phones registered to Webex Calling, see Troubleshoot Key Expansion Modules Issues in Webex Calling for details.


