- Home
- /
- Article

Thanks for your feedback.

Manage auto attendants
 In this article
 Feedback?
Set up an auto attendant to answer incoming calls and provide menu options to direct callers to right person, hunt group, or voicemail without the help of a receptionist.
An auto attendant is an automated system that allows you to offer 24/7 call handling. The system answers the incoming calls and routes the callers to an answering service, a live person, or voicemail without the intervention of an operator or receptionist. With this feature, you can ensure efficient call handling and callers' needs are met.
Here are some of the key features of an auto attendant:
-
Create business hours schedules during which your auto attendant operates.
-
Create after hours, holiday, or any special closure schedules during which your holiday auto attendant operates.
-
Provide dialing menu options to direct your customers where they need to go when they enter a specific number.
-
Customize greetings to address your caller’s needs.
Create a new auto attendant
| 1 |
Sign in to Control Hub. |
| 2 |
Go to . |
| 3 |
Go to the Auto Attendant card and click Add New .
|
| 4 |
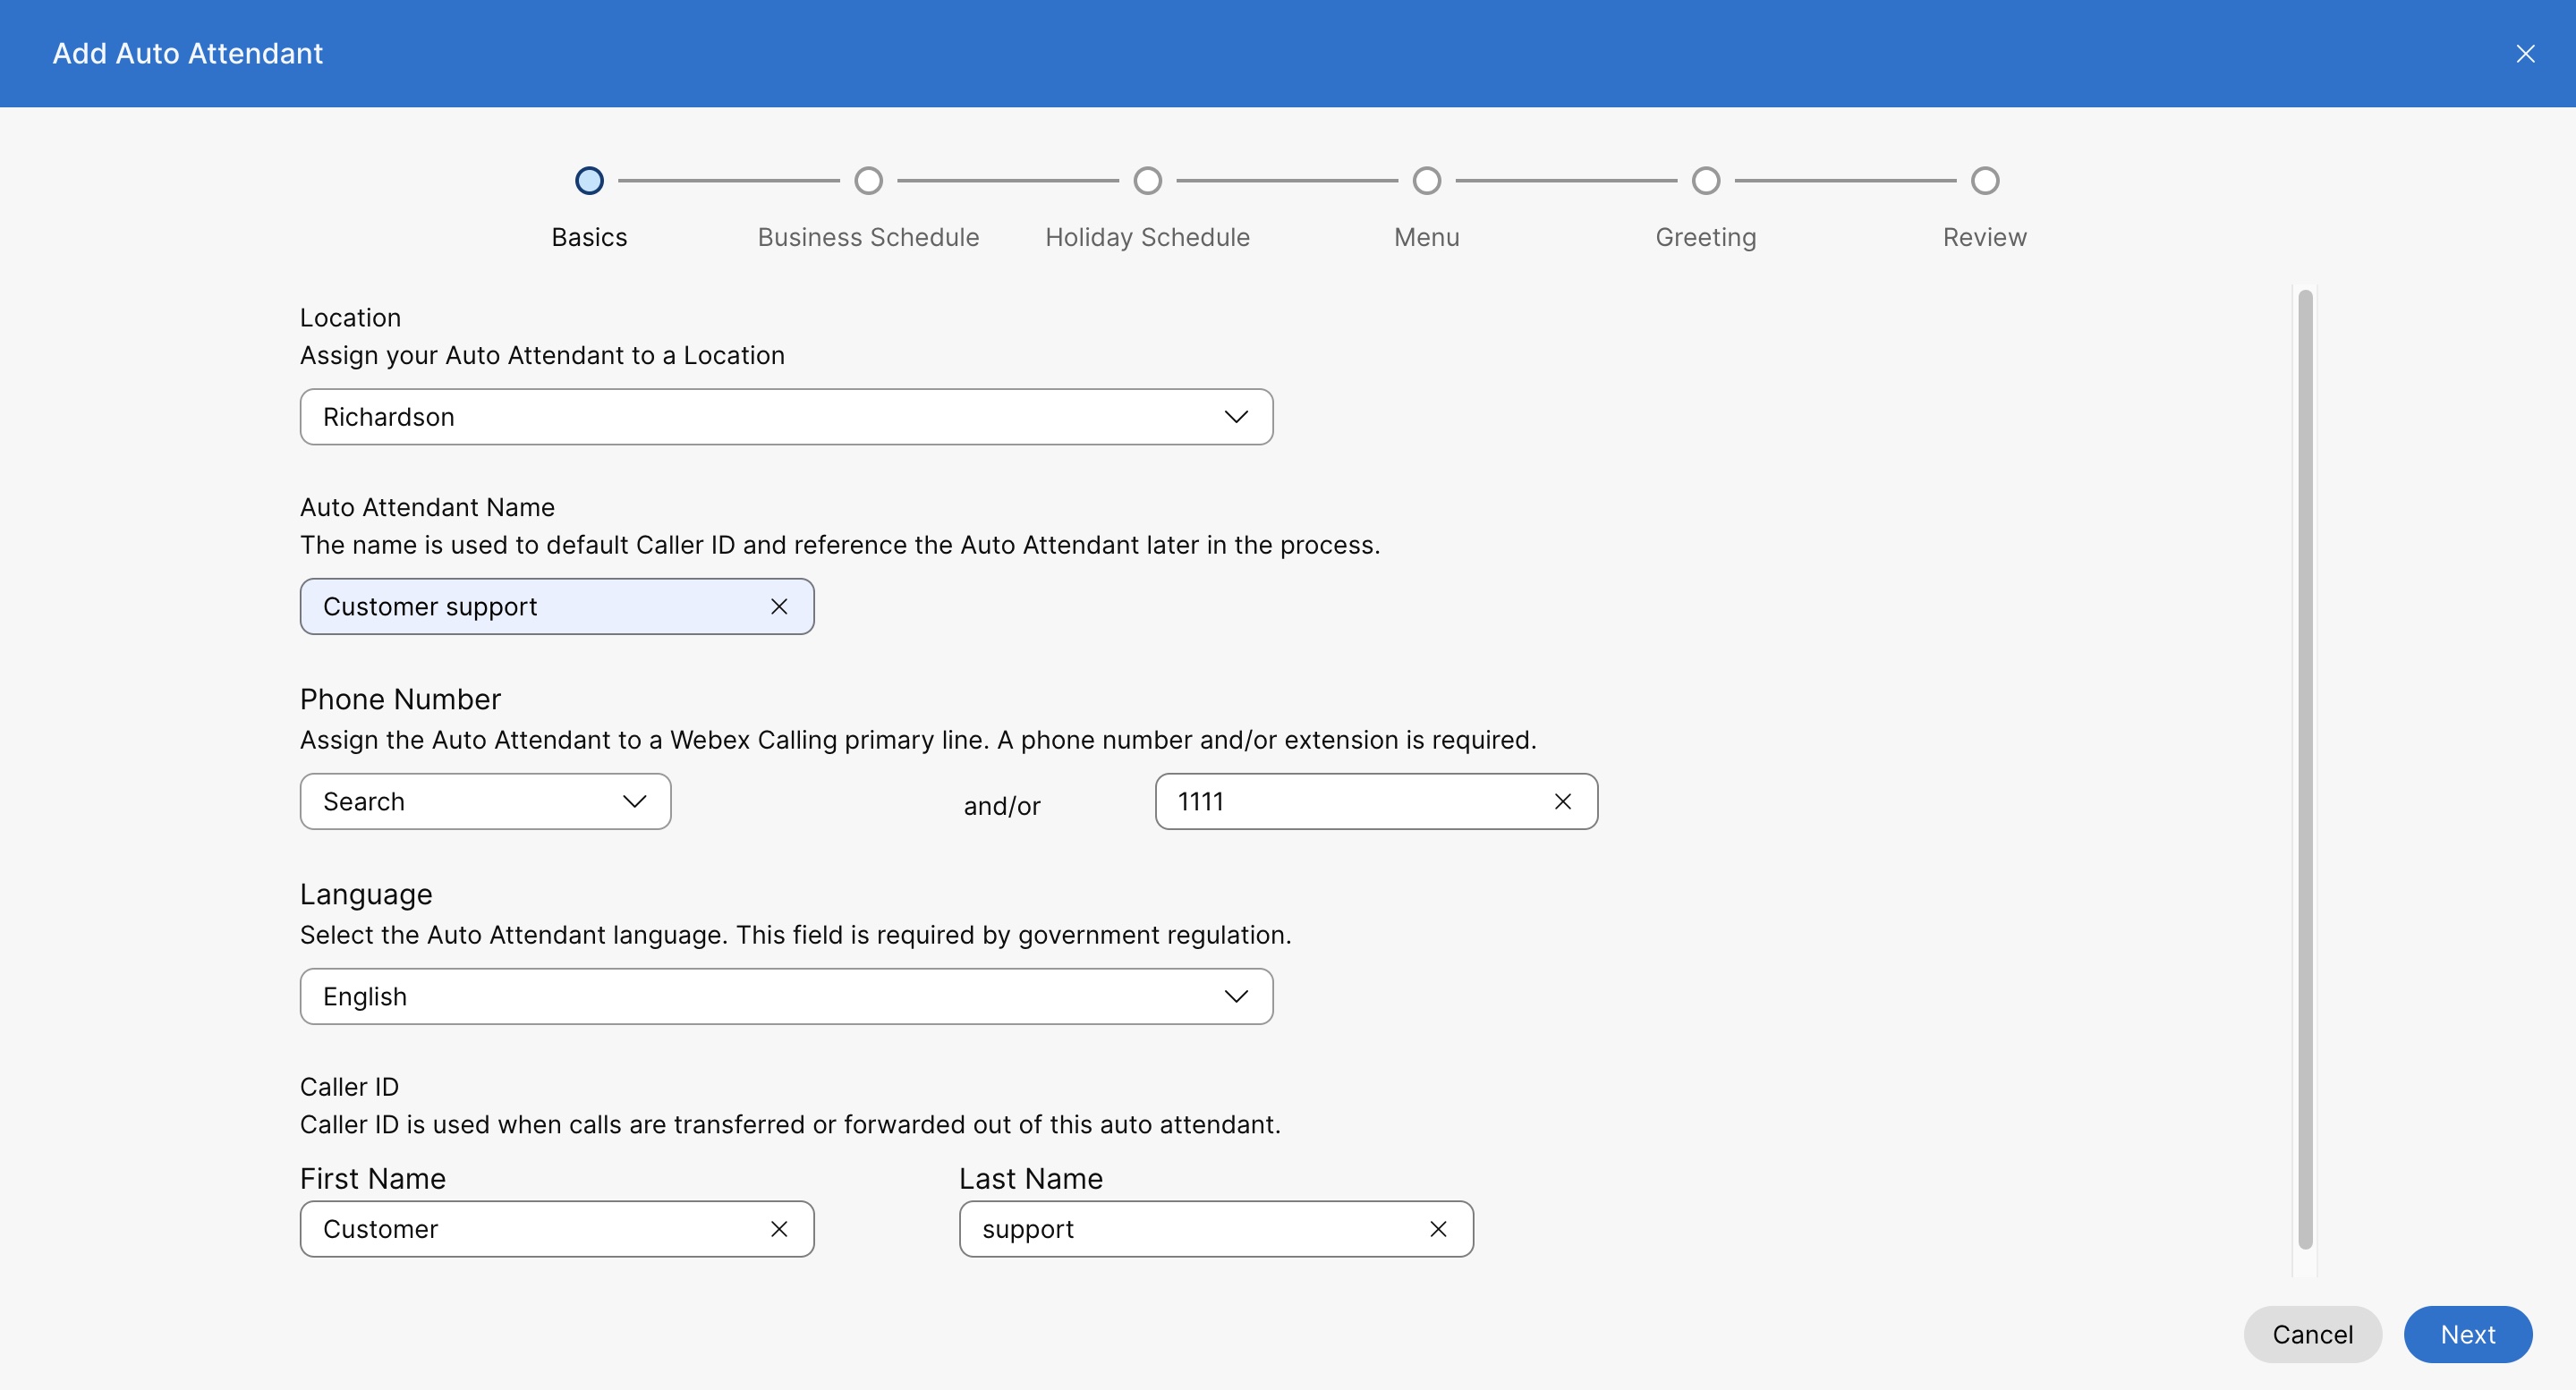
Select a Location from the drop-down menu. Once the auto attendant is created, you can't change the location later. A location is a container with a location-specific calling configuration. See Configure Cisco Webex Calling for Your Organization for more information. When configuring an auto attendant, you can provision the number of auto attendants for each location or organization. |
| 5 |
Auto Attendant Name—Enter a name for the auto attendant. |
| 6 |
Phone Number and Extension—Assign a primary phone number and an extension to the auto attendant. If you leave the extension field blank, the system automatically assigns the last four digits of the phone number as an extension for this auto attendant. To modify it, see Edit auto attendant phone numbers section. |
| 7 |
Choose which Direct line caller ID name is displayed when a person makes a call from this auto attendant.
Other direct line caller ID name supports unicode characters of maximum 128 characters length. Some PSTN providers may not honor the caller ID name setting through Webex Calling. |
| 8 |
In Dial by Name section, enter a name which you want to use to dial this auto attendant. Dial by Name field supports ASCII characters. |
| 9 |
Language—Select a language from the drop-down menu. The selected language is used for default voice greetings and other voice prompts based on menu settings. |
| 10 |
Click Next. |
| 11 |
On the Business Hours Schedule page, set the hours during which your business hours auto attendant operates. You can choose an existing schedule from the drop-down, or create a new schedule. Click Next. The existing schedule drop-down displays all the business hours schedules that you created for the location. To create a new schedule for location, see Create a schedule. |
| 12 |
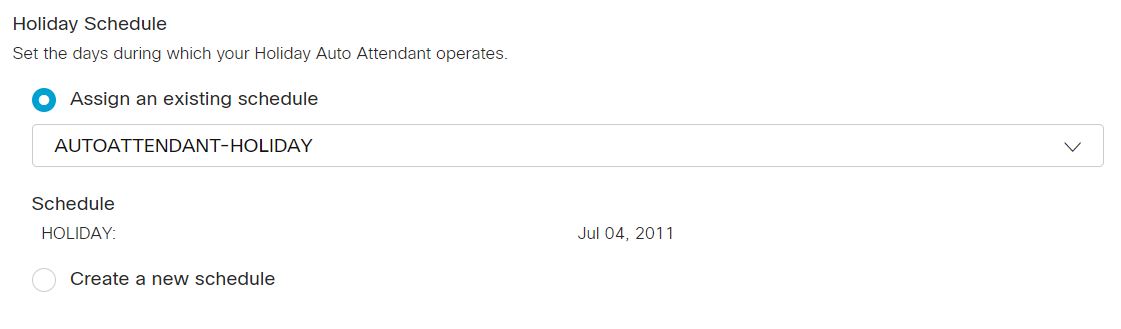
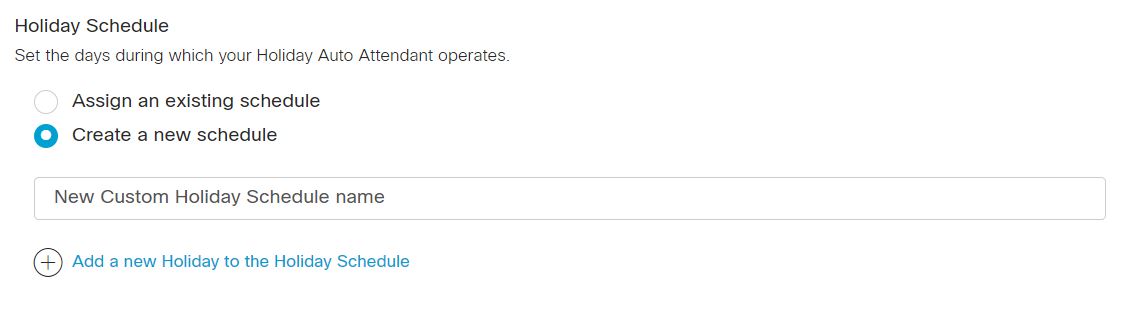
On the Holiday Schedule page, set the days during which your holiday auto attendant operates. You can choose an existing schedule from the drop-down, or create a new schedule. Click Next. The existing schedule drop-down displays all the holiday schedules that you created for the location. To create a new schedule for location, see Create a schedule. |
| 13 |
On the Menu page, under both Business Hours and After Hours tabs, set the Business hours menu to assign the dialing menu options and the Menu timeout configuration to configure the no/invalid input behaviour. Click Next.
Business hours menu
The dialing menu options direct your customers to where they need to go when they enter a specific number on their phone. The following functions are available to assign to a keypad number:
Menu timeout and repeat configuration You can set the following behaviors to take effect if there’s no input or invalid input from the caller.
|
| 14 |
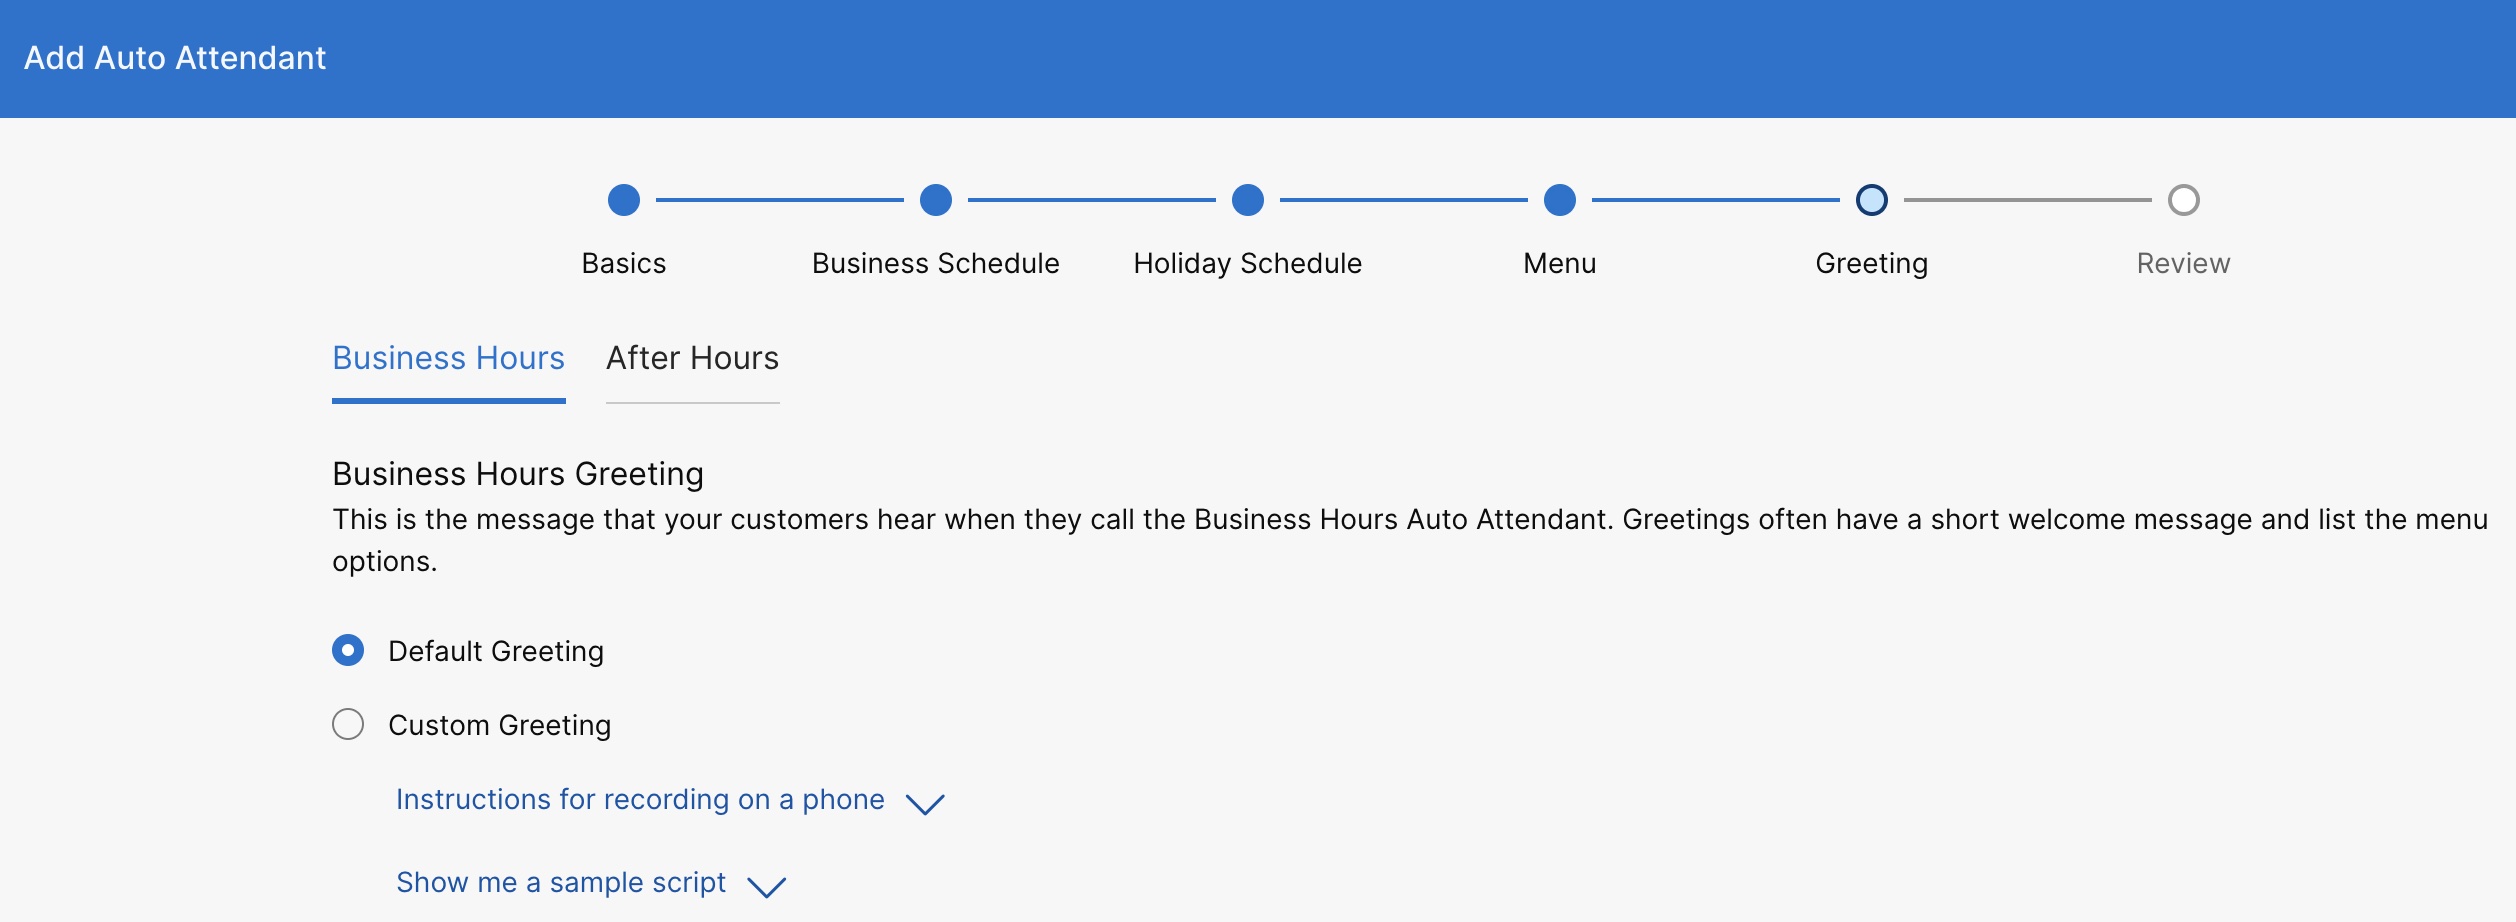
On the Greeting page, set the greetings or announcement that's played for both business hours and after hours. Under both the Business Hours and After Hours tabs, you can choose to play the default greeting or you can choose a custom greeting to upload an audio recording, or record your own greeting. Click Next.
You can find more information for recording from your phone and sample greeting scripts by clicking Instructions for recording on a phone and Show me a sample script. To record by phone, first you need to set up your voice portal number and passcode for the location this auto attendant is associated with. For details, see Configure voice portals for Webex Calling. |
| 15 |
On the Review page, under each tab, review your new auto attendant settings to make sure everything is correct. Click Create to save. |
Disable an auto attendant
| 1 |
Sign in to Control Hub. |
| 2 |
Go to . |
| 3 |
Go to the Auto Attendant card and click Manage. |
| 4 |
Select an auto attendant that you want to disable. |
| 5 |
Go to the Overview section and turn off the Enable Auto Attendant toggle. |
| 6 |
Click Save. |
Edit auto attendant general settings
| 1 |
Sign in to Control Hub. |
| 2 |
Go to . |
| 3 |
Go to the Auto Attendant card and click Manage. |
| 4 |
Select an auto attendant. |
| 5 |
Go to Overview section and click General Settings. |
| 6 |
View or edit the Language from the Language drop-down. |
| 7 |
View or edit the Time Zone from the Time Zone drop-down. |
| 8 |
View or edit the Caller ID which is used when calls are transferred out of this auto attendant. |
| 9 |
Click Save. |
Edit auto attendant phone numbers
You can change your auto attendant phone numbers and add up to 10 alternate numbers.
| 1 |
Sign in to Control Hub. |
| 2 |
Go to . |
| 3 |
Go to the Auto Attendant card and click Manage. |
| 4 |
Select an auto attendant. |
| 5 |
Go to Overview section and click Phone numbers. |
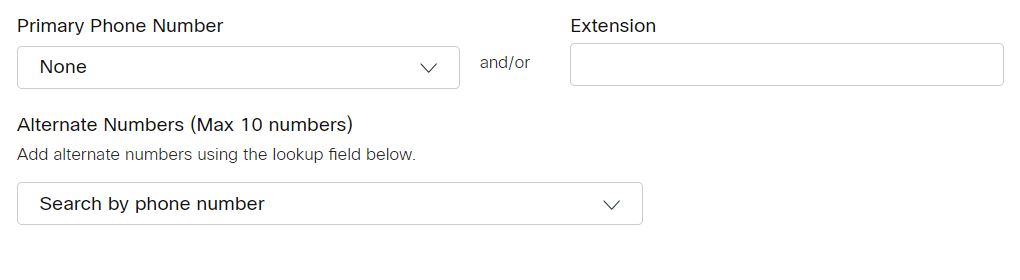
| 6 |
Edit the Primary Phone Number and Extension. If you've left the extension field blank when creating the auto attendant, the system automatically assigns the last four digits of the phone number as an extension for this auto attendant. |
| 7 |
Search and add Alternate Numbers. |
| 8 |
Click Save.
|
Configure auto attendant call forwarding
You can forward all incoming calls based on a set of criteria that you define.
| 1 |
Sign in to Control Hub. |
| 2 |
Go to . |
| 3 |
Go to the Auto Attendant card and click Manage. |
| 4 |
Select an auto attendant. |
| 5 |
Go to Overview section and click Call Forwarding. |
| 6 |
Turn on the Call Forwarding toggle. |
| 7 |
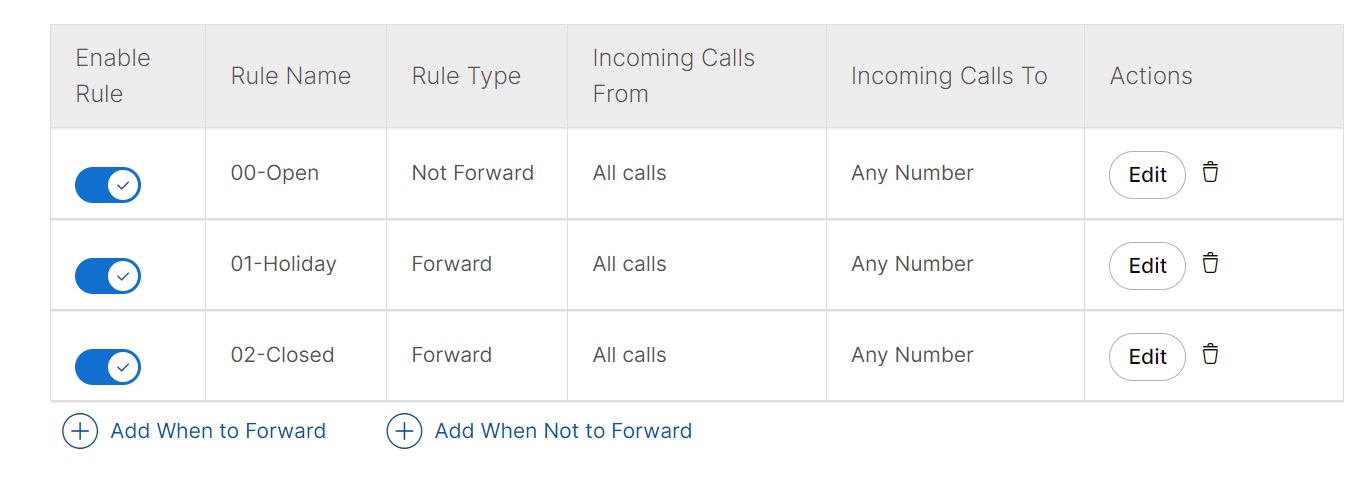
Choose one of the following options:
If you choose Selectively Forward Calls, you need to have at least one rule for call forwarding to be active.
|
| 8 |
If you choose Always Forward Calls, choose a number click Save. When choosing Always Forward or Selectively Forward, select Send to Voicemail to forward all calls to an internal voicemail. The Send to Voicemail option is disabled when you enter an external number. A virtual line number can also be added as a number to forward the calls to. |
| 9 |
If you choose Selectively Forward, create a rule by clicking Add When to Forward or Add When Not to Forward. On provisioning the Selectively Forward Calls option, the Add When Not to Forward rule takes precedence over the Add When to Forward rule. |
| 10 |
Enter a Rule Name. |
| 11 |
For When to Forward or When Not to Forward, select a Business Hours Schedule and Holiday Schedule from the drop-down. |
| 12 |
For Forward To, choose a Default Phone Number or Different Phone Number to forward the calls to. |
| 13 |
For Calls From, choose to forward calls from Any Number or Selected Numbers. If you choose Selected Numbers, select the following options:
|
| 14 |
For Calls To, select a number or alternate number from the drop-down to forward a call when received on this number in your organization. |
| 15 |
Click Save. |

-
The rules are sorted in the table by rule name character. Example: 00_rule, 01_rule, and so on.
-
The "Not to Forward" rule always takes precedence over the "Forward" rule.
-
The rules are processed based on the order they are listed in the table.
-
You can create multiple rules. However, if a rule is satisfied, the system no longer checks the next rule. If you want the specific rule to check first, we suggest that you update the rule name with numbers. For example: If you want the holiday rule to check before the business closed hours rule, then name the rule as 01-Holiday and 02-Closed.
To know more about the basic functionality and examples of the selectively forward call, see Configure Call Forwarding Selective for Webex Calling.
What to do next
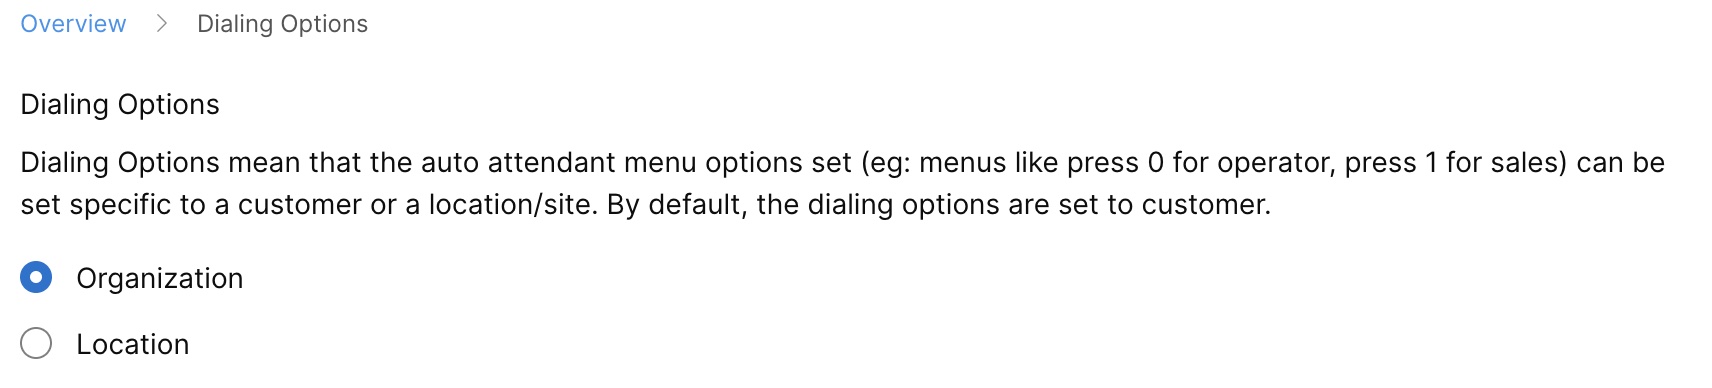
Edit auto attendant dialing options
Set the dialing options to be specific to a customer or a location/site.
| 1 |
Sign in to Control Hub. |
| 2 |
Go to . |
| 3 |
Go to the Auto Attendant card and click Manage. |
| 4 |
Select an auto attendant. |
| 5 |
Go to Overview section and click Dialing Options. |
| 6 |
Choose one of the following options:
|
| 7 |
Click Save.
|
Edit business hours auto attendant
Edit business hours schedules
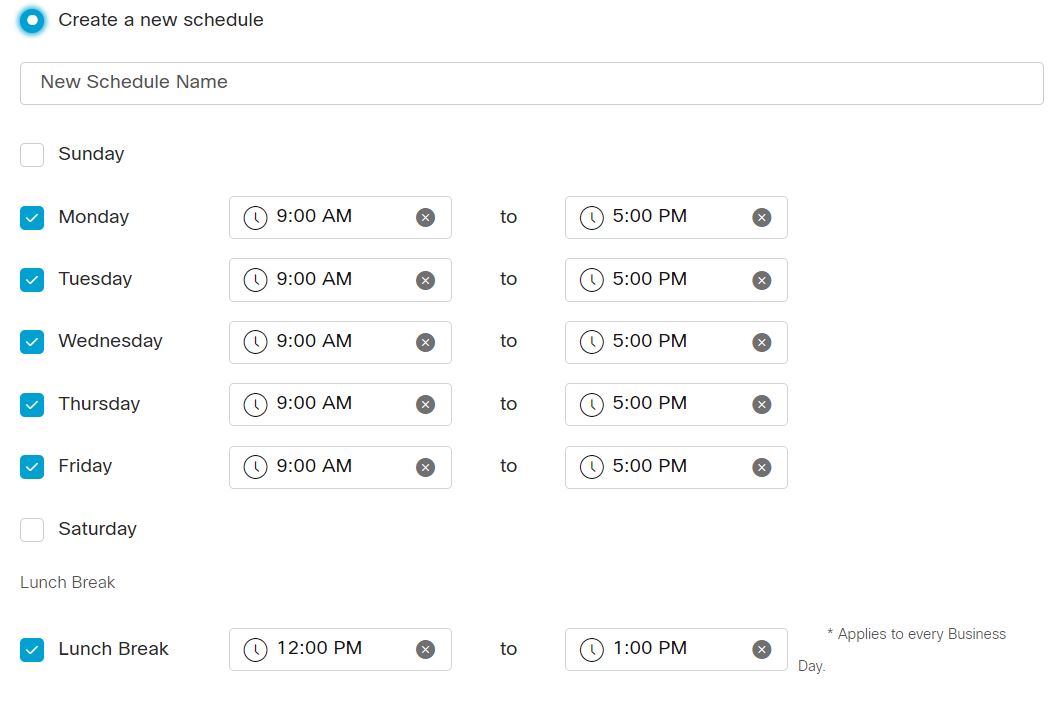
You can assign a business hours schedule created previously, or create your own business hours schedule for the auto attendant.
| 1 |
Sign in to Control Hub. |
| 2 |
Go to . |
| 3 |
Go to the Auto Attendant card and click Manage. |
| 4 |
Select an auto attendant to edit from the list. |
| 5 |
Go to Business hours auto attendant section and click Schedule. |
| 6 |
Choose one of the following options:
|
| 7 |
Click Save. |

Edit business hours menu options
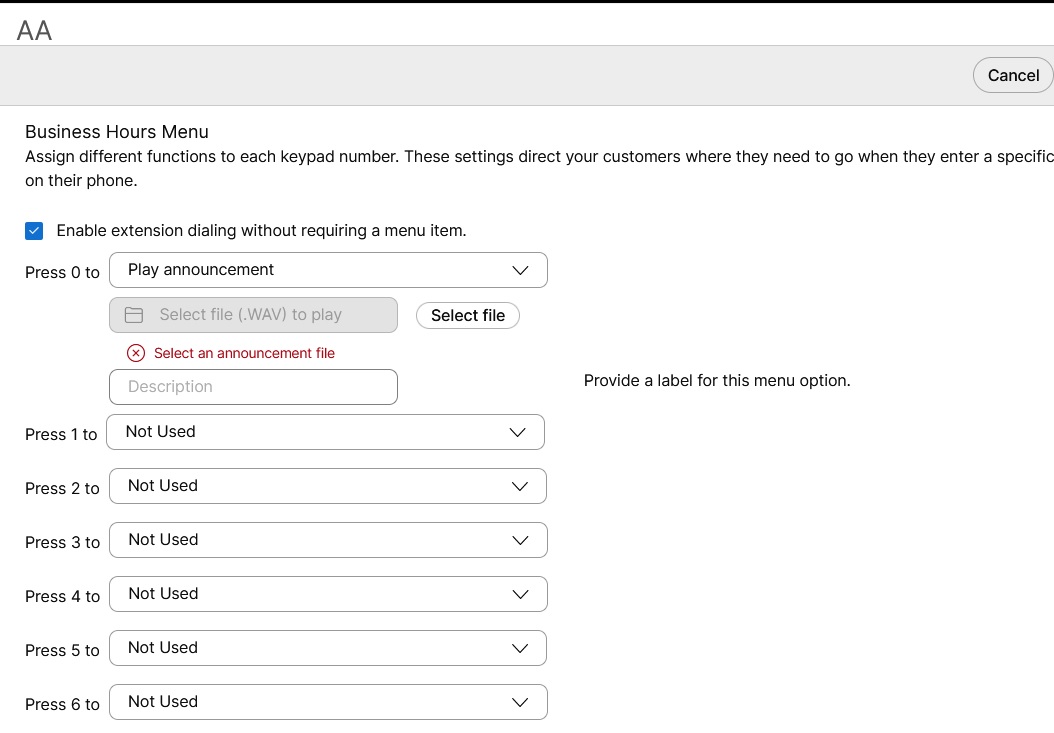
Assign different functions to each keypad number. These settings direct your customers where they need to go when they enter a specific number on their phone.
| 1 |
Sign in to Control Hub. |
| 2 |
Go to . |
| 3 |
Go to the Auto Attendant card and click Manage. |
| 4 |
Select an auto attendant to edit from the list. |
| 5 |
Go to Business hours auto attendant section and click Menu. |
| 6 |
Select Enable extension dialing without requiring a menu item to allow callers to directly dial an extension at any time. The Extension Dialing option for Auto Attendant applies only to Webex Calling subscribers. |
| 7 |
Update the Business hours menu and Menu timeout and repeat configuration. Business hours menu Assign different functions to each number or function key on the dialpad. For each assigned function, enter additional information or search and add user or workspace or virtual line number and extensions to transfer calls.
Menu timeout and repeat configuration 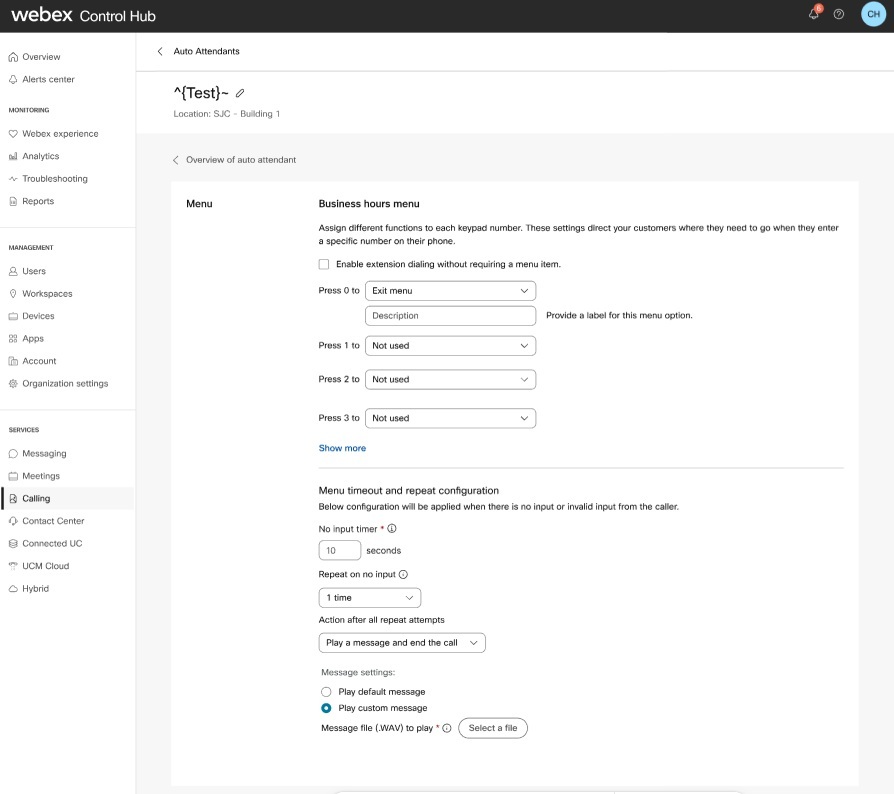
|
| 8 |
Click Save. |
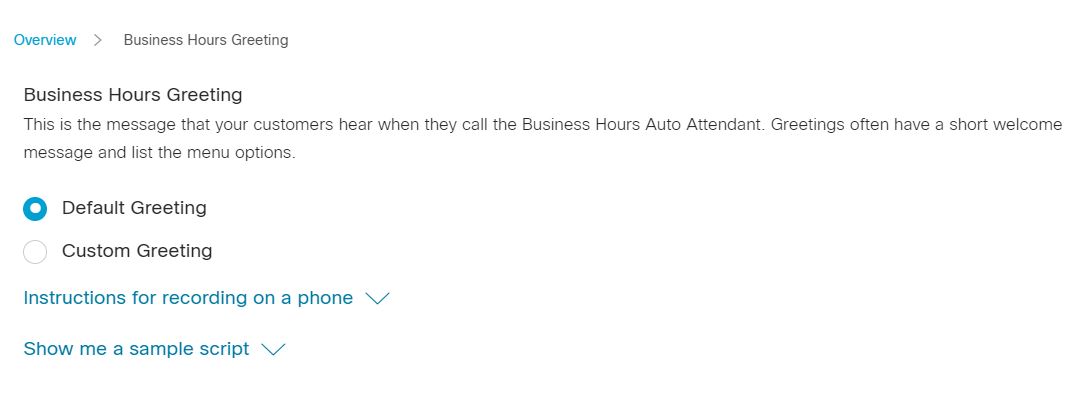
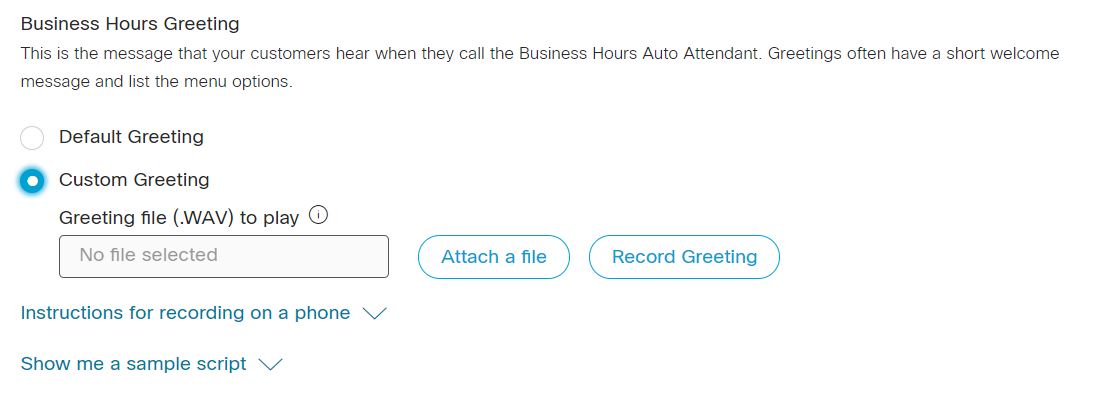
Edit business hours greeting
This is the message that your customers hear when they call during business hours. Greetings often have a short welcome message and list the menu options.
| 1 |
Sign in to Control Hub. |
| 2 |
Go to . |
| 3 |
Go to the Auto Attendant card and click Manage. |
| 4 |
Select an auto attendant to edit from the list. |
| 5 |
Go to Business hours auto attendant section and click Greeting. |
| 6 |
Choose one of the following options:
The audio (WAV) file must meet the following requirements:
You can find more information for recording from your phone and sample greeting scripts by clicking Instructions for recording on a phone and Show me a sample script. To record by phone, first you need to set up your voice portal number and passcode for the location this auto attendant is associated with. For details, see Configure voice portals for Webex Calling. |
| 7 |
Click Save. |
Edit after hours auto attendant
Edit after hours menu options
Assign different functions to each keypad number to direct your customers where they need to go when they enter a specific number on their phone. The menu that you set for after hours also applies to the holiday schedule.
| 1 |
Sign in to Control Hub. |
| 2 |
Go to . |
| 3 |
Go to the Auto Attendant card and click Manage. |
| 4 |
Select an auto attendant to edit from the list. |
| 5 |
Go to After hours auto attendant section and click Menu. |
| 6 |
Select Enable extension dialing without requiring a menu item to allow callers to directly dial an extension at any time. |
| 7 |
Update the Business hours menu and Menu timeout and repeat configuration. Business hours menu Assign different functions to each number or function key on the dialpad. For each assigned function, enter additional information or search and add user or workspace or virtual line number and extensions to transfer calls.
Menu timeout and repeat configuration
|
| 8 |
Click Save. |
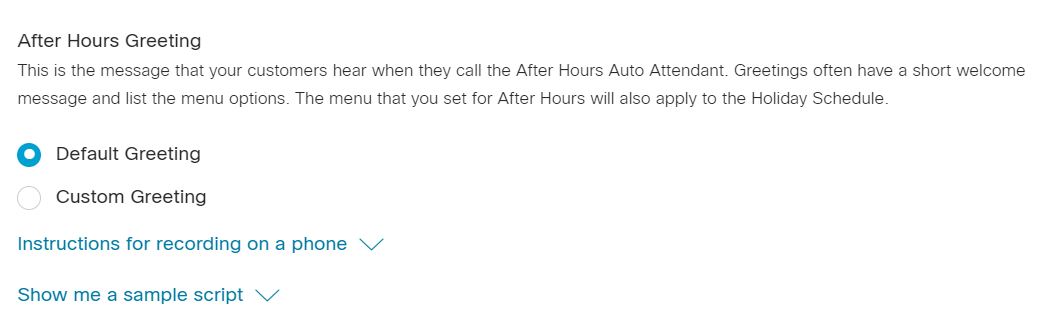
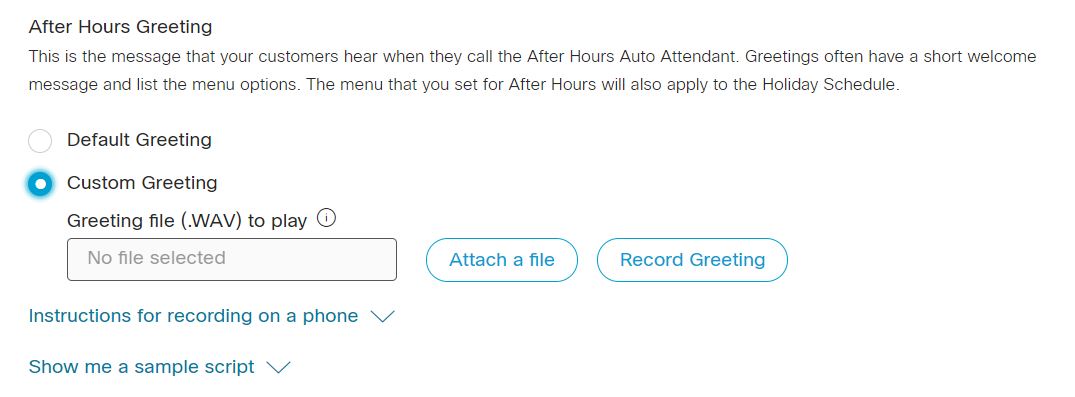
Edit after hours greeting
This is the message that your customers hear when they call after business hours. Greetings often have a short welcome message and list the menu options. The menu that you set for after hours also applies to the holiday schedule.
| 1 |
Sign in to Control Hub. |
| 2 |
Go to . |
| 3 |
Go to the Auto Attendant card and click Manage. |
| 4 |
Select an auto attendant to edit from the list. |
| 5 |
Go to After hours auto attendant section and click Greeting. |
| 6 |
Choose one of the following options:
The audio (WAV) file must meet the following requirements:
You can find more information for recording from your phone and sample greeting scripts by clicking Instructions for recording on a phone and Show me a sample script. To record by phone, first you need to set up your voice portal number and passcode for the location this auto attendant is associated with. For details, see Configure voice portals for Webex Calling. |
| 7 |
Click Save. |
Edit auto attendant holiday schedules
Set the days during which your holiday auto attendant operates. You can assign a holiday schedule created previously, or create your own holiday schedule for the auto attendant.
| 1 |
Sign in to Control Hub. |
| 2 |
Go to . |
| 3 |
Go to the Auto Attendant card and click Manage. |
| 4 |
Select an auto attendant to edit from the list. |
| 5 |
Go to Holiday auto attendant section and click Schedule. |
| 6 |
Choose one of the following options:
|
| 7 |
Click Save. |
Bulk manage auto attendant
You can bulk manage auto attendants with bulk inserts/updates for auto attendants. Administrators can import/export auto attendants with a CSV file.
-
Exporting CSV file into ZIP file format: When exporting data to a CSV file, the number of records may exceed 1000. In such cases, the ZIP file is downloaded, where the ZIP file contains the full set of record(s) in a single CSV file. A separate folder containing all the data is broken down into multiple CSV files with less than 1000 records. These files are generated for the administrators to quickly import any updates and upload.
-
Export a new CSV to capture the latest information for the fields and avoid errors during the import of changes.
If you have many auto attendants to add, the bulk manage auto attendant option is convenient and the CSV support reduces effort for deployment and migration.
Every auto attendant created in the Control Hub requires populating a wizard with many parameters and the CSV support streamlines the process.
The following functionalities are coming soon:
-
Delete of entire Auto Attendant Instances
-
Create/Modify/Delete Call Forwarding Rule
-
Exposing Bulk CSV operations as external APIs on Hydra Portal
-
Creating new schedules
Prepare your CSV
|
Column |
Add an auto attendant |
Edit an auto attendant |
Description |
Supported values |
|---|---|---|---|---|
|
Name |
Mandatory |
Mandatory |
Enter the name of the auto attendant. |
1-30 characters |
|
Phone Number |
Mandatory if the extension is left blank |
Mandatory if the extension is left blank |
Enter the phone number. You must have either a phone number or an extension. |
Use E.164 numbers for CSV import. Example: +12815550100 NOTE: Ensure the location is on the Locations tab in the Control Hub. |
|
Extension |
Mandatory if the phone number is left blank |
Mandatory if the phone number is left blank |
Enter the extension. You must have either a phone number or an extension. |
Two to ten digit extension. Example: 00-999999. Extensions that match emergency numbers in the location country aren’t allowed. Example: You can't use 911 as an extension in the U.S. |
|
Location |
Mandatory |
Mandatory |
Enter the location to add auto attendants. |
Example: San Jose. NOTE: Ensure the location is on the Locations tab in the Control Hub. |
|
Time Zone |
Optional |
Optional |
Enter the auto attendant time zone key. This time zone applies to the schedules applied to the auto attendants. |
Example: America/Chicago. Character length: 1-127 |
|
Language Code |
Optional |
Optional |
Enter the announcement language for the auto attendants. |
Example: en_us |
|
Direct Line ID Caller Name Option |
Optional |
Optional |
Select if you want to use display name or a custom name as a caller ID. |
Select DISPLAY_NAME or CUSTOM_NAME to be used as caller ID. By default DISPLAY_NAME is selected. |
|
CUSTOM NAME |
Optional |
Optional |
Enter a custom name for caller ID. Unicode characters are supported. |
String |
|
Dial By Name |
Optional |
Optional |
Enter the name by which you can dial this auto attendant. ASCII characters are supported. |
String |
|
Business Schedule |
Mandatory |
Mandatory |
Enter the business schedule name. |
Example: 00_Closed |
|
Holiday Schedule |
Mandatory |
Mandatory |
Enter the holiday schedule name. |
Example: 01_Holiday |
|
Dialing Type |
Optional |
Optional |
Enter the dialing type. |
ENTERPRISE,GROUP |
|
Business Hours Menu Extension Enabled |
Optional |
Optional |
Enter TRUE to enable the business hours menu extension. Enter FALSE to disable the business hours menu extension. |
TRUE, FALSE |
|
After Hours Menu Extension Enabled | Optional | Optional |
Enter TRUE to enable the after hours menu extension. Enter FALSE to disable the after hours menu extension. |
TRUE, FALSE |
|
Auto Attendant Enable |
Optional |
Optional |
Enter ENABLED to enable the option. Enter DISABLED to disable the option. |
ENABLED, DISABLED |
|
Alternate Numbers Action |
Optional |
Optional |
Enter ADD to add the alternate numbers you list in this row. Enter REMOVE to remove the alternate numbers you list in the row. Enter REPLACE if you want to remove all previously entered alternate numbers and replace it with the alternate numbers you’re adding in this row only. |
ADD, REMOVE,REPLACE |
|
Business Hours Greeting Type |
Optional |
Optional |
Enter the business hours greeting type as Default or Custom. If you enter Custom, then enter the business hours announcement name, media type, and level details. |
DEFAULT, CUSTOM |
|
Business Hours Announcement Name |
Optional |
Optional |
Enter the business hours announcement name. |
Example: Service-outage_loc.wav |
|
Business Hours Announcement Media Type |
Optional |
Optional |
Enter the business hours announcement media type. |
WAV |
|
Business Hours Announcement Level |
Optional |
Optional |
Enter the level (organization, location, or auto attendant/entity) at which the custom announcement is defined. |
LOCATION, ORGANIZATION, ENTITY |
|
After Hours Greeting Type |
Optional |
Optional |
Enter the after hours greeting type as Default or Custom. If you enter Custom, then enter the after hours announcement name, media type, and level details. |
DEFAULT, CUSTOM |
|
After Hours Announcement Name |
Optional |
Optional |
Enter the after hours announcement name. |
Example: Holiday-announcement-org.wav |
|
After Hours Announcement Media Type |
Optional |
Optional |
Enter the after hours announcement media type. |
WAV |
|
After Hours Announcement Level |
Optional |
Optional |
Enter the level (organization, location, or auto attendant/entity) at which the custom announcement is defined. |
LOCATION, ORGANIZATION, ENTITY |
|
Business Hours Call Treatment Retry Attempt For No Input |
Mandatory |
Mandatory |
Specify the retry attempts to make during business hours when the caller provides no input |
ONE_TIME TWO_TIMES THREE_TIMES NO_REPEAT |
|
Business Hours Call Treatment No Input Timer |
Mandatory |
Mandatory |
Enter the timer value for business hours call treatment when there is no caller input |
Acceptable values: 1-60 Default value: 10 seconds Example:20 seconds |
|
Business Hours Call Treatment Action |
Mandatory |
Mandatory |
Enter the action to perform during business hours when a caller provides no input and all retry attempts are exhausted |
TRANSFER_TO_OPERATOR PLAY_MESSAGE_AND_DISCONNECT DISCONNECT TRANSFER_WITH_PROMPT TRANSFER_WITHOUT_PROMPT TRANSFER_TO_MAILBOX |
|
Business Hours Call Treatment Greeting Type |
Optional |
Optional |
This setting specifies the greeting type to use when the Business Hours Call Treatment Action is set to PLAY_MESSAGE_AND_DISCONNECT. Enter the business hours call treatment greeting type as Default or Custom. If you enter Custom, then enter the business hours announcement name, media type, and level details. |
DEFAULT, CUSTOM |
|
Business Hours Call Treatment Action Value |
Optional |
Optional |
Select the file to use when the Business Hours Call Treatment Greeting Type is set to CUSTOM |
Example: 1745343166934.wav | WAV | LOCATION |
|
Business Hours Call Treatment Transfer Call To |
Optional |
Optional |
Specify the destination to transfer when the Business Hours Call Treatment Action is set one of the TRANSFER option |
Example:-7856758767 |
|
After Hours Call Treatment Retry Attempt For No Input |
Mandatory |
Mandatory |
Specify the after hours retry attempts the system should make when the caller provides no input |
ONE_TIME TWO_TIMES THREE_TIMES NO_REPEAT |
|
After Hours Call Treatment No Input Timer |
Mandatory |
Mandatory |
Enter the timer value for after hours call treatment when there is no caller input |
Acceptable values: 1-60 Default value: 10 seconds Example: 20 seconds |
|
After Hours Call Treatment Greeting Type |
Mandatory |
Mandatory |
This setting specifies the greeting type to use when the After Hours Call Treatment Action is set to PLAY_MESSAGE_AND_DISCONNECT. Enter the after hours call treatment greeting type as Default or Custom. |
DEFAULT, CUSTOM |
|
After Hours Call Treatment Action |
Mandatory |
Mandatory |
Enter the action to perform after business hours, when a caller provides no input and all retry attempts are exhausted |
TRANSFER_TO_OPERATOR PLAY_MESSAGE_AND_DISCONNECT DISCONNECT TRANSFER_WITH_PROMPT TRANSFER_WITHOUT_PROMPT TRANSFER_TO_MAILBOX |
|
After Hours Call Treatment Action Value |
Optional |
Optional |
Select the file to use when the After Hours Call Treatment Greeting Type is set to CUSTOM |
Example: 1745343166934.wav | WAV | LOCATION |
|
After Hours Call Treatment Transfer Call To |
Optional |
Optional |
Specify the destination when the After Hours Call Treatment Action is set one of the TRANSFER option |
Example: 14085550110 |
| Business Hours Press 0–9, * and # Description |
Mandatory if Business Hours Press 0–9, * and # Description is left blank |
Mandatory if Business Hours Press 0–9, * and # Description is left blank |
Select the business hours type. |
Example: Description Character Length: 1-20 |
|
Business Hours Press 0–9, * and # Action |
Mandatory if Business Hours Press 0–9, * and # Action is left blank |
Mandatory if Business Hours Press 0–9, * and # Action is left blank |
Select the business hours type. |
PLAY_ANNOUNCEMENT TRANSFER CALL_WITH_PROMPT TRANSFER CALL_WITHOUT_PROMPT TRANSFER CALL_TO_OPERATOR TRANSFER_TO_VOICEMAIL DIAL_BY_NAME DIAL_BY_EXTENSION REPEAT_MENU EXIT_MENU |
|
Business Hours Press 0–9, * and # Value |
Mandatory for few Actions such as PLAY_ANNOUNCEMENT, TRANSFER_WITH_PROMPT, TRANSFER_WITHOUT_PROMPT, TRANSFER_TO_OPERATOR, TRANSFER_TO_VOICEMAIL |
Mandatory for few Actions such as PLAY_ANNOUNCEMENT, TRANSFER_WITH_PROMPT, TRANSFER_WITHOUT_PROMPT, TRANSFER_TO_OPERATOR, TRANSFER_TO_VOICEMAIL |
Additional value is needed to perform certain actions. |
The format for the Play announcement file is Announcement Name | Announcement Type | Announcement Level Example: CycloneAlert.wav | WAV | LOCATION NOTE: Enter Type in ALL CAPS Other supported actions require a valid phone number or extension. |
|
After Hours Press 0–9, * and # Description |
Mandatory if After Hours Press 0–9, * and # Description is left blank |
Mandatory if After Hours Press 0–9, * and # Description is left blank |
Select the after hours type. |
Example: Description Character Length: 1-20 |
| After Hours Press 0-9, * and # Action |
Mandatory if After Hours Press 0–9, * and # Action is left blank |
Mandatory if After Hours Press 0–9, * and # Action is left blank |
Select the after hours type. |
PLAY_ANNOUNCEMENT TRANSFER CALL_WITH_PROMPT TRANSFER CALL_WITHOUT_PROMPT TRANSFER CALL_TO_OPERATOR TRANSFER_TO_VOICEMAIL DIAL_BY_NAME DIAL_BY_EXTENSION REPEAT_MENU EXIT_MENU |
|
After Hours Press 0-9, * and # Value |
Mandatory for few Actions such as PLAY_ANNOUNCEMENT, TRANSFER_WITH_PROMPT, TRANSFER_WITHOUT_PROMPT, TRANSFER_TO_OPERATOR, TRANSFER_TO_VOICEMAIL |
Mandatory for few Actions such as PLAY_ANNOUNCEMENT, TRANSFER_WITH_PROMPT, TRANSFER_WITHOUT_PROMPT, TRANSFER_TO_OPERATOR, TRANSFER_TO_VOICEMAIL |
Additional value is needed to perform certain actions |
The format for the Play announcement file is: Announcement Name | Announcement Type | Announcement Level Example: CycloneAlert.wav | WAV | LOCATION NOTE: Enter Type in ALL CAPS Other supported actions require a valid phone number or extension. |
|
Alternate Number 1, Alternate Number 2… Alternate Number 10 |
Optional |
Optional |
Enter the alternate numbers to assign to the auto attendants. |
Example: 1112223333 Character length: 1-23 NOTE: Enter Type in ALL CAPS Other supported actions require a valid phone number or extension. |
|
Alternate Number 1 Ring Pattern, Alternate Number 2 Ring Pattern... Alternate Number 10 Ring Pattern |
Optional |
Optional |
If distinctive ringing is enabled for alternate numbers, enter the distinctive ringing ring pattern. |
NORMAL, LONG_LONG, SHORT_SHORT_LONG, SHORT_LONG_SHORT |
Bulk manage auto attendants
| 1 |
Sign in to Control Hub. |
| 2 |
Go to . |
| 3 |
Go to the Auto Attendant card. On the Prefer to create Auto Attendant in bulk message, click Open the bulk editor. |
| 4 |
The Manage Auto Attendant window displays. |
| 5 |
Select a location from the drop-down list to download data for auto attendants on that location, or select all locations to download data for all auto attendants. |
| 6 |
Click Download Data or Download .csv template to verify that your CSV file is properly formatted, making sure to fill in the required information. |
| 7 |
Add or edit the first and last name, phone number, and so on, and upload the updated CSV file. |
| 8 |
Click View Import history/Tasks to view the status of your CSV import and see whether you've encountered any errors. |
View auto attendant analytics
| 1 |
Sign in to Control Hub. |
| 2 |
Go to . |
| 3 |
Go to the Auto Attendant card and click Manage. |
| 4 |
On the Auto Attendant page, click . The Analytics page appears. |
| 5 |
Click the Auto-Attendant tab to find the auto attendant call details. For more information, see Analytics for Your Cloud Collaboration Portfolio.
|
Generate auto attendant reports
You can generate a report that lists all inbound calls that reached the auto attendant service.
| 1 |
Sign in to Control Hub. |
| 2 |
Go to . |
| 3 |
Under Templates, click Calling and click the following reports:
For more information, see Reports for Your Cloud Collaboration Portfolio.
|
Access the auto attendant launch kit
Download the Launch Kit to see what an auto attendant can do. Access the greeting samples and email templates to get you started.


