- Home
- /
- Article

 In this article
Agents can connect directly to subject matter experts in real-time. Setting up Microsoft Teams connector allows agents to quickly identify the right subject matter expert, understand their availability, and contact them to seek help during a customer interaction.
Integrate Webex Contact Center with Microsoft Teams
Administrators can integrate Microsoft Teams for their organization by setting up Microsoft Teams connector.
|
Before you begin
You must have a Microsoft Azure account with one of the following roles to grant permission:
- Global Administrator
- Privileged Role Administrator
| 1 |
Login to Control Hub with the required privileges. | ||
| 2 |
Select Contact Center under Services. | ||
| 3 |
In the Contact Center page, select Integrations under Tenant Settings. All the available connectors are displayed under the Connectors tab. | ||
| 4 |
Select Set Up for Microsoft Teams connector. | ||
| 5 |
Select Authorize to authenticate with your Microsoft Azure account.
| ||
| 6 |
Select Accept to accept the requested permissions. | ||
| 7 |
Select Close after the connector is created. |
The status of the connector shows as Active after the setup.
View or edit the details of Microsoft Teams connector
Before you begin
Your Microsoft Azure account should have:
- Business phone number defined in E.164 format.
- A defined job title and department.
| 1 |
Login to Control Hub with the required privileges. |
| 2 |
Select Contact Center under Services. |
| 3 |
In the Contact Center page, select Integrations under Tenant Settings. All the available connectors are displayed under the Connectors tab. |
| 4 |
Select View/Edit details of Microsoft Teams connector to view or edit the details. |
| 5 |
(Optional) Toggle ON the Display user details setting in Desktop features to enable the agents to view the presence of the subject matter experts and search by name, department, and role of the users from Microsoft Teams when initiating consult or transfer of calls. |
Deactivate or reactivate Microsoft Teams connector
| 1 |
Login to Control Hub with the required privileges. |
| 2 |
Select Contact Center under Services. |
| 3 |
In the Contact Center page, select Integrations under Tenant Settings. All the available connectors are displayed under the Connectors tab. |
| 4 |
Select View/Edit details of Microsoft Teams connector. |
| 5 |
Select Deactivate in the Deactivate section to deactivate the connector. The status of the connector shows as Inactive upon deactivating the connector. |
| 6 |
(Optional) Click Reactivate to reactivate the connector. |
Delete Microsoft Teams connector
| 1 |
Login to Control Hub with the required privileges. | ||
| 2 |
Select Contact Center under Services. | ||
| 3 |
In the Contact Center page, select Integrations under Tenant Settings. All the available connectors are displayed under the Connectors tab. | ||
| 4 |
Select View/Edit details of Microsoft Teams connector. | ||
| 5 |
Select Delete to delete the connector.
|
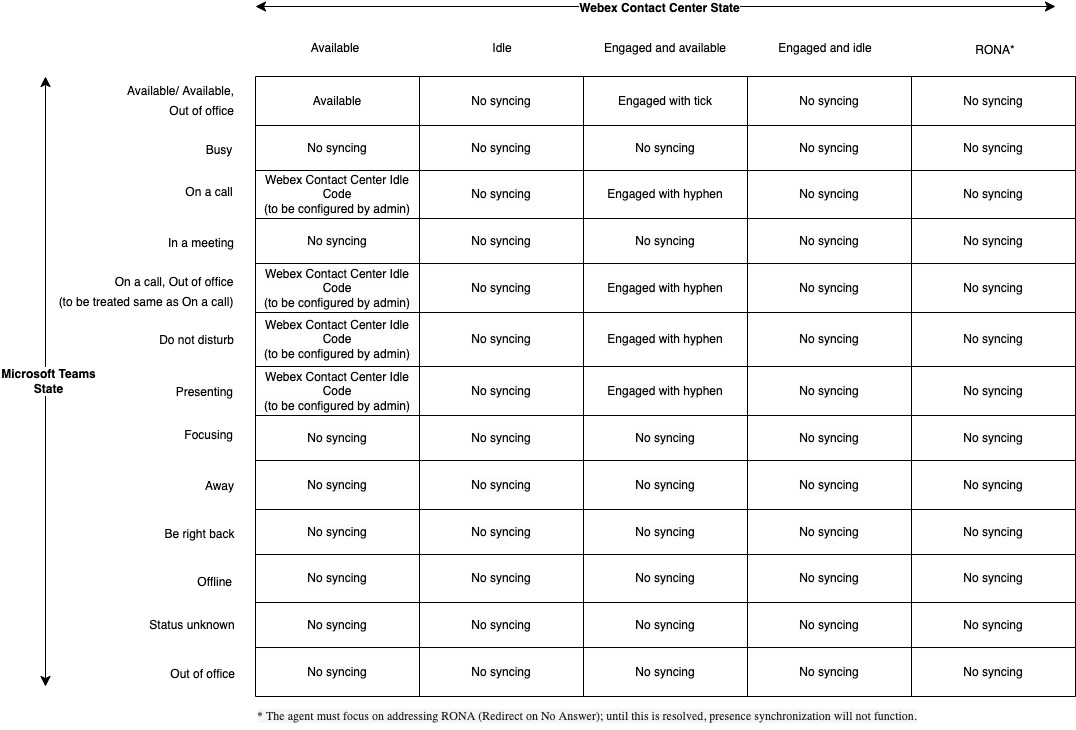
Synchronize Microsoft Teams states with Webex Contact Center idle codes
An agent can have different presence statuses in the Microsoft Teams and Webex Contact Center as per the agent's current activity. Administrator can configure presence synchronization so that the agent's presence is automatically updated across both the platforms, lowering the chances of RONA. Agents are no longer required to manually indicate themselves as unavailable when engaged in non-contact center activities. For example, if an agent is busy on a customer call in the Contact Center, then the agent's status is automatically synchronized in the Microsoft Teams App and the calls are not routed to the agent.
To synchronize agent's presence state between both the applications, administrator maps the Microsoft Teams states with the Webex Contact Center idle codes. This mapping is used to route calls to the agent. The agent states in Microsoft Teams available for mapping with Webex Contact Center are Do not disturb, On a call, and Presenting.
| 1 |
Login to Control Hub with the required privileges. | ||
| 2 |
Select Contact Center under Services. | ||
| 3 |
In the Contact Center page, select Integrations under Tenant Settings. All the available connectors are displayed under the Connectors tab. | ||
| 4 |
Select View/Edit details of Microsoft Teams connector to view or edit the details. | ||
| 5 |
Toggle ON the State synchronization setting in Desktop features to synchronize agent's presence state between both the applications.
|
The following table displays the mapping of states in Microsoft Teams and Webex Contact Center.