- Start
- /
- Artikel

Tack för din feedback.

Webbplatsens överlevnadsförmåga för Webex Calling
 I den här artikeln
 Har du feedback?
Webbplatsens överlevnad säkerställer att ditt företag förblir tillgängligt även om anslutningen till Webex bryts. Den använder en lokal nätverksgateway för att tillhandahålla reservtjänster för samtal till slutpunkter på plats under nätverksavbrott.
Överväganden vid driftsättning
Som standard fungerar Webex Calling-slutpunkter i aktivt läge och ansluter till Webex-molnet för SIP-registrering och samtalskontroll. Om nätverksanslutningen till Webex bryts växlar slutpunkterna automatiskt till överlevnadsläge och registrerar sig hos den lokala överlevnadsgatewayen. I det här läget tillhandahåller gatewayen grundläggande säkerhetskopieringstjänster. När nätverksanslutningen till Webex har återställts växlar samtalskontroll och registreringar tillbaka till Webex-molnet.
Följande anrop stöds i överlevnadsläget:
-
Interna samtal (intrasite) mellan stödda Webex Calling-slutpunkter
-
Externa samtal (inkommande och utgående) med hjälp av en lokal PSTN-krets eller SIP-trunk till externa nummer och E911-leverantörer
För att använda den här funktionen måste du konfigurera en Cisco IOS XE-router i det lokala nätverket som en Survivability Gateway. Survivability Gateway synkroniserar samtalsinformation dagligen från Webex-molnet för slutpunkter på den platsen. Om slutpunkterna växlar till överlevnadsläge kan gatewayen använda denna information för att ta över SIP-registreringar och tillhandahålla grundläggande samtalstjänster.
Konfiguration av en enda plats
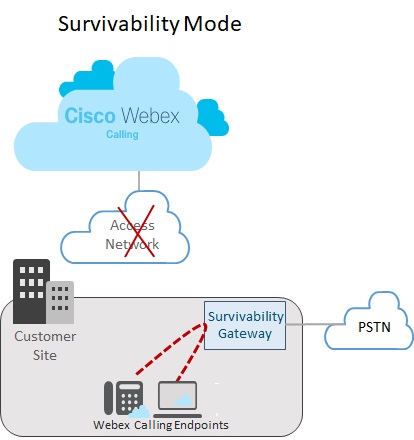
Följande bild visar ett nätverksfelsscenario där anslutningen till Webex är bruten och slutpunkterna på Webex-webbplatsen körs i överlevnadsläge. På bilden dirigerar Survivability Gateway ett internt samtal mellan två slutpunkter på plats utan att kräva en anslutning till Webex. I det här fallet är Survivability Gateway konfigurerad med en lokal PSTN-anslutning. Som ett resultat kan slutpunkter på plats i överlevnadsläge använda PSTN för inkommande och utgående samtal till externa nummer och E911-leverantörer.
Konfiguration av flera platser
Följande bild visar ett nätverksfelsscenario där anslutningen till Webex är bruten och slutpunkter som finns på olika platser körs i överlevnadsläge. Det finns flera mindre platser inom LAN-nätverket som är mappade till en enda Survivability-gateway. Denna implementering optimerar resursutnyttjandet för gatewayen samtidigt som platsspecifika konfigurationer för samtalsrouting bevaras.
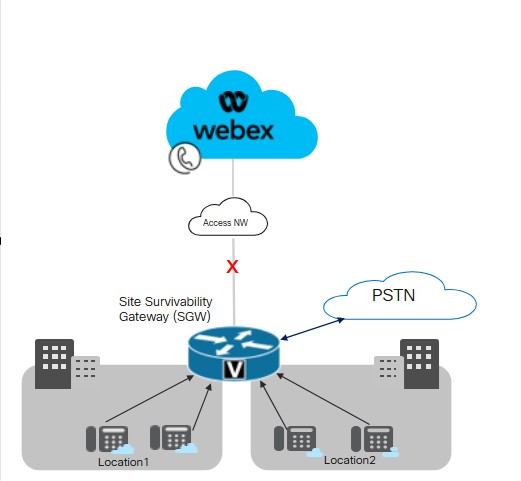
Cisco rekommenderar att man upprätthåller en latensgräns på 50 millisekunder för anslutning mellan Survivability Gateway och slutpunkter på olika platser inom ett LAN.
Viktiga villkor för platsens överlevnadsförmåga
Följande villkor gäller för Survivability Gateway:
-
Webex-molnet inkluderar Survivability Gateways IP-adress, värdnamn och port i enhetens konfigurationsfil. Som ett resultat kan slutpunkter kontakta Survivability Gateway för registrering om anslutningen till Webex bryts.
-
Den dagliga synkroniseringen av samtalsdata mellan Webex-molnet och Survivability Gateway inkluderar autentiseringsinformation för registrerade användare. Som ett resultat kan slutpunkter upprätthålla säkra registreringar, även när de arbetar i överlevnadsläge. Synkroniseringen inkluderar även routinginformation för dessa användare.
-
Survivability Gateway kan dirigera interna samtal automatiskt med hjälp av den dirigeringsinformation som Webex tillhandahåller. Lägg till en PSTN-trunkkonfiguration till Survivability Gateway för att möjliggöra externa samtal.
-
Varje plats som distribuerar Site Survivability kräver en Survivability Gateway inom det lokala nätverket.
-
Registreringar och samtalskontroll återgår båda till Webex-molnet när Webex-nätverksanslutningen återupptas i minst 30 sekunder.
Samlokalisering med Unified SRST
Survivability Gateway stöder samlokalisering av en Webex Survivability-konfiguration och en Unified SRST-konfiguration på samma gateway. Gatewayen kan stödja överlevnadsmöjligheter för både Webex Calling-slutpunkter och för slutpunkter som registrerar sig i Unified Communications Manager. Så här konfigurerar du samlokalisering:
-
Konfigurera Unified SRST-stöd för slutpunkter som registreras i Unified Communications Manager. För konfiguration, se Cisco Unified SRST Administrationsguide.
-
På samma gateway följer du Konfigurationsflöde för webbplatsöverlevnad i den här artikeln för att konfigurera gatewayen med webbplatsöverlevnad för Webex Calling-slutpunkter.
Att tänka på för samtalsdirigering vid samlokalisering
Tänk på följande när du konfigurerar samtalsroutning för samlokaliseringsscenarier:
-
Survivability Gateway dirigerar interna samtal automatiskt förutsatt att båda slutpunkterna i samtalet är registrerade på Survivability Gateway. Interna samtal dirigeras automatiskt mellan alla registrerade klienter (SRST eller Webex Calling).
-
Det är möjligt att anslutningen till ett samtalskontrollsystem bryts medan anslutningen till det andra samtalskontrollsystemet förblir uppe. Som ett resultat registrerar sig en uppsättning slutpunkter till Survivability Gateway medan en annan uppsättning slutpunkter på samma plats registrerar sig till primär samtalskontroll. I det här fallet kan du behöva dirigera samtal mellan de två uppsättningarna slutpunkter till en SIP-trunk eller PSTN-krets.
-
Externa samtal och E911-samtal kan dirigeras till en SIP-trunk eller PSTN-krets.
Funktioner och komponenter som stöds
Följande tabell innehåller information om funktioner som stöds.
| Funktion | MPP-enheter och Webex-appen | VG4xx ATA |
|---|---|---|
|
Intrasite-anknytningssamtal |
Stöds automatiskt utan krav på specifik routingkonfiguration på Survivability Gateway. |
Stöds automatiskt utan krav på specifik routingkonfiguration på Survivability Gateway. Alternativa nummer stöds inte. |
|
Intersite- och PSTN-samtal (inkommande och utgående) |
PSTN-samtal baserat på telekomkrets eller SIP-trunk. |
PSTN-samtal baserat på telekomkrets eller SIP-trunk. |
|
E911 Samtalshantering |
E911-samtal kräver en PSTN-krets eller SIP-trunk. Utgående samtal använder ett specifikt registrerat nödlokaliseringsnummer (ELIN) för en definierad nödresponsplats (ERL). Om nödoperatören returnerar ett frånkopplat samtal, dirigerar Survivability Gateway samtalet till den enhet som senast ringde nödnumret. |
E911-samtal kräver en PSTN-krets eller SIP-trunk. Utgående samtal använder ett specifikt registrerat nödlokaliseringsnummer (ELIN) för en definierad nödresponsplats (ERL). Om nödoperatören returnerar ett frånkopplat samtal, dirigerar Survivability Gateway samtalet till den enhet som senast ringde nödnumret. |
|
Parkera och återuppta samtal |
Stöds Om du använder Music on Hold (MOH) ska du etablera en MOH-fil manuellt för Survivability Gateway. |
VG4xx ATA-analoglinjer kan inte parkera eller återuppta samtal. Den här funktionen stöds endast när ett inkommande samtal tas emot på VG4xx ATA. |
|
Överföring av besvarat samtal |
Stöds |
Den här funktionen stöds endast när ett inkommande samtal tas emot på VG4xx ATA. |
|
Blind överföring av samtal |
Stöds |
Den här funktionen stöds endast när ett inkommande samtal tas emot på VG4xx ATA. |
|
Inkommande inringar-ID (namn) |
Stöds |
Stöds |
|
Inkommande nummerpresentatör (namn & Antal) |
Stöds |
Stöds |
|
Punkt-till-punkt-videosamtal |
Hänvisning |
Stöds ej |
|
Trevägssamtal |
Stöds inte |
Stöds inte |
|
Delade linjer |
Stöds |
Stöds |
|
Virtuella linjer |
Hänvisning |
Stöds ej |
|
Vidarebefordra samtal |
Stöds för vidarekoppling av alla, inget svar och upptaget. |
Stöds |
|
Svarsgrupp |
Stöds för följande: Sekventiell, parallell, peer och längsta inaktivitet. |
Stöds |
|
Autosvar |
Stöds för uppringning via anknytning |
Stöds |
När funktionen konfigureras är Site Survivability tillgänglig för följande slutpunkter som stöds.
| Typ | Modeller | Lägsta version som krävs |
|---|---|---|
| Cisco IP-telefon med multiplattforms-firmware (MPP) |
6821, 6841, 6851, 6861, 6861 Wi-Fi, 6871 7811, 7821, 7841, 7861 8811, 8841, 8851, 8861 8845 (endast ljud), 8865 (endast ljud), 8875 (video) 9800 För mer information om vilka Cisco IP-telefoner med multiplattformsfirmware (MPP) som stöds, se: |
12.0(1) För 8875-telefoner - Phone OS 3.2 och senare versioner För 9800-serien - PhoneOS 3.2(1) |
|
Cisco IP-konferenstelefon |
7832, 8832 |
12.0(1) |
|
Cisco Webex-app |
Windows och Mac |
43.2 |
|
Analoga slutpunkter |
VG400 ATA, VG410 ATA och VG420 ATA Cisco ATA 191 och 192 |
17.16.1a 11.3(1) för ATA 191 och 192 |
Tredjepartsenheter stöds inte med Survivability Gateway.
Följande tabell hjälper till att konfigurera Cisco IOS XE-routrar som en Survivability Gateway. Den här tabellen listar det maximala antalet slutpunkter som varje plattform stöder och den lägsta iOS XE-versionen.
Webex Calling Survivability Gateway-funktioner är tillgängliga med Cisco IOS XE Dublin 17.12.3 version eller senare versioner. Funktionerna för sökgrupp, vidarekoppling av samtal och automatisk svarstjänst är tillgängliga från iOS 17.18.2 och senare versioner.
| Modell | Maximalt antal slutpunktsregistreringar | Lägsta version som krävs |
|---|---|---|
|
Integrerade tjänster Router 4321 | 50 |
Cisco IOS XE Dublin 17.12.3 eller senare versioner |
|
Integrerade tjänster Router 4331 | 100 | |
|
Integrerade tjänster Router 4351 | 700 | |
|
Integrerade tjänster Router 4431 | 1200 | |
|
Integrerade tjänster Router 4451-X | 2000 | |
|
Integrerade tjänster Router 4461 | 2000 | |
|
Katalysatorkant 8200L-1N-4T | 1500 | |
|
Katalysatorkant 8200-1N-4T | 2500 | |
|
Katalysatorkant 8300-1N1S-6T | 2500 | |
|
Katalysatorkant 8300-2N2S-6T | 2500 | |
|
Katalysator Edge 8300-1N1S-4T2X | 2500 | |
|
Katalysator Edge 8300-2N2S-4T2X | 2500 | |
|
Catalyst Edge 8000V-programvara, liten konfiguration | 500 | |
|
Konfiguration av Catalyst Edge 8000V-programvara för medium | 1000 | |
|
Catalyst Edge 8000V-programvara, stor konfiguration | 2000 |
Portreferensinformation för Survivability Gateway
|
Anslutningssyfte |
Källadresser |
Källportar |
Protocol |
Destinationsadresser |
Destinationsportar |
|---|---|---|---|---|---|
|
Anropssignalering till Survivability Gateway (SIP TLS) |
Enheter |
5060-5080 |
TLS |
Överlevnadsgateway |
8933 |
|
Anropa media till Survivability Gateway (SRTP) |
Enheter |
19560-19660 |
UDP |
Överlevnadsgateway |
8000-14198 (SRTP över UDP) |
|
Samtalssignalering till PSTN-gateway (SIP) |
Överlevnadsgateway |
Tillfälliga |
TCP eller UDP |
Din ITSP PSTN-gateway |
5060 |
|
Samtalsmedia till PSTN-gateway (SRTP) |
Överlevnadsgateway |
8000-48198 |
UDP |
Din ITSP PSTN-gateway |
Tillfälliga |
|
Tidssynkronisering (NTP) |
Överlevnadsgateway |
Tillfälliga |
UDP |
NTP-server |
123 |
|
Namnmatchning (DNS) |
Överlevnadsgateway |
Tillfälliga |
UDP |
DNS-server |
53 |
|
Molnhantering |
Anslutning |
Tillfälliga |
HTTPS |
Webex-tjänster |
443, 8433 |
För operativ vägledning om molnläget, se hjälpartikeln Portreferensinformation för Webex Calling.
Du kan anpassa portinställningarna på Cisco IOS XE-routrar. Den här tabellen använder standardvärden som vägledning.
Funktionskonfiguration
Konfigurationsflöde för webbplatsens överlevnadsförmåga
Slutför följande uppgifter för att lägga till webbplatsöverlevnad för en befintlig Webex Calling-plats. Om anslutningen till Webex-molnet bryts kan en Survivability Gateway i det lokala nätverket tillhandahålla säkerhetskopiering av samtalskontroll för slutpunkter på den platsen.
Innan du börjar
Om du behöver etablera en ny gateway som ska fungera som Survivability Gateway, se Webex-artikeln Registrera Cisco IOS Managed Gateways till Webex Cloud för att lägga till gatewayen i Control Hub.
| Steg | Kommando eller åtgärd | Syfte |
|---|---|---|
|
1 | Tilldela överlevnadstjänst till en gateway |
I Control Hub, tilldela tjänsten Survivability Gateway till en gateway. |
|
2 | Hämta konfigurationsmall |
Hämta konfigurationsmallen från Control Hub. Du behöver mallen när du konfigurerar gateway-kommandoraden. |
|
3 |
Konfigurera licenser för Survivability Gateway. | |
|
4 |
Konfigurera certifikat för Survivability Gateway. | |
|
5 |
Använd konfigurationsmallen som du laddade ner tidigare som en guide för att konfigurera gateway-kommandoraden. Slutför alla obligatoriska konfigurationer som finns i mallen. |
Tilldela överlevnadstjänst till en gateway
Innan du börjar
| 1 |
Gå till Samtal under Tjänsteroch klicka sedan på fliken Hanterade gateways. Vyn Hanterade gatewayer visar listan över gatewayer som du hanterar via Control Hub.
|
| 2 |
Välj den gateway som du vill tilldela som en Survivability Gateway och välj ett av följande, baserat på värdet i fältet Service :
|
| 3 |
Från rullgardinsmenyn för tjänstetyp, välj Överlevnadsgateway och fyll i följande fält:
När du har slutfört registreringen visas platsinformationen på sidan Hanterade gateways. |
| 4 |
Klicka på Tilldela. Vyn Hanterade gatewayer visar en lista över platser som är tilldelade gatewayen.
|
Hämta konfigurationsmall
| 1 |
Om du är en partnerorganisation lanseras Partner Hub. För att öppna Control Hub, klicka på vyn Kund i Partner Hub och välj lämplig kund, eller välj Min organisation för att öppna Control Hub-inställningarna för partnerorganisationen. |
| 2 |
Gå till . |
| 3 |
Klicka på tillämplig överlevnadsgateway. |
| 4 |
Klicka på Ladda ner konfigurationsmall och ladda ner mallen till din stationära eller bärbara dator. |
Konfigurera licensiering
| 1 |
Gå in i globalt konfigurationsläge på routern: |
| 2 |
Konfigurera licenser med hjälp av de kommandon som endast gäller för din specifika plattform.
När du konfigurerar ett dataflöde högre än 250 Mbp behöver du en HSEC-plattformslicens. |
Konfigurera certifikat
Konfigurera certifikat på Cisco IOS XE
Slutför följande steg för att begära och skapa certifikat för Survivability Gateway. Använd certifikat signerade av en offentligt känd certifikatutfärdare.
Survivability Gateway-plattformen stöder endast offentligt kända CA-certifikat. Privata eller företags-CA-certifikat kan inte användas för Survivability Gateway.
För en lista över rotcertifikatutfärdare som stöds för Webex Calling, se Vilka rotcertifikatutfärdare stöds för anrop till Cisco Webex ljud- och videoplattformar?.
Survivability Gateway-plattformen stöder inte jokerteckencertifikatet.
Kör kommandona från exempelkoden för att slutföra stegen. För ytterligare information om dessa kommandon, tillsammans med fler konfigurationsalternativ, se kapitlet ” SIP TLS-stöd” i Cisco Unified Border Element Configuration Guide.
| 1 |
Gå in i globalt konfigurationsläge genom att köra följande kommandon: |
| 2 |
Generera den privata RSA-nyckeln genom att köra följande kommando. Den privata nyckelmodulen måste vara minst 2048 bitar. |
| 3 |
Konfigurera en trustpoint som ska innehålla Survivability Gateway-certifikatet. Gatewayens fullständigt kvalificerade domännamn (fqdn) måste använda samma värde som du använde när du tilldelade överlevnadstjänsten till gatewayen. |
| 4 |
Generera en certifikatsigneringsbegäran genom att köra kommandot När du uppmanas att göra det, ange När CSR:n visas på skärmen använder du Anteckningar för att kopiera certifikatet till en fil som du kan skicka till en certifikatutfärdare (CA) som stöds. Om din certifikatsigneringsleverantör kräver en CSR i PEM-format (Privacy Enhanced Mail), lägg till en sidhuvud och en sidfot innan du skickar in. Till exempel: |
| 5 |
När certifikatutfärdaren har utfärdat ett certifikat till dig kör du kommandot När du uppmanas, klistra in basen 64 CER/PEM utfärdar CA-certifikatets innehåll (inte enhetscertifikatet) till terminalen. |
| 6 |
Importera det signerade värdcertifikatet till trustpointen med kommandot När du uppmanas, klistra in basen 64 CER/PEM certifikat i terminalen. |
| 7 |
Kontrollera att rot-CA-certifikatet är tillgängligt: Endast offentligt kända certifikatutfärdare stöds med Webex Calling-lösningen. Privata eller företags CA-certifikat stöds inte. |
| 8 |
Om ditt rot-CA-certifikat inte ingår i paketet, hämta certifikatet och importera det till en ny betrodd punkt. Utför det här steget om ett allmänt känt CA-rotcertifikat inte är tillgängligt med din Cisco IOS XE-gateway. När du uppmanas, klistra in basen 64 CER/PEM certifikatets innehåll i terminalen. |
| 9 |
Använd konfigurationsläget och ange standardinställningen för förtroendepunkt, TLS-version och SIP-UA-standardvärden med följande kommandon. |
Importera certifikat tillsammans med nyckelpar
Du kan importera CA-certifikat och nyckelpar som ett paket med PKCS12-formatet (.pfx eller .p12). Du kan importera paketet från ett lokalt filsystem eller en fjärrserver. PKCS12 är en speciell typ av certifikatformat. Den paketerar hela certifikatkedjan från rotcertifikatet till identitetscertifikatet, tillsammans med RSA-nyckelparet. Det vill säga att PKCS12-paketet du importerar skulle innehålla nyckelparet, värdcertifikaten och mellanliggande certifikat. Importera ett PKCS12-paket för följande scenarier:
-
Exportera från en annan Cisco IOS XE-router och importera till din Survivability Gateway-router
-
Generering av PKCS12-paketet utanför Cisco IOS XE-routern med OpenSSL
Slutför följande steg för att skapa, exportera och importera certifikat och nyckelpar för din Survivability Gateway-router.
| 1 |
(Valfritt) Exportera PKCS12-paketet som krävs för din Survivability Gateway-router. Det här steget gäller endast om du exporterar från en annan Cisco IOS XE-router. |
| 2 |
(Valfritt) Skapa ett PKCS12-paket med OpenSSL. Det här steget är endast tillämpligt om du genererar ett PKCS12-paket utanför Cisco IOS XE med OpenSSL. |
| 3 |
Importera filpaketet i PKCS12-format. Följande är ett exempel på en konfiguration för kommandot och detaljer om de konfigurerbara parametrarna:
Kommandot crypto pki import bygger automatiskt förtroendepunkten för att hantera certifikatet. |
| 4 |
Använd konfigurationsläget och ange standardinställningen för förtroendepunkt, TLS-version och SIP-UA-standardvärden med följande kommandon. |
Konfigurera överlevnadsgatewayen
Konfigurera gateway som en överlevnadsgateway
Använd konfigurationsmallen som du laddade ner tidigare som en guide för att konfigurera gateway-kommandoraden. Fyll i de obligatoriska konfigurationerna i mallen.
Följande steg innehåller exempelkommandon tillsammans med en förklaring av kommandona. Redigera inställningarna så att de passar din distribution. De vinklade parenteserna (till exempel ) identifierar inställningar där du ska ange värden som gäller för din distribution. De olika <tag> -inställningarna använder numeriska värden för att identifiera och tilldela uppsättningar av konfigurationer.
- Om inget annat anges kräver den här lösningen att du slutför alla konfigurationer i den här proceduren.
- När du tillämpar inställningar från mallen, ersätt
%tokens%med dina önskade värden innan du kopierar till gatewayen. - För mer information om kommandona, se Webex Managed Gateway-kommandoreferens. Använd den här guiden om inte kommandobeskrivningen hänvisar till ett annat dokument.
| 1 |
Gå in i globalt konfigurationsläge. där:
|
| 2 |
Utför konfigurationen av rösttjänsten:
Förklaring av kommandona:
|
| 3 |
Aktivera Survivability på routern: Förklaring av kommandon:
|
| 4 |
Konfigurera NTP-servrar:
|
| 5 |
(Frivillig). Konfigurera allmänna behörigheter för samtal med klassbegränsning: Föregående exempel skapar en uppsättning anpassade klasser av begränsningar med namnet kategorier (till exempel |
| 6 |
Konfigurera en lista över föredragna kodekar. Till exempel anger följande lista g711ulaw som den föredragna kodeken, följt av g711alaw. Förklaring av kommandon:
|
| 7 |
Konfigurera standardröstregisterpooler: Förklaring av kommandona:
|
| 8 |
Konfigurera nödsamtal: Förklaring av kommandon:
Om Wi-Fi-överlagringen inte matchar IP-subnäten korrekt, kanske nödsamtal för nomadiska enheter inte har korrekt ELIN-mappning. |
| 9 |
Konfigurera uppringningspeer för PSTN. För ett exempel på konfigurationen av uppringningspeer, se Exempel på PSTN-anslutningar. |
| 10 |
Valfritt. Aktivera musik i vänteläge för routern. Du måste lagra en musikfil i routerns flashminne i G.711-format. Filen kan vara i .au- eller .wav-format, men filformatet måste innehålla 8-bitars 8-kHz-data (till exempel ITU-T A-law- eller mu-law-dataformat). Förklaring av kommandona:
|
Komplett synkronisering på begäran
Valfritt. Slutför endast den här proceduren om du vill slutföra en omedelbar synkronisering på begäran. Den här proceduren är inte obligatorisk eftersom Webex-molnet synkroniserar samtalsdata automatiskt till Survivability Gateway en gång per dag.
| 1 |
Om du är en partnerorganisation lanseras Partner Hub. För att öppna Control Hub, klicka på vyn Kund i Partner Hub och välj lämplig kund, eller välj Min organisation för att öppna Control Hub-inställningarna för partnerorganisationen. |
| 2 |
Gå till . |
| 3 |
Klicka på tillämplig överlevnadsgateway för att öppna vyn Överlevnadstjänst för den gatewayen. |
| 4 |
Klicka på knappen Synkronisera. |
| 5 |
Klicka på Skicka in. Det kan ta upp till 10 minuter att slutföra synkroniseringen.
|
Redigera egenskaper för Survivability Gateway
| 1 |
Om du är en partnerorganisation lanseras Partner Hub. För att öppna Control Hub, klicka på vyn Kund i Partner Hub och välj lämplig kund, eller välj Min organisation för att öppna Control Hub-inställningarna för partnerorganisationen. |
| 2 |
Gå till . |
| 3 |
Klicka på tillämplig överlevnadsgateway för att öppna vyn Överlevnadstjänst för den gatewayen. |
| 4 |
Klicka på knappen Redigera och uppdatera inställningarna för följande.
|
| 5 |
Klicka på Skicka in. Om du vill ta bort en Survivability Gateway från Control Hub, avaktivera först tilldelningen av Survivability Gateway -tjänsten. För mer information, se Tilldela tjänster till hanterade gateways. |
Konfigurationer för att aktivera CDR:er på överlevnadsgatewayen
Anslutningsprogrammet konfigurerar automatiskt CDR-relaterade kommandon för att underlätta insamling av samtalsantal.
I slutet av en överlevnadshändelse bearbetar kopplingen de CDR:er som genererats under händelseperioden, tillsammans med konfigurationsdata, för att identifiera olika samtalsantal. Mätvärdena inkluderar totala antalet samtal, nödsamtal och externa samtal, och används för att övervaka intern funktionsanvändning. Endast samtalsantal skickas till Webex-molnet medan de faktiska CDR:erna inte överförs.
Följande är en exempelkonfiguration:
!
gw-accounting file
primary ifs bootflash:guest-share/cdrs/
acct-template callhistory-detail
maximum cdrflush-timer 5
cdr-format detailed
!
Förklaring av kommandona:
-
primary ifs bootflash:guest-share/cdrs/- Det här kommandot lagrar CDR-filerna under gästdelningsmappen för att tillåta åtkomst för anslutningsprogrammet. -
acct-template callhistory-detail- Det här kommandot krävs för att inkludera dial-peer-taggen i CDR:n. -
maximum cdrflush-timer 5- Standardvärdet är 60 minuter, men om du ställer in det på 5 minuter kan CDR:er loggas till filen snabbare. -
cdr-format detailed– Detta är standardformatet. Det kompakta formatet är inte lämpligt eftersom det inte inkluderar dial-peer-taggen.
Konfigurationer för att aktivera vidarekoppling av samtal
Vidarekopplingsfunktionen är en del av överlevnadsfunktionerna som säkerställer kontinuerlig samtalshantering under nätverksavbrott när anslutningen till Webex-molnet bryts. Survivability-gatewayen fungerar som en lokal reservgateway, vilket gör det möjligt för slutpunkter att registrera sig lokalt och upprätthålla viktiga samtalsfunktioner.
-
Vidarekopplingsbeteendet i Survivability-läge hanteras av Survivability-gatewayen med hjälp av poolkonfiguration, dial-peer-konfigurationer och routingpolicyer som hanterar samtal lokalt eller dirigerar dem ut via PSTN- eller SIP-trunkar.
-
Överlevnadsgatewayen inaktiverar SIP-REFER, SIP flyttas tillfälligt för vidarekoppling och samtalsöverföring, eftersom Webex Calling inte använder dessa metoder i överlevnadsläge.
Konfigurera röstregisterpooler för vidarekopplingsscenarier:
|
För att använda vidarekopplingsfunktionen, konfigurera kommandot
|
Konfigurationer för att aktivera sökgrupp
Den här tabellen innehåller en mappning för konfigurationen av jaktgruppens funktioner i Control Hub och med hjälp av kommandona för Survivability Gateway
| Hunt-gruppens funktioner | Konfiguration med hjälp av kontrollhubben | Kommandon för överlevnadsgateway |
|---|---|---|
|
Välj samtalsroutingmönster |
Top-Down/Simultaneous/Circular/Longest-idle | Sequential/Parallel/Peer/Longest-idle |
|
Lägg till Hunt-grupp |
Lägg till sökgrupp med namn och telefonnummer per plats. | För att lägga till en jaktgrupp, använd voice hunt-group . Lägg sedan till telefonnumret med kommandot pilot och sök efter gruppens namn med kommandot description |
|
Välj användare, arbetsytor eller virtuella linjer att lägga till |
Välj de agenter som ska ingå i Hunt-gruppen |
Konfigurera listan över agenter med hjälp av kommandot |
|
Gå vidare efter inställt antal signaler |
Konfigurera med alternativet Ange antal ringsignaler |
Konfigurera med kommandot |
|
Gå vidare vid upptaget |
Konfigurera med alternativet Avancera vid upptagen |
Konfigurera med kommandot |
|
Vidarekoppla samtal om ingen agent kan nås | Konfigurera med alternativet Vidarekoppla samtal när alla agenter inte kan nås |
Konfigurera med kommandot |
|
Vidarekoppla samtal när alla agenter är upptagna eller svarsgruppen är upptagen |
Konfigurera med hjälp av alternativetVidarekoppla samtal när alla agenter är upptagna eller när sökgruppen är upptagen |
Konfigurera med hjälp av |
-
Konfigurera en Hunt-grupps sekventiella ringsignaler
voice hunt-group 1 sequential pilot 1111 number 1 1001 number 2 1002 number 3 7089001 number 4 7089002 number 5 +1210903443 ..... ..... timeout 20 final 1009 statistics collect description present-call idle-phone -
Konfigurera en parallell ring för Hunt-gruppen
voice hunt-group 2 parallel pilot 2222 number 1 2001 number 2 2002 number 3 2089001 number 4 2089002 number 5 +12109034433 ..... ..... timeout 60 final 1009 statistics collect description
Beskrivning av kommandona:
-
voice hunt-group- Det här kommandot används för att definiera och gå in i konfigurationsläget för en sökgrupp. -
parallel- Det här nyckelordet anger den sökgruppsmetod eller algoritm som systemet använder för att distribuera inkommande samtal bland medlemmarna i den här sökgruppen. -
number- Skapar en lista över extensions/e164 numbers/ESN som är medlemmar i en röstjaktsgrupp. Inget nummer i listan kan vara ett pilotnummer för en annan jaktgrupp. -
pilot- Detta är huvudnumret eller katalognumret för sökgruppen. Uppringare ringer detta nummer för att nå sökgruppen. -
timeout- Anger den maximala tiden, i sekunder, som sökgruppen ska försöka ringa sina medlemmar innan nästa åtgärd vidtas. -
final- Det här kommandot anger reservnumret. -
statistics collect- Möjliggör insamling av operativ statistik för jaktgruppen. -
descriptin- beskrivning av jaktgruppen -
present-call idle-phone- Presentera samtalet endast för agenter som är inaktiva.
Följande är ett exempel på utdata från kommandot show voice hunt-group statistics. Utdata inkluderar direkta samtal till ett röstsökningsgruppnummer och samtal från kö eller B-ACD.
Router# show voice hunt-group 1 statistics last 1 h
Wed 04:00 - 05:00
Max Agents: 3
Min Agents: 3
Total Calls: 9
Answered Calls: 7
Abandoned Calls: 2
Average Time to Answer (secs): 6
Longest Time to Answer (secs): 13
Average Time in Call (secs): 75
Longest Time in Call (secs): 161
Average Time before Abandon (secs): 8
Calls on Hold: 2
Average Time in Hold (secs): 16
Longest Time in Hold (secs): 21
Per agent statistics:
Agent: 5012
From Direct Call:
Total Calls Answered: 3
Average Time in Call (secs): 70
Longest Time in Call (secs): 150
Totals Calls on Hold: 1
Average Hold Time (secs): 21
Longest Hold Time (secs): 21
From Queue:
Total Calls Answered: 3
Average Time in Call (secs): 55
Longest Time in Call (secs): 78
Total Calls on Hold: 2
Average Hold Time (secs): 19
Longest Hold Time (secs): 26
Total Loged in Time (secs): 3000
Total Loged out Time (secs): 600
Agent: 5013
From Direct Call:
Total Calls Answered: 3
Average Time in Call (secs): 51
Longest Time in Call (secs): 118
Totals Calls on Hold: 1
Average Hold Time (secs): 11
Longest Hold Time (secs): 11
From Queue:
Total Calls Answered: 1
Average Time in Call (secs): 4
Longest Time in Call (secs): 4
Total Loged in Time (secs): 3000
Total Loged out Time (secs): 600
Agent: 5014
From Direct Call:
Total Calls Answered: 1
Average Time in Call (secs): 161
Longest Time in Call (secs): 161
From Queue:
Total Calls Answered: 1
Average Time in Call (secs): 658
Longest Time in Call (secs): 658
Total Loged in Time (secs): 3000
Total Loged out Time (secs): 600
Queue related statistics:
Total calls presented to the queue: 5
Calls handoff to IOS: 5
Number of calls in the queue: 0
Average time to handoff (secs): 2
Longest time to handoff (secs): 3
Number of abandoned calls: 0
Average time before abandon (secs): 0
Calls forwarded to voice mail: 0
Calls answered by voice mail: 0
Number of error calls: 0
Router# sh voice hunt-group
Group 1
type: sequential
pilot number: 4444, peer-tag 2147483647
list of numbers:
Member Used-by State Login/Logout
====== ======= ===== ============
1001 1001 up -
1003 1003 up -
preference: 0
preference (sec): 0
timeout: 15
final_number:
auto logout: no
stat collect: no
phone-display: no
hlog-block: no
calls in queue: 0
overwrite-dyn-stats: no
members logout: no
present-call idle-phone: no
webex-sgw-bgl14#
Konfigurationer för att aktivera grundläggande automatisk samtalsfördelning (B-ACD)
Grundläggande automatisk samtalsdistribution (B-ACD) och automatisk svarstjänst (AA) ger automatisk besvarning av externa samtal med hälsningsfraser och menyer som gör det möjligt för uppringare att välja lämplig avdelning eller ringa kända anknytningsnummer.
B-ACD tillhandahåller automatisk svarstjänst och samtalsfördelning för samtal med hjälp av interaktiva menyer och lokala samtalsgrupper. B-ACD-applikationen består av automatiska svarstjänster (AA) och en samtalskötjänst. B-ACD automatisk telefonist stöder PSTN-samtal som förhandlas med inkommande SIP-trunk med g711ulaw-kodeken
B-ACD stöder röstsökningsgrupper med sekventiella, parallella, peer-, längsta inaktiva samtalssignaler, stöd för delade SIP-linjer och blandade delade linjer.
Ett inkommande samtal ringer upp B-ACD AA-pilotnumret och hör en uppmaning med en hälsning och instruktioner som hjälper den som ringer att automatiskt dirigera samtalet.
Begränsningar
Använd samma kodek på inkommande och utgående uppringningspecialister när du överför samtal. Användning av olika codecs stöds inte. IOS kommer inte att anropa transkodern för anrop som hanteras av någon TCL-applikation.
B-ACD-komponenter
B-ACD-applikationen består av en samtalskötjänst och en eller flera AA-tjänster. De konfigurerbara komponenterna i dessa tjänster är:
-
Pilotnummer
-
Välkomstprompt och andra ljudfiler
-
Menyalternativ
-
Ring via anknytning
Pilotnummer
Varje AA-tjänst har sitt eget AA-pilotnummer som uppringare ringer för att nå AA. Detta nummer anges i kommandot param aa-pilot. AA-pilotnumret är inte kopplat till någon agents telefonnummer eller fysiska telefon, men du måste definiera en motpart med AA-pilotnumret som inkommande nummer så att detta nummer kan nås av externa uppringare.
Välkomstprompt och andra ljudfiler
Välkomstmeddelandet är en ljudfil som spelas upp när ett samtal besvaras av pilotnumret. Den här ljudfilen är en av flera ljudfiler som används med B-ACD-tjänsten för att informera uppringare om deras status och eventuella åtgärder de kan komma att vidta. Du kan skapa personliga ljudfiler som beskriver menyalternativen som är tillgängliga för dina uppringare. B-ACD-ljudfiler beskrivs i följande avsnitt:
Spela in om standardljudfiler
Standardljudfiler tillhandahålls för varje punkt i skriptet och ges till uppringarna. Du laddar ner standardljudfilerna från länken och kopierar dem till en plats som kan nås av B-ACD-routern, till exempel flashminne eller en TFTP-server. Ljudfilerna och skriptfilerna finns samlade i en tar-fil på webbplatsen. Standardfilerna och deras meddelanden listas i tabellen. Du kan spela in personliga meddelanden över standardmeddelandena, men du kan inte ändra namnen på ljudfilerna, förutom enligt specifik beskrivning i Ändra språkkoder och filnamn.
För att spela in och installera standardljudmeddelandena igen innan du använder en B-ACD-tjänst för första gången, följ stegen i Ladda ner Tcl-skript och ljudmeddelanden. För att spela in ljuduppmaningar igen i en befintlig B-ACD-tjänst, följ stegen i Uppdatera skriptparametrar och ljuduppmaningar (endast uppringning via anknytning).
| Standardfilnamn | Standardmeddelande | Längd på standardmeddelandet |
|---|---|---|
en_bacd_welcome.au |
"Tack för att du ringde." Inkluderar en två sekunders paus efter meddelandet. |
3 sekunder |
en_bacd_options_menu.au |
För försäljning, tryck 1 (paus) För kundtjänst, tryck 2 (paus) För att ringa via anknytning, tryck 3 (paus) För att tala med en operatör, tryck noll. Inkluderar en fyra sekunders paus efter meddelandet. |
15seconds |
en_bacd_disconnect.au |
"Vi kan inte ta emot ditt samtal just nu." Försök igen senare. Tack för att du ringde. Inkluderar en fyra sekunders paus efter meddelandet. |
10seconds |
en_bacd_invalidoption. au |
"Du har angett ett ogiltigt alternativ." Försök igen. Inkluderar en paus på en sekund efter meddelandet. Den här uppmaningen spelas upp när en uppringare väljer ett ogiltigt menyalternativ eller ringer en ogiltig anknytning. |
7seconds |
en_bacd_enter_dest.au |
"Ange anknytningsnumret du vill nå." Inkluderar en fem sekunders paus efter meddelandet. Denna prompt spelas upp när en uppringare väljer alternativet |
7seconds |
en_bacd_allagentsbusy. au |
"Alla agenter är för närvarande upptagna med att hjälpa andra kunder. Fortsätt att hålla intryckt för att få hjälp. Någon kommer snart att vara hos dig.” Inkluderar en två sekunders paus efter meddelandet. Denna hälsningsfras är också känd som den andra hälsningen. |
7seconds |
en_bacd_music_on_hol d.au |
Väntemusik (MOH) spelas upp för B-ACD-uppringare. |
60seconds |
Om du spelar in om någon av ljudfilerna, observera att B-ACD-prompterna kräver ett G.711-ljudfilsformat (.au) med 8-bitars, mu-law och 8-kHz-kodning. Vi rekommenderar följande ljudverktyg eller andra av liknande kvalitet:
-
Adobe Audition för Microsoft Windows av Adobe Systems Inc. (tidigare kallat Cool Edit av Syntrillium Software Corp.)
-
AudioTool för Solaris av Sun Microsystems Inc.
Konfigurera B-ACD
Här är några exempel på konfiguration:
application
service aa bootflash:app-b-acd-aa-3.0.0.8.tcl
paramspace english index 1
param handoff-string aa
param dial-by-extension-option
paramspace english language en
param aa-pilot
paramspace english location flash:
param welcome-prompt _bacd_welcome.au
param voice-mail
param service-name queue
!
service queue bootflash:app-b-acd-3.0.0.8.tcl
param queue-len 30
param queue-manager-debugs 1
!
! SIP PSTN Dial-Peers for Auto Attendant(BACD) service called aa associated with incoming voice port
dial-peer voice 500 voip
description Inbound dial-peer for Auto Attendant
service aa
session protocol sipv2
incoming called-number
dtmf-relay rtp-nte
codec g711ulaw
no vad
!
! TDM PSTN Dial-Peers if not using SIP for Auto Attendant(BACD) service called aa associated with incoming voice pots
dial-peer voice 500 voip
description Inbound dial-peer for Auto Attendant
service aa
incoming called-number
port %tdm_port%
! | Kommando | Förklaring |
|---|---|
param dial-by-extension-option |
Gör det möjligt för uppringare att ringa anknytningsnummer efter att ha slagit det angivna menynumret. menynummer—Identifierare för ett menyalternativ. Intervallet är från 1 till 9. Det finns ingen standard. |
param aa-pilot |
Anger pilotnumret som är associerat med automatisk telefonsvarare-uppringning |
param voice-mail |
Definierar en alternativ destination för samtal som inte besvaras av AA-agenter |
paramspace english language en |
Definierar språkkoden för ljudfiler som används för dynamiska uppmaningar av ett IVR-program.
Denna språkkod måste matcha det tvåsiffriga språkprefixet som används i namnen på dina ljudpromptfiler, oavsett vilket språk som faktiskt används i filen. För mer information, se Välkomstmeddelande och andra ljudfiler |
param welcome-prompt
audio-filename |
Tilldelar en ljudfil för välkomsthälsningen som används av denna AA-tjänst.
|
Ändra språkkoder och filnamn
-
Prefixet för vilket filnamn som helst kan ändras till ch, en, sp eller aa. Prefixet måste matcha koden som anges i parametern language-code i language-kommandot paramspace, oavsett vilket språk som faktiskt används i filen.
-
Efter sitt prefix kan välkomstpromptens filnamn (standard är en_bacd_welcome.au) ha vilket identifierande namn som helst, enligt definitionen i kommandot
param welcome-prompt. -
Efter sitt prefix kan filnamnet för drop-through-prompten (ingen standardinställning anges) ha valfritt identifierande namn, enligt definitionen i kommandot
param drop-through-prompt.
I ljudfilerna kan du spela in en uppmaning på vilket språk som helst. Det är inte nödvändigt att ändra prefixet för en fil som innehåller en prompt på ett annat språk eftersom språkkodsprefixen används för funktioner som inte ingår i B-ACD-tjänsten. Men det är viktigt att språkkodsprefixen för dina filer matchar språkkoden som anges i parametern språkkod i språkkommandot paramspace, oavsett vilket språk som faktiskt används i ljudfilen.
Ändra inte identifierardelen av namnet på en ljudfil, med undantag för filen _bacd_welcome.au. Skripten identifierar ljudfiler som har samma identifierande namn som de i tabell och som har samma prefix som du anger i språkkommandot paramspace.
De två undantagen från de allmänna reglerna för filnamn är ljudfilen för välkomstprompten (standard är en_bacd_welcome.au) och ljudfilen för drop-through-option -prompten (ingen standard anges). De identifierande delarna av filnamnen för dessa två ljudprompter anges explicit under konfigurationen och är helt användarkonfigurerbara. Dessa filer kan använda vilka filnamn som helst så länge namnen följer följande konventioner:
-
Prefixdelen av filnamnet måste vara densamma som språkkoden som anges i språkkommandot paramspace. Till exempel, sv.
-
Identifieringsdelen av filnamnet måste börja med ett understreck. Till exempel,
_welcome_to_xyz.au.
Använda ljudfiler för att beskriva menyalternativ
Som standard levereras två ljudfiler för att ge inledande orientering och vägledning om de tillgängliga menyalternativen: en_welcome_prompt.au och en_bacd_options_menu.au. Du kan spela in anpassade meddelanden över standardmeddelandena som finns i dessa filer, enligt beskrivningen i tabell.
Om din B-ACD-tjänst använder en enda AA-tjänst, spela in en välkomsthälsning i en_welcome_prompt.au och spela in instruktioner om menyalternativ i en_bacd_options_menu.au.
Om din B-ACD-tjänst använder flera AA-tjänster behöver du separata hälsningar och instruktioner för varje AA, enligt följande riktlinjer:
-
Spela in en separat välkomstfråga för varje AA-gudstjänst, använd ett annat namn för ljudfilen för varje välkomstfråga. Till exempel:
en_welcome_aa1.auochen_welcome_aa2.au. Välkomstmeddelandena som du spelar in i dessa filer måste innehålla både hälsningen och instruktionerna om menyalternativen. -
Spela in tystnad i ljudfilen
en_bacd_options_menu.au. Minst en sekunds tystnad måste spelas in. Observera att den här filen inte innehåller menyinstruktionerna när det finns flera AA-tjänster.
Menyalternativ
Syftet med en B-ACD-tjänst är att automatiskt dirigera samtal till rätt destination i din organisation. Med interaktiva AA-tjänster kan du ge menyalternativ till uppringare så att de kan göra lämpliga val för sina samtal. De typer av menyalternativ som är tillgängliga i B-ACD beskrivs i tabellen. Menyalternativ meddelas uppringare med ljudmeddelanden, vilka beskrivs i Välkomstmeddelande och andra ljudfiler.
| Typ | Beskrivning | Krav | Exempel |
|---|---|---|---|
Dial-by-extension |
Uppringaren trycker en siffra för att få ringa en känd anknytning. Menynumret som används för det här alternativet får inte vara detsamma som några menynummer (aa-hunt) som används med samtalskötjänsten. |
Inga krav. |
Efter att ha hört menyalternativen slår en uppringare 4 och kan ringa ett internt anknytningsnummer. |
Alternativ för uppringning via anknytning
B-ACD-tjänsten kan också ha ett alternativ för uppringning via anknytning, vilket gör det möjligt för uppringare att ringa interna anknytningsnummer när de redan känner till anknytningsnumret. Alternativet att ringa via anknytning visas som menyalternativ.
Alternativet uppringning via anknytning konfigureras genom att ange ett menyalternativsnummer för parametern uppringning via anknytning. När följande kommando används kan uppringare ringa 1 och sedan ett anknytningsnummer.
param dial-by-extension-option 1 Inom en B-ACD-samtalskötjänst måste numret för uppringning via anknytning och numret för sökgruppen vara ömsesidigt uteslutande. Denna begränsning innebär att alternativnumret som används för alternativet uppringning via anknytning inte kan vara detsamma som något av alternativnumren som används med aa-hunt-alternativen. Om du till exempel använder aa-hunt1 till aa-hunt5 för att ange sökgrupper i din konfiguration för samtalskötjänsten, kan du använda alternativ 6 för alternativet uppringning via anknytning men inte något av siffrorna 1 till 5.
Om alla tio aa-hunt-nummer används för samtalsgrupper i samtalskötjänsten finns det inget alternativ kvar för att ringa via anknytning. Observera att denna begränsning är baserad på alla alternativnummer (aa-hunt-nummer) som används med samtalskötjänsten och inte på alternativnummer som används med en AA-applikation.
Ladda ner Tcl-skript och ljudmeddelanden
Använd dessa steg för att förbereda skriptfilerna och promptfilerna som är nödvändiga för din B-ACD-tjänst.
-
Kopiera tar-filen till SGW-routerns bootflash
Packa upp tcl- och ljudfilerna med kommandot:
archive tar /xtract bootflash:cme-b-acd-3.0.0.8.tar bootflash:- Spela in ljudfilerna igen om det behövs.
Förklaring av kommandona:
| Kommando | Förklaring |
|---|---|
|
Ladda ner B-ACD tar-filen |
Ladda ner B-ACD tar-filen med namnet Den här tar-filen innehåller AA Tcl-skriptet, Tcl-skriptet för samtalskön och de standardljudfiler som du behöver för B-ACD-tjänsten |
enable |
Aktiverar privilegierat EXEC-läge på SGW-routern. Ange ditt lösenord om du blir ombedd. |
archivetar/xtract flash: |
Packar upp filerna i B-ACD-filarkivet och kopierar dem till flashminnet. Följande filer finns i filen
|
|
Spela in om det behövs | Spela in om ljudfiler med dina anpassade meddelanden, men ändra inte ljudfilnamnen. |
Exempel:
Följande exempel extraherar filer från arkivet cme-b-acd-2.1.0.0 på servern på 192.168.1.1 och kopierar dem till B-ACD-routerns flashminne.
archive tar /xtract tftp://192.168.1.1/cme-b-acd-2.1.0.0.tar flash:Uppdatera skriptparametrar och ljudmeddelanden (endast uppringning via anknytning)
Du kan uppdatera B-ACD-skriptparametrar genom att göra ändringar i Cisco IOS-konfigurationen. För att parameterändringarna ska träda i kraft måste du stoppa och ladda om B-ACD-skripten som du har gjort ändringar i. Om du spelar in om ljuduppmaningar måste du ladda om de ljuduppmaningsfiler som har ändrats.
-
Bestäm sessions-ID:n för alla aktiva sessioner-
Använd kommandot
showcall application sessionsi privilegierat EXEC-läge för att hämta sessions-ID (SID) för AA och samtalskötjänster. Om AA-sessionen inte har några aktiva anrop visas inte AA-skriptnamnet i utdata från kommandotshow call application sessions. - Stoppa B-ACD AA- och samtalskösessionerna om det behövs – Använd sessions-ID-numren från steg 1 för att stoppa B-ACD AA-tjänsten och samtalskösessionerna. Använd kommandot
call application session stopi privilegierat EXEC-läge för att stoppa AA- och samtalskösessionerna. - Ladda om AA-skriptet och samtalsköskripten – Använd kommandot
call application voice loadi privilegierat EXEC-läge för att ladda om skripten. - Om en ljudpromptfil har ändrats, ladda om den – Använd kommandot
audio-prompt loadi privilegierat EXEC-läge för att ladda om en ljudfil. Upprepa detta kommando för varje ljudfil som har ändrats.
Verifiera B-ACD-status
Använd kommandot show call application sessions för att verifiera att B-ACD är aktivt.
Följande exempel visar en session med aktiva AA- och samtalsköapplikationer. Fältet ”App” är tjänstens namn, fältet ”Url” är platsen för skriptfilen för applikationen.
Session ID 17
App: aa
Type: Service
Url: flash:app-b-acd-aa-2.1.0.0.tcl
Session ID 12
App: queue
Type: Service
Url: flash:app-b-acd-2.1.0.0.tcl Följande exempel visar en session med endast köapplikationen aktiv. AA-skriptet visas inte i utdata från kommandot show call application sessions eftersom det inte finns några aktiva anrop. Namnet på AA-tjänsten visas endast i utdata när det finns ett aktivt samtal. Samtalsköskriptet aktiveras efter det första inkommande samtalet och förblir aktivt även om det inte finns några aktiva samtal.
Router# show call application sessions
Session ID 12
App: queue
Type: Service
Url: flash:app-b-acd-2.1.0.0.tclDu kan uppdatera B-ACD-skriptparametrar genom att göra ändringar i Cisco IOS-konfigurationen. För att parameterändringarna ska träda i kraft måste du stoppa och ladda om B-ACD-skripten som du har gjort ändringar i enligt beskrivningen i följande steg. Om du spelar in om ljuduppmaningar måste du ladda om de ljuduppmaningsfiler som har ändrats.
-
Bestäm sessions-ID:n för alla aktiva sessioner:
Använd kommandot
show call application sessionsi privilegierat EXEC-läge för att hämta sessions-ID (SID) för AA och samtalskötjänster. Om AA-sessionen inte har några aktiva anrop visas inte AA-skriptnamnet i utdata från kommandotshow call application sessions.Följande exempel visar en session med aktiva samtal. Fältet ”App” är det tjänstnamn som ges till samtalsköskriptet och AA-skriptet. Du kan också se tjänstnamnen i utdata för kommandot show running-config.
Router# show call application sessions Session ID 17 App: aa Type: Service Url: bootflash:app-b-acd-aa-3.0.0.8.tcl Session ID 12 App: queue Type: Service Url: bootflash:app-b-acd-3.0.0.8.tcl - Stoppa B-ACD AA och samtalskö-tjänstsessioner om det behövs
Använd sessions-ID-numren från steg 1 för att stoppa B-ACD AA-tjänsten och samtalskötjänstsessionerna. Använd kommandot
call application session stopi privilegierat EXEC-läge för att stoppa AA- och samtalskösessionerna.Router# call application session stop id 17 Router# call application session stop id 12När du använder kommandot call application session stop för en AA-tjänst sker följande:
AA-tjänsten är upphörd.
Alla samtal som är aktivt anslutna till AA-tjänsten kopplas bort.
AA-tjänstnamnet tas bort från utdata för kommandot
show call application sessions.För att eliminera risken att samtal kopplas bort, vänta tills det inte finns några inkommande samtal innan du laddar om skriptet, till exempel efter arbetstid.
Om ett AA-tjänstnamn inte visas i utdata för kommandot
show call application sessionsbetyder det att det inte finns några samtalssessioner och du behöver inte utfärda ettcall application session stop-kommando för det. -
Ladda om AA-skriptet och samtalsköskripten
Använd kommandot
call application voice loadi privilegierat EXEC-läge för att ladda om skripten.Router# call application voice load aa Router# call application voice load queue -
Om en ljudpromptfil har ändrats, ladda om den
Använd kommandot
audio-prompt loadi privilegierat EXEC-läge för att ladda om en ljudfil. Upprepa detta kommando för varje ljudfil som ändras.Router# audio-prompt load flash:en_bacd_welcome.au Reload of flash:en_bacd_welcome.au successful
Begränsningar och restriktioner
-
Tillgängligheten av det allmänna telefonnätet (PSTN) beror på vilka SIP-trunkar eller PSTN-kretsar som är tillgängliga under ett nätverksavbrott.
-
Enheter med 4G- och 5G-anslutning (till exempel Webex-appen för mobil eller surfplatta) kan fortfarande registrera sig för Webex Calling under avbrott. Det kan leda till att de inte kan ringa andra nummer från samma plats under ett strömavbrott.
-
Uppringningsmönster kan fungera annorlunda i överlevnadsläge än i aktivt läge.
-
Survivability Gateway måste använda en IPv4-adress. IPv6 stöds inte.
-
Användaren måste ha både en anknytning och ett telefonnummer konfigurerat för att kunna registrera sig med Survivability Gateway.
-
En statusuppdatering för synkronisering på begäran i Control Hub kan ta upp till 30 minuter.
-
Samtalsdockan stöds inte i överlevnadsläget.
-
Konfigurera inte kommandot
SIP bindi konfigurationsläget för rösttjänster via VoIP. Det leder till att registreringen av slutpunkter med Survivability Gateway misslyckas. -
Säkerställ att företagssignifikanta nummer (ESN) på olika fysiska platser är unika för att undvika konflikter och förbättra spårbarhet, redundans och tillförlitlighet vid redundans.
Följande begränsningar gäller i överlevnadsläge:
-
MPP-funktionstangenter: Programknappar som Parkera, Avparkera, Bryt in, Svara, Gruppsvara och Samtalsdragning stöds inte, men de visas inte som inaktiverade på enheten.
-
Delade linjer: Samtal till delade linjer kan ringa på alla enheter; andra funktioner för delade linjer, som fjärrövervakning av linjestatus, väntkoppling, återupptagning, synkroniserad stör ej (DND) och vidarekoppling av samtal, är dock inte tillgängliga.
-
Konferens: Konferens eller trevägssamtal stöds inte.
-
Grundläggande automatisk samtalsfördelning (B-ACD): Tjänsten med samlokaliserade Survivability Gateway och Local Gateway stöds inte.
-
Samtalshistorik: Samtal som görs lagras lokalt i samtalshistoriken för både MPP-enheter och Webex-appen.
-
Jaktgrupper: Du kan konfigurera upp till 100 sökgrupper, där varje grupp stöder maximalt 32 användare.
-
Förbättrad delad samtalsprofil: Funktioner som linjestatusmeddelanden, delad linje hold/remote CV och andra med grundläggande samtal, sökgrupp eller vidarekoppling stöds inte.
-
Samtalsrouting för sökgrupp: Det viktade samtalsroutningsmönstret stöds inte.
Användarupplevelse under redundansväxling
Om en webbplats på ditt företag förlorar internetanslutningen och du befinner dig på denna webbplats kan du fortfarande ringa och ta emot samtal, både internt på företaget och externt till kunder. Se Webex-appen | Webbplatsens överlevnadsförmåga.
Konfigurationsexempel
Exempel på PSTN-anslutningar
För externa samtal, konfigurera en anslutning till PSTN. Det här avsnittet beskriver några av alternativen och ger exempelkonfigurationer. De två huvudalternativen är:
-
Anslutning av röstgränssnittskort (VIC) till PSTN
-
SIP-trunk till PSTN-gateway
Anslutning av röstgränssnittskort till PSTN
Du kan installera ett röstgränssnittskort (VIC) på routern och konfigurera en portanslutning till PSTN.
-
För mer information om hur du installerar VIC på routern, se installationsguiden för hårdvaran för din routermodell.
-
För mer information om hur du konfigurerar VIC, tillsammans med exempel, se Voice Port Configuration Guide, Cisco IOS Release 3S.
SIP-trunk till PSTN-gateway
Du kan konfigurera en SIP-trunkanslutning som pekar mot en PSTN-gateway. För att konfigurera trunk-anslutningen på gatewayen, använd konfigurationen voice-class-tenant. Följande är en exempelkonfiguration.
voice class tenant 300
sip-server ipv4::
session transport udp
bind all source-interface GigabitEthernet0/0/1
Konfiguration av uppringningspeer
För trunk-anslutningar, konfigurera inkommande och utgående uppringningspeer för trunk-anslutningen. Konfigurationen beror på dina krav. För detaljerad konfigurationsinformation, se Dial Peer Configuration Guide, Cisco IOS Release 3S.
Följande är exempelkonfigurationer:
Utgående uppringning via peer-funktioner till PSTN med UDP och RTP
dial-peer voice 300 voip
description outbound to PSTN
destination-pattern +1[2-9]..[2-9]......$
translation-profile outgoing 300
rtp payload-type comfort-noise 13
session protocol sipv2
session target sip-server
voice-class codec 1
voice-class sip tenant 300
dtmf-relay rtp-nte
no vad
Inkommande uppringning från PSTN med UDP med RTP
voice class uri 350 sip
host ipv4:
!
dial-peer voice 190 voip
description inbound from PSTN
translation-profile incoming 350
rtp payload-type comfort-noise 13
session protocol sipv2
voice-class codec 1
voice-class sip tenant 300
dtmf-relay rtp-nte
no vad
Nummeröversättningar
För PSTN-anslutningar kan du behöva använda översättningsregler för att översätta interna anknytningar till ett E.164-nummer som PSTN kan dirigera. Följande är exempelkonfigurationer:
Från PSTN-översättningsregel med icke- +E164
voice translation-rule 350
rule 1 /^\([2-9].........\)/ /+1\1/
voice translation-profile 300
translate calling 300
translate called 300
Från telefonsystemets översättningsregel med +E164
voice translation-rule 300
rule 1 /^\+1\(.*\)/ /\1/
voice translation-profile 300
translate calling 300
translate called 300
Exempel på nödsamtal
Följande exempel innehåller ett exempel på en konfiguration för nödsamtal.
Om WiFi-överlagringen inte matchar IP-subnäten korrekt, kanske nödsamtal för nomadiska enheter inte har en korrekt ELIN-mappning.
Nödinsatsplatser (ERL)
voice emergency response location 1
elin 1 14085550100
subnet 1 192.168.100.0
									/26
!
voice emergency response location 2
elin 1 14085550111
subnet 1 192.168.100.64 /26
!
voice emergency response zone 1
location 1
location 2
Utgående uppringningspecialister
voice class e164-pattern-map 301
 description Emergency services numbers
  e164 911
  e164 988
 !
voice class e164-pattern-map 351
 description Emergency ELINs
  e164 14085550100
  e164 14085550111
 !
dial-peer voice 301 pots
 description Outbound dial-peer for E911 call
 emergency response zone 1
 destination e164-pattern-map 301
 !
 dial-peer voice 301 pots
 description Inbound dial-peer for E911 call
 emergency response callback
 incoming called e164-pattern-map 351
 direct-inward-dial


