- Home
- /
- Article

Thanks for your feedback.

 In this article
 Feedback?
Once you've set up synchronization with Microsoft Entra ID, you can manage who and what you're synchronizing into your Webex organization by using the Webex application in the Entra ID portal.
How changes in Entra ID affect your Webex organization
|
Action in Entra Admin Portal |
Result in Webex Organization |
|---|---|
|
Delete user (user goes to Recycle Bin) |
Webex renames the user and marks the user as Inactive in your organization. If you don't recover the user within 30 days, Entra ID does a permanent deletion, and Webex deletes the user from your organization. For more info, see the Delete a user from Entra ID and from your Webex organization section of this article. |
|
Restore a recently deleted user from Recycle Bin |
Webex reactivates the user and changes the username back to the original value. |
|
Delete user from Recycle Bin (permanent delete) |
Webex deletes the user from your organization. |
|
Remove user from Webex application |
Webex marks the user as Inactive. |
|
Block user from signing in to Entra |
Webex marks the user as Inactive. |
|
Change user attributes (for example, display name) |
Webex updates the user attributes. Changes show in Control Hub as soon as you refresh the user view. |
|
Assign a new user to the Webex application |
Webex creates the user. |
|
Assign an existing Webex user to the Webex application |
Webex updates the user and adds an attribute for "externalId" (by
default, mapped to the Entra ID
|
Change or add user attribute mappings
Follow this procedure to map additional user attributes from Entra ID to Webex, or to change existing user attribute mappings.
Entra ID to Webex mapping does not synchronize every single user detail. Some aspects of user data are not synchronized:
-
Avatars
-
Rooms
-
Attributes not listed in the table below
We recommend that you do not change the default attribute mappings unless absolutely necessary. The value that you map as the username is particularly important. Webex uses the user's email address as their username. By default, we map userPrincipalName (UPN) in Azure AD to email address (username) in Control Hub.
If the userPrincipalName does not map to the email in Control Hub, users are provisioned into Control Hub as new users instead of matching existing users. If you want to use another Azure user attribute that is in email address format instead of UPN, you must change that default mapping in Entra ID from userPrincipalName to the appropriate Entra ID user attribute.
| 1 |
Sign in to the Azure portal and then go to Enterprise applications > All applications. | ||||||||||||||||||||||||||||||||||||||||||
| 2 |
Open the Webex application you created in the application gallery. | ||||||||||||||||||||||||||||||||||||||||||
| 3 |
Go to and click Provision Entra ID Users. | ||||||||||||||||||||||||||||||||||||||||||
| 4 |
Check the Show advanced options check box and then click Edit attribute list. | ||||||||||||||||||||||||||||||||||||||||||
| 5 |
Choose the Webex attributes to be populated from Entra ID user attributes. | ||||||||||||||||||||||||||||||||||||||||||
| 6 |
Click to confirm. The Attribute Mapping page opens, so you can map Entra ID user attributes to the Webex user attributes you chose. | ||||||||||||||||||||||||||||||||||||||||||
| 7 |
Near the bottom of the page, click Add new mapping. | ||||||||||||||||||||||||||||||||||||||||||
| 8 |
Choose Direct mapping. Select the Source attribute (Entra attribute) and the Target attribute (Webex attribute), and then click OK.
| ||||||||||||||||||||||||||||||||||||||||||
| 9 |
Repeat the previous two steps until you have added or modified all the mappings you need, then click Save and Yes to confirm your new mappings. You can Restore default mappings if you want to start again. | ||||||||||||||||||||||||||||||||||||||||||
Webex updates user attributes during the next user synchronization.
Synchronize additional users or groups
This procedure lets you add users or groups to synchronize to the Webex cloud.
Entra ID uses a concept called "assignments" to determine which users should receive access to selected apps. In the context of automatic user provisioning, only the users and/or groups of users that are "assigned" to an application in Entra ID are synchronized to Control Hub.
Use the Entra ID Wizard App in Control Hub to synchronize both users within Entra ID groups and individual group objects. Webex can't synchronize individual groups outside the Entra ID Wizard App.
| 1 |
Open the Webex application in the Entra ID portal, then go to Users and groups. |
| 2 |
Click Add Assignment. |
| 3 |
Find the users/groups you want to add to the application:
|
| 4 |
Click Select and then click Assign. Repeat these steps until you have all the groups and users you want to synchronize with Webex. |
Remove user access to your Webex organization
You can remove user assignments from Entra ID. This retains the Entra ID user accounts but removes those accounts from being able to access applications and services in your Webex organization.
When you remove the user assignment, Webex marks the user as Inactive.
| 1 |
From the Azure portal, go to Enterprise applications, and then choose the Webex application that you added. |
| 2 |
Choose a user or group of users from the list of those assigned to the application. |
| 3 |
Click Remove, and then click Yes to confirm the removal. Upon the next sync event, the user or group of users is removed from Webex application. |
Delete a user from Entra ID and from your Webex organization
-
Entra ID moves the user to the Deleted Users page (also known as the Active Directory recycle bin).
-
Entra ID changes the user's userPrincipalName (UPN), adding a string of digits to the beginning.
-
The update triggers Webex to rename the user and mark the user as Inactive in your organization.
-
Webex revokes the user tokens.
At this point, the user is "soft" deleted and remains in the directory recycle bin for up to 30 days. If you restore the user from the recycle bin, Control Hub reactivates the user, restores the tokens, and renames the user to the original email/UPN address.
If you delete the user from the directory recycle bin, or you take no action and the 30 days elapse, Entra ID permanently deletes the user. The permanent deletion triggers Webex to remove the user. (As part of the removal, Webex sends the user data to its archive service where compliance officers can view the user data subject to your organization's data retention policy.)
If you later re-add a permanently deleted user's email address to Entra ID, Webex creates an entirely new account.
| 1 |
Go to Users, check a check box next to each user account that you want to delete, and then click Delete user. Users are moved to the Deleted users tab. In Control Hub, users are moved into a "soft delete" state and are not deleted immediately. They are also renamed. Entra ID sends these changes to the Webex cloud. Control Hub then reflects this changes and marks the user as Inactive. All tokens are revoked for the user. |
| 2 |
To verify any records of the user deletion, go to Audit logs and then run a search on the User Management category or on the Delete user activity. When you open a deleted user audit log and click Target(s), you'll see the userPrincipalName has a string of numbers and characters before the @. 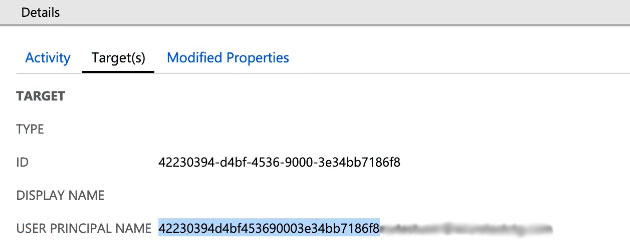 If you're performing any eDiscovery actions in Control Hub, you must get the userPrincipalName from the audit logs in Entra ID. For more information on eDiscovery, see Ensure Regulatory Compliance of Webex App and Meetings Content. |


