- Home
- /
- Article

Thanks for your feedback.

Configure in-call features from Control Hub
 In this article
 Feedback?
Use the incoming call(in-call) setting to turn on available features when joining a webex call.
Administrators can use In-call experience setting from Control Hub to manage the in-call capability or use the administrative controls for key features in the Webex App for an individual user, a group of users, and at the organizational level. All Webex Calling administrators with partner administrators, customer administrators, or sales administrator privilege can configure these settings.
You can monitor screen sharing capability to the in-call settings of the selected users, provide access for remote control, provision enabling video on desktop and mobile. You can also access administrative controls in the Webex App such as configure Move calls to meetings through Control Hub.
Settings that are configured for the organization level are automatically set for users. If the user has enabled user-level setting, then the user settings override the organization-level settings.
| 1 |
Sign in to Control Hub. |
| 2 |
Go to . |
| 3 |
Go to In-call feature access section. |
| 4 |
Select the toggle to enable or disable the following options: 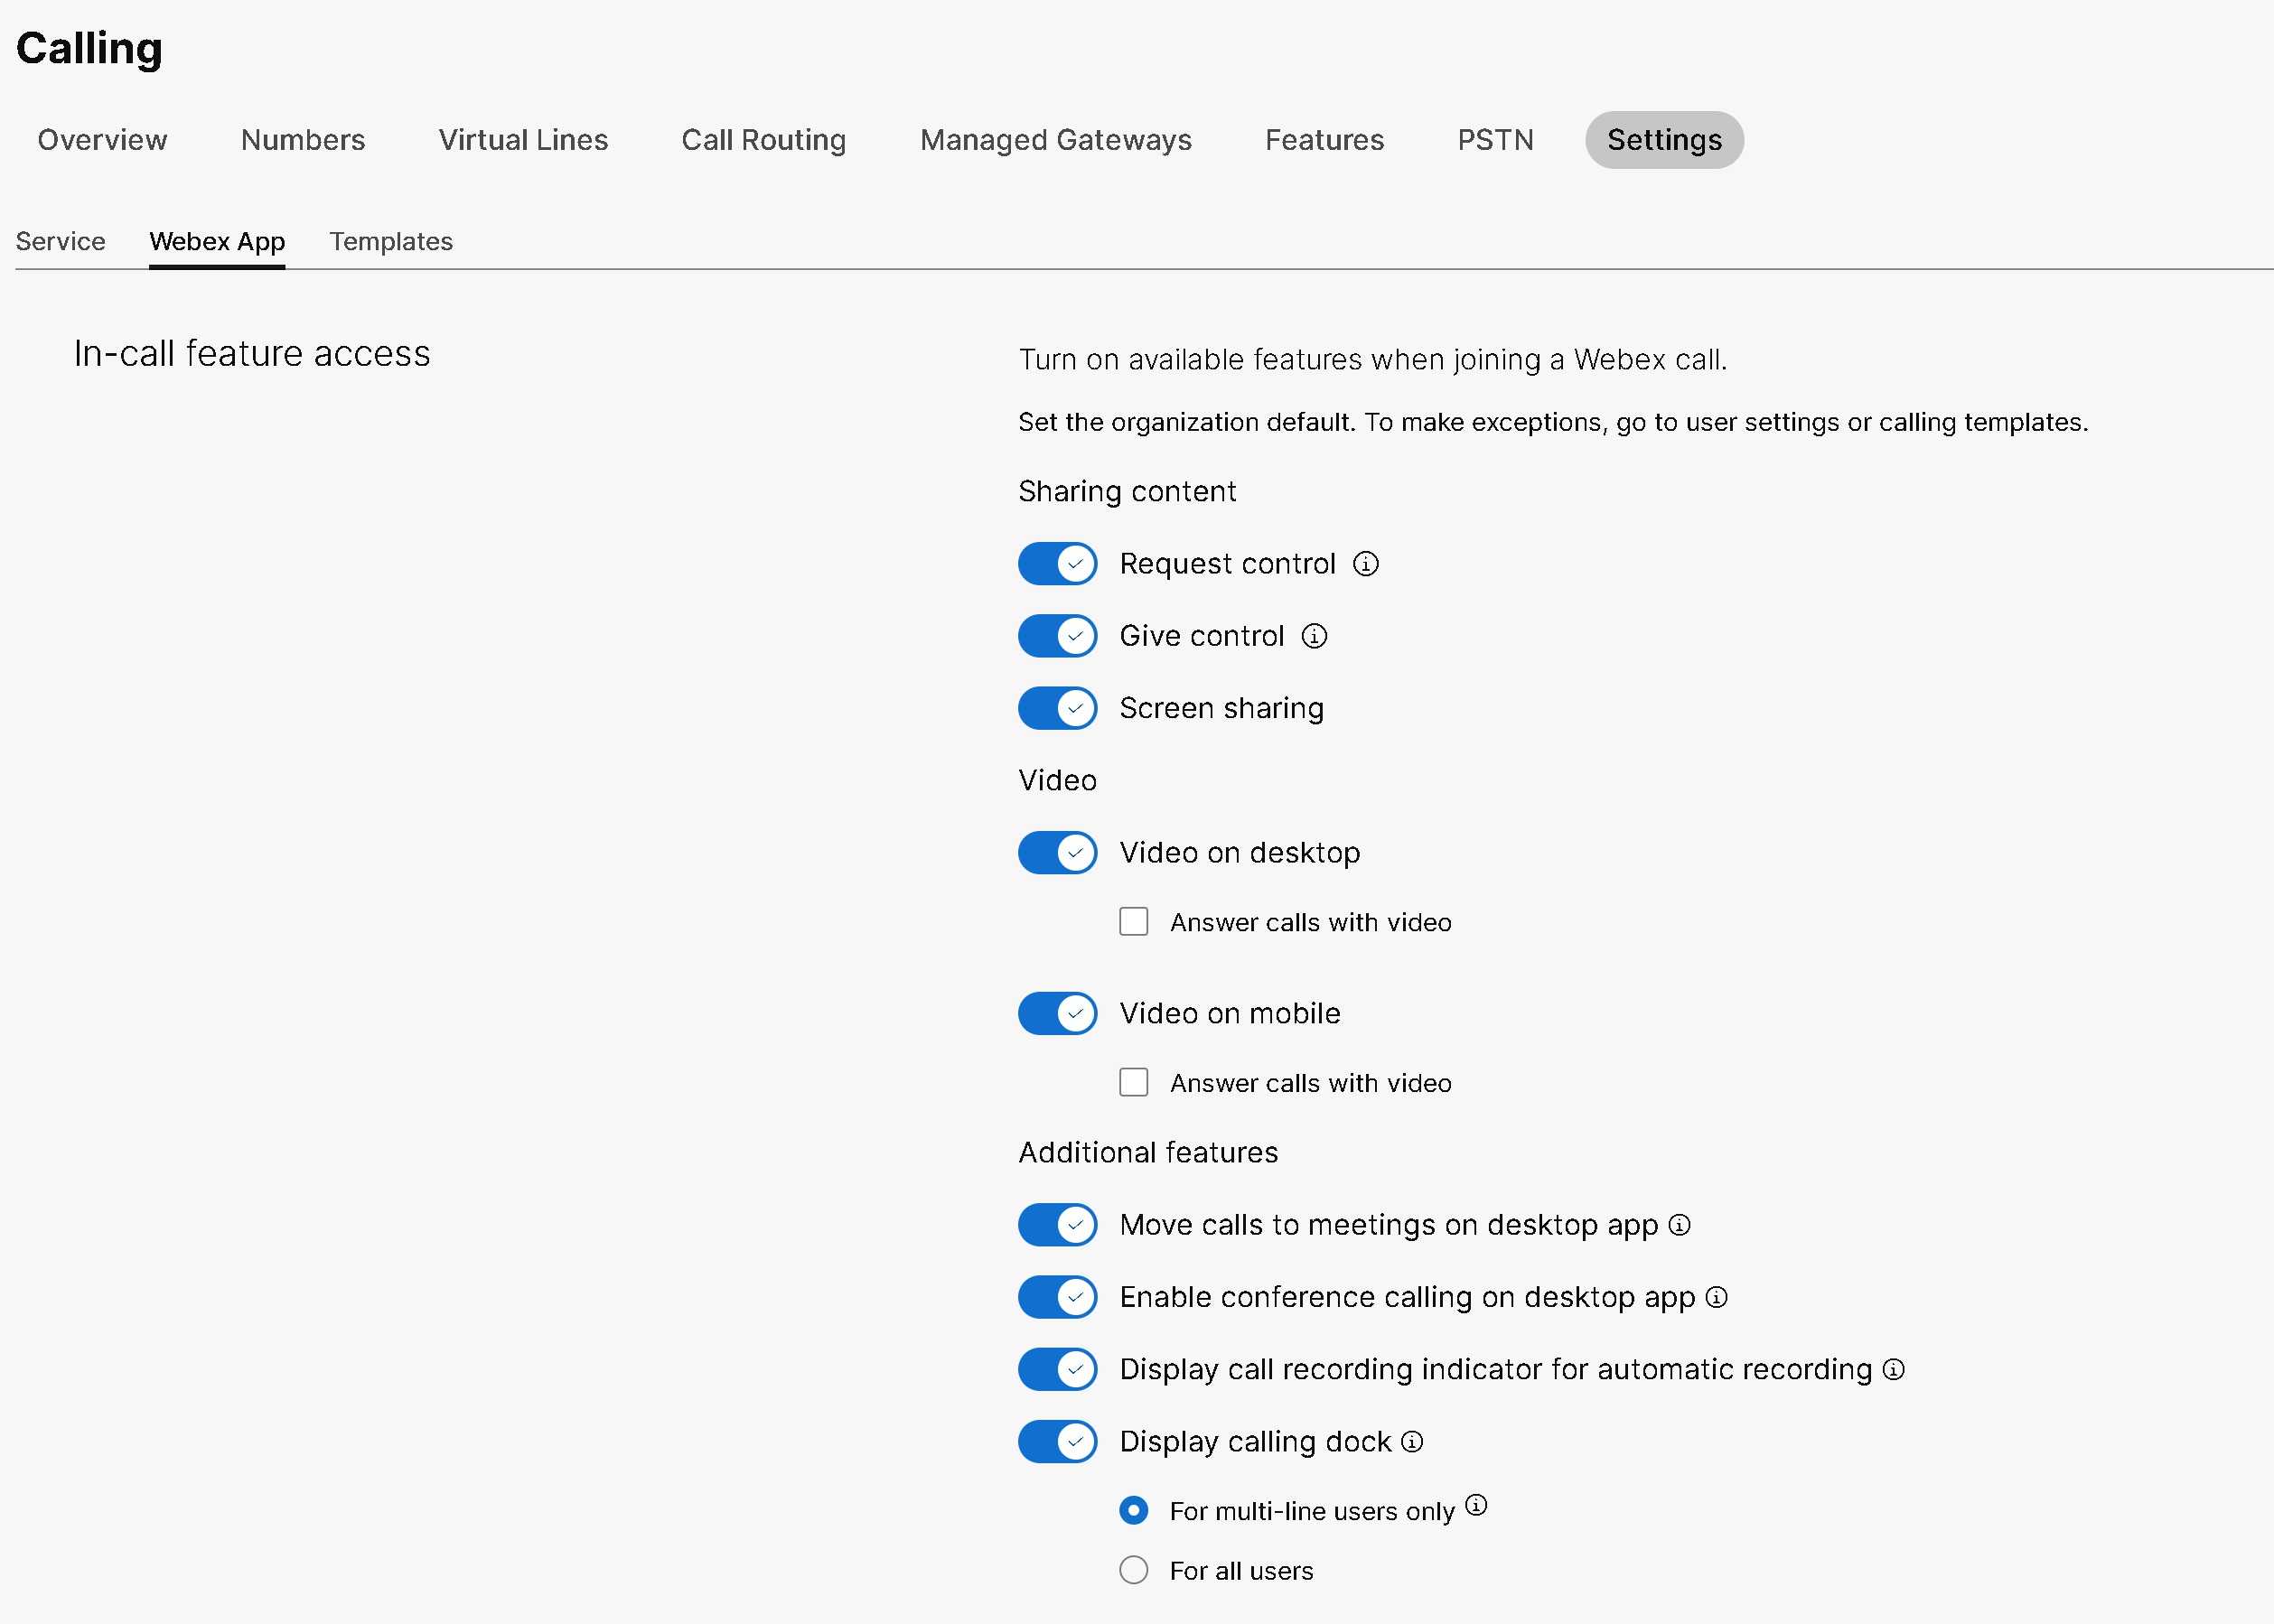
On configuring these settings for a user, you can make further modifications at the user level. User settings won’t automatically return to the organization’s default setting. You can configure the user-group settings for an entire Organization through a Calling template. You can create a template and assign to a user-group. The configuration in the template applies to all users in the group. See Calling Templates for details. |
Enable or disable Remote Desktop Control for your organization
Before you begin
-
The settings configured at the organization level automatically apply to users when you create them.
-
From Control Hub, you can set the organization default for Remote Desktop Control (RDC). To make exceptions for users, go to User Settings.
-
Once you configure the RDC setting on the user level, it doesn't return to the organization’s default setting.
| 1 |
Sign in to Control Hub. |
| 2 |
Go to . |
| 3 |
Go to In-call feature access section. |
| 4 |
Select the following toggles to enable or disable RDC default settings:
|
Enable or disable Remote Desktop Control for a user
| 1 |
Sign in to Control Hub. |
| 2 |
Go to . |
| 3 |
Select a user that you'd like to modify and click the Calling tab. |
| 4 |
Go to the User call experience section and click In-call feature access. |
| 5 |
From the Sharing content section, select the following toggles to enable or disable RDC options:
|
Enable or disable screen sharing for an organization
The Webex Calling administrator can enable organization-level settings such as screen sharing, video on mobile or desktop, and access for remote control. Enabling and disabling screen sharing is available for all Calling licenses and is configured on the organization, user, or user-group level in Control Hub.
By default, the screen sharing toggle is enabled and applies to the entire organization. If the screen sharing is modified at the organization-level, then these settings apply to all users under the organization.
To enable screen sharing capability for the organizational level, complete the following steps:
| 1 |
Sign in to Control Hub. |
| 2 |
Go to . |
| 3 |
Go to In-call feature access section. |
| 4 |
Select the Screen sharing toggle to share the screen at the organization-level. |
Enable or disable screen sharing for a user
The Webex Calling administrator can enable screen sharing for the selected user. This value has precedence over the organization-level and user group-level settings.
| 1 |
Sign in to Control Hub. |
| 2 |
Go to . |
| 3 |
Select the user that you'd like to modify. |
| 4 |
Go to . |
| 5 |
Select the Screen sharing toggle under the Sharing content section to enable or disable sharing the screen for the user. Once this setting is configured for a user, further modifications are made at the user level. User settings won’t automatically return to the organization’s default setting. |
Enable or disable screen sharing for a user-group
The administrator can enable screen sharing for a user-group through a Calling template. The values that are configured in the Calling template apply to all users in the group.
You can use Calling templates to apply settings for an entire group. Control Hub facilitates to search an existing template, view the settings that are applied, duplicate the template, and assign the template to a user-group. See the Manage Calling templates section in the Configure setting templates article for details.
For enabling and disabling screen sharing for the user-group, identify a Calling template with screen sharing toggle enabled. To monitor the screen sharing capability at the user-group level, complete the following steps:
Before you begin
Few pointers to consider when applying the Calling templates to a user-group:
-
When a user is on-boarded to an organization, the user inherits the settings from the organization-level.
-
If the user is added to a user-group, then the settings from the Calling template apply.
-
If a user belongs to multiple user-groups, then the template with the lowest rank takes the highest precedence and that template settings apply.
-
If the user has individual user settings, then these settings take precedence over user-group or organization-level settings.
| 1 |
Sign in to Control Hub. |
| 2 |
Go to . |
| 3 |
Select the user-group that you'd like to modify and navigate to the Assignments tab. |
| 4 |
In the Settings templates section, click the ⋮ icon beside the Calling service you want to apply a template to, and then click Edit. |
| 5 |
From the list, select the template you want to assign and then click Save. |


