
Thanks for your feedback.
Update Webex Meetings to Webex App
 Feedback?
This article guides your organization through updating the Webex Meetings app to Webex App. With Webex App and Control Hub, your organization administrators can deliver all Unified Communication and Collaboration services (messaging, meeting, and calling) to users through a single client.
We are running an automatic update for many customers. If you are selected for automatic update, you'll receive email about your update timeline. This article helps you to prepare for the update.
The Webex App is our new, unified app. Now you can install one application that provides a single framework to access Webex services. Webex provides rich messaging, advanced calling, and advanced meeting capabilities. You get the full featured in-meeting experience that you had in Webex Meetings, plus all of your Webex services organized in a single application.
This article is intended for organization administrators. For more information relevant to users, see:
-
User's update process describes how users will update from Webex Meetings desktop app to the Webex App.
-
Get started with Webex introduces the features of the Webex App for first time users.
-
What's new in the Webex App lists the regular updates.
If you are part of the automatic update group, we have already allocated a slot for you to update your Meetings desktop users to the Webex App. You should receive an email about this, which links you to a specific page in Control Hub.
| 1 |
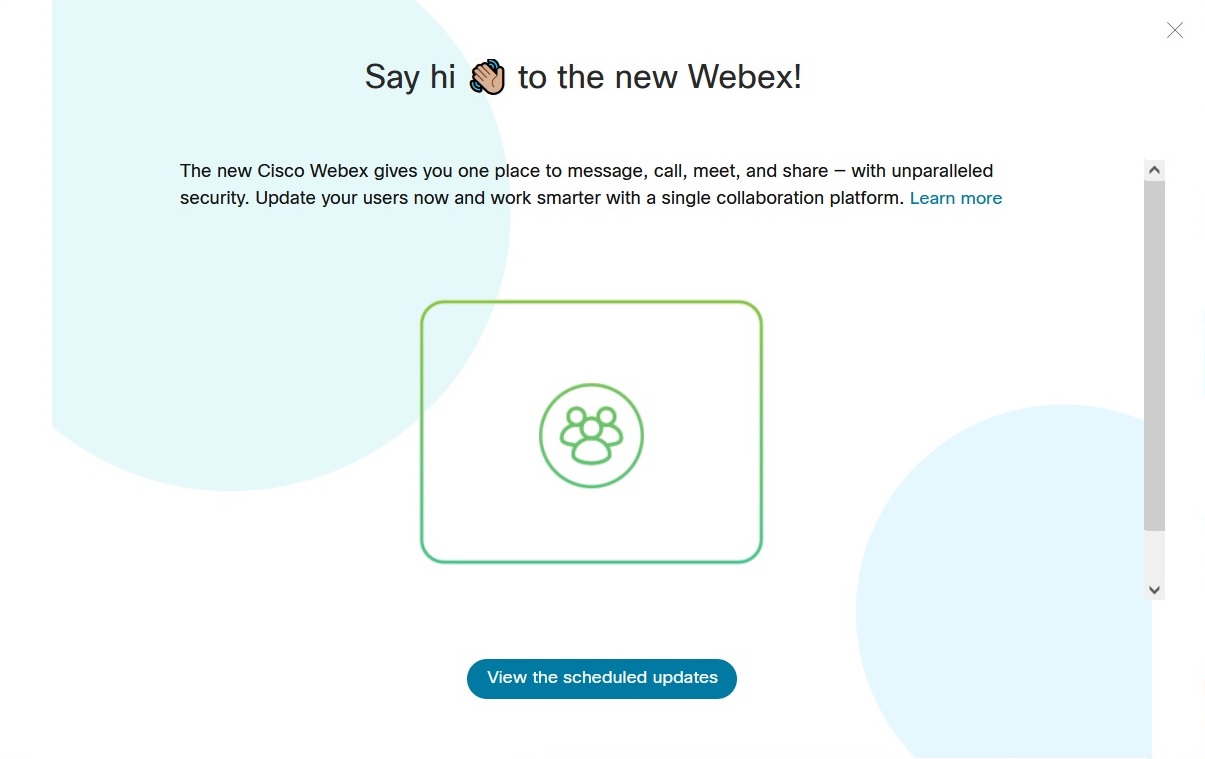
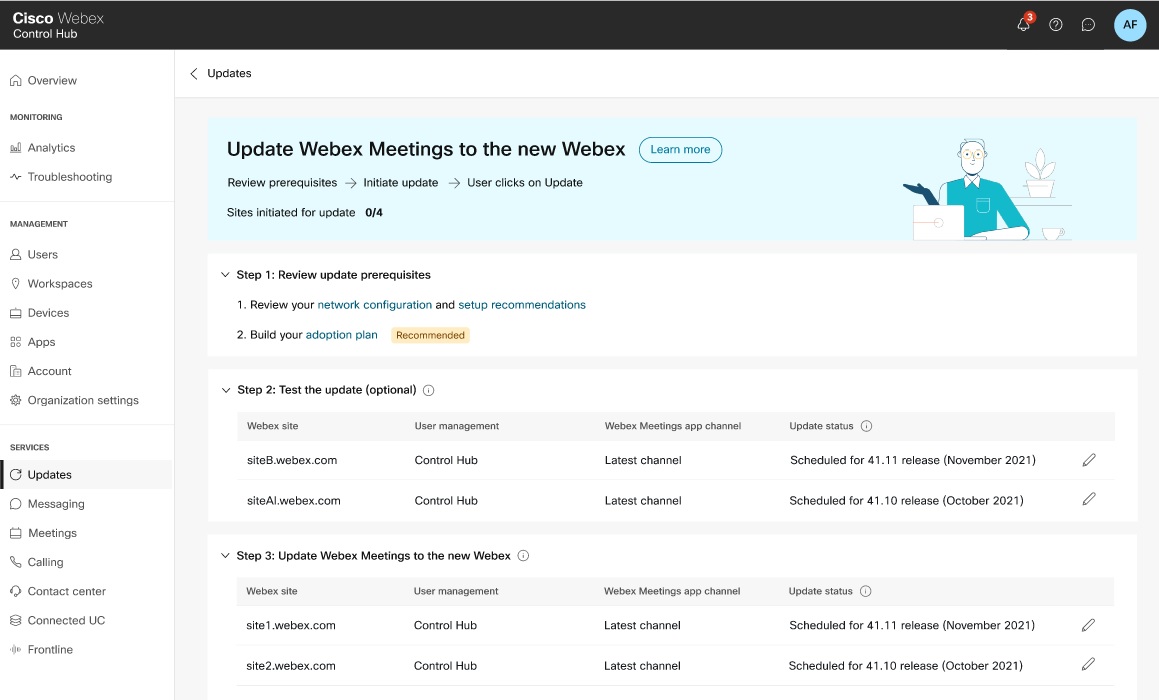
Follow the link from your email and sign in to Control Hub, where you'll see a welcome message. Click View the scheduled updates. Another option is to sign in to Control Hub and go to . Find the Update Webex Meetings to the new Webex card, and click Get Started. On the Update page, you can read the prerequisites for your updates, and see your site's update schedule. |
| 2 |
Read the prerequisites, to understand what is required to before you update. |
| 3 |
For each of your sites, check the update slot. We automatically selected dates for you, based on your site cluster and our own update schedule. |
| 4 |
Click the pencil icon to select Update now and initiate the update immediately, or wait and the sites will update on the pre-selected dates on the screen. |
When the update is available, notifications appear in Site Administration and in Control Hub. We walk you through the steps to update successfully to the Webex App.
If you manage users in Site Administration, you must link or convert your site to Control Hub. Read:
-
https://help.webex.com/en-US/article/341eud/Link-Cisco-Webex-Sites-to-Control-Hub
-
https://help.webex.com/en-US/article/uftwr4/Move-from-Cisco-Webex-Site-Administration-to-Control-Hub
Site Administration
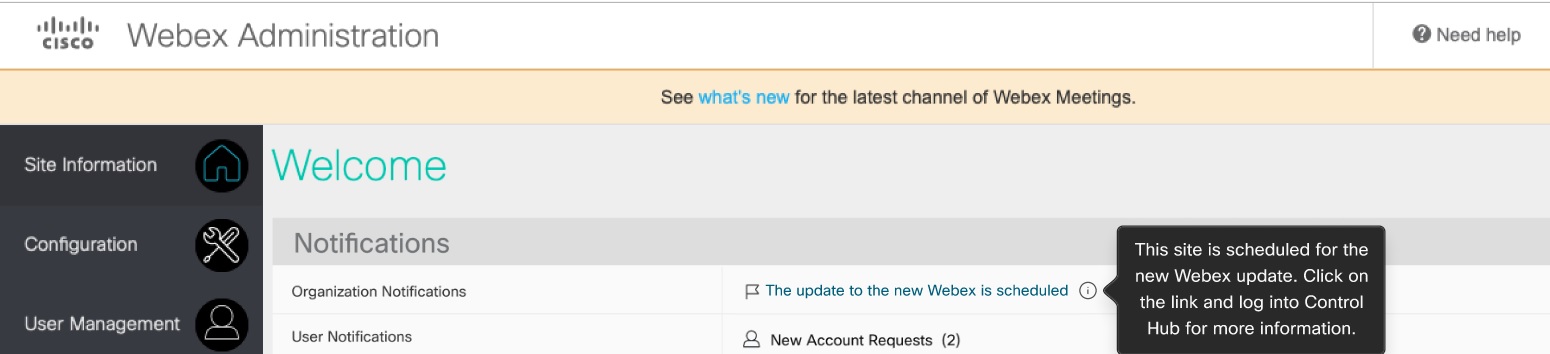
Click the link and log into Control Hub to get started.
Control Hub
For more information, you can click Learn more and visit Meet Webex. We explain the update process from the prerequisites and preparation, to the roll out.
Usually the update requires no changes to your licensing, because you've already set up users for messaging, calling, and meetings. There are some exceptions; so if you have concerns, work with your account manager to address them before you begin the update.
In Control Hub, you can manage licenses for individual users, in bulk with CSV import, or as users join the organization with default license assignment.
This is what users can expect when they update to the Webex App:
-
More than just meetings. They have a full suite of collaboration at their fingertips, which includes meetings, messaging, and calling. The application also allows users to wirelessly pair and share with Cisco video devices, share files, whiteboard, and more.
-
The logo and some other visual elements are different.
-
Mobile users should download both the Webex App and the Webex Meetings app for their devices. When they join meetings from the Webex App, the app launches Webex Meetings.
In future, mobile users will only need the Webex App.
Productivity Tools and the Office365 plugin users can still schedule meetings using these options.
Here's a high-level overview of the steps required to update to the Webex App. The topics following the overview contain more specific information and pointers to other articles to ensure you succeed with your update.
Site requirements
-
The site and its users must be linked to Control Hub.
-
Your Webex Meetings site must be version 40.10 or later.
Check whether your site is linked in Control Hub:
-
Go to .
-
Find the User management column for the site. It must be Control Hub before you update.
If you see Site Administration, then your site isn’t linked and you should not have been scheduled for automatic update.
Contact your Cisco representative in this case.
Desktop requirements
The size of the initial update file is approximately:
-
120 MB for the Apple MacOS version
-
150 MB for the Microsoft Windows version
Monthly updates to the Webex App are much smaller.
For information about system requirements for the app platform, see https://help.webex.com/nk90t65.
(Optional) Migrate Jabber
You can update Jabber users at the same time as you update Meetings users. See https://essentials.webex.com/journey-to-webex.html.
(Optional) Add calling
We encourage you to integrate your calling option into the Webex App. If you have a paid calling solution, like Webex Calling or CUCM Calling, see Webex App Calling Behavior.
Webex also includes a free calling option.
(Optional) Suppress welcome emails
If you don't want users to receive activation emails as you add them to Control Hub, you can suppress automated emails. If you want to suppress automated emails and send your own communications instead, enable SSO. See https://help.webex.com/nqj88gt.
(Optional) Subscribe to information about new features
We update the What’s New article for each component when we introduce new features. We recommend that you subscribe to the following articles to read about the latest developments:
-
What's New in Webex Meetings: https://help.webex.com/xcwws1
-
What's New in the Webex App: https://help.webex.com/8dmbcr
-
What's New in Control Hub: https://help.webex.com/u9dlxd
-
Open required network ports.
-
Add required Webex domains and certificate provider domains to your allow list.
See the following documents for more detail:
If you don't open required ports and unblock required domains, the Webex App can't function properly after the update.
Control Hub is where you manage your users and their services. We recommend the following steps in Control Hub to prepare for the Webex App update.
Some of these tasks are marked as optional, but we recommend you complete them in the order shown.
| 1 |
Check that your Webex site is linked to Control Hub:
If the site linking looks good, you can start with your deployment. If not, work with your partner or Cisco contact to get further assistance. |
| 2 |
(Recommended) Add and verify your domains. See https://help.webex.com/nxz79m5/. You add and verify your domains in Control Hub to use features that require proof of domain ownership. This step helps to ensure the security and integrity of the organization, and helps with user management. |
| 3 |
(Recommended) Claim your users. See https://help.webex.com/nceb8tm/. We recommend that you can claim all (existing) Webex users whose account names use your verified domain. This step moves the users into your primary organization, which provides a consistent collaboration experience with access to the same features and subscriptions. You can claim users into the organization by immediate or delayed claim. Delayed claim gives users 14 days to decide if they want to migrate the Webex app conversations from their existing account to new account. When claiming users in the CSV file, check all claimed users so they can get the appropriate license or entitlement during this process. |
| 4 |
(Optional) Claim your domains. See https://help.webex.com/nxz79m5. This step enables you to keep all your users in your primary organization. After you perform this step, the system automatically adds new user accounts with email addresses from your claimed domains, to your primary organization. You can also disable self-signup for your organization, so that users with that domain can’t create new accounts outside of your organization. If you have more than one Webex organization using a domain, you can’t claim that domain. For example, suppose you have the following domains:
You can’t claim |
| 5 |
(Recommended) Set up Auto License Template to simplify new users onboarding. See https://help.webex.com/n3ijtao. This step makes it easier for you to give everyone the same set of licenses, as you bring them onboard. You can modify user licenses for those users who have different requirements from your template defaults. The template applies only to new users, as you create them in your organization. It doesn’t apply to users that come into your organization with the site linking process. |
| 6 |
If necessary, Export Users and Assign Services and Licenses. Users linked from Site Administration are not governed by your automatic license assignment template in Control Hub. If you want to change licensing as part of your update, you can modify user licenses in bulk: export the users in a CSV file, change the license assignments, and then import the modified file to Control Hub. You can also change license assignments manually for a few users. See assign services and licenses to users individually. |
These tasks are optional, but we recommend doing them before deploying the Webex App if you want to optimize user experience.
-
Enable single sign-on (SSO) in all components to give users a consistent sign-in experience.
-
Synchronize your user directory with Control Hub, to simplify user management.
-
Deploy the Hybrid Calendar Service so users can schedule meetings from their calendars.
| 1 |
(Optional) Enable single sign-on (SSO) in all components and use the same identity provider:
If you have an identity provider (IdP), integrate the SAML IdP with Control Hub for SSO. With SSO, users authenticate using the same credentials for Webex Meetings, Webex App, and other applications in the organization. If you choose not to enable SSO, improve security for all users by enabling simple Multi Factor Authorization (MFA). We recommend Duo Authenticator for MFA, which you can get free from the Apple App Store and the Google Play Store. |
| 2 |
(Optional) Synchronize users from your directory, with:
When you create, update, or delete users in your directory, the changes synchronize to your Control Hub organization. |
| 3 |
(Optional) Deploy Hybrid Calendar Service, see https://www.cisco.com/go/hybrid-services-calendar. Hybrid Calendar Service connects your calendar environment to Webex. We support user calendars in Microsoft Exchange (on-premises), Office 365, and Google Workspace. This integration makes it easy to schedule and join meetings without any plugins on the user's computer. Users can add Webex Room and Desk devices and Webex Boards to a meeting as conference resources during scheduling. If you enabled the device for Calendar Service, a green Join button appears when it’s time to join the meeting. |
Configure meetings
There’s no additional configuration after you link your Webex Meetings site and users to Control Hub.
Your Site Administration settings still apply to your meetings. If you need to give meetings service to new users, create the new accounts in Site Administration, and the system automatically links them to Control Hub.
(Optional) Configure messaging
-
(Optional) Set retention policy for the organization.
Webex App uses persistent messaging, and Webex stores data for a configurable period. We recommend that you match the data retention period to your organization's policy.
-
(Optional) Ensure regulatory compliance of Webex App content.
Use this option to ensure that people comply with your internal policies and external regulatory requirements. You need Pro Pack to use this feature.
Grant the compliance officer role to your legal/compliance person. Compliance officers can sign into Control Hub and search through any conversation in the Webex App. A compliance officer can find the content shared by specific people, or search through a specific space, and then generate a report of their findings.
-
(Optional) Deploy Hybrid Data Security. See https://www.cisco.com/go/hybrid-data-security.
Data security has always been our primary focus when building the Webex App. Webex App interacts with the Key Management Service (KMS) to enable end-to-end content encryption. The KMS creates and manages the cryptographic keys that apps use to encrypt and decrypt messages and files dynamically.
All Webex App customers get end-to-end encryption by default. End-to-end encryption features dynamic keys stored in our cloud KMS, in our security realm. You can choose Hybrid Data Security if you want to move the KMS and other security-related functions to your own enterprise datacenter. Hybrid Data Security means that only your organization holds the keys to your encrypted content.
-
(Optional) Configure access to Enterprise Content Management (ECM) in Control Hub.
ECM enables your organization to manage and share content for collaboration. Configure ECM platform in Control Hub to provide users with permission for content access in Webex app. Users can only use an approved ECM platform to upload and manage files and content in Webex App.
(Optional) Align Calling for Organization
Use the following steps to set up calling in Webex app (Unified CM). If your organization has a Unified CM deployment, or you upgraded Jabber with Messenger to Webex app, see the following guides for more information:
-
Deploy Calling in Webex app (Unified CM)
In this solution, Webex app registers directly to Cisco Unified CM call control environment. This solution can be on-premises enterprise, Business Edition 6000/7000, or as delivered through an HCS partner.
End users can make calls directly on Webex app, use midcall features, and do desk phone control from Webex app.
-
Set up Webex app Calling Behavior for Organization and Users
You can configure the organization with a default calling application and the associated PSTN calling choice. You can override these choices for specific users with different calling needs.
Choose Calling in Webex app (Unified CM) to keep calls in Webex app. You can then override with Cisco Jabber app. Enable cross-launch to Jabber for users who require more advanced calling functions (such as multiline and contact center agent features).
Note the caveats in the deployment guide.
If you’re new to Webex, you can deploy Webex Free Calling for simplicity. This option is for making SIP calls. If your organization requires an enterprise grade calling solution to complement Webex app for messaging and meetings, see the following resources:
For more information about the update, visit Meet Webex or contact your account team.
By default, all sites have scheduled updates. You can update to the current release immediately, or schedule your update for a future release.
Before you begin
You must Prepare your network for the Webex App.
| 1 |
Sign in to the customer view in https://admin.webex.com and click Update Webex Meetings to the new Webex. The Update Webex Meetings to the new Webex page opens.
You can also get to this page from the following pages:
|
| 2 |
(Optional) Test the update. a. Click the corresponding pencil icon (Modify update) for the test site. b. Choose one of the following options:
c. Click Save. The status changes to Initiated with <version release >.
If you don't have a test site configured, contact your partner to get set up for testing. Repeat this step for each test site. |
| 3 |
Update Webex Meetings to the new Webex. a. Click the corresponding pencil icon (Modify update) for the site. b. Choose one of the following options:
c. Click Save.
Repeat this step for each site. |


What to do next
Remove the Webex Meetings Desktop app.
We provide a tool to remove the Webex Meetings Desktop app completely:
-
From Microsoft Windows machines: https://help.webex.com/WBX19806/
-
From Apple MacOS machines: https://help.webex.com/en-us/WBX38280


