- Start
- /
- Artikel

Tack för din feedback.

 I den här artikeln
 Har du feedback?
Installera Cisco Call som standardalternativ för alla användare i din organisation.
Använd den här artikeln för att konfigurera din Microsoft Teams-app med Cisco Call-alternativ. Ikonen ![]() läggs till i den vänstra navigeringen och som en meddelandetillägg. Med alternativet Teams-samtal inaktiverat använder alla i organisationen samma plattform för att ringa och ta emot samtal.
läggs till i den vänstra navigeringen och som en meddelandetillägg. Med alternativet Teams-samtal inaktiverat använder alla i organisationen samma plattform för att ringa och ta emot samtal.
Förutsättningar
-
Se till att du är en Microsoft Teams-administratör.
-
Se till att du har åtkomst till kontrollhubben.
-
Kontrollera att användare har tilldelat licenseri Control Hub och registrerat sig för Cisco Unified Communications Manager eller Webex Calling för att ringa samtal.
-
Användare måste ha Webex-appen och Microsoft Teams installerade.
-
För att Cisco Call för Microsoft Teams-integrationen ska fungera med Unified CM-samtalskontrollens backend (lokalt, Webex Calling Dedicated Instance eller UCM Cloud) måste du se till att du använder Unified CM 12.5 SU7 eller 14 SU3, Cisco Unity Connection (CUC) 12.5 eller 14.
-
För kunder med On-Prem Unified CM, se till att Unified CM är tillgängligt & CUC-kluster är anslutna till Webex Cloud-Connected UC (CCUC).
-
Användarna måste synkroniseras antingen från lokal Active Directory eller Cloud AD, till exempel Azure till Control Hub Common Identity (CI).
-
För lokala kunder, Webex Calling Dedicated Instance och UCM Cloud-kunder, Konfigurera Cisco Unified CM— Linjenumret på Cisco Unified CM måste kopplas till användar-ID:t för att den centraliserade samtalshistoriken ska fyllas i med användarnamnet. Från Cisco Unified CM Administration, användEnhet→Telefon, välj telefonen och klicka påEnhetsnamn (linje)och klicka sedan på önskad rad från panelenAssocieringför att komma tillAnvändare associerad med linje.
-
Se till att Unified CM e-post-ID matchar Control Hub primär e-postadress som används för att hämta den universellt unika identifieraren (UUID).
-
Virtuell skrivbordsinfrastruktur (VDI): När Cisco Call-integrering för Microsoft Teams används i en VDI-miljö måste både Cisco Call och Microsoft Teams köras på samma virtuella maskin.
Microsoft Teams-konfiguration
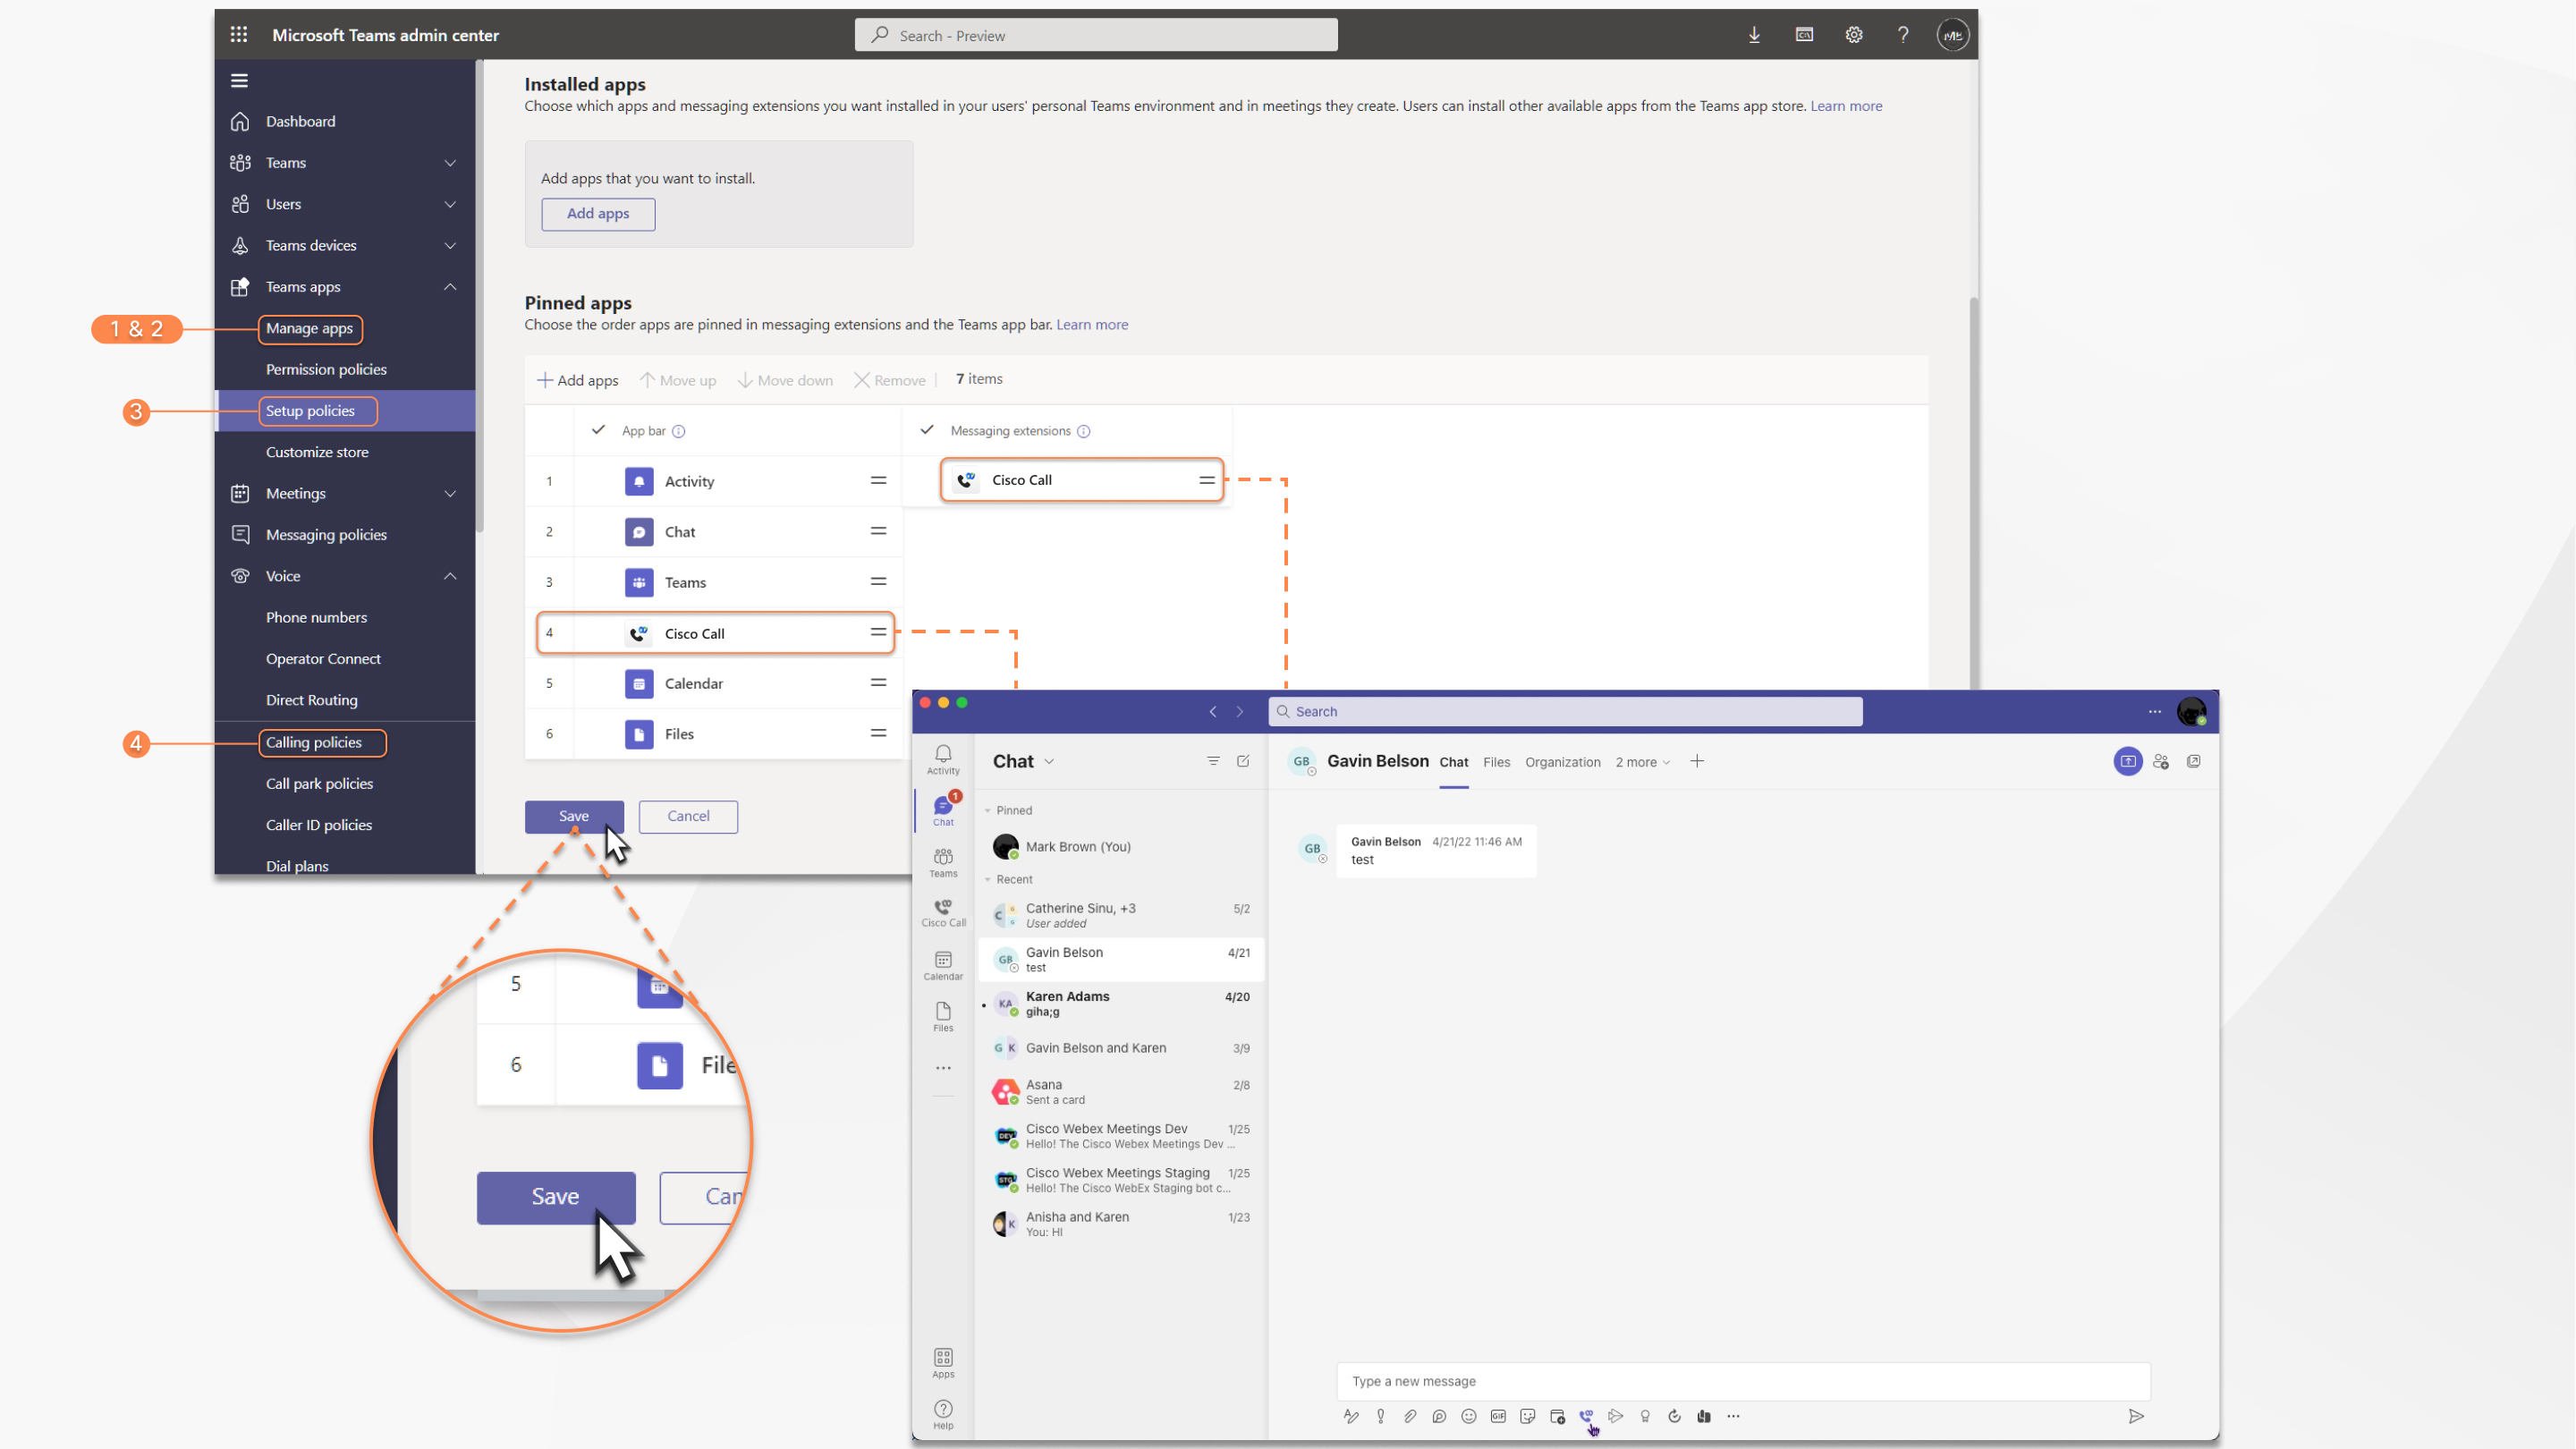
| 1 |
Logga in på Teams administratörscenter för att hantera dina appar och tillåta Cisco Call. |
| 2 |
Hantera vem som kan installera Cisco Call. |
| 3 |
Installera Cisco Call, lägg sedan till ikonen i Webex-appen och ta bort det inbyggda samtalsalternativet. |
| 4 |
Valfritt – inaktivera det inbyggda samtalsalternativet i hela organisationen och gör Cisco Call till det enda samtalsalternativet:
|
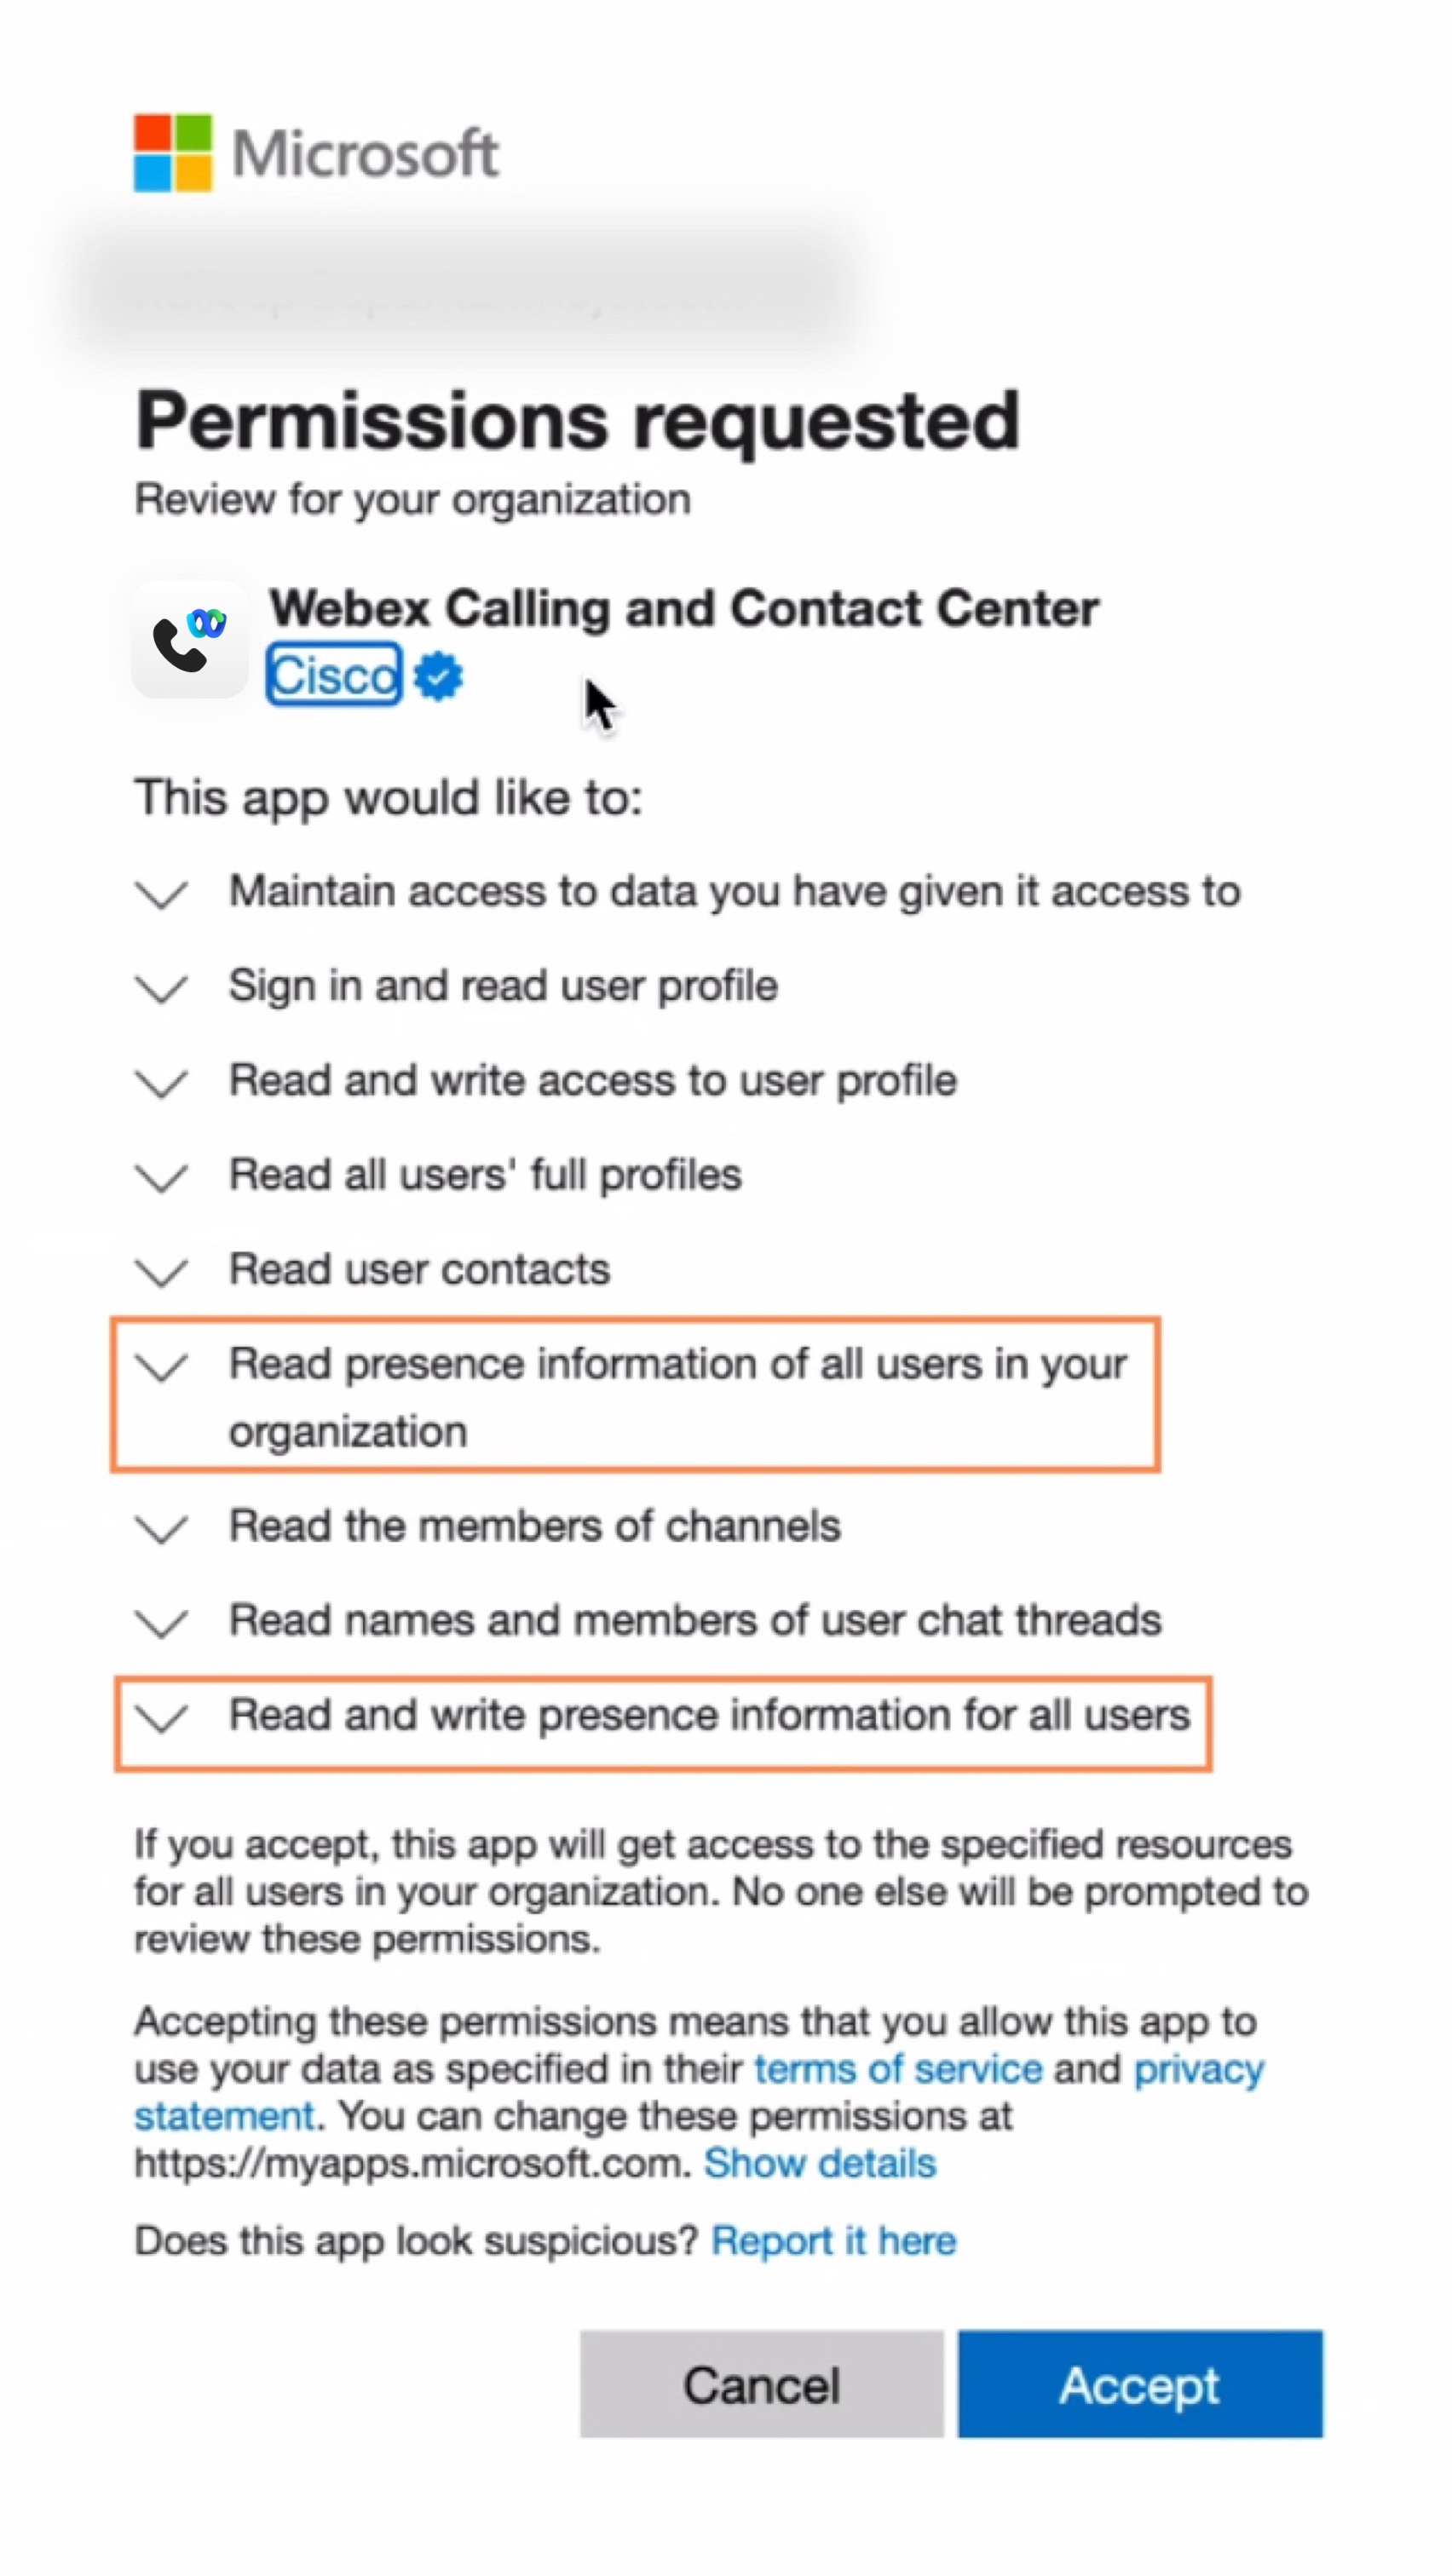
Acceptera behörigheter för närvarosynkronisering
Granska och acceptera behörigheterna för närvarosynkronisering i Microsoft Teams för att dubbelriktat synkronisera användarens närvarostatus mellan Microsoft Teams och Webex.
För att närvarosynkroniseringen ska fortsätta fungera måste användare använda Cisco Call-integrationen minst en gång var 90:e dag.
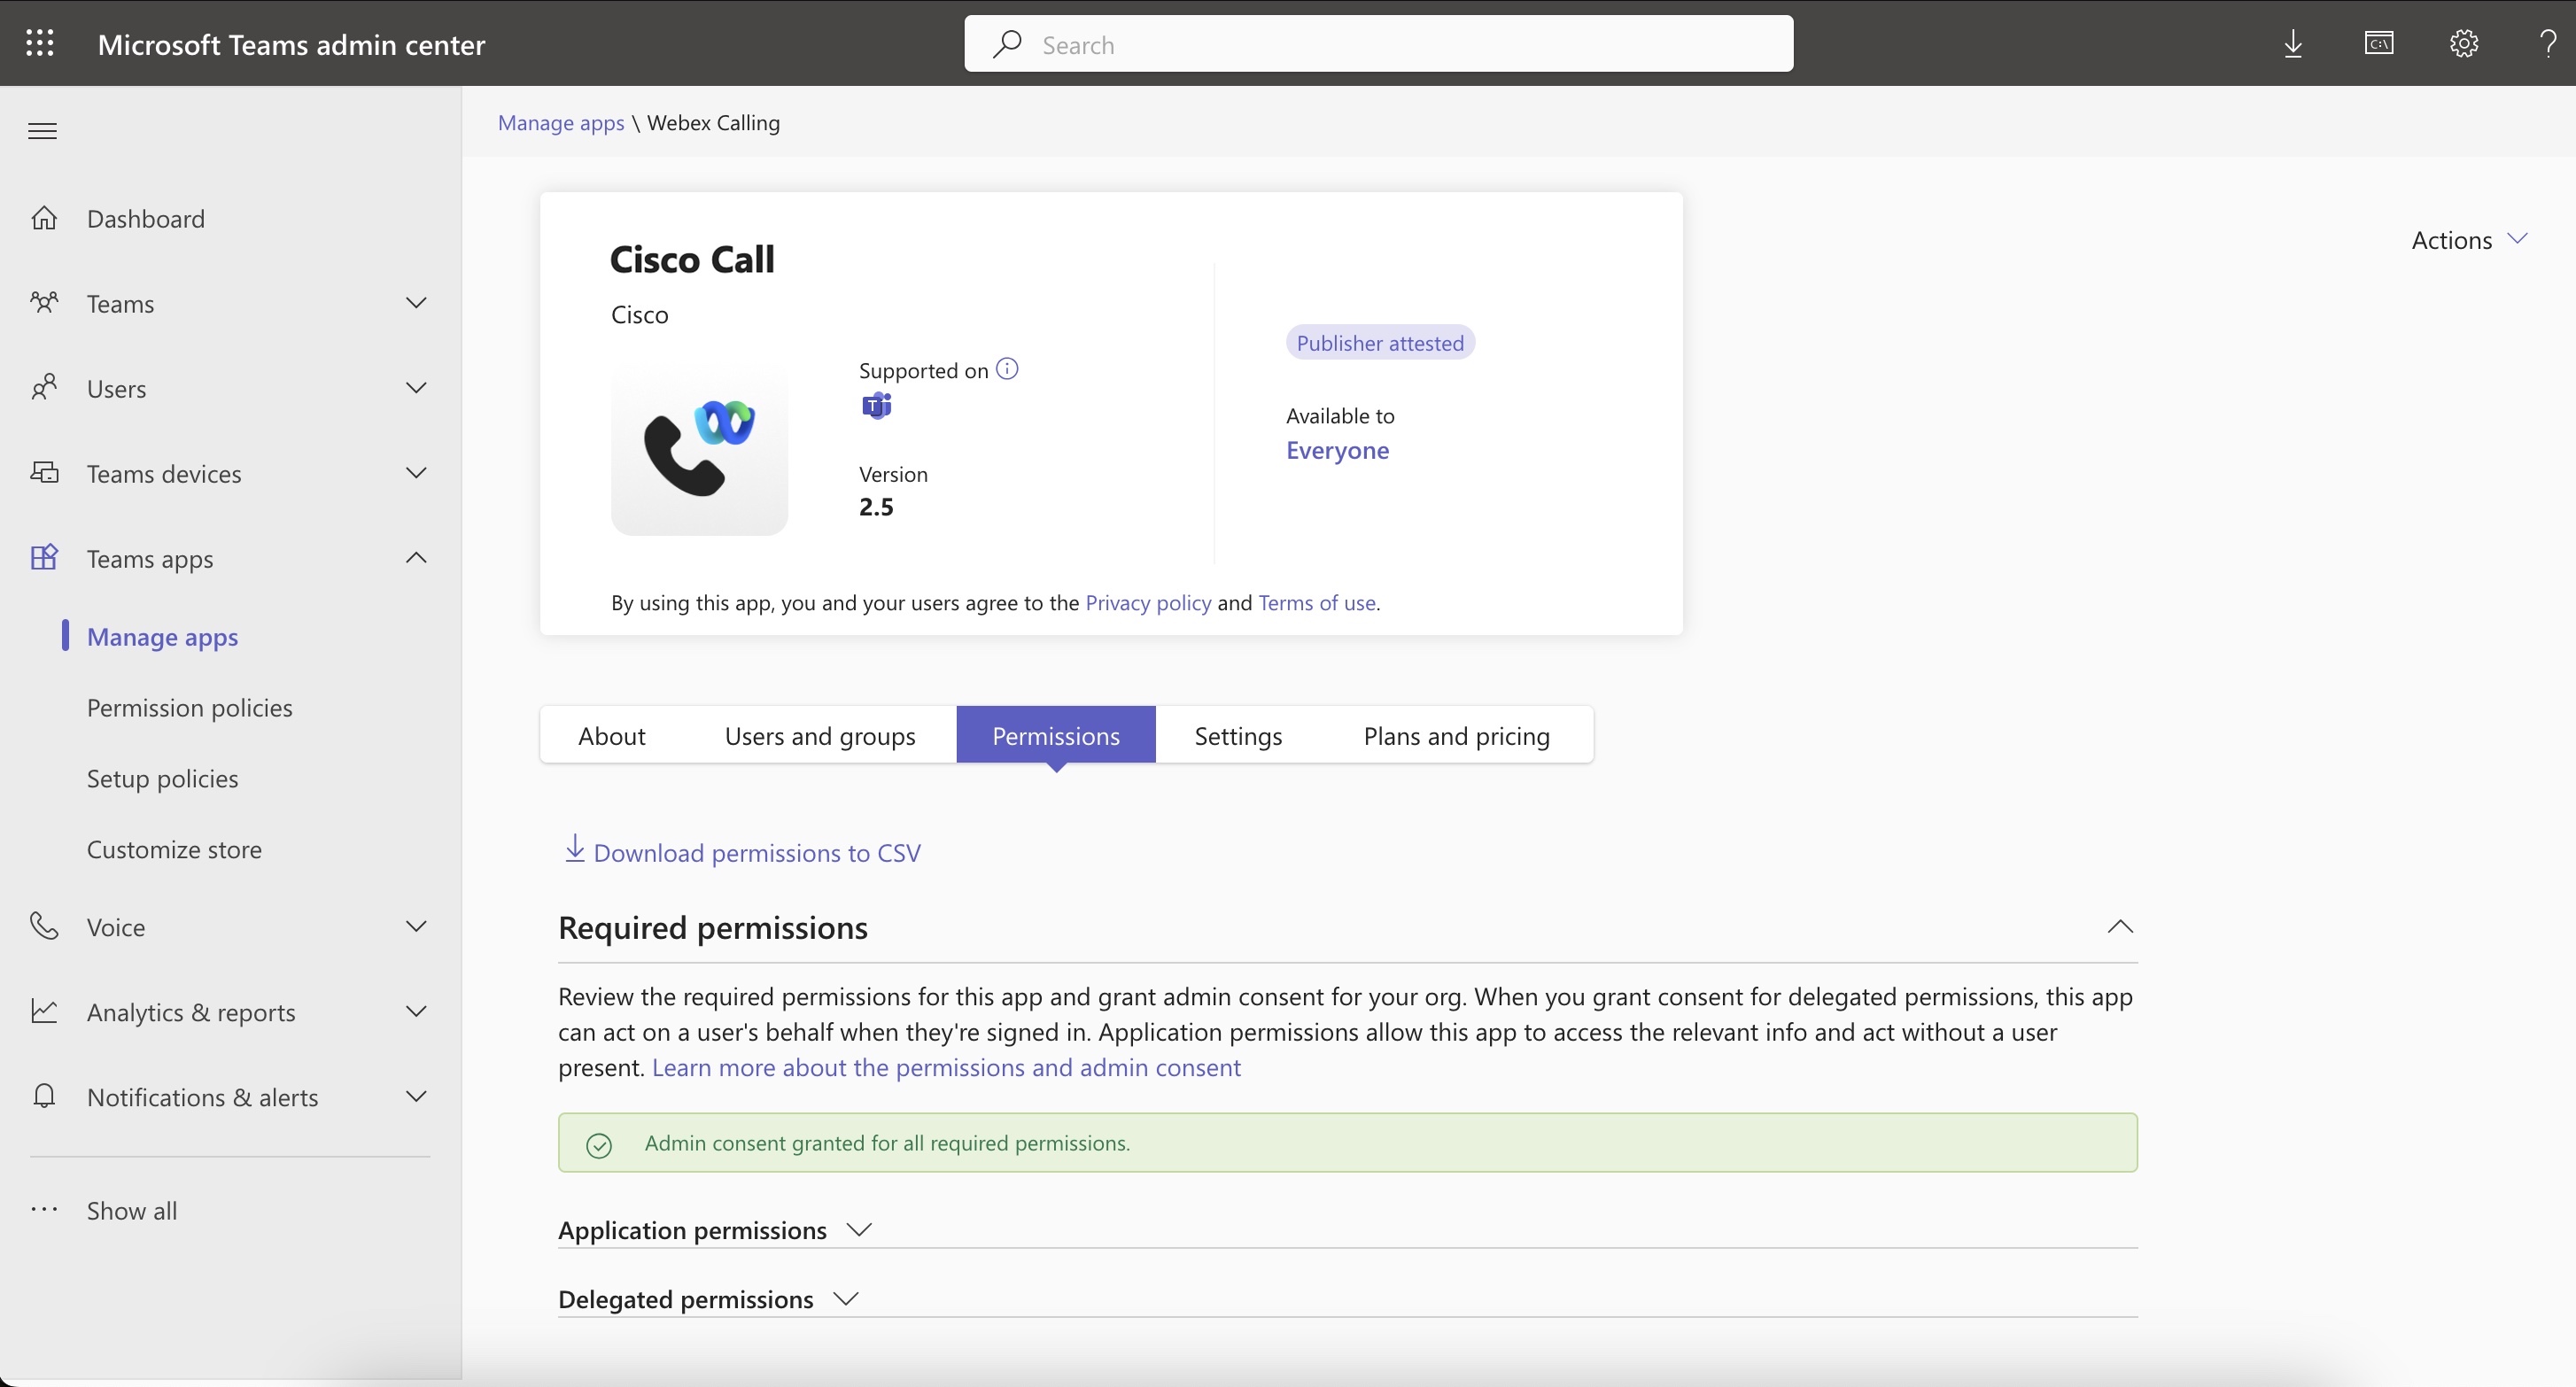
| 1 |
I menyn Instrumentpanel går du till |
| 2 |
I sökrutan skriver du |
| 3 |
Klicka på fliken Behörigheter och klicka sedan på Ge administratörsmedgivande. |
| 4 |
Kontrollera om följande behörigheter ingår.
 |
| 5 |
Klicka på Acceptera för att acceptera behörigheterna. |
| 6 |
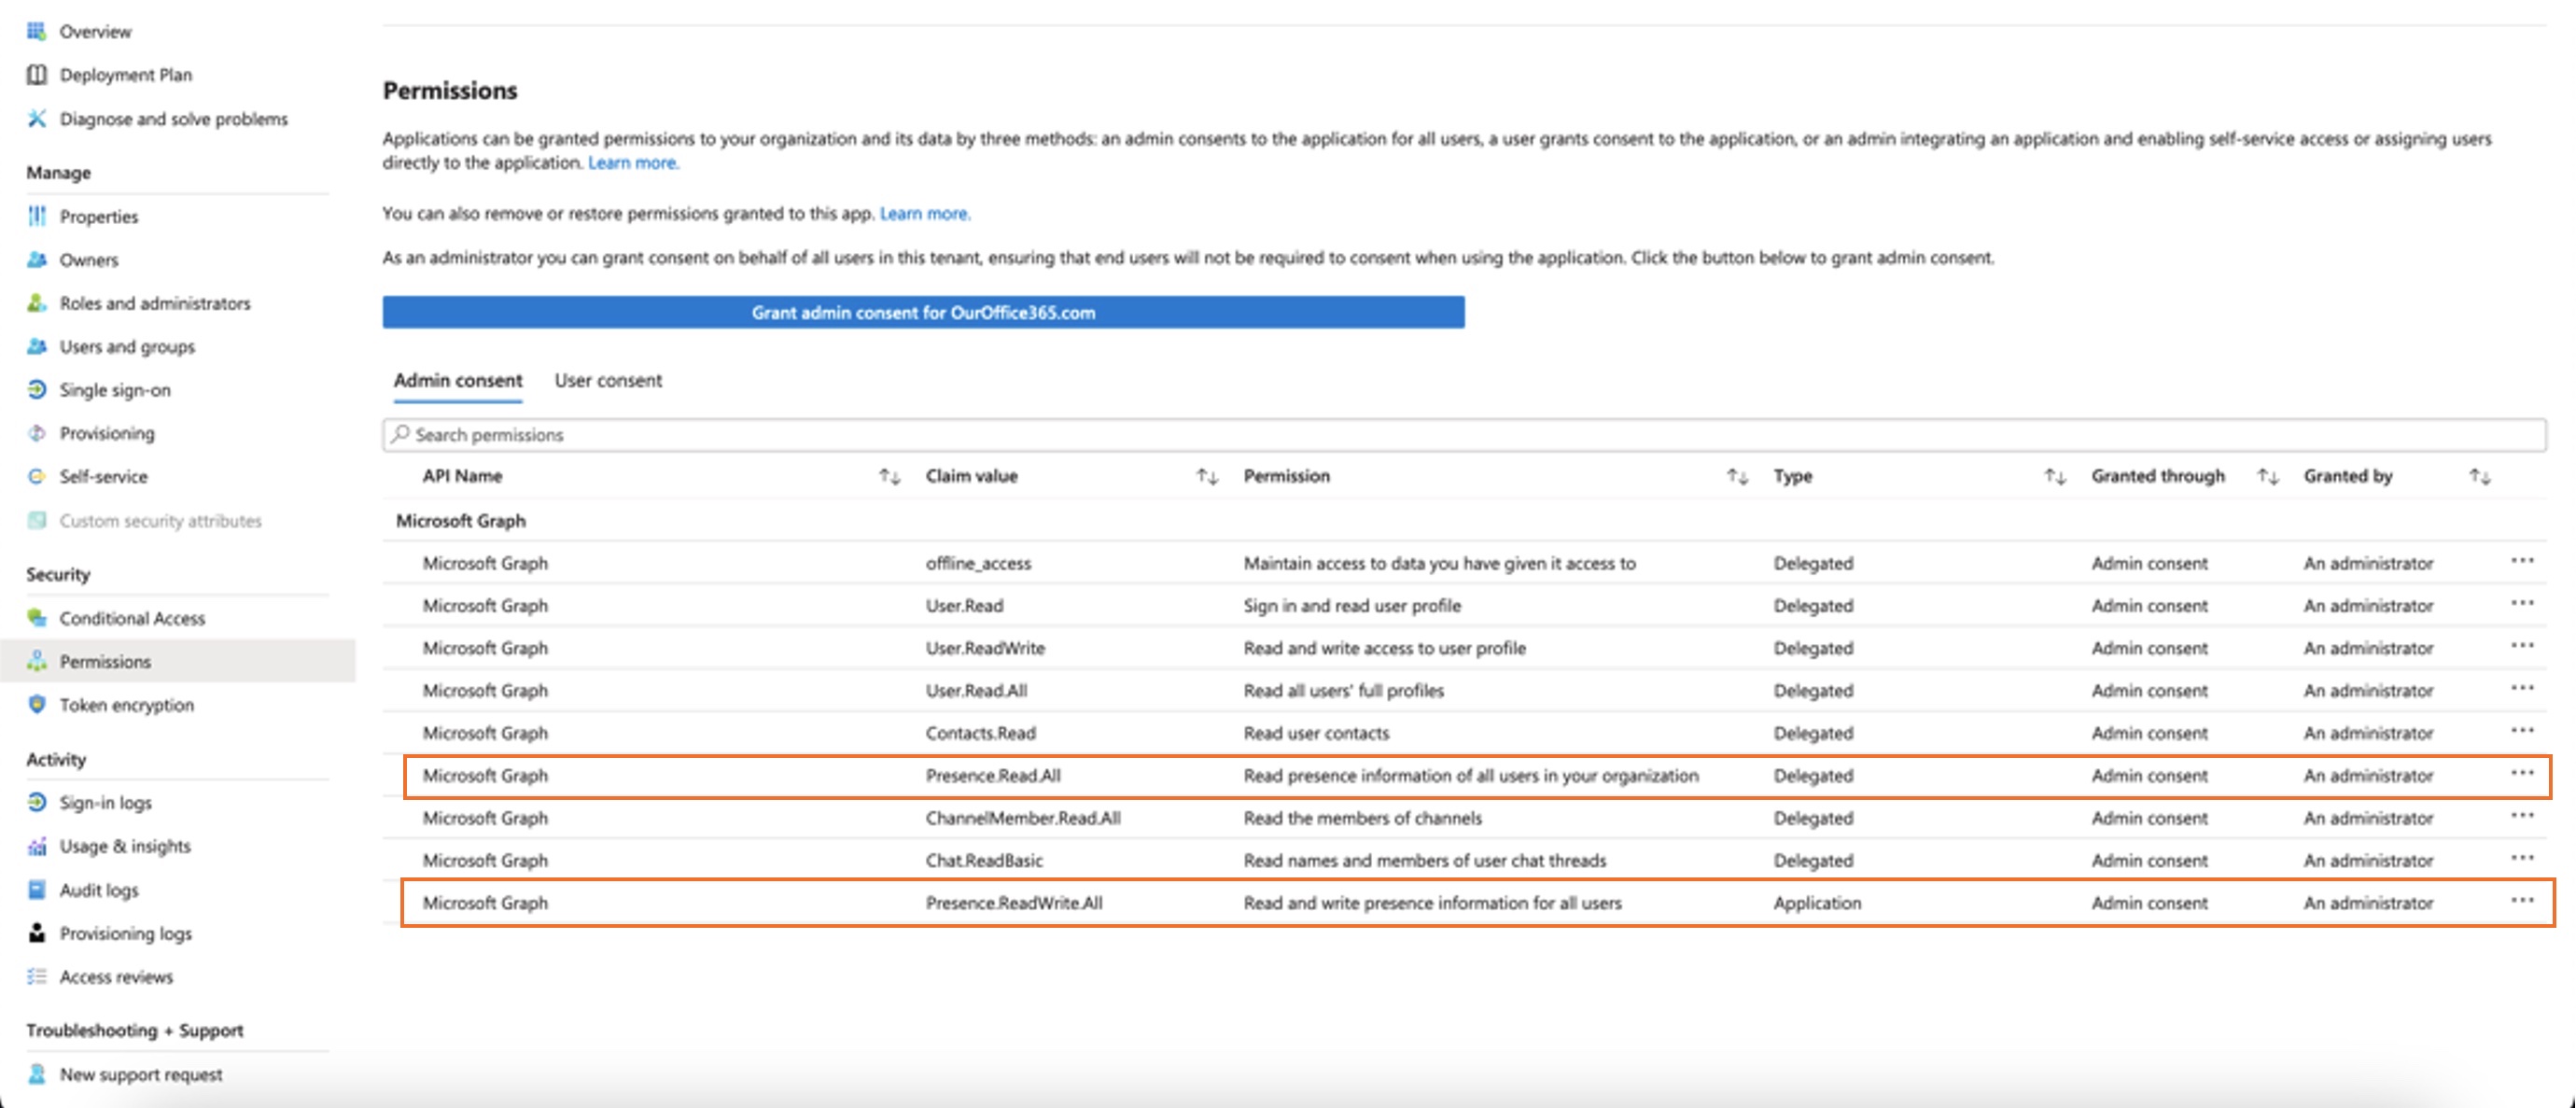
Se till att nya behörigheter visas som beviljade:
Följande behörigheter bör beaktas i administratörsmedgivandet:
Både behörigheterna
Om din organisation för närvarande använder behörigheten Om du bara vill gå från När du har verifierat behörigheterna aktiverar du närvarosynkronisering i Control Hub. Se avsnittet Aktivera dubbelriktad närvarosynkronisering. För att undvika problem med närvarosynkroniseringsstatus mellan Microsoft Teams och Webex rekommenderar vi att du ställer in inställningen Tilldelning krävs till Nej. För att uppdatera inställningen, gå till Microsoft Entry administratörscenter eller Azure-portalen och gå till och välj Nej. Om du av någon anledning behöver behålla den här inställningen på Ja, se till att du tilldelar användarna korrekt enligt stegen som anges i dessa Microsoft-dokument: Tilldela approller till applikationer & Hantera användares och gruppers tilldelning till en applikation. |
Anpassa Cisco Call-appen
Du kan skapa flera anpassningar av Cisco Call-appen för Microsoft Teams-användare baserat på din organisations behov. Du kan skapa en standardanpassning av appen för alla användare, eller skapa 10 ytterligare anpassningar av en enskild app och tilldela den till specifika användare eller grupper.
Mer information finns i Anpassa Cisco Call-appen för Microsoft Teams-användare.
Behörigheter för integration av Cisco Call och Microsoft Teams
Integrationstjänsten använder Webex och Microsoft API:er för att komma åt data, till exempel centraliserad samtalshistorik, för att visa och uppdatera statusar, till exempel markera röstmeddelanden som lästa, utan att lagra några användardata. Alla dataöverföringar mellan integrationen och Webex/Microsoft backends sker över krypterade HTTPS-kanaler. Därmed säkerställer tjänsten att användardata inte lagras i molnet, vilket stärker datasekretessen och säkerheten.
Vi begär de lägsta nödvändiga behörigheterna från Microsoft för att anropa Microsoft API för att aktivera integrationsfunktionen. Följande tabell beskriver varje behörighet som vi begär och varför den krävs.
| Behörighet | Orsak |
|---|---|
|
offline_access |
Tillåter integrationstjänsten att generera en ny åtkomsttoken utan att användaren behöver auktorisera igen ofta. |
|
Användare. Läs |
Tillåter integrationstjänsten att läsa användarens grundläggande information, till exempel e-postadressen. |
|
Användare.LäsSkriv |
Tillåter att integrationstjänsten lagrar snabbval i användarprofiler. |
|
Användare.Läs.Alla |
Tillåter integrationstjänsten att söka efter användare i Active Directory för att ringa samtal. |
|
Kontakter.Läs |
Tillåter integrationstjänsten att söka efter användarens Outlook-kontakt för att ringa samtal. |
|
ChannelMember.Read.Alla |
Tillåter integrationsmeddelandetillägget att läsa medlemmar i en kanal så att användaren kan söka efter en specifik kanalmedlem att ringa. |
|
Chat.ReadBasic |
Tillåter att integrationsmeddelandetillägget läser medlemmar i en gruppchatt så att användaren kan söka efter en specifik medlem att ringa. |
|
Närvaro.Läs.Allt |
Tillåter integrationstjänsten att läsa närvaroinformation för alla användare i katalogen. |
|
Presence.Läs.Skriv.Allt |
Tillåter integrationstjänsten att läsa all närvaroinformation och skriva aktivitet och tillgänglighet för alla användare i katalogen. |
|
Presence.ReadWrite |
Tillåter integrationstjänsten att läsa närvaroinformation och skriva aktivitet och tillgänglighet för en användare. |
Kontrollhubbkonfiguration
Du kan konfigurera och aktivera följande funktioner i Control Hub för att göra dem tillgängliga för Microsoft Teams-användare.
Dölj Webex-appens fönster
För organisationer som har valt att använda Cisco Call-integrationen med Microsoft Teams är integrationen användarnas primära gränssnitt till Webex-tjänster. När Webex-appen är konfigurerad är den fortfarande installerad och körs på användarnas datorer, men fönstret stängs som standard. Åtgärder som vidtas i Cisco Call-integrationen kan starta specifika funktioner i Webex-appen, men i allmänhet behöver användarna inte interagera med Webex-appen.
Via Control Hub kan du dölja Webex-appens fönster på följande nivåer:
-
Organisationsnivå
-
Användargruppsnivå
-
Användarnivå
Dölj Webex-appens fönster för en organisation
Inställningarna som konfigureras på organisationsnivå gäller automatiskt för alla användare inom organisationen.
| 1 | |
| 2 |
Gå till . |
| 3 |
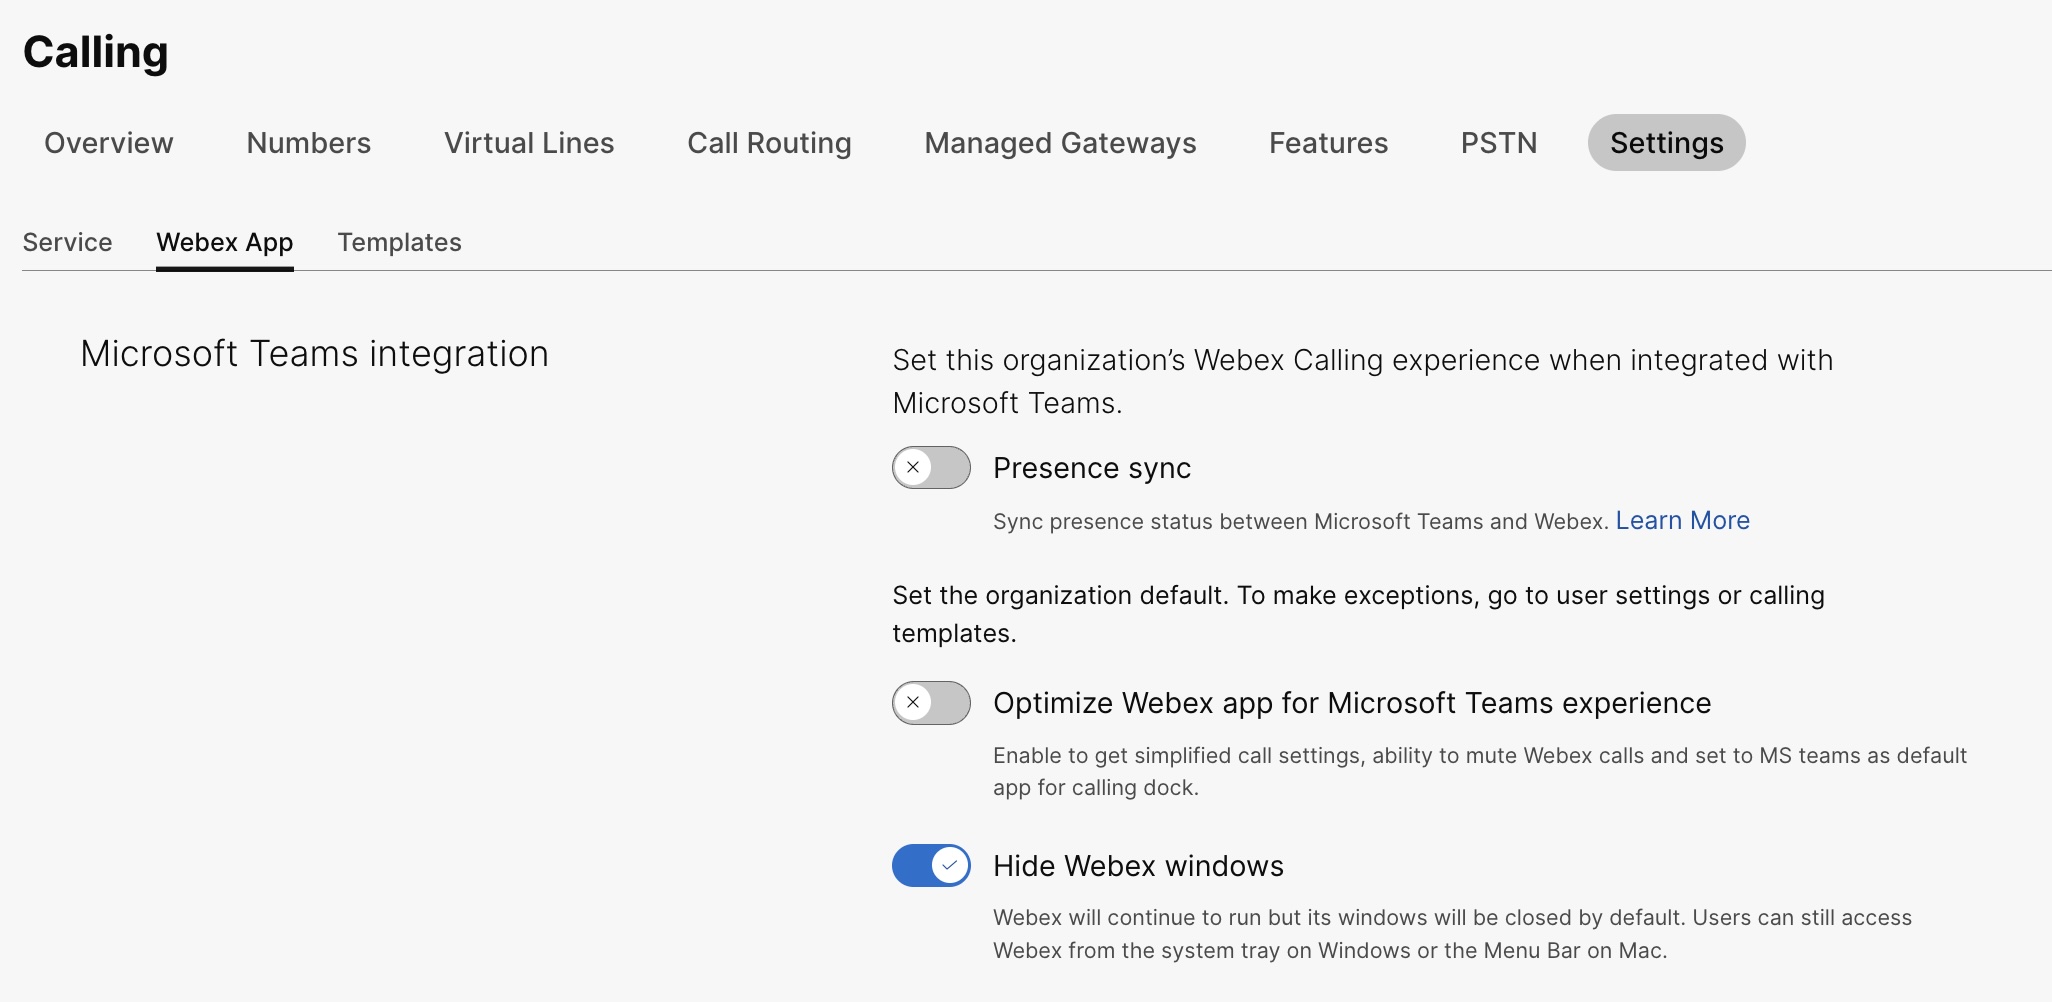
Klicka på fliken Webex-app, gå till avsnittet Microsoft Teams-integration och aktivera Dölj Webex-fönster.
Du kan också använda det offentliga API:et för att dölja Webex-appens fönster för alla användare i en organisation som använder Cisco Call-integrationen med Microsoft Teams. För mer information, se Uppdatera en organisations MS Teams-inställningar i developer.webex.com. |
Dölj Webex-appens fönster för en användargrupp
För att dölja Webex-appfönstret för en användargrupp, skapa en samtalsmall och tilldela den till en användargrupp. Konfigurationen i mallen gäller för alla användare i gruppen.
Så här skapar du en ny mall för att dölja Webex-appens fönster:
| 1 | |
| 2 |
Gå till . |
| 3 |
Klicka på Skapa mall, välj Skapa en mall och klicka på Nästa. Om utbildning är din affärsvertikal kan du använda fördefinierade mallar med anpassade inställningar för elever eller lärare. |
| 4 |
I avsnittet Allmänt skriver du in Mallnamn och Beskrivning. |
| 5 |
Gå till avsnittet Microsoft Teams-integration och aktivera Dölj Webex-fönster. |
| 6 |
Klicka på Skapa mall och nästa. |
| 7 |
Sök och välj en grupp för den här mallen och klicka på Klar. Ändra eller ta bort en mall:
För att ändra en mall, klicka på mallen, ändra växlingsknapparna och klicka på Spara. För att ta bort en mall, klicka på mallen och välj Ta bort från rullgardinsmenyn Åtgärder. På sidan Ta bort mall markerar du rutan som informerar dig om att borttagningen av en mall är permanent och klickar sedan på Ta bort. |
Att tänka på när du använder anropsmallar för en användargrupp
-
När en användare är registrerad i en organisation ärver användaren inställningarna från organisationsnivå.
-
Om användaren läggs till i en användargrupp tillämpas inställningarna från samtalsmallen.
-
Om en användare tillhör flera användargrupper har mallen med högst rang (Rang 1) högst prioritet och den mallens inställningar gäller.
-
Om användaren har individuella användarinställningar har dessa prioritet framför inställningar på användargrupps- eller organisationsnivå.
Se Konfigurera inställningsmallar för mer information om hur du hanterar dina mallar.
Du kan tillämpa den befintliga mallen antingen från avsnittet Grupp eller avsnittet Anrop.
- För att tillämpa mallen från gruppsektionen, se Konfigurera inställningsmall.
- För att ansöka från avsnittet Utlysningar, följ följande steg.
| 1 | |
| 2 |
Gå till . |
| 3 |
Klicka på |
| 4 |
Skriv in det gruppnamn som du vill tillämpa mallen på och välj sedan gruppen. |
| 5 |
Klicka på Har gjort. |
 bredvid en befintlig mall och klicka på
 Dölj Webex-appens fönster för en användare
De individuella användarinställningarna åsidosätter inställningarna på organisationsnivå och användargruppsnivå.
| 1 | |
| 2 |
Gå till . |
| 3 |
Välj en användare och klicka på Ringer. |
| 4 |
Gå till Användarupplevelse för samtal och klicka på Microsoft Teams-integration. |
| 5 |
Aktivera Dölj Webex-fönster. 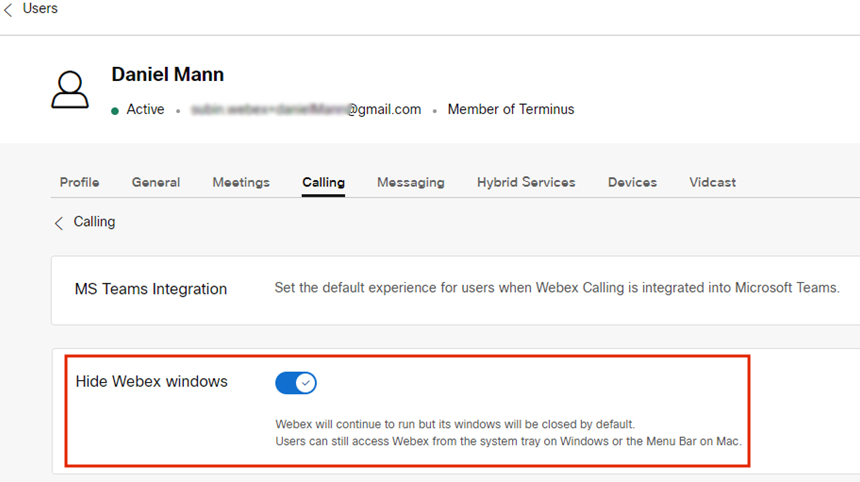 När du har konfigurerat inställningarna för en användare kan du ändra inställningarna ytterligare på användarnivå. Användarinställningar återställs inte automatiskt till en organisations standardinställningar. Du kan använda det offentliga API:et för att dölja Webex-appfönstret från Microsoft Teams-klienten för en enskild användare. Se Konfigurera en persons MS Teams-inställningar och Hämta en persons inställningar för programtjänster i developer.webex.com. |
När du har konfigurerat inställningarna måste användarna starta om sin Webex-app och logga in för att se ändringen.
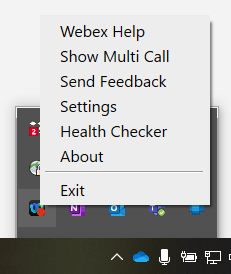
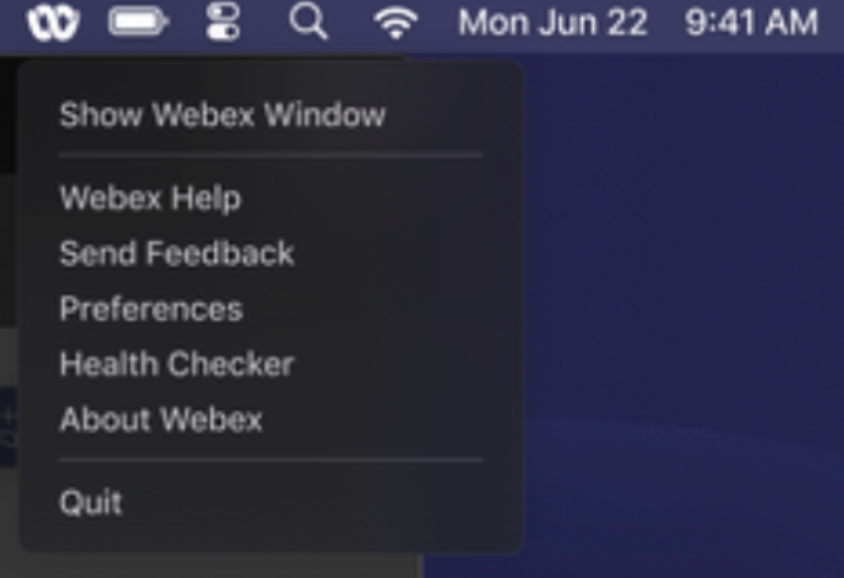
Om användare vill interagera med själva Webex-appen kan de komma åt den från systemfältet i Windows och menyfältet på Mac. Webex-appen visas bara i aktivitetsfältet i Windows eller macOS-dockan när ett fönster är aktivt och används.
|
Webex-appen i Windows systemfält |
Webex-appen i Mac-menyfältet |
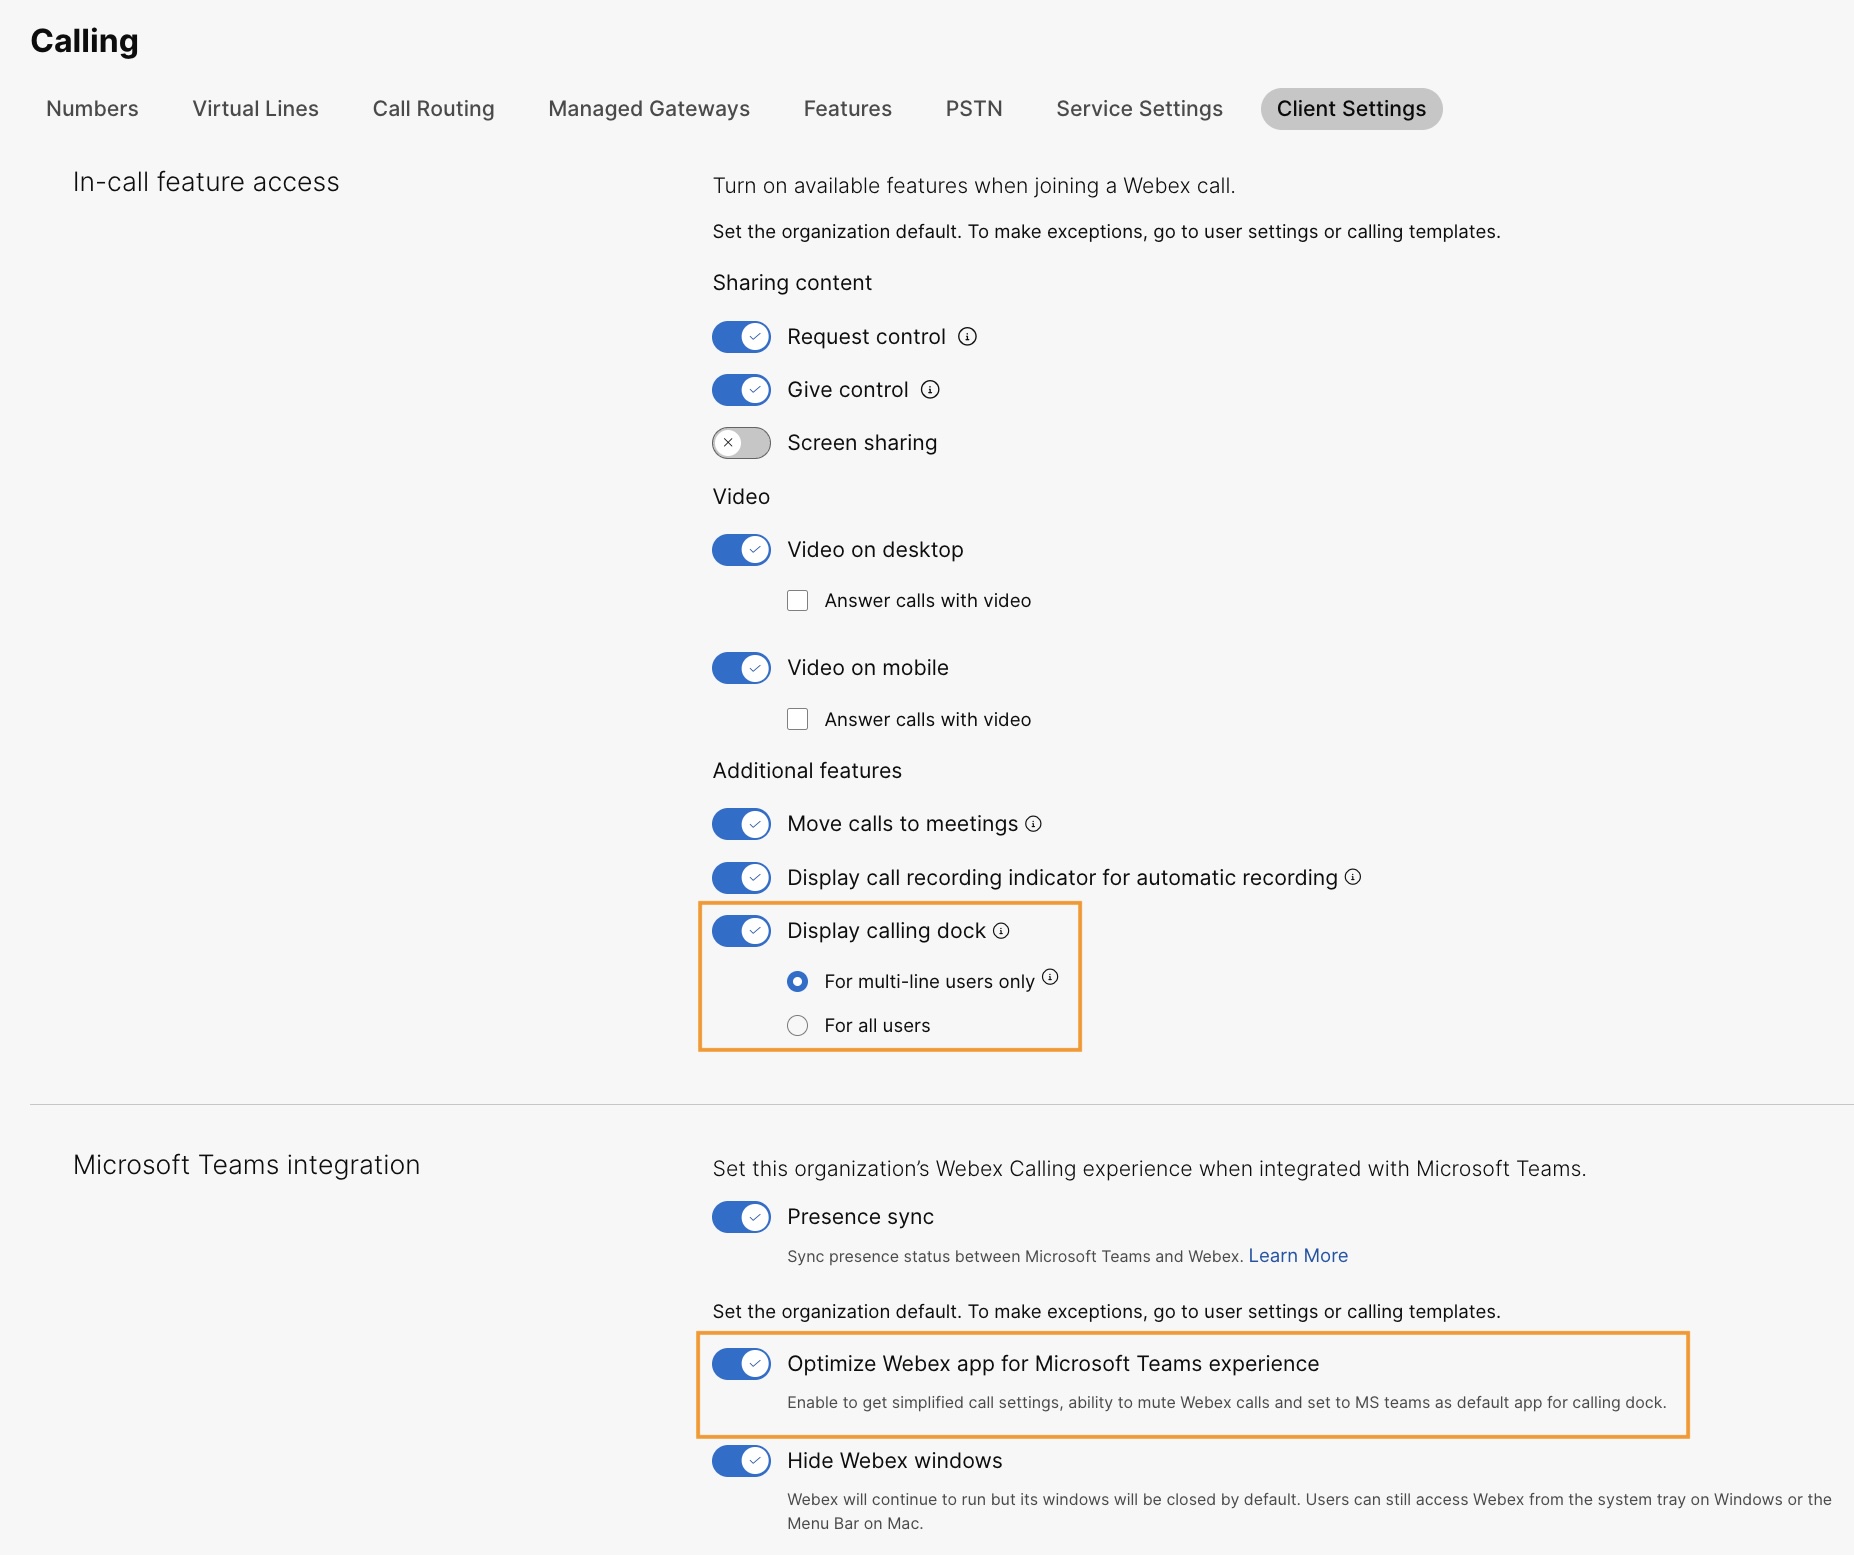
Aktivera dockningsfönstret för samtal
Fönstret för samtalsdockan (flera samtal) är ett separat, flytande fönster som hjälper användare att hantera flera eller delade linjer i ett enda fönster. Användare kan ringa och ta emot samtal, se status för alla linjer och ha bättre tillgång till funktioner som vänteläge, vidarekoppling och inbrytning, utan att byta till ett annat fönster.
| 1 | |
| 2 |
Gå till . |
| 3 |
Klicka på fliken Webex-appen, gå till avsnittet Åtkomst till funktioner under samtal och under Ytterligare funktioneraktiverar du Visa samtalsdocka och väljer ett av följande alternativ:
Du kan också konfigurera den här funktionen på användargruppsnivå och användarnivå.
|
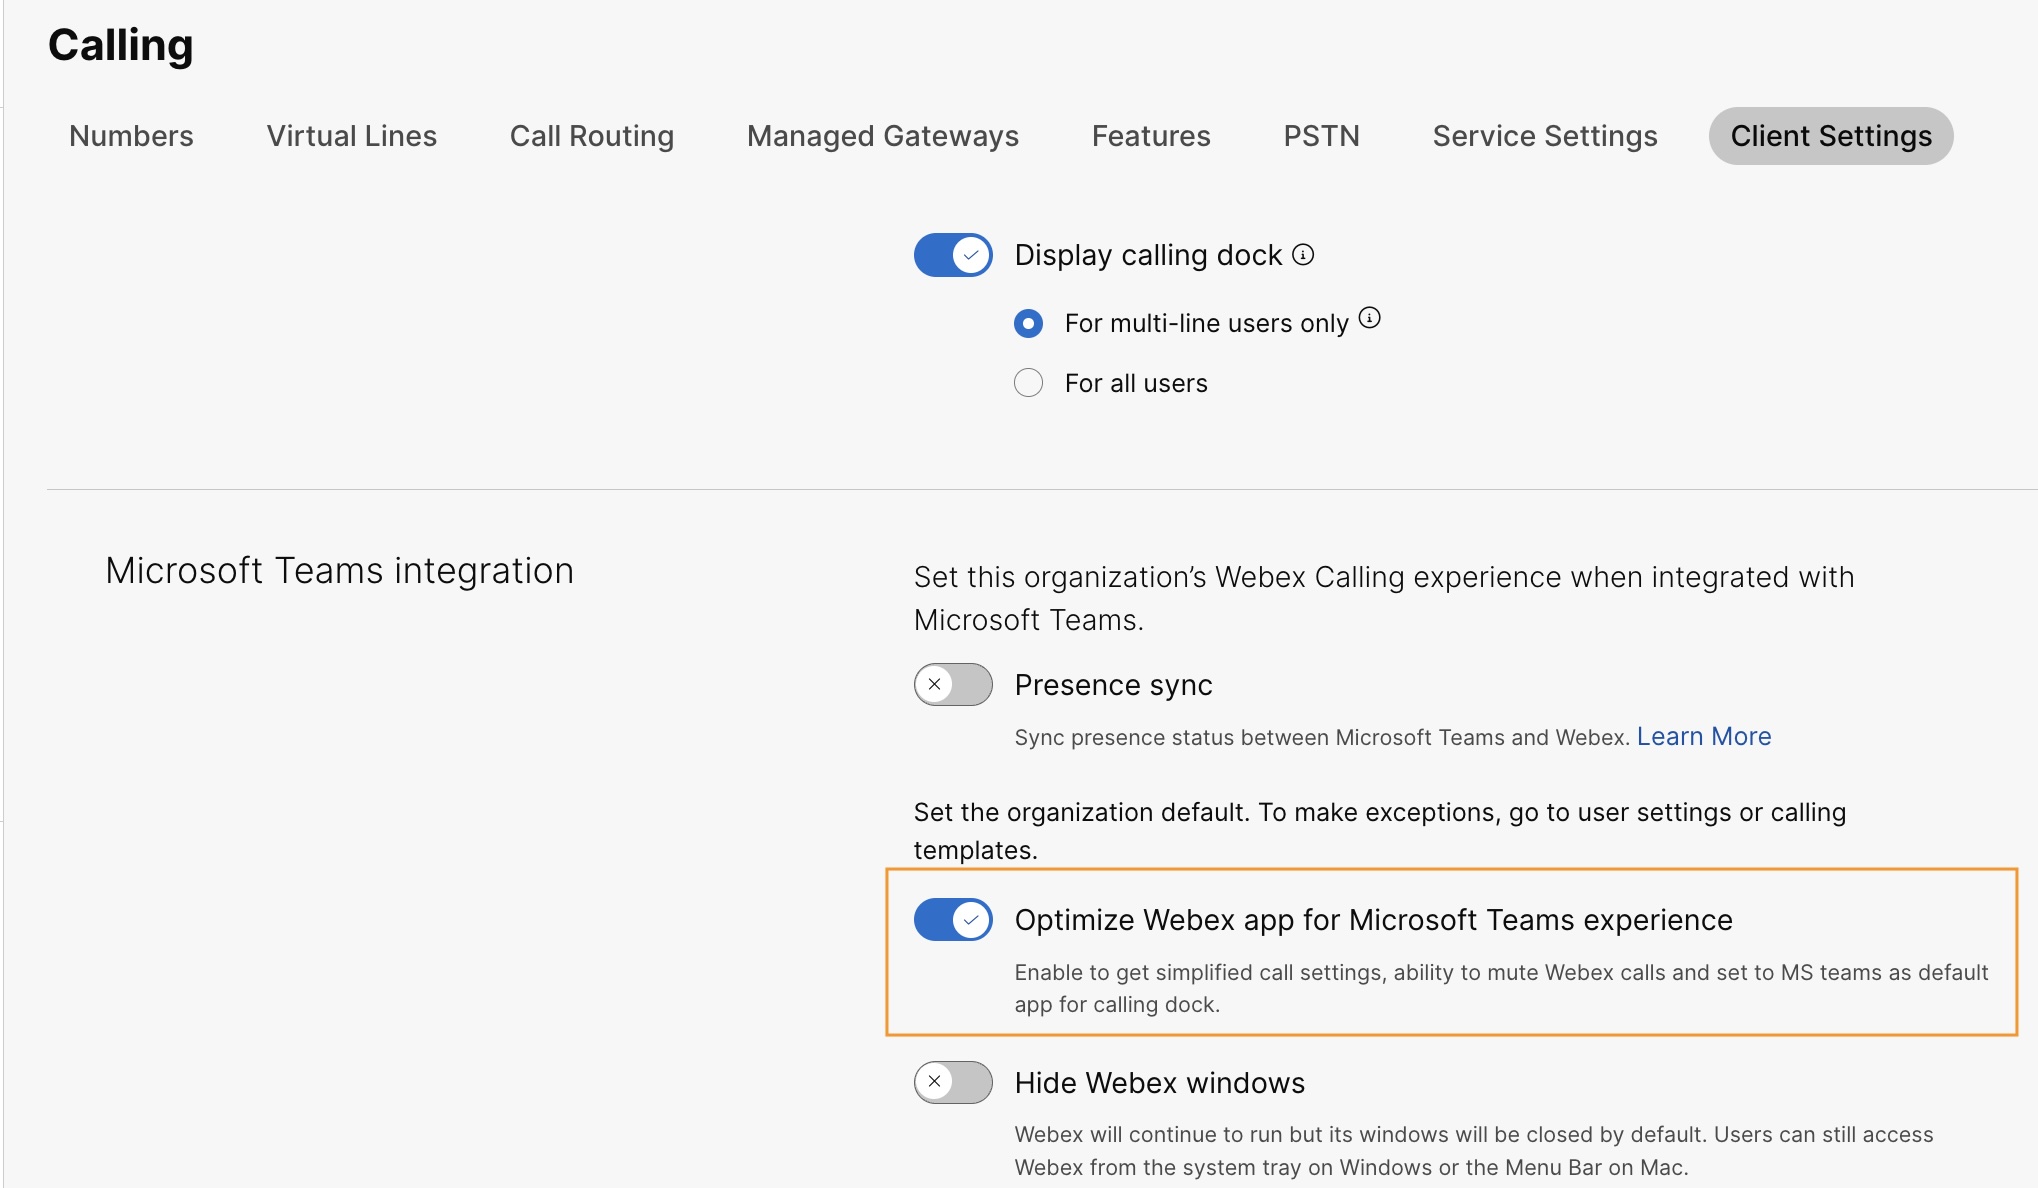
Optimera Webex-appen för Microsoft Teams-upplevelsen
Den här funktionen ger användarna följande upplevelser:
-
Förenklade samtalsinställningar – Samtalsinställningarna visar endast de alternativ som är nödvändiga för integration. Att aktivera den här funktionen förenklar endast samtalsinställningarna som är tillgängliga via samtalsdockan. Samtalsinställningarna som är tillgängliga från Cisco Call-integrationen förblir förenklade som standard.
-
Stäng av ljudet för Cisco-samtal – inkommande Cisco-samtal är avstängda när en användare deltar i ett Microsoft Teams-samtal eller möte. För att den här funktionen ska fungera måste du aktivera den i Control Hub och användaren måste aktivera alternativet Stäng endast av aviseringar när jag är i ett möte eller pågår i ett samtal från samtalsinställningarna i Cisco Call-integrationen.
Om du inaktiverar den här funktionen i Control Hub fungerar användarinställningarna bara när användaren är i ett Cisco-samtal eller möte. Om du aktiverar den här funktionen fungerar användarinställningarna när användaren är i antingen ett Microsoft Teams-samtal eller -möte eller ett Cisco-samtal eller -möte.
-
Enskild app-upplevelse – när en användare klickar på ikonerna för röstmeddelanden och centraliserad samtalshistorik från samtalsdockan omdirigeras de till Microsoft Teams Cisco Call istället för Webex-appen.
För Windows-användare: Om du klickar på Webex-appen i systemfältet öppnas samtalsdockan istället för Webex-appen.
| 1 | |
| 2 |
Gå till . |
| 3 |
Klicka på fliken Webex-app, gå till avsnittet Microsoft Teams-integration och aktivera Optimera Webex-appen för Microsoft Teams-upplevelsen.
Den här växlingsknappen är inaktiverad om du inte har aktiverat Visa samtalsdocka under avsnittet Åtkomst till funktioner under samtal. Du kan också konfigurera den här funktionen på användargruppsnivå och användarnivå.
|
Aktivera röstbrevlåda, centraliserad samtalshistorik och närvarosynkronisering
Röstbrevlåda och centraliserad samtalshistorik
Funktionerna för röstbrevlåda och centraliserad samtalshistorik är aktiverade som standard för Webex Calling-, dedikerad instans- och UCM Cloud-kunder.
För mer information om hur du aktiverar röstbrevlåda för Webex Calling-användare, se: Konfigurera och hantera röstbrevlådans inställningar för en Webex Calling-användare.
För mer information om hur du aktiverar röstbrevlåda för BroadWorks-användare, se Aktivera röstbrevlåda för Microsoft Teams-integration.
BroadWorks-administratörer måste aktivera enhetlig centraliserad samtalshistorik för att säkerställa att den här funktionen fungerar korrekt. Se Webex för Cisco BroadWorks konfigurationsguide för mer information.
Dubbelriktad närvarosynkronisering
Den här funktionen möjliggör dubbelriktad synkronisering av närvarostatus mellan Microsoft Teams och Webex, vilket stöder flera Microsoft Teams-klienter i samma Webex-organisation. Närvarostatusen inkluderar I ett samtal, I ett möte, Presenteraroch Stör ej.
Efter att den här funktionen har aktiverats, ändras en användares Microsoft Teams-status till I ett samtalnär de ringer eller tar emot ett Webex-samtal. När de aktiverar Stör ej i Webex-appen eller någon annan Webex-enhet synkroniseras statusen automatiskt med Microsoft Teams. På liknande sätt synkroniseras statusarna I ett möte och Presenterar mellan applikationer.
När Stör ej är aktiverat på användarens Webex-app eller någon Webex-enhet får de inga aviseringar om inkommande samtal och meddelanden i Webex-appen, Webex-enheten eller Microsoft Teams.
Du kan också använda ett offentligt API för att aktivera Webex-närvarosynkronisering med Microsoft Teams-klienten. För mer information, se Uppdatera en organisations MS Teams-inställningar i developer.webex.com.
Följande tabell visar den dubbelriktade statussynkroniseringsrepresentationen mellan Webex och Microsoft Teams.
|
Webex-status |
Microsoft Teams-status |
|---|---|
|
|
|
|
|
|
|
|
|
|
|
|
För närvarande kan du endast konfigurera den här funktionen på organisationsnivå.
| 1 | |
| 2 |
Gå till . |
| 3 |
Klicka på fliken Webex-appen, gå till avsnittet Microsoft Teams-integration och aktivera Närvarosynkronisering. Du kan aktivera Dölj Webex-fönster för bästa möjliga upplevelse, men det är valfritt. |
| 4 |
Gå till avsnittet Stör ej (DND) statussynkronisering och aktivera reglaget. 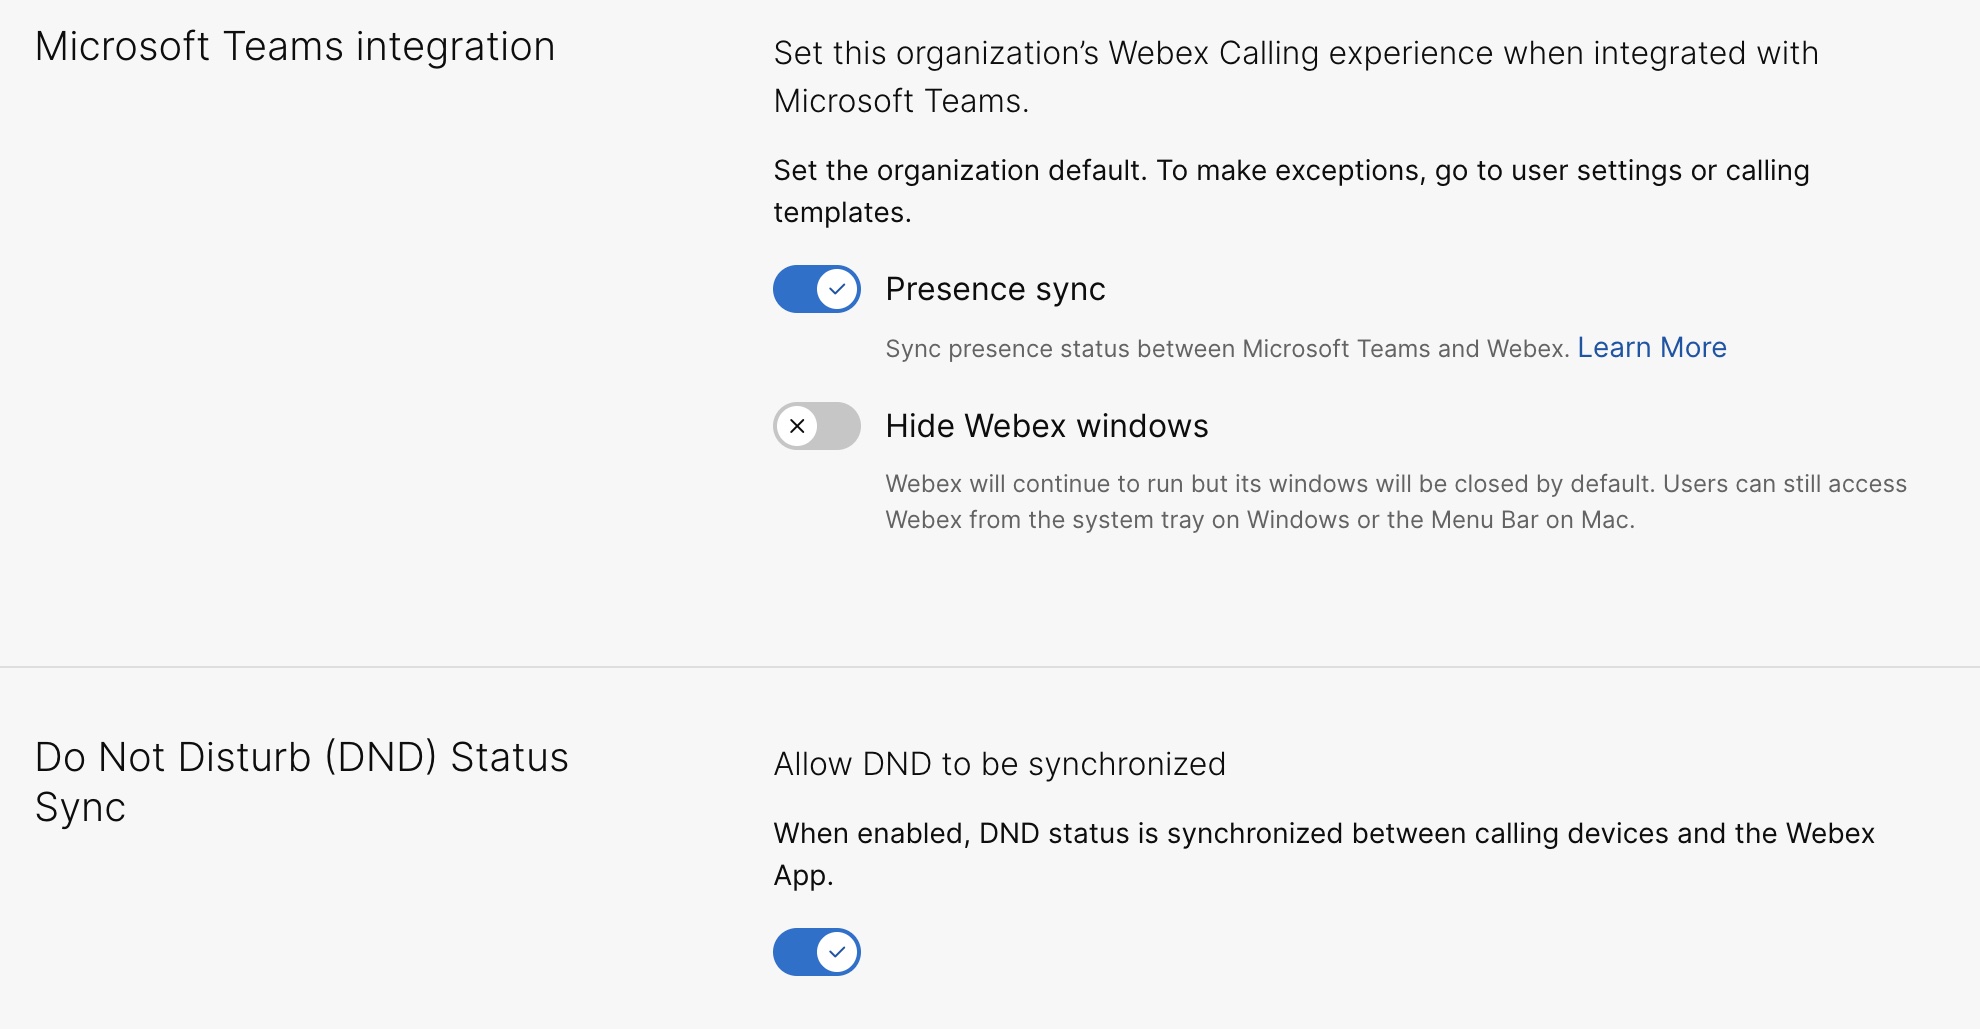 |
Ytterligare konfiguration för Unified CM-användare
För att aktivera röstbrevlåda, centraliserad samtalshistorik och dubbelriktad närvarosynkroniseringstjänst för lokala Unified CM-kunder, utför följande steg:
Det tar maximalt 12 timmar att aktivera röstbrevlådan för kunder på plats.
| 1 | |||||
| 2 |
Gå till . På kortet UC-hantering klickar du på Inventering. Listan över klustergrupper med beskrivning, status, kluster och noder visas. | ||||
| 3 |
Utför följande åtgärder:
Sidan Inventering visas med listan över kluster som tillhör den valda klustergruppen. | ||||
| 4 |
Klicka på Information bredvid det kluster som den specifika produktnoden tillhör. Nodnamnet med version, produkt och status visas. | ||||
| 5 |
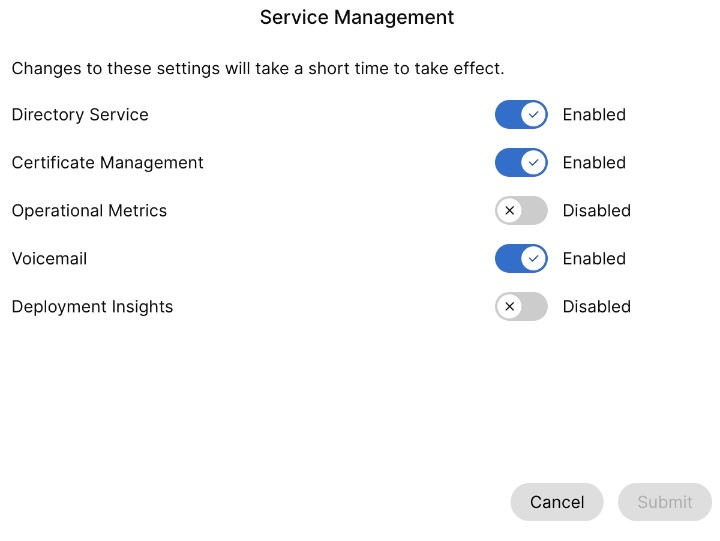
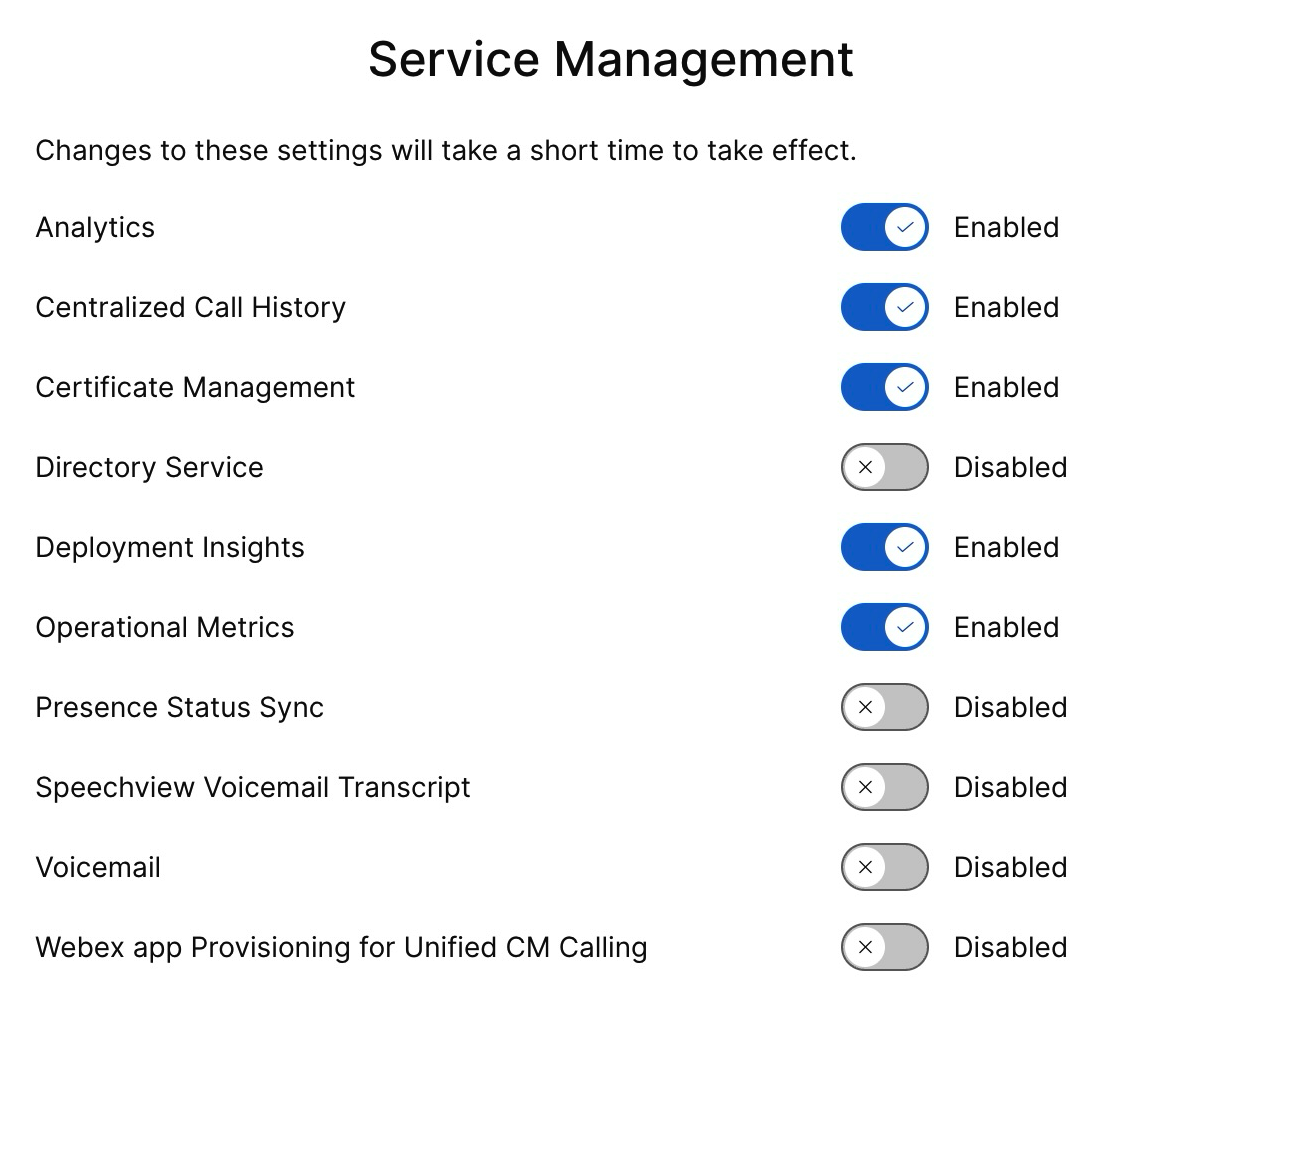
Klicka på ikonen med tre punkter ⋮ bredvid Händelsehistorik och välj Tjänsthantering. Sidan Tjänsthantering visas med listan över tjänster. | ||||
| 6 |
Använd växlingsknappen för att aktivera Röstbrevlåda, Centraliserad samtalshistorik och Synkronisering av närvarostatus.
| ||||
| 7 |
Klicka på Skicka in. | ||||
| 8 |
Om popup-fönstret Bekräftelse av datainsamling visas, godkänn det genom att markera kryssrutan och klicka på Skicka. |
Aktivera Cisco AI Assistant
Den här funktionen gäller endast Webex Calling-användare.
Cisco AI Assistant genererar sammanfattningar som användare kan komma åt både under och efter en interaktion, oavsett om samtalet spelas in eller inte.
Om AI-assistenten används under ett samtal har användaren som aktiverat sammanfattning och transkription efter samtal åtkomst till sammanfattningar, åtgärdspunkter och transkriptioner efter samtalet i sin samtalshistorik. Denna tillgänglighet gäller oavsett om samtalet spelades in och styrs av både administratörs- och användarinställningar. AI-assistentens data lagras under en fastställd period på 365 dagar.
Du kan aktivera inställningar för samtalssammanfattningar i AI-assistenten för samtalsöverföring och konferenser på organisations-, användar- och mallnivå. AI-assistentens funktioner är inte tillgängliga för användare utanför Indien.
För mer information om hur du aktiverar Cisco AI Assistant från Control Hub, se Hantera Cisco AI Assistant för Webex Calling.


