
Thanks for your feedback.
Manage your own customer main key
 Feedback?
This feature isn't supported for Webex for Government.
As part of our commitment to end-to-end security, Webex holds a main key on behalf of each organization. We call it a main key because it doesn't encrypt content directly, but it's used to encrypt your organization's other keys which encrypt the content. The base level of the key hierarchy is called the content key (CK) and the intermediate levels of the keys are called key encryption keys (KEK).
We recognize that some organizations prefer to manage their own security, so we are giving you the option to manage your own customer main key (CMK). This means that you take responsibility for creating and rotating (reencrypting) the main key that Webex uses to encrypt your content encryption keys.
Going forward, a key refers to the CMK unless otherwise specified.
How it works
-
Webex keeps your CMK in a hardware security module (HSM) so that the Webex services do not have access to the CMK value.
-
Control Hub shows your currently active or revoked CMK and any pending CMK that are stored in the HSM. When you need to rotate (reencrypt) the CMK, you generate your new CMK and encrypt it with the HSM's public key, so that only the HSM can decrypt and store it.
-
You then upload and activate the new CMK in Control Hub. Webex immediately starts using the new CMK for encrypting your content keys. Webex keeps the old CMK, but only until it's sure that your content encryption keys are secured by the new CMK.
We don’t retroactively reencrypt all the existing content. Once you activate your CMK, all new content (Spaces and Meetings) are reencrypted and protected.
We recognize that some organizations prefer to manage their own key outside of Webex. That's why we’re giving you the option to manage your own CMK in the Amazon Web Services (AWS) Key Management Service (KMS). This implies that you’re responsible for managing your keys in the AWS KMS. You authorize Webex to encrypt and decrypt using your AWS KMS key through the AWS console. You provide Webex with your AWS KMS key ID instead of your CMK. This means that you take responsibility for creating and rotating (reencrypting) the AWS KMS key that Webex uses to encrypt your content encryption keys in the cloud.
How it works
-
You create a key with AWS. The AWS KMS is used to manage your key and stores the key in a hardware security module (HSM).
-
You provide Webex with access to use the AWS KMS key through the AWS console.
This means instead of uploading your CMK into Control Hub, you provide Webex with access to the AWS KMS key. The AWS KMS key doesn’t leave your AWS KMS and Webex services don’t have access to the AWS KMS key material.
Control Hub shows your currently active or revoked AWS KMS key and any pending AWS KMS key that is stored in the AWS KMS. When you need to rotate the AWS KMS key, you generate your new AWS KMS key with the AWS KMS console.
-
You then add and activate the new AWS KMS key in Control Hub, providing it with the Amazon Resource Name (ARN) of the new AWS KMS key. Webex immediately starts using the new AWS KMS key for encrypting your content keys. Webex no longer requires the old AWS KMS key. The old AWS KMS key will disappear from Control Hub after your content encryption keys are rotated and secured by the new AWS KMS key. Webex doesn’t delete the AWS KMS key from the AWS KMS. Your customer administrator can remove the key from the AWS KMS.
Key lifecycle
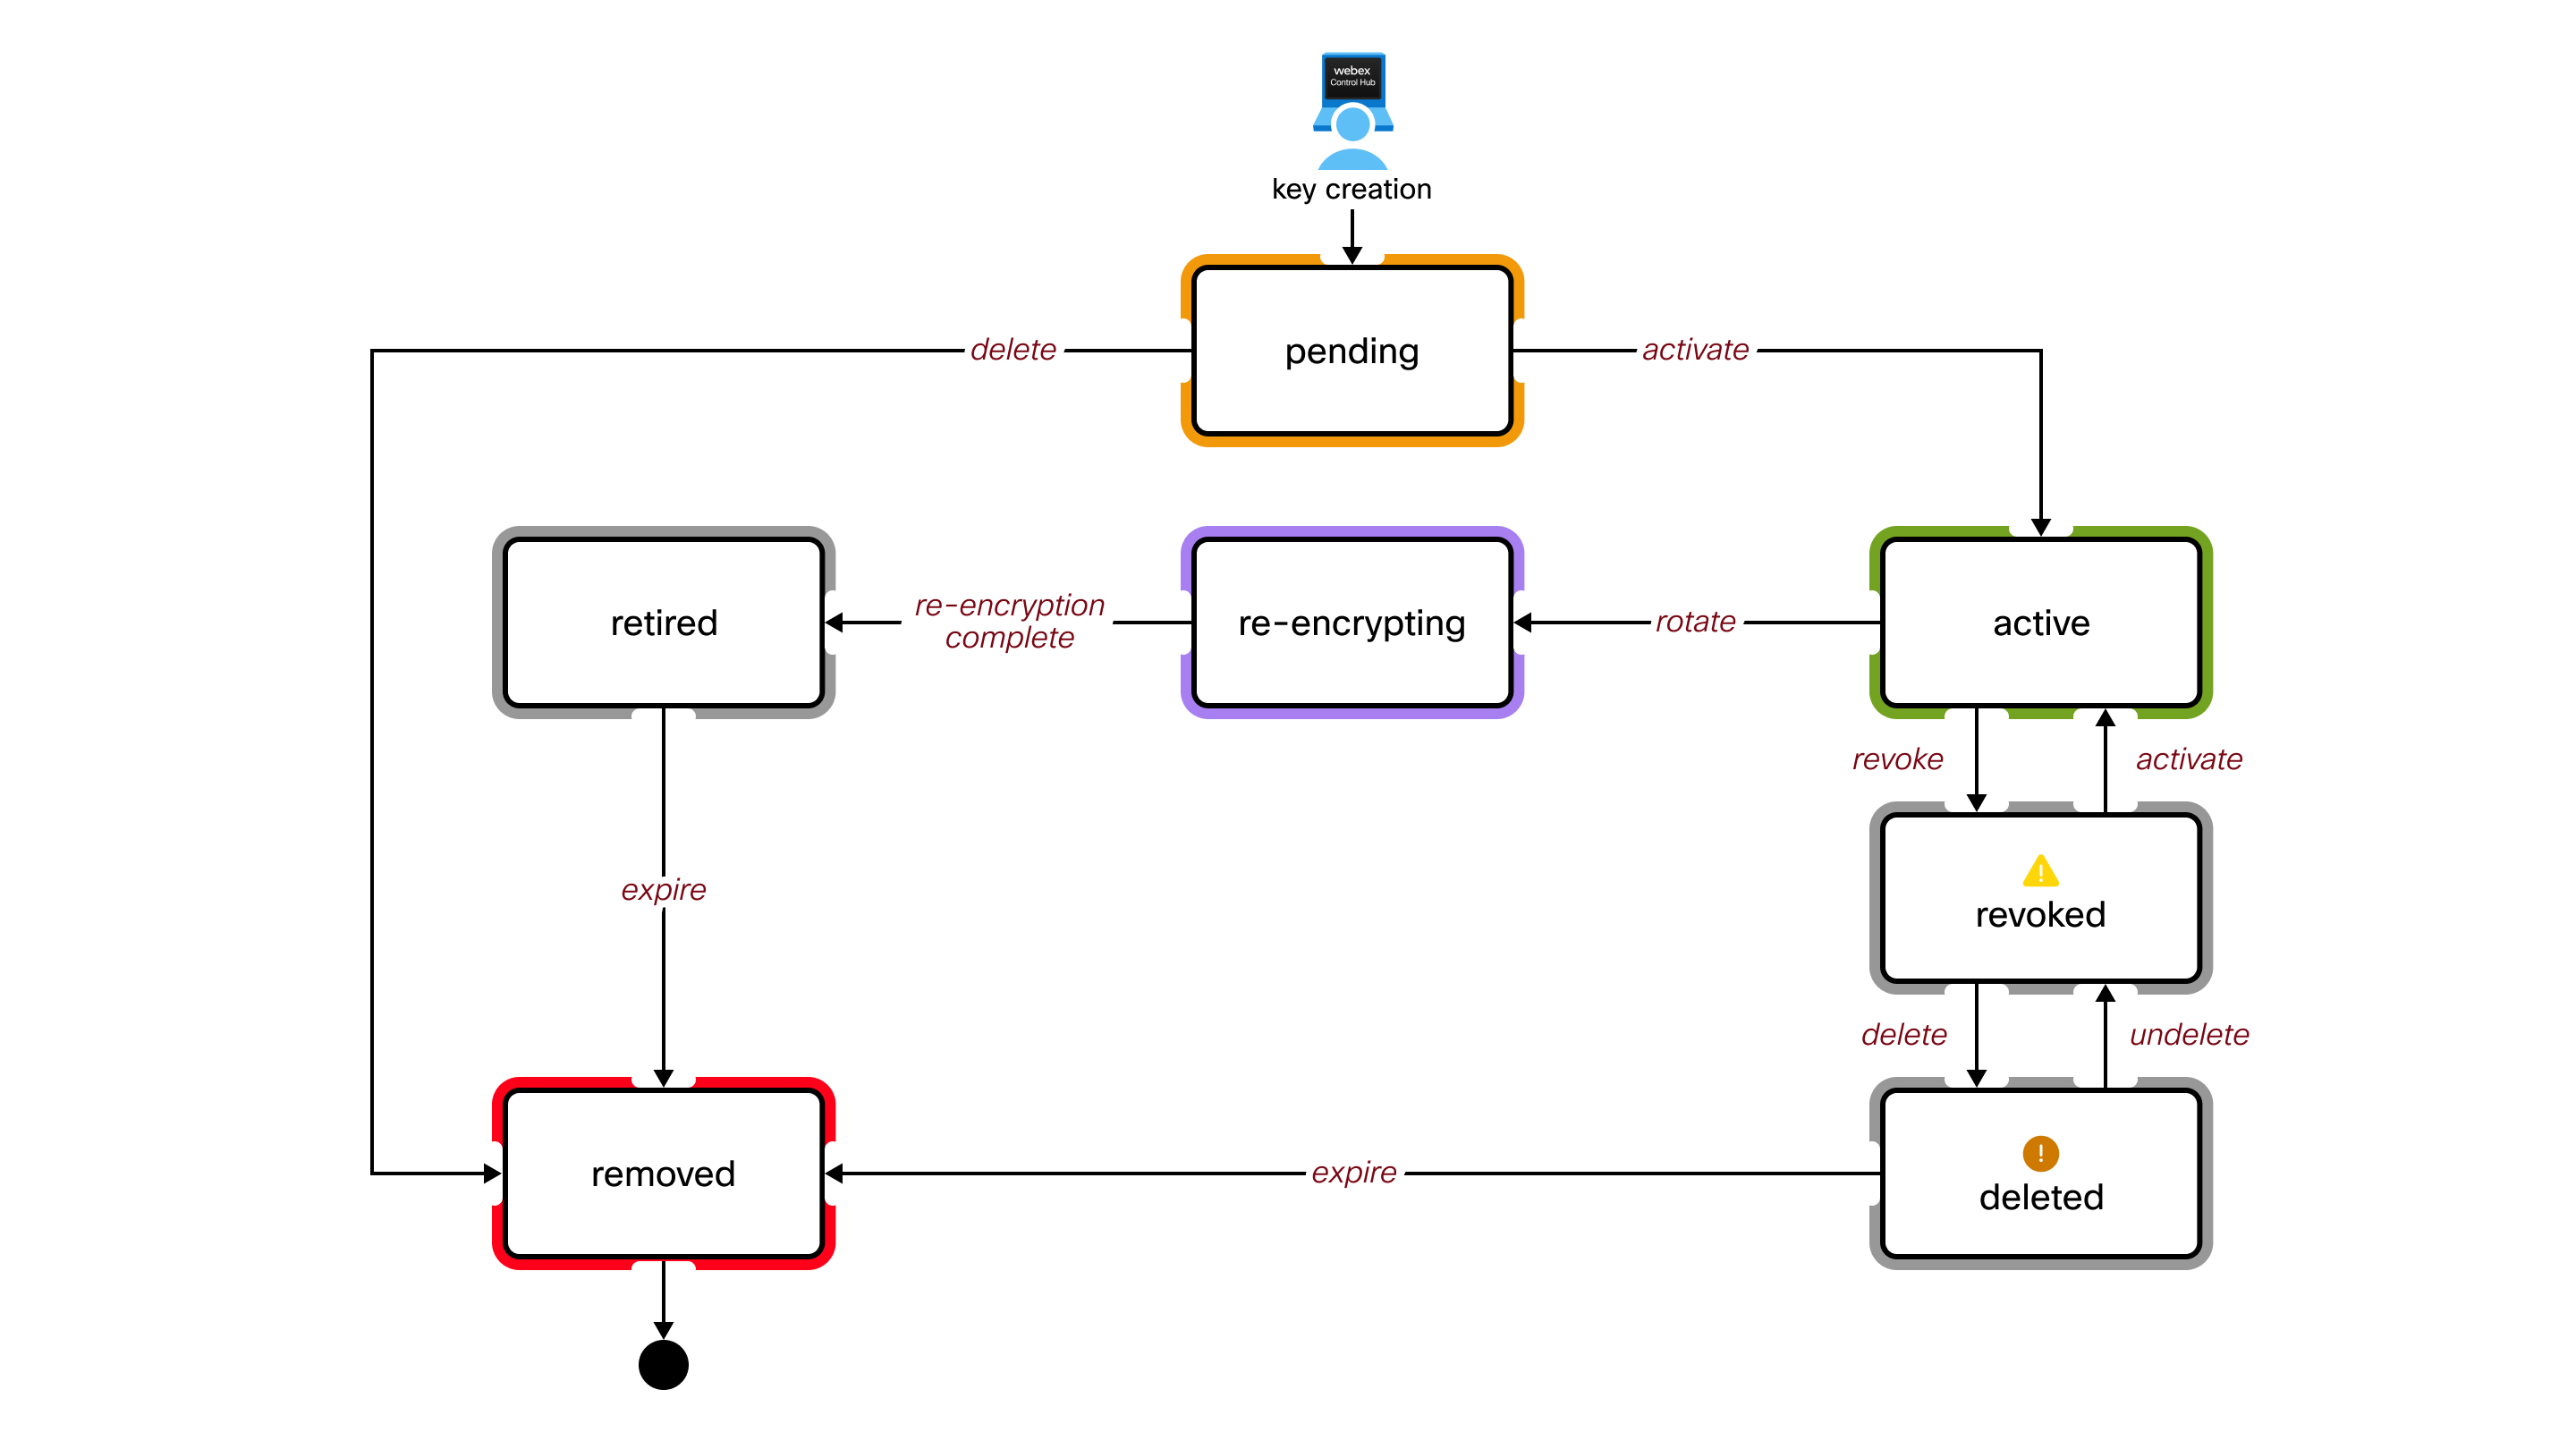
Key state definitions
- Pending
-
A key in this state is stored in the HSM but it's not yet used for encryption. Webex doesn't use this CMK for encryption.
Only one key can be in this state.
- Active
-
Webex is currently using this CMK to encrypt other keys for your organization.
Only one key can be in this state.
- Rotation
-
Webex is temporarily using this CMK. Webex needs it to decrypt your data and keys that were previously encrypted by this key. This key is retired when rotation (reencrypting) is complete.
Multiple keys can be in this state if a new key is activated before rotation is complete.
- Retired
-
Webex isn't using this CMK. This key is no longer used for encryption. A key time-to-live is set, after which this key is removed from the HSM.
- Revoked
-
Webex isn't using this CMK. Even if there are data and keys that were encrypted with this key, Webex can't use it to decrypt the data and keys.
- You only need to revoke an active key if you suspect it's compromised. This is a serious decision because it prevents many operations from behaving properly. For example, you won't be able to create new spaces, and you won't be able to decrypt any content in Webex Client.
- Only one key can be in this state. You must reactivate this key to rotate (reencrypt) a new key.
- This CMK can be deleted but you don’t have to delete it. You may want to keep it for decryption / reencrypting after you resolve the suspected security breach.
- Deleted
-
Webex isn't using this CMK. The behavior in this state is the same as the Revoked state except that a key time-to-live is set, after which this key is removed from the HSM.
- If a deleted CMK progresses to the Removed state, you must recover the original key to restore functionality to the organization.
- We recommend that you keep a backup copy of your original key, otherwise your organization will no longer be functional.
- Removed
-
This is a logical state. Webex doesn't have this CMK stored in the HSM. It's not displayed in Control Hub.
Ownership
By taking ownership of your CMK, you must:
- Take responsibility for secure creation and back up of your keys
- Understand the implications of losing your keys
- Reencrypt your active CMK at least once per year as a best practice
Key creation
You must create your own CMK using these parameters. Your key must be:
- 256 bits (32 bytes) long
- Encrypted with the RSA-OAEP scheme
- Encrypted with the Webex cloud HSM public key
Your key generation software must be capable of:
- SHA-256 hash function
- MGF1 mask generation function
- PKCS#1 OAEP padding
Refer to Example: Create and encrypt keys with OpenSSL in the Resources tab in this article.
Authorization
You must have access to your Webex organization in Control Hub. You must be a full administrator to manage your CMK.
| 1 |
Sign in to Control Hub. |
| 2 |
Go to . To enable BYOK, toggle Bring Your Own Key (BYOK) on. If you disable BYOK, the Webex common default key becomes the main key for your organization. |
| 3 |
Select Upload a custom key and click Next. |
| 4 |
Click Download public key. Save the Webex HSM public key in a .pem file on your local system. |
| 5 |
Create a cryptographically secure 256-bit (32 byte) random key using your key management software. |
| 6 |
Use the Webex HSM public key to encrypt your new key. The required encryption parameters are:
Refer to Example: Create and encrypt keys with OpenSSL in the Resources
tab in this article.
|
| 7 |
Drag the encrypted key from your file system and drop it in the upload area of the Control Hub interface, or click Choose a file. |
| 8 |
Click Next. Webex uploads your key to the HSM, where it gets decrypted and validated. Then Control Hub shows you the ID of your new CMK, and the ID of the currently active CMK, if any. If this is your first CMK, the currently active key is the Webex common default key (the one we currently use for encrypting your organization's keys). |
| 9 |
Choose how you want to activate your key:
|
What to do next
We don’t retroactively reencrypt all the existing content. Once you activate your CMK, all new content (Spaces and Meetings) will be reencrypted and protected.
| 1 |
Sign in to Control Hub. |
| 2 |
Go to . |
| 3 |
Go to the active CMK. |
| 4 |
Click |
| 5 |
Create and encrypt a new key (if you haven't yet done that). The process is described in Create and activate your customer main key in
this article.
|
| 6 |
Drag the new key from your file system and drop it in Control Hub. |
| 7 |
Click Activate new key. The new key that you uploaded goes into the Active state. The old CMK stays in Rotation (Reencrypting state) until Webex finishes encrypting all its content with the new Active CMK. After reencrypting, the key moves into the Retired state. Webex then deletes the old CMK. |
 and select
 | 1 |
Sign in to Control Hub. |
| 2 |
Go to . |
| 3 |
Go to the active key. |
| 4 |
Click |
| 5 |
Confirm the key revocation. It can up to 10 minutes to fully revoke your key.
|
| 1 |
Sign in to Control Hub. |
| 2 |
Go to . |
| 3 |
Go to the currently revoked key. |
| 4 |
Click |
| 5 |
Confirm the key activation. The previously revoked key goes into the Active state.
|
| 1 |
Sign in to Control Hub. |
| 2 |
Go to . |
| 3 |
Go to the revoked key. |
| 4 |
Click |
| 5 |
Confirm the key deletion. Once deleted, you have the option to restore the key within 30 days.
|
| 1 |
Sign in to Control Hub. |
| 2 |
Go to . |
| 3 |
Go to the deleted key. |
| 4 |
Click |
| 5 |
Confirm the key restoration. Once restored, Control Hub shows you the key in the Revoked state before it was deleted. For example, if you
delete a revoked key and then restore the key, Control Hub shows the restored key in the Revoked state.
|
Ownership
By taking ownership of your AWS KMS key, you must:
- Take responsibility for the secure creation and back up of your AWS KMS keys.
- Understand the implications of losing your AWS KMS keys.
- Reencrypt your active AMS KMS key at least once per year as a best practice.
Authorization
- You must be authorized to create and manage your keys in the AWS KMS for your Webex organization.
- You must have access to your Webex organization in Control Hub. You must be a full administrator to manage your AWS KMS key.
| 1 |
Sign in to AWS and go to the AWS KMS console. |
| 2 |
Select Customer managed keys and then click Create key. |
| 3 |
Create the key with the following attributes:
|
| 4 |
Click Next. |
| 5 |
Review your settings and click Finish. Your AWS KMS key is created.
|
| 6 |
Go to Customer managed keys and click the Alias or Key ID to view the ARN. |
What to do next
We recommend that you keep a temporary copy of the ARN. This ARN is used to add and activate your AWS KMS key in Control Hub.
We also recommend that you create a backup key to ensure data availability and resilience. This allows access to encrypted data even during regional outages. For more information, refer to Create a backup AWS KMS key in this article.
Before you begin
Ensure you have created a multi-region key before proceeding to create a backup key. For more information, refer to Create an AWS KMS key in this article.
| 1 |
Sign in to AWS and go to the AWS KMS console. |
| 2 |
Select the newly created multi-region key. |
| 3 |
Under Regionality, click Create new replica keys. |
| 4 |
Choose a backup region from the list of AWS regions and click Next. For example, if the key was created in US West (us-west-1), consider creating the
backup key in US East (us-east-1).
|
| 5 |
Create the key with the following attributes:
|
| 6 |
Click Next. |
| 7 |
Review your settings, check the confirmation box and click Create new replica keys. |
You can authorize Cisco KMS to access your AWS KMS key by creating a KMS grant or configuring an IAM role. Choose the option that best fits your organization’s needs to ensure secure and flexible key management integration.
Using a KMS grant
This method involves directly granting Cisco KMS permissions to perform cryptographic operations on your AWS KMS key.
| 1 |
Sign in to AWS and go to the AWS CloudShell console. |
| 2 |
Run The |
Using an IAM role
Create an IAM policy with the necessary KMS permissions and then attach it to an IAM role that Cisco KMS can assume, enabling secure and centralized access management.
Configure an IAM policy
| 1 |
Sign in to AWS and go to the AWS KMS console. |
| 2 |
Go to . |
| 3 |
In the left navigation pane, select Policies, then click Create policy. |
| 4 |
In the Policy editor section, select the JSON option. |
| 5 |
Copy and paste the following policy document. Replace |
| 6 |
Click Next. |
| 7 |
Enter a Policy name and an optional Description. |
| 8 |
Click Create policy. |
Configure an IAM role
| 1 |
Sign in to AWS and go to the AWS KMS console. |
| 2 |
Go to . |
| 3 |
In the left navigation pane, select Roles, then click Create role. |
| 4 |
Under Trusted entity type, select AWS account. |
| 5 |
Choose Another AWS account. |
| 6 |
In the Account ID field, enter the AWS account ID provided in the Control Hub interface. This is the same account ID that is part of the |
| 7 |
Click Next. |
| 8 |
Under Add permissions, search for and select the IAM policy you just created. |
| 9 |
Click Next. |
| 10 |
Enter a Role name and an optional Description. |
| 11 |
Review your settings and click Create role. |
Before you begin
You must create an AWS KMS key before activating it in Control Hub. Refer to Create an AWS KMS key in this article.
You must provide Webex with access to the AWS KMS key. Refer to Authorize Cisco KMS with access to the AWS KMS key in this article.
| 1 |
Sign in to Control Hub. |
| 2 |
Go to , and toggle Bring Your Own Key (BYOK) on. If you disable BYOK, the Webex common default key becomes the main key for your organization. |
| 3 |
Select Add AWS KMS key and click Next. |
| 4 |
Get the following ARNs from the AWS console:
|
| 5 |
In Control Hub, enter the Primary key ARN. If applicable, also enter the Backup key ARN and IAM Role ARN in their respective fields. Then, click Add. Your Primary key ARN gets uploaded to the Cisco KMS, where access to the key is validated. Then Control Hub shows you the Cisco KMS key ID of your new AWS KMS key, and the currently active Cisco KMS key ID, if any. If this is your first AWS KMS key, the currently active key is the Webex common default key (the one we currently use for encrypting your organization's keys). |
| 6 |
Choose how you want to activate your key:
|
| 1 |
Sign in to Control Hub, and go to . |
| 2 |
Go to the active AWS KMS key. |
| 3 |
Click |
| 4 |
Enter your new AWS KMS key and new ARN and click Add. The process is described in Add and activate your AMS KMS key in this article.
|
| 5 |
Click Activate. The new AWS KMS key that you uploaded goes into the Active state. The old AWS KMS key stays in the Rotating state until Webex finishes encrypting all its content with the new Active AWS KMS key. After reencrypting, the old AWS KMS key automatically disappears from Control Hub. |
| 1 |
Sign in to Control Hub, and go to . |
| 2 |
Click Add another key. |
| 3 |
Enter your new AWS KMS key and click Add. Control Hub shows you the Cisco KMS key ID of your new AWS KMS key, and the ID of the currently active Cisco KMS key ID. The process is described in Add and activate your AMS KMS key in this article. |
| 4 |
Click Activate. The new AWS KMS key that you uploaded goes into the Active state. The old AWS KMS key stays in the Rotating state until Webex finishes encrypting all its content with the new Active AWS KMS key. After reencrypting, the old AWS KMS key automatically disappears from Control Hub. |
| 1 |
Sign in to Control Hub, and go to . |
| 2 |
Go to the currently active AWS KMS key. |
| 3 |
Click |
| 4 |
Confirm the key revocation. It can up to 10 minutes to fully revoke your key.
The AWS KMS key goes into the Locally revoked state.
|
If your customer administrator revokes the key from the AWS KMS console, then the AWS KMS key is shown in the Revoked by Amazon state in Control Hub.
| 1 |
Sign in to Control Hub, and go to . |
| 2 |
Go to the revoked AWS KMS key. |
| 3 |
Click |
| 4 |
Confirm the key deletion. Once deleted, you can recover the key within 30 days. |
We recommend that you delete the AWS KMS key from Control Hub first before deleting your CMK from the AWS console. If you delete your CMK from the AWS console before deleting the AWS KMS key in Control Hub, you may run into problems.
Ensure that the AWS KMS key is no longer visible in Control Hub before deleting your CMK from the AWS console.
| 1 |
Sign in to Control Hub, and go to . |
| 2 |
Go to the deleted AWS KMS key. |
| 3 |
Click |
| 4 |
Confirm the key restoration. Once restored, Control Hub shows you the key in the Revoked state. |
If you run into problems with your AWS KMS key, use the following information to troubleshoot it.
-
AWS KMS key ARN. For example,
arn:aws:kms:us-east-2:111122223333:key/1234abcd-12ab-34cd-56ef-1234567890ab. -
AWS KMS key state. For example, the AWS KMS key is disabled.
This example uses version 3.0 of the OpenSSL command line tools. See OpenSSL for more about these tools.
| 1 |
Sign in to Control Hub. |
| 2 |
Go to . |
| 3 |
Click Download public key. You get the Webex HSM public key in a .pem file on your local system. |
| 4 |
Create a 256-bit (32 byte) key: The example uses the filename main_key.bin for your unencrypted new key. Alternatively, you can generate a 32-byte random value using Hex dump, Python, or online generators. You can also create and manage your AWS KMS key. |
| 5 |
Use the Webex HSM public key to encrypt your new key:
The example uses the filename main_key_encrypted.bin for the encrypted output key, and the filename path/to/public.pem for the Webex public key. The encrypted key is ready for you to upload to Control Hub. |


