You may notice some articles displaying content inconsistently. Pardon our dust as we update our site.
cross icon
In this article
dropdown icon
Introduction to Webex Contact Center
    Webex Contact Center Overview
      About Sites, Teams, Entry Points, and Queues
        Webex Contact Center Management Portal
          Webex Contact Center Modules
            About Time Zones
              PCI compliance
              dropdown icon
              Get Started with Webex Contact Center
                dropdown icon
                System Requirements
                  Supported Browsers for Management Portal
                  Domain Access Required for Desktop
                System Limits in Webex Contact Center
                  Sign in to Management Portal
                    About Management Portal Components
                      dropdown icon
                      About Dashboards
                        Entry Point - Site Level Dashboard
                        Contact Center Overview - Historical
                      Change User Interface Colors
                        Create a Custom Theme
                          View and Regenerate Your API Key
                            Access Audit Trail Reports
                            dropdown icon
                            Provisioning Webex Contact Center Resources
                              dropdown icon
                              Tenant Settings
                                General Settings
                                Desktop settings
                                Provisioning
                                Settings
                              dropdown icon
                              Entry Points and Queues
                                Create an Entry Point
                                View the Details of an Entry Point
                                Edit an Entry Point
                                Copy an Entry Point
                                Create an Outdial Entry Point
                                View the Details of an Outdial Entry Point
                                Edit an Outdial Entry Point
                                Copy an Outdial Entry Point
                                Create a Queue and an Outdial Queue
                                View the Details of a Queue or an Outdial Queue
                                Edit a Queue or an Outdial Queue
                                Copy a Queue or an Outdial Queue
                                Deactivate an Entry Point or a Queue
                                Activate an Entry Point or a Queue
                              dropdown icon
                              Sites
                                Create a Site
                                View the Details of a Site
                                Edit a Site
                                Deactivate a Site
                                Activate a Site
                              dropdown icon
                              Teams
                                Create a team
                                View a team
                                Edit a team
                                Deactivate a team
                                Activate a Team
                              dropdown icon
                              Users
                                View the Details of a User
                                Edit a User
                                Export Items Provisioned for a User
                                Revoke API Key for a User
                                Update and Upload Agent Template
                              dropdown icon
                              User Profiles
                                Manage a User Profile
                                View the Details of a User Profile
                                Edit a User Profile
                                Deactivate a User Profile
                                Activate a User Profile
                                Copy a User Profile
                              dropdown icon
                              Work Types
                                Create a Work Type
                                Edit a Work Type
                                Deactivate a Work Type
                                Activate a Work Type
                              dropdown icon
                              Auxiliary Codes
                                Create Idle or Wrap-Up Codes
                                Edit Idle or Wrap-Up Codes
                                Delete Idle or Wrap-up Codes
                              dropdown icon
                              Desktop Profiles
                                Create a Desktop Profile
                                View the Details of a Desktop Profile
                                Edit a Desktop Profile
                                Copy a Desktop Profile
                                Deactivate a Desktop Profile
                                Activate a Desktop Profile
                              dropdown icon
                              Address Books
                                Create an Address Book
                                Edit an Address Book
                                Delete an Address Book
                              dropdown icon
                              Outdial Automatic Number Identification (ANI)
                                Create an Outdial ANI
                                Edit an Outdial ANI
                                Delete an Outdial ANI
                              dropdown icon
                              Dial Plans
                                Regular expression for the default US dial plan
                                Regular expression for the default Any Format dial plan
                                Create a Dial Plan
                                Edit a Dial Plan
                                Delete a Dial Plan
                              dropdown icon
                              Global Variables
                                Create a Global Variable
                                Edit a Global Variable
                                Deactivate a Global Variable
                                Activate a Global Variable
                              dropdown icon
                              Multimedia Profiles
                                Create a Multimedia Profile
                                View the Details of a Multimedia Profile
                                Edit a Multimedia Profile
                                Deactivate a Multimedia Profile
                                Activate a Multimedia Profile
                              dropdown icon
                              Desktop Layout
                                Create a Desktop Layout
                                View a Desktop Layout
                                Edit a Desktop Layout
                                Copy a Desktop Layout
                                Deactivate a Desktop Layout
                                Activate a Desktop Layout
                              dropdown icon
                              Skill Definitions
                                Create a Skill Definition
                                Edit a Skill Definition
                                Deactivate a Skill Definition
                                Activate a Skill Definition
                              dropdown icon
                              Skill Profiles
                                Create a Skill Profile
                                Edit a Skill Profile
                                Copy a Skill Profile
                                Delete a Skill Profile
                              dropdown icon
                              Threshold Rules
                                Call Metrics
                                Agent Metrics
                                Create a Threshold Rule
                                Copy a Threshold Rule
                                Edit a Threshold Rule
                                Deactivate a Threshold Rule
                                Activate a Threshold Rule
                              dropdown icon
                              Entry Point Mappings
                                Map an Entry Point
                                Edit Dial Number to Entry Point Mappings
                                Delete Dial Number to Entry Point Mappings
                              dropdown icon
                              Reports for the Provisioned Items
                                Manage Reports for the Provisioned Items
                              Delete inactive objects permanently
                              dropdown icon
                              Business Rules
                                About Business Rules Engine
                                dropdown icon
                                Contact Routing
                                  dropdown icon
                                  About Contact Routing
                                    About Skills-based Routing
                                    Routing of Parked Contacts
                                    Set Up Skills-Based Routing
                                    Agent-based Routing
                                    About global routing overrides
                                  Configure Multimedia Profiles
                                    dropdown icon
                                    Working with Resource Files
                                      Upload an Audio Resource File
                                      Edit an Audio Resource File
                                      Play or Download a .wav File
                                      Update a Resource File
                                      Copy a Resource File
                                      Export References to a Media File
                                      Create a Predefined Email Template
                                      Configure a Predefined Chat Template
                                      Create a Predefined Chat Response
                                    dropdown icon
                                    Configure Routing Resources
                                      About Team Types
                                      View routing strategies for an entry point or queue
                                      View the current routing strategies
                                      View routing strategies by time zone
                                      Create a routing strategy
                                      Modify a Routing Strategy
                                      Routing Strategies Deletion and Restoration
                                      Audio on Hold
                                    dropdown icon
                                    Working with Global Routing Overrides
                                      View global routing overrides
                                      Create global routing overrides
                                      Edit a global routing override
                                      Global routing override parameters
                                      Delete a global routing override
                                      Restore or permanently delete a global routing override
                                  dropdown icon
                                  Working with Flow Designer
                                    Flow Designer
                                    dropdown icon
                                    Call Monitoring
                                      dropdown icon
                                      Monitor Calls
                                        Monitoring Overview
                                        Monitor Calls
                                        Coach an Agent
                                        Barge in on a Call
                                        Viewing Call Monitoring Information
                                        Working with Monitoring Schedules
                                    dropdown icon
                                    Call Recording
                                      dropdown icon
                                      Call Recording
                                        Segment Recording
                                      Create or Edit a Recording Schedule
                                        Deleting a Recording Schedule
                                        dropdown icon
                                        Recording Management
                                          Search for and Play Recordings
                                            Assign and Remove Tags
                                              dropdown icon
                                              Search Attributes
                                                Create and Export Tags
                                            Digital Channels
                                              dropdown icon
                                              Transfer Outdial Calls to Queue
                                                Map the Outdial Transfer to Queue Entry Point to a DN
                                                  Transfer an Outdial Call to a Queue on the Agent Desktop
                                                    View Agent Outdial Statistics Report
                                                    dropdown icon
                                                    Agent Transfer a Call to an Entry Point
                                                      Task Flow to Transfer a Call to an Entry Point
                                                      dropdown icon
                                                      Play a Stereo Recording
                                                        Play a Stereo Recorded File
                                                        dropdown icon
                                                        Opt Out When in Queue
                                                          Task Flow to Set Up the Opt-Out Functionality
                                                            View Opt-out-of-Queue Report
                                                            dropdown icon
                                                            Blended Multimedia Profiles
                                                              Overview
                                                                Configure a Multimedia Profile
                                                                  Associate a Multimedia Profile to an Agent, Team, or Site
                                                                    Assign Contacts to Agents
                                                                      View Agent Details
                                                                      dropdown icon
                                                                      Courtesy Callback
                                                                        About Courtesy Callback
                                                                          Configure the Callback Flow
                                                                            Make a Courtesy Callback
                                                                              View Courtesy Callback Reports
                                                                              dropdown icon
                                                                              Self Service
                                                                                Configure Entry Point and Select the Flow in Routing Strategy
                                                                                  dropdown icon
                                                                                  Enable a Virtual Agent
                                                                                    Build a Dialogflow Agent
                                                                                    Configure Virtual Agent
                                                                                    Create VA activity in Flow Designer
                                                                                  Blind Transfer
                                                                                    Disconnect Contact
                                                                                      IVR Transcript and global Variables in Agent Desktop
                                                                                        IVR and CVA Dialog Flow Report in Analyzer
                                                                                          dropdown icon
                                                                                          Text-to-Speech
                                                                                            Create a Service Account for Google Connector
                                                                                            Configure a Google Connector
                                                                                            Text-to-Speech Toggle
                                                                                        dropdown icon
                                                                                        Cisco Webex Experience Management Post Call Survey
                                                                                          Webex Experience Management Account Setup
                                                                                            Create a Webex Experience Management Connector
                                                                                              dropdown icon
                                                                                              Create Feedback Activity in the Flow Designer
                                                                                                Configure an IVR Post-call Survey
                                                                                                Configure SMS or Email Post-Call Survey
                                                                                              View Agent Desktop Widgets
                                                                                              dropdown icon
                                                                                              Troubleshooting
                                                                                                dropdown icon
                                                                                                Troubleshooting Management Portal Problems
                                                                                                  Management Portal Problems
                                                                                                  Reporting Management Portal Issues to Customer Support
                                                                                                dropdown icon
                                                                                                Troubleshooting Desktop Problems
                                                                                                  Network Interruptions
                                                                                                  Desktop Application Problems
                                                                                                  Audio Problems
                                                                                                  Reporting Agent Desktop Issues to Customer Support
                                                                                              dropdown icon
                                                                                              Report Parameters
                                                                                                Call Report Parameters
                                                                                                  Agent Report Parameters
                                                                                                    Historical Skill Report Parameters
                                                                                                      Historical Threshold Alerts Report Parameters
                                                                                                        Usage Metrics Report Parameters
                                                                                                        In this article
                                                                                                        cross icon
                                                                                                        dropdown icon
                                                                                                        Introduction to Webex Contact Center
                                                                                                          Webex Contact Center Overview
                                                                                                            About Sites, Teams, Entry Points, and Queues
                                                                                                              Webex Contact Center Management Portal
                                                                                                                Webex Contact Center Modules
                                                                                                                  About Time Zones
                                                                                                                    PCI compliance
                                                                                                                    dropdown icon
                                                                                                                    Get Started with Webex Contact Center
                                                                                                                      dropdown icon
                                                                                                                      System Requirements
                                                                                                                        Supported Browsers for Management Portal
                                                                                                                        Domain Access Required for Desktop
                                                                                                                      System Limits in Webex Contact Center
                                                                                                                        Sign in to Management Portal
                                                                                                                          About Management Portal Components
                                                                                                                            dropdown icon
                                                                                                                            About Dashboards
                                                                                                                              Entry Point - Site Level Dashboard
                                                                                                                              Contact Center Overview - Historical
                                                                                                                            Change User Interface Colors
                                                                                                                              Create a Custom Theme
                                                                                                                                View and Regenerate Your API Key
                                                                                                                                  Access Audit Trail Reports
                                                                                                                                  dropdown icon
                                                                                                                                  Provisioning Webex Contact Center Resources
                                                                                                                                    dropdown icon
                                                                                                                                    Tenant Settings
                                                                                                                                      General Settings
                                                                                                                                      Desktop settings
                                                                                                                                      Provisioning
                                                                                                                                      Settings
                                                                                                                                    dropdown icon
                                                                                                                                    Entry Points and Queues
                                                                                                                                      Create an Entry Point
                                                                                                                                      View the Details of an Entry Point
                                                                                                                                      Edit an Entry Point
                                                                                                                                      Copy an Entry Point
                                                                                                                                      Create an Outdial Entry Point
                                                                                                                                      View the Details of an Outdial Entry Point
                                                                                                                                      Edit an Outdial Entry Point
                                                                                                                                      Copy an Outdial Entry Point
                                                                                                                                      Create a Queue and an Outdial Queue
                                                                                                                                      View the Details of a Queue or an Outdial Queue
                                                                                                                                      Edit a Queue or an Outdial Queue
                                                                                                                                      Copy a Queue or an Outdial Queue
                                                                                                                                      Deactivate an Entry Point or a Queue
                                                                                                                                      Activate an Entry Point or a Queue
                                                                                                                                    dropdown icon
                                                                                                                                    Sites
                                                                                                                                      Create a Site
                                                                                                                                      View the Details of a Site
                                                                                                                                      Edit a Site
                                                                                                                                      Deactivate a Site
                                                                                                                                      Activate a Site
                                                                                                                                    dropdown icon
                                                                                                                                    Teams
                                                                                                                                      Create a team
                                                                                                                                      View a team
                                                                                                                                      Edit a team
                                                                                                                                      Deactivate a team
                                                                                                                                      Activate a Team
                                                                                                                                    dropdown icon
                                                                                                                                    Users
                                                                                                                                      View the Details of a User
                                                                                                                                      Edit a User
                                                                                                                                      Export Items Provisioned for a User
                                                                                                                                      Revoke API Key for a User
                                                                                                                                      Update and Upload Agent Template
                                                                                                                                    dropdown icon
                                                                                                                                    User Profiles
                                                                                                                                      Manage a User Profile
                                                                                                                                      View the Details of a User Profile
                                                                                                                                      Edit a User Profile
                                                                                                                                      Deactivate a User Profile
                                                                                                                                      Activate a User Profile
                                                                                                                                      Copy a User Profile
                                                                                                                                    dropdown icon
                                                                                                                                    Work Types
                                                                                                                                      Create a Work Type
                                                                                                                                      Edit a Work Type
                                                                                                                                      Deactivate a Work Type
                                                                                                                                      Activate a Work Type
                                                                                                                                    dropdown icon
                                                                                                                                    Auxiliary Codes
                                                                                                                                      Create Idle or Wrap-Up Codes
                                                                                                                                      Edit Idle or Wrap-Up Codes
                                                                                                                                      Delete Idle or Wrap-up Codes
                                                                                                                                    dropdown icon
                                                                                                                                    Desktop Profiles
                                                                                                                                      Create a Desktop Profile
                                                                                                                                      View the Details of a Desktop Profile
                                                                                                                                      Edit a Desktop Profile
                                                                                                                                      Copy a Desktop Profile
                                                                                                                                      Deactivate a Desktop Profile
                                                                                                                                      Activate a Desktop Profile
                                                                                                                                    dropdown icon
                                                                                                                                    Address Books
                                                                                                                                      Create an Address Book
                                                                                                                                      Edit an Address Book
                                                                                                                                      Delete an Address Book
                                                                                                                                    dropdown icon
                                                                                                                                    Outdial Automatic Number Identification (ANI)
                                                                                                                                      Create an Outdial ANI
                                                                                                                                      Edit an Outdial ANI
                                                                                                                                      Delete an Outdial ANI
                                                                                                                                    dropdown icon
                                                                                                                                    Dial Plans
                                                                                                                                      Regular expression for the default US dial plan
                                                                                                                                      Regular expression for the default Any Format dial plan
                                                                                                                                      Create a Dial Plan
                                                                                                                                      Edit a Dial Plan
                                                                                                                                      Delete a Dial Plan
                                                                                                                                    dropdown icon
                                                                                                                                    Global Variables
                                                                                                                                      Create a Global Variable
                                                                                                                                      Edit a Global Variable
                                                                                                                                      Deactivate a Global Variable
                                                                                                                                      Activate a Global Variable
                                                                                                                                    dropdown icon
                                                                                                                                    Multimedia Profiles
                                                                                                                                      Create a Multimedia Profile
                                                                                                                                      View the Details of a Multimedia Profile
                                                                                                                                      Edit a Multimedia Profile
                                                                                                                                      Deactivate a Multimedia Profile
                                                                                                                                      Activate a Multimedia Profile
                                                                                                                                    dropdown icon
                                                                                                                                    Desktop Layout
                                                                                                                                      Create a Desktop Layout
                                                                                                                                      View a Desktop Layout
                                                                                                                                      Edit a Desktop Layout
                                                                                                                                      Copy a Desktop Layout
                                                                                                                                      Deactivate a Desktop Layout
                                                                                                                                      Activate a Desktop Layout
                                                                                                                                    dropdown icon
                                                                                                                                    Skill Definitions
                                                                                                                                      Create a Skill Definition
                                                                                                                                      Edit a Skill Definition
                                                                                                                                      Deactivate a Skill Definition
                                                                                                                                      Activate a Skill Definition
                                                                                                                                    dropdown icon
                                                                                                                                    Skill Profiles
                                                                                                                                      Create a Skill Profile
                                                                                                                                      Edit a Skill Profile
                                                                                                                                      Copy a Skill Profile
                                                                                                                                      Delete a Skill Profile
                                                                                                                                    dropdown icon
                                                                                                                                    Threshold Rules
                                                                                                                                      Call Metrics
                                                                                                                                      Agent Metrics
                                                                                                                                      Create a Threshold Rule
                                                                                                                                      Copy a Threshold Rule
                                                                                                                                      Edit a Threshold Rule
                                                                                                                                      Deactivate a Threshold Rule
                                                                                                                                      Activate a Threshold Rule
                                                                                                                                    dropdown icon
                                                                                                                                    Entry Point Mappings
                                                                                                                                      Map an Entry Point
                                                                                                                                      Edit Dial Number to Entry Point Mappings
                                                                                                                                      Delete Dial Number to Entry Point Mappings
                                                                                                                                    dropdown icon
                                                                                                                                    Reports for the Provisioned Items
                                                                                                                                      Manage Reports for the Provisioned Items
                                                                                                                                    Delete inactive objects permanently
                                                                                                                                    dropdown icon
                                                                                                                                    Business Rules
                                                                                                                                      About Business Rules Engine
                                                                                                                                      dropdown icon
                                                                                                                                      Contact Routing
                                                                                                                                        dropdown icon
                                                                                                                                        About Contact Routing
                                                                                                                                          About Skills-based Routing
                                                                                                                                          Routing of Parked Contacts
                                                                                                                                          Set Up Skills-Based Routing
                                                                                                                                          Agent-based Routing
                                                                                                                                          About global routing overrides
                                                                                                                                        Configure Multimedia Profiles
                                                                                                                                          dropdown icon
                                                                                                                                          Working with Resource Files
                                                                                                                                            Upload an Audio Resource File
                                                                                                                                            Edit an Audio Resource File
                                                                                                                                            Play or Download a .wav File
                                                                                                                                            Update a Resource File
                                                                                                                                            Copy a Resource File
                                                                                                                                            Export References to a Media File
                                                                                                                                            Create a Predefined Email Template
                                                                                                                                            Configure a Predefined Chat Template
                                                                                                                                            Create a Predefined Chat Response
                                                                                                                                          dropdown icon
                                                                                                                                          Configure Routing Resources
                                                                                                                                            About Team Types
                                                                                                                                            View routing strategies for an entry point or queue
                                                                                                                                            View the current routing strategies
                                                                                                                                            View routing strategies by time zone
                                                                                                                                            Create a routing strategy
                                                                                                                                            Modify a Routing Strategy
                                                                                                                                            Routing Strategies Deletion and Restoration
                                                                                                                                            Audio on Hold
                                                                                                                                          dropdown icon
                                                                                                                                          Working with Global Routing Overrides
                                                                                                                                            View global routing overrides
                                                                                                                                            Create global routing overrides
                                                                                                                                            Edit a global routing override
                                                                                                                                            Global routing override parameters
                                                                                                                                            Delete a global routing override
                                                                                                                                            Restore or permanently delete a global routing override
                                                                                                                                        dropdown icon
                                                                                                                                        Working with Flow Designer
                                                                                                                                          Flow Designer
                                                                                                                                          dropdown icon
                                                                                                                                          Call Monitoring
                                                                                                                                            dropdown icon
                                                                                                                                            Monitor Calls
                                                                                                                                              Monitoring Overview
                                                                                                                                              Monitor Calls
                                                                                                                                              Coach an Agent
                                                                                                                                              Barge in on a Call
                                                                                                                                              Viewing Call Monitoring Information
                                                                                                                                              Working with Monitoring Schedules
                                                                                                                                          dropdown icon
                                                                                                                                          Call Recording
                                                                                                                                            dropdown icon
                                                                                                                                            Call Recording
                                                                                                                                              Segment Recording
                                                                                                                                            Create or Edit a Recording Schedule
                                                                                                                                              Deleting a Recording Schedule
                                                                                                                                              dropdown icon
                                                                                                                                              Recording Management
                                                                                                                                                Search for and Play Recordings
                                                                                                                                                  Assign and Remove Tags
                                                                                                                                                    dropdown icon
                                                                                                                                                    Search Attributes
                                                                                                                                                      Create and Export Tags
                                                                                                                                                  Digital Channels
                                                                                                                                                    dropdown icon
                                                                                                                                                    Transfer Outdial Calls to Queue
                                                                                                                                                      Map the Outdial Transfer to Queue Entry Point to a DN
                                                                                                                                                        Transfer an Outdial Call to a Queue on the Agent Desktop
                                                                                                                                                          View Agent Outdial Statistics Report
                                                                                                                                                          dropdown icon
                                                                                                                                                          Agent Transfer a Call to an Entry Point
                                                                                                                                                            Task Flow to Transfer a Call to an Entry Point
                                                                                                                                                            dropdown icon
                                                                                                                                                            Play a Stereo Recording
                                                                                                                                                              Play a Stereo Recorded File
                                                                                                                                                              dropdown icon
                                                                                                                                                              Opt Out When in Queue
                                                                                                                                                                Task Flow to Set Up the Opt-Out Functionality
                                                                                                                                                                  View Opt-out-of-Queue Report
                                                                                                                                                                  dropdown icon
                                                                                                                                                                  Blended Multimedia Profiles
                                                                                                                                                                    Overview
                                                                                                                                                                      Configure a Multimedia Profile
                                                                                                                                                                        Associate a Multimedia Profile to an Agent, Team, or Site
                                                                                                                                                                          Assign Contacts to Agents
                                                                                                                                                                            View Agent Details
                                                                                                                                                                            dropdown icon
                                                                                                                                                                            Courtesy Callback
                                                                                                                                                                              About Courtesy Callback
                                                                                                                                                                                Configure the Callback Flow
                                                                                                                                                                                  Make a Courtesy Callback
                                                                                                                                                                                    View Courtesy Callback Reports
                                                                                                                                                                                    dropdown icon
                                                                                                                                                                                    Self Service
                                                                                                                                                                                      Configure Entry Point and Select the Flow in Routing Strategy
                                                                                                                                                                                        dropdown icon
                                                                                                                                                                                        Enable a Virtual Agent
                                                                                                                                                                                          Build a Dialogflow Agent
                                                                                                                                                                                          Configure Virtual Agent
                                                                                                                                                                                          Create VA activity in Flow Designer
                                                                                                                                                                                        Blind Transfer
                                                                                                                                                                                          Disconnect Contact
                                                                                                                                                                                            IVR Transcript and global Variables in Agent Desktop
                                                                                                                                                                                              IVR and CVA Dialog Flow Report in Analyzer
                                                                                                                                                                                                dropdown icon
                                                                                                                                                                                                Text-to-Speech
                                                                                                                                                                                                  Create a Service Account for Google Connector
                                                                                                                                                                                                  Configure a Google Connector
                                                                                                                                                                                                  Text-to-Speech Toggle
                                                                                                                                                                                              dropdown icon
                                                                                                                                                                                              Cisco Webex Experience Management Post Call Survey
                                                                                                                                                                                                Webex Experience Management Account Setup
                                                                                                                                                                                                  Create a Webex Experience Management Connector
                                                                                                                                                                                                    dropdown icon
                                                                                                                                                                                                    Create Feedback Activity in the Flow Designer
                                                                                                                                                                                                      Configure an IVR Post-call Survey
                                                                                                                                                                                                      Configure SMS or Email Post-Call Survey
                                                                                                                                                                                                    View Agent Desktop Widgets
                                                                                                                                                                                                    dropdown icon
                                                                                                                                                                                                    Troubleshooting
                                                                                                                                                                                                      dropdown icon
                                                                                                                                                                                                      Troubleshooting Management Portal Problems
                                                                                                                                                                                                        Management Portal Problems
                                                                                                                                                                                                        Reporting Management Portal Issues to Customer Support
                                                                                                                                                                                                      dropdown icon
                                                                                                                                                                                                      Troubleshooting Desktop Problems
                                                                                                                                                                                                        Network Interruptions
                                                                                                                                                                                                        Desktop Application Problems
                                                                                                                                                                                                        Audio Problems
                                                                                                                                                                                                        Reporting Agent Desktop Issues to Customer Support
                                                                                                                                                                                                    dropdown icon
                                                                                                                                                                                                    Report Parameters
                                                                                                                                                                                                      Call Report Parameters
                                                                                                                                                                                                        Agent Report Parameters
                                                                                                                                                                                                          Historical Skill Report Parameters
                                                                                                                                                                                                            Historical Threshold Alerts Report Parameters
                                                                                                                                                                                                              Usage Metrics Report Parameters

                                                                                                                                                                                                              Webex Contact Center Setup and Administration Guide

                                                                                                                                                                                                              list-menuIn this article

                                                                                                                                                                                                              Webex Contact Center is a cloud-based solution that enhances customer experience by providing a seamless, intuitive, and flexible platform for managing customer interactions. This guide acts as your navigational compass, offering administrators a clear path through Webex Contact Center setup and management.

                                                                                                                                                                                                              Call Monitoring

                                                                                                                                                                                                              Monitor Calls

                                                                                                                                                                                                              The Call Monitoring module enables authorized users to silently monitor any active call that is managed by the Webex Contact Center service at any time, across any site, and to verify that customers are being served in a professional manner. Authorized users can also create monitoring schedules, coach an agent who is connected to a call by providing comments that only the agent can hear, and barge in on calls as needed.

                                                                                                                                                                                                              Monitoring Overview

                                                                                                                                                                                                              The Webex Contact Center Call Monitoring module enables contact center managers to monitor the quality of service being delivered across their multisource contact centers. Through a simplified Web interface, authorized users can select a combination of one or more queues, sites, and teams, as well as a specific agent that they want to monitor. After these criteria are entered, the system places a request to monitor the next call that matches the combination of all the criteria when the call is distributed to the destination site. Monitoring can be done on a continuous, one time only (ad hoc), or scheduled basis, and authorized users can monitor a call that is already in progress.

                                                                                                                                                                                                              The audio for the call is delivered through an inbound phone call using a phone number associated with the user engaged in monitoring. Authorized supervisors can coach an agent during a connected call by providing comments that only the agent can hear and can barge in on a call and become part of the conversation between the agent and the customer.

                                                                                                                                                                                                              Note the following:

                                                                                                                                                                                                              • You cannot make a continuous monitoring request and an ad-hoc request for the same target at the same time.

                                                                                                                                                                                                              • If a scheduled request and a continuous request are made for the same target, the continuous request takes precedence. When the continuous request is paused or canceled, the scheduled request is enabled.

                                                                                                                                                                                                              • If a scheduled request and an ad-hoc request are made for the same target, the ad-hoc request takes precedence. When the ad-hoc request is either canceled or completed, the scheduled request is enabled.

                                                                                                                                                                                                              • If you sign out of the Management Portal while a monitoring request is still active, a message asks if you want to cancel the monitor request or continue monitoring.

                                                                                                                                                                                                                If you select Yes, any active ad-hoc, or continuous monitoring requests are canceled after you log out. Any scheduled requests are suspended.

                                                                                                                                                                                                              Monitor Calls

                                                                                                                                                                                                              The Call Monitoring page provides an interface for monitoring a call on a continuous or one-time only basis.

                                                                                                                                                                                                              1

                                                                                                                                                                                                              From the Management Portal navigation bar, choose Call Monitoring.

                                                                                                                                                                                                              2

                                                                                                                                                                                                              In the Monitoring Filter panel, specify one or more queues, sites, teams, and agents that you want to monitor. If you set a queue, site, team, or agent list to All, it includes only entities to which you have access in the request.

                                                                                                                                                                                                              3

                                                                                                                                                                                                              In the Callback Number field, enter the phone number and click Register. If you must update a number, enter the new callback number and click Update.

                                                                                                                                                                                                              Enter the callback number in one of the following formats:

                                                                                                                                                                                                              • E.164 number format: [+][Country Code][Number]

                                                                                                                                                                                                                Example: +11234567890

                                                                                                                                                                                                              • IDD (International Direct Dialing) format: [IDD][Country Code][Number]

                                                                                                                                                                                                                Example: 01161123456789

                                                                                                                                                                                                              • Enter all the digits to connect the call, without hyphens or other special characters. For example, if the phone number is 415-555-1234, enter 4155551234.

                                                                                                                                                                                                              • The callback number used for monitoring must be the same as the one used by the supervisor when signing in to the Desktop.

                                                                                                                                                                                                              • On Classic platform also known as CTI, when a supervisor registers a call monitoring number on the portal or creates a monitoring schedule, the system sends a monitoring callback request to the recent number associated with the user who set up the schedule. If the supervisor updates the call monitoring number on the portal or signs in to the desktop with a different number, the callback for monitoring routes to the new number.

                                                                                                                                                                                                              • On Next Generation platform also known as RTMS, when a supervisor registers a call monitoring number on the portal and creates a monitoring schedule, the system sends monitoring callback requests to the callback number associated with the monitoring schedule. However, if the supervisor signs in to the desktop with an updated dial number, all callbacks route to the dial number associated with the desktop.

                                                                                                                                                                                                              • If a Webex Calling number is associated with your user profile, the number automatically appears as the Callback Number on the Call Monitoring page. If necessary, you can edit this number by entering a new available number. The new number is then associated with the supervisor.

                                                                                                                                                                                                                You can't register an internal Webex Calling extension number as the monitoring DN. You can use a full Direct Inward Dialing (DID) number to associate with that user in Webex Calling.

                                                                                                                                                                                                              4

                                                                                                                                                                                                              To prevent this monitoring session from being displayed on the Management Portal for other users, check the Use Invisible Mode check box.

                                                                                                                                                                                                              5

                                                                                                                                                                                                              Click one of the options in the following table to submit your call monitoring request.

                                                                                                                                                                                                              The system disables these options if you don't have a callback number registered.

                                                                                                                                                                                                              Choose this option

                                                                                                                                                                                                              To do this

                                                                                                                                                                                                              Monitor Next Call

                                                                                                                                                                                                              Monitor the next incoming call that fits the specified criteria.

                                                                                                                                                                                                              Continuous Monitor

                                                                                                                                                                                                              Continuously monitor calls that fit the specified criteria. After you click this button, a dialog box appears. In this dialog box, enter the duration of the monitoring session in minutes or retain the default value Unlimited. Click Monitor to close the dialog box and submit your request.

                                                                                                                                                                                                              After the monitoring duration expires, the system takes up to five minutes to remove the call monitoring request. During this time, you receive one more call.

                                                                                                                                                                                                              Your request appears in the Monitor Requests list along with any pending requests from other agents. The monitored call appears in the Calls Being Monitored list.

                                                                                                                                                                                                              For more information about the Call Monitoring page, see Viewing Call Monitoring Information.

                                                                                                                                                                                                              6

                                                                                                                                                                                                              If your user profile has authorization, you can click the Coach or Barge In button in the Action column to coach the agent or barge in on the monitored call. For details, see Barge in on a Call.

                                                                                                                                                                                                              7

                                                                                                                                                                                                              When the call ends, click Monitor Next Call to monitor the next call in the queue. Alternatively, if you choose the Continuous Monitor option, the system sends the next call in the queue to you.

                                                                                                                                                                                                              8

                                                                                                                                                                                                              Click Cancel to cancel the monitoring activity for that request. If you choose Continuous Monitor, click the Pause button to temporarily halt incoming calls. You can click the Resume button to resume call monitoring.

                                                                                                                                                                                                              If an agent goes into the Not Responding state, the call goes back to the queue and the caller hears music on hold. The Desktop disconnects the supervisor who is monitoring the call during this time. If the supervisor is scheduled to monitor a call but has not picked up the call, the call widget disappears from the Monitor Requests list, and the phone stops ringing.

                                                                                                                                                                                                              Coach an Agent

                                                                                                                                                                                                              If the Whisper Coach feature is enabled in your user profile, you can speak to an agent who is being monitored without being heard by the customer.

                                                                                                                                                                                                              • The coaching session continues, even if the call is transferred to another agent, until the call either ends or is transferred to another number (agent-to-DN transfer).

                                                                                                                                                                                                              • If the coached agent consults with another agent, you hear music on hold and are not able to continue coaching the agent until the caller is taken off hold.

                                                                                                                                                                                                              While coaching an agent, you can barge in on the call if the Barge In feature is enabled in your user profile.

                                                                                                                                                                                                              To silently coach an agent:

                                                                                                                                                                                                              1

                                                                                                                                                                                                              While you monitor a call (as described in Monitor Calls) and the call is connected to an agent, click Coach.

                                                                                                                                                                                                              Do not click Coach if the call is waiting in a queue after being transferred by the agent to another queue. Doing so causes your coach request to fail.

                                                                                                                                                                                                              The Coach button is not available when the agent transfers the call to another number (DN transfer).

                                                                                                                                                                                                              2

                                                                                                                                                                                                              Provide verbal instructions to the agent.

                                                                                                                                                                                                              3

                                                                                                                                                                                                              To remove yourself from the call, hang up. The call is removed from the Calls Being Monitored list.

                                                                                                                                                                                                              Barge in on a Call

                                                                                                                                                                                                              Authorized users can use the Barge-In function to join a call they are monitoring and participate in the conversation between the agent and the customer unless the call is transferred to another number (agent-to-DN transfer), after which the call is removed from the Calls Being Monitored list. To barge in on a call:
                                                                                                                                                                                                              1

                                                                                                                                                                                                              While you are monitoring or coaching a call, and the call is connected to an agent (and not waiting in a queue), click Barge In.

                                                                                                                                                                                                              You are immediately connected to the call. The Barge In button disappears from the page.

                                                                                                                                                                                                              2

                                                                                                                                                                                                              To remove yourself from the call, hang up. The call is removed from the Calls Being Monitored list.

                                                                                                                                                                                                              Viewing Call Monitoring Information

                                                                                                                                                                                                              To view call monitoring information, from the Management Portal navigation bar, click Call Monitoring

                                                                                                                                                                                                              The Call Monitoring page displays the following:

                                                                                                                                                                                                              • Controls for requesting a monitoring session. For more information, see Monitor Calls.

                                                                                                                                                                                                              • A chart of active and queued calls for the queue that is currently selected in the Monitoring Filter panel on the left side of the page.

                                                                                                                                                                                                              • The Monitoring Requests/Calls Being Monitored table, which displays the two lists described in the following sections.

                                                                                                                                                                                                                If you resize the Call Monitoring window to a very narrow size, the Monitoring Requests/Calls Being Monitored table displays at the bottom of the window. It might appear that the table is missing, but you can see it if your scroll to the bottom of the window.
                                                                                                                                                                                                              Calls Being Monitored List

                                                                                                                                                                                                              The Calls Being Monitored list displays information about all calls currently being monitored in your enterprise.

                                                                                                                                                                                                              When a monitored call is transferred to a specific phone number (agent-to-DN transfer), it is removed from the Calls Being Monitored list and thus, the Coach and Barge In buttons are no longer available.

                                                                                                                                                                                                              Table 1. Calls Being Monitored List

                                                                                                                                                                                                              Column

                                                                                                                                                                                                              Description

                                                                                                                                                                                                              Queue

                                                                                                                                                                                                              The queue that received the call.

                                                                                                                                                                                                              Site

                                                                                                                                                                                                              The contact center location to which the call was distributed.

                                                                                                                                                                                                              Team

                                                                                                                                                                                                              The team to which the call was distributed.

                                                                                                                                                                                                              Agent

                                                                                                                                                                                                              The name of the agent being monitored or a numeric ID code if the call was answered by a capacity-based team resource instead of by a Webex Contact Center agent.

                                                                                                                                                                                                              Monitoring Status

                                                                                                                                                                                                              The status of the monitoring session:

                                                                                                                                                                                                              • monitoring-started: The monitoring supervisor has picked up the phone.

                                                                                                                                                                                                              • connected: The agent has picked up the call.

                                                                                                                                                                                                              • CoachStarted: The monitoring supervisor has started coaching the agent.

                                                                                                                                                                                                              • barged: The monitoring supervisor has barged in on the call.

                                                                                                                                                                                                              Supervisor Name

                                                                                                                                                                                                              The name of the person monitoring the call.

                                                                                                                                                                                                              Supervisor Number

                                                                                                                                                                                                              The phone number of the person monitoring the call.

                                                                                                                                                                                                              Duration (mm:ss)

                                                                                                                                                                                                              The number of minutes and seconds since the call arrived.

                                                                                                                                                                                                              Action

                                                                                                                                                                                                              Buttons that you can click to coach or barge in on a call that is being monitored, if authorized by your user profile.

                                                                                                                                                                                                              Monitoring Requests List

                                                                                                                                                                                                              The Monitor Requests list displays information about all monitoring requests in your enterprise.

                                                                                                                                                                                                              If a monitoring request includes multiple queues, sites, teams, or agents, you can display a list of them in a tool tip by placing your mouse on a value in the Queue, Site, Team, or Agent column.

                                                                                                                                                                                                              Table 2. Monitoring Requests List

                                                                                                                                                                                                              Column

                                                                                                                                                                                                              Description

                                                                                                                                                                                                              Request Type

                                                                                                                                                                                                              The request types are:

                                                                                                                                                                                                              • Continuous: The specified target (queue, team, site, or agent) is continuously monitored until the request is paused or canceled or until the monitoring duration is reached if the monitoring user specified a duration. You can point to the word Continuous to display a tooltip showing the duration of the monitoring request or Unlimited if no duration was specified.

                                                                                                                                                                                                              • Scheduled: A call monitoring schedule for the specified target is set up and running.

                                                                                                                                                                                                              • Ad-Hoc: The next call that matches the specified criteria is monitored.

                                                                                                                                                                                                              Queue

                                                                                                                                                                                                              The queues included in the request. If multiple queues are included, you can display a list of them by pointing to the value displayed in the column.

                                                                                                                                                                                                              Site

                                                                                                                                                                                                              The sites included in the request. If multiple sites are included, you can display a list of them by pointing to the value displayed in the column.

                                                                                                                                                                                                              Team

                                                                                                                                                                                                              The teams included in the request. If multiple teams are included, you can display a list of them by pointing to the value displayed in the column.

                                                                                                                                                                                                              Agent

                                                                                                                                                                                                              The agents included in the request. If multiple agents are included, you can display a list of them by pointing to the value displayed in the column.

                                                                                                                                                                                                              Monitoring Status

                                                                                                                                                                                                              The status of the monitoring session:

                                                                                                                                                                                                              • Request Pending: The request is submitted.

                                                                                                                                                                                                              • Monitoring: The supervisor has picked up the phone.

                                                                                                                                                                                                              Supervisor Name

                                                                                                                                                                                                              The name of the person who submitted the request.

                                                                                                                                                                                                              Supervisor Number

                                                                                                                                                                                                              The phone number of the person who submitted the request.

                                                                                                                                                                                                              Action

                                                                                                                                                                                                              Buttons that you can click to pause, resume, or cancel a monitoring request.

                                                                                                                                                                                                              Working with Monitoring Schedules

                                                                                                                                                                                                              The Monitoring Schedules page in the Call Monitoring module enables authorized users to schedule call monitoring requests at specific times of the day or week. Note the following:

                                                                                                                                                                                                              • Monitoring schedules will be re-assigned to the user who edits a schedule, even if the creator of the schedule is a different user. Please ensure that users editing monitoring schedules are able to monitor agents.
                                                                                                                                                                                                              • The start and end times specified in the Call Monitoring Schedule use the enterprise time. However, calls are monitored in local time. Be sure to adjust for this when you specify the start and end times in your monitoring schedules.

                                                                                                                                                                                                              Create or Edit a Monitoring Schedule

                                                                                                                                                                                                              To create a new monitoring schedule or edit an existing schedule:

                                                                                                                                                                                                              1

                                                                                                                                                                                                              From the Management Portal navigation bar, choose Call Monitoring > Schedule.

                                                                                                                                                                                                              2

                                                                                                                                                                                                              To create a new schedule:

                                                                                                                                                                                                              • From the list view, click New Schedule.

                                                                                                                                                                                                                - OR -

                                                                                                                                                                                                              • From the calendar view, point to the beginning date of the schedule and click the Create link that appears at the upper-left corner of the date box.

                                                                                                                                                                                                              3

                                                                                                                                                                                                              To copy or edit an existing schedule from the list view, click the ellipsis button beside a listed schedule and choose Copy or Edit.

                                                                                                                                                                                                              4

                                                                                                                                                                                                              On the page that appears, specify the appropriate settings as described in the following table:

                                                                                                                                                                                                              Setting

                                                                                                                                                                                                              Description

                                                                                                                                                                                                              Name

                                                                                                                                                                                                              Enter a name for the schedule.

                                                                                                                                                                                                              Start Date and End Date

                                                                                                                                                                                                              To select the start date (the date on which the schedule becomes effective) and end date (the date on which the schedule expires), click the appropriate calendar icon in the Start Date or End Date field, and then select a date from the calendar that appears.

                                                                                                                                                                                                              Start Time and End Time

                                                                                                                                                                                                              Enter the time of the day that you want the schedule to start and end. Specify the time in the 24-hour format (0000–2400).

                                                                                                                                                                                                              Note that the time that you specify in the Call Monitoring Schedule is based on the enterprise time. However, calls are monitored in the local time.

                                                                                                                                                                                                              Pending monitor requests are checked every 'n' number of seconds as configured in your system. The default interval is five minutes. When the checking starts, each monitor request is checked and validated. If the request is past the scheduled deadline (that is, the End Time value), it is removed from the pending monitor requests list. Because of this added functionality, the scheduled end time may actually occur a few minutes later than specified.

                                                                                                                                                                                                              Day of Week

                                                                                                                                                                                                              From the drop-down list, select All Days if you want the schedule to run every day, or Weekdays if you want the schedule to run from Monday through Friday only.

                                                                                                                                                                                                              OR

                                                                                                                                                                                                              Click each icon that represents a day during which you want the schedule to run.

                                                                                                                                                                                                              Status

                                                                                                                                                                                                              Click Active if you want the schedule to become effective at the specified start time on the specified start date. Otherwise, click Not Active.

                                                                                                                                                                                                              Callback Number

                                                                                                                                                                                                              This field displays the phone number to which the audio is sent.

                                                                                                                                                                                                              The callback number can be in one of the following formats:

                                                                                                                                                                                                              • E.164 number format: [+][Country Code][Number]

                                                                                                                                                                                                                Example: +11234567890

                                                                                                                                                                                                              • IDD (International Direct Dialing) format: [IDD][Country Code][Number]

                                                                                                                                                                                                                Example: 01161123456789

                                                                                                                                                                                                              Filter By

                                                                                                                                                                                                              Select the queues, sites, teams, and agents that you want to be monitored as part of this schedule.

                                                                                                                                                                                                              5

                                                                                                                                                                                                              Click Save.

                                                                                                                                                                                                              Activate or Deactivate Monitoring Schedules

                                                                                                                                                                                                              You can activate or deactivate a monitoring schedule by editing the Status field in the settings for the schedule, or you can click a button in the list view Monitoring Schedules page as follows:

                                                                                                                                                                                                              1

                                                                                                                                                                                                              From the Management Portal navigation bar, choose Call Monitoring > Schedule.

                                                                                                                                                                                                              2

                                                                                                                                                                                                              Click the ellipsis button beside a listed schedule and click Activate or Deactivate.

                                                                                                                                                                                                              Export the Monitoring Schedule List

                                                                                                                                                                                                              To export the monitoring schedule list to a data analysis tool such as Microsoft Excel:

                                                                                                                                                                                                              1

                                                                                                                                                                                                              From the Management Portal navigation bar, choose Call Monitoring > Schedule.

                                                                                                                                                                                                              2

                                                                                                                                                                                                              In the list view, click Action on the upper-right side of the page header and choose Excel or CSV.

                                                                                                                                                                                                              3

                                                                                                                                                                                                              In the dialog box that opens, either click Open to open the file, or click Save, navigate to the directory where you want to save the file, and then click Save.

                                                                                                                                                                                                              Delete a Monitoring Schedule

                                                                                                                                                                                                              To delete a monitoring schedule:

                                                                                                                                                                                                              1

                                                                                                                                                                                                              From the Management Portal navigation bar, choose Call Monitoring > Schedule.

                                                                                                                                                                                                              2

                                                                                                                                                                                                              In the list view, click the ellipsis button beside a listed schedule and click Delete.

                                                                                                                                                                                                              3

                                                                                                                                                                                                              Click Yes to confirm the deletion.

                                                                                                                                                                                                              Call Recording

                                                                                                                                                                                                              Call Recording

                                                                                                                                                                                                              The optional Call Recording module enables authorized users to record any active call that Webex Contact Center manages.

                                                                                                                                                                                                              Authorized users can create recording schedules with a time period. Choose queue, team, site, and agent for which you want to record voice calls. The system then starts recording the calls that match the criteria.

                                                                                                                                                                                                              You can also record calls after you obtain customer consent and configure this setting at a flow level. For more information, see Recording Control. The flow level recording configuration will override any other recording configuration.

                                                                                                                                                                                                              Because you can't determine the total number of incoming calls and the number of calls to be recorded, Webex Contact Center uses predictive modeling to decide which calls to record. The models include pseudorandom number generator (PRNG) or deterministic random bit generator (DRBG). The accuracy in the percentage of calls that are recorded increases with the number of contacts.

                                                                                                                                                                                                              Regardless of the call recording duration, the first two hours of each call recording is available in Webex Contact Center.

                                                                                                                                                                                                              Recordings are transferred daily to your enterprise's recording repository over a secure encrypted virtual private network (VPN). The recording repository is a standalone server housed at a location of your enterprise's choosing, such as the contact center premise location or data facility. Your enterprise has full control over the length of storage for these recordings.

                                                                                                                                                                                                              The recordings are in standard .wav format and only authorized users can access these recordings directly and review these using standard third-party utilities. External or partner administrators can't download or play these recordings.

                                                                                                                                                                                                              You can also use the features of the optional Webex Contact Center Recording Management module to search for and play recorded files.

                                                                                                                                                                                                              • The Webex Contact Center Recording Management module records the calls routed to the overflow destination number, but doesn't list them in the user interface.

                                                                                                                                                                                                              • There may be a mismatch between call duration and recording duration for the following reasons:

                                                                                                                                                                                                                • The recording duration is different from the call duration if Pause Resume is used in the call. The Pause Resume duration is subtracted from the recording duration.

                                                                                                                                                                                                                • The recording start time is different from the call start time if the call is waiting in queue, or moves between the flows, EPs, and queues before connecting to an agent.

                                                                                                                                                                                                              • In Classic media platform, when an agent puts a caller on hold, recording of the caller's audio continues. However, in Next Generation media platform, only the music on hold is recorded and not the caller's audio.

                                                                                                                                                                                                              • For blind transfer to Dial Number (DN), and Entry Point (EP) to Dial Number (DN) call patterns there may be a mismatch in speech and record duration of calls displayed on user interface.

                                                                                                                                                                                                                • During a blind transfer, the agent who receives the call is in reserved state for a short period while the call is transferred to another agent. Based on the configuration set at each organization level the call recording either continues or ends.

                                                                                                                                                                                                                • Call recording is enabled by default when the Record All Calls setting is Yes (selected). If this setting is No (not selected), call recording is determined by the individual queue settings. For calls involving multiple queues, recording occurs based on the individual queue level.

                                                                                                                                                                                                                • When an agent performs a blind transfer between two queues, one with a recording schedule and the other without, the recording in the scheduled queue will stop. However, the reported recording duration may differ from the actual recorded file duration due to variations in recording schedules across different queues involved in a call.

                                                                                                                                                                                                                  Example

                                                                                                                                                                                                                  • Agent in Queue A (Recording Schedule): The call is recorded for the first 5 minutes.
                                                                                                                                                                                                                  • Blind Transfer to Queue B (No Recording Schedule): The agent transfers the call to Queue B, which does not have a recording schedule. The recording stops when the call is transferred to Queue B, but the call continues for another 5 minutes.
                                                                                                                                                                                                                  • Call Termination: After a total of 10 minutes, the customer ends the call.
                                                                                                                                                                                                                  The reported recording duration reflects only the time spent in the queue with the active recording schedule — in this case Queue A for 5 minutes.

                                                                                                                                                                                                                • For EP-DN, the call is recorded for consult and conference, and not for transfer of the child call (when transferred to another EP-DN number).

                                                                                                                                                                                                              • In the Next Generation media platform, if an active call is being recorded, all consult calls initiated during the active call are automatically recorded. The consult call recordings are available in the Recording Management portal.

                                                                                                                                                                                                              Segment Recording

                                                                                                                                                                                                              Segment recording refers to the functionality that allows for the recording of interactions in separate, discrete segments based on certain conditions or triggers. This is useful for ensuring compliance monitoring and quality management. In the context of segment recording, there are a few differences between Classic media platform and Next Generation media platform that are highlighted in the following table:

                                                                                                                                                                                                              Feature

                                                                                                                                                                                                              Classic media platform

                                                                                                                                                                                                              Next Generation media platform

                                                                                                                                                                                                              File Name of the segment

                                                                                                                                                                                                              In the format combined-n.wavIn the format <RecordingId>-segment.wav

                                                                                                                                                                                                              Music on Hold (MoH) handling

                                                                                                                                                                                                              Segment recording is audibleSegment recordings feature silence during MOH periods, while the combined recordings retain the MOH.

                                                                                                                                                                                                              Channel Designation

                                                                                                                                                                                                              Channel 1 is assigned to the Agent, and Channel 2 to all other parties in segment recordingsChannel 1 is assigned to the Caller, and Channel 2 to all other parties in segment recordings

                                                                                                                                                                                                              Create or Edit a Recording Schedule

                                                                                                                                                                                                              To create or edit a call recording schedule:

                                                                                                                                                                                                              1

                                                                                                                                                                                                              From the Management Portal navigation bar, choose the Call Recording module.

                                                                                                                                                                                                              2

                                                                                                                                                                                                              On the Recording Schedules page, select a queue from the Queue drop-down list.

                                                                                                                                                                                                              All call recording schedules for that queue are displayed. From here, you can:

                                                                                                                                                                                                              • Add a new schedule

                                                                                                                                                                                                              • Edit or view an existing schedule

                                                                                                                                                                                                              • Delete an existing schedule

                                                                                                                                                                                                              • Copy an existing schedule

                                                                                                                                                                                                              • Switch between a list view and calendar view of all schedules for this queue.

                                                                                                                                                                                                              3

                                                                                                                                                                                                              To create a new schedule:

                                                                                                                                                                                                              • From the list view, click New Schedule.

                                                                                                                                                                                                                - OR -

                                                                                                                                                                                                              • From the calendar view, point to the schedule’s beginning date and click the Create link that appears in the upper-left corner of the date box.

                                                                                                                                                                                                              4

                                                                                                                                                                                                              To copy or edit an existing schedule, from the list view, click the ellipsis button beside a listed schedule and click Copy or Edit.

                                                                                                                                                                                                              5

                                                                                                                                                                                                              On the page that appears, specify the appropriate settings as described in the following table, and then click Save.

                                                                                                                                                                                                              Setting

                                                                                                                                                                                                              Description

                                                                                                                                                                                                              Name

                                                                                                                                                                                                              Enter a name for the schedule.

                                                                                                                                                                                                              Start Date and End Date

                                                                                                                                                                                                              To select the start date (the date on which the schedule becomes effective) and end date (the date on which the schedule expires), click the appropriate calendar icon, and then select a date from the calendar that appears.

                                                                                                                                                                                                              Start Time and End Time

                                                                                                                                                                                                              Enter in 24-hour format (0000 to 2400) the time of day you want the schedule to start and end.

                                                                                                                                                                                                              Days of Week

                                                                                                                                                                                                              From the drop-down list, choose All Days if you want the schedule to run every day or Weekdays if you want the schedule to run from Monday through Friday only.

                                                                                                                                                                                                              -OR-

                                                                                                                                                                                                              Click each icon corresponding to the day on which you want the schedule to run.

                                                                                                                                                                                                              Status

                                                                                                                                                                                                              Click Active if you want the schedule to become effective at the specified start time on the specified start date. Otherwise, click Not Active.

                                                                                                                                                                                                              Stop Recording on Transferred Out Calls

                                                                                                                                                                                                              Click On if you want recording to stop when a call is transferred.

                                                                                                                                                                                                              Enable Pause Resume

                                                                                                                                                                                                              Click On if you want the agent to have access to the Privacy Shield icon during call recording so that the agent can pause and resume recording. For example, the agent might need to pause potential call recording when obtaining a credit card number or other protected information. Be sure to instruct agents regarding when to use this feature.

                                                                                                                                                                                                              The Privacy Shield icon is displayed on the Agent Desktop only if the Privacy Shield feature is enabled in your Webex Contact Center service configuration.

                                                                                                                                                                                                              Pause Duration (in Sec)

                                                                                                                                                                                                              If you set Enable Pause Resume to On, enter the number of seconds for which the recording will be paused if the user had not clicked the Turn Off Privacy Shield button earlier.

                                                                                                                                                                                                              Percentage

                                                                                                                                                                                                              Specify the percentage of the total number of current calls you want recorded for this queue.

                                                                                                                                                                                                              Filter By

                                                                                                                                                                                                              Select the sites, teams, and agents you want to include in your recording schedule.

                                                                                                                                                                                                              Outdial call recording is based on the site, team, and agent who makes the outdial call. For example, if a recording schedule is created for the Outdial queue and a site named Chicago, then only those outdial calls made by teams under the Chicago site are recorded, and not calls made from other sites.

                                                                                                                                                                                                              Deleting a Recording Schedule

                                                                                                                                                                                                              To delete a recording schedule:
                                                                                                                                                                                                              1

                                                                                                                                                                                                              From the Management Portal navigation bar, choose the Call Recording module.

                                                                                                                                                                                                              2

                                                                                                                                                                                                              On the Recording Schedules page, select a queue from the Queue drop-down list.

                                                                                                                                                                                                              3

                                                                                                                                                                                                              Click the ellipsis button beside a listed schedule and click Delete.

                                                                                                                                                                                                              Recording Management

                                                                                                                                                                                                              The optional Webex Contact Center Recording Management module enables authorized users to search for and play audio files that are recorded through the Webex Contact Center Call Recording feature. In addition, authorized users can create tags that can be assigned to audio files for use as search criteria, specify which global (previously known as CAD) variables to store with recordings, and view recent Recording Management activity.

                                                                                                                                                                                                              For configuration objects that have been deleted, an option to filter data using the deleted object names will not be available. It is recommended to query and fetch the data by a date range. The result set will contain details of calls handled for those configuration objects which are permanently deleted.

                                                                                                                                                                                                              Stereo Recording

                                                                                                                                                                                                              The Stereo Recording feature replaces the combined mono output file with a stereo output file. The stereo file provides the audio streams of the agent and the other participant (the caller or the called party) as two separate audio channels within a single recording. This enables better voice analytics than in a mono file, where the audio is mixed into a single stream.

                                                                                                                                                                                                              To play a stereo recorded file, the Webex Contact Center Recording Management module enables authorized users to search for and play stereo recorded audio files. For more information, see Search for and Play Recordings.

                                                                                                                                                                                                              Search for and Play Recordings

                                                                                                                                                                                                              To search for and play a recording:

                                                                                                                                                                                                              1

                                                                                                                                                                                                              From the Management Portal navigation bar, choose Recording Management.

                                                                                                                                                                                                              By default, the search page lists the recordings for the previous 13 months from the current date. To search based on specific criteria, use the following search fields on the left pane to filter the recordings:

                                                                                                                                                                                                              • Queues: Choose one or more queues to filter the recordings returned by queue.

                                                                                                                                                                                                              • Sites: Choose one or more sites. The teams and agents associated with the selected sites display in the Teams and Agents lists.

                                                                                                                                                                                                              • Teams: Choose one or more teams. Only the agents associated with the selected teams appear on the Agents list. If the Teams field is empty, then all agents associated with the selected sites appear.

                                                                                                                                                                                                              • Agents: Choose one or more agents to filter the recordings based on active agent ID.

                                                                                                                                                                                                              • Wrap Up Codes: Choose one or more codes from the list to filter the search based on the wrap-up codes.

                                                                                                                                                                                                              • Tags: Define a text string and assign it to the recording. You can filter the search based on tags by selecting them in the Tags list. For more information, see the section Assign and Remove Tags and Create and Export Tags.

                                                                                                                                                                                                              • Exclude Deleted Agents: Check the check box to exclude recordings for deleted agents from the search.

                                                                                                                                                                                                              • Search Deleted Files: Check the check box to search audio files that were deleted within 30 days. The system permanently removes deleted files older than 30 days. To play a deleted audio file, restore the file as described in Restore a recording.

                                                                                                                                                                                                              • The Queues, Sites, and other lists appear based on your access privileges.

                                                                                                                                                                                                              • To reset all lists and fields, and start over again, click Reset.

                                                                                                                                                                                                              2

                                                                                                                                                                                                              To filter the list based on more criteria, click the Advanced Search button.

                                                                                                                                                                                                              In the dialog box that appears, you can filter the search results based on Recording Duration and Call Attributes:

                                                                                                                                                                                                              • Filter by Recording Duration: You can enter values in the Recording Duration fields to specify the minimum and maximum length of the recording to search for. You can also check the Unlimited check box to search for a recording of any length.

                                                                                                                                                                                                              • Filter by Call Attributes: You can enter values that appear under the Call Attributes field to filter the search results based on the following attributes:

                                                                                                                                                                                                                • Session ID

                                                                                                                                                                                                                • DNIS

                                                                                                                                                                                                                • ANI number

                                                                                                                                                                                                              3

                                                                                                                                                                                                              Click the Search button to search.

                                                                                                                                                                                                              If the search criteria match, then the Search Results page lists the recordings.

                                                                                                                                                                                                              4

                                                                                                                                                                                                              Click the ellipsis button beside an entry. The following options appear:

                                                                                                                                                                                                              Action

                                                                                                                                                                                                              Description

                                                                                                                                                                                                              Play

                                                                                                                                                                                                              Play a recording by selecting the Stereo icon. It plays the full audio conversation of the agent and caller.

                                                                                                                                                                                                              If the Leg Recording option is enabled for your enterprise, three play buttons are available when you click the button. Select Agent to play just the agent audio; select Caller to play just the caller audio.

                                                                                                                                                                                                              This option allows you to play a recording for the entire call that includes any transfers and conferences.

                                                                                                                                                                                                              The system also provides a separate file for each call event, such as pause, resume, transfer, and conference. You can access these individual files by clicking the arrow button to the left of a listed recording.

                                                                                                                                                                                                              Download

                                                                                                                                                                                                              Download a recording.

                                                                                                                                                                                                              Tags

                                                                                                                                                                                                              Assign a tag to a recording or remove a tag from a recording. For more information, see Assign and Remove Tags.

                                                                                                                                                                                                              • Recordings only display for active Queues. Before searching for any recordings, it may be helpful to check, first, whether the Queue is active or inactive.

                                                                                                                                                                                                              Assign and Remove Tags

                                                                                                                                                                                                              You can assign the same tag to multiple recordings and you can assign multiple tags to an individual recording.

                                                                                                                                                                                                              To assign a tag to a recording or remove a tag from a recording:

                                                                                                                                                                                                              1

                                                                                                                                                                                                              From the Management Portal navigation bar, choose Recording Management.

                                                                                                                                                                                                              2

                                                                                                                                                                                                              On the Search page, perform a search for the recordings you want to either assign tags to or remove tags from, as described.

                                                                                                                                                                                                              3

                                                                                                                                                                                                              Click the ellipsis button beside a listed recording on the Search Results page and click Tags.

                                                                                                                                                                                                              On the upper part of the dialog box that opens, the list of tags assigned to the recording is displayed on the right and a list of tags that are available is displayed on the left.

                                                                                                                                                                                                              4

                                                                                                                                                                                                              To assign a tag to the recording, select a tag in list on the left and click Assign Tag to move it to the list on the right.

                                                                                                                                                                                                              5

                                                                                                                                                                                                              To remove a tag from the recording, select a tag in the list on the right and click Remove Tag to move it to the list on the right.

                                                                                                                                                                                                              6

                                                                                                                                                                                                              When you are finished, click Save.

                                                                                                                                                                                                              Search Attributes

                                                                                                                                                                                                              The Recording Management > Search Attributes page provides access to controls where you can perform the tasks described in the following topics:

                                                                                                                                                                                                              Create and Export Tags

                                                                                                                                                                                                              The Tags section of the Recording Management > Search Attributes page enables authorized users to create and export a list of tags that can be assigned to recordings (see Assign and Remove Tags).

                                                                                                                                                                                                              To create a tag or export a list of tags:

                                                                                                                                                                                                              1

                                                                                                                                                                                                              From the Management Portal navigation bar, choose Recording Management > Search Attributes.

                                                                                                                                                                                                              2

                                                                                                                                                                                                              In the Tags section of the page that appears, do one of the following:

                                                                                                                                                                                                              • To create a tag, click Add. Enter a name for the tag and click Save.

                                                                                                                                                                                                              • To export the list of tags, click the Excel or CSV link beneath the tags list. In the dialog box that opens, click Open to open the file, or click Save, navigate to the directory where you want to save the file, and then click Save.

                                                                                                                                                                                                              Digital Channels

                                                                                                                                                                                                              Introduction to Webex Contact Center

                                                                                                                                                                                                              Welcome to Webex Contact Center. The following topics provide a brief insight about Webex Contact Center.

                                                                                                                                                                                                              Webex Contact Center Overview

                                                                                                                                                                                                              Contact centers of multisourcing enterprises leverage a combination of sourcing solutions, including captive, outsourced, and offshore. The typical multisource contact-center environment is organizationally complex, consisting of sites located all over the world, and staffed by direct company employees and/or outsourced agents.

                                                                                                                                                                                                              In this environment, most locations operate independently and use disparate contact center technologies, including routing, administrative solutions, and reporting tools. This combination of tools and technologies makes both management and quality monitoring across different locations extremely challenging.

                                                                                                                                                                                                              Cisco’s Webex Contact Center offers a unique solution that combines contact center and IP technologies in a global call management service. The Webex Contact Center solution is built on the Cisco Midpoint Call Management ® technology, a centralized control point for managing and monitoring calls and contacts across a heterogeneous contact center environment.

                                                                                                                                                                                                              Offered as a cloud service, Webex Contact Center provides enterprises with full control over their global contact center queues and creates the appearance of a single, unified contact center environment. Calls, chats, and emails are distributed to the contact center sites where agents are available. When agents are occupied, contacts are queued centrally so they can be serviced by the next available agent irrespective of the physical location of the agent.

                                                                                                                                                                                                              In the voice context, by queuing calls centrally, enterprises can offload the queuing function from their premises-based equipment, thus achieving substantial cost savings in telecom hardware, toll charges, and bandwidth use. More importantly, a call can be directed to the next available agent at any site because the endpoint of the call can be anywhere around the globe, Webex Contact Center seamlessly integrates remote agents and at-home agents into the enterprise’s multisource contact center environment.

                                                                                                                                                                                                              About Sites, Teams, Entry Points, and Queues

                                                                                                                                                                                                              A Webex Contact Center tenant is an enterprise that has contact centers at one or more sites. The enterprise also has entry points for incoming contacts that are associated with queues. Incoming contacts can be toll-free numbers for voice calls, designated email addresses for emails, or chats with agents. For example, an enterprise that is named Acme might have an entry point that is named Welcome. Welcome classifies contacts into AcmeBilling and distributes to teams of agents in Chicago, Manila, and Bangalore.

                                                                                                                                                                                                              Each Webex Contact Center tenant profile consists of sites, teams, entry points, and queues.

                                                                                                                                                                                                              • A site is a physical contact center location under the control of the enterprise or an outsourcer. For example, Acme might have sites in Chicago, Manila, and Bangalore.

                                                                                                                                                                                                              • A team is a group of agents at a specific site who handle a particular type of contact. For example, Acme might have teams at their Chicago site that are named Chi_Billing, Chi_Sales, and Chi_GoldCustomerService, and teams at their Bangalore site named Bgl_Billing, Bgl_GoldCustomerService, and Bgl_Experts. Agents can be assigned to more than one team, but an agent can service only one team at a time.

                                                                                                                                                                                                              • An entry point is the initial landing place for the customer contacts on the Webex Contact Center system. For the voice contacts, typically one or more toll-free or dial numbers are associated with an entry point. IVR call treatment is performed while a call is in the entry point.

                                                                                                                                                                                                              • A queue is where active contacts are kept while they await handling by an agent. Contacts are moved from the entry point into a queue and are distributed to agents.

                                                                                                                                                                                                              Tenants that use the outdial feature are also configured with at least one outdial entry point and one outdial queue.

                                                                                                                                                                                                              Telecom managers, contact center managers, and other representatives of the enterprise who are authorized to access the Webex Contact Center service have a view of contact center activity at their enterprise through the Webex Contact Center Management Portal.

                                                                                                                                                                                                              In addition to sites, teams, entry points, and queues, the Provisioning module of the Webex Contact Center Management Portal provides an interface to add agents and assign them to teams. Each agent is configured with a desktop profile , a value that determines the agent’s permission levels and Agent Desktop behaviors, including which wrap-up and idle codes are available to the agent. Thus, you should add wrap-up and idle codes before you define desktop profiles and define desktop profiles before you define agents. If your enterprise is provisioned with the optional skills-based routing feature, you should also add skills and skill profiles before you define teams and agents.

                                                                                                                                                                                                              Webex Contact Center Management Portal

                                                                                                                                                                                                              You can access the Webex Contact Center Management Portal through a web browser. The Portal provides access to Webex Contact Center modules that enable authorized users to perform various tasks such as:

                                                                                                                                                                                                              • View real-time and historical contact center data

                                                                                                                                                                                                              • Silently monitor interactions directed to destination sites

                                                                                                                                                                                                              • Create agent accounts and other contact center resources

                                                                                                                                                                                                              • Create and edit scheduled contact routing strategies and team capacity strategies to control contact treatment and distribution

                                                                                                                                                                                                              In addition, the Webex Contact Center Management Portal landing page displays graphs of real-time and historical call activity and current agent status.

                                                                                                                                                                                                              Your assigned user profile determines your access to Webex Contact Center modules and functionality.

                                                                                                                                                                                                              For information about how to access and work with the Webex Contact Center Management Portal, see Supported Browsers for Management Portal.

                                                                                                                                                                                                              Webex Contact Center Modules

                                                                                                                                                                                                              After you sign in to the Management Portal, click the module on the navigation bar that you want to access. If the navigation bar is collapsed, click the navigation button on the top-left corner of the Management Portal landing page to expand it. If you can't see a module in your interface, then either you don’t have the appropriate permissions to access the module, or it’s an optional module that your enterprise doesn’t have license to.

                                                                                                                                                                                                              The following table describes the modules that authorized users can access through the Webex Contact Center Management Portal.

                                                                                                                                                                                                              Module

                                                                                                                                                                                                              Description

                                                                                                                                                                                                              Provisioning

                                                                                                                                                                                                              Allows authorized users to create, view, and edit the settings that are provisioned for the enterprise. The module provides access to the Audit Trail, Agent Skills Report, Provisioned Items Report, and Provisioned Skills Report.

                                                                                                                                                                                                              Reporting and Analytics

                                                                                                                                                                                                              Allows authorized users to segment, profile, and visualize the data in contact center systems. The module also helps to identify the key variables that impact productivity and desired business outcomes. For more information, see Webex Contact Center Analyzer User Guide.

                                                                                                                                                                                                              Business Rules

                                                                                                                                                                                                              Allows authorized users of the Analyzer module to incorporate customer data into the Webex Contact Center environment for custom routing.

                                                                                                                                                                                                              Agent Desktop

                                                                                                                                                                                                              Allows authorized users to access the Desktop interface for handling customer contacts and supervisor capabilities. For more information, see all the articles related to Agent Desktop and Supervisor Desktop.

                                                                                                                                                                                                              Routing Strategy

                                                                                                                                                                                                              Provides a web-based user interface to manage and configure contact handling strategies. Authorized users can create and schedule global routing and team capacity strategies, and alter them in real time in response to changes in business dynamics. For more information, see Contact Routing.

                                                                                                                                                                                                              Web Callback Request Report

                                                                                                                                                                                                              Allows authorized users to view information about Web callback requests. For more information, see View a Web Callback Request Report.

                                                                                                                                                                                                              Call Monitoring

                                                                                                                                                                                                              Allows authorized users to silently monitor the quality of service being delivered across their multisource contact centers. The power of the Webex Contact Center service lies in the unique ability to monitor any call across any site. Through a simplified web interface, users can select the queue, team, site, or agent that they want to silently monitor. Authorized users can provide instructions to the monitored agent without being heard by the caller, and can join a call being monitored and participate in the conversation. For more information, see Monitor Calls.

                                                                                                                                                                                                              Call Recording

                                                                                                                                                                                                              Optional module that allows authorized users to record calls.

                                                                                                                                                                                                              Recording Management

                                                                                                                                                                                                              Optional module that allows authorized users to search for and play calls recorded through the Webex Contact Center Call Recording feature. For more information, see Recording Management.

                                                                                                                                                                                                              Audit Trail

                                                                                                                                                                                                              Allows authorized users to view details about provisioning changes made for their enterprise and export the data to a data analysis tool, such as Microsoft Excel. For more information, see Access Audit Trail Reports.

                                                                                                                                                                                                              Release Notes

                                                                                                                                                                                                              Allows authorized users to view and download release notes. For more information, see Access Release Notes.

                                                                                                                                                                                                              About Time Zones

                                                                                                                                                                                                              All dates and times displayed on the Webex Contact Center Management Portal and in the Webex Contact Center modules reflect the time zone that is provisioned for the enterprise with the following exceptions:

                                                                                                                                                                                                              • Dates and times displayed on the main pages of the Real-Time Reports and Call Monitoring modules reflect the browser time.

                                                                                                                                                                                                              • Time values in routing strategies are based on the time zone that is provisioned for the entry point or queue. If no time zone is specified, the time zone is provisioned for the enterprise.

                                                                                                                                                                                                              Dates are converted to UTC time when they are saved to the database, so the system behavior, such as time-of-day routing, is applied universally across the multi-site contact center network, regardless of which time zones the sites are located in. The system filters the historical reports based on the enterprise time zone.

                                                                                                                                                                                                              To specify a different time zone for displaying the time values in routing strategies, see View routing strategies by time zone.

                                                                                                                                                                                                              When you edit a tenant time zone, you must relogin to see the changes.

                                                                                                                                                                                                              PCI compliance

                                                                                                                                                                                                              Webex Contact Center is fully Payment Card Industry (PCI) compliant to protect customer organizations from data loss while using voice and digital channels. We protect and secure PCI data and related information in strict adherence to the Payment Card Industry Data Security Standard (PCI DSS). This compliance enables you to:

                                                                                                                                                                                                              • Prevent logging and storing of any sensitive information that is related to PCI data.

                                                                                                                                                                                                              • Mask and encrypt customer sensitive information such as debit or credit card details.

                                                                                                                                                                                                              • Drop attachments if PCI data is detected.

                                                                                                                                                                                                              • Restrict attachments in the email and chat services if it contains cardholder information.

                                                                                                                                                                                                              • Allow administrators to configure either to reject or drop the email or chat content if it has PCI data in the email subject line or email or chat body.

                                                                                                                                                                                                              For more information, see Webex Contact Center Privacy Data Sheet from Cisco Trust Portal.

                                                                                                                                                                                                              In Webex Contact Center, PCI is enabled by default. To know more about the file types that are supported across all digital channels for regular attachments, see Supported attachment types for digital channels in Webex Contact Center.

                                                                                                                                                                                                              Embedded images aren’t supported in attachments.

                                                                                                                                                                                                              Get Started with Webex Contact Center

                                                                                                                                                                                                              This chapter describes the tasks that you need to do the first time you login to the Webex Contact Center .

                                                                                                                                                                                                              System Requirements

                                                                                                                                                                                                              This section details system requirements for various contact center applications.

                                                                                                                                                                                                              Supported Browsers for Management Portal

                                                                                                                                                                                                              The following table lists the supported operating systems and browsers for various client devices to access the Webex Contact Center Management Portal:

                                                                                                                                                                                                              Browser

                                                                                                                                                                                                              Microsoft Windows 10

                                                                                                                                                                                                              Microsoft Windows 11

                                                                                                                                                                                                              Mac OS X

                                                                                                                                                                                                              Chromebook

                                                                                                                                                                                                              Google Chrome

                                                                                                                                                                                                              76.0.3809

                                                                                                                                                                                                              103.0.5060.114

                                                                                                                                                                                                              76.0.3809 or higher

                                                                                                                                                                                                              76.0.3809 or higher

                                                                                                                                                                                                              Mozilla Firefox

                                                                                                                                                                                                              ESR 68 or higher ESRs

                                                                                                                                                                                                              ESR V102.0 or higher ESRs

                                                                                                                                                                                                              ESR 68 and higher ESRs

                                                                                                                                                                                                              NA

                                                                                                                                                                                                              Microsoft Edge

                                                                                                                                                                                                              42.17134 or higher

                                                                                                                                                                                                              103.0.1264.44 or higher

                                                                                                                                                                                                              NA

                                                                                                                                                                                                              NA

                                                                                                                                                                                                              Chromium

                                                                                                                                                                                                              NA

                                                                                                                                                                                                              NA

                                                                                                                                                                                                              NA

                                                                                                                                                                                                              79 or higher

                                                                                                                                                                                                              Domain Access Required for Desktop

                                                                                                                                                                                                              To ensure that the Desktop responds as expected on your network, add the following domains to the Firewall/VPN (Virtual Private Network) allowed list:

                                                                                                                                                                                                              An * shown at the beginning of a URL (e.g., *.webex.com) indicates that services in the top level domain and all subdomains must be accessible.

                                                                                                                                                                                                              Domain / URLDescription
                                                                                                                                                                                                              Webex Contact Center Services URLs

                                                                                                                                                                                                              cdn.jsdelivr.net

                                                                                                                                                                                                              cdnjs.cloudflare.com

                                                                                                                                                                                                              unpkg.com:443

                                                                                                                                                                                                              jquery.com:443

                                                                                                                                                                                                              *.jquery.com:443

                                                                                                                                                                                                              *.broadcloudpbx.net:443

                                                                                                                                                                                                              Content Delivery Network (CDN) services to efficiently deliver static files.

                                                                                                                                                                                                              *.cisco.com:443

                                                                                                                                                                                                              *.ciscoccservice.com:443

                                                                                                                                                                                                              ciscoccservice.com:443

                                                                                                                                                                                                              Contact Center micro-services.

                                                                                                                                                                                                              *.ciscospark.com:443

                                                                                                                                                                                                              *.wbx2.com:443

                                                                                                                                                                                                              *.webex.com:443

                                                                                                                                                                                                              Webex micro-services.

                                                                                                                                                                                                              Additional services related to Webex Contact Center—Third Party domains

                                                                                                                                                                                                              *.cloudcherry.com:443

                                                                                                                                                                                                              cloudcherry.com:443

                                                                                                                                                                                                              Webex Experience Management platform (Formerly known as Cloud Cherry).

                                                                                                                                                                                                              *.imiengage.io:443

                                                                                                                                                                                                              imiengage.io:443

                                                                                                                                                                                                              Digital channels.

                                                                                                                                                                                                              *.mixpanel.com:443

                                                                                                                                                                                                              mixpanel.com:443

                                                                                                                                                                                                              *.split.io:443

                                                                                                                                                                                                              *.lr-ingest.com:443

                                                                                                                                                                                                              *.pendo.io:443

                                                                                                                                                                                                              Performance tracking, error and crash capture, and session metrics.

                                                                                                                                                                                                              System Limits in Webex Contact Center

                                                                                                                                                                                                              This section on system limits contains all the configurations and visualization limits that apply to the Webex Contact Center Management Portal.

                                                                                                                                                                                                              The table lists the maximum system limits for configuration object types and configuration object attributes. For details of attributes within each entity, see Provisioning. Some values of system limits may vary based on specific platforms. The Service Details section on your Control Hub organization will show the voice channel service as Classic or Next Generation.

                                                                                                                                                                                                              Table 1. Maximum System Limits for Configuration Object Types and Attributes

                                                                                                                                                                                                              Configuration Object Type

                                                                                                                                                                                                              Configuration Object Attribute

                                                                                                                                                                                                              Maximum Allowed Limit for Tenants based on Classic

                                                                                                                                                                                                              Maximum Allowed Limit for Tenants based on Next Generation

                                                                                                                                                                                                              Sites

                                                                                                                                                                                                              Active

                                                                                                                                                                                                              150

                                                                                                                                                                                                              300

                                                                                                                                                                                                              Sites

                                                                                                                                                                                                              Inactive

                                                                                                                                                                                                              100

                                                                                                                                                                                                              100

                                                                                                                                                                                                              Teams

                                                                                                                                                                                                              Agent based

                                                                                                                                                                                                              750

                                                                                                                                                                                                              3000

                                                                                                                                                                                                              Teams

                                                                                                                                                                                                              Agent based - Users

                                                                                                                                                                                                              100

                                                                                                                                                                                                              100

                                                                                                                                                                                                              Teams

                                                                                                                                                                                                              Agent based - Inactive Users

                                                                                                                                                                                                              50

                                                                                                                                                                                                              100

                                                                                                                                                                                                              Teams

                                                                                                                                                                                                              Capacity based

                                                                                                                                                                                                              40

                                                                                                                                                                                                              40

                                                                                                                                                                                                              Teams

                                                                                                                                                                                                              Capacity based - Active

                                                                                                                                                                                                              100

                                                                                                                                                                                                              100

                                                                                                                                                                                                              Teams

                                                                                                                                                                                                              Capacity based - Inactive

                                                                                                                                                                                                              100

                                                                                                                                                                                                              100

                                                                                                                                                                                                              Auxiliary code

                                                                                                                                                                                                              Idle

                                                                                                                                                                                                              1000

                                                                                                                                                                                                              1000

                                                                                                                                                                                                              Auxiliary codes

                                                                                                                                                                                                              Wrapup

                                                                                                                                                                                                              1000

                                                                                                                                                                                                              1000

                                                                                                                                                                                                              Work type

                                                                                                                                                                                                              Idle

                                                                                                                                                                                                              1000

                                                                                                                                                                                                              1000

                                                                                                                                                                                                              Work type

                                                                                                                                                                                                              Wrapup

                                                                                                                                                                                                              1000

                                                                                                                                                                                                              1000

                                                                                                                                                                                                              Auxiliary Codes

                                                                                                                                                                                                              Idle - Inactive

                                                                                                                                                                                                              100

                                                                                                                                                                                                              100

                                                                                                                                                                                                              Auxiliary Codes

                                                                                                                                                                                                              Wrapup - Inactive

                                                                                                                                                                                                              100

                                                                                                                                                                                                              100

                                                                                                                                                                                                              Work type

                                                                                                                                                                                                              Idle - Inactive

                                                                                                                                                                                                              100

                                                                                                                                                                                                              100

                                                                                                                                                                                                              Work type

                                                                                                                                                                                                              Wrapup - Inactive

                                                                                                                                                                                                              100

                                                                                                                                                                                                              100

                                                                                                                                                                                                              Entry points

                                                                                                                                                                                                              Active

                                                                                                                                                                                                              1000

                                                                                                                                                                                                              6000

                                                                                                                                                                                                              Entry points

                                                                                                                                                                                                              Inactive

                                                                                                                                                                                                              100

                                                                                                                                                                                                              100

                                                                                                                                                                                                              Oudial entry points

                                                                                                                                                                                                              Active

                                                                                                                                                                                                              500

                                                                                                                                                                                                              1000

                                                                                                                                                                                                              Oudial entry points

                                                                                                                                                                                                              Inactive

                                                                                                                                                                                                              100

                                                                                                                                                                                                              100

                                                                                                                                                                                                              Users

                                                                                                                                                                                                              Active

                                                                                                                                                                                                              7500

                                                                                                                                                                                                              20000

                                                                                                                                                                                                              Users

                                                                                                                                                                                                              Inactive

                                                                                                                                                                                                              5000

                                                                                                                                                                                                              5000

                                                                                                                                                                                                              Users

                                                                                                                                                                                                              Agents

                                                                                                                                                                                                              2500

                                                                                                                                                                                                              5000

                                                                                                                                                                                                              Users

                                                                                                                                                                                                              Supervisors

                                                                                                                                                                                                              750

                                                                                                                                                                                                              3000

                                                                                                                                                                                                              Users

                                                                                                                                                                                                              Teams

                                                                                                                                                                                                              50

                                                                                                                                                                                                              50

                                                                                                                                                                                                              Multimedia profiles

                                                                                                                                                                                                              Active

                                                                                                                                                                                                              100

                                                                                                                                                                                                              150

                                                                                                                                                                                                              Multimedia profiles

                                                                                                                                                                                                              Inactive

                                                                                                                                                                                                              100

                                                                                                                                                                                                              100

                                                                                                                                                                                                              Desktop layouts

                                                                                                                                                                                                              Active

                                                                                                                                                                                                              100

                                                                                                                                                                                                              200

                                                                                                                                                                                                              Desktop layouts

                                                                                                                                                                                                              Inactive

                                                                                                                                                                                                              100

                                                                                                                                                                                                              100

                                                                                                                                                                                                              Skills

                                                                                                                                                                                                              Active

                                                                                                                                                                                                              1000

                                                                                                                                                                                                              1000

                                                                                                                                                                                                              Skills

                                                                                                                                                                                                              Inactive

                                                                                                                                                                                                              1000

                                                                                                                                                                                                              1000

                                                                                                                                                                                                              Skills

                                                                                                                                                                                                              Text

                                                                                                                                                                                                              200

                                                                                                                                                                                                              200

                                                                                                                                                                                                              Skills

                                                                                                                                                                                                              Text length

                                                                                                                                                                                                              50

                                                                                                                                                                                                              50

                                                                                                                                                                                                              Skills

                                                                                                                                                                                                              Enum limits

                                                                                                                                                                                                              200

                                                                                                                                                                                                              200

                                                                                                                                                                                                              Skills

                                                                                                                                                                                                              Enum length

                                                                                                                                                                                                              50

                                                                                                                                                                                                              50

                                                                                                                                                                                                              Skill profiles

                                                                                                                                                                                                              9000

                                                                                                                                                                                                              9000

                                                                                                                                                                                                              Skill profiles

                                                                                                                                                                                                              Skills

                                                                                                                                                                                                              50

                                                                                                                                                                                                              50

                                                                                                                                                                                                              Global variables

                                                                                                                                                                                                              Active

                                                                                                                                                                                                              5000

                                                                                                                                                                                                              5000

                                                                                                                                                                                                              Global variables

                                                                                                                                                                                                              Inactive

                                                                                                                                                                                                              100

                                                                                                                                                                                                              100

                                                                                                                                                                                                              Threshold rule

                                                                                                                                                                                                              Active

                                                                                                                                                                                                              500

                                                                                                                                                                                                              1000

                                                                                                                                                                                                              Threshold rule

                                                                                                                                                                                                              Inactive

                                                                                                                                                                                                              100

                                                                                                                                                                                                              100

                                                                                                                                                                                                              Desktop profiles

                                                                                                                                                                                                              Active

                                                                                                                                                                                                              300

                                                                                                                                                                                                              1500

                                                                                                                                                                                                              Desktop profiles

                                                                                                                                                                                                              Inactive

                                                                                                                                                                                                              100

                                                                                                                                                                                                              100

                                                                                                                                                                                                              Desktop profiles

                                                                                                                                                                                                              Maximum autowrapup timeout

                                                                                                                                                                                                              600000 miliseconds

                                                                                                                                                                                                              600000 miliseconds

                                                                                                                                                                                                              Desktop profiles

                                                                                                                                                                                                              Auxiliary codes - wrapup codes

                                                                                                                                                                                                              50

                                                                                                                                                                                                              50

                                                                                                                                                                                                              Desktop profiles

                                                                                                                                                                                                              Auxiliary codes - idle codes

                                                                                                                                                                                                              50

                                                                                                                                                                                                              50

                                                                                                                                                                                                              Desktop profiles

                                                                                                                                                                                                              Transfer targets

                                                                                                                                                                                                              150

                                                                                                                                                                                                              150

                                                                                                                                                                                                              Desktop profiles

                                                                                                                                                                                                              Buddy teams

                                                                                                                                                                                                              150

                                                                                                                                                                                                              150

                                                                                                                                                                                                              Desktop profiles

                                                                                                                                                                                                              Dial plans

                                                                                                                                                                                                              10

                                                                                                                                                                                                              10

                                                                                                                                                                                                              Desktop profiles

                                                                                                                                                                                                              Agent Dial number validation criteria

                                                                                                                                                                                                              10

                                                                                                                                                                                                              10

                                                                                                                                                                                                              Desktop profiles

                                                                                                                                                                                                              Viewable statistics queues

                                                                                                                                                                                                              100

                                                                                                                                                                                                              100

                                                                                                                                                                                                              Desktop profiles

                                                                                                                                                                                                              Viewable statistics teams

                                                                                                                                                                                                              100

                                                                                                                                                                                                              100

                                                                                                                                                                                                              User profiles

                                                                                                                                                                                                              Active

                                                                                                                                                                                                              750

                                                                                                                                                                                                              1500

                                                                                                                                                                                                              User profiles

                                                                                                                                                                                                              Inactive

                                                                                                                                                                                                              100

                                                                                                                                                                                                              100

                                                                                                                                                                                                              User profiles

                                                                                                                                                                                                              Access rights - sites

                                                                                                                                                                                                              20

                                                                                                                                                                                                              20

                                                                                                                                                                                                              User profiles

                                                                                                                                                                                                              Access rights - teams

                                                                                                                                                                                                              100

                                                                                                                                                                                                              100

                                                                                                                                                                                                              User profiles

                                                                                                                                                                                                              Access rights - entry points

                                                                                                                                                                                                              50

                                                                                                                                                                                                              50

                                                                                                                                                                                                              User profiles

                                                                                                                                                                                                              Access rights - queues

                                                                                                                                                                                                              250

                                                                                                                                                                                                              250

                                                                                                                                                                                                              Routing Strategy

                                                                                                                                                                                                              Global

                                                                                                                                                                                                              100

                                                                                                                                                                                                              200

                                                                                                                                                                                                              Routing Strategy

                                                                                                                                                                                                              Global entry points

                                                                                                                                                                                                              500

                                                                                                                                                                                                              500

                                                                                                                                                                                                              Routing Strategy

                                                                                                                                                                                                              Per entry point

                                                                                                                                                                                                              20

                                                                                                                                                                                                              20

                                                                                                                                                                                                              Dialled numbers

                                                                                                                                                                                                              Entry Point

                                                                                                                                                                                                              15000

                                                                                                                                                                                                              15000

                                                                                                                                                                                                              Dialled numbers

                                                                                                                                                                                                              Per entry point

                                                                                                                                                                                                              100

                                                                                                                                                                                                              500

                                                                                                                                                                                                              Contact service queue

                                                                                                                                                                                                              Inbound

                                                                                                                                                                                                              5000

                                                                                                                                                                                                              11000

                                                                                                                                                                                                              Contact service queue

                                                                                                                                                                                                              Inbound - inactive

                                                                                                                                                                                                              100

                                                                                                                                                                                                              100

                                                                                                                                                                                                              Contact service queue

                                                                                                                                                                                                              Outbound

                                                                                                                                                                                                              2500

                                                                                                                                                                                                              5000

                                                                                                                                                                                                              Contact service queue

                                                                                                                                                                                                              Outbound - Inactive

                                                                                                                                                                                                              100

                                                                                                                                                                                                              100

                                                                                                                                                                                                              Contact service queue

                                                                                                                                                                                                              Distribution groups

                                                                                                                                                                                                              20

                                                                                                                                                                                                              20

                                                                                                                                                                                                              Contact service queue

                                                                                                                                                                                                              Distribution groups - teams

                                                                                                                                                                                                              50

                                                                                                                                                                                                              50

                                                                                                                                                                                                              Contact service queue

                                                                                                                                                                                                              Distribution groups - total teams

                                                                                                                                                                                                              250

                                                                                                                                                                                                              250

                                                                                                                                                                                                              Contact service queue

                                                                                                                                                                                                              Service level threshold - telephony

                                                                                                                                                                                                              86400 seconds

                                                                                                                                                                                                              86400 seconds

                                                                                                                                                                                                              Contact service queue

                                                                                                                                                                                                              Service level threshold - chat

                                                                                                                                                                                                              86400 seconds

                                                                                                                                                                                                              86400 seconds

                                                                                                                                                                                                              Contact service queue

                                                                                                                                                                                                              Service level threshold - digital

                                                                                                                                                                                                              604800 seconds

                                                                                                                                                                                                              604800 seconds

                                                                                                                                                                                                              Contact service queue

                                                                                                                                                                                                              Service level threshold - email

                                                                                                                                                                                                              1209600 seconds

                                                                                                                                                                                                              1209600 seconds

                                                                                                                                                                                                              Contact service queue

                                                                                                                                                                                                              Maximum time in queue - telephony

                                                                                                                                                                                                              86400 seconds

                                                                                                                                                                                                              86400 seconds

                                                                                                                                                                                                              Contact service queue

                                                                                                                                                                                                              Maximum time in queue - chats

                                                                                                                                                                                                              86400 seconds

                                                                                                                                                                                                              86400 seconds

                                                                                                                                                                                                              Contact service queue

                                                                                                                                                                                                              Maximum time in queue - digital

                                                                                                                                                                                                              604800 seconds

                                                                                                                                                                                                              604800 seconds

                                                                                                                                                                                                              Contact service queue

                                                                                                                                                                                                              Maximum time in queue - email

                                                                                                                                                                                                              1209600 seconds

                                                                                                                                                                                                              1209600 seconds

                                                                                                                                                                                                              Call recording schedule

                                                                                                                                                                                                              Per queue

                                                                                                                                                                                                              20

                                                                                                                                                                                                              20

                                                                                                                                                                                                              Call monitoring Schedule

                                                                                                                                                                                                              1000

                                                                                                                                                                                                              2000

                                                                                                                                                                                                              Call monitoring Schedule

                                                                                                                                                                                                              Queues

                                                                                                                                                                                                              250

                                                                                                                                                                                                              250

                                                                                                                                                                                                              Call monitoring Schedule

                                                                                                                                                                                                              Sites

                                                                                                                                                                                                              20

                                                                                                                                                                                                              20

                                                                                                                                                                                                              Call monitoring Schedule

                                                                                                                                                                                                              Teams

                                                                                                                                                                                                              100

                                                                                                                                                                                                              100

                                                                                                                                                                                                              Call monitoring Schedule

                                                                                                                                                                                                              Agents

                                                                                                                                                                                                              500

                                                                                                                                                                                                              500

                                                                                                                                                                                                              Call recording Schedule

                                                                                                                                                                                                              Sites

                                                                                                                                                                                                              20

                                                                                                                                                                                                              20

                                                                                                                                                                                                              Call recording Schedule

                                                                                                                                                                                                              Teams

                                                                                                                                                                                                              100

                                                                                                                                                                                                              100

                                                                                                                                                                                                              Call recording Schedule

                                                                                                                                                                                                              Agents

                                                                                                                                                                                                              500

                                                                                                                                                                                                              500

                                                                                                                                                                                                              Address Book

                                                                                                                                                                                                              3000

                                                                                                                                                                                                              3000

                                                                                                                                                                                                              Address Book

                                                                                                                                                                                                              Entries

                                                                                                                                                                                                              6000

                                                                                                                                                                                                              6000

                                                                                                                                                                                                              Address Book

                                                                                                                                                                                                              Total entries

                                                                                                                                                                                                              100000

                                                                                                                                                                                                              100000

                                                                                                                                                                                                              Outdial ANI

                                                                                                                                                                                                              300

                                                                                                                                                                                                              400

                                                                                                                                                                                                              Outdial ANI

                                                                                                                                                                                                              Entry

                                                                                                                                                                                                              500

                                                                                                                                                                                                              200

                                                                                                                                                                                                              Outdial ANI

                                                                                                                                                                                                              Total entries

                                                                                                                                                                                                              2000

                                                                                                                                                                                                              2000

                                                                                                                                                                                                              Audio file

                                                                                                                                                                                                              17250

                                                                                                                                                                                                              17250

                                                                                                                                                                                                              Audio file

                                                                                                                                                                                                              Size in bytes

                                                                                                                                                                                                              5242880

                                                                                                                                                                                                              5242880

                                                                                                                                                                                                              Audio file

                                                                                                                                                                                                              Total size in bytes

                                                                                                                                                                                                              2097152000

                                                                                                                                                                                                              2097152000

                                                                                                                                                                                                              Call monitoring

                                                                                                                                                                                                              Dashboard - queues

                                                                                                                                                                                                              250

                                                                                                                                                                                                              250

                                                                                                                                                                                                              Call monitoring

                                                                                                                                                                                                              Dashboard - sites

                                                                                                                                                                                                              20

                                                                                                                                                                                                              20

                                                                                                                                                                                                              Call monitoring

                                                                                                                                                                                                              Dashboard - teams

                                                                                                                                                                                                              100

                                                                                                                                                                                                              100

                                                                                                                                                                                                              Call monitoring

                                                                                                                                                                                                              Dashboard - agents

                                                                                                                                                                                                              500

                                                                                                                                                                                                              500

                                                                                                                                                                                                              Recording management

                                                                                                                                                                                                              Queues

                                                                                                                                                                                                              250

                                                                                                                                                                                                              250

                                                                                                                                                                                                              Recording management

                                                                                                                                                                                                              Sites

                                                                                                                                                                                                              20

                                                                                                                                                                                                              20

                                                                                                                                                                                                              Recording management

                                                                                                                                                                                                              Teams

                                                                                                                                                                                                              100

                                                                                                                                                                                                              100

                                                                                                                                                                                                              Recording management

                                                                                                                                                                                                              Agents

                                                                                                                                                                                                              500

                                                                                                                                                                                                              500

                                                                                                                                                                                                              Recording management

                                                                                                                                                                                                              Wrapup codes

                                                                                                                                                                                                              50

                                                                                                                                                                                                              50

                                                                                                                                                                                                              Recording management

                                                                                                                                                                                                              Tags

                                                                                                                                                                                                              50

                                                                                                                                                                                                              50

                                                                                                                                                                                                              Call monitoring

                                                                                                                                                                                                              Maximum concurrent sessions

                                                                                                                                                                                                              500

                                                                                                                                                                                                              500

                                                                                                                                                                                                              Maximum concurrent supervisor sessions

                                                                                                                                                                                                              Maximum concurrent supervisor sessions

                                                                                                                                                                                                              500

                                                                                                                                                                                                              500

                                                                                                                                                                                                              Business Hours

                                                                                                                                                                                                              5000

                                                                                                                                                                                                              5000

                                                                                                                                                                                                              Overrides

                                                                                                                                                                                                              Overrides

                                                                                                                                                                                                              5000

                                                                                                                                                                                                              5000

                                                                                                                                                                                                              Holiday list

                                                                                                                                                                                                              5000

                                                                                                                                                                                                              5000

                                                                                                                                                                                                              Business Hours

                                                                                                                                                                                                              Working hours

                                                                                                                                                                                                              50

                                                                                                                                                                                                              50

                                                                                                                                                                                                              Overrides

                                                                                                                                                                                                              Overrides

                                                                                                                                                                                                              100

                                                                                                                                                                                                              100

                                                                                                                                                                                                              Holiday list

                                                                                                                                                                                                              150

                                                                                                                                                                                                              150

                                                                                                                                                                                                              Number of Connectors

                                                                                                                                                                                                              Per connector Type

                                                                                                                                                                                                              30

                                                                                                                                                                                                              CCAI Config

                                                                                                                                                                                                              100

                                                                                                                                                                                                              The table lists the system limits for visualization of filters on the UI of the Management Portal for recording management, call recording and call monitoring schedules features:

                                                                                                                                                                                                              Table 2. Maximum System Limits for Filters

                                                                                                                                                                                                              Application/Feature

                                                                                                                                                                                                              Object Types with Filters

                                                                                                                                                                                                              Description

                                                                                                                                                                                                              Maximum Allowed Limit

                                                                                                                                                                                                              Recording Management

                                                                                                                                                                                                              Queues

                                                                                                                                                                                                              The maximum number of filters for queues.

                                                                                                                                                                                                              250

                                                                                                                                                                                                              Sites

                                                                                                                                                                                                              The maximum number of filters for sites.

                                                                                                                                                                                                              20

                                                                                                                                                                                                              Teams

                                                                                                                                                                                                              The maximum number of filters for teams.

                                                                                                                                                                                                              100

                                                                                                                                                                                                              Agents

                                                                                                                                                                                                              The maximum number of filters for agents.

                                                                                                                                                                                                              500

                                                                                                                                                                                                              Wrap-Up Codes

                                                                                                                                                                                                              The maximum number of filters for wrap-up codes.

                                                                                                                                                                                                              50

                                                                                                                                                                                                              Tags

                                                                                                                                                                                                              The maximum number of filters for tags.

                                                                                                                                                                                                              50

                                                                                                                                                                                                              Call Recording Schedules

                                                                                                                                                                                                              Sites

                                                                                                                                                                                                              The maximum number of filters for sites.

                                                                                                                                                                                                              20

                                                                                                                                                                                                              Teams

                                                                                                                                                                                                              The maximum number of filters for teams.

                                                                                                                                                                                                              100

                                                                                                                                                                                                              Agents

                                                                                                                                                                                                              The maximum number of filters for agents.

                                                                                                                                                                                                              500

                                                                                                                                                                                                              Call Monitoring Dashboard

                                                                                                                                                                                                              Queues

                                                                                                                                                                                                              The maximum number of filters for queues.

                                                                                                                                                                                                              250

                                                                                                                                                                                                              Sites

                                                                                                                                                                                                              The maximum number of filters for sites.

                                                                                                                                                                                                              20

                                                                                                                                                                                                              Teams

                                                                                                                                                                                                              The maximum number of filters for teams.

                                                                                                                                                                                                              100

                                                                                                                                                                                                              Agents

                                                                                                                                                                                                              The maximum number of filters for agents.

                                                                                                                                                                                                              500

                                                                                                                                                                                                              Call Monitoring Schedules

                                                                                                                                                                                                              Queues

                                                                                                                                                                                                              The maximum number of filters for queues.

                                                                                                                                                                                                              250

                                                                                                                                                                                                              Sites

                                                                                                                                                                                                              The maximum number of filters for sites.

                                                                                                                                                                                                              20

                                                                                                                                                                                                              Teams

                                                                                                                                                                                                              The maximum number of filters for teams.

                                                                                                                                                                                                              100

                                                                                                                                                                                                              Agents

                                                                                                                                                                                                              The maximum number of filters for agents.

                                                                                                                                                                                                              500

                                                                                                                                                                                                              The listed entities have a maximum limit on the number of characters that can be used for the Name field.

                                                                                                                                                                                                              • Entry Point

                                                                                                                                                                                                              • Queue

                                                                                                                                                                                                              • Outdial Entry Point

                                                                                                                                                                                                              • Outdial Queue

                                                                                                                                                                                                              • Site

                                                                                                                                                                                                              • Team

                                                                                                                                                                                                              • Users

                                                                                                                                                                                                              • User Profiles

                                                                                                                                                                                                              • Work Types

                                                                                                                                                                                                              • Auxilary Code

                                                                                                                                                                                                              • Desktop Profiles

                                                                                                                                                                                                              • Address Book

                                                                                                                                                                                                              • Outdial ANI

                                                                                                                                                                                                              • Skills Definition

                                                                                                                                                                                                              • Skill Profile

                                                                                                                                                                                                              • Entry Point Mappings

                                                                                                                                                                                                              • Audio Files

                                                                                                                                                                                                              The Name cannot exceed 80 characters. It can contain alphanumeric characters, underscores, and hyphens.

                                                                                                                                                                                                              The table lists the supported configuration limits for routing and queuing. Active limits are the operable limits for configurations to work optimally. Maximum limits are the threshold limits for configurations to work at maximum capacity. We recommend that you use configuration values that are within the parameters mentioned in the Maximum Limits column of this table.

                                                                                                                                                                                                              Table 3. Active and maximum configuration limits

                                                                                                                                                                                                              Configurations

                                                                                                                                                                                                              Active Limits

                                                                                                                                                                                                              Maximum Limits

                                                                                                                                                                                                              Maximum number of agents for a team

                                                                                                                                                                                                              50

                                                                                                                                                                                                              100

                                                                                                                                                                                                              Maximum number of teams for a Call Distribution Group

                                                                                                                                                                                                              50

                                                                                                                                                                                                              50

                                                                                                                                                                                                              Maximum Call Distribution Groups in a queue

                                                                                                                                                                                                              20

                                                                                                                                                                                                              20

                                                                                                                                                                                                              Maximum number of teams in a queue, across all Call Distribution Groups

                                                                                                                                                                                                              250

                                                                                                                                                                                                              250

                                                                                                                                                                                                              Maximum number of agents for a queue (maximum agents in a team x maximum teams for a Call Distribution Group x maximum Call Distribution Groups in the queue)

                                                                                                                                                                                                              500

                                                                                                                                                                                                              NA

                                                                                                                                                                                                              Maximum time in a queue (voice)

                                                                                                                                                                                                              1 day

                                                                                                                                                                                                              1 day

                                                                                                                                                                                                              Maximum skills for a skill profile

                                                                                                                                                                                                              50

                                                                                                                                                                                                              50

                                                                                                                                                                                                              Maximum number for a Capacity-Based Team

                                                                                                                                                                                                              100

                                                                                                                                                                                                              100

                                                                                                                                                                                                              Maximum Capacity-Based Teams for an organization

                                                                                                                                                                                                              20

                                                                                                                                                                                                              40

                                                                                                                                                                                                              Maximum number of concurrent calls for Capacity-Based Teams (maximum number for a Capacity-Based Team x maximum number of Capacity-Based Teams for an organization)

                                                                                                                                                                                                              2000

                                                                                                                                                                                                              NA

                                                                                                                                                                                                              Maximum skill requirements for a contact

                                                                                                                                                                                                              10

                                                                                                                                                                                                              10

                                                                                                                                                                                                              Maximum number of queues for an organization

                                                                                                                                                                                                              1000

                                                                                                                                                                                                              2000

                                                                                                                                                                                                              Maximum number of concurrent calls for call monitoring

                                                                                                                                                                                                              500

                                                                                                                                                                                                              NA

                                                                                                                                                                                                              Maximum number of agents in a campaign

                                                                                                                                                                                                              500

                                                                                                                                                                                                              500

                                                                                                                                                                                                              Maximum number of configured agents for a campaign

                                                                                                                                                                                                              NA

                                                                                                                                                                                                              NA

                                                                                                                                                                                                              Maximum number of Preview campaigns for an organization

                                                                                                                                                                                                              NA

                                                                                                                                                                                                              NA

                                                                                                                                                                                                              Maximum number of configured Preview campaigns for an organization

                                                                                                                                                                                                              NA

                                                                                                                                                                                                              NA

                                                                                                                                                                                                              Maximum number of Progressive campaigns for an organization

                                                                                                                                                                                                              100

                                                                                                                                                                                                              100

                                                                                                                                                                                                              Maximum number of configured Progressive campaigns for an organization

                                                                                                                                                                                                              NA

                                                                                                                                                                                                              NA

                                                                                                                                                                                                              Sign in to Management Portal

                                                                                                                                                                                                              Sign in to the Webex Contact Center Management Portal through a web browser with your sign in credentials. You can access the modules and functionalities that your administrator grants access to.

                                                                                                                                                                                                              To sign in to the Management Portal:

                                                                                                                                                                                                              1

                                                                                                                                                                                                              Sign in to https://admin.webex.com.

                                                                                                                                                                                                              2

                                                                                                                                                                                                              Click Services from the left pane.

                                                                                                                                                                                                              3

                                                                                                                                                                                                              On the Contact Center card, click Settings.

                                                                                                                                                                                                              4

                                                                                                                                                                                                              Under the Advance Configuration section, click the Management Portal link. You can bookmark this link and access the portal directly with this link.

                                                                                                                                                                                                              The Management Portal landing page appears. For more information, see About Management Portal Components.

                                                                                                                                                                                                              After you sign out, close all Webex Contact Center windows before you sign in again.

                                                                                                                                                                                                              About Management Portal Components

                                                                                                                                                                                                              The Webex Contact Center Management Portal landing page has multiple components that you can access based on your authorization.

                                                                                                                                                                                                              The following table describes the components of the Management Portal landing page:

                                                                                                                                                                                                              Component

                                                                                                                                                                                                              Description

                                                                                                                                                                                                              Navigation bar

                                                                                                                                                                                                              Displays the modules that you are authorized to access. For more information, see Webex Contact Center Modules

                                                                                                                                                                                                              You can see either the name of the module or, if the navigation bar is collapsed, an icon that represents the module. Hover the mouse pointer over an icon to display the module name.

                                                                                                                                                                                                              To expand or collapse the navigation bar, click the button on the upper-left side of the landing page.

                                                                                                                                                                                                              Dashboard

                                                                                                                                                                                                              Displays the number of calls that are currently in IVR, in queue, connected, and the number of currently available agents.

                                                                                                                                                                                                              The rest of this panel displays four charts. Three of them provide real-time statistics for the current call activity, interval call activity, and site-level agent activity. The fourth chart provides historical statistics.

                                                                                                                                                                                                              You can click the icon at the top of a chart to display the corresponding report in the Reporting and Analytics module window.

                                                                                                                                                                                                              To change the size of a chart, point to a corner or edge and when the mouse pointer changes to a two-headed arrow, drag the corner or edge to shrink or enlarge the chart.

                                                                                                                                                                                                              To restore the original size of resized charts, click Reset Widgets.

                                                                                                                                                                                                              Settings button

                                                                                                                                                                                                              Expands and collapses a panel where you can do the following:

                                                                                                                                                                                                              Your name button

                                                                                                                                                                                                              Displays the following options in a drop-down list:

                                                                                                                                                                                                              • Help: Opens the Management Portal online help document in a separate window.

                                                                                                                                                                                                              • Sign Out: Closes all of the open modules and signs you out of the Management Portal.

                                                                                                                                                                                                              About Dashboards

                                                                                                                                                                                                              The Webex Contact Center Management Portal landing page provides the following dashboards:

                                                                                                                                                                                                              • Entry Point - Site level Dashboard (default)

                                                                                                                                                                                                              • Contact Center Overview - Realtime

                                                                                                                                                                                                              • Contact Center Overview - Historical

                                                                                                                                                                                                              • Agent State Data - Realtime

                                                                                                                                                                                                              For detailed information about the visualizations available in each dashboard, see the section Visualization in the Cisco Webex Contact Center Analyzer User Guide.

                                                                                                                                                                                                              You can access the dashboards from the drop-down list at the top-left corner of the Dashboard tab.

                                                                                                                                                                                                              • Access to the above listed dashboards is based on access privileges configured in the User Profile settings in the management portal. For more information, see User Profiles.

                                                                                                                                                                                                              • The dashboard summary view is available to all the users who access the Management Portal.

                                                                                                                                                                                                              Entry Point - Site Level Dashboard

                                                                                                                                                                                                              Displays information about the number of contacts that are in IVR and Queues.

                                                                                                                                                                                                              • Snapshot Entry Point IVR Realtime - Chart: Indicates the number of calls that are in the IVR.

                                                                                                                                                                                                              • Entry Point Interval Realtime - Chart: Indicates the number of contacts (voice, email, and chat) per entry point in real time for a specific interval. By default, the interval is 30 minutes and the duration is from the start of the day.

                                                                                                                                                                                                              • Site Interval Realtime - Chart: Indicates the number of connected contacts (voice, email, and chat) per site in real time since the start of the day.

                                                                                                                                                                                                              • Entry Point Contact Volume - Chart: Indicates the number of connected contacts per entry point on a daily interval, for the last seven days.

                                                                                                                                                                                                              Contact Center Overview - Historical

                                                                                                                                                                                                              Displays information about contacts handled, contacts abandoned, and contacts in queues for a specified duration and time interval. You can use the Interval and Duration drop-down lists in the dashboard to filter the data based on the selected time interval and duration. To refresh the data, use the Refresh icon.

                                                                                                                                                                                                              The following information is available:

                                                                                                                                                                                                              • Average Service Level: Indicates the percentage of contacts that are handled within the configured service level for the queue.

                                                                                                                                                                                                              • Total Contacts Handled: Indicates the total number of contacts (voice, email, social, and chat) handled.

                                                                                                                                                                                                              • Total Contacts Abandoned: Indicates the total number of contacts (voice, email, social, and chat) abandoned.

                                                                                                                                                                                                              • Average Handled Time: Indicates the average time that is taken to handle a contact (voice, email, social, and chat).

                                                                                                                                                                                                              • Longest Contact in Queue: Indicates the time in queue for the contact (voice, email, social, or chat) with the longest waiting time.

                                                                                                                                                                                                              • Contact Details in Queue: Shows the details of contacts (voice, email, social, and chat) that are currently in queue.

                                                                                                                                                                                                              In addition, the Team Details - Historical dashboard displays the following information in a specified duration and time interval:

                                                                                                                                                                                                              • Teams

                                                                                                                                                                                                              • Agents in Teams

                                                                                                                                                                                                              • Agent Login

                                                                                                                                                                                                              • Contacts handled by the agents

                                                                                                                                                                                                              You can filter the data using the following filters available in the dashboard:

                                                                                                                                                                                                              • Agent Name

                                                                                                                                                                                                              • Team Name

                                                                                                                                                                                                              • Interval

                                                                                                                                                                                                              • Duration

                                                                                                                                                                                                              Agent State Data - Realtime

                                                                                                                                                                                                              As an administrator or supervisor, you can monitor the agent state data using the Agent State Data - Realtime dashboard. The dashboard displays the following information:

                                                                                                                                                                                                              • The name of the agent.

                                                                                                                                                                                                              • The site and team to which the agent is assigned.

                                                                                                                                                                                                              • The login time of the agent.

                                                                                                                                                                                                              • The most recent known state of the agent.

                                                                                                                                                                                                              • The duration for which the agent has been in the most recent state.

                                                                                                                                                                                                              • The idle code, if the agent is in the Idle state.

                                                                                                                                                                                                              The filters at the top of the dashboard enable you to display the agent state data for selected sites, teams, or agents. The list of sites, teams, or agents available in the filters depends on the teams or sites to which the administrator or supervisor has access rights. For more information, see Access Rights.

                                                                                                                                                                                                              Agent State Data - Realtime dashboard provides you the ability to sign out agents based on the agent state. The most recent agent states and descriptions are available in the following table.

                                                                                                                                                                                                              Most Recent State

                                                                                                                                                                                                              Indicates that

                                                                                                                                                                                                              Connected

                                                                                                                                                                                                              The agent is connected to at least one channel. This state includes Ringing and Wrap-Up also. An icon indicates the most recently connected channel in the State Duration field.

                                                                                                                                                                                                              Available

                                                                                                                                                                                                              The agent is available on the desktop, but hasn’t received an active contact.

                                                                                                                                                                                                              Idle

                                                                                                                                                                                                              The agent has set an Idle state. Check the Idle Code field for more information.

                                                                                                                                                                                                              An option to forcefully sign out an agent is available, if a regular sign out is not possible. The administrator or supervisor should exercise caution while forcefully signing out the agent, as the agent's current contacts are cleared.

                                                                                                                                                                                                              For Chat and Email channels, when the supervisor tries to forcefully sign out an agent from the Management Portal, the agent gets signed out; but the chat session remains open. The contact clean up functionality is not available for these channels.

                                                                                                                                                                                                              To sign out an agent, click Sign Out in the Action field. You receive a notification that the agent is successfully signed out.

                                                                                                                                                                                                              You can access the Agent State Data - Realtime dashboard only if you have View or Edit permissions to the Logout Agents module. To sign out agents, you must have Edit permissions to the module. For more information, see Module Settings.

                                                                                                                                                                                                              • The Social channel type appears in the reports if your enterprise has purchased the Social Channel add-on.

                                                                                                                                                                                                              • The Deployment Name filter appears only for Cloud Connect users.

                                                                                                                                                                                                              For more information about reports, see the Types of Records Available in Each Repository section in Webex Contact Center Analyzer User Guide.

                                                                                                                                                                                                              Change User Interface Colors

                                                                                                                                                                                                              You can set colors or skins in the selection panel and in the banner on the pages:

                                                                                                                                                                                                              1

                                                                                                                                                                                                              Click the Gears icon at the top-right corner of the Management Portal.

                                                                                                                                                                                                              2

                                                                                                                                                                                                              Click the tab displaying the Wrench icon, and select a skin.

                                                                                                                                                                                                              The colors change immediately.
                                                                                                                                                                                                              3

                                                                                                                                                                                                              (Optional) Click the Reset icon to restore the default color.

                                                                                                                                                                                                              Create a Custom Theme

                                                                                                                                                                                                              You can customize the banner color and images for the Management Portal user interface by creating a custom theme. You must have proper authorization to customize the user interface.

                                                                                                                                                                                                              To create a custom theme:

                                                                                                                                                                                                              1

                                                                                                                                                                                                              Click the Gears icon at the top-right corner of the Management Portal.

                                                                                                                                                                                                              2

                                                                                                                                                                                                              Click the tab displaying the Custom Theme icon.

                                                                                                                                                                                                              3

                                                                                                                                                                                                              In Banner Color, enter the HTML (hexadecimal) code for a color or click the small box on the right and select a color.

                                                                                                                                                                                                              4

                                                                                                                                                                                                              (Optional) Click the folder button for each listed image type, navigate to the image file in your system that you want to use, and click Open. The supported file types are PNG, JPG, JPEG, and GIF.

                                                                                                                                                                                                              5

                                                                                                                                                                                                              Click Save.

                                                                                                                                                                                                              The user interface updates with the new theme.
                                                                                                                                                                                                              6

                                                                                                                                                                                                              (Optional) Click Reset to revert your changes.

                                                                                                                                                                                                              View and Regenerate Your API Key

                                                                                                                                                                                                              To view or regenerate your API key:

                                                                                                                                                                                                              1

                                                                                                                                                                                                              Click the Gears icon at the top-right corner of the Management Portal.

                                                                                                                                                                                                              2

                                                                                                                                                                                                              Click the tab displaying the API Key icon.

                                                                                                                                                                                                              3

                                                                                                                                                                                                              (Optional) Click the link to view the API key.

                                                                                                                                                                                                              4

                                                                                                                                                                                                              Click Regenerate Key to regenerate your API key.

                                                                                                                                                                                                              Access Audit Trail Reports

                                                                                                                                                                                                              The Audit Trail page provides an interface where you can view details about the provisioning module changes to your account in last three years. However, you can fetch data for a seven-day period only. You can also download the details in a Microsoft Excel or an Adobe PDF file. Ensure that you have permission to view the reports.

                                                                                                                                                                                                              To display an audit trail report:

                                                                                                                                                                                                              1

                                                                                                                                                                                                              From the Management Portal navigation bar, choose Audit Trail.

                                                                                                                                                                                                              2

                                                                                                                                                                                                              Select the filters:

                                                                                                                                                                                                              Call Status

                                                                                                                                                                                                              Description

                                                                                                                                                                                                              Entity

                                                                                                                                                                                                              Select the entity from the drop-down. Entities are the items in the provisioning database tables.

                                                                                                                                                                                                              Action

                                                                                                                                                                                                              Select the action performed on the selected entity, such as Create, Delete, and Update.

                                                                                                                                                                                                              Time Period

                                                                                                                                                                                                              Select a date range of seven days from the calender controls.

                                                                                                                                                                                                              3

                                                                                                                                                                                                              Click Apply Filters.

                                                                                                                                                                                                              4

                                                                                                                                                                                                              (optional) Click Download PDF or Download EXCEL to download the report.

                                                                                                                                                                                                              Provisioning Webex Contact Center Resources

                                                                                                                                                                                                              Tenant Settings

                                                                                                                                                                                                              You can now access tenant settings directly from the Control Hub of newly enhanced Webex Contact Center. For more information, visit Tenant Settings help on Webex Help Center.

                                                                                                                                                                                                              If you are still accessing tenant settings through Webex Contact Center Management Portal, you can continue with the following instructions.

                                                                                                                                                                                                              You can use the Webex Contact Center Management Portal to configure the tenants that your administrator provisions for your enterprise. To view the tenant settings for your enterprise, click your enterprise name under the Provisioning module in the navigation bar.

                                                                                                                                                                                                              Click the following tabs to configure the tenant settings:

                                                                                                                                                                                                              General Settings

                                                                                                                                                                                                              The General Settings tab displays the following settings.

                                                                                                                                                                                                              In the following table, the check mark (✓) at the Tenant column indicates the settings that the authorized users of your enterprise specify. Similarly the ✓ mark in the Partner column identifies the settings that the partner administrator specifies. The ✓ in the Webex Contact Center column identifies the settings that the Webex Contact Center administrator specifies.

                                                                                                                                                                                                              To modify the settings, click Edit at the bottom of the page.

                                                                                                                                                                                                              Setting

                                                                                                                                                                                                              Description

                                                                                                                                                                                                              Tenant

                                                                                                                                                                                                              Partner

                                                                                                                                                                                                              Webex Contact Center

                                                                                                                                                                                                              Tenant Details

                                                                                                                                                                                                              Name

                                                                                                                                                                                                              The name of your enterprise.

                                                                                                                                                                                                              Description

                                                                                                                                                                                                              (Optional) The description for your enterprise.

                                                                                                                                                                                                              Time Zone

                                                                                                                                                                                                              The time zone that you provision for your enterprise. For more information, see About Time Zones.

                                                                                                                                                                                                              Status

                                                                                                                                                                                                              The status of the tenant. You cannot change the status of the tenant.

                                                                                                                                                                                                              Desktop settings

                                                                                                                                                                                                              The Desktop section displays the following settings.

                                                                                                                                                                                                              • Agent experience: Set the inactivity timeout and auto wrap-up interval.

                                                                                                                                                                                                              • Voice features: Enable or disable force default DN, end call, and end consult.

                                                                                                                                                                                                              • RONA timeouts: Configure RONA (Redirection on No Answer) timeouts for unanswered calls.

                                                                                                                                                                                                              • System settings: Set lost connection recovery timeouts.

                                                                                                                                                                                                              Manage RONA timeouts

                                                                                                                                                                                                              The contact center administrators can manage the Redirection on No Answer (RONA) timeout settings for agents and customers.

                                                                                                                                                                                                              To configure the RONA timeout settings for both inbound and outbound call scenarios:

                                                                                                                                                                                                              1

                                                                                                                                                                                                              Log in to the customer organization on Control Hub.

                                                                                                                                                                                                              2

                                                                                                                                                                                                              Navigate to Services > Contact Center > Settings > Desktop.

                                                                                                                                                                                                              3

                                                                                                                                                                                                              In the RONA timeouts section, enter the timeout values in seconds, for the channels.

                                                                                                                                                                                                              The table shows the default value and the allowed range for the RONA timeout settings.

                                                                                                                                                                                                              ChannelsDefault Value (seconds)Minimum Value (seconds)

                                                                                                                                                                                                              Maximum Value (seconds)

                                                                                                                                                                                                              Telephony (inbound and outbound)

                                                                                                                                                                                                              18

                                                                                                                                                                                                              1

                                                                                                                                                                                                              120

                                                                                                                                                                                                              Chat

                                                                                                                                                                                                              30

                                                                                                                                                                                                              1

                                                                                                                                                                                                              6000

                                                                                                                                                                                                              Email

                                                                                                                                                                                                              300

                                                                                                                                                                                                              1

                                                                                                                                                                                                              6000

                                                                                                                                                                                                              Social

                                                                                                                                                                                                              30

                                                                                                                                                                                                              1

                                                                                                                                                                                                              6000

                                                                                                                                                                                                              • For inbound call scenarios, Webex Contact Center connects the customer call to the agent session for the duration of the unanswered call. The call is then redirected to another agent or skill group. For example, if the Telephony default value is set to 18 seconds and the agent does not receive the call within the specified time, the call goes to RONA state. Webex Contact Center returns the call to the queue and re-routes it to another agent or skill group.

                                                                                                                                                                                                              • For outbound call scenarios, the configured time is inclusive of both agent and customer accepting the expected call for the specified duration. Webex Contact Center will first connect to the agent for the time specified and the remaning time will be utilized to connect to the customer. For example, if the Telephony default value is set to18 seconds and it takes 2 seconds to connect to the agent, the remaining 16 seconds will be utilized to connect to the customer. It is recommended to set an optimal time that balances both the time of the agent and the customer/devices handling the calls.

                                                                                                                                                                                                              4

                                                                                                                                                                                                              Click Save.

                                                                                                                                                                                                              Provisioning

                                                                                                                                                                                                              The Provisioning tab displays the following settings. The partner administrator and the Webex Contact Center administrator specify these settings.

                                                                                                                                                                                                              To modify the settings, click Edit at the bottom of the page.

                                                                                                                                                                                                              Setting

                                                                                                                                                                                                              Description

                                                                                                                                                                                                              System Profile

                                                                                                                                                                                                              Workforce Options

                                                                                                                                                                                                              Allows the supervisors to manage the human resources. Supervisors can proactively analyze and adjust for daily realities and make smarter decisions to manage resources to optimize service levels.

                                                                                                                                                                                                              Workforce Options enable one or more of the following Workforce Optimization options for your enterprise:

                                                                                                                                                                                                              • Quality Management

                                                                                                                                                                                                              • Workforce Management

                                                                                                                                                                                                              • WFO Analytics

                                                                                                                                                                                                              • Workforce Analytics with Transcriptions

                                                                                                                                                                                                              • Workforce Optimization Bundle

                                                                                                                                                                                                              The availability of these features depends on your license. Contact your organization administrator for more information.

                                                                                                                                                                                                              Campaign Management

                                                                                                                                                                                                              Enables the third-party software List and the Campaign Manager (LCM) module for a tenant. LCM manages the upload, selection, and rescheduling of contacts. It also provides campaign manager reports.

                                                                                                                                                                                                              The availability of this feature depends on your license. Contact your organization administrator for more information.

                                                                                                                                                                                                              Speech Enabled IVR

                                                                                                                                                                                                              If this setting is Yes, your enterprise allows customers to post questions or concerns in plain language to the system.

                                                                                                                                                                                                              The availability of this feature depends on your license. Contact your organization administrator for more information.

                                                                                                                                                                                                              Settings

                                                                                                                                                                                                              The Settings tab displays the following settings. An asterisk (*) indicates that the settings are not available to tenants with standard licenses.

                                                                                                                                                                                                              In the table below, the ✓ mark in the Tenant column indicates the settings that authorized users of your enterprise specify. Similarly, the ✓ mark in the Partner column identifies the settings that the partner administrator specifies. The ✓ in the Webex Contact Center column identifies the settings that the Webex Contact Center administrator specifies.

                                                                                                                                                                                                              To modify the settings, click Edit at the bottom of the page.

                                                                                                                                                                                                              Setting

                                                                                                                                                                                                              Description

                                                                                                                                                                                                              Tenant

                                                                                                                                                                                                              Partner

                                                                                                                                                                                                              Webex Contact Center

                                                                                                                                                                                                              Call Settings

                                                                                                                                                                                                              Short Call Threshold

                                                                                                                                                                                                              The time interval, in seconds, to determine whether the call is short or abandoned.

                                                                                                                                                                                                              Sudden Disconnect Threshold

                                                                                                                                                                                                              The time interval in seconds to determine whether the agent handles the call or the call ends. The time determines if there is an issue with the connectivity or with the behavior of the agent. You can consider a call as disconnected, if the call terminates within this time interval after it reaches a destination site.

                                                                                                                                                                                                              Default Outdial ANI

                                                                                                                                                                                                              The default dial number for the tenant to make outdial calls. The default dial number is displayed in the customer's caller ID, if an agent does not select a specific outdial ANI (Automatic Number Identification) for an outdial call.

                                                                                                                                                                                                              • To be available as the default outdial ANI, the dial number must be mapped to an entry point. For more information, see Entry Point Mappings.

                                                                                                                                                                                                              • By default, the first dial number that is mapped to an entry point is displayed as the default outdial ANI. If a dial number is not mapped to an entry point, the Default Outdial ANI field indicates Not Configured.

                                                                                                                                                                                                              To select a default outdial ANI for the tenant, click Edit at the bottom of the page. The Default Outdial ANI drop-down list contains all of the existing dial numbers that are mapped to entry points. To set a dial number as the default outdial ANI, select the dial number from the drop-down list.

                                                                                                                                                                                                              Timeout Settings

                                                                                                                                                                                                              Desktop Inactivity Timeout

                                                                                                                                                                                                              Desktop Inactivity Timeout enables you to automatically sign out an agent from the desktop after being inactive for the specified time. An agent is considered inactive for not performing any activity on the Agent Desktop while in the Idle state. Agent activity includes handling contacts, working on custom widgets, or performing any task on the Agent Desktop.

                                                                                                                                                                                                              The default setting is set to No. If the setting remains at No, then the agents who are signed in will be charged for agent license usage until their session is explicitly signed out.

                                                                                                                                                                                                              If the setting is Yes, system automatically signs out an agent after being idle for the provided timeout duration.

                                                                                                                                                                                                              You can provide an idle timeout value from 3 to 10,000 minutes.

                                                                                                                                                                                                              Concurrent Voice Contact Settings

                                                                                                                                                                                                              Concurrent Voice Contact Entitlements

                                                                                                                                                                                                              The number of concurrent voice contact sessions that the tenant is entitled to.

                                                                                                                                                                                                              This entitlement is based on the following formula:

                                                                                                                                                                                                              ((Number of committed Standard Agent licenses + Number of committed Premium Agent licenses) x 3) + Number of Add-on IVR port licenses

                                                                                                                                                                                                              One session (interaction) in surge protection includes all the inbound and outbound calls related to that session.

                                                                                                                                                                                                              • For zero commitment orders, the default value of Concurrent Voice Contact Entitlements is:

                                                                                                                                                                                                                100 + Number of Add-on IVR port licenses

                                                                                                                                                                                                              • You cannot modify the value of Concurrent Voice Contact Entitlements.

                                                                                                                                                                                                              Voice Contact Surge Percentage

                                                                                                                                                                                                              The percentage of voice contact sessions that the tenant can have, over and above the Concurrent Voice Contact Entitlements.

                                                                                                                                                                                                              The default surge percentage is 30%.

                                                                                                                                                                                                              Maximum Concurrent Voice Contact Threshold

                                                                                                                                                                                                              The maximum number of concurrent voice contact sessions that are allowed for the tenant. The contact center drops any inbound or outbound voice contacts after reaching this threshold.

                                                                                                                                                                                                              This value is derived from the Concurrent Voice Contact Entitlements and the Voice Contact Surge Percentage fields.

                                                                                                                                                                                                              For example, if the concurrent voice contact entitlements is 300 and the surge percentage is 30% (default value), the Maximum Concurrent Voice Contact Threshold is calculated as:

                                                                                                                                                                                                              300 x 1.3 = 390

                                                                                                                                                                                                              • If the Maximum Concurrent Voice Contact Threshold is insufficient for your business requirements for a short duration, submit a service request to Cisco Support to have the value adjusted. Cisco Support will adjust the surge percentage to ensure that the required Maximum Concurrent Voice Contact Threshold is available for your tenant.

                                                                                                                                                                                                              • This field is for production traffic only and reverts to the previous entitlement unless you purchase license in 7 days. This feature is not meant for load testing or any non-production use.

                                                                                                                                                                                                              • Use this field only if there is evidence of calls being rejected. Be wary that if you increase the surge percentage then your monthly invoice may also increase as per the overage.

                                                                                                                                                                                                              Concurrent Digital Contact Settings

                                                                                                                                                                                                              Concurrent Digital Contact Entitlements

                                                                                                                                                                                                              The number of concurrent digital contact sessions that the tenant is entitled to.

                                                                                                                                                                                                              This entitlement is based on the following formula:

                                                                                                                                                                                                              (Number of committed Standard Agent licenses + Number of committed Premium Agent licenses) x 2 x 15

                                                                                                                                                                                                              • For zero commitment orders, the default value of concurrent digital contact entitlements is:

                                                                                                                                                                                                                100 x 15

                                                                                                                                                                                                              • You cannot modify the value of concurrent digital contact entitlements.

                                                                                                                                                                                                              Digital Contact Surge Percentage

                                                                                                                                                                                                              The percentage of digital contact sessions that the tenant can have, over and above the concurrent digital contact entitlements.

                                                                                                                                                                                                              The default surge percentage is 30%.

                                                                                                                                                                                                              Maximum Concurrent Digital Contact Threshold

                                                                                                                                                                                                              The maximum number of concurrent digital contact sessions that are allowed for the tenant. The contact center drops any new digital contacts after reaching this threshold.

                                                                                                                                                                                                              The value of Maximum Concurrent Digital Contact Threshold is set to 30% higher than the concurrent digital contact entitlements.

                                                                                                                                                                                                              Maximum Concurrent Digital Threshold = Concurrent Digital Contact Entitlements * 1.3.

                                                                                                                                                                                                              This value is derived from the Concurrent Digital Contact Entitlements and the Digital Contact Surge Percentage fields:

                                                                                                                                                                                                              Maximum Concurrent Digital Threshold =

                                                                                                                                                                                                              (Number of committed Standard Agent licenses + Number of committed Premium Agent licenses) x 2 x 15 x 1.3

                                                                                                                                                                                                              For example, if the concurrent digital contact entitlements is 300 and the surge percentage is 30% (default value), the maximum concurrent digital contact threshold is calculated as:

                                                                                                                                                                                                              300*1.3 = 390

                                                                                                                                                                                                              • For zero commitment orders, the maximum concurrent digital contact threshold is:

                                                                                                                                                                                                                Max Concurrent Digital Contact Threshold = Concurrent Digital Contact Entitlement * 1.3 =

                                                                                                                                                                                                                1500 * 1.3

                                                                                                                                                                                                              • When incoming contacts are rejected because of the surge, the associated flow generates a flow error on its node. You can find the details of the error in the Surge Protection Statistics report.

                                                                                                                                                                                                              • If the maximum concurrent digital contact threshold is insufficient for your business requirements for a short duration, submit a service request to Cisco Support to have the value adjusted. Cisco Support will adjust the surge percentage to ensure that the required maximum concurrent digital contact threshold is available for your tenant.

                                                                                                                                                                                                              • This field is for production traffic only and reverts to the previous entitlement unless you purchase a license in 7 days. This feature is not meant for load testing or any non-production use.

                                                                                                                                                                                                              • Use this field only if there is evidence of calls being rejected. Be wary that if you increase the surge percentage then your monthly invoice may also increase as per the overage.

                                                                                                                                                                                                              Other Settings

                                                                                                                                                                                                              Maximum Callback Attempts

                                                                                                                                                                                                              The number of times the system attempts a requested callback if the initial callback attempt fails.

                                                                                                                                                                                                              Retry Callback Interval

                                                                                                                                                                                                              The number of seconds between the callback attempts in case the initial callback attempt fails.

                                                                                                                                                                                                              Pause/Resume Enabled

                                                                                                                                                                                                              If this setting is Yes, agents can pause and resume recording a call. For example, the agent can pause a call recording while obtaining sensitive information from the customer, such as credit card information.

                                                                                                                                                                                                              If this setting is No, you can enable this feature for individual queues at another time.

                                                                                                                                                                                                              You can use this feature only if your administrator enables the Privacy Shield feature for your enterprise. For more information, contact your administrator.

                                                                                                                                                                                                              Recording Pause Duration

                                                                                                                                                                                                              This setting specifies the amount of time for which the system pauses the call recording. After the time has elapsed, the system automatically starts recording the call.

                                                                                                                                                                                                              Check Agent Availability

                                                                                                                                                                                                              If this setting is Yes, the system does not route any contacts to the teams with no logged-in agents.

                                                                                                                                                                                                              If this setting is No, you can enable this setting for individual queues. For more information, see Adding an Entry Point or Queue.

                                                                                                                                                                                                              Record All Calls

                                                                                                                                                                                                              If this setting is Yes, the system records all inbound and outdial calls.

                                                                                                                                                                                                              If this setting is No, the system records calls based on the settings for each queue.

                                                                                                                                                                                                              Entry Points and Queues

                                                                                                                                                                                                              Entry points and queues are types of virtual teams. A virtual team is a holding place for incoming customer requests.

                                                                                                                                                                                                              You can create entry points and queues depending on how the Webex Contact Center administrator has configured your profile.

                                                                                                                                                                                                              Entry Point

                                                                                                                                                                                                              The inbound entry point is the initial landing place for a customer contact in the Webex Contact Center system. For the customer calls, you can associate one or more toll-free or dial numbers with a given entry point. The system performs IVR call treatment for a call while the call is in the entry point.

                                                                                                                                                                                                              You can assign a flow to an entry point. Moreover, if you want to implement the business hours to define the working and nonworking hours for your contact center, you can choose a flow that has the business hours activity configured, and assign it to the entry point.

                                                                                                                                                                                                              We strongly recommend you to assign new flows directly to an entry point using the business hours activity. For the existing flows, you should also plan to migrate the routing strategy flow configurations to entry point using business hours.

                                                                                                                                                                                                              If a flow is associated to an entry point and uses business hours, it will take precedence over the same flow that is associated with a routing strategy as well.

                                                                                                                                                                                                              For more information on how to configure Business Hours in a flow, see Business Hours.

                                                                                                                                                                                                              To use entry points for the telephony channel type, ensure that you do the following:

                                                                                                                                                                                                              • Map a dial number (DN) to the entry point. For more information, see Entry Point Mappings.

                                                                                                                                                                                                              • Assign a flow to an entry point. For more information, see Create an Entry Point.

                                                                                                                                                                                                              • Contact your Webex Contact Center administrator for other Provisioning configurations.

                                                                                                                                                                                                              Queue

                                                                                                                                                                                                              An inbound queue is where the customer contact waits before the system assigns the customer to an agent or DN.

                                                                                                                                                                                                              The inbound queue that represents a third-party Automatic Call Distributor (ACD) is known as a proxy queue. Calls that are sent to an external ACD are distributed to agents by the external ACD. Webex Contact Center uses proxy queues to track the call activity that occurs on the external ACD queues. There are two types of proxy queues: dedicated and shared. Agents signed in to a dedicated proxy queue serve only the Webex Contact Center customer; agents signed in to a shared queue serve multiple customers.

                                                                                                                                                                                                              Outdial Entry Point

                                                                                                                                                                                                              The outdial entry point is provisioned for outbound (outdial) customer calls in the Webex Contact Center system.

                                                                                                                                                                                                              In the Outdial Entry Point list, a system-generated Outdial Transfer to Queue entry point is automatically created. If the outdial calls need to be transferred to the queue, map the DN to the Outdial Transfer to Queue entry point. For more information on mapping an outdial entry point, see Map an Entry Point.

                                                                                                                                                                                                              You can’t edit the system-generated Outdial Transfer to Queue entry point.

                                                                                                                                                                                                              Outdial Queue

                                                                                                                                                                                                              The outdial queue where the customer contact waits for the system to assign the customer to an agent or DN.

                                                                                                                                                                                                              Create an Entry Point

                                                                                                                                                                                                              To create an entry point:

                                                                                                                                                                                                              1

                                                                                                                                                                                                              From the Management Portal navigation bar, choose Provisioning > Entry Points/Queues.

                                                                                                                                                                                                              2

                                                                                                                                                                                                              Choose Entry Point.

                                                                                                                                                                                                              3

                                                                                                                                                                                                              Click + New Entry Point.

                                                                                                                                                                                                              4

                                                                                                                                                                                                              In the General Settings area, enter the following settings:

                                                                                                                                                                                                              Setting

                                                                                                                                                                                                              Description

                                                                                                                                                                                                              Name

                                                                                                                                                                                                              The name of the entry point.

                                                                                                                                                                                                              The Name can’t exceed 80 characters. It can contain alphanumeric characters, underscores, and hyphens.

                                                                                                                                                                                                              Description

                                                                                                                                                                                                              A short description of the entry point.

                                                                                                                                                                                                              Channel Type

                                                                                                                                                                                                              Choose a channel type, such as Telephony, Email, and Chat.

                                                                                                                                                                                                              The default channel type is Telephony.

                                                                                                                                                                                                              Outdial Primary DID URL

                                                                                                                                                                                                              The full pathname of the DID .xml file that supports outbound dialing. The Webex Contact Center administrator configures this field.

                                                                                                                                                                                                              This setting is applicable only for Outdial Entry Point.

                                                                                                                                                                                                              Outdial Backup DID URL

                                                                                                                                                                                                              The full pathname of the backup DID .xml file. The Webex Contact Center administrator configures this field.

                                                                                                                                                                                                              This setting is applicable only for Outdial Entry Point.

                                                                                                                                                                                                              5

                                                                                                                                                                                                              In the Advanced Settings area, enter the following settings:

                                                                                                                                                                                                              Setting

                                                                                                                                                                                                              Description

                                                                                                                                                                                                              Service Level Threshold

                                                                                                                                                                                                              The service level threshold field has no functional impact on the system's calculations, you may enter any dummy number for the threshold duration.

                                                                                                                                                                                                              Control Script URL

                                                                                                                                                                                                              The system automatically populates this field with the URL for this entry point or the default control script of the queue. It happens when you don’t configure the control script using the Webex Contact Center Routing Strategy module.

                                                                                                                                                                                                              This setting is available for the Telephony channel type.

                                                                                                                                                                                                              IVR Requeue URL

                                                                                                                                                                                                              Currently we don’t support this setting.

                                                                                                                                                                                                              Overflow Number

                                                                                                                                                                                                              Enter the destination phone number to which the system diverts the customer calls when they exceed the Maximum Time in Queue that you have set in the routing strategy.

                                                                                                                                                                                                              This setting is applicable only for the Telephony channel type.

                                                                                                                                                                                                              Vendor ID

                                                                                                                                                                                                              Enter the unique alphanumeric string that maps this entry point to the vendor.

                                                                                                                                                                                                              Currently, we don’t support this setting.

                                                                                                                                                                                                              Time Zone (Routing Strategies Only)

                                                                                                                                                                                                              (Optional) Enter the time zone that routing strategies use for this entry point.

                                                                                                                                                                                                              The default time zone is the time zone of the tenant.

                                                                                                                                                                                                              DN List

                                                                                                                                                                                                              IVR DN List

                                                                                                                                                                                                              Enter the DN pool list numbers if you want to integrate this entry point with an external IVR.

                                                                                                                                                                                                              This setting is available for the Telephony channel type.

                                                                                                                                                                                                              Flow

                                                                                                                                                                                                              Choose a flow from the drop-down list to assign that flow to this entry point.

                                                                                                                                                                                                              This list contains all flows that are created in the Routing Strategy > Flow page of Management Portal.

                                                                                                                                                                                                              If you want to implement the business hours entities to define working and non-working hours for your organization, we recommend you to choose only those flows in which the Business Hours activity is configured. The Business Hours activity takes the appropriate branch based on the business hours configuration associated with it. For more information about creating business hours entities in Control Hub, see Set up Business Hours in Webex Contact Center.

                                                                                                                                                                                                              For more information on how to configure Business Hours activity, see Business Hours.

                                                                                                                                                                                                              6

                                                                                                                                                                                                              Click Save.

                                                                                                                                                                                                              View the Details of an Entry Point

                                                                                                                                                                                                              To view an entry point:
                                                                                                                                                                                                              1

                                                                                                                                                                                                              From the Management Portal navigation bar, choose Provisioning > Entry Points/Queues.

                                                                                                                                                                                                              2

                                                                                                                                                                                                              Choose Entry Point .

                                                                                                                                                                                                              3

                                                                                                                                                                                                              Click the ellipsis icon beside an entry point and click View. You can view the following details:

                                                                                                                                                                                                              Setting

                                                                                                                                                                                                              Description

                                                                                                                                                                                                              Name

                                                                                                                                                                                                              The name of the entry point.

                                                                                                                                                                                                              The Name can’t exceed 80 characters. It can contain alphanumeric characters, underscores, and hyphens.

                                                                                                                                                                                                              Description

                                                                                                                                                                                                              A short description of the entry point.

                                                                                                                                                                                                              Channel Type

                                                                                                                                                                                                              Choose a channel type, such as Telephony, Email, and Chat.

                                                                                                                                                                                                              The default channel type is Telephony.

                                                                                                                                                                                                              Outdial Primary DID URL

                                                                                                                                                                                                              The full pathname of the DID .xml file that supports outbound dialing. The Webex Contact Center administrator configures this field.

                                                                                                                                                                                                              This setting is applicable only for Outdial Entry Point.

                                                                                                                                                                                                              Outdial Backup DID URL

                                                                                                                                                                                                              The full pathname of the backup DID .xml file. The Webex Contact Center administrator configures this field.

                                                                                                                                                                                                              This setting is applicable only for Outdial Entry Point.

                                                                                                                                                                                                              Edit an Entry Point

                                                                                                                                                                                                              To edit an entry point or an outdial entry point:

                                                                                                                                                                                                              1

                                                                                                                                                                                                              From the Management Portal navigation bar, choose Provisioning > Entry Points/Queues.

                                                                                                                                                                                                              2

                                                                                                                                                                                                              Choose Entry Point.

                                                                                                                                                                                                              3

                                                                                                                                                                                                              Click the ellipsis icon beside an entry point and click Edit.

                                                                                                                                                                                                              4

                                                                                                                                                                                                              You can edit the following fields:

                                                                                                                                                                                                              Vendor ID

                                                                                                                                                                                                              Enter the unique alphanumeric string that maps this entry point to the vendor. You use this setting in the following scenario:

                                                                                                                                                                                                              • If the queue is a proxy queue.

                                                                                                                                                                                                              • If it is an entry point that you use for any channel except Telephony.

                                                                                                                                                                                                              Currently, we do not support this setting.

                                                                                                                                                                                                              Setting

                                                                                                                                                                                                              Description

                                                                                                                                                                                                              Name

                                                                                                                                                                                                              The name of the entry point.

                                                                                                                                                                                                              The Name can’t exceed 80 characters. It can contain alphanumeric characters, underscores, and hyphens.

                                                                                                                                                                                                              Description

                                                                                                                                                                                                              A short description of the entry point.

                                                                                                                                                                                                              Channel Type

                                                                                                                                                                                                              Choose a channel type, such as Telephony, Email, and Chat.

                                                                                                                                                                                                              The default channel type is Telephony.

                                                                                                                                                                                                              Outdial Primary DID URL

                                                                                                                                                                                                              The full pathname of the DID .xml file that supports outbound dialing. The Webex Contact Center administrator configures this field.

                                                                                                                                                                                                              This setting is applicable only for Outdial Entry Point.

                                                                                                                                                                                                              Outdial Backup DID URL

                                                                                                                                                                                                              The full pathname of the backup DID .xml file. The Webex Contact Center administrator configures this field.

                                                                                                                                                                                                              This setting is applicable only for Outdial Entry Point.

                                                                                                                                                                                                              If you are viewing a proxy queue, you can click the search button in the DNIS Pool Data field to open a pop-up window displaying the list of DNIS entries for the queue. You can click a button bottom of the pop-up window to print the list or download the data as a .csv file.

                                                                                                                                                                                                              If you are editing a proxy queue configured to use the blocked area codes feature, you can click the edit button to edit the list of blocked area codes. For more information, see Block an Area Code

                                                                                                                                                                                                              Copy an Entry Point

                                                                                                                                                                                                              To copy an entry point:
                                                                                                                                                                                                              1

                                                                                                                                                                                                              From the Management Portal navigation bar, choose Provisioning > Entry Points/Queues.

                                                                                                                                                                                                              2

                                                                                                                                                                                                              Choose Entry Point.

                                                                                                                                                                                                              3

                                                                                                                                                                                                              Click the ellipsis icon beside an entry point and click Copy.

                                                                                                                                                                                                              A copy of the selected entry point appears. The fields have the same values as the original entry point.

                                                                                                                                                                                                              You can save the same entry point with a different name or edit and save the entry point.

                                                                                                                                                                                                              4

                                                                                                                                                                                                              You can edit the following details:

                                                                                                                                                                                                              There are some settings that you cannot edit. You can edit the Chat Template settings from https://admin.webex.com/.

                                                                                                                                                                                                              Setting

                                                                                                                                                                                                              Description

                                                                                                                                                                                                              Name

                                                                                                                                                                                                              The name of the entry point.

                                                                                                                                                                                                              The Name can’t exceed 80 characters. It can contain alphanumeric characters, underscores, and hyphens.

                                                                                                                                                                                                              Description

                                                                                                                                                                                                              A short description of the entry point.

                                                                                                                                                                                                              Channel Type

                                                                                                                                                                                                              Choose a channel type, such as Telephony, Email, and Chat.

                                                                                                                                                                                                              The default channel type is Telephony.

                                                                                                                                                                                                              Outdial Primary DID URL

                                                                                                                                                                                                              The full pathname of the DID .xml file that supports outbound dialing. The Webex Contact Center administrator configures this field.

                                                                                                                                                                                                              This setting is applicable only for Outdial Entry Point.

                                                                                                                                                                                                              Outdial Backup DID URL

                                                                                                                                                                                                              The full pathname of the backup DID .xml file. The Webex Contact Center administrator configures this field.

                                                                                                                                                                                                              This setting is applicable only for Outdial Entry Point.

                                                                                                                                                                                                              Create an Outdial Entry Point

                                                                                                                                                                                                              To create an outdial entry point:

                                                                                                                                                                                                              1

                                                                                                                                                                                                              From the Management Portal navigation bar, choose Provisioning > Entry Points/Queues.

                                                                                                                                                                                                              2

                                                                                                                                                                                                              Choose Outdial Entry Point.

                                                                                                                                                                                                              3

                                                                                                                                                                                                              Click + Outdial Entry Point.

                                                                                                                                                                                                              4

                                                                                                                                                                                                              In the General Settings area, enter the following settings:

                                                                                                                                                                                                              Setting

                                                                                                                                                                                                              Description

                                                                                                                                                                                                              Name

                                                                                                                                                                                                              The name of the outdial entry point.

                                                                                                                                                                                                              The Name cannot exceed 80 characters. It can contain alphanumeric characters, underscores, and hyphens.

                                                                                                                                                                                                              Description

                                                                                                                                                                                                              A short description of the outdial entry point.

                                                                                                                                                                                                              Channel Type

                                                                                                                                                                                                              Choose a channel type as Telephony.

                                                                                                                                                                                                              The default channel type is Telephony.

                                                                                                                                                                                                              Outdial Primary DID URL

                                                                                                                                                                                                              The full pathname of the DID .xml file that supports outbound dialing. The Webex Contact Center administrator configures this field.

                                                                                                                                                                                                              This setting is applicable only for Outdial Entry Point.

                                                                                                                                                                                                              Outdial Backup DID URL

                                                                                                                                                                                                              The full pathname of the backup DID .xml file. The Webex Contact Center administrator configures this field.

                                                                                                                                                                                                              This setting is applicable only for Outdial Entry Point.

                                                                                                                                                                                                              5

                                                                                                                                                                                                              In the Advanced Settings area, enter the following settings:

                                                                                                                                                                                                              Setting

                                                                                                                                                                                                              Description

                                                                                                                                                                                                              Service Level Threshold

                                                                                                                                                                                                              Enter the duration for which a customer request can be in a queue before the system flags it as outside the service level. If the agent completes a customer service request within this time interval, the system considers it within the service level.

                                                                                                                                                                                                              Control Script URL

                                                                                                                                                                                                              The system automatically populates this field with the URL for this entry point or the default control script of the queue. It happens when you do not configure the control script using the Webex Contact Center Routing Strategy module.

                                                                                                                                                                                                              This setting is available for the Telephony channel type.

                                                                                                                                                                                                              IVR Requeue URL

                                                                                                                                                                                                              Currently we do not support this setting.

                                                                                                                                                                                                              Overflow Number

                                                                                                                                                                                                              Enter the destination phone number to which the system diverts the customer calls when they exceed the Maximum Time in Queue that you have set in the routing strategy.

                                                                                                                                                                                                              This setting is applicable only for the Telephony channel type.

                                                                                                                                                                                                              Vendor ID

                                                                                                                                                                                                              Enter the unique alphanumeric string that maps this entry point to the vendor.

                                                                                                                                                                                                              Currently, we do not support this setting.

                                                                                                                                                                                                              Time Zone (Routing Strategies Only)

                                                                                                                                                                                                              (Optional) Enter the time zone that routing strategies use for this outdial entry point.

                                                                                                                                                                                                              Flow

                                                                                                                                                                                                              Contact Center supports building flows and event flows using the flow designer. You can use these flows in an Outdial Entry Point.

                                                                                                                                                                                                              Choose the flow that you want to assign for the Outdial Entry Point.

                                                                                                                                                                                                              • This outdial queue will be used for reporting purposes.

                                                                                                                                                                                                              • You can choose either a routing strategy or a flow for any outdial entry point. If you choose a routing strategy, you can't customize the outdial features such as selecting flow, music, and outdial queues. You can't use flow control configurations such as Customize ANI, Screen pop, Global variable and so on, as part of the outdial experience. We recommend that you use flows instead of routing strategies to avail any advanced configurations such as Screen pop, Customize ANI and so on.

                                                                                                                                                                                                              • For activities that are supported, see Support for workflows in Outdial Entry Point.

                                                                                                                                                                                                              Music on Hold

                                                                                                                                                                                                              Select the music file that you want use in the Outdial Entry Point.

                                                                                                                                                                                                              Outdial Queue

                                                                                                                                                                                                              Select the outdial queue from the list for the Outdial Entry Point.

                                                                                                                                                                                                              DN List

                                                                                                                                                                                                              IVR DN List

                                                                                                                                                                                                              Enter the DN pool list numbers if you want to integrate this entry point with an external IVR.

                                                                                                                                                                                                              This setting is available for the Telephony channel type.

                                                                                                                                                                                                              6

                                                                                                                                                                                                              Click Save.

                                                                                                                                                                                                              View the Details of an Outdial Entry Point

                                                                                                                                                                                                              To view an outdial entry point:
                                                                                                                                                                                                              1

                                                                                                                                                                                                              From the Management Portal navigation bar, choose Provisioning > Entry Points/Queues.

                                                                                                                                                                                                              2

                                                                                                                                                                                                              Choose Outdial Entry Point.

                                                                                                                                                                                                              3

                                                                                                                                                                                                              Click the ellipsis icon beside an entry point and click View. You can view the following details:

                                                                                                                                                                                                              Setting

                                                                                                                                                                                                              Description

                                                                                                                                                                                                              Name

                                                                                                                                                                                                              The name of the outdial entry point.

                                                                                                                                                                                                              The Name cannot exceed 80 characters. It can contain alphanumeric characters, underscores, and hyphens.

                                                                                                                                                                                                              Description

                                                                                                                                                                                                              A short description of the outdial entry point.

                                                                                                                                                                                                              Channel Type

                                                                                                                                                                                                              Choose a channel type as Telephony.

                                                                                                                                                                                                              The default channel type is Telephony.

                                                                                                                                                                                                              Outdial Primary DID URL

                                                                                                                                                                                                              The full pathname of the DID .xml file that supports outbound dialing. The Webex Contact Center administrator configures this field.

                                                                                                                                                                                                              This setting is applicable only for Outdial Entry Point.

                                                                                                                                                                                                              Outdial Backup DID URL

                                                                                                                                                                                                              The full pathname of the backup DID .xml file. The Webex Contact Center administrator configures this field.

                                                                                                                                                                                                              This setting is applicable only for Outdial Entry Point.

                                                                                                                                                                                                              Edit an Outdial Entry Point

                                                                                                                                                                                                              To edit an outdial entry point:

                                                                                                                                                                                                              1

                                                                                                                                                                                                              From the Management Portal navigation bar, choose Provisioning > Entry Points/Queues.

                                                                                                                                                                                                              2

                                                                                                                                                                                                              Choose Outdial Entry Point.

                                                                                                                                                                                                              3

                                                                                                                                                                                                              Click the ellipsis icon beside an outdial entry point and click Edit.

                                                                                                                                                                                                              4

                                                                                                                                                                                                              You can edit the following fields:

                                                                                                                                                                                                              Vendor ID

                                                                                                                                                                                                              Enter the unique alphanumeric string that maps this entry point to the vendor. You use this setting in the following scenario:

                                                                                                                                                                                                              • If the queue is a proxy queue.

                                                                                                                                                                                                              • If it is an entry point that you use for any channel except Telephony.

                                                                                                                                                                                                              Currently, we do not support this setting.

                                                                                                                                                                                                              Setting

                                                                                                                                                                                                              Description

                                                                                                                                                                                                              Name

                                                                                                                                                                                                              The name of the outdial entry point.

                                                                                                                                                                                                              The Name cannot exceed 80 characters. It can contain alphanumeric characters, underscores, and hyphens.

                                                                                                                                                                                                              Description

                                                                                                                                                                                                              A short description of the outdial entry point.

                                                                                                                                                                                                              Channel Type

                                                                                                                                                                                                              Choose a channel type as Telephony.

                                                                                                                                                                                                              The default channel type is Telephony.

                                                                                                                                                                                                              Outdial Primary DID URL

                                                                                                                                                                                                              The full pathname of the DID .xml file that supports outbound dialing. The Webex Contact Center administrator configures this field.

                                                                                                                                                                                                              This setting is applicable only for Outdial Entry Point.

                                                                                                                                                                                                              Outdial Backup DID URL

                                                                                                                                                                                                              The full pathname of the backup DID .xml file. The Webex Contact Center administrator configures this field.

                                                                                                                                                                                                              This setting is applicable only for Outdial Entry Point.

                                                                                                                                                                                                              Copy an Outdial Entry Point

                                                                                                                                                                                                              To copy an outdial entry point:
                                                                                                                                                                                                              1

                                                                                                                                                                                                              From the Management Portal navigation bar, choose Provisioning > Entry Points/Queues.

                                                                                                                                                                                                              2

                                                                                                                                                                                                              Choose Outdial Entry Point.

                                                                                                                                                                                                              3

                                                                                                                                                                                                              Click the ellipsis icon beside an entry point and click Copy.

                                                                                                                                                                                                              A copy of the selected outdial entry point appears. The fields have the same values as the original outdial entry point.

                                                                                                                                                                                                              You can save the same outdial entry point with a different name or edit and save the outdial entry point.

                                                                                                                                                                                                              You can edit the following details:

                                                                                                                                                                                                              Setting

                                                                                                                                                                                                              Description

                                                                                                                                                                                                              Name

                                                                                                                                                                                                              The name of the outdial entry point.

                                                                                                                                                                                                              The Name cannot exceed 80 characters. It can contain alphanumeric characters, underscores, and hyphens.

                                                                                                                                                                                                              Description

                                                                                                                                                                                                              A short description of the outdial entry point.

                                                                                                                                                                                                              Channel Type

                                                                                                                                                                                                              Choose a channel type as Telephony.

                                                                                                                                                                                                              The default channel type is Telephony.

                                                                                                                                                                                                              Outdial Primary DID URL

                                                                                                                                                                                                              The full pathname of the DID .xml file that supports outbound dialing. The Webex Contact Center administrator configures this field.

                                                                                                                                                                                                              This setting is applicable only for Outdial Entry Point.

                                                                                                                                                                                                              Outdial Backup DID URL

                                                                                                                                                                                                              The full pathname of the backup DID .xml file. The Webex Contact Center administrator configures this field.

                                                                                                                                                                                                              This setting is applicable only for Outdial Entry Point.

                                                                                                                                                                                                              You cannot edit certain settings. You can edit the Chat Template settings from https://admin.webex.com/.

                                                                                                                                                                                                              Create a Queue and an Outdial Queue

                                                                                                                                                                                                              To create a queue:

                                                                                                                                                                                                              1

                                                                                                                                                                                                              From the Management Portal navigation bar, choose Provisioning > Entry Points/Queues.

                                                                                                                                                                                                              2

                                                                                                                                                                                                              Choose Queue or Outdial Queue.

                                                                                                                                                                                                              3

                                                                                                                                                                                                              Click + New Queue or + New Outdial Queue.

                                                                                                                                                                                                              4

                                                                                                                                                                                                              Enter the following settings for the queue and click Save:

                                                                                                                                                                                                              Table 1. Configuration for Channel Type Telephony

                                                                                                                                                                                                              Setting

                                                                                                                                                                                                              Description

                                                                                                                                                                                                              General Settings

                                                                                                                                                                                                              Name

                                                                                                                                                                                                              Enter a name for the queue.

                                                                                                                                                                                                              Description

                                                                                                                                                                                                              (Optional) Enter a short description for the queue.

                                                                                                                                                                                                              Type

                                                                                                                                                                                                              (Read-only) This read-only field displays whether the settings are for an entry point, a queue, an outdial entry point, or an outdial queue.

                                                                                                                                                                                                              Channel Type

                                                                                                                                                                                                              The available channel types are:

                                                                                                                                                                                                              Telephony
                                                                                                                                                                                                              The default channel type.
                                                                                                                                                                                                              Email
                                                                                                                                                                                                              Email channel.
                                                                                                                                                                                                              Chat
                                                                                                                                                                                                              Chat channel.

                                                                                                                                                                                                              For outdial queues, the only channel type that is supported is Telephony.

                                                                                                                                                                                                              Contact Routing Settings

                                                                                                                                                                                                              If Campaign Management is enabled in the System Profile (see Provisioning), then the Contact Routing Settings section is displayed for the Outdial queues.

                                                                                                                                                                                                              Queue Routing Type

                                                                                                                                                                                                              The supported queue routing types are:

                                                                                                                                                                                                              • Longest Available Agent: Calls are routed to the agent who has been available for the longest time in all teams assigned to the queue in the Call Distribution section. For more information, see Longest Available Agent (LAA).

                                                                                                                                                                                                              • Skills Based: Calls are routed to agents based on skill requirements configured in the Flow that is associated with the entry point.

                                                                                                                                                                                                                The Skills Based routing type is available only if your queue is provisioned with Channel Type as Telephony.

                                                                                                                                                                                                                When you select Skills Based as the routing type, two other options appear for you to specify how to route a call when more than one agent with the required skill set is available:

                                                                                                                                                                                                                Longest Available Agent: The call is routed to the agent who has been available for the longest duration.

                                                                                                                                                                                                                Best Available Agent: The call is routed to the agent with the highest proficiency across all skills for the contact. This setting is applicable if at least one of the skills in the skill requirement list is of type Proficiency. For more information, see Skills-based Routing Types.

                                                                                                                                                                                                              You cannot edit the Queue Routing Type after the queue is saved.

                                                                                                                                                                                                              Outbound Campaign Enabled

                                                                                                                                                                                                              This toggle button is displayed for outdial queues.

                                                                                                                                                                                                              If the toggle button is enabled, then the Call Distribution and Queue Routing Type fields are displayed. This field cannot be edited later. The Longest Available Agent is the only supported queue routing type for outdial queues.

                                                                                                                                                                                                              Call Distribution

                                                                                                                                                                                                              Add Group

                                                                                                                                                                                                              Add a Call Distribution Group to associate one or more teams with this queue. Add multiple groups to distribute calls to more teams as time in queue progresses.

                                                                                                                                                                                                              Advanced Settings

                                                                                                                                                                                                              Permit Monitoring

                                                                                                                                                                                                              Click Yes or No to specify whether users can monitor the calls.

                                                                                                                                                                                                              This setting is available for the Telephony channel type.

                                                                                                                                                                                                              Permit Recording

                                                                                                                                                                                                              Click Yes or No to specify whether the system can record the calls.

                                                                                                                                                                                                              This setting is available for the Telephony channel type.

                                                                                                                                                                                                              Record All Calls

                                                                                                                                                                                                              This setting is available if you enable Permit Recording.

                                                                                                                                                                                                              Click Yes or No to indicate whether the system can record all the calls for this queue.

                                                                                                                                                                                                              This setting is available for the Telephony channel type.

                                                                                                                                                                                                              Pause/Resume Enabled

                                                                                                                                                                                                              Click Yes or No to specify whether the agents can pause and resume a call recording. For example, the agent can pause call recording while discussing sensitive information from the customer, such as credit card details.

                                                                                                                                                                                                              If you enable the Pause/Resume Enabled feature in the Tenant settings, the system overrides a No setting here. For more information, see Tenant Settings.

                                                                                                                                                                                                              Agents can use this feature if your organization administrator enables the Privacy Shield feature in the Webex Contact Center service configuration.

                                                                                                                                                                                                              Recording Pause Duration

                                                                                                                                                                                                              This setting is available if you set Pause/Resume Enabled to Yes.

                                                                                                                                                                                                              This setting specifies the time in seconds, after which the recording resumes automatically.

                                                                                                                                                                                                              This setting is available for the Telephony channel type.

                                                                                                                                                                                                              Service Level Threshold

                                                                                                                                                                                                              Enter the time that a customer request can be in a queue before the system flags it as outside the service level. If you complete a customer service request within this time interval, the system considers it within the service level.

                                                                                                                                                                                                              Maximum Time in Queue

                                                                                                                                                                                                              Enter the time after which the contact (all media types) is terminated.

                                                                                                                                                                                                              Default Music in Queue

                                                                                                                                                                                                              Select the name of the audio (.wav) file to play for calls when the calls arrive or wait in the queue. This is the default audio file.

                                                                                                                                                                                                              If Play Music is not configured in the Queue Contact activity, then the default music file is played.

                                                                                                                                                                                                              Time Zone (Routing Strategies Only)

                                                                                                                                                                                                              (Optional) If your organization administrator enables Multiple Time Zone for your enterprise, you can select the time zone of the entry point.

                                                                                                                                                                                                              Table 2. Configuration for Channel Type Chat

                                                                                                                                                                                                              Setting

                                                                                                                                                                                                              Description

                                                                                                                                                                                                              General Settings

                                                                                                                                                                                                              Name

                                                                                                                                                                                                              Enter a name for the queue.

                                                                                                                                                                                                              Description

                                                                                                                                                                                                              (Optional) Enter a short description for the queue.

                                                                                                                                                                                                              Type

                                                                                                                                                                                                              (Read-only) This read-only field displays whether the settings are for an entry point, a queue, an outdial entry point, or an outdial queue.

                                                                                                                                                                                                              Channel Type

                                                                                                                                                                                                              The channel type is: Chat

                                                                                                                                                                                                              For outdial queues, the only channel type supported is Telephony.

                                                                                                                                                                                                              Contact Routing Settings

                                                                                                                                                                                                              Queue Routing Type

                                                                                                                                                                                                              The supported queue routing types are:

                                                                                                                                                                                                              • Longest Available Agent: Chats are routed to the agent who has been available for the longest time over all teams assigned to the queue in the Chat Distribution section. For more information, see Longest Available Agent (LAA).

                                                                                                                                                                                                              • Skills Based: Chats are routed to agents based on skill requirements configured in the Webex Connect flow.

                                                                                                                                                                                                                When you select Skills Based as the routing type, two other options appear for you to specify how to route a chat when more than one agent with the required skill set is available:

                                                                                                                                                                                                                Longest Available Agent: The chat is routed to the agent who has been available for the longest duration. For more information, see Longest Available Agent (LAA).

                                                                                                                                                                                                                Best Available Agent: When you select this setting, the chat is routed to the agent with the highest proficiency across all skills for the contact. This setting is applicable if at least one of the skills in the skill requirement list is of type Proficiency. For more information, see Skills-based Routing Types.

                                                                                                                                                                                                              You cannot edit the Queue Routing Type after the queue is saved.

                                                                                                                                                                                                              Add Group

                                                                                                                                                                                                              Add a Chat Distribution Group to associate one or more teams with this queue. Add multiple groups to distribute chats to more teams as time in queue progresses.

                                                                                                                                                                                                              Advanced Settings

                                                                                                                                                                                                              Service Level Threshold

                                                                                                                                                                                                              Enter the time that a customer request can be in a queue before the system flags it as outside the service level. If you complete a customer service request within this time interval, the system considers it within the service level.

                                                                                                                                                                                                              Maximum Time in Queue

                                                                                                                                                                                                              Enter the time after which the contact (all media types) is terminated.

                                                                                                                                                                                                              Time Zone (Routing Strategies Only)

                                                                                                                                                                                                              (Optional) If your organization administrator enables Multiple Time Zone for your enterprise, you can select the time zone of the entry point.

                                                                                                                                                                                                              Table 3. Configuration for Channel Type Email

                                                                                                                                                                                                              Setting

                                                                                                                                                                                                              Description

                                                                                                                                                                                                              General Settings

                                                                                                                                                                                                              Name

                                                                                                                                                                                                              Enter a name for the queue.

                                                                                                                                                                                                              Description

                                                                                                                                                                                                              (Optional) Enter a short description for the queue.

                                                                                                                                                                                                              Type

                                                                                                                                                                                                              (Read-only) This read-only field displays whether the settings are for an entry point, a queue, an outdial entry point, or an outdial queue.

                                                                                                                                                                                                              Channel Type

                                                                                                                                                                                                              The channel type is: Email

                                                                                                                                                                                                              For outdial queues, the only channel type supported is Telephony.

                                                                                                                                                                                                              Contact Routing Settings

                                                                                                                                                                                                              Queue Routing Type

                                                                                                                                                                                                              The supported queue routing types are:

                                                                                                                                                                                                              • Longest Available Agent: Emails are routed to the agent who has been available for the longest time over all teams assigned to the queue in the Email Distribution section. For more information, see Longest Available Agent (LAA).

                                                                                                                                                                                                              • Skills Based: Emails are routed to agents based on skill requirements configured in the Webex Connect flow.

                                                                                                                                                                                                                When you select Skills Based as the routing type, two other options appear for you to specify how to route an email when more than one agent with the required skill set is available:

                                                                                                                                                                                                                Longest Available Agent: The email is routed to the agent who has been available for the longest duration.

                                                                                                                                                                                                                Best Available Agent: When you select this setting, the email is routed to the agent with the highest proficiency across all skills for the contact. This setting is applicable if at least one of the skills in the skill requirement list is of type Proficiency. For more information, see Skills-based Routing Types.

                                                                                                                                                                                                              You cannot edit the Queue Routing Type after the queue is saved.

                                                                                                                                                                                                              Add Group

                                                                                                                                                                                                              Add an Email Distribution Group to associate one or more teams with this queue. Add multiple groups to distribute emails to more teams as time in queue progresses.

                                                                                                                                                                                                              Advanced Settings

                                                                                                                                                                                                              Service Level Threshold

                                                                                                                                                                                                              Enter the time that a customer request can be in a queue before the system flags it as outside the service level. If you complete a customer service request within this time interval, the system considers it within the service level.

                                                                                                                                                                                                              Maximum Time in Queue

                                                                                                                                                                                                              Enter the time after which the contact (all media types) is terminated.

                                                                                                                                                                                                              Time Zone (Routing Strategies Only)

                                                                                                                                                                                                              (Optional) If your organization administrator enables Multiple Time Zone for your enterprise, you can select the time zone of the entry point.

                                                                                                                                                                                                              View the Details of a Queue or an Outdial Queue

                                                                                                                                                                                                              To view a queue or an outdial queue:
                                                                                                                                                                                                              1

                                                                                                                                                                                                              From the Management Portal navigation bar, choose Provisioning > Entry Points/Queues.

                                                                                                                                                                                                              2

                                                                                                                                                                                                              Choose Queue or Outdial Queue.

                                                                                                                                                                                                              3

                                                                                                                                                                                                              Click the ellipsis icon beside a queue and click View. You can view the following details:

                                                                                                                                                                                                              Table 4. Configuration for Channel Type Telephony

                                                                                                                                                                                                              Setting

                                                                                                                                                                                                              Description

                                                                                                                                                                                                              General Settings

                                                                                                                                                                                                              Name

                                                                                                                                                                                                              Enter a name for the queue.

                                                                                                                                                                                                              Description

                                                                                                                                                                                                              (Optional) Enter a short description for the queue.

                                                                                                                                                                                                              Type

                                                                                                                                                                                                              (Read-only) This read-only field displays whether the settings are for an entry point, a queue, an outdial entry point, or an outdial queue.

                                                                                                                                                                                                              Channel Type

                                                                                                                                                                                                              The available channel types are:

                                                                                                                                                                                                              Telephony
                                                                                                                                                                                                              The default channel type.
                                                                                                                                                                                                              Email
                                                                                                                                                                                                              Email channel.
                                                                                                                                                                                                              Chat
                                                                                                                                                                                                              Chat channel.

                                                                                                                                                                                                              For outdial queues, the only channel type that is supported is Telephony.

                                                                                                                                                                                                              Contact Routing Settings

                                                                                                                                                                                                              If Campaign Management is enabled in the System Profile (see Provisioning), then the Contact Routing Settings section is displayed for the Outdial queues.

                                                                                                                                                                                                              Queue Routing Type

                                                                                                                                                                                                              The supported queue routing types are:

                                                                                                                                                                                                              • Longest Available Agent: Calls are routed to the agent who has been available for the longest time in all teams assigned to the queue in the Call Distribution section. For more information, see Longest Available Agent (LAA).

                                                                                                                                                                                                              • Skills Based: Calls are routed to agents based on skill requirements configured in the Flow that is associated with the entry point.

                                                                                                                                                                                                                The Skills Based routing type is available only if your queue is provisioned with Channel Type as Telephony.

                                                                                                                                                                                                                When you select Skills Based as the routing type, two other options appear for you to specify how to route a call when more than one agent with the required skill set is available:

                                                                                                                                                                                                                Longest Available Agent: The call is routed to the agent who has been available for the longest duration.

                                                                                                                                                                                                                Best Available Agent: The call is routed to the agent with the highest proficiency across all skills for the contact. This setting is applicable if at least one of the skills in the skill requirement list is of type Proficiency. For more information, see Skills-based Routing Types.

                                                                                                                                                                                                              You cannot edit the Queue Routing Type after the queue is saved.

                                                                                                                                                                                                              Outbound Campaign Enabled

                                                                                                                                                                                                              This toggle button is displayed for outdial queues.

                                                                                                                                                                                                              If the toggle button is enabled, then the Call Distribution and Queue Routing Type fields are displayed. This field cannot be edited later. The Longest Available Agent is the only supported queue routing type for outdial queues.

                                                                                                                                                                                                              Call Distribution

                                                                                                                                                                                                              Add Group

                                                                                                                                                                                                              Add a Call Distribution Group to associate one or more teams with this queue. Add multiple groups to distribute calls to more teams as time in queue progresses.

                                                                                                                                                                                                              Advanced Settings

                                                                                                                                                                                                              Permit Monitoring

                                                                                                                                                                                                              Click Yes or No to specify whether users can monitor the calls.

                                                                                                                                                                                                              This setting is available for the Telephony channel type.

                                                                                                                                                                                                              Permit Recording

                                                                                                                                                                                                              Click Yes or No to specify whether the system can record the calls.

                                                                                                                                                                                                              This setting is available for the Telephony channel type.

                                                                                                                                                                                                              Record All Calls

                                                                                                                                                                                                              This setting is available if you enable Permit Recording.

                                                                                                                                                                                                              Click Yes or No to indicate whether the system can record all the calls for this queue.

                                                                                                                                                                                                              This setting is available for the Telephony channel type.

                                                                                                                                                                                                              Pause/Resume Enabled

                                                                                                                                                                                                              Click Yes or No to specify whether the agents can pause and resume a call recording. For example, the agent can pause call recording while discussing sensitive information from the customer, such as credit card details.

                                                                                                                                                                                                              If you enable the Pause/Resume Enabled feature in the Tenant settings, the system overrides a No setting here. For more information, see Tenant Settings.

                                                                                                                                                                                                              Agents can use this feature if your organization administrator enables the Privacy Shield feature in the Webex Contact Center service configuration.

                                                                                                                                                                                                              Recording Pause Duration

                                                                                                                                                                                                              This setting is available if you set Pause/Resume Enabled to Yes.

                                                                                                                                                                                                              This setting specifies the time in seconds, after which the recording resumes automatically.

                                                                                                                                                                                                              This setting is available for the Telephony channel type.

                                                                                                                                                                                                              Service Level Threshold

                                                                                                                                                                                                              Enter the time that a customer request can be in a queue before the system flags it as outside the service level. If you complete a customer service request within this time interval, the system considers it within the service level.

                                                                                                                                                                                                              Maximum Time in Queue

                                                                                                                                                                                                              Enter the time after which the contact (all media types) is terminated.

                                                                                                                                                                                                              Default Music in Queue

                                                                                                                                                                                                              Select the name of the audio (.wav) file to play for calls when the calls arrive or wait in the queue. This is the default audio file.

                                                                                                                                                                                                              If Play Music is not configured in the Queue Contact activity, then the default music file is played.

                                                                                                                                                                                                              Time Zone (Routing Strategies Only)

                                                                                                                                                                                                              (Optional) If your organization administrator enables Multiple Time Zone for your enterprise, you can select the time zone of the entry point.

                                                                                                                                                                                                              Table 5. Configuration for Channel Type Chat

                                                                                                                                                                                                              Setting

                                                                                                                                                                                                              Description

                                                                                                                                                                                                              General Settings

                                                                                                                                                                                                              Name

                                                                                                                                                                                                              Enter a name for the queue.

                                                                                                                                                                                                              Description

                                                                                                                                                                                                              (Optional) Enter a short description for the queue.

                                                                                                                                                                                                              Type

                                                                                                                                                                                                              (Read-only) This read-only field displays whether the settings are for an entry point, a queue, an outdial entry point, or an outdial queue.

                                                                                                                                                                                                              Channel Type

                                                                                                                                                                                                              The channel type is: Chat

                                                                                                                                                                                                              For outdial queues, the only channel type supported is Telephony.

                                                                                                                                                                                                              Contact Routing Settings

                                                                                                                                                                                                              Queue Routing Type

                                                                                                                                                                                                              The supported queue routing types are:

                                                                                                                                                                                                              • Longest Available Agent: Chats are routed to the agent who has been available for the longest time over all teams assigned to the queue in the Chat Distribution section. For more information, see Longest Available Agent (LAA).

                                                                                                                                                                                                              • Skills Based: Chats are routed to agents based on skill requirements configured in the Webex Connect flow.

                                                                                                                                                                                                                When you select Skills Based as the routing type, two other options appear for you to specify how to route a chat when more than one agent with the required skill set is available:

                                                                                                                                                                                                                Longest Available Agent: The chat is routed to the agent who has been available for the longest duration. For more information, see Longest Available Agent (LAA).

                                                                                                                                                                                                                Best Available Agent: When you select this setting, the chat is routed to the agent with the highest proficiency across all skills for the contact. This setting is applicable if at least one of the skills in the skill requirement list is of type Proficiency. For more information, see Skills-based Routing Types.

                                                                                                                                                                                                              You cannot edit the Queue Routing Type after the queue is saved.

                                                                                                                                                                                                              Add Group

                                                                                                                                                                                                              Add a Chat Distribution Group to associate one or more teams with this queue. Add multiple groups to distribute chats to more teams as time in queue progresses.

                                                                                                                                                                                                              Advanced Settings

                                                                                                                                                                                                              Service Level Threshold

                                                                                                                                                                                                              Enter the time that a customer request can be in a queue before the system flags it as outside the service level. If you complete a customer service request within this time interval, the system considers it within the service level.

                                                                                                                                                                                                              Maximum Time in Queue

                                                                                                                                                                                                              Enter the time after which the contact (all media types) is terminated.

                                                                                                                                                                                                              Time Zone (Routing Strategies Only)

                                                                                                                                                                                                              (Optional) If your organization administrator enables Multiple Time Zone for your enterprise, you can select the time zone of the entry point.

                                                                                                                                                                                                              Table 6. Configuration for Channel Type Email

                                                                                                                                                                                                              Setting

                                                                                                                                                                                                              Description

                                                                                                                                                                                                              General Settings

                                                                                                                                                                                                              Name

                                                                                                                                                                                                              Enter a name for the queue.

                                                                                                                                                                                                              Description

                                                                                                                                                                                                              (Optional) Enter a short description for the queue.

                                                                                                                                                                                                              Type

                                                                                                                                                                                                              (Read-only) This read-only field displays whether the settings are for an entry point, a queue, an outdial entry point, or an outdial queue.

                                                                                                                                                                                                              Channel Type

                                                                                                                                                                                                              The channel type is: Email

                                                                                                                                                                                                              For outdial queues, the only channel type supported is Telephony.

                                                                                                                                                                                                              Contact Routing Settings

                                                                                                                                                                                                              Queue Routing Type

                                                                                                                                                                                                              The supported queue routing types are:

                                                                                                                                                                                                              • Longest Available Agent: Emails are routed to the agent who has been available for the longest time over all teams assigned to the queue in the Email Distribution section. For more information, see Longest Available Agent (LAA).

                                                                                                                                                                                                              • Skills Based: Emails are routed to agents based on skill requirements configured in the Webex Connect flow.

                                                                                                                                                                                                                When you select Skills Based as the routing type, two other options appear for you to specify how to route an email when more than one agent with the required skill set is available:

                                                                                                                                                                                                                Longest Available Agent: The email is routed to the agent who has been available for the longest duration.

                                                                                                                                                                                                                Best Available Agent: When you select this setting, the email is routed to the agent with the highest proficiency across all skills for the contact. This setting is applicable if at least one of the skills in the skill requirement list is of type Proficiency. For more information, see Skills-based Routing Types.

                                                                                                                                                                                                              You cannot edit the Queue Routing Type after the queue is saved.

                                                                                                                                                                                                              Add Group

                                                                                                                                                                                                              Add an Email Distribution Group to associate one or more teams with this queue. Add multiple groups to distribute emails to more teams as time in queue progresses.

                                                                                                                                                                                                              Advanced Settings

                                                                                                                                                                                                              Service Level Threshold

                                                                                                                                                                                                              Enter the time that a customer request can be in a queue before the system flags it as outside the service level. If you complete a customer service request within this time interval, the system considers it within the service level.

                                                                                                                                                                                                              Maximum Time in Queue

                                                                                                                                                                                                              Enter the time after which the contact (all media types) is terminated.

                                                                                                                                                                                                              Time Zone (Routing Strategies Only)

                                                                                                                                                                                                              (Optional) If your organization administrator enables Multiple Time Zone for your enterprise, you can select the time zone of the entry point.

                                                                                                                                                                                                              Edit a Queue or an Outdial Queue

                                                                                                                                                                                                              To edit a queue or an outdial queue:

                                                                                                                                                                                                              1

                                                                                                                                                                                                              From the Management Portal navigation bar, choose Provisioning > Entry Points/Queues.

                                                                                                                                                                                                              2

                                                                                                                                                                                                              Choose Queue or Outdial Queue.

                                                                                                                                                                                                              3

                                                                                                                                                                                                              Click the ellipsis icon to beside a queue and click Edit.

                                                                                                                                                                                                              4

                                                                                                                                                                                                              You can edit the following fields:

                                                                                                                                                                                                              You cannot edit some settings. You can edit the Chat Template settings from Cisco Webex Control Hub.

                                                                                                                                                                                                              Table 7. Configuration for Channel Type Telephony

                                                                                                                                                                                                              Setting

                                                                                                                                                                                                              Description

                                                                                                                                                                                                              General Settings

                                                                                                                                                                                                              Name

                                                                                                                                                                                                              Enter a name for the queue.

                                                                                                                                                                                                              Description

                                                                                                                                                                                                              (Optional) Enter a short description for the queue.

                                                                                                                                                                                                              Type

                                                                                                                                                                                                              (Read-only) This read-only field displays whether the settings are for an entry point, a queue, an outdial entry point, or an outdial queue.

                                                                                                                                                                                                              Channel Type

                                                                                                                                                                                                              The available channel types are:

                                                                                                                                                                                                              Telephony
                                                                                                                                                                                                              The default channel type.
                                                                                                                                                                                                              Email
                                                                                                                                                                                                              Email channel.
                                                                                                                                                                                                              Chat
                                                                                                                                                                                                              Chat channel.

                                                                                                                                                                                                              For outdial queues, the only channel type that is supported is Telephony.

                                                                                                                                                                                                              Contact Routing Settings

                                                                                                                                                                                                              If Campaign Management is enabled in the System Profile (see Provisioning), then the Contact Routing Settings section is displayed for the Outdial queues.

                                                                                                                                                                                                              Queue Routing Type

                                                                                                                                                                                                              The supported queue routing types are:

                                                                                                                                                                                                              • Longest Available Agent: Calls are routed to the agent who has been available for the longest time in all teams assigned to the queue in the Call Distribution section. For more information, see Longest Available Agent (LAA).

                                                                                                                                                                                                              • Skills Based: Calls are routed to agents based on skill requirements configured in the Flow that is associated with the entry point.

                                                                                                                                                                                                                The Skills Based routing type is available only if your queue is provisioned with Channel Type as Telephony.

                                                                                                                                                                                                                When you select Skills Based as the routing type, two other options appear for you to specify how to route a call when more than one agent with the required skill set is available:

                                                                                                                                                                                                                Longest Available Agent: The call is routed to the agent who has been available for the longest duration.

                                                                                                                                                                                                                Best Available Agent: The call is routed to the agent with the highest proficiency across all skills for the contact. This setting is applicable if at least one of the skills in the skill requirement list is of type Proficiency. For more information, see Skills-based Routing Types.

                                                                                                                                                                                                              You cannot edit the Queue Routing Type after the queue is saved.

                                                                                                                                                                                                              Outbound Campaign Enabled

                                                                                                                                                                                                              This toggle button is displayed for outdial queues.

                                                                                                                                                                                                              If the toggle button is enabled, then the Call Distribution and Queue Routing Type fields are displayed. This field cannot be edited later. The Longest Available Agent is the only supported queue routing type for outdial queues.

                                                                                                                                                                                                              Call Distribution

                                                                                                                                                                                                              Add Group

                                                                                                                                                                                                              Add a Call Distribution Group to associate one or more teams with this queue. Add multiple groups to distribute calls to more teams as time in queue progresses.

                                                                                                                                                                                                              Advanced Settings

                                                                                                                                                                                                              Permit Monitoring

                                                                                                                                                                                                              Click Yes or No to specify whether users can monitor the calls.

                                                                                                                                                                                                              This setting is available for the Telephony channel type.

                                                                                                                                                                                                              Permit Recording

                                                                                                                                                                                                              Click Yes or No to specify whether the system can record the calls.

                                                                                                                                                                                                              This setting is available for the Telephony channel type.

                                                                                                                                                                                                              Record All Calls

                                                                                                                                                                                                              This setting is available if you enable Permit Recording.

                                                                                                                                                                                                              Click Yes or No to indicate whether the system can record all the calls for this queue.

                                                                                                                                                                                                              This setting is available for the Telephony channel type.

                                                                                                                                                                                                              Pause/Resume Enabled

                                                                                                                                                                                                              Click Yes or No to specify whether the agents can pause and resume a call recording. For example, the agent can pause call recording while discussing sensitive information from the customer, such as credit card details.

                                                                                                                                                                                                              If you enable the Pause/Resume Enabled feature in the Tenant settings, the system overrides a No setting here. For more information, see Tenant Settings.

                                                                                                                                                                                                              Agents can use this feature if your organization administrator enables the Privacy Shield feature in the Webex Contact Center service configuration.

                                                                                                                                                                                                              Recording Pause Duration

                                                                                                                                                                                                              This setting is available if you set Pause/Resume Enabled to Yes.

                                                                                                                                                                                                              This setting specifies the time in seconds, after which the recording resumes automatically.

                                                                                                                                                                                                              This setting is available for the Telephony channel type.

                                                                                                                                                                                                              Service Level Threshold

                                                                                                                                                                                                              Enter the time that a customer request can be in a queue before the system flags it as outside the service level. If you complete a customer service request within this time interval, the system considers it within the service level.

                                                                                                                                                                                                              Maximum Time in Queue

                                                                                                                                                                                                              Enter the time after which the contact (all media types) is terminated.

                                                                                                                                                                                                              Default Music in Queue

                                                                                                                                                                                                              Select the name of the audio (.wav) file to play for calls when the calls arrive or wait in the queue. This is the default audio file.

                                                                                                                                                                                                              If Play Music is not configured in the Queue Contact activity, then the default music file is played.

                                                                                                                                                                                                              Time Zone (Routing Strategies Only)

                                                                                                                                                                                                              (Optional) If your organization administrator enables Multiple Time Zone for your enterprise, you can select the time zone of the entry point.

                                                                                                                                                                                                              Table 8. Configuration for Channel Type Chat

                                                                                                                                                                                                              Setting

                                                                                                                                                                                                              Description

                                                                                                                                                                                                              General Settings

                                                                                                                                                                                                              Name

                                                                                                                                                                                                              Enter a name for the queue.

                                                                                                                                                                                                              Description

                                                                                                                                                                                                              (Optional) Enter a short description for the queue.

                                                                                                                                                                                                              Type

                                                                                                                                                                                                              (Read-only) This read-only field displays whether the settings are for an entry point, a queue, an outdial entry point, or an outdial queue.

                                                                                                                                                                                                              Channel Type

                                                                                                                                                                                                              The channel type is: Chat

                                                                                                                                                                                                              For outdial queues, the only channel type supported is Telephony.

                                                                                                                                                                                                              Contact Routing Settings

                                                                                                                                                                                                              Queue Routing Type

                                                                                                                                                                                                              The supported queue routing types are:

                                                                                                                                                                                                              • Longest Available Agent: Chats are routed to the agent who has been available for the longest time over all teams assigned to the queue in the Chat Distribution section. For more information, see Longest Available Agent (LAA).

                                                                                                                                                                                                              • Skills Based: Chats are routed to agents based on skill requirements configured in the Webex Connect flow.

                                                                                                                                                                                                                When you select Skills Based as the routing type, two other options appear for you to specify how to route a chat when more than one agent with the required skill set is available:

                                                                                                                                                                                                                Longest Available Agent: The chat is routed to the agent who has been available for the longest duration. For more information, see Longest Available Agent (LAA).

                                                                                                                                                                                                                Best Available Agent: When you select this setting, the chat is routed to the agent with the highest proficiency across all skills for the contact. This setting is applicable if at least one of the skills in the skill requirement list is of type Proficiency. For more information, see Skills-based Routing Types.

                                                                                                                                                                                                              You cannot edit the Queue Routing Type after the queue is saved.

                                                                                                                                                                                                              Add Group

                                                                                                                                                                                                              Add a Chat Distribution Group to associate one or more teams with this queue. Add multiple groups to distribute chats to more teams as time in queue progresses.

                                                                                                                                                                                                              Advanced Settings

                                                                                                                                                                                                              Service Level Threshold

                                                                                                                                                                                                              Enter the time that a customer request can be in a queue before the system flags it as outside the service level. If you complete a customer service request within this time interval, the system considers it within the service level.

                                                                                                                                                                                                              Maximum Time in Queue

                                                                                                                                                                                                              Enter the time after which the contact (all media types) is terminated.

                                                                                                                                                                                                              Time Zone (Routing Strategies Only)

                                                                                                                                                                                                              (Optional) If your organization administrator enables Multiple Time Zone for your enterprise, you can select the time zone of the entry point.

                                                                                                                                                                                                              Table 9. Configuration for Channel Type Email

                                                                                                                                                                                                              Setting

                                                                                                                                                                                                              Description

                                                                                                                                                                                                              General Settings

                                                                                                                                                                                                              Name

                                                                                                                                                                                                              Enter a name for the queue.

                                                                                                                                                                                                              Description

                                                                                                                                                                                                              (Optional) Enter a short description for the queue.

                                                                                                                                                                                                              Type

                                                                                                                                                                                                              (Read-only) This read-only field displays whether the settings are for an entry point, a queue, an outdial entry point, or an outdial queue.

                                                                                                                                                                                                              Channel Type

                                                                                                                                                                                                              The channel type is: Email

                                                                                                                                                                                                              For outdial queues, the only channel type supported is Telephony.

                                                                                                                                                                                                              Contact Routing Settings

                                                                                                                                                                                                              Queue Routing Type

                                                                                                                                                                                                              The supported queue routing types are:

                                                                                                                                                                                                              • Longest Available Agent: Emails are routed to the agent who has been available for the longest time over all teams assigned to the queue in the Email Distribution section. For more information, see Longest Available Agent (LAA).

                                                                                                                                                                                                              • Skills Based: Emails are routed to agents based on skill requirements configured in the Webex Connect flow.

                                                                                                                                                                                                                When you select Skills Based as the routing type, two other options appear for you to specify how to route an email when more than one agent with the required skill set is available:

                                                                                                                                                                                                                Longest Available Agent: The email is routed to the agent who has been available for the longest duration.

                                                                                                                                                                                                                Best Available Agent: When you select this setting, the email is routed to the agent with the highest proficiency across all skills for the contact. This setting is applicable if at least one of the skills in the skill requirement list is of type Proficiency. For more information, see Skills-based Routing Types.

                                                                                                                                                                                                              You cannot edit the Queue Routing Type after the queue is saved.

                                                                                                                                                                                                              Add Group

                                                                                                                                                                                                              Add an Email Distribution Group to associate one or more teams with this queue. Add multiple groups to distribute emails to more teams as time in queue progresses.

                                                                                                                                                                                                              Advanced Settings

                                                                                                                                                                                                              Service Level Threshold

                                                                                                                                                                                                              Enter the time that a customer request can be in a queue before the system flags it as outside the service level. If you complete a customer service request within this time interval, the system considers it within the service level.

                                                                                                                                                                                                              Maximum Time in Queue

                                                                                                                                                                                                              Enter the time after which the contact (all media types) is terminated.

                                                                                                                                                                                                              Time Zone (Routing Strategies Only)

                                                                                                                                                                                                              (Optional) If your organization administrator enables Multiple Time Zone for your enterprise, you can select the time zone of the entry point.

                                                                                                                                                                                                              Copy a Queue or an Outdial Queue

                                                                                                                                                                                                              To copy a queue:

                                                                                                                                                                                                              1

                                                                                                                                                                                                              From the Management Portal navigation bar, choose Provisioning > Entry Points/Queues.

                                                                                                                                                                                                              2

                                                                                                                                                                                                              Choose Queue or Outdial Queue.

                                                                                                                                                                                                              3

                                                                                                                                                                                                              Click the ellipsis icon beside a queue and click Copy.

                                                                                                                                                                                                              A copy of the queue page appears. The fields have the same values as the original queue.

                                                                                                                                                                                                              You can save the same queue with a different name or edit the queue.

                                                                                                                                                                                                              You can edit the following details:

                                                                                                                                                                                                              Deactivate an Entry Point or a Queue

                                                                                                                                                                                                              You cannot deactivate an entry point or queue if you associate it with any other entities such as dial numbers or other routing strategy. When you try to deactivate these entry points or queues, you get an error message. Click the information icon at the end of the message to view the list of all the associated entities.

                                                                                                                                                                                                              After you deactivate an entry point or queue, you can still see it in the Entry Points/Queues page as Not Active. Historical reports also display details of the deactivated entry points or queues.

                                                                                                                                                                                                              In the Entry Points/Queues page, you can click the ellipsis icon and then the restore icon to reactivate an entry point or queue.

                                                                                                                                                                                                              To deactivate an entry point or queue:

                                                                                                                                                                                                              1

                                                                                                                                                                                                              From the Management Portal navigation bar, choose Provisioning > Entry Points/Queues.

                                                                                                                                                                                                              2

                                                                                                                                                                                                              Choose the type of entry point or queue that you want to deactivate.

                                                                                                                                                                                                              3

                                                                                                                                                                                                              Click the ellipsis icon beside an entry point or queue and click Mark Inactive.

                                                                                                                                                                                                              4

                                                                                                                                                                                                              Click Yes to confirm.

                                                                                                                                                                                                              Once the object is marked inactive, it can be permanently deleted. For more information, see Delete inactive objects permanently.

                                                                                                                                                                                                              Activate an Entry Point or a Queue

                                                                                                                                                                                                              1

                                                                                                                                                                                                              From the Management Portal navigation bar, choose Provisioning > Entry Points/Queues.

                                                                                                                                                                                                              2

                                                                                                                                                                                                              Choose the type of entry point or queue that you want to activate.

                                                                                                                                                                                                              3

                                                                                                                                                                                                              Click the ellipsis icon beside the entry point or queue with the status Not Active and click Restore.

                                                                                                                                                                                                              4

                                                                                                                                                                                                              Click Yes to confirm.

                                                                                                                                                                                                              The status of the entry point or queue changes to Active.

                                                                                                                                                                                                              Sites

                                                                                                                                                                                                              A site is a physical contact center location under the control of your enterprise. For example, enterprise Acme can have sites in Chicago, Manila, and Bangalore with agents to handle customer contacts.

                                                                                                                                                                                                              When you create a site, the system automatically adds a team and a multimedia profile to the new site. You can change the team name and other settings, but cannot change the team type from Capacity based to Agent based. Do not delete the team without adding another team for the new site.

                                                                                                                                                                                                              Create a Site

                                                                                                                                                                                                              To create a site:
                                                                                                                                                                                                              1

                                                                                                                                                                                                              From the Management Portal navigation bar, choose Provisioning > Site.

                                                                                                                                                                                                              2

                                                                                                                                                                                                              Click + New Site.

                                                                                                                                                                                                              3

                                                                                                                                                                                                              Enter the following details and click Save:

                                                                                                                                                                                                              Settings

                                                                                                                                                                                                              Description

                                                                                                                                                                                                              General Settings

                                                                                                                                                                                                              Name

                                                                                                                                                                                                              Enter a name for the site.

                                                                                                                                                                                                              Advanced Settings

                                                                                                                                                                                                              Multimedia Profile

                                                                                                                                                                                                              This setting is available, if your administrator enables Multimedia for your enterprise.

                                                                                                                                                                                                              Select a multimedia profile for the site. If you do not assign, the system assigns the Default_Telephony_Profile. For more information, see Multimedia Profiles.

                                                                                                                                                                                                              View the Details of a Site

                                                                                                                                                                                                              To view the details of a site:

                                                                                                                                                                                                              1

                                                                                                                                                                                                              From the Management Portal navigation bar, choose Provisioning > Site.

                                                                                                                                                                                                              2

                                                                                                                                                                                                              Click the ellipsis icon beside the site that you want to view, and click View.

                                                                                                                                                                                                              3

                                                                                                                                                                                                              You can view the following settings:

                                                                                                                                                                                                              Edit a Site

                                                                                                                                                                                                              To edit a site:

                                                                                                                                                                                                              1

                                                                                                                                                                                                              From the Management Portal navigation bar, choose Provisioning > Site.

                                                                                                                                                                                                              2

                                                                                                                                                                                                              Click the ellipsis icon beside the site that you want to edit, and click Edit.

                                                                                                                                                                                                              3

                                                                                                                                                                                                              You can edit the following settings. Click Save after you have made the changes:

                                                                                                                                                                                                              Setting

                                                                                                                                                                                                              Description

                                                                                                                                                                                                              General Settings

                                                                                                                                                                                                              Name

                                                                                                                                                                                                              Edit the name of the site. Generally, it is the name of the geographical location.

                                                                                                                                                                                                              Advanced Settings

                                                                                                                                                                                                              Status

                                                                                                                                                                                                              Modify the status of the site.

                                                                                                                                                                                                              Multimedia Profile

                                                                                                                                                                                                              Modify the multimedia profile for the site.

                                                                                                                                                                                                              If you do not assign a profile to the site, the system assigns the Default_Telephony_Profile. This setting is available if the administrator has enabled Multimedia for your enterprise. For more information, see Multimedia Profiles.

                                                                                                                                                                                                              Deactivate a Site

                                                                                                                                                                                                              You cannot deactivate a site if agents or active teams are associated with the site. If you try to deactivate such a site, a message informs you that you cannot deactivate the site. You can click the information icon in the message to view the list of entities that are associated with this site.

                                                                                                                                                                                                              If you deactivate a site, you can still see it in the Sites page as Not Active. Historical reports also display details of the deactivated sites.

                                                                                                                                                                                                              To deactivate a site:

                                                                                                                                                                                                              1

                                                                                                                                                                                                              From the Management Portal navigation bar, choose Provisioning > Site.

                                                                                                                                                                                                              2

                                                                                                                                                                                                              Click the ellipsis icon beside the site you want to deactivate, and click Mark Inactive.

                                                                                                                                                                                                              3

                                                                                                                                                                                                              Click Yes to confirm.

                                                                                                                                                                                                              The status of the site changes to Not Active.

                                                                                                                                                                                                              Once the object is marked inactive, it can be permanently deleted. For more information, see Delete inactive objects permanently.

                                                                                                                                                                                                              Activate a Site

                                                                                                                                                                                                              To activate a site:

                                                                                                                                                                                                              1

                                                                                                                                                                                                              From the Management Portal navigation bar, choose Provisioning > Site.

                                                                                                                                                                                                              2

                                                                                                                                                                                                              Click the ellipsis icon beside the site that you want to activate and click Restore.

                                                                                                                                                                                                              3

                                                                                                                                                                                                              Click Yes to confirm.

                                                                                                                                                                                                              The status of the site changes to Active.

                                                                                                                                                                                                              Teams

                                                                                                                                                                                                              A team is a group of people who support a specific group of functions. For example, supporting the Gold customers or managing billing, and so on. A team consists of agents and is associated with a specific site.

                                                                                                                                                                                                              Create a team

                                                                                                                                                                                                              1

                                                                                                                                                                                                              From the Management Portal navigation bar, choose Provisioning > Team.

                                                                                                                                                                                                              2

                                                                                                                                                                                                              Click + New Team.

                                                                                                                                                                                                              3

                                                                                                                                                                                                              Enter the following details:

                                                                                                                                                                                                              Setting

                                                                                                                                                                                                              Description

                                                                                                                                                                                                              General Settings

                                                                                                                                                                                                              Site

                                                                                                                                                                                                              Choose the site from the drop-down list. You can’t edit the site later.

                                                                                                                                                                                                              Name

                                                                                                                                                                                                              Enter a name for the team. Use names that indicate the function of the team, such as Billing or Customer Support.

                                                                                                                                                                                                              Type

                                                                                                                                                                                                              Choose a team type:

                                                                                                                                                                                                              • Agent Based: You assign a specific number of agents to the team.

                                                                                                                                                                                                              • Capacity Based: You don’t assign any specific number of agents to the team. You use capacity-based teams for voice mailboxes or agent groups that Webex Contact Center does not manage.

                                                                                                                                                                                                              Advanced Settings

                                                                                                                                                                                                              DN

                                                                                                                                                                                                              Enter the dial number where the system distributes the calls for this team. This setting is applicable only for capacity-based teams.

                                                                                                                                                                                                              Capacity

                                                                                                                                                                                                              If Capacity Based is specified in the Team Type field, specify the maximum number of simultaneous calls that this team can handle.You can specify a maximum of up to 10,000. Calls will be routed toother sites or will be queued after the team capacity has beenreached.

                                                                                                                                                                                                              Priority

                                                                                                                                                                                                              The priority of the team. Currently Cisco doesn’t support this feature.

                                                                                                                                                                                                              Skill Profile

                                                                                                                                                                                                              (Optional) If your organization administrator enables the optional Skills-based Routing feature for your enterprise, you can select a skill profile for this team. For more information, see Skill Profiles.

                                                                                                                                                                                                              • As an administrator, you can update the skill profile of agents. These changes are applied to all relevant agents without the need for these agents to sign out and sign in again to the Desktop.

                                                                                                                                                                                                              • You can’t assign this setting to a capacity-based team.

                                                                                                                                                                                                              Multimedia Profile

                                                                                                                                                                                                              (Optional) If your organization administrator enables Multimedia for your enterprise, you can select a multimedia profile for this team. For more information, see Multimedia Profiles. This profile overrides the multimedia profile that you assign to the site of this team.

                                                                                                                                                                                                              You can’t assign this profile to a capacity-based team.

                                                                                                                                                                                                              Agents

                                                                                                                                                                                                              From the drop-down list, choose the agents you want to add to the team. You can assign only the agents that your organization administrator configures for your enterprise. For more information, see View the Details of a User.

                                                                                                                                                                                                              You can’t assign this profile to a capacity-based team.

                                                                                                                                                                                                              Desktop Layout

                                                                                                                                                                                                              (Optional) For agent-based teams, choose a desktop layout from the drop-down list. To create a desktop layout for agent-based teams, see Create a Desktop Layout.

                                                                                                                                                                                                              • If the team uses an unmodified layout, the new layout-based features appear automatically on the Desktop. The Desktop users can view the new layout-based features when they sign in or reload the browser.

                                                                                                                                                                                                              • This setting is not applicable for a capacity-based team.

                                                                                                                                                                                                              4

                                                                                                                                                                                                              Click Save.

                                                                                                                                                                                                              View a team

                                                                                                                                                                                                              1

                                                                                                                                                                                                              From the Management Portal navigation bar, choose Provisioning > Team.

                                                                                                                                                                                                              2

                                                                                                                                                                                                              Click the ellipsis icon beside the team that you want to view, and click View. You can view all of the configured details.

                                                                                                                                                                                                              Edit a team

                                                                                                                                                                                                              1

                                                                                                                                                                                                              From the Management Portal navigation bar, choose Provisioning > Team.

                                                                                                                                                                                                              2

                                                                                                                                                                                                              Click the ellipsis icon beside the team that you want to edit, and click Edit. You can edit the following settings:

                                                                                                                                                                                                              Setting

                                                                                                                                                                                                              Description

                                                                                                                                                                                                              General Settings

                                                                                                                                                                                                              Site

                                                                                                                                                                                                              Displays the site chosen for creating a team. This field cannot be edited.

                                                                                                                                                                                                              Name

                                                                                                                                                                                                              Enter a name for the team. Use names that indicate the function of the team, such as Billing or Customer Support.

                                                                                                                                                                                                              Type

                                                                                                                                                                                                              Choose a team type:

                                                                                                                                                                                                              • Agent Based: You assign a specific number of agents to the team.

                                                                                                                                                                                                              • Capacity Based: You don’t assign any specific number of agents to the team. You use capacity-based teams for voice mailboxes or agent groups that Webex Contact Center does not manage.

                                                                                                                                                                                                              Advanced Settings

                                                                                                                                                                                                              DN

                                                                                                                                                                                                              Enter the dial number where the system distributes the calls for this team. This setting is applicable only for capacity-based teams.

                                                                                                                                                                                                              Priority

                                                                                                                                                                                                              The priority of the team. Currently Cisco doesn’t support this feature.

                                                                                                                                                                                                              Skill Profile

                                                                                                                                                                                                              (Optional) If your organization administrator enables the optional Skills-based Routing feature for your enterprise, you can select a skill profile for this team. For more information, see Skill Profiles.

                                                                                                                                                                                                              As an administrator, you can update the skill profile of agents. These changes are applied to all relevant agents without the need for these agents to sign out and sign in again to the Desktop.

                                                                                                                                                                                                              Multimedia Profile

                                                                                                                                                                                                              (Optional) If your organization administrator enables Multimedia for your enterprise, you can select a multimedia profile for this team. For more information, see Multimedia Profiles. This profile overrides the multimedia profile that you assign to the site of this team.

                                                                                                                                                                                                              You can’t assign this profile to a capacity-based team.

                                                                                                                                                                                                              Agents

                                                                                                                                                                                                              From the drop-down list, choose the agents you want to add to the team. You can assign only the agents that your organization administrator configures for your enterprise. For more information, see View the Details of a User.

                                                                                                                                                                                                              You can’t assign this profile to a capacity-based team.

                                                                                                                                                                                                              Desktop Layout

                                                                                                                                                                                                              (Optional) For agent-based teams, choose a desktop layout from the drop-down list. To create a desktop layout for agent-based teams, see Create a Desktop Layout.

                                                                                                                                                                                                              If the team uses an unmodified layout, the new layout-based features appear automatically on the Desktop. The Desktop users can view the new layout-based features when they sign in or reload the browser.

                                                                                                                                                                                                              3

                                                                                                                                                                                                              Click Save.

                                                                                                                                                                                                              Deactivate a team

                                                                                                                                                                                                              You cannot deactivate teams associated with agents or active routing strategies. When you try to deactivate such teams, Management Portal displays a message that the team cannot be deactivated. You can click the information icon in the message to view the list of entities associated with a team.

                                                                                                                                                                                                              If you deactivate a team, you still see the Teams page as Not Active. Historical reports also display details of deactivated teams.

                                                                                                                                                                                                              1

                                                                                                                                                                                                              From the Management Portal navigation bar, choose Provisioning > Team.

                                                                                                                                                                                                              2

                                                                                                                                                                                                              Click the ellipsis icon beside the team that you want to deactivate, and click Mark Inactive.

                                                                                                                                                                                                              3

                                                                                                                                                                                                              Click Yes to confirm.

                                                                                                                                                                                                              The status of the team changes to Not Active.

                                                                                                                                                                                                              Once the object is marked inactive, it can be permanently deleted. For more information, see Delete inactive objects permanently.

                                                                                                                                                                                                              Activate a Team

                                                                                                                                                                                                              1

                                                                                                                                                                                                              From the Management Portal navigation bar, choose Provisioning > Team.

                                                                                                                                                                                                              2

                                                                                                                                                                                                              Click the ellipsis icon beside the team that you want to activate and click Restore.

                                                                                                                                                                                                              3

                                                                                                                                                                                                              Click Yes to confirm.

                                                                                                                                                                                                              The status of the team changes to Active.

                                                                                                                                                                                                              Users

                                                                                                                                                                                                              Users of a contact center are agents, supervisors, and managers. A user profile defines a user's access privileges for the Management Portal. Management Portal modules provide users with real-time visibility and control over resources for which they are responsible.

                                                                                                                                                                                                              An agent user account must include a user profile granting access to the Agent Desktop module, and must include a desktop profile, as described in Desktop Profiles. Agents use the Webex Contact Center Desktop to manage customer interactions and supervisors to manage supervisor capabilities.

                                                                                                                                                                                                              You can create and delete users through Control Hub.

                                                                                                                                                                                                              Management Portal synchronizes users with contact center licenses from Control Hub, irrespective of their status.

                                                                                                                                                                                                              By default, you are shown only active users. To view inactive users, check the Show Inactive Users check box.

                                                                                                                                                                                                              View the Details of a User

                                                                                                                                                                                                              1

                                                                                                                                                                                                              From the Management Portal navigation bar, choose Provisioning > Users.

                                                                                                                                                                                                              2

                                                                                                                                                                                                              To view the details of a user, click the ellipsis icon beside the first name, and then click View.

                                                                                                                                                                                                              3

                                                                                                                                                                                                              You can search users using one of the following parameters:

                                                                                                                                                                                                              • First Name

                                                                                                                                                                                                              • Last Name

                                                                                                                                                                                                              • Email

                                                                                                                                                                                                              The search results display 20 users per page. Enter any three characters in the Search box. The search results display the users that match the search criteria. Follow one of these steps to navigate the user list page:

                                                                                                                                                                                                              • Click Next to navigate to the next page.

                                                                                                                                                                                                              • Click Last to navigate to the last page.

                                                                                                                                                                                                              • Click Previous to navigate to the previous page.

                                                                                                                                                                                                              • Click First to navigate to the first page.

                                                                                                                                                                                                              You can view the following details of the user:

                                                                                                                                                                                                              Setting

                                                                                                                                                                                                              Description

                                                                                                                                                                                                              General Settings

                                                                                                                                                                                                              Username

                                                                                                                                                                                                              The name the user uses to log in to the Webex Contact Center Management Portal.

                                                                                                                                                                                                              First Name

                                                                                                                                                                                                              The first name of the user.

                                                                                                                                                                                                              Last Name

                                                                                                                                                                                                              The last name of the user.

                                                                                                                                                                                                              Email

                                                                                                                                                                                                              The email address of the user.

                                                                                                                                                                                                              Work

                                                                                                                                                                                                              The work phone number of the user.

                                                                                                                                                                                                              Mobile

                                                                                                                                                                                                              The mobile phone number of the user. The system displays the number as a string without dashes; for example, 4155551212.

                                                                                                                                                                                                              User Profile

                                                                                                                                                                                                              The profile of the user. For more information, see Manage a User Profile.

                                                                                                                                                                                                              Contact Center Enabled

                                                                                                                                                                                                              The setting to access the Agent Desktop and handle customer requests.

                                                                                                                                                                                                              Status

                                                                                                                                                                                                              The status of the user.

                                                                                                                                                                                                              Agent Settings

                                                                                                                                                                                                              Site

                                                                                                                                                                                                              The site of the agent. For more information, see Create a Site.

                                                                                                                                                                                                              Teams

                                                                                                                                                                                                              The teams to which the agent belongs. For more information, see Create a team

                                                                                                                                                                                                              If a user doesn't belong to any team, then the user is a supervisor.

                                                                                                                                                                                                              If a user belongs to any team, then the user is both a supervisor and an agent.

                                                                                                                                                                                                              Skill Profile

                                                                                                                                                                                                              The skill profile of the agent.

                                                                                                                                                                                                              This feature is available if your administrator has enabled the optional Skills-Based Routing feature for your enterprise. This profile overrides any skill profile at the team level that is associated with the agent. For more information, see Skill Profiles.

                                                                                                                                                                                                              Desktop Profile

                                                                                                                                                                                                              The profile of the agent. For more information, see Desktop Profiles.

                                                                                                                                                                                                              An agent can belong to several teams, but can have only one desktop profile.

                                                                                                                                                                                                              Multimedia Profile

                                                                                                                                                                                                              The multimedia profile of the agent.

                                                                                                                                                                                                              This feature is available if your administrator enables the optional Multimedia feature for your enterprise. This profile overrides the multimedia profile of the team that the agent uses to sign in to the Desktop. For more information, see Multimedia Profiles.

                                                                                                                                                                                                              External ID

                                                                                                                                                                                                              Agent identification details, such as the employee number.

                                                                                                                                                                                                              Default DN

                                                                                                                                                                                                              The dial number of the agent.

                                                                                                                                                                                                              The dial number can be in one of the following formats:

                                                                                                                                                                                                              • E.164 number format: [+][Country Code][Number]

                                                                                                                                                                                                                Example: +11234567890

                                                                                                                                                                                                              • IDD (International Direct Dialing) format: [IDD][Country Code][Number]

                                                                                                                                                                                                                Example: 01161123456789

                                                                                                                                                                                                              Edit a User

                                                                                                                                                                                                              1

                                                                                                                                                                                                              From the Management Portal navigation bar, choose Provisioning > Users.

                                                                                                                                                                                                              2

                                                                                                                                                                                                              To edit the details of a user, click the ellipsis button next to the first name of the user and then click Edit. You can edit the following settings:

                                                                                                                                                                                                              Setting

                                                                                                                                                                                                              Description

                                                                                                                                                                                                              General Settings

                                                                                                                                                                                                              Username

                                                                                                                                                                                                              Enter the name that the user uses to log in to the Webex Contact Center system. The username must be a valid email address. You can’t edit this setting.

                                                                                                                                                                                                              First Name

                                                                                                                                                                                                              Enter the first name of the user.

                                                                                                                                                                                                              Last Name

                                                                                                                                                                                                              Enter the last name of the user.

                                                                                                                                                                                                              Email

                                                                                                                                                                                                              Optionally, enter the email address of the user.

                                                                                                                                                                                                              Agent Settings

                                                                                                                                                                                                              External ID

                                                                                                                                                                                                              Optionally, enter another means of identifying the agent, such as an employee number.

                                                                                                                                                                                                              Setting

                                                                                                                                                                                                              Description

                                                                                                                                                                                                              General Settings

                                                                                                                                                                                                              Country

                                                                                                                                                                                                              Edit the country in which the user resides.

                                                                                                                                                                                                              State

                                                                                                                                                                                                              Edit the state in which the user resides.

                                                                                                                                                                                                              City

                                                                                                                                                                                                              Edit the city in which the user resides.

                                                                                                                                                                                                              Street

                                                                                                                                                                                                              Edit the street in which the user resides.

                                                                                                                                                                                                              Work

                                                                                                                                                                                                              Edit the work phone number of the user.

                                                                                                                                                                                                              Mobile

                                                                                                                                                                                                              Edit the mobile phone number of the user.

                                                                                                                                                                                                              Zip Code

                                                                                                                                                                                                              Edit the postal code of the user.

                                                                                                                                                                                                              User Profile

                                                                                                                                                                                                              Edit the profile of the user. For more information, see Manage a User Profile.

                                                                                                                                                                                                              Contact Center Enabled

                                                                                                                                                                                                              Click On to provide the user access to Agent Desktop.

                                                                                                                                                                                                              Status

                                                                                                                                                                                                              Edit the status of the user.

                                                                                                                                                                                                              Supervisor Settings

                                                                                                                                                                                                              Primary Team

                                                                                                                                                                                                              Edit the team for the supervisor.

                                                                                                                                                                                                              Agent Settings

                                                                                                                                                                                                              Site

                                                                                                                                                                                                              The site of the agent. For more information, see Create a Site.

                                                                                                                                                                                                              Ensure that the following conditions are met when you change the site of a user:

                                                                                                                                                                                                              • The agent isn’t signed in to the Agent Desktop when the site is changed. You can sign out the agent explicitly or change the site during a scheduled maintenance.

                                                                                                                                                                                                              • If the site attribute is changed while an agent is signed in, the agent experiences errors and unexpected desktop behavior.

                                                                                                                                                                                                              When you change the site:

                                                                                                                                                                                                              • The team assigned to the agent is automatically reset. You must assign a new team to the agent.

                                                                                                                                                                                                              • The desktop profileis reset if its parent type attribute is Site. The desktop profile isn’t reset if its parent type attribute is Tenant.

                                                                                                                                                                                                              • The agent can't see the data that is related to the previously assigned site in the Agent Performance Statistics Reports on the Agent Desktop.

                                                                                                                                                                                                              Teams

                                                                                                                                                                                                              The teams to which the agent belongs. To assign the agent to one or more teams, choose the teams from the drop-down list.

                                                                                                                                                                                                              Skill Profile

                                                                                                                                                                                                              Edit the skill profile of the agent. Choose a profile from the drop-down list.

                                                                                                                                                                                                              This feature is available if your administrator enables the optional Skills-Based Routing feature for your enterprise. This profile overrides any skill profile at the team level that is associated with the agent. For more information, see Skill Profiles.

                                                                                                                                                                                                              Desktop Profile

                                                                                                                                                                                                              Edit the profile of the agent. Choose a profile from the drop-down list. For more information, see Desktop Profiles.

                                                                                                                                                                                                              Note: An agent can belong to several teams, but has a single desktop profile.

                                                                                                                                                                                                              Multimedia Profile

                                                                                                                                                                                                              Edit the multimedia profile of the agent. Choose a profile from the drop-down list.

                                                                                                                                                                                                              You can't assign custom multimedia profiles to standard agents. This field is grayed out by default when you choose a standard agent.

                                                                                                                                                                                                              This feature is available if your administrator enables the optional Multimedia feature for your enterprise. This profile overrides the multimedia profile of the team that the agent uses to log in to the Agent Desktop. For more information, see Multimedia Profiles.

                                                                                                                                                                                                              Default DN

                                                                                                                                                                                                              (Optional) Edit the dial number of the agent. If a dial number isn’t specified for the agent, you can add a dial number.

                                                                                                                                                                                                              Enter the dial number in one of the following formats:

                                                                                                                                                                                                              • E.164 number format: [+][Country Code][Number]

                                                                                                                                                                                                                Example: +11234567890

                                                                                                                                                                                                              • IDD (International Direct Dialing) format: [IDD][Country Code][Number]

                                                                                                                                                                                                                Example: 01161123456789

                                                                                                                                                                                                              External ID

                                                                                                                                                                                                              (Optional) Edit the identification details of the agent, such as the employee number.

                                                                                                                                                                                                              You can edit the following settings from Cisco Webex Control Hub:

                                                                                                                                                                                                              Setting

                                                                                                                                                                                                              Description

                                                                                                                                                                                                              General Settings

                                                                                                                                                                                                              Username

                                                                                                                                                                                                              The name that the user uses to log in to Management Portal.

                                                                                                                                                                                                              First Name

                                                                                                                                                                                                              The first name of the user.

                                                                                                                                                                                                              Last Name

                                                                                                                                                                                                              The last name of the user.

                                                                                                                                                                                                              Email

                                                                                                                                                                                                              The email address of the user.

                                                                                                                                                                                                              Export Items Provisioned for a User

                                                                                                                                                                                                              To export the details of the items that you have provisioned for a user:
                                                                                                                                                                                                              1

                                                                                                                                                                                                              From the Management Portal navigation bar, choose Provisioning > Users.

                                                                                                                                                                                                              2

                                                                                                                                                                                                              Click the ellipsis icon beside a username and click Excel or PDF. The report contains details of the following items:

                                                                                                                                                                                                              Setting

                                                                                                                                                                                                              Description

                                                                                                                                                                                                              Active Inbound Entry Point Details

                                                                                                                                                                                                              The details of the entry points that you map to the user.

                                                                                                                                                                                                              Outdial Entry Points

                                                                                                                                                                                                              The details of outdial entry points that you map to the user.

                                                                                                                                                                                                              Inbound Queues

                                                                                                                                                                                                              The details of inbound queues that you map to the user.

                                                                                                                                                                                                              Outdial Queues

                                                                                                                                                                                                              The details of outdial queues that you map to the user.

                                                                                                                                                                                                              Sites

                                                                                                                                                                                                              The details of the sites that you map to the user.

                                                                                                                                                                                                              Teams

                                                                                                                                                                                                              The details of the teams that you map to the user.

                                                                                                                                                                                                              Agents

                                                                                                                                                                                                              The details of the agents that you map to the user.

                                                                                                                                                                                                              Revoke API Key for a User

                                                                                                                                                                                                              To revoke API key for a user:
                                                                                                                                                                                                              1

                                                                                                                                                                                                              From the Management Portal navigation bar, choose Provisioning > Users.

                                                                                                                                                                                                              2

                                                                                                                                                                                                              Click the ellipsis icon beside the required user and click Revoke API Key.

                                                                                                                                                                                                              A message appears that you have successfully revoked the API Key for the user.

                                                                                                                                                                                                              If you do not map an API key to the profile of that user, an error message appears that the user does not have an API key.

                                                                                                                                                                                                              Update and Upload Agent Template

                                                                                                                                                                                                              To upload the details of multiple agents simultaneously:

                                                                                                                                                                                                              1

                                                                                                                                                                                                              From the Management Portal navigation bar, choose Provisioning > Users.

                                                                                                                                                                                                              2

                                                                                                                                                                                                              To download the template, click the Export as CSV () icon.

                                                                                                                                                                                                              3

                                                                                                                                                                                                              Click Bulk Update () icon.

                                                                                                                                                                                                              4

                                                                                                                                                                                                              Browse the Agent Update template from your local system and choose the template.

                                                                                                                                                                                                              5

                                                                                                                                                                                                              Click Upload.

                                                                                                                                                                                                              6

                                                                                                                                                                                                              (Optional) Check the status of the upload from Bulk Operations Status in Provisioning.

                                                                                                                                                                                                              User Profiles

                                                                                                                                                                                                              User profiles determine the features accessible to a user in Cisco Contact Center.

                                                                                                                                                                                                              Manage a User Profile

                                                                                                                                                                                                              To create a user profile:

                                                                                                                                                                                                              1

                                                                                                                                                                                                              From the Management Portal navigation bar, choose Provisioning > User Profiles.

                                                                                                                                                                                                              2

                                                                                                                                                                                                              Click the + New User Profile.

                                                                                                                                                                                                              3

                                                                                                                                                                                                              Enter the details in the following tabs and click Save in each tab.

                                                                                                                                                                                                              4

                                                                                                                                                                                                              From the User Profiles page, you can also do the following:

                                                                                                                                                                                                              • To view the settings for a profile, click the ellipsis beside the user profile that you want to view, and click View.

                                                                                                                                                                                                              • To edit the settings for a profile, click the ellipsis icon beside the user profile that you want to edit, and click Edit. Modify the settings and click Save.

                                                                                                                                                                                                              • To export the settings for a profile, click the button to the left of the user profile and click Excel or PDF.

                                                                                                                                                                                                              • To revoke the API key for the profile, click the button to the left of the user profile and click Revoke API Key.

                                                                                                                                                                                                              General Settings

                                                                                                                                                                                                              When you configure a new user profile or edit an existing user profile, you can change the following settings in the General Settings tab.

                                                                                                                                                                                                              Parameter

                                                                                                                                                                                                              Description

                                                                                                                                                                                                              Name

                                                                                                                                                                                                              Enter a name for the user profile.

                                                                                                                                                                                                              When you copy a user profile, the system appends the words copy_of before the name of the original user profile. You can keep the same name or edit it as per your requirement.

                                                                                                                                                                                                              Description

                                                                                                                                                                                                              (Optional) Enter a description for the profile.

                                                                                                                                                                                                              Profile Type

                                                                                                                                                                                                              Choose a type to determine the privilege level for this profile.

                                                                                                                                                                                                              For Management Portal, generic profile and module mapping are:

                                                                                                                                                                                                              • Standard Agent—Has access to Desktop module.

                                                                                                                                                                                                              • Premium Agent—Has access to Desktop and Multimedia module.

                                                                                                                                                                                                              • Supervisor—Has access to all modules but can't manage tenants in the Provisioning module.

                                                                                                                                                                                                              • Administrator—Has access to all modules.

                                                                                                                                                                                                              • Administration Only—Has access to the Provisioning, Routing Strategy, and Call Recording modules.

                                                                                                                                                                                                              Multimedia mode access to Standard Agent is only applicable if you have subscribed to Flex 3.0 plan. For more information, refer to Flex 3.0 Contact Center Ordering Guide.

                                                                                                                                                                                                              You can’t edit the profile type later.

                                                                                                                                                                                                              Status

                                                                                                                                                                                                              You can view and change this setting only when you edit or copy a user profile.

                                                                                                                                                                                                              Module Settings

                                                                                                                                                                                                              You can use user profiles to control access to Management Portal. The Module Settings tab allows you to specify permissions to the Management Portal modules. You can set module access when you create a new user profile, or edit or copy an existing user profile.

                                                                                                                                                                                                              The Module Access has the following options:

                                                                                                                                                                                                              If you click All for Module Access, then the user profile can access all of the modules. Click Specific if you want to provide the user access to selected modules only.

                                                                                                                                                                                                              You can specify access to the following specific modules.

                                                                                                                                                                                                              Setting

                                                                                                                                                                                                              Description

                                                                                                                                                                                                              Additional Supervisory Features

                                                                                                                                                                                                              Allows the administrator to manage additional supervisory features for the agents.

                                                                                                                                                                                                              To enable the following setting, click the toggle button:

                                                                                                                                                                                                              • Send Messages: Allows the supervisor to send a message to an agent from the Team Performance Details page.

                                                                                                                                                                                                              • Change Agent States: Allows the supervisor to change the agent state from the Team Performance Details page.

                                                                                                                                                                                                              Agent Desktop

                                                                                                                                                                                                              Allows the user to access the Desktop.

                                                                                                                                                                                                              Call Monitoring

                                                                                                                                                                                                              Allows the user to silently monitor the quality of service that is delivered to customers across multisource contact centers. The user can silently monitor a selected queue, team, site, or agent if you enable Call Monitoring for the user.

                                                                                                                                                                                                              To enable the following settings, click the toggle button:

                                                                                                                                                                                                              • Whisper Coach: Allows the user who is monitoring the call to speak to the agent (who is handling the call), without the customer hearing the conversation.

                                                                                                                                                                                                              • Restricted Monitor Only: Prevents the user from viewing and editing monitoring schedules that the user did not create.

                                                                                                                                                                                                              • View Blind Monitor Requests: Allows the user to view blind monitoring requests of other users.

                                                                                                                                                                                                              Call Recording

                                                                                                                                                                                                              Allows the user to record any active Webex Contact Center call. The user can select the call from a queue, team, site, or agent, and specify the duration for which to record the call.

                                                                                                                                                                                                              Multimedia

                                                                                                                                                                                                              Allows authorized users to choose a multimedia profile for the user, that includes all types of media such as voice, chat, email, and social. If Multimedia is not enabled, when you edit the user's details via Provisioning > Users, the Multimedia Profile drop-down list displays only the default telephony profile.

                                                                                                                                                                                                              Users who have subscribed to Flex 3.0 plan can access the following:

                                                                                                                                                                                                              • Digital Channels - Access to chat and email only

                                                                                                                                                                                                              • Social Channels - Access to social integrations

                                                                                                                                                                                                              Users with Standard Agent user profile have access to Digital Channels only.

                                                                                                                                                                                                              Provisioning

                                                                                                                                                                                                              Provides the user access to the Provisioning module. The user can perform provisioning activities for the enterprise only if you select Edit in the Provisioning drop-down list. You can control access for an administrator user to perform the following provisioning activities for the enterprise:

                                                                                                                                                                                                              • Manage Entry Points/Queues: Allows the user to manage Webex Contact Center entry points and queues.

                                                                                                                                                                                                              • Manage Sites: Allows the user to manage Webex Contact Center sites.

                                                                                                                                                                                                              • Manage Teams: Allows the user to manage Webex Contact Center teams.

                                                                                                                                                                                                              • Manage Users: Allows the user to manage Webex Contact Center users.

                                                                                                                                                                                                              • Manage User Profiles: Allows the user to manage Webex Contact Center user profiles.

                                                                                                                                                                                                              • Entry PointDN Mappings: Allows the user to map DNs to entry points.

                                                                                                                                                                                                              • Manage Dial Plans: Allows the user to create and edit dial plans.

                                                                                                                                                                                                              • Audit Trail: Allows the user to access the Audit Trail interface. This interface allows users to view details of the provisioning changes for the enterprise.

                                                                                                                                                                                                              • Branding: Provides the user access to the Custom Theme settings on the Management Portal landing page. The user can customize the banner color and images on the Management Portal pages.

                                                                                                                                                                                                              • Manage Tenants: Allows the user to edit some of the tenant settings.

                                                                                                                                                                                                              • Revoke API Key: Allows the user to revoke the API key of a Webex Contact Center user.

                                                                                                                                                                                                              • Manage Desktop profiles: Allows the user to manage desktop profiles.

                                                                                                                                                                                                              • Manage Skill Definitions: Allows the user to manage skill definitions.

                                                                                                                                                                                                              • Manage Skill Profiles: Allows the user to manage skill profiles.

                                                                                                                                                                                                              • Mange Work Types : Allows the user to manage work types.

                                                                                                                                                                                                              • Manage Auxilliary Codes: Allows the user to manage auxilliary codes.

                                                                                                                                                                                                              • Manage Outdial ANIs: Allows the user to manage Outdial ANIs.

                                                                                                                                                                                                              • Manage Desktop Layout : Allows the user to manage desktop layouts.

                                                                                                                                                                                                              • Manage Multimedia Profile: Allows the user to manage multimedia profiles.

                                                                                                                                                                                                              • Manage Address Books: Allows the user to manage address books.

                                                                                                                                                                                                              Recording Management

                                                                                                                                                                                                              Provides access to the Recording Management module, which allows the user to search for and play audio files recorded through the Webex Contact Center Call Recording feature. You can enable the following permissions to the Recording Management module:

                                                                                                                                                                                                              • Tags: Allows the user to access the Tags tab to view, create, and edit tags that can be assigned to audio files. You can use these tags as search criteria.

                                                                                                                                                                                                              • Security Keys: Allows the user to access the Security Keys tab to view and change the schedule for generating security key pairs.

                                                                                                                                                                                                              This setting allows Supervisors to access Quality Management widget through Desktop.

                                                                                                                                                                                                              Reporting and Analytics

                                                                                                                                                                                                              Provides access to the Reporting and Analytics module. The Reporting and Analytics module allows the user to segment, profile, and visualize the data in contact center systems. This module also helps to identify the key variables that impact productivity and desired business outcomes. Users can configure and modify the Analyzer schemas using this module.

                                                                                                                                                                                                              You can provide the user access to Business Rules if you have enabled View or Edit permissions for the Reporting and Analytics module. Business Rules enable the user to incorporate customer data into the Webex Contact Center environment for custom routing and other generic implementation.

                                                                                                                                                                                                              Routing Resources

                                                                                                                                                                                                              Provides you access to the web-based user interface for managing and configuring call handling strategies.

                                                                                                                                                                                                              You can create and schedule global call routing and team capacity strategies and alter them in real-time in response to changes in business dynamics.

                                                                                                                                                                                                              You can enable the following permissions to the Routing Strategy module:

                                                                                                                                                                                                              • Manage Call Flow Scripts: Allows you to upload and update call control scripts. A control script defines how calls are handled.

                                                                                                                                                                                                              • Manage Flows: Allows you to create and manage flows. A flow defines how you handle the calls.

                                                                                                                                                                                                              • Manage Audio Files: Allows you to upload and update media resources such as audio-on-hold files for use in routing strategies. Resource files with .wav, .ulaw, .au, .php, and .xml extensions are supported along with other formats, depending on how the tenant’s system is configured.

                                                                                                                                                                                                              Provides you access to the Flow Control module based on the option selected such as None, View, and Edit. You can provide the user access to Manage Call Flow Scripts and if you have enabled the View or Edit permission for the Routing Strategy module.

                                                                                                                                                                                                              • View: If you set Routing Strategy to View, the portal provides only the Open option in the flows table.

                                                                                                                                                                                                                When this configuration is set to View, the Copy and Delete options are not provided in the Flows tab even when you set the Manage Call Flow Scripts toggle to On.

                                                                                                                                                                                                              • Edit: If you set Routing Strategy to Edit, you can configure the following settings:

                                                                                                                                                                                                                • Using this toggle, you can either enable or disable access to the Flow Control module.

                                                                                                                                                                                                                  If you disable the permission in the portal for a user, then the portal blocks the Flow Control module to load by stating- "Flow access denied - You do not have permission to edit flows for your organization".

                                                                                                                                                                                                                  If you enable the permission in the portal for a user, then the portal allows such user to work with the Flow Control module.

                                                                                                                                                                                                                • Allows you to upload and update media resources such as audio-on-hold files for use in routing strategies. Resource files with .wav, .ulaw, .au, .php, and .xml extensions are supported along with other formats, depending on how the tenant’s system is configured.

                                                                                                                                                                                                              Workforce Optimization

                                                                                                                                                                                                              Allows supervisor to access the workforce optimization features to manage human resources. Supervisors can proactively analyze and manage resources for optimizing service levels.

                                                                                                                                                                                                              The availability of workforce optimization features depends on your license.

                                                                                                                                                                                                              Access Rights

                                                                                                                                                                                                              You can configure the following settings from the Access Rights tab when you configure a new user profile or edit an existing user profile:

                                                                                                                                                                                                              • Entry Points

                                                                                                                                                                                                              • Queues

                                                                                                                                                                                                              • Sites

                                                                                                                                                                                                              • Teams

                                                                                                                                                                                                              From the drop-down list, choose the specific entities that the user can access. You can choose All to provide access to all entities of that type.

                                                                                                                                                                                                              View the Details of a User Profile

                                                                                                                                                                                                              To view the details of a user profile:
                                                                                                                                                                                                              1

                                                                                                                                                                                                              From the Management Portal navigation bar, choose Provisioning > User Profiles.

                                                                                                                                                                                                              2

                                                                                                                                                                                                              Click the ellipsis icon beside a user profile and click View.

                                                                                                                                                                                                              3

                                                                                                                                                                                                              You can view the following details:

                                                                                                                                                                                                              Edit a User Profile

                                                                                                                                                                                                              To edit a user profile:
                                                                                                                                                                                                              1

                                                                                                                                                                                                              From the Management Portal navigation bar, choose Provisioning > User Profiles.

                                                                                                                                                                                                              2

                                                                                                                                                                                                              Click the ellipsis icon beside a user profile that you want to edit and click Edit.

                                                                                                                                                                                                              3

                                                                                                                                                                                                              You can edit the details in the following tabs and click Save in each tab:

                                                                                                                                                                                                              Deactivate a User Profile

                                                                                                                                                                                                              Before you begin

                                                                                                                                                                                                              Ensure that you do not associate the user profile to any entity before you deactivate the user profile.

                                                                                                                                                                                                              To deactivate a user profile:

                                                                                                                                                                                                              1

                                                                                                                                                                                                              From the Management Portal navigation bar, choose Provisioning > User Profiles.

                                                                                                                                                                                                              2

                                                                                                                                                                                                              Click the ellipsis icon beside a user profile and click Mark Inactive.

                                                                                                                                                                                                              3

                                                                                                                                                                                                              Click Yes to confirm.

                                                                                                                                                                                                              The status of the user profile changes to Not Active.

                                                                                                                                                                                                              Once the object is marked inactive, it can be permanently deleted. For more information, see Delete inactive objects permanently.

                                                                                                                                                                                                              Activate a User Profile

                                                                                                                                                                                                              1

                                                                                                                                                                                                              From the Management Portal navigation bar, choose Provisioning > User Profiles.

                                                                                                                                                                                                              2

                                                                                                                                                                                                              Click the ellipsis icon beside the user profile that you want to activate and click Restore.

                                                                                                                                                                                                              3

                                                                                                                                                                                                              Click Yes to confirm.

                                                                                                                                                                                                              The status of the user profile changes to Active.

                                                                                                                                                                                                              Copy a User Profile

                                                                                                                                                                                                              You can copy an existing user profile, update the details, and save the profile with a different name.

                                                                                                                                                                                                              To copy a user profile:

                                                                                                                                                                                                              1

                                                                                                                                                                                                              From the Management Portal navigation bar, choose Provisioning > User Profiles.

                                                                                                                                                                                                              2

                                                                                                                                                                                                              Click the ellipsis icon beside a user profile that you want to copy, and click Copy.

                                                                                                                                                                                                              3

                                                                                                                                                                                                              Enter the details in the following tabs and click Save in each tab.

                                                                                                                                                                                                              Work Types

                                                                                                                                                                                                              When you create an idle or wrap-up code, you associate it with a work type. Work types group idle and wrap-up codes in auxiliary reports.

                                                                                                                                                                                                              Create a Work Type

                                                                                                                                                                                                              To create a work type:

                                                                                                                                                                                                              1

                                                                                                                                                                                                              From the Management Portal navigation bar, choose Provisioning > Work Types.

                                                                                                                                                                                                              2

                                                                                                                                                                                                              Click + New Work Type.

                                                                                                                                                                                                              3

                                                                                                                                                                                                              Enter the following details and click Save:

                                                                                                                                                                                                              Setting

                                                                                                                                                                                                              Description

                                                                                                                                                                                                              Name

                                                                                                                                                                                                              Enter a name for the work type.

                                                                                                                                                                                                              Description

                                                                                                                                                                                                              (Optional) Enter a description of the work type.

                                                                                                                                                                                                              Type

                                                                                                                                                                                                              Specify the type of auxiliary code to associate with the work type.

                                                                                                                                                                                                              Edit a Work Type

                                                                                                                                                                                                              To edit a work type:

                                                                                                                                                                                                              1

                                                                                                                                                                                                              From the Management Portal navigation bar, choose Provisioning > Work Types.

                                                                                                                                                                                                              2

                                                                                                                                                                                                              Click the ellipsis icon beside the work type that you want to edit and click Edit. Except the Type, you can edit the following settings:

                                                                                                                                                                                                              Setting

                                                                                                                                                                                                              Description

                                                                                                                                                                                                              Name

                                                                                                                                                                                                              Edit the name for the work type.

                                                                                                                                                                                                              Status

                                                                                                                                                                                                              You cannot edit the status. It can only be changed if the Restore option is used.

                                                                                                                                                                                                              You cannot assign an inactive work type to an auxiliary code.

                                                                                                                                                                                                              Description

                                                                                                                                                                                                              (Optionally) Edit the description of the work type.

                                                                                                                                                                                                              Type

                                                                                                                                                                                                              Specifies the type of auxiliary code. You cannot edit this setting.

                                                                                                                                                                                                              Deactivate a Work Type

                                                                                                                                                                                                              You cannot deactivate a work type if there are any auxiliary codes that are associated with the work type. When you try to deactivate such a work type, a message informs you that you cannot deactivate the work type. You can click the information icon in the message to view the list of entities that you have associated with this work type.

                                                                                                                                                                                                              After you deactivate a work type, you can still see it in the Work Types page as Not Active work types. Historical reports also display details of the deactivated work types.

                                                                                                                                                                                                              To deactivate a work type:

                                                                                                                                                                                                              1

                                                                                                                                                                                                              From the Management Portal navigation bar, choose Provisioning > Work Types.

                                                                                                                                                                                                              2

                                                                                                                                                                                                              Click the ellipsis icon beside the work type that you want to deactivate and click Mark Inactive.

                                                                                                                                                                                                              3

                                                                                                                                                                                                              Click Yes to confirm.

                                                                                                                                                                                                              The status of the work type changes to Not Active.

                                                                                                                                                                                                              Once the object is marked inactive, it can be permanently deleted. For more information, see Delete inactive objects permanently.

                                                                                                                                                                                                              Activate a Work Type

                                                                                                                                                                                                              To activate a work type:

                                                                                                                                                                                                              1

                                                                                                                                                                                                              From the Management Portal navigation bar, choose Provisioning > Work Types.

                                                                                                                                                                                                              2

                                                                                                                                                                                                              Click the ellipsis icon beside the work type that you want to activate and click Restore.

                                                                                                                                                                                                              3

                                                                                                                                                                                                              Click Yes to confirm.

                                                                                                                                                                                                              The status of the work type changes to Active.

                                                                                                                                                                                                              Auxiliary Codes

                                                                                                                                                                                                              Idle or wrap up codes are two types of Auxiliary codes. Agents select Idle or Wrap-Up codes in Webex Contact Center Agent Desktop to indicate their unavailability or status of the customer contacts. Idle codes typically indicate why an agent is not available to take customer contacts, such as during a lunch break or meeting. Wrap-up codes indicate the result of the customer contacts, for example, the agent escalated the contact, or sold a service.

                                                                                                                                                                                                              You associate each idle or wrap-up code with a work type. Work types are values that the system uses to group idle and wrap-up codes in auxiliary reports. For more information, see Create a Work Type.

                                                                                                                                                                                                              Agents can use an idle or wrap-up code if you assign the code to their profile.You must add at least one idle code and one wrap-up code in a desktop profile. For more information, see Desktop Profiles.

                                                                                                                                                                                                              If your enterprise uses the outdial feature, it is recommended that you create a wrap-up code such as Outdial Failed. Agents can use this code when they are in the wrap-up state after initiating an outdial call that fails to connect.

                                                                                                                                                                                                              Create Idle or Wrap-Up Codes

                                                                                                                                                                                                              To create an idle or wrap-up code:

                                                                                                                                                                                                              1

                                                                                                                                                                                                              From the Management Portal navigation bar, choose Provisioning > Auxiliary Codes.

                                                                                                                                                                                                              The Aux Codes Idle Codes page appears. To view the list of wrap-up codes, click Wrap Up Codes at the top of the page.
                                                                                                                                                                                                              2

                                                                                                                                                                                                              Click + New Idle Code or + New Wrap Up Code.

                                                                                                                                                                                                              3

                                                                                                                                                                                                              Enter the following details and click Save.

                                                                                                                                                                                                              Is System Auxiliary Code

                                                                                                                                                                                                              Click Yes or No to indicate whether this is the system code. System auxiliary codes are used by the multimedia subsystem.

                                                                                                                                                                                                              Status

                                                                                                                                                                                                              Displayed on the View and Edit pages to specify whether the code is Active or Not Active.

                                                                                                                                                                                                              Setting

                                                                                                                                                                                                              Description

                                                                                                                                                                                                              Name

                                                                                                                                                                                                              Enter the code name.

                                                                                                                                                                                                              Description

                                                                                                                                                                                                              (Optional) Enter a description of the code.

                                                                                                                                                                                                              Is Default

                                                                                                                                                                                                              Click Yes or No to indicate whether this is the default code.

                                                                                                                                                                                                              • If this is the first idle or wrap-up code for your organization, you must make it the default. You can modify it later after you create more codes.

                                                                                                                                                                                                              • When you make a code default, the system overrides the existing default code. At one point, there can be only one default code each for Idle and wrap-up.

                                                                                                                                                                                                              You must assign the default idle and wrap-up codes in desktop profiles. For more information, see Desktop Profiles.

                                                                                                                                                                                                              • The default wrap-up code is used when the agent’s profile specifies Auto Wrap Up. These agents do not enter wrap-up codes. Instead, they automatically go into the Available state after completing an incoming call and automatically go into the Idle state after making an outdial call.

                                                                                                                                                                                                              • The default idle code is used when the agent initially logs in and after the agent makes an outdial call if the agent’s profile specifies Auto wrap-up.

                                                                                                                                                                                                              Work Type

                                                                                                                                                                                                              Select the work type that you want to associate with this code.

                                                                                                                                                                                                              Edit Idle or Wrap-Up Codes

                                                                                                                                                                                                              1

                                                                                                                                                                                                              From the Management Portal navigation bar, choose Provisioning > Auxiliary Codes.

                                                                                                                                                                                                              2

                                                                                                                                                                                                              Click the ellipsis icon beside the idle or wrap-up code that you want to edit and click Edit.

                                                                                                                                                                                                              3

                                                                                                                                                                                                              Enter the following details and click Save.

                                                                                                                                                                                                              Setting

                                                                                                                                                                                                              Description

                                                                                                                                                                                                              Name

                                                                                                                                                                                                              Enter the code name.

                                                                                                                                                                                                              Description

                                                                                                                                                                                                              (Optional) Enter a description of the code.

                                                                                                                                                                                                              Is Default

                                                                                                                                                                                                              Click Yes or No to indicate whether this code is the default code.

                                                                                                                                                                                                              • If this code is the first idle or wrap-up code that you create, you must make it the default code. You can modify it later after you create other codes.

                                                                                                                                                                                                              You must include the default idle and wrap-up codes in desktop profiles. For more information, see Desktop Profiles.

                                                                                                                                                                                                              • The system uses the default wrap-up code when the profile of the agent specifies Auto Wrap Up. These agents do not enter wrap-up codes. Instead, they automatically go into the Available state after completing an incoming call and automatically go into the Idle state after making an outdial call.

                                                                                                                                                                                                              • The system uses the default idle code when the desktop profile has Auto Wrap enabled.

                                                                                                                                                                                                              Is System Auxiliary Code

                                                                                                                                                                                                              Click Yes or No to indicate whether this code is the system code. The multimedia subsystem uses the System auxiliary codes.

                                                                                                                                                                                                              Work Type

                                                                                                                                                                                                              Select the work type that you want to associate with this code.

                                                                                                                                                                                                              Delete Idle or Wrap-up Codes

                                                                                                                                                                                                              You cannot delete the idle or wrap-up code that is set as default. A message informs you that you cannot suspend or delete the default aux-code if you try to delete it. You must set another idle or wrap-up code to default before deleting the chosen wrap-up or idle code. See Edit Idle or Wrap-Up Codes to change the default setting.

                                                                                                                                                                                                              1

                                                                                                                                                                                                              From the Management Portal navigation bar, choose Provisioning > Auxiliary Codes.

                                                                                                                                                                                                              2

                                                                                                                                                                                                              Click the ellipsis icon beside the idle or wrap-up code and click Mark Inactive.

                                                                                                                                                                                                              3

                                                                                                                                                                                                              Click Yes to confirm.

                                                                                                                                                                                                              The status of the idle or wrap-up code changes to Not Active.

                                                                                                                                                                                                              Once the object is marked inactive, it can be permanently deleted. For more information, see Delete inactive objects permanently.

                                                                                                                                                                                                              Desktop Profiles

                                                                                                                                                                                                              Desktop Profile is a group of permissions and Desktop behaviors that you assign to agents and supervisors. Each desktop profile specifies the following permissions and settings:

                                                                                                                                                                                                              • Queue Transfer

                                                                                                                                                                                                              • Agent Consult and Transfer

                                                                                                                                                                                                              • Wrap-up and Idle Codes

                                                                                                                                                                                                              • Wrap-up Timeout Values

                                                                                                                                                                                                              • Agent Auto Available

                                                                                                                                                                                                              • Dialing Capabilities

                                                                                                                                                                                                              • Dial Number Capabilities

                                                                                                                                                                                                              • Access to the agent personal statistics

                                                                                                                                                                                                              • Auto Answer

                                                                                                                                                                                                              For reports in the Agent Personal Statistics (APS) pane on Agent Desktop, desktop profile settings are applied.

                                                                                                                                                                                                              Create a Desktop Profile

                                                                                                                                                                                                              To create a desktop profile:

                                                                                                                                                                                                              1

                                                                                                                                                                                                              From the Management Portal navigation bar, choose Provisioning > Desktop Profiles .

                                                                                                                                                                                                              2

                                                                                                                                                                                                              Click the + New Desktop Profile and enter the following settings:

                                                                                                                                                                                                              General Information

                                                                                                                                                                                                              The General Information tab displays the following settings.

                                                                                                                                                                                                              Setting

                                                                                                                                                                                                              Description

                                                                                                                                                                                                              Name

                                                                                                                                                                                                              Enter a name for the desktop profile. You can create a desktop profile from a copy of another desktop profile. When you copy a profile, the system renames the copy. The copy name consists of the name of the profile from which the copy is made and the words copy_of appended as a prefix. You can retain the name the system assigned to the file or rename it.

                                                                                                                                                                                                              Description

                                                                                                                                                                                                              (Optional) Enter a description for the profile.

                                                                                                                                                                                                              Status

                                                                                                                                                                                                              This setting appears only on the Edit page to indicate if the profile is active.

                                                                                                                                                                                                              • Active: You can assign the profile to an agent.

                                                                                                                                                                                                              • Not Active: You can't assign the profile to an agent.

                                                                                                                                                                                                              Parent Type

                                                                                                                                                                                                              Choose a parent type:

                                                                                                                                                                                                              • Tenant: The desktop profile is available to all sites at your enterprise.

                                                                                                                                                                                                              • Site: The desktop profile is available to a specific site.

                                                                                                                                                                                                              Parent Name

                                                                                                                                                                                                              This setting is available if you choose Parent Type as Site. Choose the site for which this desktop profile is available.

                                                                                                                                                                                                              Screen Popups

                                                                                                                                                                                                              Click On or Off to specify whether you want to allow external pop-up screens.

                                                                                                                                                                                                              Auto Answer

                                                                                                                                                                                                              Click Yes or No to specify whether incoming and outgoing calls on the Agent Desktop must automatically answer for an agent.

                                                                                                                                                                                                              If you choose Yes, Auto Answer works in both the following scenarios:

                                                                                                                                                                                                              Scenario 1: On Next Generation voice media platform, the agent uses Desktop as the voice channel option.

                                                                                                                                                                                                              Scenario 2: All the following conditions are met:

                                                                                                                                                                                                              If you choose Yes, Auto Answer works when all of the following conditions exist:

                                                                                                                                                                                                              • The deployment type is either a Webex Calling Cloud Connected PSTN or Local Gateway configuration.

                                                                                                                                                                                                              • On Control Hub, the Webex Contact Center Telephony option is Webex Calling.

                                                                                                                                                                                                              • On Control Hub, the setting enableAutoAnswer is on.

                                                                                                                                                                                                              • Agents use only one device.

                                                                                                                                                                                                                If agents use a Multiplatform Phone (MPP), you don't configure Webex App for the user on Control Hub.

                                                                                                                                                                                                                If agents use the Webex App, you configure the Desktop option for the user on Control Hub.

                                                                                                                                                                                                              When all the preceding conditions exist, calls are automatically answered for agents with only one device. Agents with more than one device must answer calls manually. Incoming calls to an agent are automatically answered and appear on the Agent Desktop. With outdial calls, the branch to the agent is automatically answered. The system doesn't invoke Auto Answer for simultaneous ring destinations, or if the agent forwards or redirects the call.

                                                                                                                                                                                                              In Webex Contact Center, you must not configure voicemail on agent devices, because if an agent declines a call and it is subsequently redirected to voicemail, the system will categorize the call as 'answered'.
                                                                                                                                                                                                              Auxiliary Codes

                                                                                                                                                                                                              The Desktop Profile > Auxiliary Codes page displays settings for the wrap up and idle codes and permissions that are related to wrap up and agent availability.

                                                                                                                                                                                                              Setting

                                                                                                                                                                                                              Description

                                                                                                                                                                                                              Wrap Up Settings

                                                                                                                                                                                                              When you click Auto Wrap Up with Time Out Of and enter the time, the system automatically enters the default wrap-up code after an agent completes a conversation. The agent, however, can select a different code within the time period that you specify here.

                                                                                                                                                                                                              Click Manual Wrap Up if you want the agent to select a wrap-up code after completing a call. No timeout is associated with manual wrap-up.

                                                                                                                                                                                                              Agent Available After Outdial

                                                                                                                                                                                                              Click On if you want the agent to go into the Available state after completing and wrapping up an outdial call.

                                                                                                                                                                                                              By default, an agent becomes available after the outdial call. However, if the agent does not want to be available after the outdial call, He/she can select an idle state from the Agent Availability State drop down list on the Desktop before the call is wrapped up.

                                                                                                                                                                                                              Click Off if you want the agent to go into the Idle state after completing and wrapping up an outdial call.

                                                                                                                                                                                                              Allow Auto Wrap Up Extension

                                                                                                                                                                                                              Click On if you want agents to cancel the auto wrap-up time and extend the wrap-up time.

                                                                                                                                                                                                              When this option set to On, the system displays the Cancel Auto Wrap Up option when the agent is in auto wrap-up mode.

                                                                                                                                                                                                              Wrap Up Codes

                                                                                                                                                                                                              Specify the wrap-up codes that the agents can select when they wrap up a contact:

                                                                                                                                                                                                              • Click All to make all wrap-up codes available.

                                                                                                                                                                                                              • Click Specific to make specific codes available; then choose codes from the drop-down list. To remove a code, click X on the left side of the listed code name.

                                                                                                                                                                                                              You must add the default wrap-up code in the Selected Codes list. The system uses the default code when you have enabled Auto Wrap Up in the profile of the agent. These agents do not enter wrap-up codes.

                                                                                                                                                                                                              Idle Codes

                                                                                                                                                                                                              Specify the Idle codes that the agents can select in Agent Desktop:

                                                                                                                                                                                                              • Click All to make all idle codes available.

                                                                                                                                                                                                              • Click Specific to make specific codes available; then select codes from the drop-down list. To remove a code, click X on the left side of the listed code name.

                                                                                                                                                                                                              You must add the default idle code in the Selected list. The system uses default codes in the following scenarios:

                                                                                                                                                                                                              • When the agent initially logs in.

                                                                                                                                                                                                              • After the agent makes an outdial call if you have enabled Auto Wrap Up in the profile of the agent.

                                                                                                                                                                                                              Collaboration

                                                                                                                                                                                                              The Desktop Profile > Collaboration page displays the following settings:

                                                                                                                                                                                                              Setting

                                                                                                                                                                                                              Description

                                                                                                                                                                                                              Entry Point/Queue Transfer Targets

                                                                                                                                                                                                              Specify the entry points or queues that the agents can choose from the Queue drop-down list on the Agent Desktop:

                                                                                                                                                                                                              • Click All to make all entry points and queues available.

                                                                                                                                                                                                                A maximum of 1000 entry points or queues are listed for an organization.

                                                                                                                                                                                                              • Click Specific to make specific entry points and queues available; then choose entry points and queues from the drop-down list.

                                                                                                                                                                                                              • Click None if you do not want to make any entry points or queues available as transfer targets.

                                                                                                                                                                                                              Buddy Teams

                                                                                                                                                                                                              Specify the teams that the agents can choose from the Agent drop-down list on the Agent Desktop.

                                                                                                                                                                                                              Agents can consult with, conference with, and transfer calls to the agents from the teams that they choose.

                                                                                                                                                                                                              • Click All to make the agents on all teams available.

                                                                                                                                                                                                              • Click Specific to make agents on specific teams available; then select teams from the drop-down list.

                                                                                                                                                                                                              • Click None if you do not want to make any teams available for consultation, conference, or call transfer.

                                                                                                                                                                                                              Consult To Queue

                                                                                                                                                                                                              Click On if you want the agent to be able to select a queue in the Queue drop-down list as a target for a consultation. The target must be an inbound Webex Contact Center queue.

                                                                                                                                                                                                              • If the agent selects an entry point as the target, the system disables the Consult button.

                                                                                                                                                                                                              • The system supports Consult to Queue only for queues that have teams serving them. If the agent attempts to consult to a queue that only redirects to another entry point or queue, the system displays a Consult Failed message.

                                                                                                                                                                                                              Dial Plan

                                                                                                                                                                                                              The Desktop Profile> Dial Plan page allows you to configure settings related to agent outdialing. The following table describes these settings.

                                                                                                                                                                                                              Setting

                                                                                                                                                                                                              Description

                                                                                                                                                                                                              Outdial Enabled

                                                                                                                                                                                                              If you want the agent to be able to make outdial calls, click the Outdial Enabled field to toggle to Yes.

                                                                                                                                                                                                              If you don't want the agent to make outdial calls, click the Outdial Enabled field to toggle to No. This setting prevents the dial pad from appearing on the Agent Desktop.

                                                                                                                                                                                                              To display the dial pad, you must have an appropriate setup. Contact the full administrator for the setup.

                                                                                                                                                                                                              Outdial Entry Points

                                                                                                                                                                                                              If you set Outdial Enabled to Yes, choose an entry point that the agent can use to make outdial calls from the drop-down list in the Outdial Entry Point field.

                                                                                                                                                                                                              Address Book

                                                                                                                                                                                                              Choose an address book from the drop-down list in the Address Book field. An address book includes the speed-dial numbers that the agent can choose from to make outdial and consult calls.

                                                                                                                                                                                                              If you set Outdial Enabled to No and you choose an address book, the agent can select a name from the address book for consults and transfers, but can't make outdial calls.

                                                                                                                                                                                                              Choose None if you don't want to make an address book available to the agent.

                                                                                                                                                                                                              See Create an Address Book for more information.

                                                                                                                                                                                                              Dial Plan Enabled

                                                                                                                                                                                                              If you want the agent to be able to make ad-hoc outdial calls, click the Dial Plan Enabled field to toggle to Yes.

                                                                                                                                                                                                              If you don't want the agent to be able to make ad-hoc outdial calls, click the Dial Plan Enabled field to toggle to No.

                                                                                                                                                                                                              When the Dial Plan Enabled setting is No, and the Outdial Enabled setting is Yes, the agent can make an outdial call, but only by either selecting an entry from the address book or typing a name from the address book in the Enter number to call field on the dial pad.

                                                                                                                                                                                                              Select Dial Plan

                                                                                                                                                                                                              This setting appears only if you set Dial Plan Enabled to Yes. Choose one or more dial plans for the system to use to validate the Dial Numbers (DN) that the agent enters in the Enter number to call field.

                                                                                                                                                                                                              Two default dial plans are available. You can also create custom dial plans for your enterprise. The default dial plans are:

                                                                                                                                                                                                              • US accepts input text such as the following:

                                                                                                                                                                                                                18005551234
1-800-555-1234
1 (800) 555-1234

                                                                                                                                                                                                              • Any Format accepts input such as the following:

                                                                                                                                                                                                                123
5551234
555-1234
1-800-FLOWERS
(800) 555-1234
John.Smith

                                                                                                                                                                                                              Outdial ANI

                                                                                                                                                                                                              This setting appears only if you set Outdial Enabled to Yes. Optionally, from the drop-down list in the Outdial ANI field, choose the name associated with the list of phone numbers that the agent can use to make an outdial call. The system uses the number that the agent uses as the caller ID for the call. For more information, see Create an Outdial ANI.

                                                                                                                                                                                                              Agent DN validation

                                                                                                                                                                                                              The Desktop Profile > Voice Channel options page displays the following settings.

                                                                                                                                                                                                              Setting

                                                                                                                                                                                                              Description

                                                                                                                                                                                                              Voice Channel options

                                                                                                                                                                                                              Agent DN — Allows agents to sign in using a DN

                                                                                                                                                                                                              Extension — Allows agents to sign in through a specific extension number

                                                                                                                                                                                                              Validation for Agent DN

                                                                                                                                                                                                              Click Unrestricted to allow agents to use any DN to sign in through the Station Credentials prompt on the Agent Desktop.

                                                                                                                                                                                                              If an agent enters an ad-hoc DN and the entry does not meet the sign-in syntax rules, the system rejects the agent sign-in.

                                                                                                                                                                                                              To restrict the DN that the agent can enter, click one of the following:

                                                                                                                                                                                                              • Provisioned Value restricts the sign-in DN to the default value you provision for the agent.

                                                                                                                                                                                                                Note: To provision or change an agent's default DN, edit the agent's user settings. Choose Provisioning > User > Edit > Agent Settings and enter a DN in the Default DN field. If you do not provision a DN, the agent can enter any DN to sign in.

                                                                                                                                                                                                              • Validation Criteria (Select from list) restricts the sign-in DN to the one or more dial plans you specify in the Validation Criteria setting.

                                                                                                                                                                                                              Validation Criteria

                                                                                                                                                                                                              This setting appears only if you set Validation for Agent DN to Validation Criteria.

                                                                                                                                                                                                              Select the dial plan to use for the DN validation:

                                                                                                                                                                                                              • Click All to validate the DN against all available dial plan formats.

                                                                                                                                                                                                              • Click Specific to validate the DN against one or more dial plans that you can choose from the Select Validation Criteria drop-down list. For more information, see Dial Plan.

                                                                                                                                                                                                              Agent Statistics

                                                                                                                                                                                                              The Desktop Profile > Agent Statistics page displays the following settings.

                                                                                                                                                                                                              Setting

                                                                                                                                                                                                              Description

                                                                                                                                                                                                              Agent Statistics

                                                                                                                                                                                                              Click On or Off to specify whether you want the agents to view their personal statistics in Agent Desktop.

                                                                                                                                                                                                              Queue Statistics

                                                                                                                                                                                                              This setting controls whether the agent can display statistics for all or some queues in the Agent Personal Statistics tab. Do one of the following:

                                                                                                                                                                                                              • Click All to enable the agent to display statistics for all queues.

                                                                                                                                                                                                              • Click Specific and then choose the queues from the Select Queues drop-down list to enable the agent to display statistics for specific queues.

                                                                                                                                                                                                              • Click None to prevent the agent from displaying queue statistics.

                                                                                                                                                                                                              Logged-in Team Statistics

                                                                                                                                                                                                              Click On or Off to specify whether the agent can view statistics for the team.

                                                                                                                                                                                                              • Settings for Logged-in Team Statistics and Team Statistics are independent of each other.

                                                                                                                                                                                                              • This toggle has no impact on Analyzer user reports.

                                                                                                                                                                                                              Team Statistics

                                                                                                                                                                                                              This setting controls whether the agent can display statistics for all or some teams in the Agent Personal Statistics tab. Do one of the following:

                                                                                                                                                                                                              • Click All to enable the agent to display statistics for all teams.

                                                                                                                                                                                                              • Click Specific and then choose the teams from the Select Teams drop-down list to enable the agent to display statistics for specific teams.

                                                                                                                                                                                                              • Click None to prevent the agent from displaying teams statistics.

                                                                                                                                                                                                              Access To Recordings

                                                                                                                                                                                                              This feature is currently not supported. By default, it's set to No.

                                                                                                                                                                                                              Agent Thresholds

                                                                                                                                                                                                              The Agent Thresholds page appears only if your enterprise uses the Threshold Alerts feature. This page provides settings to specify the alerts that the agent can display in the Agent Personal Statistics tab on the Agent Desktop.

                                                                                                                                                                                                              This feature is not supported. Enabling or disabling the Allow Agent Threshold under tenant settings to show the agent threshold on the desktop profile page will be removed in sometime.

                                                                                                                                                                                                              If your enterprise uses the Agent Threshold Alerts feature, the page also provides settings to specify the thresholds associated with the agent.

                                                                                                                                                                                                              For more information, see Threshold Rules.

                                                                                                                                                                                                              Setting

                                                                                                                                                                                                              Description

                                                                                                                                                                                                              Agent Viewable Threshold Alerts

                                                                                                                                                                                                              Choose rules from the drop-down list to specify the alerts that you want the agent to receive.

                                                                                                                                                                                                              When an agent breaches a threshold rule, the system generates an alert and displays it in the Agent Personal Statistics tab in Agent Desktop.

                                                                                                                                                                                                              Enable Agent Threshold Alerts

                                                                                                                                                                                                              This setting appears only if your enterprise uses the Agent Threshold Alerts feature.

                                                                                                                                                                                                              Click On or Off to specify whether you want the agent and the supervisor to receive alerts when the agent breaches specified threshold rules.

                                                                                                                                                                                                              If the agent breaches a selected rule, the system generates the alert and displays it in the Agent Threshold Alerts section of the Agent Personal Statistics tab. The supervisor also receives the alert in their Webex Contact Center Management Portal.

                                                                                                                                                                                                              Threshold Alerts

                                                                                                                                                                                                              This is available if you enable threshold alerts. If agent viewable threshold alerts are available, choose the rules for triggering the alerts from the drop-down list.

                                                                                                                                                                                                              Choose rules from the drop-down list to specify the alerts that you want the agent and supervisor to receive.

                                                                                                                                                                                                              Agent Timeout

                                                                                                                                                                                                              Agent Timeout enables you to automatically sign out an agent from the desktop after being inactive for the specified time. An agent is considered inactive if not performing any activity on the Agent Desktop while in the Idle state. Agent activity includes handling contacts, working on custom widgets, or performing any task on the Agent Desktop.

                                                                                                                                                                                                              Setting

                                                                                                                                                                                                              Description

                                                                                                                                                                                                              Desktop Inactivity Timeout

                                                                                                                                                                                                              Choose an idle timeout setting for an agent from the following options:

                                                                                                                                                                                                              Default Value: Select this to inherit the values given in Timeout Settings at the tenant level configuration.

                                                                                                                                                                                                              Custom Value: Type the value in minutes to set the idle timeout. Enter any value from 3 to 10,000 minutes in the text box. This overrides the value given in Timeout Settings at the tenant level configuration.

                                                                                                                                                                                                              Deactivate a Desktop Profile

                                                                                                                                                                                                              You cannot deactivate a desktop profile if you associate it with any other entities such as, dial numbers or any other routing strategy. When you try to deactivate these desktop profiles, you get an error message. Click the information icon at the end of the message to view the list of all the associated entities.

                                                                                                                                                                                                              After you deactivate a desktop profile, you can still see it in the Desktop Profiles page as Not Active. Historical reports also display details of the deactivated desktop profile.

                                                                                                                                                                                                              1

                                                                                                                                                                                                              From the Management Portal navigation bar, choose Provisioning > Desktop Profiles.

                                                                                                                                                                                                              2

                                                                                                                                                                                                              Click the ellipsis icon beside a desktop profile and click Mark Inactive.

                                                                                                                                                                                                              3

                                                                                                                                                                                                              Click Yes to confirm.

                                                                                                                                                                                                              The status of the desktop profile changes to Not Active.

                                                                                                                                                                                                              Once the object is marked inactive, it can be permanently deleted. For more information, see Delete inactive objects permanently.

                                                                                                                                                                                                              Activate a Desktop Profile

                                                                                                                                                                                                              To activate a desktop profile:
                                                                                                                                                                                                              1

                                                                                                                                                                                                              From the Management Portal navigation bar, choose Provisioning > Desktop Profiles.

                                                                                                                                                                                                              2

                                                                                                                                                                                                              Click the ellipsis icon beside a desktop profile with the status Not Active and click Restore.

                                                                                                                                                                                                              3

                                                                                                                                                                                                              Click Yes to confirm.

                                                                                                                                                                                                              The status of the desktop profile changes to Active.

                                                                                                                                                                                                              Address Books

                                                                                                                                                                                                              Address books contain entries with phone numbers. Instead of entering a number manually when starting a call, agents can use the address book to select an entry to dial. Agents can access an address book after you add it to their Desktop Profile. For more information, see Dial Plan in Desktop Profiles.

                                                                                                                                                                                                              You can create address books that are available to all sites or only to a specific site. The value of Maximum Address Books in the tenant settings of your enterprise determines the number of address books that you can create. For more information, see Tenant Settings.

                                                                                                                                                                                                              When an address book is updated, the administrator must inform the agents to reload the bowser or sign out and sign in again to view the updates.

                                                                                                                                                                                                              Create an Address Book

                                                                                                                                                                                                              To create a new address book:

                                                                                                                                                                                                              1

                                                                                                                                                                                                              From the Management Portal navigation bar, choose Provisioning > Address Book.

                                                                                                                                                                                                              2

                                                                                                                                                                                                              Click + New Address Book.

                                                                                                                                                                                                              3

                                                                                                                                                                                                              Enter the following details and click Save.

                                                                                                                                                                                                              Setting

                                                                                                                                                                                                              Description

                                                                                                                                                                                                              Name

                                                                                                                                                                                                              Enter a name for the address book.

                                                                                                                                                                                                              Description

                                                                                                                                                                                                              (Optional) Enter a description for the address book.

                                                                                                                                                                                                              Parent Type

                                                                                                                                                                                                              Select a parent type:

                                                                                                                                                                                                              • Tenant: The address book is available to all sites at your enterprise.

                                                                                                                                                                                                              • Site: The address book is only available for a specific site.

                                                                                                                                                                                                              Parent Name

                                                                                                                                                                                                              Select the site for the address book to be available. This field is available only if you select the Parent Type as Site.

                                                                                                                                                                                                              4

                                                                                                                                                                                                              (Optional) In the Entry List, click the + icon to add new entries in the address book.

                                                                                                                                                                                                              5

                                                                                                                                                                                                              In the Add Address Book dialog box, enter the following details:

                                                                                                                                                                                                              Setting

                                                                                                                                                                                                              Description

                                                                                                                                                                                                              Name

                                                                                                                                                                                                              Enter the name of the entry.

                                                                                                                                                                                                              Phone Number

                                                                                                                                                                                                              Enter the phone number for the entry.

                                                                                                                                                                                                              You can specify the phone number in one of the following formats:

                                                                                                                                                                                                              • E.164 number format: [+][Country Code][Number]

                                                                                                                                                                                                                Example: +11234567890

                                                                                                                                                                                                              • IDD (International Direct Dialing) format: [IDD][Country Code][Number]

                                                                                                                                                                                                                Example: 01161123456789

                                                                                                                                                                                                              The maximum number of entries in an address book is 6000. For more information on bulk operations on an address book, see Bulk operations in Webex Contact Center.

                                                                                                                                                                                                              Edit an Address Book

                                                                                                                                                                                                              You can edit the general settings and the entries of an address book.
                                                                                                                                                                                                              1

                                                                                                                                                                                                              From the Management Portal navigation bar, choose Provisioning > Address Book.

                                                                                                                                                                                                              2

                                                                                                                                                                                                              Click the ellipsis button beside the address book that you want to edit and click Edit.

                                                                                                                                                                                                              You can edit the following fields in the General Settings tab:

                                                                                                                                                                                                              Setting

                                                                                                                                                                                                              Description

                                                                                                                                                                                                              Name

                                                                                                                                                                                                              Edit the name of the address book.

                                                                                                                                                                                                              Description

                                                                                                                                                                                                              Edit the description of the address book.

                                                                                                                                                                                                              Parent Name

                                                                                                                                                                                                              Edit the site for the address book. This field is available only if the parent type is Site.

                                                                                                                                                                                                              3

                                                                                                                                                                                                              In the Entry List section, under the Action column, click the edit button to edit an entry.

                                                                                                                                                                                                              4

                                                                                                                                                                                                              You can edit the following in the Edit Address Book dialog box:

                                                                                                                                                                                                              Setting

                                                                                                                                                                                                              Description

                                                                                                                                                                                                              Name

                                                                                                                                                                                                              Edit the name of the entry.

                                                                                                                                                                                                              Phone Number

                                                                                                                                                                                                              Edit the phone number of the entry.

                                                                                                                                                                                                              You can specify the phone number in one of the following formats:

                                                                                                                                                                                                              • E.164 number format: [+][Country Code][Number]

                                                                                                                                                                                                                Example: +11234567890

                                                                                                                                                                                                              • IDD (International Direct Dialing) format: [IDD][Country Code][Number]

                                                                                                                                                                                                                Example: 01161123456789

                                                                                                                                                                                                              5

                                                                                                                                                                                                              (Optional) In the Entry List section, under the Action column, click Delete to delete an entry.

                                                                                                                                                                                                              6

                                                                                                                                                                                                              (Optional) Click the + icon to add a new entry to the entry list.

                                                                                                                                                                                                              7

                                                                                                                                                                                                              Click Save.

                                                                                                                                                                                                              Delete an Address Book

                                                                                                                                                                                                              You cannot delete an address book if you associate it with any other entities such as, desktop profile. When you try to delete these address books, you get an error message. Click the information icon at the end of the message to view the list of all the associated entities.

                                                                                                                                                                                                              1

                                                                                                                                                                                                              From the Management Portal navigation bar, choose Provisioning > Address Book.

                                                                                                                                                                                                              2

                                                                                                                                                                                                              Click the ellipsis icon beside the address book that you want to delete and click Delete.

                                                                                                                                                                                                              3

                                                                                                                                                                                                              Click Yes to confirm.

                                                                                                                                                                                                              Outdial Automatic Number Identification (ANI)

                                                                                                                                                                                                              The Outdial Automatic Number Identification (ANI) feature allows an agent to select a phone number as the caller ID for an outdial call.

                                                                                                                                                                                                              To make an outdial ANI list available to an agent, add the outdial ANI list to a Desktop Profile, and assign the profile to the agent. For more information, see Desktop Profiles.

                                                                                                                                                                                                              Create an Outdial ANI

                                                                                                                                                                                                              To create an outdial ANI:

                                                                                                                                                                                                              1

                                                                                                                                                                                                              From the Management Portal navigation bar, choose Provisioning > Outdial ANI.

                                                                                                                                                                                                              2

                                                                                                                                                                                                              Click + New Outdial ANI.

                                                                                                                                                                                                              3

                                                                                                                                                                                                              Enter the following details in the General Settings section:

                                                                                                                                                                                                              Field

                                                                                                                                                                                                              Description

                                                                                                                                                                                                              Name

                                                                                                                                                                                                              Enter a name for the outdial ANI.

                                                                                                                                                                                                              Description

                                                                                                                                                                                                              (Optional) Enter a description for the outdial ANI.

                                                                                                                                                                                                              The Name and Description fields allow alphanumeric characters, space, hyphen (-), and underscore ( _ ).

                                                                                                                                                                                                              4

                                                                                                                                                                                                              Click the + icon in the Outdial ANI Entry List section to add a new outdial ANI entry.

                                                                                                                                                                                                              5

                                                                                                                                                                                                              Enter the following details in the Add Outdial ANI dialog:

                                                                                                                                                                                                              Field

                                                                                                                                                                                                              Description

                                                                                                                                                                                                              Name

                                                                                                                                                                                                              Enter a name for the outdial ANI entry.

                                                                                                                                                                                                              The field allows alphanumeric characters, space, hyphen (-), and underscore ( _ ).

                                                                                                                                                                                                              Number

                                                                                                                                                                                                              Choose a dial number from the drop-down list. The drop-down list displays only the dial numbers that are mapped to entry points. For more information, see Entry Point Mappings.

                                                                                                                                                                                                              6

                                                                                                                                                                                                              Repeat Step 5 and Step 6 to add another outdial ANI entry to the list.

                                                                                                                                                                                                              7

                                                                                                                                                                                                              Click Save.

                                                                                                                                                                                                              Newly added entries are in the Outdial ANI Entry List section.

                                                                                                                                                                                                              Edit an Outdial ANI

                                                                                                                                                                                                              To edit an outdial ANI:

                                                                                                                                                                                                              1

                                                                                                                                                                                                              From the Management Portal navigation bar, choose Provisioning > Outdial ANI.

                                                                                                                                                                                                              2

                                                                                                                                                                                                              Click the ellipsis icon beside the outdial ANI that you want to edit and click Edit.

                                                                                                                                                                                                              3

                                                                                                                                                                                                              You can edit the following:

                                                                                                                                                                                                              • General Settings section—Edit the Name or Description of the outdial ANI.

                                                                                                                                                                                                              • Outdial ANI Entry List section—Edit the name or dial number of an outdial ANI entry.

                                                                                                                                                                                                                1. In the Action column, click the Edit icon next to an entry.

                                                                                                                                                                                                                2. Edit the outdial ANI entry Name or Number.

                                                                                                                                                                                                                3. (Optional) To delete an entry, click the corresponding Delete icon in the Action column.

                                                                                                                                                                                                                  Click Yes to the prompt message to confirm the deletion.

                                                                                                                                                                                                              4

                                                                                                                                                                                                              Click Save.

                                                                                                                                                                                                              Delete an Outdial ANI

                                                                                                                                                                                                              You cannot delete an outdial ANI if you have associated it with any entity, for example, a desktop profile.

                                                                                                                                                                                                              To delete an outdial ANI:

                                                                                                                                                                                                              1

                                                                                                                                                                                                              From the Management Portal navigation bar, choose Provisioning > Outdial ANI.

                                                                                                                                                                                                              2

                                                                                                                                                                                                              Click the ellipsis icon beside the outdial ANI that you want to delete and click Delete.

                                                                                                                                                                                                              3

                                                                                                                                                                                                              Click Yes to confirm.

                                                                                                                                                                                                              Dial Plans

                                                                                                                                                                                                              The Dial Plan page allows you to define validation criteria for the:

                                                                                                                                                                                                              • Dial Number (DN) that an agent uses to sign in to the Agent Desktop.

                                                                                                                                                                                                              • DN that an agent uses for outdialing.

                                                                                                                                                                                                              If you satisfy the validation prerequisites, the system validates DNs that agents enter in the Desktop environment against the syntax rules that are defined in one or more dial plans. The following table describes the validation prerequisites.

                                                                                                                                                                                                              DN usage

                                                                                                                                                                                                              Validation prerequisites

                                                                                                                                                                                                              Agent Desktop sign-in

                                                                                                                                                                                                              Configure Desktop Profiles > Agent DN Validation as follows:

                                                                                                                                                                                                              • Set Validation for Agent DN to Validation Criteria (Select from list).

                                                                                                                                                                                                              • Set Validation Criteria field to Specific.

                                                                                                                                                                                                              • Choose a dial plan from the drop-down list in the Select Validation Criteria field. Default dial plans and any dial plan you create appear in this list.

                                                                                                                                                                                                              Outdial calls

                                                                                                                                                                                                              Configure Desktop Profiles > Dial Plan as follows:

                                                                                                                                                                                                              • Set Outdial Enabled to Yes.

                                                                                                                                                                                                              • Set Dial Plan Enabled to Yes.

                                                                                                                                                                                                              • Choose a dial plan from the drop-down list in the Select Dial Plan field. Default dial plans and any dial plan you create appear in this list.

                                                                                                                                                                                                              Note: Agents use the Desktop dial pad to make outbound calls. To display the dial pad, you must have the correct setup. Contact your administrator for the setup.

                                                                                                                                                                                                              If you allow agents to enter DNs without requiring validation and their entries don't comply with valid syntax, the Desktop rejects sign-ins and outbound calls fail.

                                                                                                                                                                                                              You can choose from two default dial plans and create new dial plans. The default dial plans are:

                                                                                                                                                                                                              • US

                                                                                                                                                                                                              • Any Format

                                                                                                                                                                                                              The default US dial plan accepts entries such as:

                                                                                                                                                                                                              • 1-800-555-1234


                                                                                                                                                                                                              • 1 (800) 555-1234


                                                                                                                                                                                                              • 18005551234


                                                                                                                                                                                                              • 18005551234,,,222

                                                                                                                                                                                                                In this example, commas indicate pauses before entry of an extension number.

                                                                                                                                                                                                              The default Any Format dial plan accepts entries such as:

                                                                                                                                                                                                              • 123

                                                                                                                                                                                                              • 5551234

                                                                                                                                                                                                              • 555-1234

                                                                                                                                                                                                              • 8005551234

                                                                                                                                                                                                              • 1800FLOWERS

                                                                                                                                                                                                              • bruce.matthews

                                                                                                                                                                                                              You can use the Any Format dial plan to validate a DN, the first part of an email address, or a Session Initiation Protocol (SIP) uniform resource identifier (URI).

                                                                                                                                                                                                              All dial plans require a regular expression for the system to recognize what defines a valid entry. The regular expression comprises the syntax rules that the system uses to interpret what is valid.

                                                                                                                                                                                                              You can create separate dial plans with appropriate regular expressions to specify the required syntax for the:

                                                                                                                                                                                                              • DN that an agent uses to sign in to the Desktop Station Credentials pop-up window.

                                                                                                                                                                                                              • DN an agent enters in the Enter number to call field of the Desktop dial pad.

                                                                                                                                                                                                                Optionally, you can specify a prefix and characters that the system must strip from the entry in the dial pad.

                                                                                                                                                                                                              The regular expressions of the default dial plans are described in the following sections. You can refer to the syntax rules that are described in these sections to guide you in formulating regular expressions for the dial plans you create.

                                                                                                                                                                                                              For an outdial call, the system performs the following steps to determine the validity of an entry an agent makes in the Enter number to call field of the Desktop dial pad:

                                                                                                                                                                                                              1. Strip the characters specified in the dial plan’s Stripped Characters field from the entry in the Enter number to call field.

                                                                                                                                                                                                                In the default US and Any Format dial plans, the specified Stripped Characters are left parenthesis, right parenthesis, space, and hyphen.

                                                                                                                                                                                                              2. Validate the resulting entry according to the criteria defined in the regular expression of the chosen dial plan. If the entry meets the criteria, it's deemed valid.

                                                                                                                                                                                                              3. If the entry is invalid, prepend the entry that is specified in the Prefix field.

                                                                                                                                                                                                                In the US dial plan, the specified prefix is number 1.

                                                                                                                                                                                                              4. Validate the resulting entry according to the defined regular expression again.

                                                                                                                                                                                                              Regular expression for the default US dial plan

                                                                                                                                                                                                              The regular expression that is specified for the US dial plan is:

                                                                                                                                                                                                              1[0-9]{3}[2-9][0-9]{6}([,]{1,10}[0-9]+){0,1}

                                                                                                                                                                                                              Following is a description of what this regular expression specifies.

                                                                                                                                                                                                              • The first digit must be 1.

                                                                                                                                                                                                              • Three digits in the range of 0–9 must follow.

                                                                                                                                                                                                                {3} means 3 digits in the preceding range [0-9]

                                                                                                                                                                                                              • One digit in the range of 2-9 must follow.

                                                                                                                                                                                                              • Six digits in the range of 0-9 must follow.

                                                                                                                                                                                                                {6} means six digits in the preceding range [0-9]

                                                                                                                                                                                                              • Zero or one occurrence of the following sequence can follow: between one and ten commas [,] followed by one or more digits [0-9].

                                                                                                                                                                                                                {1,10} means one to ten pauses as specified by one comma [,] per pause

                                                                                                                                                                                                                + means one or more digits in the preceding range [0-9]

                                                                                                                                                                                                                {0,1} means zero or one occurrence of the sequence of pauses [,] followed by one or more digits in the preceding range [0-9]

                                                                                                                                                                                                              Regular expression for the default Any Format dial plan

                                                                                                                                                                                                              The regular expression that is specified for the Any Format dial plan is:

                                                                                                                                                                                                              ([0-9a-zA-Z]+[-._])*[0-9a-zA-Z]+

                                                                                                                                                                                                              Following is a description of what this regular expression specifies.

                                                                                                                                                                                                              • The dial pad entry can start with zero or more sets of the following sequence:

                                                                                                                                                                                                                one or more alphanumeric characters [0-9a-zA-Z] followed by one hyphen, period, or underscore [-._].

                                                                                                                                                                                                                • + means one or more alphanumeric characters in the preceding range [0-9a-zA-Z]

                                                                                                                                                                                                                • * means zero or more of the preceding sequence of alphanumeric characters [0-9a-zA-Z] followed by one hyphen, period, or underscore [-._].

                                                                                                                                                                                                              • One or more alphanumeric characters [0-9a-zA-Z] must follow.

                                                                                                                                                                                                              Create a Dial Plan

                                                                                                                                                                                                              Before you begin

                                                                                                                                                                                                              You require Administrator privileges to complete this procedure.
                                                                                                                                                                                                              1

                                                                                                                                                                                                              From the Management Portal navigation bar, choose Provisioning > Dial Plan.

                                                                                                                                                                                                              The Dial Plan page appears. This page displays a list of existing dial plans.

                                                                                                                                                                                                              2

                                                                                                                                                                                                              Click + New Dial Plan.

                                                                                                                                                                                                              3

                                                                                                                                                                                                              Configure the following settings.

                                                                                                                                                                                                              Setting

                                                                                                                                                                                                              Description

                                                                                                                                                                                                              Name

                                                                                                                                                                                                              Enter a name for the Dial Plan. You can assign one or more dial plans to an agent when you create or edit the agent's profile, and when you configure Agent DN validation.

                                                                                                                                                                                                              Regular Expression

                                                                                                                                                                                                              Enter a regular expression. The regular expression comprises the valid syntax for dial numbers (DN) the agent enters in the Desktop environment. Each dial plan requires a regular expression.

                                                                                                                                                                                                              For examples of the regular expressions of the default dial plans, see the following sections. Use the examples shown in these sections to formulate regular expressions for the dial plans you create.

                                                                                                                                                                                                              Prefix

                                                                                                                                                                                                              (Optional) Enter a prefix that the system automatically adds to the phone number that the agent enters. For example, enter the digit 1 for long-distance calls within the United States.

                                                                                                                                                                                                              The system adds a prefix only if the agent does not add it when entering a DN in the Desktop environment.

                                                                                                                                                                                                              Stripped Character

                                                                                                                                                                                                              Enter the characters that the system removes from the DN that an agent enters in the Desktop environment.

                                                                                                                                                                                                              The system automatically removes the following characters from the number that an agent enters: left and right parentheses, space, and hyphen.

                                                                                                                                                                                                              4

                                                                                                                                                                                                              Click Save.

                                                                                                                                                                                                              Edit a Dial Plan

                                                                                                                                                                                                              Before you begin

                                                                                                                                                                                                              You require Administrator privileges to complete this procedure.
                                                                                                                                                                                                              1

                                                                                                                                                                                                              From the Management Portal navigation bar, choose Provisioning > Dial Plan.

                                                                                                                                                                                                              The Dial Plan page appears. This page displays a list of existing dial plans.

                                                                                                                                                                                                              2

                                                                                                                                                                                                              Click the ellipsis icon beside the dial plan you want to edit and choose Edit.

                                                                                                                                                                                                              The Edit Dial Plan page appears.
                                                                                                                                                                                                              3

                                                                                                                                                                                                              You can edit the settings described in the following table. When you are done editing, click Save.

                                                                                                                                                                                                              Setting

                                                                                                                                                                                                              Description

                                                                                                                                                                                                              Name

                                                                                                                                                                                                              Edit the name of the Dial Plan.

                                                                                                                                                                                                              Regular Expression

                                                                                                                                                                                                              Edit the Regular Expression.

                                                                                                                                                                                                              The regular expression comprises the valid syntax for dial numbers (DN) the agent enters in the Desktop environment. Each dial plan requires a regular expression.

                                                                                                                                                                                                              Prefix

                                                                                                                                                                                                              Enter a DN in the Desktop environment.

                                                                                                                                                                                                              Stripped Character

                                                                                                                                                                                                              Edit the Stripped Character. The system automatically removes the following characters from the number that the agent enters: left and right parentheses, space, and hyphen.

                                                                                                                                                                                                              Delete a Dial Plan

                                                                                                                                                                                                              Before you begin

                                                                                                                                                                                                              • You require Administrator privileges to complete this procedure.

                                                                                                                                                                                                              • Before deleting a dial plan, ensure that it isn't provisioned for a desktop profile or used to validate an agent's sign-in Dial Number (DN). If you can't delete a dial plan, contact your Full Administrator.

                                                                                                                                                                                                              1

                                                                                                                                                                                                              From the Management Portal navigation bar, choose Provisioning > Dial Plan

                                                                                                                                                                                                              The Dial Plan page appears. This page displays a list of all existing dial plans.

                                                                                                                                                                                                              2

                                                                                                                                                                                                              Click the ellipsis icon beside the dial plan you want to delete and choose Delete.

                                                                                                                                                                                                              The Heads Up! dialog box appears.
                                                                                                                                                                                                              3

                                                                                                                                                                                                              Click Yes to confirm.

                                                                                                                                                                                                              Global Variables

                                                                                                                                                                                                              Global variables are custom variables defined in the Provisioning module and accessible throughout a flow. Flow developers can add global variables to the flow as required. For more information, see Global Variables in Flow Designer.

                                                                                                                                                                                                              Global variables are specific to the Webex Contact Center voice channel. They collect one of the following types of data values:

                                                                                                                                                                                                              • Caller-entered data: Data that a customer enters using IVR during a call, such as an account number.

                                                                                                                                                                                                              • Agent-entered data: Data that an agent enters into the Interaction Control pane of the Desktop during an active call with a customer, such as a case number or action code.

                                                                                                                                                                                                              You can create any number of global variables. However, you can enable only up to 100 global variables for reporting at a time.

                                                                                                                                                                                                              For more information, see Create a Global Variable.

                                                                                                                                                                                                              By default, you are shown only active global variables. To view inactive global variables, check the Show Inactive Global Variables check box.

                                                                                                                                                                                                              • Global variable values are visible to users who have access to historical records on the Management Portal. Never store secure data such as credit card numbers, personal identification numbers, or social security numbers using global variables.

                                                                                                                                                                                                              • You can't delete Global variables; but you can deactivate a global variable that isn’t in use in any flow. You can’t use an inactive global variable to store data. For more information on how to deactivate a global variable, see Create a Global Variable.

                                                                                                                                                                                                              System-Defined Variables

                                                                                                                                                                                                              System-defined variables are the predefined global variables used by the Webex Contact Center.

                                                                                                                                                                                                              You can edit the system-defined variables in the Provisioning module; but you can’t create or deactivate system-defined variables.

                                                                                                                                                                                                              Webex Contact Center uses the following system-defined variables:

                                                                                                                                                                                                              • Global_FeedbackSurveyOptin: Indicates whether the customer chooses to participate in (opt-in) or not participate in (opt-out) a post call survey. The Variable Type is defined as String; while the default value is uninitialized, meaning there is no initial value.

                                                                                                                                                                                                              • Global_Language: Indicates the language that a customer uses in the flow. The Variable Type is defined as String; and the default value is en-US. For more information, see Webex Experience Management Language Support.

                                                                                                                                                                                                              • Global_VoiceName: Indicates the output-recorded name used in the flow. The Variable Type is defined as String; while the default value is Automatic. When the value is Automatic, Google Dialogflow chooses the voice name for a given language.

                                                                                                                                                                                                              Create a Global Variable

                                                                                                                                                                                                              1

                                                                                                                                                                                                              From the Management Portal navigation bar, choose Provisioning > Global Variables.

                                                                                                                                                                                                              2

                                                                                                                                                                                                              Click + New Global Variable.

                                                                                                                                                                                                              The Global Variable window appears.
                                                                                                                                                                                                              3

                                                                                                                                                                                                              Enter a Name for the variable.

                                                                                                                                                                                                              • You can't edit a name after it's created.

                                                                                                                                                                                                              • The name supports only alphanumeric characters and underscores. Spaces are not supported.

                                                                                                                                                                                                              • The name supports a maximum of 80 characters, but only 50 characters are displayed. If you hover the mouse pointer, the tooltip displays the complete name.

                                                                                                                                                                                                              4

                                                                                                                                                                                                              Enter a Description for the variable.

                                                                                                                                                                                                              5

                                                                                                                                                                                                              Choose one of the following types from the Variable Type drop-down list and specify the variable value.

                                                                                                                                                                                                              Variable TypeDefault Value

                                                                                                                                                                                                              Boolean

                                                                                                                                                                                                              Select True or False.

                                                                                                                                                                                                              String

                                                                                                                                                                                                              Enter a string value. The string can be a maximum of 256 characters long for each variable. Strings support alphanumeric characters, special characters and spaces.

                                                                                                                                                                                                              Integer

                                                                                                                                                                                                              Enter an integer value.

                                                                                                                                                                                                              Decimal

                                                                                                                                                                                                              Enter a decimal value.

                                                                                                                                                                                                              Date Time

                                                                                                                                                                                                              Enter a date in Tenant Timezone in one of the supported formats:

                                                                                                                                                                                                              • YYYY-MM-DD

                                                                                                                                                                                                              • YYYY-MM-DDThh:mm

                                                                                                                                                                                                              You can’t edit the variable type after the variable is created.

                                                                                                                                                                                                              6

                                                                                                                                                                                                              (Optional) Disable the Status toggle button to make the variable Not Active.

                                                                                                                                                                                                              7

                                                                                                                                                                                                              (Optional) Enable the Make Reportable toggle button to display the variable in the Analyzer for reporting purposes.

                                                                                                                                                                                                              You can enable up to 100 global variables for reporting.

                                                                                                                                                                                                              8

                                                                                                                                                                                                              (Optional) Enable the Make Agent Viewable toggle button to display the variable on the Desktop along with the value entered as part of the flow.

                                                                                                                                                                                                              When you enable the Make Agent Viewable toggle button, the following configurations appear:

                                                                                                                                                                                                              • Desktop Label: This label appears on the Desktop in place of the variable name. Enter a clearer label than the variable name itself, so that agents can understand the data that is being passed to them.

                                                                                                                                                                                                                The desktop label supports a maximum of 50 characters.

                                                                                                                                                                                                              • Agent Editable: Enable this toggle button when you want the agent to be able to edit the value of the variable as part of the interaction session. Any updates to the variable that is made in the Desktop are available in the flow. The agent can edit the variable and click the Save button in the Desktop. If the call gets disconnected before the edits are saved, the variable update doesn’t take place.

                                                                                                                                                                                                              9

                                                                                                                                                                                                              Click Save.

                                                                                                                                                                                                              Edit a Global Variable

                                                                                                                                                                                                              To edit a global variable:

                                                                                                                                                                                                              1

                                                                                                                                                                                                              From the Management Portal navigation bar, choose Provisioning > Global Variables.

                                                                                                                                                                                                              2

                                                                                                                                                                                                              Click the ellipsis icon beside the required global variable and click Edit.

                                                                                                                                                                                                              3

                                                                                                                                                                                                              Make the necessary changes and click Save.

                                                                                                                                                                                                              • You can’t edit the Name and Variable Type fields of a global variable.

                                                                                                                                                                                                              • You can enable up to 100 global variables for reporting. For more information, see Create a Global Variable.

                                                                                                                                                                                                              Deactivate a Global Variable

                                                                                                                                                                                                              1

                                                                                                                                                                                                              From the Management Portal navigation bar, choose Provisioning > Global Variables.

                                                                                                                                                                                                              2

                                                                                                                                                                                                              Click the ellipsis icon beside the global variable that you want to deactivate and click Mark Inactive.

                                                                                                                                                                                                              3

                                                                                                                                                                                                              Click Yes to confirm.

                                                                                                                                                                                                              The status of the global variable changes to Not Active.

                                                                                                                                                                                                              Once the object is marked inactive, it can be permanently deleted. For more information, see Delete inactive objects permanently.

                                                                                                                                                                                                              Activate a Global Variable

                                                                                                                                                                                                              1

                                                                                                                                                                                                              From the Management Portal navigation bar, choose Provisioning > Global Variables.

                                                                                                                                                                                                              2

                                                                                                                                                                                                              Click the ellipsis icon beside the required global variable and click Restore.

                                                                                                                                                                                                              3

                                                                                                                                                                                                              Click Yes to confirm.

                                                                                                                                                                                                              The status changes from Not Active to Active.

                                                                                                                                                                                                              Multimedia Profiles

                                                                                                                                                                                                              If your administrator enables multimedia for your enterprise, you can assign each agent with a multimedia profile. Each profile specifies the number of each type of media, such as email, chat, or telephone, that the agent can handle simultaneously.

                                                                                                                                                                                                              The optional multimedia feature enables the Webex Contact Center system to manage routing strategies for email, telephone, and chat contacts.

                                                                                                                                                                                                              You can assign multimedia profiles to sites, teams, or individual agents. By default, the system assigns the Default_Telephony_Profile to every site. You cannot edit or delete this profile, but can re-assign a different multimedia profile to the site.

                                                                                                                                                                                                              All of the teams under a site have the same multimedia profile as that of the site, unless you assign a different profile to the teams. Similarly, all of the agents under the teams have the same profile as that of the team, unless you change the profile for the agents.

                                                                                                                                                                                                              Create a Multimedia Profile

                                                                                                                                                                                                              To configure a multimedia profile:

                                                                                                                                                                                                              1

                                                                                                                                                                                                              From the Management Portal navigation bar, choose Provisioning > Multimedia Profiles

                                                                                                                                                                                                              2

                                                                                                                                                                                                              Click + New Multimedia Profile.

                                                                                                                                                                                                              3

                                                                                                                                                                                                              Do the following:

                                                                                                                                                                                                              1. In the Profile Details area, enter the following details:

                                                                                                                                                                                                                Setting

                                                                                                                                                                                                                Description

                                                                                                                                                                                                                Name

                                                                                                                                                                                                                Enter a name for the multimedia profile.

                                                                                                                                                                                                                Description

                                                                                                                                                                                                                (Optional) Enter a description for the profile.

                                                                                                                                                                                                              2. In the Media Details area, enter the following details:

                                                                                                                                                                                                                Setting

                                                                                                                                                                                                                Description

                                                                                                                                                                                                                Blended

                                                                                                                                                                                                                Allows agents to handle multiple contacts simultaneously for different channel types. Set the number for each channel type.

                                                                                                                                                                                                                Number of contacts that you can set:

                                                                                                                                                                                                                • Voice: 0–1

                                                                                                                                                                                                                • Chat, Email, and Social Channel: 0–5

                                                                                                                                                                                                                Blended Real-time

                                                                                                                                                                                                                Allows agents to handle one mandatory real-time channel, either Voice or Chat, and in addition you can set the limit for Email.

                                                                                                                                                                                                                Number of contacts that you can set:

                                                                                                                                                                                                                • Voice: 1 (mandatory)

                                                                                                                                                                                                                • Chat: 1–5

                                                                                                                                                                                                                • Email: 0–5

                                                                                                                                                                                                                Exclusive

                                                                                                                                                                                                                Allows agents to focus on one customer contact at a time. Check the channel types for which the agents receive contacts.

                                                                                                                                                                                                              4

                                                                                                                                                                                                              Click Save.

                                                                                                                                                                                                              View the Details of a Multimedia Profile

                                                                                                                                                                                                              To view the details of a multimedia profile:
                                                                                                                                                                                                              1

                                                                                                                                                                                                              From the Webex Contact Center Portal navigation bar, choose Provisioning.

                                                                                                                                                                                                              2

                                                                                                                                                                                                              Click the ellipsis icon beside a multimedia profile and click View.

                                                                                                                                                                                                              1. In the Profile Details area, view the following information about the multimedia profile:

                                                                                                                                                                                                                Setting

                                                                                                                                                                                                                Description

                                                                                                                                                                                                                Name

                                                                                                                                                                                                                The name of the multimedia profile.

                                                                                                                                                                                                                Description

                                                                                                                                                                                                                The description of the profile.

                                                                                                                                                                                                                Status

                                                                                                                                                                                                                The status of the multimedia profile. The status can be either Active or Inactive.

                                                                                                                                                                                                              2. In the Media Details area, view the following information about the multimedia profile:

                                                                                                                                                                                                                Setting

                                                                                                                                                                                                                Description

                                                                                                                                                                                                                Voice

                                                                                                                                                                                                                Displays the number of contacts for the voice channel.

                                                                                                                                                                                                                Chat

                                                                                                                                                                                                                Displays the number of contacts for the chat channel.

                                                                                                                                                                                                                Email

                                                                                                                                                                                                                Displays the number of contacts for the email channel.

                                                                                                                                                                                                                You can define the maximum number of media types in Maximum Channels Per Profile in the Module Permissions page of the tenant settings for your enterprise. For more information, see Tenant Settings.

                                                                                                                                                                                                              3

                                                                                                                                                                                                              (Optional) Click Edit to change the settings. For more information, see Edit a Multimedia Profile.

                                                                                                                                                                                                              4

                                                                                                                                                                                                              (Optional) Click Delete to deactivate the settings. For more information, see Deactivate a Multimedia Profile.

                                                                                                                                                                                                              Edit a Multimedia Profile

                                                                                                                                                                                                              To edit a multimedia profile:
                                                                                                                                                                                                              1

                                                                                                                                                                                                              From the Management Portal navigation bar, choose Provisioning > Multimedia Profiles.

                                                                                                                                                                                                              2

                                                                                                                                                                                                              Click the ellipsis icon beside a multimedia profile and click Edit.

                                                                                                                                                                                                              3

                                                                                                                                                                                                              Do the following:

                                                                                                                                                                                                              1. In the Profile Details area, edit the following details:

                                                                                                                                                                                                                Setting

                                                                                                                                                                                                                Description

                                                                                                                                                                                                                Name

                                                                                                                                                                                                                Enter a name for the multimedia profile.

                                                                                                                                                                                                                Description

                                                                                                                                                                                                                (Optional) Enter a description for the profile.

                                                                                                                                                                                                              2. In the Media Details area, edit the following details:

                                                                                                                                                                                                                Setting

                                                                                                                                                                                                                Description

                                                                                                                                                                                                                Blended

                                                                                                                                                                                                                Allows agents to handle multiple contacts simultaneously for different channel types. Set the number for each channel type.

                                                                                                                                                                                                                Number of contacts that you can set:

                                                                                                                                                                                                                • Voice: 0–1

                                                                                                                                                                                                                • Chat, Email: 0–5

                                                                                                                                                                                                                Blended Real-time

                                                                                                                                                                                                                Allows agents to handle one mandatory real-time channel, either Voice or Chat, and in addition you can set the limit for Email.

                                                                                                                                                                                                                Number of contacts that you can set:

                                                                                                                                                                                                                • Voice: 1 (mandatory)

                                                                                                                                                                                                                • Chat: 1–5

                                                                                                                                                                                                                • Email: 0–5

                                                                                                                                                                                                                Exclusive

                                                                                                                                                                                                                Allows agents to focus on one customer contact at a time. Check the channel types for which the agents receive contacts.

                                                                                                                                                                                                              4

                                                                                                                                                                                                              Click Save.

                                                                                                                                                                                                              Deactivate a Multimedia Profile

                                                                                                                                                                                                              You cannot deactivate a multimedia profile if you associate it with any entity.

                                                                                                                                                                                                              To delete a multimedia profile:
                                                                                                                                                                                                              1

                                                                                                                                                                                                              From the Management Portal navigation bar, choose Provisioning > Multimedia Profiles.

                                                                                                                                                                                                              2

                                                                                                                                                                                                              Click the ellipsis icon beside the multimedia profile that you want to deactivate, and click Mark Inactive.

                                                                                                                                                                                                              3

                                                                                                                                                                                                              Click Yes to confirm.

                                                                                                                                                                                                              The status of the multimedia profile changes to Not Active.

                                                                                                                                                                                                              Once the object is marked inactive, it can be permanently deleted. For more information, see Delete inactive objects permanently.

                                                                                                                                                                                                              Activate a Multimedia Profile

                                                                                                                                                                                                              1

                                                                                                                                                                                                              From the Management Portal navigation bar, choose Provisioning > Multimedia Profiles.

                                                                                                                                                                                                              2

                                                                                                                                                                                                              Click the ellipsis icon beside a multimedia profile with the status Not Active and click Restore.

                                                                                                                                                                                                              3

                                                                                                                                                                                                              Click Yes to confirm.

                                                                                                                                                                                                              The status of the multimedia profile changes to Active.

                                                                                                                                                                                                              Desktop Layout

                                                                                                                                                                                                              The Desktop Layout feature allows you to configure the Webex Contact Center Desktop as per your business requirements. You can customize elements such as logo, title, and widgets. For the complete list of elements that you can customize, see Define a Custom Desktop Layout. You can create a desktop layout and assign it to a team. This layout generates the agent experience on the desktop for all agents who sign in as part of that team.

                                                                                                                                                                                                              There are two types of layouts:

                                                                                                                                                                                                              • Global Layout: This layout is a system-generated layout that gets assigned by default when you create a team. For more information, see Create a team. When you create a team, the Global Layout is automatically set as the desktop layout for the team. You cannot delete this layout.

                                                                                                                                                                                                              • Custom Layout: A layout that provides a customized desktop experience. You can create a custom layout for one or more teams.

                                                                                                                                                                                                              If you assign a new desktop layout when an agent is signed in, the agent must reload the page to see the new layout.

                                                                                                                                                                                                              The Webex Contact Center Desktop supports three personas:

                                                                                                                                                                                                              • Agent

                                                                                                                                                                                                              • Supervisor

                                                                                                                                                                                                              • Supervisor and an Agent

                                                                                                                                                                                                              The JSON layout file has separate sections for each of the personas. The administrator should configure the settings for each persona in the corresponding section of the JSON layout file. For more information about a sample JSON layout file, see JSON Layout Top-Level Properties.

                                                                                                                                                                                                              When Cisco adds a new feature to the Desktop Layout, the unmodified layout is updated automatically with the new features. The updated desktop layout is automatically available to the existing teams that use the unmodified desktop layout. The Desktop users using the unmodified desktop layout receive the new layout-based features when they sign in or reload the browser.

                                                                                                                                                                                                              If you are using the Default Desktop Layout.json file without any modification, then it is considered an unmodified layout. However, if you download the Default Desktop Layout.json file and upload it again, it is considered a modified layout even if the file content or filename is not modified.

                                                                                                                                                                                                              Create a Desktop Layout

                                                                                                                                                                                                              To create a custom desktop layout:

                                                                                                                                                                                                              Before you begin

                                                                                                                                                                                                              Ensure that you have a custom JSON layout file that defines your layout. To create a custom JSON layout file, download the Default Desktop Layout.json file from the Desktop Layout page and customize the layout as described in Define a Custom Desktop Layout.
                                                                                                                                                                                                              1

                                                                                                                                                                                                              From the Management Portal navigation bar, choose Provisioning > Desktop Layout.

                                                                                                                                                                                                              2

                                                                                                                                                                                                              Click New Layout.

                                                                                                                                                                                                              3

                                                                                                                                                                                                              Enter the following details:

                                                                                                                                                                                                              Setting

                                                                                                                                                                                                              Description

                                                                                                                                                                                                              Name

                                                                                                                                                                                                              Enter a name that identifies the purpose of the layout.

                                                                                                                                                                                                              Description

                                                                                                                                                                                                              Enter a description.

                                                                                                                                                                                                              Team

                                                                                                                                                                                                              Choose a team name from the drop-down list.

                                                                                                                                                                                                              • If a custom layout is already assigned to a team, then that team name doesn’t appear in this drop-down list. For more information on the Team settings, see Create a team.

                                                                                                                                                                                                              • If you assign a custom layout on this page, you overwrite the global layout, which is the default layout for all teams.

                                                                                                                                                                                                              JSON FileClick to download the Default Desktop Layout.json file and customize the layout as described in Define a Custom Desktop Layout.

                                                                                                                                                                                                              If you use the unmodified layout, the new layout-based features appear automatically on the Desktop. The Desktop users can view the new layout-based features when they sign in or reload the browser.

                                                                                                                                                                                                              4

                                                                                                                                                                                                              Upload the JSON file that you customized to define the custom desktop layout.

                                                                                                                                                                                                              • The system validates the JSON file for errors and an appropriate message appears.

                                                                                                                                                                                                                The system enables the Save button when the validation is complete.

                                                                                                                                                                                                              • To integrate Webex Experience Management widgets, see the Webex Experience Management documentation.

                                                                                                                                                                                                              5

                                                                                                                                                                                                              If the uploaded custom layout has validation errors, click Restore to restore the default layout.

                                                                                                                                                                                                              6

                                                                                                                                                                                                              Click Save to save the configuration.

                                                                                                                                                                                                              Important:

                                                                                                                                                                                                              To verify the layout experience, see View Layout Experience on Desktop.

                                                                                                                                                                                                              View Layout Experience on Desktop
                                                                                                                                                                                                              1

                                                                                                                                                                                                              Create a test team. For more information, see Create a team.

                                                                                                                                                                                                              2

                                                                                                                                                                                                              Assign yourself to the test team.

                                                                                                                                                                                                              3

                                                                                                                                                                                                              From the Management Portal navigation bar, choose Desktop Agent Desktop.

                                                                                                                                                                                                              4

                                                                                                                                                                                                              Select the test team and validate the experience.

                                                                                                                                                                                                              Define a Custom Desktop Layout

                                                                                                                                                                                                              This topic discusses how to create a custom layout by editing the JSON file and provides sample use cases to get started with widgets such as the Customer Experience Management Metrics widget and Customer Experience Journey widget.

                                                                                                                                                                                                              Before You Begin

                                                                                                                                                                                                              The following are good-to-have skills to customize the Desktop layout:

                                                                                                                                                                                                              1. Understanding of the HTML structure

                                                                                                                                                                                                              2. Understanding of the document tree model in a browser

                                                                                                                                                                                                              3. Understanding of the JSON format

                                                                                                                                                                                                              Desktop Layout Overview

                                                                                                                                                                                                              In the Desktop, there are two types of widgets—iframe-based and web component-based. The header, navigation (custom page), persistent area, headless area, and aux panel are the customizable area in a Desktop. These are not widgets.

                                                                                                                                                                                                              The following list details the spaces that you can configure. The images illustrates the layout of the Desktop:

                                                                                                                                                                                                              1. Title and Logo area: This space displays the Webex Contact Center logo and name (default) at the top-left corner of your screen.

                                                                                                                                                                                                              2. Horizontal Header area: This space has a configurable area that is populated with custom widgets. These widgets can display, for example, inline information and drop-down menus. As the height of this header is only 64 pixels, the widget height cannot cross the header height.

                                                                                                                                                                                                              3. Workspace area: This space changes as per the selection on the navigation bar or when an agent is interacting with customers. When an agent is on a call, this area displays the interaction control and auxiliary information pane (that includes custom widgets and persistent widgets). When an agent is interacting on email, chat, or social channels, this area displays the workspace area and auxiliary information pane (that includes the persistent widget area).

                                                                                                                                                                                                                Custom Page displays on the Desktop interface in the workspace pane. You can access the custom page through icons on the navigation bar. Each custom page can contain one or more custom widgets.

                                                                                                                                                                                                                Custom Widget is a third-party application that is configured in the JSON layout. You can place the custom widget on the custom page, custom tab (Auxiliary Information pane), or on the horizontal header of the Desktop.

                                                                                                                                                                                                              4. Navigation Bar area: Use this space to add navigation items to access custom pages.

                                                                                                                                                                                                              Sample Desktop UI for Voice
                                                                                                                                                                                                              Sample Desktop UI for New Digital Channels
                                                                                                                                                                                                              JSON Layout Top-Level Properties

                                                                                                                                                                                                              Roles

                                                                                                                                                                                                              The default JSON layout has following three roles.

                                                                                                                                                                                                              • agent—To set the Desktop Layout to be displayed when an agent signs in to the Webex Contact Center Desktop to handle agent activities.

                                                                                                                                                                                                              • supervisor—To set the Desktop Layout to be displayed when a supervisor signs in to the Webex Contact Center Desktop to handle only supervisor capabilities.

                                                                                                                                                                                                                When a supervisor signs in to the Desktop, the desktop layout that is specified for the primary team is applied. If you do not provide a primary team, the global layout applies. By default, APS reports are disabled.

                                                                                                                                                                                                              • supervisorAgent—To set the Desktop Layout to be displayed when a supervisor signs in to the Webex Contact Center Desktop to handle both supervisor capabilities and agent activities.

                                                                                                                                                                                                              You can either add or modify widgets for each role in the corresponding persona of the relevant JSON layout file.

                                                                                                                                                                                                              The following are the top-level properties for JSON layout based on the role:

                                                                                                                                                                                                              {
                                                                                                                                                                                                                  "agent": {
                                                                                                                                                                                                                      "version": "0.1.0",
                                                                                                                                                                                                                      "appTitle": "Webex Contact Center",
                                                                                                                                                                                                                      "logo": "",
                                                                                                                                                                                                                      "taskPageIllustration": "https://www.abc.com/image/logo.jpg",
                                                                                                                                                                                                                      "stopNavigateOnAcceptTask": false,
                                                                                                                                                                                                                      "dragDropEnabled": false,
                                                                                                                                                                                                                      "notificationTimer": 8,
                                                                                                                                                                                                                      "maximumNotificationCount": 3,
                                                                                                                                                                                                                      "browserNotificationTimer": 8,
                                                                                                                                                                                                                      "wxmConfigured": false,
                                                                                                                                                                                                                      "desktopChatApp": {
                                                                                                                                                                                                                          "webexConfigured": false,
                                                                                                                                                                                                                      }
                                                                                                                                                                                                                      "headerActions": ["outdial", "notification"],
                                                                                                                                                                                                                      "area": {
                                                                                                                                                                                                                          "advancedHeader": {
                                                                                                                                                                                                                              ...
                                                                                                                                                                                                                          },
                                                                                                                                                                                                                          "panel": {
                                                                                                                                                                                                                              ...
                                                                                                                                                                                                                          },
                                                                                                                                                                                                                          "navigation": {
                                                                                                                                                                                                                              ...
                                                                                                                                                                                                                          },
                                                                                                                                                                                                                          "persistent": {
                                                                                                                                                                                                                              ...
                                                                                                                                                                                                                          },
                                                                                                                                                                                                                          "headless": {
                                                                                                                                                                                                                              ...
                                                                                                                                                                                                                          }
                                                                                                                                                                                                                      },
                                                                                                                                                                                                                  },
                                                                                                                                                                                                                  "supervisor": {
                                                                                                                                                                                                                      "version": "0.1.0",
                                                                                                                                                                                                                      "appTitle": "Webex Contact Center",
                                                                                                                                                                                                                      "logo": "",
                                                                                                                                                                                                                      "taskPageIllustration": "https://www.abc.com/image/logo.jpg",
                                                                                                                                                                                                                      "stopNavigateOnAcceptTask": false,
                                                                                                                                                                                                                      "dragDropEnabled": false,
                                                                                                                                                                                                                      "notificationTimer": 8,
                                                                                                                                                                                                                      "maximumNotificationCount": 3,
                                                                                                                                                                                                                      "browserNotificationTimer": 8,
                                                                                                                                                                                                                      "wxmConfigured": false,
                                                                                                                                                                                                                      "desktopChatApp": {
                                                                                                                                                                                                                          "webexConfigured": false,
                                                                                                                                                                                                                      }
                                                                                                                                                                                                                      "headerActions": ["outdial", "notification"],
                                                                                                                                                                                                                      "area": {
                                                                                                                                                                                                                          "advancedHeader": {
                                                                                                                                                                                                                              ...
                                                                                                                                                                                                                          },
                                                                                                                                                                                                                          "panel": {
                                                                                                                                                                                                                              ...
                                                                                                                                                                                                                          },
                                                                                                                                                                                                                          "navigation": {
                                                                                                                                                                                                                              ...
                                                                                                                                                                                                                          },
                                                                                                                                                                                                                          "persistent": {
                                                                                                                                                                                                                              ...
                                                                                                                                                                                                                          },
                                                                                                                                                                                                                          "headless": {
                                                                                                                                                                                                                              ...
                                                                                                                                                                                                                          },
                                                                                                                                                                                                                          "homePage": {
                                                                                                                                                                                                                              ...
                                                                                                                                                                                                                          }
                                                                                                                                                                                                                      },
                                                                                                                                                                                                                  }
                                                                                                                                                                                                                  "supervisorAgent": {
                                                                                                                                                                                                                      "version": "0.1.0",
                                                                                                                                                                                                                      "appTitle": "Webex Contact Center",
                                                                                                                                                                                                                      "logo": "",
                                                                                                                                                                                                                      "taskPageIllustration": "https://www.abc.com/image/logo.jpg",
                                                                                                                                                                                                                      "stopNavigateOnAcceptTask": false,
                                                                                                                                                                                                                      "dragDropEnabled": false,
                                                                                                                                                                                                                      "notificationTimer": 8,
                                                                                                                                                                                                                      "maximumNotificationCount": 3,
                                                                                                                                                                                                                      "browserNotificationTimer": 8,
                                                                                                                                                                                                                      "wxmConfigured": false,
                                                                                                                                                                                                                      "desktopChatApp": {
                                                                                                                                                                                                                          "webexConfigured": false,
                                                                                                                                                                                                                      }
                                                                                                                                                                                                                      "headerActions": ["outdial", "notification"],
                                                                                                                                                                                                                      "area": {
                                                                                                                                                                                                                          "advancedHeader": {
                                                                                                                                                                                                                              ...
                                                                                                                                                                                                                          },
                                                                                                                                                                                                                          "panel": {
                                                                                                                                                                                                                              ...
                                                                                                                                                                                                                          },
                                                                                                                                                                                                                          "navigation": {
                                                                                                                                                                                                                              ...
                                                                                                                                                                                                                          },
                                                                                                                                                                                                                          "persistent": {
                                                                                                                                                                                                                              ...
                                                                                                                                                                                                                          },
                                                                                                                                                                                                                          "headless": {
                                                                                                                                                                                                                              ...
                                                                                                                                                                                                                          }
                                                                                                                                                                                                                      },
                                                                                                                                                                                                                  }
                                                                                                                                                                                                              },
                                                                                                                                                                                                              • The changes made to the JSON layout properties take effect when the Desktop browser is refreshed.

                                                                                                                                                                                                              • If a feature that you enabled on JSON layout is not available on the Desktop, contact Cisco Support to enable the feature.

                                                                                                                                                                                                              • All the properties in the JSON layout are case sensitive.

                                                                                                                                                                                                              appTitle

                                                                                                                                                                                                              To specify a title on the horizontal header of the Desktop. The default title is Webex Contact Center.

                                                                                                                                                                                                              Example:

                                                                                                                                                                                                              "appTitle": "Webex Contact Center"

                                                                                                                                                                                                              The default appTitle is changed from Contact Center Desktop to Webex Contact Center. There is no impact on the existing custom layouts that use the old default appTitle (Contact Center Desktop). To use the new appTitle, you must modify the custom layout. However, the new global layout uses the default appTitle as Webex Contact Center.

                                                                                                                                                                                                              The title can either be text, an image, or an empty string. The title text appears in two rows. If the text extends beyond the second row, an ellipsis icon is displayed, and the tooltip displays the complete title. Styles cannot be applied to the title.

                                                                                                                                                                                                              You can either use data URIs (Uniform Resource Identifier) or host a custom title image on a content delivery network (CDN), Amazon Web Services (AWS) Simple Storage Service (S3) bucket, or a similar hosting service, and then specify the URL to the hosted image. The supported title image formats are PNG, JPG, JPEG, GIF, SVG, and WebP. The supported title image size is 184 x 32 pixels (width x height).

                                                                                                                                                                                                              logo

                                                                                                                                                                                                              To specify a URL for the company logo. If you do not provide a URL, then the Webex Contact Center logo appears by default.

                                                                                                                                                                                                              Example:

                                                                                                                                                                                                              "logo": "https://my-cdn.com/logo.png"

                                                                                                                                                                                                              You can host a custom logo image on a CDN, Amazon Web Services (AWS) Simple Storage Service (S3) bucket, or a similar hosting service, and then specify the URL to the hosted image. The supported logo image formats are PNG, JPG, JPEG, GIF, SVG, and WebP. The supported logo image size is 96 x 32 pixels (width x height).

                                                                                                                                                                                                              Table 10. Display Matrix for appTitle and logo Based on the Desktop Layout Configuration
                                                                                                                                                                                                              Condition Example appTitle logo
                                                                                                                                                                                                              If appTitle and logo are not configured
                                                                                                                                                                                                              "appTitle": "",
                                                                                                                                                                                                                "logo": "",
                                                                                                                                                                                                              
                                                                                                                                                                                                              No title Default logo
                                                                                                                                                                                                              If appTitle and logo are configured
                                                                                                                                                                                                              "appTitle": "ABC Company",
                                                                                                                                                                                                                "logo": "https://my-cdn.com/abclogo.png",
                                                                                                                                                                                                              
                                                                                                                                                                                                              Configured text Configured logo
                                                                                                                                                                                                              If appTitle is configured and logo is not configured
                                                                                                                                                                                                              "appTitle": "ABC Company",
                                                                                                                                                                                                                "logo": "",
                                                                                                                                                                                                              
                                                                                                                                                                                                              Configured text Default logo

                                                                                                                                                                                                              If appTitle is not configured and logo is configured

                                                                                                                                                                                                              "appTitle": "",
                                                                                                                                                                                                                "logo": "https://my-cdn.com/abclogo.png",
                                                                                                                                                                                                              
                                                                                                                                                                                                              No title Configured logo
                                                                                                                                                                                                              If appTitle is configured and logo is not preferred
                                                                                                                                                                                                              "appTitle": "ABC Company",
                                                                                                                                                                                                                "logo": "no-logo",
                                                                                                                                                                                                              
                                                                                                                                                                                                              Configured text No logo

                                                                                                                                                                                                              If appTitle is not configured and logo is not preferred

                                                                                                                                                                                                              "appTitle": "",
                                                                                                                                                                                                                "logo": "no-logo",
                                                                                                                                                                                                              
                                                                                                                                                                                                              No title No logo
                                                                                                                                                                                                              If appTitle is added as an image and logo is configured
                                                                                                                                                                                                              "appTitle": "https://my-cdn.com/abccompanylogo.png ",
                                                                                                                                                                                                                "logo": "https://my-cdn.com/abclogo.png",
                                                                                                                                                                                                              
                                                                                                                                                                                                              Configured image Configured logo

                                                                                                                                                                                                              If appTitle is added as an image and logo is not configured

                                                                                                                                                                                                              "appTitle": "https://my-cdn.com/abccompanylogo.png ",
                                                                                                                                                                                                                "logo": "",
                                                                                                                                                                                                              
                                                                                                                                                                                                              Configured image Default logo

                                                                                                                                                                                                              If appTitle is added as an image and logo is not preferred

                                                                                                                                                                                                              "appTitle": "https://my-cdn.com/abccompanylogo.png ",
                                                                                                                                                                                                                "logo": "no-logo",
                                                                                                                                                                                                              
                                                                                                                                                                                                              Configured image No logo
                                                                                                                                                                                                              • The custom image size is adjusted based on the aspect ratio. The custom title text that is configured earlier may now appear in two rows on the Desktop. To avoid this, you can modify the custom title text.

                                                                                                                                                                                                              • If title and logo are not configured in the horizontal header of the Desktop, that space is used by the header widgets. The header widgets must be configured correctly to use the title and logo space.

                                                                                                                                                                                                              • The title and logo together cannot exceed the maximum width of 304 pixels (including padding). If the logo width is lesser than 96 pixels, the remaining width can be used for the title.

                                                                                                                                                                                                              • If the custom image size is higher than the supported size, the image size is adjusted based on the aspect ratio in the horizontal header. If the custom image size is lesser than the supported size, the actual image size is retained in the horizontal header.

                                                                                                                                                                                                              taskPageIllustration

                                                                                                                                                                                                              To specify a custom illustration for the task page based on organization preferences and brand alignment. When an agent signs in, the task page displays the configured illustration as a background. By default, the task page appears without illustration.

                                                                                                                                                                                                              Example:

                                                                                                                                                                                                              "taskPageIllustration": "https://www.abc.com/image/logo.jpg",

                                                                                                                                                                                                              You can either use data URIs or host a custom illustration on a content delivery network (CDN), Amazon Web Services (AWS) Simple Storage Service (S3) bucket, or a similar hosting service, and then specify the URL to the hosted illustration. The illustration can be configured at the global or team level based on the layout definition. Ensure to configure the correct URL to prevent the broken image from being displayed on the Desktop.

                                                                                                                                                                                                              The supported task page illustration formats are PNG, JPG, JPEG, GIF, SVG, and WebP. The recommended illustration size is 400 x 400 pixels (width x height). If the custom illustration size is larger than the recommended size, the illustration size is adjusted based on the aspect ratio in the task page. If the custom illustration size is smaller than the recommended size, the actual illustration size is retained in the task page.

                                                                                                                                                                                                              Sample example for a custom illustration retaining the actual size
                                                                                                                                                                                                              Sample example for a custom illustration adjusted based on the aspect ratio

                                                                                                                                                                                                              stopNavigateOnAcceptTask

                                                                                                                                                                                                              To determine whether to shift the focus to a newly accepted task, when the agent accepts the new task while working on a previous task. The default value is false.

                                                                                                                                                                                                              Example:

                                                                                                                                                                                                              "stopNavigateOnAcceptTask": false

                                                                                                                                                                                                              If the value is set as true, when the user accepts a new task on the Desktop, the focus is retained on the previous task and does not shift to the newly accepted task. This setting prevents the user from losing any data when accepting a new request.

                                                                                                                                                                                                              For example, consider that Agent 1 is on chat with Customer 1 and simultaneously on a voice call with Customer 2. During the voice call, Agent 1 is updating the details of Customer 2 in the Interaction Control pane. Currently, Agent 1 has two active tasks in the Task List pane, and the focus is on the Interaction Control pane. When Agent 1 accepts a new chat request from Customer 3, the focus remains on the Interaction Control pane with Customer 2 and does not shift to the newly accepted chat request.

                                                                                                                                                                                                              To retain the focus on the previous task and not to shift to the newly accepted task, select the custom layout with the stopNavigateOnAcceptTask property value set to true.

                                                                                                                                                                                                              If the stopNavigateOnAcceptTask property value is not entered in the JSON layout, the Desktop shifts the focus to the newly accepted task. The behavior is similar to when the stopNavigateOnAcceptTask property value is set to false.

                                                                                                                                                                                                              • The setting applies to all tasks (voice and digital channels) performed on the Desktop—such as accepting a task, conference, consult, or transfer, and for outdial calls, outbound campaign calls, auto wrap up, and so on.

                                                                                                                                                                                                              • The setting does not apply if the Desktop user is on the Home page, with no active task in the Task List pane. In such a case, when a new task is accepted, the focus is shifted from the Home page to the newly accepted task.

                                                                                                                                                                                                              dragDropEnabled

                                                                                                                                                                                                              To enable the drag-and-drop and resizing of the widgets on the custom pages, set the value to true. The default value is false.

                                                                                                                                                                                                              Example:

                                                                                                                                                                                                              "dragDropEnabled": false

                                                                                                                                                                                                              For more information about enabling the drag-and-drop feature for the tabs in the Auxiliary Information pane, see Auxiliary Information Pane.

                                                                                                                                                                                                              notificationTimer

                                                                                                                                                                                                              To set the duration (in seconds) after which the desktop notifications on the Desktop are automatically dismissed. The notification appears at the top-right corner of the Desktop. The default timeout value is 8 seconds. The valid range for timeout values is 1-10 seconds. For the timeout changes to take effect, the browser must be refreshed after the changes are made.

                                                                                                                                                                                                              Example:

                                                                                                                                                                                                              "notificationTimer": 8

                                                                                                                                                                                                              maximumNotificationCount

                                                                                                                                                                                                              To set the number of desktop notifications to be displayed at a time on the Desktop. The default value is 3. The range for desktop notifications is 1-10. The desktop notifications are stacked. If there are many notifications, they appear with a slight delay depending on the notificationTimer settings.

                                                                                                                                                                                                              Example:

                                                                                                                                                                                                              "maximumNotificationCount": 3

                                                                                                                                                                                                              browserNotificationTimer

                                                                                                                                                                                                              To set the duration (in seconds) after which the browser toaster notifications on the Desktop are automatically dismissed. Toaster is a native browser notification that appears only if the Desktop is not the active browser window or tab. The Desktop browser window or tab is inactive when

                                                                                                                                                                                                              • You are working on other browser windows or tabs.

                                                                                                                                                                                                              • You are working on other applications.

                                                                                                                                                                                                              • You have minimized the Desktop browser window.

                                                                                                                                                                                                              The notification appears at the top-right corner of the Desktop. The default timeout value is 8 seconds. The recommended range for timeout values is 5-15 seconds. For the timeout changes to take effect, the browser must be refreshed after the changes are made.

                                                                                                                                                                                                              Example:

                                                                                                                                                                                                              "browserNotificationTimer": 8

                                                                                                                                                                                                              The configured timeout for browser notifications depends on the operating system and browser settings. The timeout value is honored in the Chrome browser across Windows OS, Chrome OS, and macOS. However, the other supported browsers do not honor the configured notification timeout value consistently.

                                                                                                                                                                                                              wxmConfigured

                                                                                                                                                                                                              (Optional) To configure Webex Experience Management, set the value to true. The default value is false. For more information, see Add Widgets to Webex Contact Center.

                                                                                                                                                                                                              Example:

                                                                                                                                                                                                              "wxmConfigured": true

                                                                                                                                                                                                              desktopChatApp

                                                                                                                                                                                                              To configure multiple Cisco-offered chat applications such as Webex App.

                                                                                                                                                                                                              webexConfigured

                                                                                                                                                                                                              Webex App along with its messaging and meeting functionalities can be configured within the Desktop. This configuration allows agents to collaborate with other agents, supervisors, and subject matter experts (SMEs) in their organization without navigating away from the Desktop.

                                                                                                                                                                                                              • The site administrator manages Webex Meeting users and assigns privileges only if the users have Webex Enterprise Edition. For more information, see Manage Webex Meetings Users in Cisco Webex Control Hub.

                                                                                                                                                                                                              • The supervisors and SMEs must download the Webex Client on their system (personal device) or access Webex App using Webex App for Web ( https://web.webex.com/). For more information, see Download the App.

                                                                                                                                                                                                              • You can access the Webex App within the Agent Desktop to collaborate with other agents, supervisors, and subject matter experts (SMEs) of your organization without navigating away from the Agent Desktop. The call control feature isn't available. To receive and make calls, you require the external, non-embedded Webex App. For more information, see Calling Apps.

                                                                                                                                                                                                              To configure Webex App within the Desktop:

                                                                                                                                                                                                              • In Cisco Webex Control Hub, when adding services for a user, select the Advanced Messaging check box (Users > Manage Users > Services > Messaging). For more information, see Manage User Accounts in Cisco Webex Site Administration.

                                                                                                                                                                                                              • In the custom Desktop Layout, set the webexConfigured property value to true.

                                                                                                                                                                                                                Example:

                                                                                                                                                                                                                "desktopChatApp": {
                                                                                                                                                                                                                    "webexConfigured": true
                                                                                                                                                                                                                },

                                                                                                                                                                                                                The default value of the webexConfigured property is false.

                                                                                                                                                                                                                Webex App is available for the agent, supervisor, and supervisorAgent roles only if you set the webexConfigured property value to true for each of these roles. The agent, supervisor, or supervisorAgent can't sign out of Webex App.

                                                                                                                                                                                                                To display the (Webex) icon on the horizontal header of the Desktop, enter the value webex in the headerActions property. For more information, see headerActions.

                                                                                                                                                                                                                To enable Webex App for a specific team, select the custom layout with the webexConfigured property value set to true. For more information, see Create a team.

                                                                                                                                                                                                              You can configure Webex App in the Auxiliary Information pane, custom page, and custom widget also. For more information, see Auxiliary Information Pane.

                                                                                                                                                                                                              Webex App Notification

                                                                                                                                                                                                              The values that are specified using the notificationTimer and browserNotificationTimer properties for the notification timer are applicable for Webex App. The default timeout value is 8 seconds for these properties. For more information, see notificationTimer and browserNotificationTimer.

                                                                                                                                                                                                              headerActions

                                                                                                                                                                                                              To change the order of the icons on the horizontal header of the Desktop. The default order is as follows:

                                                                                                                                                                                                              1. (Webex)

                                                                                                                                                                                                              2. (Outdial Call)

                                                                                                                                                                                                              3. (Notification Center)

                                                                                                                                                                                                              Set the value of the headerActions property as follows:

                                                                                                                                                                                                              Icon Name

                                                                                                                                                                                                              headerActions Property Value

                                                                                                                                                                                                              Webex App

                                                                                                                                                                                                              webex

                                                                                                                                                                                                              Outdial Call

                                                                                                                                                                                                              outdial

                                                                                                                                                                                                              Notification Center

                                                                                                                                                                                                              notification

                                                                                                                                                                                                              Example:

                                                                                                                                                                                                              "headerActions": ["webex", "outdial", "notification"],

                                                                                                                                                                                                              The headerActions property value is case sensitive.

                                                                                                                                                                                                              To change the default order of the icons, enter the headerActions property and the values in the custom layout accordingly.

                                                                                                                                                                                                              Example:

                                                                                                                                                                                                              "headerActions": ["notification", "outdial", "webex"],
                                                                                                                                                                                                              • If you do not enter the headerActions property and values in the custom layout, the icons are displayed in the default order.

                                                                                                                                                                                                              • To remove the header icons and the associated functionalities from the Desktop, set an empty value for the headerActions property ("headerActions": []). However, if you have added Webex App to the Auxiliary Information pane or a custom page, or as a custom widget, the agent can still access Webex App although Webex App is not available in the horizontal header of the Desktop.

                                                                                                                                                                                                              • If the webexConfigured property value is set as false, the Webex App icon is not displayed on the horizontal header of the Desktop, even if the webex value is added in the headerActions property. For more information, see webexConfigured.

                                                                                                                                                                                                              area

                                                                                                                                                                                                              The area property is the core section of the Desktop Layout. You can define the layout as per the area.

                                                                                                                                                                                                              "area": {
                                                                                                                                                                                                                  "header": {
                                                                                                                                                                                                                      ...
                                                                                                                                                                                                                  },
                                                                                                                                                                                                                  "advancedHeader: {
                                                                                                                                                                                                                      {
                                                                                                                                                                                                                        "comp": "widget-1",
                                                                                                                                                                                                                        "attributes": { ... },
                                                                                                                                                                                                                        "script": ....
                                                                                                                                                                                                                      }
                                                                                                                                                                                                                  },
                                                                                                                                                                                                                  "panel": {
                                                                                                                                                                                                                      ...
                                                                                                                                                                                                                  },
                                                                                                                                                                                                                  "navigation": {
                                                                                                                                                                                                                      ...
                                                                                                                                                                                                                  },
                                                                                                                                                                                                                  "persistent": {
                                                                                                                                                                                                                      ...
                                                                                                                                                                                                                  },
                                                                                                                                                                                                                  "headless": {
                                                                                                                                                                                                                      ...
                                                                                                                                                                                                                  }
                                                                                                                                                                                                              },

                                                                                                                                                                                                              You can configure the following area objects:

                                                                                                                                                                                                              • Panel: Represents the second panel or the right-most panel in the Auxiliary Information pane.

                                                                                                                                                                                                              • Navigation: Represents custom pages and their navigation elements that are related to the pages.

                                                                                                                                                                                                              • Persistent: Represents the page-level widgets that are persistent and display on all pages of the Desktop.

                                                                                                                                                                                                              • Headless: Represents the widgets that do not have a visual interface, but execute logic in the background.

                                                                                                                                                                                                              If advancedHeader property is configured, the header and headerActions properties must be removed.

                                                                                                                                                                                                              advancedHeader

                                                                                                                                                                                                              To customise the visibility and change the order of the icons on the horizontal header of the Desktop. The default order is as follows:

                                                                                                                                                                                                              1. (Webex)

                                                                                                                                                                                                              2. (Outdial Call)

                                                                                                                                                                                                              3. (Notification Center)

                                                                                                                                                                                                              4. (Agent State Selector)

                                                                                                                                                                                                              Set the value of the advancedHeader property as follows:

                                                                                                                                                                                                              Icon Name

                                                                                                                                                                                                              headerActions Property Value

                                                                                                                                                                                                              Webex App

                                                                                                                                                                                                              agentx-webex

                                                                                                                                                                                                              Outdial Call

                                                                                                                                                                                                              agentx-outdial

                                                                                                                                                                                                              Notification Center

                                                                                                                                                                                                              agentx-notification

                                                                                                                                                                                                              Agent State Selector

                                                                                                                                                                                                              agentx-state-selector

                                                                                                                                                                                                              Example:

                                                                                                                                                                                                              "advancedHeader": [
                                                                                                                                                                                                                      {
                                                                                                                                                                                                                        "comp": "agentx-webex"
                                                                                                                                                                                                                      },
                                                                                                                                                                                                                      {
                                                                                                                                                                                                                        "comp": "agentx-outdial"
                                                                                                                                                                                                                      },
                                                                                                                                                                                                                      {
                                                                                                                                                                                                                        "comp": "agentx-notification"
                                                                                                                                                                                                                      },
                                                                                                                                                                                                                      {
                                                                                                                                                                                                                        "comp": "agentx-state-selector"
                                                                                                                                                                                                                      }
                                                                                                                                                                                                                      {
                                                                                                                                                                                                                        "comp": "widget-1",
                                                                                                                                                                                                                        "attributes": { ... },
                                                                                                                                                                                                                        "script": ....
                                                                                                                                                                                                                      }
                                                                                                                                                                                                                    ]

                                                                                                                                                                                                              The advancedHeader property value is case sensitive.

                                                                                                                                                                                                              To change the default order of the icons, enter the advancedHeader property and the values in the custom layout accordingly.

                                                                                                                                                                                                              The widgets flow into the dropdown menu from left to right.

                                                                                                                                                                                                              • If you do not enter the advancedHeader property in the custom layout, the default header is displayed.

                                                                                                                                                                                                              • When advanced header is enabled, you should move the widgets from the exisiting header to the advanced header as per the example.

                                                                                                                                                                                                              • When advanced header is enabled, old header will not be displayed.

                                                                                                                                                                                                              • Every widget icon has a default padding and margin that is defined through CSS and cannot be customised through desktop.

                                                                                                                                                                                                              • The location of the logo, title, and profile icons are fixed and cannot be customised.

                                                                                                                                                                                                              • To remove the header icons and the associated functionalities from the Desktop, set an empty value for the associated component in the advancedHeader property ("advancedHeader": []).

                                                                                                                                                                                                                If you have added Webex App to the Auxiliary Information pane or a custom page, or as a custom widget, the agent can still access Webex App although Webex App is not available in the horizontal header of the Desktop.

                                                                                                                                                                                                              • If you add a widget with a long label, a truncated label name is displayed according to the space available.

                                                                                                                                                                                                                You can use the attribute textContent to add a label to a widget.

                                                                                                                                                                                                                Example:

                                                                                                                                                                                                                {
                                                                                                                                                                                                                          "comp": "timer-widget",
                                                                                                                                                                                                                          "attributes": { "duration": "08:00:00" },
                                                                                                                                                                                                                          "textContent": "Count Down Timer for Current Shift",
                                                                                                                                                                                                                          "script": "https://wxcc-demo.s3.amazonaws.com/widgets/timer-widget.js"
                                                                                                                                                                                                                        }

                                                                                                                                                                                                                The label "Count Down Timer for Current Shift" will be truncated and displayed according to the space available.

                                                                                                                                                                                                                • Avoid adding widgets with a long label.

                                                                                                                                                                                                                • When a widget flows to the drop-down, only the widget icon is clickable.

                                                                                                                                                                                                              • If the webexConfigured property value is set as false, the Webex App icon is not displayed on the horizontal header of the Desktop, even if the webex value is added in the advancedHeader property. For more information, see webexConfigured.

                                                                                                                                                                                                              Home Page

                                                                                                                                                                                                              When you sign in to the Desktop, you land on the Home Page.

                                                                                                                                                                                                              The Home Page is only applicable to Supervisors and SupervisorAgent persona.

                                                                                                                                                                                                              You can view the following widgets on the Home Page. Analyzer widgets are provided by default, but the administrator can also configure Persistent and Custom widgets. For more information, see JSON Layout Top-Level Properties.

                                                                                                                                                                                                              Analyzer Widgets

                                                                                                                                                                                                              By default, Analyzer widget displays on the Desktop Home Page.

                                                                                                                                                                                                              Home Page Layout Configuration

                                                                                                                                                                                                              You can configure the Home Page of the Desktop to display layout that is based on your organization preferences and brand alignment. Edit the Homepage field to configure the home page. You can configure the following components to be displayed in the Home Page when a user signs in to the Desktop:

                                                                                                                                                                                                              • A Welcome message

                                                                                                                                                                                                              • The Task icon on the Navigation bar to navigate to the Task pane. The Task icon is displayed for the Supervisor and Supervisor & Agent role with the call monitoring feature enabled. Task pane displays incoming customer requests, active and past customer interactions, and active monitoring requests.

                                                                                                                                                                                                              • Filter sections such as Queue Name, Channel Type, and Managed Teams.

                                                                                                                                                                                                              The following table describes the page properties that are required to configure the Home Page:

                                                                                                                                                                                                              Table 11. Dynamic Home Page Layout—page Properties

                                                                                                                                                                                                              Property

                                                                                                                                                                                                              Description and Code

                                                                                                                                                                                                              page > useFlexLayout

                                                                                                                                                                                                              Flex layout is a new web component. It doesn't change the existing widgets. The new flex layout uses the same layout configuration format in a simplified way. It's backward compatible and doesn't impact existing widgets. You need to configure the JSON layout. To configure the JSON layout, provide the height and width of the widget. The widget is rendered in the same sequence as it's configured inside the JSON layout. Widgets have a default margin of 8 px.

                                                                                                                                                                                                              The JSON layout is based on the dimensions (width x height) and coordinates (X, Y, and Z) of the widgets.

                                                                                                                                                                                                              The flexible layout supports capabilities such as individual widget resize, maximize widgets, and so on.

                                                                                                                                                                                                              The height of individual widgets is measured in pixels. 1 unit of height = 40 pixels. The width of the widget depends on the number of columns in the container and the number of columns that change based on the container width.

                                                                                                                                                                                                              Widgets are displayed from the left to the right. The advanced layout engine uses custom logic to apply both horizontal and vertical space adjustment of widgets. Initially, the layout loads horizontally. After loading horizontally, the widget loads vertically and ensures that space utilization is optimal.

                                                                                                                                                                                                              Configure the widgets based on the screen size. You can either increase or decrease the width of the widgets, based on the screen size. This renders the widgets more readable and usable.

                                                                                                                                                                                                              Flex layout provides standard breakpoints such as large, medium, small, and extra small.

                                                                                                                                                                                                              • Large widgets have a resolution of 1360 px or more. For large widgets, specify the column value as 12.

                                                                                                                                                                                                              • Medium widgets have a resolution of 1070 px to 1360 px. For medium widgets, specify the column value as 10.

                                                                                                                                                                                                              • Small widgets have a resolution of 850 px to 1070 px. For small widgets, specify the column value as 6.

                                                                                                                                                                                                              • Extra small widgets have a resolution of 500 px. For extra small widgets, specify the column value as 4.

                                                                                                                                                                                                              These pixels might vary based on the operating system and the broswer.

                                                                                                                                                                                                              "page": {
                                                                                                                                                                                                                        "id": "landing",
                                                                                                                                                                                                                        "useFlexLayout": true,
                                                                                                                                                                                                                        "widgets": {
                                                                                                                                                                                                                          "comp1": {
                                                                                                                                                                                                                            "comp": "div",
                                                                                                                                                                                                                            "width": 4,
                                                                                                                                                                                                                            "height": 4,
                                                                                                                                                                                                                            "textContent": "Widget 1",
                                                                                                                                                                                                                            "attributes": {
                                                                                                                                                                                                                              "style": "width: max-content; margin: 80px 240px; color: white;"
                                                                                                                                                                                                                            }
                                                                                                                                                                                                                          },
                                                                                                                                                                                                                          "comp2": {
                                                                                                                                                                                                                            "comp": "div",
                                                                                                                                                                                                                            "width": 4,
                                                                                                                                                                                                                            "height": 4,
                                                                                                                                                                                                                            "textContent": "Widget 2",
                                                                                                                                                                                                                            "attributes": {
                                                                                                                                                                                                                              "style": "width: max-content; margin: 80px 240px;color: white;"
                                                                                                                                                                                                                            }
                                                                                                                                                                                                                          }
                                                                                                                                                                                                                        }
                                                                                                                                                                                                              

                                                                                                                                                                                                              page > comp

                                                                                                                                                                                                              Ensure you provide a unique custom component.

                                                                                                                                                                                                              "comp": "page-title",

                                                                                                                                                                                                              The page-title component represents level 2 heading <h2> of the custom HTML element.

                                                                                                                                                                                                              page > pageHeader

                                                                                                                                                                                                              Ensure to specify a title string that can be static, dynamic, or both.

                                                                                                                                                                                                              The page-title component represents level 2 heading <h2> in the custom HTML element.

                                                                                                                                                                                                              • Static string: For example, Hey, Welcome!

                                                                                                                                                                                                                "comp": "page-title",
                                                                                                                                                                                                                "attributes": {
                                                                                                                                                                                                                    "pageTitle": "Hey, Welcome!"
                                                                                                                                                                                                                }
                                                                                                                                                                                                              • Dynamic string: To fetch the value from the STORE. For example, Jane Doe.

                                                                                                                                                                                                                "comp": "page-title",
                                                                                                                                                                                                                "attributes": {
                                                                                                                                                                                                                    "pageTitle": "$STORE.agent.agentName"
                                                                                                                                                                                                                }

                                                                                                                                                                                                              • Both: The combination of static and dynamic strings. For example, Hey Jane Doe, Welcome!

                                                                                                                                                                                                                "comp": "page-title",
                                                                                                                                                                                                                "attributes": {
                                                                                                                                                                                                                    "pageTitle": "Hey {$STORE.agent.agentName}, Welcome!"
                                                                                                                                                                                                                }

                                                                                                                                                                                                                You must enclose the dynamic part of the string within the closed curly brackets {} and prefix with the structure $.

                                                                                                                                                                                                              page > pageSubHeader

                                                                                                                                                                                                              Ensure to add Sub Header that displays on the Desktop. The user can add Go to Analyzer in the Sub Header.

                                                                                                                                                                                                              • Code block for Sub Header

                                                                                                                                                                                                                "useFlexLayout": true,
                                                                                                                                                                                                                          "pageSubHeader": {
                                                                                                                                                                                                                            "comp": "div",
                                                                                                                                                                                                                            "attributes": {
                                                                                                                                                                                                                              "style": "display: flex; float:right;margin:16px 0px 16px 16px"
                                                                                                                                                                                                                            },
                                                                                                                                                                                                                            "children": [
                                                                                                                                                                                                                              {
                                                                                                                                                                                                                                "comp": "div",
                                                                                                                                                                                                                                "children": [
                                                                                                                                                                                                                                  {
                                                                                                                                                                                                                                    "comp": "md-label",
                                                                                                                                                                                                                                    "textContent": "$I18N.pageSubHeader.queueName",
                                                                                                                                                                                                                                    "attributes": {
                                                                                                                                                                                                                                      "style": "margin-bottom:8px;"
                                                                                                                                                                                                                                    }
                                                                                                                                                                                                              • Code block for Go to Analyzer in Sub Header

                                                                                                                                                                                                                {
                                                                                                                                                                                                                                "comp": "div",
                                                                                                                                                                                                                                "children": [
                                                                                                                                                                                                                                  {
                                                                                                                                                                                                                                    "comp": "agentx-more-actions-wrapper",
                                                                                                                                                                                                                                    "properties": {
                                                                                                                                                                                                                                      "actionList": [
                                                                                                                                                                                                                                        {
                                                                                                                                                                                                                                          "comp": "agentx-wc-goto-analyzer"
                                                                                                                                                                                                                                        }
                                                                                                                                                                                                                                      ]
                                                                                                                                                                                                                                    }
                                                                                                                                                                                                                                  }
                                                                                                                                                                                                              Header Widgets

                                                                                                                                                                                                              The header is used to display inline information, to add drop-down menus, and so on. As the header container has limited vertical space, the overall header height is only 64 pixels. For more information on the layout alignment, see the layout property section.

                                                                                                                                                                                                              Example:

                                                                                                                                                                                                              "header":{
                                                                                                                                                                                                                 "id":"header",
                                                                                                                                                                                                                 "widgets":{
                                                                                                                                                                                                                    "head1":{
                                                                                                                                                                                                                       "comp":"header-widget-one",
                                                                                                                                                                                                                       "script":"https://my-cdn.com/dynamic-widgets/header-widget-one.js",
                                                                                                                                                                                                                    },
                                                                                                                                                                                                                    "head2":{
                                                                                                                                                                                                                       "comp":"header-widget-two",
                                                                                                                                                                                                                       "script":"https://my-cdn.com/dynamic-widgets/header-widget-two.js",
                                                                                                                                                                                                                    }
                                                                                                                                                                                                                 },
                                                                                                                                                                                                                 "layout":{
                                                                                                                                                                                                                    "areas":[[ "head1", "head2" ]], 
                                                                                                                                                                                                                    "size": { "cols": [1, 1], "rows": [1] } 
                                                                                                                                                                                                                    } 
                                                                                                                                                                                                              }

                                                                                                                                                                                                              To add a tooltip for a header widget, wrap the component with md-tooltip. Enter tooltip information in the message property.

                                                                                                                                                                                                              Example:

                                                                                                                                                                                                              "header": {
                                                                                                                                                                                                                  "id": "dw-header",
                                                                                                                                                                                                                  "widgets": {
                                                                                                                                                                                                                      "head1": {
                                                                                                                                                                                                                          "comp": "md-tooltip",
                                                                                                                                                                                                                          "attributes": {
                                                                                                                                                                                                                              "message": "Netlify"
                                                                                                                                                                                                                          },
                                                                                                                                                                                                                          "children": [{
                                                                                                                                                                                                                              "comp": "agentx-wc-iframe",
                                                                                                                                                                                                                              "attributes": {
                                                                                                                                                                                                                                  "src": "https://keen-jackson-8d352f.netlify.app"
                                                                                                                                                                                                                              }
                                                                                                                                                                                                                          }]
                                                                                                                                                                                                                      },
                                                                                                                                                                                                              
                                                                                                                                                                                                                  },
                                                                                                                                                                                                              }

                                                                                                                                                                                                              You must add the style attributes display and height to configure any widgets through iFrame in the customizable widget area in the header. The best fit value of the height attribute is 64 pixels.

                                                                                                                                                                                                              Ensure that you add the style attributes to the existing header widgets for them to load as expected within the iFrame.

                                                                                                                                                                                                              Example:

                                                                                                                                                                                                              "head1": {
                                                                                                                                                                                                                  "comp": "agentx-wc-iframe",
                                                                                                                                                                                                                  "attributes": {
                                                                                                                                                                                                                      "src": "https://widget-kad.s3.amazonaws.com/Headers/Timer/Timer.htm",
                                                                                                                                                                                                                      "style": "height:64px;display:flex;"
                                                                                                                                                                                                                  }
                                                                                                                                                                                                              
                                                                                                                                                                                                              
                                                                                                                                                                                                              },

                                                                                                                                                                                                              We recommend that you use only a single row with multiple columns for the header because the header height is only 64 pixels. For more information on the alignment, see the layout property section.

                                                                                                                                                                                                              Navigation (Custom Pages)

                                                                                                                                                                                                              In this section, you can add pages that appear on the left navigation bar. You specify a navigation icon and a unique URL for the widget to appear on the navigation bar. We recommend using a specific prefix for the URL to avoid conflicts. For more details, see the nav property section.

                                                                                                                                                                                                              You can also have a collection of widgets that can display on this page. The page can have a single widget that appears on the screen or a collection of widgets in a grid. For more details on grid arrangement, see the layout property section.

                                                                                                                                                                                                              You do not need to add a dynamic-area wrapper to the widget tree. This means that you can drag and drop and resize widgets on custom pages when you enable this option.

                                                                                                                                                                                                              Example:

                                                                                                                                                                                                              {
                                                                                                                                                                                                                  "nav": {
                                                                                                                                                                                                                      "label": “Custom Page”,
                                                                                                                                                                                                                      "icon": "stored-info",
                                                                                                                                                                                                                      "iconType": "momentum",
                                                                                                                                                                                                                      "navigateTo": "dynamic-tabs",
                                                                                                                                                                                                                      "align": "top",
                                                                                                                                                                                                                      "isDefaultLandingPage": true
                                                                                                                                                                                                                           },    
                                                                                                                                                                                                                  "page": {
                                                                                                                                                                                                                      "id": “my - custom - page“,
                                                                                                                                                                                                                      "useFlexLayout": true,
                                                                                                                                                                                                                      "widgets": {
                                                                                                                                                                                                                          “
                                                                                                                                                                                                                          comp1”: {
                                                                                                                                                                                                                              "comp": "md-tabs",
                                                                                                                                                                                                                              "children": [{
                                                                                                                                                                                                                                      "comp": "md-tab",
                                                                                                                                                                                                                                      "textContent": "Shift Timer",
                                                                                                                                                                                                                                      "attributes": {
                                                                                                                                                                                                                                          "slot": "tab"
                                                                                                                                                                                                                                      }
                                                                                                                                                                                                                                  },
                                                                                                                                                                                                                                  {
                                                                                                                                                                                                                                      "comp": "md-tab-panel",
                                                                                                                                                                                                                                      "attributes": {
                                                                                                                                                                                                                                          "slot": "panel"
                                                                                                                                                                                                                                      },
                                                                                                                                                                                                                                      "children": [{
                                                                                                                                                                                                                                          "comp": “my - custom - timer”,
                                                                                                                                                                                                                                          “source”: http: //my-cdn.com/my-custom-timer.js
                                                                                                                                                                                                                                              "wrapper": {
                                                                                                                                                                                                                                                  "title": "Shift Timer",
                                                                                                                                                                                                                                                  "maximizeAreaName": "app-maximize-area"
                                                                                                                                                                                                                                              }
                                                                                                                                                                                                                                      }]
                                                                                                                                                                                                                                  },
                                                                                                                                                                                                                                  {
                                                                                                                                                                                                                                      "comp": "md-tab",
                                                                                                                                                                                                                                      "textContent": "Stock Market",
                                                                                                                                                                                                                                      "responsive": "false"
                                                                                                                                                                                                                                      "attributes": {
                                                                                                                                                                                                                                          "slot": "tab"
                                                                                                                                                                                                                                      },
                                                                                                                                                                                                                                  },
                                                                                                                                                                                                                                  {
                                                                                                                                                                                                                                      "comp": "md-tab-panel",
                                                                                                                                                                                                                                      "attributes": {
                                                                                                                                                                                                                                          "slot": "panel"
                                                                                                                                                                                                                                      },
                                                                                                                                                                                                                                      "children": [{
                                                                                                                                                                                                                                          "comp": "agentx-wc-iframe",
                                                                                                                                                                                                                                          "responsive": "false"
                                                                                                                                                                                                                                          "attributes": {
                                                                                                                                                                                                                                              "src": "https://widget-kad.s3.amazonaws.com/Trading.htm"
                                                                                                                                                                                                                                          },
                                                                                                                                                                                                                                          "wrapper": {
                                                                                                                                                                                                                                              "title": "Stock Market",
                                                                                                                                                                                                                                              "maximizeAreaName": "app-maximize-area"
                                                                                                                                                                                                                                          }
                                                                                                                                                                                                                                      }],
                                                                                                                                                                                                                                  },
                                                                                                                                                                                                                                  {
                                                                                                                                                                                                                                      "comp": "md-tab",
                                                                                                                                                                                                                                      "textContent": "Widget3",
                                                                                                                                                                                                                                      "attributes": {
                                                                                                                                                                                                                                          "slot": "tab"
                                                                                                                                                                                                                                      }
                                                                                                                                                                                                                                  },
                                                                                                                                                                                                                                  {
                                                                                                                                                                                                                                      "comp": "md-tab-panel",
                                                                                                                                                                                                                                      "textContent": "Three Content",
                                                                                                                                                                                                                                      "attributes": {
                                                                                                                                                                                                                                          "slot": "panel"
                                                                                                                                                                                                                                      }
                                                                                                                                                                                                                                  }
                                                                                                                                                                                                                              ]
                                                                                                                                                                                                                          },
                                                                                                                                                                                                                          “comp2”: {
                                                                                                                                                                                                                              "comp": “my - google - maps - component“,
                                                                                                                                                                                                                              “source”: "https://my-cdn.com/my-google.maps.js
                                                                                                                                                                                                                              "wrapper": {
                                                                                                                                                                                                                                  "title": "Google Map",
                                                                                                                                                                                                                                  "maximizeAreaName": "app-maximize-area"
                                                                                                                                                                                                                              }
                                                                                                                                                                                                                          }
                                                                                                                                                                                                                      },
                                                                                                                                                                                                                      "layout": {
                                                                                                                                                                                                                          "areas": [
                                                                                                                                                                                                                              ["left", "right"]
                                                                                                                                                                                                                          ],
                                                                                                                                                                                                                          "size": {
                                                                                                                                                                                                                              "cols": [1, 1],
                                                                                                                                                                                                                              "rows": [1]
                                                                                                                                                                                                                          }
                                                                                                                                                                                                                      }
                                                                                                                                                                                                                  }
                                                                                                                                                                                                              },

                                                                                                                                                                                                              The following table describes nav and page properties along with their child properties:

                                                                                                                                                                                                              Table 12. nav Property Details

                                                                                                                                                                                                              Property

                                                                                                                                                                                                              Description and Code

                                                                                                                                                                                                              nav > label

                                                                                                                                                                                                              This property indicates the page navigation identifier. The screen reader reads this property and it appears in the tooltip.

                                                                                                                                                                                                              These parameters are necessary to display your custom page on the navigation bar.

                                                                                                                                                                                                              type Navigation.Item = {
                                                                                                                                                                                                                  label: string;
                                                                                                                                                                                                                  iconType: "momentum" | "other";
                                                                                                                                                                                                                  icon: string;
                                                                                                                                                                                                                  align: "top" | "bottom";
                                                                                                                                                                                                                  navigateTo: string;
                                                                                                                                                                                                                  iconSize ? : number;
                                                                                                                                                                                                                  isResponsive ? : boolean;
                                                                                                                                                                                                              };

                                                                                                                                                                                                              The label property is the title of the custom page.

                                                                                                                                                                                                              nav > iconType

                                                                                                                                                                                                              This property represents the type of icon that displays in the navigation bar for the custom page.

                                                                                                                                                                                                              The following types of icons are available:

                                                                                                                                                                                                              • Momentum: You can choose any available icons in the collection: https://momentum.design/icons. The advantage of using Momentum is that it provides a few icons with an “active” version.

                                                                                                                                                                                                                Use case of an active version:

                                                                                                                                                                                                                For example, if you choose a Momentum icon type announcement, you can see the default icon on the navigation bar. When you navigate to the custom page (linked to the icon), the icon changes to the announcement-active version automatically. Ensure that you verify whether it has an active version of this same icon in the icon library.

                                                                                                                                                                                                              • Other: You can provide a custom image URL (hosted on a CDN) that appears on the navigation bar. If you use a black or white custom icon, the icon isn't visible when you switch between light and dark modes.

                                                                                                                                                                                                              nav > icon

                                                                                                                                                                                                              This property represents the name of the icon in the Momentum library or the CDN URL.

                                                                                                                                                                                                              type Navigation.Item ={
                                                                                                                                                                                                                 icon:“announcement”;
                                                                                                                                                                                                              }; 
                                                                                                                                                                                                              // OR //
                                                                                                                                                                                                              type Navigation.Item ={
                                                                                                                                                                                                                 icon:“https://my-cdn.com
                                                                                                                                                                                                                 /my-navigation-icon.png”;
                                                                                                                                                                                                              };

                                                                                                                                                                                                              nav > align

                                                                                                                                                                                                              This property helps you align the icon to the top or bottom of the navigation bar.

                                                                                                                                                                                                              Currently, the property allows top alignment only.

                                                                                                                                                                                                              nav > isDefaultLandingPage

                                                                                                                                                                                                              This property specifies the default landing page for the agents in Agent Desktop. Set this property to true to make the navigation bar page the default Landing page that appears for the agents after signing in to the Agent Desktop. If more than one navigation bar page has this property set to true, the system considers the first navigation bar page to become the default Landing page.

                                                                                                                                                                                                              If no navigation bar page has this property set to true, the Home page acts as the default Landing page.

                                                                                                                                                                                                              You can't set Agent Performance Statistics reports as the default landing page.

                                                                                                                                                                                                              nav > navigateTo

                                                                                                                                                                                                              This property specifies the name of the custom page. This name appears in the address bar when the agent navigates.

                                                                                                                                                                                                              The navigateTo must not include the following values: images, fonts, css, build_info, help, app, i18n, icons, images-mfe-wc, and sounds.

                                                                                                                                                                                                              type Navigation.Item = {
                                                                                                                                                                                                                  navigateTo: “my - custom - page”;
                                                                                                                                                                                                              };
                                                                                                                                                                                                              Table 13. page Property Details

                                                                                                                                                                                                              Property

                                                                                                                                                                                                              Description and Code

                                                                                                                                                                                                              page > id

                                                                                                                                                                                                              In page property, you specify the custom page (dynamic widget) object.

                                                                                                                                                                                                              The id property represents a unique page identifier. For example, my-custom-page-1. Agent can’t see this identifier on the Desktop.

                                                                                                                                                                                                              type DynamicWidgets.Page = {
                                                                                                                                                                                                                  id: string;
                                                                                                                                                                                                                  widgets: Record < string,
                                                                                                                                                                                                                  DynamicWidget.Options > ;
                                                                                                                                                                                                                  layout: Layout;
                                                                                                                                                                                                              };

                                                                                                                                                                                                              page > useFlexLayout

                                                                                                                                                                                                              Flex layout is a new web component. It doesn't change the existing widgets. The new flex layout uses the same layout configuration format in a simplified way. It's backward compatible and doesn't impact existing widgets. You need to configure the JSON layout. To configure the JSON layout, provide the height and width of the widget. The widget is rendered in the same sequence as it's configured inside the JSON layout. Widgets have a default margin of 8 px.

                                                                                                                                                                                                              The JSON layout is based on the dimensions (width x height) and coordinates (X, Y, and Z) of the widgets.

                                                                                                                                                                                                              The flexible layout supports capabilities such as individual widget resize, maximize widgets, and so on.

                                                                                                                                                                                                              The height of individual widgets is measured in pixels. 1 unit of height = 40 pixels. The width of the widget depends on the number of columns in the container and the number of columns that change based on the container width.

                                                                                                                                                                                                              Widgets are displayed from the left to the right. The advanced layout engine uses custom logic to apply both horizontal and vertical space adjustment of widgets. Initially, the layout loads horizontally. After loading horizontally, the widget loads vertically and ensures that space utilization is optimal.

                                                                                                                                                                                                              Configure the widgets based on the screen size. You can either increase or decrease the width of the widgets, based on the screen size. This renders the widgets more readable and usable.

                                                                                                                                                                                                              Flex layout provides standard breakpoints such as large, medium, small, and extra small.

                                                                                                                                                                                                              • Large widgets have a resolution of 1360 px or more. For large widgets, specify the column value as 12.

                                                                                                                                                                                                              • Medium widgets have a resolution of 1070 px to 1360 px. For medium widgets, specify the column value as 10.

                                                                                                                                                                                                              • Small widgets have a resolution of 850 px to 1070 px. For small widgets, specify the column value as 6.

                                                                                                                                                                                                              • Extra small widgets have a resolution of 500 px. For extra small widgets, specify the column value as 4.

                                                                                                                                                                                                              These pixels might vary based on the operating system and the broswer.

                                                                                                                                                                                                              "page": {
                                                                                                                                                                                                                        "id": "landing",
                                                                                                                                                                                                                        "useFlexLayout": true,
                                                                                                                                                                                                                        "widgets": {
                                                                                                                                                                                                                          "comp1": {
                                                                                                                                                                                                                            "comp": "div",
                                                                                                                                                                                                                            "width": 4,
                                                                                                                                                                                                                            "height": 4,
                                                                                                                                                                                                                            "textContent": "Widget 1",
                                                                                                                                                                                                                            "attributes": {
                                                                                                                                                                                                                              "style": "width: max-content; margin: 80px 240px; color: white;"
                                                                                                                                                                                                                            }
                                                                                                                                                                                                                          },
                                                                                                                                                                                                                          "comp2": {
                                                                                                                                                                                                                            "comp": "div",
                                                                                                                                                                                                                            "width": 4,
                                                                                                                                                                                                                            "height": 4,
                                                                                                                                                                                                                            "textContent": "Widget 2",
                                                                                                                                                                                                                            "attributes": {
                                                                                                                                                                                                                              "style": "width: max-content; margin: 80px 240px;color: white;"
                                                                                                                                                                                                                            }
                                                                                                                                                                                                                          }
                                                                                                                                                                                                                        }
                                                                                                                                                                                                              

                                                                                                                                                                                                              page > widgets

                                                                                                                                                                                                              page > comp

                                                                                                                                                                                                              Helps you define your custom widgets. To place multiple widgets, specify widget options in sequence. Ensure that you give each widget a unique area name. Use it in the layout section later.

                                                                                                                                                                                                              "widgets": {
                                                                                                                                                                                                                  "comp1": {
                                                                                                                                                                                                                      ...
                                                                                                                                                                                                                  }
                                                                                                                                                                                                                  "comp2": {
                                                                                                                                                                                                                      ...
                                                                                                                                                                                                                  }
                                                                                                                                                                                                              }

                                                                                                                                                                                                              This property represents the name of the custom HTML element (known as a Web Component or any other element - if you want to use it as a wrapper). For more information, see Sample Use Case Examples. Enter your custom element name here without angular brackets (“<” or “>”). For example, “my-custom-element.”

                                                                                                                                                                                                              Each entry under the widgets section supports the following format:

                                                                                                                                                                                                              type Options = {
                                                                                                                                                                                                                  comp: string;
                                                                                                                                                                                                                  script ? : string;
                                                                                                                                                                                                                  properties ? : Record < string,
                                                                                                                                                                                                                  any > ;
                                                                                                                                                                                                                  attributes ? : Record < string,
                                                                                                                                                                                                                  string > ;
                                                                                                                                                                                                                  children ? : Options[];
                                                                                                                                                                                                                  textContent ? : string;
                                                                                                                                                                                                                  style ? : Partial < CSSStyleDeclaration > ;
                                                                                                                                                                                                                  wrapper ? : {
                                                                                                                                                                                                                      title: string;
                                                                                                                                                                                                                      maximizeAreaName: string;
                                                                                                                                                                                                                  };
                                                                                                                                                                                                              };

                                                                                                                                                                                                              page > script

                                                                                                                                                                                                              (Optional) This property is required only when you load the widget or component from a remote location such as a CDN.

                                                                                                                                                                                                              "comp1": {
                                                                                                                                                                                                                  "comp": "widget-one",
                                                                                                                                                                                                                  "script": "http:/my-cdn.com /
                                                                                                                                                                                                                      dynamic - widgets / widget - one.js ",
                                                                                                                                                                                                              }

                                                                                                                                                                                                              Don’t change the script URL for the same component. If you need to change the script URL for the same component, do one of the following:

                                                                                                                                                                                                              • Notify the agent to clear the browser cache and reload the Agent Desktop.

                                                                                                                                                                                                              • Retain the existing URL. Dynamically import the new bundle URL using the javascript hosted in the existing URL.

                                                                                                                                                                                                                Example:

                                                                                                                                                                                                                (function() {
                                                                                                                                                                                                                          var script = document.createElement("script");
                                                                                                                                                                                                                              script.src = <Your JS Script URL>
                                                                                                                                                                                                                              script.type = "text/javascript";
                                                                                                                                                                                                                              script.async = true;
                                                                                                                                                                                                                              document.getElementsByTagName ("head").item(0).appendchild(script);
                                                                                                                                                                                                                
                                                                                                                                                                                                                            } ) ()

                                                                                                                                                                                                              page > properties

                                                                                                                                                                                                              You can specify properties that you must pass for the Web component.

                                                                                                                                                                                                              "properties": {
                                                                                                                                                                                                                  "user": "admin",
                                                                                                                                                                                                              },

                                                                                                                                                                                                              page > responsive

                                                                                                                                                                                                              Determines whether a web component or an iFrame based widget that is added in the custom layout at the page level or the comp level is responsive. Responsive web components make your web page visually appealing on all devices and are easy to use. You must use responsive iFrame widgets.

                                                                                                                                                                                                              Configure this property with one of the following values:

                                                                                                                                                                                                              • True: Enables responsiveness of the widget. By default, all widgets are responsive based on the progressive screen sizes, orientation, and viewing areas of the device in use.

                                                                                                                                                                                                              • False: Disables responsiveness of the widget. If the widgets do not support viewing on different devices, mark them as nonresponsive.

                                                                                                                                                                                                              {
                                                                                                                                                                                                                  "comp": "md-tab",
                                                                                                                                                                                                                  "responsive": true,
                                                                                                                                                                                                                  "attributes": {
                                                                                                                                                                                                                      "slot": "tab",
                                                                                                                                                                                                                      "class": "widget-pane-tab"
                                                                                                                                                                                                                  },
                                                                                                                                                                                                                  "children": [{
                                                                                                                                                                                                                      "comp": "slot",
                                                                                                                                                                                                                      "attributes": {
                                                                                                                                                                                                                          "name": "SCREEN_POP_TAB"
                                                                                                                                                                                                                      }
                                                                                                                                                                                                                  }],
                                                                                                                                                                                                                  "visibility": "SCREEN_POP"
                                                                                                                                                                                                              }, {
                                                                                                                                                                                                                  "comp": "md-tab-panel",
                                                                                                                                                                                                                  "responsive": false,
                                                                                                                                                                                                                  "attributes": {
                                                                                                                                                                                                                      "slot": "panel",
                                                                                                                                                                                                                      "class": "widget-pane"
                                                                                                                                                                                                                  },
                                                                                                                                                                                                                  "children": [{
                                                                                                                                                                                                                      "comp": "slot",
                                                                                                                                                                                                                      "attributes": {
                                                                                                                                                                                                                          "name": "CALL_GUIDE"
                                                                                                                                                                                                                      }
                                                                                                                                                                                                                  }],
                                                                                                                                                                                                                  "visibility": "CALL_GUIDE"
                                                                                                                                                                                                              },

                                                                                                                                                                                                              Nonresponsive widgets cannot ensure the best user experience and are not displayed in the smaller view. The agent must increase the size of the browser window to view any widgets that are configured as nonresponsive.

                                                                                                                                                                                                              page > attributes

                                                                                                                                                                                                              You can specify the Web component attributes in this section.

                                                                                                                                                                                                              "attributes": {
                                                                                                                                                                                                                       "disabled": "false",
                                                                                                                                                                                                              },

                                                                                                                                                                                                              page > visibility

                                                                                                                                                                                                              Specifies whether the Cisco-offered widgets added in the custom layout at the page level or the comp level are visible or not.

                                                                                                                                                                                                              Cisco-offered widgets are Contact History, Cisco Webex Experience Management, IVR Transcript, Preview Campaign Call Guide, and Screen Pop.

                                                                                                                                                                                                              • The visibility property values are built in and defined in the default JSON file of the Desktop Layout. The administrator cannot modify the visibility property values of the Cisco-offered widgets.

                                                                                                                                                                                                              • The visibility property value NOT_RESPONSIVE is deprecated. You can continue to use it only for backward compatibility. Any value set as NOT_RESPONSIVE previously doesn't require modification, as the functionality remains the same.

                                                                                                                                                                                                                To set a newly created widget as responsive or not responsive, you must use the responsive property. For more information, see responsive property.

                                                                                                                                                                                                              page > children

                                                                                                                                                                                                              This property is the core part of the layout. In the children section, you can nest as many levels as required if the Web Component-based widget allows you to pass children. To make that possible, the developer must programmatically handle the slotted content. For more information, see Cisco Webex Contact Center Desktop Developer Guide.

                                                                                                                                                                                                              To know about passing STORE values as properties, see Share Data from Desktop to Widgets.

                                                                                                                                                                                                              "children": [{
                                                                                                                                                                                                                      "comp": "div",
                                                                                                                                                                                                                      "textContent": "Test"
                                                                                                                                                                                                                  },
                                                                                                                                                                                                                  {
                                                                                                                                                                                                                      "comp": "div",
                                                                                                                                                                                                                      "textContent": “Test”
                                                                                                                                                                                                                  },
                                                                                                                                                                                                                  {
                                                                                                                                                                                                                      "comp": "div",
                                                                                                                                                                                                                      "textContent": "Test"
                                                                                                                                                                                                                  },
                                                                                                                                                                                                                  {
                                                                                                                                                                                                                      "comp": "div",
                                                                                                                                                                                                                      "children": [{
                                                                                                                                                                                                                              "comp": "div",
                                                                                                                                                                                                                              "textContent": “Test”
                                                                                                                                                                                                                          },
                                                                                                                                                                                                                          {
                                                                                                                                                                                                                              "comp": "div",
                                                                                                                                                                                                                              "textContent": "Test"
                                                                                                                                                                                                                          }
                                                                                                                                                                                                                      ]
                                                                                                                                                                                                                  }
                                                                                                                                                                                                              ],

                                                                                                                                                                                                              The advantage of the “children” array section is that you can use existing Web Components in your layout specification, which is already part of the Desktop bundle. A few of the Desktop bundle Web Components include:

                                                                                                                                                                                                              • agentx-wc-iframe: A widget that allows you to place any web page into an iFrame as a widget.

                                                                                                                                                                                                              • dynamic-area: A component that allows you to enable the drag-and-drop feature for Agents in a place other than custom pages. The custom pages can also have this capability if you enable drag-and-drop by default.

                                                                                                                                                                                                              • Any component in the momentum-ui-web-component library. For more information, see GitHub. For example:

                                                                                                                                                                                                                • md-tabs: Tabs container wrapper

                                                                                                                                                                                                                • md-tab: Single tab header

                                                                                                                                                                                                                • md-tab-panel: Single tab content

                                                                                                                                                                                                              For more information on the attributes for the persistent tab, see Attributes for Persistent Tabs.

                                                                                                                                                                                                              page > textContent

                                                                                                                                                                                                              Helps you to add your text content.

                                                                                                                                                                                                              "textContent": "My Text Content",

                                                                                                                                                                                                              page > style

                                                                                                                                                                                                              Helps you to assign a particular CSS style to your component.

                                                                                                                                                                                                              "style": {
                                                                                                                                                                                                                  "backgroundColor": "#CBD",
                                                                                                                                                                                                                  "overflow": "scroll"
                                                                                                                                                                                                              },

                                                                                                                                                                                                              page > wrapper

                                                                                                                                                                                                              Widget wrapper allows you to add a toolbar on top of your widget. The toolbar can contain a title and the (Maximize) icon on top of the widget. When the widget has occupied a small space on the page, the maximize icon allows the agent to see the widget in full workspace.

                                                                                                                                                                                                              Ensure that you use the default value as "app-maximize-area". Currently, only the default value is available.

                                                                                                                                                                                                              "wrapper": {
                                                                                                                                                                                                                  "title": My Widget Title ",
                                                                                                                                                                                                                  "maximizeAreaName": "app-maximize-area"
                                                                                                                                                                                                              }

                                                                                                                                                                                                              page > wrapper> id

                                                                                                                                                                                                              (Optional) The web component widget wrapper allows you to update the dynamic widget title using a unique identifier. Enter the widget wrapper id property value as unique-id-to-update-title.

                                                                                                                                                                                                              "wrapper": {
                                                                                                                                                                                                                  "title": My Widget Title ",
                                                                                                                                                                                                                  "id": "unique-id-to-update-title",
                                                                                                                                                                                                                  "maximizeAreaName": "app-maximize-area"
                                                                                                                                                                                                              }
                                                                                                                                                                                                              

                                                                                                                                                                                                              Ensure that you use the same unique identifier for the JavaScript CustomEvent. For more information, see the Asynchronous Events section in the Agent Contact Module chapter of the Cisco Webex Contact Center Desktop Developer.

                                                                                                                                                                                                              To update the iFrame-based widget title, use the iFrame content from the same domain. The following is a sample example:

                                                                                                                                                                                                              <
                                                                                                                                                                                                              script type = "text/javascript" >
                                                                                                                                                                                                                  var title = "";
                                                                                                                                                                                                              window.addEventListener("update-title-event", function(e) {
                                                                                                                                                                                                                  title = e.detail.title;
                                                                                                                                                                                                              });
                                                                                                                                                                                                              document.querySelector('#customEvent').onclick = function() {
                                                                                                                                                                                                                  const e = new CustomEvent("update-title-event", {
                                                                                                                                                                                                                      bubbles: true,
                                                                                                                                                                                                                      detail: {
                                                                                                                                                                                                                          title: "new title"
                                                                                                                                                                                                                      }
                                                                                                                                                                                                                  });
                                                                                                                                                                                                                  window.parent.dispatchEvent(e);
                                                                                                                                                                                                              }; <
                                                                                                                                                                                                              /script> <
                                                                                                                                                                                                              button id = "customEvent" > New Title < /button> <
                                                                                                                                                                                                                  iframe src = "https://blog.logrocket.com/the-ultimate-guide-to-iframes/" > < /iframe>

                                                                                                                                                                                                              page > agentx-wc-iframe

                                                                                                                                                                                                              Allows you to embed a web page in an iFrame that appears as a widget on the Desktop. You can use the iFrame widget called “agentx-wc-iframe”.

                                                                                                                                                                                                              "comp1": {
                                                                                                                                                                                                                  "comp": "agentx-wc-iframe",
                                                                                                                                                                                                                  "attributes": {
                                                                                                                                                                                                                      "src": "https://blog.logrocket.com /
                                                                                                                                                                                                                          the - ultimate - guide - to - iframes / "
                                                                                                                                                                                                                  },
                                                                                                                                                                                                                  "wrapper": {
                                                                                                                                                                                                                      "title": "AgentX iFrame",
                                                                                                                                                                                                                      "maximizeAreaName": "app-maximize-area"
                                                                                                                                                                                                                  }
                                                                                                                                                                                                              },

                                                                                                                                                                                                              page > layout

                                                                                                                                                                                                              Allows you to arrange the widgets on a page.

                                                                                                                                                                                                              The following format represents a grid layout:

                                                                                                                                                                                                              type Layout = {
                                                                                                                                                                                                                  areas: string[][];
                                                                                                                                                                                                                  size: {
                                                                                                                                                                                                                      rows: number[];
                                                                                                                                                                                                                      cols: number[];
                                                                                                                                                                                                                  };
                                                                                                                                                                                                              };

                                                                                                                                                                                                              Here you can define the grid with the area names that you defined in the widgets section.

                                                                                                                                                                                                              The following example shows how the layout of three rows and three columns is specified:

                                                                                                                                                                                                              "layout": {
                                                                                                                                                                                                                  "areas": [
                                                                                                                                                                                                                      [
                                                                                                                                                                                                                          "comp1",
                                                                                                                                                                                                                          "comp1",
                                                                                                                                                                                                                          "comp3"
                                                                                                                                                                                                                      ],
                                                                                                                                                                                                                      [
                                                                                                                                                                                                                          "comp2",
                                                                                                                                                                                                                          "comp2",
                                                                                                                                                                                                                          "comp3"
                                                                                                                                                                                                                      ],
                                                                                                                                                                                                                      [
                                                                                                                                                                                                                          "comp4",
                                                                                                                                                                                                                          "comp4",
                                                                                                                                                                                                                          "comp4"
                                                                                                                                                                                                                      ]
                                                                                                                                                                                                                  ],
                                                                                                                                                                                                                  "size": {
                                                                                                                                                                                                                      "cols": [1, 1, 1],
                                                                                                                                                                                                                      "rows": [1, 1, 1]
                                                                                                                                                                                                                  }
                                                                                                                                                                                                              }
                                                                                                                                                                                                              Equal Distribution of a 3x3 Layout

                                                                                                                                                                                                              In the size section, numbers represent the fraction of space that a widget can occupy, relative to the other widgets. All three columns occupy equal 1 fraction of space. With 100% as available width, each widget occupies 33.33% of horizontal space.

                                                                                                                                                                                                              With Equal Column Width

                                                                                                                                                                                                              Another use case example, if you set as "cols": [1, 2, 2], it means that overall space is divided by 5 (1+2+2) and the first widget occupies 20% of horizontal space. The second and third widgets take 40% each. For more information, see Basic Concepts of Grid Layout.

                                                                                                                                                                                                              After Changing the Column Width

                                                                                                                                                                                                              page > ROOT

                                                                                                                                                                                                              Nesting of layouts is called a sublayout. In case you have nested layouts in your layout configuration, you must have a single "ROOT" object as a parent for sublayouts. Otherwise, your layout configuration can be flat if no nesting is required.

                                                                                                                                                                                                              This sublayout provides more control over the layout resize behavior. The page layout property must be of type Record<string, Layout>. The layout property allows you to arrange the widgets on a page.

                                                                                                                                                                                                              {
                                                                                                                                                                                                                  "id": "some-id",
                                                                                                                                                                                                                  "widgets": {
                                                                                                                                                                                                                      "c1": {
                                                                                                                                                                                                                          "comp": "div",
                                                                                                                                                                                                                          "textContent": "c1"
                                                                                                                                                                                                                      },
                                                                                                                                                                                                                      "c2": {
                                                                                                                                                                                                                          "comp": "div",
                                                                                                                                                                                                                          "textContent": "c2"
                                                                                                                                                                                                                      },
                                                                                                                                                                                                                      "c3": {
                                                                                                                                                                                                                          "comp": "div",
                                                                                                                                                                                                                          "textContent": "c3"
                                                                                                                                                                                                                      },
                                                                                                                                                                                                                      "c4": {
                                                                                                                                                                                                                          "comp": "div",
                                                                                                                                                                                                                          "textContent": "c4"
                                                                                                                                                                                                                      },
                                                                                                                                                                                                                      "c5": {
                                                                                                                                                                                                                          "comp": "div",
                                                                                                                                                                                                                          "textContent": "c5"
                                                                                                                                                                                                                      }
                                                                                                                                                                                                                  },
                                                                                                                                                                                                                  "layout": {
                                                                                                                                                                                                                      "ROOT": {
                                                                                                                                                                                                                          "areas": [
                                                                                                                                                                                                                              ["c1", "sub1"],
                                                                                                                                                                                                                              ["c2", "sub2"],
                                                                                                                                                                                                                          ],
                                                                                                                                                                                                                          "size": {
                                                                                                                                                                                                                              "cols": [1, 1],
                                                                                                                                                                                                                              "rows": [1, 1]
                                                                                                                                                                                                                          }
                                                                                                                                                                                                                      },
                                                                                                                                                                                                                      "sub1": {
                                                                                                                                                                                                                          "areas": [
                                                                                                                                                                                                                              ["c3", "c4"]
                                                                                                                                                                                                                          ],
                                                                                                                                                                                                                          "size": {
                                                                                                                                                                                                                              "cols": [1, 1],
                                                                                                                                                                                                                              "rows": [1]
                                                                                                                                                                                                                          }
                                                                                                                                                                                                                      },
                                                                                                                                                                                                                      "sub2": {
                                                                                                                                                                                                                          "areas": [
                                                                                                                                                                                                                              ["c1"],
                                                                                                                                                                                                                              ["c5"]
                                                                                                                                                                                                                          ],
                                                                                                                                                                                                                          "size": {
                                                                                                                                                                                                                              "cols": [1],
                                                                                                                                                                                                                              "rows": [1, 1]
                                                                                                                                                                                                                          }
                                                                                                                                                                                                                      }
                                                                                                                                                                                                                  }
                                                                                                                                                                                                              }

                                                                                                                                                                                                              This setup creates a grid in the ROOT layout with two subgrids that you can resize independently.

                                                                                                                                                                                                              Sub-layout Appearance

                                                                                                                                                                                                              Resizing a component affects the components within that sublayout.

                                                                                                                                                                                                              After Resizing both Sub-layouts

                                                                                                                                                                                                              Be aware of the following cases:

                                                                                                                                                                                                              Infinite loop: If you include ROOT layout as a sublayout of ROOT, it causes a "call stack exceeded" error and runs into an infinite loop.

                                                                                                                                                                                                              {
                                                                                                                                                                                                                  "layout": {
                                                                                                                                                                                                                      "ROOT": {
                                                                                                                                                                                                                          "areas": [
                                                                                                                                                                                                                              ["c1", "c2"],
                                                                                                                                                                                                                              ["c3", "ROOT"],
                                                                                                                                                                                                                          ],
                                                                                                                                                                                                                          "size": {
                                                                                                                                                                                                                              "cols": [1, 1],
                                                                                                                                                                                                                              "rows": [1, 1]
                                                                                                                                                                                                                          }
                                                                                                                                                                                                                      }
                                                                                                                                                                                                                  }
                                                                                                                                                                                                              Sub-layout With Infinite Loop

                                                                                                                                                                                                              Same Sub-Layout (N) times: If you include the sublayout into your grid more than once with the same name, and if you resize one of them, all the sublayouts get resized automatically.

                                                                                                                                                                                                              If this is not the desired behavior, rename each of the sublayouts with a unique name.

                                                                                                                                                                                                              {
                                                                                                                                                                                                                  "layout": {
                                                                                                                                                                                                                      "ROOT": {
                                                                                                                                                                                                                          "areas": [
                                                                                                                                                                                                                              ["c1", "sub1"],
                                                                                                                                                                                                                              ["c2", "sub1"],
                                                                                                                                                                                                                          ],
                                                                                                                                                                                                                          "size": {
                                                                                                                                                                                                                              "cols": [1, 1],
                                                                                                                                                                                                                              "rows": [1, 1]
                                                                                                                                                                                                                          }
                                                                                                                                                                                                                      },
                                                                                                                                                                                                                      "sub1": {
                                                                                                                                                                                                                          "areas": [
                                                                                                                                                                                                                              ["c3", "c4"]
                                                                                                                                                                                                                          ],
                                                                                                                                                                                                                          "size": {
                                                                                                                                                                                                                              "cols": [1, 1],
                                                                                                                                                                                                                              "rows": [1]
                                                                                                                                                                                                                          }
                                                                                                                                                                                                                      }
                                                                                                                                                                                                                  }
                                                                                                                                                                                                              }
                                                                                                                                                                                                              Sub-layout with N times

                                                                                                                                                                                                              Attributes for Persistent Tabs

                                                                                                                                                                                                              To set the tabs in the custom pages and custom widgets as persistent, enter the attributes for md-tabs in the custom layout.

                                                                                                                                                                                                              Example: Set Tabs as Persistent

                                                                                                                                                                                                              {
                                                                                                                                                                                                                  "comp": "md-tabs",
                                                                                                                                                                                                                  "attributes": {
                                                                                                                                                                                                                      "persist-selection": true,
                                                                                                                                                                                                                      "tabs-id": "unique-id for all the tabs together in the container"
                                                                                                                                                                                                                  },
                                                                                                                                                                                                              }

                                                                                                                                                                                                              Property

                                                                                                                                                                                                              Description

                                                                                                                                                                                                              persist-selection

                                                                                                                                                                                                              To set md-tabs to be persistent. The default value is true.

                                                                                                                                                                                                              tabs-id

                                                                                                                                                                                                              Unique identification for all the tabs together in the container.

                                                                                                                                                                                                              When you set md-tabs to be persistent (persist-selection: true), Agent Desktop retains the tab selection even if an agent switches between pages or widgets in the Desktop.

                                                                                                                                                                                                              • The persist-selection property is not applicable for the tabs in the Auxiliary Information pane and Agent Performance Statistics reports page, because the persistent tab behavior is already set in the Desktop.

                                                                                                                                                                                                              • The tab selection is reset to the default tab when you sign out of the Desktop, reload/refresh the browser, or clear the browser cache.

                                                                                                                                                                                                              Persistent Widgets Configuration

                                                                                                                                                                                                              You can configure any custom widget to be persistent. Persistent widgets display on all pages of the Desktop. Persistent widgets display as a new tab in the Auxiliary Information pane only when you have an active contact request or conversation. For example, Sample Persistent widget.

                                                                                                                                                                                                              Persistent widgets do not display on the Home page in the way they display on the other pages. However, if you have an active interaction, the persistent widgets display in the Home page as part of the Auxiliary Information pane. For example, when you have answered a call, the Interaction Control pane displays, and the Sample Persistent widget displays as part of the Auxiliary Information pane.

                                                                                                                                                                                                              Example:

                                                                                                                                                                                                              "area": {
                                                                                                                                                                                                                  "persistent": [{
                                                                                                                                                                                                                          "comp": "md-tab",
                                                                                                                                                                                                                          "attributes": {
                                                                                                                                                                                                                              "slot": "tab"
                                                                                                                                                                                                                          },
                                                                                                                                                                                                                          "children": [{
                                                                                                                                                                                                                                  "comp": "md-icon",
                                                                                                                                                                                                                                  "attributes": {
                                                                                                                                                                                                                                      "name": "emoticons_16"
                                                                                                                                                                                                                                  }
                                                                                                                                                                                                                              },
                                                                                                                                                                                                                              {
                                                                                                                                                                                                                                  "comp": "span",
                                                                                                                                                                                                                                  "textContent": "Custom Page Widget"
                                                                                                                                                                                                                              }
                                                                                                                                                                                                                          ]
                                                                                                                                                                                                                      },
                                                                                                                                                                                                                      {
                                                                                                                                                                                                                          "comp": "md-tab-panel",
                                                                                                                                                                                                                          "attributes": {
                                                                                                                                                                                                                              "slot": "panel"
                                                                                                                                                                                                                          },
                                                                                                                                                                                                                          "children": [{
                                                                                                                                                                                                                              "comp": "dynamic-area",
                                                                                                                                                                                                                              "properties": {
                                                                                                                                                                                                                                  "area": {
                                                                                                                                                                                                                                      "id": "dw-panel-two",
                                                                                                                                                                                                                                      "widgets": {
                                                                                                                                                                                                                                          "comp1": {
                                                                                                                                                                                                                                              "comp": "agentx-wc-iframe",
                                                                                                                                                                                                                                              "attributes": {
                                                                                                                                                                                                                                                  "src": "https://blog.logrocket.com/the-ultimate-guide-to-iframes/"
                                                                                                                                                                                                                                              },
                                                                                                                                                                                                                                              "wrapper": {
                                                                                                                                                                                                                                                  "title": "AgentX iFrame",
                                                                                                                                                                                                                                                  "maximizeAreaName": "app-maximize-area"
                                                                                                                                                                                                                                              }
                                                                                                                                                                                                                                          },
                                                                                                                                                                                                                                          "comp2": {
                                                                                                                                                                                                                                              "comp": "uuip-widget-two",
                                                                                                                                                                                                                                              "script": "./dynamic-widgets/widget-two.js",
                                                                                                                                                                                                                                              "attributes": {
                                                                                                                                                                                                                                                  "title": "WIDGET 2 content"
                                                                                                                                                                                                                                              },
                                                                                                                                                                                                                                              "wrapper": {
                                                                                                                                                                                                                                                  "title": "Widget 2 title",
                                                                                                                                                                                                                                                  "maximizeAreaName": "app-maximize-area"
                                                                                                                                                                                                                                              }
                                                                                                                                                                                                                                          }
                                                                                                                                                                                                                                      },
                                                                                                                                                                                                                                      "layout": {
                                                                                                                                                                                                                                          "areas": [
                                                                                                                                                                                                                                              ["comp1", "comp2"]
                                                                                                                                                                                                                                          ],
                                                                                                                                                                                                                                          "size": {
                                                                                                                                                                                                                                              "cols": [1, 1],
                                                                                                                                                                                                                                              "rows": [1]
                                                                                                                                                                                                                                          }
                                                                                                                                                                                                                                      }
                                                                                                                                                                                                                                  }
                                                                                                                                                                                                                              }
                                                                                                                                                                                                                          }]
                                                                                                                                                                                                                      }
                                                                                                                                                                                                                  ]
                                                                                                                                                                                                              }

                                                                                                                                                                                                              When you customize a widget, you can choose either one of the options:

                                                                                                                                                                                                              • Host an application on a web page that can be embedded within an iframe.

                                                                                                                                                                                                              • Build a custom widget.

                                                                                                                                                                                                              The technical widget requirements are described in the Desktop Widget Development Documentation. As a layout editor, ensure that you have these details:

                                                                                                                                                                                                              • What is the name of the custom HTML element (known as Web Component)?

                                                                                                                                                                                                              • What is the URL to the content delivery network (CDN) source that hosts the JavaScript bundle?

                                                                                                                                                                                                              Auxiliary Information Pane

                                                                                                                                                                                                              The Auxiliary Information pane of the Desktop displays the tabs which include the Cisco-offered (default) widgets and custom widgets. The following Cisco-offered widgets appear in the predefined tabs:

                                                                                                                                                                                                              • Contact History

                                                                                                                                                                                                              • IVR Transcript

                                                                                                                                                                                                              • Customer Experience Journey

                                                                                                                                                                                                              • Screen Pop

                                                                                                                                                                                                              You can use the Auxiliary Information pane to:

                                                                                                                                                                                                              • Add tabs

                                                                                                                                                                                                              • Change the tab order

                                                                                                                                                                                                              • Remove predefined tabs

                                                                                                                                                                                                              • Mark the custom tabs as draggable

                                                                                                                                                                                                              • Add tooltips to the custom tabs

                                                                                                                                                                                                              • Add the Reset Tab Order option

                                                                                                                                                                                                              Example:

                                                                                                                                                                                                              "panel": {
                                                                                                                                                                                                                  "comp": "md-tabs",
                                                                                                                                                                                                                  "attributes": {
                                                                                                                                                                                                                      "class": "widget-tabs"
                                                                                                                                                                                                                  },
                                                                                                                                                                                                                  "children": [{
                                                                                                                                                                                                                          "comp": "md-tab",
                                                                                                                                                                                                                          "attributes": {
                                                                                                                                                                                                                              "slot": "tab",
                                                                                                                                                                                                                              "class": "widget-pane-tab"
                                                                                                                                                                                                                          },
                                                                                                                                                                                                                          "children": [{
                                                                                                                                                                                                                              "comp": "slot",
                                                                                                                                                                                                                              "attributes": {
                                                                                                                                                                                                                                  "name": "CONTACT_HISTORY_TAB"
                                                                                                                                                                                                                              }
                                                                                                                                                                                                                          }]
                                                                                                                                                                                                                      },
                                                                                                                                                                                                                      {
                                                                                                                                                                                                                          "comp": "md-tab-panel",
                                                                                                                                                                                                                          "attributes": {
                                                                                                                                                                                                                              "slot": "panel",
                                                                                                                                                                                                                              "class": "widget-pane"
                                                                                                                                                                                                                          },
                                                                                                                                                                                                                          "children": [{
                                                                                                                                                                                                                              "comp": "slot",
                                                                                                                                                                                                                              "attributes": {
                                                                                                                                                                                                                                  "name": "CONTACT_HISTORY"
                                                                                                                                                                                                                              }
                                                                                                                                                                                                                          }]
                                                                                                                                                                                                                      },
                                                                                                                                                                                                                      {
                                                                                                                                                                                                                          "comp": "md-tab",
                                                                                                                                                                                                                          "attributes": {
                                                                                                                                                                                                                              "slot": "tab",
                                                                                                                                                                                                                              "class": "widget-pane-tab"
                                                                                                                                                                                                                          },
                                                                                                                                                                                                                          "children": [{
                                                                                                                                                                                                                                  "comp": "md-icon",
                                                                                                                                                                                                                                  "attributes": {
                                                                                                                                                                                                                                      "name": "pop-out_16"
                                                                                                                                                                                                                                  }
                                                                                                                                                                                                                              },
                                                                                                                                                                                                                              {
                                                                                                                                                                                                                                  "comp": "span",
                                                                                                                                                                                                                                  "textContent": "Screen Pop"
                                                                                                                                                                                                                              }
                                                                                                                                                                                                                          ],
                                                                                                                                                                                                                          "visibility": "SCREEN_POP"
                                                                                                                                                                                                                      },
                                                                                                                                                                                                                      {
                                                                                                                                                                                                                          "comp": "md-tab-panel",
                                                                                                                                                                                                                          "attributes": {
                                                                                                                                                                                                                              "slot": "panel",
                                                                                                                                                                                                                              "class": "widget-pane"
                                                                                                                                                                                                                          },
                                                                                                                                                                                                                          "children": [{
                                                                                                                                                                                                                              "comp": "#SCREEN_POP"
                                                                                                                                                                                                                          }],
                                                                                                                                                                                                                      },
                                                                                                                                                                                                                      {
                                                                                                                                                                                                                          "comp": "md-tab",
                                                                                                                                                                                                                          "attributes": {
                                                                                                                                                                                                                              "slot": "tab"
                                                                                                                                                                                                                          },
                                                                                                                                                                                                                          "children": [{
                                                                                                                                                                                                                                  "comp": "md-icon",
                                                                                                                                                                                                                                  "attributes": {
                                                                                                                                                                                                                                      "name": "emoticons_16"
                                                                                                                                                                                                                                  }
                                                                                                                                                                                                                              },
                                                                                                                                                                                                                              {
                                                                                                                                                                                                                                  "comp": "span",
                                                                                                                                                                                                                                  "textContent": "Custom Widget"
                                                                                                                                                                                                                              }
                                                                                                                                                                                                                          ]
                                                                                                                                                                                                                      },
                                                                                                                                                                                                                      {
                                                                                                                                                                                                                          "comp": "md-tab-panel",
                                                                                                                                                                                                                          "attributes": {
                                                                                                                                                                                                                              "slot": "panel"
                                                                                                                                                                                                                          },
                                                                                                                                                                                                                          "children": [{
                                                                                                                                                                                                                              "comp": "dynamic-area",
                                                                                                                                                                                                                              "properties": {
                                                                                                                                                                                                                                  "area": {
                                                                                                                                                                                                                                      "id": "dw-panel-two",
                                                                                                                                                                                                                                      "widgets": {
                                                                                                                                                                                                                                          "comp1": {
                                                                                                                                                                                                                                              "comp": "agentx-wc-iframe",
                                                                                                                                                                                                                                              "attributes": {
                                                                                                                                                                                                                                                  "src": "https://blog.logrocket.com/the-ultimate-guide-to-iframes/"
                                                                                                                                                                                                                                              },
                                                                                                                                                                                                                                              "wrapper": {
                                                                                                                                                                                                                                                  "title": "AgentX iFrame",
                                                                                                                                                                                                                                                  "maximizeAreaName": "app-maximize-area"
                                                                                                                                                                                                                                              }
                                                                                                                                                                                                                                          },
                                                                                                                                                                                                                                          "comp2": {
                                                                                                                                                                                                                                              "comp": "widget-one",
                                                                                                                                                                                                                                              "script": "https://my-cdn.com/dynamic-widgets/widget-one.js",
                                                                                                                                                                                                                                              "wrapper": {
                                                                                                                                                                                                                                                  "title": "Widget title",
                                                                                                                                                                                                                                                  "maximizeAreaName": "app-maximize-area"
                                                                                                                                                                                                                                              }
                                                                                                                                                                                                                                          }
                                                                                                                                                                                                                                      },
                                                                                                                                                                                                                                      "layout": {
                                                                                                                                                                                                                                          "areas": [
                                                                                                                                                                                                                                              ["comp1"],
                                                                                                                                                                                                                                              ["comp2"]
                                                                                                                                                                                                                                          ],
                                                                                                                                                                                                                                          "size": {
                                                                                                                                                                                                                                              "cols": [1],
                                                                                                                                                                                                                                              "rows": [1, 1]
                                                                                                                                                                                                                                          }
                                                                                                                                                                                                                                      }
                                                                                                                                                                                                                                  }
                                                                                                                                                                                                                              }
                                                                                                                                                                                                                          }]
                                                                                                                                                                                                                      }
                                                                                                                                                                                                                  ]
                                                                                                                                                                                                              },

                                                                                                                                                                                                              You can configure the Customer Experience Journey widget after you enable the Customer Experience Management Metrics on the Management Portal.

                                                                                                                                                                                                              In the Auxiliary Information pane, add new tabs to place your custom widgets. No special rules apply here and the component nesting is as expected and described in the children section. For more information, see the Children property of the page.

                                                                                                                                                                                                              The following are the specific examples to customize your tab headers:

                                                                                                                                                                                                              Example to Place Icons and Labels in the Children Property

                                                                                                                                                                                                              {
                                                                                                                                                                                                                  "comp": "md-tab",
                                                                                                                                                                                                                  "attributes": {
                                                                                                                                                                                                                      "slot": "tab",
                                                                                                                                                                                                                      "class": "widget-pane-tab"
                                                                                                                                                                                                                  },
                                                                                                                                                                                                                  "children": [{
                                                                                                                                                                                                                          "comp": "md-icon",
                                                                                                                                                                                                                          "attributes": {
                                                                                                                                                                                                                              "name": "transcript_16"
                                                                                                                                                                                                                          }
                                                                                                                                                                                                                      },
                                                                                                                                                                                                                      {
                                                                                                                                                                                                                          "comp": "span",
                                                                                                                                                                                                                          "textContent": “My Widget Tab”
                                                                                                                                                                                                                      }
                                                                                                                                                                                                                  ],
                                                                                                                                                                                                              },

                                                                                                                                                                                                              Example to Place Image (with CSS) and Labels in the Children Property

                                                                                                                                                                                                              {
                                                                                                                                                                                                                  "comp": "md-tab",
                                                                                                                                                                                                                  "attributes": {
                                                                                                                                                                                                                      "slot": "tab"
                                                                                                                                                                                                                  },
                                                                                                                                                                                                                  "children": [{
                                                                                                                                                                                                                      "comp": "span",
                                                                                                                                                                                                                      "attributes": {
                                                                                                                                                                                                                          "style": "align-items: center; display: flex;"
                                                                                                                                                                                                                      },
                                                                                                                                                                                                                      "children": [{
                                                                                                                                                                                                                              "comp": "img",
                                                                                                                                                                                                                              "attributes": {
                                                                                                                                                                                                                                  "src": “http: //my-cdn.com/icon.svg”,
                                                                                                                                                                                                                                      "width": 16,
                                                                                                                                                                                                                                  "height": 16,
                                                                                                                                                                                                                                  "style": "margin-right: 0.5rem;"
                                                                                                                                                                                                                              }
                                                                                                                                                                                                                          },
                                                                                                                                                                                                                          {
                                                                                                                                                                                                                              "comp": "span",
                                                                                                                                                                                                                              "textContent": “My Widget Tab”
                                                                                                                                                                                                                          }
                                                                                                                                                                                                                      ]
                                                                                                                                                                                                                  }],
                                                                                                                                                                                                              },

                                                                                                                                                                                                              The More Tabs drop-down list appears automatically when the Auxiliary Information pane contains multiple tabs.

                                                                                                                                                                                                              You must add a custom tab tooltip for readability and accessibility. To add a tooltip for a custom tab, wrap the component with md-tooltip. Enter the tooltip information in the message property and apply the style property values as shown in the following example.

                                                                                                                                                                                                              "comp": "md-tooltip",
                                                                                                                                                                                                              "attributes": {
                                                                                                                                                                                                                  "class": "widget-tabs",
                                                                                                                                                                                                                  "message": "Sample Tab 1",
                                                                                                                                                                                                                  "style": "max-width: 252px; min-width: 110px; overflow: hidden; text-overflow: ellipsis; white-space: nowrap; display: inline-block; margin-bottom: -10px;"
                                                                                                                                                                                                              },

                                                                                                                                                                                                              For a custom tab, we recommend a maximum width of 252 pixels and a minimum width of 110 pixels.

                                                                                                                                                                                                              To enable the drag-and-drop feature within the custom tab, add the following property within the attributes:

                                                                                                                                                                                                              "comp": "md-tabs",
                                                                                                                                                                                                              "attributes": {
                                                                                                                                                                                                                  "class": "widget-tabs",
                                                                                                                                                                                                                  "draggable": true,
                                                                                                                                                                                                                  "comp-unique-id": "sample-dynamic-custom-tabs"
                                                                                                                                                                                                              },
                                                                                                                                                                                                              • draggable: Set the draggable property value to true.

                                                                                                                                                                                                              • comp-unique-id: Enter a unique value to identify the component.

                                                                                                                                                                                                                Example:

                                                                                                                                                                                                                "comp-unique-id": "sample-dynamic-custom-tabs"
                                                                                                                                                                                                                

                                                                                                                                                                                                              If you enable drag-and-drop for a custom tab, the agent can drag and drop the tab to the required position within the Auxiliary Information pane. To reset the tabs to the default tab order, add the following property:

                                                                                                                                                                                                              "comp": "agentx-wc-more-actions-widget",
                                                                                                                                                                                                              "attributes": {
                                                                                                                                                                                                                  "slot": "settings",
                                                                                                                                                                                                                  "class": "widget-pane",
                                                                                                                                                                                                                  "tabs-unique-id": "sample-dynamic-custom-tabs"
                                                                                                                                                                                                              },
                                                                                                                                                                                                              • agentx-wc-more-actions-widget: Enter the component that is displayed as the More Actions () icon in the Auxiliary Information pane.

                                                                                                                                                                                                              • slot="settings": Enter an attribute within the component that is displayed as the Reset Tab Order option in the More Actions drop-down list. Agents can reset the tabs in the Auxiliary Information pane to the default order by clicking the > Reset Tab Order.

                                                                                                                                                                                                              • tabs-unique-id: Enter the same unique value defined for the comp-unique-id property to map and reset the md-tabs components.

                                                                                                                                                                                                              The following sample code uses the More Actions and Reset Tab Order functions.

                                                                                                                                                                                                              "comp": "agentx-wc-more-actions-widget",
                                                                                                                                                                                                              "attributes": {
                                                                                                                                                                                                                  "slot": "settings",
                                                                                                                                                                                                                  "class": "widget-pane",
                                                                                                                                                                                                                  "tabs-unique-id": "sample-dynamic-custom-tabs"
                                                                                                                                                                                                              },
                                                                                                                                                                                                              "children": [{
                                                                                                                                                                                                                  "comp": "div",
                                                                                                                                                                                                                  "attributes": {
                                                                                                                                                                                                                      "textContent": "custom action",
                                                                                                                                                                                                                      "slot": "custom-action"
                                                                                                                                                                                                                  },
                                                                                                                                                                                                                  "children": [{
                                                                                                                                                                                                                          "comp": "agentx-wc-notes-header-widget"
                                                                                                                                                                                                                      },
                                                                                                                                                                                                                      {
                                                                                                                                                                                                                          "comp": "agentx-wc-menu-notification"
                                                                                                                                                                                                                      }
                                                                                                                                                                                                                  ]
                                                                                                                                                                                                              }],
                                                                                                                                                                                                              
                                                                                                                                                                                                              }

                                                                                                                                                                                                              By default, the tooltip, ellipsis icon, and tab order reset for predefined tabs are defined.

                                                                                                                                                                                                              The More Actions drop-down list can be extended to add additional custom components or widgets after the Reset Tab Order option. The following is a sample set of style property values that can be applied to additional components.

                                                                                                                                                                                                              "comp": "md-tooltip",
                                                                                                                                                                                                              "attributes": {
                                                                                                                                                                                                                  "class": "widget-tabs",
                                                                                                                                                                                                                  "message": "Sample Element",
                                                                                                                                                                                                                  "style": "max-width: 252px; min-width: 110px; overflow: hidden; text-overflow: ellipsis; white-space: nowrap; display: inline-block; margin-bottom: -10px;"
                                                                                                                                                                                                              },

                                                                                                                                                                                                              The drag-and-drop feature is not supported for the additional custom components or widgets that are added to the More Actions drop-down list.

                                                                                                                                                                                                              Headless Widgets

                                                                                                                                                                                                              In the headless section, you can add widgets that are hidden and do not appear on the Agent Desktop. These widgets are used to execute logic in the background. This section is useful to trigger events that occur on the Desktop and execute widget-specific logic. For example, opening a custom CRM Screen Pop for an SMS on its arrival.

                                                                                                                                                                                                              Example:

                                                                                                                                                                                                              "headless":{
                                                                                                                                                                                                                 "id":"headless",
                                                                                                                                                                                                                 "widgets":{
                                                                                                                                                                                                                    "comp1":{
                                                                                                                                                                                                                       "comp":"headless-widget-one",
                                                                                                                                                                                                                       "script":"https://my-cdn.com/dynamic-widgets/headless-widget-one.js",
                                                                                                                                                                                                                    },
                                                                                                                                                                                                                    "comp2":{
                                                                                                                                                                                                                       "comp":"headless-widget-two",
                                                                                                                                                                                                                       "script":"https://my-cdn.com/dynamic-widgets/headless-widget-two.js",
                                                                                                                                                                                                                    }
                                                                                                                                                                                                                 },
                                                                                                                                                                                                                 "layout":{
                                                                                                                                                                                                                    "areas":[[ "comp1", comp2" ]], 
                                                                                                                                                                                                                    "size": { "cols": [1, 1], "rows": [1] } 
                                                                                                                                                                                                                    } 
                                                                                                                                                                                                              }
                                                                                                                                                                                                              Share Data from Desktop to Widgets

                                                                                                                                                                                                              To receive real-time data through properties or attributes inside a custom widget, assign appropriate STORE values in the layout JSON configuration.

                                                                                                                                                                                                              In addition, to access the data through JavaScript SDK subscribers, you can also pass the data through properties or attributes. If your component is built to react to property or attribute changes, you get real-time data updates from Agent Desktop, which is called a data provider.

                                                                                                                                                                                                              Currently, we have a single data provider under a key STORE. For more information, see the Data Provider—Widget Properties and Attributes section in the Cisco Webex Contact Center Desktop Developer Guide.

                                                                                                                                                                                                              Preview Campaign Call

                                                                                                                                                                                                              The administrator creates campaigns, configures the dialing mode (preview), and assigns the campaigns to teams. If an agent is part of a team to which campaigns are assigned, then the agent can make an outbound preview campaign call. For more information, see Configure Voice Outbound Campaign Modes in Webex Contact Center.

                                                                                                                                                                                                              The administrator configures the following in the custom layout to enable preview campaign contact for an agent.

                                                                                                                                                                                                              Campaign Contact

                                                                                                                                                                                                              The administrator adds the Campaign Contact widget in the header container of the custom layout. The campaign contact displays the customer's contact information based on the defined properties. For more information on the layout alignment, see the layout property row of the page Property Details table.

                                                                                                                                                                                                              Example:

                                                                                                                                                                                                              
                                                                                                                                                                                                              "advancedHeader": [
                                                                                                                                                                                                                {
                                                                                                                                                                                                                  "comp": "agentx-preview-campaign",
                                                                                                                                                                                                                  "properties": {
                                                                                                                                                                                                                    "isCampaignManagementEnabled": "$STORE.agent.isCampaignManagementEnabled",
                                                                                                                                                                                                                    "agentDbId": "$STORE.agent.acqueonAgentId",
                                                                                                                                                                                                                    "lcmUrl": "$STORE.agent.lcmUrl",
                                                                                                                                                                                                                    "isCallInProgress": "$STORE.agentContact.isActiveCall",
                                                                                                                                                                                                                    "outdialEntryPointId": "$STORE.agent.outDialEp",
                                                                                                                                                                                                                    "teamId": "$STORE.agent.getAcqueonTeamId",
                                                                                                                                                                                                                    "campaignManagerAdditionalInfo": "$STORE.agent.campaignManagerAdditionalInfo"
                                                                                                                                                                                                                    "orgId": "$STORE.agent.orgId",
                                                                                                                                                                                                                    "dialerProxyHost": "$STORE.envVariables.serviceUrls.dialerProxyHost",
                                                                                                                                                                                                                    "isProgressiveCampaignEnabled": "$STORE.app.featuresFlags.isProgressiveCampaignEnabled"    }
                                                                                                                                                                                                                },
                                                                                                                                                                                                                {
                                                                                                                                                                                                                  "comp": "agentx-webex"
                                                                                                                                                                                                                },
                                                                                                                                                                                                                {
                                                                                                                                                                                                                  "comp": "agentx-outdial"
                                                                                                                                                                                                                },
                                                                                                                                                                                                                {
                                                                                                                                                                                                                  "comp": "agentx-notification"
                                                                                                                                                                                                                },
                                                                                                                                                                                                                {
                                                                                                                                                                                                                  "comp": "agentx-state-selector"
                                                                                                                                                                                                                }
                                                                                                                                                                                                              ] 
                                                                                                                                                                                                              

                                                                                                                                                                                                              Call Guide

                                                                                                                                                                                                              The Call Guide widget displays in the Auxiliary Information pane on the Desktop. The call guide displays the questions and answers at the campaign level. The agent is prompted to read through the set of questions in the call guide and submit the responses.

                                                                                                                                                                                                              Example:

                                                                                                                                                                                                              "panel":{
                                                                                                                                                                                                                 "comp":"md-tabs",
                                                                                                                                                                                                                 "attributes":{
                                                                                                                                                                                                                    "class":"widget-tabs"
                                                                                                                                                                                                                 },
                                                                                                                                                                                                                 "children":[
                                                                                                                                                                                                                    {
                                                                                                                                                                                                                       "comp":"md-tab",
                                                                                                                                                                                                                       "attributes":{
                                                                                                                                                                                                                          "slot":"tab",
                                                                                                                                                                                                                          "class":"widget-pane-tab"
                                                                                                                                                                                                                       },
                                                                                                                                                                                                                       "children":[
                                                                                                                                                                                                                          {
                                                                                                                                                                                                                             "comp":"md-icon",
                                                                                                                                                                                                                             "attributes":{ "name":"icon-note_16"
                                                                                                                                                                                                                             }
                                                                                                                                                                                                                          },
                                                                                                                                                                                                                          {
                                                                                                                                                                                                                             "comp":"span", "textContent":"Call Guide"
                                                                                                                                                                                                                          }
                                                                                                                                                                                                                       ],
                                                                                                                                                                                                                       "visibility":"CALL_GUIDE"
                                                                                                                                                                                                                    },
                                                                                                                                                                                                                    {
                                                                                                                                                                                                                       "comp":"md-tab-panel",
                                                                                                                                                                                                                       "attributes":{
                                                                                                                                                                                                                          "slot":"panel", "class":"widget-pane"
                                                                                                                                                                                                                       },
                                                                                                                                                                                                                       "children":[
                                                                                                                                                                                                                          {
                                                                                                                                                                                                                             "comp": "acqueon-call-guide",
                                                                                                                                                                                                                             "script": "http://localhost:5555//index.js", // include CDN link here
                                                                                                                                                                                                                             "wrapper":{
                                                                                                                                                                                                                                "title":"Call Guide", "maximizeAreaName":"app-maximize-area"
                                                                                                                                                                                                                             },
                                                                                                                                                                                                                             "properties":{
                                                                                                                                                                                                                                "lcmKey":"$STORE.agentContact.getCallGuideProps.LCMKey",
                                                                                                                                                                                                                                "agentDbId":"$STORE.agent.acqueonAgentId",
                                                                                                                                                                                                                                "lcmUrl":"$STORE.agent.lcmUrl",
                                                                                                                                                                                                                                "campaignManagerAdditionalInfo":"$STORE.agent.campaignManagerAdditionalInfo"
                                                                                                                                                                                                                                "orgId": "$STORE.agent.orgId",
                                                                                                                                                                                                                                "dialerProxyHost": "$STORE.envVaribles.serviceUrls.dialerProxyHost",
                                                                                                                                                                                                                                "isProgressiveCampaignEnabled": "$STORE.app.featureFlags.isProgressiveCampaignEnabled"
                                                                                                                                                                                                                             }
                                                                                                                                                                                                                          }
                                                                                                                                                                                                                       ],
                                                                                                                                                                                                                       "visibility":"CALL_GUIDE"
                                                                                                                                                                                                                    }
                                                                                                                                                                                                                 ]
                                                                                                                                                                                                              }
                                                                                                                                                                                                              • The following comp property references have changed. agentx in the property value is replaced with acqueon:

                                                                                                                                                                                                                • agentx-preview-campaign is renamed to acqueon-preview-campaign

                                                                                                                                                                                                                • agentx-call-guide is renamed to acqueon-call-guide

                                                                                                                                                                                                              • You must host List and Campaign Manager (LCM) on a CDN and then specify the URL in the script property.

                                                                                                                                                                                                              Screen Pop

                                                                                                                                                                                                              In the Desktop Layout, you can configure Screen Pop in one of the following ways:

                                                                                                                                                                                                              • As a custom page

                                                                                                                                                                                                              • As one of the widgets in the custom page

                                                                                                                                                                                                              • As a tab in the Auxiliary Information pane

                                                                                                                                                                                                              The Screen Pop is displayed on the Desktop based on the following factors:

                                                                                                                                                                                                              For the Voice channel:

                                                                                                                                                                                                              • The configuration defined in the Desktop Layout

                                                                                                                                                                                                              • The Screen Pop activity defined in the Flow Designer

                                                                                                                                                                                                              For the New Digital Channels:

                                                                                                                                                                                                              • The configuration defined in the Desktop Layout

                                                                                                                                                                                                              • The Screen Pop node defined in the Connect Flow Builder

                                                                                                                                                                                                              For more information on configuring Screen Pop, see Screen Pop.

                                                                                                                                                                                                              Configuring Screen Pop in the Navigation Bar

                                                                                                                                                                                                              You can configure Screen Pop as a custom page, or as one of the widgets in a custom page. To access the Screen Pop custom page, click the Screen Pop icon on the Navigation bar. To access the Screen Pop widget in the custom page, click the custom icon on the Navigation bar. For more information on nav properties, see Navigation (Custom Pages).

                                                                                                                                                                                                              Example: Screen Pop as a Custom Page

                                                                                                                                                                                                              {
                                                                                                                                                                                                                  "nav": {
                                                                                                                                                                                                                      "label": "Screen Pop",
                                                                                                                                                                                                                      "icon": "pop-out",
                                                                                                                                                                                                                      "iconType": "momentum",
                                                                                                                                                                                                                      "navigateTo": "/screenpop",
                                                                                                                                                                                                                      "align": "top"
                                                                                                                                                                                                                  },
                                                                                                                                                                                                                  "page": {
                                                                                                                                                                                                                      "id": "agentx-wc-screen-pop",
                                                                                                                                                                                                                      "widgets": {
                                                                                                                                                                                                                          "comp1": {
                                                                                                                                                                                                                              "comp": "agentx-wc-screen-pop",
                                                                                                                                                                                                                              "properties": {
                                                                                                                                                                                                                                  "screenPopUrl": "$STORE.session.screenpop.screenPopSelector"
                                                                                                                                                                                                                              }
                                                                                                                                                                                                                          }
                                                                                                                                                                                                                      },
                                                                                                                                                                                                                      "layout": {
                                                                                                                                                                                                                          "areas": [
                                                                                                                                                                                                                              ["comp1"]
                                                                                                                                                                                                                          ],
                                                                                                                                                                                                                          "size": {
                                                                                                                                                                                                                              "cols": [1],
                                                                                                                                                                                                                              "rows": [1]
                                                                                                                                                                                                                          }
                                                                                                                                                                                                                      }
                                                                                                                                                                                                                  },
                                                                                                                                                                                                                  "visibility": "SCREEN_POP"
                                                                                                                                                                                                              }

                                                                                                                                                                                                              Example: Screen Pop as a Widget in the Custom Page

                                                                                                                                                                                                              "comp1": {
                                                                                                                                                                                                                  "comp": "agentx-wc-screen-pop",
                                                                                                                                                                                                                  "properties": {
                                                                                                                                                                                                                      "screenPopUrl": "$STORE.session.screenpop.screenPopSelector"
                                                                                                                                                                                                                  }

                                                                                                                                                                                                              If the Screen Pop is not configured in the Flow Designer, the custom page appears blank. For more information on configuring Screen Pop in the Flow Designer, see Screen Pop.

                                                                                                                                                                                                              Configuring Screen Pop in the Auxiliary Information Pane

                                                                                                                                                                                                              You can configure Screen Pop to appear as a tab in the Auxiliary Information pane.

                                                                                                                                                                                                              By default, Screen Pop appears as a new sub tab in the Screen Pop tab of the Auxiliary Information pane if Screen Pop is configured to be displayed as Inside Desktop in the Flow Designer.

                                                                                                                                                                                                              Add the following attribute in the panel section to include Screen Pop as a tab in the Auxiliary Information pane. For more information on panel details, see Auxiliary Information Pane.

                                                                                                                                                                                                              Example: Screen Pop as a tab in the Auxiliary Information Pane

                                                                                                                                                                                                               {
                                                                                                                                                                                                                       "comp":"md-tab",
                                                                                                                                                                                                                       "attributes":{
                                                                                                                                                                                                                          "slot":"tab",
                                                                                                                                                                                                                          "class":"widget-pane-tab"
                                                                                                                                                                                                                       },
                                                                                                                                                                                                                       "children":[
                                                                                                                                                                                                                          { "comp": "md-icon", "attributes": { "name": "pop-out_16" }},
                                                                                                                                                                                                                          { "comp": "span", "textContent": "Screen Pop" }], 
                                                                                                                                                                                                                        "visibility": "SCREEN_POP" 
                                                                                                                                                                                                                      }, 
                                                                                                                                                                                                                      { 
                                                                                                                                                                                                                        "comp": "md-tab-panel", 
                                                                                                                                                                                                                        "attributes": { "slot": "panel", "class": "widget-pane" }, 
                                                                                                                                                                                                                        "children": [{ "comp": "#SCREEN_POP"
                                                                                                                                                                                                                          }
                                                                                                                                                                                                                       ],
                                                                                                                                                                                                                    }

                                                                                                                                                                                                              The Screen Pop display option defined in the Flow Designer takes precedence over the configuration defined in the Desktop Layout.

                                                                                                                                                                                                              For example, consider you have configured the following Screen Pop settings:

                                                                                                                                                                                                              • Flow Designer—Display settings as In the new browser tab

                                                                                                                                                                                                              • Desktop Layout—As a tab in the Auxiliary Information pane

                                                                                                                                                                                                              When the event for which screen pop is configured occurs, the Screen Pop is displayed outside the Desktop - that is, in a new browser tab.

                                                                                                                                                                                                              Sample Use Case Examples
                                                                                                                                                                                                              The following sections provide a few examples for your reference:

                                                                                                                                                                                                              Configure and Access Customer Experience Management Metrics Widget From the Navigation Bar

                                                                                                                                                                                                              Example:

                                                                                                                                                                                                              {
                                                                                                                                                                                                                  "nav": {
                                                                                                                                                                                                                      "label": "Customer Experience Management Metrics",
                                                                                                                                                                                                                      "icon": "/app/images/wxm.bcd45cc3.svg",
                                                                                                                                                                                                                      "iconType": "other",
                                                                                                                                                                                                                      "navigateTo": "wxm-metrics",
                                                                                                                                                                                                                      "align": "top"
                                                                                                                                                                                                                  },
                                                                                                                                                                                                                  "page": {
                                                                                                                                                                                                                      "id": "wxm-metrics",
                                                                                                                                                                                                                      "widgets": {
                                                                                                                                                                                                                          "comp1": {
                                                                                                                                                                                                                              "comp": "agentx-wc-cloudcherry-widget",
                                                                                                                                                                                                                              "attributes": {
                                                                                                                                                                                                                                  "metrics": true
                                                                                                                                                                                                                              },
                                                                                                                                                                                                                              "properties": {
                                                                                                                                                                                                                                  "userModel": "$STORE.app.userModel",
                                                                                                                                                                                                                                  "spaceId": "",
                                                                                                                                                                                                                                  "metricsId": "",
                                                                                                                                                                                                                                  "teamId": "$STORE.agent.teamName",
                                                                                                                                                                                                                                  "ani": "$STORE.agentContact.taskSelected.ani",
                                                                                                                                                                                                                                  "isDarkMode": "$STORE.app.darkMode"
                                                                                                                                                                                                                              },
                                                                                                                                                                                                                              "wrapper": {
                                                                                                                                                                                                                                  "title": "Customer Experience Journey",
                                                                                                                                                                                                                                  "maximizeAreaName": "app-maximize-area"
                                                                                                                                                                                                                              }
                                                                                                                                                                                                                          }
                                                                                                                                                                                                                      },
                                                                                                                                                                                                                      "layout": {
                                                                                                                                                                                                                          "areas": [
                                                                                                                                                                                                                              ["comp1"]
                                                                                                                                                                                                                          ],
                                                                                                                                                                                                                          "size": {
                                                                                                                                                                                                                              "cols": [1],
                                                                                                                                                                                                                              "rows": [1]
                                                                                                                                                                                                                          }
                                                                                                                                                                                                                      }
                                                                                                                                                                                                                  }
                                                                                                                                                                                                              },

                                                                                                                                                                                                              To get the spaceId and metricsId, see the Webex Experience Management documentation.

                                                                                                                                                                                                              Using Tabs on the Custom Page

                                                                                                                                                                                                              Example:

                                                                                                                                                                                                              {
                                                                                                                                                                                                                  "nav": {
                                                                                                                                                                                                                      "label": "Dynamic Tabs",
                                                                                                                                                                                                                      "icon": "stored-info",
                                                                                                                                                                                                                      "iconType": "momentum",
                                                                                                                                                                                                                      "navigateTo": "dynamic-tabs",
                                                                                                                                                                                                                      "align": "top"
                                                                                                                                                                                                                  },
                                                                                                                                                                                                                  "page": {
                                                                                                                                                                                                                      "id": "page-id-tabs",
                                                                                                                                                                                                                      "widgets": {
                                                                                                                                                                                                                          "comp1": {
                                                                                                                                                                                                                              "comp": "md-tabs",
                                                                                                                                                                                                                              "children": [{
                                                                                                                                                                                                                                      "comp": "md-tab",
                                                                                                                                                                                                                                      "textContent": "One",
                                                                                                                                                                                                                                      "attributes": {
                                                                                                                                                                                                                                          "slot": "tab"
                                                                                                                                                                                                                                      }
                                                                                                                                                                                                                                  },
                                                                                                                                                                                                                                  {
                                                                                                                                                                                                                                      "comp": "md-tab-panel",
                                                                                                                                                                                                                                      "attributes": {
                                                                                                                                                                                                                                          "slot": "panel"
                                                                                                                                                                                                                                      },
                                                                                                                                                                                                                                      "children": [{
                                                                                                                                                                                                                                          "comp": "widget-two",
                                                                                                                                                                                                                                          "script": "http:/my-cdn.com/dynamic-widgets/widget-two.js"
                                                                                                                                                                                                                                      }]
                                                                                                                                                                                                                                  },
                                                                                                                                                                                                                                  {
                                                                                                                                                                                                                                      "comp": "md-tab",
                                                                                                                                                                                                                                      "textContent": "Two",
                                                                                                                                                                                                                                      "attributes": {
                                                                                                                                                                                                                                          "slot": "tab"
                                                                                                                                                                                                                                      }
                                                                                                                                                                                                                                  },
                                                                                                                                                                                                                                  {
                                                                                                                                                                                                                                      "comp": "md-tab-panel",
                                                                                                                                                                                                                                      "textContent": "Two Content",
                                                                                                                                                                                                                                      "attributes": {
                                                                                                                                                                                                                                          "slot": "panel"
                                                                                                                                                                                                                                      }
                                                                                                                                                                                                                                  }
                                                                                                                                                                                                                              ]
                                                                                                                                                                                                                          },
                                                                                                                                                                                                                          "comp2": {
                                                                                                                                                                                                                              "comp": "widget-two",
                                                                                                                                                                                                                              "script": " http:/my-cdn.com/dynamic-widgets/widget-two.js"
                                                                                                                                                                                                                          }
                                                                                                                                                                                                                      },
                                                                                                                                                                                                                      "layout": {
                                                                                                                                                                                                                          "areas": [
                                                                                                                                                                                                                              ["comp1", "comp2"]
                                                                                                                                                                                                                          ],
                                                                                                                                                                                                                          "size": {
                                                                                                                                                                                                                              "cols": [1, 1],
                                                                                                                                                                                                                              "rows": [1]
                                                                                                                                                                                                                          }
                                                                                                                                                                                                                      }
                                                                                                                                                                                                                  }
                                                                                                                                                                                                              }

                                                                                                                                                                                                              Default Auxiliary Information Pane with Contact History and Screen Pop

                                                                                                                                                                                                              Example:

                                                                                                                                                                                                              "panel": {
                                                                                                                                                                                                                  "comp": "md-tabs",
                                                                                                                                                                                                                  "attributes": {
                                                                                                                                                                                                                      "class": "widget-tabs"
                                                                                                                                                                                                                  },
                                                                                                                                                                                                                  "children": [{
                                                                                                                                                                                                                          "comp": "md-tab",
                                                                                                                                                                                                                          "attributes": {
                                                                                                                                                                                                                              "slot": "tab",
                                                                                                                                                                                                                              "class": "widget-pane-tab"
                                                                                                                                                                                                                          },
                                                                                                                                                                                                                          "children": [{
                                                                                                                                                                                                                              "comp": "slot",
                                                                                                                                                                                                                              "attributes": {
                                                                                                                                                                                                                                  "name": "CONTACT_HISTORY_TAB"
                                                                                                                                                                                                                              }
                                                                                                                                                                                                                          }]
                                                                                                                                                                                                                      },
                                                                                                                                                                                                                      {
                                                                                                                                                                                                                          "comp": "md-tab-panel",
                                                                                                                                                                                                                          "attributes": {
                                                                                                                                                                                                                              "slot": "panel",
                                                                                                                                                                                                                              "class": "widget-pane"
                                                                                                                                                                                                                          },
                                                                                                                                                                                                                          "children": [{
                                                                                                                                                                                                                              "comp": "slot",
                                                                                                                                                                                                                              "attributes": {
                                                                                                                                                                                                                                  "name": "CONTACT_HISTORY"
                                                                                                                                                                                                                              }
                                                                                                                                                                                                                          }]
                                                                                                                                                                                                                      },
                                                                                                                                                                                                                  ]
                                                                                                                                                                                                              }, {
                                                                                                                                                                                                                  "comp": "md-tab",
                                                                                                                                                                                                                  "attributes": {
                                                                                                                                                                                                                      "slot": "tab",
                                                                                                                                                                                                                      "class": "widget-pane-tab"
                                                                                                                                                                                                                  },
                                                                                                                                                                                                                  {
                                                                                                                                                                                                                      "comp": "md-tab",
                                                                                                                                                                                                                      "attributes": {
                                                                                                                                                                                                                          "slot": "tab",
                                                                                                                                                                                                                          "class": "widget-pane-tab"
                                                                                                                                                                                                                      },
                                                                                                                                                                                                                      "children": [{
                                                                                                                                                                                                                          "comp": "slot",
                                                                                                                                                                                                                          "attributes": {
                                                                                                                                                                                                                              "name": "SCREEN_POP_TAB"
                                                                                                                                                                                                                          }
                                                                                                                                                                                                                      }],
                                                                                                                                                                                                                      "visibility": "SCREEN_POP"
                                                                                                                                                                                                                  },
                                                                                                                                                                                                                  {
                                                                                                                                                                                                                      "comp": "md-tab-panel",
                                                                                                                                                                                                                      "attributes": {
                                                                                                                                                                                                                          "slot": "panel",
                                                                                                                                                                                                                          "class": "widget-pane"
                                                                                                                                                                                                                      },
                                                                                                                                                                                                                      "children": [{
                                                                                                                                                                                                                          "comp": "slot",
                                                                                                                                                                                                                          "attributes": {
                                                                                                                                                                                                                              "name": "SCREEN_POP"
                                                                                                                                                                                                                          }
                                                                                                                                                                                                                      }],
                                                                                                                                                                                                                      "visibility": "SCREEN_POP"
                                                                                                                                                                                                                  }
                                                                                                                                                                                                              },

                                                                                                                                                                                                              Auxiliary Information Pane with Customer Experience Journey Widget

                                                                                                                                                                                                              Example:

                                                                                                                                                                                                              "panel": {
                                                                                                                                                                                                                  "comp": "md-tabs",
                                                                                                                                                                                                                  "attributes": {
                                                                                                                                                                                                                      "class": "widget-tabs"
                                                                                                                                                                                                                  },
                                                                                                                                                                                                                  "children": [{
                                                                                                                                                                                                                              "comp": "md-tab",
                                                                                                                                                                                                                              "attributes": {
                                                                                                                                                                                                                                  "slot": "tab"
                                                                                                                                                                                                                              },
                                                                                                                                                                                                                              "children": [{
                                                                                                                                                                                                                                  "comp": "slot",
                                                                                                                                                                                                                                  "attributes": {
                                                                                                                                                                                                                                      "name": "WXM_JOURNEY_TAB"
                                                                                                                                                                                                                                  }
                                                                                                                                                                                                                              }],
                                                                                                                                                                                                                              "visibility": "WXM_JOURNEY"
                                                                                                                                                                                                                          },
                                                                                                                                                                                                                          {
                                                                                                                                                                                                                              "comp": "md-tab-panel",
                                                                                                                                                                                                                              "attributes": {
                                                                                                                                                                                                                                  "slot": "panel",
                                                                                                                                                                                                                                  "class": "widget-pane"
                                                                                                                                                                                                                              },
                                                                                                                                                                                                                              "children": [{
                                                                                                                                                                                                                                  "comp": "agentx-wc-cloudcherry-widget",
                                                                                                                                                                                                                                  "properties": {
                                                                                                                                                                                                                                      "userModel": "$STORE.app.userModel",
                                                                                                                                                                                                                                      "spaceId": "",
                                                                                                                                                                                                                                      "metricsId": "",
                                                                                                                                                                                                                                      "teamId": "$STORE.agent.teamName",
                                                                                                                                                                                                                                      "ani": "$STORE.agentContact.taskSelected.ani",
                                                                                                                                                                                                                                      "isDarkMode": "$STORE.app.darkMode"
                                                                                                                                                                                                                                  },
                                                                                                                                                                                                                                  "wrapper": {
                                                                                                                                                                                                                                      "title": "Customer Experience Journey",
                                                                                                                                                                                                                                      "maximizeAreaName": "app-maximize-area"
                                                                                                                                                                                                                                  }
                                                                                                                                                                                                                              }],
                                                                                                                                                                                                                              {
                                                                                                                                                                                                                                  "comp": "md-tab",
                                                                                                                                                                                                                                  "attributes": {
                                                                                                                                                                                                                                      "slot": "tab",
                                                                                                                                                                                                                                      "class": "widget-pane-tab"
                                                                                                                                                                                                                                  },
                                                                                                                                                                                                                                  "children": {
                                                                                                                                                                                                                                      "comp": "md-tab",
                                                                                                                                                                                                                                      "attributes": {
                                                                                                                                                                                                                                          "slot": "tab",
                                                                                                                                                                                                                                          "class": "widget-pane-tab"
                                                                                                                                                                                                                                      },
                                                                                                                                                                                                                                      "children": [{
                                                                                                                                                                                                                                          "comp": "slot",
                                                                                                                                                                                                                                          "attributes": {
                                                                                                                                                                                                                                              "name": "CONTACT_HISTORY_TAB"
                                                                                                                                                                                                                                          }
                                                                                                                                                                                                                                      }]
                                                                                                                                                                                                                                  },
                                                                                                                                                                                                                                  {
                                                                                                                                                                                                                                      "comp": "md-tab-panel",
                                                                                                                                                                                                                                      "attributes": {
                                                                                                                                                                                                                                          "slot": "panel",
                                                                                                                                                                                                                                          "class": "widget-pane"
                                                                                                                                                                                                                                      },
                                                                                                                                                                                                                                      "children": [{
                                                                                                                                                                                                                                          "comp": "slot",
                                                                                                                                                                                                                                          "attributes": {
                                                                                                                                                                                                                                              "name": "CONTACT_HISTORY"
                                                                                                                                                                                                                                          }
                                                                                                                                                                                                                                      }]
                                                                                                                                                                                                                                  },
                                                                                                                                                                                                                                  {
                                                                                                                                                                                                                                      "comp": "md-tab",
                                                                                                                                                                                                                                      "attributes": {
                                                                                                                                                                                                                                          "slot": "tab",
                                                                                                                                                                                                                                          "class": "widget-pane-tab"
                                                                                                                                                                                                                                      },
                                                                                                                                                                                                                                      "children": [{
                                                                                                                                                                                                                                          "comp": "slot",
                                                                                                                                                                                                                                          "attributes": {
                                                                                                                                                                                                                                              "name": "SCREEN_POP_TAB"
                                                                                                                                                                                                                                          }
                                                                                                                                                                                                                                      }],
                                                                                                                                                                                                                                      "visibility": "SCREEN_POP"
                                                                                                                                                                                                                                  },
                                                                                                                                                                                                                                  {
                                                                                                                                                                                                                                      "comp": "md-tab-panel",
                                                                                                                                                                                                                                      "attributes": {
                                                                                                                                                                                                                                          "slot": "panel",
                                                                                                                                                                                                                                          "class": "widget-pane"
                                                                                                                                                                                                                                      },
                                                                                                                                                                                                                                      "children": [{
                                                                                                                                                                                                                                          "comp": "slot",
                                                                                                                                                                                                                                          "attributes": {
                                                                                                                                                                                                                                              "name": "SCREEN_POP"
                                                                                                                                                                                                                                          }
                                                                                                                                                                                                                                      }],
                                                                                                                                                                                                                                      "visibility": "SCREEN_POP"
                                                                                                                                                                                                                                  }
                                                                                                                                                                                                                                  "visibility": "SCREEN_POP"
                                                                                                                                                                                                                              },
                                                                                                                                                                                                                          },
                                                                                                                                                                                                              Keyboard Shortcuts

                                                                                                                                                                                                              Keyboard shortcuts define an alternative way to perform a specific action on the desktop. For more information on the system-defined keyboard shortcuts, see the Access keyboard shortcuts section in the Accessibility features and keyboard shortcuts in Webex Contact Center Desktop article.

                                                                                                                                                                                                              The order of the shortcut key number in the Agent Desktop navigation bar is based on the order in which the related widget or custom page is configured in the Desktop Layout. For example, if the Cisco Webex Experience Management icon is the third item in your navigation bar, the Ctrl + Alt + 3 opens the Cisco Webex Experience Management page.

                                                                                                                                                                                                              The developer can register the keyboard shortcuts for custom widgets using the Shortcut Key module. For more information, see Cisco Webex Contact Center Desktop Developer Guide.

                                                                                                                                                                                                              Keyboard Shortcut Conflicts

                                                                                                                                                                                                              Keyboard shortcut conflicts occur if multiple widgets use the same keyboard shortcut. This causes the keyboard shortcut to be disabled until the conflict is resolved.

                                                                                                                                                                                                              Keyboard shortcut conflicts can occur in the following scenarios:

                                                                                                                                                                                                              Scenario

                                                                                                                                                                                                              Resolution

                                                                                                                                                                                                              Conflicts can occur when two widgets (custom widget or Cisco-provided desktop widget) have the same keyboard shortcut, and both are on the same page.

                                                                                                                                                                                                              Move one of the widgets (custom widget) to another page. The resolution is applicable for all non-page-level widgets.

                                                                                                                                                                                                              Conflicts can occur when the keyboard shortcut is the same for a custom widget and a page-level widget.

                                                                                                                                                                                                              This conflict cannot be resolved by the Agent Desktop administrator.

                                                                                                                                                                                                              • When there are multiple instances of the same widget with the same keyboard shortcut, the system ignores the duplicate key registration for the widget. When the keyboard shortcut is used, all instances of the widget are triggered.

                                                                                                                                                                                                              • The administrator cannot create new keyboard shortcuts or modify the existing (out-of-the-box) keyboard shortcuts.

                                                                                                                                                                                                              • Any conflict of the Agent Desktop keyboard shortcuts with the browser or operating system keyboard shortcuts cannot be resolved. The behavior depends on the browser or the operating system. When the conflicting keyboard shortcut is used, both the Agent Desktop functionality and the browser or operating system functionality might be executed.

                                                                                                                                                                                                              Localization
                                                                                                                                                                                                              The Desktop UI supports localization in 29 languages.

                                                                                                                                                                                                              The following are the supported languages:

                                                                                                                                                                                                              Bulgarian, Catalan, Chinese (China), Chinese (Taiwan), Croatian, Czech, Danish, Dutch, English (UK), English (US), Finnish, French, German, Hungarian, Italian, Japanese, Korean, Norwegian, Polish, Portuguese (Brazil), Portuguese (Portugal), Romanian, Russian, Serbian, Slovak, Slovenian, Spanish, Swedish, and Turkish.

                                                                                                                                                                                                              The Desktop UI language is based on the language preference settings on your browser. For example, let us consider that you have selected the preferred language as French on the Firefox browser. When you launch the Desktop in the Firefox browser, the Desktop UI appears in Français (French). However, the horizontal header, navigation bar, and other components added in the Desktop Layout are not localized based on the language preference settings on your browser.

                                                                                                                                                                                                              Localize Desktop Components

                                                                                                                                                                                                              To localize desktop components,

                                                                                                                                                                                                              • Use the existing localization keys set in the app.json file. If the localization keys are not set, the default language English (US) is used. You can submit a service request to Cisco Support to add a localization key to the app.json file.

                                                                                                                                                                                                                Example: Localization Key

                                                                                                                                                                                                                {
                                                                                                                                                                                                                    "common": {
                                                                                                                                                                                                                        "buttonTitle": "Stop Timer"
                                                                                                                                                                                                                    }
                                                                                                                                                                                                                }
                                                                                                                                                                                                              • Enter the following case-sensitive property in the Desktop Layout JSON file to localize a component:

                                                                                                                                                                                                                "textContent": "$I18N.<key>",
                                                                                                                                                                                                                

                                                                                                                                                                                                                where <key> refers to the corresponding localization key in the app.json file.

                                                                                                                                                                                                              Example: Localize Header Component

                                                                                                                                                                                                              "header": {
                                                                                                                                                                                                                  "id": "header",
                                                                                                                                                                                                                  "widgets": {
                                                                                                                                                                                                                      "head1": {
                                                                                                                                                                                                                          "comp": "md-button",
                                                                                                                                                                                                                          "attributes": {
                                                                                                                                                                                                                              "slot": "menu-trigger",
                                                                                                                                                                                                                              "style": "height: 64px"
                                                                                                                                                                                                                          },
                                                                                                                                                                                                                          "children": [{
                                                                                                                                                                                                                                  "comp": "span",
                                                                                                                                                                                                                                  "textContent": "$I18N.common.buttonTitle",
                                                                                                                                                                                                                              }
                                                                                                                                                                                                                          },
                                                                                                                                                                                                              
                                                                                                                                                                                                                      },
                                                                                                                                                                                                                  }

                                                                                                                                                                                                              Example: Localize Tab Component in the Auxiliary Information Pane

                                                                                                                                                                                                              "panel": {
                                                                                                                                                                                                                  "comp": "md-tab",
                                                                                                                                                                                                                  "attributes": {
                                                                                                                                                                                                                      "slot": "tab"
                                                                                                                                                                                                                  },
                                                                                                                                                                                                                  "children": [{
                                                                                                                                                                                                                      "comp": "span",
                                                                                                                                                                                                                      "textContent": "$I18N.panelTwo.screenPopTitle"
                                                                                                                                                                                                                  }]
                                                                                                                                                                                                              }

                                                                                                                                                                                                              View a Desktop Layout

                                                                                                                                                                                                              To view a desktop layout:
                                                                                                                                                                                                              1

                                                                                                                                                                                                              From the Management Portal navigation bar, choose Provisioning > Desktop Layout.

                                                                                                                                                                                                              2

                                                                                                                                                                                                              Select the ellipsis icon next to the Desktop Layout name that you need to view, and click View.

                                                                                                                                                                                                              3

                                                                                                                                                                                                              View the following details:

                                                                                                                                                                                                              Setting

                                                                                                                                                                                                              Description

                                                                                                                                                                                                              Name

                                                                                                                                                                                                              Shows the name of the layout.

                                                                                                                                                                                                              Description

                                                                                                                                                                                                              Shows the description for the layout.

                                                                                                                                                                                                              Team

                                                                                                                                                                                                              Shows the team name that is assigned to this layout.

                                                                                                                                                                                                              JSON FileShows the JSON file that is used for this layout.

                                                                                                                                                                                                              Edit a Desktop Layout

                                                                                                                                                                                                              You can edit the Global Layout or a custom desktop layout. To edit a desktop layout:
                                                                                                                                                                                                              1

                                                                                                                                                                                                              From the Management Portal navigation bar, choose Provisioning > Desktop Layout.

                                                                                                                                                                                                              2

                                                                                                                                                                                                              Select the ellipsis icon next to the Desktop Layout that you need to edit, and click Edit.

                                                                                                                                                                                                              3

                                                                                                                                                                                                              Edit the following details:

                                                                                                                                                                                                              Setting

                                                                                                                                                                                                              Description

                                                                                                                                                                                                              Name

                                                                                                                                                                                                              Enter a name that identifies the purpose of the layout.

                                                                                                                                                                                                              Description

                                                                                                                                                                                                              Enter a description.

                                                                                                                                                                                                              Team

                                                                                                                                                                                                              Choose a team name from the drop-down list.

                                                                                                                                                                                                              • If a custom layout is already assigned to a team, then that team name doesn’t appear in this drop-down list. For more information on the Team settings, see Create a team.

                                                                                                                                                                                                              • If you assign a custom layout on this page, you overwrite the global layout, which is the default layout for all teams.

                                                                                                                                                                                                              JSON FileClick to download the Default Desktop Layout.json file and customize the layout as described in Define a Custom Desktop Layout.

                                                                                                                                                                                                              If you use the unmodified layout, the new layout-based features appear automatically on the Desktop. The Desktop users can view the new layout-based features when they sign in or reload the browser.

                                                                                                                                                                                                              4

                                                                                                                                                                                                              Once you've customized the file, click Upload to upload the customized JSON file.

                                                                                                                                                                                                              • The system validates the JSON file for errors and an appropriate message appears.

                                                                                                                                                                                                                The system enables the Save button when the validation is complete.

                                                                                                                                                                                                              • To integrate Webex Experience Management widgets, see the Webex Experience Management documentation.

                                                                                                                                                                                                              5

                                                                                                                                                                                                              (Optional) Click Restore to restore the default layout.

                                                                                                                                                                                                              6

                                                                                                                                                                                                              Click Save to save the configuration.

                                                                                                                                                                                                              Important:

                                                                                                                                                                                                              To verify the layout experience, see View Layout Experience on Desktop.

                                                                                                                                                                                                              Copy a Desktop Layout

                                                                                                                                                                                                              To copy a desktop layout:
                                                                                                                                                                                                              1

                                                                                                                                                                                                              From the Management Portal navigation bar, choose Provisioning > Desktop Layout.

                                                                                                                                                                                                              2

                                                                                                                                                                                                              Select the ellipsis icon next to the Desktop Layout that you need to copy, and click Copy.

                                                                                                                                                                                                              When you copy a desktop layout, the Team field is not copied. Ensure that you configure the Team field.

                                                                                                                                                                                                              3

                                                                                                                                                                                                              Edit the following details:

                                                                                                                                                                                                              Setting

                                                                                                                                                                                                              Description

                                                                                                                                                                                                              Name

                                                                                                                                                                                                              Enter a name that identifies the purpose of the layout.

                                                                                                                                                                                                              Description

                                                                                                                                                                                                              Enter a description.

                                                                                                                                                                                                              Team

                                                                                                                                                                                                              Choose a team name from the drop-down list.

                                                                                                                                                                                                              • If a custom layout is already assigned to a team, then that team name doesn’t appear in this drop-down list. For more information on the Team settings, see Create a team.

                                                                                                                                                                                                              • If you assign a custom layout on this page, you overwrite the global layout, which is the default layout for all teams.

                                                                                                                                                                                                              JSON FileClick to download the Default Desktop Layout.json file and customize the layout as described in Define a Custom Desktop Layout.

                                                                                                                                                                                                              If you use the unmodified layout, the new layout-based features appear automatically on the Desktop. The Desktop users can view the new layout-based features when they sign in or reload the browser.

                                                                                                                                                                                                              4

                                                                                                                                                                                                              Once you've customized the JSON file locally, click Upload to upload the file. The Webex Contact Center system starts to validate the JSON file.

                                                                                                                                                                                                              • The system validates the JSON file for errors and an appropriate message appears.

                                                                                                                                                                                                                The system enables the Save button when the validation is complete.

                                                                                                                                                                                                              • To integrate Webex Experience Management widgets, see the Webex Experience Management documentation.

                                                                                                                                                                                                              5

                                                                                                                                                                                                              (Optional) Click Restore to restore the default layout.

                                                                                                                                                                                                              6

                                                                                                                                                                                                              Click Save to save the configuration.

                                                                                                                                                                                                              Deactivate a Desktop Layout

                                                                                                                                                                                                              You cannot deactivate a desktop layout if the layout is assigned to a team. When you try to deactivate such a layout, a message informs you that you cannot deactivate the desktop layout. You can click the information icon in the message to view the list of entities that you have associated with this desktop layout.

                                                                                                                                                                                                              After you deactivate a desktop layout, you can still see it in the desktop layout page as Not Active.

                                                                                                                                                                                                              To deactivate a Desktop Layout:

                                                                                                                                                                                                              1

                                                                                                                                                                                                              From the Management Portal navigation bar, choose Provisioning > Desktop Layout.

                                                                                                                                                                                                              2

                                                                                                                                                                                                              Click the ellipsis icon beside the desktop layout you want to deactivate, and click Mark Inactive.

                                                                                                                                                                                                              3

                                                                                                                                                                                                              Click Yes to confirm.

                                                                                                                                                                                                              The status of the desktop layout changes to Not Active.

                                                                                                                                                                                                              Once the object is marked inactive, it can be permanently deleted. For more information, see Delete inactive objects permanently.

                                                                                                                                                                                                              Activate a Desktop Layout

                                                                                                                                                                                                              1

                                                                                                                                                                                                              From the Management Portal navigation bar, choose Provisioning > Desktop Layout.

                                                                                                                                                                                                              2

                                                                                                                                                                                                              Click the ellipsis icon beside the desktop layout that you want to activate and click Restore.

                                                                                                                                                                                                              3

                                                                                                                                                                                                              Click Yes to confirm.

                                                                                                                                                                                                              The status of the desktop layout changes to Active.

                                                                                                                                                                                                              Skill Definitions

                                                                                                                                                                                                              Skills-based routing is an optional Webex Contact Center feature that enables you to assign skill requirements, such as language fluency or product expertise, to incoming calls so they can be distributed to agents with a matching set of skills.

                                                                                                                                                                                                              The Skill Definitions page provides an interface for viewing, creating, and editing the skills that can be assigned to calls and to skill profiles, which can then be assigned to teams or individual agents. For more information, see see About Skills-based Routing and Skill Profiles.

                                                                                                                                                                                                              The maximum number of active skills that you can create is determined by the Maximum Skills and Maximum Text Skills values provisioned for your enterprise. For more information, see Tenant Settings.

                                                                                                                                                                                                              Create a Skill Definition

                                                                                                                                                                                                              1

                                                                                                                                                                                                              On the Portal navigation bar, choose Provisioning > Skills > Skill Definition.

                                                                                                                                                                                                              2

                                                                                                                                                                                                              On the Skill Definitions page, click + New Skill Definition.

                                                                                                                                                                                                              3

                                                                                                                                                                                                              Specify the skill settings as described in this table.

                                                                                                                                                                                                              Setting

                                                                                                                                                                                                              Description

                                                                                                                                                                                                              Name

                                                                                                                                                                                                              Enter a name for the skill.

                                                                                                                                                                                                              Description

                                                                                                                                                                                                              Optionally, enter a description of the skill.

                                                                                                                                                                                                              Service Level Threshold

                                                                                                                                                                                                              Specify how many seconds a customer call can be in queue for this skill before being flagged as outside the service level. If a call is completed within this time interval, it is considered to have been handled within service level for this skill.

                                                                                                                                                                                                              Type

                                                                                                                                                                                                              If you are creating a new skill, specify the skill type:

                                                                                                                                                                                                              • Text: A free-form text skill that must be matched exactly. For example, you might define a skill named Extension that will let you route a call to a specific agent’s extension number based on digits entered by the caller in response to a prompt. The text value can include up to 40 characters, including spaces.

                                                                                                                                                                                                              • Proficiency: Can have a value ranging from 0 to 10 that represents the agent’s level of expertise in the skill. For example, you might define a skill for each language that your agents speak.

                                                                                                                                                                                                              • Boolean: Can have the value of True or False to indicate whether or not the agent has the skill. For example, you might define a skill named PremierService to ensure that your most valuable customers get the best service. Your most experienced agents can be assigned a value of True, and your least experienced agents can be assigned a value of False

                                                                                                                                                                                                              • Enum: A named set of predefined values. For example, a skill named Line of Business might have a set of three values: Sales, Service, and Billing. Each value can include up to 20 characters, including spaces.

                                                                                                                                                                                                              You can't change the skill type later.

                                                                                                                                                                                                              Status

                                                                                                                                                                                                              Select Active or Not Active. You can't inactivate a skill, if it is used in a skill profile or a routing strategy.

                                                                                                                                                                                                              4

                                                                                                                                                                                                              Click Save.

                                                                                                                                                                                                              5

                                                                                                                                                                                                              To reset the settings in all fields, click Reset.

                                                                                                                                                                                                              Edit a Skill Definition

                                                                                                                                                                                                              To view and edit a skill definition:

                                                                                                                                                                                                              To view and edit a skill definition:

                                                                                                                                                                                                              1

                                                                                                                                                                                                              On the Management Portal navigation bar, choose Provisioning > Skills > Skill Definition.

                                                                                                                                                                                                              2

                                                                                                                                                                                                              Click the ellipsis icon beside the skill that you want to edit and click Edit.

                                                                                                                                                                                                              3

                                                                                                                                                                                                              Edit the skill settings as described in this table.

                                                                                                                                                                                                              Setting

                                                                                                                                                                                                              Description

                                                                                                                                                                                                              Name

                                                                                                                                                                                                              Displays the name of the skill. You can't edit the name of the skill.

                                                                                                                                                                                                              Description

                                                                                                                                                                                                              Optionally, enter a description of the skill.

                                                                                                                                                                                                              Service Level Threshold

                                                                                                                                                                                                              Specify how many seconds a customer call can be in the queue for this skill before being flagged as outside the service level. If a call is completed within this time interval, it is considered to have been handled within the service level for this skill.

                                                                                                                                                                                                              Type

                                                                                                                                                                                                              Displays the skill type. You can't edit the skill type.

                                                                                                                                                                                                              List Values

                                                                                                                                                                                                              This field is displayed only if the skill type is enum. Specify the values that can be associated with this skill. For example, for an enum skill named Operating System, you might define three values: Windows, Linux, and Unix. Each value is limited to a maximum length of 20 characters, including spaces.

                                                                                                                                                                                                              • To add a value, type the value name in the List Value field and then press Enter. Repeat for each value you want to add.

                                                                                                                                                                                                              • To delete a value, click x on the value entry.

                                                                                                                                                                                                              Status

                                                                                                                                                                                                              Select Active or Not Active. You can't inactivate a skill, if it is used in a skill profile or a routing strategy.

                                                                                                                                                                                                              4

                                                                                                                                                                                                              Click Save.

                                                                                                                                                                                                              Deactivate a Skill Definition

                                                                                                                                                                                                              1

                                                                                                                                                                                                              On the Management Portal navigation bar, choose Provisioning > Skills > Skill Definition.

                                                                                                                                                                                                              2

                                                                                                                                                                                                              Click the ellipsis icon besides the skill that you want to delete and click Mark Inactive.

                                                                                                                                                                                                              3

                                                                                                                                                                                                              Click Yes to confirm.

                                                                                                                                                                                                              Once the object is marked inactive, it can be permanently deleted. For more information, see Delete inactive objects permanently.

                                                                                                                                                                                                              Activate a Skill Definition

                                                                                                                                                                                                              1

                                                                                                                                                                                                              On the Management Portal navigation bar, choose Provisioning > Skills > Skill Definition.

                                                                                                                                                                                                              2

                                                                                                                                                                                                              Click the ellipsis icon beside a skill with the status Not Active and click Restore.

                                                                                                                                                                                                              3

                                                                                                                                                                                                              Click Yes to confirm.

                                                                                                                                                                                                              The status of the skill changes to Active.

                                                                                                                                                                                                              Skill Profiles

                                                                                                                                                                                                              A skill profile is a set of skills, each with an assigned value, that you assign to an agent-based team or to an individual agent. For example, you can assign a skill of English a high level of proficiency in one skill profile and a lower level in another profile.

                                                                                                                                                                                                              If you assign a skill profile to a team, all agents that are logged in to that team are associated with that skill profile unless an agent is assigned a specific skill profile.

                                                                                                                                                                                                              • As an administrator, you can update the skill profile of agents. These changes are applied to all relevant agents without the need for these agents to sign out and sign back in to the Agent Desktop.

                                                                                                                                                                                                              • The number of agents who share the same skill profile is limited to 500 to ensure effective performance of the system. You can assign the skill profile to the agent directly or to a team (Choose Provisioning > Skills > Skill Profiles). When you add an agent to a team, the agent is assigned the team’s skill profile.

                                                                                                                                                                                                              Create a Skill Profile

                                                                                                                                                                                                              1

                                                                                                                                                                                                              On the Management Portal navigation bar, choose Provisioning > Skills > Skill Profiles.

                                                                                                                                                                                                              2

                                                                                                                                                                                                              On the Skill Profiles page, click + New Skill Profile.

                                                                                                                                                                                                              3

                                                                                                                                                                                                              Enter the name of the skill profile and description.

                                                                                                                                                                                                              4

                                                                                                                                                                                                              Select the active skills you want to assign from the Active skills list.

                                                                                                                                                                                                              5

                                                                                                                                                                                                              Provide the appropriate skill value. For more information, see Skill definitions.

                                                                                                                                                                                                              6

                                                                                                                                                                                                              Click Save to save the skill profile.

                                                                                                                                                                                                              7

                                                                                                                                                                                                              (Optional) Click Reset to reset the values in all fields.

                                                                                                                                                                                                              Edit a Skill Profile

                                                                                                                                                                                                              1

                                                                                                                                                                                                              On the Management Portal navigation bar, choose Provisioning > Skills > Skill Profiles.

                                                                                                                                                                                                              2

                                                                                                                                                                                                              Click the ellipsis icon beside the skill profile and click Edit.

                                                                                                                                                                                                              3

                                                                                                                                                                                                              Edit the name, description, and active skills.

                                                                                                                                                                                                              4

                                                                                                                                                                                                              Click Save to save the skill profile.

                                                                                                                                                                                                              Copy a Skill Profile

                                                                                                                                                                                                              1

                                                                                                                                                                                                              On the Management Portal navigation bar, choose Provisioning > Skills > Skill Profiles.

                                                                                                                                                                                                              2

                                                                                                                                                                                                              Click the ellipsis icon beside a skill profile and click Copy.

                                                                                                                                                                                                              3

                                                                                                                                                                                                              Edit the necessary details.

                                                                                                                                                                                                              4

                                                                                                                                                                                                              Click Save to save the skill profile.

                                                                                                                                                                                                              Delete a Skill Profile

                                                                                                                                                                                                              1

                                                                                                                                                                                                              On the Management Portal navigation bar, choose Provisioning > Skills > Skill Profiles.

                                                                                                                                                                                                              2

                                                                                                                                                                                                              Click the ellipsis icon beside the skill profile that you want to delete and choose Delete.

                                                                                                                                                                                                              3

                                                                                                                                                                                                              Click Yes to confirm.

                                                                                                                                                                                                              Threshold Rules

                                                                                                                                                                                                              If your enterprise uses the Threshold Alerts feature, authorized users can create threshold rules to monitor agent and call data.

                                                                                                                                                                                                              Call Metrics

                                                                                                                                                                                                              You can configure threshold rules for call metrics. For each rule, specify a value that triggers the alert. Configure call metrics as described in this table.

                                                                                                                                                                                                              Table 14. Call Metrics

                                                                                                                                                                                                              Metric

                                                                                                                                                                                                              Entity Type

                                                                                                                                                                                                              Trigger Value Type

                                                                                                                                                                                                              Abandoned Calls

                                                                                                                                                                                                              Queue

                                                                                                                                                                                                              Count

                                                                                                                                                                                                              Average Queue Time

                                                                                                                                                                                                              Queue

                                                                                                                                                                                                              Duration

                                                                                                                                                                                                              Average Speed of Answer

                                                                                                                                                                                                              Queue

                                                                                                                                                                                                              Duration

                                                                                                                                                                                                              Blind Transferred Calls

                                                                                                                                                                                                              Queue

                                                                                                                                                                                                              Count

                                                                                                                                                                                                              IVR Calls

                                                                                                                                                                                                              Entry Point

                                                                                                                                                                                                              Count

                                                                                                                                                                                                              Longest Time in Queue

                                                                                                                                                                                                              Queue

                                                                                                                                                                                                              Duration

                                                                                                                                                                                                              Number of Calls in Queue

                                                                                                                                                                                                              Queue

                                                                                                                                                                                                              Count

                                                                                                                                                                                                              Overflow Calls

                                                                                                                                                                                                              Queue

                                                                                                                                                                                                              Count

                                                                                                                                                                                                              Service Level Threshold

                                                                                                                                                                                                              Queue

                                                                                                                                                                                                              Percentage

                                                                                                                                                                                                              Short Calls

                                                                                                                                                                                                              Entry Point

                                                                                                                                                                                                              Count

                                                                                                                                                                                                              Transferred Calls

                                                                                                                                                                                                              Queue

                                                                                                                                                                                                              Count

                                                                                                                                                                                                              Agent Metrics

                                                                                                                                                                                                              You can configure rules for agent metrics. For each rule, specify a value that triggers the alert. Configure agent metrics as described in this table.

                                                                                                                                                                                                              Table 15. Agent Metrics

                                                                                                                                                                                                              Metric

                                                                                                                                                                                                              Entity Type

                                                                                                                                                                                                              Trigger Value Type

                                                                                                                                                                                                              Available Agents

                                                                                                                                                                                                              Site or Team

                                                                                                                                                                                                              Count

                                                                                                                                                                                                              Connected Agents

                                                                                                                                                                                                              Site or Team

                                                                                                                                                                                                              Count

                                                                                                                                                                                                              IB Average Handle Time

                                                                                                                                                                                                              Site or Team

                                                                                                                                                                                                              Duration

                                                                                                                                                                                                              Idle Agents

                                                                                                                                                                                                              Site or Team

                                                                                                                                                                                                              Count

                                                                                                                                                                                                              Not Responding Agents

                                                                                                                                                                                                              Site or Team

                                                                                                                                                                                                              Count

                                                                                                                                                                                                              Number of Agents in Outdial

                                                                                                                                                                                                              Site or Team

                                                                                                                                                                                                              Count

                                                                                                                                                                                                              Number of Logged in Agents

                                                                                                                                                                                                              Site or Team

                                                                                                                                                                                                              Count

                                                                                                                                                                                                              OB Average Handle Time

                                                                                                                                                                                                              Site or Team

                                                                                                                                                                                                              Duration

                                                                                                                                                                                                              Occupancy

                                                                                                                                                                                                              Site or Team

                                                                                                                                                                                                              Percentage

                                                                                                                                                                                                              By default, the maximum number of rules that are allowed for a tenant is 50. To increase this to a higher limit, contact Cisco Support.

                                                                                                                                                                                                              Create a Threshold Rule

                                                                                                                                                                                                              A threshold alert is displayed in the Agent Peformance Statistics report on the Agent Desktop if you set Agent Viewable to Yes for the threshold rule and select the threshold alert in the desktop profile. For more information, see Desktop Profiles.

                                                                                                                                                                                                              1

                                                                                                                                                                                                              From the Management Portal navigation bar, choose Provisioning > Threshold Rules.

                                                                                                                                                                                                              2

                                                                                                                                                                                                              On the Threshold Rules page:

                                                                                                                                                                                                              • Click + New Threshold Rule.

                                                                                                                                                                                                              • To delete a threshold rule, click the ellipsis button beside a listed rule and click Delete. In the confirmation dialog box, click OK.

                                                                                                                                                                                                              3

                                                                                                                                                                                                              Specify or change the settings for the rule. You can specify or change the following settings in the General Settings area:

                                                                                                                                                                                                              Setting

                                                                                                                                                                                                              Description

                                                                                                                                                                                                              Name

                                                                                                                                                                                                              Enter a name for the rule.

                                                                                                                                                                                                              Description

                                                                                                                                                                                                              Enter a short description for the rule.

                                                                                                                                                                                                              Entity Type

                                                                                                                                                                                                              You can specify or change the following settings in the Entity Information area:

                                                                                                                                                                                                              Setting

                                                                                                                                                                                                              Description

                                                                                                                                                                                                              Metric Type

                                                                                                                                                                                                              Specify whether this is an Agent Threshold or a Call Threshold.

                                                                                                                                                                                                              Entity

                                                                                                                                                                                                              Choose the entry point, queue, site, or team to which the rule is applicable. This setting is not applicable if the entity type is Agent.

                                                                                                                                                                                                              You can specify or change the following settings in the Threshold Information area:

                                                                                                                                                                                                              Setting

                                                                                                                                                                                                              Description

                                                                                                                                                                                                              Threshold Metric

                                                                                                                                                                                                              Choose a value from the drop-down list. The list displays only those metrics that are applicable to the selected entity type.

                                                                                                                                                                                                              Operand

                                                                                                                                                                                                              Choose a value from the drop-down list:

                                                                                                                                                                                                              • > (greater than)

                                                                                                                                                                                                              • >= (greater than or equal to)

                                                                                                                                                                                                              • < (less than)

                                                                                                                                                                                                              • <= (less than or equal to)

                                                                                                                                                                                                              • = (equal to)

                                                                                                                                                                                                              Trigger Value

                                                                                                                                                                                                              Specify the value that triggers a threshold alert. The value type (duration, count, or percentage) is based on the metric selected.

                                                                                                                                                                                                              The trigger value must be greater than 0.

                                                                                                                                                                                                              Trigger Interval

                                                                                                                                                                                                              Specify the interval, in seconds, during which the system generates only one alert for the threshold rule check.

                                                                                                                                                                                                              You can specify or change the following settings in the Email Information area:

                                                                                                                                                                                                              Setting

                                                                                                                                                                                                              Description

                                                                                                                                                                                                              Notification Receivers

                                                                                                                                                                                                              If you want an individual to receive an email alert in the HTML format when the threshold is triggered, enter the email address in the Notification Receivers field and press Enter. Repeat for each address that you want to add.

                                                                                                                                                                                                              To remove an address, click x on the left side of the listed address.

                                                                                                                                                                                                              Text Notification Receivers

                                                                                                                                                                                                              If you want an individual to receive an email alert in the text format when the threshold is triggered, enter the email address in the Text Notification Receivers field and press Enter. Repeat for each address that you want to add.

                                                                                                                                                                                                              To remove an address, click x on the left side of the listed address.

                                                                                                                                                                                                              4

                                                                                                                                                                                                              Click Save.

                                                                                                                                                                                                              Copy a Threshold Rule

                                                                                                                                                                                                              1

                                                                                                                                                                                                              From the Management Portal navigation bar, choose Provisioning > Threshold Rules.

                                                                                                                                                                                                              2

                                                                                                                                                                                                              On the Threshold Rules page, click the ellipsis button beside a listed rule and click Copy.

                                                                                                                                                                                                              3

                                                                                                                                                                                                              Specify or change the settings for the rule. You can specify or change the following settings in the General Settings area:

                                                                                                                                                                                                              Setting

                                                                                                                                                                                                              Description

                                                                                                                                                                                                              Name

                                                                                                                                                                                                              Enter a name for the rule.

                                                                                                                                                                                                              Description

                                                                                                                                                                                                              Enter a short description for the rule.

                                                                                                                                                                                                              Entity Type

                                                                                                                                                                                                              Choose the entity type to which the threshold rule is applicable: Entry Point, Queue, Site, Team, or Agent (if your enterprise uses the Agent Threshold Alerts feature).

                                                                                                                                                                                                              4

                                                                                                                                                                                                              You can specify or change the following settings in the Entity Information area:

                                                                                                                                                                                                              Setting

                                                                                                                                                                                                              Description

                                                                                                                                                                                                              Metric Type

                                                                                                                                                                                                              Specify whether this is an Agent Threshold or a Call Threshold.

                                                                                                                                                                                                              Entity

                                                                                                                                                                                                              Choose the entry point, queue, site, or team to which the rule is applicable. This setting is not applicable if the entity type is Agent.

                                                                                                                                                                                                              5

                                                                                                                                                                                                              You can specify or change the following settings in the Threshold Information area:

                                                                                                                                                                                                              Setting

                                                                                                                                                                                                              Description

                                                                                                                                                                                                              Threshold Metric

                                                                                                                                                                                                              Choose a value from the drop-down list. The list displays only those metrics that are applicable to the selected entity type.

                                                                                                                                                                                                              Operand

                                                                                                                                                                                                              Choose a value from the drop-down list:

                                                                                                                                                                                                              • > (greater than)

                                                                                                                                                                                                              • >= (greater than or equal to)

                                                                                                                                                                                                              • < (less than)

                                                                                                                                                                                                              • <= (less than or equal to)

                                                                                                                                                                                                              • = (equal to)

                                                                                                                                                                                                              Trigger Value

                                                                                                                                                                                                              Specify the value that triggers a threshold alert. The value type (duration, count, or percentage) is based on the metric selected.

                                                                                                                                                                                                              The trigger value must be greater than 0 for all metrics.

                                                                                                                                                                                                              Trigger Interval

                                                                                                                                                                                                              Specify the interval, in seconds, during which the system generates only one alert for the threshold rule check.

                                                                                                                                                                                                              6

                                                                                                                                                                                                              You can specify or change the following settings in the Email Information area:

                                                                                                                                                                                                              Setting

                                                                                                                                                                                                              Description

                                                                                                                                                                                                              Notification Receivers

                                                                                                                                                                                                              If you want an individual to receive an email alert in the HTML format when the threshold is triggered, enter the email address in the Notification Receivers field and press Enter. Repeat for each address that you want to add.

                                                                                                                                                                                                              To remove an address, click x on the left side of the listed address.

                                                                                                                                                                                                              Text Notification Receivers

                                                                                                                                                                                                              If you want an individual to receive an email alert in the text format when the threshold is triggered, enter the email address in the Text Notification Receivers field and press Enter. Repeat for each address that you want to add.

                                                                                                                                                                                                              To remove an address, click x on the left side of the listed address.

                                                                                                                                                                                                              7

                                                                                                                                                                                                              Click Save.

                                                                                                                                                                                                              Edit a Threshold Rule

                                                                                                                                                                                                              1

                                                                                                                                                                                                              From the Management Portal navigation bar, choose Provisioning > Threshold Rules.

                                                                                                                                                                                                              2

                                                                                                                                                                                                              On the Threshold Rules page:

                                                                                                                                                                                                              • To edit the settings for a threshold rule, click the ellipsis icon beside a listed rule and click Edit.

                                                                                                                                                                                                                After you create the Entity Information while creating a Threshold Rule, you cannot edit Metric Type and Entity options in this field.
                                                                                                                                                                                                              3

                                                                                                                                                                                                              Specify or change the settings for the rule. You can specify or change the following settings in the General Settings area:

                                                                                                                                                                                                              Setting

                                                                                                                                                                                                              Description

                                                                                                                                                                                                              Name

                                                                                                                                                                                                              Enter a name for the rule.

                                                                                                                                                                                                              Description

                                                                                                                                                                                                              Enter a short description for the rule.

                                                                                                                                                                                                              Entity Type

                                                                                                                                                                                                              Choose the entity type to which the threshold rule is applicable: Entry Point, Queue, Site, Team, or Agent (if your enterprise uses the Agent Threshold Alerts feature).

                                                                                                                                                                                                              4

                                                                                                                                                                                                              You can specify or change the following settings in the Threshold Information area:

                                                                                                                                                                                                              Setting

                                                                                                                                                                                                              Description

                                                                                                                                                                                                              Threshold Metric

                                                                                                                                                                                                              Choose a value from the drop-down list. The list displays only those metrics that are applicable to the selected entity type.

                                                                                                                                                                                                              Operand

                                                                                                                                                                                                              Choose a value from the drop-down list:

                                                                                                                                                                                                              • > (greater than)

                                                                                                                                                                                                              • >= (greater than or equal to)

                                                                                                                                                                                                              • < (less than)

                                                                                                                                                                                                              • <= (less than or equal to)

                                                                                                                                                                                                              • = (equal to)

                                                                                                                                                                                                              Trigger Value

                                                                                                                                                                                                              Specify the value that triggers a threshold alert. The value type (duration, count, or percentage) is based on the metric selected.

                                                                                                                                                                                                              The trigger value must be greater than 0 for all metrics.

                                                                                                                                                                                                              Trigger Interval

                                                                                                                                                                                                              Specify the interval, in seconds, during which the system generates only one alert for the threshold rule check.

                                                                                                                                                                                                              5

                                                                                                                                                                                                              You can specify or change the following settings in the Email Information area:

                                                                                                                                                                                                              Setting

                                                                                                                                                                                                              Description

                                                                                                                                                                                                              Notification Receivers

                                                                                                                                                                                                              If you want an individual to receive an email alert in the HTML format when the threshold is triggered, enter the email address in the Notification Receivers field and press Enter. Repeat for each address that you want to add.

                                                                                                                                                                                                              To remove an address, click x on the left side of the listed address.

                                                                                                                                                                                                              Text Notification Receivers

                                                                                                                                                                                                              If you want an individual to receive an email alert in the text format when the threshold is triggered, enter the email address in the Text Notification Receivers field and press Enter. Repeat for each address that you want to add.

                                                                                                                                                                                                              To remove an address, click x on the left side of the listed address.

                                                                                                                                                                                                              6

                                                                                                                                                                                                              Click Save.

                                                                                                                                                                                                              Deactivate a Threshold Rule

                                                                                                                                                                                                              Before you begin

                                                                                                                                                                                                              1

                                                                                                                                                                                                              From the Management Portal navigation bar, choose Provisioning > Threshold Rules.

                                                                                                                                                                                                              2

                                                                                                                                                                                                              Click the ellipsis icon beside the threshold rule that you want to deactivate and click Mark Inactive.

                                                                                                                                                                                                              3

                                                                                                                                                                                                              Click Yes to confirm.

                                                                                                                                                                                                              The status of the threshold rule changes to Not Active.

                                                                                                                                                                                                              Once the object is marked inactive, it can be permanently deleted. For more information, see Delete inactive objects permanently.

                                                                                                                                                                                                              Activate a Threshold Rule

                                                                                                                                                                                                              1

                                                                                                                                                                                                              On the Management Portal navigation bar, choose Provisioning > Threshold Rules.

                                                                                                                                                                                                              2

                                                                                                                                                                                                              Click the ellipsis icon beside a threshold rule with the status Not Active and click Restore.

                                                                                                                                                                                                              3

                                                                                                                                                                                                              Click Yes to confirm.

                                                                                                                                                                                                              The status of the threshold rule changes to Active.

                                                                                                                                                                                                              Entry Point Mappings

                                                                                                                                                                                                              The Entry Point Mappings page is an interface for managing the mappings between entry points and the following:

                                                                                                                                                                                                              • Dial Numbers (DN)

                                                                                                                                                                                                                • Webex Contact Center PSTN

                                                                                                                                                                                                                • Voice POP bridge

                                                                                                                                                                                                                • Webex Calling

                                                                                                                                                                                                              • Social Messaging

                                                                                                                                                                                                              By default, all the DN to entry point mappings are listed. If required, you can filter the list by selecting an entry from the Select Entry Point drop-down list. The list displays DN, Entry Point, Number Type, and ID.

                                                                                                                                                                                                              If an incoming Entry Point DN is not in the correct format, the call fails to connect. For example, if the Entry Point DN is in the format (xxx xxx xxx) and the incoming Entry Point DN format is (+1 xxx xxx xxx), the call fails to connect.

                                                                                                                                                                                                              The following points apply if you've a Cisco PSTN add-on:

                                                                                                                                                                                                              • The Number Type column displays if the number is a toll number or toll-free number.

                                                                                                                                                                                                              • If your tenant contains any DN that is recognized as toll-free and you do not have Cisco Bundle 2: Inbound toll-free number access add-on, then a banner appears saying "Some mappings need to be deleted". Remove the toll-free numbers as the entitlement does not exist.

                                                                                                                                                                                                              • If you forward or redirect the DN from a service provider to Cisco PSTN, the delay in media path between agents and callers increases, thereby impacting the agent and caller experience.

                                                                                                                                                                                                              To use an entry point, you must map a dial number to the entry point.

                                                                                                                                                                                                              Map an Entry Point

                                                                                                                                                                                                              To map an entry point:

                                                                                                                                                                                                              1

                                                                                                                                                                                                              On the Management Portal navigation bar, click Provisioning > Entry Point Mappings.

                                                                                                                                                                                                              2

                                                                                                                                                                                                              Click Entry Point Mappings and choose the appropriate mapping list:DN to Entry Point Mappings.

                                                                                                                                                                                                              • Dialed Numbers: Map dialed numbers to entry points.
                                                                                                                                                                                                              • Social Messaging: Map social channel connectors to entry points.
                                                                                                                                                                                                              3

                                                                                                                                                                                                              Click + New DN to EP Mapping.

                                                                                                                                                                                                              4

                                                                                                                                                                                                              Enter the following fields:

                                                                                                                                                                                                              • For DN mapping:

                                                                                                                                                                                                                Setting

                                                                                                                                                                                                                Description

                                                                                                                                                                                                                Location (Only for Webex Calling)

                                                                                                                                                                                                                Choose a location from the drop-down list. The list of locations appears as configured on Webex Calling.

                                                                                                                                                                                                                Ensure that you've created a location in Webex Calling and added the required numbers. For more details on adding numbers in Webex Calling, see the article Manage Numbers in Locations.

                                                                                                                                                                                                                Available Numbers / DN

                                                                                                                                                                                                                • For Webex Calling:

                                                                                                                                                                                                                Select the number that you want to map to this entry point.

                                                                                                                                                                                                                • The Webex Calling location main number doesn’t appear in this list. If you need to use that main number for mapping, change the main number. For details on managing numbers, see the article Manage Numbers in Locations.

                                                                                                                                                                                                                • A toll-free number cannot be used for Entry Point mapping without the appropriate entitlement. If the Telephony type is Cisco PSTN and you do not have Cisco Bundle 2: Inbound toll-free number access add-on, use a toll number to map an entry point.

                                                                                                                                                                                                                Entry Point

                                                                                                                                                                                                                Choose the entry point to which you want to map the DN.

                                                                                                                                                                                                                PSTN Region

                                                                                                                                                                                                                Choose a region in which you want to enable regional voice media services. The dial number (DN) must be configured in the selected region to accept incoming calls. The entry point is mapped to the dial number that belongs to the selected region. Mapping the dialed number to a region keeps the voice media local to that region.

                                                                                                                                                                                                                If you don’t choose a region, the Default region is selected. The default region is the data center corresponding to the country of operation that is configured on Control Hub when you provision the contact center tenant.

                                                                                                                                                                                                                Example 1: For home region you can select a local location and, for PSTN region you can select default.

                                                                                                                                                                                                                For an organization in Japan you can select the location as Tokyo or Osaka and select a number within that location as an entry point and PSTN region must be default.

                                                                                                                                                                                                                1. To use the Outdial Transfer to Queue feature, map the Outdial Transfer to Queue entry point to a DN.

                                                                                                                                                                                                              • For Social Messaging mapping:

                                                                                                                                                                                                                Setting

                                                                                                                                                                                                                Description

                                                                                                                                                                                                                Connector

                                                                                                                                                                                                                Choose a connector from the drop-down list.

                                                                                                                                                                                                                Entry Point

                                                                                                                                                                                                                Choose the entry point to which you want to map the connector.

                                                                                                                                                                                                              5

                                                                                                                                                                                                              (Only for SMS) After you choose the Entry Point, a Webhook URL gets populated on the page. Copy the Webhook URL and configure MessageBird. This configuration helps exchange SMS messages with MessageBird.

                                                                                                                                                                                                              6

                                                                                                                                                                                                              Click Save.

                                                                                                                                                                                                              Edit Dial Number to Entry Point Mappings

                                                                                                                                                                                                              To edit the mapping of a dial number or social messaging channel to an entry point:
                                                                                                                                                                                                              1

                                                                                                                                                                                                              From the Management Portal navigation bar, click Provisioning > Entry Point Mappings.

                                                                                                                                                                                                              2

                                                                                                                                                                                                              Choose the appropriate list:

                                                                                                                                                                                                              • Dialed Numbers

                                                                                                                                                                                                              • Social Messaging

                                                                                                                                                                                                              For dial numbers, you can do the following:
                                                                                                                                                                                                              • In the Select Entry Point drop-down list, search for the dial number that you have mapped to an entry point.
                                                                                                                                                                                                              • From the Select Entry Point drop-down list, choose Not Mapped. All of dial numbers that are not mapped to entry points display. You can then map a dial number to an entry point as required.
                                                                                                                                                                                                              • (Optional) To export the dial numbers and the related entry points as a CSV file, click Export as CSV.
                                                                                                                                                                                                              3

                                                                                                                                                                                                              To edit a mapping, click the ellipsis icon beside a dial number or social messaging channel, and click Edit.

                                                                                                                                                                                                              4

                                                                                                                                                                                                              Make the edits and click Save.

                                                                                                                                                                                                              • You cannot edit a Dial Number to Entry Point mapping if the dial number is the default outdial ANI of the tenant. For more information on default outdial ANI, see Settings.

                                                                                                                                                                                                              Delete Dial Number to Entry Point Mappings

                                                                                                                                                                                                              To delete the mapping of a dial number or social messaging channel to an entry point:
                                                                                                                                                                                                              1

                                                                                                                                                                                                              From the Management Portal navigation bar, click Provisioning > Entry Point Mappings.

                                                                                                                                                                                                              2

                                                                                                                                                                                                              Choose the appropriate list:

                                                                                                                                                                                                              • Dialed Numbers

                                                                                                                                                                                                              • Social Messaging

                                                                                                                                                                                                              3

                                                                                                                                                                                                              Click DN to Entry Point Mappings.

                                                                                                                                                                                                              4

                                                                                                                                                                                                              Click the ellipsis icon beside the entry that you want to delete and click Delete.

                                                                                                                                                                                                              5

                                                                                                                                                                                                              Click Yes to confirm.

                                                                                                                                                                                                              • You can't delete a Dial Number to Entry Point mapping if the dial number is the default outdial ANI of the tenant and if its not the only remaining Dial Number to Entry Point mapping. For more information on default outdial ANI, see Settings.

                                                                                                                                                                                                              • You can't delete a mapping if the dial number is referenced by any other entities (for example, Outdial ANI List Entry).

                                                                                                                                                                                                                Click the (Information) icon in the error message to view the list of entities associated with the selected dial number. You can delete the Dial Number to Entry Point mapping only if the associated entities are deleted.

                                                                                                                                                                                                              Reports for the Provisioned Items

                                                                                                                                                                                                              Use the Management Portal to generate reports about the active resources that the Webex Contact Center administrator provisions for your enterprise.You can view the following reports:

                                                                                                                                                                                                              Report

                                                                                                                                                                                                              Description

                                                                                                                                                                                                              Site Report

                                                                                                                                                                                                              The details of the sites for your enterprise.

                                                                                                                                                                                                              For more information, see About Sites, Teams, Entry Points, and Queues

                                                                                                                                                                                                              Team Report

                                                                                                                                                                                                              The details of the teams for your enterprise.

                                                                                                                                                                                                              For more information, see About Sites, Teams, Entry Points, and Queues

                                                                                                                                                                                                              Agent Report

                                                                                                                                                                                                              The details of the agents for your enterprise.

                                                                                                                                                                                                              For more information, see Desktop Profiles.

                                                                                                                                                                                                              Inbound EP Report

                                                                                                                                                                                                              The details of the entry points for your enterprise.

                                                                                                                                                                                                              For more information, see Entry Points and Queues.

                                                                                                                                                                                                              Inbound Queues Report

                                                                                                                                                                                                              The details of the queues for your enterprise.

                                                                                                                                                                                                              For more information, see Entry Points and Queues.

                                                                                                                                                                                                              Outdial EP Report

                                                                                                                                                                                                              The details of the outdial entry points for your enterprise.

                                                                                                                                                                                                              For more information, see Entry Points and Queues.

                                                                                                                                                                                                              Outdial Queues Report

                                                                                                                                                                                                              The details of the outdial queues for your enterprise.

                                                                                                                                                                                                              For more information, see Entry Points and Queues.

                                                                                                                                                                                                              Desktop Profile Report

                                                                                                                                                                                                              The details of the desktop profiles for your enterprise.

                                                                                                                                                                                                              For more information, see Desktop Profiles.

                                                                                                                                                                                                              Skill Report

                                                                                                                                                                                                              The details of the skills that are available for your enterprise.

                                                                                                                                                                                                              This report is available if your enterprise uses the Skill-Based Routing.

                                                                                                                                                                                                              For more information on how to define the skills for your enterprise, see Skill Definitions.

                                                                                                                                                                                                              Currently we do not support Skill-Based Routing.

                                                                                                                                                                                                              Skill Profile Report

                                                                                                                                                                                                              The details of the mapping of the skills and the corresponding profiles.

                                                                                                                                                                                                              This report is available if your enterprise uses the Skill-Based Routing.

                                                                                                                                                                                                              For more information on how to define the profiles for the skills, see Skill Profiles.

                                                                                                                                                                                                              Routing Report

                                                                                                                                                                                                              The details about the mapping of the routing strategies with the entry points, queues, and teams.

                                                                                                                                                                                                              For more information on how to define routing strategies, see About Contact Routing.

                                                                                                                                                                                                              Agent Skills Report

                                                                                                                                                                                                              The details about the agents and their corresponding skills.

                                                                                                                                                                                                              This report is available if your enterprise uses the Skill-Based Routing.

                                                                                                                                                                                                              For more information on how to define the skills for your enterprise and Desktop Profiles, see Skill Definitions and Desktop Profiles.

                                                                                                                                                                                                              Note: Currently we do not support Skill-Based Routing.

                                                                                                                                                                                                              Manage Reports for the Provisioned Items

                                                                                                                                                                                                              To email the report or download the report for any provisioned item:

                                                                                                                                                                                                              1

                                                                                                                                                                                                              From the Management Portal navigation bar, choose Provisioning > Reports.

                                                                                                                                                                                                              2

                                                                                                                                                                                                              Select the required type of report.

                                                                                                                                                                                                              For more information on the types of the reports, see Reports for the Provisioned Items.

                                                                                                                                                                                                              3

                                                                                                                                                                                                              Download the report as either an Excel sheet or PDF.

                                                                                                                                                                                                              For the Routing Report, you have to select the type of the routing strategy for which you want to generate the report. The options are:

                                                                                                                                                                                                              • Current

                                                                                                                                                                                                              • Active

                                                                                                                                                                                                              • All

                                                                                                                                                                                                              Delete inactive objects permanently

                                                                                                                                                                                                              Webex Contact Center allows administrators to permanently delete configuration objects that have been marked inactive. This helps customers remove unwanted configurations, keep a lightweight configuration footprint, and improve application performance. Before deleting a configuration object permanently, you will need to mark it inactive. You can also periodically delete inactive objects using an automatic purge tenant level setting.

                                                                                                                                                                                                              You can permanently delete the following configuration object types:

                                                                                                                                                                                                              • Users

                                                                                                                                                                                                              • User Profiles

                                                                                                                                                                                                              • Desktop Profiles

                                                                                                                                                                                                              • Work Types

                                                                                                                                                                                                              • Auxiliary Codes

                                                                                                                                                                                                              • Threshold Rules

                                                                                                                                                                                                              • Skill Profile

                                                                                                                                                                                                              • Teams

                                                                                                                                                                                                              • Sites

                                                                                                                                                                                                              • Entry Points

                                                                                                                                                                                                              • Outdial Entry Points

                                                                                                                                                                                                              • Queues

                                                                                                                                                                                                              • Outdial Queues

                                                                                                                                                                                                              • Desktop Layouts

                                                                                                                                                                                                              • Global Variables

                                                                                                                                                                                                              • Multimedia Profiles

                                                                                                                                                                                                              • Skill Definitions

                                                                                                                                                                                                              The maximum number of inactive users is 5000. The maximum inactive objects for all other object types is 100. If this limit is reached, you must delete inactive objects to be able to deactivate more objects. If the configuration object has associated objects, you must inactivate all the referenced objects.

                                                                                                                                                                                                              1

                                                                                                                                                                                                              From the Management Portal navigation bar, choose Provisioning.

                                                                                                                                                                                                              2

                                                                                                                                                                                                              Select an entity.

                                                                                                                                                                                                              3

                                                                                                                                                                                                              To permanently delete a configuration object manually, on the entity page, click the ellipsis icon beside the object. Select Delete.

                                                                                                                                                                                                              4

                                                                                                                                                                                                              On the dialog box that informs you that the object will be permanently deleted and can't be recovered, click Yes. A message appears that the object is permanently deleted.

                                                                                                                                                                                                              To configure an automatic purge of inactive objects for permanent deletion, see the article Configure auto-purge of inactive entities.

                                                                                                                                                                                                              Business Rules

                                                                                                                                                                                                              About Business Rules Engine

                                                                                                                                                                                                              Business Rules Engine (BRE) provides a means for tenants to incorporate their data into the Webex Contact Center environment for custom routing and for general implementation. Administrators can use the BRE solution with Webex Contact Center to use business data for their organization in flows.

                                                                                                                                                                                                              For more information about BRE, visit the Webex Contact Center Business Rules Engine User Guide.

                                                                                                                                                                                                              Contact Routing

                                                                                                                                                                                                              About Contact Routing

                                                                                                                                                                                                              The Routing Strategy module provides a flexible environment for routing contacts to the best resource, regardless of location. Each incoming contact arrives at an entry point, from where it’s sent to queue for distribution among teams at contact center sites according to scheduled routing strategies, scheduled team capacity strategies, and queue precedence settings specified in the Routing Strategy module.

                                                                                                                                                                                                              In addition, if your enterprise uses the outdial feature, each outdial call passes through an outdial entry point and outdial queue according to routing strategies in the Routing Strategy module.

                                                                                                                                                                                                              Although the examples in the following sections refer to phone contacts, the same contact routing options are available to other media types.

                                                                                                                                                                                                              Each contact arrives at an entry point, where a routing strategy applies business logic. Based on the evaluated criteria in the routing strategy, the system selects an appropriate queue to distribute the contact to one of the available teams.

                                                                                                                                                                                                              About Skills-based Routing

                                                                                                                                                                                                              This section covers the following topics:

                                                                                                                                                                                                              Skill based routing types

                                                                                                                                                                                                              Longest available agent

                                                                                                                                                                                                              Rank queues

                                                                                                                                                                                                              Skills-based Routing (SBR) is an optional feature that matches the needs of contacts with agents who have the skills to best meet those needs. SBR is available for voice contacts as well as digital channel contacts. When calls arrive at an entry point, SBR classifies the calls into subsets. You can route the calls in each subset to agents who possess a required set of skills, such as language fluency or product expertise.

                                                                                                                                                                                                              SBR assigns skill requirements to calls in a flow. Based on the assigned skill requirements, the calls enter a queue for distribution to agents who have matching skills. You can configure SBR in a way that removes or reduces the skill requirements of agents if an agent is not available within a time interval that is specified in the queue. For more information, see Skill Definitions. To remove or reduce the skill requirements, specify the skill relaxations in the Queue Contact activity.

                                                                                                                                                                                                              SBR matches all skill requirements of contacts with the skills of agents. If one of the skill requirements of a contact is invalid because skill values are not properly defined in the flow, SBR cannot find a matching agent. In such cases, the call is routed to the longest available agent.

                                                                                                                                                                                                              SBR provides the following capabilities:

                                                                                                                                                                                                              • Match skill requirements of contacts with agents who have those specific skills.

                                                                                                                                                                                                              • Add skill requirements to contacts and route contacts with the same skill requirements to a single queue. For more information, see Queue Contact activity.

                                                                                                                                                                                                              • Configure different agent teams with a set of agents to serve a queue. For more information, see Create a Queue and an Outdial Queue.

                                                                                                                                                                                                              • Map various skills to the profiles of these agents. For more information, see Agent Profiles.

                                                                                                                                                                                                              In the preceding example, contact C1 requires skill A and contact C2 requires both skill A and skill B. When C2 enters the queue, it requires agents with both skill A and skill B. For best customer service, map C2 to the team that has both skill A and skill B. Do not map C2 to a team that has only skill A or skill B. If you map C2 to a team that has only skill A or skill B, C2 becomes the longest contact in the parked state.

                                                                                                                                                                                                              Skills-based Routing Types

                                                                                                                                                                                                              SBR routes contacts to agents based on the contact’s skill requirements that are configured in the flow. For more information, see About Skills-based Routing.

                                                                                                                                                                                                              You can enable SBR in the Queue Routing Type settings when creating a queue. For more information, see Create a Queue and an Outdial Queue. SBR routes contacts to agents in one of the following ways when more than one agent with the required skill set is available:

                                                                                                                                                                                                              • Longest Available Agent

                                                                                                                                                                                                              • Best Available Agent

                                                                                                                                                                                                              Longest Available Agent: SBR routes contacts to the agent who has been available for the longest duration.

                                                                                                                                                                                                              Best Available Agent: SBR routes contacts to the agent who has the highest level of proficiency in the skill. To route contacts to the best available agent:

                                                                                                                                                                                                              • Configure the contact’s skill requirements with the necessary condition so that the contact is always routed to an agent with the highest level of proficiency:

                                                                                                                                                                                                                • If you choose <= condition for the contact’s skill requirements, a lower value indicates a better match with the contact's requirement.

                                                                                                                                                                                                                • If you choose >= condition for the contact’s skill requirements, a higher value indicates a better match with the contact's requirement.

                                                                                                                                                                                                                • If you choose IS condition for the contact’s skill requirements, a higher value indicates a better match with the contact's requirement.

                                                                                                                                                                                                                For more information, see Skill Requirements in Queue Contact activity.

                                                                                                                                                                                                              • Assign the proficiency level to an agent when creating Skill Definitions and Agent Profiles.

                                                                                                                                                                                                              For example, you can route contacts to agents with English speaking skill as a language proficiency. Consider two agents: Agent 1 with an English language proficiency level of 3 and Agent 2 with an English language proficiency level of 6. Both agents are available in the queue.

                                                                                                                                                                                                              • If you configure the contact’s skill requirement with <= condition in the flow, Agent 1 with an English language proficiency level of 3 is the best available agent in the queue to connect to the contact.

                                                                                                                                                                                                              • If you configure the contact’s skill requirement with >= condition in the flow, Agent 2 with an English language proficiency level of 6 is the best available agent in the queue to connect to the contact.

                                                                                                                                                                                                              Longest Available Agent (LAA)

                                                                                                                                                                                                              Contacts are routed to the agents who have been available for the longest time since handling their last contact in all teams that are assigned to the queue in the Call Distribution section. In Webex Contact Center, the Longest Available algorithm ensures a fair way to distribute contacts to the longest available agent across all media channels such as voice and digital (WhatsApp, Facebook Messenger, Livechat, Email, and SMS).

                                                                                                                                                                                                              Agents lose their LAA positions across all channels when they are offered a contact of any media-type, that means after an agent handles a contact, the next contact of any media type queued will be assigned to the next longest available agent.

                                                                                                                                                                                                              In the above diagram, Agent 1 logged in first at T0 and by virtue of it Agent 1 is the longest available agent. Similarly, Agent 2 and Agent 3 log in at T1 and T2, so their LAA positions are 2 and 3 respectively.

                                                                                                                                                                                                              Let's consider a scenario where Contact 1 (a voice contact) is put in Queue 1 at T0, Contact 2 (a Chat contact) is put in Queue 2 at T1, and Contact 3 (again a voice contact) is put in Queue 3 at T2. Here, Agent 1 handles Contact 1, Agent 2 handles Contact 2, and Agent 3 handles Contact3.

                                                                                                                                                                                                              By virtue of Agent 1 being offered Contact 1, Agent 1 loses the LAA position. This ensures a fair distribution of contacts in LAA queues across all media types such as voice and non-voice contacts.

                                                                                                                                                                                                              There is a possibility that a single longest available agent can get multiple contacts when contacts matching this agent are queued at the same time.
                                                                                                                                                                                                              Rank queues

                                                                                                                                                                                                              Queue ranking allows you to prioritize which queues a team's agents handle first. This ranking takes precedence over contact priority and length of time of a contact in queue. This function allows administrators to define queue rankings that sets the order in which calls are routed from queues to teams, on a per-team basis. If you set the queue ranking, it overrides any previously configured contact priority settings.

                                                                                                                                                                                                              For example, suppose that Team A can take calls from queues Billing and Sales. You could use queue ranking to assign a higher ranking to the Billing queue, so when calls come in to the queues, those from Billing will be routed to Team A ahead of those from Sales.

                                                                                                                                                                                                              The following are some of the important characteristics of queue ranking:

                                                                                                                                                                                                              • If you assign a rank only to some of the queues, calls in those queues will take precedence over calls in the queues for which no rank is specified.

                                                                                                                                                                                                              • You can set queue ranking on a maximum of 50 queues across all media types with a value ranging between 1 and 50 with 1 as the highest rank.

                                                                                                                                                                                                              • You can assign the same rank to multiple queues.

                                                                                                                                                                                                              • If you enable queue ranking, queues that are not selected are treated lower than all ranked queues.

                                                                                                                                                                                                              • Queue Ranking works within same media type.

                                                                                                                                                                                                                For example, if Queue Sale is a voice media type queue with rank 2 and Queue Billing Support is a chat queue with rank 1 for Team A, then agents available in Team A get voice call first even though the rank is 2.

                                                                                                                                                                                                                However, consider two chats queues for Team B - Queue Credit Card with queue rank 2 and Queue Debit Card with queue rank 1. Then the available agents in Team B will be offered contacts from Queue Debit Card first.

                                                                                                                                                                                                              • The queue ranking configuration page shows all queues within the selected media. The Assigned column indicates whether the team is currently part of the queue.

                                                                                                                                                                                                              • For telephony, you can rank and blend both inbound and outbound queues.

                                                                                                                                                                                                              • Queue ranking doesn't apply to capacity-based teams.

                                                                                                                                                                                                              Before you begin

                                                                                                                                                                                                              • Queues must be created.
                                                                                                                                                                                                              • Teams must be assigned to the queue to set routing changes.
                                                                                                                                                                                                              1

                                                                                                                                                                                                              Sign in to your customer organization using the Control Hub URL https://admin.webex.com/.

                                                                                                                                                                                                              2

                                                                                                                                                                                                              Go to Contact Center > Customer Experience > User Management > Teams.

                                                                                                                                                                                                              3

                                                                                                                                                                                                              Click Create Team.

                                                                                                                                                                                                              4

                                                                                                                                                                                                              In the Team Settings section, choose Agent Based as the Team Type.

                                                                                                                                                                                                              5

                                                                                                                                                                                                              In the Queue Ranking section, enable the Rank queues for this team toggle button.

                                                                                                                                                                                                              The queue ranking section appears.
                                                                                                                                                                                                              6

                                                                                                                                                                                                              Choose the media type tab for which you want to configure the queue ranking such as Telephony, Chat, Email, and Social Channels.

                                                                                                                                                                                                              7

                                                                                                                                                                                                              Click Select Queues.

                                                                                                                                                                                                              A pop up appears showing the list of queues available for the selected media type. For example, if you choose Telephony as the media type, the Select telephony queues to rank page appears.
                                                                                                                                                                                                              8

                                                                                                                                                                                                              Choose the required queues from the list.

                                                                                                                                                                                                              Optionally, you can use the Search by name and All queues fields to filter your search result by their names and queue direction types such as inbound and outbound.

                                                                                                                                                                                                              You can select up to a maximum of 50 queues across all media types for ranking.

                                                                                                                                                                                                              9

                                                                                                                                                                                                              In the Rank column, assign the required rank for each queue.

                                                                                                                                                                                                              You can assign the same rank you multiple queues. Unranked queues appear with the default value as None.
                                                                                                                                                                                                              10

                                                                                                                                                                                                              (Optional) In the Queue ranking section, click Select queues to choose any other queues that are not assigned to the current team.

                                                                                                                                                                                                              11

                                                                                                                                                                                                              (Optional) Click the delete icon of a queue row to remove that queue from the ranking.

                                                                                                                                                                                                              12

                                                                                                                                                                                                              Click Select queues after you rank all selected queues.

                                                                                                                                                                                                              13

                                                                                                                                                                                                              Click Save.

                                                                                                                                                                                                              A message appears that says the team is successfully created.

                                                                                                                                                                                                              What to do next

                                                                                                                                                                                                              Advanced Queue Information

                                                                                                                                                                                                              The Advanced Queue Information feature allows you to assess if the skills of the logged in and available agents in a queue match the contact's skill requirement without queueing the contacts for a long duration. The GetQueueInfo activity provides the number of agents that are logged on and available. However, this activity doesn't provide information about any logged in agents who have specific skills that match the requirement of a specific contact. For more information about the GetQueueInfo activity, see Get Queue Info.

                                                                                                                                                                                                              At some time of the day, there may be no agents who are adequately skilled to match the skill requirement of a specific contact. The administrator needs information about such agents before and after queuing a contact to initiate alternative action such as playing a message, providing a callback option, or escalating to a different queue.

                                                                                                                                                                                                              The administrator can do the following:

                                                                                                                                                                                                              • If this activity is invoked before queuing the contact, the flow uses the skill requirements that are configured in the and the teams from the last call distribution group. This determines the number of logged in and available agents and populates the LoggedOnAgentsAll and AvailableAgentsAll output variables. The system sets the output variable CurrentGroup to –1.

                                                                                                                                                                                                                A value of -1 for the CurrentGroup indicates that the contact isn't yet queued when the activity is invoked. Flow designers can use the output variable CurrentGroup and determine if the contact isn't queued.

                                                                                                                                                                                                              • If this activity is invoked after queuing the contact, the system considers the current skills of the contact. The skills in the current skill relaxation cycle and the teams from the current call distribution group will be used to calculate the available and logged in agents. These values are populated in the LoggedOnAgentsCurrent and AvailableAgentsCurrent output variables. The system uses skills from the current skill relaxation cycle and the last call distribution group to calculate logged in and available agents and stores these values in the LoggedOnAgentsAll and AvailableAgentsAll output variables. The system also stores values in the PIQ, CurrentGroup, and TotalGroups output variables.

                                                                                                                                                                                                              You can invoke this activity for LAA-based queues. However, skill requirements that are configured for this activity aren't applicable for LAA-based queues. You can use this activity in a loop. The Flow Designer invokes the Advanced Queue Information activity when executing the flow.

                                                                                                                                                                                                              In the Flow Designer, you can create flows using the Advanced Queue Information activity only if the feature flag is enabled for this feature. You can't work with flows that have the Advanced Queue Information activity in the Flow Designer, if the feature flag is disabled. Ensure that the feature flag is enabled for the Advanced Queue Information activity.

                                                                                                                                                                                                              As part of the Advanced Queue Information when a contact is parked in a queue and you use the Advanced Queue Information to query another queue stack, this will not be supported and will result in an error. For more information on the error response code, see Advanced Queue Information.

                                                                                                                                                                                                              Escalate Call Distribution Group

                                                                                                                                                                                                              The application uses the in the post queuing loop to quickly move to the next call distribution group or the last. Typically, administrators use this activity to identify the contacts that are parked against escalation groups. These escalation groups have at least one logged in agent who has matching skills or no logged in agents.

                                                                                                                                                                                                              The application uses the QueueContact activity and calls the advanced GetQueueInfo activity to determine if there are any agents logged in to a specific call distribution group. If no agents are logged in to a specific call distribution group, the flow designer uses the EscalateCallDistribution activity to move ahead to either the next or the last call distribution group in the series. If an agent is available in the escalated group, Webex Contact Center routes the contact to that agent. If not, Webex Contact Center parks the contact immediately in that call distribution group.

                                                                                                                                                                                                              For more information about the QueueContact activity, see Queue Contact.

                                                                                                                                                                                                              A customer use case is a queue that has many call distribution groups. If an agent is not available in the first call distribution group to answer a call, the flow designer redirects the call to another call distribution group within the queue. At each level, the number of agents in the call distribution group increases so that there is a greater chance of the call getting answered. At certain times of the day, agents from this group or other groups might not be available.

                                                                                                                                                                                                              For SBR and LAA-based queues, if you invoke the EscalateCallDistribution activity on a contact that is not yet queued, it results in an error and exits the error path in the flow activity.

                                                                                                                                                                                                              Escalate Call Distribution Group is an independent activity. You can use this activity along with the AdvancedQueueInformation and the GetQueueInformation activities to escalate the call distribution group on a queue. The CheckAgentAvailability parameter in the QueueContact activity results in escalation of call distribution groups. Don't use the EscalateCallDistributionGroup activity along with the CheckAgentAvailability parameter in the QueueContact activity.

                                                                                                                                                                                                              In the Flow Designer, you can create flows using the EscalateCallDistributionGroup activity only if the feature flag is enabled for this feature. You can't work with flows that have the EscalateCallDistributionGroup activity in the Flow Designer, if the feature flag is disabled. Ensure that the feature flag is enabled for the EscalateCallDistributionGroup activity.

                                                                                                                                                                                                              Routing of Parked Contacts

                                                                                                                                                                                                              SBR parks contacts in a queue until an agent connects with the contacts.

                                                                                                                                                                                                              When agents become available, SBR routes contacts by using one of the following selection methods:

                                                                                                                                                                                                              • Skills-based Contact Selection

                                                                                                                                                                                                              • First In, First Out (FIFO) based Contact Selection

                                                                                                                                                                                                              By default, Skills-based contact selection is enabled for your organization.

                                                                                                                                                                                                              Skills-based Contact Selection

                                                                                                                                                                                                              In skills-based contact selection, contacts are selected based on the exact match between the skill requirements of the contact and the skills of the agent. Skills-based contact selection does not assign contacts to agents on FIFO basis. If the contact's skill requirements match exactly with the agent's skill, the contact connects to the agent irrespective of its position in the queue. If there are many such contacts with the same skill requirements, skills-based contact selection filters contacts in the queue and assigns them to the agent in the following order:

                                                                                                                                                                                                              1. Priority

                                                                                                                                                                                                              2. Timestamp (oldest to newest)

                                                                                                                                                                                                              For example, consider that contact C1 which requires an agent with skill A and contact C2 which requires an agent with skill B are waiting in the queue to connect to an agent. Contact C3 which requires an agent with skill C also enters the queue. If an agent with skill C becomes available, C3 does not wait for C1 and C2 to connect to agents, as the skill requirements of C3 match exactly with the agent who has skill C.

                                                                                                                                                                                                              First In, First Out (FIFO) based Contact Selection

                                                                                                                                                                                                              The first contact that enters the queue has the highest priority to connect to an agent. The first contact connects to an agent when an agent with matching skills becomes available. If the agent’s skill does not match the skill requirement of the first contact that is parked in the queue, the agent does not connect to the first contact. Even though the agent’s skill matches the skill requirements of other contacts in the queue, the contacts remain parked until the first contact finds an agent.

                                                                                                                                                                                                              For example, consider two contacts: C1 is the first contact to enter the queue which requires an agent with skill A and C2 is the second contact to enter the queue which requires an agent with skill B. When an agent with skill B becomes available, C2 does not connect to skill B. Since C1 is the first contact to enter the queue, SBR waits for an agent with skill A to be available to connect to C1 first. C2 connects to skill B only after C1 finds an agent.

                                                                                                                                                                                                              To enable FIFO-based contact selection for your organization, contact Cisco Support.

                                                                                                                                                                                                              Set Up Skills-Based Routing

                                                                                                                                                                                                              1

                                                                                                                                                                                                              Define the skills. For more information, see Skill Definitions.

                                                                                                                                                                                                              2

                                                                                                                                                                                                              Define the skill profiles. For more information, see Skill Profiles.

                                                                                                                                                                                                              3

                                                                                                                                                                                                              Assign the skill profiles to teams or agents. You can assign a skill profile to each agent-based team. All agents logged in to the team are associated with that skill profile. However, you can also assign a skill profile to an individual agent, which overrides the skill profile of the team.

                                                                                                                                                                                                              For more information, see Create a team and. View the Details of a User
                                                                                                                                                                                                              4

                                                                                                                                                                                                              Assign the skill profiles to agents. You can assign a skill profile to an individual agent or a team. For more information, see View the Details of a User.

                                                                                                                                                                                                              5

                                                                                                                                                                                                              Create Entry Points and Queues.

                                                                                                                                                                                                              6

                                                                                                                                                                                                              Create a queue with a channel type as Telephony and Queue Routing Type as Skills-Based.

                                                                                                                                                                                                              7

                                                                                                                                                                                                              Create or upload a call control script that defines how to treat the call. For more information, see Working with Call Control Scripts.

                                                                                                                                                                                                              8

                                                                                                                                                                                                              Create a flow that defines how to treat the call. For more information, see Create and Manage Flows.

                                                                                                                                                                                                              9

                                                                                                                                                                                                              Add a Queue Contact activity and select the queue for which Skills-Based Routing is configured. For more information, see Queue Contact.

                                                                                                                                                                                                              10

                                                                                                                                                                                                              Create an entry point and queue routing strategy. In the entry point routing strategy, you assign skill requirements to calls during call treatment defined in the call control script. For more information, see Assigning Skill Requirements to Incoming Calls. The calls are then distributed to the specified queue where they wait for an agent with the required skills.

                                                                                                                                                                                                              In the queue routing strategy, you specify options for identifying agents to service the incoming calls. If an agent with the required skills doesn't become available within a specified time interval, you can remove or reduce the skill requirement.

                                                                                                                                                                                                              For more information, see Create a Desktop Profile.

                                                                                                                                                                                                              11

                                                                                                                                                                                                              Create an entry point routing strategy and select the flow that you created. For more information, see Create a routing strategy.

                                                                                                                                                                                                              Agent-based Routing

                                                                                                                                                                                                              Agent-based Routing is an optional feature that routes or queues a contact to the preferred agent directly. An agent lookup with agent's email address or agent's ID routes a contact to the preferred agent. The Queue To Agent activity in the flow helps to achieve Agent-based Routing. For more information, see the section Queue To Agent activity.

                                                                                                                                                                                                              A contact can have one or more preferred agents. The mapping between the contacts and their preferred agents is managed in an external application outside Webex Contact Center. The preferred agent lookup for any contact is performed using the HTTP Request activity in the flow. The HTTP Request activity retrieves the mapping from the external application. To route or park the contact against that preferred agent, you can configure the Queue To Agent activity in the flow. The Queue To Agent activity allows you to specify the agent by their Webex Contact Center agent ID or email address. You can also park the contact against a preferred agent if that preferred agent isn't immediately available.

                                                                                                                                                                                                              You can consider chaining an activity within the flow to route or queue contacts.

                                                                                                                                                                                                              For example, you can chain one Queue To Agent activity to another Queue To Agent activity to queue a contact to multiple preferred agents. You can chain a Queue Contact activity to the Queue To Agent activity to route a contact if none of the preferred agents are available for that contact.

                                                                                                                                                                                                              Agent-based Routing is useful in the following scenarios:

                                                                                                                                                                                                              • Preferred agent routing: The customer can assign contacts to dedicated agents or relationship executives. In such scenarios, the Agent-based Routing routes the contacts directly to that preferred agent.

                                                                                                                                                                                                              • Last agent routing: When a contact calls back the contact center multiple times to interact with an agent, Agent-based Routing can route the contact to the last agent who handled that contact.

                                                                                                                                                                                                              In both use cases, the details of the contact and the agent mapping are stored outside the Webex Contact Center. The HTTP activity retrieves the data. The Queue To Agent activity routes the contact to the preferred agent or the last agent.

                                                                                                                                                                                                              In case of Blended Real-time or Exclusive Multimedia Profiles, if Preferred Agent is already handling one real-time channel, the agent will be considered busy, and the call won't be routed to the preferred agent immediately.

                                                                                                                                                                                                              To set up Agent-based Routing:

                                                                                                                                                                                                              Before you begin:

                                                                                                                                                                                                              You must export the Webex Contact Center agent ID and agent email address from Webex Contact Center to an external application. Webex Contact Center doesn't store the mapping between the agent and its contacts.

                                                                                                                                                                                                              1. Retrieve the mapping between the agent and the contact from the external application using the HTTP Request activity in the Flow Designer (From the Management Portal navigation bar, choose Routing Strategy > Flow and click New to create a new flow). For more information, see the section HTTP Request.

                                                                                                                                                                                                              2. Configure the Queue To Agent Activity in the Flow Designer. You can provide the general settings and the contact handling details to route the contact. For more information, see the section Queue To Agent activity.

                                                                                                                                                                                                              About global routing overrides

                                                                                                                                                                                                              A global routing override is a routing strategy that applies to one or more Telephony entry points. When a call arrives at an entry point, the routing engine checks whether a Global Routing Override exists for that entry point. If a Global Routing Override exists, it becomes the current routing strategy for the entry point, overriding any standard routing strategies associated with that entry point.

                                                                                                                                                                                                              Creating a global routing override enables you to change the routing strategies quickly and easily for many entry points simultaneously in urgent situations, rather than changing each routing strategy individually.

                                                                                                                                                                                                              Global routing overrides operate in the Tenant time zone.

                                                                                                                                                                                                              Configure Multimedia Profiles

                                                                                                                                                                                                              If your enterprise uses social channels, chat, and email routing in addition to voice, then Multimedia profiles are enabled. You can associate sites and agents with multimedia profiles.

                                                                                                                                                                                                              1

                                                                                                                                                                                                              Define the multimedia profiles. If your enterprise subscribes to the Multimedia feature, each agent is associated with a multimedia profile, which specifies how many contacts of each media type the agent can handle concurrently. For more information, see Multimedia Profiles.

                                                                                                                                                                                                              2

                                                                                                                                                                                                              Assign multimedia profiles to sites, teams, or agents. When Multimedia is enabled, every site is associated with a multimedia profile. Each agent-based team at a given site is associated with the profile assigned to that site unless the team is assigned a different multimedia profile. Similarly, each agent logged in to a team is associated with the team's profile unless the agent is assigned a different multimedia profile. For more information, see Sites, Create a team, and Users.

                                                                                                                                                                                                              3

                                                                                                                                                                                                              Create separate entry points and queues for each media type. For more information, see Create an Entry Point.

                                                                                                                                                                                                              4

                                                                                                                                                                                                              Work with Webex Contact Center Operations to create routing strategies configured to use a specialized call control script.

                                                                                                                                                                                                              5

                                                                                                                                                                                                              Work with your specific CRM vendor to configure the multimedia interaction at the agent level.

                                                                                                                                                                                                              Alternately you can configure the queue routing strategy to assign multimedia contacts (Chat, Email, Social Channels) to your agents.

                                                                                                                                                                                                              Working with Resource Files

                                                                                                                                                                                                              To view the resources, choose Routing Strategy from the Management Portal navigation bar.

                                                                                                                                                                                                              You can choose to see the audio files, predefined emails, or predefined chat responses.

                                                                                                                                                                                                              Upload an Audio Resource File

                                                                                                                                                                                                              Webex Contact Center supports uploading .wav audio files with the following specifications:

                                                                                                                                                                                                              • Channels: 1

                                                                                                                                                                                                              • Sample Rate: 8000

                                                                                                                                                                                                              • Sample Encoding: 8-bit u-law

                                                                                                                                                                                                              • Mono Recording (for combined, caller, or agent recording)

                                                                                                                                                                                                                • Channels: 1

                                                                                                                                                                                                                • Sample Rate: 8000

                                                                                                                                                                                                                • Precision: 16-bit

                                                                                                                                                                                                                • Sample Encoding: GSM

                                                                                                                                                                                                                • Maximum Recording Duration: 2 Hours

                                                                                                                                                                                                              • Stereo Recording (for combined recording)

                                                                                                                                                                                                                • Channels: 2

                                                                                                                                                                                                                • Sample Rate: 8000

                                                                                                                                                                                                                • Precision: 13-bit

                                                                                                                                                                                                                • Sample Encoding: 4-bit IMA ADPCM

                                                                                                                                                                                                                • Maximum Recording Duration: 2 Hours

                                                                                                                                                                                                              By default, only mono recording is enabled for all tenants.

                                                                                                                                                                                                              1

                                                                                                                                                                                                              From the Management Portal navigation bar, choose Routing Strategy.

                                                                                                                                                                                                              2

                                                                                                                                                                                                              From the Routing Strategy page, choose Resources > Audio Files.

                                                                                                                                                                                                              3

                                                                                                                                                                                                              Click New.

                                                                                                                                                                                                              4

                                                                                                                                                                                                              On the Upload Resource page, click Browse.

                                                                                                                                                                                                              5

                                                                                                                                                                                                              Navigate to the file in your system, and click Open.

                                                                                                                                                                                                              The File field displays the path and file name of the uploaded file, and the Resource Name field displays the file name.

                                                                                                                                                                                                              6

                                                                                                                                                                                                              Click Save.

                                                                                                                                                                                                              Edit an Audio Resource File

                                                                                                                                                                                                              Do not update resources that are currently used by the system.

                                                                                                                                                                                                              1

                                                                                                                                                                                                              From the Management Portal navigation bar, choose Routing Strategy.

                                                                                                                                                                                                              2

                                                                                                                                                                                                              From the Routing Strategy page, choose Resources > Audio Files.

                                                                                                                                                                                                              3

                                                                                                                                                                                                              Click the Ellipsis button beside the resource name and click Edit.

                                                                                                                                                                                                              4

                                                                                                                                                                                                              On the Overwrite Resource page, click Browse.

                                                                                                                                                                                                              5

                                                                                                                                                                                                              Navigate to the file in your system, and click Open.

                                                                                                                                                                                                              The File field displays the path and file name of the uploaded file, and the Resource Name field displays the file name.

                                                                                                                                                                                                              For audio file specifications, see Upload an Audio Resource File.

                                                                                                                                                                                                              6

                                                                                                                                                                                                              Click Save.

                                                                                                                                                                                                              7

                                                                                                                                                                                                              Click Yes to confirm overwriting the audio file.

                                                                                                                                                                                                              Play or Download a .wav File

                                                                                                                                                                                                              1

                                                                                                                                                                                                              From the Management Portal navigation bar, choose Routing Strategy.

                                                                                                                                                                                                              2

                                                                                                                                                                                                              From the Routing Strategy page, choose Resources > Audio Files.

                                                                                                                                                                                                              3

                                                                                                                                                                                                              Click the ellipsis button beside the file name and click Play.

                                                                                                                                                                                                              4

                                                                                                                                                                                                              In the dialog box that opens, specify whether you want to open or save the file. When you click Open, the media player installed on your computer opens and plays the file. If a compatible media player is not installed, a dialog box opens and prompts you to download a player.

                                                                                                                                                                                                              Update a Resource File

                                                                                                                                                                                                              1

                                                                                                                                                                                                              From the Management Portal navigation bar, choose Routing Strategy.

                                                                                                                                                                                                              2

                                                                                                                                                                                                              From the Routing Strategy page, choose Resources > Audio Files.

                                                                                                                                                                                                              3

                                                                                                                                                                                                              Click the ellipsis button beside the file name and click Edit.

                                                                                                                                                                                                              4

                                                                                                                                                                                                              Make the necessary changes to the resource.

                                                                                                                                                                                                              5

                                                                                                                                                                                                              Click Save.

                                                                                                                                                                                                              Copy a Resource File

                                                                                                                                                                                                              The copy function enables you to create backup copies of prompts and other resource files. Only files with the .wav extension can be copied.

                                                                                                                                                                                                              1

                                                                                                                                                                                                              From the Management Portal navigation bar, choose Routing Strategy.

                                                                                                                                                                                                              2

                                                                                                                                                                                                              From the Routing Strategy page, choose Resources > Audio Files.

                                                                                                                                                                                                              3

                                                                                                                                                                                                              Click the ellipsis button beside the file name and click Copy.

                                                                                                                                                                                                              4

                                                                                                                                                                                                              On the page that appears, enter a name for the copied file or leave the default name (Copy_ is prepended to the original name).

                                                                                                                                                                                                              5

                                                                                                                                                                                                              Click Save.

                                                                                                                                                                                                              Export References to a Media File

                                                                                                                                                                                                              You can view or export a list showing the name of each routing strategy that references a specified media file along with the name of the associated entry point or queue. In the case of a global routing strategy, the list shows 0 instead of the name of an entry point or queue.

                                                                                                                                                                                                              To view or export the references to a media file:

                                                                                                                                                                                                              1

                                                                                                                                                                                                              From the Management Portal navigation bar, choose Routing Strategy.

                                                                                                                                                                                                              2

                                                                                                                                                                                                              From the Routing Strategy page, choose Resources > Audio Files.

                                                                                                                                                                                                              3

                                                                                                                                                                                                              Click the ellipsis button beside the file name and click Excel or CSV.

                                                                                                                                                                                                              4

                                                                                                                                                                                                              In the dialog box that opens, specify whether to open or save the file.

                                                                                                                                                                                                              Create a Predefined Email Template

                                                                                                                                                                                                              You can predefine the email template that agents use to communicate with customers. An organization can have a single predefined template for email.

                                                                                                                                                                                                              To edit or delete the template, click the ellipsis button beside the template in the Predefined Emails page.

                                                                                                                                                                                                              You cannot use the predefined email templates for quick-reply emails.

                                                                                                                                                                                                              To create an email template:

                                                                                                                                                                                                              1

                                                                                                                                                                                                              From the Management Portal navigation bar, choose Routing Strategy.

                                                                                                                                                                                                              2

                                                                                                                                                                                                              From the Routing Strategy page, choose Resources > Predefined Emails.

                                                                                                                                                                                                              3

                                                                                                                                                                                                              Click New.

                                                                                                                                                                                                              The New button is disabled if your organization already has a predefined email template.

                                                                                                                                                                                                              4

                                                                                                                                                                                                              In the New Predefined Email dialog box, do the following:

                                                                                                                                                                                                              1. Enter a name for the email template.

                                                                                                                                                                                                              2. Set the status for the template.

                                                                                                                                                                                                                Set the status as Active to use it as a default template for all email communications between agents and customers.

                                                                                                                                                                                                                Set the status to Not Active to save it as draft. You can later change the status to Active to use it.

                                                                                                                                                                                                              3. Enter the email body. You can use the formatting tools to draft the email body.

                                                                                                                                                                                                              4. (Optional) Add macros to the email body.

                                                                                                                                                                                                                You can use the macro to add variables for Customer Name or Agent Name to the email. You can set a default value for the variable type you choose. You can use the macros multiple times in the template as per your requirement.

                                                                                                                                                                                                                • To add the macro variables, place the cursor where you want the variable. Choose the type of macro you want to add and click the Insert to Text Editor button.

                                                                                                                                                                                                                • To set a default value for a macro, enter the default value in the field Default Value before you insert the macro to the text editor.

                                                                                                                                                                                                              5. Click Save to save the email template.

                                                                                                                                                                                                              Configure a Predefined Chat Template

                                                                                                                                                                                                              Before you begin

                                                                                                                                                                                                              Ensure that you create an entry point before you configure a chat template.

                                                                                                                                                                                                              Entry points are the initial landing place for all channel types in Webex Contact Center. The system sends the contact to an agent based on the routing strategy that is set for an entry point.

                                                                                                                                                                                                              You can configure one chat template for each entry point. For more information, see Entry Points and Queues.

                                                                                                                                                                                                              Only customers whose organization is provisioned on an existing Webex Calling Integrated Platform can configure a chat template for their contact center.

                                                                                                                                                                                                              1

                                                                                                                                                                                                              Log in to the customer organization at https://admin.webex.com.

                                                                                                                                                                                                              2

                                                                                                                                                                                                              From the navigation pane on the left, in the Services section, click Contact Center > Features.

                                                                                                                                                                                                              3

                                                                                                                                                                                                              Choose one of the following options:

                                                                                                                                                                                                              • To create a new chat template, click New > Chat Template.
                                                                                                                                                                                                              • To edit an existing chat template, double-click the card.

                                                                                                                                                                                                              The system displays the Chat Template wizard.

                                                                                                                                                                                                              4

                                                                                                                                                                                                              In the Define Template page:

                                                                                                                                                                                                              1. Enter a unique name that identifies the purpose of your template.

                                                                                                                                                                                                              2. Choose a preconfigured entry point from the drop-down list.

                                                                                                                                                                                                              3. Choose the following customization options and click Next. You can choose multiple options depending on what you want your customers to see when they chat with your organization.

                                                                                                                                                                                                                • Proactive Prompt: The message that appears in the chat box when the customer opens the website of your organization. You can customize this message. You can configure the time to prompt the message to the customer. You can also change the title and the default welcome message.

                                                                                                                                                                                                                • Off-Hours: The non-business hours of your organization. You can set the availability of the chat support by configuring the business hours and time zone of your organization. You can also add an away message for customers.

                                                                                                                                                                                                                • Virtual Agent: The preconfigured chatbot that starts the conversation with the customer. You can choose from the available virtual agents and add a welcome message.

                                                                                                                                                                                                                  Configure the customer information form, the visual display of the agents, and the status messages for the chat window. For more information, see Configure a Virtual Agent for Webex Contact Center.

                                                                                                                                                                                                                • Feedback: The feedback form that appears after the chat ends. You can add a message inviting customers to give their feedback about their chat experience.

                                                                                                                                                                                                                Based on the selected options, the subsequent steps appear in the wizard.

                                                                                                                                                                                                              5

                                                                                                                                                                                                              In the Proactive Prompt, Off-Hours page:

                                                                                                                                                                                                              1. In the Proactive Prompt section, enter the wait time, title, and message for the prompt.

                                                                                                                                                                                                              2. In the Off-Hours section, enter the message for the prompt, and choose the business hours and time zone from the drop-down list.

                                                                                                                                                                                                              3. Click Next.

                                                                                                                                                                                                              The Proactive Prompt doesn’t pop up during the off-hours or when agents aren’t available to assist.

                                                                                                                                                                                                              6

                                                                                                                                                                                                              In the Customer Information page, click each of the fields in the Preview card and modify the attributes. The customer uses these attributes to fill the form.

                                                                                                                                                                                                              It's mandatory to enter at least one category in the Type Attributes section for customers to choose the category from the drop-down list.

                                                                                                                                                                                                              7

                                                                                                                                                                                                              In the Virtual Agent page:

                                                                                                                                                                                                              1. Choose a preconfigured Virtual Agent (that can provide initial automated support in your customer chat experience) from the drop-down list and enter a message.

                                                                                                                                                                                                              2. Enter a welcome message and click Next.

                                                                                                                                                                                                              8

                                                                                                                                                                                                              In the Branding and Identity, Status Messages page:

                                                                                                                                                                                                              1. In the Branding and Identity section, choose one of the following Profile Type:

                                                                                                                                                                                                                • Organization: Use a single profile to represent all agents in your organization. For example, the name of the organization.

                                                                                                                                                                                                                • Virtual Agent or Agents: Use unique profiles to represent different agents in your organization.

                                                                                                                                                                                                                  Choose one of the following options:

                                                                                                                                                                                                                  • Show agent's display name: Displays the agent's full name.

                                                                                                                                                                                                                  • Show agent's alias: Displays the agent's alias name.

                                                                                                                                                                                                              2. In the Status Messages section, enter the messages (that appear to the customer) and then click Next.

                                                                                                                                                                                                              9

                                                                                                                                                                                                              In the Feedback page, enter Label and Hint Text in the Attributes card to receive customer feedback.

                                                                                                                                                                                                              10

                                                                                                                                                                                                              In the Done page, click Finish.

                                                                                                                                                                                                              After you successfully configure the chat template, a code snippet appears. To use the newly configured chat template in your organization's website, you can copy and paste the code snippet within the <head> or <body> HTML tag of your webpage's source file.

                                                                                                                                                                                                              You can close the code snippet and download it later from the Contact Center > Features page.

                                                                                                                                                                                                              Create a Predefined Chat Response

                                                                                                                                                                                                              You can define a set of chat responses that your agents can use to communicate with the customers. You can configure the chat responses for a specific queue or for all the queues. We support the following languages:
                                                                                                                                                                                                              • US English

                                                                                                                                                                                                              • Japanese

                                                                                                                                                                                                              • Italian

                                                                                                                                                                                                              • French

                                                                                                                                                                                                              • German

                                                                                                                                                                                                              • Spanish

                                                                                                                                                                                                              You can configure 50 responses per language, per queue, for a total of 300 responses per queue. Agents can see the responses in their queue based on the language settings in their local browser. Thus, agents can see only 50 responses at a time.

                                                                                                                                                                                                              1

                                                                                                                                                                                                              From the Management Portal navigation bar, choose Routing Strategy.

                                                                                                                                                                                                              2

                                                                                                                                                                                                              From the Routing Strategy page, choose Resources > Predefined Chat Responses.

                                                                                                                                                                                                              3

                                                                                                                                                                                                              Click New.

                                                                                                                                                                                                              4

                                                                                                                                                                                                              Enter the following details:

                                                                                                                                                                                                              Setting

                                                                                                                                                                                                              Description

                                                                                                                                                                                                              Response Name

                                                                                                                                                                                                              Contains the name of the predefined chat response. You can enter a name of maximum 40 characters.

                                                                                                                                                                                                              Status

                                                                                                                                                                                                              Contains the status of the predefined chat response. Deactivate the status to hide it from the agents in Agent Desktop.

                                                                                                                                                                                                              Language

                                                                                                                                                                                                              Choose the language of the predefined chat response from the drop-down list.

                                                                                                                                                                                                              You cannot edit the language of the chat reponse.

                                                                                                                                                                                                              Queue

                                                                                                                                                                                                              Choose the queue for which you want to define the chat response. If you select All from the drop-down list, all agents in all the queues in your organization can use the chat response.

                                                                                                                                                                                                              However, if any queue has reached the capacity of 50 messages, the system displays an error message with the names of the queues that have reached the limit. The system disables the queues that have reached the limit and you cannot choose them.

                                                                                                                                                                                                              Content

                                                                                                                                                                                                              Contains the text for the chat response. You can enter a maximum of 150 characters.

                                                                                                                                                                                                              5

                                                                                                                                                                                                              Click Save.

                                                                                                                                                                                                              Configure Routing Resources

                                                                                                                                                                                                              You can choose either a routing resource or a flow. If you choose a routing resource, you can't customize flow control configurations such as Customize ANI, Screen pop, Global variable and so on, as part of the outdial experience. We recommend that you use flows instead of routing resources to avail any advanced configurations such as Screen pop, Customize ANI and so on. For more information, see Create a Flow.

                                                                                                                                                                                                              Routing strategies will be obsolete in the future. It is recommended to use flows configured with business hours and outdial entry points.

                                                                                                                                                                                                              If you want to proceed with routing strategies, consider the following aspects. For each entry point and queue, you should create a set of default routing strategies that cover all time intervals. In addition, you can schedule an alternate strategy beyond the default strategy for any time interval. For example, Queue 1 could have a BusyHourStrategy for the normal day shift and an OffHoursStrategy for non-business hours.

                                                                                                                                                                                                              Flag the normal daily schedule as the default strategy. You can create a non-default strategy, such as a holiday schedule for a time interval that overlaps the default strategy. A strategy that is not flagged as default overrides a default strategy and is used as an exception to the default schedule. This means that the system first checks for a strategy that is not flagged as default, and if none exists, the system uses the default strategy.

                                                                                                                                                                                                              When the default strategy is the current strategy (that is, the strategy that is currently running), the system checks every three minutes for a non-default strategy and if one is found, it becomes the current strategy.

                                                                                                                                                                                                              If no strategy is specified for a time interval, and there is no default strategy for the time interval, the last strategy used by the system may continue as the current strategy even though it has expired. In this case, the system checks every minute for a valid strategy and as soon as it finds one, that strategy becomes the current strategy.

                                                                                                                                                                                                              About Team Types

                                                                                                                                                                                                              When you create or modify a queue routing strategy, the following options appear:

                                                                                                                                                                                                              • Agent-Based teams have a known number of agents assigned to teams. Authorized users assign a desktop profile to one or more teams. These agents use the Agent Desktop to interface with the Webex Contact Center system.

                                                                                                                                                                                                              • Capacity-Based teams don’t have specific agents assigned to them, and the agents don’t use the Agent Desktop. For example, an outsourcer could have teams that use a PBX or an ACD to handle calls. You can use a capacity-based team to represent a voicemail box or an agent group, which Webex Contact Center doesn’t manage.

                                                                                                                                                                                                                The capacity of these teams is based on the provisioned team capacity setting, which can override the team capacity strategies. For more information, see Scheduling Team Capacity. If the team's actual capacity is higher or lower than the value currently used by the system, the result is either not enough or too many calls for agents to handle. This makes strategy design more challenging.

                                                                                                                                                                                                              When you use the getNumAgentsLoggedIn API, the response includes the number of agents logged in along with the number of capacity-based teams that are considered as active.

                                                                                                                                                                                                              When you create a routing strategy, you can mix team types. Remember that the accuracy of call routing to capacity-based teams depends on the capacity number specified.

                                                                                                                                                                                                              Limitations of Capacity Based Teams when using Classic platform

                                                                                                                                                                                                              Webex Contact Center assigns calls to the capacity-based team by transferring the call to a Dial Number (DN). After the call transfers to a DN, Webex Contact Center disconnects from the call. Webex Contact Center is not aware of the call status; that is, whether the capacity-based team answers, handles, or rejects the call.

                                                                                                                                                                                                              This limitation causes the following behaviors:

                                                                                                                                                                                                              • Tracking the contact after the call transfer is not possible.

                                                                                                                                                                                                              • Detecting RONA or call failures is not possible

                                                                                                                                                                                                              • Recording the call is not possible.

                                                                                                                                                                                                              • Getting the Connect Time and Handled Time values is not possible. Call report shows the value as zero (0).

                                                                                                                                                                                                              • Setting the capacity is not applicable, hence more calls could go to the capacity-based team.

                                                                                                                                                                                                              When using Next Generation media platform, Webex Contact Center assigns calls to the capacity-based teams, wherein the Webex Contact Center:

                                                                                                                                                                                                              • Handles the call status and determines whether the call routed to capacity-based team is answered, handled, or rejected.

                                                                                                                                                                                                              • Monitors the overall status of calls, including call termination, and decides when to update the consumption value of the capacity-based team. For example, if the call is terminated, capacity must be increased and vice versa.

                                                                                                                                                                                                              • Obtain the Connect Time and Handled Time values.

                                                                                                                                                                                                              When a static load-balancing strategy includes both agent-based and capacity-based teams, the system distributes the calls to either agent-based teams or capacity-based teams, in the order that they are configured. Once the capacity of the capacity-based teams reaches the maximum limit, calls are routed to agent-based teams, if agents are available. If the call is in queue, it can be routed to either agent-based or capacity-based teams, depending on which team has resources available. If no team has capacity, calls are queued until capacity becomes available. This load-balancing strategy ensures that calls are handled efficiently and that no team is overloaded.

                                                                                                                                                                                                              View routing strategies for an entry point or queue

                                                                                                                                                                                                              To view all routing strategies for an entry point or queue:

                                                                                                                                                                                                              1

                                                                                                                                                                                                              From the Management Portal navigation bar, choose Routing Strategy.

                                                                                                                                                                                                              2

                                                                                                                                                                                                              Choose an entry point or queue from the Select Entry Point drop-down list to display the routing strategies for that entry point or queue.

                                                                                                                                                                                                              For more information on the parameters that display on the Routing Strategy page, see Routing strategy parameters.

                                                                                                                                                                                                              The upper section of the list view displays a table that lists all routing strategies available for the selected entry point or queue.

                                                                                                                                                                                                              (Optional) Use the sort button at the end of the table to chronologically sort the strategies.

                                                                                                                                                                                                              3

                                                                                                                                                                                                              To see details for a strategy, click the ellipsis beside the routing strategy and click Edit.

                                                                                                                                                                                                              The lower section of the Routing Strategy page displays the Routing Strategy Mapping Details table, which:

                                                                                                                                                                                                              • lists destination queues and entry points, which are based on the active routing strategies that you define for the selected entry point.

                                                                                                                                                                                                              • lists the teams to which the system routes calls, chats, or emails, which are based on the active routing strategies that you define for the selected queue. Mapping details aren't provided for a queue routing strategy that simply redirects the call to another entry point or queue.

                                                                                                                                                                                                                Your access privileges determine what you see in the Mapping Details table. For example, if the system routes calls for the Sales queue to Teams A and B, and you have access rights only to Team A, the mapping table shows only Team A as the destination for incoming calls.

                                                                                                                                                                                                              4

                                                                                                                                                                                                              Click Save.

                                                                                                                                                                                                              Routing strategy parameters

                                                                                                                                                                                                              The following table describes the parameters that appear on the Routing Strategy page.

                                                                                                                                                                                                              Column

                                                                                                                                                                                                              Description

                                                                                                                                                                                                              Name

                                                                                                                                                                                                              Displays the name you assign to the strategy. You can't change the strategy name after you create it.

                                                                                                                                                                                                              ID

                                                                                                                                                                                                              Displays the system-assigned number of the strategy.

                                                                                                                                                                                                              Status

                                                                                                                                                                                                              Indicates the status of the strategy.

                                                                                                                                                                                                              • Current (appears in Red) means this is a snapshot of the currently running strategy. You can't copy the current strategy, but you can modify any setting that does not affect execution time or date. Changes to the strategy don't affect the recurring scheduled version of the strategy.

                                                                                                                                                                                                                You can delete the current strategy, but don't delete it before you create a different strategy for the same time interval. If you delete a strategy without having another one in place, the last strategy used by the system becomes the default strategy although the start and end times and dates have expired. If this occurs, either create a new strategy for the current time period, or copy the default strategy and correct the time settings.

                                                                                                                                                                                                              • Active means that the strategy is in effect at the specified start time on the specified start date. This is the default status.

                                                                                                                                                                                                              • Not Active means the strategy isn't in effect regardless of the specified start time and date. This status lets you save a strategy for future use or as a draft to continue with later.

                                                                                                                                                                                                              Default

                                                                                                                                                                                                              Indicates whether the strategy is the default. A strategy not flagged as the default overrides a default strategy and potentially replaces the default schedule.

                                                                                                                                                                                                              Chat Template

                                                                                                                                                                                                              Identifies the chat template used for the routing strategy.

                                                                                                                                                                                                              Repetition

                                                                                                                                                                                                              Specifies whether the strategy repeats daily or only on specific days of the week.

                                                                                                                                                                                                              Start Date

                                                                                                                                                                                                              Displays the date on which the strategy starts.

                                                                                                                                                                                                              End Date

                                                                                                                                                                                                              Displays the date on which the strategy ends.

                                                                                                                                                                                                              Start Time

                                                                                                                                                                                                              Displays the time at which the strategy starts (in 24-hour format) for any given day in the specified date range.

                                                                                                                                                                                                              End Time

                                                                                                                                                                                                              Displays the time at which the strategy ends (in 24-hour format) for any given day in the specified date range.

                                                                                                                                                                                                              Time Zone

                                                                                                                                                                                                              Displays the time zone if you enable the Multiple Time Zone feature when you create the entry point or queue.

                                                                                                                                                                                                              Flow

                                                                                                                                                                                                              Lists the associated call flows when a routing strategy is executing.

                                                                                                                                                                                                              View the current routing strategies

                                                                                                                                                                                                              You can view a list of currently deployed routing strategies for multiple entry points or queues.

                                                                                                                                                                                                              1

                                                                                                                                                                                                              From the Management Portal navigation bar, choose Routing Strategy.

                                                                                                                                                                                                              2

                                                                                                                                                                                                              From the Routing Strategy page, choose Current Routing Strategies.

                                                                                                                                                                                                              3

                                                                                                                                                                                                              Choose All from the drop-down list to view current strategies for all entry points or queues.

                                                                                                                                                                                                              4

                                                                                                                                                                                                              Click Apply.

                                                                                                                                                                                                              table provides details about the current routing strategies for the selected entry points or queues. The Control Script column displays the names of the call control scripts that are associated with the listed entry points or queues.

                                                                                                                                                                                                              table provides details about the current routing strategies for the selected entry points or queues. The Flow column displays the names of the call flows associated with the listed entry points or queues.

                                                                                                                                                                                                              View routing strategies by time zone

                                                                                                                                                                                                              If you enable the Multiple Time Zone feature for your enterprise, you can configure entry points and queues with time zones. Time values that are used in the routing strategies are based on the time zone you configure for the entry point or queue. If you don't configure time zones with entry points and queues, the system uses the time zone that you configure for your enterprise (typically headquarters).

                                                                                                                                                                                                              When you click your name button on the upper-right side of the Routing Strategy page, any time zones you configure for entry points or queues appear in a drop-down list.

                                                                                                                                                                                                              If you do not enable the Multiple Time Zone feature for your enterprise, time values in routing strategies are based on the time zone you configure for your enterprise.

                                                                                                                                                                                                              If the time zone observes daylight-saving time, the time adjusts automatically when the daylight-saving time changes.

                                                                                                                                                                                                              1

                                                                                                                                                                                                              On the Management Portal, click the gears icon in the upper-right corner to view the three or four Tab keyed settings panel.

                                                                                                                                                                                                              2

                                                                                                                                                                                                              Click the gears icon. Select a time zone from the Time Zone drop-down list.

                                                                                                                                                                                                              3

                                                                                                                                                                                                              Click Apply.

                                                                                                                                                                                                              4

                                                                                                                                                                                                              From the Management Portal navigation bar, choose Routing Strategy to view the routing strategies based on the selected time zone.

                                                                                                                                                                                                              Create a routing strategy

                                                                                                                                                                                                              Use this procedure to create new routing strategies. You can also create a new strategy by editing an existing strategy and changing the parameters in accordance with the requirements.

                                                                                                                                                                                                              Before you create new strategies:

                                                                                                                                                                                                              • Always create an active strategy for every time interval. If you don't specify an active strategy for a time interval, the system uses the default. If there’s no default strategy, the last strategy that the system used may continue as the current strategy although it has expired.

                                                                                                                                                                                                              • You can easily create a new strategy from an existing strategy, change some settings, and save it as a new strategy.

                                                                                                                                                                                                              • You can have only one routing strategy for each chat or email entry point.

                                                                                                                                                                                                                You can't have a global routing strategy for Chat and Email entry points.

                                                                                                                                                                                                              • You can't save changes to an active strategy when the scheduled dates or times conflict with an existing active strategy.

                                                                                                                                                                                                              Before you begin

                                                                                                                                                                                                              You must Create a Chat Template before you create a Chat Routing Strategy.

                                                                                                                                                                                                              1

                                                                                                                                                                                                              From the Management Portal navigation bar, choose Routing Strategy.

                                                                                                                                                                                                              2

                                                                                                                                                                                                              At the Routing Strategy page, choose Routing > Routing Strategies.

                                                                                                                                                                                                              3

                                                                                                                                                                                                              Choose an entry point from the Select Entry Point drop-down list.

                                                                                                                                                                                                              4

                                                                                                                                                                                                              Do one of the following in the list view:

                                                                                                                                                                                                              • Click New Strategy.

                                                                                                                                                                                                                Global Routing Overrides only apply to Telephony channel type.

                                                                                                                                                                                                                - OR -

                                                                                                                                                                                                              • Click the ellipsis button beside an existing routing strategy with Active status and click Copy.

                                                                                                                                                                                                              5

                                                                                                                                                                                                              Enter or modify the settings as described in the following tables.

                                                                                                                                                                                                              You can create more than one strategy for a Telephony or Social channel.

                                                                                                                                                                                                              Table 1. General settings applicable in routing strategy

                                                                                                                                                                                                              Setting

                                                                                                                                                                                                              Description

                                                                                                                                                                                                              General Settings

                                                                                                                                                                                                              Name

                                                                                                                                                                                                              Enter a name for the strategy, such as US Holiday or Weekends. You can’t edit this field after you save the strategy.

                                                                                                                                                                                                              Enterprise Name

                                                                                                                                                                                                              Shows the tenant name.

                                                                                                                                                                                                              Status

                                                                                                                                                                                                              Click Active if you want the strategy to become effective on the start date that you specify in the Start Date field.

                                                                                                                                                                                                              Click Not Active if you want to save the strategy for future use or as a draft to work on later.

                                                                                                                                                                                                              The status is always Active for chat and email routing strategies as you can configure only one routing strategy for each entry point or queue.

                                                                                                                                                                                                              Call Distribution (only applicable to queues)

                                                                                                                                                                                                              Add Group

                                                                                                                                                                                                              If this is an inbound queue routing strategy, specify the teams that you must associate with this strategy and organize them into groups. See Specifying Call Distribution Settings for details. In addition, do the following (as described in Assigning Teams and Skill-Relaxation Settings to Groups):

                                                                                                                                                                                                              • If the routing type is Load Balance, assign percentage spreads or capacities to each team in Group 1. You can add more groups, but you can’t assign percentage spreads or capacities to the teams in those additional groups.

                                                                                                                                                                                                              • If the routing type is Priority, assign priorities. Assign a specific priority to only one team within the strategy (for example, only one team can have a priority of 1 assigned to it).

                                                                                                                                                                                                              • If the routing type is Skills Based, specify skill relaxation settings if appropriate.

                                                                                                                                                                                                              If this is a routing strategy for an outdial queue, you must specify a team in the Call Distribution section. The specified team is only a placeholder and not used. In addition, be sure to create only one group for an outdial queue routing strategy.

                                                                                                                                                                                                              Table 2. Settings applicable in routing strategy for Telephony and Social Channel Entry Point

                                                                                                                                                                                                              Setting

                                                                                                                                                                                                              Description

                                                                                                                                                                                                              Entry Point

                                                                                                                                                                                                              This field shows the entry point for which you’re creating the strategy. Select the entry points or queues that are associated with this routing strategy.

                                                                                                                                                                                                              Queue

                                                                                                                                                                                                              This field shows the queue for which you’re creating the strategy. Select the entry points or queues that are associated with this routing strategy.

                                                                                                                                                                                                              Time Settings

                                                                                                                                                                                                              Start Date


                                                                                                                                                                                                              End Date

                                                                                                                                                                                                              Click in each of these fields and use the calendar controls to specify the start date (the date strategy becomes effective) and the end date (the date strategy expires).

                                                                                                                                                                                                              Start Time


                                                                                                                                                                                                              End Time

                                                                                                                                                                                                              Enter in 24-hour format (0000–2400) the time of day you want the strategy to start and end.

                                                                                                                                                                                                              Day of Week

                                                                                                                                                                                                              From the drop-down list:

                                                                                                                                                                                                              • Choose All Days if you want to schedule the strategy to run every day.

                                                                                                                                                                                                              • Choose Weekdays if you want to schedule the strategy to run from Monday through Friday only.

                                                                                                                                                                                                              • Choose Specific Days, and click on the icons representing weekdays if you want to schedule the strategy to run on specific days of the week.

                                                                                                                                                                                                              Advanced Settings

                                                                                                                                                                                                              Music on Hold

                                                                                                                                                                                                              Select the name of the audio (.wav) file to play for calls when they arrive or are waiting in a queue. This isn’t applicable for email and chat routing strategies.

                                                                                                                                                                                                              Maximum Time in Queue

                                                                                                                                                                                                              For a standard Webex Contact Center queue routing strategy, specify the duration in seconds before a queued call routes to the overflow destination number provisioned for the queue. Cisco recommends setting this to 1800 (30 minutes) or to three times the average queue length during busy hours.

                                                                                                                                                                                                              If this is an email routing strategy, set this to a high value to avoid overflow.

                                                                                                                                                                                                              By default, this field adopts the value that is configured for the queue.

                                                                                                                                                                                                              The cumulative specified queue time for all groups in the Call Distribution section of the routing strategy mustn’t be greater than the value specified here. See Specifying Call Distribution Settings for more information.

                                                                                                                                                                                                              Retries within the Cisco Webex Teams

                                                                                                                                                                                                              For a standard Webex Contact Center queue routing strategy, specify the maximum number of times to attempt sending a call to a team before the call gets routed to the next available team. The system makes no further attempts to send the call to that team again.

                                                                                                                                                                                                              Exceptions:

                                                                                                                                                                                                              • This setting doesn’t apply to Skills Based routing strategies. For Skills Based routing, if the call is in the last group, the call overflows if the system finds no matching agent.

                                                                                                                                                                                                              • In a load balance strategy using percentage allocation, the system doesn't route a call to a second team when the first team is unavailable. Instead, the system retries the first team's DN according to the specified number of times for the strategy and then overflows the call.

                                                                                                                                                                                                              Flag as Default Routing Strategy

                                                                                                                                                                                                              -or-

                                                                                                                                                                                                              Update as Default Routing Strategy

                                                                                                                                                                                                              This setting is available only if you’re creating a new strategy or copying an existing one.

                                                                                                                                                                                                              Set to Yes if you want this to be the default routing strategy for the specified time interval for this entry point or queue.

                                                                                                                                                                                                              Set to No if you’re creating an exception to the default schedule, such as a holiday. A strategy that has no default flag overrides the default strategy. That is, the system checks first for a strategy that has no default flag, and if none exists, the system uses the default strategy.

                                                                                                                                                                                                              Call Control

                                                                                                                                                                                                              Virtual Agent

                                                                                                                                                                                                              If a Virtual Agent is not active, you can use the Control Script.

                                                                                                                                                                                                              If a Virtual Agent is active, all interactions begin with an automated conversational IVR in place of Control Scripts.

                                                                                                                                                                                                              Before enabling the Virtual Agent feature, ensure that you have configured at least one Virtual Agent or chat template on the Cisco Webex Control Hub. To configure a Virtual Agent or chat template on the Control Hub, see the articles:

                                                                                                                                                                                                              Configure Cisco Webex Contact Center Virtual Agent

                                                                                                                                                                                                              Cisco Webex Contact Center Chat Template.

                                                                                                                                                                                                              Perform the following steps:

                                                                                                                                                                                                              1. Select a Virtual Agent from the drop-down list.

                                                                                                                                                                                                              2. Default Queue: Choose a default queue to escalate when self-service fails.

                                                                                                                                                                                                              3. Exit Intent Mapping: Map the intents from Dialogflow virtual agents to queues. If the last intent causes the customer to exit the conversational IVR, then escalate the interaction (Telephony or Social Channel) to the specified queue. There’s a limit of 100 exit intents rules.

                                                                                                                                                                                                                • IF intent is: Select the intents that are defined in the Dialog flow.

                                                                                                                                                                                                                • THEN queue to: Select the queue to escalate.

                                                                                                                                                                                                                  The Add Condition option provides an OR logic when you add new intents.

                                                                                                                                                                                                              This is applicable also for Social Channel (Facebook Messenger and SMS) routing rules.

                                                                                                                                                                                                              Control Script

                                                                                                                                                                                                              Select a call control script in the drop-down list. Every strategy must have an associated control script, which defines how the system handles calls. If appropriate, change the script's default parameters in the fields displayed. For more information, see Assigning Call Control Scripts and Parameters.

                                                                                                                                                                                                              When you create an Inbound Queue and select a Control Script, then the Music in Queue setting gets reset.

                                                                                                                                                                                                              If you’re editing an existing strategy, selecting a different call control script can significantly change how the system handles calls. It’s important that you’re clear on what you want to do before changing scripts or script parameters.

                                                                                                                                                                                                              If this is an entry point strategy for Skills-Based routing, assign skills requirements as described in Assigning Skill Requirements to Incoming Calls.

                                                                                                                                                                                                              Call Distribution

                                                                                                                                                                                                              Business Metrics & Queue Escalation (applicable only to cross-ACD entry points)

                                                                                                                                                                                                              If this routing strategy is for a cross-ACD entry point, organize the queues that the entry point serves into one or more groups and specify the call routing algorithm and applicable parameters as described in Specifying Call Distribution Settings.

                                                                                                                                                                                                              Table 3. Settings applicable in routing strategy for Telephony Queue

                                                                                                                                                                                                              Setting

                                                                                                                                                                                                              Description

                                                                                                                                                                                                              Queue

                                                                                                                                                                                                              Select the queue that you plan to associate with this routing strategy.

                                                                                                                                                                                                              Routing Type

                                                                                                                                                                                                              This option is not available for proxy queues:

                                                                                                                                                                                                              • Longest Available Agent: The system routes calls to the agent who has been available for the longest time among all the agents on all the teams assigned to the strategy in the Call Distribution section.

                                                                                                                                                                                                              • Load Balance: The system routes calls to agents based on load-balancing conditions that you set in the Mode and Type fields and in the settings you specified in the Call Distribution section.

                                                                                                                                                                                                                • Mode: If you specified Load Balance in the Routing Type field, select one of the following values to specify how to handle the call load:

                                                                                                                                                                                                                  • Percentage: The system routes calls to selected teams based on a percentage allocation that you specify for each team in the Call Distribution section. The percentage spread total must equal 100 across all teams selected for Group 1. For more information, see Specifying Call Distribution Settings.

                                                                                                                                                                                                                  • Number: The system routes calls to selected teams based on the value you specify for each team in the Call Distribution section. This value reflects the call capacity for that team. After the system sends the specified number of calls to a particular team, it sends no additional calls to that team. In other words, this strategy allows you to specify an upper limit on the total number of calls the system sends to a particular team. This allows you to meet any contractual obligations not to exceed certain targets.

                                                                                                                                                                                                                • Type: If you specified Load Balance in the Routing Type field, select one of the following values in the Type field:

                                                                                                                                                                                                                  • Dynamic: Calls routed dynamically result in a single virtual queue. The system queues callers for the longest available agent across all associated teams instead of routing them immediately at the time of call arrival to a team specified in the load balance strategy (based on active call conditions).

                                                                                                                                                                                                                  • Static: The system routes calls to specific teams on the basis of a predefined percentage or numeric allocation at the time of call arrival. In static routing, the system assigns calls to a team based on the allowable number of calls specified for that team in the Call Distribution section (either a percentage or number of calls). In dynamic routing, the system assigns calls to a team based on the current allocation of calls among the teams based on the day's tally.

                                                                                                                                                                                                              • Priority Based: The system routes calls to agent teams based on a priority scheme that you set in the Call Distribution section.

                                                                                                                                                                                                              • Skills Based: The system routes calls to agents based on skill requirements that are specified in the Call Distribution section of the routing strategy for the entry point that sends calls to this queue. The Skills Based routing type is available only if your enterprise has the optional Skills-Based Routing feature provisioned.

                                                                                                                                                                                                                When you select Skills Based as the routing type, two more settings appear for you to specify how to route a call when more than one agent has the required skill set:

                                                                                                                                                                                                                • Longest Available Agent: The system routes the call to the agent who has been available the longest.

                                                                                                                                                                                                                • Best Available Agent: When you select this setting, a Skill drop-down list appears. The system routes the call to the agent with the highest proficiency in the skill you select from the drop-down list.

                                                                                                                                                                                                              Time Settings (These are read-only for proxy queues.)

                                                                                                                                                                                                              Start Date


                                                                                                                                                                                                              End Date

                                                                                                                                                                                                              Click in each of these fields and use the calendar controls to specify the start date (the date the strategy becomes effective) and end date (the date the strategy expires).

                                                                                                                                                                                                              Start Time


                                                                                                                                                                                                              End Time

                                                                                                                                                                                                              Enter in 24-hour format (0000–2400) the time of day you want the strategy to start and end.

                                                                                                                                                                                                              Day of Week

                                                                                                                                                                                                              From the drop-down list, select All Days if you want to schedule the strategy for every day or Weekdays if you want to schedule the strategy for Monday through Friday only.

                                                                                                                                                                                                              -OR-

                                                                                                                                                                                                              Select each icon that represents a day on which you want to schedule the strategy.

                                                                                                                                                                                                              Advanced Settings

                                                                                                                                                                                                              Music on Hold

                                                                                                                                                                                                              Select the name of the audio (.wav) file to play for calls when they arrive or are waiting in a queue. This isn’t applicable for email and chat routing strategies.

                                                                                                                                                                                                              Maximum Time in Queue

                                                                                                                                                                                                              If this is a standard Webex Contact Center queue routing strategy, enter the length of time to wait, in seconds, before the system routes a queued call to the overflow destination number provisioned for the queue. Cisco recommends setting this to 1800 (30 minutes) or to three times the average queue length during busy hours.

                                                                                                                                                                                                              If this is an email routing strategy, set this parameter to a value high enough to avoid overflow.

                                                                                                                                                                                                              By default, this field adopts the value provisioned for the queue.

                                                                                                                                                                                                              The cumulative total queue time configured for all groups in the Call Distribution section of the routing strategy mustn’t exceed the value specified here. See Specifying Call Distribution Settings for more information.

                                                                                                                                                                                                              Retries within the Team

                                                                                                                                                                                                              If this is a standard Webex Contact Center queue routing strategy, specify the maximum number of attempts the system makes to send a call to a team before it routes the call to the next available team. The system makes no further attempts to send the call to that team again.

                                                                                                                                                                                                              Exceptions:

                                                                                                                                                                                                              • This setting doesn’t apply to Skills-Based routing strategies. For Skills Based routing, if the call is in the last group, the call overflows if the system finds no matching agent. If the call is in any other group, and if it’s sent to an agent who doesn’t answer, the system continues to try matching other available agents any number of times, without regard to this setting.

                                                                                                                                                                                                              • In a load balance strategy using percentage allocation, the system does not route a call to a second team when the first team is unavailable. Instead, the system retries the first team's DN for the number of times that are specified for the strategy, and then overflows the call.

                                                                                                                                                                                                              Flag as Default Routing Strategy

                                                                                                                                                                                                              -or-

                                                                                                                                                                                                              Update as Default Routing Strategy

                                                                                                                                                                                                              This setting is available only if you’re creating a new strategy or copying an existing one.

                                                                                                                                                                                                              Set to Yes if you want this to be the default routing strategy for the specified time interval for this entry point or queue.

                                                                                                                                                                                                              Set to No if you’re creating an exception to the default schedule, such as a holiday. A strategy that isn’t configured as default overrides the default strategy. That is, the system first checks for a strategy that isn’t flagged as default, and if none exists, the default strategy is used.

                                                                                                                                                                                                              Call Control

                                                                                                                                                                                                              Control Script

                                                                                                                                                                                                              Select a call control script from the drop-down list. Every strategy must have a control script associated with it, which defines how calls are handled. If appropriate, change the script's default parameters in the fields displayed. For more information, see Assigning Call Control Scripts and Parameters.

                                                                                                                                                                                                              When you create an Inbound Queue, if a Control Script is selected, then the Music in Queue setting gets reset.

                                                                                                                                                                                                              If you’re editing an existing strategy, selecting a different call control script can significantly change how calls are handled. It’s important that you’re clear on what you want to do before changing scripts or script parameters.

                                                                                                                                                                                                              If this is an entry point strategy for Skills-Based routing, assign skills requirements as described in Assigning Skill Requirements to Incoming Calls.

                                                                                                                                                                                                              Table 4. General settings applicable in routing strategy

                                                                                                                                                                                                              Setting

                                                                                                                                                                                                              Description

                                                                                                                                                                                                              General Settings

                                                                                                                                                                                                              Name

                                                                                                                                                                                                              Enter a name for the strategy, such as US Holiday or Weekends. You can’t edit this field after you save the strategy.

                                                                                                                                                                                                              Enterprise Name

                                                                                                                                                                                                              Shows the tenant name.

                                                                                                                                                                                                              Status

                                                                                                                                                                                                              Click Active if you want the strategy to become effective on the start date that you specify in the Start Date field.

                                                                                                                                                                                                              Click Not Active if you want to save the strategy for future use or as a draft to work on later.

                                                                                                                                                                                                              The status is always Active for chat and email routing strategies as you can configure only one routing strategy for each entry point or queue.

                                                                                                                                                                                                              Table 5. Settings applicable in routing strategy for Telephony

                                                                                                                                                                                                              Setting

                                                                                                                                                                                                              Description

                                                                                                                                                                                                              Time Settings (These are read-only for proxy queues.)

                                                                                                                                                                                                              Start Date


                                                                                                                                                                                                              End Date

                                                                                                                                                                                                              Click in each of these fields and use the calendar controls to specify the start date (the date that the strategy becomes effective) and the end date (the date that the strategy expires).

                                                                                                                                                                                                              Start Time


                                                                                                                                                                                                              End Time

                                                                                                                                                                                                              Enter in 24-hour format (0000–2400) the time of day that you want the strategy to start and end.

                                                                                                                                                                                                              Day of Week

                                                                                                                                                                                                              From the drop-down list, choose All Days if you want to schedule the strategy for every day or Weekdays if you want to schedule the strategy for Monday through Friday only.

                                                                                                                                                                                                              -OR-

                                                                                                                                                                                                              Click each icon that represents a day on which you want to schedule the strategy.

                                                                                                                                                                                                              Advanced Settings

                                                                                                                                                                                                              Music on Hold

                                                                                                                                                                                                              Select the name of the audio (.wav) file to play for calls when an agent puts a call on hold. Music in Queue (MIQ) is handled from Flow. When a contact is queued and if no agent is available, the customer is engaged with MIQ.

                                                                                                                                                                                                              Call Control

                                                                                                                                                                                                              Flag as Default Routing Strategy

                                                                                                                                                                                                              -or-

                                                                                                                                                                                                              Update as Default Routing Strategy

                                                                                                                                                                                                              Choose the Routing Strategy. This setting is available only if you create a new strategy or copy an existing one.

                                                                                                                                                                                                              Set to Yes if you want this routing strategy to be the default routing strategy for the specified time interval for this entry point or queue.

                                                                                                                                                                                                              Set to No to create an exception to the default schedule, such as a holiday. This strategy overrides the default strategy. That is, the system first checks for a strategy that isn’t flagged as default, and if none exists, the system uses the default strategy.

                                                                                                                                                                                                              Various routing strategies may be configured for a given time interval, but only one can be considered the current routing strategy. Webex Contact Center uses the following order of preference to decide the current routing strategy at any given time:

                                                                                                                                                                                                              1. Global Routing Overrides

                                                                                                                                                                                                              2. Default Global Routing Overrides

                                                                                                                                                                                                              3. Routing Strategy

                                                                                                                                                                                                              4. Default Routing Strategy

                                                                                                                                                                                                              Flow

                                                                                                                                                                                                              Select the flow from the drop-down list.

                                                                                                                                                                                                              Table 6. Settings applicable in routing strategy for Email Entry Point and Queue

                                                                                                                                                                                                              Setting

                                                                                                                                                                                                              Description

                                                                                                                                                                                                              Email Account

                                                                                                                                                                                                              You can add only one email account for each entry point. You can edit or delete the email account using the icons beside the email account name.

                                                                                                                                                                                                              Add Email Account

                                                                                                                                                                                                              Click the Add Email Account button to open the Add Email Account dialog box. Enter the following details:

                                                                                                                                                                                                              Email Address:
                                                                                                                                                                                                              Enter the email address to contact your organization.
                                                                                                                                                                                                              Inbound Server Settings:
                                                                                                                                                                                                              Enter the following server details for incoming emails:
                                                                                                                                                                                                              • Incoming Protocol

                                                                                                                                                                                                              • Incoming Host

                                                                                                                                                                                                              • Inbound Encryption

                                                                                                                                                                                                              • Inbound Port Number

                                                                                                                                                                                                              Outbound Server Settings:
                                                                                                                                                                                                              Enter the following server details for outgoing emails:
                                                                                                                                                                                                              • SMTP Server

                                                                                                                                                                                                              • Outbound Encryption

                                                                                                                                                                                                              • Outbound Port Number

                                                                                                                                                                                                              Server Authentication:
                                                                                                                                                                                                              Enter the username and password to connect to the email account.

                                                                                                                                                                                                              Ensure you use only secure access to mail servers, such as:

                                                                                                                                                                                                              • SMTP, IMAP, or POP over SSL

                                                                                                                                                                                                              • SMTP, IMAP, or POP over TLS

                                                                                                                                                                                                              Mandatory steps to use a Gmail account for an email channel are as follows:

                                                                                                                                                                                                              1. Enable the IMAP option if you provide IMAP server to fetch mails in the server in the Gmail settings.

                                                                                                                                                                                                              2. Enable the Less Secure Apps flag in the Gmail account settings.

                                                                                                                                                                                                              3. Disable the captcha by logging into https://g.co/allowaccess.

                                                                                                                                                                                                              4. Update the credentials in the routing strategy and click Save.

                                                                                                                                                                                                              Advanced Email Account Settings:
                                                                                                                                                                                                              Enter the following advanced settings for the email account:
                                                                                                                                                                                                              • Maximum Attachment Size

                                                                                                                                                                                                              • Number of Attachment Limit

                                                                                                                                                                                                              • Mail Delay

                                                                                                                                                                                                              • Maximum Messages/Cycle

                                                                                                                                                                                                              Email Routing Rules

                                                                                                                                                                                                              You can add up to 20 email routing rules. Use the icon beside the rule to edit or delete the rule.

                                                                                                                                                                                                              Routing Rule

                                                                                                                                                                                                              Click the Add Routing Rule button to open the Add Routing Rule dialog box. Enter the following details to add a rule:

                                                                                                                                                                                                              Routing Rule Name:
                                                                                                                                                                                                              Enter the name for the rule.
                                                                                                                                                                                                              IF Email Subject Contains:
                                                                                                                                                                                                              Enter the text in the email subject to set the condition for the rule. You can add up to 10 conditions using the AND or OR operators. However, you can mix the AND and OR operators in a rule.
                                                                                                                                                                                                              Then:
                                                                                                                                                                                                              Select the email queue to which the email is queued if it satisfies any condition.

                                                                                                                                                                                                              The email can remain in a queue for a maximum of 240 days. After 240 days, the system removes the email from Webex Contact Center.

                                                                                                                                                                                                              Default Routing Rule

                                                                                                                                                                                                              Select an email queue for the default routing rule in case none of the defined rules satisfy the criteria.

                                                                                                                                                                                                              Table 7. Settings applicable in routing strategy for Chat

                                                                                                                                                                                                              Setting

                                                                                                                                                                                                              Description

                                                                                                                                                                                                              Chat Routing Experience

                                                                                                                                                                                                              Chat Template

                                                                                                                                                                                                              Shows that the name of the Chat Template used. To edit, you must log in to Control Hub.

                                                                                                                                                                                                              Chat Reason Mapping Details

                                                                                                                                                                                                              Associate the preconfigured chat reasons. For more information, see Create a Chat+Callback Template.

                                                                                                                                                                                                              Modify a Routing Strategy

                                                                                                                                                                                                              Before you modify a routing strategy, be aware of the following:

                                                                                                                                                                                                              • Although you cannot copy the current strategy, you can modify any of its settings except those that affect execution time or date. These changes have no effect on the recurring scheduled version of the strategy.

                                                                                                                                                                                                              • When you modify the current strategy, your changes take effect immediately for new calls and remain in effect until the current strategy ends. If there are calls in the queue when the modifications are made, the existing queued calls follow the original strategy unless you check the Apply changes to current calls in queue check box to the right of the Save button.

                                                                                                                                                                                                                Changes made to the current Email or Chat entry point routing strategy are also applied to the corresponding active routing strategies.

                                                                                                                                                                                                              • When you modify a strategy that is not the current strategy, your changes take effect according to the scheduled times specified in the strategy.

                                                                                                                                                                                                              1

                                                                                                                                                                                                              From the Management Portal navigation bar, choose Routing Strategy.

                                                                                                                                                                                                              2

                                                                                                                                                                                                              On the Routing Strategy page, choose an entry point or queue from the Select Entry Point/Queue drop-down list.

                                                                                                                                                                                                              3

                                                                                                                                                                                                              Click the ellipsis button beside the strategy that you want to modify and choose Edit.

                                                                                                                                                                                                              4

                                                                                                                                                                                                              If you are modifying a global routing strategy:

                                                                                                                                                                                                              1. Click the Routing button on the menu bar, select Global Routing Strategies, select the Entry Point or Queue button on the upper-left side page.

                                                                                                                                                                                                              2. If you are modifying a strategy for cross-ACD entry points or for proxy queues, set the CC-one ACD field to False.

                                                                                                                                                                                                              3. Click the horizontal ellipsis button to the left of a the strategy you want to modify and select Edit.

                                                                                                                                                                                                              5

                                                                                                                                                                                                              Make your changes. For information about each setting, see the setting descriptions table in Create a routing strategy.

                                                                                                                                                                                                              6

                                                                                                                                                                                                              If you modify the current strategy and want the changes to apply to calls currently in queue, check the Apply changes to current calls in queue check box on the lower right side of the page. If you don't check this check box, the changes only apply to new calls.

                                                                                                                                                                                                              7

                                                                                                                                                                                                              Click Save to save your changes.

                                                                                                                                                                                                              Routing Strategies Deletion and Restoration

                                                                                                                                                                                                              When you delete a routing strategy, the system moves the strategy to the Deleted Routing Strategies or Deleted Global Routing Overrides page where it can be restored or permanently deleted within 30 days. After 30 days, the system permanently deletes the routing strategy.

                                                                                                                                                                                                              When you delete a current strategy, the system activates the next strategy scheduled for that time period. Do not delete a current strategy unless an alternate strategy is available.

                                                                                                                                                                                                              Delete a Standard Routing Strategy
                                                                                                                                                                                                              1

                                                                                                                                                                                                              From the Management Portal navigation bar, choose Routing Strategy.

                                                                                                                                                                                                              2

                                                                                                                                                                                                              On the Routing Strategy page, choose an entry point or queue from the Select Entry Point/Queue drop-down list.

                                                                                                                                                                                                              3

                                                                                                                                                                                                              Click the ellipsis button beside the routing strategy that you want to delete and click Delete.

                                                                                                                                                                                                              4

                                                                                                                                                                                                              Click Yes to confirm.

                                                                                                                                                                                                              The system moves the strategy to the Deleted Routing Strategies page where it can be restored or permanently deleted (see Restore or Permanently Delete a Routing Strategy).

                                                                                                                                                                                                              Restore or Permanently Delete a Routing Strategy
                                                                                                                                                                                                              1

                                                                                                                                                                                                              From the Management Portal navigation bar, choose Routing Strategy.

                                                                                                                                                                                                              2

                                                                                                                                                                                                              On the Routing Strategy page, click Deleted Strategies.

                                                                                                                                                                                                              3

                                                                                                                                                                                                              Choose an entry point or queue from the Select Entry Point/Queue drop-down list.

                                                                                                                                                                                                              4

                                                                                                                                                                                                              Click the ellipsis button beside the strategy that you want to either restore or permanently delete and do one of the following:

                                                                                                                                                                                                              • To permanently delete the strategy, click Delete. Click Yes to confirm.

                                                                                                                                                                                                                - OR -

                                                                                                                                                                                                              • To restore the strategy, click Restore.

                                                                                                                                                                                                              5

                                                                                                                                                                                                              If you are restoring a strategy, modify the settings as required, and click Restore.

                                                                                                                                                                                                              You cannot restore a deleted Chat Entry Point Routing Strategy, if a Routing Strategy is assigned to the Entry Point.

                                                                                                                                                                                                              If any settings conflict with an existing routing strategy, a message informs you. In this case, you must modify the settings before you can restore the strategy.

                                                                                                                                                                                                              Audio on Hold

                                                                                                                                                                                                              When a call is queued on the network, an audio file continues to play until the call is distributed to a team with available capacity. If the call is queued for longer than the length of the audio content, the audio file loops back and restarts from the beginning.

                                                                                                                                                                                                              We recommend that the audio file include a brief delay message followed by music. The message should announce the name of the associated queue, instruct the caller to hold for the next available agent, and include a warning that calls may be monitored.

                                                                                                                                                                                                              You can record one audio file for each strategy, so the message can vary by time of day, day of week, holiday schedule, and other factors.

                                                                                                                                                                                                              Working with Global Routing Overrides

                                                                                                                                                                                                              A global routing override is a routing strategy that applies to one or more Telephony entry points. When a call arrives at an entry point, the routing engine checks whether a Global Routing Override exists for that entry point. If a Global Routing Override exists, it becomes the current routing strategy for the entry point, overriding any standard routing strategies associated with that entry point.

                                                                                                                                                                                                              Creating a global routing override enables you to change the routing strategies quickly and easily for many entry points simultaneously in urgent situations, rather than changing each routing strategy individually.

                                                                                                                                                                                                              Global routing overrides operate in the Tenant time zone.

                                                                                                                                                                                                              View global routing overrides

                                                                                                                                                                                                              Use this procedure to view a list of global routing overrides.

                                                                                                                                                                                                              Before you begin

                                                                                                                                                                                                              You require Administrator access privileges to perform this procedure.

                                                                                                                                                                                                              1

                                                                                                                                                                                                              From the Management Portal navigation bar, choose Routing Strategy.

                                                                                                                                                                                                              The Routing Strategy page opens.

                                                                                                                                                                                                              2

                                                                                                                                                                                                              From the menu bar, choose Routing > Global Routing Overrides.

                                                                                                                                                                                                              The Global Routing Overrides page opens to display the Global Routing Overrides List. This page displays all existing global routing overrides. You can use the Search function at the top-right of the List area to find your target. See Global routing override parameters for a description of the parameters that are visible on the page.

                                                                                                                                                                                                              3

                                                                                                                                                                                                              (Optional) To export the list of global routing overrides for data analysis, click the ellipsis button near the top-right side of the page and click Excel or CSV.

                                                                                                                                                                                                              4

                                                                                                                                                                                                              (Optional) To display the details of a routing overrides or to edit it, click the ellipsis button at the left of the listed overrides and then click Edit. See Edit a global routing override for further detail on editing a routing override.

                                                                                                                                                                                                              Create global routing overrides

                                                                                                                                                                                                              You can change the contact handling flow for multiple telephony entry points at the same time, such as for a holiday or emergency situation. Preconfigure one or more flows that you can apply quickly as an override when needed. When it becomes active, the global routing override only applies to new calls, while active calls follow the current entry point routing strategies.

                                                                                                                                                                                                              By default, you create global routing overrides in the Tenant time zone. All the data that are displayed on the Global Routing Overrides page or dashboard are based on the Tenant time zone.

                                                                                                                                                                                                              You can choose between two methods to create a global routing override:

                                                                                                                                                                                                              Create a global routing override

                                                                                                                                                                                                              Use this procedure to create a global routing override.

                                                                                                                                                                                                              Before you begin

                                                                                                                                                                                                              You require Administrator access privileges to perform this procedure.

                                                                                                                                                                                                              1

                                                                                                                                                                                                              From the Management Portal navigation bar, choose Routing Strategy.

                                                                                                                                                                                                              The Routing Strategy page opens.

                                                                                                                                                                                                              2

                                                                                                                                                                                                              From the menu bar, choose Routing > Global Routing Overrides.

                                                                                                                                                                                                              The Global Routing Overrides page opens to display the Global Routing Overrides List. This page shows all existing global routing overrides.

                                                                                                                                                                                                              3

                                                                                                                                                                                                              From the Global Routing Overrides page, click + New Override.

                                                                                                                                                                                                              The Create Global Routing Override page opens.

                                                                                                                                                                                                              4

                                                                                                                                                                                                              Configure the new global routing override as described in Global routing override parameters.

                                                                                                                                                                                                              5

                                                                                                                                                                                                              Click Save or Cancel.

                                                                                                                                                                                                              Create a global routing override from a copy

                                                                                                                                                                                                              Use this procedure to create a global routing override from a copy of an existing override.

                                                                                                                                                                                                              Before you begin

                                                                                                                                                                                                              You require Administrator access privileges to perform this procedure.

                                                                                                                                                                                                              1

                                                                                                                                                                                                              From the Management Portal navigation bar, choose Routing Strategy.

                                                                                                                                                                                                              The Routing Strategy page opens.

                                                                                                                                                                                                              2

                                                                                                                                                                                                              From the menu bar, choose Routing > Global Routing Overrides.

                                                                                                                                                                                                              The Global Routing Overrides page opens to display the Global Routing Overrides List. This page shows all existing global routing overrides.

                                                                                                                                                                                                              3

                                                                                                                                                                                                              Locate the global routing override you want to copy to create a new override. You can use the Search function at the top-right of the Global Routing Overrides List area to find your target.

                                                                                                                                                                                                              4

                                                                                                                                                                                                              Click the ellipsis button to the left of a listed override, and then click Copy.

                                                                                                                                                                                                              The Copy Global Routing Override page opens.

                                                                                                                                                                                                              5

                                                                                                                                                                                                              Change the settings as required, and in accordance with instructions provided in Global routing override parameters.

                                                                                                                                                                                                              6

                                                                                                                                                                                                              Click Save or Cancel.

                                                                                                                                                                                                              Edit a global routing override

                                                                                                                                                                                                              Use this procedure to edit an existing global routing override.

                                                                                                                                                                                                              Before you begin

                                                                                                                                                                                                              You require Administrator access privileges to perform this procedure.

                                                                                                                                                                                                              1

                                                                                                                                                                                                              From the Management Portal navigation bar, choose Routing Strategy.

                                                                                                                                                                                                              The Routing Strategy page opens.

                                                                                                                                                                                                              2

                                                                                                                                                                                                              From the menu bar, choose Routing > Global Routing Overrides.

                                                                                                                                                                                                              The Global Routing Overrides page opens to display the Global Routing Overrides List. This page shows all existing global routing overrides.

                                                                                                                                                                                                              3

                                                                                                                                                                                                              Locate the global routing override you want to edit. You can use the Search function at the top-right of the Global Routing Overrides List area to find your target.

                                                                                                                                                                                                              4

                                                                                                                                                                                                              Click the ellipsis button at the left of the entry point you want to modify, and then click Edit.

                                                                                                                                                                                                              The Overwrite Global Routing Override page opens.

                                                                                                                                                                                                              5

                                                                                                                                                                                                              Edit the routing override parameters in accordance with the information provided in Global routing override parameters.

                                                                                                                                                                                                              6

                                                                                                                                                                                                              Click Save or Cancel.

                                                                                                                                                                                                              Global routing override parameters

                                                                                                                                                                                                              The following sections describe the parameters you see on the various pages that constitute the global routing override user interface.
                                                                                                                                                                                                              Parameters for Global Routing Overrides page

                                                                                                                                                                                                              The following table lists and describes the parameters you see in the Global Routing Overrides List area on the Global Routing Overrides page.

                                                                                                                                                                                                              Column

                                                                                                                                                                                                              Description

                                                                                                                                                                                                              Name

                                                                                                                                                                                                              Displays the name you assign to the override. You can't change the override name after you create it.

                                                                                                                                                                                                              ID

                                                                                                                                                                                                              Displays the system-assigned number of the override.

                                                                                                                                                                                                              Status

                                                                                                                                                                                                              Indicates the status of the override.

                                                                                                                                                                                                              • Current (appears in Red) means this is a snapshot of the currently running override. You can't copy the current override, but you can modify any setting that doesn't affect execution time or date. Changes to the override don't affect the recurring scheduled version of the override.

                                                                                                                                                                                                                You can delete the current override, but don't delete it before you create a different override for the same time interval. If you delete an override without having another one in place, the last override used by the system becomes the default override although the start and end times and dates have expired. If this occurs, either create a new override for the current time period, or copy the default override and correct the time settings.

                                                                                                                                                                                                              • Active means that the override is in effect at the specified start time on the specified start date. This is the default status.

                                                                                                                                                                                                              • Not Active means the override isn't in effect regardless of the specified start time and date. This status lets you save an override for future use or as a draft to continue with later.

                                                                                                                                                                                                              Default

                                                                                                                                                                                                              Indicates whether the global routing override is the default routing strategy (Yes) or isn't the default routing strategy (No).

                                                                                                                                                                                                              Repetition

                                                                                                                                                                                                              Specifies whether the override repeats daily or only on specific days of the week.

                                                                                                                                                                                                              Start Date

                                                                                                                                                                                                              Displays the date on which the override starts.

                                                                                                                                                                                                              End Date

                                                                                                                                                                                                              Displays the date on which the override ends.

                                                                                                                                                                                                              Start Time

                                                                                                                                                                                                              Displays the time at which the override starts (in 24-hour format) for any given day in the specified date range.

                                                                                                                                                                                                              End Time

                                                                                                                                                                                                              Displays the time at which the override ends (in 24-hour format) for any given day in the specified date range.

                                                                                                                                                                                                              Time Zone

                                                                                                                                                                                                              Displays the Tenant time zone.

                                                                                                                                                                                                              Global routing overrides operate in the Tenant time zone.

                                                                                                                                                                                                              Flow

                                                                                                                                                                                                              Lists the associated call flows when a routing override is executing.

                                                                                                                                                                                                              Parameters for Create, Overwrite, Copy, and Restore Gobal Routing Override pages

                                                                                                                                                                                                              The following table lists and describes the parameters that you see on the:

                                                                                                                                                                                                              • Create Global Routing Override page

                                                                                                                                                                                                              • Overwrite Global Routing Override page

                                                                                                                                                                                                              • Copy Global Routing Override page

                                                                                                                                                                                                              • Restore Global Routing Override page

                                                                                                                                                                                                              Use this information to configure new or copied overrides and edit existing ones.

                                                                                                                                                                                                              Parameter

                                                                                                                                                                                                              Description

                                                                                                                                                                                                              General Settings

                                                                                                                                                                                                              Name

                                                                                                                                                                                                              Enter the name for the global routing override. You can't change the name after it's created.

                                                                                                                                                                                                              If you copy an override, you can change the name of the copy.

                                                                                                                                                                                                              Enterprise Name

                                                                                                                                                                                                              Displays the name of the Tenant.

                                                                                                                                                                                                              Channel Type

                                                                                                                                                                                                              Displays the only valid channel type: Telephony

                                                                                                                                                                                                              Entry Points or Queues

                                                                                                                                                                                                              This field appears only if you are creating or copying a global routing override.

                                                                                                                                                                                                              Choose the entry points or queues to which the global routing override applies.

                                                                                                                                                                                                              Routing Type

                                                                                                                                                                                                              This option is available only for queues. It is not available for proxy queues.

                                                                                                                                                                                                              • Longest Available Agent: The system routes calls to the agent who has been available for the longest time among all the agents on all the teams assigned to the strategy in the Call Distribution section.

                                                                                                                                                                                                              • Load Balance: The system routes calls to agents based on load-balancing conditions that you set in the Mode and Type fields and in the settings you specified in the Call Distribution section.

                                                                                                                                                                                                                • Mode: If you specified Load Balance in the Routing Type field, select one of the following values to specify how to handle the call load:

                                                                                                                                                                                                                  • Percentage: The system routes calls to selected teams based on a percentage allocation that you specify for each team in the Call Distribution section. The percentage spread total must equal 100 across all teams selected for Group 1. For more information, see Specifying Call Distribution Settings.

                                                                                                                                                                                                                  • Number: The system routes calls to selected teams based on the value you specify for each team in the Call Distribution section. This value reflects the call capacity for that team. After the system sends the specified number of calls to a particular team, it sends no additional calls to that team. In other words, this strategy allows you to specify an upper limit on the total number of calls the system sends to a particular team. This allows you to meet any contractual obligations not to exceed certain targets.

                                                                                                                                                                                                                • Type: If you specified Load Balance in the Routing Type field, select one of the following values in the Type field:

                                                                                                                                                                                                                  • Dynamic: Calls routed dynamically result in a single virtual queue. The system queues callers for the longest available agent across all associated teams instead of routing them immediately at the time of call arrival to a team specified in the load balance strategy (based on active call conditions).

                                                                                                                                                                                                                  • Static: The system routes calls to specific teams on the basis of a predefined percentage or numeric allocation at the time of call arrival. In static routing, the system assigns calls to a team based on the allowable number of calls specified for that team in the Call Distribution section (either a percentage or number of calls). In dynamic routing, the system assigns calls to a team based on the current allocation of calls among the teams based on the day's tally.

                                                                                                                                                                                                              Routing Type (cont'd)

                                                                                                                                                                                                              • Priority Based: The system routes calls to agent teams based on a priority scheme that you set in the Call Distribution section.

                                                                                                                                                                                                              • Skills Based: The system routes calls to agents based on skill requirements that are specified in the Call Distribution section of the routing strategy for the entry point that sends calls to this queue. The Skills Based routing type is available only if your enterprise has the optional Skills-Based Routing feature provisioned.

                                                                                                                                                                                                                When you select Skills Based as the routing type, two more settings appear for you to specify how to route a call when more than one agent has the required skill set:

                                                                                                                                                                                                                • Longest Available Agent: The system routes the call to the agent who has been available the longest.

                                                                                                                                                                                                                • Best Available Agent: When you select this setting, a Skill drop-down list appears. The system routes the call to the agent with the highest proficiency in the skill you select from the drop-down list.

                                                                                                                                                                                                              Status

                                                                                                                                                                                                              Click the Status toggle button to set the status of the global routing override to either Active or Not Active.

                                                                                                                                                                                                              When set to Active, the routing override activates and deactivates on the dates and at the times specified in the related Start and End Date and Start and End Time fields.

                                                                                                                                                                                                              Time Settings

                                                                                                                                                                                                              Time zone

                                                                                                                                                                                                              Displays the Tenant time zone.

                                                                                                                                                                                                              Global routing overrides operate in the Tenant time zone.

                                                                                                                                                                                                              Start Date

                                                                                                                                                                                                              End Date

                                                                                                                                                                                                              Click in each of these fields and use the calendar controls to specify the start date (the date the global routing override becomes effective) and end date (the date the global routing override expires).

                                                                                                                                                                                                              Start Time

                                                                                                                                                                                                              End Time

                                                                                                                                                                                                              Enter in 24-hour format (0000–2400) the time of day you want the global routing override to start and end.

                                                                                                                                                                                                              Day of Week

                                                                                                                                                                                                              From the drop-down list:

                                                                                                                                                                                                              • Choose All Days if you want to schedule the global routing override to run every day.

                                                                                                                                                                                                              • Choose Weekdays if you want to schedule the global routing override to run from Monday through Friday only.

                                                                                                                                                                                                              • Choose Specific Days, and click the icons representing weekdays if you want to schedule the global routing override to run on specific days of the week.

                                                                                                                                                                                                              Advanced Settings

                                                                                                                                                                                                              Music on Hold

                                                                                                                                                                                                              From the drop-down list, choose the name of the audio (.wav) file to play for calls when an agent puts a call on hold. Music in Queue (MIQ) is handled from Flow. When a contact is queued and if no agent is available, the customer is engaged with MIQ.

                                                                                                                                                                                                              Maximum Time in Queue

                                                                                                                                                                                                              If this is a standard Webex Contact Center queue routing strategy, enter the length of time to wait, in seconds, before the system routes a queued call to the overflow destination number provisioned for the queue. Cisco recommends setting this to 1800 (30 minutes) or to three times the average queue length during busy hours.

                                                                                                                                                                                                              If this is an email routing strategy, set this parameter to a value high enough to avoid overflow.

                                                                                                                                                                                                              By default, this field adopts the value provisioned for the queue.

                                                                                                                                                                                                              The cumulative total queue time configured for all groups in the Call Distribution section of the routing strategy mustn’t exceed the value specified here. See Specifying Call Distribution Settings for more information.

                                                                                                                                                                                                              Retries within the Team

                                                                                                                                                                                                              If this is a standard Webex Contact Center queue routing strategy, specify the maximum number of attempts the system makes to send a call to a team before it routes the call to the next available team. The system makes no further attempts to send the call to that team again.

                                                                                                                                                                                                              Exceptions:

                                                                                                                                                                                                              • This setting doesn’t apply to Skills-Based routing strategies. For Skills Based routing, if the call is in the last group, the call overflows if the system finds no matching agent. If the call is in any other group, and if it’s sent to an agent who doesn’t answer, the system continues to try matching other available agents any number of times, without regard to this setting.

                                                                                                                                                                                                              • In a load balance strategy using percentage allocation, the system does not route a call to a second team when the first team is unavailable. Instead, the system retries the first team's DN for the number of times that are specified for the strategy, and then overflows the call.

                                                                                                                                                                                                              Flag as Default Routing Strategy

                                                                                                                                                                                                              This setting is available only if you create a new override or copy an existing one.

                                                                                                                                                                                                              Set to Yes if you want this global routing override to be the default global routing override for the specified time interval for this entry point or queue.

                                                                                                                                                                                                              Set to No to create an exception to the default schedule, such as a holiday. This override overrides the default override. That is, the system first checks for a override that isn’t flagged as default, and if none exists, the system uses the default override.

                                                                                                                                                                                                              You can configure different routing strategies for a given time interval. However, Webex Contact Center prioritizes only one routing strategy. Webex Contact Center uses the following order of prioritization to decide the current routing strategy at any given time:

                                                                                                                                                                                                              1. Global Routing Overrides

                                                                                                                                                                                                              2. Default Global Routing Overrides

                                                                                                                                                                                                              3. Routing Strategy

                                                                                                                                                                                                              4. Default Routing Strategy

                                                                                                                                                                                                              Call Control

                                                                                                                                                                                                              Control Script

                                                                                                                                                                                                              Select a call control script from the drop-down list. Every strategy must have a control script associated with it, which defines how calls are handled. If appropriate, change the script's default parameters in the fields displayed. For more information, see Assigning Call Control Scripts and Parameters.

                                                                                                                                                                                                              When you create an Inbound Queue, if a Control Script is selected, then the Music in Queue setting gets reset.

                                                                                                                                                                                                              If you’re editing an existing strategy, selecting a different call control script can significantly change how calls are handled. It’s important that you’re clear on what you want to do before changing scripts or script parameters.

                                                                                                                                                                                                              If this is an entry point strategy for Skills-Based routing, assign skills requirements as described in Assigning Skill Requirements to Incoming Calls.

                                                                                                                                                                                                              Flow

                                                                                                                                                                                                              Choose a flow to override the contact handling behavior for the selected entry points during the configured time period.

                                                                                                                                                                                                              Call Distribution

                                                                                                                                                                                                              This parameter applies to queues only. It does not apply to proxy queues.

                                                                                                                                                                                                              If this is a standard queue routing strategy, specify which teams you want to associate with this strategy and organize them into groups. See “Specifying Call Distribution Settings” on page 166 for details. In addition, do the following (as described in “Assigning Teams and Skill-Relaxation Settings to Groups” beginning on page 168):

                                                                                                                                                                                                              • If the routing type is Load Balance, assign percentage spreads or capacities to each team in Group 1. You can add additional groups, but you cannot assign percentage spreads or capacities to the teams in those additional groups.

                                                                                                                                                                                                              • If the routing type is Priority, assign priorities. Note that a specific priority can be assigned to only one team within the strategy (for example, only one team can have a priority of 1 assigned to it).

                                                                                                                                                                                                              • If the routing type is Skills Based, specify skill relaxation settings if appropriate.

                                                                                                                                                                                                              If this is a routing strategy for an outdial queue, you must specify a team in the Call Distribution section. The specified team is only a placeholder and is not used. In addition, be sure to create only one group for an outdial queue routing strategy.

                                                                                                                                                                                                              Delete a global routing override

                                                                                                                                                                                                              Use this procedure to delete a global routing strategy.

                                                                                                                                                                                                              Before you begin

                                                                                                                                                                                                              You require Administrator access privileges to complete this procedure.
                                                                                                                                                                                                              1

                                                                                                                                                                                                              From the Management Portal navigation bar, choose Routing Strategy.

                                                                                                                                                                                                              The Routing Strategy page opens.

                                                                                                                                                                                                              2

                                                                                                                                                                                                              From the menu bar, choose Routing > Global Routing Overrides.

                                                                                                                                                                                                              The Global Routing Overrides page opens to display the Global Routing Overrides List. This page shows all existing global routing overrides. See Global routing override parameters for a description of the elements that are visible on the page.

                                                                                                                                                                                                              3

                                                                                                                                                                                                              Locate the global routing override you want to edit. You can use the Search function at the top-right of the Global Routing Overrides List area to find your target.

                                                                                                                                                                                                              4

                                                                                                                                                                                                              Click the ellipsis button to the left of the routing override you want to delete, then click Delete. In the confirmation dialog box that opens, click OK.

                                                                                                                                                                                                              The routing override moves to the Deleted Global Routing Overrides page where it awaits restoration or permanent deletion. For more information, see Restore or Permanently Delete a Routing Strategy.

                                                                                                                                                                                                              Restore or permanently delete a global routing override

                                                                                                                                                                                                              Use this procedure to restore or permanently delete a global routing override.

                                                                                                                                                                                                              Before you begin

                                                                                                                                                                                                              You require Administrator access privileges to perform this procedure.
                                                                                                                                                                                                              1

                                                                                                                                                                                                              From the Management Portal navigation bar, choose Routing Strategy.

                                                                                                                                                                                                              The Routing Strategy page opens.

                                                                                                                                                                                                              2

                                                                                                                                                                                                              From the menu bar, choose Routing > Global Routing Override.

                                                                                                                                                                                                              The Global Routing Overrides page opens to display the Global Routing Overrides List. This page shows all existing global routing overrides. See Global routing override parameters for a description of the parameters that are visible on the page.

                                                                                                                                                                                                              3

                                                                                                                                                                                                              Click the Deleted Global Routing Overrides button at the top-right side of the page.

                                                                                                                                                                                                              The Deleted Global Routing Overrides page opens displaying a list of deleted routing overrides, if any exist.

                                                                                                                                                                                                              4

                                                                                                                                                                                                              In the Deleted Global Routing Overrides List view, locate the routing override you want to either restore or permanently delete. You can use the Search function at the far-right of the page to locate your target.

                                                                                                                                                                                                              5

                                                                                                                                                                                                              Click the ellipsis button to the left of the routing override you want to either restore or permanently delete and do one of the following:

                                                                                                                                                                                                              1. (Optional) To permanently delete the override, click the Delete icon. Click Yes in the confirmation dialog box to commit.

                                                                                                                                                                                                                The Deleted Global Routing Overrides page immediately refreshes, excluding the deleted routing override.

                                                                                                                                                                                                              2. (Optional) To restore the override, click the Restore icon. Click Yes in the confirmation dialog box to commit.

                                                                                                                                                                                                                The Restore Global Routing Override page appears, displaying the settings for the routing override.

                                                                                                                                                                                                                You can change some of the settings in accordance with the information that is provided in Global routing override parameters.

                                                                                                                                                                                                                Click Restore to save changes and confirm reactivation of the override.

                                                                                                                                                                                                                If any settings conflict with an existing routing override, a message informs you. In this case, you must modify the settings before the override restores.

                                                                                                                                                                                                                The Deleted Global Routing Overrides page immediately refreshes, excluding the restored routing override.

                                                                                                                                                                                                              Working with Flow Designer

                                                                                                                                                                                                              Flow Designer

                                                                                                                                                                                                              For information about Flow Designer and the configuration details, visit the Flow Designer Guide in the Webex Help Center.

                                                                                                                                                                                                              Transfer Outdial Calls to Queue

                                                                                                                                                                                                              Map the Outdial Transfer to Queue Entry Point to a DN

                                                                                                                                                                                                              To map the Outdial Transfer to Queue entry point to a DN:

                                                                                                                                                                                                              1

                                                                                                                                                                                                              Choose the Outdial Transfer to Queue entry point from the Entry Point drop-down list when you Map an Entry Point.

                                                                                                                                                                                                              2

                                                                                                                                                                                                              Save the mapping.

                                                                                                                                                                                                              The agent can now use this mapping on the Agent Desktop to transfer an outbound call.

                                                                                                                                                                                                              Transfer an Outdial Call to a Queue on the Agent Desktop

                                                                                                                                                                                                              To transfer an outdial call to a queue:

                                                                                                                                                                                                              1

                                                                                                                                                                                                              From the Agent Desktop, make an outbound call. For more information, see Make outbound call in Desktop.

                                                                                                                                                                                                              2

                                                                                                                                                                                                              After the conversation, transfer the call to the configured queue. For more information, see Transfer a call to a different queue.

                                                                                                                                                                                                              View Agent Outdial Statistics Report

                                                                                                                                                                                                              To view the Agent Outdial Statistics report:

                                                                                                                                                                                                              1

                                                                                                                                                                                                              From the Analyzer portal, click Visualization.

                                                                                                                                                                                                              2

                                                                                                                                                                                                              Navigate to Stock Reports > Historical Reports > Agent Reports. For more information, see the section on agnt outdial statistics in the Cisco Webex Contact Center Customer Journey Analyzer User Guide.

                                                                                                                                                                                                              Agent Transfer a Call to an Entry Point

                                                                                                                                                                                                              When the call is transferred to another flow, Global (previously known as CAD) variables with the same name and data type are copied from the first flow to the new flow that is active in the associated entry point.

                                                                                                                                                                                                              For example, if a customer is connected to an agent who handles debit card transactions, but intends to transact on credit cards, the agent servicing the customer can transfer the call to the credit card flow.

                                                                                                                                                                                                              Task Flow to Transfer a Call to an Entry Point

                                                                                                                                                                                                              After an agent accepts a voice call request (inbound and outbound) from a customer, the agent can transfer the active call to another entry point.

                                                                                                                                                                                                              1. The agent clicks Transfer in the Agent Desktop and chooses the entry point from the Queue drop-down list.

                                                                                                                                                                                                                For more information about how to transfer a call, see Transfer a Call.

                                                                                                                                                                                                                After the call is transferred to an entry point, the call can't be routed back to the same agent who transferred the call.

                                                                                                                                                                                                              2. During the transfer, the global variable values with the same name and data type are copied to the new flow associated with the entry point selected above.

                                                                                                                                                                                                                Any global variables in the first flow that don't match the name and data type of global variables in the new flow aren't carried over.

                                                                                                                                                                                                                Example

                                                                                                                                                                                                                When the agent transfers the call from flow1 to flow2 associated with an entry point:

                                                                                                                                                                                                                  • If both flow1 and flow2 have a global variable customerID of type Integer and flow2 is active, the value of the global variable customerID gets copied from flow1 to flow2.

                                                                                                                                                                                                                  • If flow1 and flow2 have variable var1 with data type Integer in flow1 and String in flow2, then var1 isn't carried over from flow1 to flow2.

                                                                                                                                                                                                                  • If both flow1 and flow2 have a global variable var1 of type Integer, and activities such as Set Variable or HTTP Request update the value of var1 in flow2, then var1 in flow2 has the new value.

                                                                                                                                                                                                                  For more information about global variables, see Global Variables.

                                                                                                                                                                                                              Play a Stereo Recording

                                                                                                                                                                                                              The Stereo Recording feature replaces the combined mono output file with a stereo output file. The stereo file provides the audio streams of the agent and the other participant (the caller or the called party) as two separate audio channels within a single recording. This enables better voice analytics than in a mono file, where the audio is mixed into a single stream.

                                                                                                                                                                                                              Play a Stereo Recorded File

                                                                                                                                                                                                              To play a stereo recorded file, the Webex Contact Center Recording Management module enables authorized users to search for and play stereo recorded audio files. For more information, see Search for and Play Recordings.

                                                                                                                                                                                                              Opt Out When in Queue

                                                                                                                                                                                                              Queue is where the contact waits before the system assigns to an agent or a dial number. The queue is created in the Provisioning module of the Management Portal.

                                                                                                                                                                                                              The customer is presented with the opt-out of the queue menu with information about the estimated wait time and the position in the queue. The customer can choose to opt out and exit the queue.

                                                                                                                                                                                                              Task Flow to Set Up the Opt-Out Functionality

                                                                                                                                                                                                              View Opt-out-of-Queue Report

                                                                                                                                                                                                              Task Flow to Set Up the Opt-Out Functionality

                                                                                                                                                                                                              To set up the opt-out functionality:

                                                                                                                                                                                                              1

                                                                                                                                                                                                              Create new opt-out-of-queue flow from the Cisco Webex Contact Center Management Portal (Routing Strategy > Flows > New).

                                                                                                                                                                                                              2

                                                                                                                                                                                                              Configure the Play Music activity in the Flow Designer. Specify the audio file, music duration, and the start offset.

                                                                                                                                                                                                              3

                                                                                                                                                                                                              Configure the Queue Contact activity to place the contact in a queue or the Queue to Agent activity to route the contact directly to a preferred agent.

                                                                                                                                                                                                              4

                                                                                                                                                                                                              Configure the Get Queue Info activity to know the current position in the queue and the estimated wait time.

                                                                                                                                                                                                              5

                                                                                                                                                                                                              Configure the Menu activity for the wait-in-queue prompt or the opt-out-of-queue prompt with the Text-to-Speech functionality enabled.

                                                                                                                                                                                                              6

                                                                                                                                                                                                              Configure the Callback flow if the contact selects to opt out of the queue and registers for a callback in the opt-out-of-queue prompt selection.

                                                                                                                                                                                                              7

                                                                                                                                                                                                              Click Publish Flow.

                                                                                                                                                                                                              For more information, see Publish a Flow.

                                                                                                                                                                                                              View Opt-out-of-Queue Report

                                                                                                                                                                                                              The Opt-out-of-Queue report captures the average wait time in a queue after the customer chooses to opt out of the queue. For more information about how to view the Opt-out-of-Queue report, see the Webex Contact Center Analyzer User Guide.

                                                                                                                                                                                                              Blended Multimedia Profiles

                                                                                                                                                                                                              Overview

                                                                                                                                                                                                              If you are using Multimedia Profiles from Webex Contact Center Control Hub, see Manage multimedia profiles article for the latest updates. However, if you are accessing multimedia profiles through Management portal, you can proceed with this section of Setup and Admin Guide.

                                                                                                                                                                                                              Blended Multimedia Profiles offer Webex Contact Center administrators the ability to configure the media channel types (voice, chat, email, and social) and the number of contacts of each media channel that an agent can handle simultaneously.

                                                                                                                                                                                                              Administrators can configure multimedia profiles of the following types:

                                                                                                                                                                                                              • Blended

                                                                                                                                                                                                              • Blended Real-time

                                                                                                                                                                                                              • Exclusive

                                                                                                                                                                                                              The administrator can then associate the multimedia profile to agents at the site, team, or agent level.

                                                                                                                                                                                                              Advantages of Blended Multimedia Profiles

                                                                                                                                                                                                              Blended Multimedia Profiles enable organizations to provide dedicated attention to customers, promoting better quality of service, improved customer experience, and better conversion rates. Also, organizations can balance the load across media channels when experiencing uneven load in some channels, enabling efficient utilization of agents.

                                                                                                                                                                                                              Setting Up Blended Multimedia Profiles

                                                                                                                                                                                                              To set up Blended Multimedia Profiles:

                                                                                                                                                                                                              1. The administrator configures the Blended Multimedia Profile using the Multimedia settings in the Provisioning module of the Management Portal.

                                                                                                                                                                                                              2. The administrator associates the Blended Multimedia Profile to an agent, team, or site.

                                                                                                                                                                                                              In the Agent Desktop, agents are assigned contacts based on the multimedia profile associated with them at any point in time.

                                                                                                                                                                                                              Administrators and supervisors can view multimedia profile settings of agents and the number of contacts of each media channel type that the agents handled, via the Agent Details report. This report is available in the Webex Contact Center Analyzer.

                                                                                                                                                                                                              Configure a Multimedia Profile

                                                                                                                                                                                                              As an administrator, do the following to configure a multimedia profile:

                                                                                                                                                                                                              1. From the Management Portal navigation bar, choose Provisioning > Multimedia Profiles.

                                                                                                                                                                                                              2. On the Multimedia Profiles page, click + to create a new multimedia profile or click the ellipsis button to edit an existing multimedia profile.

                                                                                                                                                                                                              3. In the Media Details section, select the blended multimedia profile as required. The available multimedia profile types are:

                                                                                                                                                                                                                • Blended: Allows you to specify the media channels and the number of contacts per media channel that an agent can handle simultaneously (for example, 1 voice, 3 chats and 5 emails).

                                                                                                                                                                                                                • Blended Real-time: Contacts of only one real-time media channel (either voice or chat) will be assigned to an agent at a point in time, along with contacts of other media channel types (email and social).

                                                                                                                                                                                                                  For Blended and Blended Real-time multimedia profiles, the maximum number of contacts that can be assigned to an agent is 1 for voice, and 5 for chat, email and social.

                                                                                                                                                                                                                • Exclusive: Select this profile type to assign only one contact to the agent across all media channels, at a point in time.

                                                                                                                                                                                                              For more information, see Create a Multimedia Profile.

                                                                                                                                                                                                              Associate a Multimedia Profile to an Agent, Team, or Site

                                                                                                                                                                                                              After you configure the multimedia profile, associate the profile to a site, team, or agent via the Provisioning module in the Management Portal. For more information, see Sites, Teams, and Users.

                                                                                                                                                                                                              A multimedia profile associated with an agent takes precedence over the multimedia profile of the agent's team. A multimedia profile of the team takes precedence over the multimedia profile associated with the site.

                                                                                                                                                                                                              Assign Contacts to Agents

                                                                                                                                                                                                              In the Agent Desktop, contacts are assigned to an agent based on the multimedia profile associated with the agent.

                                                                                                                                                                                                              View Agent Details

                                                                                                                                                                                                              As an administrator or supervisor, you can view the multimedia profile settings of agents and the number of contacts of each channel type handled by the agents, via the Agent Details report in the Webex Contact Center Analyzer.

                                                                                                                                                                                                              For more information, see Agent Details Report in the Visualization chapter in the Cisco Webex Contact Center Analyzer User Guide.

                                                                                                                                                                                                              Courtesy Callback

                                                                                                                                                                                                              About Courtesy Callback

                                                                                                                                                                                                              A customer calling the contact center can be offered an option to receive a callback rather than waiting in the queue to connect to an agent. The customer can be offered the callback option during peak hours when the wait time is longer, or during non-working hours of the contact center.

                                                                                                                                                                                                              Advantages of Courtesy Callback

                                                                                                                                                                                                              Courtesy callback enables the contact center to offer better quality of service, and increase customer retention. The customer experience is enhanced, because the contact receives a proactive call from an agent rather than having to wait to connect to the agent.

                                                                                                                                                                                                              Setting Up Courtesy Callback

                                                                                                                                                                                                              To set up courtesy callback, the flow developer needs to configure the callback flow using the Flow Designer.

                                                                                                                                                                                                              • Prior to configuring the courtesy callback flow, the contact center administrator must configure the inbound entry point and queue for courtesy callback.

                                                                                                                                                                                                              • Courtesy callback isn't supported with capacity-based teams (CBT). CBTs have no individual agents assigned to them, and courtesy callback requires an Agent ID to function. Therefore, if the courtesy callback flows to an entry point or a queue served by a CBT, the call fails.

                                                                                                                                                                                                              • Courtesy callback should be configured after a queuing activity. This should not be used as a first-class queuing activity in a flow.

                                                                                                                                                                                                              When a customer dials in to the contact center and waits in queue for an agent, the customer can be provided with the option to opt out of the queue and receive a callback instead. The customer's position in the queue is retained for receiving the callback. The contact will remain in a queue based on the duration set in MAX_TIME_IN_QUEUE configuration. When an agent is available, the agent is offered the callback request in the Agent Desktop, based on the customer’s position in the queue. After the agent accepts the callback request, the call is dialed out to the customer. When the interaction ends, the agent chooses a wrap-up code to wrap up the call.

                                                                                                                                                                                                              A Courtesy Callback report is available in Webex Contact Center Analyzer, for the supervisor and administrator to view callback statistics. In addition, agents can gain insights on their callback statistics via the Team Stats- Historic Agent Performance Statistics (APS) report.

                                                                                                                                                                                                              Configure the Callback Flow

                                                                                                                                                                                                              Ensure that the administrator has set up the inbound entry point and queue for courtesy callback. For more information about how to set up entry points and queues, see Entry Points and Queues.

                                                                                                                                                                                                              As a flow developer, set up the courtesy callback flow using the Flow Designer. The following figure illustrates a sample courtesy callback flow:

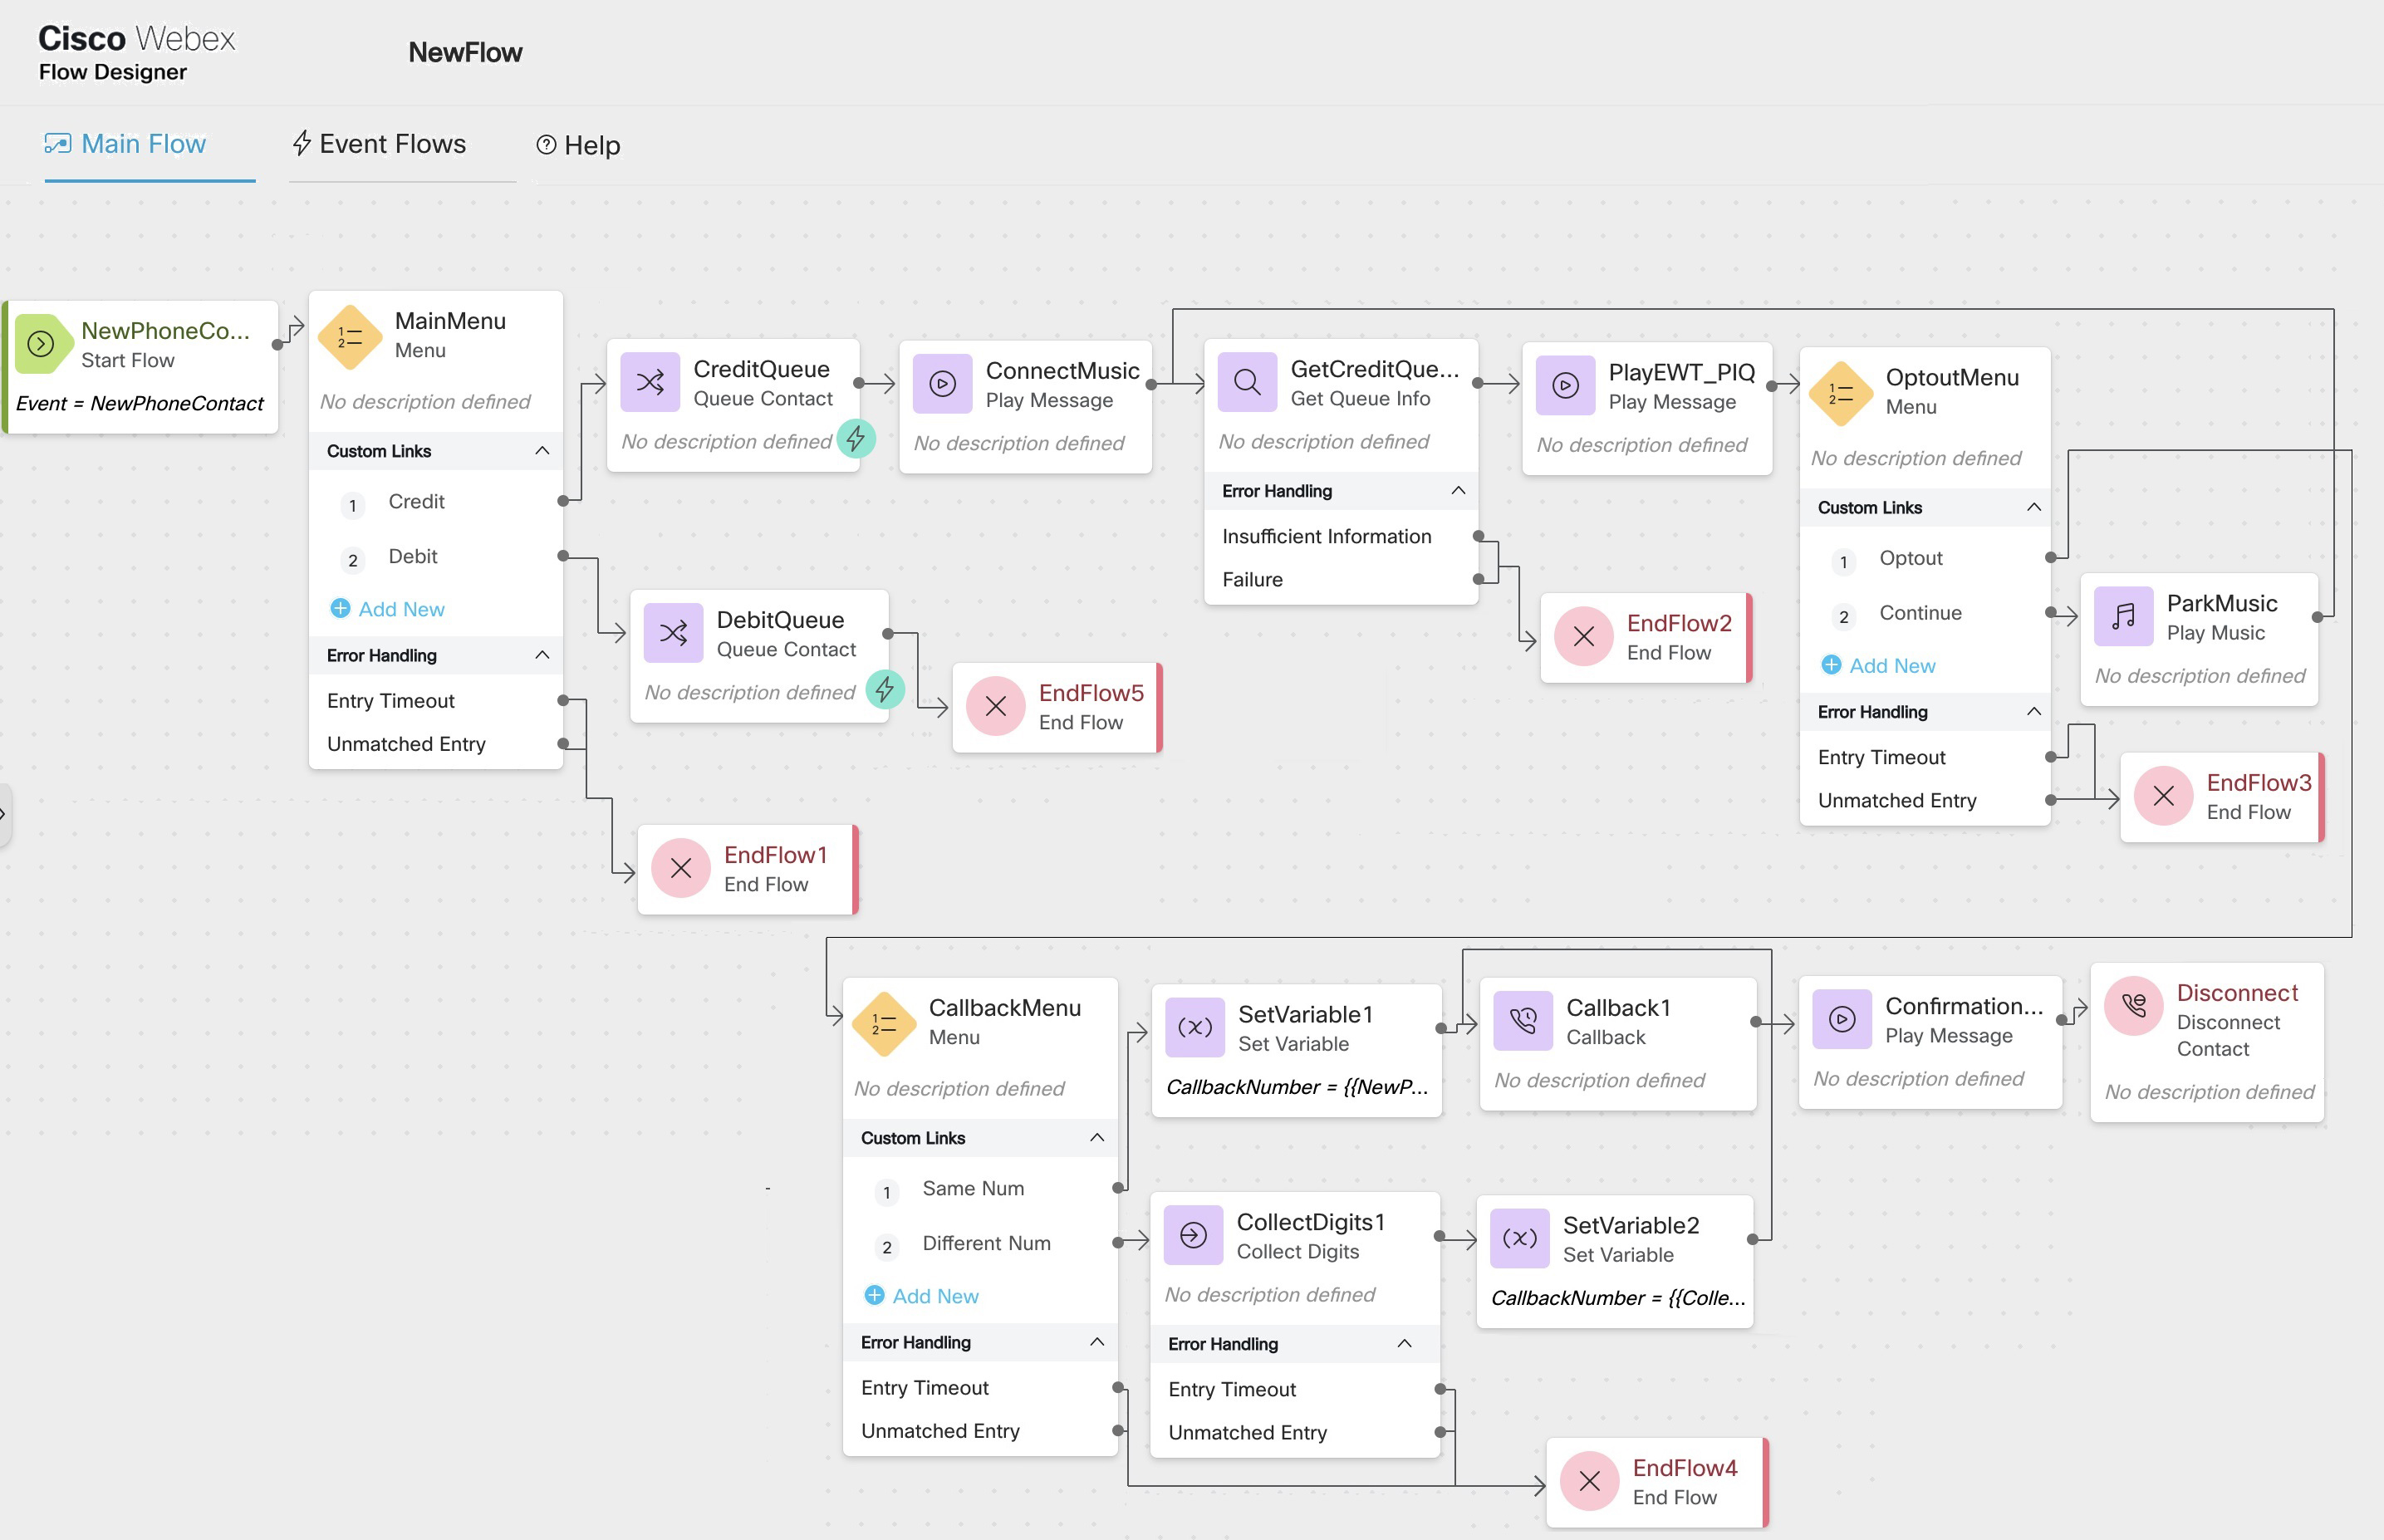
                                                                                                                                                                                                              For more information on how to configure a flow using the Flow Designer, see Flow Designer Overview.

                                                                                                                                                                                                              The following steps summarize the sample courtesy callback flow:

                                                                                                                                                                                                              1. The customer dials into the IVR.

                                                                                                                                                                                                              2. The customer contact is routed to an appropriate queue in accordance with the Menu and Queue Contact configuration. The sample flow and the sequence of steps depicted here are based on this scenario.

                                                                                                                                                                                                                Alternatively, you can enable the customer to opt out of the call and receive a callback before the call is routed to a queue; for example, during non-working hours of the contact center. The contact can then be routed to an appropriate queue by configuring the Callback activity.

                                                                                                                                                                                                                When the customer waits in a queue (call is parked) for an agent, you can engage the customer with the following activities:

                                                                                                                                                                                                                • Play Music: Plays a static .wav file as the customer waits in queue.

                                                                                                                                                                                                                • Play Message: Informs the customer of the position in queue (PIQ) and the estimated wait time (EWT) using this activity. Use the Get Queue Info activity to fetch the EWT/PIQ.

                                                                                                                                                                                                                You can configure the Play Music activity and the Play Message activity to play the audio files intermittently, until an agent is available or until the customer opts out of the queue.

                                                                                                                                                                                                              3. The customer can be offered an Opt Out of Queue menu option, based on the EWT/PIQ. You can configure any of the following options when the customer opts out of the queue:

                                                                                                                                                                                                                • Leave a voice mail: Configure a Blind Transfer activity to enable the customer to leave a voice mail when the customer opts out of the queue.

                                                                                                                                                                                                                • Receive a courtesy callback: The customer's position in queue is retained to receive a courtesy callback.

                                                                                                                                                                                                                  The following activities enable you to configure the callback:

                                                                                                                                                                                                                  • Menu: Configure a callback menu to enable the customer to choose a callback number.

                                                                                                                                                                                                                    The customer can provide the callback number, or the customer's ANI (Automatic Number Identification) number is used as the default callback number.

                                                                                                                                                                                                                    You can use the Collect Digits and Set Variable activities to set the callback number, as illustrated in the callback flow.

                                                                                                                                                                                                                  • Callback: Configure the Callback activity to make the courtesy callback. You can configure the Callback activity to use the same queue as the inbound call, or a different queue to make the callback.

                                                                                                                                                                                                                    Do not configure callback to use a queue served by a capacity-based team (CBT) as it results in call failure. Callback processing requires an Agent ID, and CBTs have no individual agents assigned to them.

                                                                                                                                                                                                                    If you select the same queue to make the callback, the customer is called back when the agent is available in the queue, based on the customer's position in queue.

                                                                                                                                                                                                                    If you select a different queue to make the callback, the callback request is placed at the end of the new queue.

                                                                                                                                                                                                                    You can select a static queue or a variable queue when you configure the Callback activity. For more information on setting the Callback activity parameters, see Callback.

                                                                                                                                                                                                                You can configure a confirmation message that the callback is registered and then disconnect the contact, by using the Play Message and the Disconnect Contact activities.

                                                                                                                                                                                                              • When you design a flow, a Consult interaction can't include a Courtesy Callback activity.

                                                                                                                                                                                                              • You can use a Play Message activity after a Callback activity in a flow. If an agent is found during Callback registration or a Play Message period, the customer is immediately connected to the agent.

                                                                                                                                                                                                              Make a Courtesy Callback

                                                                                                                                                                                                              After the customer opts out of the queue, a callback request to the customer is initiated when an agent is available in the queue, based on the contact's position in the queue. The agent is offered the callback request in the Agent Desktop.

                                                                                                                                                                                                              • If the agent does not accept the request, the request is routed to another available agent, or continues to wait in the queue until an agent is available.

                                                                                                                                                                                                              • Only a single attempt is made for the courtesy callback. If the call is not successfully connected to the customer, or is rejected by the customer, it isn't retried.

                                                                                                                                                                                                              After the agent accepts the call, the call is dialed out to the customer. The customer receives the call from an ANI associated with the contact center. For more information on ANI, see Outdial Automatic Number Identification (ANI).

                                                                                                                                                                                                              If the customer does not respond to the call or rejects the call, the callback request is canceled. If the customer answers the call, the callback request is marked as processed.

                                                                                                                                                                                                              When the interaction ends, the agent chooses a wrap-up code to wrap up the call.

                                                                                                                                                                                                              For more information on how to process a callback request via the Agent Desktop, see Callback section in the Manage your calls in Agent Desktop article.

                                                                                                                                                                                                              View Courtesy Callback Reports

                                                                                                                                                                                                              The following reports are available for courtesy callback:

                                                                                                                                                                                                              • Courtesy Callback Report: Enables administrators and supervisors to view callback statistics. For more information, see Courtesy Callback Report in the Visualization chapter in the Cisco Webex Contact Center Analyzer User Guide.

                                                                                                                                                                                                              • Team Stats - Historic Report: Enables agents to gain insights on their performance with respect to callback contacts. The APS report is available in the Agent Desktop. For more information, see the Team Stats - Historiccal reports section of the Agent Performance Statistics Reports in the View and manage agent performance reports article.

                                                                                                                                                                                                              Self Service

                                                                                                                                                                                                              The Webex Contact Center offers Self Service functionality to handle the customer requests without involving human agents. Self Service uses the Interactive Voice Response (IVR) system in the call flow. This IVR includes basic activities such as Play Message, Collect Digits, and Menu. All of these activities can also play the audio dynamically through Text-to-Speech functionality.

                                                                                                                                                                                                              The maximum file size supported for audio files is 8 MB. The supported file format is .wav. For more information, see Working with Resource Files.

                                                                                                                                                                                                              You can extend interactions in Self Service to have Virtual Agents in the flow. The Virtual Agent can understand caller utterances to deliver a conversational Self Service experience.

                                                                                                                                                                                                              You can use the Flow Designer to script any possible use cases in the Self Service space. For more information, see Activities In Flow Designer.

                                                                                                                                                                                                              Enable a Virtual Agent

                                                                                                                                                                                                              A virtual agent handles conversations with your customers. The virtual agent understands the intent of the conversation and assists the customer as part of the IVR experience. The virtual agent is powered by Google's Dialogflow capabilities. The administrator has access to the Conversational IVR transcript.

                                                                                                                                                                                                              The virtual agent supports the following audio codecs:

                                                                                                                                                                                                              • G711A for A-law

                                                                                                                                                                                                              • G711U for µ-law

                                                                                                                                                                                                              1

                                                                                                                                                                                                              Create a Dialogflow agent to integrate the conversational experience into the IVR system. For more information, see Build a Dialogflow Agent.

                                                                                                                                                                                                              Include Hello as a training phrase in the preferred language for the Dialogflow agent to start a conversation with the caller. You can add this training phrase in the default welcome intent or in any other intent of the Dialogflow agent. For more information, see Intents.

                                                                                                                                                                                                              2

                                                                                                                                                                                                              Configure a virtual agent in the Control Hub. For more information, see Configure Virtual Agent.

                                                                                                                                                                                                              3

                                                                                                                                                                                                              Add a Virtual Agent activity to the call flow to handle customer queries in conversational format. For more information, see Create Virtual Agent Activity in Flow Designer.

                                                                                                                                                                                                              Build a Dialogflow Agent

                                                                                                                                                                                                              Configure Google Dialogflow:

                                                                                                                                                                                                              Build a Dialogflow agent that provides automated responses.

                                                                                                                                                                                                              1. Use the Google Cloud console.

                                                                                                                                                                                                              2. Download the JSON file that contains the Authentication Key. For more information, see About Service Account Keys.

                                                                                                                                                                                                              3. Ensure that you create the JSON file using the Dialogflow API Admin role.

                                                                                                                                                                                                              Configure Virtual Agent

                                                                                                                                                                                                              After you download the Authentication Key, upload the Authentication Key by choosing the JSON file to create the Virtual Agent in the Control Hub.

                                                                                                                                                                                                              The administrator must Configure a Virtual Agent in the Control Hub.

                                                                                                                                                                                                              After configuring a Virtual Agent on the Control Hub, the administrator can configure the Virtual Agent activity in the Flow Designer.

                                                                                                                                                                                                              Create VA activity in Flow Designer

                                                                                                                                                                                                              After configuring the Virtual Agent on Control Hub, configure the Virtual Agent activity in the Flow Designer.

                                                                                                                                                                                                              You can add a Virtual Agent to a call flow to handle customer queries in a conversational format. The Virtual Agent understands the intent of the conversation and assists the customer as part of the IVR experience. For more information, see Virtual Agent .

                                                                                                                                                                                                              Blind Transfer

                                                                                                                                                                                                              The Blind Transfer activity refers to a process wherein a contact is transferred to an external Dial Number (DN) and entry point through the IVR, without agent intervention.

                                                                                                                                                                                                              The Blind Transfer activity is applicable when a call should be transferred to an external Dial Number and entry point. The transfer can also be initiated to an external bridge. For more information, see Blind Transfer.

                                                                                                                                                                                                              Disconnect Contact

                                                                                                                                                                                                              This activity is used to disconnect the contact from the call. This refers to the end of a contact in IVR.

                                                                                                                                                                                                              For more information, see Disconnect Contact.

                                                                                                                                                                                                              IVR Transcript and global Variables in Agent Desktop

                                                                                                                                                                                                              The administrator can provide access to an agent to view the Conversational IVR transcript and to view or edit the global (previously known as CAD) variables based on the configurations set in the call flow.

                                                                                                                                                                                                              An agent can view the Conversational IVR transcript and the global variables extracted from the Conversational IVR transcript based on the permissions set in the call flow by the administrator. For more information on the Conversational IVR transcript in Agent Desktop, see IVR Transcript Widget.

                                                                                                                                                                                                              For more information on the global variables in Agent Desktop, see Enter call-associated data variables.

                                                                                                                                                                                                              IVR and CVA Dialog Flow Report in Analyzer

                                                                                                                                                                                                              The IVR and CVA Dialog Flow report enables the administrators and supervisors to view the Self-service operational metrics.

                                                                                                                                                                                                              For more information on the IVR and CVA Dialog Flow report in Analyzer, see the section IVR and CVA Dialog Flow Report in the Cisco Webex Contact Center Analyzer User Guide.

                                                                                                                                                                                                              Text-to-Speech

                                                                                                                                                                                                              The Text-to-Speech capability is powered by Google's Text-to-Speech APIs. To enable this functionality, you must set up a Google Cloud account and configure the Text-to-Speech service.

                                                                                                                                                                                                              With Text-to-Speech, you can convert arbitrary strings, words, sentences, and variables into an actual human speech that is played dynamically to the caller. This is in place of playing a prerecorded audio.

                                                                                                                                                                                                              To enable Text-to-Speech, follow this task flow:

                                                                                                                                                                                                              1

                                                                                                                                                                                                              Create a Service Account to download the private key. For more information, see Create a Service Account for Google Connector.

                                                                                                                                                                                                              2

                                                                                                                                                                                                              Configure the Google Connector in Control Hub to enable the Text-to-Speech capability in Flow Designer. For more information, see Configure a Google Connector.

                                                                                                                                                                                                              3

                                                                                                                                                                                                              To use Text-to-Speech in your prompt, enable the Text-to-Speech toggle. For more information, see Text-to-Speech Toggle.

                                                                                                                                                                                                              Create a Service Account for Google Connector

                                                                                                                                                                                                              Complete the following procedure to configure the Google Connector:

                                                                                                                                                                                                              Create a service account and download the JSON file that contains the Authentication Key.

                                                                                                                                                                                                              1. Create a Service account.

                                                                                                                                                                                                              2. Download the JSON file that contains the Authentication Key.

                                                                                                                                                                                                              Configure a Google Connector

                                                                                                                                                                                                              After you download the Authentication Key, upload the Authentication Key by choosing the JSON file to configure the Google Connector in the Control Hub.

                                                                                                                                                                                                              • The administrator must Configure a Connector (see the Google tab) in the Control Hub.

                                                                                                                                                                                                              • Add the ability to read dynamic messages. These messages can contain variables and can be used in a sequence with audio files.

                                                                                                                                                                                                              • If you are using variables, use this syntax: {{ variable }}. You can also use SSML to construct the message. If you are using SSML, insert it inside the <speak></speak> tags.

                                                                                                                                                                                                              • To learn more about Google tags, see: https://developers.google.com/assistant/conversational/df-asdk/ssml%22

                                                                                                                                                                                                              After creating the connector, the administrator can enable the Text-To-Speech functionality.

                                                                                                                                                                                                              Text-to-Speech Toggle

                                                                                                                                                                                                              The Text-to-Speech toggle allows you to create natural-sounding, synthetic human speech as part of activities in your flow that can play messages to the caller, including Menu, Play Message, and Collect Digits. With Text-to-Speech, you can convert arbitrary strings, words, sentences, and variables into an actual human speech. This is in place of playing a pre‐recorded audio.

                                                                                                                                                                                                              Text-to-Speech takes two types of input: raw text (plain text) or Speech Synthesis Markup Language-formatted (SSML-formatted) data.

                                                                                                                                                                                                              After creating the Google connector, enable the Text-To-Speech toggle in IVR activities in the Flow Designer. For more information, see Menu, Play Message, Collect Digits.

                                                                                                                                                                                                              Cisco Webex Experience Management Post Call Survey

                                                                                                                                                                                                              Webex Experience Management is a Customer Experience Management (CEM) platform that enables you to see your business from your customers' perspective and see their experience with the brand. Webex Experience Management powers customer journey mapping, text analytics, and predictive modeling using the feedback collected from customers through different channels such as email, SMS, and Interactive Voice Response (IVR). For more information, see Cisco Webex Experience Management Overview.

                                                                                                                                                                                                              • Customer experience survey: Administrators can configure and send post-call surveys to customers, after an interaction, to collect feedback about their interaction.

                                                                                                                                                                                                              • Customer Experience Journey (CEJ) gadget: Displays all the past survey responses from a customer in a chronological list. The agent and supervisor use this gadget to gain context about the customer's past experiences with the business and engage with them appropriately. Administrators can configure and add the CEJ widget on the Webex Contact Center Agent Desktop.

                                                                                                                                                                                                              • Customer Experience Analytics (CEA) gadget: Displays the overall experience of the customer interaction with agents using industry-standard metrics such as NPS, CSAT, and CES or other KPIs tracked within Webex Experience Management. Administrators can configure and add the CEA widget on the Webex Contact Center Agent Desktop.

                                                                                                                                                                                                              Webex Experience Management Post Call Survey

                                                                                                                                                                                                              Webex Experience Management Post Call surveys collect feedback from customers to determine the performance of the contact center and the relevant services. With Webex Experience Management, you can do one of the following:

                                                                                                                                                                                                              • Configure post-call surveys and initiate them over IVR when agents end the calls in the Webex Contact Center Agent Desktop.
                                                                                                                                                                                                              • Send post-call surveys to the customer through email or SMS after the call ends.

                                                                                                                                                                                                              For a survey over IVR, after an agent ends the call, Webex Contact Center transfers the call to Webex Experience Management and the customer receives the inline survey. The customer can barge-in during the inline survey and use the keypad to answer the survey.

                                                                                                                                                                                                              For a survey through email or SMS, you can configure Webex Contact Center to send out an email or SMS that contains a message along with a link to launch the survey.

                                                                                                                                                                                                              You can collect, analyze, and present the data from various surveys as widgets on the Webex Contact Center Agent Desktop.

                                                                                                                                                                                                              Webex Experience Management Account Setup

                                                                                                                                                                                                              To create an Webex Experience Management account:

                                                                                                                                                                                                              1

                                                                                                                                                                                                              Submit the form Assurance to Quality(A2Q) process for Cisco Webex Experience Management. Provide a correct provisioning administrator email address in the A2Q form to ensure that provisioning notification and service access information is received.

                                                                                                                                                                                                              2

                                                                                                                                                                                                              As part of the account creation process, the following actions are performed:

                                                                                                                                                                                                              1. Creates an account for you and provisions the account.

                                                                                                                                                                                                              2. Creates default spaces and metric groups for your account. For more information about creating spaces, see Space Creation.

                                                                                                                                                                                                              3. Creates standard questionnaires for Webex Experience Management Post Call Surveys and publishes the same. For more information about creating questionnaires, see Questionnaires.

                                                                                                                                                                                                              3

                                                                                                                                                                                                              After the account is created and provisioned, the handover information is sent to the admin email address provided in the A2Q form. The handover emails contain credentials and other essential information about your account.

                                                                                                                                                                                                              Initially, Spaces and Widgets are created as part of the Webex Experience Management account provisioning. To know more about the different default Widgets within Experience Management, how to use the Metric Library to create additional Experience Management Widgets, and how to export and derive meaningful insights from them, see Webex Experience Management Widgets.

                                                                                                                                                                                                              4

                                                                                                                                                                                                              Add the Webex Experience Management widgets as an Agent Desktop widget into the Agent Desktop layout. For more information, see Cisco Webex Experience Management Widgets and Gadgets.

                                                                                                                                                                                                              Create a Webex Experience Management Connector

                                                                                                                                                                                                              After you receive the handover emails with credentials and other essential information about your Webex Experience Management account, use the credentials to create a Webex Experience Management connector in Control Hub.

                                                                                                                                                                                                              1

                                                                                                                                                                                                              Configure the Webex Experience Management Connector on Control Hub.

                                                                                                                                                                                                              2

                                                                                                                                                                                                              Create the feedback activity in the Webex Contact Center Management Portal.

                                                                                                                                                                                                              Create Feedback Activity in the Flow Designer

                                                                                                                                                                                                              After you create the Webex Experience Management connector, you configure the post-call surveys.

                                                                                                                                                                                                              Configure an IVR Post-call Survey

                                                                                                                                                                                                              The steps to enable IVR post-call survey in Webex Contact Center are as follows:

                                                                                                                                                                                                              1

                                                                                                                                                                                                              Create and configure the questionnaires in Webex Experience Management for sending IVR surveys to the customer.

                                                                                                                                                                                                              Webex Experience Management questionnaires are cached for 24 hours, and any modifications to them would reflect after that period. This applies to any PII-handling metadata as well, because the metadata is associated with each questionnaire.

                                                                                                                                                                                                              2

                                                                                                                                                                                                              Create a voice-based feedback activity in Flow Designer.

                                                                                                                                                                                                              For more information, see Feedback activity.

                                                                                                                                                                                                              Validate DTMF Input Response in IVR Post-call Survey

                                                                                                                                                                                                              Webex Contact Center validates Dual-Tone Multi-Frequency (DTMF) input responses from the customers during IVR post-call surveys.

                                                                                                                                                                                                              You can configure the maximum number of retry attempts in case of invalid or no DTMF input, as well as audio notification messages (for invalid input, timeout, and maximum retries exceeded) for questionnaires by using Webex Experience Management.

                                                                                                                                                                                                              For more information, see Retry And Timeout Settings In Post Call IVR Survey in Webex Experience Management documentation.

                                                                                                                                                                                                              If the customer enters an invalid DTMF input or does not enter any DTMF input to a survey question within the specified duration ( Timeout parameter in the Feedback activity), the contact center:

                                                                                                                                                                                                              1. Notifies the customer about the invalid entry or timeout by playing the audio message that is configured in the survey questionnaire in Webex Experience Management.

                                                                                                                                                                                                              2. Plays the same survey question to the customer based on the number of retry attempts that is configured in the survey questionnaire in Webex Experience Management.

                                                                                                                                                                                                              When the maximum number of retry attempts for invalid input and timeout exceeds, the contact center:

                                                                                                                                                                                                              1. Notifies the customer that the maximum retries have exceeded, by playing the audio message that is configured in the survey questionnaire in Webex Experience Management.

                                                                                                                                                                                                              2. Skips the remaining survey questions and plays the Thank You message (if a Thank You note is configured in Webex Experience Management) to end the survey.

                                                                                                                                                                                                              • By default, the maximum number of retry attempts for invalid input and timeout is 0. For the customer to attempt for a specific number of times (for example, 3 attempts), the maximum number of retry attempts for invalid input and timeout must be set to 2 in Webex Experience Management.

                                                                                                                                                                                                              • If the audio messages for invalid input, timeout and maximum retry exceeded are not configured in Webex Experience Management, the contact center plays the survey questions without any notification messages to the customer.

                                                                                                                                                                                                              Configure SMS or Email Post-Call Survey

                                                                                                                                                                                                              To configure the Webex Experience Management Invitation module for sending SMS/Email surveys to the customer:

                                                                                                                                                                                                              Before you begin

                                                                                                                                                                                                              The partner hosted module in the Webex Experience Management Invitations solution is mandatory for the SMS/Email surveys to work.

                                                                                                                                                                                                              For information about partner hosted module, see Cisco Webex Experience Management Invitations Module Architecture Document.

                                                                                                                                                                                                              1

                                                                                                                                                                                                              Provision the infrastructure required to deploy the partner hosted components of the Webex Experience Management Invitations module.

                                                                                                                                                                                                              2

                                                                                                                                                                                                              Deploy the partner-hosted components.

                                                                                                                                                                                                              For information about how to deploy the partner hosted components, see Deployment Guide for Invitations Module.

                                                                                                                                                                                                              3

                                                                                                                                                                                                              Create dispatch templates on Webex Experience Management.

                                                                                                                                                                                                              For more information, see Dispatch User Guide.

                                                                                                                                                                                                              4

                                                                                                                                                                                                              Create a SMS/Email Based feedback activity in Webex Contact Center Management Portal.

                                                                                                                                                                                                              For more information, see Feedback.

                                                                                                                                                                                                              View Agent Desktop Widgets

                                                                                                                                                                                                              After you configure the Agent Desktop widgets, you can view the Customer Experience Journey (CEJ) and Customer Experience Analytics (CEA) widgets. For more information on how to configure widgets, see Cisco Webex Experience Management Widgets.

                                                                                                                                                                                                              View the CEJ and CEA widgets in the Agent Desktop. For more information, see the Webex Experience Management widget section in the Get started with Agent Desktop article.

                                                                                                                                                                                                              Troubleshooting

                                                                                                                                                                                                              Troubleshooting Management Portal Problems

                                                                                                                                                                                                              Management Portal Problems

                                                                                                                                                                                                              If you experience a problem with the Management Portal, the following table may help you solve the problem.

                                                                                                                                                                                                              Problem

                                                                                                                                                                                                              Description/Workaround

                                                                                                                                                                                                              You cannot log in to the Management Portal.

                                                                                                                                                                                                              Check to make sure that you enetered the correct user name and password.

                                                                                                                                                                                                              You cannot access a module from the Management Portal, or you cannot see some entry points or queues.

                                                                                                                                                                                                              You do not have the correct privileges to access these modules, entry points, or queues. Contact your Webex Contact Center administrator.

                                                                                                                                                                                                              The Management Portal does not display data for agents or calls, or shows that no agents are logged in.

                                                                                                                                                                                                              Make sure that the privacy setting for Internet Explorer is set to Medium.

                                                                                                                                                                                                              Occasionally the message Please Refresh the Page appears in the Real-Time Reports module.

                                                                                                                                                                                                              Log out of the current Webex Contact Center session. Close any remaining Webex Contact Center windows and log in again.

                                                                                                                                                                                                              When you resize the Agent view of a real-time agent report, tooltips for idle and wrap-up codes are sometimes displayed in the graph area instead of near the cursor.

                                                                                                                                                                                                              Maximize the window to display the tooltip near the cursor.

                                                                                                                                                                                                              Too many abandoned calls are being reported.

                                                                                                                                                                                                              Escalate to Customer Support.

                                                                                                                                                                                                              While you view a chart in a report or on a monitoring page, you see the following message Communication Interruption on <date> at <time>.

                                                                                                                                                                                                              The system has been unable to refresh the data in the chart since the time indicated in the message, typically because of an intermittent network interruption or server issue. If the problem persists for several minutes, notify your system administrator.

                                                                                                                                                                                                              The real-time reports are not refreshing on the Management Portal.

                                                                                                                                                                                                              Escalate to Customer Support.

                                                                                                                                                                                                              The real-time report statistics are not displayed.

                                                                                                                                                                                                              Escalate to Customer Support.

                                                                                                                                                                                                              In a real-time agent report, the wrap-up count and number of entered wrap-up codes do not match.

                                                                                                                                                                                                              This discrepancy occurs when an agent logs out while still in the Wrap-up state without selecting a wrap-up code. Instruct agents to always go into the Idle state and then click the Log Out button to log out rather than closing the browser while logged in.

                                                                                                                                                                                                              Changes to the names of existing idle and wrap-up codes do not appear immediately in agent reports. Instead, agent reports display the previous code names before they were edited or N/A for a new code.

                                                                                                                                                                                                              Log out and then log in again to see the changes.

                                                                                                                                                                                                              When exported to CSV format, data in the Agent View of a current snapshot agent report displays incorrectly.

                                                                                                                                                                                                              The Time Value displays in two cells instead of one when exported to CSV format. This is because a comma separates the day from the date and time in the Login Time field.

                                                                                                                                                                                                              When you export historical report data to Microsoft Excel that includes date and time in the hh:mm:ss format, Excel displays only the hours and minutes, and not the seconds.

                                                                                                                                                                                                              By default, Excel displays the data in hh:mm format. However, you can double-click in the cell to see the data in hh:mm:ss format.

                                                                                                                                                                                                              For a new team, data in the agent interval report displays in half-hour intervals from the time an agent on the team logs in after system restart.

                                                                                                                                                                                                              This is transient for teams that log in for the first time. Normally, data displays in half-hour intervals from midnight.

                                                                                                                                                                                                              In the Historical Reports module, occasionally the parameters for a customized default report are not saved after you log out and log in again.

                                                                                                                                                                                                              After you save a custom report, wait 10-15 seconds before logging out.

                                                                                                                                                                                                              You cannot make a monitoring request.

                                                                                                                                                                                                              Ensure that you use the correct DN and prefix.

                                                                                                                                                                                                              Monitoring session left open for an hour or longer displays a blank page or unexpected behavior

                                                                                                                                                                                                              Close the module and re-open it.

                                                                                                                                                                                                              Supervisor phone rings even when the monitoring request is for a different queue.

                                                                                                                                                                                                              If a monitoring request is made for a team and if multiple queues use the same team for routing, any of the queue's calls for that team can be monitored.

                                                                                                                                                                                                              A call ends, but the monitoring screen indicates that the call is still in progress.

                                                                                                                                                                                                              Escalate to Customer Support

                                                                                                                                                                                                              Signed in agents cannot see changes made to Skill profile.

                                                                                                                                                                                                              The agent needs to sign in again to view the changes.

                                                                                                                                                                                                              Reporting Management Portal Issues to Customer Support

                                                                                                                                                                                                              When you escalate a Management Portal issue to Cisco Webex Contact Center Customer Support, make sure to provide the following information:

                                                                                                                                                                                                              • The login and user name of the person experiencing the problem.

                                                                                                                                                                                                              • The time that the issue was first observed.

                                                                                                                                                                                                              • If the problem occurred in the Monitoring module, the number that the supervisor was attempting to call and a call session ID, if available.

                                                                                                                                                                                                              Troubleshooting Desktop Problems

                                                                                                                                                                                                              Network Interruptions

                                                                                                                                                                                                              If a network interruption occurs that lasts for less than two minutes, the Desktop display a Reconnecting message and then successfully reconnect.

                                                                                                                                                                                                              If a network interruption lasts longer than two minutes, instruct agents to close the current Desktop window, and then sign in using the primary URL. If the sign in fails with the primary URL, instruct agents to use the backup application center sign in.

                                                                                                                                                                                                              Escalate all network interruptions; report the time that the problem occurred and the number of agents affected.

                                                                                                                                                                                                              If the network to the primary application center is down, Management Portal users cannot view any statistics.

                                                                                                                                                                                                              Desktop Application Problems

                                                                                                                                                                                                              If you experience a problem with the Desktop application, the following table may help you solve the problem.

                                                                                                                                                                                                              Problem

                                                                                                                                                                                                              Description/Workaround

                                                                                                                                                                                                              You are not able to sign in to the Desktop.

                                                                                                                                                                                                              1. Check to make sure that cookies are enabled in Internet Explorer.

                                                                                                                                                                                                              2. Ensure that you enter the correct user name and password in the sign-in screen.

                                                                                                                                                                                                              During sign in, the error message Invalid phone number appears after you click Go.

                                                                                                                                                                                                              Check the format of the DN that you entered and make sure that the number is valid.

                                                                                                                                                                                                              You accidentally closed the browser window while on a call.

                                                                                                                                                                                                              If you close the browser window while on a call, you cannot sign in again until you complete the call. If you close the browser window while the call is on hold, the system automatically takes the call off hold.

                                                                                                                                                                                                              When you refresh the Desktop window, you are signed out and the sign-in screen displays.

                                                                                                                                                                                                              Sign in again. Avoid refreshing the window while signed in.

                                                                                                                                                                                                              The status bar on the Desktop displays Not Responding and your phone does not ring.

                                                                                                                                                                                                              1. Check the volume setting on the phone and make sure that the ringer is set to high.

                                                                                                                                                                                                              2. Check the DN (dial number), including the dialing prefix, and make sure it is correct.

                                                                                                                                                                                                              3. After resolving the problem, click one of the buttons on the message to change your state to Available or Idle .

                                                                                                                                                                                                              After reconnecting to the system following a network interruption, you are suddenly signed out.

                                                                                                                                                                                                              Sign in to the Desktop again. If you are unable to sign in, escalate to Customer Support.

                                                                                                                                                                                                              Re-launching the Desktop while you are signed in may create problems

                                                                                                                                                                                                              Do not open more than one Desktop application at a time on the desktop.

                                                                                                                                                                                                              The Desktop becomes very slow.

                                                                                                                                                                                                              This can happen when you leave the Desktop open for long periods of time. Close both the Desktop and the browser after you sign out of the system. If this does not help, end the process from the Windows Task Manager.

                                                                                                                                                                                                              The Desktop occasionally signs out agents following a network interruption.

                                                                                                                                                                                                              Sign in to the Desktop again.

                                                                                                                                                                                                              The Desktop is not displayed.

                                                                                                                                                                                                              Minimize the Desktop, and then restore it from the taskbar.

                                                                                                                                                                                                              Launch pages and graphs do not display properly.

                                                                                                                                                                                                              Make sure that in Internet Explorer, the Show Pictures option is selected in the Advanced tab of the Internet Options dialog box.

                                                                                                                                                                                                              You are available but no calls are sent to you.

                                                                                                                                                                                                              Make sure you are in the Available state and are signed in to the correct team.

                                                                                                                                                                                                              You are talking to a customer, but the Desktop status bar displays Reserved.

                                                                                                                                                                                                              Report the incident to Customer Support.

                                                                                                                                                                                                              Your agent softphone is not ringing, but the Desktop status bar displays Not Responding.

                                                                                                                                                                                                              Make sure that you entered the correct DN.

                                                                                                                                                                                                              The Desktop status bar displays Re-connecting.

                                                                                                                                                                                                              Check to see if the computer network cable has been disconnected or loosened. If you do not see a message indicating that there has been a network problem, escalate to Customer Support.

                                                                                                                                                                                                              You answer a call, but the call disconnects after 30 seconds.

                                                                                                                                                                                                              If Not Responding displays in the Desktop status bar, change to the Available state and wait for the next call.

                                                                                                                                                                                                              The Internet Explorer browser freezes.

                                                                                                                                                                                                              Open Windows Task Manager and end all browser processes.

                                                                                                                                                                                                              Pop-up blockers appear.

                                                                                                                                                                                                              From the Internet Explorer Tools menu, disable pop-up blockers.

                                                                                                                                                                                                              The Desktop status bar displays a connected state while the phone is ringing.

                                                                                                                                                                                                              Report the incident to Customer Support.

                                                                                                                                                                                                              An outbound call fails.

                                                                                                                                                                                                              Make sure you entered the correct DN and prefix.

                                                                                                                                                                                                              During a blind transfer, call details do not display on the Desktop of the receiving agent while that agent is in the Reserved state.

                                                                                                                                                                                                              The Reserved state is transient. Call details display when the second agent answers the call.

                                                                                                                                                                                                              Audio Problems

                                                                                                                                                                                                              If you experience audio problems with the Desktop, the following table helps to resolve the problems.

                                                                                                                                                                                                              Problem

                                                                                                                                                                                                              Description/Workaround

                                                                                                                                                                                                              Echo or low volume

                                                                                                                                                                                                              Check the phone settings. If using a softphone, check the Microsoft Windows and softphone settings.

                                                                                                                                                                                                              Jitter/Stutter audio

                                                                                                                                                                                                              -OR-

                                                                                                                                                                                                              High latency

                                                                                                                                                                                                              Bad connectivity, probably due to a network problem. Check to make sure that your PC is not also running other software that uses audio. Escalate to Customer Support.

                                                                                                                                                                                                              Cross talk

                                                                                                                                                                                                              Escalate to Customer Support.

                                                                                                                                                                                                              One-way audio

                                                                                                                                                                                                              Make sure you are not on mute. If not, escalate to Customer Support.

                                                                                                                                                                                                              Background noise

                                                                                                                                                                                                              The background noise removal feature is enabled by default for your organization. In situations where the agent wants to hear background noise from the customer, contact Customer Support to disable the feature flag.

                                                                                                                                                                                                              This feature is available only for Flex 3 premium agents on Webex Contact Centers with regional media support on the Next Generation media platform.

                                                                                                                                                                                                              Reporting Agent Desktop Issues to Customer Support

                                                                                                                                                                                                              When you escalate an Agent Desktop issue to Webex Contact Center Customer Support, make sure to provide the following information:

                                                                                                                                                                                                              • Ask the agent to provide a screen capture of the Agent Desktop screen.

                                                                                                                                                                                                              • Include the time that the issue was first observed.

                                                                                                                                                                                                              Report Parameters

                                                                                                                                                                                                              Call Report Parameters

                                                                                                                                                                                                              The following table describes the parameters available in Webex Contact Center real-time and historical call reports. In the table, CSR is an abbreviation for Customer Session Record.

                                                                                                                                                                                                              Parameter

                                                                                                                                                                                                              Description

                                                                                                                                                                                                              Report

                                                                                                                                                                                                              % Abandoned

                                                                                                                                                                                                              The percentage of calls that were abandoned during the report interval.

                                                                                                                                                                                                              (Abandoned/Total) * 100

                                                                                                                                                                                                              Real-time Call Interval reports for Queues & Skills by Queue; Historical Call reports for Queues

                                                                                                                                                                                                              % Answered

                                                                                                                                                                                                              The number of answered calls divided by the number of calls that entered the queue minus short calls multiplied by 100.

                                                                                                                                                                                                              (Answered/(Answered + Abandoned)) * 100

                                                                                                                                                                                                              Real-time Call Interval reports for Queues & Skills by Queue; Historical Call reports for Queues

                                                                                                                                                                                                              Abandoned

                                                                                                                                                                                                              The number of calls that were abandoned during the report interval. An abandoned call is a call that was terminated without being distributed to a destination site, but that was in the system for longer than the time specified by the Short Call threshold provisioned for the enterprise.

                                                                                                                                                                                                              Real-time Call Interval reports for Queues & Skills by Queue; Historical Call reports for Queues

                                                                                                                                                                                                              Abandoned Time

                                                                                                                                                                                                              The cumulative amount of time that calls were in the system for longer than the time specified by the Short Call threshold, but terminated before being distributed to an agent or other resource.

                                                                                                                                                                                                              Real-time Call Interval reports for Queues & Skills by Queue; Historical Call reports for Queues

                                                                                                                                                                                                              Abandoned within SL

                                                                                                                                                                                                              The number of calls that were terminated while in queue within the Service Level threshold provisioned for the queue or skill (in a skills interval by queue report).

                                                                                                                                                                                                              Although this metric is visible for outdial calls, it is not meaningful for outdial calls.

                                                                                                                                                                                                              Real-time Call Interval reports for Queues & Skills by Queue; Historical Call reports for Queues

                                                                                                                                                                                                              Adjusted Service Level %

                                                                                                                                                                                                              The number of calls that were either answered or abandoned within the Service Level threshold provisioned for the queue or skill (in a skills interval by queue report), divided by total calls (including abandoned calls) multiplied by 100.

                                                                                                                                                                                                              ((In Service Level + Abandoned within SL)/(Answered + Abandoned)) * 100

                                                                                                                                                                                                              Although this metric is visible for outdial calls, it is not meaningful for such calls.

                                                                                                                                                                                                              Real-time Call Interval reports for Queues & Skills by Queue; Historical Call reports for Queues, Sites, & Teams

                                                                                                                                                                                                              Agent

                                                                                                                                                                                                              The name of the agent who handled the call or a numeric ID code if the call was handled by a capacity-based team resource instead of by a Webex Contact Center agent.

                                                                                                                                                                                                              CSR

                                                                                                                                                                                                              Agent Start Time

                                                                                                                                                                                                              The time the agent picked up the phone and began talking with the caller.

                                                                                                                                                                                                              CSR

                                                                                                                                                                                                              ANI

                                                                                                                                                                                                              The ANI digits delivered with the call. ANI, or Automatic Number Identification, is a service provided by the phone company that delivers the caller's phone number along with the call.

                                                                                                                                                                                                              CSR

                                                                                                                                                                                                              Answered

                                                                                                                                                                                                              The number of calls that were routed from the queue to an agent or available resource and were answered by the agent or resource.

                                                                                                                                                                                                              Real-time Call Interval reports for Queues, Skills by Queue, Sites, & Teams; Historical Call reports for Queues, Sites, & Teams

                                                                                                                                                                                                              Answered Time

                                                                                                                                                                                                              The cumulative amount of time between when calls entered the queue and when they were answered (connected to an agent or other resource) during the report interval. Because answered time is calculated after the call is answered, answered time for calls that are waiting to be answered is not reflected in the report.

                                                                                                                                                                                                              Real-time Call Interval reports for Queues, Skills by Queue, Sites, & Teams; Historical Call reports for Queues, Sites, & Teams

                                                                                                                                                                                                              Available Agents

                                                                                                                                                                                                              The number of logged-in agents who are currently in the Available state.

                                                                                                                                                                                                              Call Snapshot report

                                                                                                                                                                                                              Avg Abandoned Time

                                                                                                                                                                                                              The total amount of time that calls were in the system before they were abandoned divided by the total number of calls that were abandoned:

                                                                                                                                                                                                              Abandoned Time/Abandoned

                                                                                                                                                                                                              Real-time Call Interval reports for Queues & Skills by Queue; Historical Call reports for Queues

                                                                                                                                                                                                              Avg Connected Time

                                                                                                                                                                                                              The total connected time divided by the total number of calls that were answered during the report interval:

                                                                                                                                                                                                              Connected Time/(Answered + Secondary Answered)

                                                                                                                                                                                                              Real-time Call Interval reports for Queues, Skills by Queue, Sites, & Teams; Historical Call reports for Queues, Sites, & Teams

                                                                                                                                                                                                              Avg Handle Time

                                                                                                                                                                                                              The average length of time spent handling a call (connected time plus wrap-up time), divided by number of answered calls:

                                                                                                                                                                                                              Connected Time+Wrap Up Time/(Answered + Secondary Answered)

                                                                                                                                                                                                              Real-time Call Interval reports for Queues, Skills by Queue, Sites, & Teams; Historical Call reports for Queues, Sites, & Teams

                                                                                                                                                                                                              Avg IVR Time

                                                                                                                                                                                                              The total amount of time that calls were in the IVR system divided by the total number of calls that were in the IVR system.

                                                                                                                                                                                                              Real-time Call Interval & Historical Call reports for Entry Points

                                                                                                                                                                                                              Avg Queued Time

                                                                                                                                                                                                              The total amount of time that calls were in queue divided by the total number of calls that were queued:

                                                                                                                                                                                                              Queued Time/Queued

                                                                                                                                                                                                              Real-time Call Interval reports for Queues & Skills by Queue; Historical Call reports for Queues.

                                                                                                                                                                                                              Avg Speed of Answer

                                                                                                                                                                                                              The total answered time divided by the total number of answered calls:

                                                                                                                                                                                                              Answered Time/Answered

                                                                                                                                                                                                              Real-time Call Interval reports for Queues, Skills by Queue, Sites, & Teams; Historical Call reports for Queues, Sites, & Teams

                                                                                                                                                                                                              Avg Wrap Up Time

                                                                                                                                                                                                              The total amount of time agents spent in the Wrap-up state divided by the total number of answered calls:

                                                                                                                                                                                                              Wrap Up Time/(Answered + Secondary Answered)

                                                                                                                                                                                                              Real-time Call Interval reports for Queues, Skills by Queue, Sites, & Teams; Historical Call reports for Queues, Sites, & Teams

                                                                                                                                                                                                              Blind Transfer Count

                                                                                                                                                                                                              The number of times the call was transferred out of the queue by the agent without the first agent consulting or conferencing with the party to whom the call was transferred

                                                                                                                                                                                                              CSR

                                                                                                                                                                                                              Blind Transfers

                                                                                                                                                                                                              The subset of transferred out calls that were transferred by the agent to another agent or an external DN without the first agent consulting or conferencing with the party to whom the call was transferred.

                                                                                                                                                                                                              Real-time Call Interval reports for Queues, Skills by Queue, Sites, & Teams; Historical Call reports for Queues, Sites, & Teams

                                                                                                                                                                                                              Call Duration

                                                                                                                                                                                                              The amount of time between when the call arrived at the entry point or queue and when it was terminated.

                                                                                                                                                                                                              CSR

                                                                                                                                                                                                              Call End Time

                                                                                                                                                                                                              The time the call was terminated.

                                                                                                                                                                                                              CSR

                                                                                                                                                                                                              Call Start Time

                                                                                                                                                                                                              The time the call arrived at the entry point or queue.

                                                                                                                                                                                                              CSR

                                                                                                                                                                                                              Completed

                                                                                                                                                                                                              The number of calls that ended during the report interval. Answered, abandoned, and disconnected calls are included in this count. Transferred and short calls are not counted.

                                                                                                                                                                                                              Real-time Call Interval reports for Queues, Skills by Queue, Sites, & Teams; Historical Call reports for Queues, Sites, & Teams

                                                                                                                                                                                                              Conference Count

                                                                                                                                                                                                              The number of times the agent established a conference call with the caller and another agent.

                                                                                                                                                                                                              CSR

                                                                                                                                                                                                              Conference Count

                                                                                                                                                                                                              The number of times agents initiated a conference call to an agent or external number.

                                                                                                                                                                                                              Real-time Call Interval reports for Queues, Skills by Queue, Sites, & Teams; Historical Call reports for Queues, Sites, & Teams

                                                                                                                                                                                                              Conference Time

                                                                                                                                                                                                              The amount of time an agent spent in conference with the caller and another agent.

                                                                                                                                                                                                              CSR

                                                                                                                                                                                                              Connected

                                                                                                                                                                                                              The number of calls currently connected to an agent.

                                                                                                                                                                                                              Call Snapshot report

                                                                                                                                                                                                              Connected Time

                                                                                                                                                                                                              The time interval between when calls were answered by an agent or other resource and when the calls were terminated. Because connected time is not calculated until the call is terminated, the connected time for a call that is still in progress is not reflected in the report.

                                                                                                                                                                                                              Real-time call interval reports for Sites, Teams, Queues, & Skills by Queue; Historical Call reports for Queues, Sites, & Teams

                                                                                                                                                                                                              Connected Time

                                                                                                                                                                                                              The total amount of time the call was connected to an agent (talk time plus hold time).

                                                                                                                                                                                                              CSR

                                                                                                                                                                                                              Consult Count

                                                                                                                                                                                                              The number of times agents initiated a consult with another agent or someone at an external number during a call.

                                                                                                                                                                                                              Real-time Call Interval reports for Queues, Skills by Queue, Sites, & Teams; Historical Call reports for Queues, Sites, & Teams

                                                                                                                                                                                                              Consult Count

                                                                                                                                                                                                              The number of times the agent consulted another agent during the call.

                                                                                                                                                                                                              CSR

                                                                                                                                                                                                              Consult Errors

                                                                                                                                                                                                              The number of times agents did not respond to a consult invitation.

                                                                                                                                                                                                              CSR

                                                                                                                                                                                                              Consult Time

                                                                                                                                                                                                              The amount of time an agent spent consulting with another agent during this call.

                                                                                                                                                                                                              CSR

                                                                                                                                                                                                              CTQ Answer Count

                                                                                                                                                                                                              The number of times consult-to-queue requests were answered.

                                                                                                                                                                                                              Real-time Call Interval reports for Queues, Skills by Queue, Sites, & Teams; Historical Call reports for Queues, Sites, & Teams

                                                                                                                                                                                                              CTQ Answer Time

                                                                                                                                                                                                              The cumulative amount of time between when consult-to-queue requests were answered and when the consultations ended.

                                                                                                                                                                                                              Historical Call reports for Queues, Sites, & Teams

                                                                                                                                                                                                              CTQ Request Count

                                                                                                                                                                                                              The number of times consult-to-queue requests were initiated.

                                                                                                                                                                                                              Real-time Call Interval reports for Queues, Skills by Queue, Sites, & Teams; Historical Call reports for Queues, Sites, & Teams; CSR

                                                                                                                                                                                                              CTQ Request Time

                                                                                                                                                                                                              The cumulative amount of time between when consult-to-queue requests were initiated and when the consultations ended.

                                                                                                                                                                                                              Historical Call reports for Queues, Sites, & Teams; CSR

                                                                                                                                                                                                              Current Service Level %

                                                                                                                                                                                                              The percentage of calls in queue that have not yet reached the Service Level threshold provisioned for the queue (in a queue report) or skill (in the skill rows of a skills-by-queue report).

                                                                                                                                                                                                              Although this metric is visible for outdial calls, it is not meaningful for outdial calls.

                                                                                                                                                                                                              Call Snapshot report

                                                                                                                                                                                                              Disconnected

                                                                                                                                                                                                              The number of calls that were answered (that is, connected to an agent or distributed to and accepted by a destination site), but that were then immediately disconnected within the Sudden Disconnect threshold provisioned for the enterprise.

                                                                                                                                                                                                              Real-time Call Interval reports for Queues, Skills by Queue, Sites, & Teams; Historical Call reports for Queues, Sites, & Teams

                                                                                                                                                                                                              DN

                                                                                                                                                                                                              The number the caller dialed (DNIS).

                                                                                                                                                                                                              All DN Canned report

                                                                                                                                                                                                              DNIS

                                                                                                                                                                                                              The DNIS digits delivered with the call. DNIS, or Dialed Number Identification Service, is a service provided by the phone company that delivers a digit string indicating the number the caller dialed along with the call.

                                                                                                                                                                                                              CSR

                                                                                                                                                                                                              Entry Point

                                                                                                                                                                                                              The name of the entry point associated with the call.

                                                                                                                                                                                                              CSR

                                                                                                                                                                                                              From Entry Point

                                                                                                                                                                                                              The number of calls that entered this queue after having been classified into the queue from an entry point by the IVR call control script.

                                                                                                                                                                                                              The number of calls that entered this queue after having been classified into the queue from an entry point by the IVR flow.

                                                                                                                                                                                                              Real-time Call Interval reports for Queues & Skills by Queue; Historical Call reports for Queues

                                                                                                                                                                                                              From Entry Point

                                                                                                                                                                                                              The number of calls that came in to this entry point from another entry point.

                                                                                                                                                                                                              Real-time Call Interval & Historical Call reports for Entry Points

                                                                                                                                                                                                              Full Monitored Calls

                                                                                                                                                                                                              The number of calls that were monitored from beginning to end.

                                                                                                                                                                                                              Monitored Calls report

                                                                                                                                                                                                              Handle Time

                                                                                                                                                                                                              The amount of time spent handling the call (Connected Time + Wrap Up Time).

                                                                                                                                                                                                              CSR

                                                                                                                                                                                                              Handle Time

                                                                                                                                                                                                              The cumulative amount of time spent handling calls:

                                                                                                                                                                                                              Connected Time + Wrap Up Time

                                                                                                                                                                                                              Real-time Call Interval reports for Queues, Skills by Queue, Sites, & Teams; Historical Call reports for Queues, Sites, & Teams

                                                                                                                                                                                                              Handle Type

                                                                                                                                                                                                              How the call was handled. Possible values:

                                                                                                                                                                                                              • park: The call was queued in the Webex Contact Center network and subsequently ended without being distributed to a site.

                                                                                                                                                                                                              • park_and_transfer: The call was queued in the Webex Contact Center network and subsequently distributed to a site.

                                                                                                                                                                                                              • straight_transfer: The call was distributed to a site upon arrival without being queued in the Webex Contact Center network.

                                                                                                                                                                                                              • ivr: The call was handled by the IVR but the caller disconnected before the call was transferred or parked.

                                                                                                                                                                                                              • unknown: This is the default value when no other value overrides it.

                                                                                                                                                                                                              CSR

                                                                                                                                                                                                              Hold Count

                                                                                                                                                                                                              The number of times the call was put on hold.

                                                                                                                                                                                                              • CSR

                                                                                                                                                                                                              • Real-time Call Interval reports for Queues, Skills by Queue, Sites, & Teams; Historical Call reports for Queues, Sites, & Teams

                                                                                                                                                                                                              Hold Time

                                                                                                                                                                                                              The amount of time the call was on hold in this queue (for a queue CSR) or in all underlying queues (for an entry point CSR).

                                                                                                                                                                                                              CSR

                                                                                                                                                                                                              In IVR

                                                                                                                                                                                                              The number of calls that are currently in the IVR system.

                                                                                                                                                                                                              Call Snapshot report

                                                                                                                                                                                                              In Queue

                                                                                                                                                                                                              The number of calls currently in the queues that are covered in the report. In the case of entry-point reports, this is the number of calls that are currently in queues fed by the entry point.

                                                                                                                                                                                                              In entry point and queue reports, you can click a number in this column to display the Age of Calls in Queue pie chart in a pop-up window. The chart displays the number of calls that have been in the queue for the length of time represented by three time segments. The time segments are derived by dividing the Longest Time in Queue value by three, rounding the resulting value down to the nearest 10 seconds, and then multiplying that value by 1, 2, and 3. For example, if the Longest Time in Queue value is 85 seconds, then 85/3=28.3, which is rounded down to 20, and the chart displays time segments of 20, 40, and 60 seconds.

                                                                                                                                                                                                              Call Snapshot report

                                                                                                                                                                                                              In Service Level

                                                                                                                                                                                                              The number of calls that were answered within the Service Level threshold provisioned for this queue or skill (in a skills interval by queue report).

                                                                                                                                                                                                              Although this metric is visible for outdial calls, it is not meaningful for outdial calls.

                                                                                                                                                                                                              Real-time Call Interval reports for Queues & Skills by Queue; Historical Call reports for Queues, Sites, & Teams

                                                                                                                                                                                                              Invisible Monitored Calls

                                                                                                                                                                                                              The number of calls that were monitored using the Invisible mode, which prevents the monitoring session from being displayed on Management Portals other than that of the initiating supervisor.

                                                                                                                                                                                                              Monitored Calls report

                                                                                                                                                                                                              IVR Ended

                                                                                                                                                                                                              The number of calls that ended in the IVR but were not short calls.

                                                                                                                                                                                                              Real-time Call Interval & Historical Call reports for Entry Points

                                                                                                                                                                                                              IVR Time

                                                                                                                                                                                                              The amount of time the call was in the IVR system.

                                                                                                                                                                                                              CSR

                                                                                                                                                                                                              IVR Time

                                                                                                                                                                                                              The cumulative amount of time calls were in the IVR system.

                                                                                                                                                                                                              Real-time Call Interval & Historical Call reports for Entry Points

                                                                                                                                                                                                              Logged-in Agents

                                                                                                                                                                                                              The number of agents who are currently logged in to this team or to all teams at this site. At the queue level, this is the number of agents logged in to all teams at the sites serving this queue.

                                                                                                                                                                                                              Call Snapshot report

                                                                                                                                                                                                              Longest Call In Queue Time

                                                                                                                                                                                                              The longest amount of time a call has been in each queue covered in the report.

                                                                                                                                                                                                              Call Snapshot report

                                                                                                                                                                                                              Maximum Wait Time

                                                                                                                                                                                                              The longest amount of time a call was in the queue waiting to be answered.

                                                                                                                                                                                                              Historical Call reports for Queues

                                                                                                                                                                                                              Midcall Monitored Calls

                                                                                                                                                                                                              The number of calls for which monitoring began after the call was already in progress.

                                                                                                                                                                                                              Monitored Calls report

                                                                                                                                                                                                              Monitor Flag

                                                                                                                                                                                                              Whether or not the call was monitored, coached, or barged in on. Possible values:

                                                                                                                                                                                                              • Not Monitored. The call was not monitored

                                                                                                                                                                                                              • Monitored. The call was monitored.

                                                                                                                                                                                                              • Whisper-Coach. While the call was monitored, the monitoring supervisor coached the agent, but did not barge in on the call.

                                                                                                                                                                                                              • Barged-In. While the call was monitored, the monitoring supervisor barged in on the call.The supervisor might have also coached the agent. (If the call was both coached and barged-in on, the value of this parameter is Barged-In).

                                                                                                                                                                                                              For information about monitoring, see Monitor Calls.

                                                                                                                                                                                                              CSR

                                                                                                                                                                                                              New

                                                                                                                                                                                                              The number of external calls that came in to the entry point.

                                                                                                                                                                                                              Real-time Call Interval & Historical Call reports for Entry Points

                                                                                                                                                                                                              New

                                                                                                                                                                                                              The number of calls that came into the system by way of a specific dialed number.

                                                                                                                                                                                                              All DN Canned report

                                                                                                                                                                                                              No. of Transfers

                                                                                                                                                                                                              The number of times the call was transferred by an agent.

                                                                                                                                                                                                              CSR

                                                                                                                                                                                                              Overflow

                                                                                                                                                                                                              The number of calls that were sent to the overflow number provisioned for the queue and were answered. Typically, a call is sent to an overflow number if it is queued for longer than the maximum time specified in the routing strategy or because an error occurred when the call was sent to an agent. If the call is not answered, it is included in the Abandoned or Disconnected count when the call ends.

                                                                                                                                                                                                              Real-time Call Interval reports for Queues & Skills by Queue; Historical Call reports for Queues

                                                                                                                                                                                                              Queue

                                                                                                                                                                                                              The name of the queue associated with the call.

                                                                                                                                                                                                              CSR

                                                                                                                                                                                                              Queue

                                                                                                                                                                                                              The name of the queue that was monitored.

                                                                                                                                                                                                              Calls Monitored report

                                                                                                                                                                                                              Queue Time

                                                                                                                                                                                                              The amount of time the call was in a queue waiting to be sent to a destination site.

                                                                                                                                                                                                              CSR

                                                                                                                                                                                                              Queued

                                                                                                                                                                                                              The number of calls that entered the queue during this interval.

                                                                                                                                                                                                              Real-time Call Interval reports for Queues & Skills by Queue; Historical Call reports for Queues

                                                                                                                                                                                                              Queued Time

                                                                                                                                                                                                              The cumulative amount of time calls were in queue, waiting to be sent to an agent or other resource. Because queued time is calculated after the call leaves the queue, the queued time for a call that is still in the queue is not reflected in the report.

                                                                                                                                                                                                              Real-time Call Interval reports for Queues & Skills by Queue; Historical Call reports for Queues

                                                                                                                                                                                                              Record Flag

                                                                                                                                                                                                              Whether or not the call was recorded by Webex Contact Center through the optional call recording feature.

                                                                                                                                                                                                              CSR

                                                                                                                                                                                                              Requeued

                                                                                                                                                                                                              The number of calls that left this queue after having been transferred by the agent to another queue. For calls to be requeued, the first agent clicks the Queue button, selects a queue from the drop-down list, and clicks Transfer.

                                                                                                                                                                                                              Real-time Call Interval reports for Queues, Skills by Queue, Sites, & Teams; Historical Call reports for Queues, Sites, & Teams

                                                                                                                                                                                                              S No.

                                                                                                                                                                                                              A sequence number identifying each leg of a call as it moves through the Webex Contact Center system. Click an entry in this column to open a window that displays the history of the call throughout its life cycle.

                                                                                                                                                                                                              CSR

                                                                                                                                                                                                              Secondary Answered

                                                                                                                                                                                                              The number of calls that were answered by an agent after being transferred to the agent by another agent.

                                                                                                                                                                                                              Real-time Call Interval reports for Queues, Skills by Queue, Sites, & Teams; Historical Call reports for Queues, Sites, & Teams

                                                                                                                                                                                                              Service Level %

                                                                                                                                                                                                              The number of calls that were answered within the Service Level threshold provisioned for the queue or skill (in a skills interval by queue report), divided by total calls (including abandoned calls) multiplied by 100:

                                                                                                                                                                                                              ((In Service Level)/(Answered + Abandoned)) * 100

                                                                                                                                                                                                              Although this metric is visible for outdial calls, it is not meaningful for outdial calls.

                                                                                                                                                                                                              Real-time Call Interval reports for Queues & Skills by Queue; Historical Call reports for Queues, Sites, & Teams.

                                                                                                                                                                                                              Session ID

                                                                                                                                                                                                              A value assigned by the system that uniquely identifies a call during its life cycle.

                                                                                                                                                                                                              CSR

                                                                                                                                                                                                              Short

                                                                                                                                                                                                              The number of calls that were terminated within the Short Call threshold provisioned for the enterprise without being distributed to a destination site or connected to an agent.

                                                                                                                                                                                                              Real-time Call Interval & Historical Call reports for Entry Points

                                                                                                                                                                                                              Short

                                                                                                                                                                                                              The number of calls that were terminated within the Short Call threshold provisioned for the enterprise without being connected to an agent.

                                                                                                                                                                                                              Real-time Call Interval reports for Queues & Skills by Queue; Historical Call reports for Queues

                                                                                                                                                                                                              Site

                                                                                                                                                                                                              The contact center location to which the call was distributed.

                                                                                                                                                                                                              CSR

                                                                                                                                                                                                              Site

                                                                                                                                                                                                              The name of the site that was monitored.

                                                                                                                                                                                                              Monitored Calls report

                                                                                                                                                                                                              Team

                                                                                                                                                                                                              The name of the team to which the call was distributed.

                                                                                                                                                                                                              CSR

                                                                                                                                                                                                              Team

                                                                                                                                                                                                              The name of the team that was monitored.

                                                                                                                                                                                                              Monitored Calls report

                                                                                                                                                                                                              Terminating Party

                                                                                                                                                                                                              Who terminated the call: Agent or Caller

                                                                                                                                                                                                              CSR

                                                                                                                                                                                                              Termination Type

                                                                                                                                                                                                              How the call was terminated. Possible values:

                                                                                                                                                                                                              • abandoned: The call was terminated before being distributed to a destination site, but was in the system for longer than the time specified in the Short Call threshold provisioned for the enterprise.

                                                                                                                                                                                                              • agent_transfer: The call was transferred from one agent to another.

                                                                                                                                                                                                              • transfer_error: The call could not be transferred to the agent.

                                                                                                                                                                                                              • normal: The call ended normally.

                                                                                                                                                                                                              • reclassified: The call was sent to another entry point.

                                                                                                                                                                                                              • transferred: The call was transferred by an agent.

                                                                                                                                                                                                              • self_service: The call ended in the IVR.

                                                                                                                                                                                                              • short_call: The call was never connected and the total duration of the call was less than the specified Short Call threshold.

                                                                                                                                                                                                              • sudden_disconnect: The call was connected, but the agent talk time for the call was less than the specified Sudden Disconnect threshold.

                                                                                                                                                                                                              • overflow: The call was transferred to the overflow destination number provisioned for the queue. Typically, the transfer is because the call was queued for longer than the maximum queue time specified in the routing strategy or because an error occurred when the call was sent to an agent.

                                                                                                                                                                                                              CSR

                                                                                                                                                                                                              To Entry Point

                                                                                                                                                                                                              The number of calls that were transferred to another entry point.

                                                                                                                                                                                                              Real-time Call Interval & Historical Call reports for Entry Points

                                                                                                                                                                                                              To Queue

                                                                                                                                                                                                              The number of calls that were sent to a queue.

                                                                                                                                                                                                              Real-time Call Interval & Historical Call reports for Entry Points

                                                                                                                                                                                                              Total Monitored Calls

                                                                                                                                                                                                              The total number of calls monitored during the report time interval.

                                                                                                                                                                                                              Monitored Calls report

                                                                                                                                                                                                              Transfer Errors

                                                                                                                                                                                                              The number of times an error occurred during the transfer process.

                                                                                                                                                                                                              CSR

                                                                                                                                                                                                              Transferred

                                                                                                                                                                                                              The sum of all calls transferred from this queue to an agent, external DN, or another Webex Contact Center queue:

                                                                                                                                                                                                              Transferred Out + Requeued

                                                                                                                                                                                                              Real-time Call Interval reports for Queues, Skills by Queue, Sites, & Teams; Historical Call reports for Queues, Sites, & Teams

                                                                                                                                                                                                              Transferred In

                                                                                                                                                                                                              The number of calls that were transferred to this entry point by an agent.

                                                                                                                                                                                                              Real-time Call Interval & Historical Call reports for Entry Points

                                                                                                                                                                                                              Transferred In

                                                                                                                                                                                                              The number of calls that entered this queue after being transferred into the queue by an agent who clicked the Queue button, selected a queue from the drop-down list, and clicked Transfer.

                                                                                                                                                                                                              Real-time Call Interval reports for Queues & Skills by Queue; Historical Call reports for Queues

                                                                                                                                                                                                              Transferred Number

                                                                                                                                                                                                              The phone number to which the agent transferred the call in an agent-to-DN transfer. This parameter appears in the Webex Contact Center window that opens when you click an entry in the S No. (sequence number) column of either an entry point or queue call detail record (CSR).

                                                                                                                                                                                                              CSR

                                                                                                                                                                                                              Transferred Out

                                                                                                                                                                                                              The number of calls that left this queue after being transferred by an agent to an external DN or to another agent. Transferred-out calls result when an agent clicks the Agent button, selects an agent from the drop-down list, and clicks Transfer, or when the agent clicks the DN button, enters a phone number, and clicks Transfer. Transferred-out calls may begin as a consultation or conference, but are counted as transferred-out only when the first agent completes the transfer to the second party.

                                                                                                                                                                                                              Real-time Call Interval reports for Queues, Skills by Queue, Sites, & Teams; Historical Call reports for Queues, Sites, & Teams

                                                                                                                                                                                                              Wrap Up

                                                                                                                                                                                                              The wrap-up code that the agent gave for the call. Note that if the agent wraps up the call after the CSR is generated, the corresponding CSR is updated after the agent selects the wrap-up code for that call.

                                                                                                                                                                                                              CSR

                                                                                                                                                                                                              Wrap Up Time

                                                                                                                                                                                                              The amount of time an agent spent in the Wrap-up state during the call.

                                                                                                                                                                                                              CSR

                                                                                                                                                                                                              Wrap Up Time

                                                                                                                                                                                                              The cumulative amount of time agents spent in the Wrap-up state during the call.

                                                                                                                                                                                                              Real-time Call Interval reports for Queues, Skills by Queue, Sites, & Teams; Historical Call reports for Queues, Sites, & Teams

                                                                                                                                                                                                              Agent Report Parameters

                                                                                                                                                                                                              The following table describes the parameters available in Webex Contact Center real-time and historical agent reports. In the table, ADR is an abbreviation for Agent Detail Report.

                                                                                                                                                                                                              Parameter

                                                                                                                                                                                                              Description

                                                                                                                                                                                                              Report

                                                                                                                                                                                                              Action

                                                                                                                                                                                                              Icons you can click to perform an action:

                                                                                                                                                                                                              • Click the Logout icon to sign out the agent.

                                                                                                                                                                                                              • Click the Monitor icon to open the Call Monitoring module where you can monitor the agent's call by when you enter your callback number and clicking the Midcall Monitor button.

                                                                                                                                                                                                                This icon displays only in the Team view and only if the agent is in the Connected state and your user profile authorizes midcall monitoring. For more information, see Monitor Calls.

                                                                                                                                                                                                              Snapshot/Team & Skill views

                                                                                                                                                                                                              Agent

                                                                                                                                                                                                              The name of an agent in the report.

                                                                                                                                                                                                              If your enterprise uses the Multimedia feature and the report includes more than one media channel, you can click the a collapse arrow or expand arrow to the left of an agent name to collapse or expand the data grouped by channel type.

                                                                                                                                                                                                              Snapshot/Agent view; Real-time Agent Interval/Agent-level

                                                                                                                                                                                                              Agent Requeue

                                                                                                                                                                                                              The number of times an agent requeued an inbound call.

                                                                                                                                                                                                              Historical Agent Summary & Interval reports; ADR; Snapshot/Agent view; Agent Trace report

                                                                                                                                                                                                              Agent Transfer

                                                                                                                                                                                                              The number of times an agent transferred an inbound call to another agent.

                                                                                                                                                                                                              Historical Agent Summary & Interval reports; ADR; Agent Trace report

                                                                                                                                                                                                              Available

                                                                                                                                                                                                              Count: The number of times an agent went into the Available state.

                                                                                                                                                                                                              Total Time: The total amount of time an agent spent in the Available state.

                                                                                                                                                                                                              Average Time: (Not in ADR or Snapshot/Agent view or Agent Trace report) The average length of time agents were in the Available state (Total Available Time divided by Available Count).

                                                                                                                                                                                                              % Time: (Only in ADR) The percentage of time the agent was in the Available state.

                                                                                                                                                                                                              Historical Agent Summary & Interval reports; ADR & Snapshot/Agent view; Agent Trace report

                                                                                                                                                                                                              Available

                                                                                                                                                                                                              The number of agents currently in the Available state or, in the Skill view, the number of agents in the Available state who possess the skill.

                                                                                                                                                                                                              Snapshot/Site, Skill, & Skills by Team views

                                                                                                                                                                                                              Available Time

                                                                                                                                                                                                              The amount of time agents were in the Available state during the time interval.

                                                                                                                                                                                                              Real-time Agent Interval reports

                                                                                                                                                                                                              Average Connected Time

                                                                                                                                                                                                              The connected time divided by the number of calls that were connected during the time interval.

                                                                                                                                                                                                              Real-time Skills Interval by Team

                                                                                                                                                                                                              Average Handle Time

                                                                                                                                                                                                              The average length of time spent handling a call (connected time plus wrap-up time, divided by number of calls).

                                                                                                                                                                                                              Real-time Skills Interval by Team

                                                                                                                                                                                                              Blind Transfer

                                                                                                                                                                                                              The number of times an agent transferred an inbound call without consulting first.

                                                                                                                                                                                                              Historical Agent Summary & Interval reports; ADR; Snapshot/Agent view; Agent Trace report

                                                                                                                                                                                                              Calls Handled

                                                                                                                                                                                                              The number of calls the agent handled (or, for the Skill view, the number of calls the agent handled for that skill) since logging in. Rest the cursor over a number in this column to display a pop-up showing the wrap-up codes the agent entered and how many times each code was entered.

                                                                                                                                                                                                              Snapshot/Team view & Skill view

                                                                                                                                                                                                              Calls Handled

                                                                                                                                                                                                              The total number of inbound and outdial calls handled.

                                                                                                                                                                                                              Historical Agent Summary & Interval reports

                                                                                                                                                                                                              Channel

                                                                                                                                                                                                              The media channel associated with the activity. (Appears only if your enterprise uses the Multimedia feature.)

                                                                                                                                                                                                              ADR; Agent Trace report

                                                                                                                                                                                                              Conference

                                                                                                                                                                                                              The number of times the agent initiated a conference call.

                                                                                                                                                                                                              Historical Agent Summary & Interval reports; ADR; Snapshot/Agent view; Agent Trace report

                                                                                                                                                                                                              Connected

                                                                                                                                                                                                              The number of agents currently connected to an inbound call, or in the Skill view, the number of agents connected to a call who possess the skill.

                                                                                                                                                                                                              Snapshot/Site, Skill, & Skills by Team views

                                                                                                                                                                                                              Connected Time

                                                                                                                                                                                                              The amount of time inbound calls were connected to an agent during the time interval (talk time plus hold time).

                                                                                                                                                                                                              Real-time Skills Interval by Team

                                                                                                                                                                                                              Consult

                                                                                                                                                                                                              Count: The number of times an agent answered a consult request plus the number of times an agent consulted other agents.

                                                                                                                                                                                                              Total Time: Total Consult Answer Time plus Total Consult Request Time.

                                                                                                                                                                                                              Average Time: (Not in ADR or Agent Trace report) The average length of consulting time (Total Consult Time divided by Consult Count).

                                                                                                                                                                                                              Historical Agent Summary & Interval reports; ADR; Agent Trace report

                                                                                                                                                                                                              Consult Answer

                                                                                                                                                                                                              Count: The number of times an agent answered a consult request from another agent.

                                                                                                                                                                                                              Total Time: The total amount of time an agent spent answering consult requests from agents.

                                                                                                                                                                                                              Average Time: (Not in ADR or Agent Trace report) The average length of time agents spent answering consult requests (Total Consult Answer Time divided by Consult Answer Count).

                                                                                                                                                                                                              % Time: (Only in ADR and Agent Trace report) The percentage of time the agent spent answering consult requests.

                                                                                                                                                                                                              Historical Agent Summary & Interval reports; ADR; Agent Trace report

                                                                                                                                                                                                              Consult Request

                                                                                                                                                                                                              Count: The number of times an agent sent a consult request to another agent.

                                                                                                                                                                                                              Total Time: The total amount of time an agent spent consulting other agents.

                                                                                                                                                                                                              Average Time: (Not in ADR or Agent Trace report) The average length of time agents spent consulting other agents (Total Consult Request Time divided by Consult Request Count).

                                                                                                                                                                                                              % Time: (Only in ADR and Agent Trace report) The percentage of time the agent spent consulting other agents while on an inbound call.

                                                                                                                                                                                                              Historical Agent Summary & Interval reports; ADR; Agent Trace report

                                                                                                                                                                                                              Consulting

                                                                                                                                                                                                              The number of agents currently consulting with another agent.

                                                                                                                                                                                                              Snapshot/Site & Skills by Team views

                                                                                                                                                                                                              CTQ

                                                                                                                                                                                                              The number of agents currently consulting with another agent after initiating or answering a consult-to-queue request.

                                                                                                                                                                                                              Snapshot/Site view

                                                                                                                                                                                                              Current State

                                                                                                                                                                                                              The agent's current state.

                                                                                                                                                                                                              In Team and Skill views, if the current state is Idle, the idle code the agent selected is shown in parentheses. No code shows if the agent has just signed in and has not selected an idle code.

                                                                                                                                                                                                              Snapshot/Team, Skill, & Agent views

                                                                                                                                                                                                              Disconnected Count

                                                                                                                                                                                                              The number of calls that were connected to an agent, but that were then immediately disconnected within the Sudden Disconnect threshold provisioned for the enterprise.

                                                                                                                                                                                                              Historical Agent Summary & Agent Interval reports; ADR; Agent Trace report

                                                                                                                                                                                                              Disconnected Hold Count

                                                                                                                                                                                                              The number of times an inbound call was disconnected while the caller was on hold.

                                                                                                                                                                                                              Snapshot/Agent view

                                                                                                                                                                                                              DN

                                                                                                                                                                                                              The dial number the agent used to log in to the Agent Desktop.

                                                                                                                                                                                                              Snapshot/Team, Agent, & Skill views; ADR; Agent Trace report

                                                                                                                                                                                                              Duration

                                                                                                                                                                                                              The amount of time the agent was in the state.

                                                                                                                                                                                                              Agent Trace Report

                                                                                                                                                                                                              Final Logout Time

                                                                                                                                                                                                              The date and time the agent logged out. This column appears only in agent-level summary reports.

                                                                                                                                                                                                              Historical Agent Summary/Agent level

                                                                                                                                                                                                              Hold

                                                                                                                                                                                                              The number of agents in the Connected state who have placed the caller on hold.

                                                                                                                                                                                                              Snapshot/Site view & Skills by Team view

                                                                                                                                                                                                              Hold Time

                                                                                                                                                                                                              The amount of time callers were on hold during the time interval.

                                                                                                                                                                                                              Real-time Skills Interval by Team

                                                                                                                                                                                                              Idle

                                                                                                                                                                                                              The number of times the agent went into the Idle state from a different state. Rest the cursor over a number in this column to display a pop-up showing the idle codes the agent entered and how many times each code was entered.

                                                                                                                                                                                                              Because an agent can change the idle code while in the Idle state, the number of idle codes displayed in the pop-up can exceed the number of times the agent went into the Idle state. For example, an agent might move from Idle-Break to Idle-Email.

                                                                                                                                                                                                              Snapshot/Team & Skill views

                                                                                                                                                                                                              Idle

                                                                                                                                                                                                              The number of agents currently in the Idle state.

                                                                                                                                                                                                              Snapshot/Site & Skills by Team views

                                                                                                                                                                                                              Idle

                                                                                                                                                                                                              Count: The number of times an agent went into the Idle state.

                                                                                                                                                                                                              Total Time: The total amount of time agents spent in the Idle state.

                                                                                                                                                                                                              Average Time:(Not available in ADR or Agent Trace report) The average length of time agents were in the Idle state (Total Idle Time divided by Idle Count).

                                                                                                                                                                                                              % Time.:(Not available in Agent Summary and Interval reports) The percentage of time the agent was in the Idle state.

                                                                                                                                                                                                              Historical Agent Summary & Interval reports; ADR; Agent Trace report

                                                                                                                                                                                                              Idle

                                                                                                                                                                                                              Count: The number of times the agent went into the Idle state from a different state. Rest the cursor over the number in this field to see the idle codes the agent entered and how many times each code was used.

                                                                                                                                                                                                              Because an agent can change the idle code while in the Idle state, the number of idle codes can exceed the number of times the agent went into the Idle state. For example, an agent might move from Idle-Break to Idle-Email.

                                                                                                                                                                                                              Total Time: The total amount of time the agent spent in the Idle state.

                                                                                                                                                                                                              Snapshot/Agent view

                                                                                                                                                                                                              Idle Time

                                                                                                                                                                                                              The amount of time agents were in the Idle state during the time interval.

                                                                                                                                                                                                              Real-time Agent Interval reports

                                                                                                                                                                                                              In Outdial

                                                                                                                                                                                                              The number of agents who are connected to or are wrapping up an outdial call.

                                                                                                                                                                                                              Snapshot/Site view & Skills by Team view

                                                                                                                                                                                                              In Outdial

                                                                                                                                                                                                              The number of times the agent was connected to or was wrapping up an outdial call.

                                                                                                                                                                                                              Snapshot/Team view

                                                                                                                                                                                                              In Time

                                                                                                                                                                                                              The time the agent entered the state.

                                                                                                                                                                                                              Agent Trace report

                                                                                                                                                                                                              Inbound

                                                                                                                                                                                                              Reserved Time: The amount of time agents were in the Reserved state, during which incoming calls were ringing but had not yet been answered.

                                                                                                                                                                                                              Answered Count: The number of inbound calls that were answered by an agent during the time interval.

                                                                                                                                                                                                              Talk Time: The amount of time agents were talking on inbound calls during the time interval.

                                                                                                                                                                                                              Hold Time: The amount of time inbound calls were on hold during the time interval.

                                                                                                                                                                                                              Connected Time: The amount of time inbound calls were connected to an agent during the time interval (inbound talk time plus inbound hold time).

                                                                                                                                                                                                              Wrap Up Time: The amount of time agents spent in the Wrap-up state after an inbound call during the time interval.

                                                                                                                                                                                                              Average Connected Time: Inbound connected time divided by the number of inbound calls that were connected during the time interval.

                                                                                                                                                                                                              Average Handle Time: The average length of time spent handling an inbound call (inbound connected time plus inbound wrap-up time, divided by number of inbound calls).

                                                                                                                                                                                                              Real-time Agent Interval reports

                                                                                                                                                                                                              Inbound Average Handle Time

                                                                                                                                                                                                              The average length of time spent handling a call (total connected time plus total hold time and total wrap-up time, divided by connected count).

                                                                                                                                                                                                              Snapshot/Agent view

                                                                                                                                                                                                              Inbound Avg Handle Time

                                                                                                                                                                                                              The average length of time spent handling an inbound call (Total Inbound Connected Time plus Total Wrap Up Time, divided by Inbound Connected Count).

                                                                                                                                                                                                              Historical Agent Summary & Interval reports; ADR; Agent Trace report

                                                                                                                                                                                                              Inbound Connected

                                                                                                                                                                                                              Hold Count: The number of times an agent put an inbound caller on hold.

                                                                                                                                                                                                              Connected Count: The number of inbound calls that were connected to an agent.

                                                                                                                                                                                                              Total Talk Time: The total amount of time an agent was talking with a caller.

                                                                                                                                                                                                              Total Hold Time: The total amount of time inbound calls were on hold.

                                                                                                                                                                                                              Total Time: The total amount of time agents were connected to inbound calls.

                                                                                                                                                                                                              Average Hold Time: (Not in ADR or Snapshot/Agent view or Agent Trace report) The average hold time for inbound calls (Total Hold Time divided by Hold Count).

                                                                                                                                                                                                              Average Time: (Not in ADR or Snapshot/Agent view) The average inbound connected time (Total Time divided by Connected Count).

                                                                                                                                                                                                              % Talk Time: (Only in ADR and Agent Trace report) The percentage of inbound connected time the agent was talking with the caller.

                                                                                                                                                                                                              % Hold Time: (Only in ADR) The percentage of inbound connected time the caller was on hold.

                                                                                                                                                                                                              % Time: (Only in ADR) The percentage of time the agent was connected to an inbound call.

                                                                                                                                                                                                              Historical Agent Summary & Interval reports; ADR; Snapshot/Agent view; Agent Trace report

                                                                                                                                                                                                              Inbound Consult

                                                                                                                                                                                                              Count: The number of times an agent answered a consult request plus the number of times an agent consulted other agents.

                                                                                                                                                                                                              Total Time: Total Consult Answer Time plus Total Consult Request Time.

                                                                                                                                                                                                              Snapshot/Agent view

                                                                                                                                                                                                              Inbound Consult Answer

                                                                                                                                                                                                              Count: The number of times an agent answered a consult request from another agent handling an inbound call.

                                                                                                                                                                                                              Total Time: The total amount of time an agent spent answering consult requests from agents handling inbound calls.

                                                                                                                                                                                                              Snapshot/Agent view

                                                                                                                                                                                                              Inbound Consult Request

                                                                                                                                                                                                              Count: The number of times an agent sent a consult request to another agent during an inbound call.

                                                                                                                                                                                                              Total Time: The total amount of time an agent spent consulting other agents during inbound calls.

                                                                                                                                                                                                              Snapshot/Agent view

                                                                                                                                                                                                              Inbound CTQ

                                                                                                                                                                                                              Count: Inbound CTQ Answer Count plus Inbound CTQ Request Count.

                                                                                                                                                                                                              Total Time: Total Inbound CTQ Answer Time plus Total Inbound CTQ Request Time.

                                                                                                                                                                                                              Snapshot/Agent view

                                                                                                                                                                                                              Inbound CTQ Answer

                                                                                                                                                                                                              Count: The number of times an agent answered a consult-to-queue request from an agent who was handling an inbound call.

                                                                                                                                                                                                              Total Time: The total amount of time an agent spent answering consult-to-queue requests from agents handling inbound calls.

                                                                                                                                                                                                              Snapshot/Agent view; Historical Agent Summary & Interval reports; ADR

                                                                                                                                                                                                              Inbound CTQ Request

                                                                                                                                                                                                              Count: The number of times an agent initiated a consult to queue while handling an inbound call.

                                                                                                                                                                                                              Total Time: The total amount of time between when an agent initiated consult-to-queue requests while handling inbound calls and when the consultations ended.

                                                                                                                                                                                                              Snapshot/Agent view; Historical Agent Summary & Interval reports; ADR

                                                                                                                                                                                                              Inbound Reserved

                                                                                                                                                                                                              Count: (Not in ADR or Agent Trace report) The number of times an agent went into the Inbound Reserved state, during which a call is coming in to an agent’s station but has not yet been answered.

                                                                                                                                                                                                              Total Time: The total amount of time an agent spent in the Reserved state.

                                                                                                                                                                                                              Average Time: The average length of time agents were in the Inbound Reserved state (Total Available Time divided by Available Count).

                                                                                                                                                                                                              % Time: (Only in ADR and Agent Trace report) The percentage of time the agent was in the Inbound Reserved state.

                                                                                                                                                                                                              Snapshot/Agent view

                                                                                                                                                                                                              Inbound Transfers

                                                                                                                                                                                                              The number of inbound calls the agent transferred to another agent, queue, or number.

                                                                                                                                                                                                              Snapshot/Agent view

                                                                                                                                                                                                              Inbound Wrap Up

                                                                                                                                                                                                              Count: The number of times an agent went into the Wrap-up state after an inbound call.

                                                                                                                                                                                                              In the Snapshot/Agent view, you can rest the cursor over a number in this column to see the wrap-up codes the agent entered and how many times each code was used.

                                                                                                                                                                                                              Total Time: The total amount of time an agent spent in the Wrap-up state after an inbound call.

                                                                                                                                                                                                              Average Time: (Not in ADR, Agent Trace report, or Snapshot/Agent view) The average length of time agents were in the Wrap-up state after an inbound call (Total Wrap Up Time divided by Wrap Up Count).

                                                                                                                                                                                                              % Time: (Only in ADR and Agent Trace report) The percentage of time the agent was in the Wrap-up state after an inbound call.

                                                                                                                                                                                                              Historical Agent Summary & Interval reports; ADR; Agent Trace report; Snapshot/Agent view

                                                                                                                                                                                                              Initial Login Time

                                                                                                                                                                                                              The date and time the agent signed in.

                                                                                                                                                                                                              Historical Agent Summary/Agent level

                                                                                                                                                                                                              Login Count

                                                                                                                                                                                                              Total number of times an agent sined in on that day. Appears only if Agents is selected in the Display Results By drop-down list.

                                                                                                                                                                                                              Historical Agent Summary/Agent level

                                                                                                                                                                                                              Login Time

                                                                                                                                                                                                              The date and time the agent logged in to the Agent Desktop.

                                                                                                                                                                                                              Snapshot/Team, Agent, & Skill views; ADR; Agent Trace report

                                                                                                                                                                                                              Logout Time

                                                                                                                                                                                                              The date and time the agent signed out of the Agent Desktop.

                                                                                                                                                                                                              ADR; Agent Trace report

                                                                                                                                                                                                              Not Responding

                                                                                                                                                                                                              The number of agents currently in the Not Responding state.

                                                                                                                                                                                                              Snapshot/Site & Skills by Team views

                                                                                                                                                                                                              Not Responding

                                                                                                                                                                                                              Count: The number of times an agent was in the Not Responding state.

                                                                                                                                                                                                              Total Time: The total amount of time an agent spent in the Not Responding state.

                                                                                                                                                                                                              Average Time: (Not in ADR or Snapshot/Agent view or Agent Trace report) The average length of time agents were in the Not Responding state (Total Not Responding Time divided by Not Responding Count).

                                                                                                                                                                                                              % Time: (Only in ADR and Agent Trace report) The percentage of time the agent was in the Not Responding state.

                                                                                                                                                                                                              Historical Agent Summary & Interval reports; ADR; Agent Trace report; Snapshot/Agent view

                                                                                                                                                                                                              Not Responding Time

                                                                                                                                                                                                              The amount of time agents spent in the Not Responding state during the time interval.

                                                                                                                                                                                                              Real-time Agent Interval reports

                                                                                                                                                                                                              Number of Calls

                                                                                                                                                                                                              The number of inbound calls that were connected to the site or team during the time interval.

                                                                                                                                                                                                              Real-time Skills Interval by Team

                                                                                                                                                                                                              Occupancy

                                                                                                                                                                                                              The measure of time the agent spent on calls compared to available and idle time, calculated by dividing total connected time (inbound connected time plus outdial connected time) plus total wrap up time (inbound wrap-up time plus outdial wrap up time) by staff hours.

                                                                                                                                                                                                              Snapshot/Agent view; Real-time Agent Interval reports; Historical Agent Summary, Agent Interval, ADR, & Agent Trace report

                                                                                                                                                                                                              Occupancy

                                                                                                                                                                                                              The measure of time the agent spent on calls compared to available and idle time, calculated by dividing inbound connected time plus inbound wrap up time by staff hours.

                                                                                                                                                                                                              Real-time Skills Interval by Team

                                                                                                                                                                                                              Out Time

                                                                                                                                                                                                              The time the agent left the state.

                                                                                                                                                                                                              Agent Trace report

                                                                                                                                                                                                              Outdial

                                                                                                                                                                                                              Attempted: The number of calls that agents initiated during the time interval.

                                                                                                                                                                                                              Connected: The number of outdial calls that were connected to an agent during the time interval.

                                                                                                                                                                                                              Reserved Time: The amount of time agents were in the Outdial Reserved state, a state indicating that the agent has initiated an outdial call, but the call is not connected yet.

                                                                                                                                                                                                              Talk Time: The amount of time agents were talking on outdial calls during the time interval.

                                                                                                                                                                                                              Hold Tim: The amount of time outdial calls were on hold during the time interval.

                                                                                                                                                                                                              Connected Time: The amount of time outdial calls were connected to an agent during the time interval (outdial talk time plus outdial hold time).

                                                                                                                                                                                                              Average Connected Time: Outdial connected time divided by the number of outdial calls that were connected during the time interval.

                                                                                                                                                                                                              Wrap Up Time: The amount of time agents spent in the Wrap-up state after an outdial call during the time interval.

                                                                                                                                                                                                              Average Handle Time: The average length of time spent handling an outdial call (outdial connected time plus outdial wrap up time, divided by number of outdial calls).

                                                                                                                                                                                                              Real-time Agent Interval reports

                                                                                                                                                                                                              Outdial Avg Handle Time

                                                                                                                                                                                                              The average length of time spent handling an outdial call (Total Outdial Connected Time plus Total Outdial Wrap Up Time, divided by Outdial Connected Count).

                                                                                                                                                                                                              Historical Agent Summary, Agent Interval, ADR, & Agent Trace report

                                                                                                                                                                                                              Outdial Conference

                                                                                                                                                                                                              The number of outdial calls the agent conferenced with another party.

                                                                                                                                                                                                              Snapshot/Agent view

                                                                                                                                                                                                              Outdial Connected

                                                                                                                                                                                                              Attempted Count: The number of times an agent attempted to make an outdial call.

                                                                                                                                                                                                              Connected Count: The number of outdial calls that were connected to an agent.

                                                                                                                                                                                                              Hold Count: The number of times an agent put an outdial call on hold.

                                                                                                                                                                                                              Total Talk Time: The total amount of time an agent was talking with a party on an outdial call.

                                                                                                                                                                                                              Total Hold Time: The total amount of time outdial calls were on hold.

                                                                                                                                                                                                              Total Time: The total amount of time agents were connected to outdial calls.

                                                                                                                                                                                                              Average Hold Time: (Not in ADR, Agent Trace report, or Snapshot/Agent view) The average hold time for outdial calls (Total Hold Time divided by Hold Count).

                                                                                                                                                                                                              Average Time. (Not in ADR, Agent Trace report, or Snapshot/Agent view) The average outdial connected time (Total Time divided by Connected Count).

                                                                                                                                                                                                              Historical Agent Summary & Interval reports; ADR; Agent Trace report; Snapshot/Agent view

                                                                                                                                                                                                              Outdial Consult

                                                                                                                                                                                                              Count: Outdial Consult Answer count plus Outdial Consult Request count.

                                                                                                                                                                                                              Total Time: Total Outdial Consult Answer Time plus Total Outdial Consult Request Time.

                                                                                                                                                                                                              Snapshot/Agent view

                                                                                                                                                                                                              Outdial Consult Answer

                                                                                                                                                                                                              Count: The number of times the agent answered a consult request from another agent who was on an outdial call.

                                                                                                                                                                                                              Total Time: The amount of time the agent was consulted by another agent who was on an outdial call.

                                                                                                                                                                                                              Snapshot/Agent view

                                                                                                                                                                                                              Outdial Consult Request

                                                                                                                                                                                                              Count: The number of times the agent consulted another agent while on an outdial call.

                                                                                                                                                                                                              Total Time: The amount of time the agent consulted another agent during an outdial call.

                                                                                                                                                                                                              Snapshot/Agent view

                                                                                                                                                                                                              Outdial CTQ

                                                                                                                                                                                                              Count: Outdial CTQ Answer Count plus Outdial CTQ Request Count.

                                                                                                                                                                                                              Total Time: Total Outdial CTQ Answer Time plus Total Outdial CTQ Request Time

                                                                                                                                                                                                              Snapshot/Agent view

                                                                                                                                                                                                              Outdial CTQ Answer

                                                                                                                                                                                                              Count: The number of times an agent answered a consult-to-queue request from an agent who was handling an outdial call.

                                                                                                                                                                                                              Total Time: The total amount of time an agent spent answering consult-to-queue requests from agents handling outdial calls.

                                                                                                                                                                                                              Snapshot/Agent view; Historical Agent Summary & Interval reports; ADR

                                                                                                                                                                                                              Outdial CTQ Request

                                                                                                                                                                                                              Count: The number of times an agent initiated a consult to queue while handling an inbound call.

                                                                                                                                                                                                              Total Time: The total amount of time between when an agent initiated consult-to-queue requests while handling inbound calls and when the consultations ended.

                                                                                                                                                                                                              Snapshot/Agent view; Historical Agent Summary & Interval reports; ADR

                                                                                                                                                                                                              Outdial Reserved

                                                                                                                                                                                                              Count: The number of times an agent was in the Outdial Reserved state, a state indicating that the agent has initiated an outdial call, but the call is not connected yet.

                                                                                                                                                                                                              Total Time: The total amount of time an agent was in the Outdial Reserved state.

                                                                                                                                                                                                              Average Time: (Not in ADR, Agent Trace report, or Snapshot/Agent view) The average amount of time agents were in the Outdial Reserved state (Total Time divided by Count).

                                                                                                                                                                                                              Historical Agent Summary & Interval reports; ADR; Agent Trace report; Snapshot/Agent view

                                                                                                                                                                                                              Outdial Transfers

                                                                                                                                                                                                              The number of outdial calls the agent transferred to another agent, queue, or number.

                                                                                                                                                                                                              Snapshot/Agent view

                                                                                                                                                                                                              Outdial Wrap Up

                                                                                                                                                                                                              Count: The number of times an agent went into the Wrap-up state after an outdial call.

                                                                                                                                                                                                              Total Time: The total amount of time an agent spent in the Wrap-up state after an outdial call.

                                                                                                                                                                                                              Average Time: (Not in ADR, Agent Trace report, or Snapshot/Agent view) The average length of time agents were in the Wrap-up state after an outdial call (Total Outdial Wrap Up Time divided by Outdial Wrap Up Count).

                                                                                                                                                                                                              Historical Agent Summary & Interval reports; ADR; Agent Trace report; Snapshot/Agent view

                                                                                                                                                                                                              Queue

                                                                                                                                                                                                              If the agent is currently handling a call, the name of the queue that the call came in on.

                                                                                                                                                                                                              Snapshot/Team, Agent, & Skill views

                                                                                                                                                                                                              Reason

                                                                                                                                                                                                              The reason the agent logged out. For example:

                                                                                                                                                                                                              • Desktop browser closed. The browser window in which the Agent Desktop application was running was closed while the agent was logged in.

                                                                                                                                                                                                              • LoggingInAnotherInstance. The system logged the agent out because the agent logged in to another instance of the Agent Desktop.

                                                                                                                                                                                                              • Lost network connection. The agent was logged out because of a network interruption that exceeded two minutes (unless a different timeout is specified for your system).

                                                                                                                                                                                                              • Normal logout. The agent clicked the Log Out button in the Agent Desktop window.

                                                                                                                                                                                                              • Operational logout. The system logged the agent out in response to a command initiated by Webex Contact Center Operations or Technical Support.

                                                                                                                                                                                                              • Supervisory logout. The supervisor logged the agent out.

                                                                                                                                                                                                              Other reasons can occasionally occur.

                                                                                                                                                                                                              ADR; Agent Trace report

                                                                                                                                                                                                              Reserved

                                                                                                                                                                                                              The number of agents currently in the Reserved state, during which a call is coming in but has not yet been answered.

                                                                                                                                                                                                              Snapshot/Site view & Skills by Team view

                                                                                                                                                                                                              Reserved

                                                                                                                                                                                                              The number of agents in the Reserved state who possess the skill.

                                                                                                                                                                                                              Snapshot/Skill view

                                                                                                                                                                                                              Site

                                                                                                                                                                                                              The name of a site.

                                                                                                                                                                                                              If your enterprise uses the Multimedia feature and the report includes more than one media channel, you can click the a collapse arrow or expand arrow to the left of a team name to collapse or expand the data grouped by channel type.

                                                                                                                                                                                                              In the Site view of a current snapshot agent report, you can do the following:

                                                                                                                                                                                                              • Click a collapse arrow or expand arrow next to a site name to collapse or expand the list of logged-in teams at the site.

                                                                                                                                                                                                              • Click the name of a team to drill-down to the Team view for that team.

                                                                                                                                                                                                              Snapshot/Site view; Real-time Agent Interval reports (except Agent-level)

                                                                                                                                                                                                              Site

                                                                                                                                                                                                              The site where the team the agent was handling calls for is located.

                                                                                                                                                                                                              ADR; Agent Trace report

                                                                                                                                                                                                              Skill

                                                                                                                                                                                                              The name of the skill.

                                                                                                                                                                                                              In the Skill view of the current snapshot agent report you can do the following:

                                                                                                                                                                                                              • Click a collapse arrow or expand arrow next to a skill name to collapse or expand the list of logged-in agents who possess the skill.

                                                                                                                                                                                                              • Click the name of an agent to drill-down to the Agent view for that agent.

                                                                                                                                                                                                              • If your enterprise uses the Multimedia feature and the report includes more than one media channel, you can click the collapse or expand arrow to the left of an agent name to collapse or expand the data grouped by channel type.

                                                                                                                                                                                                              Snapshot/Skill view; Real-time Skills Interval by Team

                                                                                                                                                                                                              Staff Hours

                                                                                                                                                                                                              The amount of time the agent has been logged in.

                                                                                                                                                                                                              Snapshot/Team, Agent, & Skill views

                                                                                                                                                                                                              Staff Hours

                                                                                                                                                                                                              The amount of time the agent was logged in during the time interval.

                                                                                                                                                                                                              Real-time Agent Interval reports & Skills Interval by Team

                                                                                                                                                                                                              Staff Hours

                                                                                                                                                                                                              The total amount of time agents were logged in.

                                                                                                                                                                                                              Historical Agent Summary & Interval reports

                                                                                                                                                                                                              Staff Hours

                                                                                                                                                                                                              The amount of time the agent was logged in during each login session.

                                                                                                                                                                                                              ADR; Agent Trace report

                                                                                                                                                                                                              State

                                                                                                                                                                                                              The time the agent logged in and logged out and each state the agent was in during the login session:

                                                                                                                                                                                                              • Available: The agent was available and waiting for calls.

                                                                                                                                                                                                              • Conference: The agent conferenced a call with another party.

                                                                                                                                                                                                              • Consult-Answer: The agent answered a consult request from another agent.

                                                                                                                                                                                                              • Consult-Request: The agent initiated a consultation with another agent.

                                                                                                                                                                                                              • Idle: The phone rang but was not answered within a specified period of time.

                                                                                                                                                                                                              • Not Responding: The agent’s phone rang but the agent did not answer within a specified period of time.

                                                                                                                                                                                                              • Hold: The agent placed a connected call on hold.

                                                                                                                                                                                                              • Talk: The agent was talking on an inbound call.

                                                                                                                                                                                                              • Wrap Up: The call ended but the agent was not ready for the next call.

                                                                                                                                                                                                              Agent Trace report

                                                                                                                                                                                                              Talk

                                                                                                                                                                                                              The number of agents in the Connected state who are currently talking with a caller.

                                                                                                                                                                                                              Snapshot/Site & Skills by Team views

                                                                                                                                                                                                              Talk Time

                                                                                                                                                                                                              The amount of time agents were talking with callers during the time interval.

                                                                                                                                                                                                              Real-time Skills Interval by Team

                                                                                                                                                                                                              Team

                                                                                                                                                                                                              The name of a team in the report.

                                                                                                                                                                                                              In the Team view and Skills by Team view of a current snapshot agent report you can do the following:

                                                                                                                                                                                                              • Click a collapse arrow or expand arrow next to a team name to collapse or expand the list of logged-in agents on the team.

                                                                                                                                                                                                              • If your enterprise uses the Multimedia feature and the report includes more than one media channel, you can click the a collapse or expand arrow to the left of an agent name to collapse or expand the data grouped by channel type.

                                                                                                                                                                                                              In the Team view, you can click the name of an agent to drill-down to the Agent view for that agent.

                                                                                                                                                                                                              Snapshot/Team view & Skills by Team view; Real-time Agent Interval report/Team & Skills by Team level

                                                                                                                                                                                                              Team

                                                                                                                                                                                                              The team the agent was handling calls for.

                                                                                                                                                                                                              ADR; Agent Trace report

                                                                                                                                                                                                              Time in Current State

                                                                                                                                                                                                              The amount of time the agent has been in the current state.

                                                                                                                                                                                                              Snapshot/Team, Agent, & Skill views

                                                                                                                                                                                                              Total Calls

                                                                                                                                                                                                              Inbound Answered calls plus Outdial Attempted calls.

                                                                                                                                                                                                              Real-time Agent Interval reports

                                                                                                                                                                                                              Total Logged In

                                                                                                                                                                                                              The number of agents currently logged in or, in the Skill view, the number of agents currently logged in who possess the skill.

                                                                                                                                                                                                              Snapshot/Site, Team, Skill, & Skills by Team views

                                                                                                                                                                                                              Channels Logged In

                                                                                                                                                                                                              The number of media channels to which agents are currently logged in. Appears only if your enterprise uses the Multimedia feature.

                                                                                                                                                                                                              Snapshot/Site, Team, Skill, & Skills by Team views

                                                                                                                                                                                                              Wrap Up

                                                                                                                                                                                                              The number of agents currently in the Wrap-up state.

                                                                                                                                                                                                              Snapshot/Site & Skills by Team view

                                                                                                                                                                                                              Wrap Up Time

                                                                                                                                                                                                              The amount of time agents spent in the Wrap-up state after an inbound call during the time interval.

                                                                                                                                                                                                              Real-time Skills Interval by Team

                                                                                                                                                                                                              Historical Skill Report Parameters

                                                                                                                                                                                                              The following table describes the parameters available in Webex Contact Center historical Skills by Queues reports. Asterisks (*) mark parameters that are available only in a skill summary report, which you can display by drilling down on a skill name in a Skills by Queue report.

                                                                                                                                                                                                              Parameter

                                                                                                                                                                                                              Description

                                                                                                                                                                                                              Report

                                                                                                                                                                                                              % Calls Matched

                                                                                                                                                                                                              The percentage of calls for which the initial value of the skill required by the call was equal to the final value when the call was distributed to an agent.

                                                                                                                                                                                                              (Matched Calls * 100)/ (Connected + Abandoned + Reclassified)

                                                                                                                                                                                                              Skills by Queue

                                                                                                                                                                                                              Abandoned

                                                                                                                                                                                                              The number of calls with this skill requirement that were abandoned during the report interval.

                                                                                                                                                                                                              Skills by Queue

                                                                                                                                                                                                              Abandoned within SL

                                                                                                                                                                                                              The number of calls that were terminated while in queue within the Service Level threshold provisioned for this skill.

                                                                                                                                                                                                              Skills by Queue

                                                                                                                                                                                                              Avg Handle Time

                                                                                                                                                                                                              The average length of time spent handling a call with this skill requirement (total connected time plus total wrap-up time, divided by calls handled).

                                                                                                                                                                                                              Skills by Queue & Skills by Agents

                                                                                                                                                                                                              Connected

                                                                                                                                                                                                              The number of calls with this skill requirement that were connected during the report interval.

                                                                                                                                                                                                              Skills by Queue & Skills by Agents

                                                                                                                                                                                                              Connected within SL

                                                                                                                                                                                                              The number of calls with this skill requirement that were connected within the Service Level threshold provisioned for this skill.

                                                                                                                                                                                                              Skills by Queue & Skills by Agents

                                                                                                                                                                                                              Final Operand*

                                                                                                                                                                                                              The skill operand type that was assigned to the call when it was distributed to an agent with a matching skill.

                                                                                                                                                                                                              Skills by Queue

                                                                                                                                                                                                              Final Value*

                                                                                                                                                                                                              The value of the skill requirement assigned to the call when the call was distributed to an agent.

                                                                                                                                                                                                              Skills by Queue

                                                                                                                                                                                                              Initial Operand*

                                                                                                                                                                                                              The skill operand type that was assigned to the call when it was distributed to the queue. Possible values:

                                                                                                                                                                                                              • eq (equal to)

                                                                                                                                                                                                              • neq (not equal to)

                                                                                                                                                                                                              • gte (greater than or equal to)

                                                                                                                                                                                                              • lte (less than or equal to)

                                                                                                                                                                                                              Skills by Queue

                                                                                                                                                                                                              Initial Value*

                                                                                                                                                                                                              The value of the skill requirement assigned to the call when it arrived in the queue.

                                                                                                                                                                                                              Skills by Queue

                                                                                                                                                                                                              Operand

                                                                                                                                                                                                              The skill operand type that was assigned to the call when it was distributed to the agent. Possible values:

                                                                                                                                                                                                              • eq (equal to)

                                                                                                                                                                                                              • neq (not equal to)

                                                                                                                                                                                                              • gte (greater than or equal to)

                                                                                                                                                                                                              • lte (less than or equal to)

                                                                                                                                                                                                              Skills by Agents

                                                                                                                                                                                                              Reclassified

                                                                                                                                                                                                              The number of calls with this skill requirement that were transferred from the queue by the system.

                                                                                                                                                                                                              Skills by Queue

                                                                                                                                                                                                              Reclassified within SL

                                                                                                                                                                                                              The number of calls with this skill requirement that were transferred from the queue by the system within the Service Level threshold provisioned for the skill.

                                                                                                                                                                                                              Skills by Queue

                                                                                                                                                                                                              Skill

                                                                                                                                                                                                              The name of a skill.

                                                                                                                                                                                                              In a Skills by Queue report, you can click an entry in this column to drill down to view daily activity for the month (from a monthly summary) or to view half-hourly data for a day (from a daily summary).

                                                                                                                                                                                                              Skills by Queue Skills by Agents

                                                                                                                                                                                                              Total

                                                                                                                                                                                                              The total number of calls.

                                                                                                                                                                                                              Skills by Queue

                                                                                                                                                                                                              Value

                                                                                                                                                                                                              The value of the skill requirement assigned to the call when the call was distributed to the agent.

                                                                                                                                                                                                              Skills by Agents

                                                                                                                                                                                                              Historical Threshold Alerts Report Parameters

                                                                                                                                                                                                              If your enterprise uses the threshold alerts feature and your user profile authorizes you to view alerts, you can use the controls on the Threshold Alerts page of the Historical Reports module to display details about threshold alerts that were triggered between midnight of the current day and three months ago. The following table describes the available parameters.

                                                                                                                                                                                                              Parameter

                                                                                                                                                                                                              Description

                                                                                                                                                                                                              Acknowledged

                                                                                                                                                                                                              Whether or not a supervisor acknowledged the alert.

                                                                                                                                                                                                              Acknowledged Time

                                                                                                                                                                                                              The time the alert was acknowledged.

                                                                                                                                                                                                              Actual Value

                                                                                                                                                                                                              The actual value that triggered the alert.

                                                                                                                                                                                                              Archived

                                                                                                                                                                                                              Whether or not a supervisor archived the alert.

                                                                                                                                                                                                              Comments

                                                                                                                                                                                                              Optional comments, if any, entered by the supervisor who acknowledged the alert.

                                                                                                                                                                                                              Metric

                                                                                                                                                                                                              The metric that the threshold is associated with.

                                                                                                                                                                                                              Operand

                                                                                                                                                                                                              > (greater than)

                                                                                                                                                                                                              >= (greater than or equal to)

                                                                                                                                                                                                              < (less than)

                                                                                                                                                                                                              <= (less than or equal to)

                                                                                                                                                                                                              = (equal to)

                                                                                                                                                                                                              Supervisor

                                                                                                                                                                                                              The name of the supervisor who acknowledged the alert.

                                                                                                                                                                                                              Time

                                                                                                                                                                                                              The date and time that the threshold alert was triggered.

                                                                                                                                                                                                              Trigger Interval

                                                                                                                                                                                                              The number of seconds specified in the threshold rule as the interval during which the system should generate only one alert for the threshold rule check.

                                                                                                                                                                                                              Trigger Value

                                                                                                                                                                                                              The value that the threshold rule defined as the trigger.

                                                                                                                                                                                                              Usage Metrics Report Parameters

                                                                                                                                                                                                              The following table describes the parameters available in the Usage Metrics Report.

                                                                                                                                                                                                              Column

                                                                                                                                                                                                              Description

                                                                                                                                                                                                              Calls Duration (min)

                                                                                                                                                                                                              The total amount of time between when inbound calls arrived or outdial calls were placed and when they were terminated.

                                                                                                                                                                                                              Inbound

                                                                                                                                                                                                              Total Calls: The total number of inbound calls.

                                                                                                                                                                                                              Connected Calls: The number of inbound calls that were connected to an agent.

                                                                                                                                                                                                              IVR Duration (min): The number of minutes during which calls were in the IVR system.

                                                                                                                                                                                                              Queue Duration (sec): The number of seconds during which calls were in a queue.

                                                                                                                                                                                                              Talk Time (min): The number of minutes during which agents were talking with callers.

                                                                                                                                                                                                              Hold Time (min): The number of minutes during which inbound calls were on hold.

                                                                                                                                                                                                              Month

                                                                                                                                                                                                              The month during which the call activity occurred.

                                                                                                                                                                                                              Outdial

                                                                                                                                                                                                              Total Calls: The total number of outdial calls.

                                                                                                                                                                                                              Connected Calls: The number of outdial calls that were connected to an agent.

                                                                                                                                                                                                              Talk Time (min): The number of minutes during which an agent was talking with a party on an outdial call.

                                                                                                                                                                                                              Hold Time (min): The number of minutes during which outdial calls were on hold.

                                                                                                                                                                                                              Recorded Calls

                                                                                                                                                                                                              The number of calls that were recorded.

                                                                                                                                                                                                              Total Calls

                                                                                                                                                                                                              The total number of inbound and outdial calls.

                                                                                                                                                                                                              Was this article helpful?