Manage Software Channel Upgrades for Your Webex Site
 Feedback?
Overview
The Latest Channel gives your organization immediate access to the latest updates and features for Webex. It is always recommended that you use the latest version of Webex meetings as it comes with all the new features and updates that are available.
The Slow Channel (formerly called lockdown) gives businesses more time to roll out new versions of Webex Business suite applications to their users. You can view the options available in Slow Channel in this article. To get on to the latest Slow Channel contact your Cisco account representative or Cisco support.
For detailed information, see the Cisco Webex Meetings Slow Channel Policy.
If your site is on the Latest Channel, you can’t change to the Slow Channel.
Both Webex Site Administration and Webex Control Hub feature Slow Channel release management.
If you’re a Webex Partner and you’re managing multiple sites, you can upgrade multiple sites at once.
If you’re a Webex Partner, you will need to allow your customers to manage their own sites in Webex Control Hub.
After you upgrade your site, you can't change it back to a previous version.
Before you begin
-
Ensure that users are aware of the planned upgrade and latest features. Check these articles:
-
Check for integration compatibility with the upgrade. See Webex Meetings desktop app and Productivity Tools support . Alternately, test the integration in your sandbox Webex site.
-
If your users can't install applications on their computers, use a remote management tool to deploy each Webex service application for both Windows and Mac.
-
Schedule the upgrade for a time period when fewer meetings occur and avoid times when important meetings are likely to occur.
-
Export a usage report to help track any changes in usage, storage, or new users.
| 1 |
Sign in to Site Administration. |
| 2 |
Select Upgrade Now on the banner at the top of your screen.
The banner displays an available upgrade after you deploy the release to the primary and GSB clusters.
|
| 3 |
If you don't see a banner, go to . |
| 4 |
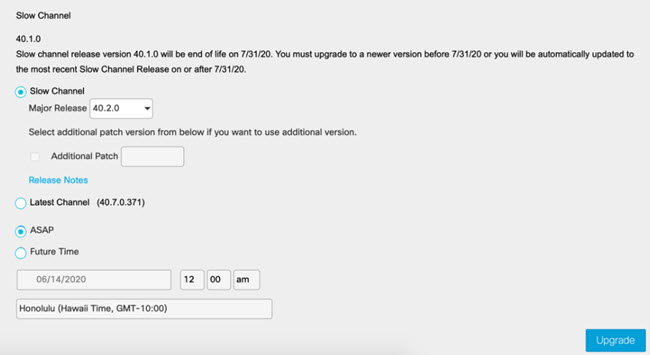
Choose whether to upgrade to a later Slow Channel or to move to the Latest Channel, by selecting the corresponding radio button.
If you move from a Slow Channel release to the Latest Channel, your site automatically upgrades to the latest available Cisco Webex desktop applications. Your site receives new features, enhancements, and fixes as we release them. If you stay on the Slow Channel, the Upgrade button isn't available when your site is running the latest slow channel release. |
| 5 |
If you chose to remain on the Slow Channel, select an available Major Release and an Additional Patch level. If you don't want to apply an Additional Patch , uncheck the box. |
| 6 |
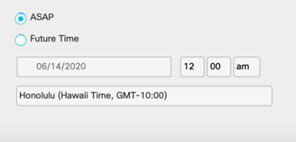
To update your site immediately, select ASAP . If you want to schedule the update for a later time, select Future Time , and then select a date and time up to one month in advance.
|
| 7 |
Select Upgrade . |
| 8 |
On the Upgrade Confirmation dialogue, confirm your selection and click Yes . If you're switching to the Latest Channel, you can't switch back to the Slow Channel. If you're switching to a later Slow Channel version, confirm the version number. You can't roll back to an earlier version. The upgrade takes up to 30 minutes to complete. |
| 9 |
Verify whether the upgrade is successful by checking the version number in . After you upgrade to the latest version, the notification and dropdown disappears. Select History to see the status of upgrades, when the upgrades started and ended, and who performed the upgrades. Should an upgrade fail, your Webex site should still function. We recommend that you hold a test meeting after an upgrade. |
After you upgrade your site, you can't change it back to a previous version.
Before you begin
-
Ensure that users are aware of the planned upgrade and latest features. Check: What's New for Lockdown Versions of Cisco Webex Meetings, What's New for the Latest Versions of Webex Meetings, and Webex Meetings Suite End-of-Version Support Policy.
-
Check for integration compatibility with the upgrade. See Desktop Application support or Productivity Tools support. Alternately, test the integration in your sandbox Webex site.
-
If your users can't install applications on their computers, use a remote management tool to deploy each Webex service application for both Windows and Mac.
-
Schedule the upgrade for a time period when fewer meetings occur and avoid times when important meetings are likely to occur.
-
Export a usage report to help track any changes in usage, storage, or new users.
| 1 |
From the customer view in https://admin.webex.com, go to Meeting and then select a Webex site. |
| 2 |
Click the Settings tab. |
| 3 |
Under Common Settings, select Desktop App Upgrade. |
| 4 |
Choose whether to upgrade to a later Slow Channel or to move to the Latest Channel, by selecting the corresponding radio button. If you move from a Slow Channel release to the Latest Channel, your site automatically upgrades to the latest available Cisco Webex desktop applications. Your site receives new features, enhancements, and fixes as we release them. If you stay on the Slow Channel, the Upgrade button isn't available when your site is running the latest slow channel release. |
| 5 |
If you chose to remain on the slow channel, select an available Major Release and an Additional Patch level. If you don't want to apply an Additional Patch, uncheck the check box. |
| 6 |
On the Upgrade Confirmation dialogue, confirm your selection and then click Yes. If you're switching to the Latest Channel, you can't switch back to the Slow Channel. If you're upgrading to a later Slow Channel version, confirm the version number. You can't roll back to an earlier version. The upgrade takes up to 30 minutes to complete. |
| 7 |
To verify that the upgrade is successful, go to Services, select your Webex site, and click . |


