- Home
- /
- Article

Thanks for your feedback.

 In this article
 Feedback?
Call Queue is a collection of core call center features such as voice queues, call queue analytics, reports, and so on. Agents and supervisors can use these features along with advanced calling features to efficiently handle the customer calls.
Call Queue is an offering available as part of the Webex Calling professional license. It includes features such as voice queues, skill-based routing, call queue monitoring and analytics, multi call window, and more, help users to engage with customers efficiently. Also, with our Cisco Call for Microsoft Teams integration, the Microsoft Teams users can access the features directly from Teams.
As Call Queue has voice-only offering, it's best suited for customers who need simple voice-centric call center capabilities and don't need the advanced features of comprehensive Contact Center service.
We recommend Webex Calling Customer Assist for customers who require low-end professional Contact Center capabilities such as agent and supervisor experience in Webex App, real-time queue view, agent screen pop, and so on.
We recommend Webex Contact Center for customers who require sophisticated customer engagement capabilities, omni-channel routing, or large-scale, high call volume deployments.
Features and benefits
Call Queue includes the following features:
- Voice Queues—Helps administrators to configure various features such as skills-based routing, enhanced queue polices, customer callback, and so on.
- Call queue analytics—Helps administrators to view the important data such as top call queues, top agents, live call queues status, and so on.
- Call queue reports—Helps administrators to view the details such as call queue status report and agent status report.
- Agent experience in Webex App—Helps users to check and change their call queue status and join/unjoin queue in the Webex App.
- Multi call window—Helps users to get a quick view of the call status and easily access some common Calling features.
- Cisco Call integration within Microsoft Teams—Helps users to access the features directly from Microsoft Teams.
Voice Queues
Voice queue, which is formerly known as Group Call Management (GCM), is a set of features designed to efficiently manage high call volume and team call handling services.
Voice queue adds key features that provide supervisor capabilities, enhances queue policies to determine call routing based on business hours, provides skill-based routing, provides call-back capabilities for customers and reports and analytics for administrators. Voice queues is an out-of-box feature set within Webex Calling and is recommended for call queues up to 50 agents.
Voice queue includes:
-
For Callers
-
Welcome greeting
-
Comfort greeting (we’ll be with you shortly)
-
Request callback (a caller can designate a callback number, rather than wait in a queue)
-
Enhanced queue routing policies (for night service, holidays, and forced forwarding)
-
Additional IVR functions-call whisper message and comfort bypass message
-
-
For Agents
-
One-step login / logout of queue
-
Personal readiness status management
-
Multiqueue operations
-
Intuitive UX options for desk phone and Webex App
-
-
For Supervisors and Administrators
-
Monitor / coach / barge / takeover active calls
-
Agent status management
-
Call queue reporting and analytics dashboard
-
Assign call queue staff per queue
-
Assign skills-based routing ratings of staff per queue
-
Call Queue launch kit
Before configuring the call queue, if you want to understand the ways to equip call queues and empower your call queue agents, you can download the Call Queue launch kit.
Call queues routes callers to agents who can help with a particular issue or question. Calls are distributed one at a time to the agents in the queue. Call queues temporarily hold calls when all agents assigned to receive calls from the queue are unavailable. When agents become available, the queued calls are routed according to the call routing settings you’ve determined for the call queue.
When a call arrives to a call queue and is sent to an agent, the agent call forwarding feature doesn't work.
The following table outlines the limitations for queues, agents, and supervisors.
|
Limitation |
Maximum Limit |
|---|---|
|
Number of queues per location |
1,000 |
|
Number of agents per queue |
1,000 100 if the call routing type is Weighted 50 if the call routing type is Simultaneous |
|
Queue size—number of calls a queue can handle |
250 |
|
Number of agents a supervisor can manage |
100 |
Multiple DNIS for Call Queues
You can configure multiple Dialed Number Identification Service (DNIS) entries for Call Queue. This allows several phone numbers to route to the same queue while preserving the number and identity dialed by the caller.
Transition from Alternate Numbers to DNIS
DNIS is an enhanced and more scalable replacement for the existing Alternate Numbers feature. DNIS provides a more scalable and flexible way to manage multiple numbers with additional capabilities such as custom names and announcements. As part of this transition:
-
You can continue to add and use alternate numbers for the first 3 months.
-
You can use existing alternate numbers but can’t add new ones after 3 months.
-
The Alternate Numbers feature will be fully removed after 6 months.
-
Alternate Numbers that are already provisioned for call queues will be converted to DNISs automatically.
Create a call queue
You can create multiple call queues for your organization. Use these call queues when you can't answer customers' calls to provide an automated answer, comfort messages or hold music until someone answers.
| 1 |
Sign in to Control Hub. | ||||||||||||||||||||||
| 2 |
Go to . | ||||||||||||||||||||||
| 3 |
Go to the Call Queue card and click Add new to create a new call queue. | ||||||||||||||||||||||
| 4 |
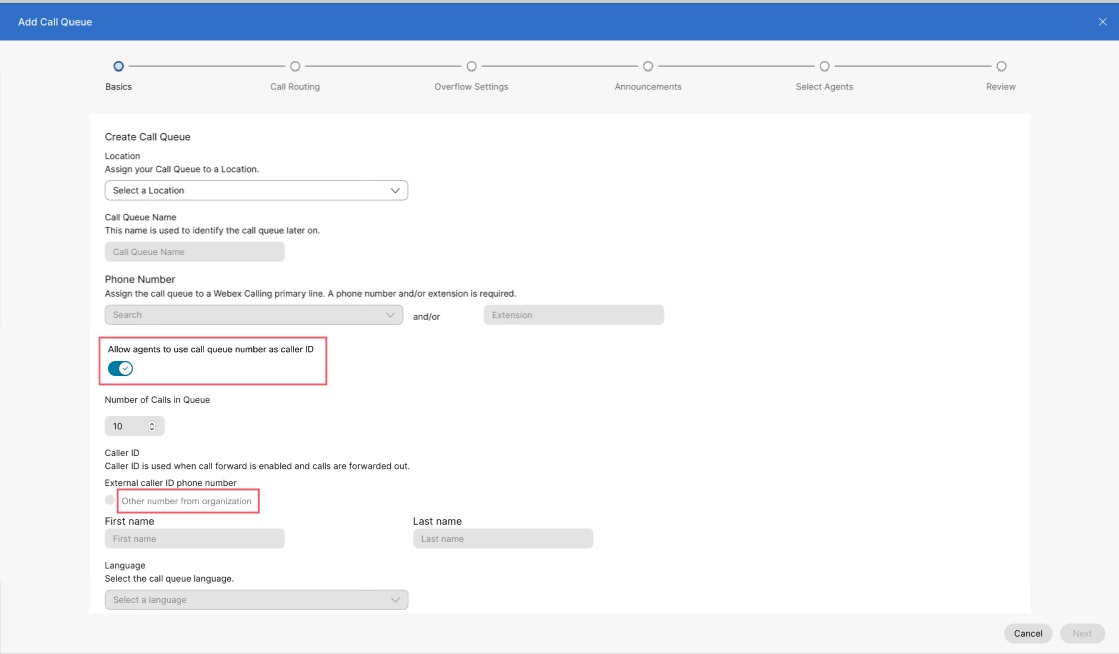
On the Basics page, enter the following information, and then click Next.
| ||||||||||||||||||||||
| 5 |
On the Call Routing page, choose one of the following options, and click Next.
The following table shows the maximum number of agents that you can allocate for each call routing type.
By default, the calls aren’t routed to agents when they are in the Wrapping Up state. | ||||||||||||||||||||||
| 6 |
On the Overflow Settings page, configure overflow settings and notification tones for agents, and click Next.
| ||||||||||||||||||||||
| 7 |
On the Announcements page, determine the messages and music that callers hear while waiting in the queue and click Next. Announcement settings are configured at two levels:
You can enable any of the following options:
| ||||||||||||||||||||||
| 8 |
On the Select Agents page, click Add User or Workspace or Virtual Line drop-down, then search or select the users, workspaces, or virtual lines to add to the call queue. You can assign a skill level (1 being the highest skill level and 20 being the lowest skill level) to each user or workspaces added to the call queue.
You can select the Allow agents on active calls to take additional calls check box if you want to allow agents on active calls to take additional calls. You can select the Allow agents to join or unjoin the queue check box if you want to allow agents to join or unjoin the queue. Depending on the call routing option you chose previously, you may need to add extra information such as adding percentage weighting to users or workspaces, or for circular or top-down call routing, drag and drop users and workspaces in the order of their queue position. If an agent is assigned only an extension, ensure their location has a main number. Without a main number, calls to the queue won’t be routed to the extension-only agents. | ||||||||||||||||||||||
| 9 |
On the Review page, review your call queue settings to make sure you've entered the correct details. | ||||||||||||||||||||||
| 10 |
Click Create and Done to confirm your call queue settings. On creating a queue, you can enable or disable the queue using the toggle beside Enable Call Queue. Toggling off the Enable Queue disables all new calls to the queue and presents a busy status to the caller. Also, it resets the call routing type allocation for the next agent, for example, circular routing will default to the first agent in the list. | ||||||||||||||||||||||
Watch this video demonstration on how to create a new call queue in Control Hub.
Create call queues in bulk
You can add and manage call queues in bulk using a call queue CSV. This section covers the specific fields and values needed for the CSV upload of Webex Calling call queues.
Before you begin
-
Before uploading your call queue CSV, make sure to read Bulk provisioning Webex Calling elements using CSV to understand the CSV conventions.
-
You can either export your current call queues, which allows you to add, delete, or modify your existing data set, or you can export a sample set of call queues. Once modified, you can upload the file through the bulk features.
-
Exporting CSV file into ZIP file format: When exporting data to a CSV file, the number of records may exceed 1000. In such cases, download the ZIP file, which contains the full set of records in a single CSV file. A separate folder containing all the data breaks down into multiple CSV files with less than 1000 records. These files are generated for the administrators to quickly import any updates and upload.
-
Export a new CSV to capture the latest information for the fields and avoid errors during the import of changes.
-
-
It’s important to know the mandatory and optional columns, and information that you need to provide when filling out the CVS template. You can find the specific fields for the call queue CSV in the table under the Prepare your CSV section.
-
The maximum amount of rows is 1,000 (not including the header).
-
Agents can be users or workspaces. For users, enter the user’s email address. For workspaces, enter the workspace name.
-
Each row can hold a maximum of 50 agents. See Add or edit more than 50 agents at a time for more information.
Bulk add call queues
To add call queues in bulk, you’ll simply download and fill out a blank CSV template.
Call forwarding settings for a call queue can’t be modified in bulk. To edit call forwarding for a call queue, see Configure call forwarding for a call queue.
| 1 |
Sign in to Control Hub. |
| 2 |
Go to . |
| 3 |
Go to the Call Queue card. On the Prefer to create Call Queue in bulk message, click Open the bulk editor. The Manage Call Queue window displays. |
| 4 |
Select a location for the call queues you'd like to add. |
| 5 |
Click Download Data or Download .csv templateto verify that your CSV file is properly formatted, making sure to fill in the required information. |
| 6 |
Fill out the spreadsheet. |
| 7 |
Upload the CSV file by dragging and dropping or clicking Choose a file. |
| 8 |
Click View Import history/Tasks to view the status of your CSV import and see whether you've encountered any errors.. |
Bulk edit call queues
To modify call queues in bulk, you’ll simply download the current CSV data and make the necessary changes to the spreadsheet.
Call forwarding settings for a call queue can’t be modified in bulk. To edit call forwarding for a call queue, see Configure call forwarding for a call queue.
| 1 |
Sign in to Control Hub. |
| 2 |
Go to . |
| 3 |
Go to the Call Queue card. On the Prefer to create Call Queue in bulk message, click Open the bulk editor. The Manage Call Queue window displays. |
| 4 |
Select a location for the call queues you'd like to modify. |
| 5 |
Click Download Data or Download .csv templateto verify that your CSV file is properly formatted, making sure to fill in the required information. If the data for the call queues you’ve selected exceeds the maximum (more than 10,000 rows for each CSV), you receive a zipped file with multiple CSV files included. |
| 6 |
Make the necessary changes to the spreadsheet. |
| 7 |
Upload the CSV file by dragging and dropping or clicking Choose a file. |
| 8 |
Click View Import history/Tasks to view the status of your CSV import and see whether you've encountered any errors. When successfully uploaded, you can click See Tasks Page for details to view the status of the changes. |
Prepare your CSV
Use this table to see what fields are mandatory or optional, and what you need to determine when adding or editing call queues in bulk.
Columns are either mandatory or optional fields. This varies depending on whether you’re using the CSV to add a new call queue or edit an existing call queue.
|
Column |
Mandatory or optional (Add a call queue) |
Mandatory or optional (Edit a call queue) |
Description |
Supported values |
|---|---|---|---|---|
|
Name |
Mandatory |
Mandatory |
Enter the name of the call queue. Call queue names within the same location need to be uniquely identifiable. If the call queues are in different locations, they can have the same call queue name. |
Example: San Jose Call Queue Character length: 1-30 |
|
Phone Number |
Mandatory (if extension is left blank) |
Optional |
Enter the call queue phone number. You must have either a phone number or an extension. |
Only E.164 numbers are allowed for CSV import. Example: +12815550100 Phone number must be on the Numbers tab in Control Hub. |
|
Extension |
Mandatory (if the phone number is left blank) |
Optional |
Enter the call queue extension. You must have either a phone number or an extension. |
Two to ten digit extension. 00-999999 |
|
Location |
Mandatory |
Mandatory |
Enter the location to assign this call queue. |
Example: San Jose Location must be on the Locations tab in Control Hub. |
|
External Caller ID Number |
Optional |
Optional |
Enter the external caller ID phone number in E164 format. |
Example: +19095550000. Character length: 1-23 |
|
Direct Line ID Caller Name Option |
Optional |
Optional |
Select if you want to use display name or a custom name as a caller ID. |
Select DISPLAY_NAME or CUSTOM_NAME to be used as caller ID. By default DISPLAY_NAME is selected. |
|
CUSTOM NAME |
Optional |
Optional |
Enter a custom name for caller ID. Unicode characters are supported. |
String |
|
Dial By Name |
Optional |
Optional |
Enter the name by which you can dial this call queue. ASCII characters are supported. |
String |
|
Language |
Optional |
Optional |
Enter the announcement language for your call queue. |
Example: en_us |
|
Timezone |
Optional |
Optional |
Enter the call queue time zone key. This time zone applies to the schedules applied to this call queue. |
Example: America/Chicago Character length: 1-127 |
|
Call Queue Enable |
Optional |
Optional |
Use this column to activate or deactivate the call queue. |
ENABLED, DISABLED, enabled, disabled |
|
Number of Calls in Queue |
Optional |
Optional |
Enter the limit for the number of calls the system keeps in queue, waiting for an available agent. |
Range: 1-250 Don’t set the Number of Calls in Queue to 0. If it's set to 0, then incoming calls aren’t allowed. |
|
Call Routing Type (Priority / Skill Based) |
Optional |
Optional This field is mandatory when you edit the call routing pattern. |
Select the call routing type for your call queue. |
PRIORITY_BASED, SKILL_BASED |
|
Call Routing Pattern |
Mandatory |
Optional |
Enter the call queue routing pattern. Choose one of the following supported policies. |
When the Call Routing Type is Priority Based, values are: CIRCULAR, REGULAR, SIMULTANEOUS, UNIFORM, WEIGHTED When the Call Routing Type is Skill Based, values are: CIRCULAR, REGULAR, SIMULTANEOUS. |
|
Phone Number For Outgoing Calls Enable |
Optional |
Optional |
Enter TRUE to enable the queue phone number for outgoing calls. Enter FALSE to disable the queue phone number for outgoing calls. |
TRUE, FALSE |
|
Allow Agent Join Enable |
Optional |
Optional |
Enter TRUE to join agents to the queue. Enter FALSE to unjoin agents from the queue. |
TRUE, FALSE |
|
Overflow Action |
Optional |
Optional |
Enter the call queue overflow processing action. Choose from one of the supported actions. | PERFORM_BUSY_TREATMENT, TRANSFER_TO_PHONE_NUMBER, PLAY_RINGING_UNTIL_CALLER_HANGS_UP |
|
Overflow Enable |
Optional |
Optional |
Enter TRUE to enable overflow treatment after a set amount of time. Enter FALSE to disable overflow treatment after a set amount of time. If you enter TRUE, enter the time in the Overflow After Wait Time column. |
TRUE, FALSE |
|
Play Ringing Tone To Callers When Their Call Is Sent To An Available Agent |
Optional |
Optional |
If no value is defined at the time of creation, the value is set to TRUE. |
TRUE, FALSE |
|
Reset Caller Statistics Upon Queue Entry |
Optional |
Optional |
If no value is defined at the time of creation, the value is set to TRUE. |
TRUE, FALSE |
|
Overflow Transfer Number |
Optional |
Optional |
Enter the number where you want to transfer overflow calls. |
Example: 1112223333 Phone number must be on the Numbers tab in Control Hub. Character length: 1-23 |
|
Overflow Transfer to Voicemail Enable |
Optional |
Optional |
Enter TRUE to enable overflow transfer to voicemail. Enter FALSE to disable overflow transfer to voicemail. |
TRUE, FALSE |
|
Overflow After Wait Time |
Optional |
Optional |
Enter the time to wait (in seconds) for any agent to answer before forwarding the caller elsewhere. |
Range: 1-7200 |
|
Overflow Announcement Enable |
Optional |
Optional |
Enter TRUE to play announcement before overflow processing. Enter FALSE to not play the announcement before overflow processing. |
TRUE, FALSE |
|
Welcome Message Enable |
Optional |
Optional |
Enter TRUE to play a message when callers first reach the queue. Enter FALSE to not play a message when callers first reach the queue. |
TRUE, FALSE |
|
Welcome Message Mandatory |
Optional |
Optional |
Enter TRUE if you want the welcome message to play for every caller. Enter FALSE to if you don't want the welcome message to play for every caller. |
TRUE, FALSE |
|
Wait Message Enable |
Optional |
Optional |
Enter TRUE to notify the caller with either their estimated wait time or position in the queue. If this option is enabled, it plays after the welcome message and before the comfort message. Enter FALSE to not notify the caller with either their estimated wait time or position in the queue. If you enter TRUE, enter the details in the Wait Message Mode column. |
TRUE, FALSE |
|
Wait Message Mode |
Optional |
Optional |
Choose what you want your wait message to communicate to callers. Choose from one of the supported options. |
TIME, POSITION |
|
Wait Message Handling Time |
Optional |
Optional |
Enter the default number of call handling minutes. |
Range: 1-100 |
|
Wait Message Play Position |
Optional |
Optional |
Enter the number of positions for which the estimated wait is played. |
Range: 1-100 |
|
Wait Message Wait Time |
Optional |
Optional |
Enter the number of minutes for which the estimated wait is played. |
Range: 1-100 |
|
Wait Message High Volume Message |
Optional |
Optional |
Enter TRUE to enable the wait message to play a message informing callers that there’s a high volume of calls. Enter FALSE to disable the wait message. |
TRUE, FALSE |
|
Comfort Message Enable |
Optional |
Optional |
Enter TRUE to play a message after the welcome message and before hold music. Enter FALSE to not play a message after the welcome message and before hold music. If you enter TRUE, enter the number of seconds in the Comfort Message Time column. |
TRUE, FALSE |
|
Comfort Message Time |
Optional |
Optional |
Enter the interval in seconds between each repetition of the comfort message played to callers in the queue. |
Range: 1-600 |
|
Hold Music Enable |
Optional |
Optional |
Enter TRUE to enable hold music for queued calls. Enter FALSE to disable hold music for queued calls. |
TRUE, FALSE |
|
Hold Music Alternate Source Enable |
Optional |
Optional |
Enter TRUE to enable a non-default music-on-hold file. Enter FALSE to disable a non-default music-on-hold file. |
TRUE, FALSE |
|
Comfort Message Bypass Enable |
Optional |
Optional |
Enter TRUE to enable comfort message bypass for queued calls. Enter FALSE to disable comfort message bypass for queued calls. |
TRUE, FALSE |
|
Comfort Message Bypass Call Wait Time |
Optional |
Optional |
Enter the interval in seconds for the comfort message bypass call wait time for callers in the queue. |
Range: 1-120 |
|
Whisper Message Enable |
Optional |
Optional |
Enter TRUE to enable the whisper message for queued calls. Enter FALSE to disable the whisper message for queued calls. |
TRUE, FALSE |
|
Allow Multiple Calls Per Agent |
Optional |
Optional |
Enter TRUE to enable call waiting for agents. Enter FALSE to disable the call waiting for agents. |
TRUE, FALSE |
|
Bounced Call Enable |
Optional |
Optional |
Enter TRUE to enable bounced calls for this queue. Enter FALSE to disable bounced calls for this queue. If you enter TRUE, enter the number of rings in the Bounced Call Number of Rings column. |
TRUE, FALSE |
|
Bounced Call Number of Rings |
Optional |
Optional |
Enter the number of rings to wait for the currently hunted agent to answer before hunting to the next available agent. |
Range: 1-20 |
|
Bounced Call If Agent Unavailable |
Optional |
Optional |
Enter TRUE to enable Bounce calls if the agent becomes unavailable while routing the call. Enter FALSE to disable Bounce calls if the agent becomes unavailable while routing the call. |
TRUE, FALSE |
|
Bounce Call After Set Time Enable |
Optional |
Optional |
Enter TRUE to enable bounce calls after being on hold by the agent for longer than <X> seconds. Enter FALSE to disable bounce calls after being on hold by the agent for longer than <X> seconds. If you enter TRUE, enter the number of seconds in the Bounce Call After Set Time column. |
TRUE, FALSE |
|
Bounce Call After Set Time |
Optional |
Optional |
Enter the number of seconds after which a held call should be bounced. If the Bounce Call After Set Time Enable column is set true and you don't fill this row, then the default value 60 is used. |
Range: 1-600 |
|
Alert Agent If Call On Hold Enable |
Optional |
Optional |
Enter TRUE to enable the Alert agent if the call is on hold for longer than <X> seconds. Enter FALSE to disable the Alert agent if the call is on hold for longer than <X> seconds. If you enter TRUE, enter the number of seconds in the Alert Agent If Call On Hold Time column. |
TRUE, FALSE |
|
Alert Agent If Call On Hold Time |
Optional |
Optional |
Enter the number of seconds after which to alert the agent about the held call. If the Alert Agent If Call On Hold Enable column is set to true and you don't fill this row, then default value 30 is used. |
Range: 1-600 |
|
Distinctive Ringing Enable |
Optional |
Optional |
Enter TRUE to enable the distinctive ringing for the queue calls. If enabled, agents hear a distinctive ringing when they receive calls from the queue. Enter FALSE to disable the distinctive ringing for the queue calls. If you enter TRUE, enter the type of ring patter in the Distinctive Ring Pattern column. |
TRUE, FALSE |
|
Distinctive Ringing Pattern |
Optional |
Optional |
If distinctive ringing is enabled, choose the distinctive ringing ring pattern. Choose from one of the supported options. |
NORMAL, LONG_LONG, SHORT_SHORT_LONG, SHORT_LONG_SHORT |
|
Alternate Number Distinctive Ringing Enable |
Optional |
Optional |
Enter TRUE to enable a distinctive ringing for alternate numbers. Enter FALSE to disable a distinctive ringing for alternate numbers. If you enter TRUE, enter the ring patter in the Alternate Numbers Ring Pattern column. |
TRUE, FALSE |
|
Alternate Numbers Action |
Optional |
Optional |
Enter ADD to add the alternate numbers you list in this row. Enter REMOVE to remove the alternate numbers you list in the row. Enter REPLACE if you want to remove all the previously entered alternate numbers and replace it with the alternate numbers you’re adding in this row only. |
ADD, REPLACE, REMOVE |
|
Agent Action |
Optional |
Optional |
Enter ADD to add the agents you list in this row. Enter REMOVE to remove the agents you list in the row. Enter REPLACE if you want to remove all the previously entered agents and replace it with the agents you’re adding in this row only. |
ADD, REPLACE, REMOVE |
|
Use Enterprise Play Tone To Agent Settings Enabled |
Optional |
Optional |
Enable or disable to use the organization level settings to all call queues. |
TRUE, FALSE |
|
Play Tone To Agent For Barge In Enabled |
Optional |
Optional |
Enable or disable to play a notification tone to the agent when a supervisor barges in to the agent's call. |
TRUE, FALSE |
|
Play Tone To Agent For Silent Monitoring Enabled |
Optional |
Optional |
Enable or disable to play a notification tone to the agent when a supervisor monitors the agent's call. |
TRUE, FALSE |
|
Play Tone To Agent For Supervisor Coaching Enabled |
Optional |
Optional |
Enable or disable to play a notification tone to the agent when a supervisor coaches an agent's call. |
TRUE, FALSE |
|
Overflow Announcement Type |
Optional |
Optional |
Select Default or Custom announcement type. If you choose Custom, then enter the announcement name, media type, and level. |
DEFAULT, CUSTOM |
|
Welcome Message Announcement Type |
Optional |
Optional |
Select Default or Custom announcement type. If you choose Custom, then enter the announcement name, media type, and level. |
DEFAULT, CUSTOM |
|
Comfort Message Announcement Type |
Optional |
Optional |
Select Default or Custom announcement type. If you choose Custom, then enter the announcement name, media type, and level. |
DEFAULT, CUSTOM |
|
Hold Music Announcement Type |
Optional |
Optional |
Select Default or Custom announcement type. If you choose Custom, then enter the announcement name, media type, and level. |
DEFAULT, CUSTOM |
|
Hold Music Alternate Source Announcement Type |
Optional |
Optional |
Select Default or Custom announcement type. If you choose Custom, then enter the announcement name, media type, and level. |
DEFAULT, CUSTOM |
|
Comfort Message Bypass Announcement Type |
Optional |
Optional |
Select Default or Custom announcement type. If you choose Custom, then enter the announcement name, media type, and level. |
DEFAULT, CUSTOM |
|
Whisper Message Announcement Type |
Optional |
Optional |
Select Default or Custom announcement type. If you choose Custom, then enter the announcement name, media type, and level. |
DEFAULT, CUSTOM |
|
Overflow Announcement Name 1...4 |
Optional |
Optional |
Enter the custom overflow announcement name. |
Example: Overflow |
|
Overflow Announcement Media Type 1...4 |
Optional |
Optional |
Enter the custom overflow message media type. |
WAV |
|
Overflow Announcement Level 1...4 |
Optional |
Optional |
Enter the level (organization, location, or queue/entity) at which the custom overflow message announcement is defined. |
LOCATION,ORGANIZATION,ENTITY |
|
Welcome Message Announcement Name 1...4 |
Optional |
Optional |
Enter the custom welcome message announcement name. |
Example: Welcome message |
|
Welcome Message Announcement Media Type 1...4 |
Optional |
Optional |
Enter the custom welcome message media type. |
WAV |
|
Welcome Message Announcement Level 1...4 |
Optional |
Optional |
Enter the level (organization, location, or queue/entity) at which the custom welcome message announcement is defined. |
LOCATION,ORGANIZATION,ENTITY |
|
Comfort Message Announcement Name 1...4 |
Optional |
Optional |
Enter the custom comfort message announcement name. |
Example: Comfort message |
|
Comfort Message Announcement Media Type 1...4 |
Optional |
Optional |
Enter the custom comfort message media type. |
WAV |
|
Comfort Message Announcement Level 1...4 |
Optional |
Optional |
Enter the level (organization, location, or queue/entity) at which the custom comfort message announcement is defined. |
LOCATION,ORGANIZATION,ENTITY |
|
Hold Music Announcement Name 1...4 |
Optional |
Optional |
Enter the custom hold music message announcement name. |
Example: Hold music |
|
Hold Music Announcement Media Type 1...4 |
Optional |
Optional |
Enter the custom hold music message media type. |
WAV |
|
Hold Music Announcement Level 1...4 |
Optional |
Optional |
Enter the level (organization, location, or queue/entity) at which the custom hold music announcement is defined. |
LOCATION,ORGANIZATION,ENTITY |
|
Hold Music Alternate Source Announcement Name 1...4 |
Optional |
Optional |
Enter the custom hold music alternate source announcement name. |
Example: Hold music alternate source |
|
Hold Music Alternate Source Announcement Media Type 1...4 |
Optional |
Optional |
Enter the custom hold music alternate source announcement media type. |
WAV |
|
Hold Music Alternate Source Announcement Level 1...4 |
Optional |
Optional |
Enter the level (organization, location, or queue/entity) at which the custom hold music alternate source announcement is defined. |
LOCATION,ORGANIZATION,ENTITY |
|
Comfort Message Bypass Announcement Name 1...4 |
Optional |
Optional |
Enter the custom comfort bypass announcement name. |
Example: Comfort message bypass |
|
Comfort Message Bypass Announcement Media Type 1...4 |
Optional |
Optional |
Enter the custom comfort bypass message media type. |
WAV |
|
Comfort Message Bypass Announcement Level 1...4 |
Optional |
Optional |
Enter the level (organization, location, or queue/entity) at which the custom comfort bypass announcement is defined. |
LOCATION,ORGANIZATION,ENTITY |
|
Whisper Message Announcement Name 1...4 |
Optional |
Optional |
Enter the custom whisper message announcement name. | Example: Whisper message |
|
Whisper Message Announcement Media Type 1...4 |
Optional |
Optional |
Enter the custom whisper message media type. |
WAV |
|
Whisper Message Announcement Level 1...4 |
Optional |
Optional |
Enter the level (organization, location, or queue/entity) at which the custom whisper message announcement is defined. |
LOCATION,ORGANIZATION,ENTITY |
|
Alternate Number(s) |
Optional |
Optional |
Enter the alternate number(s) to assign to the call queue. |
Example: 1112223333 Phone number must be on the Numbers tab in Control Hub. Character length: 1-23 |
|
Alternate Numbers Ring Pattern |
Optional |
Optional |
If distinctive ringing is enabled for alternate numbers, choose the distinctive ringing ring pattern. Choose from one of the supported options. |
NORMAL, LONG_LONG, SHORT_SHORT_LONG, SHORT_LONG_SHORT |
|
Agent1 ID, Agent2 ID… Agent50 ID |
Optional |
Optional |
Enter the agents you’d like to assign to the call queue. Agents can be users or workspaces. For users, enter the user’s email address. For workspaces, enter the workspace name. |
Example: test@example.com Character length: 1-161 |
|
Agent1 Weight, Agent2 Weight... Agent50 Weight |
Optional |
Optional |
If the call routing policy for the call queue is weighted, enter the agent’s percentage weighting. |
Range: 0-100 |
|
Agent1 Skill Level, Agent2 Skill Level... Agent50 Skill Level |
Optional |
Optional |
Select the agent skill level for the assigned agents. |
Range: 1-20 |
Add or edit more than 50 agents at a time
Each row can hold a maximum of 50 agents and their associated call routing weight percentage (if applicable). To add or edit more than 50 agents, using the CSV file, follow these steps.
| 1 |
Enter the 50 agents, and their associated call routing weight percentage (if applicable), that you’d like to add or edit on the first row for the call queue you’re adding or editing. |
| 2 |
On the next row, you only have to enter information in the following columns to add or edit additional agents:
You can leave all other columns blank. |
| 3 |
Continue to do this until you have added all of the agents you need to add or edit. |
Make sure customers are reaching the right agents at the right time when they call into a call queue. When a call is received through a configured DNIS, the DNIS name and number are presented to the agent (if enabled), helping them identify the context of the call.
You can configure and edit the following incoming call settings for a call queue in the Control Hub:
-
Call forwarding
-
Routing pattern
-
Overflow settings
-
Bounced call settings
-
Call back settings
Edit call queue settings
You can change the language, number of calls for the queue, and the caller ID for your call queue.
| 1 |
Sign in to Control Hub. |
| 2 |
Go to . |
| 3 |
Go to the Call Queue card and click Manage. |
| 4 |
Select a call queue to edit from the list. |
| 5 |
Go to Overview section and click General settings. |
| 6 |
Edit any of the following fields:
|
| 7 |
Click Save. |
Edit call queue phone numbers
You can change your call queue phone number and add up to 10 alternate numbers.
| 1 |
Sign in to Control Hub. |
| 2 |
Go to . |
| 3 |
Go to the Call Queue card and click Manage. |
| 4 |
Select a call queue to edit from the list. |
| 5 |
Go to Overview section and click Phone numbers. |
| 6 |
Edit the Phone Number and Extension. If you've left the extension field blank when creating the call queue, the system automatically assigns the last four digits of the phone number as an extension for this call queue. |
| 7 |
Enable the Allow agents to use call queue number as caller ID to allow the agents to use the call queue number as the caller ID. There’s a restriction that both the call queue’s location and the agent’s location must have the same PSTN provider, country, and zone (this applies only to locations in India). If it’s different, then the call queue caller ID doesn't display to the agent. This restriction helps to prevent call failure, potential billing issues, and ensures adherence to country-specific telecom regulations. Examples of invalid cross-location number usage:
|
| 8 |
Add Alternate Numbers using the search function. |
| 9 |
Enable or disable Distinctive Ringing for the alternate numbers assigned to the call queue by clicking the toggle. |
| 10 |
In the table, select the ring pattern to assign to each alternate number using the drop-down menu in the Ring Pattern column. |
| 11 |
Click Save. |
Edit call forwarding settings
You can forward all incoming calls dependent on a set of criteria that you define.
| 1 |
Sign in to Control Hub. |
| 2 |
Go to . |
| 3 |
Go to the Call Queue card and click Manage. |
| 4 |
Select a call queue to edit from the list. |
| 5 |
Go to Overview section and click Call forwarding. |
| 6 |
Toggle the Call Forwarding feature on. |
| 7 |
Choose from one of the following options:
If you choose Selectively Forward Calls, you need to have at least one rule for forwarding applied for call forwarding to be active. |
| 8 |
Assign the number you want to forward calls to. If you have chosen Always Forward Calls, click Save. When choosing Always Forward or Selectively Forward, check the Send to Voicemail check box to forward all calls to an internal voicemail. The Send to Voicemail check box is disabled when an external number is entered. |
| 9 |
If you choose Selectively Forward Calls, create a rule by clicking Add When to Forward or Add When Not to Forward. |
| 10 |
Create a Rule Name. |
| 11 |
For When to Forward or When Not to Forward, select a Business Schedule and Holiday Schedule from the drop-down menu. |
| 12 |
For Forward To, select at least one option from Default Phone Number or add a Different Phone Number. |
| 13 |
For Calls From, select Any Number or Selected Numbers with at least one option from the following:
|
| 14 |
For Calls To, select a number or alternative number from the drop-down menu, so that calls are forwarded when a call is received to this number in your organization that you define. |
| 15 |
Click Save. |
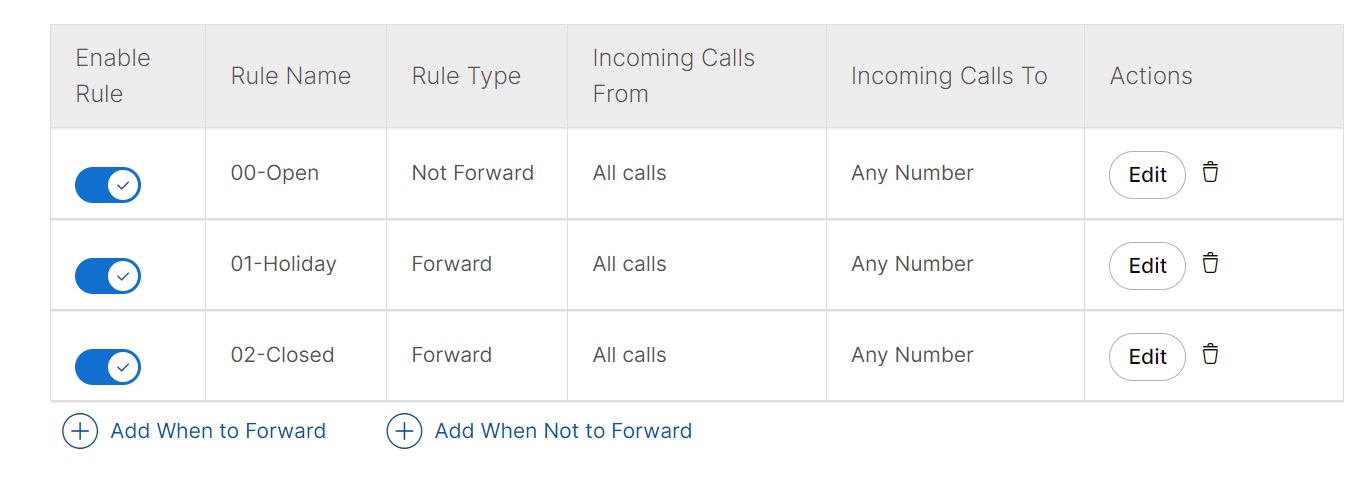
The rules created for the selectively forward calls are processed based on the following criteria:
-
The rules are sorted in the table by rule name character. Example: 00_rule, 01_rule, and so on.
-
The "Not to Forward" rule always takes precedence over the "Forward" rule.
-
The rules are processed based on the order they are listed in the table.
-
You can create multiple rules. However, if a rule is satisfied, the system no longer checks the next rule. If you want the specific rule to check first, we suggest that you update the rule name with numbers. For example: If you want the holiday rule to check before the business closed hours rule, then name the rule as 01-Holiday and 02-Closed.
To know more about the basic functionality and examples of the selectively forward call, see Configure Call Forwarding Selective for Webex Calling.
What to do next
Once a rule is created, you can enable or disable a rule using the toggle beside the rule in the table. You can also change or delete a rule at any time by clicking Edit or  .
.
Edit overflow settings
The overflow settings determine how your overflow calls are handled when the call queue becomes full.
| 1 |
Sign in to Control Hub. |
| 2 |
Go to . |
| 3 |
Go to the Call Queue card and click Manage. |
| 4 |
Select a call queue to edit from the list. |
| 5 |
Go to Overview section and click Overflow Settings. |
| 6 |
Enable or disable the following settings:
|
| 7 |
Choose how to handle new calls when the queue is full:
|
| 8 |
Enable or disable the following settings:
|
| 9 |
Click Save. |
Edit routing type
You can change the call routing pattern of your existing call queue.
| 1 |
Sign in to Control Hub. |
| 2 |
Go to . |
| 3 |
Go to the Call Queue card and click Manage. |
| 4 |
Select a call queue to edit from the list. |
| 5 |
Go to Overview section and click Call routing type. |
| 6 |
Edit the following options:
|
| 7 |
Click Save. |
Edit bounced calls settings
Bounced calls are those that were sent to an available agent, but the agent doesn’t answer. These calls are then placed back into the queue at the top of all the queued calls. You can edit how bounced calls are handled.
| 1 |
Sign in to Control Hub. |
| 2 |
Go to . |
| 3 |
Go to the Call Queue card and click Manage. |
| 4 |
Select a call queue to edit from the list. |
| 5 |
Go to Overview section and click Bounced Calls. |
| 6 |
Select the toggle next to any of the following options to enable or disable the setting:
|
| 7 |
Enable or disable Distinctive Ringing for bounced calls. If enabled, choose the ring pattern from the drop-down menu.
|
| 8 |
Click Save. If you’ve set up a call queue with simultaneous call routing pattern and bounced call settings, you can enhance the call distribution of unanswered calls. For more information, see Enhance call queue simultaneous ring call distribution for bounced calls. |
Edit call back settings
The call back option allows callers to receive a call-back to the phone number provided when their original position in the queue reaches. The phone number is verified against a location’s outgoing calls policy.
Before you begin
You can configure the call back settings only if you've enabled the Estimated wait message for queued calls option. For more information, see the Estimated wait message for queued calls section.
| 1 |
Sign in to Control Hub. |
| 2 |
Go to . |
| 3 |
Go to the Call Queue card and click Manage. |
| 4 |
Select a call queue to edit from the list. |
| 5 |
Go to Overview section and click Call Back. |
| 6 |
Toggle the Call Back option on. |
| 7 |
Enter Minimum estimated time for call back option in minutes. This determines at what estimated wait time the caller receives the call back prompt. This option works along with the Estimated wait message for Queued Calls. If this value is equal to or lower than the Default Call Handling Time announcement value, then the call back prompt plays. If this value is higher than the Default Call Handling Time announcement value, then the call back prompt doesn't play. |
| 8 |
Check the Allow international call-back number prompt check box. This allows international users wanting a call-back to enter their country code. The call-back numbers validate against a location's policy on outgoing calls. |
| 9 |
Click Save.
The number of call back retries is configurable at the system level, with the default value of 3. The retry interval is also configurable at the system level, with the default value of 5 minutes. The caller ID phone number for the call back is populated using the Caller ID Phone Number of the Call Queue if it’s configured. If it isn’t configured, then the Call Queue's phone number is used. If the Call Queue doesn’t have a phone number, then group number is used. |

With call queue policies, you can configure how to route calls during holiday and after-hour periods, temporarily divert new incoming calls, and manage the calls in queue when the agents are unavailable.
Call Queue policies are important to understand how calls get routed in and out of the queue. The services that are part of queue policies take precedence based on the following order of priority:
-
Holiday Service
-
Night Service
-
Forced Forwarding
-
Stranded Calls
The services enabled in the call queue take the order of precedence and enter the call queue to determine how the call is.
- Handled when the call queue becomes full
- Bounced when the agent doesn’t answer the calls
- Processed when the queue has no agents
Manage holiday service
Configure the call queue to route calls differently during the holidays.
| 1 |
Sign in to Control Hub. |
| 2 |
Go to . |
| 3 |
Go to the Call Queue card and click Manage. |
| 4 |
Select a call queue to edit from the list. |
| 5 |
Go to Queue Policies section and click Holiday Service. |
| 6 |
Enable the Holiday Service. |
| 7 |
Select an option from the drop-down list.
|
| 8 |
Select Holiday Schedule from the drop-down list. You can also create a new holiday schedule if a specific holiday schedule
isn’t listed in the drop-down list. For details, see configure schedules.
|
| 9 |
Select Play announcement before holiday service action to play the holiday service announcement. |
| 10 |
Choose an Announcement audio with one of the following options:
|
| 11 |
Click Save to save the service. |
Manage night service
Configure the call queue to route calls differently during the hours when the queue isn’t in service. This is determined by a schedule that defines the business hours of the queue.
| 1 |
Sign in to Control Hub. |
| 2 |
Go to . |
| 3 |
Go to the Call Queue card and click Manage. |
| 4 |
Select a call queue to edit from the list. |
| 5 |
Go to Queue Policies section and click Night Service. |
| 6 |
Enable Night Service. |
| 7 |
Select an option from the drop-down list.
|
| 8 |
Check the Play announcement before night service action check box to play the night service announcement. |
| 9 |
Choose an Announcement type with one of the following:
|
| 10 |
Select Business Hours from the drop-down list. You can also configure a new business hours schedule if a specific business
hour isn’t listed in the drop-down list. For details, see configure schedules.
|
| 11 |
Enable Forced Night service now regardless of business hours schedule to force calls regardless of business hours. |
| 12 |
Choose an Announcement type with one of the following options:
|
| 13 |
Click Save to save the service. |
Manage forced forwarding
Forced forwarding allows the queue to be put in an emergency mode to forward calls to a different location during the emergency. Configure the call queue to temporarily divert new incoming calls to a different route independent of the Night Service and Holiday Service route.
| 1 |
Sign in to Control Hub. |
| 2 |
Go to . |
| 3 |
Go to the Call Queue card and click Manage. |
| 4 |
Select a call queue to edit from the list. |
| 5 |
Go to Queue Policies section and click Forced Forwarding. |
| 6 |
Enable Forced Forwarding. |
| 7 |
Enter the phone number you want to transfer the call to. |
| 8 |
Select Play announcement before forwarding to play the forced forward announcement. |
| 9 |
Choose an Announcement audio with one of the following options:
|
| 10 |
Click Save to save the service. |
Manage stranded calls
A stranded call is processed by a queue that has no agents currently staffed. Configure the call queue routing policy for calls stranded in the queue when all the agents are signed out.
| 1 |
Sign in to Control Hub. |
| 2 |
Go to . |
| 3 |
Go to the Call Queue card and click Manage. |
| 4 |
Select a call queue to edit from the list. |
| 5 |
Go to the Queue Policies section and click Stranded Calls. |
| 6 |
Trigger policy when all agents are unreachable—Enable this option to reroute your calls to an external number, even if agents are logged in but not reachable due to events like power outages or network connectivity. Stranded call handling does not activate if at least one staffed agent remains in the wrap-up or busy state. The option is effective after the call has bounced off all available and attempted agents. The unreachable agent’s ACD state remains set to Available. |
| 7 |
Select from the options for stranded calls.
|
| 8 |
Click Save. |
Edit call queue announcement settings
Call queue announcements are messages and music that callers hear while waiting in the queue. You can manage your announcement settings for an existing call queue.
| 1 |
Sign in to Control Hub. |
| 2 |
Go to . |
| 3 |
Go to the Call Queue card and click Manage. |
| 4 |
Select a call queue to edit from the list. |
| 5 |
Go to Announcements section and click Announcements. |
| 6 |
Edit any of the following announcement setting services: |
Welcome message
Play a message when callers first reach the queue.
| 1 |
Enable Welcome Message. The welcome message plays to every caller unless an agent is available to service the call. |
| 2 |
Select Welcome message is mandatory. Selecting this option causes the message to play to a caller before presented to an agent even if an agent is available. |
| 3 |
Choose one of the following message types:
|
| 4 |
Click Save. |
Estimated wait message for queued calls
Notify the caller with either their estimated wait time or position in the queue.
| 1 |
Enable Estimated wait message for queued calls. Enabling this option plays the wait message after the welcome message and before the comfort message.
|
| 2 |
Set the Default Handling Time 1–100 minutes. This time is the estimated handling time per call (in minutes). The system uses this time to calculate the estimated wait time, and announces it to the user if you select the Announce Wait Time option as the announcement type. This option works along with the Minimum estimated time for call back option. If you want to play the call back prompt to the caller, then this value must be equal or higher than the Minimum estimated time for call back option value.
|
| 3 |
Enable the Repeat periodic playing of Estimated wait message option and set the time 10–600 seconds. If you enable this option, the estimated wait time message announcement (queue position or wait time message) plays at a determined interval until the system reaches the Minimum estimated time for call back option value. If you disable this option, then the call back prompt plays immediately.
|
| 4 |
Choose the type of wait message announcement to play for the callers.
|
| 5 |
Select Play high volume message to play an announcement when all volumes are higher than the maximum queue position defined. Enabling this option plays the call back prompt after this announcement.
|
| 6 |
Click Save. |
Comfort message
Play a message after the welcome message and before hold music. It’s typically a custom announcement that plays information, such as current promotions or information about products and services.
| 1 |
Enable Comfort Message. |
| 2 |
Set the time in seconds for a caller to hear the comfort message. This is the interval between repetitions of the entire set of comfort messages. All configured messages play consecutively as a group when the interval is reached, rather than spacing out individual messages. |
| 3 |
Choose one of the following message types:
|
| 4 |
Click Save. |
Comfort message bypass
Play a shorter comfort message instead of the standard Comfort Message or Music On Hold announcement for all the calls that should be answered quickly. This feature prevents a caller from hearing a short portion of the standard comfort message that abruptly ends when they are connected to an agent.
| 1 |
Enable Comfort Message Bypass. |
| 2 |
Set the time in seconds for a caller to hear the comfort bypass message. By default, the time for a caller to hear the comfort bypass message is 30 seconds and it ranges between 1–120 seconds. A comfort bypass message is announced when a new incoming call is received by the queue and the longest waiting time for a call in the queue is less than or equal to this threshold. |
| 3 |
Choose from one of the following Message types:
|
| 4 |
Click Save. |
Hold music
The customer assist queue hold music feature enables you to play music or announcements to callers waiting in a call queue, looping audio after the comfort message until the call is answered. You can customize the caller experience with single audio files or a playlist.
You can select an existing playlist that you want to use from the announcement repository, or create your own playlist. When a caller is placed on hold, a new announcement from the playlist is randomly selected and played. If the playlist contains more than one file, a new file is selected and played when the current announcement finishes.
| 1 |
Enable Hold Music. |
| 2 |
Choose one of the following greeting types:
You can add up to four music types. |
| 3 |
You can select an alternate source for internal calls. |
| 4 |
Click Save. |
Call whisper message
Play a message to the agent immediately before the incoming call is connected. The message typically announces the identity of the call queue from which the call is coming.
| 1 |
Enable Call Whisper. The message is only played to the agents and is useful if they belong to two or more queues. |
| 2 |
Choose one of the following message types:
|
| 3 |
Click Save. |
For every Webex call initiated, you’ll be provided with a business Calling Line Identification (CLID). This business CLID can either be a call queue phone number or the agent's configured phone number. The agent can decide to provide this information for outgoing calls either through a persistent configuration or a temporary configuration.
Configure agent settings for user
Before you begin
-
The Control Hub administrator enables the phone number to use as the outgoing phone number for the agents in the call queue/hunt group.
-
On enabling the phone number, the administrator can set the agents outgoing phone number with the specific queue/hunt group CLID as per Persistent Configuration.
- The agents can also set a Temporary CLID Configuration by using the FAC code #80 to use the call queue/hunt group phone number as the CLID displayed for the outgoing call or #81 for outgoing default caller ID as the phone number displayed as CLID.
| 1 |
Sign in to Control Hub. |
| 2 |
Go to . |
| 3 |
Select a user that you want to configure the agent setting for. |
| 4 |
Click Calling and go to the Agent Settings section. |
| 5 |
Click the Agent Caller ID. You can set the agent caller ID to either the agent's own caller ID or a specific call queue or hunt group. |
| 6 |
Configure the agent call queue or hunt group ID from the following options:
|
Add or edit agents
Users who receive calls from the queue are known as agents. You can add or delete users, workspaces, and virtual lines from a call queue. Users, workspaces, and virtual lines can be assigned to multiple call queues.
If you’re a location administrator, you may view all the agents assigned to a call queue including the agents outside your assigned location. You can delete any assigned agents and can add any users to the queue, including the users from other locations. However, you can allow agents only in your assigned locations to join or unjoin the queue. For more details, see Delegate location administration.
| 1 |
Sign in to Control Hub. |
| 2 |
Go to . |
| 3 |
Go to the Call Queue card and click Manage. |
| 4 |
Select a call queue to edit from the list. |
| 5 |
Go to Overview section and click Agents. |
| 6 |
(Optional) Select a default skill level value for the agents if you’re adding them based on their skills from the Assigned Skill Level drop-down list. Call routing is based on an agent's skill and competence level. The highest skill level is 1 while the lowest is 20. |
| 7 |
From the Add User or Workspace or Virtual Line drop-down, search or select the users, workspaces, or virtual lines to add to the call queue. |
| 8 |
(Optional) Select Allow agents on active calls to take additional calls if you want to allow agents on active calls to take additional calls. |
| 9 |
(Optional) Select Allow agents to join or unjoin the queue if you want to allow agents to join or unjoin the queue. |
| 10 |
(Optional) Edit the skill level and the Joined toggle for each user, workspace, or virtual line in the queue. |
| 11 |
(Optional) To remove a user, workspace, or virtual line, click the |
| 12 |
(Optional) Click Remove All to remove all users, workspaces, or virtual lines from the queue. |
| 13 |
Click Save.
For 6800/7800/8800 series Multiplatform Phones (MPP), you can enable Automatic Call Distribution (ACD) softkeys from the device settings in Control Hub. See Configure and modify device settings in Webex Calling for the details. For 9800 series desk phones, the ACD softkeys appear automatically when the devices associated with users, workspaces, or virtual lines are added in the queue. |
View agent dashboard
Agent dashboard allows an administrator to have a consolidated view of all agents across call queues. The dashboard displays the agents information and their call queue participation. This allows an administrator to make appropriate call queue staffing decisions and also change the join status of an agent easily.
| 1 |
Sign in to Control Hub. | ||||||||||||||||||||
| 2 |
Go to . | ||||||||||||||||||||
| 3 |
Go to the Call Queue card and click Manage. | ||||||||||||||||||||
| 4 |
Click the Agents tab. | ||||||||||||||||||||
| 5 |
Select an agent from the default list of agents displayed or search for an agent name or the primary number or extension associated with the agent. You can filter the agent list based on Call queues, Queue locations, and Join/Unjoin status. The agent dashboard in the default collapsed view displays:
| ||||||||||||||||||||
| 6 |
Click > to expand on the agent details. The agent dashboard displays:
| ||||||||||||||||||||
| 7 |
Toggle to join or unjoin an agent to the specific call queue. | ||||||||||||||||||||
| 8 |
(Optional) Click Export CSV to export a spreadsheet with the comprehensive agent details. Use this table to find the details in the exported CSV.
|
Agents in a call queue can be associated with a supervisor who can silently monitor, coach, barge in or to take over call queue calls that their assigned agents are currently handling.
Supervisors can’t monitor, coach, barge in, or take over non-call queue calls that agents are handling.
Call queue supervisor functions for Webex Calling
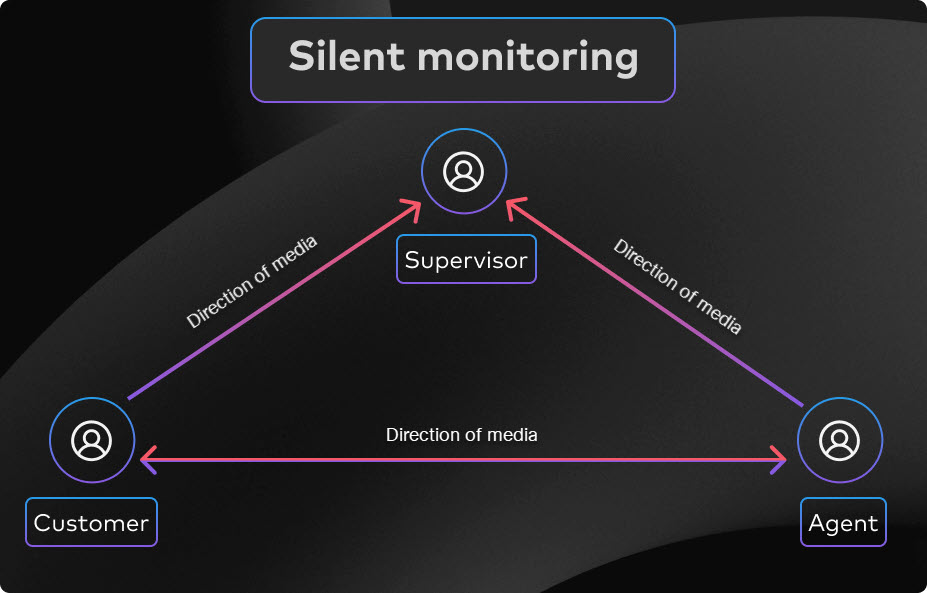
Silent monitoring—Monitor an agent’s call without the caller knowing. Use this feature to make sure training is working or identify where agents need to improve.
To silently monitor a call, enter #82 plus the agent’s extension or phone number.
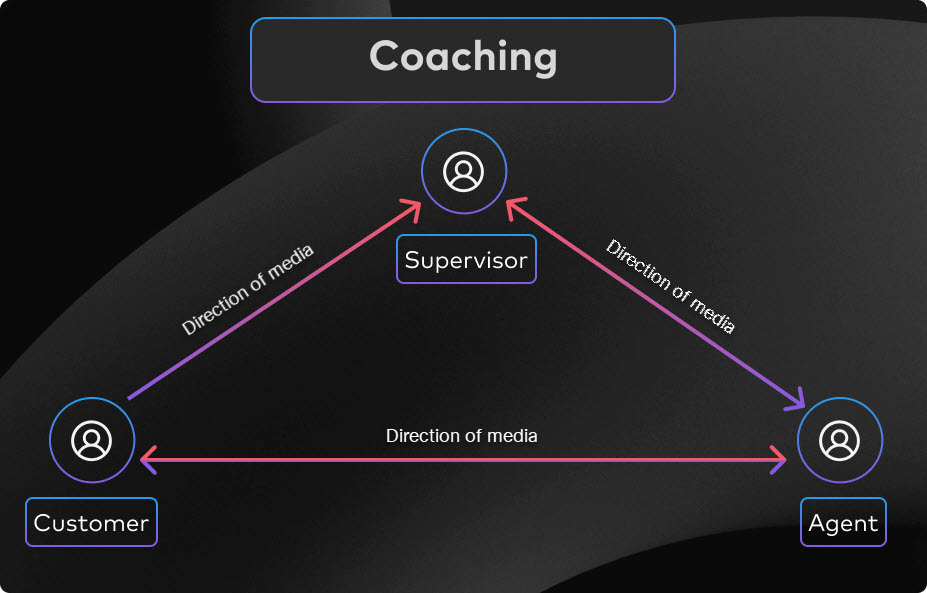
Coaching—Patch into an agent’s call and communicate with the agent. The agent is the only one who can hear you. Use this feature for training new employees.
To coach a call, enter #85 plus the agent’s extension or phone number.
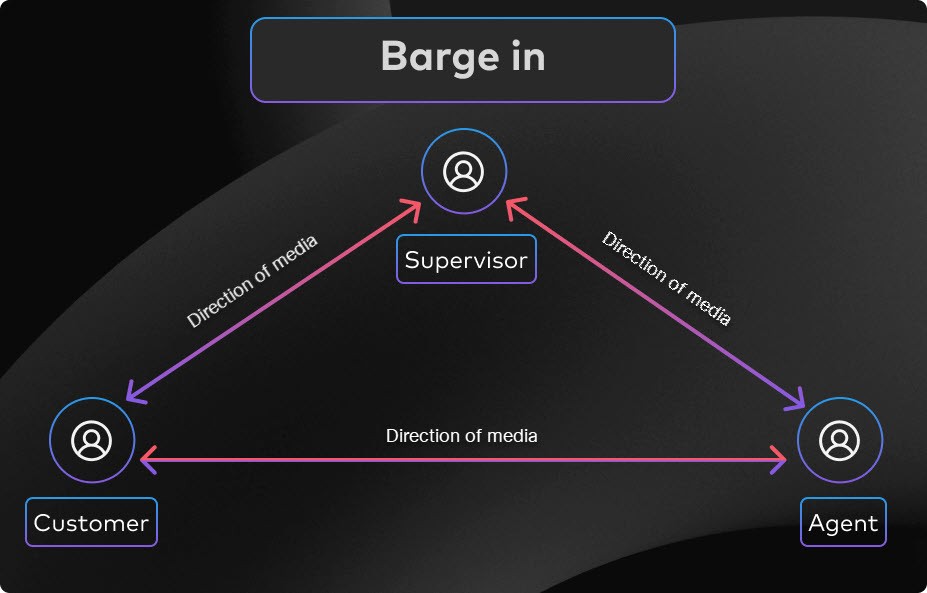
Barge-in—Drop in on an agent’s call. Both the agent and the caller can hear you. This feature is useful when you need to participate in the call and help resolve issues.
To barge-in on a call, enter *33 plus the agent’s extension or phone number.
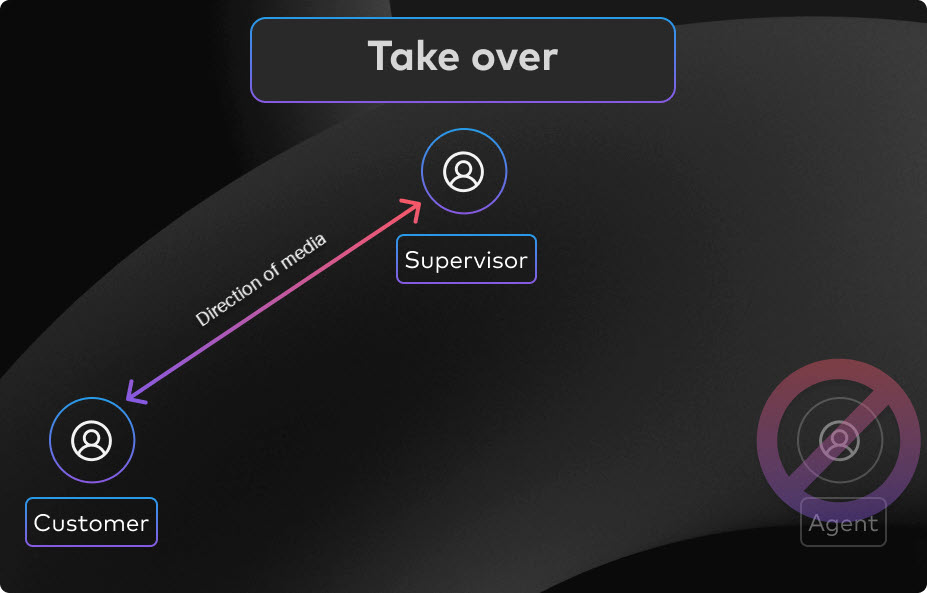
Take Over—Pull a call from an agent. Use this feature when you need to completely take over the call for an agent.
To take over a call, enter #86 plus the agent’s extension or phone number.
While invoking Supervisor functions, a warning tone is played to an agent while he monitors, coaches or barges in and an announcement is played for the takeover function.
Add or delete a supervisor
You can add or delete supervisors. When adding a supervisor, you can assign agents to them from multiple call queues.
You can assign up to 100 agents to a supervisor.
| 1 |
Sign in to Control Hub. |
| 2 |
Go to . |
| 3 |
Go to the Call Queue card and click Manage. |
| 4 |
Click the Supervisors tab and then click Add Supervisor. |
| 5 |
On the Basics page, select a user from the drop-down list to add as a supervisor and click Next. |
| 6 |
On the Assign agents page, select a user from the drop-down list to assign as agents to the supervisor and click Next. |
| 7 |
On the Review page, review the supervisor selected and the agents assigned. |
| 8 |
Click Add Supervisor. Once a supervisor is added, you can assign agents to the supervisor. To remove a supervisor, click the Remove Supervisor icon associated with the supervisor.
|
Assign or unassign agents to a supervisor
Assign agents to a supervisor so that the supervisor can perform silent monitoring, coaching, barge-in, and take over.
You can assign up to 100 agents to a supervisor.
| 1 |
Sign in to Control Hub. |
| 2 |
Go to . |
| 3 |
Go to the Call Queue card and click Manage. |
| 4 |
Click the Supervisors tab. The list of supervisors added appear. |
| 5 |
Under the Actions column, from the drop-down list of a respective supervisor, select a user to add as agent to the supervisor. The selected agent gets assigned to the supervisor.
|
| 6 |
To unassign agents, expand the supervisor row and click the Unassign Agents icon associated with the agent. When you unassign the last agent from a supervisor, the supervisor is removed as well. Once agents are assigned to a supervisor, a supervisor can use Feature Access Codes (FACs) to monitor, coach, barge-in, and take over calls. For more information, see the section Call queue supervisor functions for Webex Calling. |
View agents assigned to a queue
You can see a list of all the agents who are assigned to a call queue.
| 1 |
Sign in to Control Hub. |
| 2 |
Go to . |
| 3 |
Go to the Call Queue card and click Manage. |
| 4 |
Select a call queue to edit from the list. |
| 5 |
Go to Overview section and click Agents. |
| 6 |
Edit the users, workspaces, or virtual lines assigned as agents to this call queue. |
| 7 |
Click Save. Click Remove All if you want to remove all users, workspaces, or virtual lines from this call queue. |
You can use analytics to evaluate the call queue status, call queue agent status, and live queue status. The call queue data is batch processed each day, and is made available within 24 hours, and metrics are available by 1:00 PM GMT the next day. The amount of data you have access to depends on the type of customer you are. If you're a standard customer, you have access to 3 months of data. If you're a Pro Pack customer, you have access to 13 months of data.
These analytics data are for your general use and shouldn't be used for billing purposes.
To view call queue analytics, go to .
Location administrators don't have access to Analytics.
Dashboard tips
Adjust time period
You can view some charts in a hourly, daily, weekly, or monthly timescale so you can track engagement over time and look for usage trends. This offers powerful insight into how incoming calls are being handled in call queues.
The date picker doesn't apply to data in the live queue stats section. Data for the live queue stats section is collected every 30 seconds.
Global filters
The dashboard contains powerful filtering tools. Click on the Filters bar to select which data you want to see. The filters that you select will automatically apply to all of the charts. You can filter by specific call queues, locations, and Supervisors.
The Supervisors filter is applicable only to Call Queue Agent Stats.
Export data or charts
You can export any graph or detail view. Click the More button on the top right of the chart/list, and select the file format for your download (PDF, PNG, or CSV, depending on whether it's a graph or list).
When you combine file download with the filters available, you can easily generate useful reports about call queues in your organization.
KPIs
KPIs are available at the top of the page to show you a quick high-level status of incoming calls in call queues within the date range that you selected. The KPIs available are:
- Total answered calls—Total number of calls that agents answered. The percentage shows the change in value over time by comparing it with the past data of the date range selected.
- Total abandoned calls—Total number of calls where the caller hung up or left a message before an agent became available. The percentage shows the change in value over time by comparing it with the past data of the date range selected.
- Percentage of abandoned calls—Percentage of calls where the caller hung up or left a message before an agent became available. The percentage shows the change in value over time by comparing it with the past data of the date range selected.
- Avg wait time—Average time that callers spent waiting for the next available agent to answer the call. The percentage shows the change in value over time by comparing it with the past data of the date range selected.
Incoming calls for call queues and trend
This chart shows a breakdown of call queue statistics by incoming calls. You can use this chart to see how call queues are handling all the incoming calls to your organization.
Avg call queue time per call and trend
This chart shows a breakdown between the average abandoned and average wait minutes from incoming calls. You can use this chart to see how long callers had to wait before hanging up the call or getting transferred to an agent. Average minutes are calculated as:
- Avg. abandoned time—Average call time that the callers spent waiting for an agent before hanging up or selecting the option to leave a message.
- Avg. wait time—Average time that callers spend waiting for the next available agent to answer the call.
Top 25 call queues by status of calls
This table shows the top 25 call queues with the most calls by a specific status. The statuses of calls available are:
- Answered calls—Number of calls answered by agents.
- % of answered calls—Percentage of calls answered by agents.
- Abandoned calls—Number of calls where the caller hung up or left a message before an agent became available.
- % of abandoned calls—Percentage of calls where the caller hung up or left a message before an agent became available.
- Overflows - Busy—Number of calls that overflowed to a different call queue because the queue limit was met.
- Overflows - Timed out—Number of calls that overflowed to a different call queue because the wait time exceeded the maximum configured limit.
- Calls transferred—Number of calls that were transferred out of the queue.
Top 25 call queues by avg wait and abandoned time
This table shows the top 25 call queues with the highest average wait and abandoned times from incoming calls. Average time are calculated as:
- Avg abandoned time—Average call time that the callers spent waiting for an agent before hanging up or selecting the option to leave a message.
- Avg wait time—Average call time that callers spend waiting for the next available agent to answer the call.
Call queue stats
This table shows details of call queues that have been set up in your organization. You can use this table to see the number of incoming calls to call queues and the status of those calls. You can also search for specific call queues, locations, phone numbers, and extensions by using the search bar in the table. The details available are:
- Call queue—Name of the call queue.
- Location—Location assigned to the call queue.
- Phone No.—Phone number assigned to the call queue.
- Extension—Extension number assigned to the call queue.
- Total hold time—Total time that calls were placed on hold by agents.
- Avg hold time—Average time that calls were placed on hold by agents.
- Total talk time—Total time that agents were actively talking on calls.
- Avg talk time—Average time that agents were actively talking on calls.
- Total handle time—Total time an agent spends on a call from a queue. This is recorded when the agent ends or transfers the call. Handle time includes talk time, hold time, and ring time.
- Avg handle time—Average time that agents spent handling calls. Handle time includes talk time, hold time, and ring time.
- Total wait time—Total time that callers spent waiting for the next available agent to answer the call.
- Avg wait time—Average time that callers spent waiting for the next available agent to answer the call.
- Calls answered—Number of calls answered by agents.
- % Answered calls—Percentage of calls answered by agents.
- Calls abandoned—Number of calls where the caller hung up or left a message before an agent became available.
- % Abandoned calls—Percentage of calls where the caller hung up or left a message before an agent became available.
- Avg abandoned time—Average time where callers hung up or left a message before an agent became available.
- Abandoned time—Time where callers hung up or left a message before an agent became available.
- Total calls—Total number of incoming calls.
- Overflow - Busy—Number of calls that overflowed because the queue limit was met.
- Overflow - Timed out—Number of calls that overflowed because the wait time exceeded the maximum limit.
- Calls transferred—Number of calls that were transferred out of the queue.
- Avg. no. of agents assigned—Average number of agents assigned to call queues.
- Avg. no. of agents handling calls—Average number of agents that actively handled calls.
Call queues with no data won't show in this table.
KPIs
KPIs are available at the top of the page to show you details about the calls that agents handled within the date range that you selected. The KPIs available are:
- Total answered calls—Total number of presented calls that were answered by agents. The percentage shows the change in value over time by comparing it with the past data of the date range selected.
-
Total bounced calls—Total number of calls that were presented to an
agent but weren't answered. The percentage shows the change in value over time by
comparing it with the past data of the date range selected.
Calls that were declined by an agent aren't counted as bounced calls.
- Avg. handle time—Average time that agents spend on handling calls. The percentage shows the change in value over time by comparing it with the past data of the date range selected.
Avg agent call time per call and trend
This chart shows on average how long each call lasts by their call status. You can use this chart to see if callers are getting the help they need in a timely manner.
Incoming calls to agents by call status
This chart shows a breakdown of incoming calls to agents based on the call status. This chart can help you see if there are more bounced calls than usual.
Agents handling calls vs agents assigned
This chart shows a trend of the average number of agents handling calls against the average number of assigned agents to call queues. You can use this chart to see if there are enough agents to handle calls and adjust as needed.
Top 25 agents by answered and bounced calls
This table shows the top 25 agents with the most answered or bounced calls.
Calls that were declined by an agent aren't counted as bounced calls.
Top 25 agents by avg talk and avg held time
This table shows the top 25 agents with the highest average talk or hold minutes.
Call queue agents
This table shows details of all the agents that have been assigned to call queues in your organization. You can use this table to see which agent gets the most calls and information about their calling stats. You can also search for specific agent or workspace names, call queues, and locations by using the search bar in the table. The details available are:
- Agent name—Name of the agent or workspace.
- Call queue—Name of the call queue.
- Location—Location assigned to the call queue.
- Total answered calls—Number of calls that were presented to the agent and answered by them.
-
Bounced calls—Number of calls that were presented to the agent but went
unanswered.
Calls that were declined by an agent aren't counted as bounced calls.
- Total presented calls—Number of inbound calls to the agent that were distributed by the call queue.
- Total talk time—Total time that an agent spent actively talking on calls.
- Avg. talk time—Average time that an agent spent actively talking on calls.
- Total hold time—Total time that an agent put calls on hold.
- Avg. hold time—Average time that an agent put calls on hold.
- Total handle time—Total time that an agent spent handling calls. Handle minutes are calculated as Total talk time + Total hold time = Total handle time.
- Avg. handle time—Average time that an agent spent handling calls.
KPIs
KPIs are available at the top of the page to show you all the current incoming calls and what their statuses are to help you monitor call queues in real time. The KPIs available are:
- Active calls—Shows the number of calls where agents are talking to callers.
- Calls waiting—Shows the number of calls that are waiting for the next available agent to answer.
- Held calls—Shows the number of calls that agents placed on hold.
Live call queue stats
This table shows details of all the call queues that have been set up in your organization. You can use this table to see which call queue gets the most calls and adjust the number of agents as needed. You can also search for specific call queues, locations, phone numbers, and extensions by using the search bar in the table. The details available are:
- Call queue—The name of the call queue.
- Location—The location assigned to the call queue.
- Phone no.—The phone number assigned to the call queue.
- Extension—The extension assigned to the call queue.
- Active calls—The number of calls where agents are talking to callers.
- Held calls—The number of calls that agents have placed on hold.
- Calls waiting—The number of calls that are waiting for the next available agent.
See these videos for more details:
For more details, see Analytics for Your Cloud Collaboration Portfolio.
You can view call queue reports with details on all inbound calls that reached the call queue and also view queue and agent stats.
You can access reports under .
Location administrators don't have access to Reports.
Queue stats
This report includes one record for each call queue and phone number pairing. If a call queue has only a primary number configured, the report includes one record for that queue. If a call queue has both a primary number and a DNIS number configured, the report includes separate records for each queue and phone number pairing. Use the Phone number and Extension columns to distinguish between records for the same call queue.
| Column name | Description |
|---|---|
| Call Queue | Name of the call queue. |
| Location | Location assigned to the call queue. |
| Phone number | Phone number assigned to the call queue. This can be the primary number or DNIS number associated with the queue record. |
| Extension | Extension assigned to the call queue, when configured. |
| Total Hold Time | Total time that calls are placed on hold by agents. |
| Avg Hold Time | Average time that calls are placed on hold by agents. |
| Total Talk Time | Total time that agents are actively talking on calls. |
| Avg Talk Time | Average time that agents are actively talking on calls. |
| Total Handle Time | Total time an agent spends on a call from a queue, including ring time. This is recorded when the agent ends or transfers the call. |
| Avg Handle Time | Average time that agents spent handling calls. |
| Total Wait Time | Total time that callers spent waiting for the next available agent to answer the call. |
| Avg Wait Time | Average time that callers spent waiting for the next available agent to answer the call. |
| Answered Calls | Number of calls answered by agents. |
| % Answered Calls | Percentage of calls answered by agents. |
| Abandoned Calls | Number of calls where the caller hung up or left a message before an agent became available. |
| % Abandoned Calls | Percentage of calls where the caller hung up or left a message before an agent became available. |
| Avg Abandoned Time | Average time where callers hung up or left a message before an agent became available. |
| Total Abandoned Time | Time where callers hung up or left a message before an agent became available. |
| Total Calls | Total number of incoming calls. |
| Calls Overflowed | Number of calls that overflowed because the queue limit is met. |
| Calls Timed Out | Number of calls that timed out because the wait time exceeded the maximum limit. |
| Calls Transferred | Number of calls that are transferred out of the queue. |
| Avg No. of Agents Assigned | Average number of agents assigned to call queues. |
| Avg No. of Agents Handling Calls | Average number of agents that actively handled calls. |
Queue agent stats
This report includes agent statistics for each call queue and phone number pairing. If a call queue has only a primary number configured, the report includes one record for that queue. If a call queue has both a primary number and a DNIS number configured, the report includes separate records for each queue and phone number pairing. Use the Phone number and Extension columns to distinguish between records for the same call queue.
| Column name | Description |
|---|---|
| Agent Name/Workspace Name | Name of the agent or workspace. |
| Call Queue | Name of the call queue. |
| Location | Location assigned to the call queue. |
| Phone number | Phone number assigned to the call queue for the agent statistics record. This can be the primary number or DNIS number associated with the queue. |
| Extension | Extension assigned to the call queue, when configured. |
| Total Answered Calls | Number of calls that are presented to the agent and answered by them. |
| Bounced Calls | Number of calls that are presented to the agent but went unanswered. |
| Abandoned Calls | Number of calls where the caller hung up or left a message before an agent became available. |
| Other Unanswered Calls | Number of calls that had a status other than unanswered. For example, instances where the caller didn't make a key selection. |
| Total Presented Calls | Number of inbound calls to the agent that are distributed by the call queue. |
| Total Talk Time | Total time that an agent spent actively talking on calls. |
| Avg Talk Time | Average time that an agent spent actively talking on calls. |
| Total Hold Time | Total time that an agent put calls on hold. |
| Avg Hold Time | Average time that an agent put calls on hold. |
| Total Handle Time | Total time an agent spends on a call from a queue, including ring time. This is recorded when the agent ends or transfers the call. |
| Avg Handle Time | Average time that an agent spent handling calls. |
For more details on other services report templates, custom templates and managing reports, see Reports for Your Cloud Collaboration Portfolio.
Agent features
Using the Webex App, the agents can set availability status, join/unjoin queue, make outbound call, make conference call, and so on.
For more details, see Change your call queue status.
Multi call window
The muti call window option in the Webex App allows agents to get a quick view of the call status and easily access some common calling features such as dismiss calls, answer calls, transfer, hold, and so on.
For more details, see Manage all your phone calls in one place.
Cisco Call for Microsoft Teams
The Cisco Call integration within the Microsoft Teams allows agents to access the Webex Calling features directly from the Microsoft Teams.
For more details, see Cisco Call for Microsoft Teams.


