
Thanks for your feedback.
Set up Webex Cloud-Connected UC for on-premises devices
 Feedback?
-
If your organization has already established communication with Control Hub, then refer to Activate Webex Cloud-Connected UC for Organizations.
-
If your organization does not have Control Hub, contact your Cisco partner to submit a Webex Cloud-Connected UC order on your behalf.
-
After completing the order through Cisco Commerce Workspace (CCW), refer to the Cisco Collaboration Flex Plan Ordering Guide for information on how to order Webex Cloud-Connected UC.
-
Starting with Unified CM Release 12.5(1)SU2, there’s no need to create the agent installer COP file. Agent code is built into the release, enabling a connection to Control Hub through a CLI command.
When you first set up Webex Cloud-Connected UC, a wizard guides you on how to set up an agent file and cluster group. Subsequently, when you create additional agent files and cluster groups, the wizard no longer appears.
Create an Agent Cisco Operations Package (COP) file in the Control Hub. Then install it on all nodes of a Unified CM, or IM and Presence, or Cisco Unity Connection, or Cisco Emergency Responder cluster that you want to connect to the Control Hub. After installing the agent file, sign back into Control Hub to verify the server cluster connections and assign them to a cluster group.
-
After you install the Agent COP file, no server or cluster reboot is required.
-
If you face any issues while performing the procedure below, see Troubleshoot Webex Cloud-Connected UC.
Create an Agent Cisco Operations Package (COP) file in the Control Hub. Then install it on all nodes in the Unified CM, or IM and Presence cluster you want to connect to the Control Hub. After installing the agent file, sign back into the Control Hub to verify the server cluster connections and assign them to a cluster group.
Before you begin
Ensure that your network firewalls and proxies allow access to the following URLs:
-
*.ucmgmt.cisco.com
-
*.webex.com
Collect the proxy information required to connect the nodes to the internet. For information on how to add an authenticated proxy or to add a proxy after the agent has been installed, see Add a Proxy.
The Clusters should have unique PKIDs.
| 1 |
From the customer view in Control Hub, go to . On the UC Management card, click Get Started. The Get Started button remains enabled until you create an agent file and a cluster group. |
| 2 |
Click Next. |
| 3 |
Name the agent file and provide a description. The maximum length for a filename is 200 characters, and the description is 1000 characters. |
| 4 |
Enter the proxy information to connect the nodes to the internet, and then click Save to create the agent file.
|
| 5 |
Click Download. The Agent File Download window appears. |
| 6 |
In the Agent File Download window, click Download corresponding to one of the following options:
Based on your selection, the agent COP file corresponding to the Unified CM, or IM & Presence, or Cisco Unity Connection, or Cisco Emergency Responder version installed on the node is downloaded. You have created and downloaded your first agent file. After the first agent file is created, theAdd Agent Install File option appears on the screen. Use this button to create multiple agent install files. Continue with the setup wizard to create your first cluster group. Cluster groups are similar to folders. They are a logical construct that allows you to group clusters together for easier management. Enter a name for the cluster group that makes sense for your deployment. For example, you can name cluster groups based on geographic regions or release environments. |
| 7 |
Click Next. |
| 8 |
Enter a name and description for the cluster group, then click Save. You can create multiple cluster groups. After creating the required cluster groups, proceed to the next step. |
| 9 |
Click Next, and then Finish to close the wizard. |
-
This procedure is applicable only if you are not going through the setup wizard.
-
For Unified CM 12.5 SU4 or later, you can also onboard a node using the inbuilt agent COP file that comes with the software. We recommend that you use that method to onboard a node rather than following these steps to manually create an agent COP file. For more info, see Onboard a node using the admin CLI.
-
If you encounter any issues during this procedure, refer to Troubleshoot Webex Cloud-Connected UC.
Before you begin
Ensure that your network firewalls and proxies allow access to the following URLs:
-
*.ucmgmt.cisco.com
-
*.webex.com
Gather the proxy information required to connect the nodes to the internet. For information on how to add an authenticated proxy or to add a proxy after the agent has been installed, see Add a Proxy.
The Clusters should have unique PKIDs.
| 1 |
From the customer view in Control Hub, navigate to . On the UC Management card, click Agent Install Files. |
| 2 |
Click Add File to create an agent installer file containing zero or more proxies. |
| 3 |
Name the agent file and provide a description. The maximum length for a filename is 200 characters and the description is 1000 characters. |
| 4 |
Enter the proxy information, and then click Save to create the agent file.
|
| 5 |
Click Download. |
| 6 |
In the shortcut menu, click Download corresponding to one of the following options: Based on your selection, the agent COP file corresponding to the Unified CM, or IM & Presence, or Cisco Unity Connection, or Cisco Emergency Responder version that is installed on the node is downloaded. |
-
For Unified CM 12.5 SU4 or higher versions, the agent COP file is bundled along with the software. Use the Admin CLI to onboard a node using this agent COP file.
-
For CER 14.SU1 or higher, the agent COP file is bundled along with the software. Use the Admin CLI to onboard a node using this agent COP file.
| 1 |
On the Admin CLI prompt, type |
| 2 |
To find out your Organization ID, from the customer view in Control Hub, go to Management > Account. In the Company Information section, you can see the Organization ID. For example, organization_id could be 43e67ab7-8f31-4566-abfc-16b3de8362ac. |
| 3 |
Type utils ucmgmt agent enable. After a few minutes, the node is onboarded. |
| 4 |
Repeat the steps before this on all the nodes in the cluster. Once you onboard the nodes in a cluster, see Verify and assign Clusters for information on how to verify a cluster. Once you onboard the nodes, the CDR repository manager and log partition monitoring tool services restarts and it is an expected behavior. |
Each agent installer file can have zero to any number of HTTP proxies defined in it. If you must add more HTTP proxies after you create an agent installer file, create a new agent installer file with the requisite proxies. When you install the agent installer file on a node, the node cycles through all the proxies defined in the file until it can reach the cloud service. Hence, the proxies added to an agent installer cop file determine the data center where you can use the file.
You can also create multiple cluster groups to organize your clusters.
Add Cluster groups
Add cluster groups to the Control Hub to enable you to assign clusters to them. A cluster group is a place to logically group clusters so that they can be managed together. For example, you can create cluster groups based on geographic regions or release environments. You can rename cluster groups, move clusters from one cluster group to another, and so on.
If you face any issues while performing the below procedure, see Troubleshoot Webex Cloud-Connected UC.
| 1 |
From the customer view in Control Hub, go to . On the UC Management card, click Inventory. The UC Management page appears showing the list of cluster groups. |
| 2 |
From the Add drop-down list, choose Cluster Group. |
| 3 |
In the Create Cluster Group window, enter the Cluster Group Name and the Group Description, and click Save. |
Cluster Group Status, Node Status, and Telemetry Module Status
The following table lists the different statuses of a cluster group with a brief description about each. For details on how to fix an issue that is related to the status of a cluster group, see Troubleshoot Webex Cloud-Connected UC.
|
Cluster Group Status |
Brief Description |
|---|---|
|
Needs Verification |
The customer administrator must verify the cluster. |
|
No Clusters |
No clusters are present in the cluster group. |
|
Misconfigured |
One or more nodes in the cluster group are configured incorrectly. |
|
No Agent running |
No agents are running on any of the nodes. |
|
No Publisher |
|
|
Offline |
One or more nodes in the cluster group have their agent offline. The agent process might have stopped and requires consideration. |
The following table lists the different statuses of a node with a brief description about each. For details on how to fix an issue that is related to the status of a node, see Troubleshoot Webex Cloud-Connected UC.
|
Node Status |
Brief Description |
|---|---|
|
Needs Assignment |
You must assign the node to a cluster. |
|
Needs Verification |
The customer administrator must verify the node. |
|
Unsupported |
Node is onboarded but is not supported by CCUC. For example, Cisco Unity, Cisco Emergency Responder, and so on. |
|
Offline |
The node is not reachable. |
|
Online |
The node is onboarded and the agent is verified. |
|
Misconfigured |
Node is configured incorrectly. |
|
No Agent running |
If no agents are running on the node, the agent process might have stopped. |
|
No Publisher |
One or more clusters in the clusters under that cluster have no Publisher. This is a rare scenario. |
The following table lists the different statuses of a node in the Telemetry Module Inventory with a brief description about each.
|
Telemetry Module Status |
Brief Description |
|---|---|
|
Starting |
The administrator has started the telemetry service. |
|
Stopping |
The administrator has stopped the telemetry service. |
|
Stopped by user |
The user has stopped the telemetry service. |
|
Waiting for installation |
Installation in progress. |
|
Online |
The module is online and running with the latest cop file. |
|
Offline |
The module is offline. |
After installing the agent on a node, a verification code shows up at the end of the install log file. For more information about how to install an agent cop file, refer to the respective documentation, depending on whether you have a Unified CM node, IM and P node, or a Cisco Unity Connection (CUC) node.
For a Unified CM or IM and P node, refer to Installation Guide for Cisco Unified Communications Manager and the IM and Presence Service based on your Unified CM release.
For a Unified CM node, the verification code is also present on the sign-in pages for the GUI and CLI. This code is similar to a serial number and makes it easy for you to identify each node uniquely. When you accept a node into the inventory, ensure that the verification code on the node matches what is displayed in Control Hub. Thus, you're certain that you’re working with the correct node.
For a CUC node, refer to Install, Upgrade, and Maintenance Guide for Cisco Unity Connection based on your CUC release.
Verify and assign Clusters
If you face any issues while performing the below procedure, see Troubleshoot Webex Cloud-Connected UC.
| 1 |
From the customer view in Control Hub, go to . On the UC Management card, click Inventory. The UC Management page appears showing the list of cluster groups. |
| 2 |
If any of the cluster groups shows the Needs Verification status, click Resolve next to the cluster group. |
| 3 |
Click Verify next to a cluster. |
| 4 |
From the Cluster Group drop-down list, choose the cluster group to which you want to assign a cluster. After you assign a cluster to the cluster group, all the nodes belonging to that cluster get assigned to the selected cluster group. |
| 5 |
Click check |
| 6 |
Click Save. After the cloud agent COP file installation, it would take up to one and half hours for the UC Analytics service to be up and running. |
 next to the node that you want to assign to the
cluster group, or
next to the node that you want to assign to the
cluster group, or  to remove the node.
You can redownload and delete agent files and change the name and descriptions of cluster groups.
Edit names or descriptions of cluster groups
| 1 |
From the customer view in Cisco Webex Control Hub, go to . On the UC Management card, click Inventory. The UC Management page appears showing the list of cluster groups. |
| 2 |
Click Details next to the cluster group that you want to edit. |
| 3 |
Click on the text field that you want to edit. |
Pause and resume the telemetry service
Based on your requirement, you can pause or resume the telemetry services. After you disable this service, no cloud operations occur on the node, including upgrade.
| 1 |
From the customer view in Control Hub, go to Services > Connected UC, On the UC Management Card, click Inventory. |
| 2 |
Click any of the cluster group and choose the cluster. |
| 3 |
Select the nodes from the entries in the list. A pane appears on the right where you can view more details about the node and the agent. |
| 4 |
Use CCUC service toggle to Pause and Resume the telemetry services. |
Delete a cluster group from control hub
You can remove a cluster group that you no longer require to efficiently manage the infrastructure that is connected to the cloud.
| 1 |
From the customer view in Cisco Webex Control Hub, go to . On the UC Management card, click Inventory. The UC Management page appears showing the list of cluster groups. |
| 2 |
Click Details next to the cluster group that you want to delete. The Inventory page displays all the clusters that are assigned to the selected cluster group. If the cluster group has any clusters that are assigned to it, you must either move those clusters to a different cluster group or delete those clusters before you delete the cluster group. For more information on how to delete a cluster, see Delete a cluster from control hub. |
| 3 |
(Optional) To move a cluster, select it and click Move. The Assign and Move window appears. |
| 4 |
(Optional) From the cluster group selection drop-down list, choose a cluster group and click Move.
|
| 5 |
(Optional) To create a new cluster group, choose Add Cluster Group option in the drop-down list and then Save. |
| 6 |
To delete the empty cluster group, click Delete Cluster Group on the Inventory page. The deleted cluster group no longer appears on the Control Hub. |
Delete a cluster from control hub
You can remove a cluster that you no longer require to efficiently manage the infrastructure that is connected to the cloud.
| 1 |
From the customer view in Cisco Webex Control Hub, go to . On the UC Management card, click Inventory. The UC Management page appears showing the list of cluster groups. |
| 2 |
Click Details next to the cluster group to which the cluster you want to delete belongs. |
| 3 |
On the cluster group details page, choose Delete Cluster from the drop-down list at the top right of the page. |
| 4 |
Click Yes to delete or click No to cancel. After cluster deletion, the agent and telemetry module are uninstalled from all the nodes that are associated with the deleted cluster. The deleted cluster no longer appears on the Control Hub. |
Download or delete agent files
After you create an agent installer file, you can’t edit it. If any file produces an error during its installation or you want to add more proxy information to a file, you can create a new agent install file and choose to delete the old file that is no longer needed.
| 1 |
From the customer view in Cisco Webex Control Hub, go to Services. In the UC Management card, and click Agent Install Files. |
| 2 |
Click on an agent file, and then select Download or Delete. |
Webex Cloud-Connected UC enables you to view the issues that occur on your on-premises infrastructure. These issues cause loss of telemetry data and incorrect data to be displayed on the Analytics charts. Based on the severity of the issue, either an error or warning notification is sent to the Control Hub. The notifications enable you to take necessary actions to rectify any on-premises issue and make informed decisions.
View on cluster groups details page
You can view the error or warning messages regarding your on-premises infrastructure on the cluster groups details page.
| 1 |
From the customer view in Cisco Webex Control Hub, go to . On the UC Management card, click Inventory. The UC Management page appears to show the list of cluster groups. You can also see an Error or Warning label in the Status column of cluster groups that have an issue. |
| 2 |
Click Details next to the cluster group for which you want to view the notification. |
| 3 |
Click Details next to the cluster for which you want to view the notification. If there are any error or warning notifications or both, you can view them on the side panel. |
| 4 |
To view the detailed information regarding an error or warning notification, next to the notification text click >. A side panel appears, displaying details such as severity, first and last reported times, applicability (node or cluster level), a description of the notification, and the required corrective action.. |
View on nodes list details page
You can also view the error or warning messages regarding your on-premises infrastructure on the nodes list details page.
| 1 |
From the customer view in Cisco Webex Control Hub, go to . On the UC Management card, click Inventory. The UC Management page appears to show the list of cluster groups. |
| 2 |
Click the Show Nodes List icon to view the list of all nodes. You can also see an Error or Warning label in the Status column of nodes that have an issue. |
| 3 |
Click the node for which you want to view the notifications. If there are any error or warning notifications or both, you can view them on the side panel. |
| 4 |
To view the detailed information regarding an error or warning notification, next to the notification text click >. A side panel appears, displaying details such as severity, first and last reported times, applicability (node or cluster level), a description of the notification, and the required corrective action. |
View events history
You can view the history of all Warning and Error events that were raised and resolved during a selected time period. The historical data for the past one year is maintained.
| 1 |
From the customer view in Cisco Webex Control Hub, go to . On the UC Management card, click Inventory. The UC Management page appears to show the list of cluster groups. You can also see an Error or Warning label in the Status column of cluster groups that have an issue. |
| 2 |
Click Details next to the cluster group for which you want to view the event history. The list of clusters belonging to the selected cluster group appears. |
| 3 |
Click Details next to the cluster for which you want to view the event history. The list of nodes belonging to the selected cluster appears. |
| 4 |
Click Details next to the node for which you want to view the event history. |
| 5 |
Click Events History. The Events History page appears that provides details, such as event name, type, severity, cluster name, node name, and time. |
| 6 |
To filter the data, choose one or a combination of the following options from the Time Duration drop-down list:
|
You can set a specific upgrade schedule or use the default schedule of 11 a.m. UTC.
Software upgrades for Cloud-Connected UC modules are done automatically at the cluster level, which ensures that all nodes are always running the same software version. Upgrades are done according to the upgrade schedule for the cluster.
Before you begin
-
This procedure describes how to schedule an upgrade for a Cloud-Connected UC module. Currently, the option to schedule an agent upgrade isn't available. For more information about an Agent and module, see .
-
This procedure describes how to schedule an upgrade for a Cloud-Connected UC module.
An urgent upgrade is a critical fix that impacts multiple customers. It is applied using the default time set for the cluster in the next available schedule. Consider an example where you set the upgrade schedule for a cluster to 11 a.m. UTC every Sunday. If an urgent upgrade becomes available before 11 a.m. on a particular day, the Cloud-Connected UC module is upgraded at 11 a.m. the same day. However, if the urgent upgrade becomes available post 11 a.m., then the Cloud-Connected UC module is upgraded at 11 a.m. on the following day.
| 1 |
From the customer view in Control Hub, go to . On the UC Management card, click Inventory. The UC Management page appears with the list of cluster groups. |
| 2 |
Click Details next to the cluster group to which the node belongs. The Inventory page with the list of clusters belonging to the selected cluster group appears.
|
| 3 |
Click Details next to the cluster to which the node belongs. The Node name with the version, product, and status appears.
|
| 4 |
Click the ellipsis (…) icon beside Event History and select Choose CCUC Module Upgrade Schedule. The CCUC Module Upgrade Schedule page appears. The below screenshot is just an example for illustrative purposes. 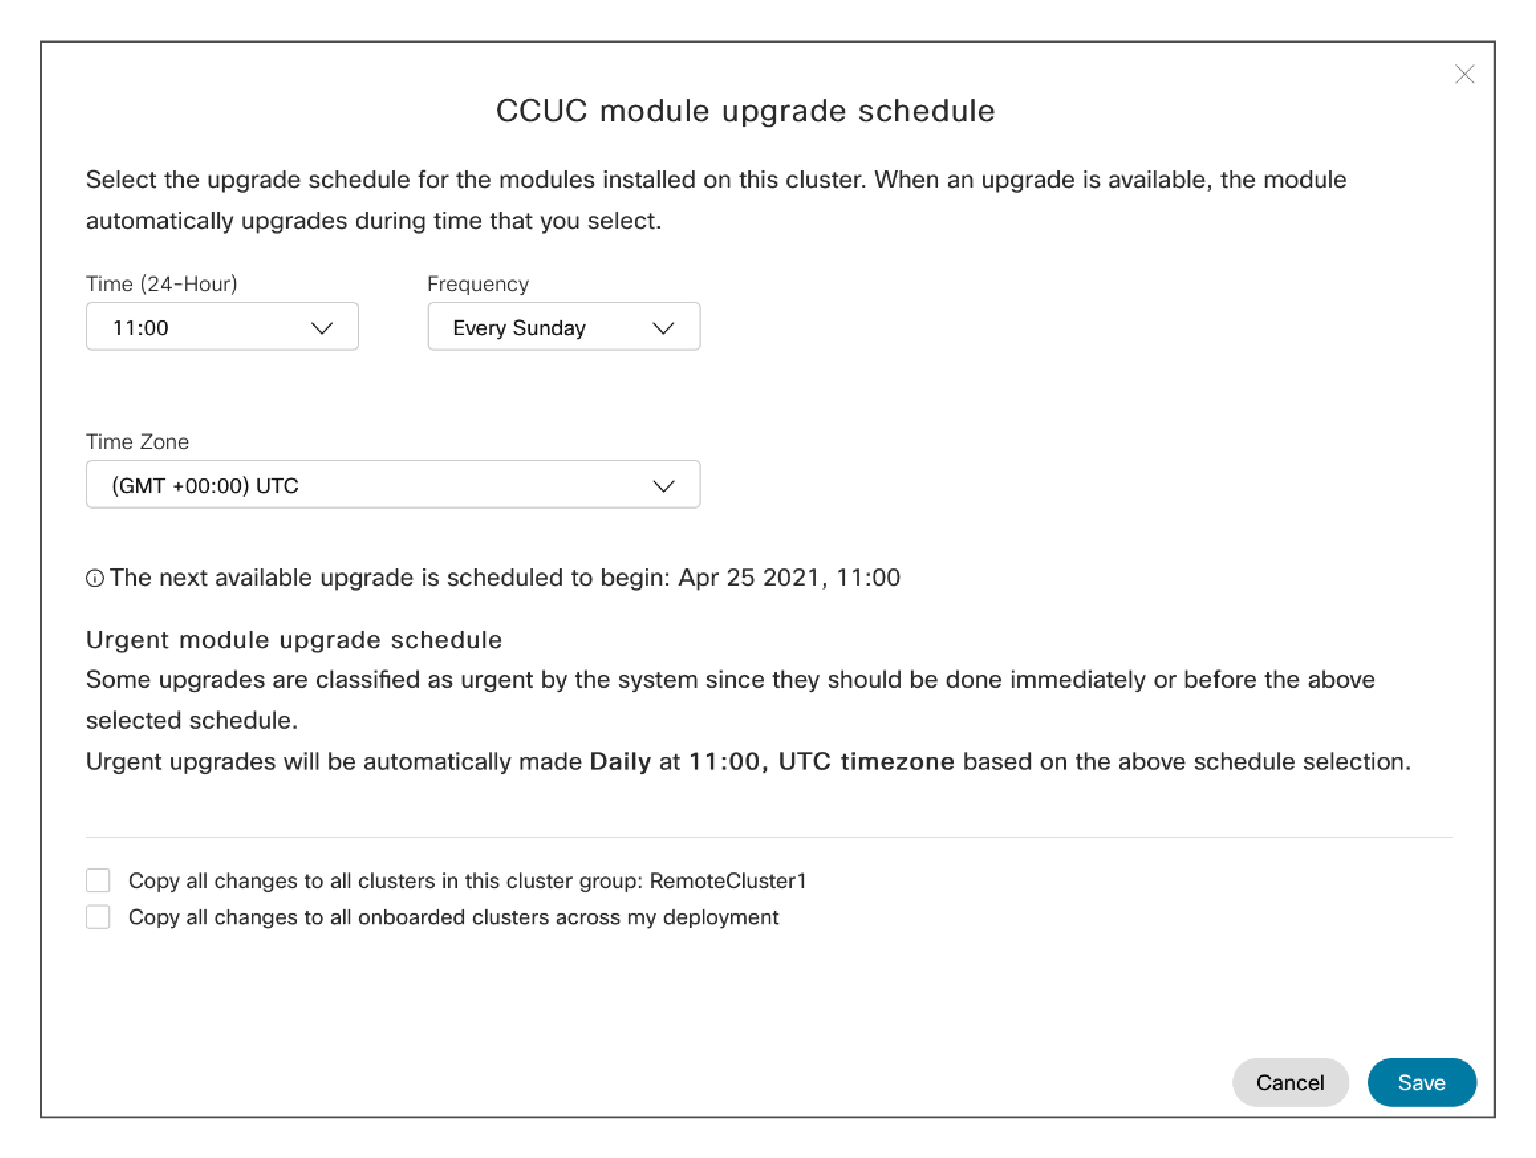
|
| 5 |
Choose the time, frequency, and time zone for the upgrade schedule from the respective drop-down lists. The next available upgrade is displayed below the Time Zone field. |
| 6 |
(Optional) If you want to apply the same upgrade schedule settings for all the clusters in the selected cluster group, check the Copy all changes to all clusters in this cluster group check box. |
| 7 |
(Optional) If you want to apply the same upgrade schedule settings for all the clusters that have been onboarded, check the Copy all changes to all onboarded clusters across my deployment check box. |
| 8 |
Click Save to save the changes or Cancel to discard them. |
You can view the details of a particular Webex Cloud-Connected UC service on the inventory page.
| 1 |
From the customer view in Control Hub, go to Services. On the UC Management card, click Inventory. The UC Management page appears to show the list of cluster groups. You can also see an Error or Warning label in the Status column of cluster groups that have an issue. |
| 2 |
Click the cluster group for which you want to view the status of a particular Webex Cloud-Connected UC service. The Inventory page appears to show the Agent Status and Service Status columns. The Service status can be as follows:
|
| 3 |
Click the cluster for which you want to view the status of a particular Webex Cloud-Connected UC service. The node details page appears to show the Agent Status
and Service Status columns. On this page, you can view
which service is offline. For example, if A appears in red, it indicates that
the Analytics service is configured and not running.
|
| 4 |
Click on the nodes from the entities in the list. A side panel appears showing details of the Agent Status, Service Status, and the telemetry module. |
| 5 |
Click show more on the side panel to view more details about the various Webex Cloud-Connected UC services for the selected node. |
|
From the customer view in Control Hub, go to . On the UC Management card, click Telemetry Module Inventory. The Telemetry Module Inventory page displays the status of all nodes in the various Unified CM clusters. For more information, see Cluster Group Status, Node Status, and Telemetry Module Status. |
Based on your requirement, you can start or stop the telemetry module. After you disable this service, no cloud operations occur on the node, including upgrade.
After you disable the service, no cloud operation (including upgrade) can take place on the node.
| 1 |
From the customer view in Control Hub, go to Services. On the UC Management card, click Telemetry Module Inventory. |
| 2 |
Click any of the node entries in the list. A pane appears on the right using which you can view more details about the node and the agent. |
| 3 |
Click Pause CCUC Services to disable the telemetry service. |
| 4 |
Click Resume CCUC Services to enable the telemetry service. |
What to do next
For information about CCUC Analytics, see Analytics for Your Cisco Webex Cloud-Connected UC.


