- ホーム
- /
- 投稿記事

コメントありがとうございます。

 この記事の内容
 フィードバックがある場合
コントロールハブでユーザーのボイスメールとボイスメール設定を有効にすることで、ユーザーが忙しい時や電話に出られない時に通話をボイスメールに転送したり、メール、テキストメッセージ、またはその両方でボイスメール通知を有効にしたり、ボイスメッセージを任意の場所に保存したりできるようになります。
組織のボイスメール設定を構成する
ユーザーのボイスメール設定を管理する前に、組織の設定を構成してください。これらの設定によって、ユーザーのボイスメール設定が決定されます。
開始する前に
ボイスメール機能を使用するには、その場所のボイスポータル拡張機能を設定する必要があります。詳細については、 Webex Calling の音声ポータルを構成するを参照してください。
| 1 | |
| 2 |
。 |
| 3 |
ボイスメール セクションに移動し、以下の設定を構成してください。
|
ボイスメールの転送
この設定を有効にすると、ユーザーはボイスメールを他のユーザーの電話番号または内線番号に転送できるようになります。無効にすると、ユーザーはボイスメールを外部メールボックスに転送したり、ボイスメールのコピーを指定されたメールアドレスに送信したりすることができなくなります。
-
この設定を有効にするには、トグルをクリックします。
ボイスメールの削除
180日以上前のボイスメールは自動的にアーカイブされます。アーカイブされたボイスメールへのアクセスが必要な場合は、シスコにサービスリクエストを提出してください。
ボイスメールの削除機能を使用すると、期限切れメッセージの削除条件を設定できます。有効にすると、管理者はメッセージの有効期限を指定できます。指定された欄に日数(1~180)を入力してください。管理者はメッセージ削除の条件を設定することもできます。
この設定を有効にするには、トグルをクリックして、以下のいずれかのオプションを選択してください。
-
許可削除— ユーザーがメールボックスにアクセスしたときに、未読のボイスメールをすべて保持し、期限切れのボイスメールを削除します。
-
厳密な削除— 設定した期間に基づいて、既読および未読のボイスメールをすべて削除します。
ボイスメールのパスコード
組織のボイスメールへのアクセスに使用するデフォルトのパスコードを設定する前に、以下のセキュリティ上の注意点を覚えておいてください。 risks/concerns エンドユーザー向け:
-
組織にデフォルトのパスコードを設定すると、どのユーザーのメールボックスやサービスにもアクセスできるようになります。
-
デフォルトのパスコードを使用すると、他のユーザーのサービスにアクセスできます。例えば、以下のようなサービスです。
-
ボイスメール(メッセージ再生、名前のパーソナライズ、挨拶などを含む)
-
シングルナンバーリーチポータル
-
ホテリング
-
-
デフォルトのパスコードでは、音声ポータルオプションを使用したホットデスクへのサインインが無効になります。
セキュリティを維持するためには、ユーザーがパスコードを更新することが重要です。ユーザーはユーザーハブを通じて個人のボイスメールPINを設定できます。または、一時的なパスコードを割り当てることもできます。 のセクションを参照してください Reset/Set この記事では、一時的なユーザーのボイスメールPIN を使用して、ユーザーの一時的なパスコードを設定します。ユーザーは、パスコードの設定方法について、 ボイスメールPINの設定またはリセット を参照してください。
組織のデフォルトパスコードを設定するには:
- ボイスメールパスコード トグルを有効にします。
- にパスコードを入力してください。デフォルトのパスコードを作成します。
- パスコードを確認してください。デフォルトのパスコードを確認してください。
また、パスコードを変更しなければならない期間や、変更後にパスコードを再度変更できる頻度を設定することもできます。
-
パスコード変更機能を有効にすると、ユーザーがパスコードを変更できる最小日数(1~7日)を設定できます。トグルがオフになっている場合は、同じ日にパスコードを複数回変更できます。
Webex Callingでは、ユーザーが古いパスコードを設定できないようにすることで、ユーザーのパスコードのセキュリティを強化しています。
-
有効にしている場合、パスコードの有効期限の日数 (15 ~ 180) を設定できます。トグルをオフにすると、パスコードを無期限に使用できます。
この機能により、パスコード履歴が10~24件まで拡張されます。つまり、各ユーザーの過去 24 個のパスコードを保存し、保存したパスコードの再利用を防ぐことができます。
ユーザーのボイスメールを有効にする
着信転送が有効になっている場合、これらの着信転送設定は、構成されているボイスメール設定を上書きします。
| 1 | |
| 2 |
。 |
| 3 |
ユーザーを選択し、 呼び出しをクリックします。 |
| 4 |
ボイスメール、ファックス、アナウンス言語とタイムゾーン セクションに移動し、 ボイスメールをクリックします。 |
| 5 |
ボイスメール のトグルをオンにして、必要な設定を有効にします。 組織の設定により、一部のボイスメール機能を利用できない場合があります。 |
ユーザーの通話をボイスメールに送信する
これらのボイスメール設定を構成して、ユーザーのボイスメールへの着信を直接行います。
| 1 | |
| 2 |
。 |
| 3 |
ユーザーを選択し、 呼び出しをクリックします。 |
| 4 |
ボイスメール、ファックス、アナウンス言語とタイムゾーン セクションに移動し、 ボイスメールをクリックします。 |
| 5 |
ボイスメールのトグルを オン にします。 |
| 6 |
ボイスメールに転送する セクションに移動し、以下のいずれかのオプションを選択してください。
ファイルをアップロードするか挨拶を録音したら、 ファイルの置換 を選択するか、別のメッセージを録音することで更新できます。新しいメッセージを録音したり、新しいファイルをアップロードしたりすると、以前の挨拶は上書きされます。 音声ファイル(WAVファイル)は、8kHz、8ビットモノラル、CCITTマイクロ法則、最大2MB、.wavファイル形式である必要があります。 すべての通話をボイスメールに転送するを選択した場合、他の 2 つのオプションを選択することはできません。 通話中は着信をボイスメールに転送する と 応答がない場合に着信をボイスメールに転送する の両方のオプションを同時に選択すると、ボイスメールに転送するように設定できます。 |
| 7 |
[保存] をクリックします。 |
Reset/Set ユーザーの一時的なボイスメールPIN
組織でデフォルトのボイスメールPINを有効にしている場合は、ユーザーのボイスメールPINをリセットできます。組織でデフォルトのボイスメール PIN を設定する方法については、「すべての新規ユーザーに適用されるデフォルトのボイスメール PIN を構成する」を参照してください。
| 1 | |
| 2 |
ユーザーのボイスメールPINをリセットするには: |
| 3 |
ユーザーの一時的なパスコードを設定するには: |
| 4 |
仮想回線の一時的なパスコードを設定するには: ユーザーは、組織レベルで設定された指定基準に従って、 ユーザーハブ でボイスメールPINをリセットすることもできます。詳細については、 ボイスメールPINの設定またはリセットを参照してください。 |
ユーザーのボイスメール通知を有効にする
コントロールハブでユーザーのボイスメールと設定を有効にすると、通話中または不在時に着信をボイスメールに転送したり、メール、テキストメッセージ、またはその両方でボイスメール通知を受信したり、音声メッセージを保存したりできるようになります。
Webex Calling に特有のメール ブランディングのカスタマイズの詳細については、 高度なブランディングのカスタマイズの設定を参照してください。
| 1 | |
| 2 |
。 |
| 3 |
ユーザーを選択し、 呼び出しをクリックします。 |
| 4 |
ボイスメール、ファックス、アナウンス言語とタイムゾーン セクションに移動し、 ボイスメールをクリックします。 |
| 5 |
ボイスメールのトグルを オン にします。 |
| 6 |
通知 セクションに移動し、 新しい音声メッセージの通知を受け取る トグルをオンにします。 |
| 7 |
以下の選択肢から1つ、または両方を選択してください。
Webex Calling は、米国およびカナダの電話番号のみ、 テキスト オプションをサポートしています。 Webex for Government は メール経由 オプションのみをサポートしています。 テキストメッセージを選択した場合は、保存する前にコントロール ハブに表示されるテキスト メッセージ の利用規約とプライバシー情報 を確認してください。 |
| 8 |
[保存] をクリックします。 |

ユーザーのボイスメール メッセージ ストレージを管理する
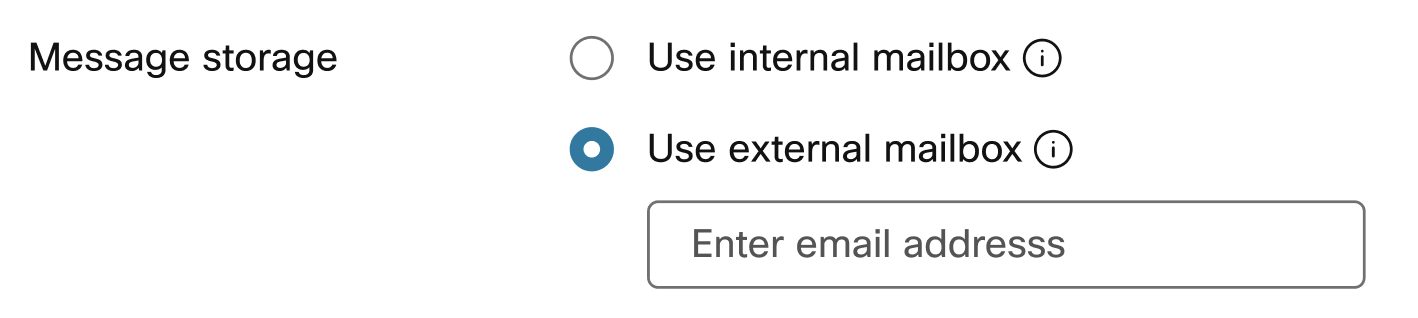
ユーザーがボイスメールにアクセスできる場所を指定できます。電話、ユーザーハブ、または指定された電子メールアドレスから .tiff ファイルとしてアクセスできます。
ユーザーに割り当てられた場所でボイスメールの文字起こしが有効になっていて、ユーザーにボイスメールの文字起こしを受信させたい場合は、メッセージのコピーをメールで送信し、 内部メールボックスを使用する オプションを選択してください。場所にボイスメールの議事文字を有効にする方法の詳細については、「場所の ボイスメールの議事文字を有効または無効にする」を参照してください。
| 1 | |
| 2 |
。 |
| 3 |
ユーザーを選択し、 呼び出しをクリックします。 |
| 4 |
ボイスメール、ファックス、アナウンス言語とタイムゾーン セクションに移動し、 ボイスメールをクリックします。 |
| 5 |
ボイスメールのトグルを オン にします。 |
| 6 |
メッセージストレージ セクションに移動し、以下のオプションのいずれかを選択してください。
このオプションは、ボイスメールの転送が無効になっている場合には利用できない場合があります。 |
| 7 |
[保存] をクリックします。 |
ユーザーのその他のボイスメール設定を構成する
これらの追加設定は、コントロールハブでユーザーの他のボイスメール設定と合わせて構成できます。
| 1 | |
| 2 |
。 |
| 3 |
ユーザーを選択し、 呼び出しをクリックします。 |
| 4 |
ボイスメール、ファックス、アナウンス言語とタイムゾーン セクションに移動し、 ボイスメールをクリックします。 |
| 5 |
ボイスメールのトグルを オン にします。 |
| 6 |
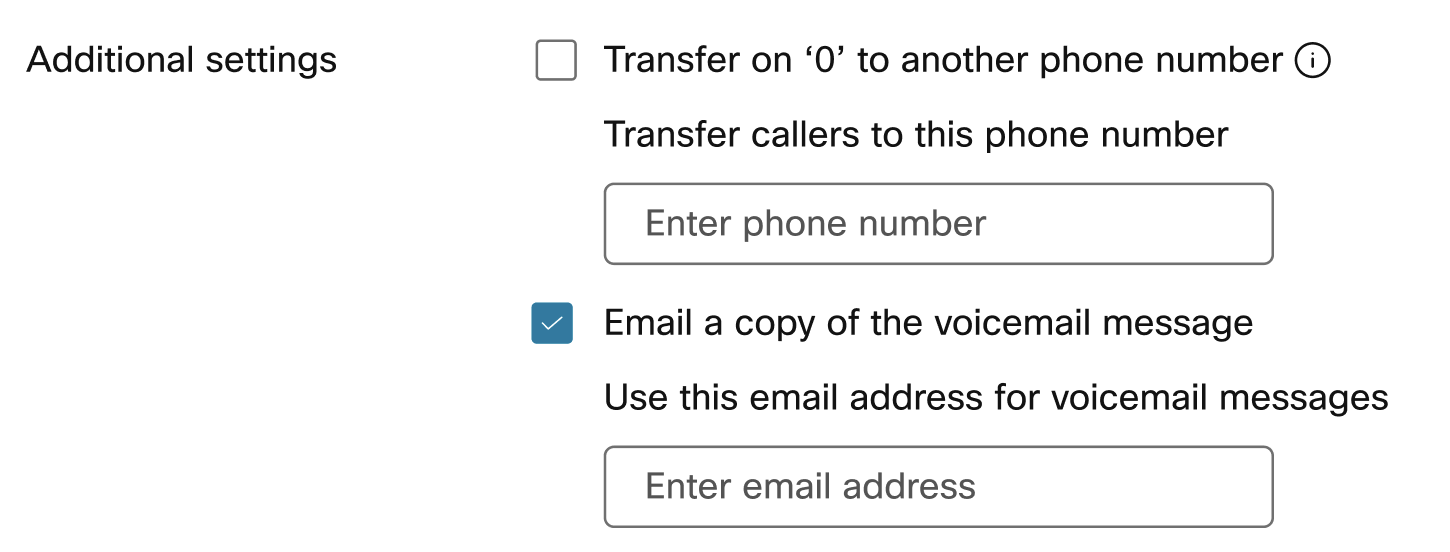
追加設定 セクションに移動し、以下のオプションのいずれか、または両方を選択してください。
このオプションは、ボイスメールの転送が無効になっている場合には利用できない場合があります。 ユーザーに割り当てられた場所でボイスメールの文字起こしが有効になっている場合は、ユーザーがボイスメールの文字起こしを受け取れるように、 メッセージのコピーをメールで送信する オプションを選択してください。 |
| 7 |
[保存] をクリックします。 |
ユーザーのファックス メッセージング設定を構成する
ファックス メッセージングを使用すると、ユーザーはボイスメール サービスから直接インバウンドのファックスを受信することができます。
始める前に
この機能を設定する前に、以下の点に注意してください。
-
ファックスは Webex Calling プラットフォームによって収集され、ボイスメール メッセージと共に共有ストレージ領域に保存されます。ストレージ容量は、ボイスメールでは 100 分、ファックス メッセージでは 1,000 ページです。ユーザーが利用可能なスペースを認識し、新しい FAX メッセージにスペースを割り当て、賢明にアーカイブする必要があります。
-
ファックス メッセージは保存期間は無制限です。
| 1 | |
| 2 |
。 |
| 3 |
ユーザーを選択し、 呼び出しをクリックします。 |
| 4 |
ボイスメール、ファックス、アナウンス言語とタイムゾーン セクションに移動し、 ボイスメールをクリックします。 |
| 5 |
ボイスメールのトグルを オン にします。 |
| 6 |
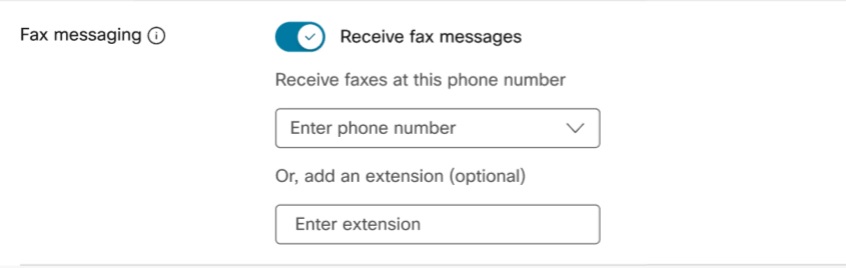
ファックスメッセージング セクションに移動し、 ファックスメッセージを受信する トグルをオンにします。 |
| 7 |
ファックス送信用に割り当てられた電話番号を入力してください。 |
| 8 |
必要に応じて、内線番号を入力してください。
|
| 9 |
[保存] をクリックします。 |
ユーザーのボイスメールの文字起こしを有効にする
ボイスメールの文字起こしを使用すると、ユーザーは、メール本文にボイスメールの音声テキストが記載され、ボイスメールの添付ファイルとして .WAV ファイルが添付されたメールを受信します。
ボイスメールの文字起こしを使用するユーザーは、以下の条件の適用を受けます。
-
ユーザーのロケーションでボイスメールの文字起こしが有効であること。詳細については、 Webex Calling のボイスメール文字起こしを参照してください。
-
発信 [] プロファイルのユーザーのボイスメール設定領域で、 ボイスメールメッセージのコピーをメールで送信 と [ 内部メールボックスを使用する を選択します。

ユーザーはユーザーハブで、ボイスメールの設定をすべて自分で構成することもできます。詳細については、 ボイスメール設定の構成を参照してください。ユーザーがこれらの設定に加えた変更は、ユーザーハブとコントロールハブの両方に反映されます。


