- Home
- /
- Article

Thanks for your feedback.

Cisco Webex Edge Audio Customer Configuration Guide
 In this article
 Feedback?
Use this configuration guide to set up your Edge Audio solution. You will need access to Webex Site Administration or Control Hub, Cisco Unified Communications Manager, Expressway-C configuration, and Expressway-E configuration.
Webex Edge Audio Overview
Edge Audio is an audio solution where calls originating within the enterprise go through your company network, over the internetthe internet or Webex Edge ConnectWebex Edge Connect, and into the cloud. Similarly, calls that initiate from Webex during a meeting route through the internetthe internet or Webex Edge ConnectWebex Edge Connect to leverage your on-premises audio routing.
Cisco Unified Border Element (CUBE) with Edge Audio supports vCUBE and all ASR and ISR platforms running CUBE version 16.12.2 and later.
We support the Edge Audio with only Expressway-E deployment with Webex Edge Connect. To route calls through the internet, use either an Expressway-C and Expressway-E pair or a CUBE. These deployments are covered in the Cisco Webex Edge Audio Customer Configuration Guide or the Cisco Webex Edge Audio for CUBE Customer Configuration Guide.
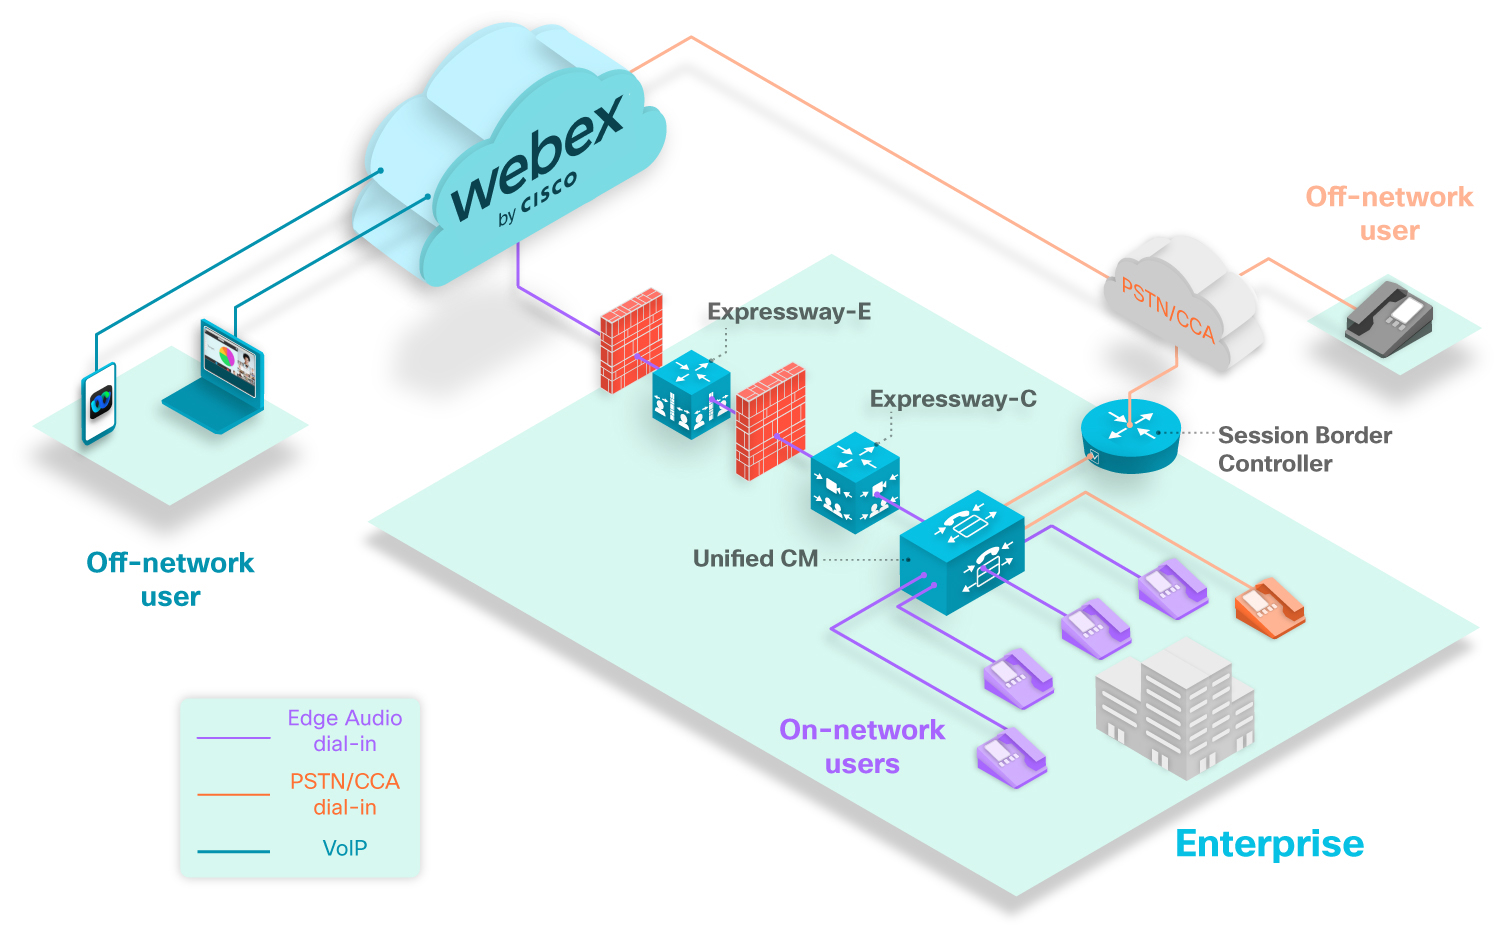
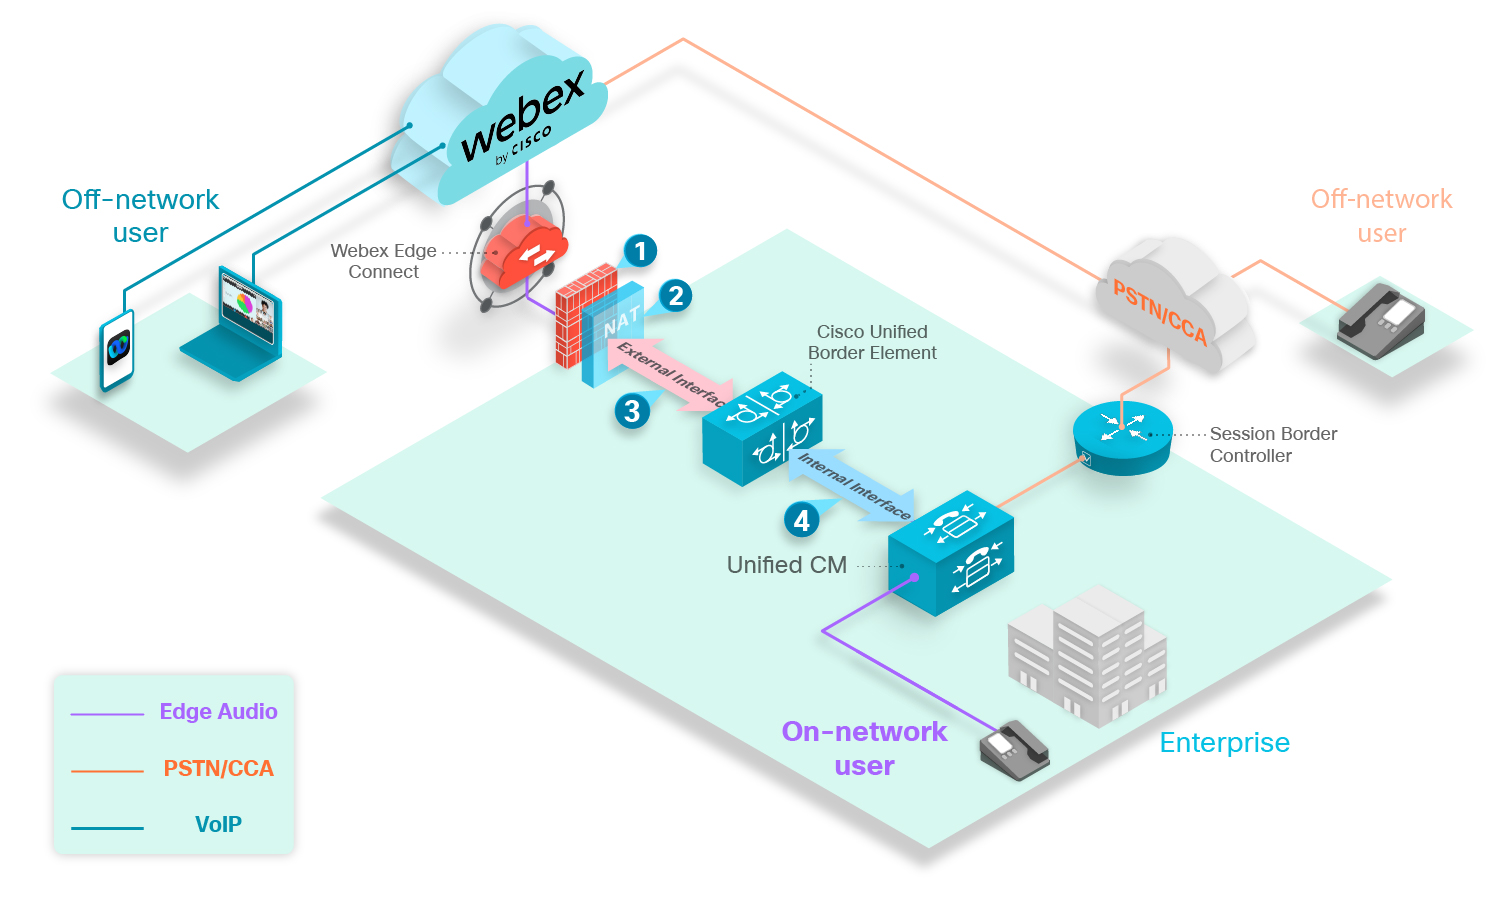
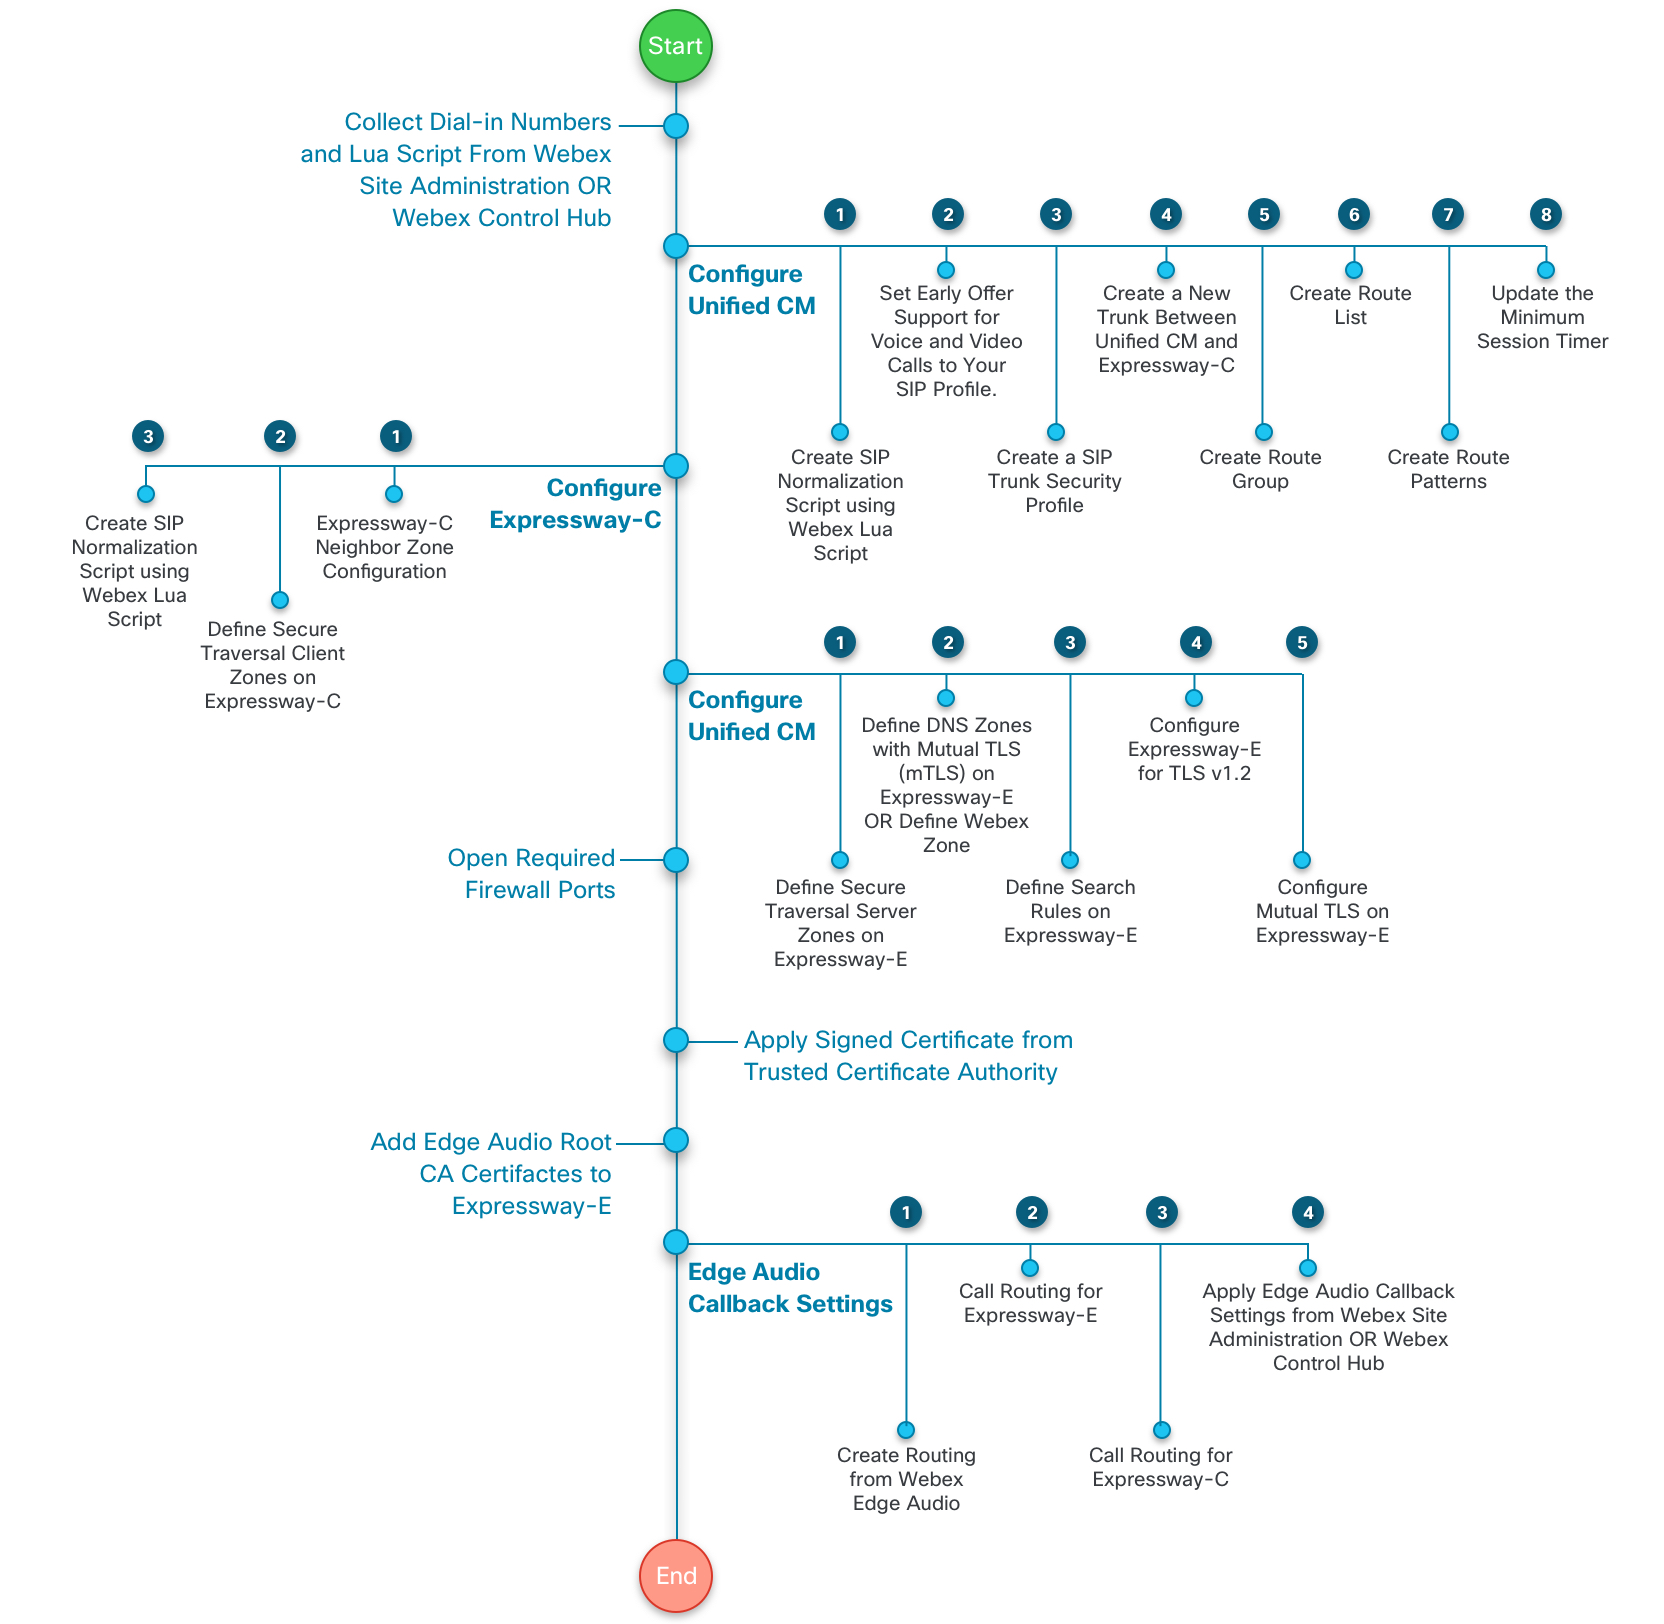
The above diagram shows a typical dial-in scenario. The purple phones represent dial-in users who are calling numbers that are set up with Edge Audio. All on-network users that dial numbers configured with Edge Audio have their call route into the Unified CM, through the Expressways, and into the Webex cloud.
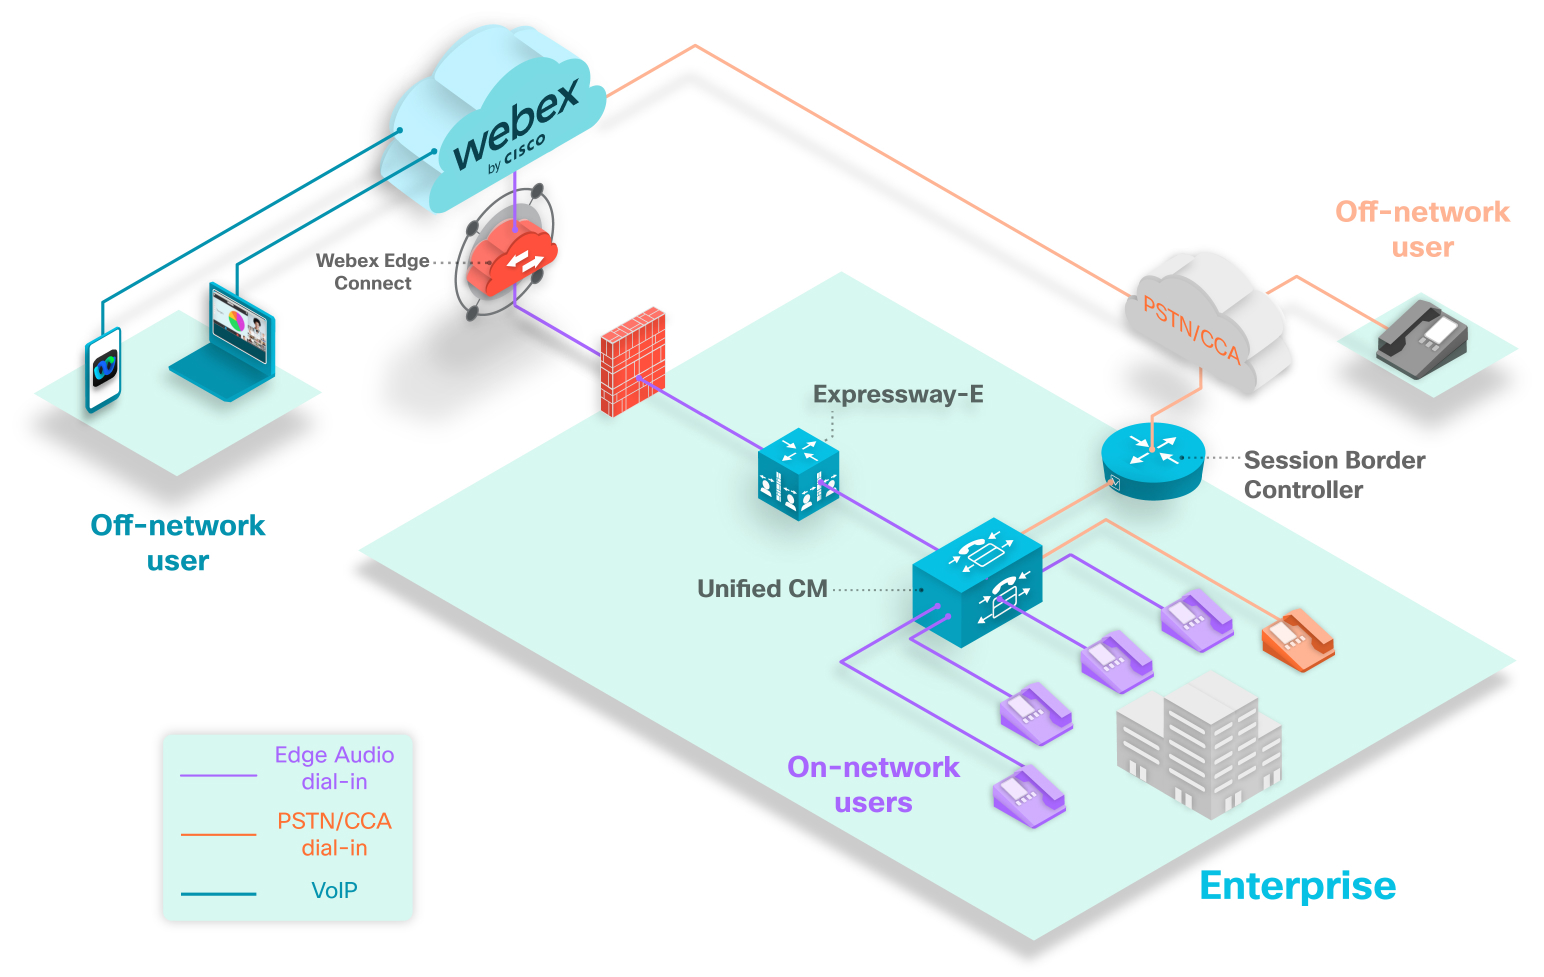
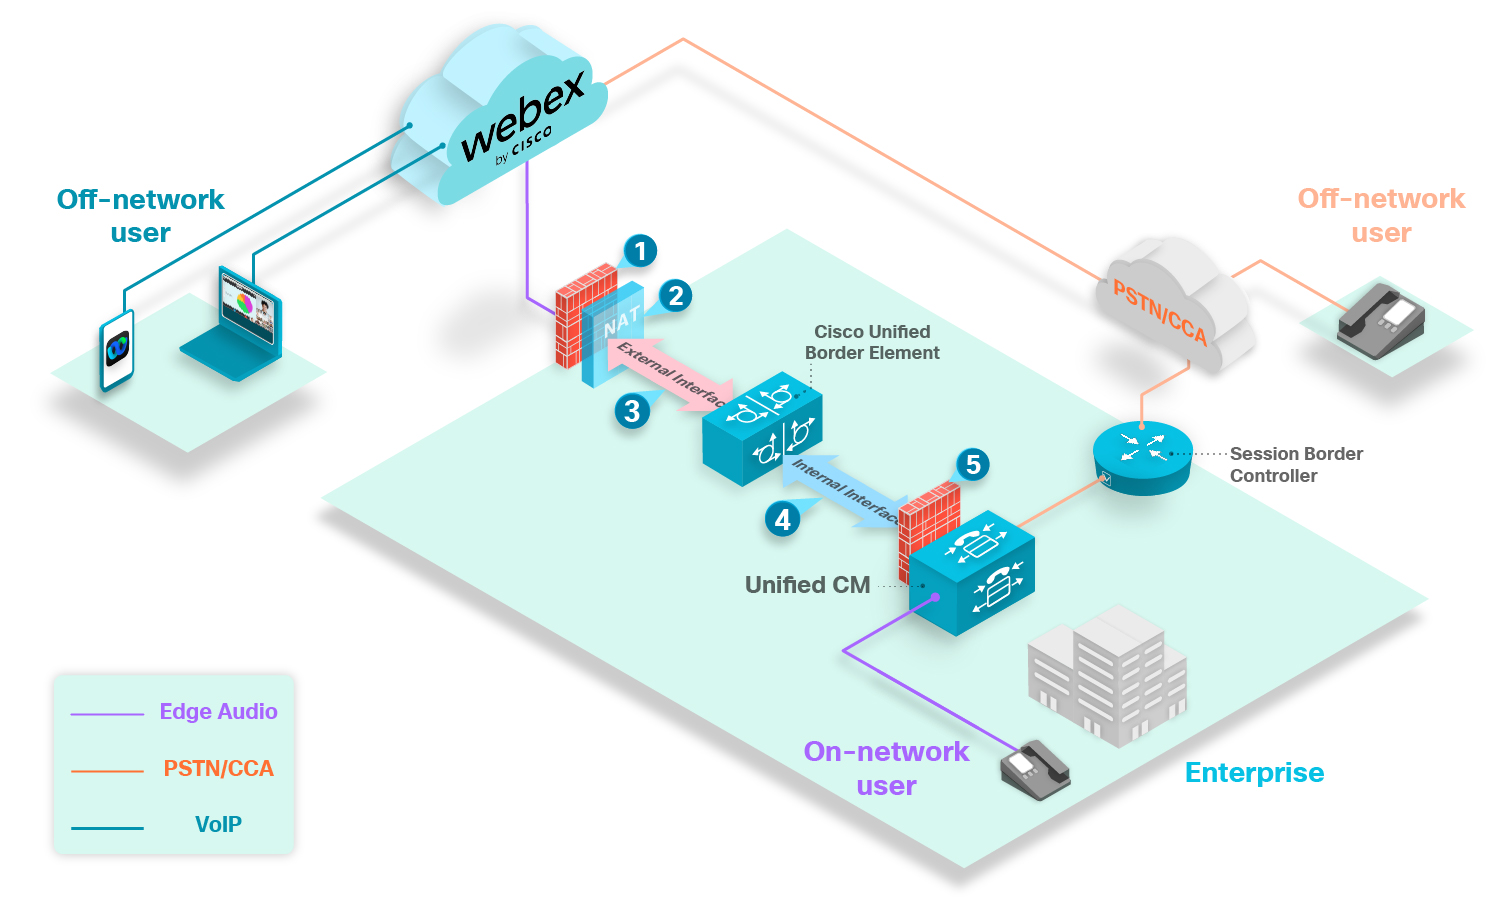
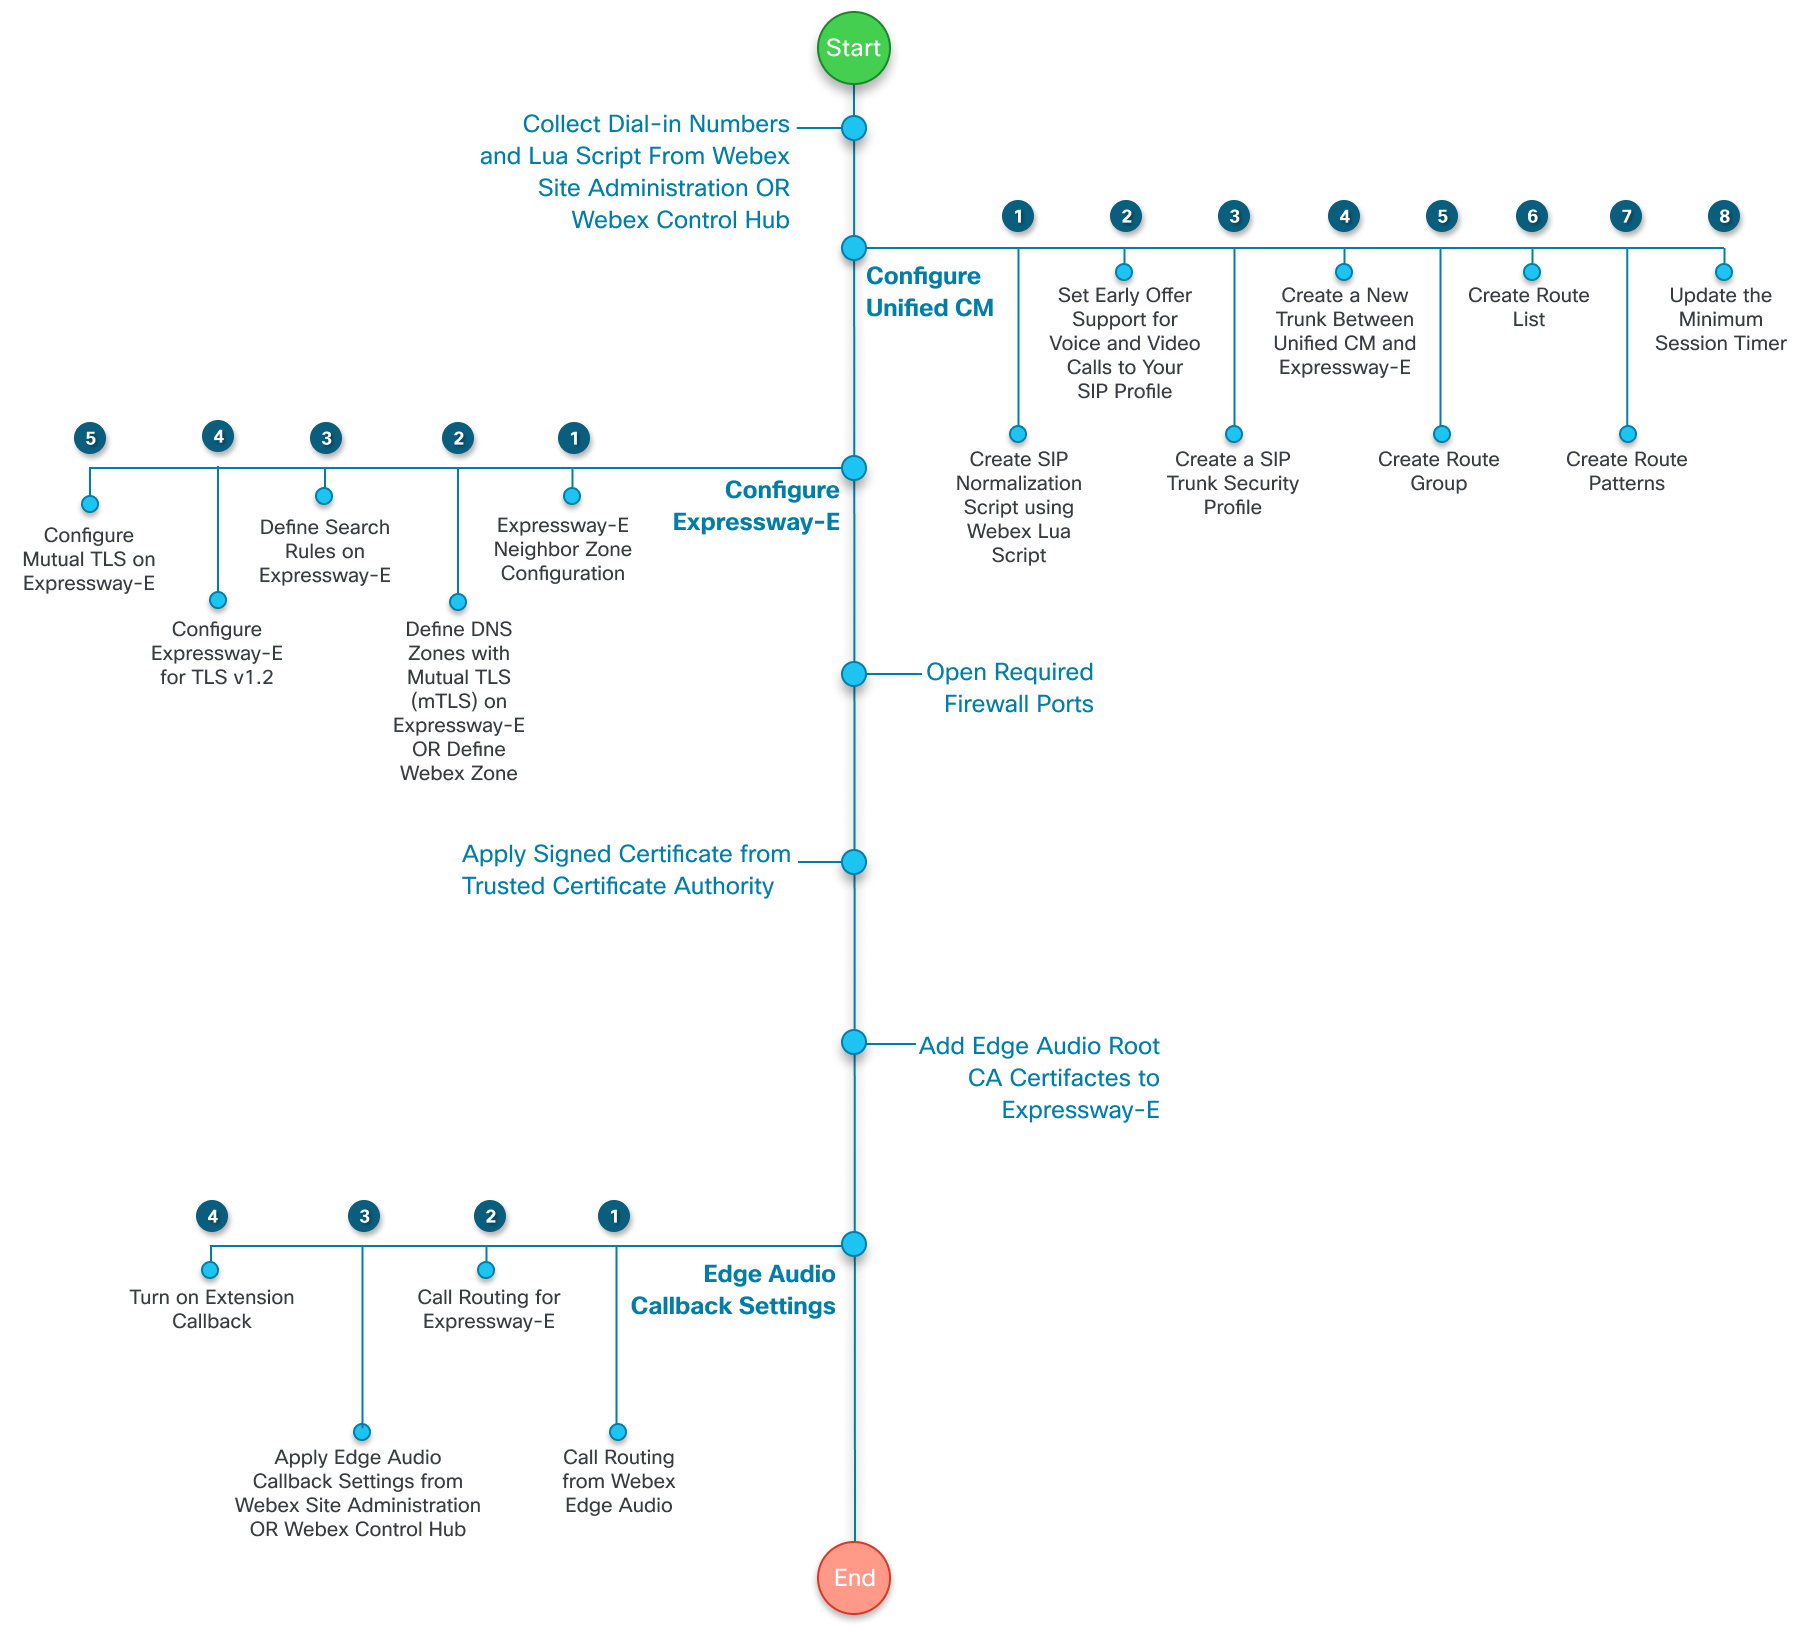
The above diagram shows a typical dial-in scenario. The purple phones represent dial-in users who are calling numbers that are set up with Edge Audio. All on-network users that dial numbers configured with Edge Audio will have their call route into the Unified CM, through Expressway-E, and into the Webex cloud.
The orange phone represents a user in your enterprise that dials into a meeting using a number that doesn't route over Edge Audio. Since the user dials an unconfigured number, the call routes through the Session Border Controller, over the PSTN or CCA-SP partner network, and into the Webex cloud.
The gray phone represents an off-network user. Off-network users who dial into Webex meetings don't route over Edge Audio. Their calls route over the PSTN or CCA-SP partner network and into the Webex cloud.
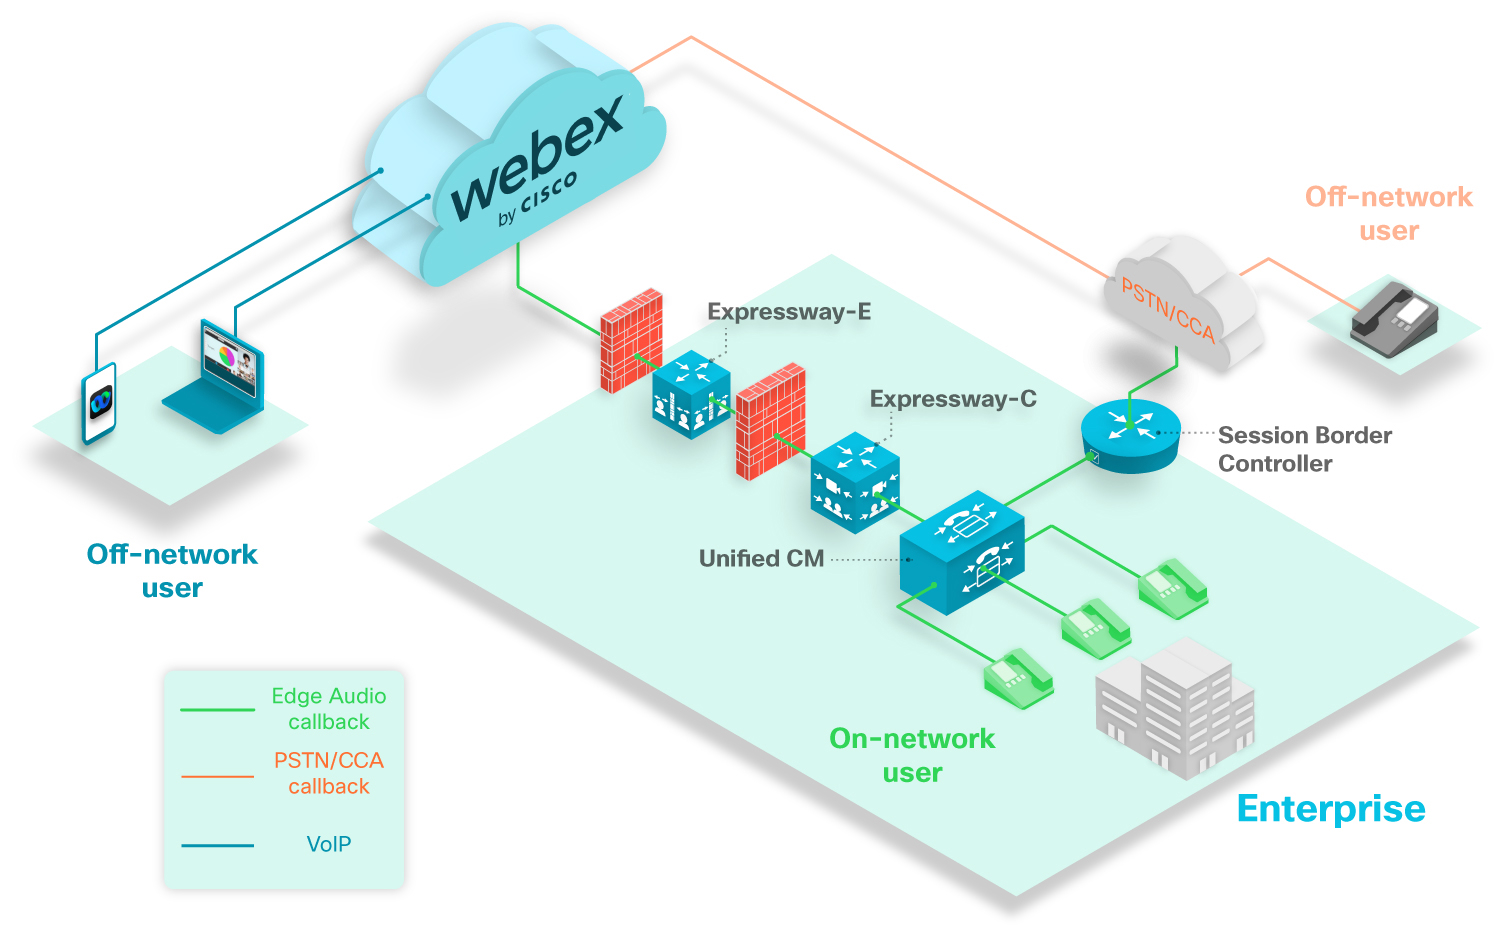
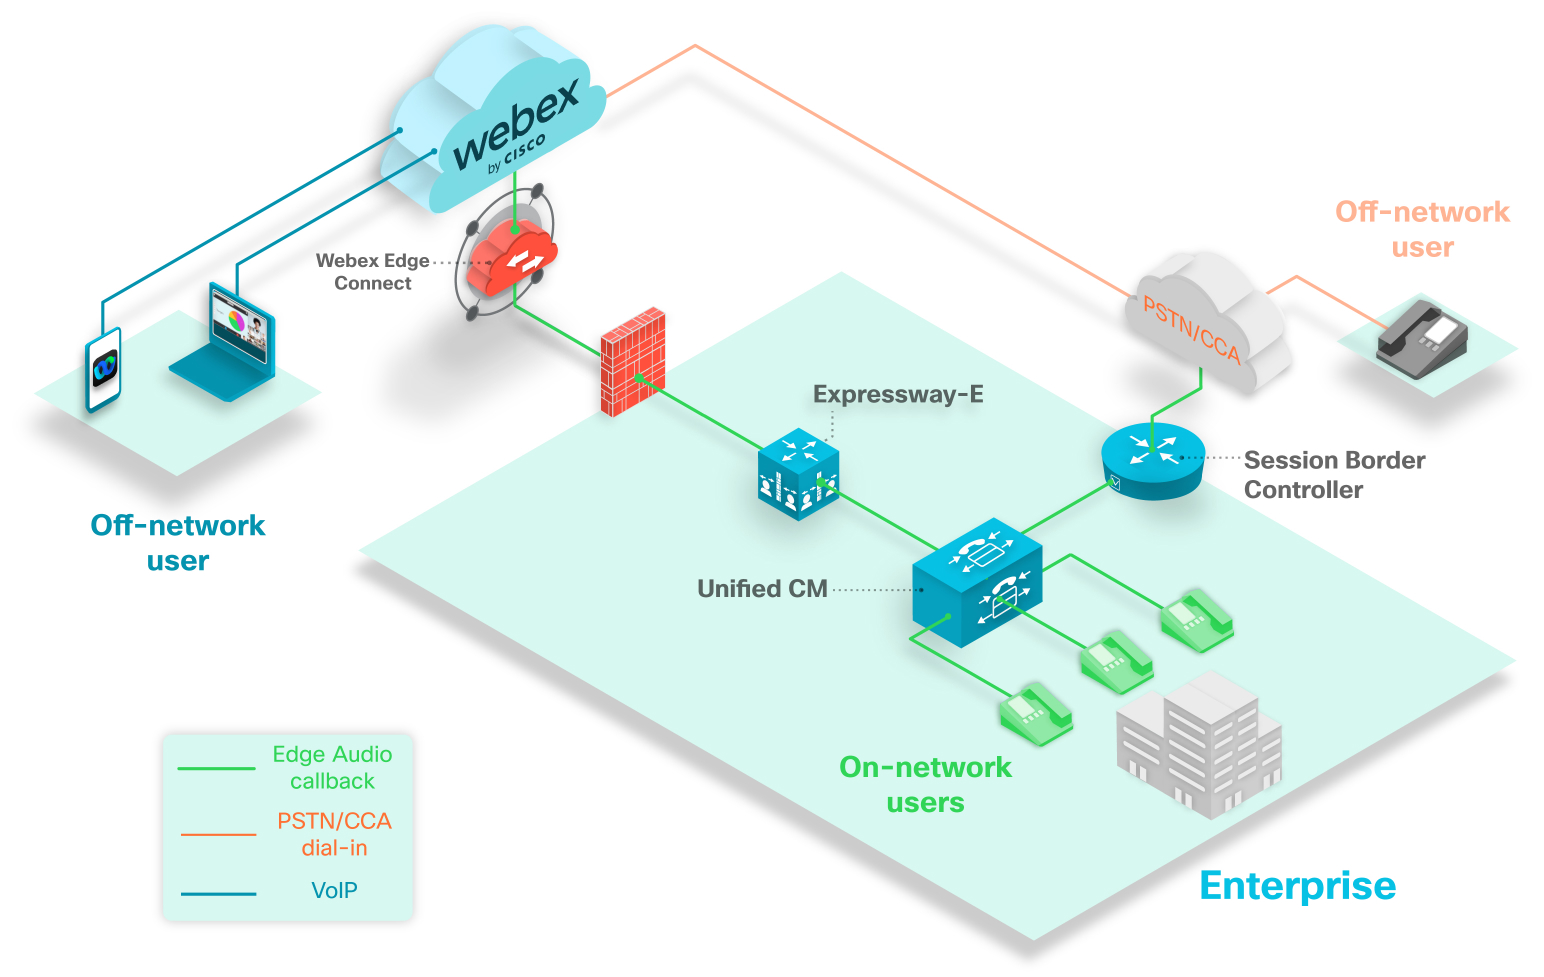
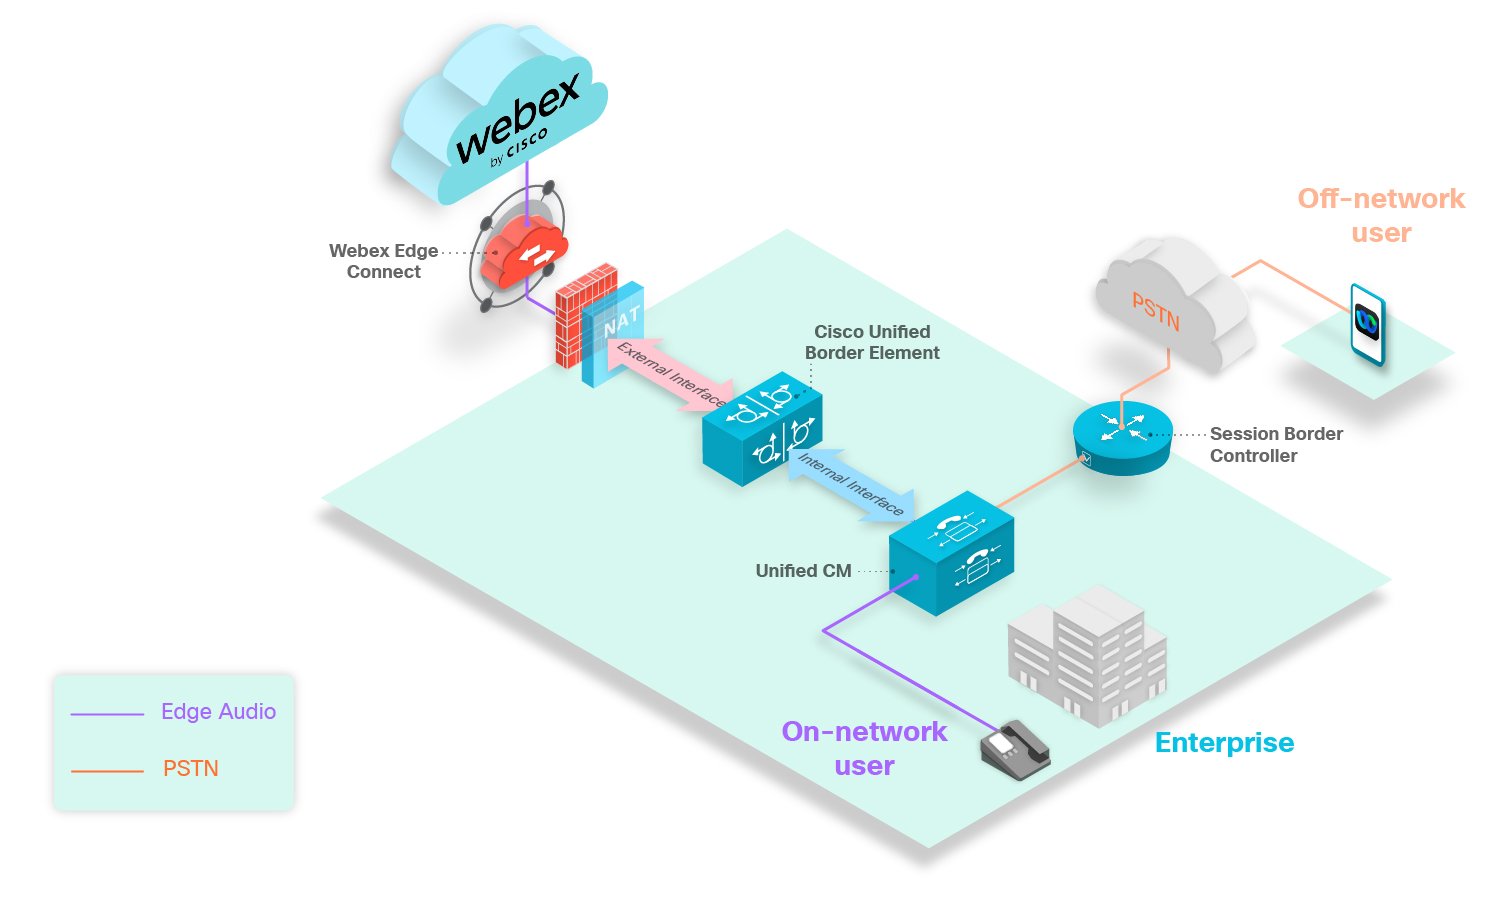
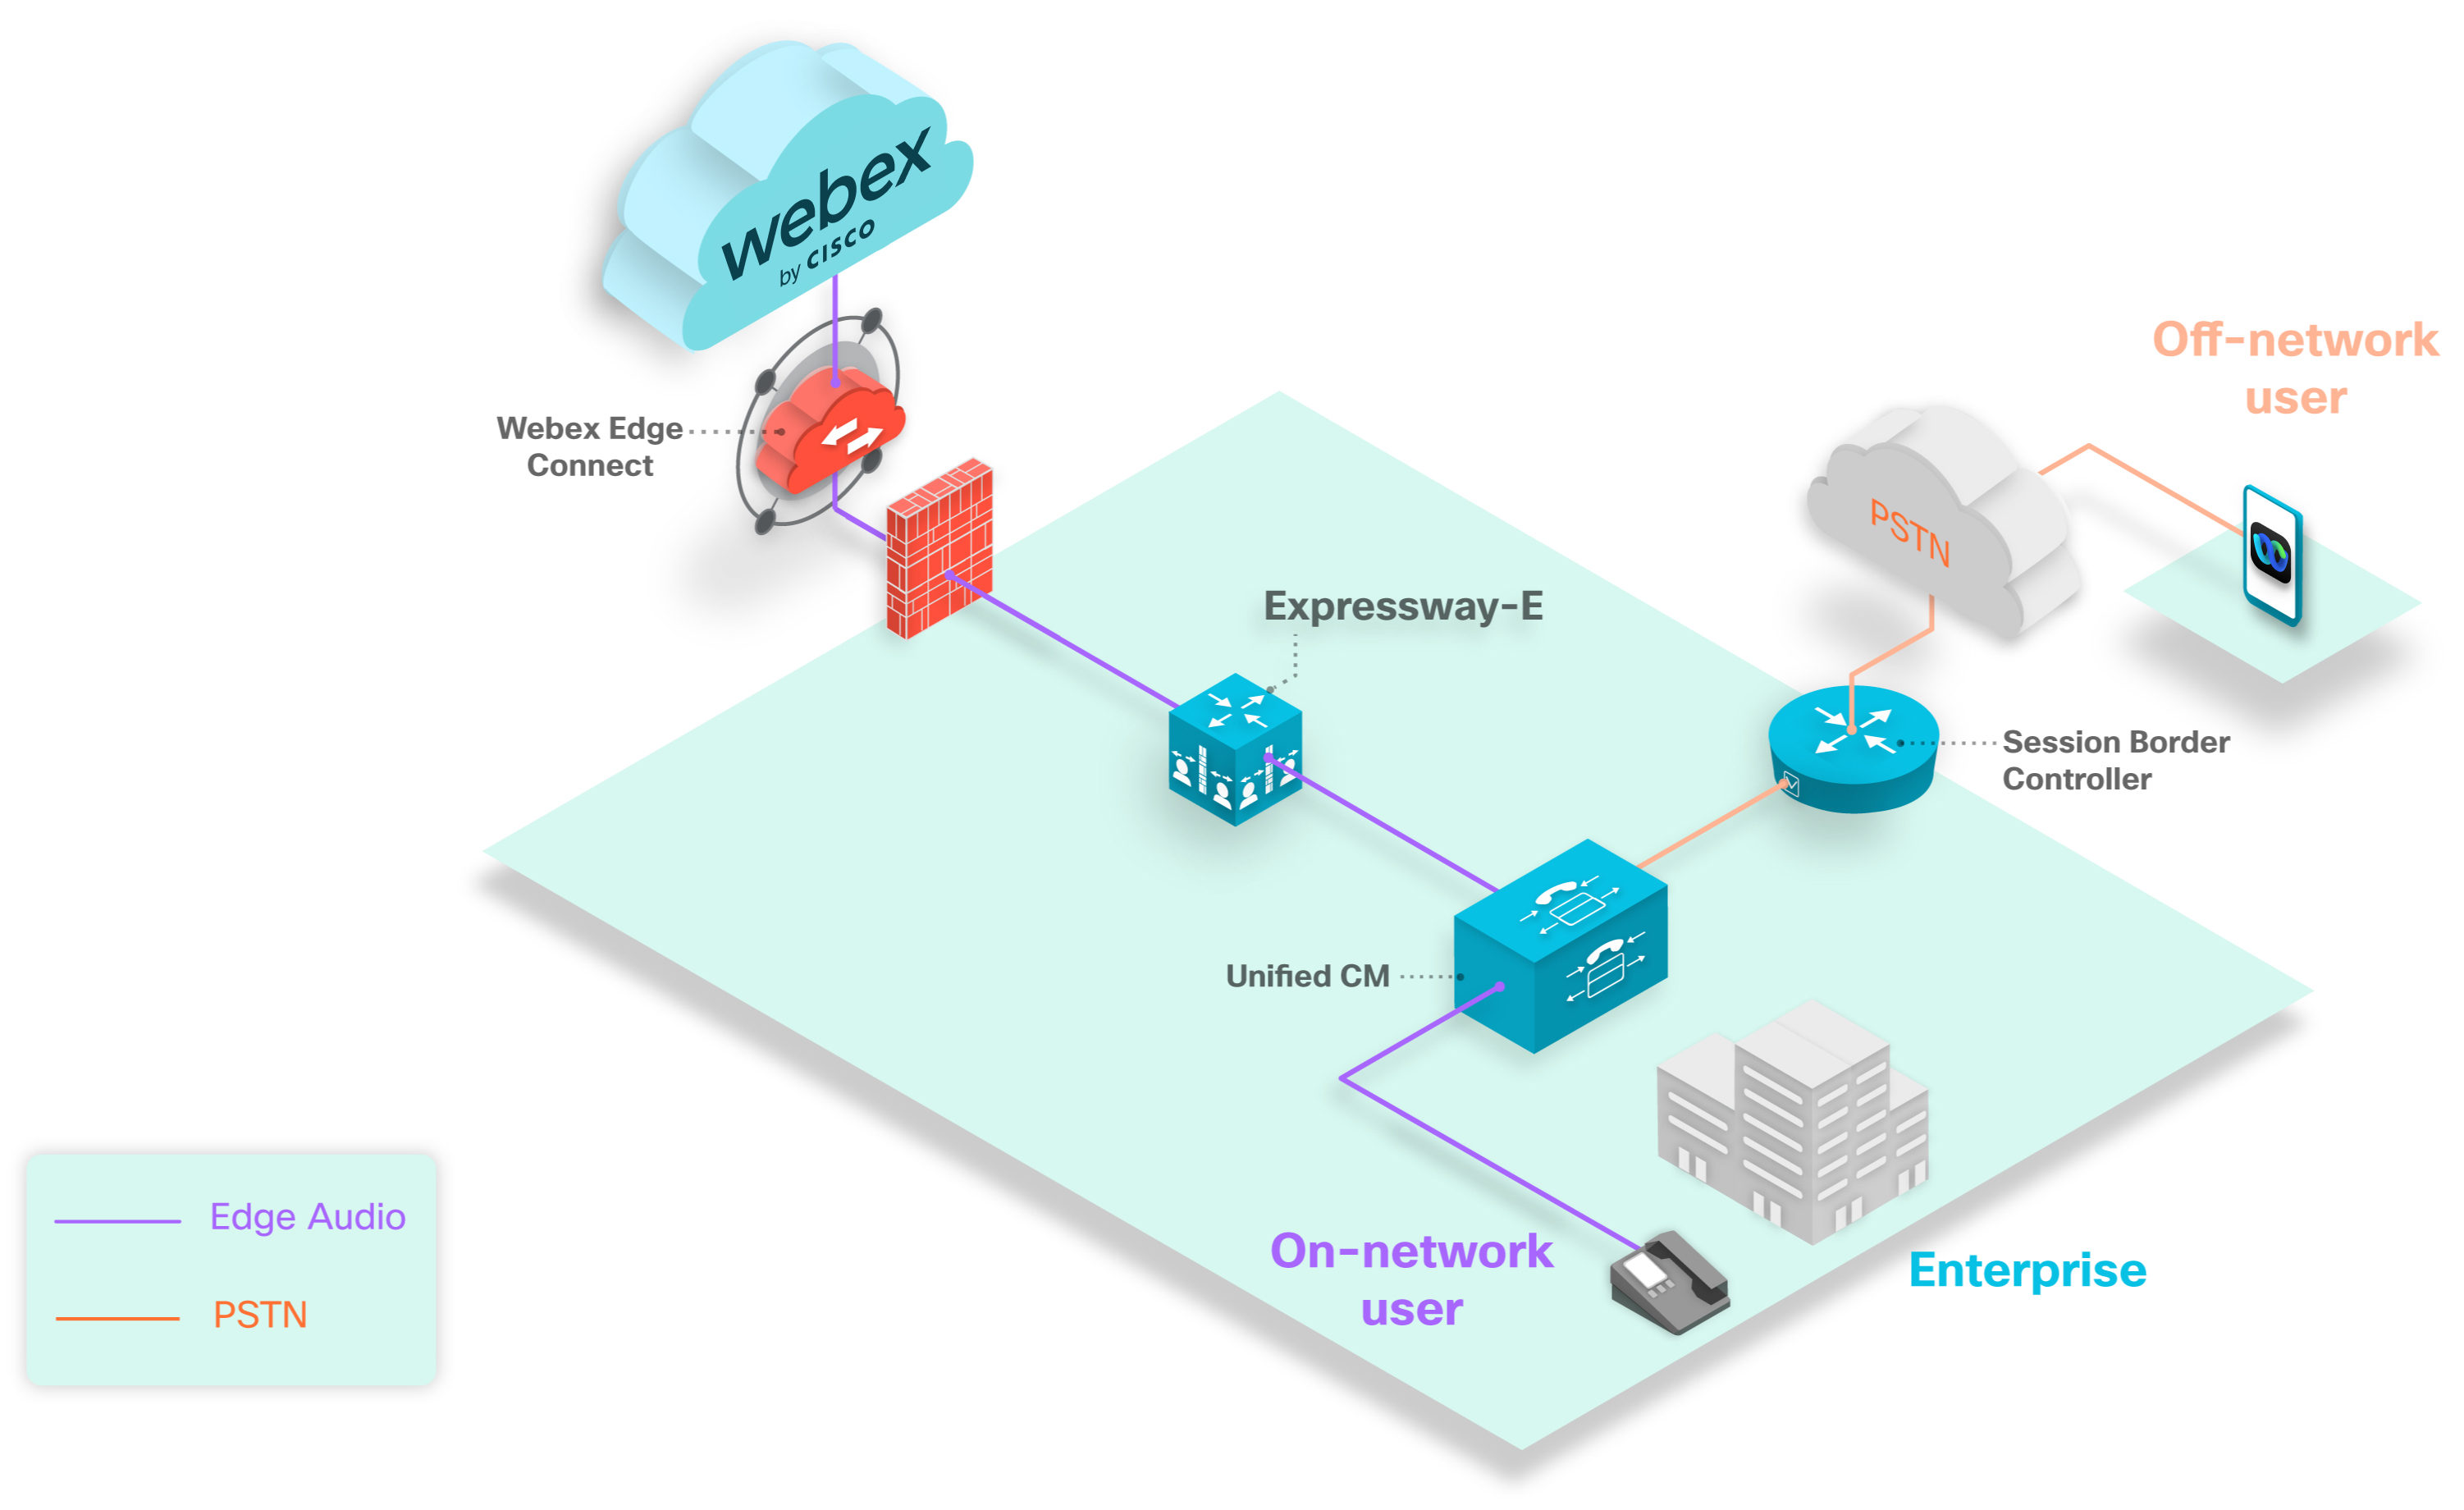
The above diagram shows a typical callback scenario. The green phones represent callback users on your network that can have calls route to them.
The gray phone represents an off-network user. If an off-network user that connects their audio with the callback option, then the call routes from Webex over the PSTN or CCA-SP partner network.
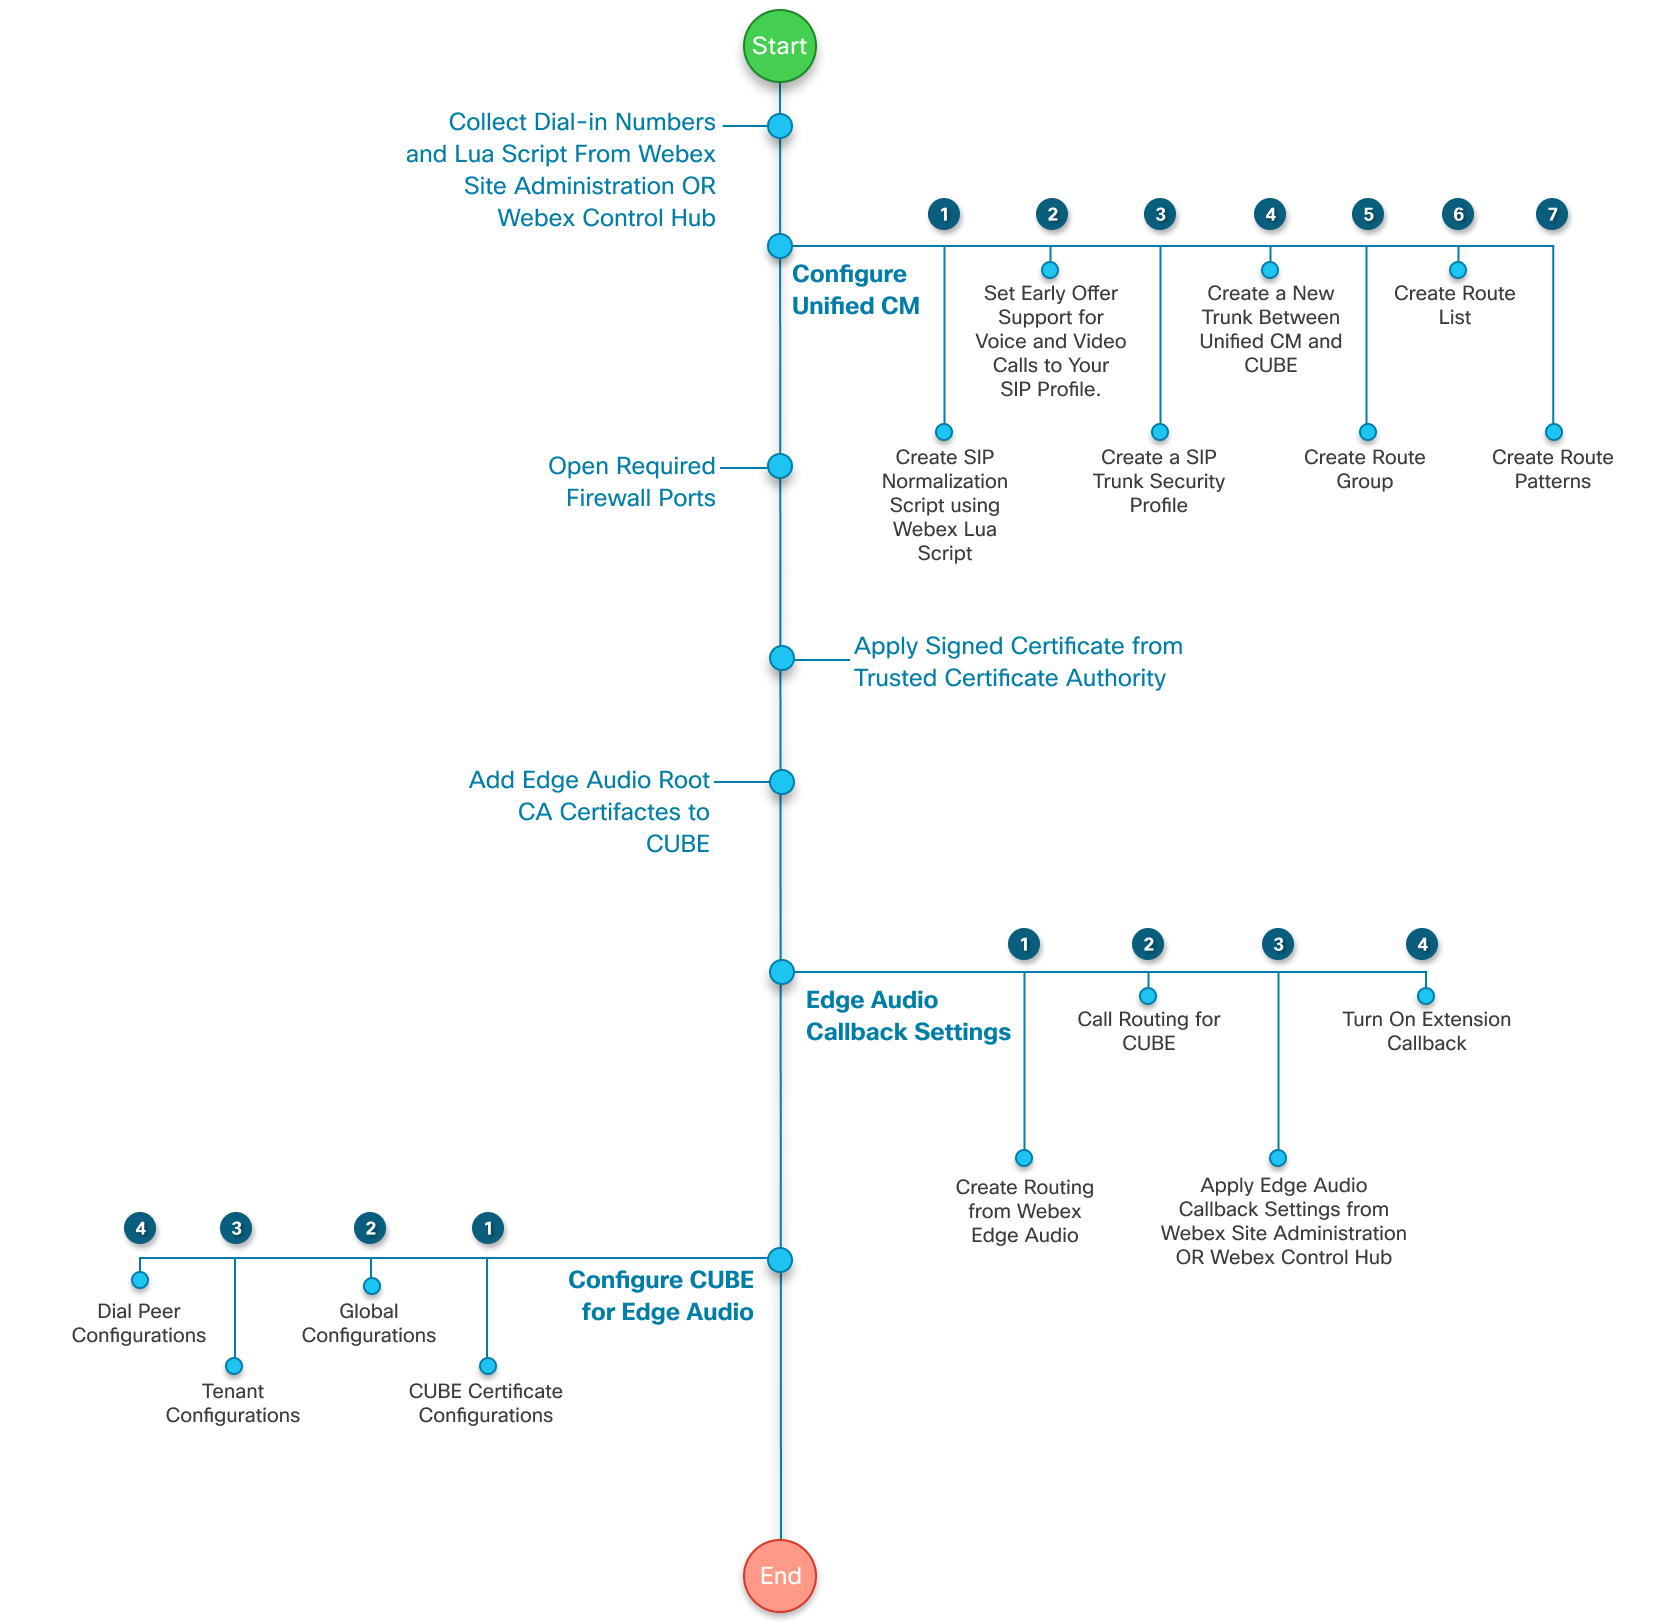
The above image shows a typical Edge Audio deployment using a CUBE with Webex Edge Connect. Edge Audio calls route from the Unified CM, through the CUBE and into the Webex cloud.
We recommend that you use a dedicated CUBE for Edge Audio.
For this deployment, note the following points:
-
Open recommended ports.
-
Static NAT with a public IP address.
-
Apply recommended Webex secure configurations.
-
Secure or unsecure signaling and media, depending on your enterprise.
The above image shows how the CUBE connects directly to the internet in this configuration.
The CUBE must be inside a DMZ when you use the internet to route calls.
Open signaling port 5061 on the internal firewall to allow a secure connection between your CUBE and Unified CM. You must open the media ports based on the CUBE’s internal media port range.
For this deployment, note the following points:
-
Open recommended ports.
-
Static NAT with a public IP address.
-
Apply recommended Webex secure configurations.
-
Secure or insecure connection, depending on your enterprise.
-
Open signaling and media ports based on the CUBE's internal interface media port range.
This guide explains how to configure the network components for Edge Audio. It covers configuring for calls going into the Webex cloud from your enterprise (dial-in) and handling callback calls that are initiated from Webex.
To set up Edge Audio, you need the necessary dial-in information from Cisco Webex Site Administration or Cisco Webex Control Hub, such as, dial-in numbers and the Lua Normalization script. You use this information to set up the dial-in numbers that users use to dial-in to their Webex services.
Edge Audio supports the site linking process described in this article.
Migration Considerations for Webex Sites with Edge Audio
If you move a Webex site, always do the following:
-
Generate a new Lua script. Then, replace the old Lua script with the new one wherever you use it in the Edge Audio configuration.
Never reuse Lua scripts if you move Webex sites.
-
Save all the countries, extensions, and ExpresswayCUBE DNS SRVs from Audio Settings before you delete the old site.
The Lua Script with Edge Audio
Edge Audio is a global service. To route calls using Webex numbers to the Webex cloud, you must specify call routing rules in Unified CM. You can also define custom dial-in numbers to route calls for a particular country dial code and toll type to Webex over Edge Audio. Custom dial-in numbers must be accessible through the PSTN and aren't supported for Cloud Connected Audio Service Provider (CCA-SP) customers.
You also need a Lua normalization script to create the trunk in Unified CM and to maintain proper routing. You can access the Lua script and all the phone numbers (your custom numbers, and any Webex-owned numbers that you allow) from Webex Site Administration or Control Hub.
The Lua script makes the following call translations:
-
It updates the host portion of the request URI so that ExpresswayCUBE can route calls to the Edge Audio.
-
It appends the
x-cisco-site-uuidparameter to the request URI referencing the Webex site. -
It updates the SIP
Toheader user part that Edge Audio processing requires.
Custom Dial-in Number Considerations
You can add custom dial-in numbers that are accesible from your enterprise and also from a PSTN. Callers inside your enterprise can use the number directly through your Edge Audio path. For a deployment with Expressway-C and Expressway-E, the path passes into Unified CM, through the Expressways, and into the Webex cloud.For a deployment with CUBE, the path passes into Unified CM, through the CUBE, through Webex Edge Connect or the internet, and into the Webex cloud.For a deployment with only Expressway-E, the path passes into Unified CM, through the Expressway-E, through Webex Edge Connect, and into the Webex cloud.

When you make a custom number accessible from a PSTN, an off-network caller can use the number through the PSTN to your Edge Audio path. The path passes from the Session Border Controller into Unified CM, through the Expressways, and into the Webex cloud.The path passes from the Session Border Controller into Unified CM, through the CUBE, through Webex Edge Connect or the internet, and into the Webex cloud.The path passes from the Session Border Controller into Unified CM, through the Expressway-E, through Webex Edge Connect, and into the Webex cloud.
If your custom number is only available within your enterprise, off-network callers can't use it to call in to Webex audio on any call path.
You can enable up to 100 custom dial-in numbers for your site. A custom number must be unique to one Webex site. If your deployment has several Webex sites, you can't use the same custom number on more than one Webex site.
Each configured number impacts the number of instructions and the memory usage of the SIP normalization (Lua) script on Unified CM. The defaults for the script are 1000 instructions and a 50 kilobyte Memory Threshold. When setting up Edge Audio, increase the Lua Instruction Threshold in Unified CM to 3000 instructions and the Memory Threshold to 200 kilobytes.
Setup Task Flow for Edge Audio Call-in
|
Step |
Description |
Section |
|---|---|---|
|
1 |
Get the dail-in numbers and Lua script for the deployment. |
Configure Dial-in Settings and Export the Lua Script from Webex Site Administration or Configure Dial-in Settings and Export the Lua Script from Control Hub |
|
2 |
Set Up your Unified CM. |
|
|
3 |
Set up your Expressway-C. |
|
|
4 |
Set up your Expressway-E |
This diagram gives a more detailed view of the task flow. These tasks are explained later in this guide.
|
Step |
Description |
Section |
|---|---|---|
|
1 |
Get the dail-in numbers and Lua script for the deployment. |
Configure Dial-in Settings and Export the Lua Script from Webex Site Administration or Configure Dial-in Settings and Export the Lua Script from Control Hub |
|
2 |
Set up your Unified CM. |
|
|
3 |
Set up your dedicated CUBE. |
This diagram gives a more detailed view of the task flow. These tasks are explained later in this guide.
|
Step |
Description |
Section |
|---|---|---|
|
1 |
Get the dail-in numbers and Lua script for the deployment. |
Configure Dial-in Settings and Export the Lua Script from Webex Site Administration or Configure Dial-in Settings and Export the Lua Script from Control Hub |
|
2 |
Set up your Unified CM. |
|
|
3 |
Set up your Expressway-E. |
This diagram gives a more detailed view of the task flow. These tasks are explained later in this guide.
Configure Dial-in Settings and Export the Lua Script from Webex Site Administration
If you manage your Webex sites in Webex Site Administration, or have completed the Site Linking process, then use these steps. Configure the dial-in settings, collect the full list of dial-in numbers, and export a copy of the Lua script.
If you change any allowed Webex call-in number or custom call-in number, update the Lua script in Unified CM.
| 1 |
Sign in to Webex Site Administration and go to . |
| 2 |
In the Allowed Call-in Numbers section, choose the Webex-provided global call-in numbers on which hosts and participants can call in to a meeting. |
| 3 |
In the Edge Audio Custom Global Call-in Numbers section, add custom dial-in numbers if you have them. These are numbers that your organization owns, which callers can use to call in from a specific country or region. You can add up to 100 custom numbers. Each custom number must be unique to a single Webex site. |
| 4 |
When you are done adding numbers, click Preview to see all your allowed call-in numbers. Make note of all of the phone numbers in a separate file. You need these numbers for the route pattern configurations that you set up on Unified CM. |
| 5 |
Click Generate Lua Script, and then select Export. The Lua script is saved to your computer in a .lua format. |
| 6 |
In the Site Default Global Call-in Numbers section, choose up to two dial-in numbers to use as global defaults for your site. |
| 7 |
In the Notifications section, decide whether to have Webex notify impacted hosts when you disable or delete a number that the hosts use as their default. When checked, Webex emails the impacted hosts within 24 hours to notify them to update existing meetings and any default preferences that use the diasabled or deleted number. |
What to do next
Changes take effect on the Webex side as soon as you save them. But, you must apply the updated Lua script to your Unified CM to update your call routing.
Configure Dial-in Settings and Export the Lua Script from Control Hub
If you manage your Webex sites in Control Hub, then use these steps. Configure the dial-in settings, collect the full list of dial-in numbers, and export a copy of the Lua script.
If you change any allowed Webex call-in number or custom call-in number, update the Lua script in Unified CM.
| 1 |
From the customer view in https://admin.webex.com, go to Services and under Meeting select Sites. |
| 2 |
Select the site to configure with Edge Audio, and choose Configure Site. |
| 3 |
Select . |
| 4 |
In the Allowed Call-in Numbers section, choose the Webex-provided global call-in numbers on which hosts and participants can call in to a meeting. |
| 5 |
In the Edge Audio Custom Global Call-in Numbers section, add custom dial-in numbers if you have them. These are numbers that your organization owns, which callers can use to call in from a specific country or region. You can add up to 100 custom numbers. Each custom number must be unique to a single Webex site. |
| 6 |
When you are done adding numbers, click Preview to see all your allowed call-in numbers. Make note of all of the phone numbers in a separate file. You need these numbers for the route pattern configurations that you set up on Unified CM. |
| 7 |
Click Generate Lua Script, and then select Export. The Lua script is saved to your computer in a .lua format. |
| 8 |
In the Site Default Global Call-in Numbers section, choose up to two dial-in numbers to use as global defaults for your site. |
| 9 |
In the Notifications section, decide whether to have Webex notify impacted hosts when you disable or delete a number that the hosts use as their default. When checked, Webex emails the impacted hosts within 24 hours to notify them to update existing meetings and any default preferences that use the diasabled or deleted number. |
What to do next
Changes take effect on the Webex side as soon as you save them. But, you must apply the updated Lua script to your Unified CM to update your call routing.
Setup Task Flow for Unified CM Configuration
To route calls from your enterprise to the Webex cloud, you set up routing rules and trunks in Unified CM Administration. The following are high-level steps for this configuration:
|
Step |
Description |
Section |
|---|---|---|
|
1 |
Create a SIP normalization script from the Webex Lua script. |
|
|
2 |
(Optional) Create or update a SIP Profile to use early offer support. |
(Optional) Set Early Offer Support for Voice and Video Calls |
|
3 |
Create a security profile for your SIP trunk. |
|
|
4 |
(Optional) Add support for the G.722 codec. |
|
|
5 |
Create a new trunk between Unified CM and your Expressway-CCUBEExpressway-E |
Create a New Trunk Between Unified CM and Expressway-CCUBEExpressway-E |
|
6 |
Create a route group. |
|
|
7 |
Create a route list. |
|
|
8 |
Create route patterns. |
Create SIP Normalization Script from the Webex LUA Script
Use the Lua script that you exported from Webex Site Administration or Control Hub to create a new SIP Normalization Script in Unified CM.
Before you begin
Update To
                header
section: -- Update To header with CCAX URL
local oldTo1 = msg:getHeader("To")
local newTo1 = string.gsub(oldTo1, "<sip:(.+)@(.*)>", "<sip:%1@ecccx.<your_region>.webex.com>")
msg:modifyHeader("To", newTo1)| 1 |
In Unified CM Administration, go to . |
| 2 |
Select Add New to create a new SIP Normalization Script. |
| 3 |
Give the script a name that clearly identifies it, such as “your_site_name_webex_edge_audio”. |
| 4 |
Select Import File, and select the Lua script that you exported earlier. After the Lua script imports, the Content updates based on the Lua script. |
| 5 |
Set Memory Threshold to
|
| 6 |
Set Lua Instruction Threshold to
|
| 7 |
Click Save. |
What to do next
Apply this SIP Normalization Script to the trunk between your Unified CM and your Expressway-CCUBEExpressway-E.
(Optional) Set Early Offer Support for Voice and Video Calls
We recommend that you use early offer support with Edge Audio, but Edge Audio doesn't require it. Edge Audio also supports delayed offers.
If your Unified CM Administration configuration doesn't have a SIP Profile, create one with these steps.
If you have an existing SIP Profile with early offer support, you can try re-using it for this purpose. Ensure that it matches the settings in Steps 4–6 of this procedure.
| 1 |
From Unified CM Administration, go to , and select Find. |
| 2 |
Select Standard SIP Profile For Cisco VCS. |
| 3 |
Select Copy. |
| 4 |
Change the Name to identify the new version. For
example, add |
| 5 |
Uncheck the Allow iX Application Media check box. |
| 6 |
Set Early Offer support for voice and video calls to Best Effort (no MTP inserted). |
| 7 |
Save your SIP Profile. |
Create a SIP Trunk Security Profile
| 1 |
From Cisco Unified CM Administration, go to , and select Add New. |
| 2 |
Name the SIP trunk security profile. |
| 3 |
Set Device Security Mode to Encrypted or Non- secure, based on your deployment needs. |
| 4 |
Enter a port value for the Incoming Port that doesn't conflict with other entries. Don't use ports 5060 or 5061. Use any nonconflicting port, such as port 5070. |
| 5 |
Save your profile. |
(Optional) Add Support for the G.722 Codec
Edge Audio supports the G.722 codec. You don't need to configure the G.722 codec on your Unified CM for Edge Audio to work. But, because G.722 uses less bandwidth than other codecs, configuring it might improve the quality of service for your deployment.
Webex supports the G.722, G.711a, and G.711μ audio codecs. However, Webex does not support renegotiating codecs mid call, such as for Music On Hold (MOH).
| 1 |
From Unified CM Administration, go to . |
| 2 |
Choose Enabled for Advertise G.722 Codec and save your change. |
| 3 |
Go to and click Add New. |
| 4 |
Name the region, and save the change. |
| 5 |
Select Factory Default lossy for the Audio Codec Preference List. |
| 6 |
Select 64 kbps (G.722, G.711) for the Maximum Audio Bit Rate. |
| 7 |
Save your changes. |
What to do next
Apply the new region to the device pool for Edge Audio.
Create a New Trunk Between Unified CM and Expressway-CCUBEExpressway-E
Create a new trunk to use for Edge Audio. Don't modify an existing trunk.
| 1 |
From Cisco Unified CM Administration, go to , and select Add New. |
| 2 |
For Trunk Type, select SIP Trunk, and then choose Next. |
| 3 |
Enter a Device Name. |
| 4 |
Under Destination, enter the Destination Address and the Destination Port for your Expressway-CCUBEExpressway-E. Use port 5060 for nonsecure trunks and port 5061 for secure trunks. |
| 5 |
Set the SIP Trunk Security Profile to the trunk that you created in the Create a SIP Trunk Security Profile task. You can only use one secure TLS trunk between Unified CM and ExpresswayCUBE. For more information, see Intermittent calls to Destination fails via TLS trunk (CSCus63305). If another TLS trunk exists, then you must configure a TCP trunk with ExpresswayCUBE here. |
| 6 |
Set the SIP Profile to the SIP profile that you created in the (Optional) Set Early Offer Support for Voice and Video Calls task. |
| 7 |
For the DTMF Signaling Method, select RFC 2833. |
| 8 |
For Normalization Script, select the Normalization Script that you created in the Create SIP Normalization Script from the Webex LUA Script task. |
| 9 |
Save the trunk. For other settings, such as Device Pools, Media Resource Group Lists, Locations, Calling Search Spaces, Call Classification, choose appropriate configurations for your dpeloyment. Assign the configurations based on your enterprise policies and services. |
Create a Route Group
| 1 |
From Cisco Unified CM Administration, go to . |
| 2 |
Select Add New. |
| 3 |
Name the route group. |
| 4 |
For Available Devices, select the Edge Audio trunk that you created. |
| 5 |
Select Add to Route Group. |
| 6 |
Save the route group. |
Create a Route List
| 1 |
From Cisco Unified CM Administration, go to . |
| 2 |
Select Add New. |
| 3 |
Name the route list and give it a description. |
| 4 |
For Cisco Unified Communications Manager Group, select an appropriate value for your configuration, and then save the change. |
| 5 |
Under Route List Member Information, select Add Route Group, and choose the route group that you created. |
| 6 |
Save the route list. |
Create Route Patterns
You must set up the phone numbers that you saved earlier. These are the numbers that users dial to start and join their Webex meetings.
These numbers include all possible numbers that connect with Edge Audio. Depending on your configuration, country, or region, you might not want to create route patterns for all the numbers.
If you don't configure a phone number in a route pattern, then calls to that number route over the PSTN or CCA-SP partner network.
| 1 |
From Cisco Unified CM Administration, go to , and select Add New. |
| 2 |
For Route Pattern, enter a phone number over which users dial in to their Webex meetings. Strip off any escape code or prefix used to dial out. The phone number is sent in a fully qualified E.164 format with or without a leading plus sign. |
| 3 |
For Gateway/Route List, select the route list that you created in the previous task. |
| 4 |
Save your changes. |
| 5 |
Repeat these steps for each of the remaining phone numbers that you saved earlier. |
The Unified CM configuration now routes calls for the selected numbers to your Expressway-CCUBEExpressway-E.
Setup Task Flow for Expressway-C
After you configure your Unified CM, you configure the Expressway-C.
|
Step |
Description |
Section |
|---|---|---|
|
1 |
Create a neighbor zone to your Unified CM on the Expressway-C. |
Create Neighbor Zone to Unified CM for Expressway-CExpressway-E |
|
2 |
Define a secure traversal client zone to your Expressway-E on the Expressway-C. |
Define Secure Traversal Client Zone to Expressway-E on Expressway-C |
|
3 |
Define search rules on the Expressway-C. |
Create Neighbor Zone to Unified CM for Expressway-CExpressway-E
| 1 |
Sign in to the Expressway-CExpressway-E configuration page and go to , and select Add New. | ||||||||||
| 2 |
Name the zone. | ||||||||||
| 3 |
For Type, select Neighbor. | ||||||||||
| 4 |
Under H.323, set the Mode to Off. | ||||||||||
| 5 |
Under SIP, set these properties:
| ||||||||||
| 6 |
Under Location, enter the Unified CM peer information. | ||||||||||
| 7 |
Under Advanced, set these properties:
| ||||||||||
| 8 |
Click Create Zone. |
Define Secure Traversal Client Zone to Expressway-E on Expressway-C
| 1 |
Sign in to the Expressway-C configuration page, go to , and then select Add New. | ||||||||||
| 2 |
Name the zone. | ||||||||||
| 3 |
For Type, select Traversal client. | ||||||||||
| 4 |
Under Connection Credentials, enter the username and password that's used to connect to the traversal server. | ||||||||||
| 5 |
Under H.323, set the Mode to Off. | ||||||||||
| 6 |
Under SIP, set these properties:
| ||||||||||
| 7 |
Under Location, enter the IP address for your Expressway-E. If there is more than one IP address, enter them all. | ||||||||||
| 8 |
Save your zone. |
Define Search Rules on Expressway-C
| 1 |
Sign in to the Expressway-C configuration page, go to , and select New. | ||||||||||||||||
| 2 |
Name the search rule and assign it a priority, if necessary. | ||||||||||||||||
| 3 |
Set these properties:
| ||||||||||||||||
| 4 |
Click Create search rule. |
Setup Task Flow for Expressway-E
If your deployment uses an Expressway version X8.11 or later, follow these steps:
|
Step |
Description |
Section |
|---|---|---|
|
1 |
Define a secure traversal server zone on your Expressway-E. |
|
|
2 |
Define the Webex zone on your Expressway-E. |
|
|
3 |
Define search rules on your Expressway-E. |
|
|
4 |
Set up your Expressway-E to use TLS v1.2. |
|
|
5 |
Set up mTLS on your Expressway-E. |
|
|
6 |
Update the minimum session timer of your Expressway-E. |
If your deployment uses an Expressway version earlier than X8.11, follow these steps:
|
Step |
Description |
Section |
|---|---|---|
|
1 |
Define a secure traversal server zone on your Expressway-E. |
|
|
2 |
Define the DNS zones with Mutual TLS (mTLS) on your Expressway-E. |
|
|
3 |
Define search rules on your Expressway-E. |
|
|
4 |
Set up your Expressway-E to use TLS v1.2. |
|
|
5 |
Set up mTLS on your Expressway-E. |
|
|
6 |
Update the minimum session timer of your Expressway-E. |
Define Secure Traversal Server Zone on Expressway-E
| 1 |
Sign in to the Expressway-E configuration page, go to , and select New. | ||||||
| 2 |
Name the zone. | ||||||
| 3 |
For Type, choose Traversal Server and select Create zone. | ||||||
| 4 |
Enter the username and password that you configured in the Traversal Client Zone of your Expressway-C. | ||||||
| 5 |
Under H.323, set the Mode to Off. | ||||||
| 6 |
Under SIP, set these properties:
| ||||||
| 7 |
Save the zone. |
Define the Webex Zone on Expressway-E
If you're using Expressway version X8.11 or later, add the Webex zone to your Expressway-E
| 1 |
Sign in to the Expressway-E configuration page, go to , and select New. |
| 2 |
For Type, select Webex. |
| 3 |
Click Create zone. |
| 4 |
Find the numeric zone ID for the Webex zone by selecting it from the zone list. The numeric zone ID appears in your browser address bar, for example, "editzone?id=3". |
| 5 |
Using the admin CLI with numeric zone ID, set the Webex Zone to use a Force Encrypted media encryption configuration. For example, if the zone ID is 3, you use this command: |
Define DNS Zones with Mutual TLS on Expressway-E
If you're using an expressway version earlier than X8.11, define the DNS zones to use Mutual TLS (mTLS).
If you use your Expressway-E for Webex for Government, you must enable mTLS.
| 1 |
Sign in to the Expressway-E configuration page, go to , and select Create Zone. |
| 2 |
Name the zone. |
| 3 |
For Type, select DNS. |
| 4 |
Under H.323, set the Mode to Off. |
| 5 |
For TLS verify mode, select On. |
| 6 |
For TLS verify subject name, enter
|
| 7 |
For TLS verify inbound mapping, select On. |
| 8 |
Set the Media encryption mode to Auto. |
| 9 |
Set the Media encryption mode to Force Encrypted. |
| 10 |
Under Advanced, set Zone profile to Custom. |
| 11 |
For SIP parameter preservation, select On. This setting ensures that the right parameters that the Lua script sets up are passed through Expressway-E. |
| 12 |
Save your changes. |
Define Search Rules on Expressway-E
| 1 |
Sign in to the Expressway-E configuration page, go to , and select New. | ||||||||||||||||
| 2 |
Name the search rule and assign it a priority, if necessary. | ||||||||||||||||
| 3 |
Set these properties:
| ||||||||||||||||
| 4 |
Click Create search rule. |
Set Up Expressway-E for TLS v1.2
Edge Audio only works with TLS v1.2.
| 1 |
Sign in to the Expressway-E configuration page and go to . |
| 2 |
For SIP TLS ciphers, enter this cipher: |
| 3 |
For SIP minimum TLS version, select TLS v1.2. |
| 4 |
Save your changes. |
Set Up Mutual TLS on Expressway-E
Ensure that your Expressway-E uses mTLS.
If you use your Expressway-E for Webex for Government, you must enable mTLS.
| 1 |
Sign in to the Expressway-E configuration page and go to . |
| 2 |
For Mutual TLS mode, select On. |
| 3 |
Set the Mutual TLS port to
|
| 4 |
Save your changes. |
Update the Minimum Session Timer
We recommend updating the minimum session timer because Webex and Unified CM have different default values for this setting. This change helps avoid a certain call error for calls going from your organization to the Webex cloud.
Previously, we recommended changing the setting in Unified CM, but that approach impacts other SIP flows that don't require the longer period.
| 1 |
Sign in to the Expressway-E configuration page and go to . |
| 2 |
Scroll to Session refresh interval (seconds), and set the value to 14400. |
| 3 |
Save your change. |
Setup Task Flow for Firewall and Certificate Configuration
You must configure your firewalls with the proper ports and signed certificates to enable Edge Audio.
|
Step |
Description |
Section |
|---|---|---|
|
1 |
Open the required firewall ports. |
|
|
2 |
Apply the necessary signed certificates. |
|
|
3 |
Add the Edge Audio Root CA Certificates to Expressway-E |
Required Firewall Ports
After you complete the Unified CM and ExpresswayCUBE configurations, you must open the necessary firewall ports. Refer to this article, https://help.webex.com/article/WBX264, for network requirement information and which ports to open.
Signed Certificates from a Trusted Certificate Authority
Edge Audio requires your Expressway-E to offer signed certificates from trusted CA certificate authorities for Mutual TLS (mTLS) connections. This article lists the certificate authorities that Cisco trusts: https://help.webex.com/article/WBX9000008850. Edge Audio considers certificates that listed authorities sign as valid and allows the connection.
If you use your Expressway-E for Webex for Government, you must enable mTLS.
Edge Audio requires your CUBE to offer signed certificates from trusted CA certificate authorities for Mutual TLS (mTLS) connections. Use the following link to get to a list of certificate authorities that Cisco trusts: https://help.webex.com/article/WBX9000008850. Edge Audio considers certificates that listed authorities sign as valid and allows the connection.
For Webex for Government deployments, you must enable mTLS.
CUBEs are already configured to accept Webex certificates. They have a in-built Certificate Authority (CA) trust-store with the required Quavadis Root CA certificate.
You must upload the CUBE certificate and CA certificate chain that you purchased from the CA. Before uploading the CUBE certificate, you must configure a trustpoint. For details, see the section on configuring CUBE in Configure and Troubleshoot Enterprise CA (Third Party CA) Signed Certificates for SIP TLS and SRTP Between CUCM, IP Phones and CUBE at https://www.cisco.com/c/en/us/support/docs/unified-communications/unified-border-element/200614-Configure-and-Troubleshoot-Enterprise-CA.html.
When Edge Audio sends its certificate during the mTLS handshake, CUBE validates it
against the certifiactes in the trustpool. To update the trustpool bundle with the
Cisco Root CA, download the latest "Cisco Trusted Core Root Bundle" from
http://www.cisco.com/security/pki/ with this command:
crypto pki trustpool import clean url <latest_bundle_url>For more information on updating the trustpool, see the chapter on PKI trustpool management in the Public Key Infrastructure Configuration Guide, Cisco IOS XE guide.
Add Edge Audio Root CA Certificates to Expressway-E
Edge Audio requires signed CA certificates from IdenTrust and QuoVadis. If you already have these CA certificates uploaded to your Expressway-E configuration, you can skip this task.
Soon, we will no longer use the "Hydrant SSL ICA G2" certificate. Update your Expressways to include the IdenTrust certificate instead.
Before you begin
You need PEM files of the "IdenTrust Commercial Root CA1" and "QuoVadis Root CA2" certificates. You can get these CA certificates from the IdenTrust and QuoVadis websites.
| 1 |
Sign in to the Expressway-E configuration page and go to . |
| 2 |
Under Upload, select Browse and upload the PEM files that you created. |
| 3 |
Click Append CA certificate. |
Set up callback
Setup task flow for Edge Audio callback
If your site uses Webex Calling, you can use on-net routing for callback instead. If you don't have Webex Calling, use this method. Don't configure callback by both methods.
Before you set up Edge Audio Callback, make sure that your deployment is properly configured:
-
Apply the following DNS SRV settings:
-
DNS SRVs for each Expressway-E target must point to port 5062.
-
Provision A Records to resolve the Fully Qualified Domain Names (FQDNs) in the SRV records.
-
-
Some deployments might use the same Expressway-E targets for business-to-business calls and for Edge Audio Callback. If your deployment reuses these targets, use a dedicated domain for the SRV records for the Edge Audio Expressway-E targets. Don't mix different ports in a single set of SRV records.
-
Your Unified CM configuration must properly route Edge Audio calls for users on and off your network.
-
Apply the following DNS SRV settings:
-
DNS SRVs for each CUBE target must point to port 5061.
-
Provision A Records to resolve the Fully Qualified Domain Names (FQDNs) in the SRV records.
-
-
Some deployments might use the same CUBE targets for business-to-business calls and for Edge Audio Callback. If your deployment reuses these targets, use a dedicated domain for the SRV records for the Edge Audio CUBE targets. Don't mix different ports in a single set of SRV records.
-
Your Unified CM configuration must properly route Edge Audio calls for users on and off your network.
If you don't configure your network properly to handle the calls from Webex, Edge Audio fails over to the Webex PSTN or CCA-SP partner network.
You configure Edge Audio Callback as follows:
|
Step |
Description |
Section |
|---|---|---|
|
1 |
Set up a search rule on your Expressway-C. | |
|
2 |
Set up a search rule on your Expressway-E. | |
|
3 |
Set up Edge Audio Callback in your portal, either Webex Site Administration or Control Hub. |
Apply Edge Audio callback settings in Webex Site Administration or |
|
4 |
(Optional) Enable Extension Callback in your portal. |
|
Step |
Description |
Section |
|---|---|---|
|
1 |
Set up Edge Audio Callback in your portal, either Webex Site Administration or Control Hub. |
Apply Edge Audio callback settings in Webex Site Administration or |
|
2 |
(Optional) Enable Extension Callback in your portal. |
|
Step |
Description |
Section |
|---|---|---|
|
1 |
Set up a search rule on your Expressway-E. | |
|
2 |
Set up Edge Audio Callback in your portal, either Webex Site Administration or Control Hub. |
Apply Edge Audio callback settings in Webex Site Administration or |
|
3 |
(Optional) Enable Extension Callback in your portal. |
Call Routing for the Expressway-C
For Edge Audio Callback to work, your deployment must allow E.164 numbers to traverse your Expressway and route calls based on your configuration. This ensures proper call routing for users that are on and off your network.
| 1 |
Sign in to the Expressway-C configuration page, go to , and select New. | ||||||||||||||||||||||
| 2 |
Name the rule and assign it a priority, if necessary. | ||||||||||||||||||||||
| 3 |
Set these properties:
| ||||||||||||||||||||||
| 4 |
Select Create search rule. |
Call Routing for the Expressway-E
For Edge Audio Callback to work, your deployment must allow E.164 numbers to traverse your Expressway and route calls based on your configuration. This ensures proper call routing for users that are on and off your network.
| 1 |
Sign in to the Expressway-E configuration page, go to , and select New. | ||||||||||||||||||||||||
| 2 |
Name the rule and assign it a priority, if necessary. | ||||||||||||||||||||||||
| 3 |
Set these properties:
| ||||||||||||||||||||||||
| 4 |
Select Create search rule. |
Globally Distributed Media for Callback
Edge Audio uses globally distributed media for all callbacks. To achieve optimal connectivity, Webex selects the nearest media node to your enterprise edge based on the SRV. Traffic then passes from the Webex cloud to the nearest enterprise edge for that call. This routing minimizes latency and keeps most of the traffic on the Webex backbone and off the internet.
Apply Edge Audio callback settings in Webex Site Administration
| 1 |
Sign in to Cisco Webex Site Administration, and go to . |
| 2 |
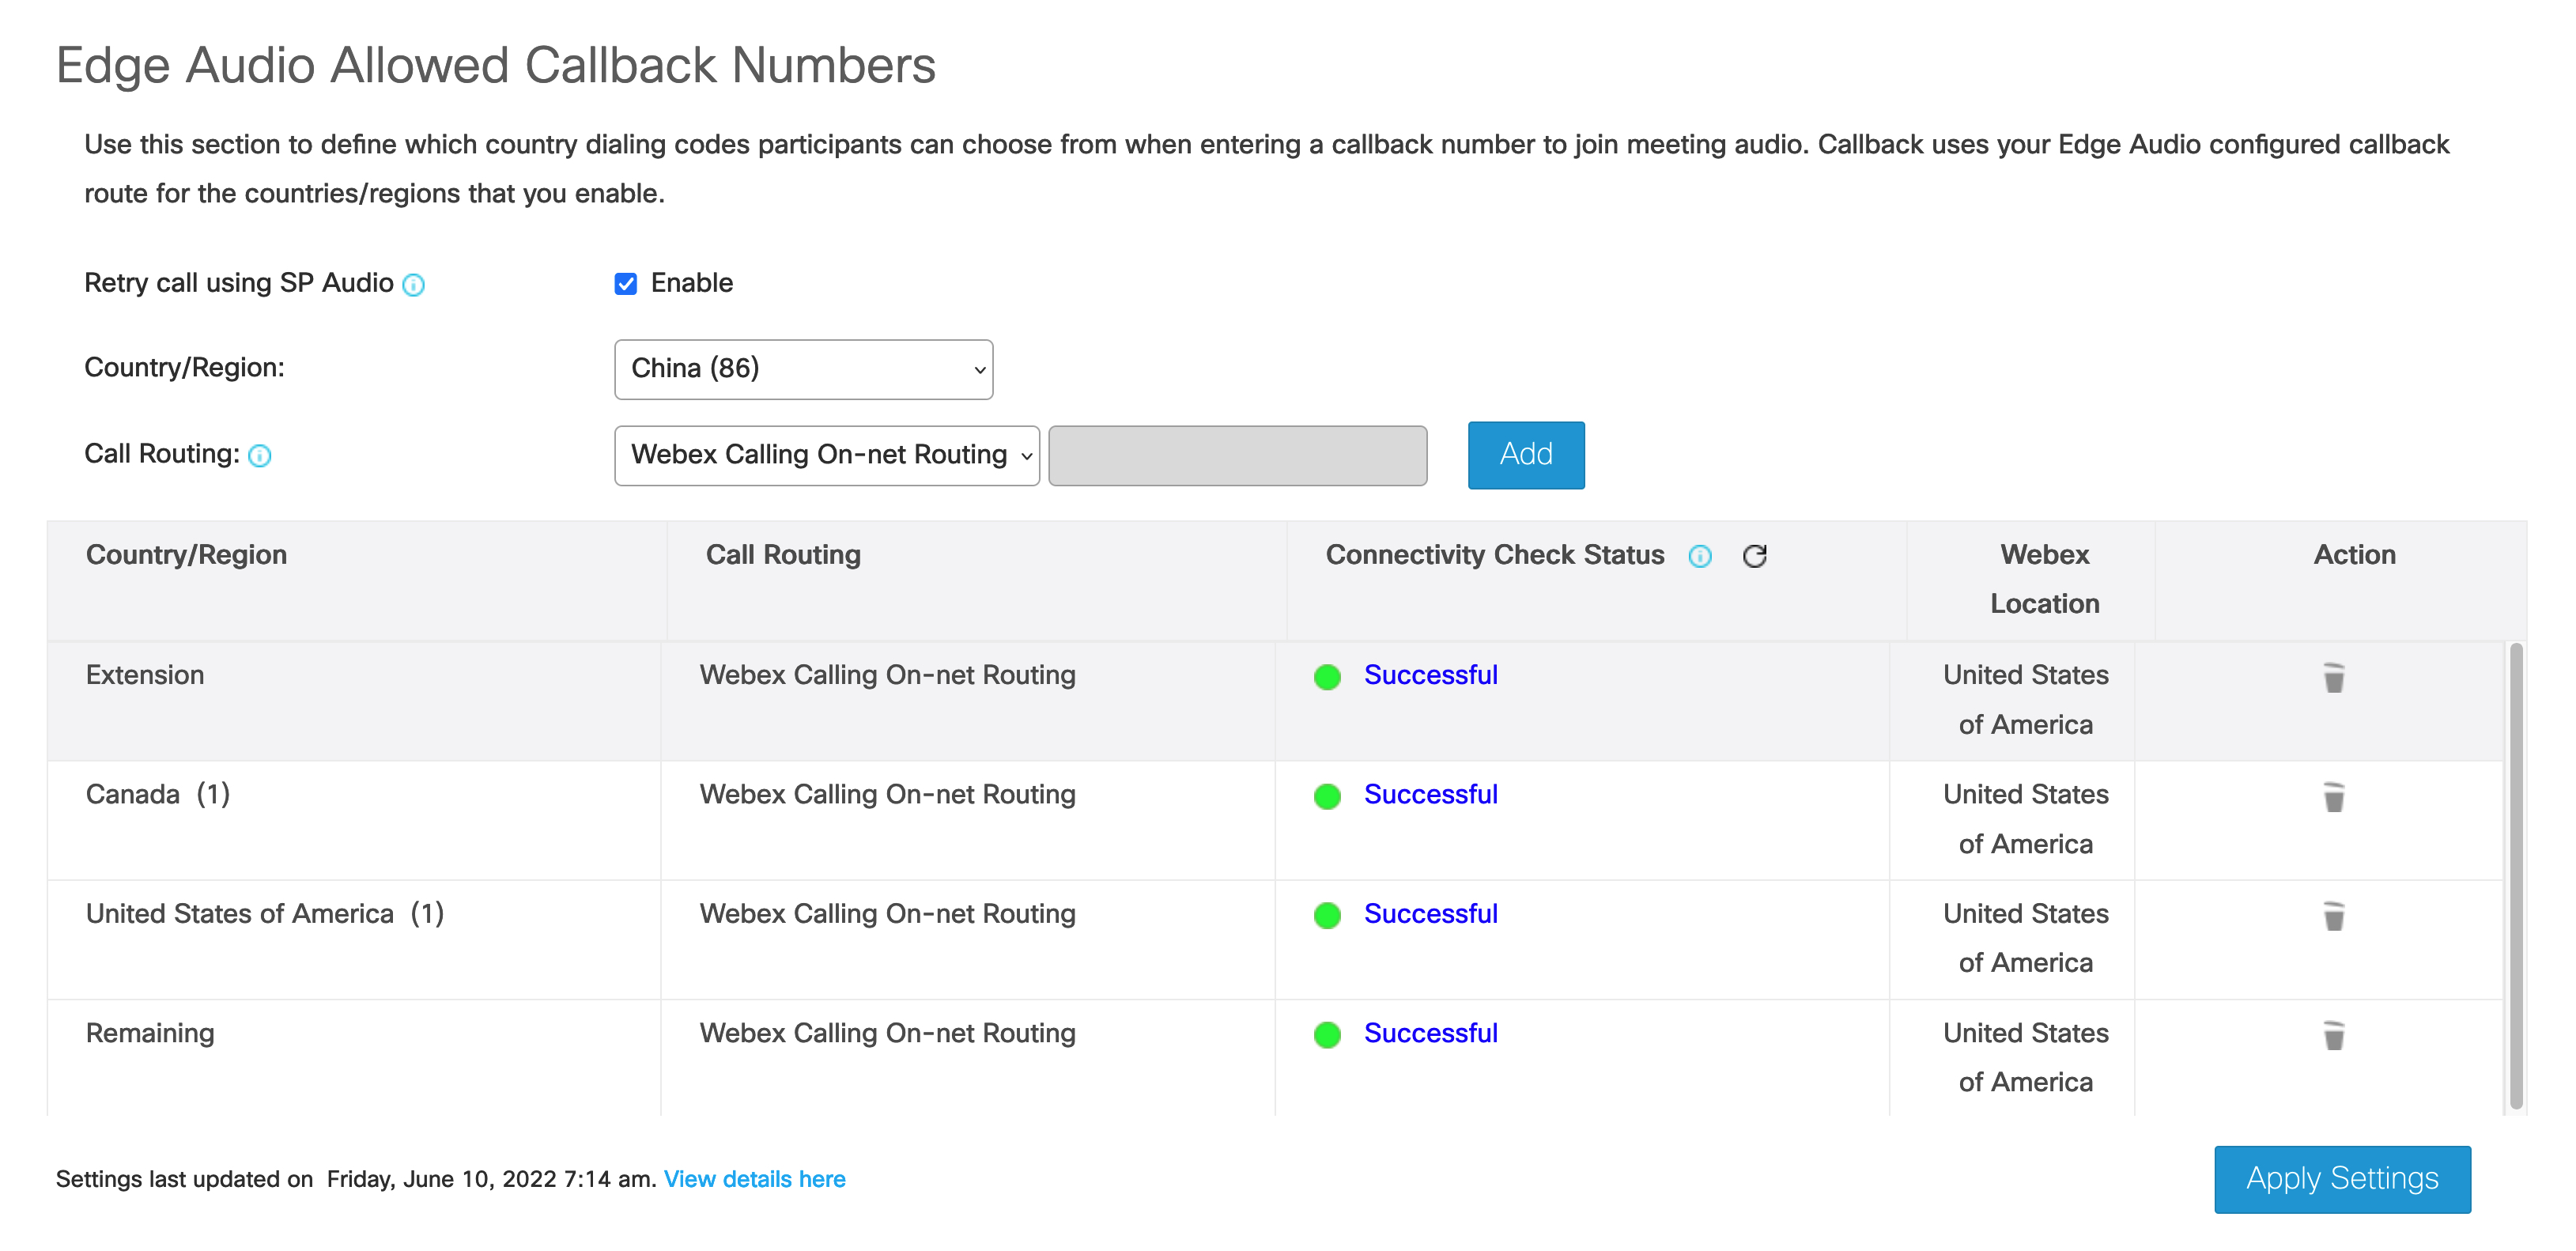
In the Edge Audio Allowed Callback Numbers section, select the Country/Region for which to apply callback settings, and then enter the domain name for the Expressway DNS SRVCUBE DNS SRV . For example, if your DNS SRV record is
|
| 3 |
Click Add. When you click Add, Edge Audio automatically tests the configured DNS SRV connectivity and looks up the closest Webex media node for that SRV. Before you apply the settings, make sure that the DNS SRV passes the connectivity test. If Webex can't determine the geographic location of an added SRV, Webex selects a default media node based on your site's location. Webex uses the MaxMind DB to locate your IP address. If you see a discrepancy in the location for your IP address, contact MaxMind to correct the issue. |
| 4 |
To show connectivity check details, click on the status indicator to display the Verify SIP Destination page. |
| 5 |
Choose Apply Settings when you're done adding all the callback settings. |
Apply Edge Audio callback settings in Control Hub
| 1 |
From the customer view in https://admin.webex.com, go to Services, and under Meeting, select Sites. |
| 2 |
Select the site for which to configure Edge Audio, and choose Configure Site. |
| 3 |
Select . |
| 4 |
In the Edge Audio Allowed Callback Numbers section, select the Country/Region for which to apply callback settings, and then enter the domain name for the Expressway DNS SRVCUBE DNS SRV . For example, if your DNS SRV record is
|
| 5 |
Click Add. When you click Add, Edge Audio automatically tests the configured DNS SRV connectivity and looks up the closest Webex media node for that SRV. Before you apply the settings, make sure that the DNS SRV passes the connectivity test. If Webex can't determine the geographic location of an added SRV, Webex selects a default media node based on your site's location. Webex uses the MaxMind DB to locate your IP address. If you see a discrepancy in the location for your IP address, contact MaxMind to correct the issue. |
| 6 |
To show connectivity check details, click on the status indicator to display the Verify SIP Destination page. |
| 7 |
Choose Apply Settings when you're done adding the callback settings. |
Edge Audio Callback Routing Options
When you enable Edge Audio callback for one or more countries, Webex routes calls over the Internet. If there are DNS, TCP, or TLS connectivity issues, or a call fails with a 380 or a 400-699 SIP error response, then Webex by default retries the call over a PSTN or CCA-SP partner network.
See Control Callback Routing Options for Edge Audio for details on disabling Edge Audio from retrying failed calls over a PSTN or CCA-SP partner network.
(Optional) Setup Task Flow for Extension Callback
Extension Callback for Edge Audio is only available for WBS33 and later sites. To find out which version you're using, see Find Your Cisco Webex Meetings Version Number.
Extension callback for Edge Audio allows users to join Webex meetings using the Call Me feature and their internal extension. This is only available for Webex Meetings, and doesn't work with Webex Events, Webex Training, or Webex Support.
You can reuse the search patterns that you created for Edge Audio callback with extension callback.
You configure Edge Audio Callback as follows:
|
Step |
Description |
Section |
|---|---|---|
|
1 |
Enable Extension Callback in your portal, either Webex Site Administration or Control Hub. |
Enable Extension Callback in Webex Site Administration or |
|
2 |
Enable internal callback teleconferencing. |
Allow Internal Call-Back for Webex Teleconferencing in Webex Site Administration or Allow Internal Call-Back for Webex Teleconferencing in Control Hub |
|
3 |
Specify the countries or regions to which Webex can route callbacks. |
Set Allowed Countries for Callback in Webex Site Administration or |
|
4 |
(Optional) Set up Audio Secure Profiles for your Expressway-E. |
|
Step |
Description |
Section |
|---|---|---|
|
1 |
Enable Extension Callback in your portal, either Webex Site Administration or Control Hub. |
Enable Extension Callback in Webex Site Administration or |
|
2 |
Enable internal callback teleconferencing. |
Allow Internal Call-Back for Webex Teleconferencing in Webex Site Administration or Allow Internal Call-Back for Webex Teleconferencing in Control Hub |
|
3 |
Specify the countries or regions to which Webex can route callbacks. |
Set Allowed Countries for Callback in Webex Site Administration or |
|
4 |
(Optional) Set up Audio Secure Profiles for your CUBE. |
|
Step |
Description |
Section |
|---|---|---|
|
1 |
Enable Extension Callback in your portal, either Webex Site Administration or Control Hub. |
Enable Extension Callback in Webex Site Administration or |
|
2 |
Enable internal callback teleconferencing. |
Allow Internal Call-Back for Webex Teleconferencing in Webex Site Administration or Allow Internal Call-Back for Webex Teleconferencing in Control Hub |
|
3 |
Specify the countries or regions to which Webex can route callbacks. |
Set Allowed Countries for Callback in Webex Site Administration or |
|
4 |
(Optional) Set up Audio Secure Profiles for your Expressway-E. |
Enable Extension Callback in Webex Site Administration
If you manage your Webex sites in Webex Site Administration, or have completed the Site Linking process, then enable extension callback in Webex Site Administration.
| 1 |
Sign in to Cisco Webex Site Administration, and go to . |
| 2 |
In the Edge Audio Allowed Callback Numbers section, select Extension as the Country/Region and then enter the Expressway DNS SRVCUBE DNS SRV. |
| 3 |
Click Add. |
| 4 |
Choose Apply Settings. After you enable extension callback, it takes 30 minutes for the settings to apply to the database. |
Enable Extension Callback in Control Hub
If you set up and manage your Webex sites in Control Hub, then enable extension callback in Control Hub.
| 1 |
From the customer view in https://admin.webex.com, go to Services and under Meeting select Sites. |
| 2 |
Select the site for which to configure Edge Audio, and choose Configure Site. |
| 3 |
Select |
| 4 |
In the Edge Audio Allowed Callback Numbers section, select Extension as the Country/Region and then enter the Expressway DNS SRVCUBE DNS SRV. |
| 5 |
Click Add. |
| 6 |
Choose Apply Settings. After you enable extension callback, it takes 30 minutes for the settings to apply to the database. |
Allow Internal Call-Back for Webex Teleconferencing in Control Hub
This setting is only available for CCA-SP, CCA Enterprise, and Edge Audio customers, and only applies to Webex Meetings.
When provisioned for your site, you can turn on the option to allow meeting participants to receive calls at an internal phone number within the same corporate site. You can also edit the label that appears within the Audio Conference dialog when participants join the audio conference.
| 1 |
From the customer view in https://admin.webex.com, go to Services, and under Meeting, select Sites. |
| 2 |
Choose the Webex site to change the settings for, and click Configure Site. |
| 3 |
Under Common Settings, check the Enable internal call-back teleconferencing check box. |
| 4 |
In the Internal call-back option label field, enter a descriptive name or phrase to identify the internal call-back option. |
| 5 |
Click Update. |
Allow Internal Call-Back for Webex Teleconferencing in Webex Site Administration
This setting is only available for CCA-SP, CCA Enterprise, and Edge Audio customers, and only applies to Webex Meetings.
When provisioned for your site, you can turn on the option to allow meeting participants to receive calls at an internal phone number within the same corporate site. You can also edit the label that appears within the Audio Conference dialog when participants join the audio conference.
| 1 |
Sign in to Webex Site Administration and go to . |
| 2 |
Scroll to the Site Options section, and then check the Enable internal call-back teleconferencing check box. |
| 3 |
In the Internal call-back option label field, enter a descriptive name or phrase to identify the internal call-back option. |
| 4 |
Click Update. |
Set Allowed Countries for Callback in Webex Site Administration
If you manage your Webex sites in Webex Site Administration, or have completed the Site Linking process, use these steps to specify the countries or regions to which Webex can route callbacks.
| 1 |
Sign in to Cisco Webex Site Administration, and go to . |
| 2 |
In the Webex Allowed Callback Countries section, use the checkboxes to enable or disable a country or region. You must have at least one country or region enabled for callback. |
| 3 |
When you're done making changes, save your changes. Your changes can take up to 30 minutes to propagate to the client. |
Set Allowed Countries for Callback in Control Hub
If you manage your Webex sites in Control Hub, use these steps to specify the countries or regions to which Webex can route callbacks.
| 1 |
From the customer view in https://admin.webex.com, go to Services and under Meeting select Sites. |
| 2 |
Select the site for which you want to configure Edge Audio, and choose Configure Site. |
| 3 |
Select . |
| 4 |
In the Webex Allowed Callback Countries section, use the checkboxes to enable or disable a country or region. You must have at least one country or region enabled for callback. |
| 5 |
When you're done making changes, save your changes. Your changes can take up to 30 minutes to propagate to the client. |
(Optional) Audio Secure Profiles for Expressway-E
We recommend that you configure the extension callback for Edge Audio only to accept calls that come from your Webex site. If participants use callback to join meetings from unexpected Webex sites, the Expressway-E rejects those calls.
To set up an audio secure profile, download or copy the Call Policy (CPL) XML file from Site Administration or Control Hub. Then, upload the file to your Expressway-E clusters.
Your Webex site must be on version 40.8.0 or higher to set up an audio secure profile.
If you have an existing CPL XML file with rules to accept or reject calls, you must merge the CPL XML file from Site Administration or Control Hub with your existing file.
If you don't merge the two files together, the original CPL XML file is overwritten with the new CPL XML file. Make sure to merge the two files carefully.
When you merge the CPL XML files, place call rejection rules at the top of the list, and call acceptance rules at the bottom of the list.
If you accept calls from multiple Webex sites, merge the
<taa:rule> block together with the site UUID. For example,
the following code block shows what the CPL XML file looks like with these three site
UUIDs:
-
x-cisco-site-uuid=9ca12345678e321be0123456e00ab789
-
x-cisco-site-uuid=9ca87654321e123be6543210e00ab987
-
x-cisco-site-uuid=9ca11223344e121be5566777e00ab555
<cpl xmlns=”urn:ietf:params:xml:ns:cpl” xmlns:taa=http://www.tandberg.net/cpl-extensions xmlns:xsi=http://www.w3.org/2001/XMLSchema-instance xsi:schemaLocation=”urn:ietf:params:xml:ns:cpl cpl.xsd”>
<taa:routed>
<taa:rule-switch>
<taa:rule originating-zone=”Webex Zone” destination=”.*;x-cisco-site-uuid=9ca12345678e321be0123456e00ab789;.*”>
<proxy/>
</taa:rule>
<taa:rule originating-zone=”Webex Zone” destination=”.*;x-cisco-site-uuid=9ca87654321e123be6543210e00ab987;.*”>
<proxy/>
</taa:rule>
<taa:rule originating-zone=”Webex Zone” destination=”.*;x-cisco-site-uuid=9ca11223344e121be5566777e00ab555;.*”>
<proxy/>
</taa:rule>
<taa:rule originating-zone=”Webex Zone” destination=”.*;x-cisco-webex-service=audio”>
<reject status =”403” reason=”Unknown Webex Site”/>
</taa:rule>
</taa:rule-switch>
</taa:routed>
</cpl>
Upload CPL XML File to Expressway-E
| 1 |
Export or copy the CPL XML file of your Webex site:
|
| 2 |
In the Edge Audio Customer Edge section, click Secure Edge. |
| 3 |
In the Expressway-E section, click Export or Copy. If you have more than one Webex site that goes through a single
Expressway-E, then repeat steps 1-3 for each Webex site. For each
additional Webex site, copy the |
| 4 |
Sign in to the Expressway-E configuration page, and go to . |
| 5 |
For Select the new Call Policy file, select Choose File and upload the CPL XML file. |
| 6 |
Click Show Call Policy File to check your uploaded file. |
Setup task flow for Webex Calling on-net routing for callback
If your site uses Webex Calling, you can use on-net routing for callback. If you don't have Webex Calling, use the Edge Audio callback method. Don't configure callback by both methods.
|
Step |
Description |
Section |
|---|---|---|
|
1 |
Set up Webex Calling on-net routing callback in your portal, either Webex Site Administration or Control Hub. |
Set Webex Calling on-net routing for callback in Webex Site Administration or Set Webex Calling on-net routing for callback in Control Hub |
|
2 |
(Optional) Enable Extension Callback in your portal. |
Set Webex Calling on-net routing for callback in Webex Site Administration
Before you begin
You can specify the countries or regions to which Webex can route callbacks. To us this feature, you must manage Webex sites in Webex Site Administration or have completed the Site Linking process. For the configured international extensions, when a user selects the Call me or callback option when joining a meeting, Webex Meetings first attempts to route the call directly to Webex Calling. If the user-entered number is not a Webex Calling registered number, then the call falls back and routes through the PSTN, the normal callback behavior.
| 1 |
Sign in to Cisco Webex Site Administration, and go to . |
| 2 |
In the Edge Audio Allowed Callback Numbers section, use the check boxes to enable or disable country or region. Enable at least one country or region for callback. |
| 3 |
In the Country/Region drop-down list, select the country to route calls to though on-net. |
| 4 |
In the Call Routing drop-down list, select Webex Calling On-net Routing.
|
| 5 |
Click Add. Based on your requirements, repeat the step for ‘Extension’ or other countries. We recommend using Webex Calling on-net routing for all available countries in the Country/Region list. |
| 6 |
Choose Apply Settings when you've added all the callback settings. Your changes can take up to 30 minutes to propagate to the client. |
Set Webex Calling on-net routing for callback in Control Hub
Before you begin
Prerequisites
-
Webex Calling licenses and a Webex Calling PSTN number
-
Webex Meetings licenses
If you manage your Webex sites in Control Hub, you can specify the countries or regions to which Webex can route callbacks. For the configured international extensions, when a user selects the Call me or callback option when joining a meeting, Webex Meetings first attempts to route the call directly to Webex Calling. If the user-entered number isn't a Webex Calling registered number, then the call falls back and routes through the PSTN, the normal callback behavior.
| 1 |
From the customer view in https://admin.webex.com, go to Services and, under Meeting, select Sites. |
| 2 |
Select the site for which to configure Webex Calling on-net routing and choose Configure Site. |
| 3 |
Select . |
| 4 |
In the Webex Calling on-net routing section, use the check boxes to enable or disable country or region. Enable at least one country or region for a callback. |
| 5 |
In the Country/Region drop-down list, select the country to route calls through on-net. |
| 6 |
In the Call Routing drop-down list, select Webex Calling On-net Routing.
|
| 7 |
Click Add. Based on your requirements, repeat the step for ‘Extension’ or other countries. We recommend using Webex Calling on-net routing for all available countries in the Country/Region list. |
| 8 |
Choose Apply Settings when you've added all the callback settings. Your changes can take up to 30 minutes to propagate to the client. |
What to do next
The customer can receive a callback on the Webex Calling device by choosing the Call me option in the meeting audio connection settings and entering a Webex Calling PSTN number.
CCA Partners and Edge Audio
Edge Audio works with any CCA partner. The configurations are the same. The main difference is that the deployment uses a CCA partner’s network instead of Webex PSTN audio. The CCA Call Detail Record (CDR) shows any customer calls that connect to a meeting using Edge Audio. For more information on the CCA CDR, see the design document.
After a CCA partner submits an Edge Audio order, the partner either decides to configure Edge Audio themselves or work with a customer administrator to have them configure it.
Customize Dial-in Interactive Voice Response (IVR) Prompt Language
The IVR prompts for calls that route over Edge Audio using dial-in numbers from a CCA Partner default to English. To set up an Edge Audio Webex site with an IVR system in another language, provide your customer with an updated LUA script that identifies the dial-in numbers for each language.
To update the language in the LUA Script, you must set the Locale tag. For more information on the locale tag see this article: https://help.webex.com/article/4zjt9m
After you update the LUA script, send it to your customer. The customer then updates the LUA script on their Unified CM.
Set the Default IVR Language for CCA Dial-in Numbers
You can update the IVR prompt for Edge Audio Webex sites to play in a language other than English. This task explains how to change the default IVR language from English to another language for all CCA dial-in numbers.
-
Use this article as a reference for which locale tags you can add.
-
Add all locale tags before
x-cisco-site-uuid.
Before you begin
Download the LUA script from Site Administration, Control Hub, or the CCA Portal.
| 1 |
Open the Lua Script in a text editor. |
| 2 |
Scroll to the Update Request URI with Edge Audio URL and site uuid section and choose.
|
| 3 |
Save the Lua script and send it to your customer to upload to their Unified CM. |


