
피드백을 보내 주셔서 감사합니다.
휴대폰에서 Webex Go 활성화
 피드백이 있습니까?
시작하기 전에
-
전화기가 이동 통신 사업자 잠금 해제, 듀얼 SIM 호환, 활성 eSIM 프로파일을 지원할 수 있는지 확인합니다.
-
Webex Go는 eSIM을 통해 활성화되며, 장치에서 활동 중인 eSIM 프로필을 사용할 수 있도록 요구합니다. 지원되는 장치 모델 및 장치에서 지원하는 활성 eSIM의 수를 참조하십시오.
장치 잠금 정책은 미국에서만 적용됩니다.
-
-
통화 모드 설정을 구성하려면 모바일 전화의 Webex 응용프로그램에서 로그아웃하십시오.
-
활성화된 Wi-Fi 네트워크가 있는지 확인합니다.
지원되는 iPhone 모델
-
아이폰 Xr
-
아이폰 Xs
-
아이폰 Xs 최대
-
아이폰 SE 2020
-
아이폰 11
-
아이폰 11 프로
-
아이폰 11 프로 맥스
-
아이폰 12
-
아이폰 12 프로 맥스
-
아이폰 SE 2022
-
아이폰 13
-
아이폰 13 프로
-
아이폰 13 프로 최대
-
아이폰 14
-
아이폰 14 플러스
-
아이폰 14 프로
-
아이폰 14 프로 맥스
OS/소프트웨어 버전 필요: iOS 15.4 이상
장치 잠금 상태
미국 내 고객에게만 적용됩니다.
-
설정 → 일반 → 정보
-
이동 통신 사업자 잠금 아래에 SIM 제한 사항이 없습니다. 메시지가 없는 경우, 연락처:
-
IT 관리자(기업 플랜에 있는 경우)
-
이동 통신 사업자 (개인 플랜을 하는 경우)
-
QR 코드 스캔 중
귀하의 모바일 장치에 설정된 언어에 따라, 모바일 데이 터 및 모바일 플랜 대신 모바일 데이 터 및 모바일 플 랜이라는 용어가 사용될 수 있습니다.
-
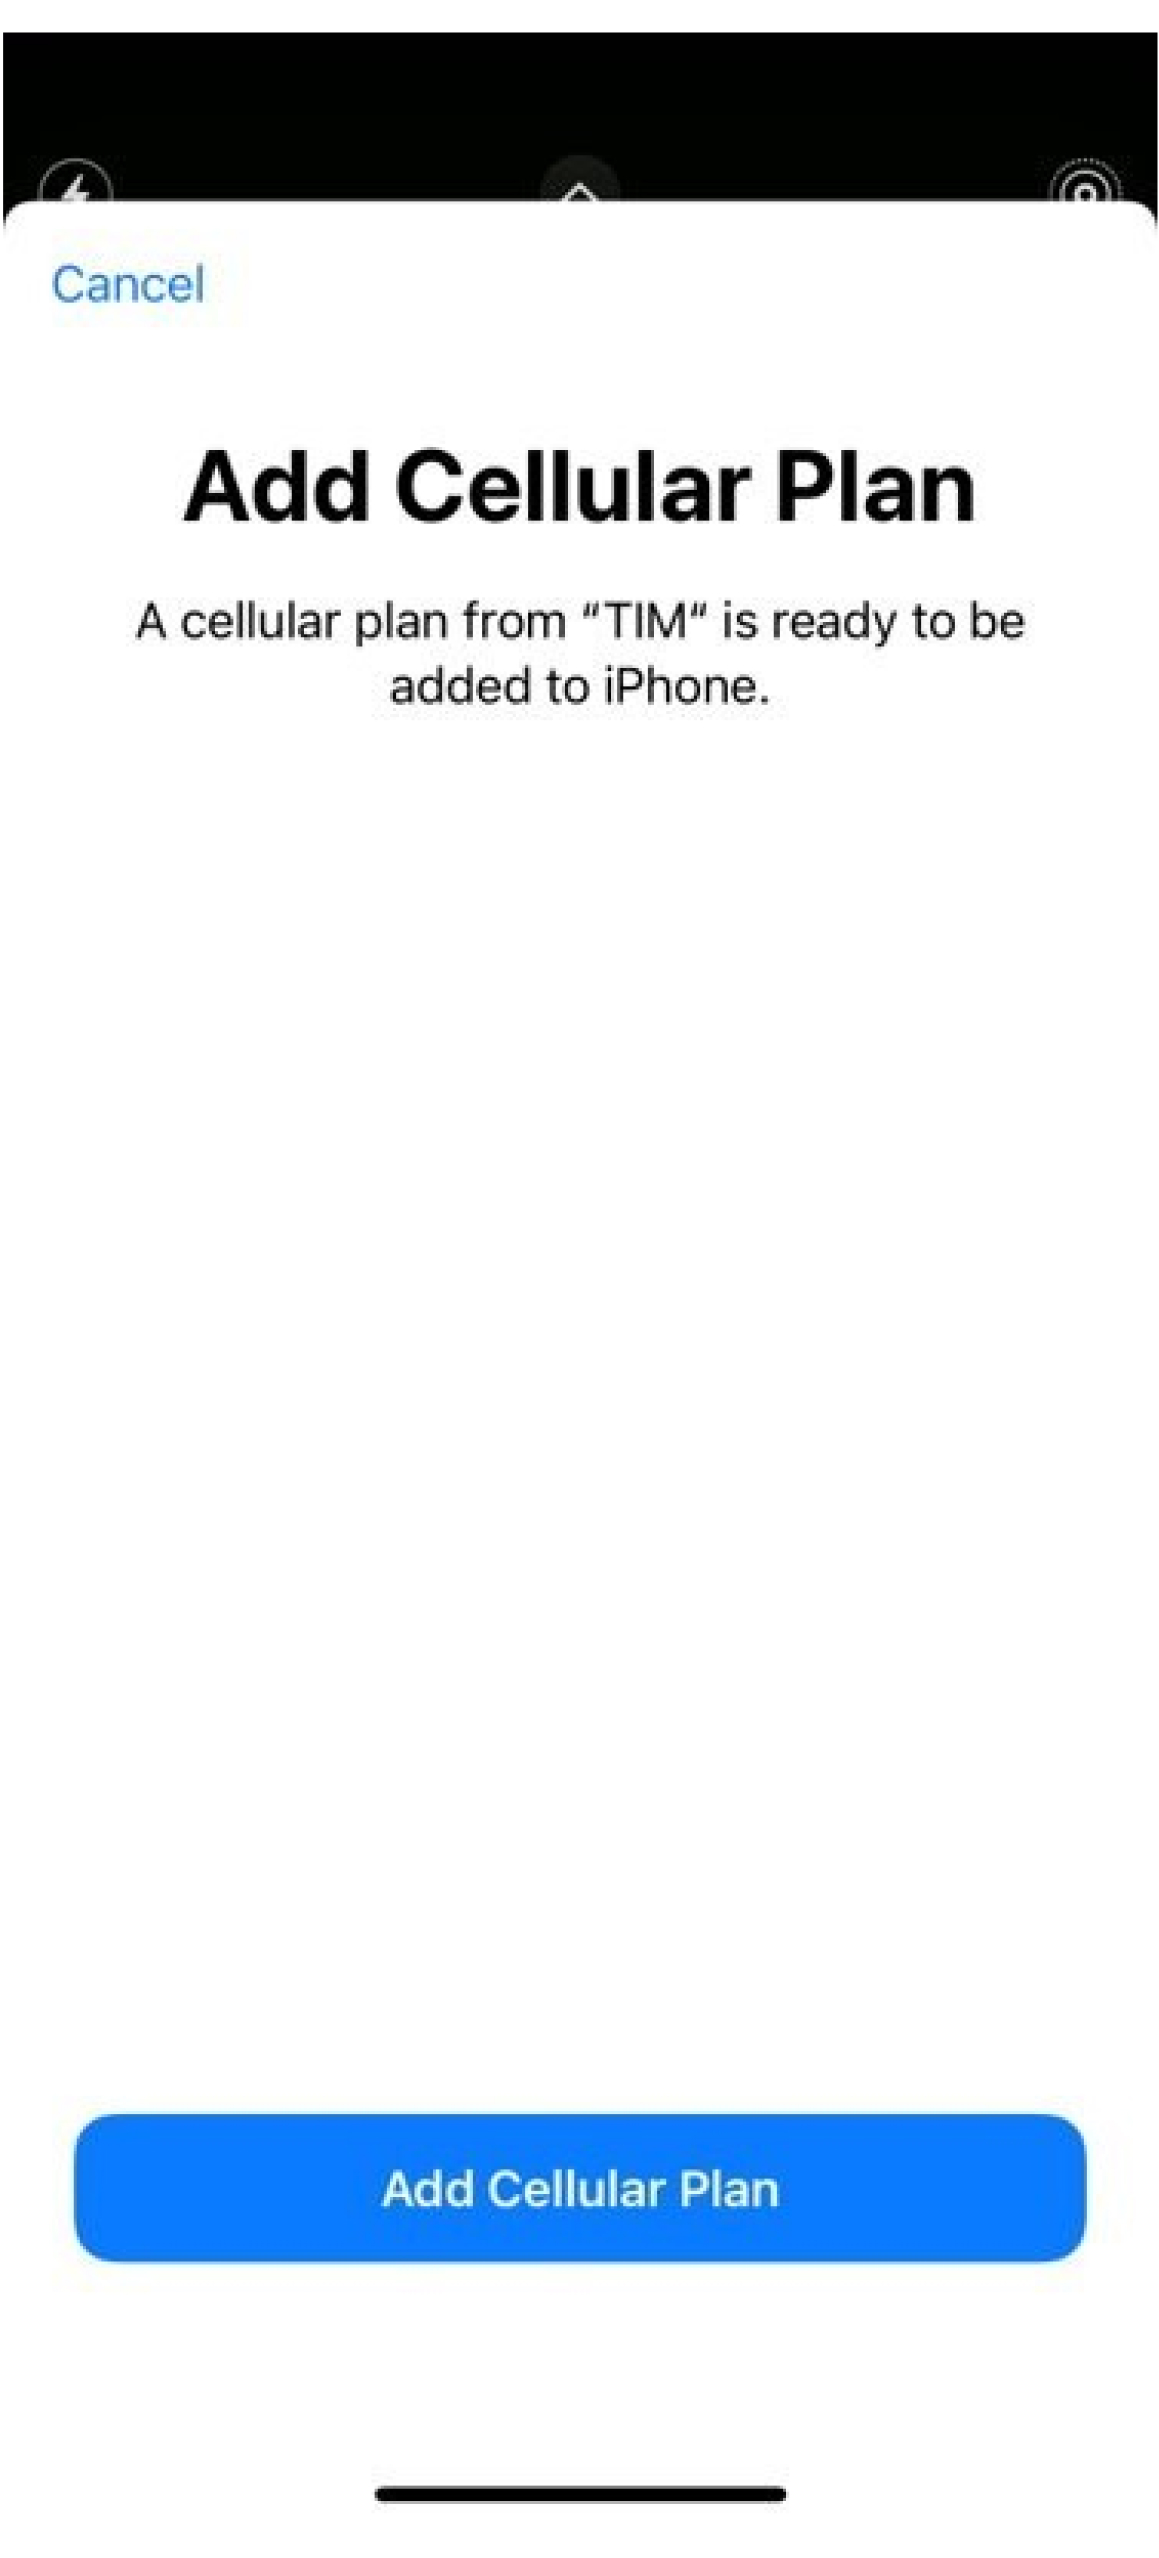
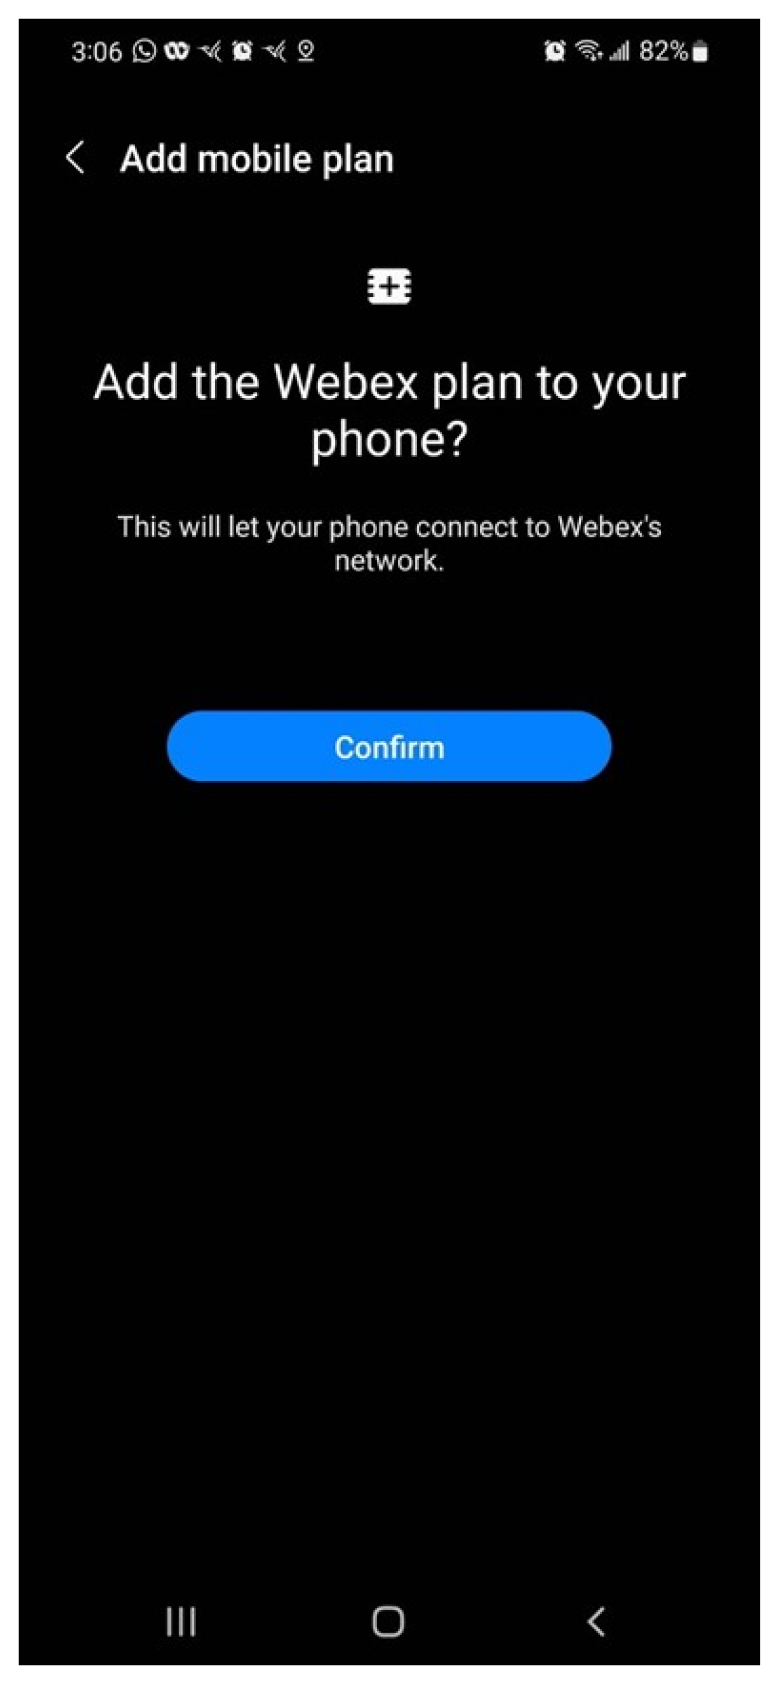
셀룰러 플랜 추가에 → 데이터 → 탐색합니다.
-
활성화 이메일에 포함된 QR 코 드를 스캔합니다.
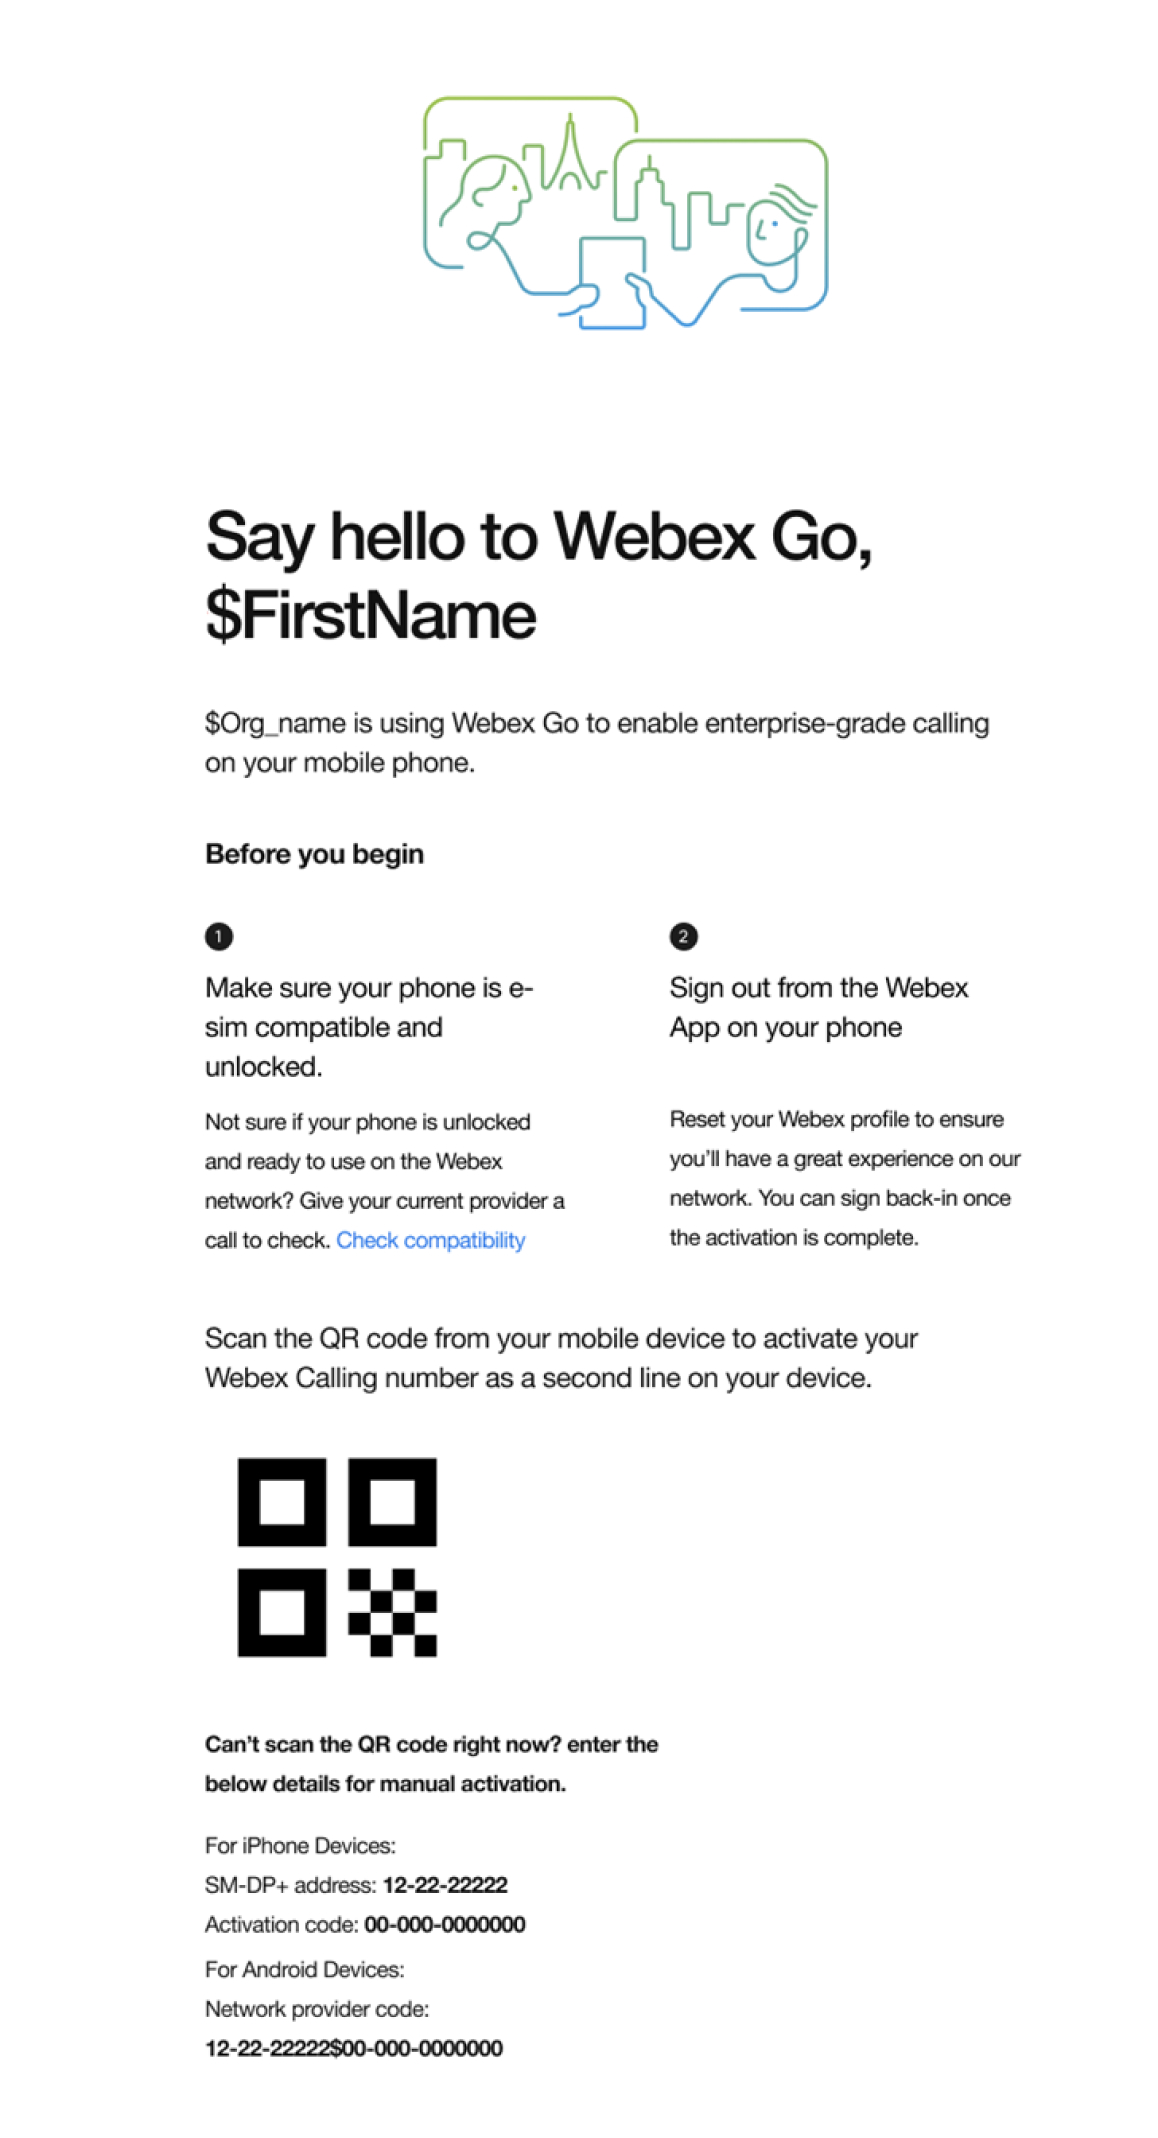
-
셀룰러 플랜 추가를 탭합니다.
-
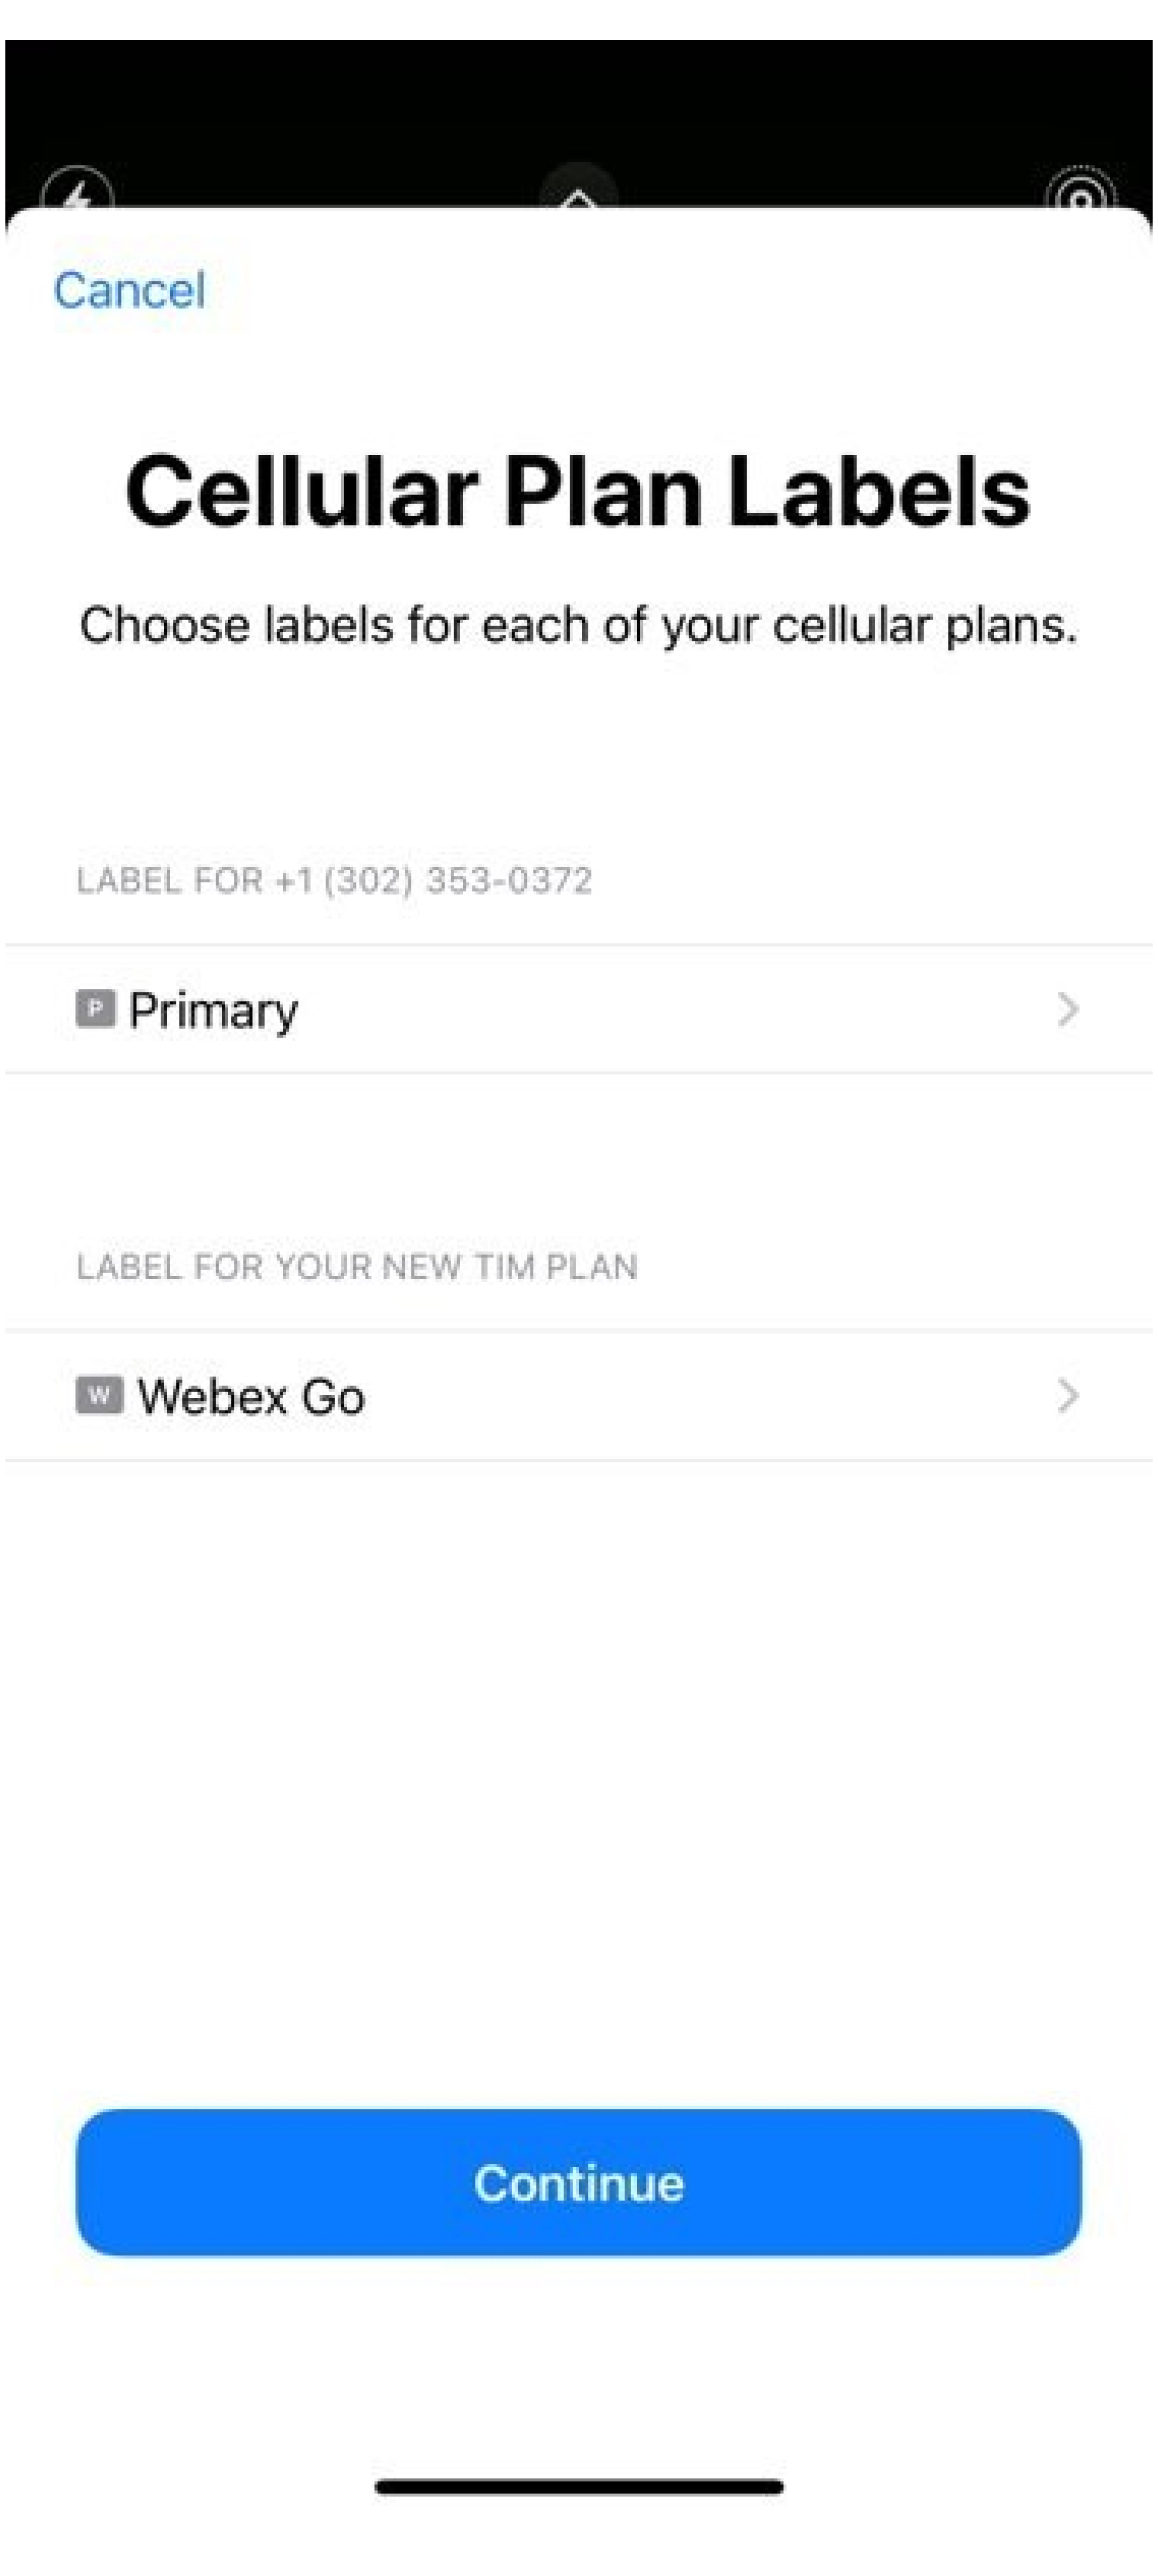
보험 라벨 지정: 기존의 레이블을 선택하거나 사용자 정의 레이블을 만들고 계속을 클릭합니다.
-
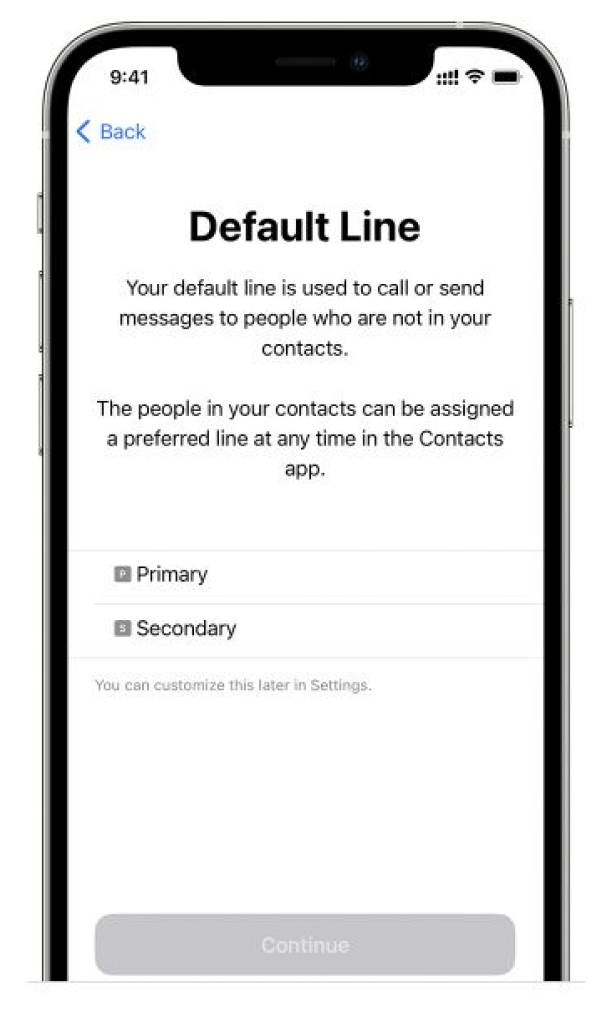
기본 번호 설정: 기본 회선은 연락처 응용프로그램에 없는 사용자에게 전화하거나 메시지를 보낼 때 사용됩니다.
Webex를 기본 라인으로 선택하는 경우 - 통화는 Webex Calling에 대한 통화 세부 정보 기록(CDR)에 캡처됩니다. 참고로, 이제 Webex Calling과 관련된 조직 보안 및 규정 준수 정책은 개인 모바일 전화 장치에서 모바일 플랜 및 eSIM을 사용하고 있는 이 번호에 적용됩니다. 또한, 비즈니스 텍스팅은 현재 Webex Go 번호에서 사용할 수 없으며, 클라우드 연결 공급자와 별도로 활성화되어야 합니다.
-
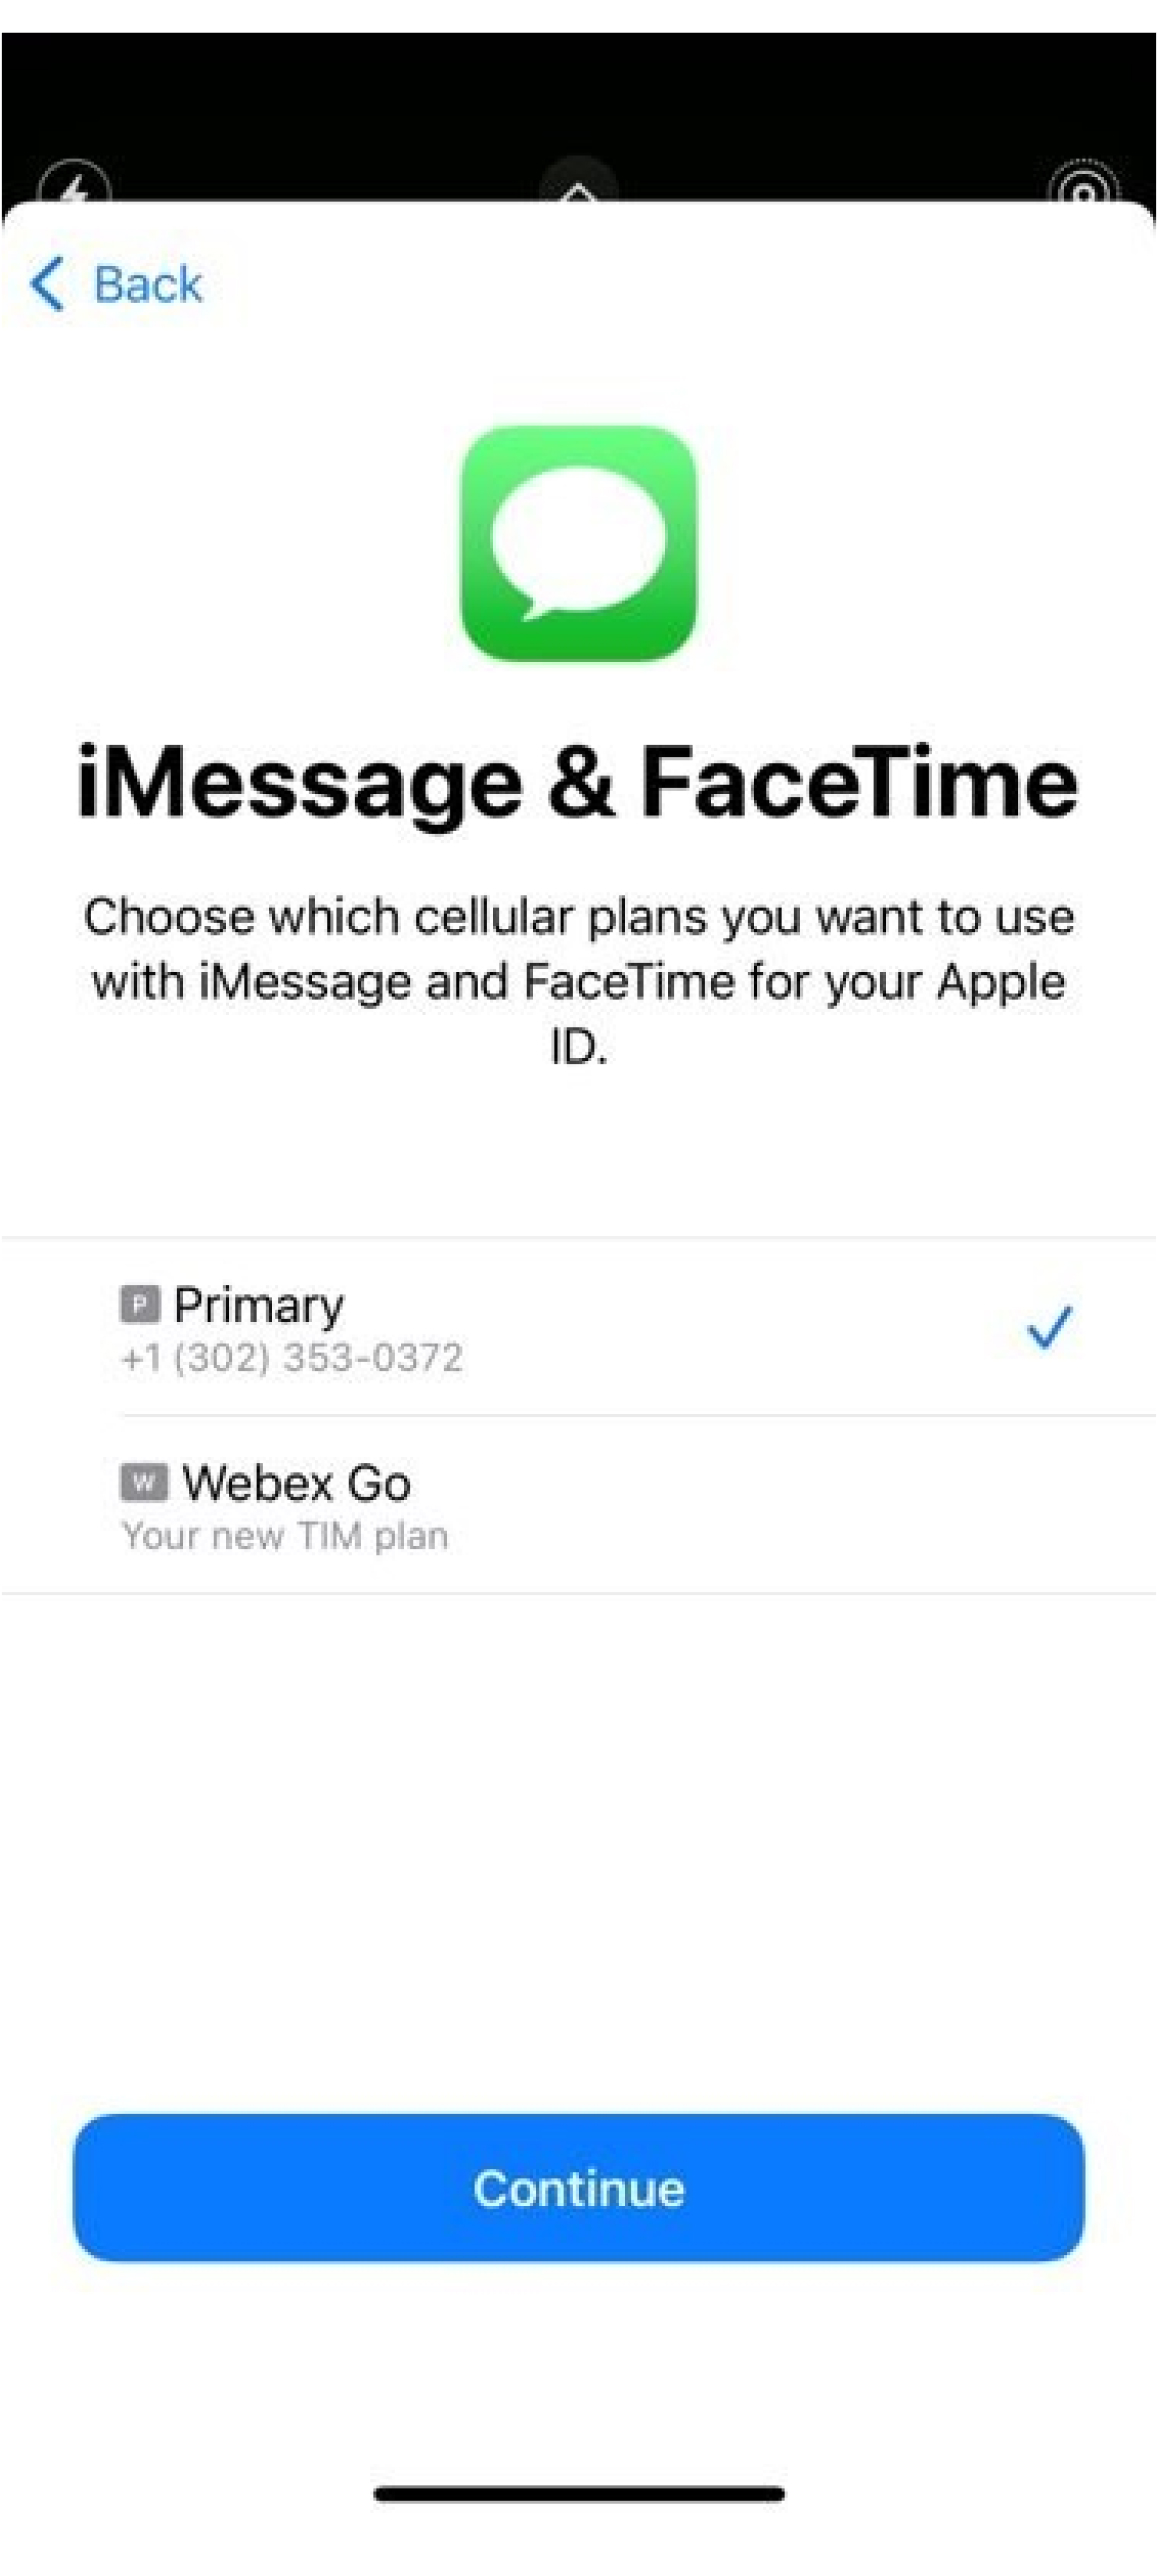
iMessage 및 FaceTime에 대한 셀룰러 플랜 설정: iOS 13 이상을 사용하는 경우, iMessage 및 FaceTime에 대해 사용할 셀룰러 플랜을 선택할 수 있습니다. 장치에서 활동 중인 기존 플랜으로 설정하는 것이 좋습니다.
-
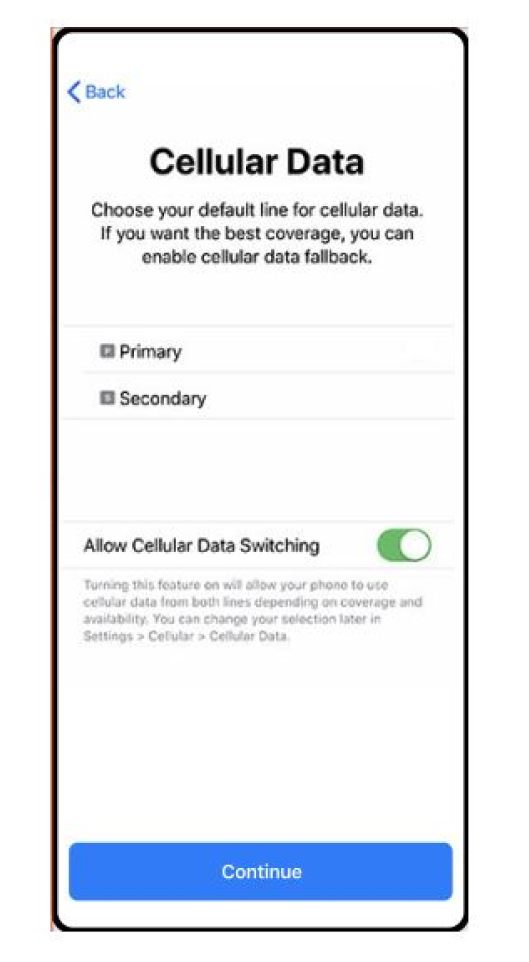
셀룰러 데이터에 대한 기본 회선 설정: 장치에서 활동 중인 기존 플랜으로 설정하는 것이 좋습니다. 단, 비즈니스 라인 에서 통화 중일 때 셀룰러 데이터 전환 허용을 켜고 응용프로그램에 액세스합니다.
-
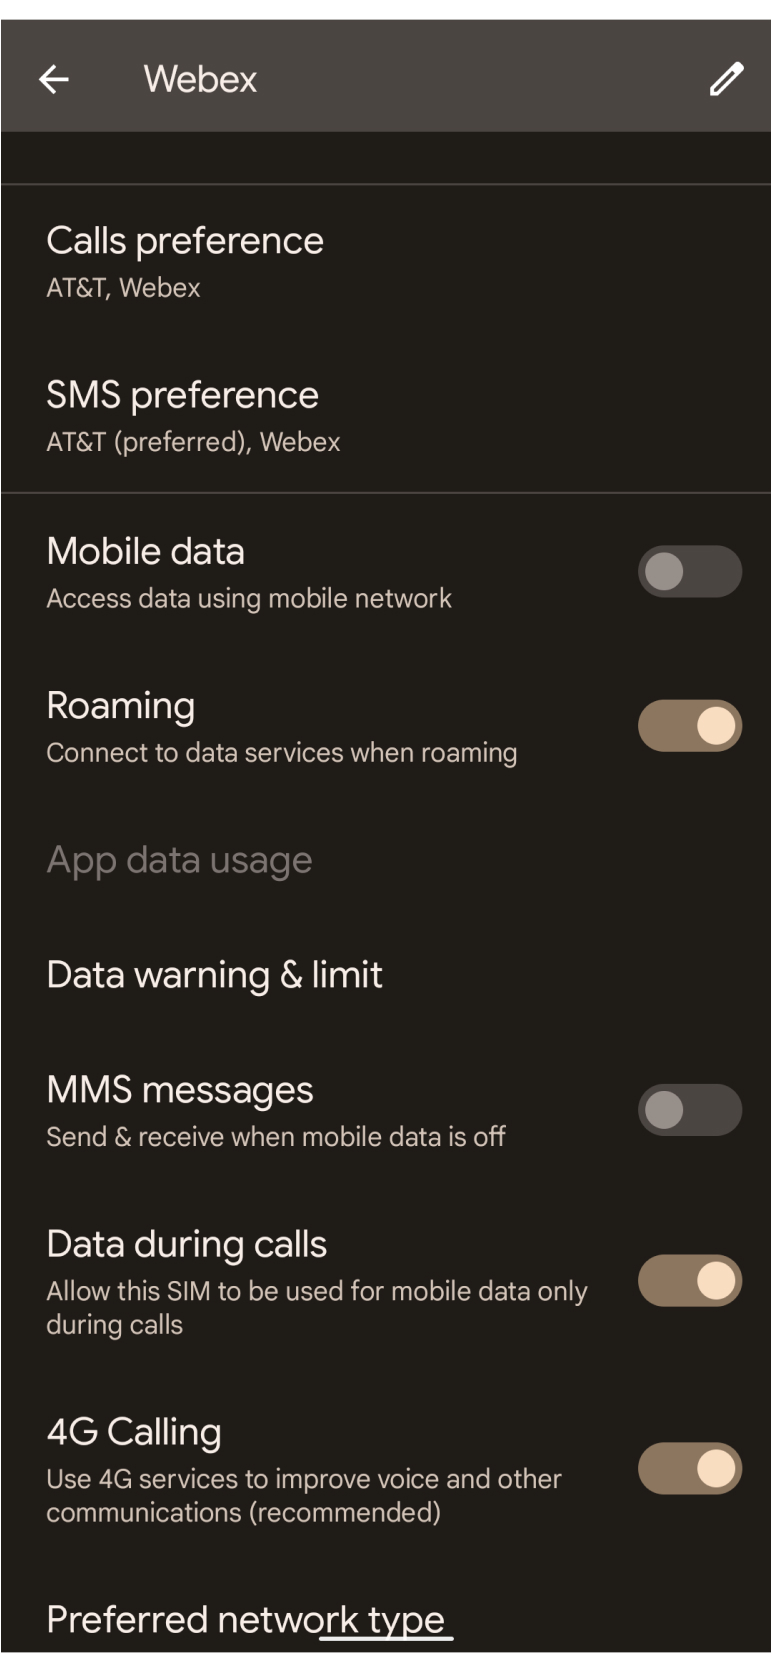
Webex Go는 통화 라우팅에 VoLTE 모바일 네트워크를 활용합니다. 다음 설정이 활성화되었는지 확인하고 서비스를 사용하려면 휴대폰을 다시 시작합니다.
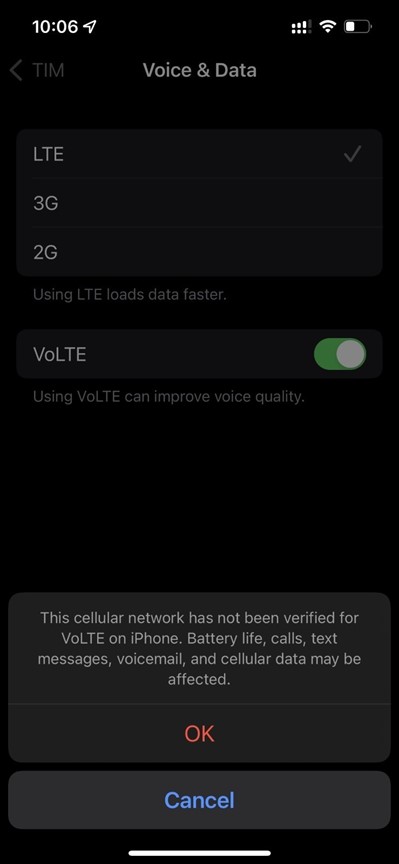
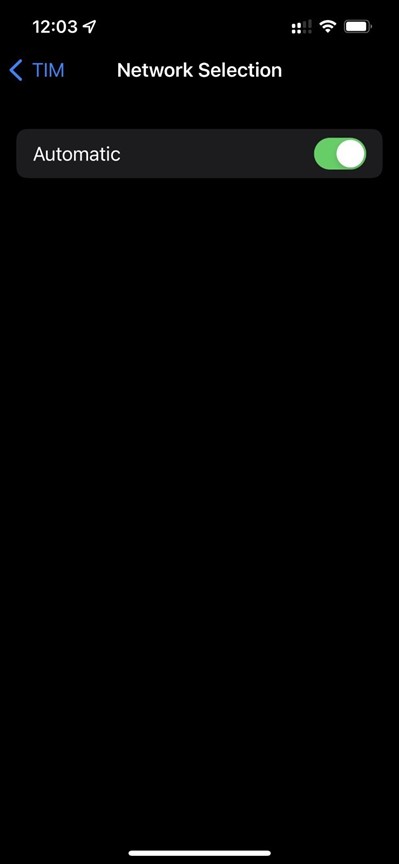
음성 &데이터 아래에서 데이터에 대해 4G 또는 LTE 가 선택되어 있으며 음성에 대해 VoLTE 가 활성화되어 있도록 합니다.
데이터 로밍 슬라이더가 활성화되었습니다.
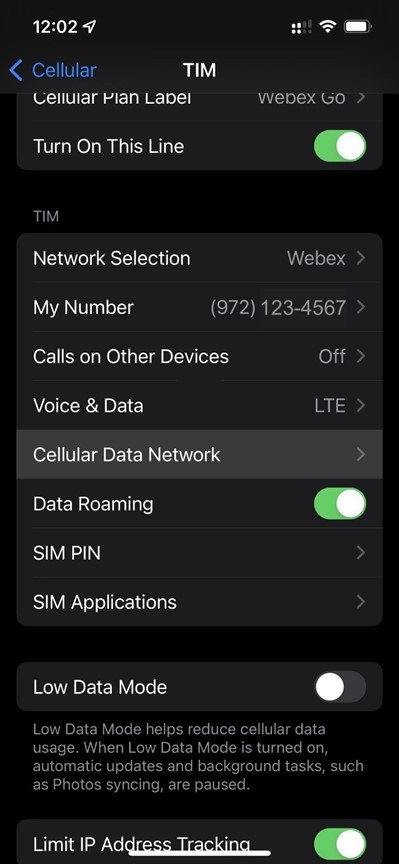
네트워크 선택 슬라이더가 자동으로 설정되었습니다.
-
설정이 완료되면 휴대폰을 다시 시작합니다. 제어 센터 에서 Webe x 네트워크를 확인해야 합니다. 제어 센터를 열려면 iPhone 화면의 오른쪽 상단 모서리에서 아래로 스와이프합니다.
수동으로 플랜 입력
eSIM과 듀얼 SIM 사용에 대한 자세한 내용은를 참조하십시오 https://support.apple.com/en-us/HT209044.
어떻게 작동하는지 확인하고 싶습니까? iPhone에서 Webex Go를 활성화하는 방법에 대해 이 비디오 데 모를 시청하십시오.시작하기 전에
-
전화기가 이동 통신 사업자 잠금 해제, 듀얼 SIM 호환, 활성 eSIM 프로파일을 지원할 수 있는지 확인합니다.
-
Webex Go는 eSIM을 통해 활성화되며, 장치에서 활동 중인 eSIM 프로필을 사용할 수 있도록 요구합니다. 지원되는 장치 모델 및 장치에서 지원하는 활성 eSIM의 수를 참조하십시오.
장치 잠금 정책은 미국에서만 적용됩니다.
-
-
통화 모드 설정을 구성하려면 모바일 전화에서 Webex 응용 프로그램을 사인아웃하십시오.
-
활성화된 Wi-Fi 네트워크가 있는지 확인합니다.
지원되는 Samsung 모델
-
갤럭시 S20 FE 5G
-
갤럭시 S21 5G
-
갤럭시 S21 + 5G
-
갤럭시 S22
-
갤럭시 S22+
-
갤럭시 S22 울트라
-
갤럭시 S23
-
갤럭시 S23+
-
갤럭시 S23 울트라
-
갤럭시 XCover 6 Pro
-
갤럭시 Z 플립4
OS/소프트웨어 버전 필요: 13 One Ui 5.1 이상
장치 잠금 상태
미국 내 고객에게만 적용됩니다.
-
기업 플랜에 있는 경우, IT 관리자와 작업하여 장치를 잠금 해제합니다.
-
개인 보험에 가입한 경우, 서비스 제공자에게 연락하십시오. 서비스 공급자가 제공하는 IMEI 도구로의 링크:
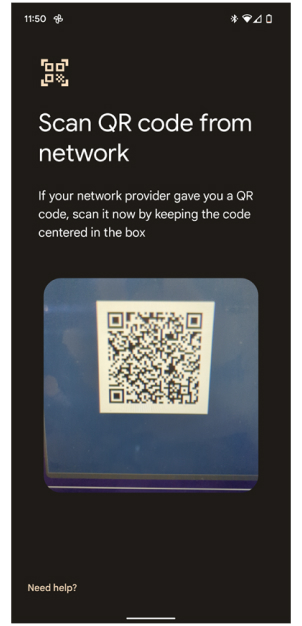
QR 코드 스캔 중
-
SIM 카드 → 연결을 → 탐색합니다.
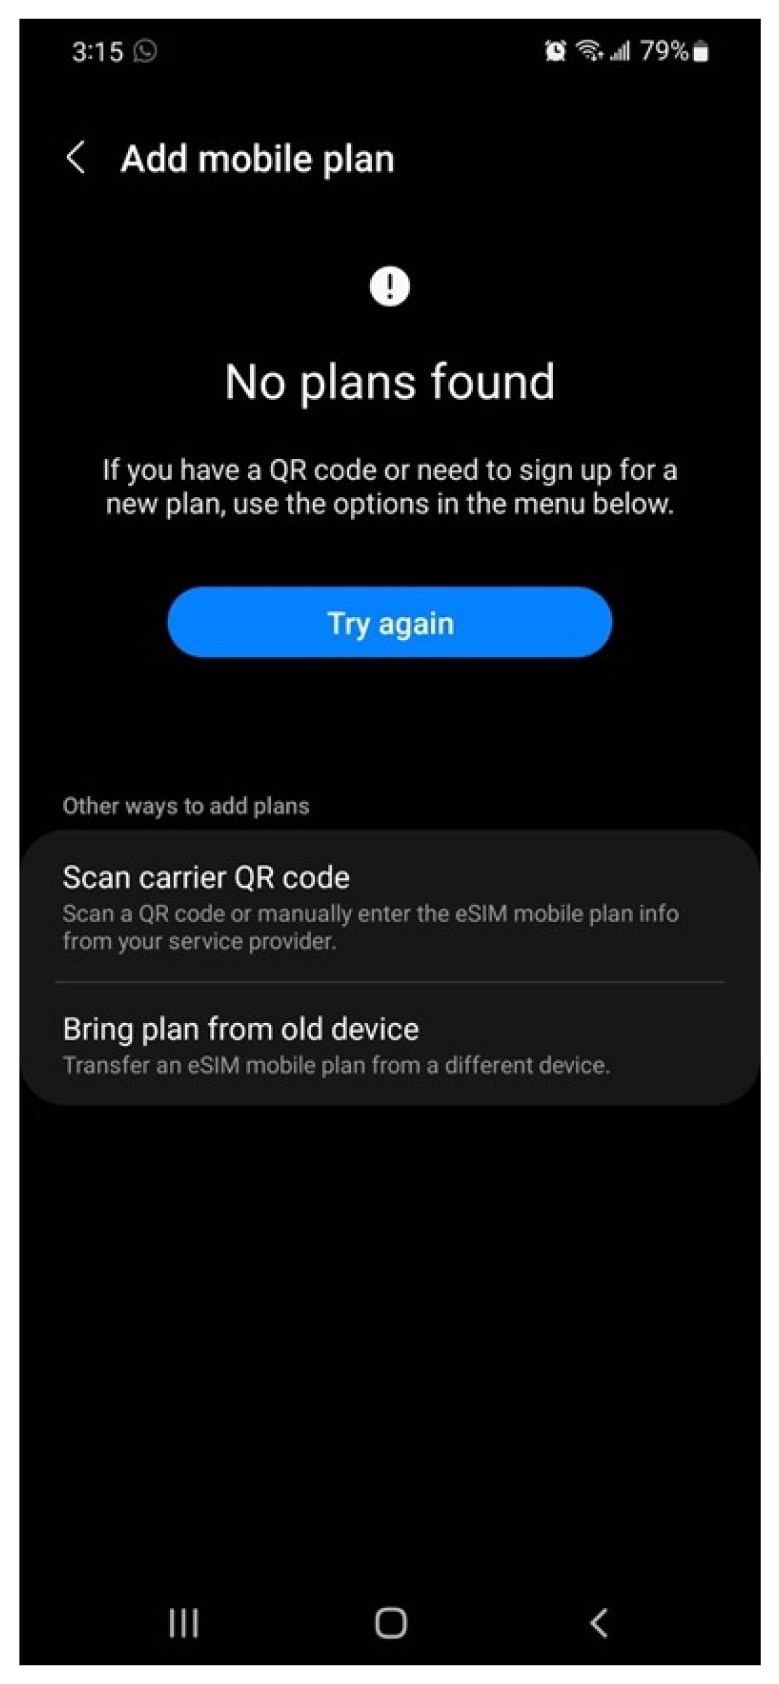
모바일 플랜 추가를 탭 하고 이동 통신 사업 자 검색을 QR 코드.
-
이메일을 통해 전송된 QR 코드를 스캔합니다.
메시지가 이 플랜을 새로운 모바일 네트워크에 추 가가 표시되는 경우, 전화에 플랜 추 가를 선택합니다.
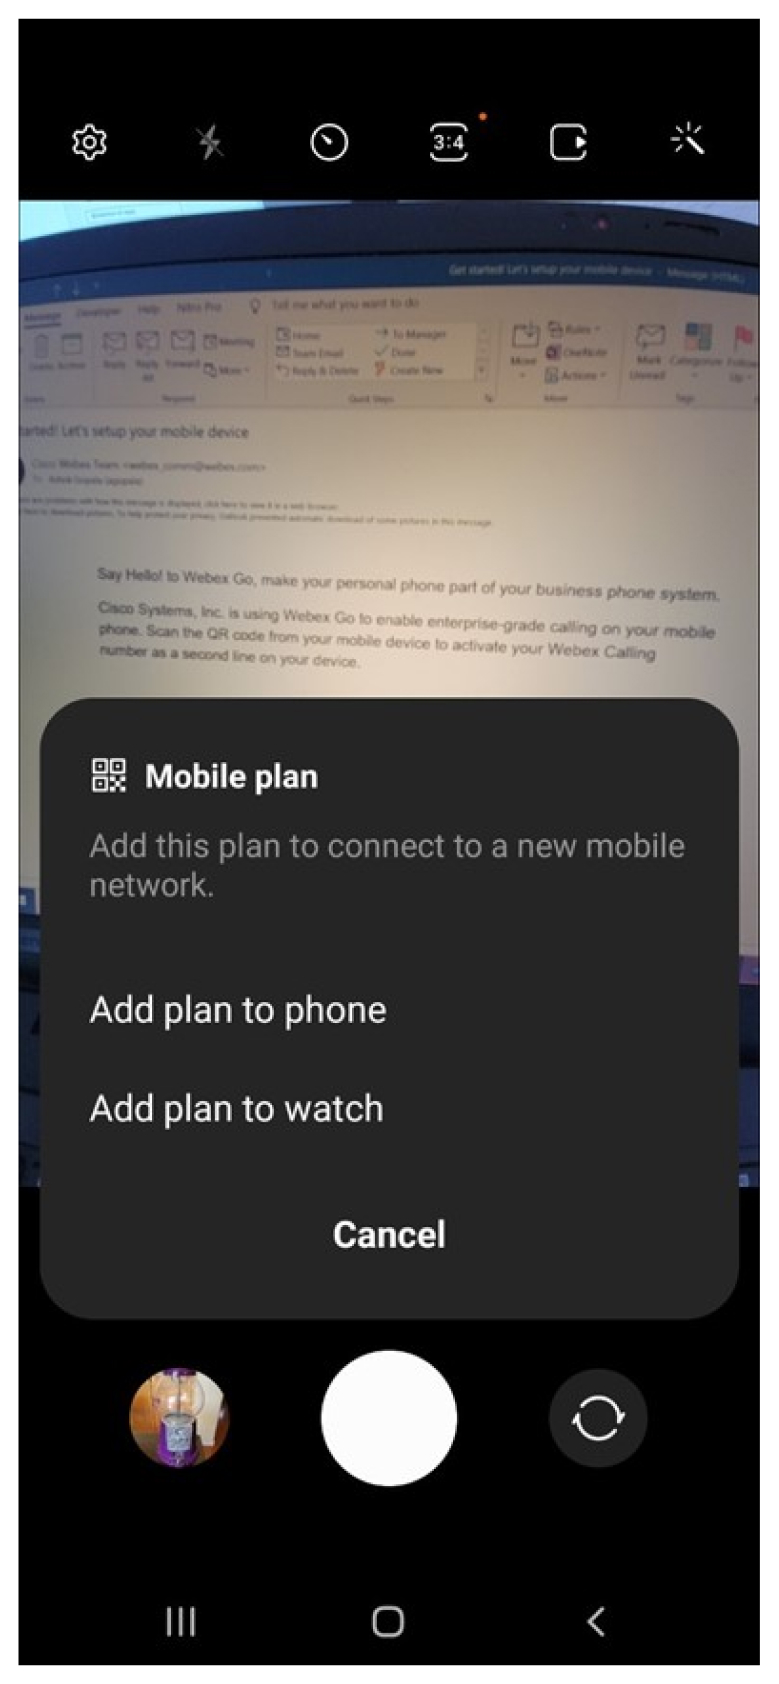
다음 화면에서 확 인을 클릭하면 귀하의 장치에 보험이 추가됩니다.
프 롬 프트가 표시될 때 허용을 클릭하여 통화 중에 보조 SIM이 데이터를 사용할 수 있도록 허용합니다.

-
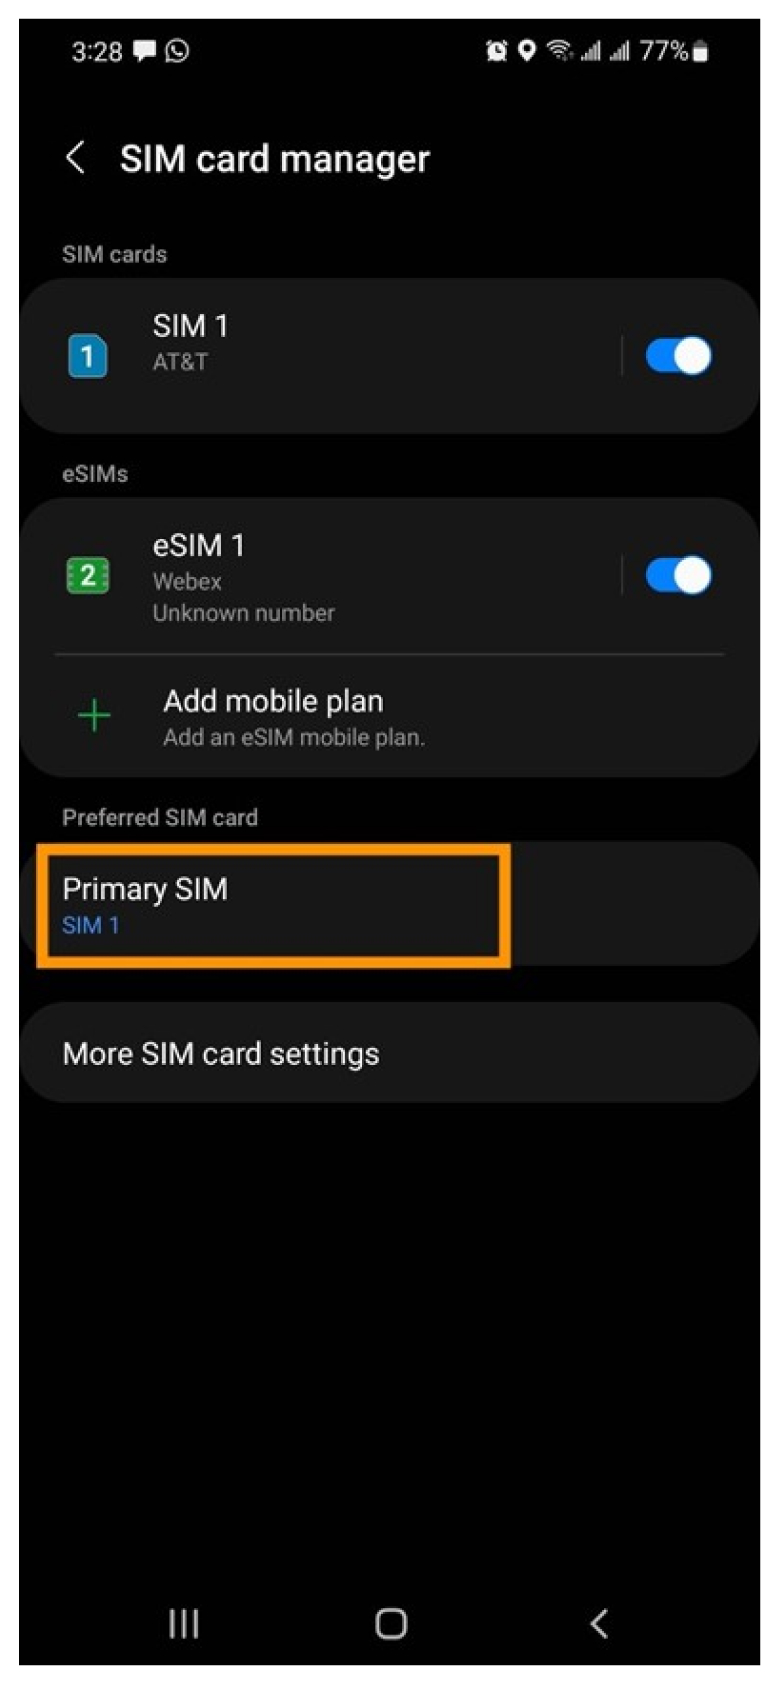
선호하는 SIM 설정: 선호하는 SIM은 통화, 텍스트 및 데이터에 사용되는 기본 셀룰러 플랜입니다.
Webex를 기본 SIM으로 선택하는 경우, 통화가 녹화됩니다. 조직 보안 및 규정 준수 정책은 비즈니스 셀룰러 플랜을 통해 실행되는 통화에 적용됩니다. 또한, 현재 귀하의 비즈니스 플랜에서 문자 메시지를 사용할 수 없습니다.
수동으로 플랜 추가
QR 코드에 문제가 있는 경우, 이메일에 네트워크 공급자 코드를 입력하여 수동으로 플랜을 추가합니다.
시작하기 전에
-
전화기가 이동 통신 사업자 잠금 해제, 듀얼 SIM 호환, 활성 eSIM 프로파일을 지원할 수 있는지 확인합니다.
-
Webex Go는 eSIM을 통해 활성화되며, 장치에서 활동 중인 eSIM 프로필을 사용할 수 있도록 요구합니다. 지원되는 장치 모델 및 장치에서 지원하는 활성 eSIM의 수를 참조하십시오.
장치 잠금 정책은 미국에서만 적용됩니다.
-
-
통화 모드 설정을 구성하려면 모바일 전화에서 Webex 응용 프로그램을 사인아웃하십시오.
-
활성화된 Wi-Fi 네트워크가 있는지 확인합니다.
지원되는 Google Pixel 모델
-
화소 6
-
화소 6a
-
픽셀 6 프로
-
픽셀 7
-
픽셀 7 프로
OS/소프트웨어 버전 필요: Android 13 이상
장치 잠금 상태:
-
기업 플랜을 사용 중이신 경우, IT 관리자와 작업하여 장치를 잠금 해제하십시오.
-
개인 플랜을 이용하고 있는 경우, 서비스 공급자에게 연락하십시오. 서비스 공급자가 제공하는 IMEI 도구로의 링크:
검색을 QR 코드
-
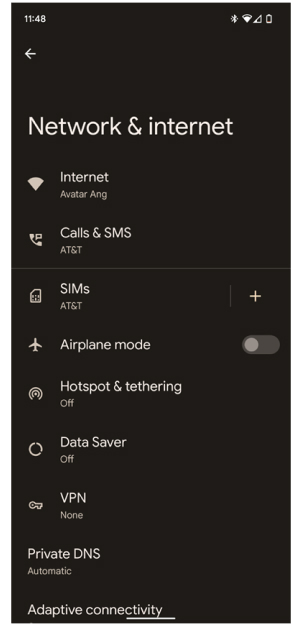
설정 -네트워크 및 > 탐색합니다.
-
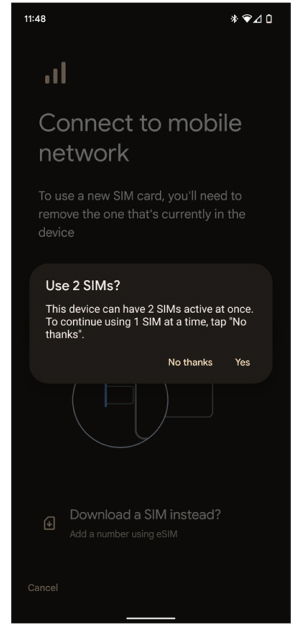
SIM 옆에 있는 + 기호를 탭합니다.
-
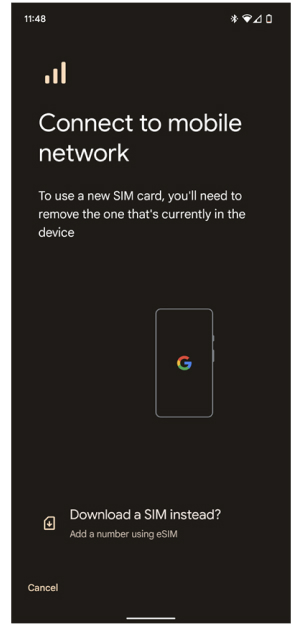
모바일 네트워크에 연결 화면에서 대신 SIM 다운로드?를 탭합니다.
-
2개의 SIM 사용에서 예를 탭하여 동시에 두 개의 SIM을 활성화합니다.
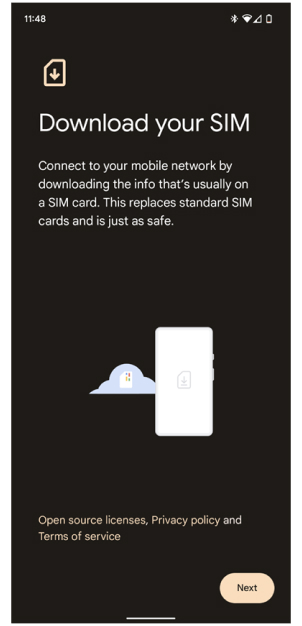
-
SIM 다운로드 화면 에서 다음을 클릭합니다.
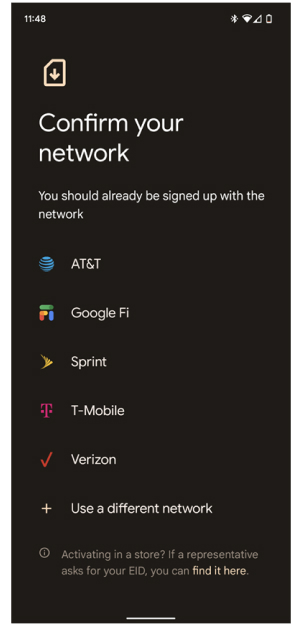
-
네트워크 화면 확인에서 다른 네트워크 사용 옆에 있는 + 기호 를 클릭합니다.
-
QR 코드를 스캔합니다.
-
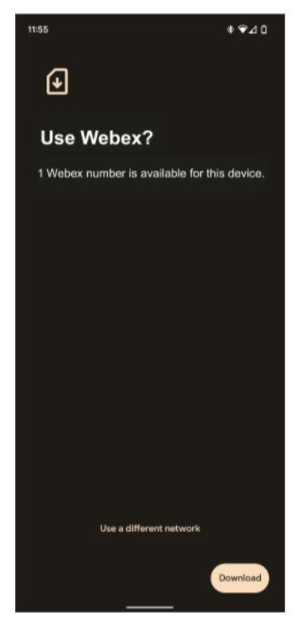
Webex 사용 화면에서 다운로드를 클릭하여 Webex 번호를 사용할지 클릭합니다.
-
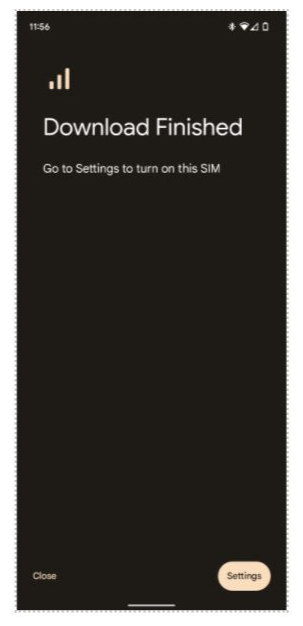
다운로드가 완료되면 설정을 클릭하여 SIM을 켜 습니다.
-
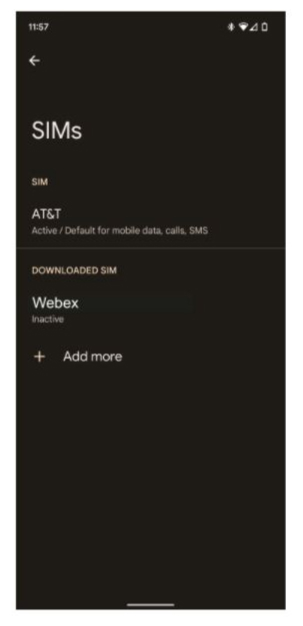
다운로드 된 SIM에서 Webex 를 선택합니다.
-
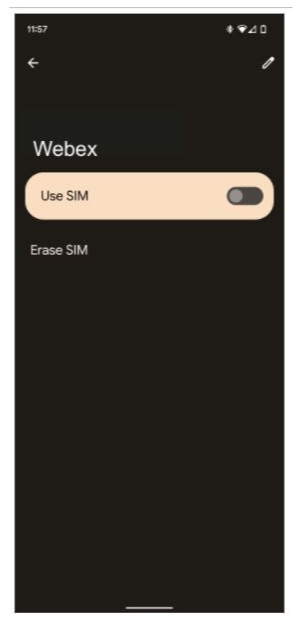
토글을 켜고 확인을 요청하면 예를 선택합니다.
-
-
eSIM 연결 에서 데이터를 사용하려면 로밍을 활성화하십시오.
-
듀얼 SIM 기본 설정 설정하기:
-
데이터에 대해 하나의 SIM만 기본값이 될 수 있습니다. 이미 한 가지 설정이 있는 경우, 알림을 수신하게 됩니다. 이전에 설치한 SIM을 데이터 기본값으로 사용할 것이 좋습니다. 단, 통화 중에 토 글이 Webex SIM에 대해 활성화되어 있는지 확인하십시오.
-
통화에 대해 매 번 묻기으로 기본 설정을 설정하십시오.
-
SMS에 대해 이전에 SIM을 설치한 SIM로 기본 설정을 설정하십시오.
-
수동으로 플랜 입력
-
Webex를 수동으로 활성화하는 경우, 위에서 단계 1 부터 6 단계를 따르고 있습니다. 스캔 QR 코드 화면의 하단에 있는 도움 필요를 클릭하고 활성화 이메일에 포함된 네트워크 공급자 코드를 수동으로 입력합니다.
추가 정보 Google Pixel 문서 .
Webex Go 모바일 운영자는 활성화하기 위해 QR 코드가 필요하지 않습니다. 활성화는 관리자가 처리합니다. 모바일 번호를 추가하고 Control Hub에서 사용자에게 할당하는 과정에 대해 자세히 알아보려면 Webex Go 프로비저닝을 참조하십시오. 관리자가 프로비저닝하면 Webex Go Bolt-on 또는 Service Operation Code용 AT&T Cloud Voice는 백엔드에서 자동으로 활성화되며, Control Hub에서 모바일 번호가 지정되면 즉시 활성화되어야 합니다. 사용자가 실행해야 하는 작업은 없습니다.
관리자가 모바일 번호를 지정하면 AT&T 휴대폰, Webex 데스크 폰, 데스크 또는 회의실 시스템 및 Webex 앱을 사용하는 노트북을 포함한 모든 Webex 장치는 AT&T 휴대폰 번호를 공유합니다. Webex 보이스메일로 업그레이드되고 모든 Webex Calling 기능에 액세스할 수도 있습니다.
관리자용:
Webex Go 모바일 운영자는 모바일 운영자로부터 모바일 번호의 인증 및 활성화를 요청한 후 사용자에게 기본 회선으로 지정하여 활성화/프로비저닝됩니다(고정된 비즈니스 번호 대체). Control Hub에서 모바일 번호를 추가한 후 사용자에게 지정하는 방법에 대한 단계는 Webex Go 구축을 참조하십시오.


