
Geri bildiriminiz için teşekkürler.
Cep telefonunuzda Webex Go’yu etkinleştirin
 Geri Bildirim?
Başlamadan önce
-
Telefonunuzun operatörün kilidinin açık olduğunu, çift SIM uyumlu olduğunu ve etkin bir eSIM profilini destekleyebileceğini doğrulayın.
-
Webex Go, eSIM aracılığıyla etkinleştirilir ve cihazda etkin bir eSIM profilinin kullanılabilir olmasını gerektirir. Desteklenen cihaz modellerine ve cihaz tarafından desteklenen aktif eSIM'lerin sayısına bakın.
Cihaz kilidi politikaları yalnızca ABD'de geçerlidir.
-
-
Çağrı modu ayarlarını yapılandırmak için cep telefonunuzda Webex uygulamasında oturumu kapatın.
-
Etkin bir Wi-Fi ağınız olduğundan emin olun.
Desteklenen iPhone modelleri
-
iPhone Xr'ın
-
iPhone Xs'ın
-
iPhone Xs Max'ın
-
iPhone SE 2020
-
IPhone 11
-
iPhone 11 Pro'yu
-
iPhone 11 Pro Maks
-
IPhone 12
-
iPhone 12 Pro Max'ın
-
iPhone SE 2022'nın
-
iPhone 13'ün
-
iPhone 13 Pro'yu
-
iPhone 13 Pro maks
-
iPhone 14'ün
-
iPhone 14 Plus'ı
-
iPhone 14 Pro'yu
-
iPhone 14 Pro Max'ın
OS/yazılım sürümü gerekli: iOS 15.4 veya sonrası
Cihaz kilit durumu
Yalnızca ABD’deki müşteriler için geçerlidir
-
Ayarlar → Genel → Hakkında'ya gidin
-
Operatör Kilidi altında SIM kısıtlaması olmadığını görmelisiniz. Mesajı görmüyorsanız şu kişi ile iletişime geçin:
-
BT yöneticiniz (kurumsal plandaysanız)
-
Operatör (kişisel bir plan üzerindeysanız)
-
QR kodu taranıyor
Mobil cihazınızda ayarlanan dile bağlı olarak Mobil Ver i ve Mobil Pla n terimleri Hücresel Ver i ve Hücresel Plan yerine kullanılabilir.
-
Hücresel Veri Bağlantısı → Ayarlarına → Gidin.
-
Etkinleştirme e-postasında bulunan QR kodun u tarayın.
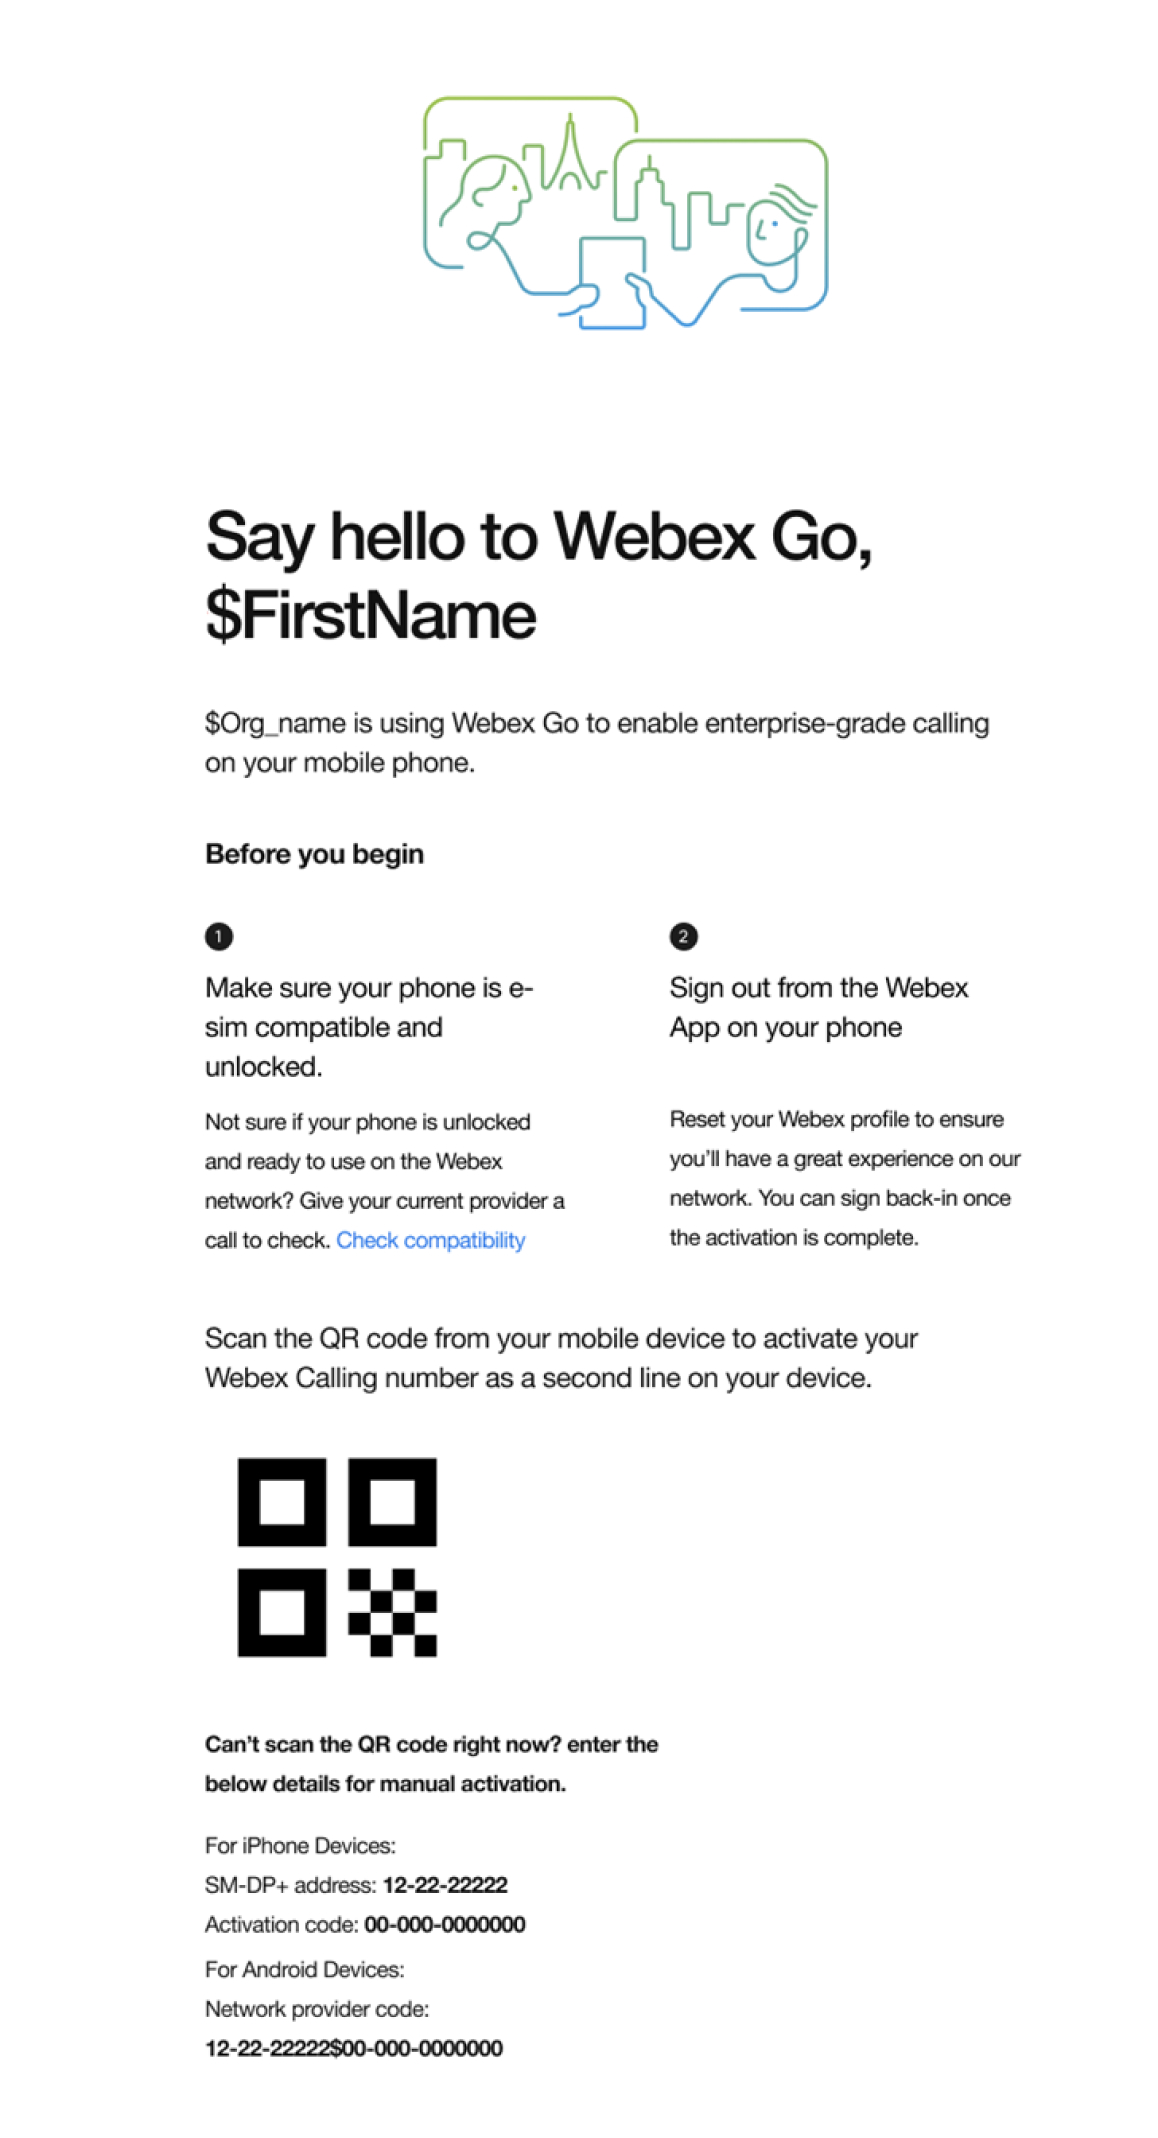
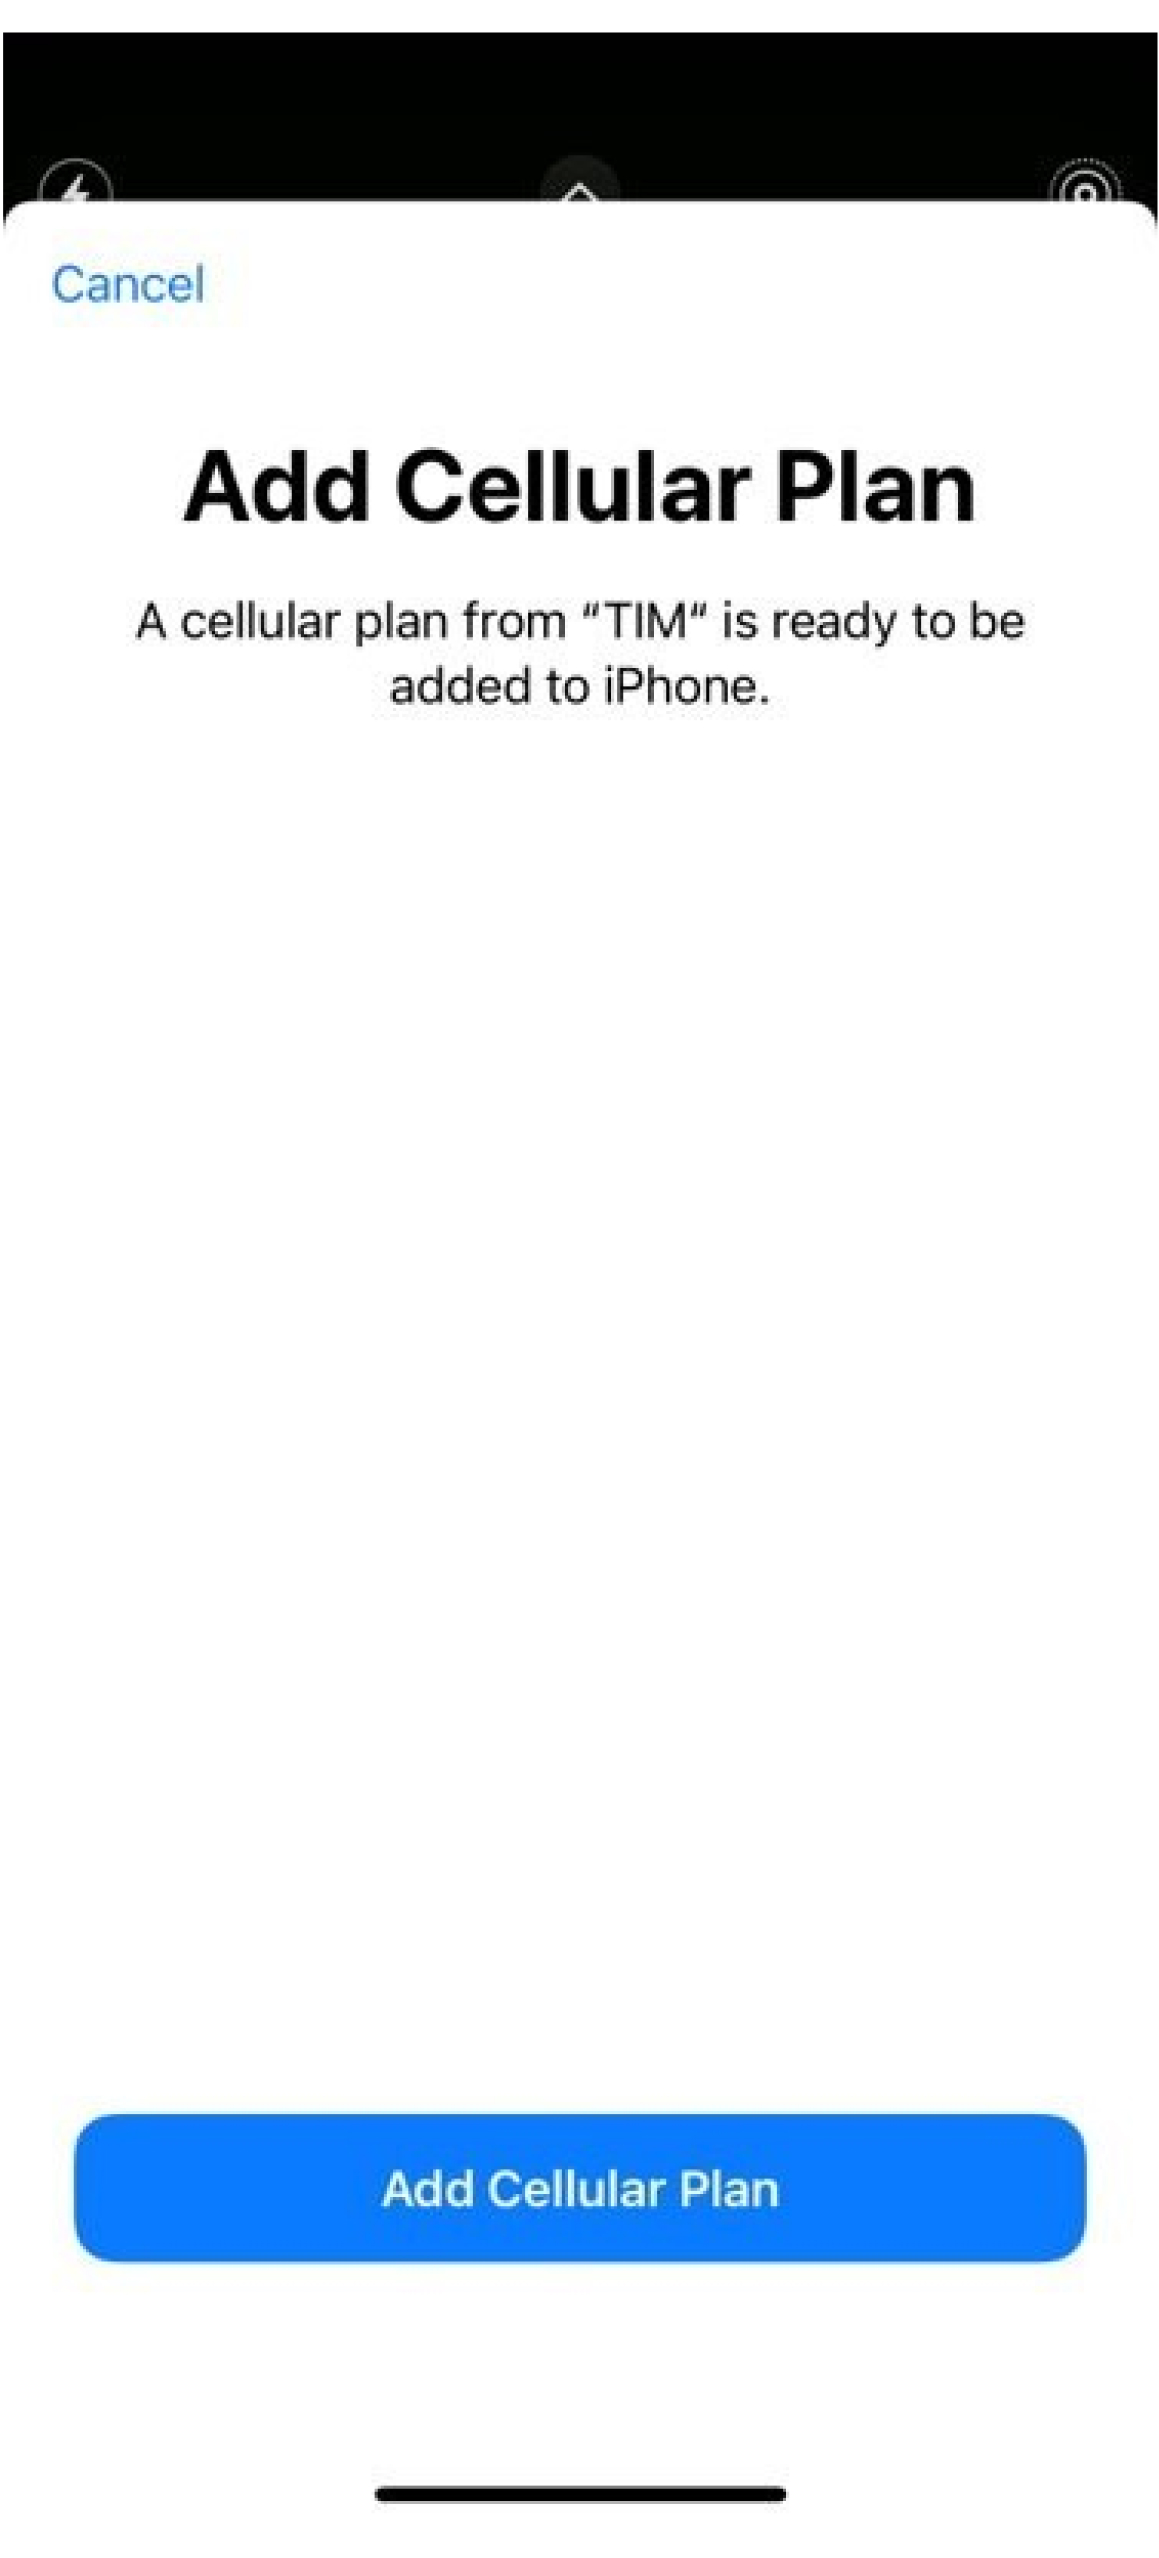
-
Hücresel Plan Ekle'ye dokunun.
-
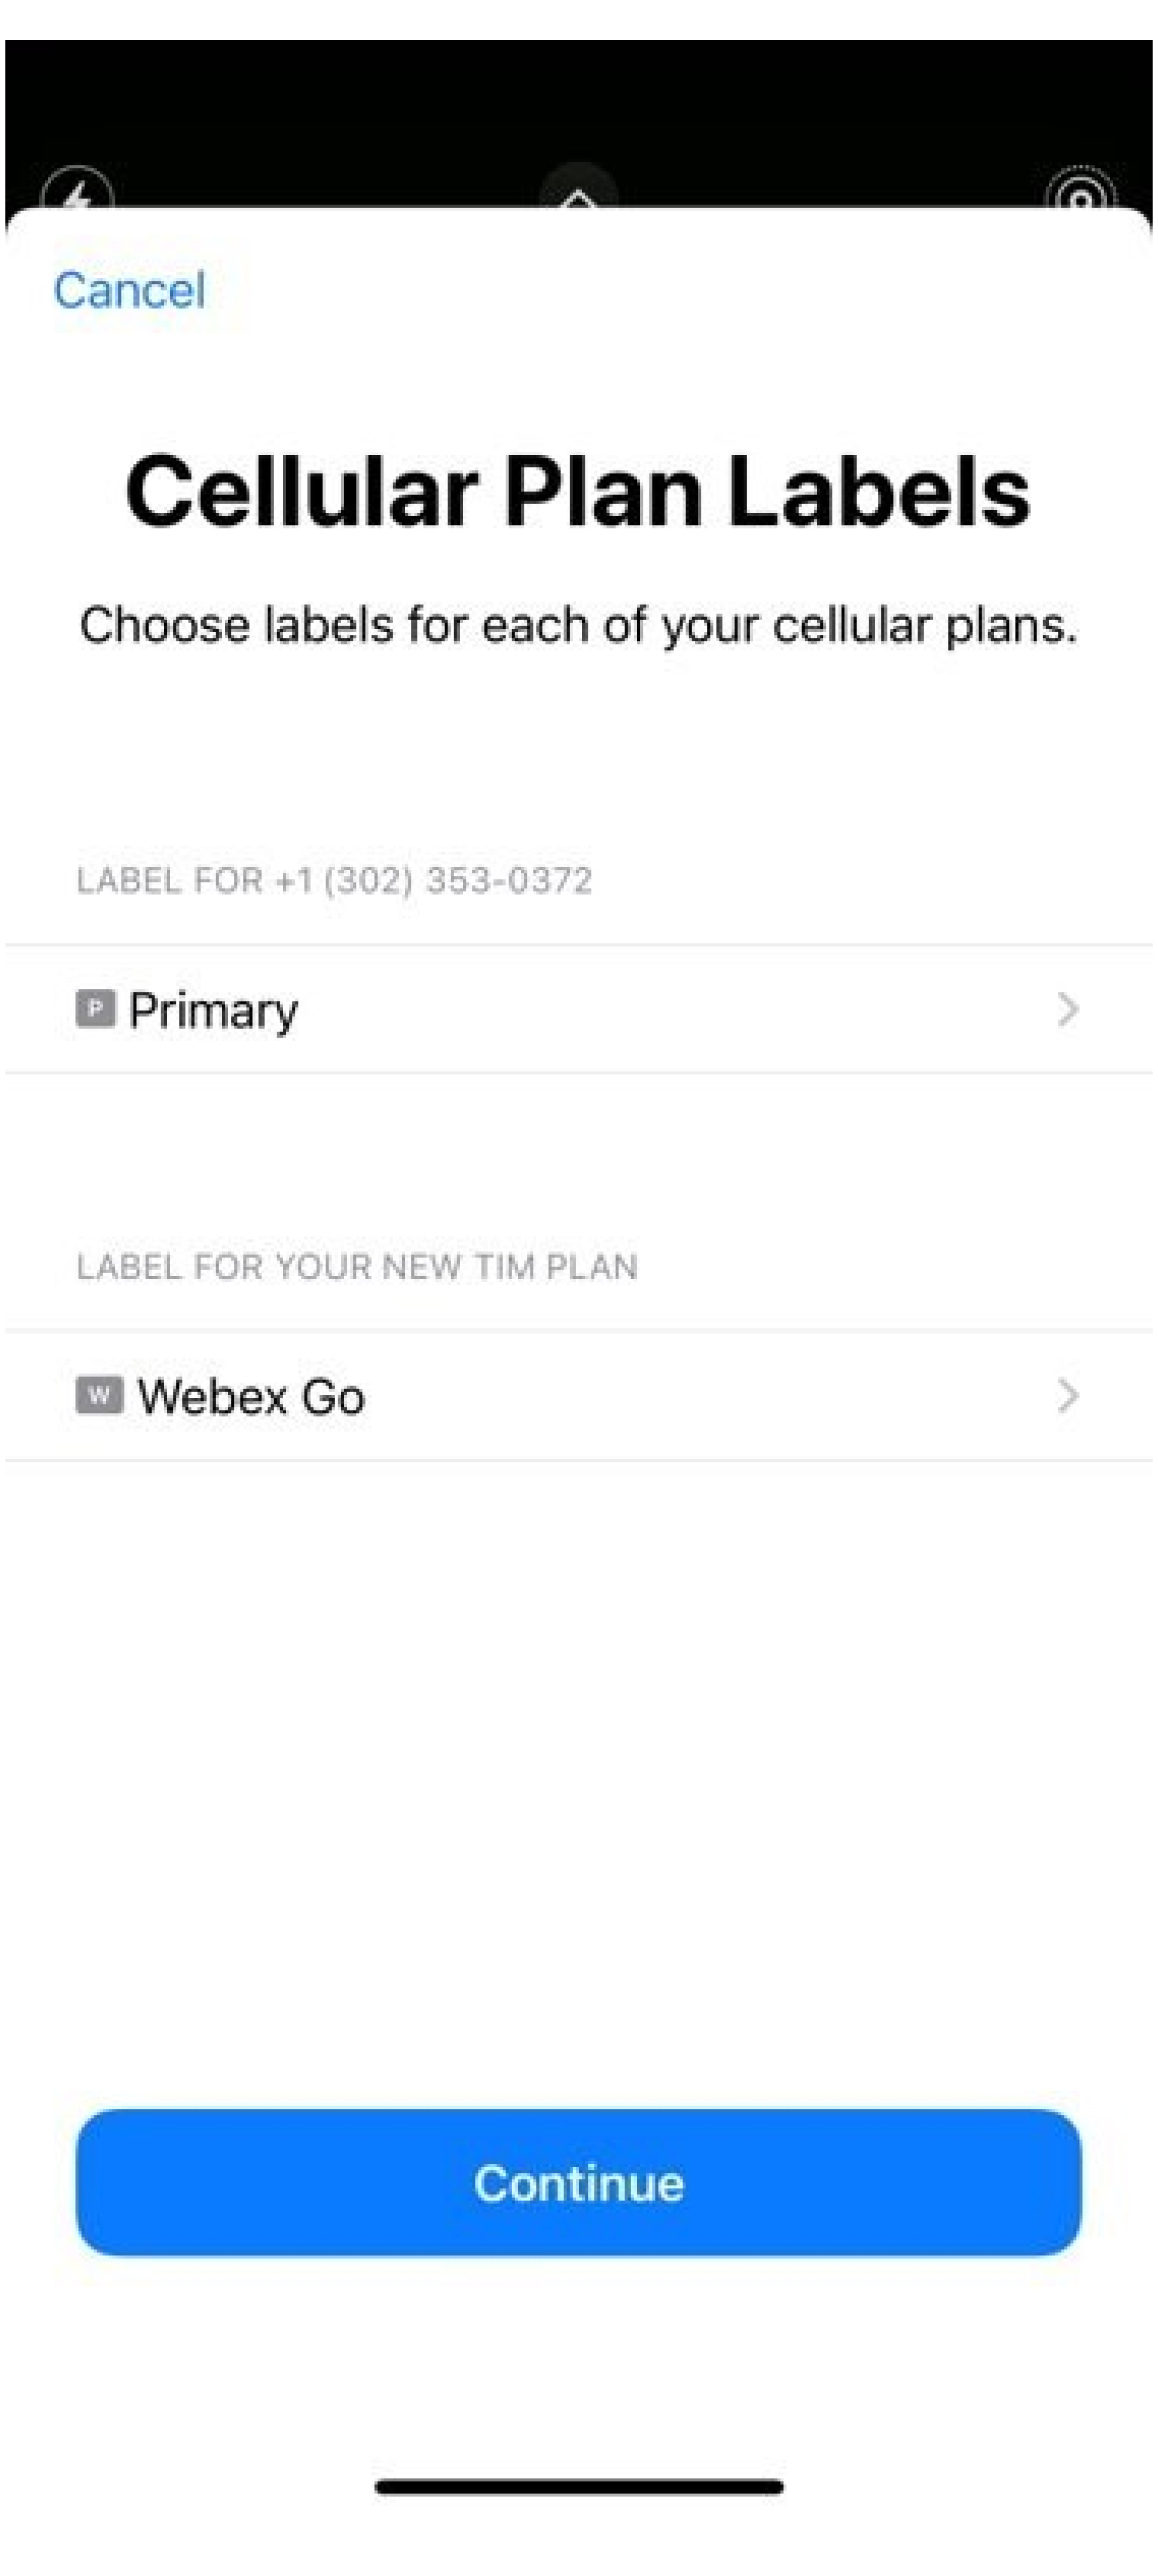
Planınızı etiketleyin: Mevcut bir etiketi alın veya özel bir etiket oluşturun ve Devam öğesini tıklatın.
-
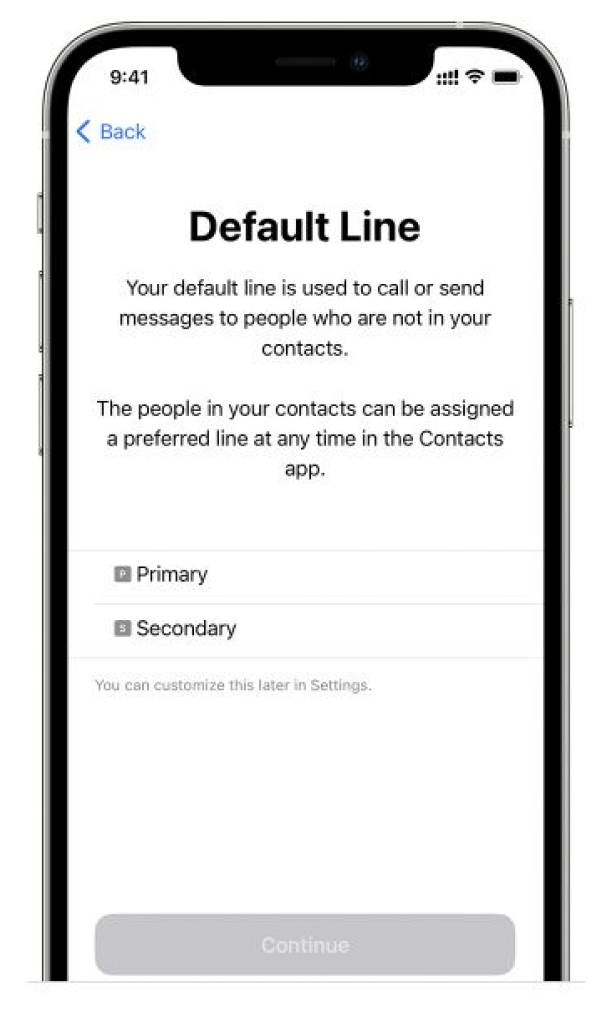
Varsayılan numaranızı ayarlayın: Varsayılan hat, Kişiler uygulamanızda olmayan birini aradığınızda veya bu kişiye mesaj gönderdiğinizde kullanılır.
Varsayılan hat olarak Webex seçilirse çağrılar Webex Calling için Çağrı Ayrıntısı Kaydında (CDR) yakalanır. Webex Calling ile ilgili kuruluşunuzun güvenlik ve uyumluluk politikalarının artık kişisel cep telefonu cihazında mobil plan ve eSIM kullanan bu numaraya uygulanacağını unutmayın. Ayrıca, Iş Mesajlaşması şu anda Webex Go numaralarıyla kullanılamaz ve Cloud Connect Sağlayıcısı ile ayrı olarak etkinleştirilmesi gerekir.
-
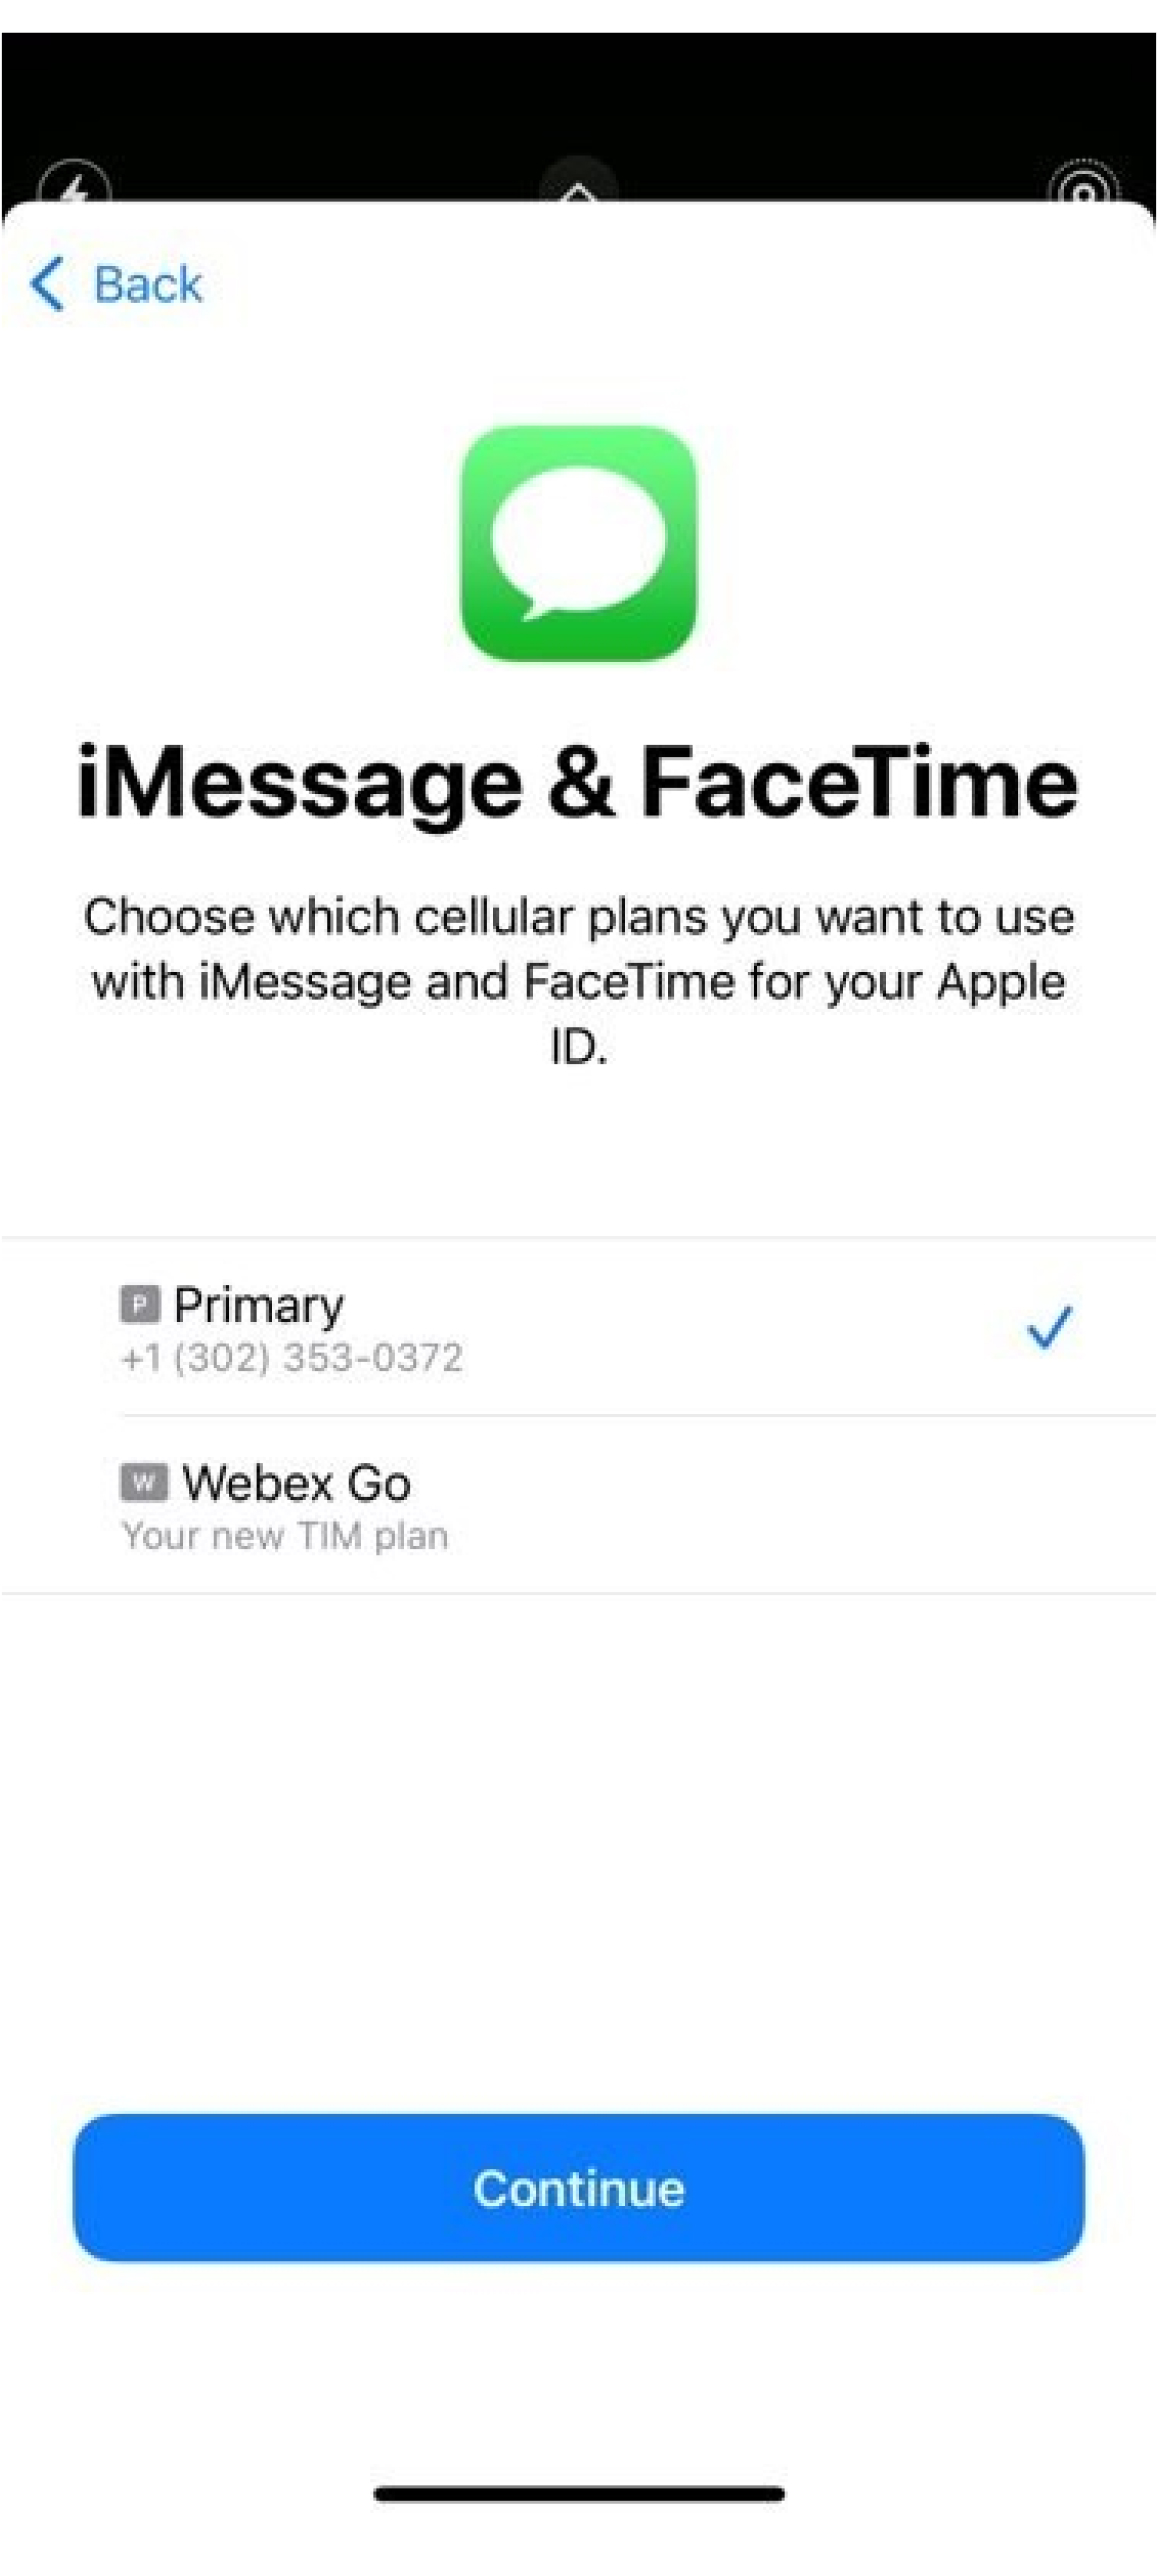
iMessage ve FaceTime için hücresel planı ayarlayın: iOS 13 ve daha yeni bir zaman kullanıyorsanız iMessage ve FaceTime için hangi hücresel planı kullanmak istediğinizi seçebilirsiniz. Cihazı üzerinde etkin olan mevcut plana ayarlamanız önerilir.
-
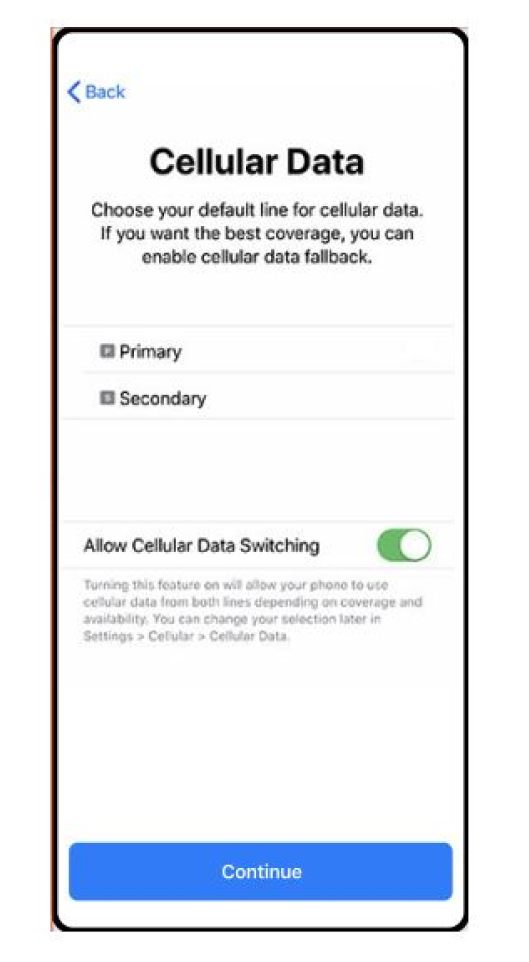
Hücresel veri için varsayılan hat ayarlama: Cihazı üzerinde etkin olan mevcut plana ayarlamanız önerilir. Bununla birlikte, iş hattınızı arayınken uygulamalara erişmek için Hücresel Veriye Geçişe İzin Ver'i kullanın.
-
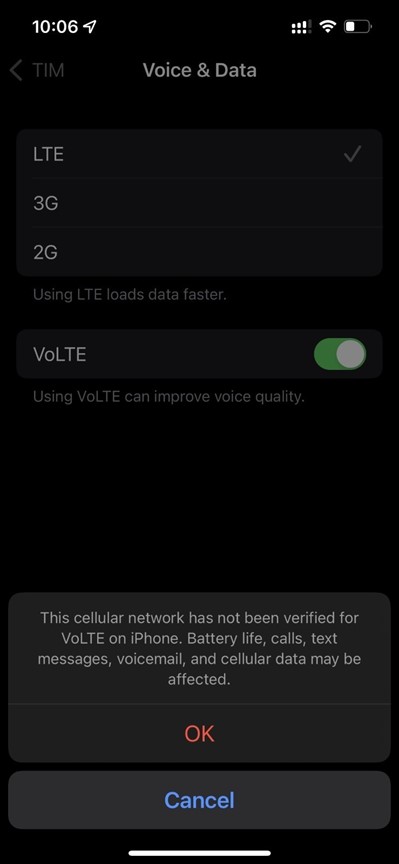
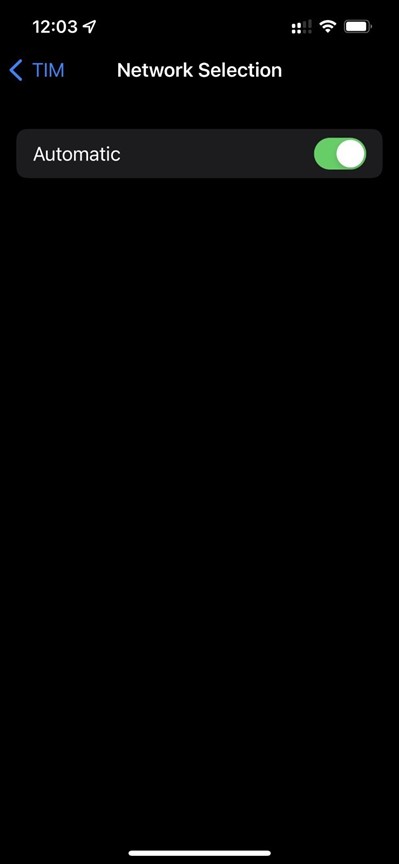
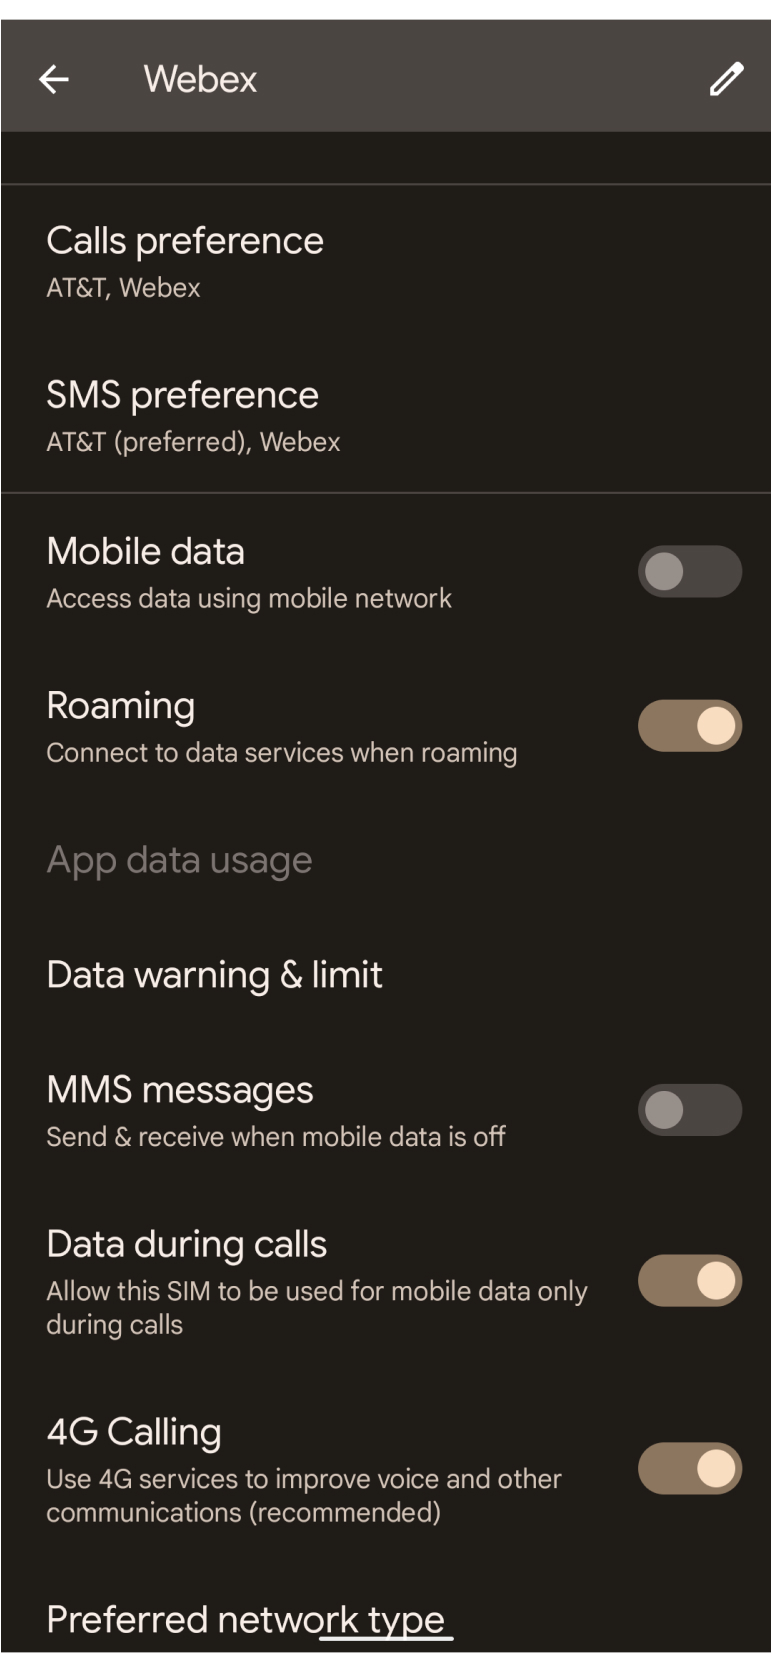
Webex Git, çağrıları yönlendirmek için VoLTE mobil ağına sahip olur. Aşağıdaki ayarların etkinleştirildiğini onaylayın ve hizmeti kullanmak için cep telefonunu yeniden başlatın.
Ses ve Veri altında veriiçin 4G veya LTE'nin seçili olduğundan ve VoLTE'nin ses için etkinleştirildiğinden emin olun.
Veri Dolaşımı kaydırıcısı etkinleştirildi.
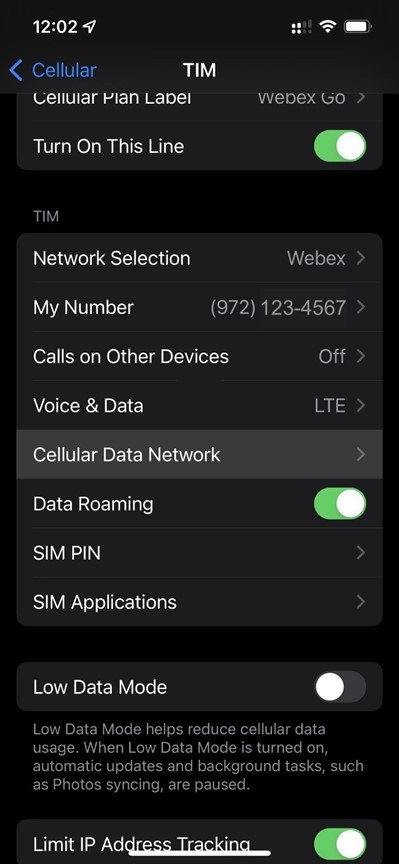
Ağ Seçimi kaydırıcısı Otomatik olarak ayarlanmıştır.
-
Kurulum tamamlandıktan sonra cep telefonunuzu yeniden başlatın. Kontrol me rkezinde Webe x ağını görmeniz gerekir. Kontrol merkezini açmak için iPhone ekranınızın sağ üst köşesinden aşağı kaydırın.
Planı manuel olarak girin
-
Ayarlar'a gidin.
-
Hücresel veya Mobil Veri'ye dokunun.
-
Hücresel Plan Ekle'ye dokunun.
-
iPhone ekranınızın alt kısmında bulunan Ayrıntıları Manuel Olarak Gir öğesine dokunun ve e-postada verilen SM-DP+adresin i ve etkinleştirme kodun u girin. Kurulumu tamamlamak için 5. adı m'dan 9. adı m'a kadar QR Kod u prosedürünü izleyin.
eSIM ile Çift SIM Kullanma hakkında bilgi içinbkz. https://support.apple.com/en-us/HT209044.
Nasıl olduğunu görmek istiyor musunuz? iPhone'unuzda Webex Go'yu etkinleştirme ile ilgili bu video gösterimin i izleyin.Başlamadan önce
-
Telefonunuzun operatörün kilidinin açık olduğunu, çift SIM uyumlu olduğunu ve etkin bir eSIM profilini destekleyebileceğini doğrulayın.
-
Webex Go, eSIM aracılığıyla etkinleştirilir ve cihazda etkin bir eSIM profilinin kullanılabilir olmasını gerektirir. Desteklenen cihaz modellerine ve cihaz tarafından desteklenen aktif eSIM'lerin sayısına bakın.
Cihaz kilidi politikaları yalnızca ABD'de geçerlidir.
-
-
Çağrı modu ayarlarını yapılandırmak Webex mobil uygulamanız üzerinde oturum açmanızı değiştirin.
-
Etkin bir Wi-Fi ağınız olduğundan emin olun.
Desteklenen Samsung modelleri
-
Galaxy S20 FE 5G'nın
-
Galaxy S21 5G'nın
-
Galaxy S21 + 5G
-
Galaxy S22'nın
-
Galaxy S22+'nın
-
Galaxy S22 Ultra'nın
-
Galaxy S23'ün
-
Galaxy S23+'nın
-
Galaxy S23 Ultra'nın
-
Galaxy XCover 6 Pro'yu
-
Galaxy Z Flip4'ün
OS/yazılım sürümü gerekli: 13 One Ui 5.1 veya sonrası
Cihaz kilit durumu
Yalnızca ABD’deki müşteriler için geçerlidir
-
Kurumsal bir plan kullanıyorsanız cihazınızın kilidini açmak için BT yöneticinizle çalışın.
-
Kişisel planınız varsa hizmet sağlayıcınızla iletişime geçin. Hizmet sağlayıcılar tarafından sunulan IMEI araçlarına bağlantılar:
QR kodu taranıyor
-
SIM kart yöneticisi → Bağlantılar → gidin.
Mobil plan ekle'ye dokunun ve Operatör aramasını tara'QR kod.
-
E-posta ile gönderilen QR kodunu tarayın.
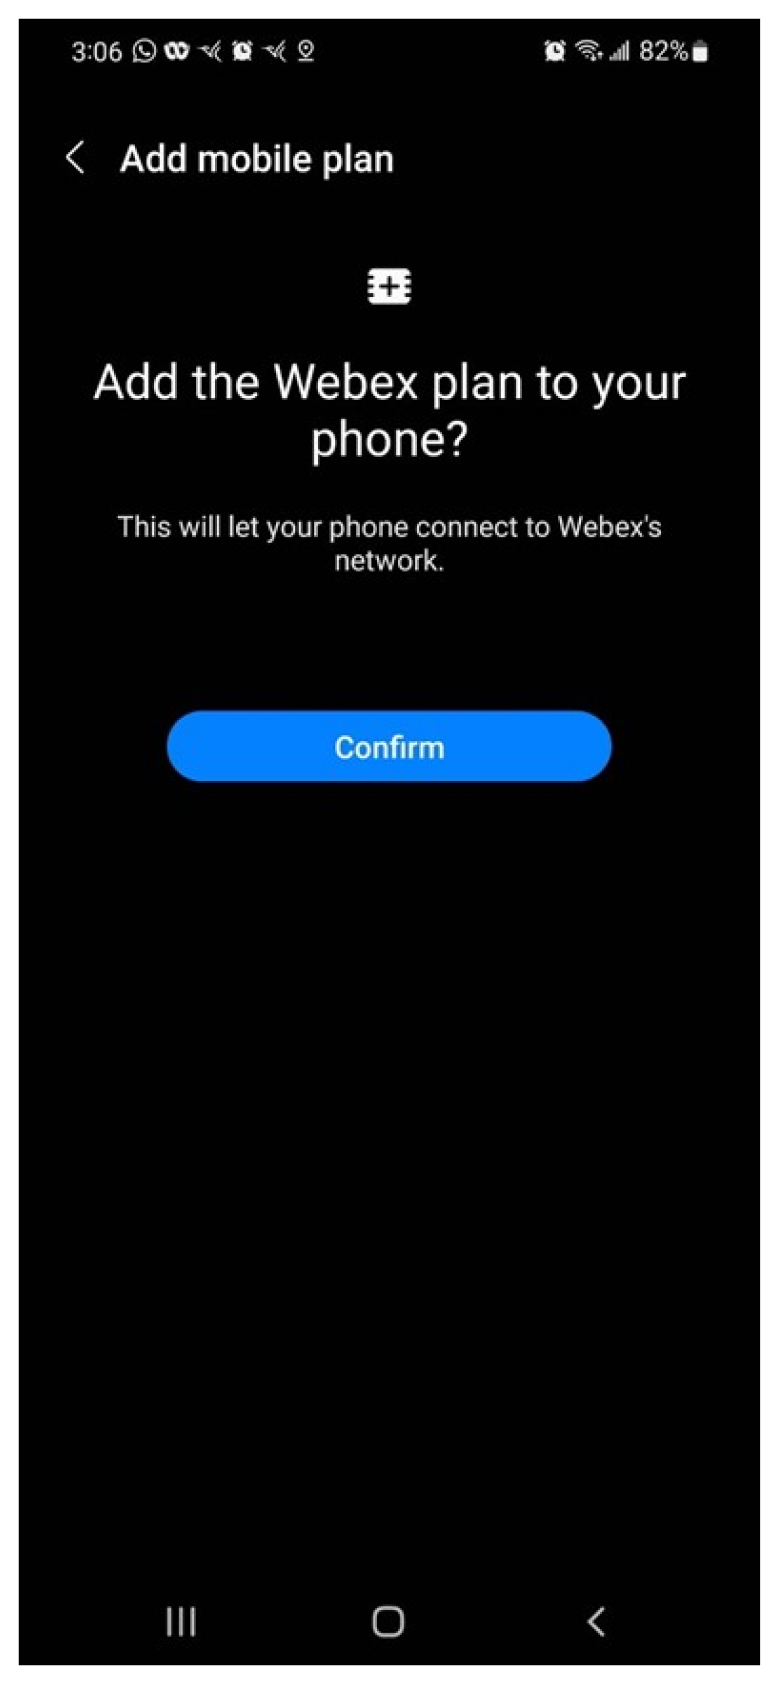
Bu planı yeni bir mobil ağa ekle me sajı görüntüleniyorsa Telefona plan ekl e seçeneğini seçin.
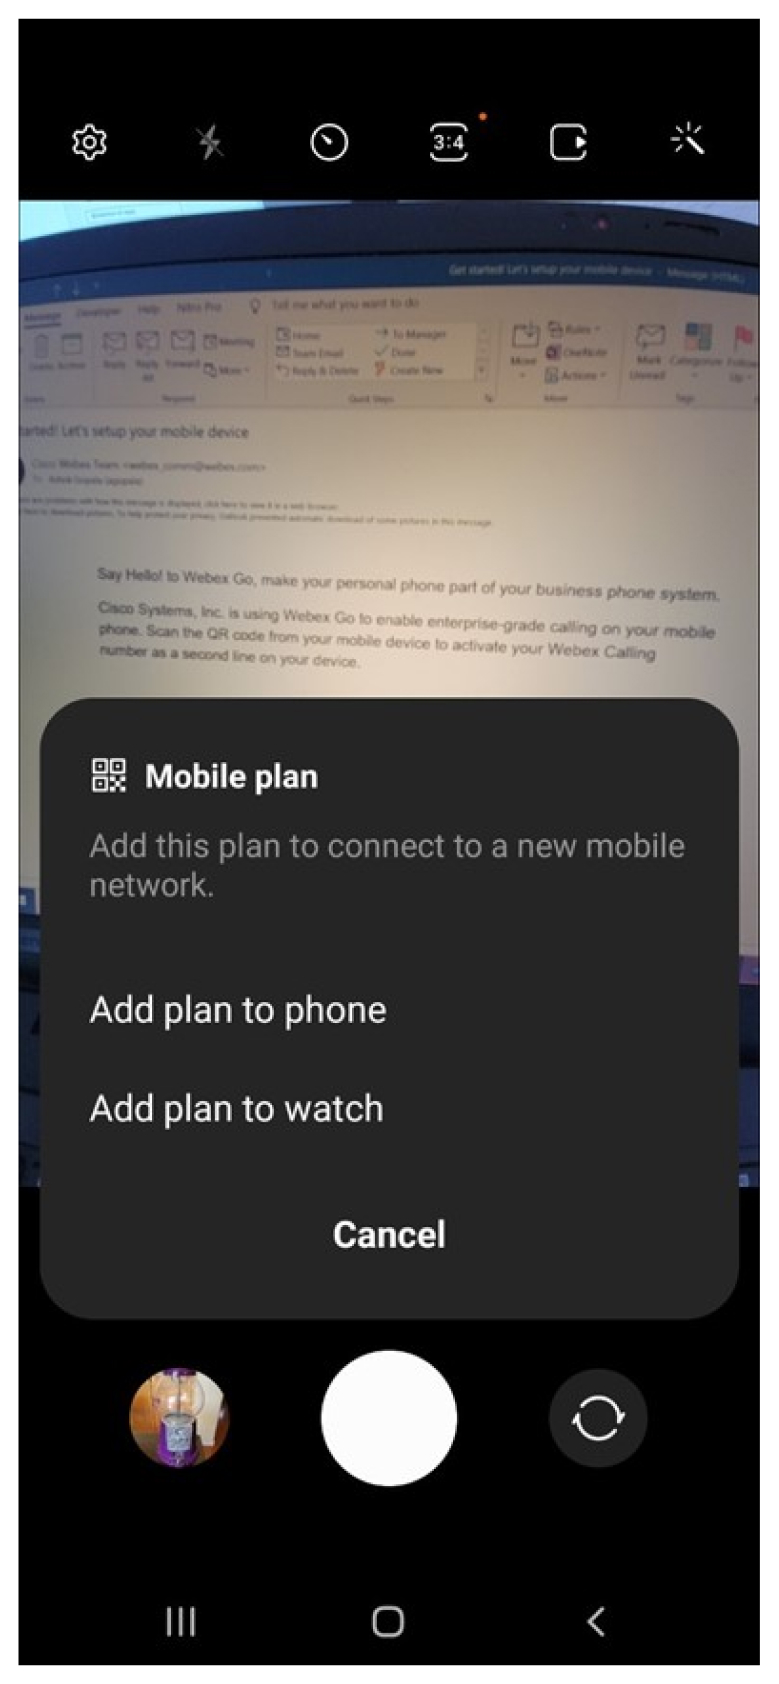
Sonraki ekranda Onayl a düğmesine tıklayın; plan cihazınıza eklenir
aramalar sırasında ikincil SIM'in veri kullanmasına izin vermek için istendiğinde İzin Ver öğesini tıklatın.

-
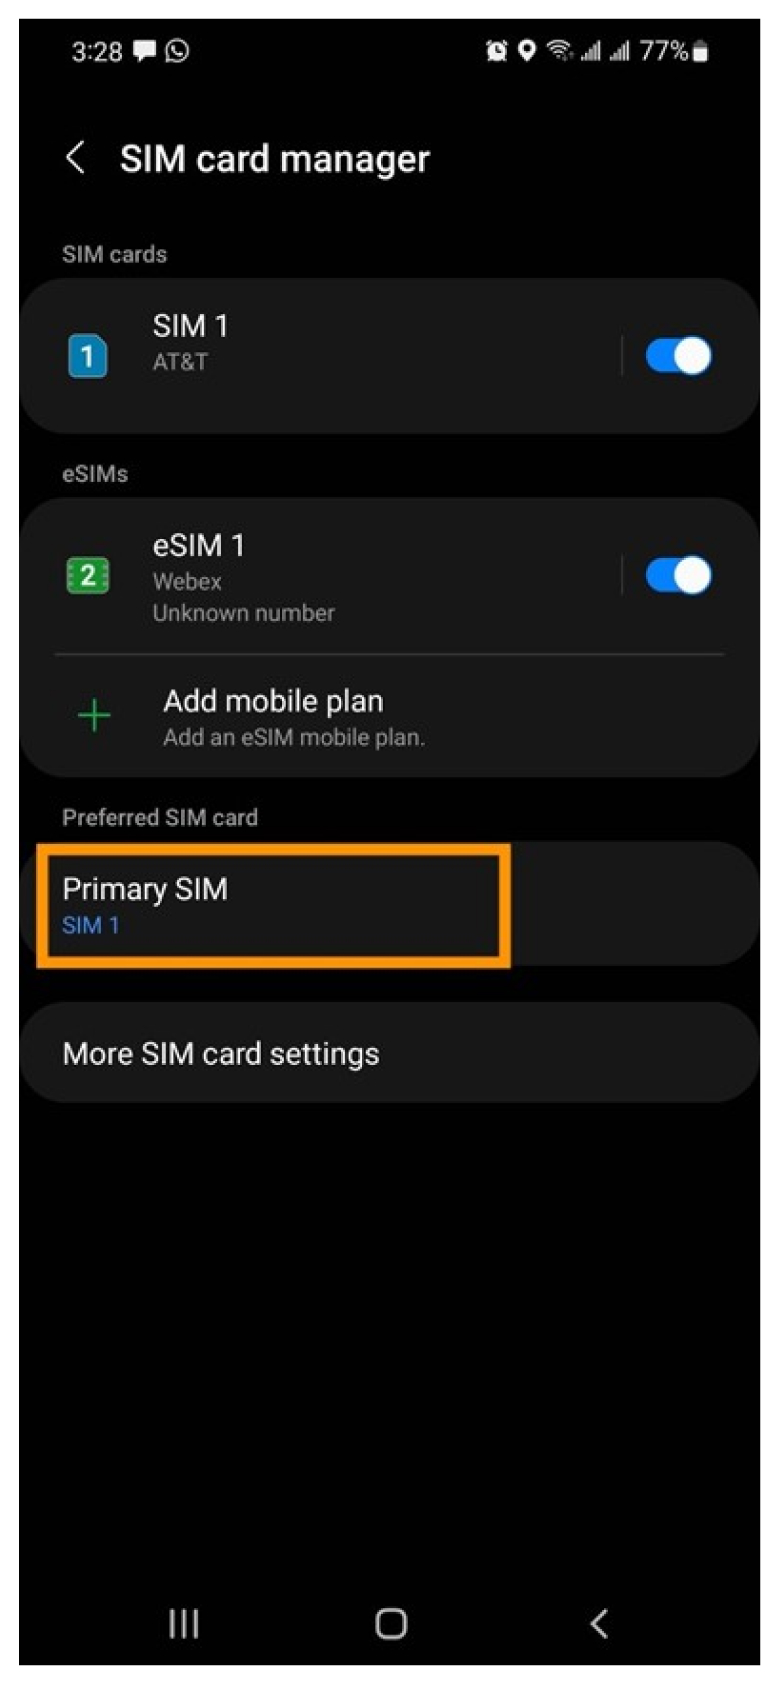
Tercih edilen SIM'i ayarlayın: Tercih edilen SIM, çağrılar, metinler ve veriler için kullanılan varsayılan hücresel plandır.
Birincil SIM olarak Webex seçilirse çağrılar kaydedilir. Kuruluşunuzun güvenlik ve uyumluluk politikalarının, iş hücresel planından geçen çağrılar için geçerli olduğunu unutmayın. Ayrıca, şu anda iş planınızla birlikte mesajlaşma özelliği kullanılamaz.
Planı manuel olarak ekle
QR koduyla ilgili sorunlarınız varsa ağ sağlayıcı kodunu e-postaya girerek planı manuel olarak ekleyin.
Başlamadan önce
-
Telefonunuzun operatörün kilidinin açık olduğunu, çift SIM uyumlu olduğunu ve etkin bir eSIM profilini destekleyebileceğini doğrulayın.
-
Webex Go, eSIM aracılığıyla etkinleştirilir ve cihazda etkin bir eSIM profilinin kullanılabilir olmasını gerektirir. Desteklenen cihaz modellerine ve cihaz tarafından desteklenen aktif eSIM'lerin sayısına bakın.
Cihaz kilidi politikaları yalnızca ABD'de geçerlidir.
-
-
Çağrı modu ayarlarını yapılandırmak Webex mobil uygulamanız üzerinde oturum açmanızı değiştirin.
-
Etkin bir Wi-Fi ağınız olduğundan emin olun.
Desteklenen Google Pixel modelleri
-
Piksel 6'nın
-
Piksel 6a'nın
-
Piksel 6 pro
-
Piksel 7'nin
-
Piksel 7 pro
OS/yazılım sürümü gerekli: Android 13 veya üzeri
Aygıt kilit durumu:
-
Kurumsal bir plan üzerindeyseniz, cihazınızın kilidinin açılması için lütfen IT yöneticinizle birlikte çalışabilirsiniz.
-
Kişisel bir plan üzerindeysiniz, lütfen hizmet sağlayıcınızla iletişime geçin. Hizmet sağlayıcılar tarafından sunulan IMEI araçlarına bağlantılar:
Tarama QR kod
-
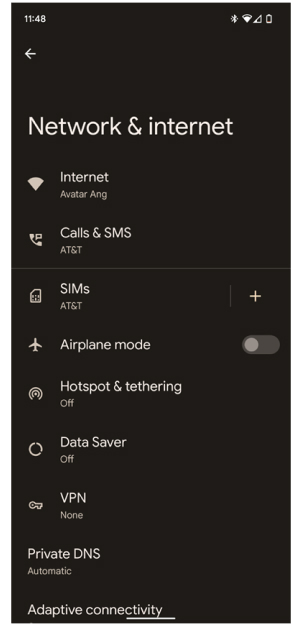
Ayarlar -> Ve İnternet'e gidin.
-
SM'ler'in yanındaki + işaretine dokunun.
-
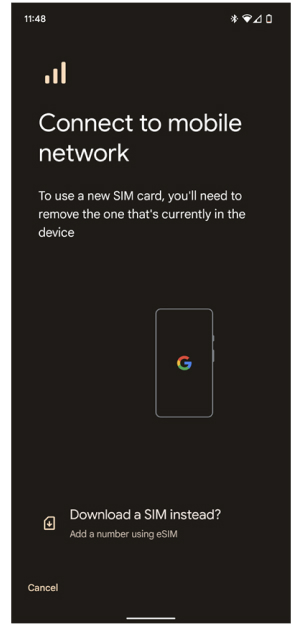
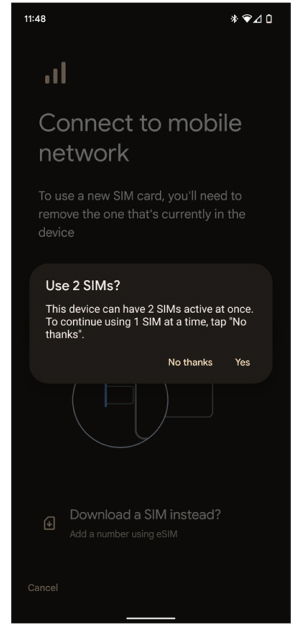
Mobil ağ bağlantısı ekranında bunun yerine BIR SIM indir ? öğesine dokunun.
-
Aynı anda iki SIM'nin etkin olması için 2 SIM Kullan? ekranında Evet'e dokunun.
-
SIM ekranınızı indir'de Sonraki seçeneğini tıklayın.
-
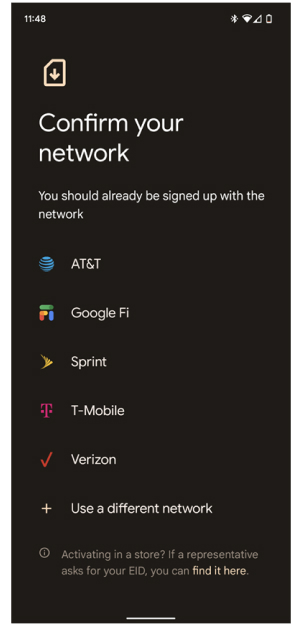
Ağ ekranınızı onaylayın'da Farklı bir ağ kullan seçeneğinin yanında + işaretine tıklayın.
-
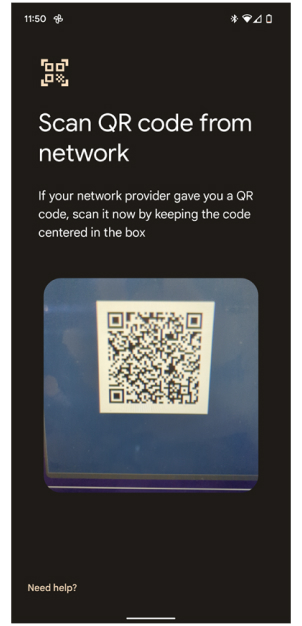
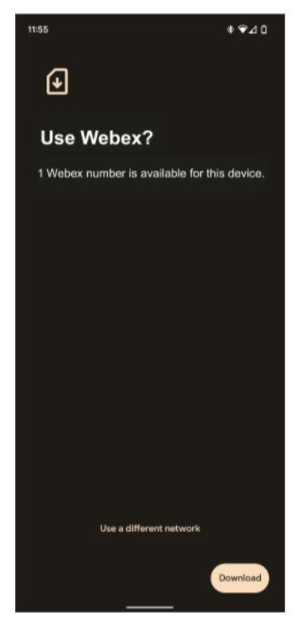
QR kod tarayın.
-
Aşağıdaki numarayı Webex? ekranında İndir'e tıklayarak bu numarayı Webex onaylayın.
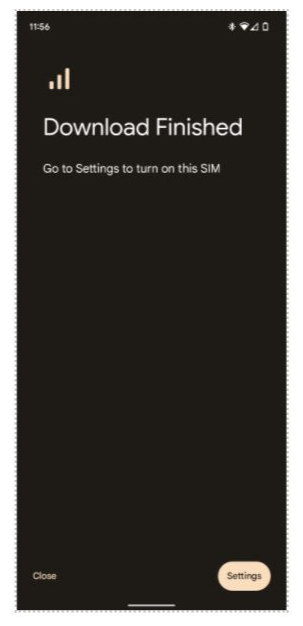
-
İndirme tamamlandıktan sonra, SIM'yi açmak için Ayarlar'a tıklayın.
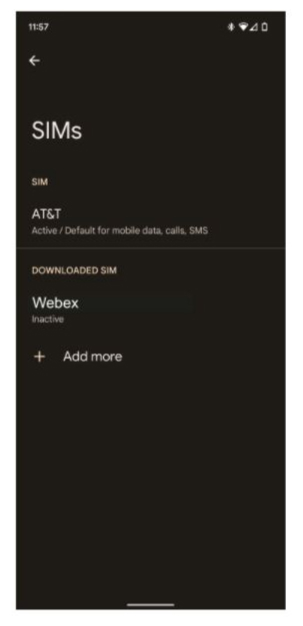
-
İndirilen Webex SIM'in altında İndir'i seçin.
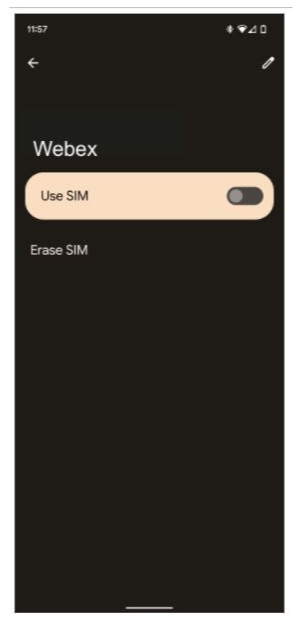
-
Açma/kapatma seçeneğini açıp onaylamanız isten olduğunda Evet'i seçin.
-
-
eSIM bağlantısında verileri kullanmak için Dolaşım'ı etkinleştirin.
-
Çift SIM tercihlerini ayarlama:
-
Veriler için varsayılan olarak yalnızca bir SIM olabilir. Önceden bir set hazırsanız bildirim alırsınız. Veriler için önceden yüklenmiş SIM'in varsayılan olarak kullanılması önerilir. Ancak lütfen çağrı sırasında verinin SIM için Webex emin olun.
-
Aramalar için tercihi her zaman Sor olarak ayarlayın.
-
SMS için tercihi önceden yüklenmiş SIM olarak ayarlayın.
-
Planı manuel olarak girin
-
Devam Et'i manuel olarak Webex yukarıdaki 6 . Adım'ı takip edin. Ekran tarama QR kod , ekranın alt kısmında yardıma ihtiyacınız var öğesini tıklatın ve etkinleştirme e-postası dahil ağ sağlayıcı kodunu manuel olarak girin.
-
Kodu girdikten sonra, lütfen yukarıdaki 8 . adım ile 11. Adım'a geçin.
Daha fazla bilgi için Google Pixel makalesi .
Webex Go Mobil Operatörü etkinleştirmek için bir QR kodu gerektirmez. Etkinleştirme, yöneticiniz tarafından gerçekleştirilir. Control Hub’da mobil numara ekleme ve bunları kullanıcılara atama süreci hakkında daha fazla bilgi için bkz. Webex Go Sağlama. Yöneticiniz tarafından sağlandıktan sonra, Webex Go Bolt-on veya Hizmet Kullanım Kodu için AT&T Bulut Sesi arka uçta otomatik olarak etkinleştirilir ve mobil numara Control Hub'da atandığında anında etkinleştirilmelidir. Kullanıcı tarafından herhangi bir işlem gerekmez.
Mobil numaranız yöneticiniz tarafından atandıktan sonra, AT&T cep telefonu, Webex masa telefonu, masa veya oda sistemi ve Webex Uygulamalı dizüstü bilgisayar dahil tüm Webex cihazlarınız AT&T cep telefonu numarasını paylaşır. Ayrıca Webex sesli postaya yükseltildiniz ve tüm Webex Calling özelliklerine erişebilirsiniz.
Yöneticiler için:
Webex Go Mobile Operator, mobil operatörden mobil numaraların kimlik doğrulaması ve etkinleştirilmesi talep edilerek ve ardından bunu bir kullanıcıya birincil hat olarak atayarak (sabit iş numaralarının yerine) etkinleştirilir/sağlanır. Control Hub’a mobil numara ekleme ve ardından kullanıcıya atama adımları için bkz. Webex Go Sağlama.


