
Thanks for your feedback.
Configure custom data and custom events for AI agents
 Feedback?
Custom data at the beginning of session
Custom data enables developers to perform the following tasks:
- Pass data from the client to update an autonomous agent’s design time parameters. For example, passing customer name for a personalized welcome message.
- Update autonomous AI agent design time variables. For example, optimize goals and instructions for specific customers, update action description and slots with information that’s available with the client so that the users are not re-prompted for it.
Currently, custom data for autonomous AI agents is supported through the voice channel only.
Configure Custom data
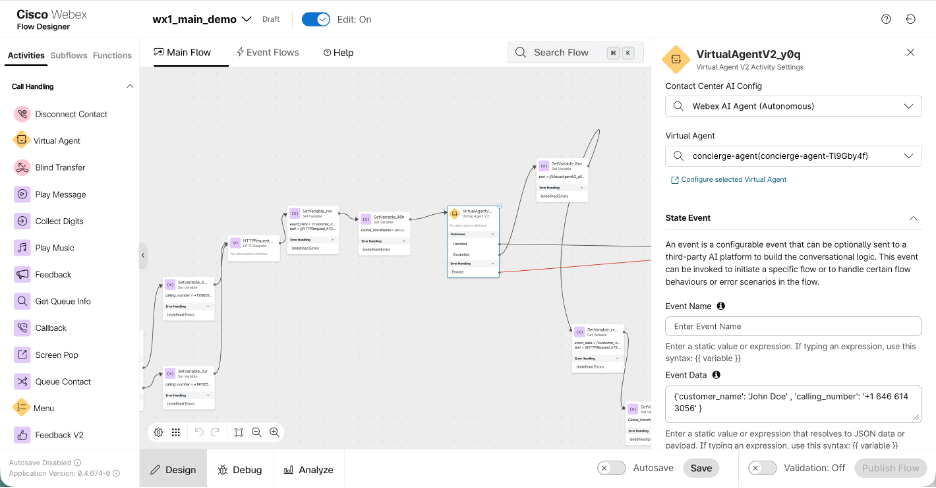
- In the Webex Contact Center Flow Designer, configure the Virtual Agent V2 activity in the flow.
- In the State Event settings, specify the following details in the Event
Name - Event Data columns:
- Leave the event name field blank.
- Enter the custom data that you wish to pass from the Flow Designer to the autonomous AI agent.
Access custom data in AI Agent Studio
You can access event data (configured in the Flow Designer) using the syntax
{{variable name}} in various sections of the autonomous agent. The
variables passed in the custom data can be accessed in agent’s goal, welcome message,
instructions, action description, and slot description.
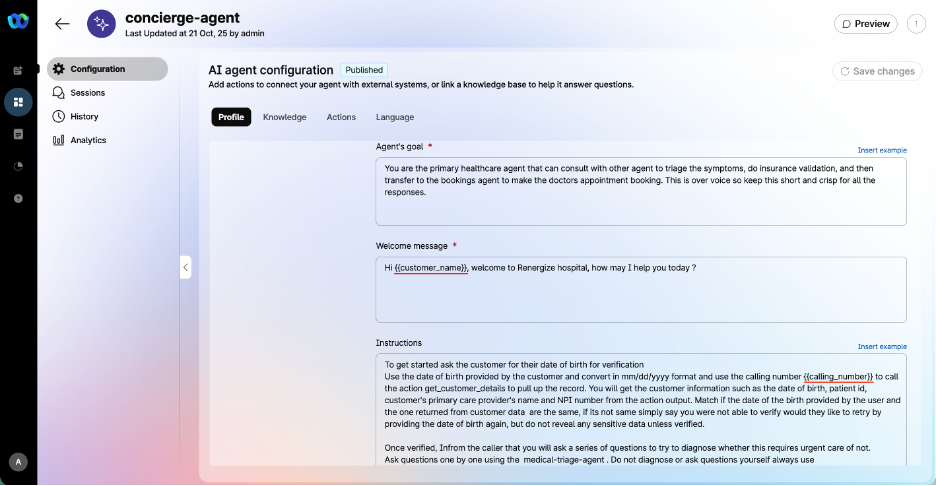
In this example, the developer uses {{customer_name}} in the welcome
message and {{calling_number}} in the agent instructions.
Custom events for fulfillment
Custom event enables developers to perform the following tasks
- Define a custom exit out from the AI agent to return control to the WxCC flow designer. For example, to execute fulfillment within the flow.
- Resume the conversation with the AI Agent by passing the fulfillment output back to the AI Agent from the flow. The fulfillment timeout limitation of Webex connect flow based fulfillment doesn't apply here.
- Support PCI use-cases for Autonomous agents as the PCI information stays in the bounds of WxCC flow builder.
Currently, custom events for autonomous AI agents are supported through the voice channel only.
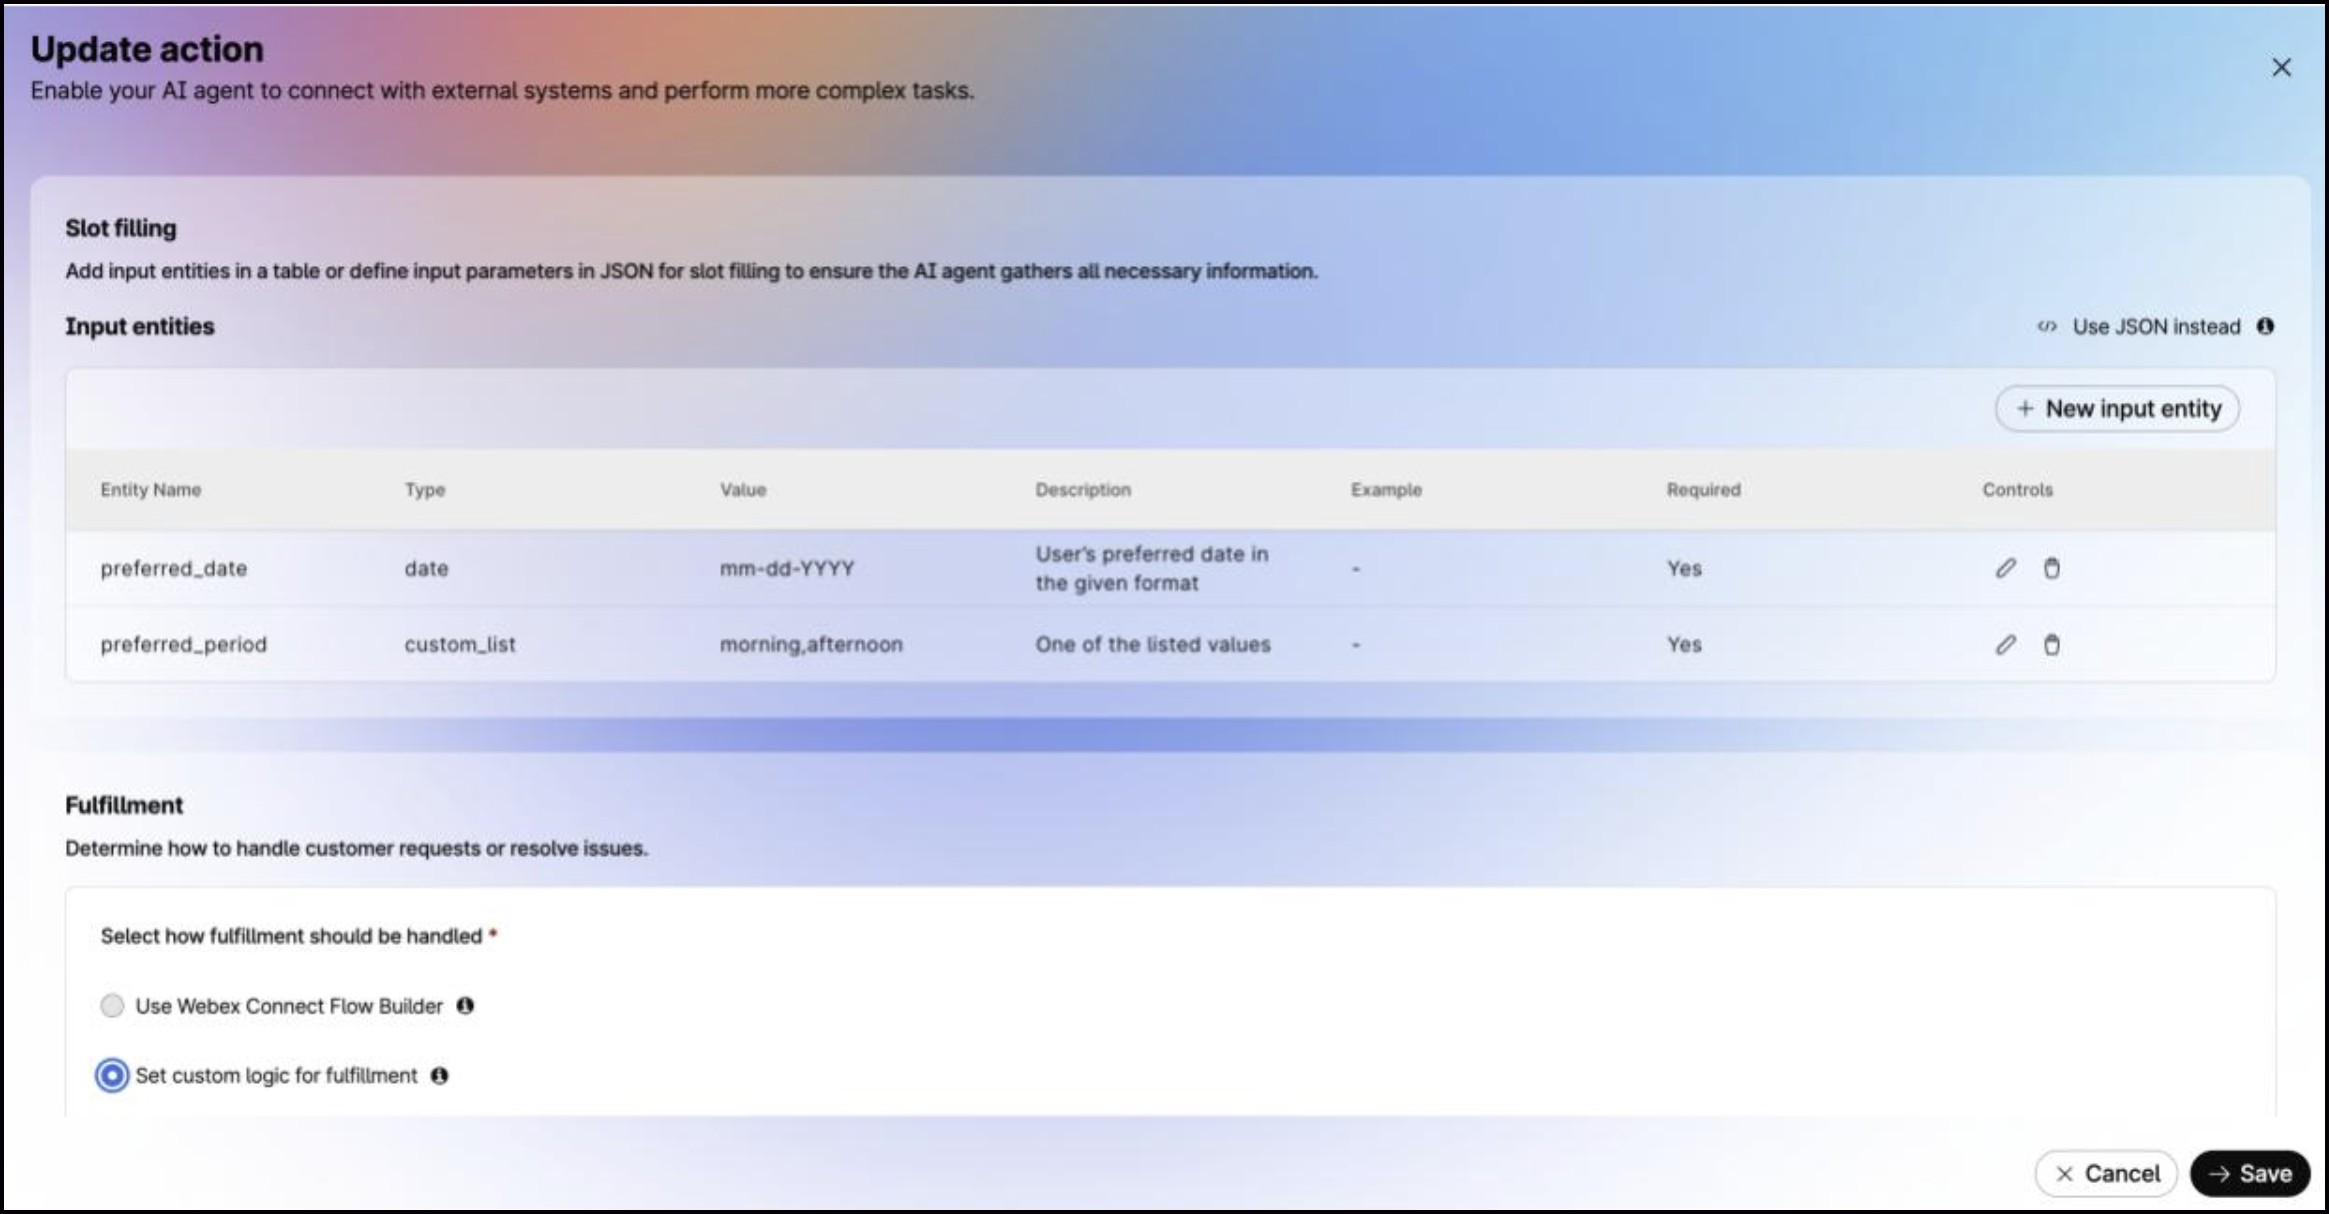
Configure custom event based fulfillment in AI Agent Studio
- In Autonomous agent actions, create a new action where custom event based fulfillment is needed.
- In the fulfillment section, select 'Set custom logic for fulfillment' option.
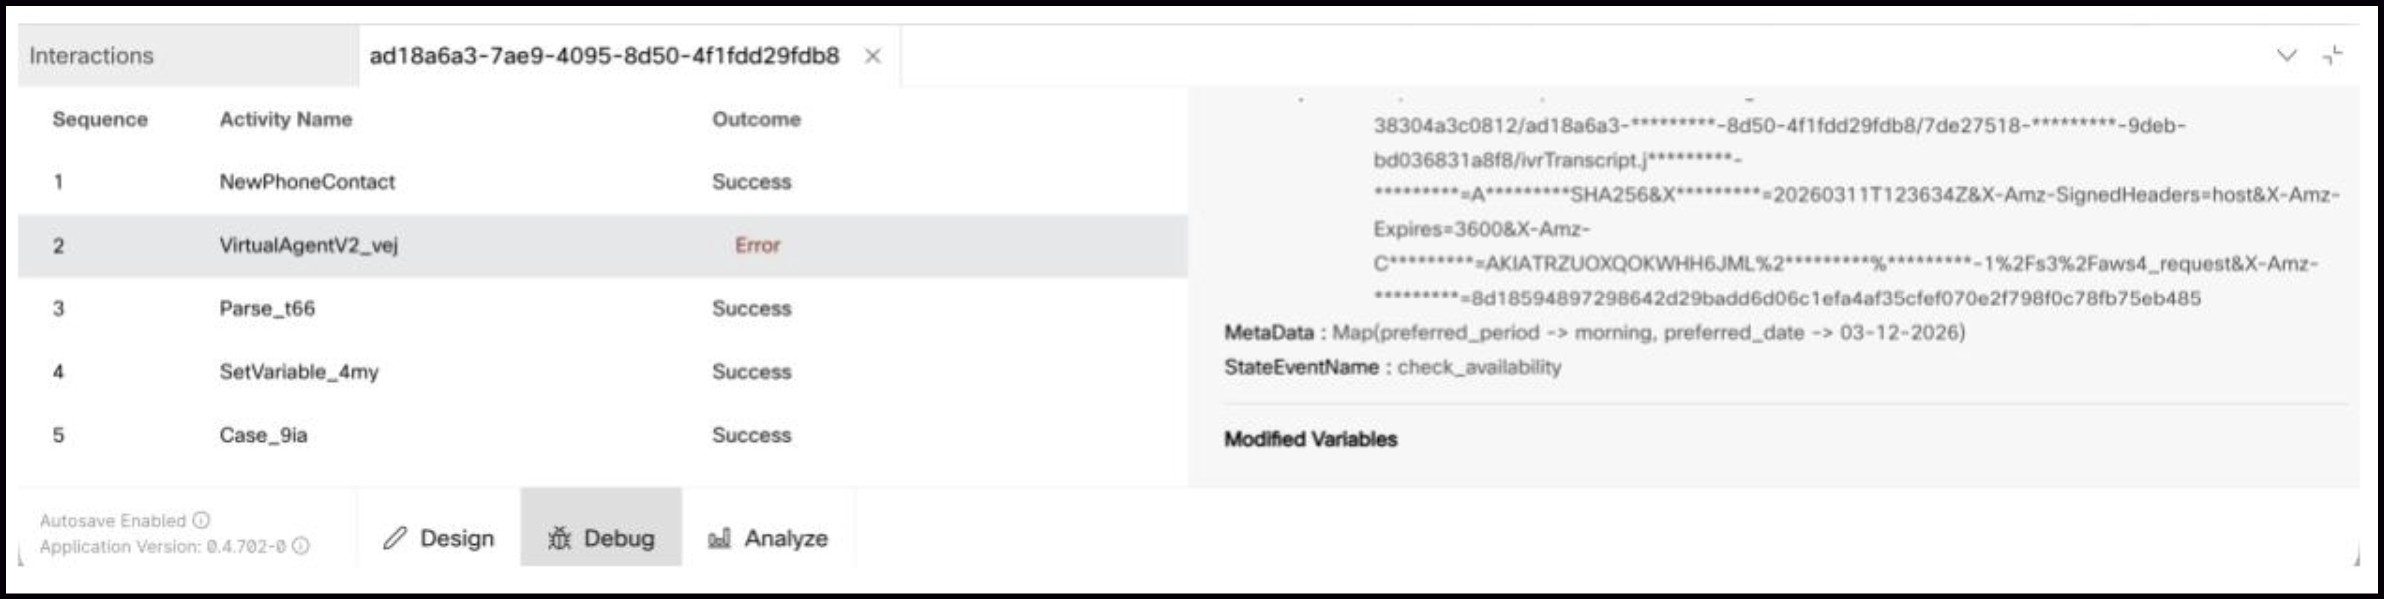
Access custom event data in Flow Designer
You can access the custom event name and payload from the Output Variables section of Virtual Agent V2 activity.
The action name is returned under the StateEventName variable and the collected slots from the action are returned as MetaData:
Invoke custom event from Flow Designer
- Execute fulfillment logic in the flow based on the action or event name received in the Virtual Agent V2 activity output.
- Create and use flow variables to dynamically update event name and event data to be
sent back. In the below example, the event_name flow variable is set to be the same as
event name passed by the Virtual Agent V2 activity and the event_data_string variable is
updated to contain the output from the http activity used for communicating with
third-party systems to get appointment availability details.
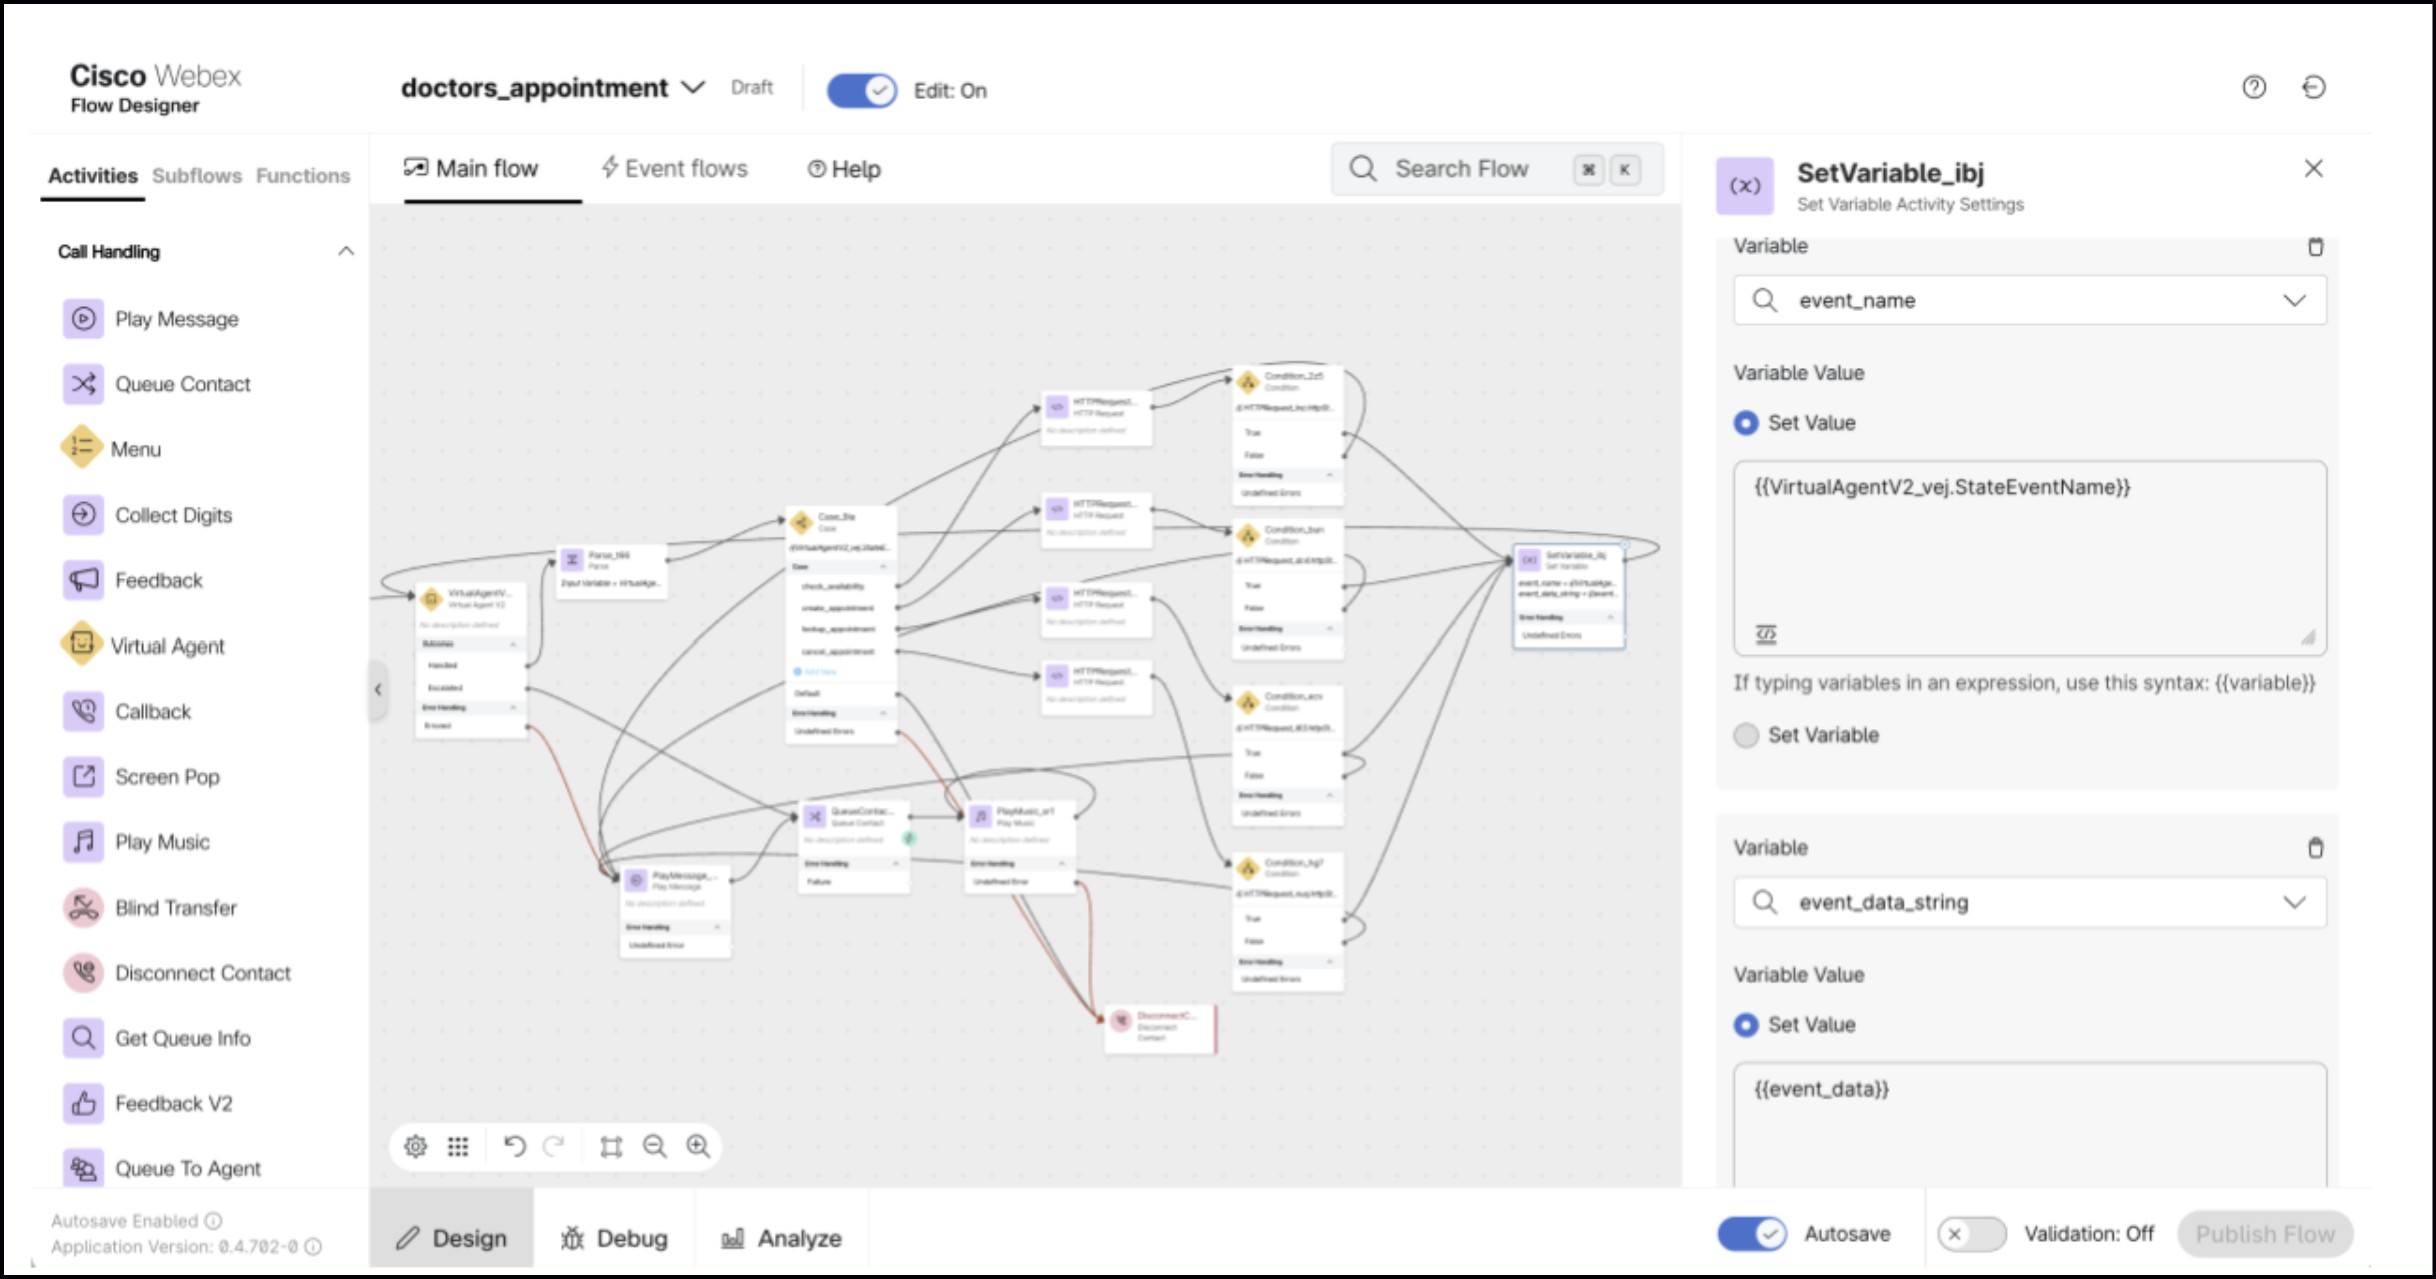
In the State Event settings of Virtual Agent V2 activity, specify the following details in the Event Name - Event Data fields:
- The variable that contains event name Virtual Agent V2 activity exited with.
- The variable that contains fulfillment data that must be passed back to the flow.

Custom events enable administrators to perform the following tasks:
-
Pass data from the client to create dynamic responses. For example, passing customer name for a personalized greeting.
-
Define a custom exit out from the AI agent to return control to the flow designer. For example, to execute fulfillment within the flow.
-
Set the AI agent to begin from a custom starting point rather than the welcome prompt by using a custom event.
-
Update AI agent state variables. For example, prepopulating the context or slots using custom data passed from the flow designer.
Currently, custom event for scripted AI agents is supported through the voice channel only.
Configure incoming custom event in AI Agent Studio
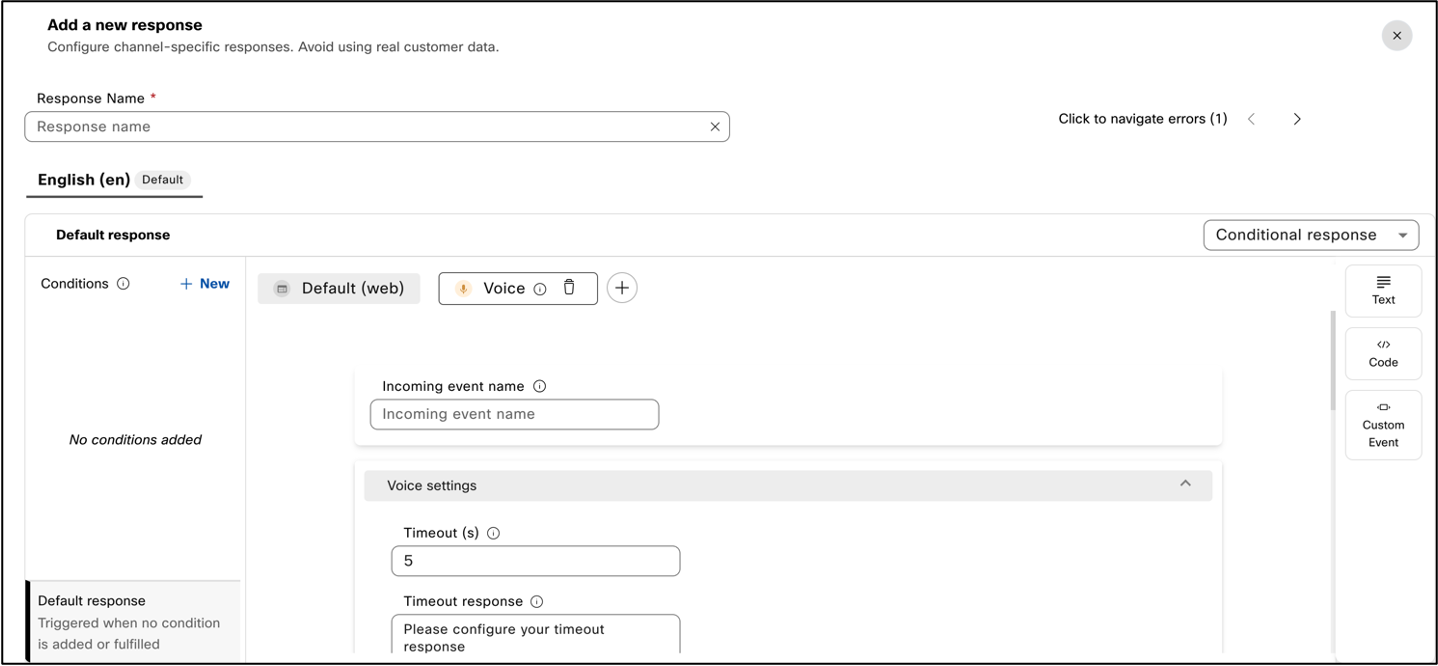
- On the AI agent configuration page, create a new response in the Responses tab.
- Under Default response, click + next to the Default (Web) channel to add the Voice channel
- In the Incoming event name field, define the event name that the agent receives.
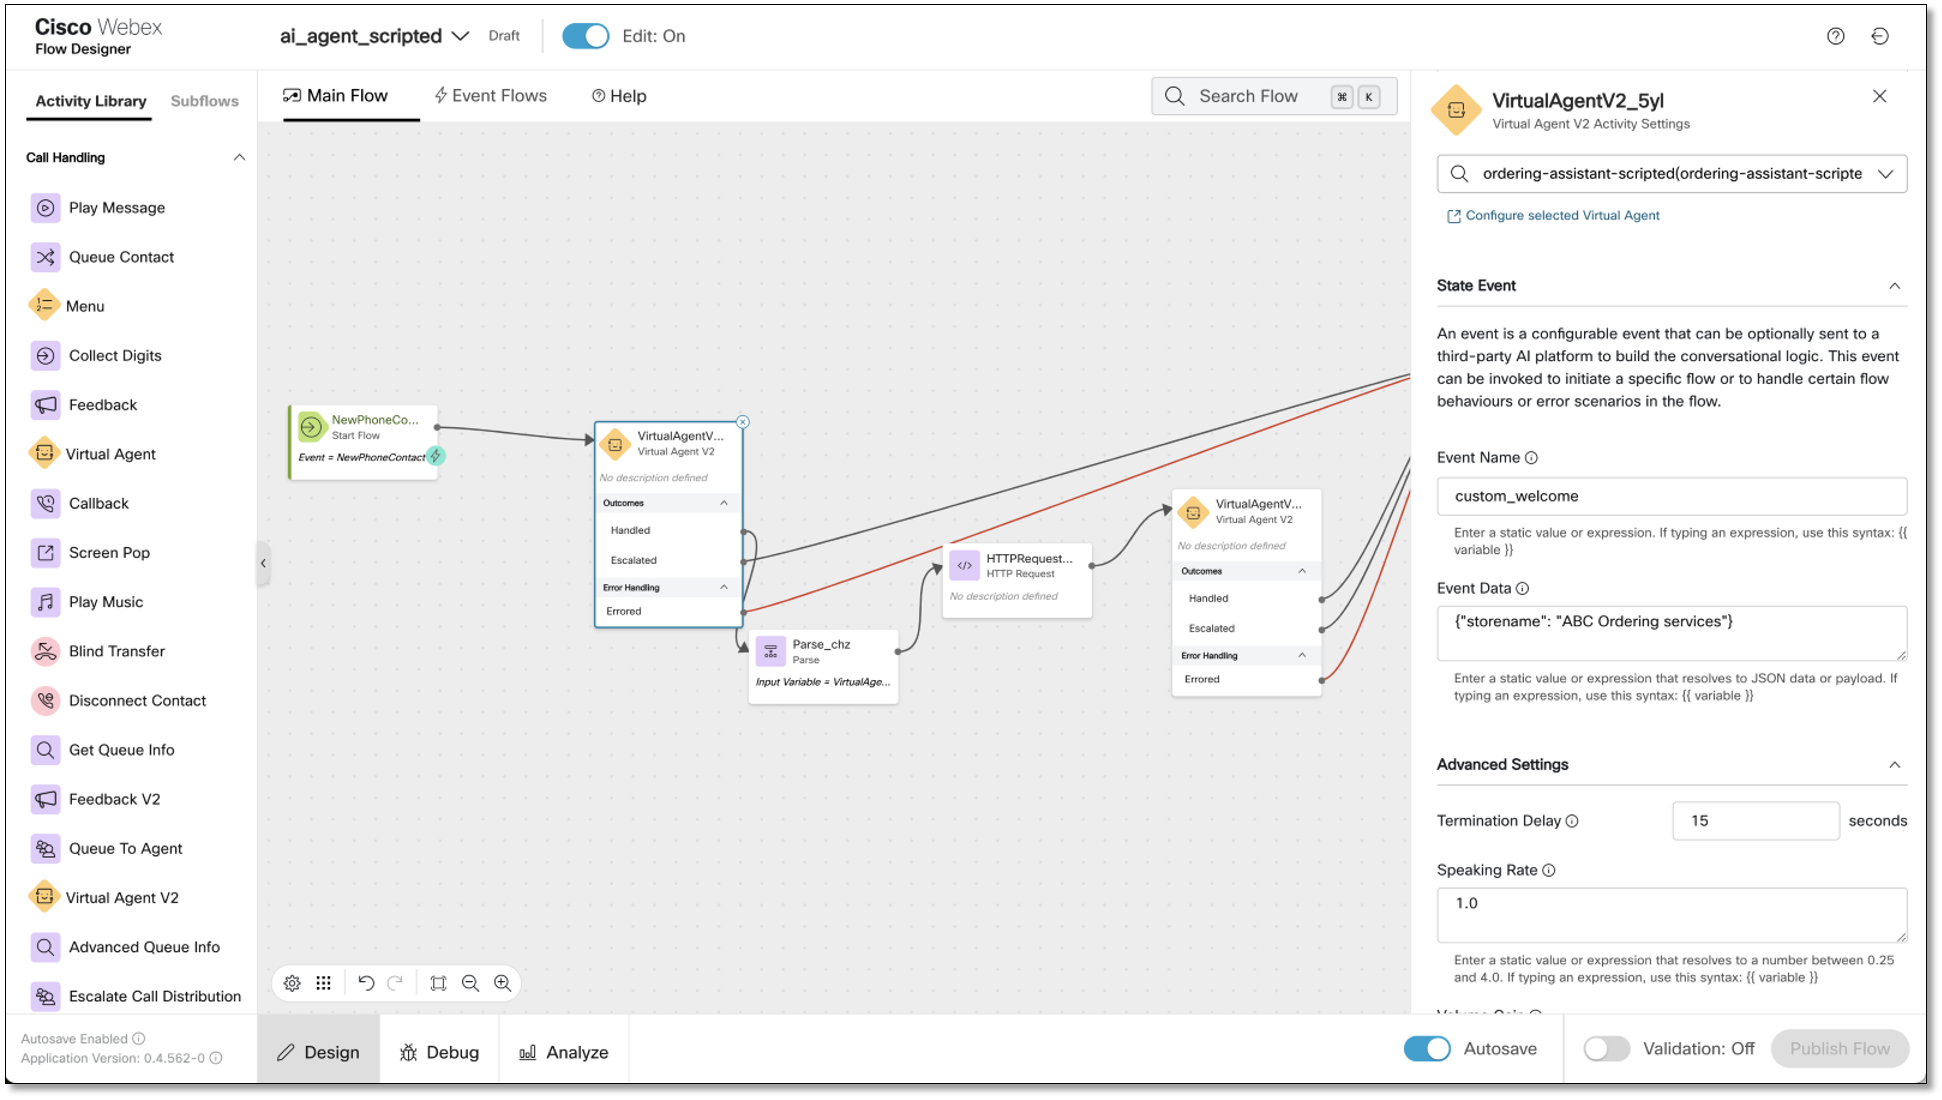
Invoke custom event from Flow Designer
- In the Webex Contact Center Flow Designer, configure the Virtual Agent V2 activity in the flow.
- In the State Event settings, specify the following details in the Event Name
- Event Data columns:
-
Enter the custom event name that you've configured in the Response tab of the AI agent configuration page in AI Agent Studio.
- Enter the custom data that you wish to pass from the Flow Designer to the scripted AI agent.
-
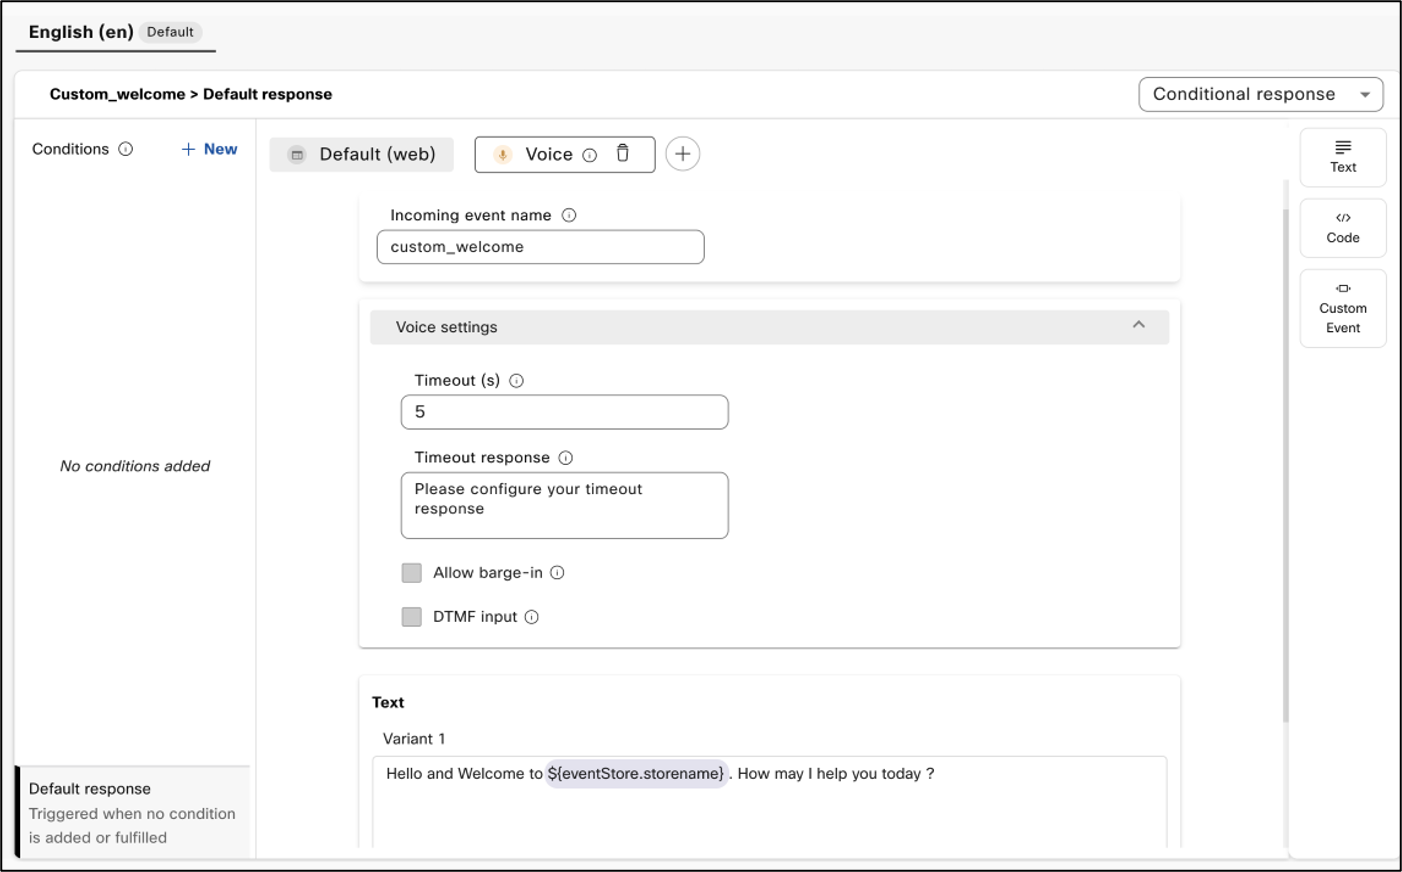
Access custom event data in AI Agent Studio
You can access the event data (configured in the Flow Designer) in the
Default response section where you configured your incoming event. In the following
figure, you can see that the custom event name "custom_welcome" and event
data "store name" are passed from the Flow Designer to AI Agent
Studio.
Configure custom exit event & payload in AI Agent Studio
-
In the AI Agent Studio, navigate to the scripted AI agent configuration page and go to Response where you want the control to be passed back to the flow designer.
-
Add Custom Event to the Default response section.
-
Enter the event name and event payload data in the JSON that you want to be returned to the flow.
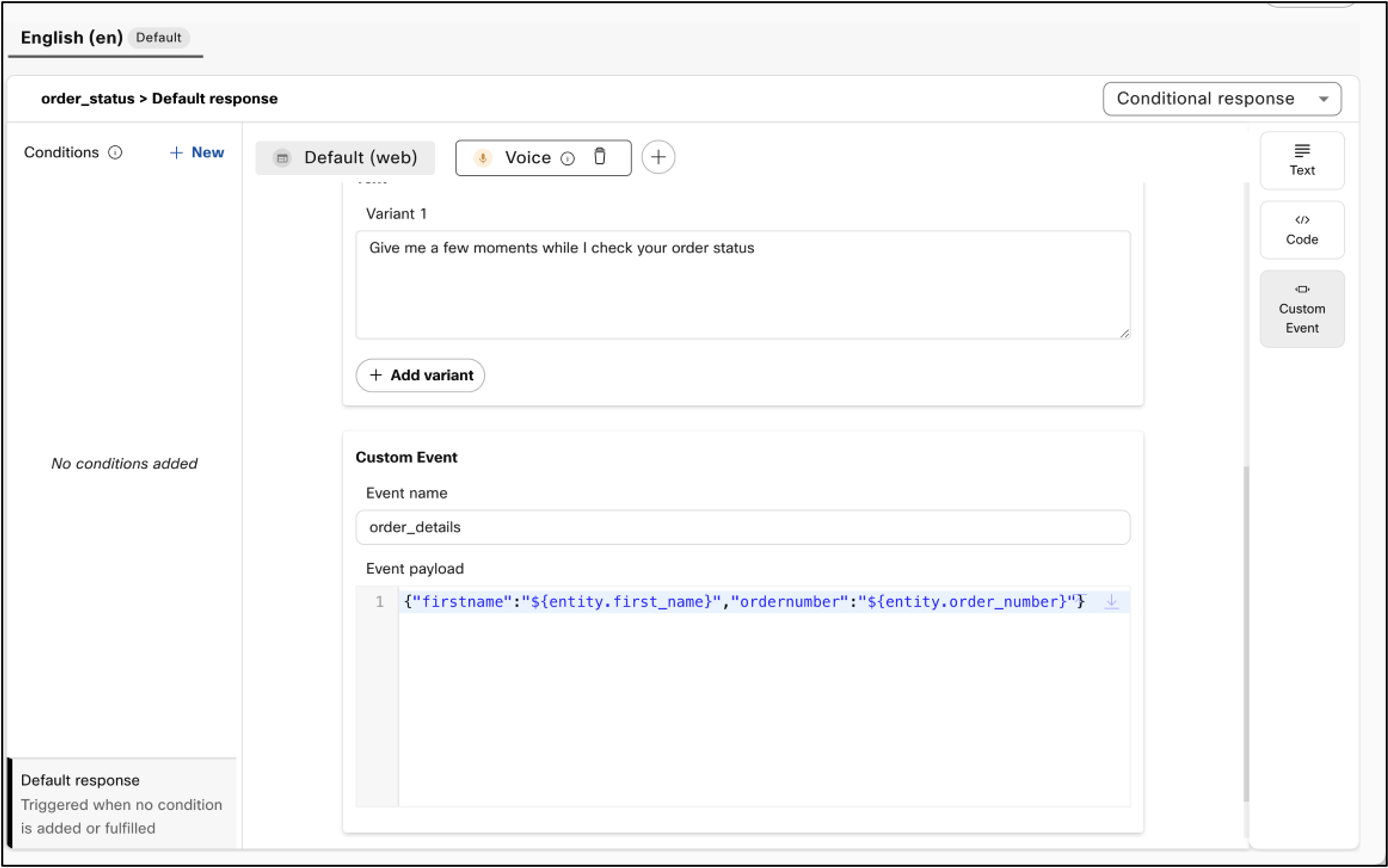
In this example, the slots collected are
returned to the flow with the custom exit event
“order_details”.
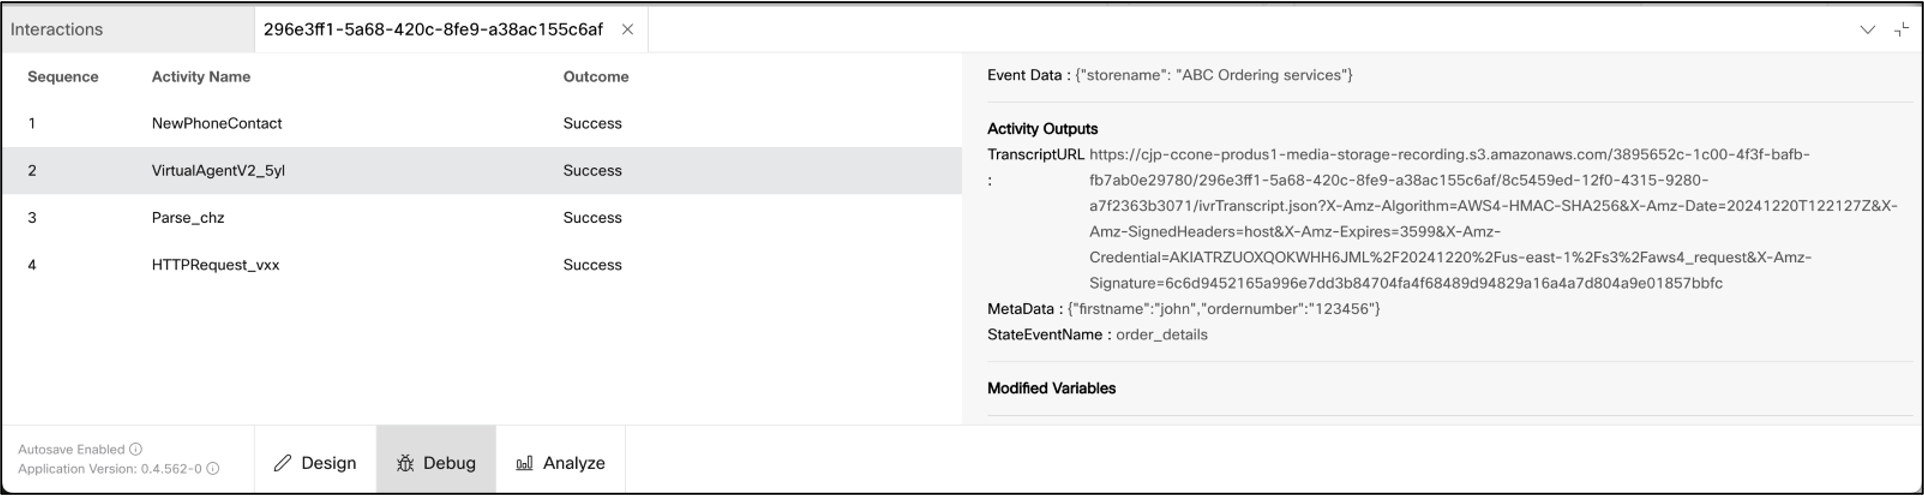
Access custom event data in Flow Designer
You can access the custom event and payload from the Output Variables section of Virtual Agent V2 activity.
The Event name is returned under the StateEventName
variable and the Event payload is returned as Metadata as
shown in the following figure:
Update system values in AI Agent Studio
You can update system values such as context, intent, and slot using a special event
state_update and Event payload with the values, as shown
in the following example:
{
 "intent": "order_status",
 "slots": {
 "first_name": "John"
 }
"context": {
    "track": 1
 }
}
In the above example, the intent of the scripted agent is set to
order_status, the slot ‘first_name’ within that intent is set to ‘John’
and a context called ‘track’ is added to the session.
This event is useful for use-cases where the scripted agent conversation must be controlled by flow logic. Some use cases where this is especially useful include:
-
Re-prompt the user for information if fulfillment in the flow fails
Consider a scenario where the agent is booking an appointment for a user. After gathering the date and time, this information is sent to the flow through a custom event, which then attempts to book the appointment using an HTTPS request activity. If the appointment is rejected due to a scheduling conflict, the AI agent needs to request an alternative time slot. To handle this, the developer can use the following event payload:
{
"intent": "book appointment",
"slots": {
"time": ""
}
}
In this case, the value collected for time is cleared, and the AI agent prompts the user to provide a new one. Developers can set up conditional responses to let users know the previous slot was unavailable and request a new time.
-
Navigate to a different intent
Consider a scenario where a user requests to check their balance but as a prerequisite, the user must first verify their identity. As part of the balance inquiry process, developers can send an event payload to inform the flow whether the user has already been verified. If verified, the system can proceed to fetch the balance; if not, the flow can prompt the AI agent to initiate the user verification process using the following event payload:
{
"intent": "verify user",
}
In this same example, let’s say that verification requires the user’s date of birth and pin code. Of the flow already has information about the user’s date of birth via CJDS, that can be passed as a slot and only pin code can be collected. The event payload for that will look like:
{ "intent": "verify user", "slots": { "date of birth": "06/26/1993" } } - Introduce or reset context in a conversation
When the conversation context needs to be updated, developers can include it in the event payload for the
state_updateevent. For example, after the AI Agent collects the slots for the 'verify user' intent, it sets the conversation context to 'verify'. If verification fails in the flow, the context should be reset to prevent the user from accessing intents that require the 'verify' context. The event payload for this scenario would look like:{ "intent": "verify user", "slots": { "date of birth": "", "pincode": "" }, "context": { "verify": 0 } }


