
Thanks for your feedback.
Migrate Personal Contacts to Webex
 Feedback?
Understanding Personal Contacts
Contact migration to cloud is a one time import that enables you to search, look up, call, message, or invite your contacts similar to Jabber.
End users define Webex Personal Contacts in the Webex app.
Jabber Custom Contacts refer to non-directory contacts who are outside of your organization and contacts that are stored in the database of Cisco Unified Communications Manager - IM & Presence Service.
Third-party contacts refer to contacts who're outside your org that may be exported and later imported into Webex.
Prerequisite
Before you start migration of the personal contacts, make sure that you meet the following requirements:
-
Get familiar with Control Hub.
Webex Control Hub is the management interface for the Webex platform. For more information, see Get Started with Webex Control Hub.
-
Access Control Hub with full administrator privileges.
With full administrator privileges, you can assign one or more roles to any user in your organization. Ensure to assign a user with administrator privilege so you can migrate the rest of your Jabber custom contacts. For more information, see Assign Organizational Account Roles in Webex Control Hub.
-
Ensure the on-premises applications from where you plan to migrate the personal contacts such as Cisco Unified Communications Manager (Unified CM), Unified CM - IM and Presence Service is at version 11.5 or later to use the Control Hub migration wizard.
-
If you're migrating your end users' Jabber custom contacts, use Bulk Administration to download the end-user file from Cisco Unified Communications Manager (Unified CM) and contacts file from Unified CM - IM and Presence.
Use the Import/Export menu in the Cisco Unified Communications Manager application, to import the users. See the Export Users Using Unified CM Bulk Administration for detailed information.
-
If importing custom contacts from third-party sources, use the procedure that is described in Import Personal Contacts from Third Party Sources.
-
Ensure that your migration task conforms to a maximum of 500 contacts per user and a maximum of 10,000 contacts in a single file. We recommend listing the same type of contacts in a single file.
Use Bulk Administration in the Unified CM application to export users and later import to Control Hub.
Use this procedure to obtain enduser file from the Cisco Unified Communications Manager IM & Presence Service, if the IM address scheme is User@Default Domain.
-
Select Bulk Administration > Import/Export > Export to export the enduser list of the migrating users from the current home cluster. The Export Data window displays.

When you upload a new file or the same file again, the tool only detects but cannot avoid creating duplicate personal contacts.
-
Choose End User under User Data section in the Export Data window.
-
Choose a filename for the exported list data. In the Job Description field, enter the description that you want to provide for the job.
Export Configurationis the default description.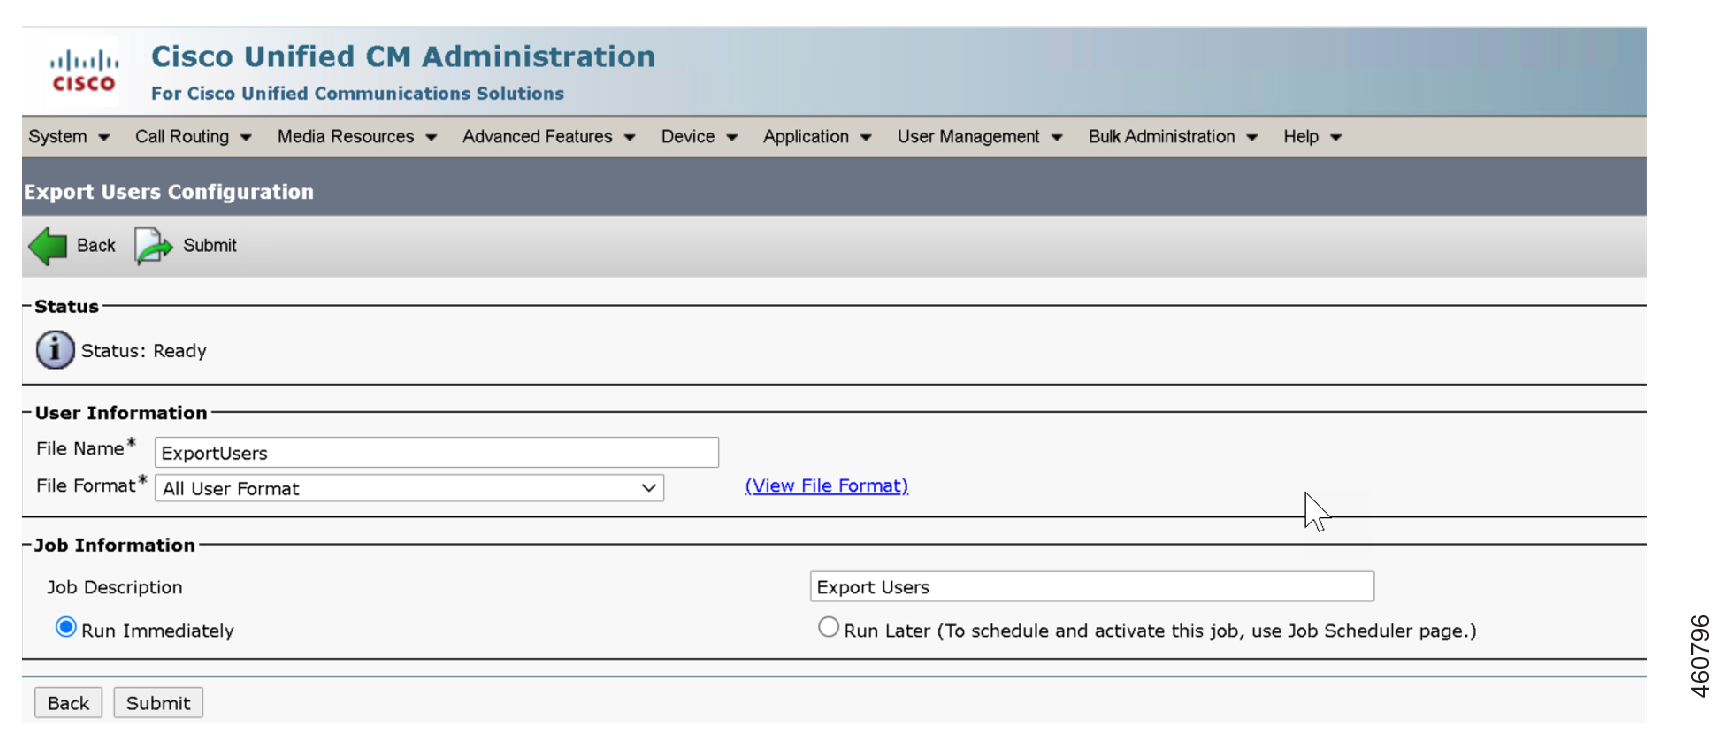
-
Click Run Immediately or schedule the job to run later. Click Submit.
-
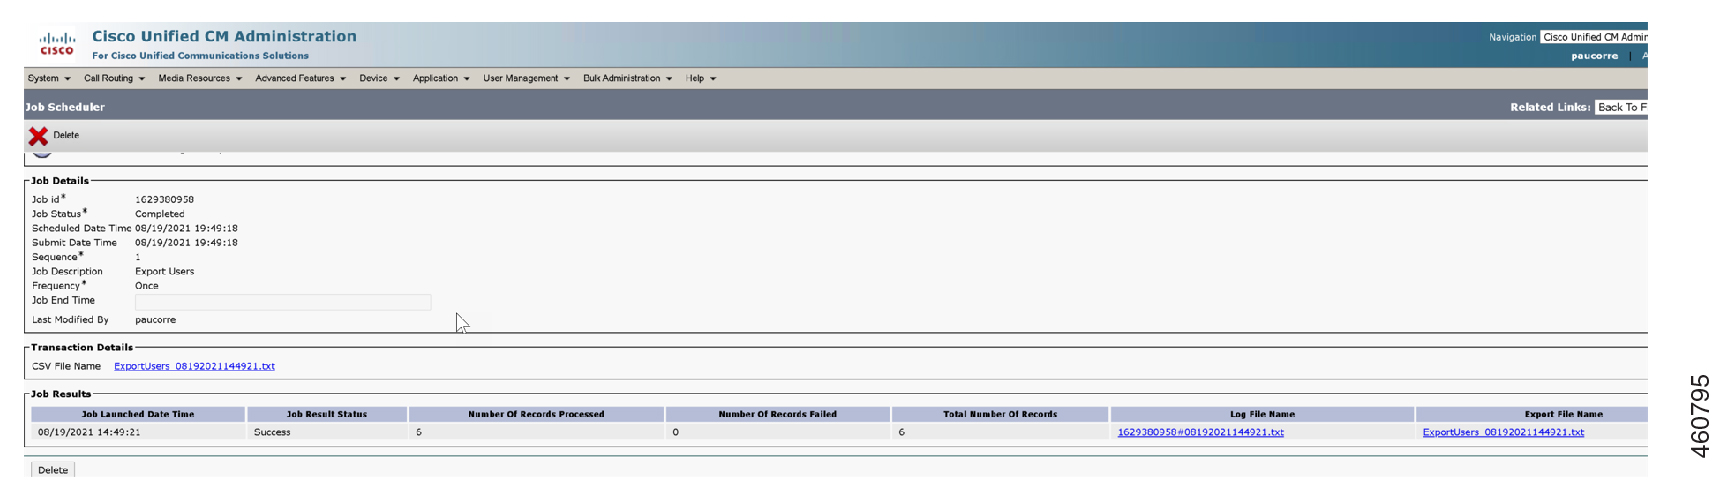
Monitor the status of the export job. Use the Job Scheduler option in the Bulk Administration main menu to activate the job, if the job is scheduled to run later.
Do not modify or update the tar file after you export the file from Unified CM application.
Complete these steps to import the users from the Cisco Unified CM application:
| 1 |
Download the export file and store it for use later when the user migration is complete. Choose Cisco Unified CM Administration > Bulk Administration > Upload/Download Files. From the Upload/Download window select the tar file and click on Download Selected. 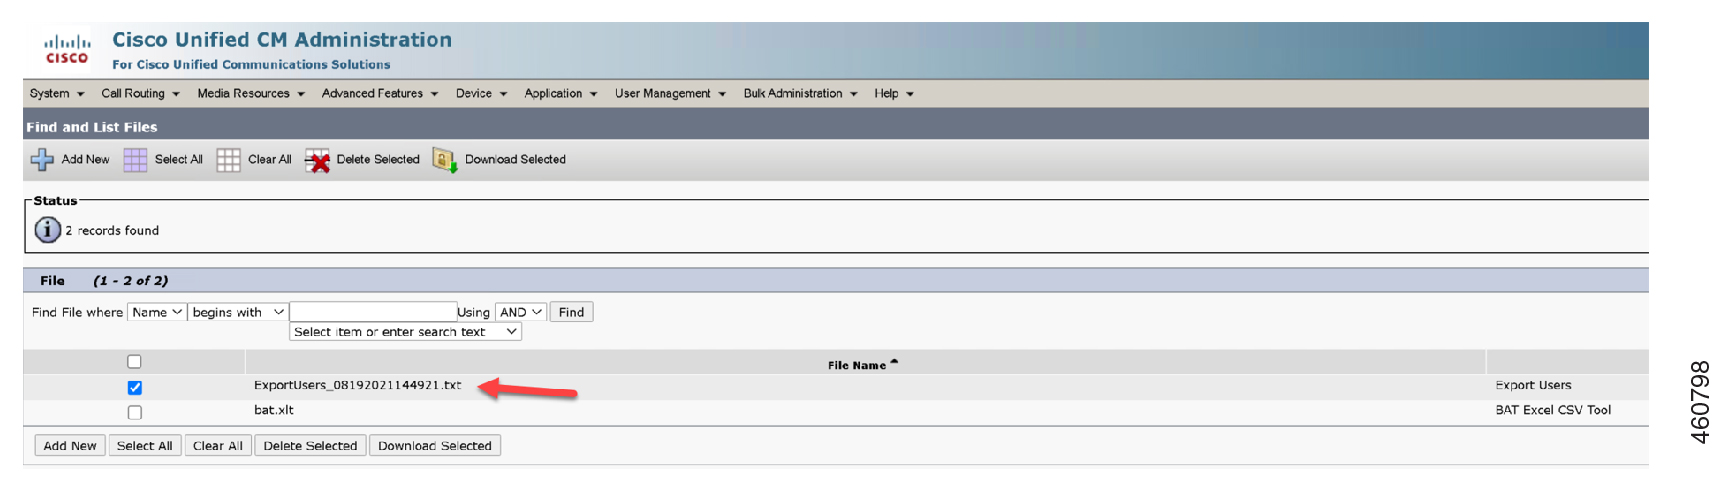
|
| 2 |
Un-tar the .tar file to any location on your machine using the tar -xvf command. Extract the enduser.csv file to the specified location. See the Configuration and Administration of the IM and Presence Service for detailed information. |
| 1 |
From the customer view in Webex Control Hub, go to Updates and Migrations. |
| 2 |
On the Migrate Personal Contacts to Webex card click Get started. The Contact Synchronization page appears. |
| 1 |
To import data, click the Select the type of contacts to import drop-down list and then select the domain address type. The IM and Presence Server supports the following two IM addressing schemes:
To know the scheme that is used by the on-premises IM&Presence server, see the IM&Presence server settings. For more details about the addressing scheme, refer to Configure IM Addressing Scheme. | ||||||||||
| 2 |
Depending on the IM addressing schemes selected, drag and drop the
Ensure that you import the | ||||||||||
| 3 |
Click See file download details for detailed instructions on importing the file. The Export Unified CM IM&Presence contact data window displays when importing Custom Contacts
This feature does not support migrating of the Active Directory groups from the Cisco IM&Presence server using the CSV file. Also, Webex does not support Active Directory (AD) Groups. You can manually edit the CSV file to add the AD groups. On completion of the migration, these groups appear as personal groups on Webex. The Export Unified CM user data window displays when importing enduser.csv file. To export and download user data from Unified CM, follow these steps:
On implementing the autodeletion policy, the uploaded or stored data that is older than 90 days is deleted. | ||||||||||
| 4 |
On completing the upload successfully, Control Hub validates the contacts in the csv files. During validation depending on the default scheme, you can see these changes in the Review file.
You can see the replaced value under "User Email" or "Contact Email" field in the Review file. Control Hub uses this email address to check, if the user or contact exists in its Common Identity(CI). The following details appear on the screen:
(Optional)
| ||||||||||
| 5 |
On validating the csv file, the Review for sync button is enabled. The Review for sync page allows you to view the list of eligible contacts and the contacts with error. | ||||||||||
| 6 |
Click Bulk Edit to fix the flagged errors. Click Download XLS file to download the error report. Navigate to the Failure reason column in the report and take the appropriate action to resolve the error and upload the latest file. See Migrated Contacts for detailed information. Click Choose file to upload the file and validate the file again. | ||||||||||
| 7 |
Once the processing completes, the total number of valid contacts ready to migrate to Webex App displays. Click Migrate Contacts to start the migration. | ||||||||||
| 8 |
To begin migration, enter a task name and click Confirm and Migrate. | ||||||||||
| 9 |
A task is created, and you can view the Track Migration progress to know the status of migration. On completion of the task, see the Success KPI under the Track Migration progress, to know the number of contacts that are migrated successfully. Only valid records are migrated and invalid records are not migrated. | ||||||||||
| 10 |
Click the down arrow next to Errors in the Track Migration section to download the Summary report. The newly migrated contacts are now listed in the Webex app. |
This feature provides a generic mechanism to import any user's contacts into the Webex personal contact (contact service) database. This is generic in that the source of the contacts may be from on-premises deployments, cloud-competitor contact systems, or even the Webex Calling MT deployments. It opens up the migration scenarios to support any personal contact import case, not just Unified CM.
-
Replace the old contact details with the new details that are provided in the new generic file using the Contact UUID.
-
The tool populates the Contact UUID field. After you migrate a contact has, the corresponding Contact UUID information is available in the
Migration Summary.csvfile. -
Don't modify the Contact UUID field in the template file or the Migration Summary.csv file. Also, there should not be duplicate Contact UUIDs in the template file. Hence, don't copy records to create another row in the file.
-
If you want to update any information that is related to a contact, you must add all the details of the contact to the new file in addition to the Contact UUID. Use the Contact UUID from the latest
Migration Summary.csvfile.
Use the following procedure to import your users' personal contacts that reside in third-party sources.
| 1 |
To import data, click the Select the type of contacts to import drop-down list and choose Generic Personal Contacts. |
| 2 |
Click Download sample template. |
| 3 |
After you fill the template file with data for all the personal contacts, drag and drop it on the Import personal contacts section. Alternatively, click browse for files and navigate to the folder location where the filled sample template file exists and upload it.
|
| 4 |
After the upload is successful, Control Hub validates the contacts in the CSV file. After the validation process is complete, the label Custom is displayed next to the contacts. For details about the KPIs, refer to the table in the Import Personal Contacts from On-Premises Application section. |
| 5 |
Perform steps 5–10 in the Import Personal Contacts from On-Premises Application section. |
This page lists the error and warning messages for the selected contacts. It also provides you with the necessary suggestions and solutions to resolve them. Resolve the errors before you proceed. However, you can ignore the warnings.
Note: You can also remove the contacts with errors and proceed.
| 1 |
You can view the count of these values:
|
| 2 |
Click Bulk Edit to fix the flagged errors. Click Download XLS file to download the error report. Navigate to the Failure reason column in the report and take the appropriate action to resolve the error and upload the latest file. Click Choose file to upload the file and validate the file again. |
| 3 |
Click Migrate Contacts. The migrate contacts progress bar displays and you cannot perform any action until the migration completes. |
| 4 |
View the status of the migration from the Track Migration Status page. This page displays the count of the successfully migrated contacts and the contacts that failed to migrate. |
Use this table to see what fields are mandatory or optional, and what you’ll need to determine when migrating personal contacts in bulk.
|
Column |
Description |
Supported values |
|---|---|---|
| User Email | The User domain ID. It can have a maximum of 128 characters. | The value is the domain portion of the user's email address. bjones@example .com where bjones is an user ID and example.com is the domain |
| Contact Email | The contact domain ID. It can have a maximum of 128 characters. | The value is the domain portion of the contact email address. bjones@example .com where bjones is the contact ID and example.com is the domain |
| Group Name | Add the contact list entry to the specified group. | If a user’s contacts are not sorted into groups, the default group name will be specified in the Group Name field. |
| Display Name | Enter the display name. | Example: Test UTF-8 only characters are supported. |
| First Name | Enter the first name to display the contact name. | Example: Ted UTF-8 only characters are supported. |
| Last Name | Enter the last name to display the contact name. | Example: Ross UTF-8 only characters are supported. |
| Company | Enter the company name. | Example: ABC Character length: 1-30 |
| Title | Enter the title. | Example: Title Character length: 1-30 |
| Address | Enter the address. | Example: New York, NY Character Length: 1-30 |
| Phone Number | Enter the phone number. You must have either a phone number or an extension. |
Only E.164 numbers are allowed for CSV import. Example: +12815550100 Phone number must be on the Numbers tab in Control Hub. |
| Phone Number Type | Enter the phone number type. |
Work, Mobile, Home, Other. If the phone number type is not set, it is not possible to call. |
|
Photo Encoding |
Enter the photo encoding scheme. |
Encoding scheme is Base64 |
|
Photo Type |
The type of photo. |
The photo types are JPEG, PNG, BMP, and GIF |
|
Photo Content |
The photo content. |
A valid Base64 value |
|
Contact UUID |
Enter the contact UUID. |
Example: AFS123CX Character Length: 36 character alpha-numeric. |


