- Головна
- /
- Стаття

Дякуємо за відгук.

 У цій статті
 Надіслати відгук?
Встановіть Cisco Call як опцію виклику за замовчуванням для всіх користувачів у вашій організації.
Скористайтеся цією статтею, щоб налаштувати програму Microsoft Teams за допомогою параметрів Cisco Call. Піктограму ![]() додано до лівої навігаційної панелі та як розширення для обміну повідомленнями. Коли опція виклику Teams вимкнена, усі в організації використовують одну платформу для здійснення та отримання дзвінків.
додано до лівої навігаційної панелі та як розширення для обміну повідомленнями. Коли опція виклику Teams вимкнена, усі в організації використовують одну платформу для здійснення та отримання дзвінків.
Передумови
-
Переконайтеся, що ви адміністратор Microsoft Teams.
-
Переконайтеся, що у вас є доступ до Центру керування.
-
Перевірте, чи користувачам призначено ліцензіїв Control Hub та чи зареєструвалися вони в Cisco Unified Communications Manager або Webex Calling для здійснення дзвінків.
-
Користувачі повинні мати встановлені застосунки Webex та Microsoft Teams.
-
Щоб інтеграція Cisco Call для Microsoft Teams працювала з серверною частиною керування викликами Unified CM (локальною, виділеною екземплярною Webex Calling або хмарою UCM), переконайтеся, що ви використовуєте Unified CM 12.5 SU7 або 14 SU3, Cisco Unity Connection (CUC) 12.5 або 14.
-
Для клієнтів локального Unified CM переконайтеся, що Unified CM & Кластери CUC інтегровані в Webex Cloud-Connected UC (CCUC).
-
Користувачів має бути синхронізовано або з локальної, або з хмарної служби Active Directory, наприклад Azure із Control Hub Common Identity (CI).
-
Для локальних клієнтів, клієнтів виділеного екземпляра Webex Calling та UCM Cloud, Налаштуйте Cisco Unified CM— Номер лінії в Cisco Unified CM потрібно пов’язати з ідентифікатором користувача, щоб централізована історія викликів була заповнена ім’ям користувача. У Cisco Unified CM Administration скористайтеся менюПристрій→Телефон, виберіть телефон і натиснітьНазва пристрою (лінія), а потім натисніть потрібну лінію на панеліЗв'язок, щоб перейти доКористувач, пов'язаний з лінією.
-
Переконайтеся, що ідентифікатор пошти Unified CM збігається з основною електронною адресою Control Hub , яка використовується для отримання універсального унікального ідентифікатора (UUID).
-
Інфраструктура віртуальних робочих столів (VDI): Коли інтеграція Cisco Call для Microsoft Teams використовується в середовищі VDI, Cisco Call та Microsoft Teams повинні працювати в одній віртуальній машині.
Конфігурація Microsoft Teams
| 1 |
Увійдіть до центру адміністрування Teams, щоб керувати своїми програмами та дозволити Cisco Call. |
| 2 |
Керуйте тим, хто може встановлювати Cisco Call. |
| 3 |
Встановіть Cisco Call, потім додайте значок до застосунку Webex та відкріпіть вбудовану опцію викликів. |
| 4 |
Необов’язково – вимкніть вбудовану опцію виклику для всієї організації та зробіть Cisco Call єдиною опцією виклику:
|
Прийняти дозволи на синхронізацію присутності
Перегляньте та прийміть дозволи на синхронізацію присутності в Microsoft Teams, щоб двонаправлено синхронізувати стан присутності користувача між Microsoft Teams і Webex.
Щоб синхронізація присутності працювала, користувачі повинні використовувати інтеграцію Cisco Call принаймні раз на 90 днів.
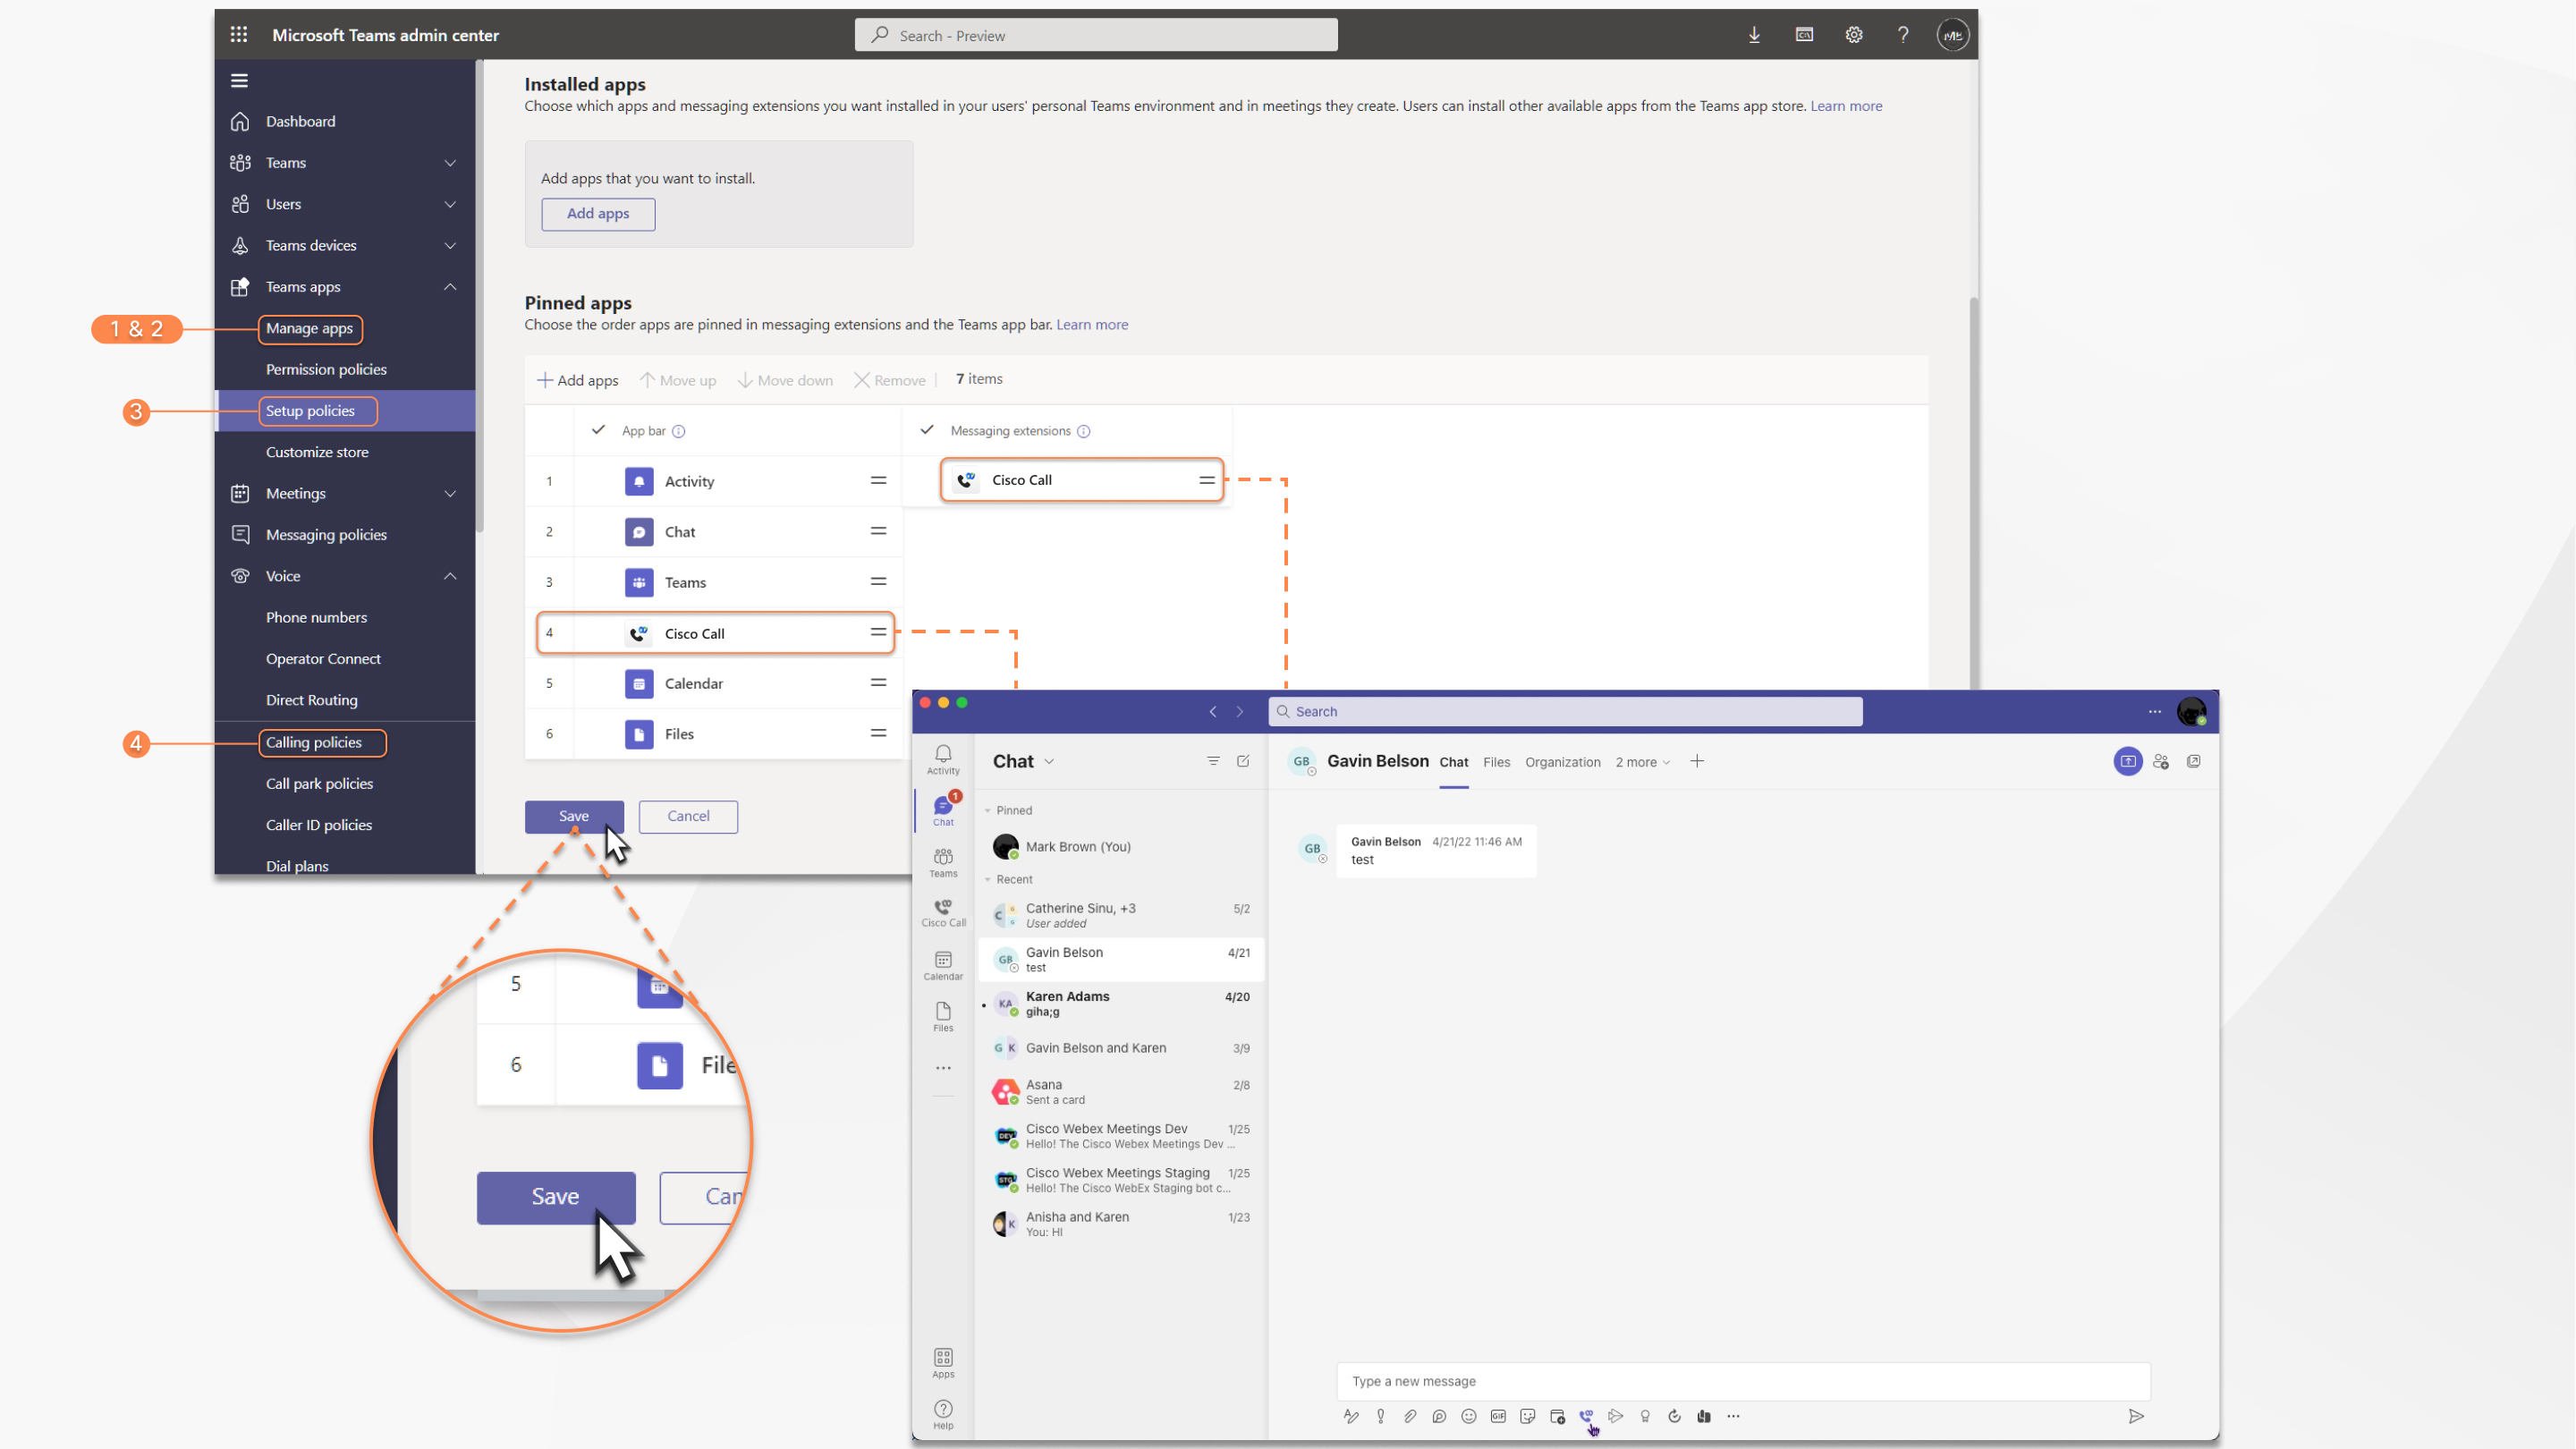
| 1 |
У меню Панель керування перейдіть до розділу |
| 2 |
У полі пошуку введіть |
| 3 |
Натисніть вкладку Дозволи, а потім натисніть Надати згоду адміністратора. |
| 4 |
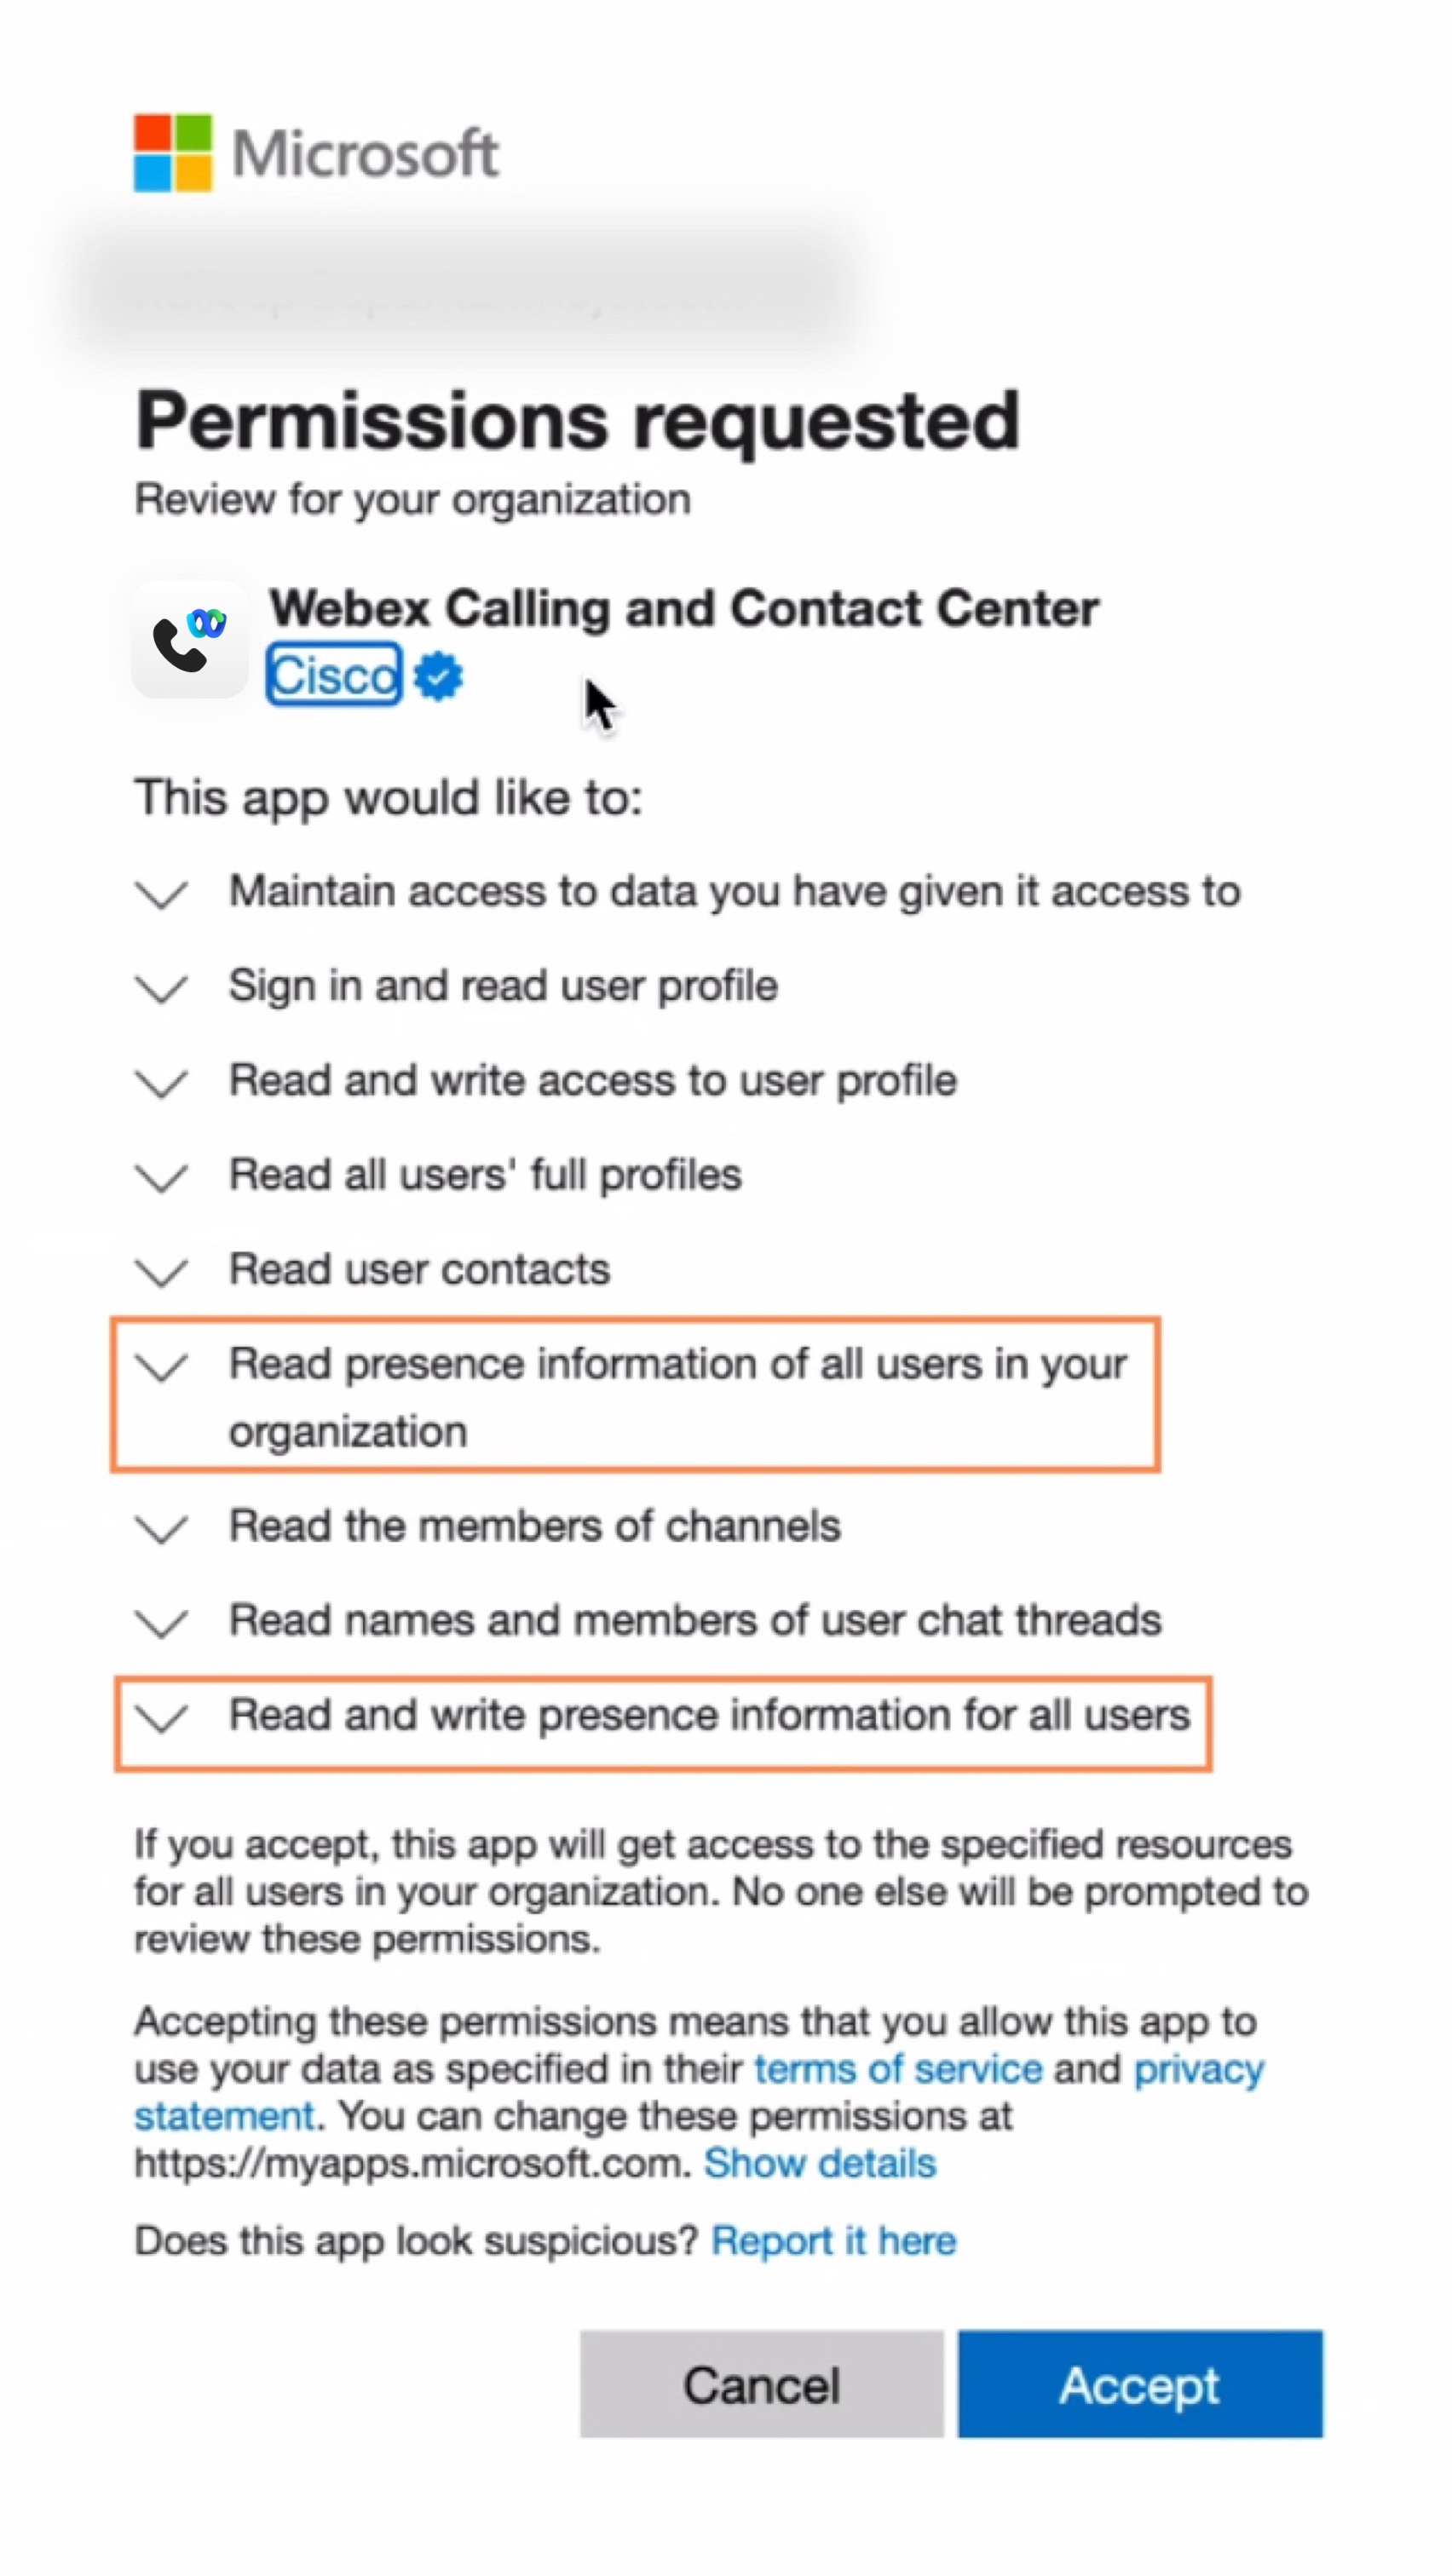
Перевірте, чи включено наступні дозволи.
 |
| 5 |
Натисніть Прийняти, щоб прийняти дозволи. |
| 6 |
Переконайтеся, що нові дозволи відображаються як надані:
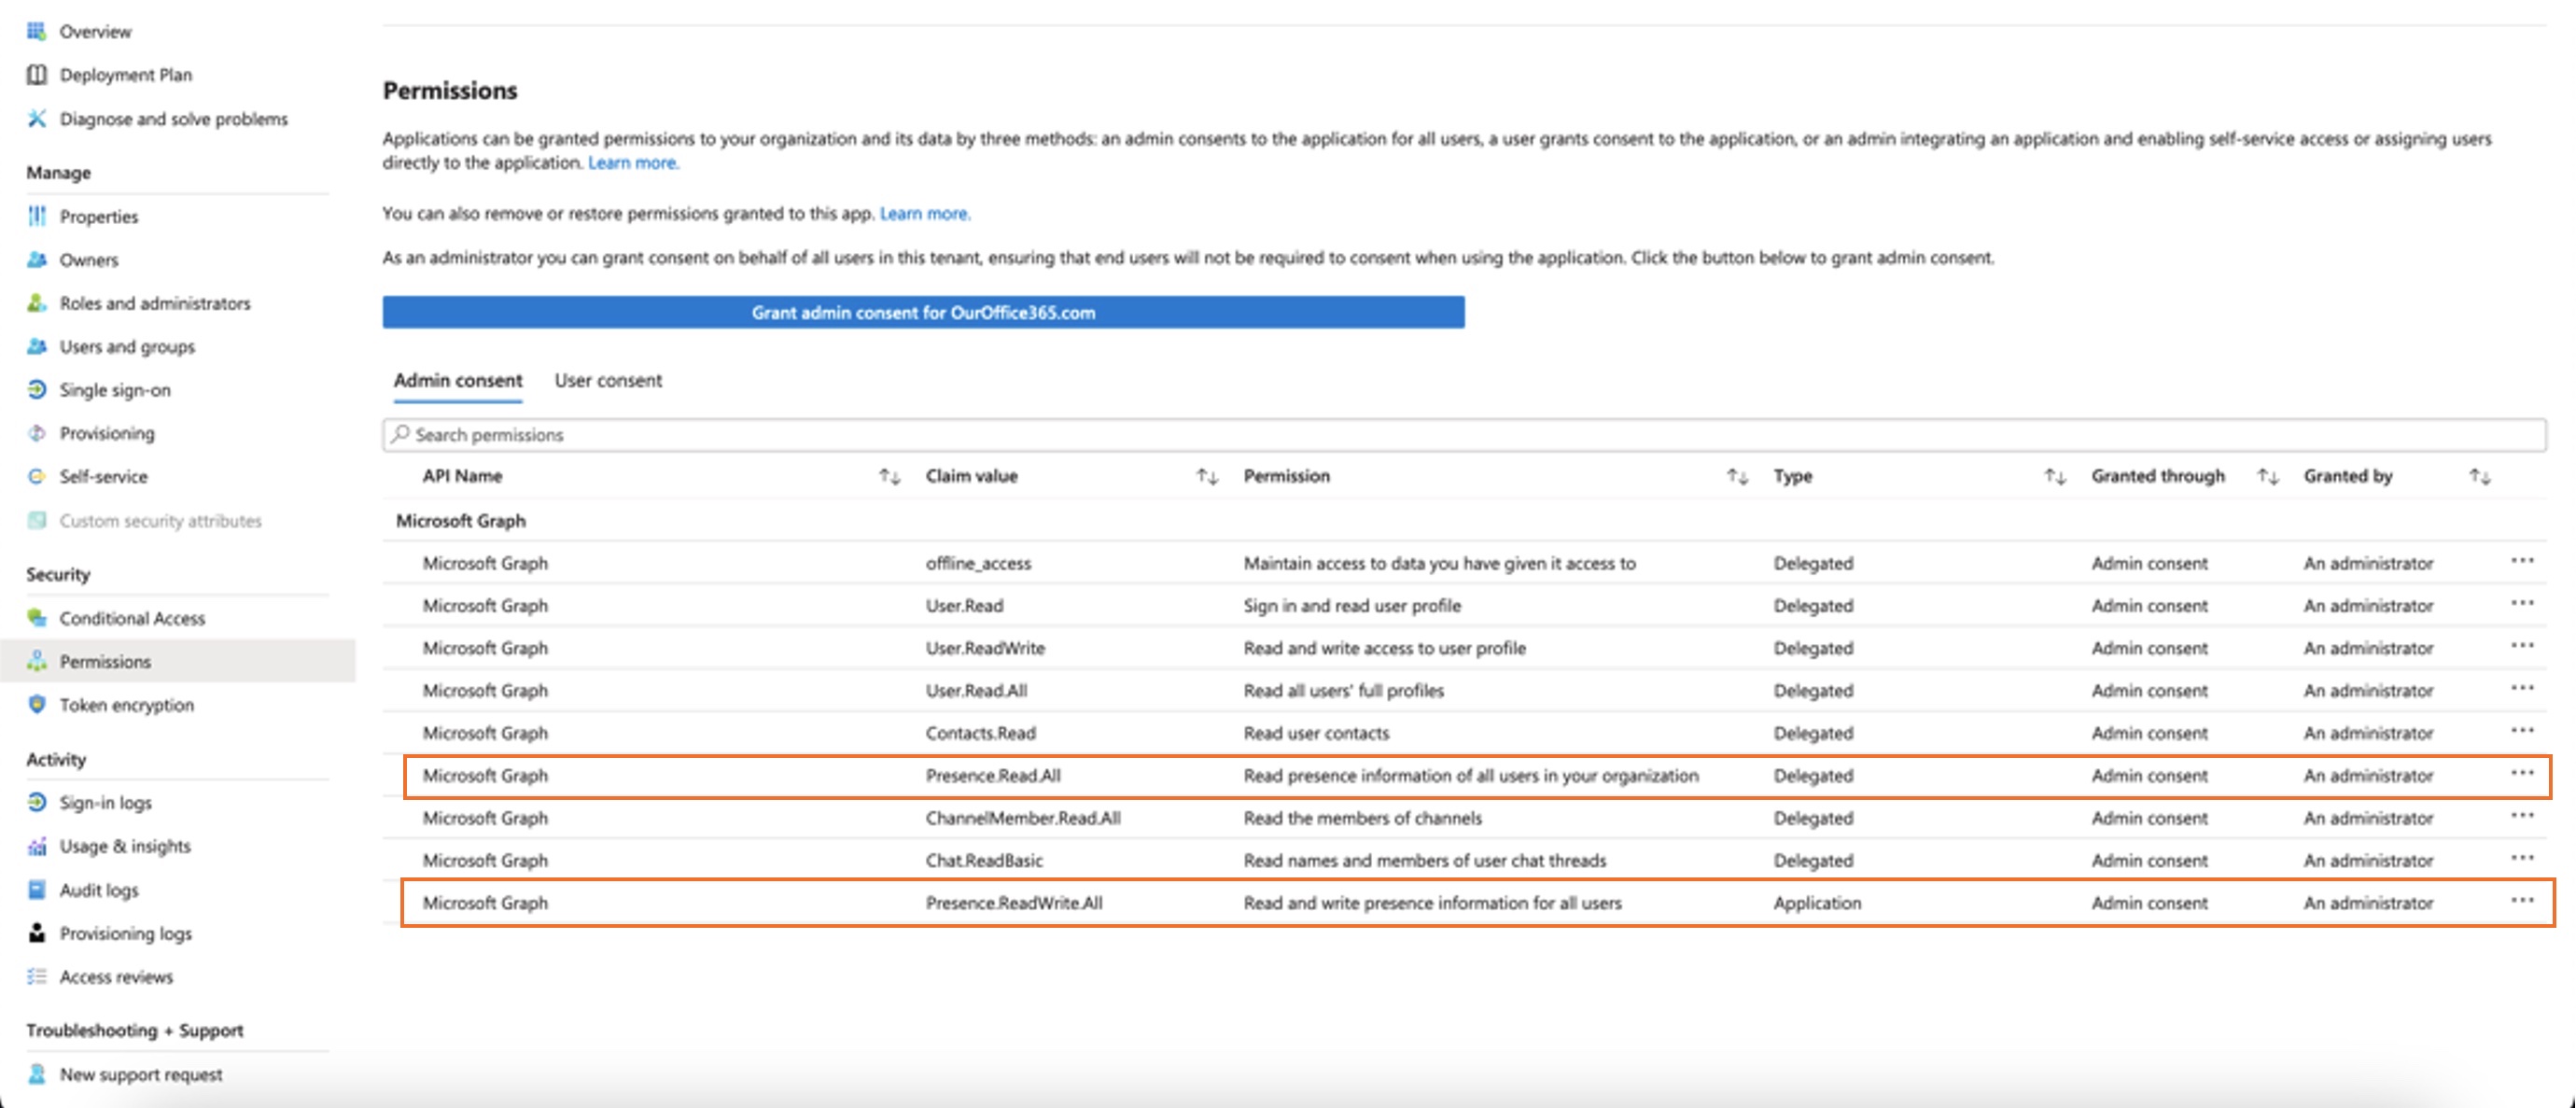
У згоді адміністратора слід враховувати такі дозволи:
Дозволи
Якщо ваша організація наразі використовує дозвіл Якщо ви хочете перейти лише з Після перевірки дозволів увімкніть синхронізацію присутності в Центрі керування. Див. розділ Увімкнення двонаправленої синхронізації присутності. Щоб уникнути проблем із синхронізацією статусу присутності між Microsoft Teams і Webex, рекомендуємо встановити для параметра Потрібне призначення значення Ні. Щоб оновити налаштування, перейдіть до центру адміністрування Microsoft Entry або порталу Azure та виберіть та виберіть Ні. Якщо з будь-якої причини вам потрібно залишити цей параметр як «Так», переконайтеся, що ви правильно призначили користувачів, виконавши кроки, зазначені в цих документах Microsoft: Призначення ролей програм програмам & Керування призначенням користувачів та груп до програми. |
Налаштування програми Cisco Call
Ви можете створити кілька налаштувань програми Cisco Call для користувачів Microsoft Teams відповідно до потреб вашої організації. Ви можете створити налаштування програми за замовчуванням для всіх користувачів або створити 10 додаткових налаштувань однієї програми та призначити їх певним користувачам чи групам.
Для отримання додаткової інформації див. Налаштування програми Cisco Call для користувачів Microsoft Teams.
Дозволи для інтеграції Cisco Call та Microsoft Teams
Служба інтеграції використовує API Webex та Microsoft для доступу до даних, таких як централізована історія викликів, для відображення та оновлення статусів, наприклад, позначення голосових повідомлень як прочитаних, без зберігання будь-яких даних користувача. Усі передачі даних між інтеграцією та Webex/Microsoft Бекенди працюють через зашифровані HTTPS-канали. Таким чином, сервіс гарантує, що дані користувачів не зберігаються в хмарі, посилюючи конфіденційність та безпеку даних.
Ми запитуємо мінімально необхідні дозволи від Microsoft для виклику API Microsoft для активації функції інтеграції. У наступній таблиці описано кожен дозвіл, який ми запитуємо, і чому він потрібен.
| Дозвіл | Причина |
|---|---|
|
offline_access |
Дозволяє службі інтеграції генерувати новий токен доступу, не вимагаючи від користувача частої повторної авторизації. |
|
Користувач.Читати |
Дозволяє службі інтеграції зчитувати основну інформацію користувача, таку як адреса електронної пошти. |
|
Користувач.ReadWrite |
Дозволяє службі інтеграції зберігати номери швидкого набору в профілях користувачів. |
|
Користувач.Читати.Все |
Дозволяє службі інтеграції шукати користувачів в Active Directory для здійснення викликів. |
|
Контакти.Читати |
Дозволяє службі інтеграції шукати контакт користувача в Outlook для здійснення дзвінків. |
|
ChannelMember.Read.All |
Дозволяє розширенню інтеграційних повідомлень зчитувати учасників каналу, щоб користувач міг знайти певного учасника каналу для дзвінка. |
|
Чат.ЧитатиОсику |
Дозволяє розширенню інтеграційних повідомлень зчитувати учасників групового чату, щоб користувач міг знайти певного учасника для дзвінка. |
|
Присутність.Читання.Все |
Дозволяє службі інтеграції зчитувати інформацію про присутність усіх користувачів у каталозі. |
|
Presence.ReadWrite.All |
Дозволяє службі інтеграції зчитувати всю інформацію про присутність і записувати дані про активність і доступність усіх користувачів у каталозі. |
|
Присутність.Читання/Запис |
Дозволяє службі інтеграції зчитувати інформацію про присутність та записувати дані про активність і доступність користувача. |
Конфігурація центру керування
Ви можете налаштувати та ввімкнути наступні функції в Центрі керування, щоб зробити їх доступними для користувачів Microsoft Teams.
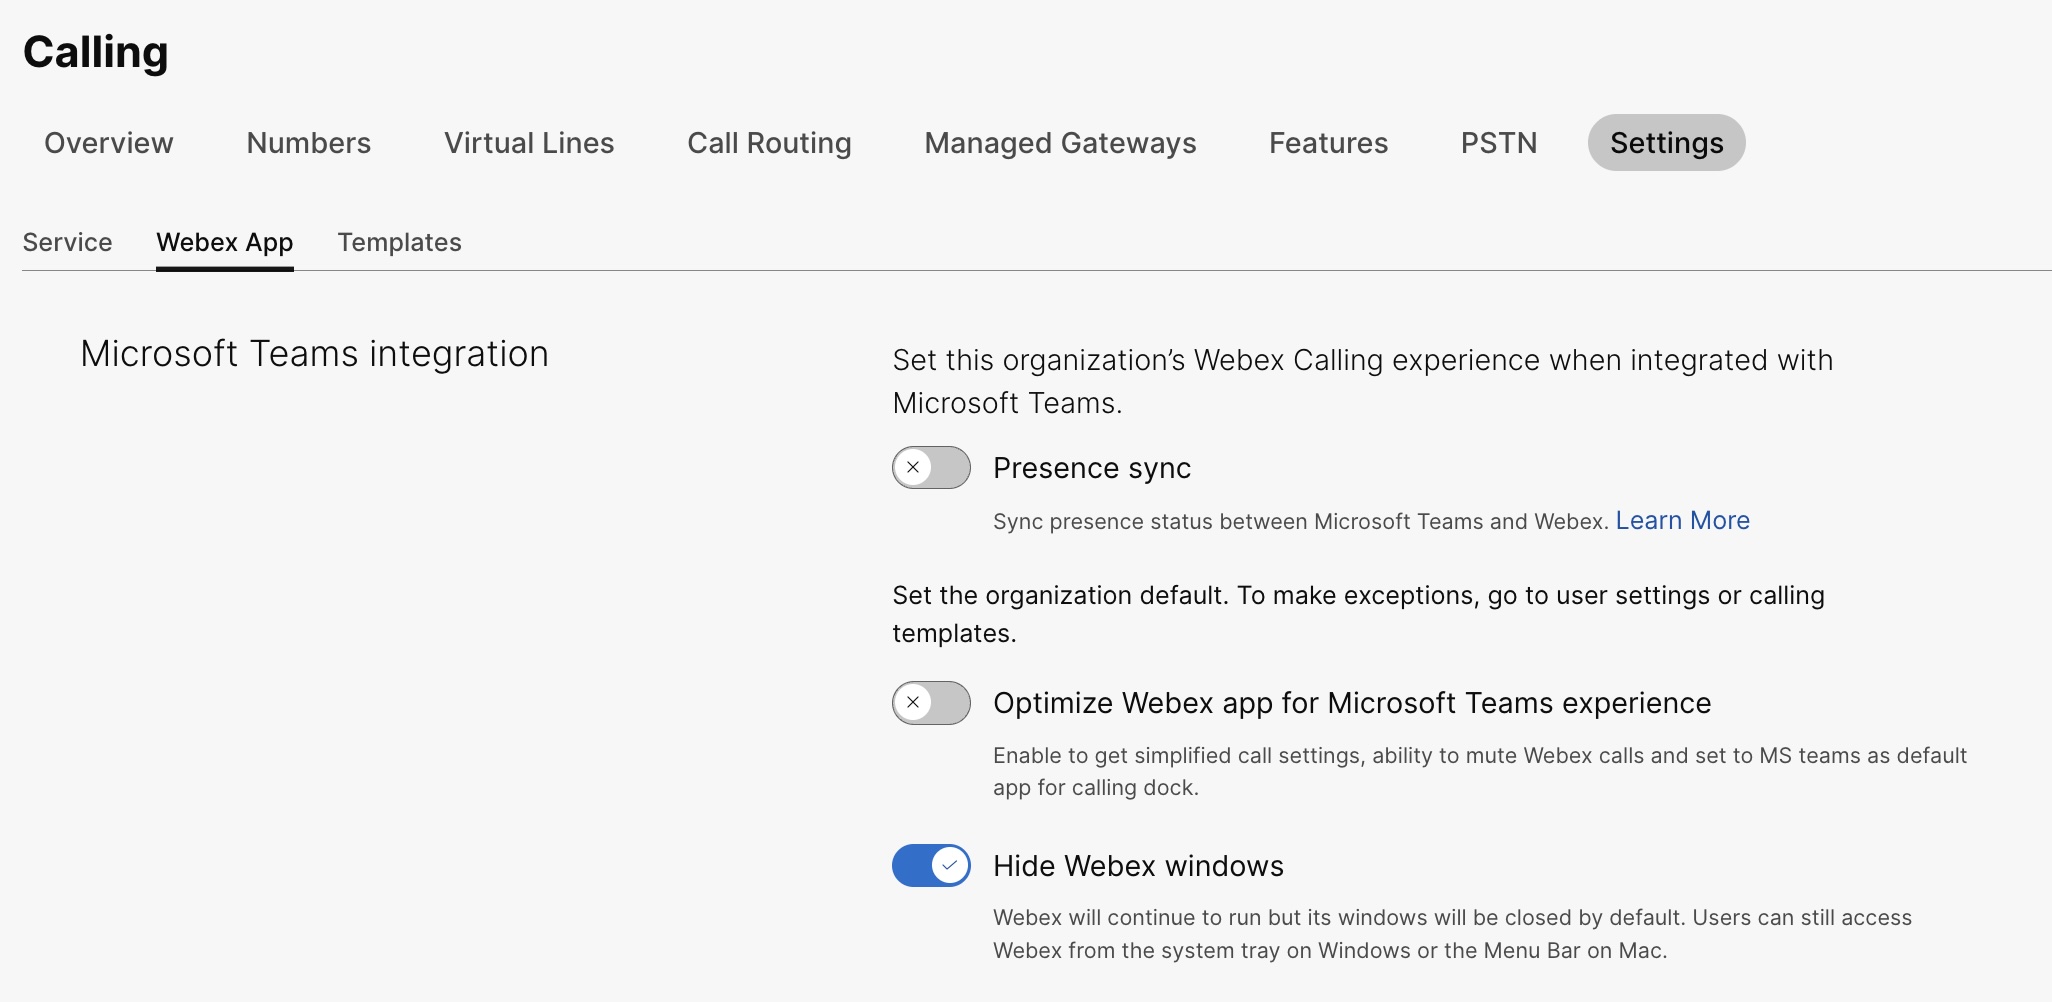
Приховати вікно застосунку Webex
Для організацій, які обрали інтеграцію Cisco Call з Microsoft Teams, ця інтеграція є основним інтерфейсом користувачів до сервісів Webex. Після налаштування застосунок Webex все ще інстальовано та запущено на комп’ютерах ваших користувачів, але його вікно буде закрито за замовчуванням. Дії, виконані під час інтеграції Cisco Call, можуть запускати певні функції в застосунку Webex, але загалом користувачам не потрібно взаємодіяти з застосунком Webex.
Через Центр керування можна приховати вікно програми Webex на таких рівнях:
-
Рівень організації
-
Рівень групи користувачів
-
Рівень користувача
Приховування вікна застосунку Webex для організації
Налаштування, налаштовані на рівні організації, автоматично застосовуються до всіх користувачів в організації.
| 1 |
Увійдіть у Центркерування. |
| 2 |
Перейти до . |
| 3 |
Натисніть вкладку Програма Webex, перейдіть до розділу Інтеграція з Microsoft Teams та увімкніть Приховати вікна Webex.
Ви також можете використовувати публічний API, щоб приховати вікно програми Webex для всіх користувачів в організації, які використовують інтеграцію Cisco Call з Microsoft Teams. Докладніше див. Оновлення налаштувань MS Teams організації на developer.webex.com. |
Приховати вікно застосунку Webex для групи користувачів
Щоб приховати вікно застосунку Webex для групи користувачів, створіть шаблон виклику та призначте його групі користувачів. Конфігурація в шаблоні застосовується до всіх користувачів у групі.
Щоб створити новий шаблон для приховування вікна програми Webex:
| 1 |
Увійдіть у Центркерування. |
| 2 |
Перейти до . |
| 3 |
Натисніть Створити шаблон, виберіть Створити шаблон та натисніть Далі. Якщо освіта є вашою галуззю бізнесу, ви можете застосувати попередньо визначені шаблони з власними налаштуваннями для студентів або вчителів. |
| 4 |
У розділі Загальні введіть назву шаблону та опис. |
| 5 |
Перейдіть до розділу Інтеграція з Microsoft Teams та увімкніть Приховати вікна Webex. |
| 6 |
Натисніть кнопку Створити шаблон і далі. |
| 7 |
Знайдіть і виберіть групу для цього шаблону та натисніть Готово. Змінити або видалити шаблон:
Щоб змінити шаблон, клацніть шаблон, змініть перемикачі та натисніть Зберегти. Щоб видалити шаблон, клацніть шаблон і виберіть Видалити зі спадного списку Дії. На сторінці Видалити шаблон встановіть прапорець, що повідомляє про остаточне видалення шаблону, а потім натисніть Видалити. |
Міркування щодо застосування шаблонів викликів до групи користувачів
-
Коли користувач підключений до організації, він успадковує налаштування з рівня організації.
-
Якщо користувача додано до групи користувачів, застосовуються налаштування з шаблону Виклик.
-
Якщо користувач належить до кількох груп користувачів, то шаблон з найвищим рангом (Ранг 1) має найвищий пріоритет, і застосовуються налаштування цього шаблону.
-
Якщо користувач має індивідуальні налаштування користувача, то ці налаштування мають пріоритет над налаштуваннями групи користувачів або рівня організації.
Див. Налаштування шаблонів параметрів для отримання додаткової інформації про керування шаблонами.
Ви можете застосувати існуючий шаблон або з розділу Група, або з розділу Виклик.
- Щоб застосувати шаблон із розділу «Група», див. Налаштування шаблону параметрів.
- Щоб подати заявку з розділу «Виклики», виконайте такі дії.
| 1 |
Увійдіть у Центркерування. |
| 2 |
Перейти до . |
| 3 |
Натисніть |
| 4 |
Введіть назву групи, до якої потрібно застосувати шаблон, а потім виберіть групу. |
| 5 |
Клацніть Готово. |
 поруч із існуючим шаблоном і натисніть
 Приховування вікна застосунку Webex для користувача
Налаштування окремого користувача замінюють налаштування рівня організації та групи користувачів.
| 1 |
Увійдіть у Центркерування. |
| 2 |
Перейти до . |
| 3 |
Виберіть користувача та натисніть Виклик. |
| 4 |
Перейдіть до розділу Досвід дзвінків користувача та натисніть Інтеграція з Microsoft Teams. |
| 5 |
Увімкнути Приховати вікна Webex. 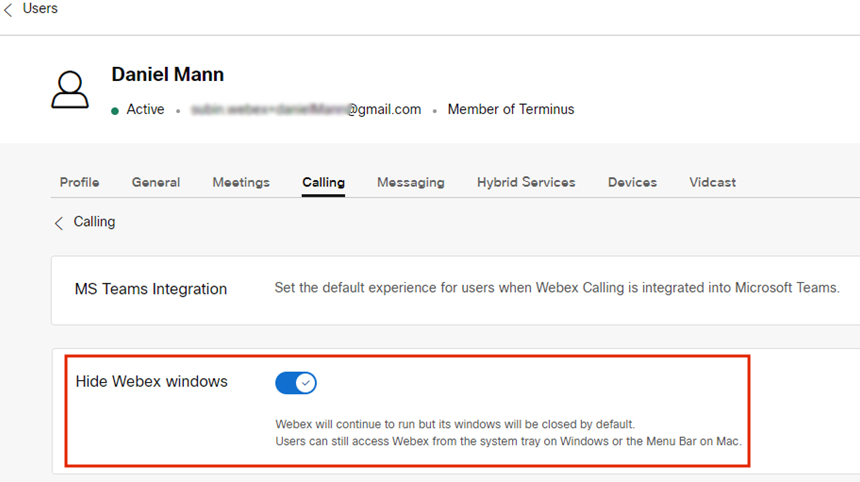 Після налаштування параметрів для користувача ви можете додатково змінити параметри на рівні користувача. Налаштування користувача не повертаються автоматично до налаштувань організації за замовчуванням. Ви можете використовувати публічний API, щоб приховати вікно програми Webex від клієнта Microsoft Teams для окремого користувача. Див. Налаштування параметрів MS Teams для користувача та Отримання параметрів служби програм для користувача на developer.webex.com. |
Після налаштування параметрів користувачам потрібно перезапустити застосунок Webex і ввійти, щоб переглянути зміни.
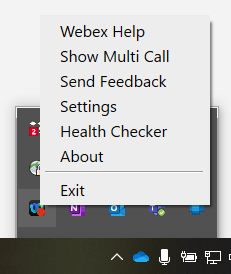
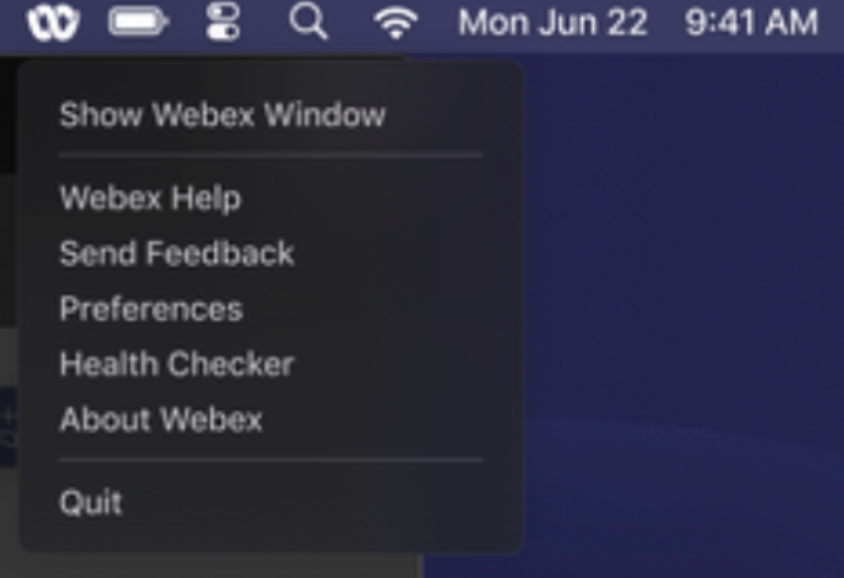
Якщо користувачі хочуть взаємодіяти з самим застосунком Webex, вони можуть отримати до нього доступ із системного трея у Windows та з рядка меню на Mac. Програма Webex відображається на панелі завдань Windows або в панелі Dock macOS лише тоді, коли вікно активне та використовується.
|
Додаток Webex у системному треї Windows |
Додаток Webex у рядку меню Mac |
Увімкнути вікно виклику док-станції
Вікно док-станції викликів (багатовикликів) – це окреме плаваюче вікно, яке допомагає користувачам керувати кількома або спільними лініями в одному вікні. Користувачі можуть здійснювати та приймати дзвінки, переглядати стан усіх ліній та мати кращий доступ до таких функцій, як утримання, переадресація та втручання, не переходячи до іншого вікна.
| 1 |
Увійдіть у Центркерування. |
| 2 |
Перейти до . |
| 3 |
Натисніть вкладку Додаток Webex, перейдіть до розділу Доступ до функцій під час виклику і в розділі Додаткові функціїувімкніть Відображати док-станцію виклику та виберіть один із наведених нижче параметрів.
Ви також можете налаштувати цю функцію на рівні групи користувачів та на рівні користувача.
|
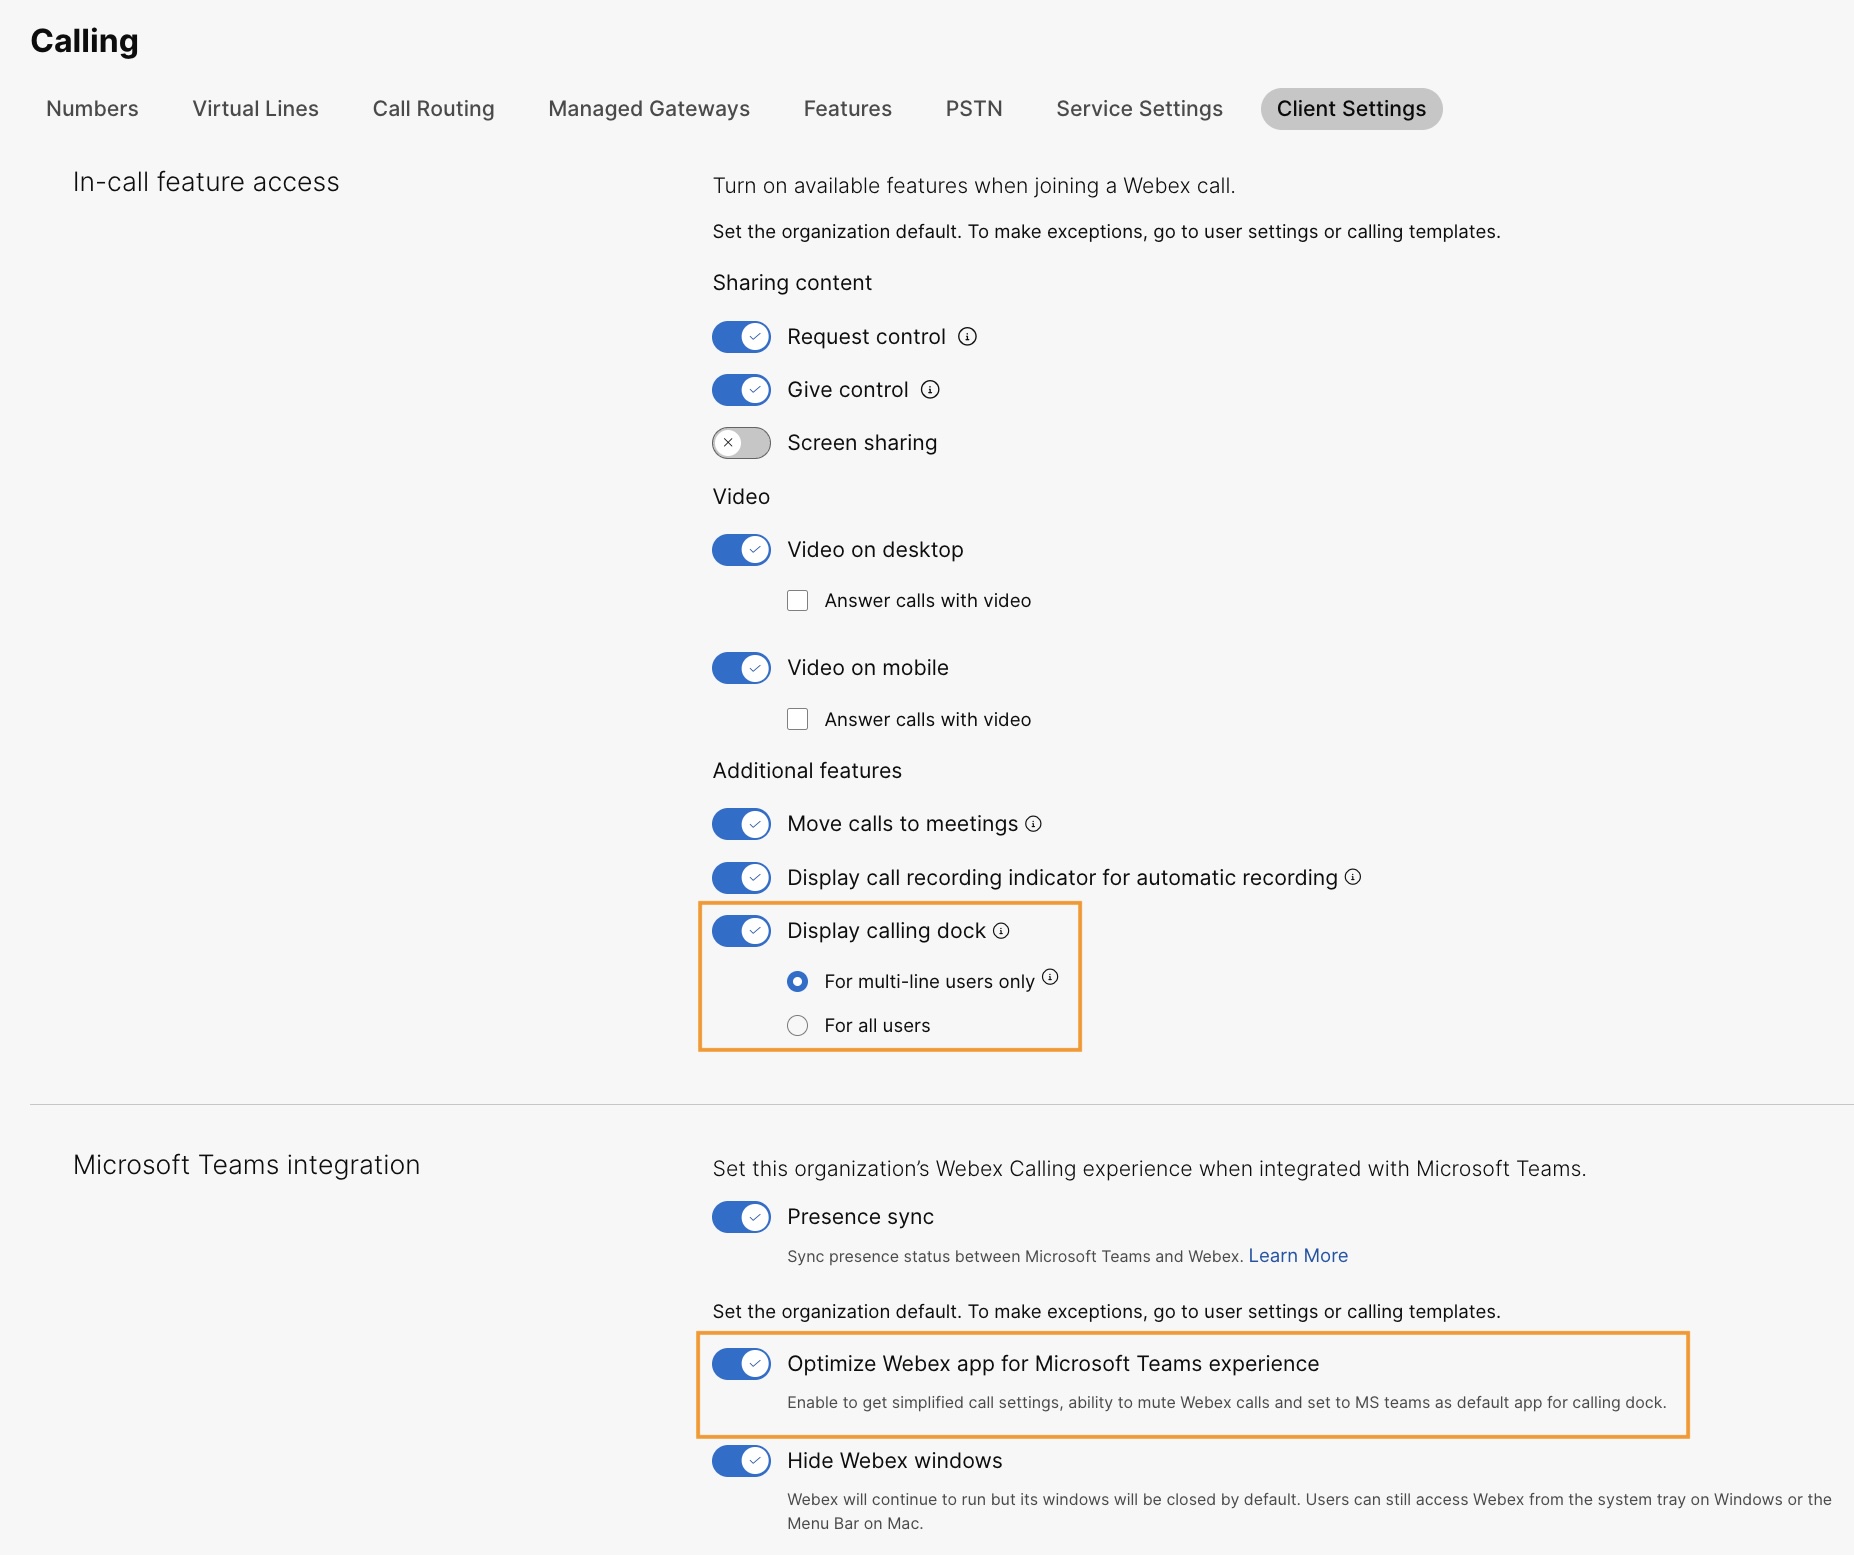
Оптимізуйте застосунок Webex для роботи з Microsoft Teams
Ця функція надає користувачам такі можливості:
-
Спрощені налаштування викликів — у налаштуваннях викликів відображаються лише ті параметри, які необхідні для інтеграції. Увімкнення цієї функції спрощує лише налаштування викликів, доступні через Calling Dock. Налаштування викликів, доступні з інтеграції Cisco Call, за замовчуванням залишаються спрощеними.
-
Вимкнути звук викликів Cisco — вхідні виклики Cisco вимикаються, коли користувач бере участь у виклику або нараді Microsoft Teams. Щоб ця функція працювала, її потрібно ввімкнути в Центрі керування, а користувач має ввімкнути опцію Вимкнути сповіщення лише під час зустрічі або дзвінка у налаштуваннях викликів в інтеграції Cisco Call.
Якщо вимкнути цю функцію в Центрі керування, налаштування користувача працюватимуть лише тоді, коли користувач перебуває на виклику або зустрічі Cisco. Якщо ввімкнути цю функцію, налаштування користувача працюватимуть, коли користувач перебуває у виклику чи нараді Microsoft Teams або у виклику чи нараді Cisco.
-
Робота з однією програмою — коли користувач натискає значки голосової пошти та централізованої історії викликів на панелі викликів, його перенаправляє до Microsoft Teams Cisco Call замість програми Webex.
Для користувачів Windows: Клацання значка програми Webex у системному треї відкриває панель викликів замість програми Webex.
| 1 |
Увійдіть у Центркерування. |
| 2 |
Перейти до . |
| 3 |
Натисніть вкладку Додаток Webex, перейдіть до розділу Інтеграція з Microsoft Teams та ввімкніть Оптимізація застосунку Webex для Microsoft Teams.
Цей перемикач вимкнено, якщо ви не ввімкнули перемикач Відображати док-станцію для викликів у розділі Доступ до функцій під час виклику. Ви також можете налаштувати цю функцію на рівні групи користувачів та на рівні користувача.
|
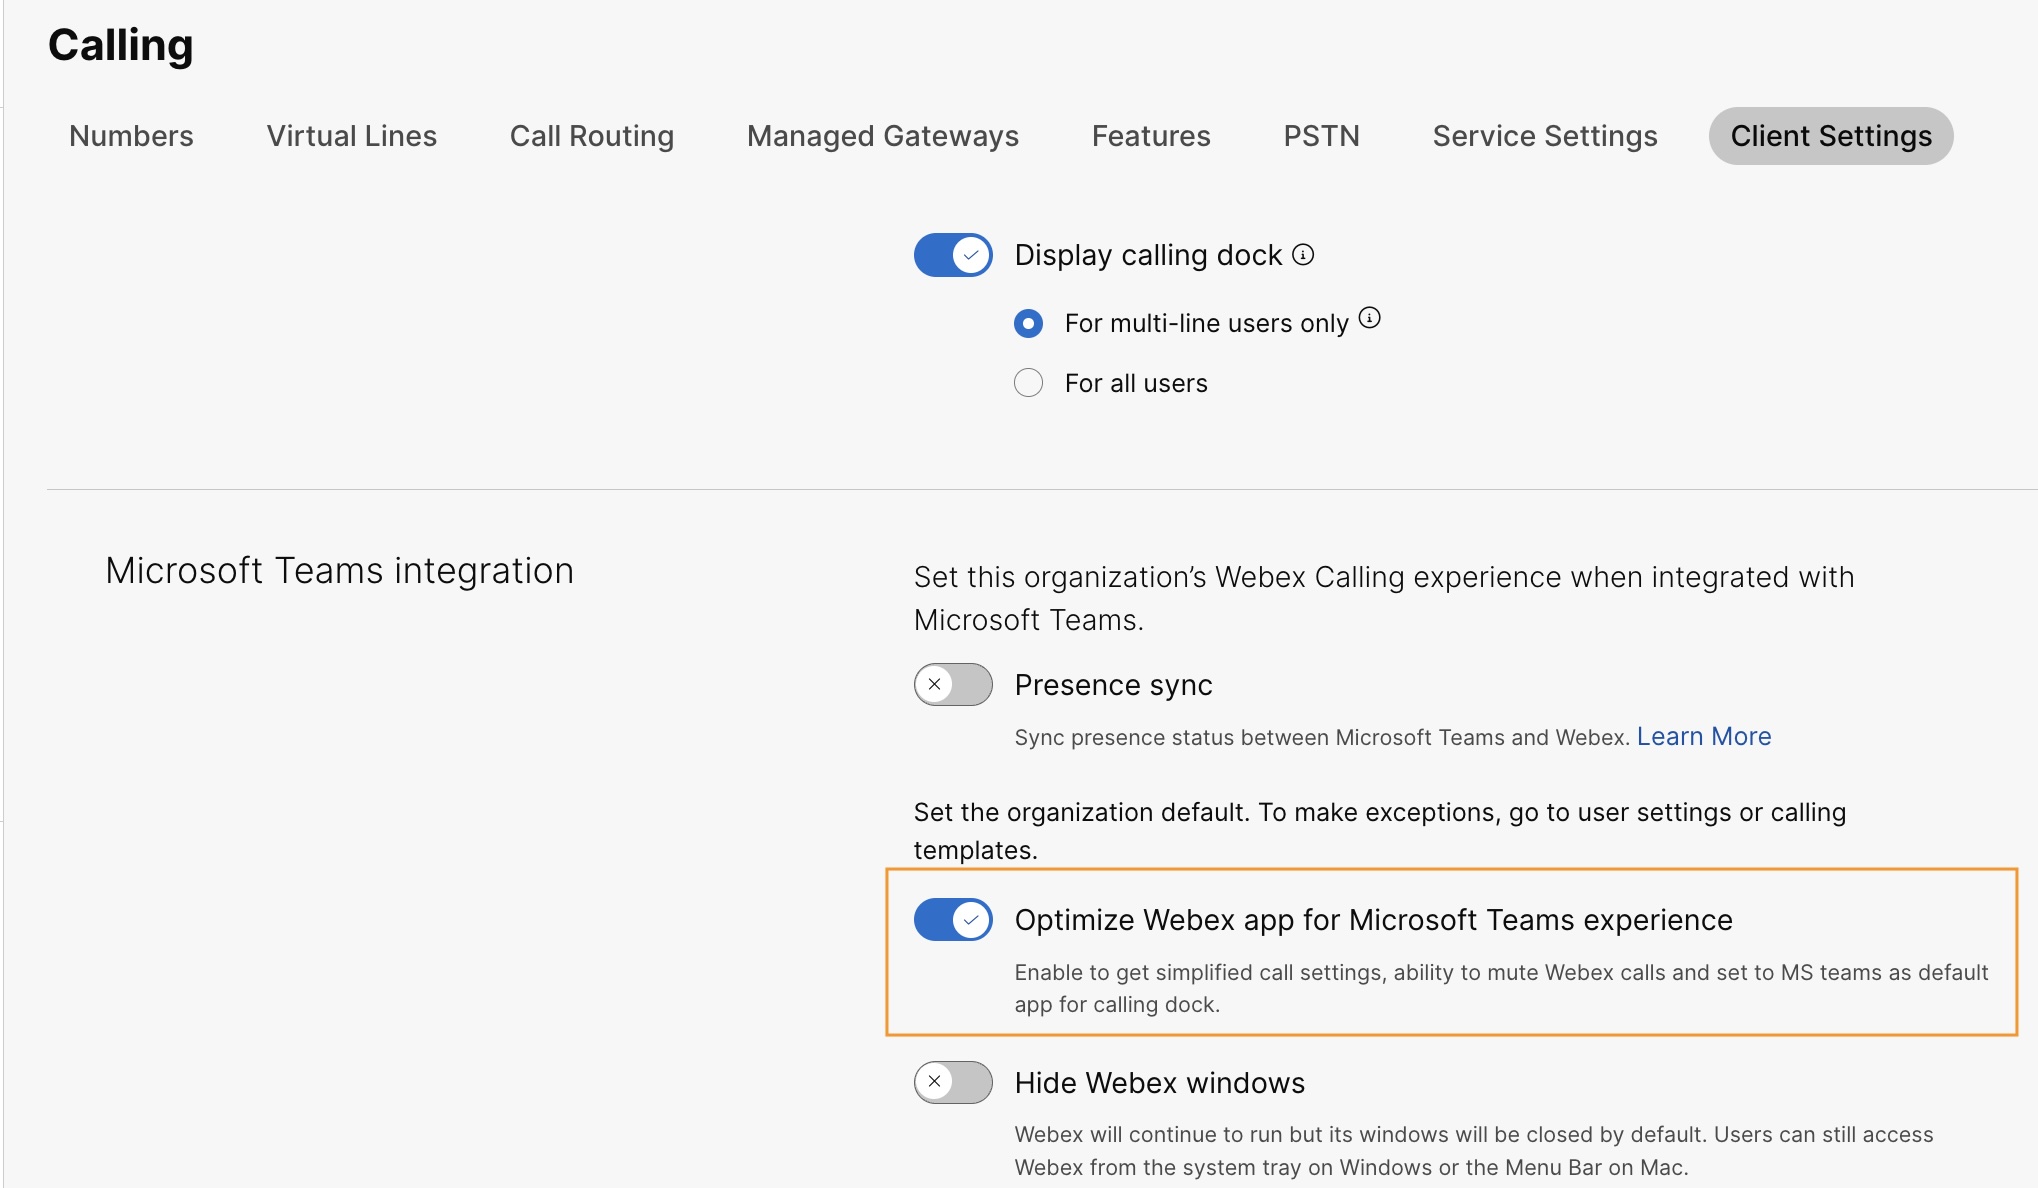
Увімкнути голосову пошту, централізовану історію викликів та синхронізацію присутності
Голосова пошта та централізована історія дзвінків
Функції голосової пошти та централізованої історії викликів увімкнено за замовчуванням для клієнтів Webex Calling, Dedicated Instance та UCM Cloud.
Щоб отримати додаткові відомості про ввімкнення голосової пошти для користувачів Webex Calling, див.: Налаштування та керування параметрами голосової пошти для користувача Webex Calling.
Щоб отримати додаткові відомості про ввімкнення голосової пошти для користувачів BroadWorks, див. Увімкнення голосової пошти для інтеграції Microsoft Teams.
Адміністратори BroadWorks повинні ввімкнути єдину централізовану історію викликів, щоб забезпечити правильну роботу цієї функції. Див. Webex для Cisco BroadWorks Configuration Guide для отримання додаткової інформації.
Двонаправлена синхронізація присутності
Ця функція забезпечує двонаправлену синхронізацію стану присутності між Microsoft Teams та Webex, підтримуючи кількох клієнтів Microsoft Teams в одній організації Webex. Стан присутності включає У виклику, На зустрічі, Презентаціята Не турбувати.
Після ввімкнення цієї функції, коли користувач здійснює або отримує виклик Webex, його статус у Microsoft Teams змінюється на У виклику. Коли вони вмикають режим «Не турбувати » у застосунку Webex або на будь-якому пристрої Webex, стан автоматично синхронізується з Microsoft Teams. Аналогічно, статуси На зустрічі та Презентація синхронізуються між програмами.
Коли ввімкнено режим «Не турбувати » у застосунку Webex або будь-якому пристрої Webex користувача, він не отримуватиме жодних сповіщень про вхідні виклики та повідомлення в застосунку Webex, на пристрої Webex або в Microsoft Teams.
Ви також можете використовувати публічний API, щоб увімкнути синхронізацію присутності Webex із клієнтом Microsoft Teams. Докладніше див. Оновлення налаштувань MS Teams організації на developer.webex.com.
У наступній таблиці показано двонаправлене представлення синхронізації стану між Webex та Microsoft Teams.
|
Стан Webex |
Стан команд Microsoft |
|---|---|
|
|
|
|
|
|
|
|
|
|
|
|
Наразі ви можете налаштувати цю функцію лише на рівні організації.
| 1 |
Увійдіть у Центркерування. |
| 2 |
Перейти до . |
| 3 |
Натисніть вкладку Додаток Webex, перейдіть до розділу Інтеграція з Microsoft Teams та увімкніть Синхронізацію присутності. Ви можете ввімкнути перемикач Приховати вікна Webex для найкращого використання, але це необов’язково. |
| 4 |
Перейдіть до розділу Синхронізація стану режиму «Не турбувати» (DND) та увімкніть перемикач. 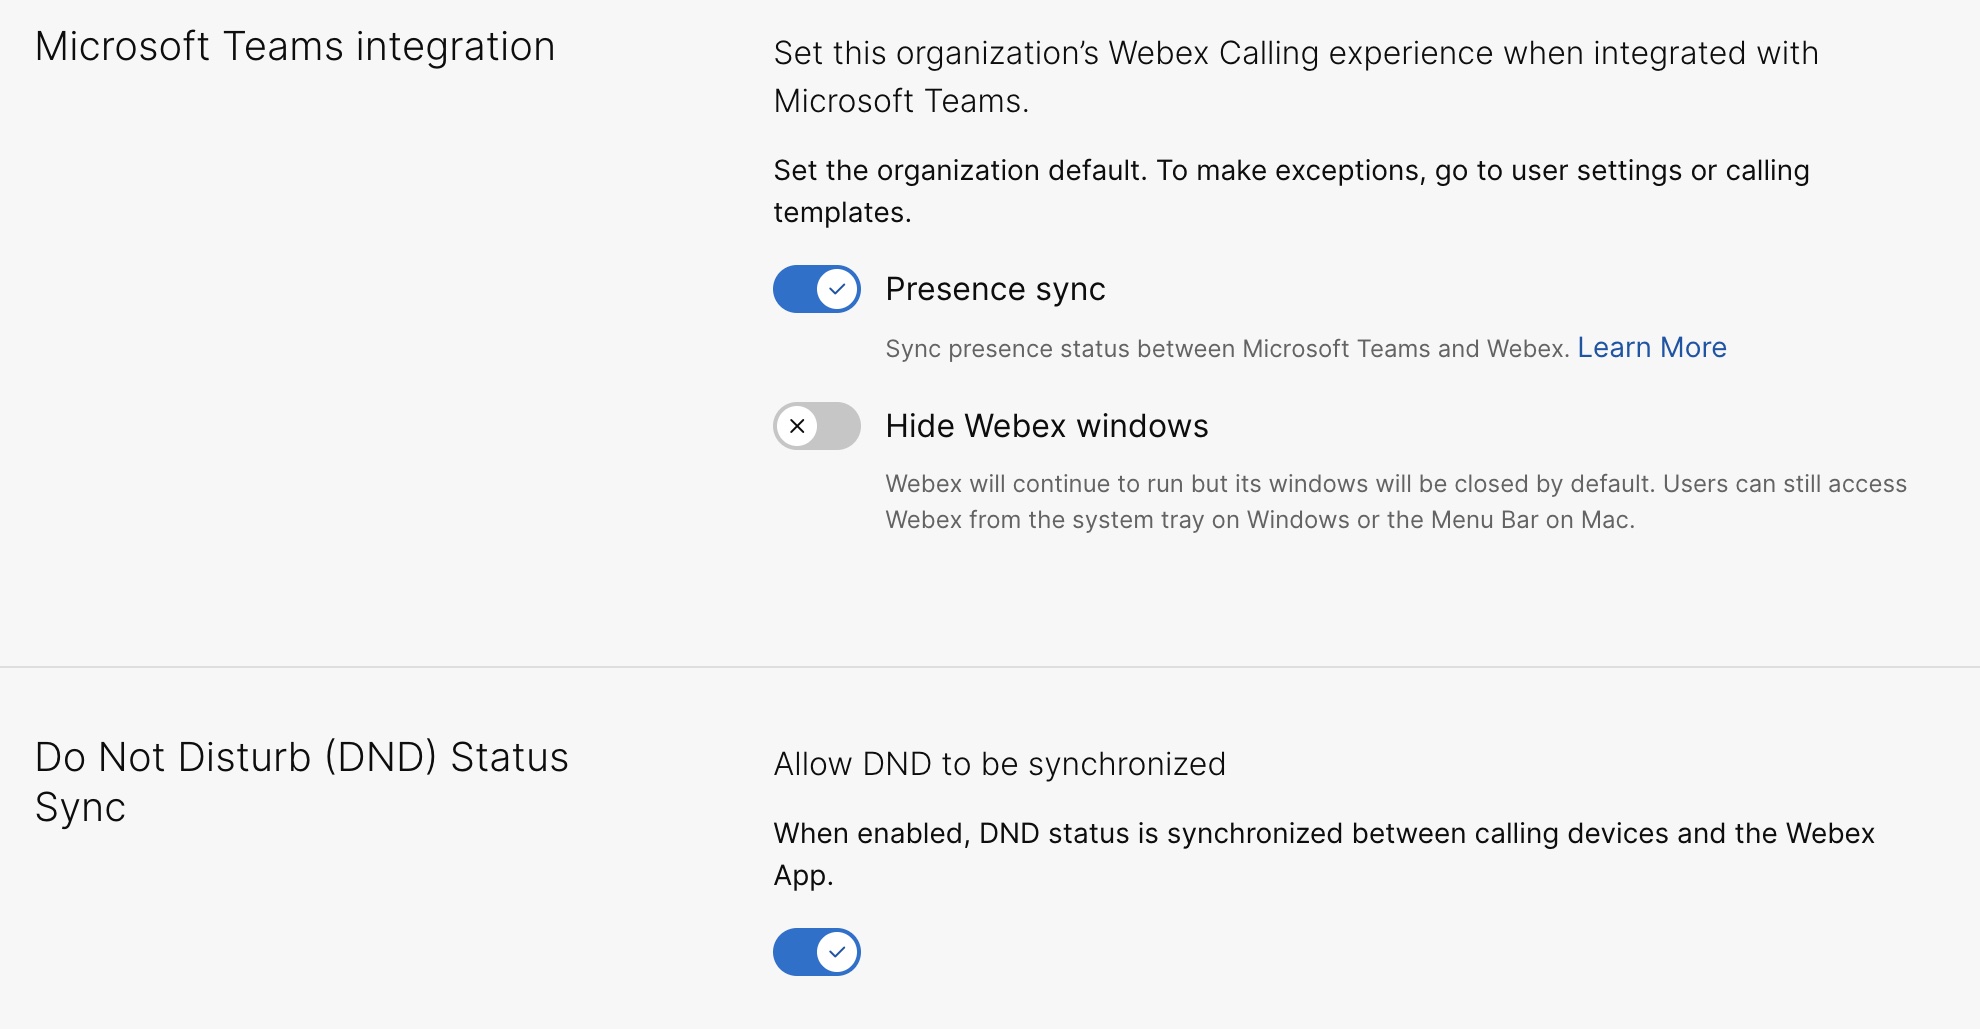 |
Додаткова конфігурація для користувачів Unified CM
Щоб увімкнути голосову пошту, централізовану історію викликів та службу двонаправленої синхронізації присутності для локальних клієнтів Unified CM, виконайте такі дії:
Активація послуги голосової пошти для локальних клієнтів займає максимум 12 годин.
| 1 |
Увійдіть у Центркерування. | ||||
| 2 |
Перейти до . У картці Керування UC клацніть Реєстр. Відобразиться список груп кластерів з описом, станом, кластерами й вузлами. | ||||
| 3 |
Виконайте наступні дії:
З’явиться сторінка реєстру зі списком кластерів, що належать до вибраної групи кластерів. | ||||
| 4 |
Клацніть Відомості поруч із кластером, до якого належить вузол конкретного продукту. Відобразиться назва вузла із зазначенням версії, продукту й стану. | ||||
| 5 |
Клацніть значок трьох крапок ⋮ поруч із параметром «Історія подій» і виберіть Керування службами. З’явиться сторінка «Керування службами» зі списком служб. | ||||
| 6 |
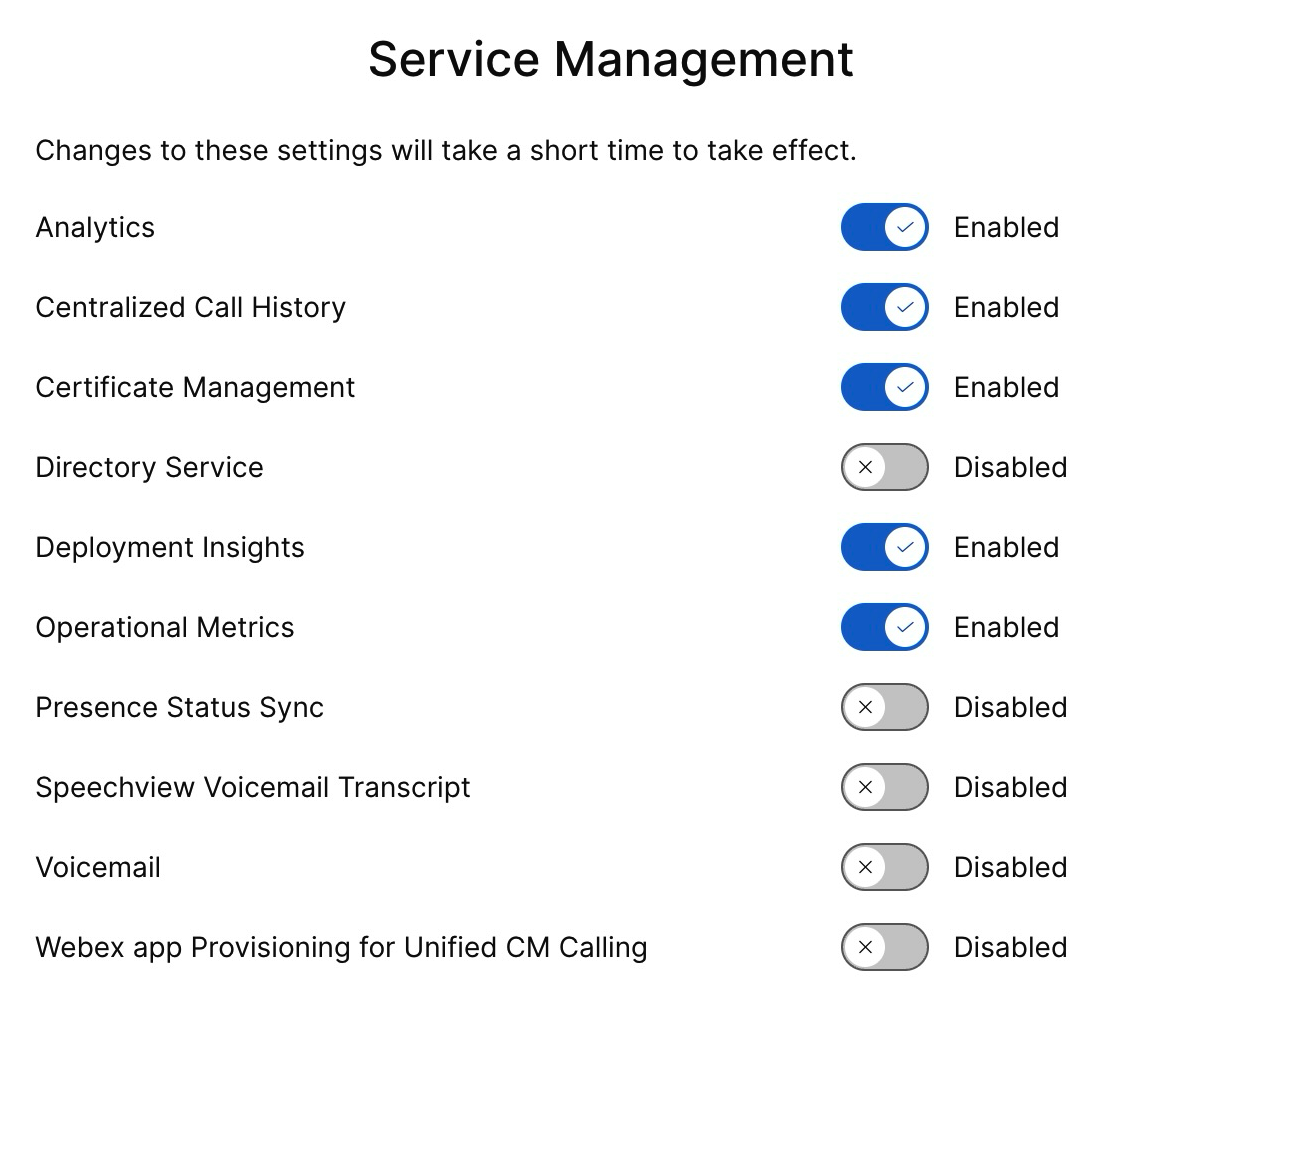
Використовуйте кнопку-перемикач, щоб увімкнути голосову пошту, централізовану історію викликів та синхронізацію статусу присутності.
| ||||
| 7 |
Клацніть Надіслати. | ||||
| 8 |
Якщо відображається спливаюче вікно Підтвердження збору даних, погодьтеся з ним, встановивши прапорець, і натисніть Надіслати. |
Увімкнення Cisco AI Assistant
Ця функція доступна лише для користувачів Webex Calling.
Cisco AI Assistant генерує зведення, до яких користувачі можуть отримати доступ як під час, так і після взаємодії, незалежно від того, чи було записано дзвінок.
Якщо під час виклику використовується помічник зі штучним інтелектом, користувач, який увімкнув зведення та стенограму після виклику, матиме доступ до зведень, завдань та стенограм після виклику в історії викликів. Ця доступність застосовується незалежно від того, чи було записано дзвінок, і контролюється як налаштуваннями адміністратора, так і налаштуваннями користувача. Дані AI Assistant зберігаються протягом фіксованого періоду в 365 днів.
Ви можете ввімкнути налаштування зведення викликів AI Assistant для переадресації викликів та конференцій на рівні організації, користувача та шаблону. Функції AI Assistant недоступні для користувачів з Індії.
Щоб отримати докладнішу інформацію про ввімкнення Cisco AI Assistant з Control Hub, див. Керування Cisco AI Assistant для Webex Calling.


