- Home
- /
- Article

Thanks for your feedback.

Ensure regulatory compliance of Webex Calling content
 In this article
 Feedback?
As a compliance officer, you can use Control Hub to search through call detail records (CDR) and call recordings for your organization.
You can look for a specific person in your company, find CDRs and call recordings associated to the calls, and generate a report based on your findings. This way, you can make sure people are complying with both your internal policies and any external regulatory requirements.
-
Control Hub now supports eDiscovery of Calling content for your organizations.
-
Use a single unified compliance solution for Webex Meetings,Webex App, and Webex Calling.
Search and generate compliance reports
You must have the compliance officer role assigned to you to create and view reports.
-
You can search through the content that's deleted, subject to data retention periods or legal hold.
-
You can search through the Webex Calling content for somebody who has left your organization, the data is stored since September 2023 and subject to your organization's data retention periods.
-
CDR compliance retention periods:
-
13 months (except European Union countries)
-
6 months European Union countries
For details, see Webex Calling Privacy Data Sheet.
-
-
You can search for all CDRs for Webex Calling calls relating to a user within your organization. This includes the following:
-
CDRs for Calls within the organization
-
CDRs for Calls to a user from the PSTN or calls from a user to the PSTN.
The following isn’t included:
-
Basic Webex Calls
-
Workspace calls or other calls that don't involve a user in the organization
-
- You can search for Call Recordings for Webex Calling calls relating to a user within your organization.
-
Call recordings are available in compliance reports when Webex is the call recording provider.
-
If the customer does not have the Calling compliance add-on license, then only limited recording data is available.
-
The following content is captured in the reports:
|
Webex Calling CDRs |
Call Correlation ID |
|
Calling/Called Line ID | |
|
Calling Number | |
|
Called Number | |
|
Dialed Digits | |
|
User ID | |
|
User Type | |
|
Call Type | |
|
Call Direction | |
|
Duration | |
|
Answered | |
|
Start Time | |
|
Answer Time | |
|
Transfer Time | |
|
Redirecting Number | |
|
Redirected Reason | |
| Call Recording |
Recording ID |
|
Created Time of the report | |
|
Duration | |
|
Owner ID |
-
You can search through content posted within the last 90 days or if you have a Pro Pack you can search through content that's older than 90 days.
-
You can download reports that are up to 10 days old. For reports older than 10 days, rerun the report to access the data.
-
All searches carried out by compliance officers are logged for audit.
-
eDiscovery supports the following proxies:
-
No authentication
-
Basic
-
NTLM on Windows—Configure this proxy to work with the credentials from the operating system, manually entering credentials isn’t supported.
-
Negotiate (Kerberos) on Windows—Configure this proxy to work with the credentials from the operating system, manually entering credentials isn’t supported.
-
-
From the customer view in Control Hub, go to Troubleshooting > Status > View eDiscovery.
-
Choose the data you want to search for (This setting is on by default):
-
Search Webex Messages
-
Search Webex Meetings
-
Search Webex Calling
-
-
Add your search information:
-
Email Address—Enter up to 500 comma-separated email addresses either manually or click CSV Bulk Add to select a CSV file.
-
Space Names(Only applies if you chose to search Webex messages)—Enter up to 5 comma-separated space names.
Space name matching is applied. For example: when you search for note, your results include notes, noted, and footnote.
-
Date Range—Choose a date range for your search.
When you enter multiple values for Email Address and Space Names, the search engine uses these values as: [(email_address1 OR email_address2) AND (space_name1 OR space_name2)]
-
-
Enter your report information:
-
Report Name—Enter a name for your report.
-
Description—[Optional] Add a description for your report.
-
-
Click Search & Generate Report.
Your search is queued and you can review the status of the report. The length of time to create your report depends on the amount of data that matches your search criteria.
When a report ZIP file reaches a limit of 5 GB or 100,000 files, then another ZIP file is created using the same name but prefixed with -1, -2 and so on.
We do support generating an empty report, if there’s no data available.
Install eDiscovery Download Manager
-
Download the eDiscovery Download Manager to view any reports.
-
Ensure you have the Compliance Officer role to run the eDiscovery Download Manager.
-
Ensure there is sufficient space on the computer to download large reports.
The eDiscovery Download Manager application runs in Webex App instead of a separate desktop application.
We're progressively rolling out this feature, so it may not yet be available to all customers.
| 1 |
From Control Hub, go to and click Download Manager. |
| 2 |
Choose the eDiscovery Download Manager for your operating system and follow the instructions to install the application. Ensure to install the recent version of Download Manager for the latest features such as the Webex Calling Support. |
View compliance reports
You can only view the compliance reports that you create. You can review the status of your report and download the report using the eDiscovery Download Manager.
| 1 |
From Control Hub, go to . |
| 2 |
Click REPORTS to review all your reports. Reports have one of the following statuses:
|
| 3 |
Click on a report to review the report details, including status, date initiated, description, and a summary of the contents of your report.
|


Compliance officer role
Full administrators can assign the compliance officer role to any person within their organization. Full administrators can't assign the compliance officer role to themselves, another full administrator must assign the role to them.
For example: If your company requires details for legal proceedings, as a compliance officer you can access the Webex App eDiscovery Search and Extraction tool from Control Hub. You can generate reports from here that contain all the conversations held in Webex App spaces and any files shared within those spaces.
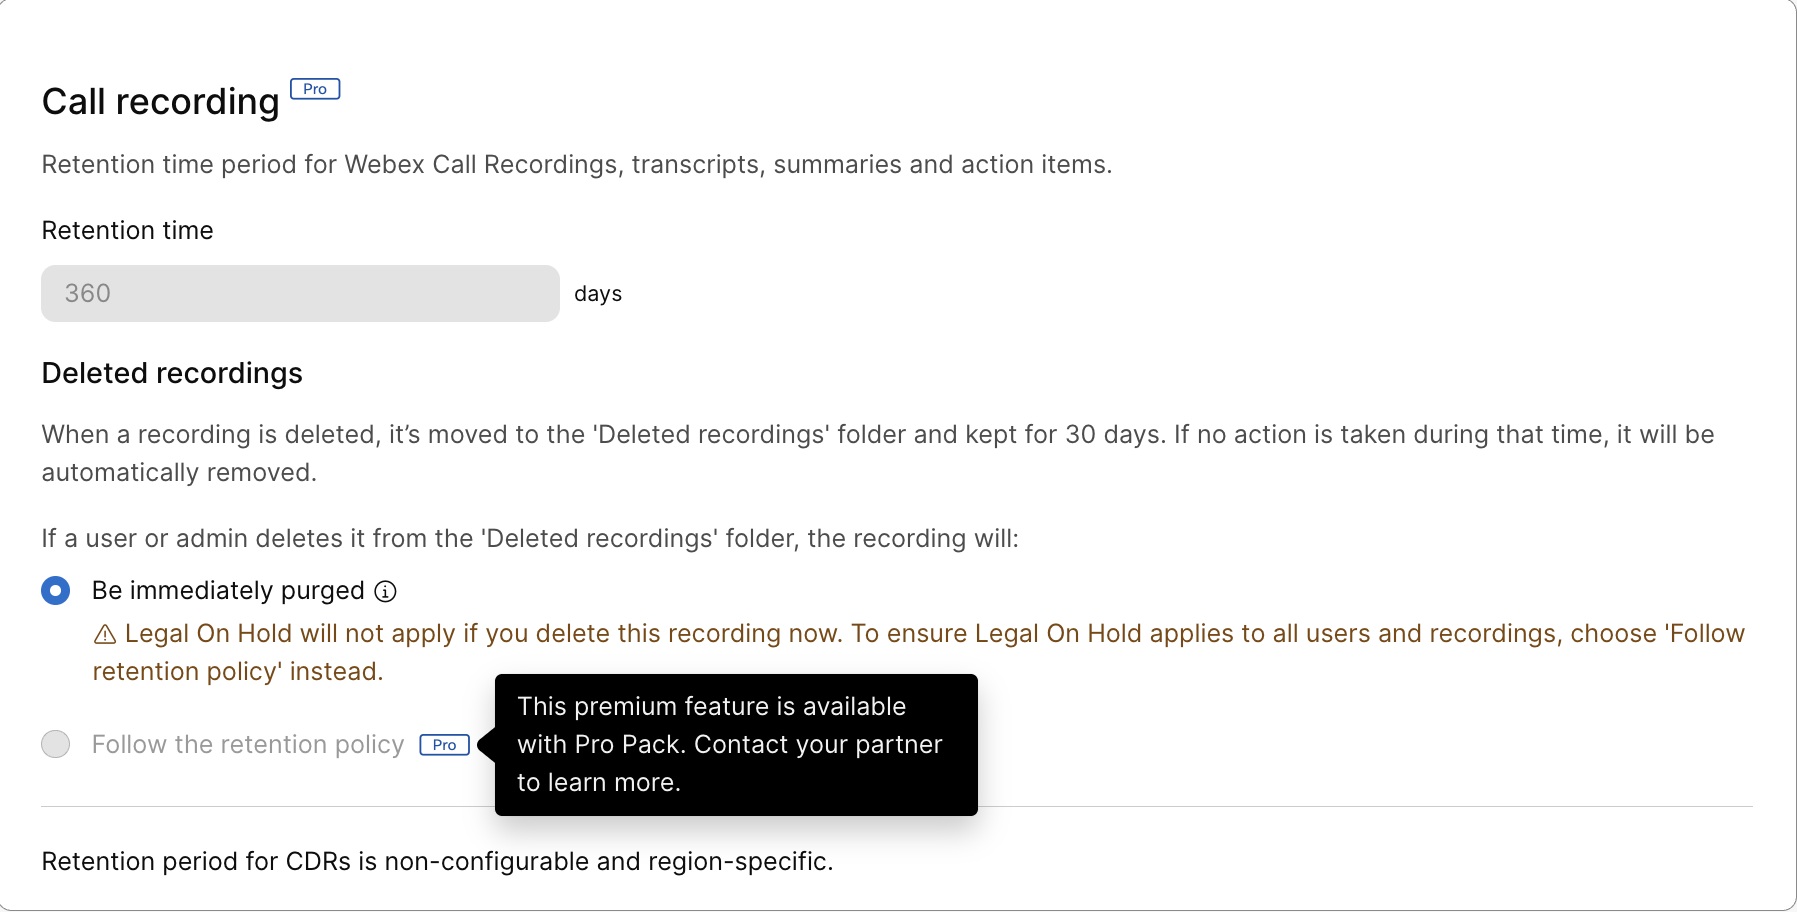
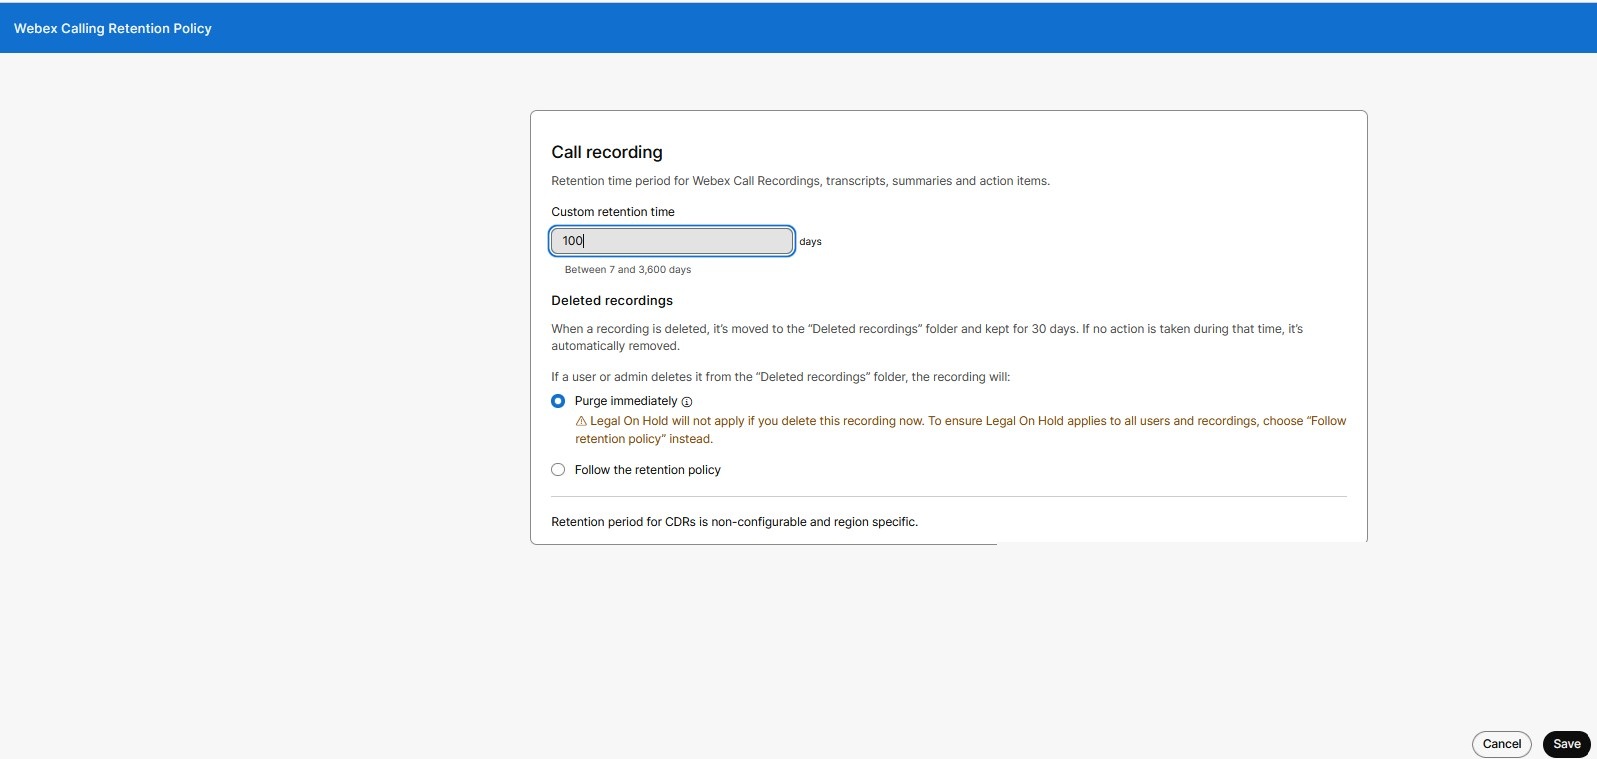
As a compliance officer you can preserve data for legal proceedings, this data is also returned when you access the Webex App eDiscovery Search and Extraction tool. For more information, see Manage compliance data for legal hold. By default, Webex Calling CDRs have a 400 days (13 months) retention policy.
Configure retention policy
Configuring a retention period helps you manage the life cycle of your user-generated content, reduce your data footprint, and ensure you can meet compliance and regulatory standards.
Consult your legal counsel to determine the most appropriate retention period for your organization. This is important because when you keep information around a long time, you increase the chances of confidential information being accessible.
The legal compliance feature includes the following:
-
Configurable Retention for Webex call provider.
-
Legal Hold helps preserve call recording data for individual users.
To use the configurable retention feature, you must have a Pro Pack license for Webex Calling.
To manage the user-generated Webex content, follow these steps:
| 1 |
Sign in to Control Hub. | |||||||||||||
| 2 |
Go to . | |||||||||||||
| 3 |
Scroll to the Data Retention section. | |||||||||||||
| 4 |
Click Settings to define the Webex App Messaging Retention policy for one to one chats.
| |||||||||||||
| 5 |
Define the Meetings retention policy by clicking Settings.
| |||||||||||||
| 6 |
Define a Webex Calling Retention policy by clicking Add-on.
| |||||||||||||
| 7 |
Define a Contact Center retention policy by clicking Update the policy.
|
What to do next
You can use the Webex API to take offline copies of your chats.
Consider using eDiscovery for managing data for compliance.
Recording storage usage notifications
Organization administrators must configure one or more notification methods to manage recording storage capacity. The notifications are automatically sent when storage usage reaches the following thresholds:
-
80%, 90% usage – Medium usage alert
-
95%, 100% usage – High usage alert
These notifications alert administrators in advance of potential storage exhaustion, so they can free up space or increase capacity.
| 1 |
Sign in to Control Hub. |
| 2 |
Go to Alert Center from the left navigation The Alert Center window displays. |
| 3 |
Click |
| 4 |
Locate the alert rule titled General – Cloud Storage. 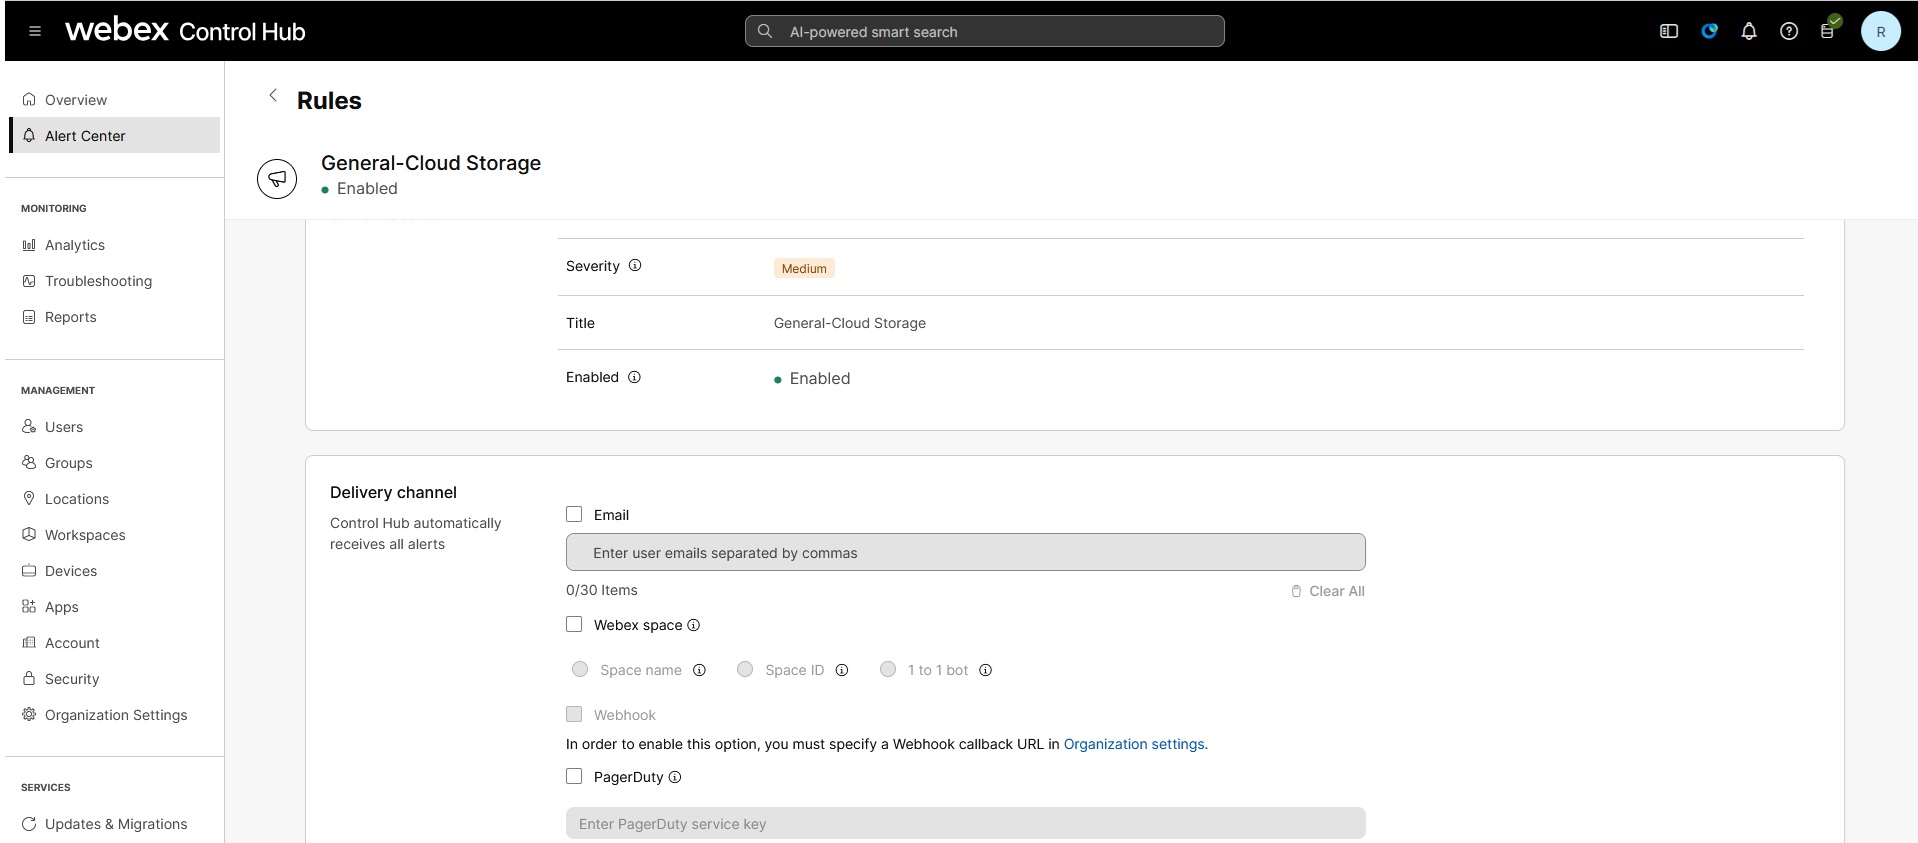
|
| 5 |
Go to Delivery Channel section and add your preferred notification channels:
|
| 6 |
Save your changes to receive automatic alerts at the 80% and 95% usage thresholds. The alert center notifications on Control Hub 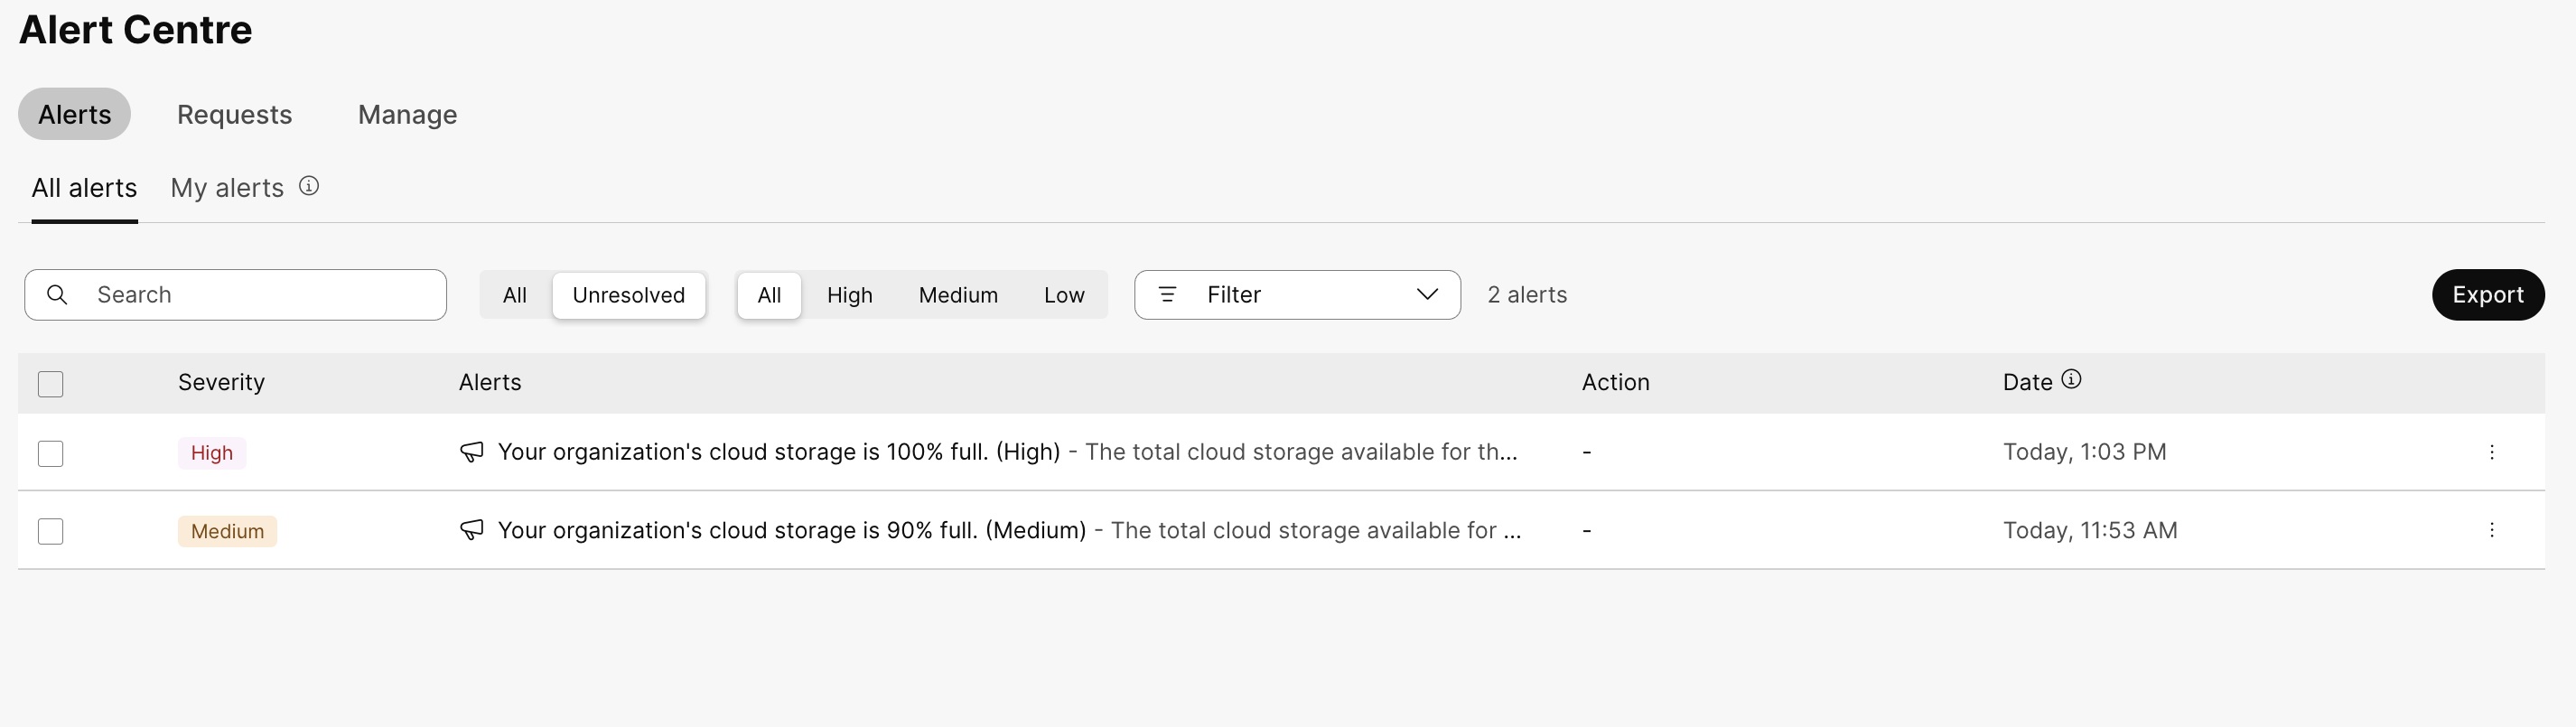
|
What to do next
Recommended actions on receiving a storage alert
At 80%,90% usage (medium usage):
-
Review current recordings and identify those that are no longer needed.
-
Initiate archiving or deletion of outdated content to free up space.
At 95%,100% usage (high usage):
-
Immediately remove unnecessary recordings to avoid service interruptions.
-
Consider buying additional cloud storage capacity from Cisco.
-
Notify your teams about high usage so they can plan urgent actions.
Set up multiple notification channels—such as email, Webex Space, or PagerDuty so as to ensure alerts reach stakeholders promptly and enable quick action.


